

Syncra HF
Instruction manual
10.0 / 12.0 / 16.0
EN • DE • FR • I • ES • NL • PT • RU

WARRANTY - GARANTIE - GARANZIA - GARANTIA - GARANTIED
GARANTIA - GARANTI -
SEAL AND SIGNATURE OF RESALE DEALER - STEMPEL UND UNTERSCHRIFT DES VERKÄUFERS
CACHET ET SIGNATURE DU REVENDEUR - TIMBRO E FIRMA DEL RIVENDITORE
SELLO Y FIRMA DEL REVENDEDOR - STEMPEL EN HANDTEKENING VAN DE DEALER
CARIMBO E ASSINATURA DO REVENDEDOR - УПЛОТНЕНИЕ И ПОДПИСЬ МАГАЗИНА
DATE OF PURCHASE - VERKAUFSDATUM - DATE DE VENTE - DATA DI VENDITA
FECHA DE VENTA - DATUM VAN AANKOOP - DATA DE VENDA - ДАТА ПОКУПКЫ
ГАРАНТИЯ
FOR UK ONLY
(10 m cable no plug)
IMPORTANT - The wires in this lead are coloured as follows:
Blue-Neutral/Brown-Live. The colours of the wires of the main lead of this
appliance may not correspond with the coloured markings identifying the
terminals in your plug. In this case, connect as follows:
the BROWN wire must be connected to the terminal marked with L or in
RED colour; the BLUE wire must be connected to the terminal marked N
or in BLACK colour.
CAUTION - The BROWN or BLUE leads must NEVER be connected to
the earth terminal (marked E or in GREEN/YELLOW colour) of a 3 pins
plug.
Fig. A
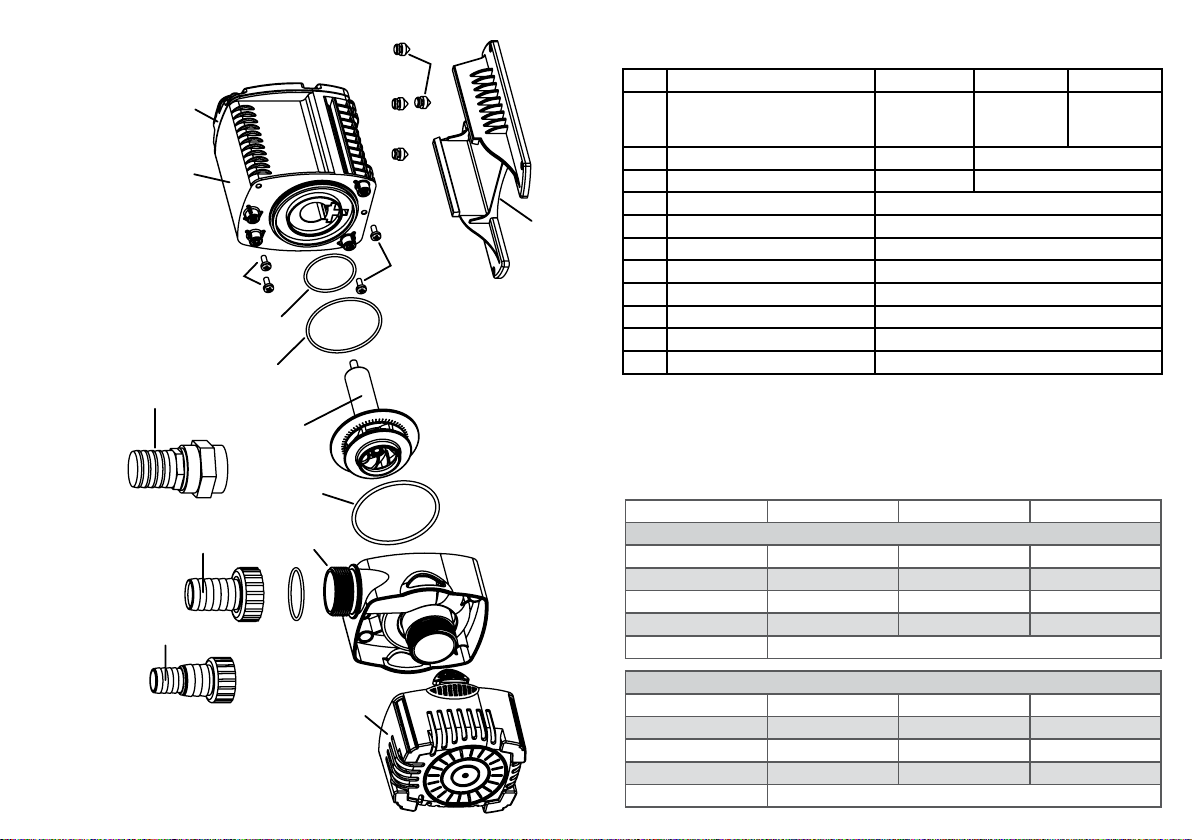
Fig. 2
bis
➇
Syncra 12.0
Syncra 16.0
➆
➄
➀
➇
➃
• SPAREPARTS • ERSATZTEILE • PIECES DE RECHANGE
➉
(aquarium version)
(pond version)
➈
➃
a
b
• RICAMBI • PIEZAS DE REPUESTOS • ЗАПАСНЫЕ ЧАСТИ
Fig. 2
2 Rotor - Shaft Rubber
3 Prechamber - MPT SPL0068 SPL0070
3 Prechamber - GAS SPL0069 SPL0071
5 Back Cover with Handle SPL0065
6 Front Cover SPL0067
Hose Adapter 1½” GAS - D.40-32-25 + O-Ring
7
8
Hose adapter 1½” 50 mm - Coupling 1½” GAS
8 bis
9 Support base SPL0066
10 Support Rubber Feet SVE0033 (OPTIONAL)
a+b+c Kit O-Ring SVE0034
Description Syncra HF 10.0 Syncra HF 12.0 Syncra HF 16.0
SGR0117/A
(230V-50Hz)
SGR0116/A
(120V-60Hz)
Hose adapter 1½” GAS - D.38 + O-Ring
STR0017 - Syncra 12.0-16.0 (OPTIONAL)
SGR0119/A
(230V-50Hz)
SGR0118/A
(120V-60Hz)
STR0028 - Syncra 10.0
STR0016 - Syncra 12.0-16.0
SGR0121/A
(230V-50Hz)
SGR0120/A
(120V-60Hz)
➁
TECHNICAL DATA
c
➂
Synacra HF
Max ow rate 9.500 L/h 12.500 L/h 16.000 L/h
Watt 135 W 155 W 175 W
Ampere
Head max
Cord lenght 3 m - 10 m
10.0 12.0 16.0
230V - 50 Hz
0,60 A 0,65 A 0,70 A
4,5 m 5,0 m 4,5 m
Syncra 10.0
➅
120V - 60 Hz
Max ow rate 2500 US gph 3200 US gph 4200 US gph
Watt 145 W 165 W 190 W
Ampere 1.7 A 1.9 A 2.0 A
Head max 16.4 ft 17.05 ft 15.04 ft
Cord lenght 7.2 ft - 20 ft
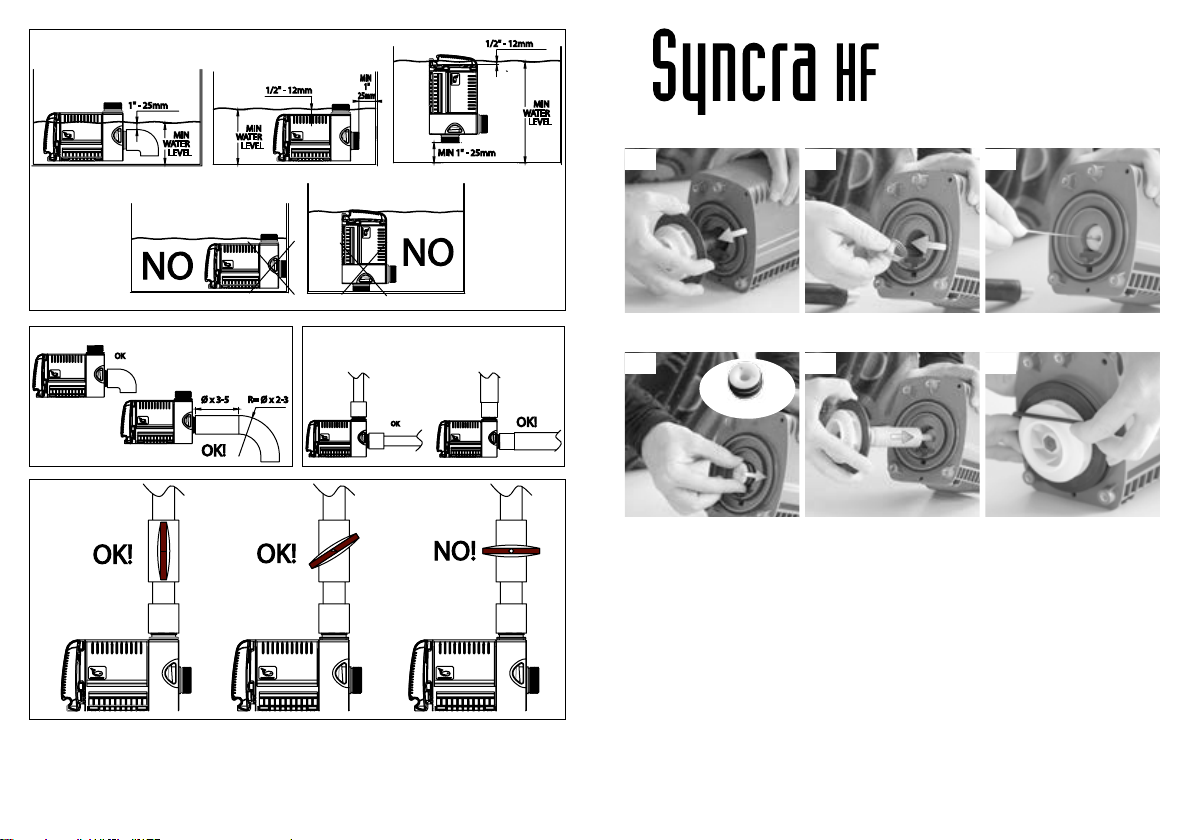
Fig. 3
SPARE PART ROTOR KIT:
instruction for replacement
Fig. 4 Fig. 5
Fig. 6
I
IV
Ø 8 mm
II
V
III
VI

IMPORTANT SAFETY INSTRUCTIONS
WARNING - To guard against injury, basic safety precautions should be observed,
including the following.
READ AND FOLLOW
ALL SAFETY INSTRUCTIONS
CAUTION: Always disconnect the pump when not in use, before adding or removing
parts and before cleaning.
- Do not allow pump to run dry. Pump must be immersed in water completely.
- This pump is to be used in a circuit protected by a ground fault circuit interrupter.
WARNING: - To reduce the risk of electric shock,
install only on a circuit protected by a Ground - Fault
Circuit - Interrupter (GFCI).
- To reduce the risk of electric shock, use only on portable
self-contained fountain no large than 5 feet in any
dimension.
- This pump has not been investigated for use in
swimming pool or marine areas.
- To avoid possible electric shock, special care should
be taken since water is employed in the use of aquarium
or pond equipment. For each of the following situations,
do not attempt repairs by yourself. Return the appliance
to an authorized service facility for service or discard the
appliance.
1) Do not operate any appliance if it has a damaged cord
or plug, or if it doesn’t work properly or has been dropped
or damaged in any manner.
2) To avoid the possibility of the appliance plug or
receptacle getting wet, position aquarium stand and tank
or the fountain to one side of a wall-mounted receptacle
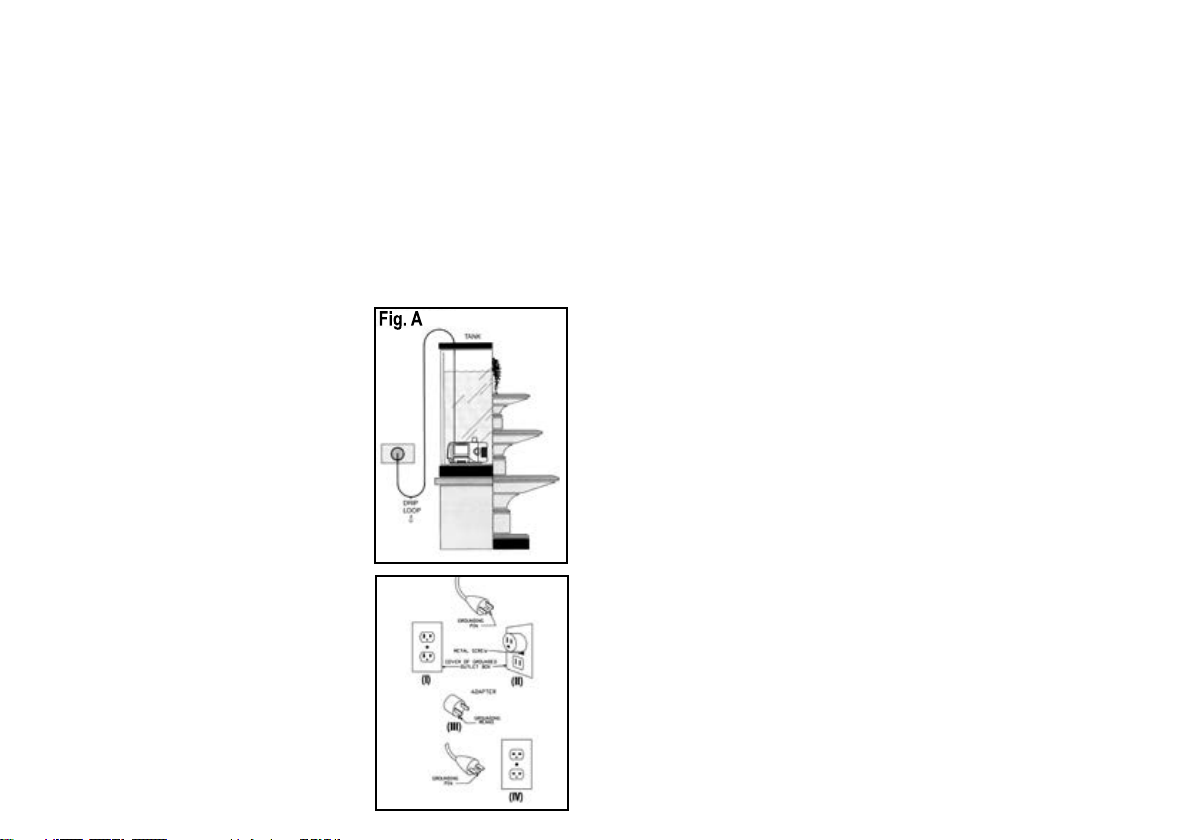
to prevent water from dripping onto the receptacle or plug.
A “drip-loop” (Pic. A) should be arranged by the user
for each cord connecting an aquarium appliance to a
receptacle. The “drip-loop” is the part of the cord below
the level of the receptacle or the connector if an extension
cord is used, which prevents water travelling along the
cord and coming in contact with the receptacle.
If the plug or socket does get wet, DON’T unplug the cord. Disconnect the fuse or circuit
breaker that supplies power to appliance. Then unplug and examine for presence of water
in the receptacle.
3) Close supervision is necessary when any appliance is used by near children.
4) To avoid injury, do not contact moving parts or hot parts such as heaters, reectors,
lamp bulbs and similar.
5) Always unplug an appliance from an outlet when not in use, before putting on or taking
off parts and before cleaning. Never yank cord to pull plug from outlet. Grasp the plug and
pull to disconnect.
6) Do not use an appliance for other than intended use. The use of attachments, not
recommended or sold by the manufacturer of the appliance, may cause an unsafe
condition.
7) Do not install or store the appliances where it will be exposed to the weather or to
temperatures below freezing.
8) Make sure an appliance mounted on a tank is securely installed before operating it.
9) Read and observe all the important notices of the appliance.
10) If an extension cord is necessary, a cord with a proper rating should be used. A cord
rated for less amperes or watts than the appliance rating may overheat. Care should be
taken to arrange the cord so that it will not be tripped over or pulled.
11) This appliance has a polarized plug (one blade is wider than other). As a safety
feature, this plug will t in a polarized outlet only one way. If the plug does not t fully
in the outlet, reverse the plug. If it still does not t, contact a qualied electrician. Never
use with an extension cord unless plug can be fully inserted. Do no attempt to defeat this
safety feature.
This appliance should be grounded to minimize the possibility of electric shock. This
appliance is equipped with an electric cord having an equipment gounding conductor
and a grounding type plug. The plug must be plugged into an outlet that is installed and
grounded in accordance with all appropriate codes and ordinances.
This appliance is for use on a nominal 120-volt circuit, and has a grounding plug that looks
like the plug illustrated in (II). A temporary adapter which looks like the adapter illustrated
in (III) and (IV) below may be used to connect this plug to a two-pole receptacle as shown
in (III) if a grounded outlet is not available. The temporary adapter should be used only
until a grounded outlet is not available. The temporary adapter should be used only until
a grounded outlet can be installed by a qualied electrician. The green-colored rigid ear
(lug, and the like) extending from the adapter must be fastened to a permanent ground
such as a grounded outlet box.
GROUNDING INSTRUCTIONS
SAVE THESE INSTRUCTIONS
CONSIGNES DE SÉCURITÉ
IMPORTANTES
MISE EN GARDE : An de se protéger contre les blessures, des mesures de sécurité
de base doivent être observées, y compris les suivantes.
LIRE ET OBSERVER TOUTES
LES CONSIGNES DE SÉCURITÉ
ATTENTION: Toujours débrancher une pompe qui ne sert pas, ou à laquelle on doit
ajouter ou retirer des pièces ou qui doit être entretenue.
- Ne pas faire fonctionner la pompe à sec. La pompe peut être complètement immergée
dans l’eau.
- Cette pompe doit être branchée à une dérivation
protegée par un disjoncteur différentiel.
DANGER -
munie d’une che de raccordement de mise à la terre. An de
réduire le risque de choc électrique vous assurer qu’elle est
branchée seulement à une prise de courant adéquatement
mise à la terre.
- Pour réduire le risque de choc électrique, installer seulement
sur un circuit protégé par GFCI.
- Pour réduire le risque de choc électrique, utilisez-la
uniquement sur une récipient portable de max 5 pieds dans
n’importe quelle dimension.
Cette pompe n’a pas été étudiée pour une utilisation dans une
piscine ou des zones marines.
- Pour éviter tout choc électrique, une grande prudence
est de rigueur. Dans chacune des situations suivantes, ne
pas essayer de réparer l’appareil soi-même; l’expédier au
fabricant pour réparation ou le jeter.
1) Ne pas faire fonctionner un appareil défectueux, dont le
cordon électrique ou la che sont endommagés, ou qui a été
échappé ou abîmé d’une façon quelconque.
2) An d’éviter que l’appareil ou la prise de courant soient
mouillés, installer le support pour aquarium et le bac ou la
fountaine à côté d’une prise de courant pour empêcher
l’eau de dégoutter sur la prise. L’utilisateur devrait faire une
boucle d’égouttement (Fig. A) pour chaque cordon électrique
branché d’un aquarium à une prise de courant. Une boucle
Risque de choc électrique – Cette pompe est
d’égouttement est la partie du cordon se trouvant sous la prise de courant ou le raccord si une
rallonge électrique est utilisée, an d’empêcher l’eau de circuler le long du cordon électrique et
d’être en contact avec la prise de courant. Si la che ou la prise de courant sont mouillées, NE PAS
débrancher le cordon électrique. Débrancher d’abord le fusible ou disjoncteur qui fournit l’électricité
à l’appareil et débrancher ensuite l’appareil en vériant qu’il n’y a pas d’eau dans la prise.
3) Il est essentiel de surveiller étroitement les enfants utilisant cet appareil ou se trouvant à
proximité.
4) Pour éviter les accidents, ne pas toucher aux pièces mobiles ou chaudes comme les chauffeeau, réecteurs, ampoules, etc.
5) Toujours débrancher l’appareil quand il n’est pas utilisé, quand des pièces sont enlevées ou
remplacées et avant l’entretien. Ne jamais tirer sur le l pour débrancher l’appareil; prendre la
che et débrancher l’appareil.
6) Ne pas utiliser un appareil pour un emploi autre que celui pour lequel il a été fabriqué. Les
pièces non vendues ou non recommandées par le fabricant pourraient compromettre la sécurité
de l’appareil.
7) Ne pas exposer cet appareil aux intempéries ou à une température en dessous de 0º C.
8) Vous assurer qu’un appareil monté sur un aquarium est bien installé avant de le faire fonctionner.
9) Lire et observer tous les avis importants sur l’appareil.
10) Si une rallonge électrique est nécessaire, vous assurer qu’elle est d’un calibre adéquat. Un
cordon électrique de calibre inférieur ou de moins d’ampères ou de watts que l’appareil peut
surchauffer. Le cordon doit être placé de façon à éviter que quelqu’un trébuche ou le tire.
11) Cet appareil possède une che polarisée (une lame est plus large que les autres). Par mesure
de sécurité, cette che s’insère dans une prise polarisée que dans un sens. Si la iche n’entre
pas complètement dans la prise, inverser la che. Si elle ne rentre toujours pas, contactez un
électricien qualié. Ne jamais utiliser une rallonge si la che peut être insérée complètement. Ne
pas essayer de contourner ce dispositif de sécurité.
MISE À LA TERRE
Cet appareil doit être mis à la terre (masse) an de minimiser les risques de choc électrique. Cet
appareil est équipé d’un cordon électrique possédant un conducteur de terre et une prise de terre.
La che doit être branchée dans une prise installée et mise à la terre en conformité avec tous les
codes et les ordonnances appropriées.
Cet appareil est destiné à l‘utilisation dans un circuit de 120 volts nominales et a une che de
mise à la terre qui ressemble à la che illustrée en (II) ci-dessous. Un adaptateur temporaire
qui ressemble à l’adaptateur illustré en (III) et (IV) ci-dessous peut être utilisé pour connecter
cette che à une prise à deux broches comme indiqué dans (III), si une prise de terre n‘est pas
disponible. L’adaptateur temporaire ne doit être utilisé que jusqu’à quand une prise avec mise à
la terre n‘est pas disponible. L’adaptateur temporaire ne doit être utilisé que jusqu’à quand une
prise de terre peut être installé par un électricien qualié. L’ergot rigide de couleur verte (oreille,
patte) se étendant de l’adaptateur doit être xé à une mise
exemple une boîte de prise de terre.
à la terre permanente, comme par
CONSERVER CES INSTRUCTIONS

Dear Customer,
EN
friendly design. The pump comes equipped with threaded inlet and outlet which can be connected
to different standard ttings and accessories available on the market.
IMPORTANT SAFETY INSTRUCTIONS
Syncra HF is made in conformity with the national and international security laws. Please read
carefully and save the following instructions to use in the best way your Syncra HF.
1) Always isolate the pump from the mains electricity before installing or carrying out any
maintenance. Power to the pump must be supplied through a Residual Current Device (RCD)
with a rated residual operating current not exceeding 30mA
2) The pump can work “Wet & Dry”, in or out of water.
3) Before connecting the pump to the electricity supply, check there are any damages on cord
or plug.
4) The pump has a type Z cable link. The cable and the plug cannot be substituted or repaired; in
case of damage of them replace the entire pump.
5) ATTENTION: do not operate any appliance if it has a damaged cord or plug, if it is malfunctioning,
or if it has been dropped or damaged in any way.
6) The pump must not be used without water otherwise non reparaible damage may accure
to the motor.
7) The pump can be used in liquids or in environment with a temperature not higher than 35° C
/ 95° F.
8) Do not use the pump for uses different to those for which it has been projected as, i.e. in
bathroom or similar applications.
9) Avoid to use the pump with corrosive and abrasive liquids.
10) The pump cannot be used by people with handicaps or by children if they are not supervised by
a person responsible for their safety.
11) To avoid that accidental drips wet the plug or the socket, make a loop with the cord under the
socket level (Pic. A)
12) Avoid to take the pump by the cord during the installation or maintenance.
13) The pump can be used only in the above mentioned applications and it is only for internal use.
14) If the pump or the lter is supplied with a cable 10 metres long, or a cable more than 6 feet
long for the American type (USA), these appliances are intended for outdoor use as required by
international standards.
USE AND MAINTENANCE
Syncra HF pumps are designed favoring the almost total dismantling of its components, to
facilitate proper use and maintenance and ensure a long life. Below is the list of the individual
parts and spare parts (Pic. 2):
1 Completely submergible motor body
insulated with bi-component resin
2 Noiseless and wear-proof rotor with hub impeller
3 O-ring + threaded volute 1” Gas (Mod. 10.0),
1½” Gas (Mod. 12.0 - 16.0)
4 Volute tightening screws (4 pcs)
5 Rear pump cover
INSTALLATION
To install the Syncra HF proceed as follows:
- Connect the joint to the pump outtake to which you can Connect the hose with the appropriate
diameter.
- Place the pump in an area of the pond, easily accessible for the maintenance operations.
- The pump can work horizontally and vertically.
- If the pump is used sumersed and not in line, it must be always fully submersed (Pic. 3).
- Unwind the supply cable where it can be safe from any kind of damage.
congratulations for choosing a Syncra HF. This pump is ideal for many aquarium and
pond applications including: waterfalls, small streams, powering external lters or
gravity lters, UV sterilizers, professional ltration systems, as well as return pumps
or in sumps for large aquariums. Syncra HF have leading edge technology with a user
6 Pre-lter
7 O-ring + stepped joint D25 mm and
D30 mm with female thread 1” GAS mod. 10.0
8 O-ring + joint D38 mm
with female thread 1½” GAS mod. 12.0 - 16.0
9 Mounting base ( Pond version)
10 Antivibration rubbers ( Aquatic version)
- Connect the plug to a power supply socket with the same voltage as the voltage indicated on
the technical data label.
IN LINE APPLICATIONS
It is recommended to place the pump in spaces where there is a proper ventilation and the pump is
not directly exposed to heat sources.
Place the pump so as to prevent too long idraulic pipings, which would reduce its performance.
Do not position the pump above the water level because it is not self-priming and the risk of the pump
to run dry, or of invisible air bubbles creating a vacum area is very high. Damages which are caused
by the pump running dry are excluded from warranty. To maximize the pump’s efciency, choose a
straight inlet tube to be connected to bows or elbows (Pic. 4).
We suggest to use Inlet and outlet tubes with diameter egual or bigger than the diameter of the
treathed pipe included (Pic. 5).
Do not use the pump leaving the outlet totally closed. A minimum water ow is necessary to keep
the inner motor refrigerated and not running dry (Pic. 6).
MAINTENANCE
Syncra HF needs simple but necessary periodical maintenance for its correct and safe operation.
Before starting rst unplug the device from the socket and strictly comply with the safety instructions
and the following procedure:
Remove the entire pump from the pond or from the tank
Disconnect the base (9). Pond Version
Disconnect the pre-lter (6) gently pressing on the aps on the sides, separate the volute (3) from
the pump (1) removing the screws (4), rinse everything with fresh water.
Remove the entire rotor (2) and rinse it with fresh water, using soap or vinegar and a soft toothbrush
to remove possible calcications.
Check and clean the rotor housing in the motor body (1), the recirculation system and the lower
bushing with fresh water.
Perform the mounting operation as follows:
Insert the O-ring (a) in the housing inside the pump’s body (1).
Insert the O-ring (b) in the housing on the external holed disc of the rotor (2).
Insert the rotor (2) in the pump’s body housing (1) checking that the O-ring (2) is correctly
positioned in the housing of the pump body (1) to allow the correct centering of the rotor.
Insert the O-ring (c) in the external housing of the body (1).
Assembly the volute (3) to the body (1) pushing it in place and tighten the screws (4).
Assembly the pre-lter (6).
Assembly the base (9), put the pump in its original position and connect it to the power supply.
IMPORTANT: The pump is equipped with a thermal device and an electronic motor protection. In
case of malfunction which causes the locking of the rotor (due to excessive dirt or other) or operating
without water, the pump, after 20 attempts, it stops automatically. In this case you must unplug the
pump, check the water level and if the rotor is dirty. After maitenance operations, as per the above
instructions, you can plug the pump on to restart it. It may take up to a ‘time If the thermal device has
switched on.
ATTENTION: do not underestimate the power of the magnet. If you slightly loose the grip and the
axis hits the rear bearing, the risk to damage the bearing is very high. A damage axis and bearing
causes high reparation costs.
SPECIAL MAINTENANCE AND REPLACING GROUP ROTOR
Remove the complete rotor (2 - Pic. I) from the pumps’ body. Insert the hook inside the rotor’s house
(Pic. II), snap the ceramic bearing located in the end side of the internal pump’s body (Pic. III) and
pull out using a little strenght.
Rinse with fresh water and vinegar the internal sides of the pump and locate the new ceramic bearing
at the beginning of the rotor’s house. (Pic. IV). Insert the O-ring (a) in the housing inside the pump’s
body (1). Insert the O-ring (b) in the housing on the external holed disc of the rotor (2). Position the
rotor close to the ceramic bearing and push both inside the rotor’s house (Pic. V).
Insert the O-ring (c) in the external housing of the pump’s body (Pic. VI).
Assemble the volute (3) to the pumps’ body (1) tightening the 4 screws.
Assemble the pre-lter (6).

ONLINE HELP
Watch our tutorial videos on THE SICCE YOU TUBE ofcial channel www.youtube.com/
SICCEspa.
INSTRUCTIONS FOR THE CORRECT DISCHARGE OF THE PRODUCT ACCORDING
TO EU DIRECTIVE 2002/96/EC
When used or broken, the product does not have to be discharged with the other waste.
It can be delivered to the specic electric waste collection centers or to dealers who give
this service. Discharge separately an electric tool avoid negative consequences for the
environment and for the Health and allows to regenerate the materials so to have a great saving of
energy and resources.
WARRANTY
This product is guaranteed against defects of materials and workmanship for a period of 3 years
from the date of purchase, except the rotor 2. The warranty certicate must be lled in by the
dealer and must accompany the pump if it is returned for repair, along with the cash register
receipt or similar document. The warranty covers the replacement of the defective parts. In
case of improper use, tampering or negligence by the buyer or user, the guarantee is void and
expires immediately. The guarantee is also void in absence of the cash register receipt or similar
document. The shipping cost to and from the factory, or the repair station, have to be paid by the
buyer.
FIND OUT HOW TO GET YOUR PRODUCT GUARANTEED FOR 5 YEARS
To improve our service and our clients’ satisfaction, SICCE offers the possibility of adding a 2
years extension to the warranty by simply registering your product on our website www.sicce.com
in “Sicce for you/Product registration”
Fill-in the form and upload the product’s purchase receipt. After having correctly inserted all your
data, complete the warranty extension request.
Sehr geehrter Kunde, sehr geehrte Kundin,
DE
Design, einfach im Gebrauch und in der Wartung und ausgestattet mit Gewindeanschlüssen für
diverse marktgängige Standardanschlüsse und -Nebenteile, die jede erwünschte Verbindung
gewährleisten.
SICHERHEITSHINWEISE:
Die multifunktionale Syncra HF Pumpe entspricht den nationalen und internationalen gesetzlichen
Sicherheitsvorschriften. Damit Sie die Eigenschaften dieses Qualitätsprodukts optimal ausnützen
können, bitten wir Sie folgende Hinweise aufmerksam zu lesen.
1) Vor Gebrauch der Pumpe ist die auf dem Etikett angegebene Netzspannung zu überprüfen. Die
Pumpe sollte über FI- Schutzschalter <30mA betrieben werden.
2) Die Pumpe ist für „Wet&Dry“ Einsatz geeignet (als Tauchpumpe oder Außerhalb des Wassers).
3) Vor Anschluss des Geräts, vergewissern Sie sich Unversehrtheit des Produkts. Insbesondere
dürfen das Kabel und die Pumpe keinerlei Beschädigungen aufweisen.
4) Netzkabel dürfen nicht verändert oder beschädigt werden (Z-Verbindung Kabel). Das
Netzkabel darf nicht zum Befestigen der Pumpe verwendet werden. Liegt eine Beschädigung des
Netzkabels vor, ist die Pumpe auszuwechseln.
5) ACHTUNG: Ziehen Sie unbedingt die Netzstecker aller eingetauchten Elektrogeräte ab, bevor
Sie mit den Händen ins Wasser greifen und grundsätzlich vor jeder Wartung.
6) Die Pumpe darf nicht trocken laufen um Beschädigungen an der Rotor zu vermeiden.
7) Die maximale Flüssigkeitstemperatur darf 35° C / 95° F nicht überschreiten.
8) Die Pumpe darf nicht im ätzenden Säure verwendet werden. Wenn sich die Pumpe in Betrieb
bendet, ist außerdem sicherzustellen, dass sie keinen Sand ansaugt, der die Innenteile ernsthaft
beschädigen und folglich zum Ausschluss des Produktes von der Garantie führen kann.
9) Die Pumpe darf ohne Aufsicht nicht von unfähigen Menschen benutzt werden.
10) Außerhalb der Rechweite von Kindern aufbewahren.
11) Beim Anschluss der Pumpe an das Stromnetz ist so vorzugehen, dass sich der niedrigste
Punkt des Kabels unterhalb der Netzsteckdose bendet, damit nicht zufällig Wassertropfen vom
Kabel in die Steckdose gelangen können (Abb. A - DRIP LOOP).
12) Das Kabel ist weder durchzuschneiden noch ist daran zu ziehen um die Stromspeisung zu
unterbrechen.
13) Die Pumpe darf nur im Innenbereich eingesetzt werden.
14) Falls die Pumpe oder der Filter mit einem Kabel von 10 Meter Länge, beziehungsweise mit
einem Kabel von mehr als 6 Fuß Länge beim amerikanischen Typ (USA), geliefert werden, sind
diese Geräte für den Einsatz im Außenbereich bestimmt, wie von den internationalen Normen
vorgeschrieben.
GEBRAUCHS- UND WARTUNGSANWEISUNG
Die Syncra HF-Pumpen bestehen aus den folgenden Funktionskomponenten (Abb. 2):
1 Komplett wasserfester Motorkörper,
isoliert mit Zweikomponentenharz
2 Rotor mit festem Impeller und verschleiß und geräuschresistenter Nabe
3 O-Ring + Gewindewindung 1” Gas
(Mod. 10.0), 1½” Gas (Mod. 12.0 - 16.0)
4 Befestigungsschrauben
5 Rückabdeckung Pumpe
INSTALLATION
Um die Syncra HF-Pumpe zu installieren, gehen Sie bitte wie folgt vor:
- Verbinden Sie den Anschluss mit dem Ventil der Pumpe, an das Sie einen exiblen Schlauch
geeigneten Durchmessers anschließen.
- Stellen Sie die Pumpe in einem achen und zu Wartungszwecken leicht zugänglichen Bereich
vielen Dank, dass Sie SICCE Syncra HF ausgewählt haben; die ideale Pumpe für
die Gestaltung von Wasserfällen oder kleinen Bachläufen in Ihrem Zierteich, die
zugleich mit externen Druck- oder Kassettenltern mit oder ohne UVC- Leuchten
für die Filterung des Teichs und Aquarien betrieben werden kann. Modern im
6 Vorlter
7 O-Ring + gestufter Anschluss D25 mm
und D30 mm mit Schraubengewinde 1” GAS
weiblich mod. 10.0
8 O-Ring + Anschluss D38 mm
mit Schraubengewinde 1½” GAS weiblich
mod. 12.0 - 16.0
9 Pumpenfuß ( Teich Version)
10 Anti-Vibration Gummifüβe
des Teichs auf.
- Die Pumpe funktioniert sowohl in horizontaler als auch in vertikaler Position.
- Wenn die Pumpe getaucht verwendet wird (und nicht Inline), soll die Pumpe immer
vollständig getaucht werden (Abb. 3).
- Verlegen Sie das Versorgungskabel an einer Stelle, wo es nicht beschädigt werden kann.
- Verbinden Sie den Stecker mit einer Steckdose, deren Spannung dem technischen Datenblatt
entspricht.
INLINE (Trocken) ANWENDUNG
Es wird empfohlen, die Pumpe in einem belüftenden Bereich zu legen. Legen Sie die Pumpe nicht
direkt im Wärmequellen.
Stellen Sie die Pumpe so zu lange Hydraulikleitungen zu verhindern, die die Leistung reduzieren
würde.
Stellen Sie die Pumpe über das Wasserniveau. Schäden, die durch die Pumpe Trockenlauf
verursacht wurden, sind von der Garantie ausgeschlossen.
Um die Leistung der Pumpe vollastandig zu nutzen, wählen Sie eine gerade Einlaufrohr die auf
Gewinde verbunden werden kann (Abb. 4).
Wir empfehlen, Ein- und Auslaufrohre mit einem Durchmesser von genau oder größer als der
Durchmesser der Gewinde zu verwenden (Abb. 5).
Verwenden Sie nicht die Pumpe mit der Druckseite vllständig geschlossen. Eine
Mindestwasserdurchuss ist notwendig, um den Motor gekühlt (Abb. 6) zu halten.
WARTUNG
Für eine korrekte Funktionsweise muss die Syncra HF regelmäßig gewartet werden. Hierfür muss
zunächst der Stecker aus der Steckdose gezogen werden. Die Sicherheitshinweisen und das
folgende Verfahren sind genau zu befolgen:
Nehmen Sie die Pumpe komplett aus dem Teich.
Entfernen Sie den Pumpenfuß (9).
Entfernen Sie den Vorlter (6) durch leichten Druck auf die zwei seitlichen Klappen (3), entfernen
Sie die Spirale (1) und schrauben Sie die Schrauben (4) ab, spülen Sie das Ganze unter
ießendem Wasser ab.
Entfernen Sie den gesamten Rotor (2) und spülen Sie ihn unter ießendem Wasser mit Spülmittel
oder Essig und einer weichen Bürste ab, um eventuelle Ablagerungen zu lösen.
Überprüfen und reinigen Sie den Sitz des Rotors im Motorkörper (1), die Umwälzanlage und das
untere Gleitlager unter ießendem Wasser.
Montieren Sie die Einzelteile auf folgende Weise:
Befestigen Sie den O-Ring (a) innerhalb des Körpers (1).
Befestigen Sie den O-Ring (b) auf der externen Hohlplatte des Rotors (2).
Befestigen Sie den Rotor (2) innerhalb des Pumpenkörpers (1) und überprüfen Sie dabei, dass
sich der O-Ring (2) in der korrekten Position im Pumpenkörper (1) bendet, so dass der Rotor
korrekt zentriert ist.
Befestigen Sie den O-Ring (c) außerhalb des Pumpenkörpers (1).
Montieren Sie die Spirale (3) auf dem Körper (1) und ziehen Sie die Schrauben (4) an.
Montieren Sie den Vorlter (6).
Montieren Sie den Fuß (9), stellen Sie die Pumpe in der Originalposition wieder auf und schließen
Sie sie an.
WICHTIG: Die Pumpe verfügt über eine elektronische Vorrichtung zum Schutz des Motors .
Wenn durch einen nicht ordnungsgemäßen Betrieb der Rotor durch übermäßigen Dreck oder aus
anderen Gründen blockiert, hört die Pumpe automatisch auf zu arbeiten. Um sie wieder in Betrieb
zu nehmen, muss der Stecker aus- und wieder eingestöpselt werden.
ACHTUNG: unterschätzen Sie nicht den Kraft des Magneten. Wenn Sie etwas lose den Griff und
die Achse geht an den hinteren Lagers, ist das Risiko für das Lager beschädigen sehr hoch. Ein
Schaden Achse und Lager verursacht hohe Reparaturkosten.
BESONDERE WARTUNG UND ROTOR AUSTAUSCH
Entfernen Sie das Rotor (2 - Abb. I). Setzen Sie den Haken im Rotorkammer (Abb. II), lassen Sie
die Keramiklager in der Stirnseite des inneren Pumpenkörper entfernen (Abb. III) und ziehen Sie.
Mit Frischwasser und Essig die inneren Teilen der Pumpe spülen. Wenn notwendig, neue
Keramiklager setzen (Abb. IV). Setzen Sie den O-Ring (a) in dem Gehäuse innerhalb des
Körpers der Pumpe (1). Der O-Ring (b) in dem Gehäuse auf der Außenlochscheibe des Rotors
(2). Positionieren Sie den Rotor in der Nähe der Keramiklager und drücken innerhalb des Rotors
house (Abb. V).
Setzen Sie den O-Ring (c) in dem Kreiselgehäuse der Pumpe (Abb. VI).
Montieren Sie das kreiselgehäuse (3) in der Pumpen Körper (1) Ziehen Sie die 4 Schrauben an
der Pumpe an.
Montieren Sie das Vorlter (6).
ONLINE HILFE UND SUPPORT
Schauen Sie sich unsere Tutorial Videos auf dem ofziellen SICCE YOUTUBE Kanal an: www.
youtube.com/SICCEspa.
Richtlinie 2002/96/EC. Alle Elektro- und Elektronik-Altgeräte müssen getrennt vom Hausmüll über
die dafür staatlich vorgesehenen Stellen entsorgt werden. Mit der ordnungsgemäßen Entsorgung
des alten Geräts vermeiden Sie Umweltschäden und eine Gefährdung der persönlichen
Gesundheit. Weitere Informationen zur Entsorgung des alten Geräts erhalten Sie bei der
Stadtverwaltung, beim Entsorgungsamt oder in dem Geschäft, wo Sie das Produkt erworben
haben.
GARANTIE
Wir garantieren für 3 Jahre ab Kaufdatum (ausschließlich dem Rotor 2) für fehlerhaftes Material
und Fabrikationsfehler. Im Garantiefall schicken Sie bitte das reklamierte Gerät mit der vom
Händler ausgefüllten Garantiekarte und der datierten Kaufquittung oder Rechnung zu dem
Händler ein. Mangelnde Pege und unsachgemäße Behandlung haben einen Garantieverlust zur
Folge. Die Garantie besteht im Austausch der schadhaften Teile. Die Kosten für Versand und die
Rücksendung gehen zu Lasten des Käufers.
SO KÖNNEN SIE DIE GARANTIE FÜR IHR PRODUKT AUF 5 JAHRE VERLÄNGERN
Um unseren Service zu verbessern und die Zufriedenheit unserer Kundinnen und Kunden zu
erhöhen, bietet SICCE Ihnen die Möglichkeit, die Garantie um 2 Jahre zu verlängern. Hierfür
müssen Sie das Produkt lediglich auf unserer Website www.sicce.com beim „Quality Control
Department“ registrieren.
Füllen Sie dazu einfach das Formular aus und laden Sie den Kaufbeleg des Produkts hoch. Im
Anschluss an die korrekte Eingabe der Daten können Sie die Garantie-Anforderung ausfüllen.
ENTSORGUNG (NACH RL2002/96/EC)
Gerät darf nicht dem normalen Hausmüll beigefügt werden, sondern muss fachgerecht
entsorgt werden. Wichtig für Deutschland: Gerät über Ihre kommunale Entsorgungsstelle
entsorgen. Entsorgung von Altgeräten: Wenn dieses Symbol eines durchgestrichenen
Abfalleimers auf einem Produkt angebracht ist, unterliegt dieses Produkt der europäischen

Chère Cliente, Cher Client,
FR
design moderne, facile d’utilisation et d’entretien, cette pompe est dotée d’aspiration et sortie
letés auxquels peuvent être branchés différents raccords et accessoires standard présents sur
le marché, pour répondre à n’importe quel besoin de connexion.
NORMES DE SECURITE
La pompe multifonction Syncra HF est conforme aux normes de sécurité nationales et
internationales. An d’obtenir entière satisfaction de votre pompe, nous vous prions de consulter
et de conserver les instructions suivantes.
1) Vérier que la tension indiquée sur l’étiquette de la pompe corresponde bien à celle de votre
réseau électrique. Cet appareil électrique doit être alimenté par l’intermédiaire d’un disjoncteur
différentiel (dit de sécurité) avec un seuil de déclenchement inférieure ou égal à 30mA.
2) La pompe peut fonctionner en mode « Wet & Dry », immergée ou en ligne (c’est à dire hors de l’eau).
3) Avant de connecter l’appareil électrique au réseau, vérier que le câble d’alimentation ne soit
pas endommagé.
4) La pompe est construite avec une liaison électrique de type «Z». Le câble et la prise ne peuvent
être ni remplacés ni réparés. En cas de dommages du câble ou de la prise, il est nécessaire de
remplacer toute la pompe.
5) ATTENTION: déconnecter tous les appareils électriques immergés avant d’une quelconque
manutention dans l’eau. Si la prise de courant est mouillée ou humide, déconnecter l’interrupteur
général avant de débrancher la prise.
6) Pour éviter tout dommage au moteur, la pompe ne doit JAMAIS fonctionner sans eau.
7) La pompe peut être utilisée dans des liquides ou des ambiances dont les températures ne
dépassent pas 35° C / 95° F.
8) Ne pas utiliser l’appareil pour des applications différentes de celles pour lesquelles il à été
conçu, comme par exemple un fonctionnement en salles de bain ou équivalent.
9) Eviter un fonctionnement de la pompe avec des liquides corrosifs ou abrasifs.
10) Cet appareil n’a pas été conçu pour une utilisation par des personnes (y compris des enfants)
ayant une capacité physique, sensorielle ou mentale réduite, sauf en cas de surveillance par une
tierce personne responsable de leur sécurité. S’assurer que les enfants ne touchent pas cet appareil.
11) Pour éviter que des gouttes d’eau coulent le long du câble électrique et mouillent la prise de
courant ou la prise sur le mur, nous conseillons d’effectuer une boucle du câble en-dessous du
niveau de la prise de courant (Fig. A).
12) Ne pas tirer la pompe par le câble d’alimentation pour la déplacer ou la soulever pendant
l’installation ou l’entretien.
13) Si dotée de câble bipolaire, la pompe est destinée exclusivement à un fonctionnement en
intérieur.
14) Si la pompe ou le ltre sont fournis avec un câble de 10 mètres de longueur ou avec un câble
d’une longueur supérieure à 6 pieds pour le type américain (USA), ces appareils sont adaptés à
l’emploi à l’extérieur comme le prescrit la réglementation internationale.
MANUEL D’UTILISATION ET D’ENTRETIEN
Les pompes Syncra HF sont conçues pour une presque totale démontage des pièces, pour un
meilleur entretien et une plus longue durée de vie.
Ci-dessous la liste des parts et pièces détachées (Fig. 2):
1 Corps moteur entièrement submersible
et isolé avec résine à deux composants
2 Rotor avec turbine solidaire au moyeu anti-usure
et anti-bruit
3 Joint-torique + volute letée 1” Gaz (Mod. 10.0),
1½” Gaz (Mod. 12.0 - 16.0)
4 Vis de serrage volute (4 pcs)
5 Couvercle postérieur pompe
merci pour avoir choisi Syncra HF, la pompe idéale pour la création de cascades et
petits ruisseaux autour de votre bassin, connectable à ltres extérieurs à pression
ou gravitaires pour bassins ou systèmes de ltration pour aquariums de grands
dimensions, ou comme pompe de remonté dans un bac à décantation. Avec un
6 Préltre
7 Joint torique + raccord en gradins D25 mm
et D30 mm avec letage 1” GAZ femelle Mod. 10.0
8 Joint torique + raccord D38 mm avec letage
1½” GAZ femelle mod. 12.0 - 16.0
9 Base de support (version Bassin)
10 Pieds en caoutchouc anti-vibrations
(version Aquarium)
INSTALLATION
Pour installer la pompe Syncra HF il est nécessaire de procéder comme suit :
- Connecter le raccord au refoulement de la pompe auquel vous pouvez ensuite raccorder un tube
exible avec le diamètre correct.
- Positionner la pompe dans une zone plate du bassin, facilement accessible pour les opérations
d’entretien.
- La pompe peut fonctionner en position verticale aussi bien qu’en position horizontale.
- La pompe, si installée en application “en eau”, doit toujours être complètement immergée
en eau (Fig. 3).
- Dérouler le câble d’alimentation dans une endroit où il ne risque pas d’être endommagé.
- Brancher la prise du câble d’alimentation à la prise de courant électrique avec une tension
correspondante à celle indiquée sur l’étiquette des données techniques de l’appareil.
APPLICATION HORS DE L’EAU - “EN LIGNE
On conseille de placer la pompe dans des zones avec une bonne ventilation en évitant qu’elle soit
directement exposée aux sources de chaleur.
Positionner la pompe en évitant des connexions trop longs qui en feront baisser les prestations.
La pompe ne doit pas être installée au-dessus du niveau de l’eau car elle n’est pas auto-amorçant,
donc le risque qu’elle fonctionne sans eau ou que des boules d’air se créent serait très élevé. Les
dommages causés par le fonctionnement à sec de la pompe ne sont pas couverts par la garantie.
Pour maximiser le rendement de la pompe, il est préférable de connecter à son aspiration une
coude à large rayon (Fig. 4).
Il est recommandé d’installer en aspiration et en refoulement des tuyaux de diamètre égal ou
supérieur au diamètre du raccord fourni. Le tuyau de refoulement et de l’aspiration doivent avoir
le même diamètre pour minimiser les pertes de pression (Fig. 5).
Ne pas faire fonctionner la pompe avec le refoulement complètement fermé. Toujours permettre
un débit minimum d’eau an que le moteur de la pompe soit réfrigérée et ne fonctionne pas à
sec (Fig. 6).
ENTRETIEN
Pour fonctionner correctement la pompe Syncra HF nécessite d’un entretien hebdomadaire
simple mais efcace. Pour l’exécuter il est indispensable avant tout de débrancher la prise du
courant électrique et de suivre scrupuleusement les instructions de sécurité ainsi que la procédure
suivante:
Sortir la pompe complète du bassin ou de l’aquarium.
Découpler la base de la version Bassin (9).
- Décrocher le préltre (6) en appuyant légèrement sur les deux ailettes latérales, séparer la volute
(3) de la pompe (1) en dévissant les vis (4), rincer le tout sous l’eau du robinet.
- Retirer le rotor complet (2) et le rincer sous l’eau du robinet, en utilisant du savon ou du vinaigre
et une brosse à dents souple pour enlever les incrustations éventuelles.
- Contrôler et nettoyer le logement du rotor dans le corps moteur (1), la recirculation et la bague
inférieure avec de l’eau du robinet.
Exécuter les opérations de montage de la manière suivante:
Insérer le joint torique (a) dans le logement intérieur du corps (1).
Insérer le joint torique (b) dans le logement sur le disque extérieur foré du rotor (2).
Insérer le rotor (2) dans le logement du corps de pompe (1) en vériant que le joint torique (2)
soit correctement positionné dans le logement du corps de pompe (1) an d’obtenir un centrage
correct du rotor.
Insérer le joint torique (c) dans le logement extérieur du corps de pompe (1).
Assembler la volute (3) au corps (1) en la poussant dans son logement puis visser les vis (4).
Assembler le préltre (6).
Assembler la base (9), repositionner la pompe dans sa position d’origine puis brancher la pompe.
IMPORTANT: La pompe est dotée d’un dispositif thermique et d’un électronique de protection du
moteur. En cas de mauvais fonctionnement qui provoque le blocage du rotor à cause d’un excès
de saleté ou autre, après 20 essais de démarrage la pompe s’arrête automatiquement. On doit
débrancher la prise, vérier le niveau de l’eau et contrôler si nécessaire nettoyer le rotor avant de
rebrancher la prise pour redémarrer la pompe.

Dans le cas le dispositif thermique ait déclenché, il est nécessaire d’attendre que la pompe
refroidisse (max. une heure) avant de la redémarrer.
ATTENTION: lors de l’entretien, ne sous-estimez pas la force magnétique du rotor. Si vous perdez
accidentellement un peu d’adhérence et l’axe du rotor frappe le roulement arrière en céramique
pure, le risque de les endommager est très élevé. Un accident de ce type peut devenir coûteux
à réparer.
ENTRETIEN EXTRAORDINAIRE ET REMPLACEMENT DU ROTOR
Retirer le rotor complet (2 Fig. I) du corps de pompe, introduire le crochet spécial fourni à l’intérieur
de la siège du rotor (Fig. II), accrocher la bague intérieure positionnée à l’extrémité (Fig. III), et
sortir-la en exerçant un peu de vigueur.
Rincer à l’eau et / ou au vinaigre les parties internes de la pompe et placer la nouvelle bague en
céramique au début du siège du rotor (Fig. IV). Placer le joint torique (a) dans le logement interne
du corps (1). Insérer le joint torique (b) dans le siège sur le disque externe foré du rotor (2). Proter
du rotor pour pousser la bague et le rotor dans leur siège (Fig. V).
Insérer le joint torique (c) dans le siège exteriéur du corps de la pompe (Fig. VI).
Assembler la volute (3) sur le corps (1) en la poussant en place et serrer les vis (4).
Assembler le préltre (6).
SUPPORT EN LIGNE
Regarder nos vidéos-notices sur le canal ofciel YOUTUBE SICCE www.youtube.com/SICCEspa.
INSTRUCTIONS POUR LA DÉCHARGE CORRECTE DU PRODUIT SELON L’EU
2002/96/EC DIRECTIF
Cet appareil ne doit pas être jeté dans les poubelles domestiques mais doit suivre les
procédures d’élimination prévues pour les déchets électriques. La décharge séparément
d’un outil électrique évite des conséquences négatives pour l’environnement et pour la santé et
permets de régénérer les matériaux pour avoir une grande économie d’énergie et des ressources
naturelles.
GARANTIE
Ce produit, à l’exclusion du rotor 2, est garanti pendant une période de 3 ans à compter de la
date de l’achat, contre les défauts du matériel et de fabrication. Le certicat de garantie doit être
rempli dans toutes ses parties par le revendeur et devra accompagner l’appareil s’il est restitué
pour la réparation, avec le ticket de caisse ou autre titre d’achat équivalent. La garantie consiste
dans le remplacement des pièces défectueuses. En cas d’utilisation incorrecte, de manipulation
ou de négligence de la part de l’acheteur ou de l’utilisateur, la garantie s’annule et perd son effet
immédiatement. D’autre part, la garantie s’annule également en cas d’absence du ticket de caisse
ou d’un titre d’achat équivalent. Les frais d’expédition et de renvoi sont à la charge de l’acheteur
DECOUVREZ COMMENT OBTENIR 5 ANS DE GARANTIE SUR VOTRE PRODUIT
Pour améliorer le service et la satisfaction de nos clients, SICCE offre la possibilité d’obtenir 2 ans
de garantie supplémentaire simplement en enregistrant votre produit sur notre site Internet www.
sicce.com dans la section “Quality Control Department”.
Remplir le formulaire et charger électroniquement le reçu d’achat du produit. Après avoir rempli
correctement vos données, vous aurez ensuite la possibilité de remplir la demande de garantie
supplémentaire.
Gentile cliente,
I
pompa di risalita o di movimento, nelle sump. Moderna nel design, di facile uso e manutenzione,
è dotata di aspirazione e mandata lettate alle quali possono essere collegati diversi raccordi e
accessori standard presenti sul mercato.
NORME IMPORTANTI PER LA SICUREZZA
Syncra HF è conforme alle principali norme di sicurezza nazionali ed internazionali. Per la Vostra
sicurezza e per utilizzare correttamente il prodotto, Vi consigliamo di leggere attentamente e
conservare le istruzioni che seguono.
1) Controllare che la tensione riportata sull’etichetta della pompa corrisponda alla tensione di rete.
L’apparecchio deve essere alimentato attraverso un interruttore differenziale (salvavita), la cui
corrente nominale sia inferiore o uguale a 30mA.
2) La pompa può funzionare in modalità “Wet&Dry” (sommersa o fuori dall’acqua).
3) Prima di collegare l’apparecchio alla rete controllare che il cavo e la pompa non risultino in
qualche modo danneggiati.
4) la pompa è costruita con un collegamento di tipo Z. Il cavo e la spina non possono essere
sostituiti o riparati; in caso di danneggiamento sostituire l’intero apparecchio.
5) ATTENZIONE: scollegare tutti gli apparecchi elettrici sommersi prima di eseguire qualsiasi tipo
di manutenzione nell’acqua; nel caso in cui la spina di connessione o la presa di corrente fossero
bagnate, disinserire l’interruttore generale prima di staccare il cavo d’alimentazione.
6) La pompa non deve mai funzionare senza acqua per evitare danni irreparabili al motore.
7) La pompa può essere utilizzata in liquidi o in ambienti con temperatura non superiore ai 35°
C / 95° F.
8) Non utilizzare l’apparecchio per scopi diversi da quelli per i quali è stato realizzato, come ad es.
in stanze da bagno o applicazioni simili.
9) Evitare di far funzionare la pompa con liquidi corrosivi ed abrasivi.
10) Questo dispositivo non è progettato per essere utilizzato da persone (inclusi bambini) con
ridotte capacità siche, sensoriali e mentali a meno che non siano accompagnati da persone
responsabili per la loro sicurezza.
11) Per evitare che accidentali gocciolamenti bagnino la spina o la presa di corrente realizzare con
il cavo un’ansa sotto il livello della presa (Fig. A).
12) Evitare di sollevare la pompa dal cavo di alimentazione durante l’installazione e la manuten
zione.
13) La pompa può essere utilizzata solamente nelle applicazioni suddette ed è destinata esclusivamente ad uso in ambienti interni se dotata di cavo bipolare.
14) Nel caso la pompa o il ltro siano forniti con cavo di 10 metri oppure con cavo di misura superiore a 6 piedi per il tipo americano (USA), questi apparecchi sono per uso esterno come prescrive
la normativa internazionale.
ISTRUZIONI D’USO E MANUTENZIONE
Le pompe Syncra HF sono state progettate per favorire la quasi totale scomponibilità dei suoi
componenti, per facilitare un corretto uso e manutenzione e garantire una lunga durata nel tempo.
Qui di seguito l’elenco delle singole parti e relativi pezzi di ricambio (Fig. 2):
1 Corpo motore completamente sommergibile
e isolato con resina bicomponente
2 Rotore con girante solidale al mozzo antiusura
e antirumore
3 O-ring + voluta lettata 1” Gas (Mod. 10.0),
1½” Gas (Mod. 12.0 - 16.0)
4 Viti di serraggio voluta (4 pz)
5 Coperchio posteriore pompa
grazie per aver scelto Syncra HF interamente prodotta in Italia da SICCE. Una linea
di pompe ideale per molteplici applicazioni: per creare cascate e piccoli corsi d’ac-
qua nel vostro laghetto ornamentale, per alimentare ltri esterni in pressione o a cassetta con o senza lampade UVC, per acquari o importanti sistemi di ltraggio come
-
6 Preltro
7 O-ring + raccordo a gradini D 25mm e D30 mm
con lettatura 1” GAS femmina Mod. 10.0
8 O-ring + raccordo D38 mm con lettatura
1½” GAS femmina Mod. 12.0 - 16.0
9 Base di supporto (versione Laghetto)
10 Piedini antivibrazione (versione Acquariologia)

INSTALLAZIONE
Per installare la pompa Syncra HF è necessario procedere come segue:
- Collegate il raccordo alla mandata della pompa al quale poi potete collegare il tubo essibile di
diametro opportuno.
- Posizionare la pompa in una zona piana del laghetto o dell’acquario, facilmente accessibile per
le operazioni di manutenzione.
- La pompa può funzionare sia in posizione orizzontale sia verticale.
- La pompa, se utilizzata in acqua e non in linea, deve funzionare sempre completamente
immersa (Fig. 3).
- Svolgete il cavo di alimentazione in una zona dove non possa venire danneggiato in alcun modo.
- Collegare la spina alla presa di corrente elettrica con tensione corrispondente a quella riportata
sull’etichetta dati tecnici.
UTILIZZO CON COLLEGAMENTO IN LINEA - Applicazioni DRY
Si consiglia di posizionare la pompa in spazi dove ci sia un’ adeguata areazione e la pompa non
sia direttamente esposta a fonti di calore.
Posizionare la pompa in moda da evitare collegamenti idraulici troppi lunghi che ne diminuireb
bero le prestazioni.
La pompa non deve essere posizionata sopra il livello dell’acqua perché non è autoadescante
e il rischio che funzioni a secco o che si creino delle bolle d’aria non visibili è molto alto. Danni
derivanti dal funzionamento a secco della pompa non sono coperti da garanzia.
Per massimizzare l’ efcienza della pompa, prediligere in aspirazione un tratto rettilineo e/o un
gomito con raggio grande (Fig. 4).
Si consiglia di utilizzare, in aspirazione e in mandata, tubi di diametro uguale o maggiore al diametro del portagomma fornito in dotazione. Il tubo di mandata e di aspirazione dovrebbero avere lo
stesso diametro per minimizzare perdite di pressione (Fig. 5).
Non far funzionare la pompa con mandata completamente chiusa. Lasciare sempre che un minimo usso d’acqua tenga il motore della pompa refrigerato e non a secco (Fig. 6).
MANUTENZIONE
Syncra HF, per il suo corretto funzionamento, richiede una semplice ma necessaria manutenzione
periodica. Per eseguirla, innanzitutto staccare la spina dalla presa di corrente elettrica attenendosi
scrupolosamente alle istruzioni di sicurezza e alla seguente procedura:
Estrarre dal laghetto o dall’acquario la pompa completa.
Sganciare la base (9) versione Laghetto.
Sganciare il preltro (6) premendo leggermente le due alette laterali, separare la voluta (3) dalla
pompa (1) svitando le viti (4), sciacquare il tutto sotto acqua corrente.
Togliere il rotore completo (2) e sciacquarlo sotto acqua corrente, utilizzando sapone o aceto e
uno spazzolino morbido per rimuovere eventuali incrostazioni.
Controllare e pulire la sede del rotore nel corpo motore (1), il ricircolo e la boccola inferiore con
acqua corrente.
Eseguire le operazioni di assemblaggio nel seguente modo:
Inserire l’O-ring (a) nella sede interna al corpo pompa (1).
Inserire l’O-ring (b) nella sede sul disco esterno forato del rotore (2).
Inserire il rotore (2) nella sede del corpo pompa (1) controllando che l’O-ring (2) sia posizionato
correttamente nella sede del corpo pompa (1) per consentire il corretto centraggio del rotore.
Inserire l’O-ring (c) nella sede esterna del corpo pompa (1).
Assemblare la voluta (3) al corpo (1) spingendola in sede e avvitare le viti (4).
Assemblare il preltro (6).
Assemblare la base (9), riposizionare la pompa nella posizione originaria e alimentare la pompa.
IMPORTANTE: La pompa è dotata di un dispositivo termico ed uno elettronico di protezione del
motore. In caso di funzionamento anomalo che provoca il bloccaggio del rotore (per sporco ec
cessivo o altro) o di funzionamento senza acqua, la pompa, dopo 20 tentativi di partenza, si ferma
automaticamente. In questo caso è necessario staccare la spina, vericare il livello dell’acqua e/o
controllare che il rotore non sia incrostato e particolarmente sporco. Dopo aver eseguito le operazioni di manutenzione reinserire la spina per riavviare la pompa. Potrebbe essere necessario
attendere no ad un’ ora nel caso in cui sia scattata la protezione termica.
-
-
ATTENZIONE: non sottostimate la forza magnetica del gruppo rotore. Se accidentalmente si
perde un po’ la presa e l’ alberino colpisce il cuscinetto posteriore in ceramica pura, il rischio di
danneggiare lo stesso o il cuscinetto è molto alto. Un danno di questo tipo comporta costi elevati
di riparazione.
MANUTENZIONE STRAORDINARIA E SOSTITUZIONE DEL GRUPPO ROTORE
Togliere il rotore completo (2 Fig. I) dal corpo pompa, inserire l’ apposito uncino in dotazione nell
‘interno della sede rotore (Fig. II), agganciare la boccola interna posizionata all’estremità (Fig. III),
ed estrarla esercitando un po’ di forza.
Risciacquare con acqua e/o aceto, le parti interne della pompa e posizionare la nuova boccola in
ceramica nella parte iniziale della sede rotore (Fig. IV). Inserire l’O-ring (a) nella sede interna al
corpo (1). Inserire l’O-ring (b) nella sede sul disco esterno forato del rotore (2). Avvalendosi del
rotore spingere la boccola ed il rotore nella loro sede (Fig. V).
Inserire l’O-ring (c) nella sede esterna del corpo pompa (Fig. VI).
Assemblare la voluta (3) al corpo (1) spingendola in sede e avvitare le viti (4).
Assemblare il preltro (6).
ASSISTENZA
Vi consigliamo di prendere visione dei nostri video Tutorial a supporto dell’installazione e manu
tenzione dei prodotti, disponibili nel canale ufciale www.youtube.com/SICCEspa.
AVVERTENZE PER IL CORRETTO SMALTIMENTO DEL PRODOTTO AI SENSI DELLA
DIRETTIVA EUROPEA 2002/96/EC
Alla ne della sua vita utile, il prodotto non deve essere smaltito insieme ai riuti urbani.
Può essere consegnato presso gli appositi centri di raccolta differenziata predisposti dalle
amministrazioni comunali, oppure presso i rivenditori che forniscono questo servizio. Smaltire
separatamente un elettrodomestico consente di evitare possibili conseguenze negative per l’ambiente e per la Salute derivante da un suo smaltimento inadeguato e permette di recuperare i
materiali di cui è composto, al ne di ottenere un importante risparmio energetico e di risorse.
GARANZIA
Questo prodotto, con l’esclusione del gruppo rotore 2, è garantito per un periodo di 3 anni dalla
data di acquisto, da difetti di materiale e lavorazione. Il certicato di garanzia deve essere compi
lato in ogni sua parte dal rivenditore, e dovrà accompagnare l’apparecchio , nel caso in cui venga
restituito per la riparazione, assieme allo scontrino scale o equivalente. La garanzia consiste
nella sostituzione delle parti difettose qualora non siano stati rilevati uso improprio, manomissione o negligenza da parte dell’acquirente o utente rendendo nulla la garanzia con decadenza
immediata. La garanzia è inoltre nulla in caso di mancanza dello scontrino scale d’acquisto o
equivalente. Le spese di spedizione e rinvio sono a carico dell’acquirente.
SCOPRI COME OTTENERE 5 ANNI DI GARANZIA SUL TUO PRODOTTO
Per migliorare il servizio e la soddisfazione dei clienti, SICCE offre la possibilità di applicare 2 anni
extra di garanzia semplicemente registrando il prodotto nel sito web www.sicce.com alla sessione
«Sicce for you/ Registrazione prodotto».
Compilare quindi il modulo nelle sue parti e caricare elettronicamente la ricevuta d’acquisto del
prodotto.
-
-

Estimado cliente,
ES
presentes en el mercado, para satisfacer todas las exigencias de conexión.
NORMAS DE SEGURIDAD:
La bomba multifunción Syncra HF está conforme con las normas de seguridad nacionales y
internacionales. Le pedimos lea atentamente las breves instrucciones a continuación para que
pueda apreciar más las características y la calidad de esta bomba.
1) Atención: controle el voltaje de la bomba que aparece en la etiqueta y asegúrese que sea
igual de la tensión eléctrica. Se aconseja que la bomba, como todos los demás dispositivos
eléctricos, esté protegido en su origen, por un interruptor especial diferencial (salvavidas) con
corriente de intervención no superior a 30mA.
2) La bomba puede funcionar en modalidad „Wet&Dry“ (sumergida o fuera del agua).
3) Antes de poner en funcionamiento el producto, vericar la integridad de todas sus partes y
sobre todo comprobar que el cable y la bomba no estén dañados de ninguna manera.
4) El cable de alimentación no puede ser reparado ni sustituido (Cable con conexión Z), por lo que
en caso de que se estropee, habrá que demoler el aparato.
5) ATENCIÓN: Antes de intervenir en la bomba, hay que desconetar siempre la alimentación.
Para reducir los riesgos de shock accidentales, mantener secas todas las conexiones.
6) La bomba no debe funcionar sin agua para evitar daños irreparables en el motor.
7) La bomba no puede funcionar en seco o con líquidos con temperatura superior a 35° C / 95° F.
8) Evitar el utilizo de la bomba en líquidos corrosivos y abrasívos.
9) El aparato no puede ser utilizado por personas con discapacidad y por niños sin vigilancia.
10) No es un juguete para niños.
11) Al conectar la bomba en la toma de corriente, el punto más bajo del cable tiene que
encontrarse por debajo de la toma de corriente, al n de evitar que gotas de agua presentes en
el cable puedan entrar accidentalmente en el enchufe (Fig. A).
12) No cortar el cable de alimentación y no tirar del mismo para quitar la alimentación.
13) Esta bomba tiene que ser utilizada exclusivamente en interiores de viviendas.
14) En el caso de que se envíen la bomba o el ltro con un cable de 10 metros de longitud, o con
cable de más de 6 pies para el tipo americano (EE UU), signica que dichos aparatos se utilizarán
externamente, como establece la normativa internacional.
INSTRUCCIONES DE USO Y MANTENIMIENTO
Las bombas Syncra HF están compuestas de los siguientes elementos funcionales (Fig. 2):
1 Cuerpo del motor completamente sumergible
y aislado con resina bicomponente
2 Rotor con hélice solidaria en el buje antirruido
y anticierre
3 Junta tórica + voluta roscada 1” Gas (Mod. 10.0),
1½” Gas (Mod. 12.0-16.0)
4 4 tornillos de apriete de voluta
5 Tapa posterior de la bomba
INSTALACIÓN
Para instalar la bomba Syncra HF, es necesario proceder de la siguiente manera:
- Conectar la unión a la impulsión de la bomba, donde se puede colocar el tubo exible del
diámetro correspondiente.
- Ubicar la bomba en una zona plana del lago, donde sea fácil acceder para las operaciones de
mantenimiento.
- La bomba puede funcionar tanto en posición horizontal como vertical.
- La bomba debe usarse en agua, no en línea; debe funcionar siempre sumergida (Fig. 3).
- Desenrollar el cable de alimentación en una zona donde no pueda ser dañado de ninguna
manera.
gracias por haber elegido Syncra HF, la bomba ideal para crear cascadas y pequeños
cursos de agua en su lago ornamental. La bomba puede aplicarse a ltros externos
a presión o tipo cassette, con o sin lámparas UVC para el ltrado del lago. De diseño
moderno, fácil uso y mantenimiento, la bomba cuenta con aspiración e impulsión
roscados, a los que pueden conectarse diferentes uniones y accesorios estándar
6 Preltro
7 Junta tórica + unión escalonada D25 mm
y D30 mm con rosca 1” GAS hembra
mod. 10.0
8 Junta tórica + unión D38 mm con rosca
1½” GAS hembra mod. 12.0 - 16.0
9 Base de apoyo
10 Gomas antivibración (Versión acuario)
- Conectar el enchufe en el tomacorriente eléctrico con la tensión correspondiente A la que gura
en la etiqueta de datos técnicos.
APLICACIONES EN LÍNEA
Se recomienda poner la bomba en espacios donde haya una ventilación adecuada y la bomba no
esté directamente expuesta a fuentes de calor.
Colocar la bomba de tal manera que prevenga tuberías demasiado largas, las cuales pueden
reducir su funcionamiento.
No posicionar la bomba por encima del nivel de agua porque no es autoaspirante y el riesgo de
funcionar en seco, o de que burbujas invisibles creen vacío es muy alto. Los daños causados en
la bomba por su funcionamiento en seco están excluidos de la garantía.
Para maximizar la eciencia de las bombas, elije un tubo recto de entrada para ser conectado a
ángulos o codos (Fig. 4).
Nuestra sugerencia es usar tubos de entrada y salida con diámetro igual o mayor que el diámetros
de la espiga ncluida (Fig. 5).
No usar la bomba con la salida totalmente cerrada. Se necesita un mínimo de ujo para mantener
el motor interior refrigerado y que no funcione en seco (Fig. 6).
MANTENIMIENTO
Syncra HF, para funcionar correctamente, requiere un mantenimiento simple pero necesario.
Para realizarlo, debe desenchufarla, cumplir estrictamente las instrucciones de seguridad y el
siguiente procedimiento:
Extraer toda la bomba del lago.
Liberar la base (9).
Desenganchar el preltro (6) presionando las dos aletas laterales, separar la voluta (3) de la
bomba (1) aojando los tornillos (4), enjuagar todo bajo el agua corriente.
Extraer todo el rotor (2) y enjuagarlo bajo el agua corriente, usando jabón o vinagre y un cepillo
suave para quitar las eventuales incrustaciones.
Controlar y limpiar (1), la recirculación y el buje inferior con agua corriente.
Realizar las operaciones de montaje de la siguiente manera:
Insertar la junta tórica (a) en la sede interior del cuerpo (1).
Insertar la junta tórica (b) en la sede del disco externo perforado del rotor (2).
Insertar el rotor (2) en la sede del cuerpo de la bomba (1) controlando que la junta tórica (2) esté
correctamente ubicado en la sede del cuerpo de la bomba (1) para permitir el correcto centrado
del rotor.
Insertar la junta tórica (c) en la sede externa del cuerpo (1).
Ensamblar la voluta (3) al cuerpo (1) empujándola en su sede y apretar los tornillos (4).
Ensamblar el preltro (6).
Ensamblar la base (9), colocar la bomba en la posición original y alimentar la bomba.
IMPORTANTE: La bomba viene equipada con un sistema térmico y protección electrónica del
motor. En caso de mal funcionamiento que provoque el bloqueo del mortor (debido a excesiva
suciedad u otros) o funcionamiento sin agua, la bomba, después de 20 intentos, se para
automáticamente. En este caso debes desenchufar la bomba, comprobar el nivel de agua y si
el rotor está sucio. Después de operaciones de mantenimiento, y siguiendo las instrucciones
de más arriba, puedes enchufar la bomba para arrancarla. Puede llevar un tiempo si el térmico
había saltado.
IMPORTANTE: La bomba cuenta con un dispositivo electrónico de protección del motor. En caso
de funcionamiento anómalo que provocara el bloqueo del rotor debido a suciedad excesiva y
demás, la bomba se detiene automáticamente y es necesario enchufarla y desenchufarla para
reactivarla.
MANTENIMIENTO ESPECIAL Y SUSTITUCIÓN DEL GRUPO ROTOR
Quitar el rotor completo (2 - Fig. I) del cuerpo de la bomba. Introducir el gancho en el hueco del
rotor (Fig. II), agarrar el tope de cerámica que está al fondo del cuerpo de la bomba (Fig. III) y
tirar hacia afuera usando un poco de fuerza.
Limpiar con agua dulce y vinagre los lados internos de la bomba y poner los nuevos topes
cerámicos al nal del hueco del rotor. (Fig. IV). Poner la junta (a) en su lugar dentro del cuerpo
de la bomba (1). Insertar la junta (b) en su lugar en el hueco exterior del disco tapa del rotor (2).

Posicionar el rotor junto al tope cerámico y presionar ambas partes (Fig. V).
Insertar la junta (c) en el hueco externo del cuarpo de la bomba (Fig. VI).
Ensamblar la voluta (3) al cuerpo de la bomba (1) apretando los 4 tornillos.
Ensamblar el preltro (6).
AYUDA ON-LINE
Vea nuestros videos tutoriales en el canal ocial de YOU TUBE de SICCE: www.youtube.com/
SICCEspa.
INSTRUCCIONES PARA DESHACERSE DEL PRODUCTO DE ACUERDO CON LA
DIRECTIVA EUROPEA 2002/96/EC
Si en un producto aparece el símbolo de un contenedor de basura tachado, signica que
éste se acoge a la Directiva 2002/96/EC. Todos los aparatos eléctricos o electrónicos se
deben desechar de forma distinta al servicio municipal de recogida de basuras, a través de los
puntos de recogida designados por el gobierno o las autoridades locales. La correcta recogida y
tratamiento de los dispositivos inservibles contribuye a evitar riesgos potenciales para el medio
ambiente y la salud pública. Para obtener más información sobre cómo deshacerse de sus
aparatos eléctricos y electrónicos viejos, póngase en contacto con su ayuntamiento, el servicio
de recogida de basuras o el establecimiento donde adquirió el producto.
GARANTÍA
Este producto, excepto el rotor 2, está garantizado por un período de 3 años, a partir de la
fecha de compra, contra defectos de materiales y fabricación. El certicado de garantía debe
ser cumplimentado debidamente por el vendedor, y se entregará junto a la bomba en caso de
entregarla para ser reparada, junto con el recibo de la compra o equivalente. La garantía cubre
la sustitución de las piezas defectuosas. En caso de uso impropio, manipulación indebida o
negligencia por parte del comprador o del usuario, la garantía se anulará y perderá su validez
inmediatamente. Asimismo, la garantía se anulará en el caso de que falte el recibo de compra
o equivalente. Los gastos de envío, a y desde la fábrica, o el taller de reparaciones, correrán a
cargo del comprador.
CÓMO OBTENER 5 AÑOS DE GARANTIA EN SU PRODUCTO
Para mejorar nuestro servicio y la satisfacción de nuestros clientes, SICCE ofrece la posibilidad
de añadir 2 años adicionales de garantía, registrando el producto en nuestra página web www.
sicce.com “SICCE FOR YOU/Registro del Producto”.
Rellene el formulario y adjunte el recibo de compra del producto. Después de introducir
correctamente todos sus datos, complete la solicitud de extensión de garantía.
Beste klant,
NL
technologie en is gemakkelijk in onderhoud. De pompen zijn voorzien van slangtules met
schroefdraad om standaard aansluitingen te vereenvoudigen. De Syncra HF voldoet aan al uw
behoeften en kan zowel Nat als Droog opgesteld worden.
BELANGRIJKE VEILIGHEIDSINSTRUCTIES
De Syncra HF pompen zijn geproduceerd conform de nationale en internationale veiligheidsnormen.
Lees aandachtig en bewaar de volgende instructies om de Syncra HF optimaal te gebruiken.
1) Controleer of de op het etiket van de pomp aangeduide spanning overeenkomt met de
netspanning. Het apparaat dient gevoed te worden door middel van een differentiële schakelaar
(levensbeschermer) waarvan de nominale stroom lager of gelijk is aan 30mA.
2) De pomp kan functioneren „Wet&Dry“ (Ondergedompeld in het water of buiten het water).
3) Alvorens het apparaat op het net aan te sluiten moet u de de kabel en/of de pomp controleren
of deze beschadigd zijn.
4) De pomp is vervaardigd met een verbinding van het type Z. De kabel en de stekker kunnen
niet vervangen of gerepareerd worden;Bij beschadiging dient het complete apparaat vervangen
te worden.
5) LET OP ! haal de stekker van alle elektrische apparaten uit het stopcontact voordat u onderhoud
gaat uitvoeren of uw handen in het water steekt; als de stekker of de kabel nat zijn geworden,
schakel dan eerst de hoofdschakelaar uit voordat u de stekker uit het stopcontact verwijdert;
6) De pomp mag niet in werking worden gesteld zonder water om schade aan de motor te
voorkomen.
7) De pomp mag niet worden gebruikt in vloeistoffen of in een omgeving met een temperatuur
hoger dan 35° C / 95° F).
8) Gebruik de pomp niet voor andere doeleinden dan waarvoor de pomp is ontworpen zoals in
badkamers of dergelijke toepassingen;
9) Laat het apparaat niet functioneren met uitbijtende- of wegvretendemiddelen.
10) Dit apparaat is niet ontworpen om gebruikt te worden door personen (inclusief kinderen)
met gereduceerde fysische, zinnelijke en geestelijke capaciteiten, tenzij deze begeleid zijn door
verantwooordijke personen die zorg dragen voor hun veiligheid.
11) Om te voorkomen dat per ongeluk druppels de stekker of het stopcontact nat maken, realiseer
een lus in het snoer onder het water niveau (Afb. A).
12) De pomp niet optillen middels de voedingskabel tijdens de installatie en het onderhoud.
13) De pomp moet alleen gebruikt worden voor de hierboven genoemde applicaties en is
uitsluitend bestemd voor een intern gebruik.
14) In het geval dat de pomp of het lter zijn uitgerust met een kabel van 10 meter, of met een
kabel van meer dan 6 feet voor het Amerikaanse (VS) type, zijn de apparaten bestemd voor
gebruik buitenshuis, overeenkomstig de voorschriften van de internationale richtlijnen.
GEBRUIK EN ONDERHOUD
De Syncra HF bestaat uit de volgende onderdelen (Afb. 2):
1 Een volledig onderdompelbaar motorhuis,
geisoleerd met twee-componenten hars
2 Een geluidsloze en slijtvaste rotor
met een wikkelkern spoel
3 O-ring + schroefdraad aansluiting 1“ Gas
(Model 10.0), 1 ½” Gas (Mod. 12.0 - 16.0)
4 4 schroeven voorzien van schroefdraad
5 Afdekplaat voor de achterkant van de pomp
INSTALLATIE
Ga als volgt te werk Om de Syncra HF te installeren:
- Verbind het koppelstuk met de uitgang zodat u de slang met de juiste diameter kunt aansluiten.
bedankt dat u heeft gekozen voor de Syncra HF. Deze pomp is ideaal voor vele
Vijver en Aquarium toepassingen zoals het creëren van watervallen en beekloopjes,
als toevoer naar een externe lter, druklter en of UV-Lamp, circulatiepomp voor
Aquaria, sump-pomp en meer. Syncra HF heeft een modern ontwerp, geavanceerde
6 Voor-lter
7 O-ring + slangtule D25 mm en D30 mm
met vrouwelijke schroefdraad 1” GAS mod. 10.0
8 O-ring + slangtule 38 mm met vrouwelijke
schroefdraad 1½” GAS mod. 12.0 - 16.0
9 Voetstuk (Vijver versie)
10 Anti Vibratie rubbers (Aquarium versie)

- Plaats de pomp zo dat u er eenvoudig bij kunt komen indien er onderhoud verricht moet worden.
- De pomp kan horizontaal of verticaal werken.
- Als de pomp ondergedompeld wordt gebruikt en niet in droogopstelling, zorg er dan wel
voor dat hij volledig is ondergedompeld (Afb. 3).
- Rol de voedingskabel uit op een veilige plaats.
- Steek de stekker in een stopcontact dat overeenkomt met dezelfde voltage die staat aangegeven
op het etiket van de pomp.
TOEPASSINGEN DROOGOPSTELLING
Het wordt aanbevolen om de pomp in goed geventileerde ruimtes te plaatsen en de pomp niet
rechtstreeks blootstellen aan warmtebronnen.
Plaats de pomp zo dat het niet nodig is om lange aansluitleidingen te gebruiken om op deze
manier het verminderen van de prestaties te voorkomen.
De Syncra HF is niet zelfaanzuigend en daarom adviseren wij om nooit de pomp boven het
waterniveau te plaatsen. Op deze manier voorkom je dat de pomp doet drooglopen en of
lucht doet aanzuigen. Schade die worden veroorzaakt door het drooglopen van de pomp zijn
uitgesloten van de garantie.
Gebruik een rechte toevoerleiding om de efciëntie van de pomp te optimaliseren, het gebruik van
bochten kan invloed hebben op de prestaties van de pomp (Afb. 4).
Wij adviseren om aansluitleidingen te gebruiken die gelijk of groter zijn dan de meegeleverde
standaard slangtules (Afb. 5).
Gebruik de pomp niet zodra de uitgang volledig afgesloten is. Een minimale waterstroom is
noodzakelijk om de motor te koelen en om drooglopen van de motor te voorkomen (Afb. 6).
ONDERHOUD
De Syncra HF heeft slechts eenvoudig maar noodzakelijk periodiek onderhoud nodig om een
juiste en veilige werking te garanderen. Verwijder de stekker uit het stopcontact voordat u aan het
onderhoud begint en volg de onderstaande veiligheidsinstructies:
Haal de gehele pomp uit de vijver.
Koppel het voetstuk los (9). (Vijver versie).
Koppel het voor-lter (6) los door voorzichtig de kleppen aan de zijkanten in te drukken, maak het
slakkenhuis (3) los van de pomp (1) door middel van het los draaien van de schroeven (4), spoel
alles af met stromend water.
Verwijder de gehele rotor (2) en spoel deze af met stromend water, indien nodig kunt u zeep of
azijn en een zachte tandenborstel gebruiken om eventuele aanslag te verwijderen.
Controleer en reinig het rotor en pomphuis (1), het recirculatie systeem en de onderste bus met
stromend schoon water.
Voer de onderstaande montage instructies uit:
Plaats de O-ring (a) in de behuizing van de pomp (1).
Plaats de O-ring (b) in de behuizing van de schijf met gaten van de rotor (2).
Plaats de rotor (2) in het pomphuis van de pomp (1), controleer of de O-ring (2) op de juiste wijze
geplaatst is in pomp (1) en dat de rotor gecentreerd is.
Plaats de O-ring (c) aan de buitenkant van de pomp (1).
Monteer het slakkenhuis (3) in de pomp (1) door het op z’n plaats te duwen en zet de schroeven
vast (4).
Monteer het voor-lter (6).
Monteer het voetstuk (9), zet de pomp terug op de originele plaats en steek de stekker in het
stopkontakt.
BELANGRIJK: De pomp is uitgerust met een thermische beveiliging en een elektronische
beveiliging van de motor. In het geval dat een storing, overmatig vuil of bij geen aanwezigheid
van water de rotor laat vastlopen, onderneemt de pomp 20 pogingen om te herstarten voordat
de pomp automatisch uitschakeld. In het geval dat de pomp is uitgeschakeld, moet u de stekker
uit het stopcontact verwijderen, het waterpeil controleren en eventueel het vuil rondom de rotor
verwijderen. Volg hierbij de bovenstaande onderhoud instructies. Daarna kunt u de stekker van de
pomp opnieuw in het stopcontact steken en zal de pomp herstarten, het kan even duren voordat
de thermische beveiliging opnieuw ingeschakeld is.
LET OP: onderschat niet de kracht van de magneet. Er is een groot risico aanwezig zodra
u enigszins de grip verliest dat de as van de rotor de onderste lager doet beschadigen. Een
beschadiging aan de as of de lager veroorzaakt hoge reparatie kosten.
SPECIAAL ONDERHOUD EN HET VERVANGEN VAN DE ROTOR
Verwijder de volledige rotor (2 - Afb.I) uit het pomphuis ‘. Plaats de haak in het rotorhuis (Afb. II),
en haak in de keramische lager die aan het einde van het huis aanweizg is (Afb. III) daarna kunt
u deze met een beetje kracht los trekken.
Spoel met schoon water en azijn het interne pomphuis schoon en positie de nieuwe keramische
lager aan het begin van het rotorhuis (Afb. IV). Plaats de O-ring (a) in het pomphuis (1). Plaats
de O-ring (b) in de behuizing van de schijf met gaten van de rotor (2). Plaats de rotor nabij de
keramische lager en druk beide het rotorhuis binnen (Afb. V) tot ze de correcte positie bereikt
hebben.
Plaats de O-ring (c) aan de buitenkant van de pomp (Afb. VI).
Monteer het slakkenhuis (3) in de pomp (1) door het op z’n plaats te duwen en draai de 4
schroeven vast .
Monteer het voor-lter (6).
ONLINE HULP
Bekijk onze instructievideo’s op het ofciële SICCE YOU TUBE kanaal www.youtube.com/
SICCEspa.
AANWIJZINGEN VOOR EEN JUISTE AFVOER VAN HET PRODUCT VOLGENS DE
EUROPESE RICHTLIJN 2002/96/EC
Aan het einde van zijn bruikbaarheidsduur, mag het product niet samen met het gemeentelijk
afval worden afgevoerd. Het kan worden afgegeven bij de speciale gemeentelijke centra
voor gescheiden afvalinzameling of bij verkopers die deze service aanbieden. Door huishoudelijke
apparaten gescheiden te verwerken, kunnen mogelijk negatieve gevolgen voor het milieu en de
gezondheid door een onjuiste verwerking worden vermeden en kunnen de materialen waaruit het
bestaat worden teruggewonnen voor een aanzienlijke besparing van energie en bronnen.
GARANTIE
Dit product,met uitzondering van de rotor 2 heeft een garantietermijn voor een periode van 3
jaren vanaf de datum van aankoop tegen gebreken van het materiaal en van de bewerking. Het
certicaat van garantie dient in elke gedeelte van het formulier door de wederverkoper ingevuld te
worden en moet het apparaat begeleiden indien het voor reparatie teruggegeven wordt tezamen
met de scale bon van aankoop of een gelijkwaardig document. De garantie betreft de vervanging
van de gebrekkige delen. In geval van een verkeerd gebruik, openbreking of nalatigheid van de
koper of gebruiker is de garantie nietig en vervalt onmiddellijk. De garantie is tevens nietig in
geval van het ontbreken van de scale bon van aankoop of van een gelijkwaardig document. De
kosten van verzending en terugzending komen ten laste van de koper.
ONTDEK HOE JE 5 JAAR GARANTIE KUNT KRIJGEN OP HET PRODUCT
Om onze dienstverlening en de tevredenheid van onze klanten te verbeteren, biedt SICCE de
mogelijkheid om de garantie periode te verlengen met 2 jaar. U hoeft simpelweg alleen uw product
te registreren op onze website www.sicce.com in “Sicce for you / Productregistratie”
Vul het formulier in en upload de aankoopbon van het product. Na het correct invullen van al uw
gegevens, moet u het uitbreiden van de garantie verzoek indienen.

Estimado cliente,
PT
aspiração e descarga roscada, às quais podem ser feitas várias ligações e conectados diversos
acessórios padrão encontrados no mercado, para satisfazer qualquer necessidade de conexão.
INSTRUÇÕES DE SEGURANÇA:
A Syncra HF está em conformidade com leis nacionais e internacionais de segurança. Por favour,
leia cuidadosamente e guarde as seguintes instruções para usar sua Syncra HF da melhor
maneira.
1) Verique se a tensão do rótulo da bomba corresponde com a da rede de energia. A bomba
deve ser provida de um interruptor diferencial (protetor) através do qual a corrente nominal seja
igual ou inferior a 30mA.
2) A bomba pode funcionar no sistema “Wet & Dry”, dentro ou fora da água.
3) Antes de ligar a bomba à rede elétrica, verique se o cabo ou a bomba não estão danicados.
4) A bomba tem uma ligação de cabo tipo Z. O cabo e/ou o plugue não podem ser substituídos ou
consertados; em caso de danos, substitua a bomba inteira.
5) ATENÇÃO: Desconecte todos os produtos elétricos submerses antes de fazer qualquer
manutenção no aquário; no caso do plugue ou a tomada de energia, desligue a chave disjuntora
antes de desligar o cabo de energia.
6) A bomba não pode funcionar sem água a m de não danicar o motor.
7) A bomba pode ser usada em líquidos ou meios com temperaturas abaixo de 35° C / 95° F.
8) Não use a bomba para nalidades diferentes daquelas para as quais ela foi projetada, como
por exemplo em banheiros ou outros tipos de aplicações.
9) Evite usar a bomba em líquidos abrasives ou corrosives.
10) A bomba não foi projetada para pessoas desabilitadas ou crianças sem supervisão de uma
pessoa responsável por sua segurança.
11) Para evitar pingos acidentais no plugue ou na tomada de energia, faça uma volta com o cabo
de maneira que que abaixo do nível do soquete (Fig. A).
12) Evite desligar a bomba puxando o cabo da tomada durante a instalação ou manutenção.
13) A bomba pode ser usada apenas dentro das aplicações mencionadas acima e serve somente
para espaços internos.
14) No caso em que a bomba e o ltro sejam fornecidos com cabo de 10 metros de comprimento
ou com cabo de medida superior a 6 pés para o tipo americano (EUA), estes aparelhos são
destinados a utilização no exterior como indicado pela normativa internacional.
INSTRUÇÕES DE USO E MANUTENÇÃO
As bombas Syncra HF são constituídas pelos seguintes componentes funcionais (Fig. 2):
1 Corpo do motor completamente submergível
e isolado com resina bicomponente
2 Rotor com roda xada ao cubo anti-desgaste
e anti-ruído
3 O-ring + espiral roscada 1” Gas (Mod. 10.0),
1½” Gas (Mod. 12.0 - 16.0)
4 4 parafusos de aperto em espiral
5 Tampa posterior da bomba
INSTALAÇÃO
Para instalar a bomba Syncra HF é necessário proceder da seguinte forma:
- Unir a conexão à descarga da bomba, a qual pode depois unir o tubo exível de diâmetro
apropriado.
- Colocar a bomba numa zona plana do pequeno lago, facilmente acessível para as operações
de manutenção.
- A bomba pode funcionar tanto na posição horizontal como vertical.
- Se a bomba for usada submersa e em vez de em linha, deve de estar sempre
obrigado por ter escolhido Syncra HF, a bomba ideal para criar cascatas e pequenos
cursos de água no seu pequeno lago decorativo e que pode ser aplicada aos ltros
externos de pressão ou de cascata com ou sem lâmpada UVC, para a ltragem do
seu pequeno lago. Moderna no design, de fácil utilização e manutenção, é munida de
6 Pré-ltro
7 O-ring + conexão para degraus D25 mm e
D30 mm com rosca 1” GAS fêmea mod. 10.0
8 O-ring + conexão D38 mm com rosca
1½” GAS fêmea mod. 12.0 - 16.0
9 Base de suporte
10 Borrachas Antivibração (Versão Aquática)
completamente submersa (Fig. 3).
- Desenrolar O cabo de alimentação numa zona onde não venha A car danicado de modo
algum.
- Ligar A cha na tomada da corrente eléctrica com tensão correspondente aquela mencionada
no rótulo dos dados técnicos.
APLICAÇÕES EM LINHA
É recomendado colocar a bomba em espaços onde exista ventilação apropriada e que a bomba
não esteja directamente exposta a fontes de calor.
Coloque a bomba por forma a evitar tubagens hidraulicas demasiado longas, que reduzem a
sua performance.
Não coloque a bomba acima do nivel de água pois a mesma não é auto ferrável e o risco de
trabalhar a seco, ou de bombas de ar invisiveis criarem uma area de vaccum é muito elevado.
Danos causados por a bomba trabalhar a seco estão excluidos da garantia.
Para maximizar a eciência da bomba, escolha um tubo recto para ligar a entrada e cotovelos
com boa dimensão (Fig. 4).
Sugerimos o uso de tubos de diametro igual ou maior aos das entradas e saidas da própria
bomba (Fig. 5).
Nunca utilize a bomba com a saida totalmente fechada. Um minimo de caudal é necessário para
manter o interior do motor refrigerado e não trabalhar a seco. (Fig. 6).
MANUTENÇÃO
Para o funcionamento correcto da Syncra HF, é necessária uma manutenção simples, mas
periódica. Para a executar, acima de tudo é necessário desligar a cha da tomada de corrente
eléctrica e ater-se escrupulosamente às instruções de segurança e ao seguinte procedimento:
Extrair A bomba completa Do pequeno lago.
Desapertar a base (9).
Desapertar o pré-ltro (6) levantando ligeiramente as duas patilhas laterais, separar a espiral (3)
da bomba (1) desapertando os parafusos (4) e enxaguar tudo sob água corrente.
Retirar o rotor completo (2) e enxaguá-lo sob água corrente, utilizando sabão ou vinagre e uma
pequena escova macia para remover eventuais incrustações.
Vericar e limpar a base do rotor no corpo do motor (1), a recirculação e o casquilho em água
corrente.
Executar as operações de montagem do seguinte modo:
Inserir o O-ring (a) na base interna do corpo (1).
Inserir o O-ring (b) na base sob o disco externo furado do rotor (2).
Inserir o rotor (2) na base do corpo da bomba (1), vericando se o O-ring (2) está correctamente
colocado na base do corpo da bomba (1), a m de permitir o correcto alinhamento do rotor.
Inserir o O-ring (c) na base externa do corpo da bomba (1).
Montar a aspiral (3) ao corpo (1), empurrando-a para a base e apertar os parafusos (4).
Montar o pré-ltro (6).
Montar a base (9), voltar a colocar a bomba na posição original e alimentar a bomba.
IMPORTANTE: A bomba está equipada com um dispositivo electrónico de protecção
térmica. Em caso de funcionamento anómalo que possa provocar bloqueio do rotor (devido a
sujidade excessiva ou outro) ou a operar sem água, a bomba, depois de 20 tentativas, pára
automáticamente. Neste caso deverá ser desconectada a cha, vericar o nivel de água e se o
rotor está sujo. Depois destas operações de manutenção, e de acordo com as instruções acima,
poderá voltar a conectar a cha da bomba e assim re-iniciar a mesma. Poderá demorar um pouco
caso a protecção térmica ainda esteja ligada.
ATENÇÃO: não substime o poder da força magnetica. Ao soltar ligeiramente o iman se o eixo
bater no rolamento trazeiro, o risco de danicar o rolamento é muito alto. Danicar o eixo ou o
rolamento causará grandes despesas de reparação.
MANUTENÇÃO ESPECIAL E REPOSIÇÃO GRUPO ROTOR
Remova o rotor completo (2 - Fig. I) do corpo da bomba. Insira o gancho dentro da caixa do rotor
(Fig. II), torça o rolamento cerâmico localizado dentro do corpo da bomba (Fig. III) e puxe para
fora utilizando um pouco de força.

Encha com água doce e vinagre as partes internas da bomba e coloque o novo rolamento
cerâmico na base da caixa do rotor. (Fig. IV). Insira o O-ring (a) na caixa dentro do corpo da
bomba (1). Insira o O-ring (b) na caixa do disco externo do rotor (2). Posicione o rotor perto do
rolamento cerâmico empurre ambos para dentro da caixa do rotor (Fig. V).
Insira o O-ring (c) na caixa externa do corpo da bomba (Fig. VI).
Monte a espiral (entrada) ao corpo da bomba (1) apertando os 4 parafusos.
Monte o pre-ltro (6).
ASSISTÊNCIA ON-LINE
Sugerimos que veja nossos tutoriais em vídeo para apoiar a instalação e manutenção de
produtos, disponível no canal ocial www.youtube.com/SICCEspa.
PRECAUÇÕES PARA DESCARTE CORRETO DO PRODUTO NOS TERMOS DA
DIRECTIVA CE 2002/96 / CE
Se usada ou quebrada, esta bomba não pode ser descartada como lixo comum. Verique
a legislação vigente e procure centros apropriados para descartar a bomba, ou devolva-a
ao revendedor. Descarte separadamente qualquer components elétrico para não causar danos
ao ambiente . Procure centros de reciclagem desse tipo de material.
GARANTIA
Este produto é totalmente coberto pela lei do consumidor vigente no Brasil. A garantia do
produto só será cumprida pelo revendedor ou importador no caso de apresentação de nota
scal comprobatória da compra que prove que o material comprado está no prazo de garantia
de 3 anos da data da compra. O rotor da bomba 2 não possui garantia. A garantia não será
dada a produtos em que se prove mal uso, danos intencionais - como a alteração nas suas
caractrerísticas originais ou o corte do plugue de tomada, retirada de qualquer dos componentes
do plugue ou corte do próprio cabo de energia da bomba. quando adquirir a bomba, peça ao
revendedor ou importador para desmontá-la e vericar o estado do rotor. As despesas de
expediçãoe devolução cam por conta do comprador.
DESCUBRA COM OBTER 5 ANOS DE GARANTIA NO SEU PRODUTO
Para melhorar o nosso serviço e aumentar a satisfação dos nossos clientes, a SICCE oferece
a possibilidade de aplicar 2 anos extra de garantia, registando o produto na nossa página Web
www.sicce.com em “Quality Control Department”.
Preencha o formulário em todas as suas partes e envie electrónicamente o comprovante de
compra do produto.
Уважаемый клиент,
благодарим за выбор Syncra HF. Этот насос идеально подходит для использования в
водоемах и аквариумах, включая: создание водопадов, небольших ручьев, подачу воды
на внешние фильтры или проточные фильтры, кварцевателей, профессиональных
RU
фильтрационных систем, а также возвратных насосов или для крупных аквариумов.
Syncra HF создан с применением передовой технологии и прост в эксплуатации.
подсоединять различные стандартную шланги или трубы и различные аксессуары, доступные на
рынке.
ОБЩИЕ ИНСТРУКЦИИ БЕЗОПАСНОСТИ
Помпа Syncra HF - соответствует законам национальной и международной безопасности.
1)Проверьте, что напряжение на ярлыке помпы соответствует напряжению в электрическоий
сети. Помпа должна подключаться через устройство защитного отключения (УЗО) с минимальным
током утечки 30 mA.
2) Насос предназначен для использования исключительно в закрытых помещениях и не может
устанавливаться на открытых пространствах.
3) Перед подключением насоса к электрической сети, убедитесь, что кабель и насос не
повреждены.
4) К помпе присоединен кабель типа Z. Кабель и штепсель нельзя заменить или восстановить; в
случае повреждения их заменяют вместе с насосом.
5) ВНИМАНИЕ: отсоедините все электрические приборы перед выполнением любых манипуляций
с любым прибором в воде, или погружении рук в воду; в случае, если штепсель или электрический
выход влажные, отключите общий выключатель электрического питающего кабеля.
6) Насос не должен работать без воды, чтобы избежать повреждения двигателя.
7 Запрещено эксплуатировать насос без воды или с жидкостями, температура которых превышает
35° C!
8) Избегайте использование помпы с коррозийными и жесткими жидкостями.
9) Не используйте помпу для работ, отличных от тех, для которых она была спроектирована,
например, в ванной.
10) Данный прибор не предназначен для использования лицами (включая детей) с
ограниченными физическими, сенсорными или умственными способностями, а также лицами
без соответствующего опыта и знаний; в противном случае прибор должен эксплуатироваться
под контролем взрослых или после проведения соответствующего инструктажа об эксплуатации
прибора лицом, ответственным за технику безопасности. Контролируйте детей, прибор – не
игрушка.
11) Чтобы избежать попадания случайных капель на штепсель или в розетку, сделайте петлю из
шнура ниже уровня розетки (Рис. A).
12) Избегайте брать помпу за шнур во время ее установки или обслуживания.
13) насос может быть использован только в выше перечисленных программ, и это только для
внутреннего использования.
14) Если насос или фильтр поставляются вместе с кабелем 10 метров в длину, или кабелем более6
футов в длину американского типа (США), эти устройства предназначены для использования на
открытом воздухев соответствии с требованиями международных стандартов.
ИНСТРУКЦИЯ ПО ЭКСПЛУАТАЦИИ И УХОДЕ
В состав насосов SYNCRA HF входят следующие функциональные компоненты (Рис. 2):
1 Моторный корпус полностью подводный
и изолированный двойной резиной
2 Ротор с жёсткозакреплённым лопастным
колесом с износостойкой втулкой и
противошумовым прибором
3 Кольцо + спираль с резьбою 1” Gas
(Mod. 10.0), 1½” Gas (Mod. 12.0-16.0)
4 4 винта со спиральным завинчиванием
5 Крышка для задней части насоса
Насос оборудован резьбовым впускным и выпускным отверстиями, к которым можно
6 Фильтр грубой очистки
7 Кольцо + ступенчатое крепление D25 mm e
D30 mm с резьбой 1” GAS охватывающая
деталь mod. 10.0
8 Кольцо + крепление D38 mm с резьбой
1½” GAS охватывающая деталь mod. 12.0 - 16.0
9 Опорная стойка (Модель для водоемов)
10 Противовибрационные резиновые прокладки
(Аквариумная модель)
УСТАНОВКА
Для того, чтобы установить помпу Syncra HF необходимо следовать инструкции:
- Присоедините крепление с насосной станцией к которой Вы сможете затем присоединить
гибкую трубку нужного диаметра.
- Установить насос на ровное место озерца, которое позволяет легко манипулировать и
поддерживать работу прибора.-
- Насос может функционировать как в вертикальном так и в горизонтальном.
- Если насос используется в погруженном состоянии и не с последовательным
расположением, то он должен быть всегда полностью погруженным (Рис. 3).
- Разматывайте кабель питания в том месте, где он будет полностью защищен от повреждения.
- Присоединяйте вилку кабеля электропитания к источнику электропитания с напряжением,
которое допускается инструкцией по эксплуатации.
ИСПОЛЬЗОВАНИЕ ВНЕ ВОДЫ
Рекомендуется размещать насос в местах с надлежащей вентиляцией, где насос не подвергается
прямому воздействию источников тепла.
Разместите насос таким образом, чтобы исключить слишком длинное соединения (трубопровод),
которые снизят эффективность его работы.
Не размещайте насос над уровнем воды, потому что он не является “самозаливающимся”, и имеется
высокий риск того, что подача воды прекратится внасосо попадет воздух и воздушные пузырьки
создадут вакуум. Повреждение, вызванное пересыханием насоса, не охваывается гарантией.
Для максимального увеличения эффективности работы насоса, выберите прямую впускную
трубку, подсоединяемую к угловым или коленчатым патрубкам (Рис. 4).
Мы рекомендуем использовать впускные и выпускные трубки с диаметром, равным или большим,
чем диаметр резьбовой трубки идущей в комплекте (Рис. 5).
Не используйте насос с полностью перекрытым выпускным отверстием. Минимальный поток
воды необходим для поддержания внутреннего двигателя охлажденным и предотвращения
пересыхания насоса (Рис. 6).
УХОД
Для того, чтобы правильно функционировать Syncra HF требует простого, но необходимого
и периодического ухода. Для правильного ухода за оборудованием прежде всего нужно
отсоединить кабель от источника электропитания и строго придерживаться инструкции по
безопасности, а также исполнять следующую инструкцию:
Полностью внуть насосо из воды.
Разомкнуть основание (9). Модель для водоемов
Разомкнуть фильтр грубой очистки (6), нажимая при этом два боковых ребра, отсоединить
спираль (3) от насоса (1), отвинчивая винты(4), ополоснуть компоненты в проточной воде.
Отсоединить комплектный ротор (2) и ополоснуть его в проточной воде, используя мыло, уксус и
мягкую тряпочку для того, чтобы снять налет.
Контролировать состояние чистоты гнезда ротора моторной части (1), рециркуляции и нижней
втулки с помощью проточной воды.
Исполнять монтажные работы следуя инструкции:
Присоединить кольцо (a) во внутреннее гнездо корпуса (1).
Присоединить кольцо (b) в гнездо над внешним просверленным диском ротора (2).
Присоединить ротор (2) в гнездо корпуса насоса (1), контролируя чтобы кольцо (2) было
размещенным правильным образом в гнезде корпуса насоса (1) для того, чтобы поддерживать
правильную центровку ротора.
Присоединить кольцо (c) во внешнее гнездо корпуса насоса (1).
Вмонтировать спираль (3) в корпус (1) толкая ее в гнездо и завинчивая винты (4).
Собрать фильтр грубой очистки (6).
Собрать основу (9), поставив насос в начальное положение и начать работу насоса.
ВАЖНО: Насос оборудован термоустройством и электронной защитой двигателя. В случае
неполадки, которая вызывает блокировку ротора (в виду значительного засорения грязью или
по другой причине) или работу без воды, насос после 20 попыток запустить ротор автоматически
останавливается. В этом случае Вы должны отсоединить насос от линии электропитания,
проверить уровень воды, а также не загрязнился ли ротор. После выполнения операций по
техобслуживанию в соответствии с вышеперечисленными инструкциями Вы можете подсоединить
насос к линии электропитания для повторного запуска. Это может занять определенное время в
случае, если сработало термоустройство.
ВНИМАНИЕ: Недооценивайте силу магнита. Если Вы слегка ослабите сцепление и ось ударит
задний подшипник, имеется высокий риск повреждения подшипника. Поврежденная ось и
подшипник приведут к высокой стоимости ремонта.
СПЕЦИАЛЬНОЕ ТЕХНИЧЕСКОЕ ОБСЛУЖИВАНИЕ И ЗАМЕНА РОТОРНОЙ ГРУППЫ
Удалите ротор в сборе (2 - Рис. I) из корпуса насоса. Вставьте крюк внутрь корпуса ротора (Рис. II),
зацепите керамический подшипник, находящийся у окончания внутреннего корпуса насоса (Рис.
III) и достаньте его, приложив небольшое усилие.
Промойте внутренние стороны насоса свежей водой и уксусом, и разместите новый керамический
подшипник в начале корпуса ротора. (Рис. IV). Вставьте уплотнительное кольцо (a) в паз внутри
корпуса насоса (1). Вставьте уплотнительное кольцо в паз на внешнем перфорированном диске
ротора (2). Расположите ротор рядом с керамическим подшипником и вставьте их внутрь корпуса
ротора. (Рис. V).
Вставьте уплотнительное кольцо (c) во внешний паз на корпусе насоса. (Рис. VI).
Вставьте улитку (3) в корпус насоса (1) и затяните 4 винта.
Соберите предварительный фильтр (6).
ОНЛАЙН-СПРАВКА
Смотрите обучающие видеоролики на официальном канале THE SICCE YOUTUBE www.youtube.
com/SICCEspa.
ИНСТРУКЦИИ ПО ПРАВИЛЬНОЙ УТИЛИЗАЦИИ ПРОДУКЦИИ В СООТВЕТСТВИИ С
ДИРЕКТИВОЙ ЕС 2002/96/EC
Нельзя утилизировать использованный или поломанный товар вместе с бытовыми
отходами. Его необходимо доставить в специальный центр утилизации электрических
отходов. Отнеситесь к утилизации фильтра ответственно. Узнайте всю необходимую информацию
у своих местных представителей.
ГАРАНТИЙНЫЕ ОБЯЗАТЕЛЬСТВА
На данную продукцию (кроме лопастного колеса 2) распространяется гарантия сроком на 3
год с момента покупки. Гарантийный талон должен быть заполнен продавцом и прилагаться к
насосу при его возврате для ремонта вместе с чеком, подтверждающим покупку товара. Гарантия
распространяется на замену всех дефектных частей. В случае неправильного использования,
несанкционированного вмешательства в конструкцию или небрежности покупателя или
пользователя, гарантийные обязательства немедленно утрачивают силу. Изделие также не
подлежит гарантийному обслуживанию в случае отсутствия чека или другого подтверждения
покупки. Стоимость отправки насоса производителю или в место ремонта оплачивается
покупателем.
УЗНАЙТЕ, КАК ПОЛУЧИТЬ ГАРАНТИЮ НА ВАШ ТОВАРО СРОКОМ НА 5 ЛЕТ
С целью улучшения обслуживания и для более полного удовлетворения запросов наших клиентов,
компания SICCE предлагает возможность дополнительного гарантированного обслуживания
сроком на 2 года. Просто зарегистрируйте свой товар на вебсайте www.sicce.com в разедел “Sicce
для вас / Регистрация товара”.
Заполните форму и загрузите чек на приобретенный товар. После того, как вы правильно введете
всю информацию, заполните заявку на продление гарантийного срока.

SICCE S.r.l.
Via V. Emanuele, 115 - 36050 Pozzoleone (VI) - Italy
Tel. +39 0444 462826 - Fax +39 0444 462828 - P. IVA / VAT 02883090249
info_service@sicce.com - www.sicce.com
SICCE USA
1737 Louisville Drive - Knoxville, Tennessee 37921, USA
Ph. +1 865 291-3202 - Fax +1 865 291-3203
sales@sicceus.com - www.sicce.com
80N246/D - 02-2016© SICCE All rights reserved
 Loading...