

INSTRUCTION MANUAL
5.5 · 7.0 · 9.0
EN · DE · FR · IT · ES · NL · PT · RU

WARRANTY - GARANTIE - GARANZIA - GARANTIA - GARANTIED
GARANTIA - GARANTI -
SEAL AND SIGNATURE OF RESALE DEALER - STEMPEL UND UNTERSCHRIFT DES VERKÄUFERS
CACHET ET SIGNATURE DU REVENDEUR - TIMBRO E FIRMA DEL RIVENDITORE
SELLO Y FIRMA DEL REVENDEDOR - STEMPEL EN HANDTEKENING VAN DE DEALER
CARIMBO E ASSINATURA DO REVENDEDOR - УПЛОТНЕНИЕ И ПОДПИСЬ МАГАЗИНА
ГАРАНТИЯ
DATE OF PURCHASE - VERKAUFSDATUM - DATE DE VENTE - DATA DI VENDITA
FECHA DE VENTA - DATUM VAN AANKOOP - DATA DE VENDA - ДАТА ПОКУПКЫ
SYNCRA ADV 5.5 SYNCRA ADV 7.0 SYNCRA ADV 9.0
VOLTAGE 220 - 240 V / 50 Hz
MAX POWER
CONSUMPTION
Q MAX
H MAX
INLET / OUTLET
CABLE LENGHT
IP CLASS
THERMAL
PROTECTION
40 W 55 W 90 W
5500 l/h 7000 l/h 9500 l/h
3,5 m 3,5 m 4,5 m
1” / 1”
3 m Schuko Plug
10 m (outdoor)
IP X8
Yes Yes Yes
SYNCRA ADV 5.5 SYNCRA ADV 7.0 SYNCRA ADV 9.0
VOLTAGE 110 - 120 V / 60 Hz
MAX POWER
CONSUMPTION
Q MAX
H MAX
INLET / OUTLET
CABLE LENGHT
IP CLASS
THERMAL
PROTECTION
40 W 55 W 90 W
1450 US gph 1900 US gph 2500 US gph
11.5 ft 11.5 ft 14.8 ft
1” / 1”
10 ft
20 ft (outdoor)
IP X8
Yes Yes Yes
5
5
8
1
2
3
4
5
1
4
SVE0033
SPARE PARTS · ERSATZTEILE · PIECES DE RECHANGE · RICAMBI · PIEZAS DE REPUESTOS · ONDERDELEN · PEÇAS DE REPOSIÇÃO · ЗАПЧАСТИ
ADV 5.5 ADV 7.0 ADV 9.0
SGR0222 SGR0218 SGR0217
230 V - 50 Hz 230 V - 50 Hz 230 V - 50 Hz
STR0029
120 V - 60 Hz 120 V - 60 Hz 120 V - 60 Hz
8
SVE0055 (Mod. 5.5)
SGR0222 SGR0219 SGR0218
SVE0053
2
6
3
SVE0052
SVE0054 (Mod. 5.5)
SPL0095
SPL0097 (Mod. 5.5)
7
SPL0094
Fig. B
SVE0054 (Mod. 5.5)
Fig. C
Fig. D
IN LINE
Fig. 1
Fig. 2
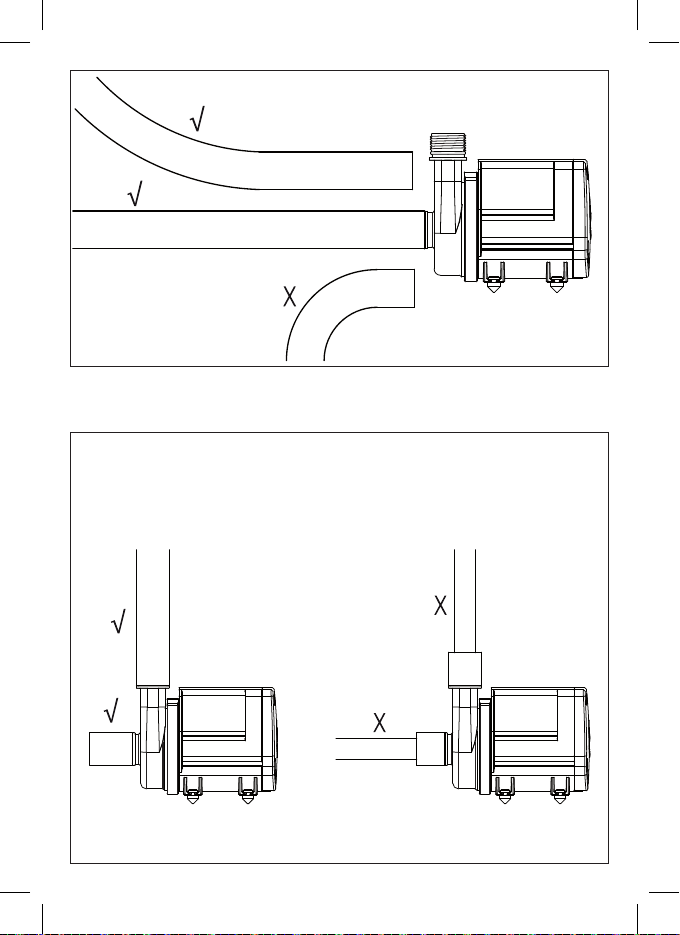
Fig. 3
Fig. 4
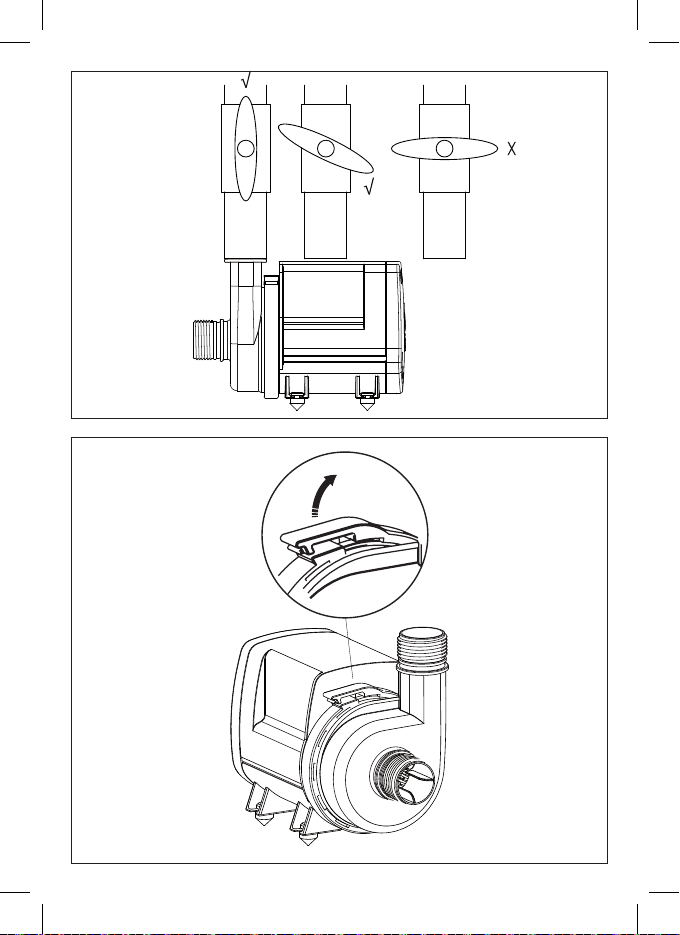
Fig. 5
Fig. 6
O-RING 1
O-RING 2
Fig. 7
Fig. 8
BIG TEETH
BEHIND
CLICK
Fig. 9
RIGHT SIDE
1
HOOK
2
Fig. 10
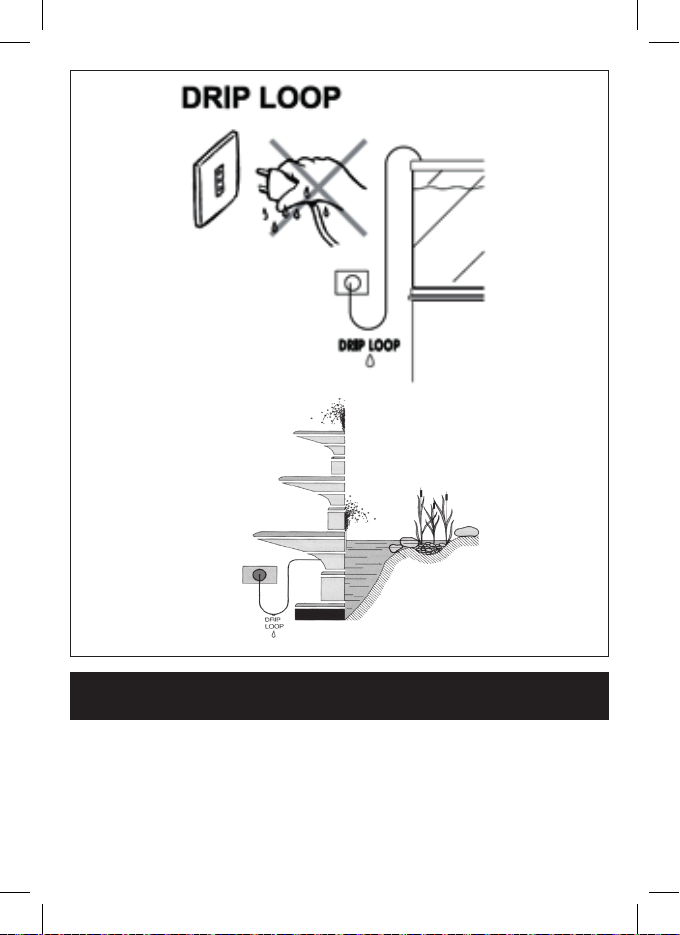
Fig. A
FOR UK ONLY
(10m cable no plug)
IMPORTANT - The wires in this lead are coloured as follows:
Blue-Neutral/Brown-Live. The colours of the wires of the main lead of this appliance may not correspond
with the coloured markings identifying the terminals in your plug. In this case, connect as follows: the
BROWN wire must be connected to the terminal marked with L or in RED colour; the BLUE wire must
be connected to the terminal marked N or in BLACK colour.
CAUTION - The BROWN or BLUE leads must NEVER be connected to the earth terminal (marked E or
in GREEN/YELLOW colour) of a 3 pins plug.
IMPORTANT SAFETY INSTRUCTIONS
WARNING To guard against injury, basic safety precautions should be observed, including the following.
READ AND FOLLOW
ALL SAFETY INSTRUCTIONS
CAUTION Always disconnect the pump when not in use, before adding or removing parts and before
cleaning.
- Do not allow pump to run dry. Pump must be immersed in water completely.
- This pump is to be used in a circuit protected by a ground fault circuit interrupter.
WARNING
To reduce the risk of electric shock, install only on a circuit
protected by a Ground - Fault Circuit - Interrupter (GFCI).
To reduce the risk of electric shock, use only in portable selfcontained fountain no larger than 5 feet in any dimension.
This pump has not been designed for use in swimming pool
or marine areas.
To avoid possible electric shock, special care should be taken
since water is employed in the use of aquarium or pond
equipment. For each of the following situations, do not attempt
repairs by yourself. Return the appliance to an authorized
service facility for service or discard the appliance.
1) Do not operate any appliance if it has a damaged cord or
plug, or if it doesn’t work properly or has been dropped or
damaged in any manner.
2) To avoid the possibility of the appliance plug or receptacle
getting wet, position aquarium stand and tank or the fountain
to one side of a wall-mounted receptacle to prevent water
from dripping onto the receptacle or plug.
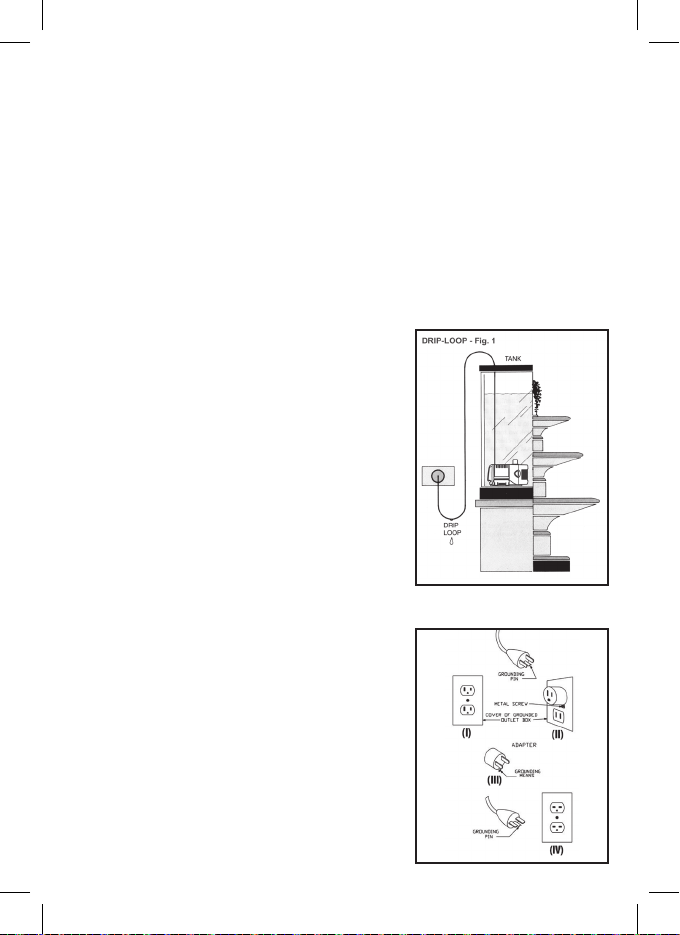
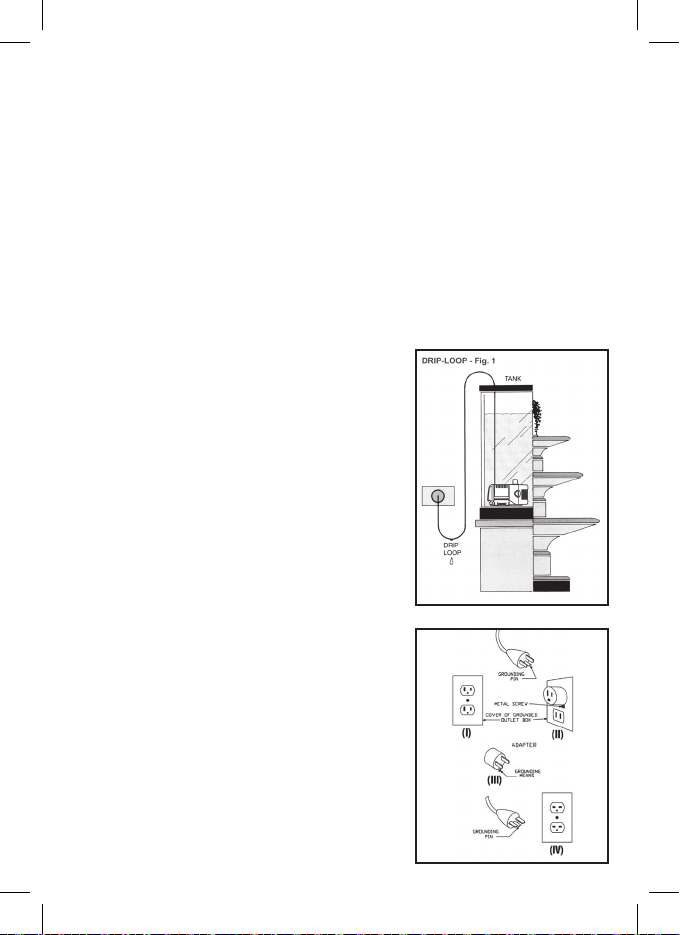
A “drip-loop” (PIC. A) should be arranged by the user for
each cord connecting an aquarium appliance to a receptacle.
The “drip-loop” is the part of the cord below the level of the
receptacle or the connector if an extension cord is used, which
prevents water from travelling along the cord and coming in
contact with the receptacle.
If the plug or socket does get wet, DON’T unplug the cord.
Disconnect the fuse or circuit breaker that supplies power to

appliance. Then unplug and examine for presence of water in the receptacle.
3) Close supervision is necessary when any appliance is used by near children.
4) To avoid injury, do not come in contact with moving parts or hot parts such as heaters, reflectors,
lamp bulbs and similar.
5) Always unplug an appliance from the outlet when not in use, before putting on or taking off parts and
before cleaning. Never yank the cord to pull plug from outlet. Grasp the plug and pull to disconnect.
6) Do not use an appliance for other than intended use. The use of attachments, not recommended or
sold by the manufacturer of the appliance, may cause an unsafe condition.
7) Do not install or store the appliance where it will be exposed to the weather or to temperatures
below freezing.
8) Make sure an appliance mounted on a tank is securely installed before operating it.
9) Read and observe all the important notices of the appliance.
10) If an extension cord is necessary, a cord with a proper rating should be used. A cord rated for less
amperes or watts than the appliance rating may overheat. Care should be taken to arrange the cord so
that it will not be tripped over or pulled.
11) This appliance has a polarized plug (one blade is wider than other). As a safety feature, this plug will
fit in a polarized outlet only one way. If the plug does not fit fully in the outlet, reverse the plug. If it still
does not fit, contact a qualified electrician. Never use with an extension cord unless plug can be fully
inserted. Do not attempt to defeat this safety feature.
IMPORTANT SAFETY INSTRUCTIONS
This appliance should be grounded to minimize the possibility of electric shock. This appliance is
equipped with an electric cord having an equipment grounding conductor and a grounding type plug.
The plug must be plugged into an outlet that is installed and grounded in accordance with all appropriate
codes and ordinances.
This appliance is for use on a nominal 120-Volt circuit, and has a grounding plug that looks like the
plug illustrated in (II). A temporary adapter which looks like the adapter illustrated in (III) and (IV) below
may be used to connect this plug to a two-pole receptacle as shown in (III) if a grounded outlet is
not available. The temporary adapter should be used only until a grounded outlet is not available. The
temporary adapter should be used only until a grounded outlet can be installed by a qualified electrician.
The green-colored rigid ear (lug, and the like) extending from the adapter must be fastened to a
permanent ground such as a grounded outlet box.
SAVE THESE INSTRUCTIONS
CONSIGNES DE SÉCURITÉ IMPORTANTES
MISE EN GARDE Afin de se protèger contre les blessures, des mesures de sècuritè de base doivent
être observèes, y compris les suivantes.
LIRE ET OBSERVER TOUTES
LES CONSIGNES DE SÉCURITÉ
ATTENTION Toujours dèbrancher une pompe qui ne sert pas, ou à laquelle on doit ajouter ou retirer
des pièces ou qui doit être entretenue.
- Ne pas faire fonctionner la pompe à sec. La pompe peut être complètement immergée dans l’eau.
- Cette pompe doit être branchée à une dérivation protegée par un disjoncteur différentiel.
DANGER Risque de choc électrique. Cette pompe est munie
d’une fiche de raccordement de mise à la terre. Afin de réduire
le risque de choc électrique vous assurer qu’elle est branchée
seulement à une prise de courant adéquatement mise à la terre.
Pour réduire le risque de choc électrique, installer seulement
sur un circuit protégé par GFCI. Pour réduire le risque de choc
électrique, utilisez-la uniquement sur une récipient portable de
max 5 pieds dans n’importe quelle dimension. Cette pompe
n’a pas été étudiée pour une utilisation dans une piscine
ou des zones marines. Pour éviter tout choc électrique, une
grande prudence est de rigueur. Dans chacune des situations
suivantes, ne pas essayer de réparer l’appareil soi-même;
l’expédier au fabricant pour réparation ou le jeter.
1) Ne pas faire fonctionner un appareil défectueux, dont le
cordon électrique ou la fiche sont endommagés, ou qui a été
échappé ou abîmé d’une façon quelconque.
2) Afin d’éviter que l’appareil ou la prise de courant soient
mouillés, installer le support pour aquarium et le bac ou la
fountaine à côté d’une prise de courant pour empêcher
l’eau de dégoutter sur la prise. L’utilisateur devrait faire une
boucle d’égouttement (Fig. A) pour chaque cordon électrique
branché d’un aquarium à une prise de courant. Une boucle
d’égouttement est la partie du cordon se trouvant sous la prise
de courant ou le raccord si une rallonge électrique est utilisée,
afin d’empêcher l’eau de circuler le long du cordon électrique
et d’être en contact avec la prise de courant. Si la fiche ou la

prise de courant sont mouillées, NE PAS débrancher le cordon électrique. Débrancher d’abord le fusible
ou disjoncteur qui fournit l’électricité à l’appareil et débrancher ensuite l’appareil en vérifiant qu’il n’y a
pas d’eau dans la prise.
3) Il est essentiel de surveiller étroitement les enfants utilisant cet appareil ou se trouvant à proximité.
4) Pour éviter les accidents, ne pas toucher aux pièces mobiles ou chaudes comme les chauffe-eau,
réflecteurs, ampoules, etc.
5) Toujours débrancher l’appareil quand il n’est pas utilisé, quand des pièces sont enlevées ou
remplacées et avant l’entretien. Ne jamais tirer sur le fil pour débrancher l’appareil; prendre la fiche et
débrancher l’appareil.
6) Ne pas utiliser un appareil pour un emploi autre que celui pour lequel il a été fabriqué. Les pièces
non vendues ou non recommandées par le fabricant pourraient compromettre la sécurité de l’appareil.
7) Ne pas exposer cet appareil aux intempéries ou à une température en dessous de 0º C.
8) Vous assurer qu’un appareil monté sur un aquarium est bien installé avant de le faire fonctionner.
9) Lire et observer tous les avis importants sur l’appareil.
10) Si une rallonge électrique est nécessaire, vous assurer qu’elle est d’un calibre adéquat. Un cordon
électrique de calibre inférieur ou de moins d’ampères ou de watts que l’appareil peut surchauffer. Le
cordon doit être placé de façon à éviter que quelqu’un trébuche ou le tire.
11) Cet appareil possède une fiche polarisée (une lame est plus large que les autres). Par mesure
de sécurité, cette fiche s’insère dans une prise polarisée que dans un sens. Si la iche n’entre pas
complètement dans la prise, inverser la fiche. Si elle ne rentre toujours pas, contactez un électricien
qualifié. Ne jamais utiliser une rallonge si la fiche peut être insérée complètement. Ne pas essayer de
contourner ce dispositif de sécurité.
MISE À LA TERRE
Cet appareil doit être mis à la terre (masse) afin de minimiser les risques de choc électrique. Cet appareil
est équipé d’un cordon électrique possédant un conducteur de terre et une prise de terre. La fiche
doit être branchée dans une prise installée et mise à la terre en conformité avec tous les codes et les
ordonnances appropriées.
Cet appareil est destiné à l‘utilisation dans un circuit de 120 volts nominales et a une fiche de mise
à la terre qui ressemble à la fiche illustrée en (II) ci-dessous. Un adaptateur temporaire qui ressemble
à l’adaptateur illustré en (III) et (IV) ci-dessous peut être utilisé pour connecter cette fiche à une prise
à deux broches comme indiqué dans (III), si une prise de terre n‘est pas disponible. L’adaptateur
temporaire ne doit être utilisé que jusqu’à quand une prise avec mise à la terre n‘est pas disponible.
L’adaptateur temporaire ne doit être utilisé que jusqu’à quand une prise de terre peut être installé par
un électricien qualifié. L’ergot rigide de couleur verte (oreille, patte) se étendant de l’adaptateur doit être
fixé à une mise à la terre permanente, comme par exemple une boîte de prise de terre.
CONSERVER CES INSTRUCTIONS

EN
Dear valued Customer, thank you for choosing SYNCRA ADVANCED. This new generation of Syncra
Silent pumps are highly efficient products that have been developed and manufactured in Italy to meet
the most stringent quality and performance requirements. SYNCRA ADVANCED are ideal to be used in
marine and fresh water aquariums, decorative fountains, protein skimmers, and water-cooling systems.
SYNCRA ADVANCED can be used fully submersed or for inline (external) applications. The pumps have
a turning pre-chamber, which makes them easy to use for many applications in tight spaces. The unique
closing ring allows the pumps to be maintained easily and without screws or tools. Please, read carefully
and save the following instructions for best practices and use of the SYNCRA ADVANCED pump.
SAFETY INSTRUCTIONS:
SYNCRA ADVANCED is made in conformity with the national and international security laws.
1) Always isolate the pump from the main electricity before installing or carrying out any maintenance.
2) The pump can work submerged or inline out of water.
3) Before connecting the pump to the electricity supply, check there are any damages on cord or plug.
4) The pump has a type Z cable link. The cable and the plug cannot be substituted or repaired; in case
of damage replace the entire pump.
5) ATTENTION: do not operate any appliance if it has a damaged cord or plug, if it is malfunctioning,
or if it has been dropped or damaged in any way.
6) The pump must not work without water to avoid damages to the motor.
7) The pump can be used in liquids or in environment with a temperature not higher than 35° C / 95° F.
8) Do not use the pump for uses different to those for which it has been projected as, i.e. in bathroom
or similar applications.
9) Avoid using the pump with corrosive and abrasive liquids.
10) The pump cannot be used by people with handicaps or by children if they are not supervised by a
person responsible for their safety.
11) To avoid that accidental drips wet the plug or the socket, make a loop with the cord under the
socket level (Pic. A).
12) Avoid to take the pump by the cord during the installation or maintenance.
13) The pump can be used only in the above mentioned applications and it is only for internal use (3
meters long cable).
14) If the pump or the filter is supplied with a cable 10 meters long, or more than 6 feet long for the
American type (USA), these appliances are intended for outdoor use as required by international
standards.
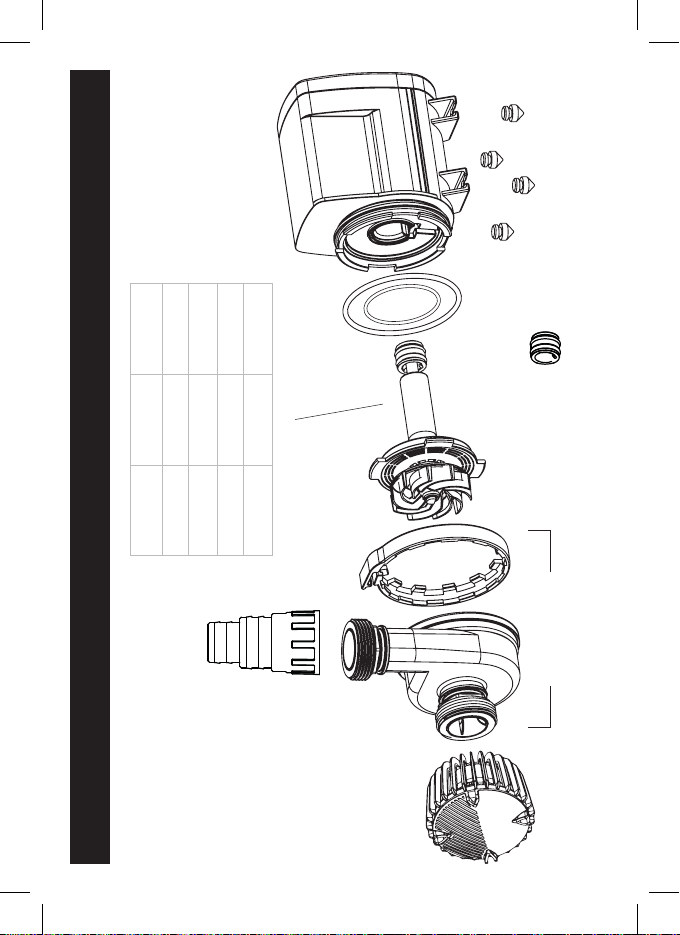
COMPONENTS
SYNCRA ADVANCED pumps are designed favoring the almost total dismantling of their components,
to facilitate proper use and maintenance and ensure a long life. Below is the list of the individual parts
and spare parts (Pic. B):
1. Motor body completely submersible and insulated by epoxy resin;

EN
2. Rotor Kit with Impeller and bottom bearing
3. Bottom Bearing
4. O Ring
5. Anti-vibration Rubber Feet
6. Turning pre-chamber
7. Pre-filter Grid
8. 1” Threaded Hose fittings
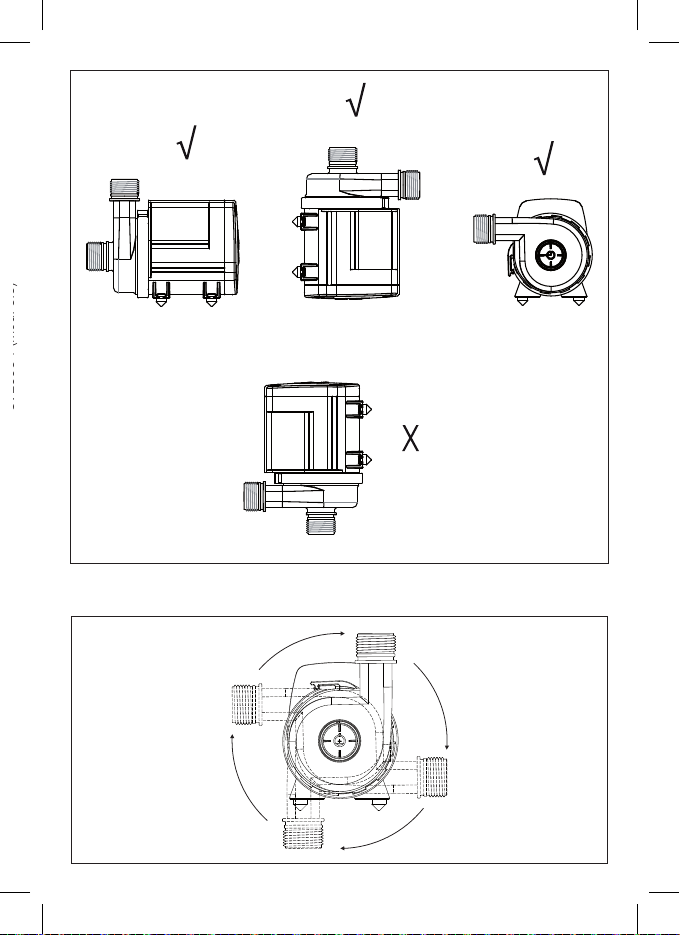
PUMP INSTALLATION: USE AND REGULATION
Proceed as follows to install the pump:
-Connect the joint to the pump outtake to which you can connect the hose with the appropriate diameter.
- Place the pump in an area of the pond, easily accessible for the maintenance operations.
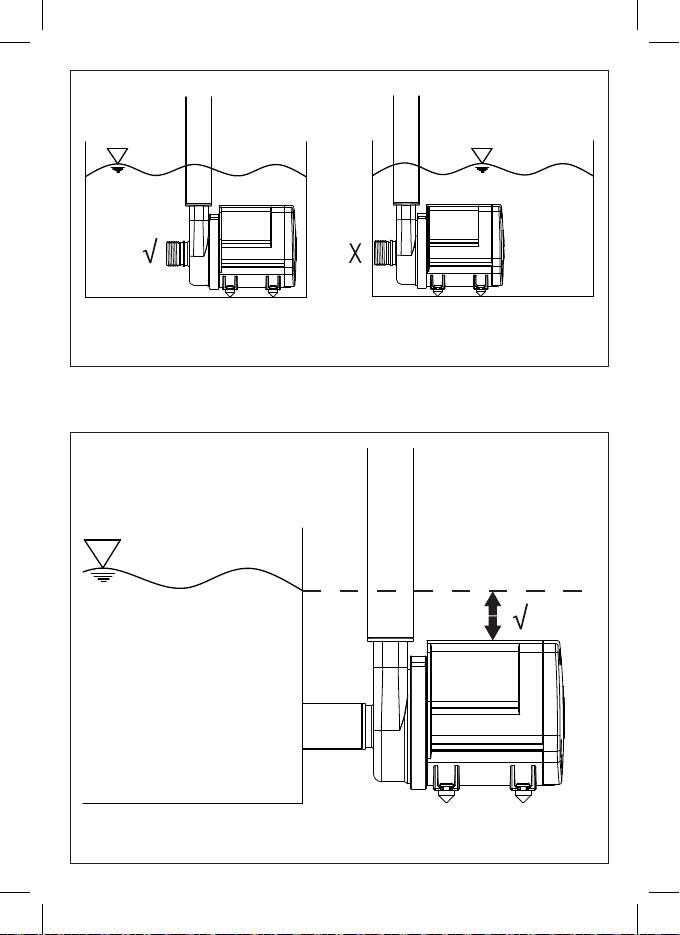
- If the pump is used submersed and not in line, it must be always fully submersed. (Pic. 1)
IN LINE APPLICATIONS
It is recommended to place the pump in spaces where there is a ‘proper ventilation and the pump is
not directly exposed to heat sources.
Place the pump so as to prevent too long idraulic pipings, which would reduce its performance.
Do not position the pump above the water level (Pic.2) because it is not self-priming and the risk of the
pump to run dry. The risk of invisible air bubbles creating a vacuum area is very high. Damages which
are caused by the pump running dry are excluded from warranty.
To maximize the pump’s efficiency, choose a straight inlet tube without elbows. (Pic.3)
We suggest an Inlet and outlet tubes with diameter equal or bigger than the diameter of the threaded
pipe included. (Pic.4)
Do not use the pump leaving the outlet totally closed. A minimum water flow is necessary to keep the
inner motor cool without running dry (Pic.5)
MAINTENANCE
For the periodic maintenance of the pump, unplug the pump from the electric socket and then remove
the pump from water.
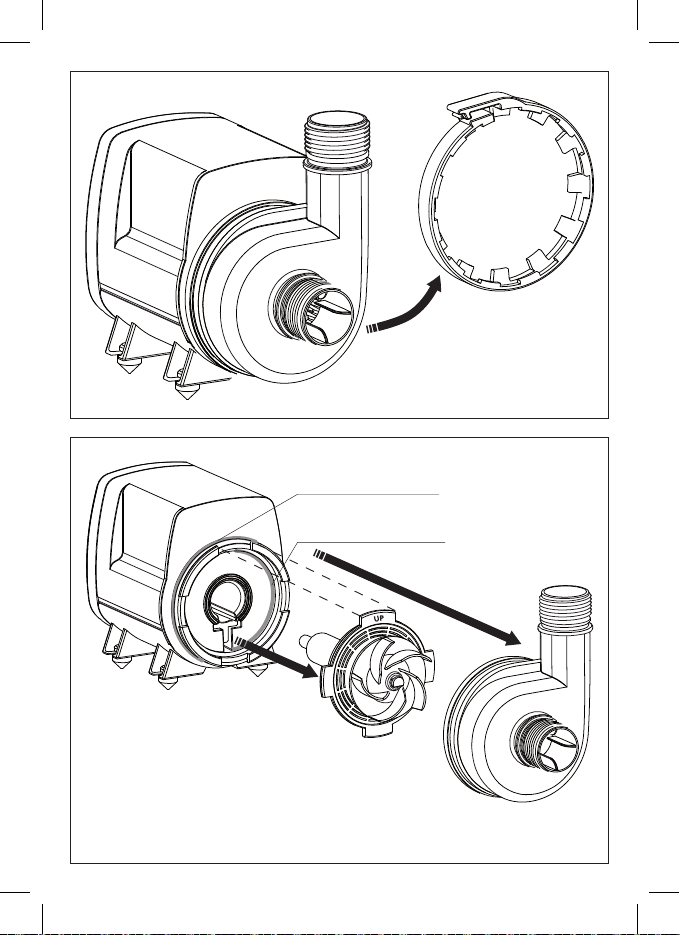
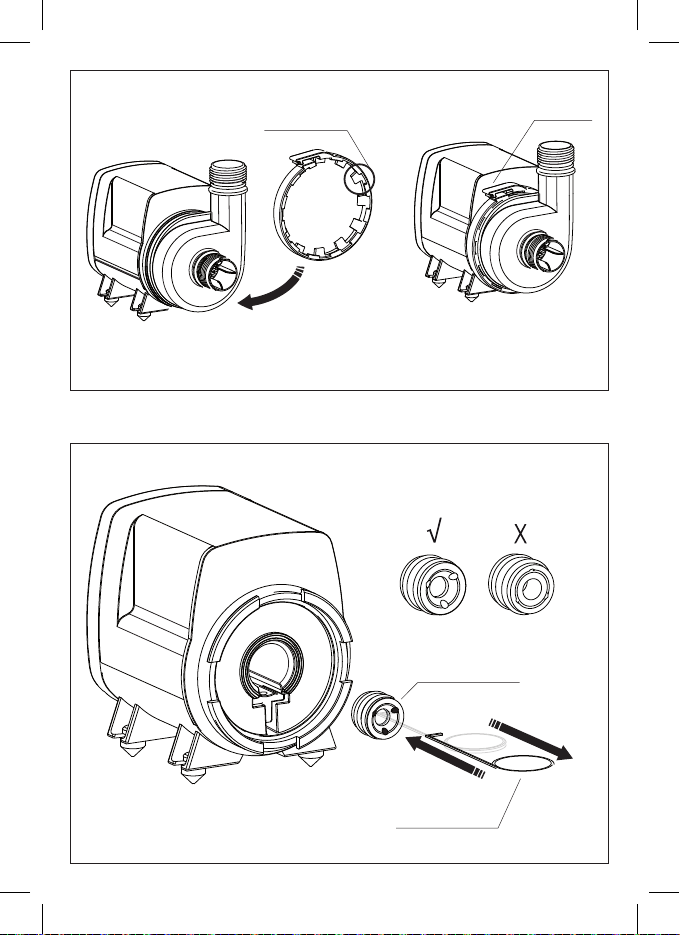
1) Lift the plastic ring of the pump’s volute pulling the tab outwards (Pic.6)
2) Remove the ring (Pic.7)
3) Remove the volute of the pump by turning and simultaneously pulling forward (in the case of fouling
this may take more pressure).
4) Pull out the complete rotor set (Pic.8)
5) Rinse each part with water, using a soft brush to remove the deposit.
6) Then assemble everything in the inverse order.
7) Put the ring in place with the biggest teeth facing the pump and close it by pressing on the tab until
you hear a “click”. (Pic.9)

EN
Any damage to the o-rings, even small, can seriously endanger the pump performance. In this case, it
is best to replace them.
IMPORTANT: The build-in circuit board of the pump has been programmed to provide 3 levels of
protection:
Protection against rotor’s blockage: In case of malfunction which causes the lock of the rotor (due
to excessive dirt or other) or of operating without water, the pump, after 20 attempts to start, followed
by a short interval of time, and other 20 attempts will stop automatically. If this does not happen, the
pump will automatically go on standby, the electronic board will remain powered but the engine will shut
down. In this case to restart the pump you need to remove and re-insert the plug into the power outlet.
Dry running protection and thermal protection: motor’s protection in case of functioning without
water. The pump stops when it works without water, or if there is a locked rotor. When the pump is taken
out from the water, the motor stops.
ATTENTION: do not underestimate the power of the magnet. If you slightly loose the grip and the axis
hits the rear bearing, the risk to damage the bearing is very high. A damage axis and bearing causes
high reparation costs.
SPECIAL MAINTENANCE AND REPLACING GROUP ROTOR
Follow this instruction for an accurate rotor kit cleaning or replacing
Repeat the opening actions as indicate in Maintenance section, steps 1,2,3,4.
To easily remove the bottom bearing, we suggest to leave the pump submersed with water and vinegar
for a while to soften debris or limestone.
- Insert the hooks supplied (SVE0052 - SVE0054) inside the tube of the pump. (Pic 10)
- Hook the bearing and pull it out
- Clean the bearing under running water (never use soap or detergent of any kind because they pollute
the aquarium water: we recommend using a vinegar and water solution) possibly using a soft brush to
remove scale deposits. If it is heavily worn, we suggest to replaces it with a new one.
- Re-insert the bearing sleeve in the pump (Pic.10) after wetting and push it all the way.
ONLINE HELP
Watch our tutorial videos on THE SICCE YOU TUBE official channel www.youtube.com/SICCEspa.
INSTRUCTIONS FOR THE CORRECT DISCHARGE OF THE PRODUCT ACCORDING TO EU
DIRECTIVE 2002/96/EC
When used or broken, the product does not have to be discharged with the other waste. It can be
delivered to the specific electric waste collection centers or to dealers who give this service. Discharge
separately an electric tool avoid negative consequences for the environment and for the Health and
allows to regenerate the materials so to have a great saving of energy and resources.

EN
WARRANTY
This product is guaranteed against defects of materials and workmanship for a period of 3 years from
the date of purchase, except the rotor 2. The warranty certificate must be filled in by the dealer and must
accompany the pump if it is returned for repair, along with the cash register receipt or similar document.
The warranty covers the replacement of the defective parts. In case of improper use, tampering or
negligence by the buyer or user, the guarantee is void and expires immediately. The guarantee is also
void in absence of the cash register receipt or similar document. The shipping cost to and from the
factory, or the repair station, have to be paid by the buyer. FIND OUT HOW TO GET YOUR PRODUCT
GUARANTEED FOR 5 YEARS To improve our service and our clients’ satisfaction, SICCE offers the
possibility of adding a 2 years extension to the warranty by simply registering your product on our
website www.sicce.com in “Sicce for you/Product registration” Fill-in the form and upload the product’s
purchase receipt. After having correctly inserted all your data, complete the warranty extension request.
ATTENTION!
The limestone deposits and the natural wear-out of the components might cause a raise of the pump’s
noise. However, they do not affect the good functioning of the pump. In this case, we recommend you
to replace the impeller.
TIPS FOR A LONGER LASTING
In case, after a first installation, the pump will not be used for over one week, we recommend to take the
rotor assembly out of the pump, cleaning it thoroughly and store pump and rotor separately.

DE
Sehr geehrte Kunden, vielen Dank, dass Sie sich für SYNCRA ADVANCED entschieden haben. Durch
den Kauf einer SYNCRA Silent Pumpe der neuesten Generation profitieren Sie von einem effizienten
und energiesparenden Produkt. Die in Italien konstruierte und gebaute Pumpe SYNCRA ADVANCED
steht für maximale Qualität und eignet sich für den Einsatz in Süß- und Meerwasseraquarien,
Zierbrunnen für Innen- und Außenbereiche, Hydrokulturen sowie Anwendungen, die die Bewegung
und Umwälzung von klarem Wasser erfordern. Die modernen, kompakten und leise laufenden Pumpen
SYNCRA ADVANCED sind leicht zu warten. Die Anschlüsse sind im Lieferumfang enthalten und werden
einfach ohne Verschraubungen zusammengesteckt. SYNCRA ADVANCED Pumpen können nicht nur
unter Wasser, sondern auch in Inline-Anwendungen außerhalb des Wassers eingesetzt werden. Lesen
Sie die Bedienungsanleitung vor Gebrauch sorgfältig durch und bewahren Sie sie zwecks späteren
Nachschlagens gut auf.
SICHERHEITSHINWEISE:
Die multifunktionale SYNCRA ADVANCED Pumpe entspricht den nationalen und internationalen
gesetzlichen Sicherheitsvorschriften.
1) Vor Gebrauch der Pumpe ist die auf dem Etikett angegebene Netzspannung zu überprüfen. Die
Pumpe sollte über FI- Schutzschalter < 30 mA betrieben werden.
2) Die Pumpe ist für „Wet&Dry“ Einsatz geeignet (als Tauchpumpe oder außerhalb des Wassers).
3) Vor Anschluss des Geräts vergewissern Sie sich Unversehrtheit des Produkts. Insbesondere dürfen
das Kabel und die Pumpe keinerlei Beschädigungen aufweisen.
4) Netzkabel dürfen nicht verändert oder beschädigt werden. Das Netzkabel darf nicht zum Befestigen
der Pumpe verwendet werden. Liegt eine Beschädigung des Netzkabels vor, ist die Pumpe
auszuwechseln.
5) ACHTUNG: Ziehen Sie unbedingt die Netzstecker aller eingetauchten Elektrogeräte ab, bevor Sie mit
den Händen ins Wasser greifen und grundsätzlich vor jeder Wartung.
6) Die Pumpe darf nicht trocken laufen um Beschädigungen am Rotor zu vermeiden.
7) Die maximale Flüssigkeitstemperatur darf 35° C / 95° F nicht überschreiten.
8) Die Pumpe darf nicht in ätzender Säure verwendet werden. Wenn sich die Pumpe in Betrieb befindet,
ist außerdem sicherzustellen, dass sie keinen Sand ansaugt, der die Innenteile ernsthaft beschädigen
und folglich zum Ausschluss des Produktes von der Garantie führen kann.
9) Die Pumpe darf nicht mit korrosiven und abrasiven Flüssigkeiten verwendet werden.
10) Die Pumpe darf nicht von ohne Aufsicht von Kindern oder persönlich eingeschränkten Menschen
benutzt werden. Außerhalb der Reichweite von Kindern aufbewahren.
11) Beim Anschluss der Pumpe an das Stromnetz ist so vorzugehen, dass sich der niedrigste Punkt
des Kabels unterhalb der Netzsteckdose befindet, damit nicht zufällig Wassertropfen vom Kabel in die
Steckdose gelangen können (Abb. A - DRIP LOOP).
12) Das Kabel ist weder durchzuschneiden noch ist daran zu ziehen, um die Stromspeisung zu
unterbrechen.
13) Die Pumpe darf nur im Innenbereich eingesetzt werden (Kabel von 3 Meter Länge).

DE
14) Falls die Pumpe oder der Filter mit einem Kabel von 10 Meter Länge, beziehungsweise mit einem
Kabel von mehr als 6 Fuß Länge beim amerikanischen Typ (USA), geliefert werden, sind diese Geräte
für den Einsatz im Außenbereich bestimmt, wie von den internationalen Normen vorgeschrieben.
KOMPONENTEN
Die SYNCRA ADVANCED -Pumpen bestehen aus den folgenden Funktionskomponenten (Abb. B):
1. Komplett versenkbares und isoliertes Motorgehäuse aus Zweikomponentenharz
2. Rotorbaugruppe mit Flansch, Laufrad und hinterem Lager
3. Hinteres Lager
4. O-Ringdichtung
5. Gummistoßdämpfer
6. Drehbare Vorkammer
7. Vorfilter
8. 1-Zoll-Anschlüsse
INSTALLATION
Für die Installation der SYNCRA ADVANCED Pumpe folgen Sie diese Hinweise:
– Verbinden Sie den Anschluss mit dem Ventil der Pumpe, an das Sie einen flexiblen Schlauch mit
geeignetem Durchmesser anschließen.
– Stellen Sie die Pumpe in einem flachen und zu Wartungszwecken leicht zugänglichen Bereich des
Teichs auf.
– Wenn die Pumpe nicht inline, sondern im Wasser verwendet wird, muss sie immer vollkommen
untergetaucht sein (Abb. 1).
INLINE (Trocken) ANWENDUNG
Es wird empfohlen, die Pumpe in einem belüftenden Bereich zu legen. Legen Sie die Pumpe nicht
direkt im Wärmequellen.
Stellen Sie die Pumpe so zu lange Hydraulikleitungen zu verhindern, die die Leistung reduzieren würde.
Stellen Sie die Pumpe über das Wasserniveau. (Abb. 2) Schäden, die durch die Pumpe Trockenlauf
verursacht wurden, sind von der Garantie ausgeschlossen.
Um die Leistung der Pumpe voll auszuschöpfen, verwenden sie einen geraden Anschluss ohne Bögen.
( Abb.3)
Wir empfehlen Ein- und Auslaufrohre, deren Durchmesser mindestens dem Durchmesser der Gewinde
an der Pumpe entspricht. (Abb.4)
Verwenden Sie nicht die Pumpe mit der Druckseite vllständig geschlossen. Eine Mindestwasserdurchfluss
ist notwendig, um den Motor gekühlt (Abb. 5) zu halten.
WARTUNG DER PUMPE
Vor jeder Wartung oder bevor Sie mit den Händen ins Wasser greifen, ziehen Sie immer und unbedingt
die Netzstecker aller eingetauchten Elektrogeräte ab.

DE
1) Den Verschlussring der Spirale durch Herausziehen der Lasche lösen (Abb. 6).
2) Den Ring entfernen (Abb. 7).
3) Die Pumpenspirale durch Drehen und gleichzeitiges nach vorne Ziehen entfernen (falls Verkrustungen
vorliegen, ist dazu etwas Kraft aufzuwenden).
4) Den Rotor zusammen mit dem Flansch ausbauen (Abb. 8).
5) Die Teile unter fließendem Wasser reinigen und eventuell vorhandene Verkrustungen mit einer
weichen Bürste entfernen.
6) Zu Wiedermontage der Pumpe die Arbeitsvorgänge in umgekehrter Reihenfolge ausführen.
7) Den Ring mit den größeren Zähnen in Richtung Pumpe wieder einsetzen und durch hörbares
Einrasten der Lasche verschließen (Abb. 9).
Jegliche, auch sehr geringe, Beschädigungen a den O-Ringen können die Leistung der Pumpe
beeinträchtigen. In diesem Fall sind die O-Ringe auszuwechseln.
WICHTIG: Die in der Pumpe befindliche Elektronikplatine ist so programmiert, dass sie 3 Schutzstufen
gewährleistet:
– Schutz bei blockiertem Rotor: Eine Blockierung oder Störung des Rotors kann durch starke
Verschmutzung oder das Trockenlaufen der Pumpe verursacht werden. In diesem Fall unternimmt
die integrierte Elektronik 20 Startversuche und nach einer kurzen Pause weitere 20 Startversuche,
um die Pumpe ordnungsgemäß zu starten. Wenn die Pumpe nach den 20+20 Startversuchen nicht
automatisch aus dem Standby startet, wird die Platine weiterhin mit Strom versorgt, aber der Motor
schaltet ab. Um die Pumpe erneut zu starten, muss in diesem Fall der Netzstecker gezogen und erneut
eingesteckt werden.
– Trocken läuf- und Überhitzungsschutz: schützt den Motor vor dem Betrieb ohne Wasser. Die
Pumpe schaltet ab, wenn sie trockenläuft oder der Rotor blockiert ist. Wenn die Pumpe aus dem Wasser
genommen wird, bleibt der Motor stehen.
ACHTUNG: Unterschätzen Sie nicht die Kraft des Magneten. Wenn Sie keinen festen Griff anwenden,
kann die Achse an das hintere Lager schlagen. Das Risiko einer Beschädigung des Lagers ist sehr
hoch. Ein Schaden an Achse und/oder Lager verursacht hohe Reparaturkosten.
BESONDERE WARTUNG UND AUSTAUSCH DES ROTORS
Gehen Sie für die Reinigung oder den Austausch der Rotorbaugruppe (2) wie folgt vor:
Die Schritte zum Öffnen der Pumpe wie unter den Punkten 1, 2, 3 und 4 im Abschnitt Wartung beschrieben
durchführen.
Um Verkrustungen im Pumpeninneren leichter zu entfernen und die Buchse leichter abzuziehen, wird empfohlen,
die Pumpe für einige Zeit in einer Mischung aus Wasser und Essig zu belassen.
– Den mitgelieferten Haken (SVE0052 - SVE0054) in den Pumpenkanal einführen (Abb. 10).
– Das Lager mit dem Haken erfassen und herausziehen.
– Das Lager unter fließendem Wasser reinigen (Auf keinen Fall Wasch- oder Reinigungsmittel verwenden, weil diese
das Aquariumwasser verunreinigen. Wir empfehlen eine Mischung aus Essig und Wasser). Kalkablagerungen
lassen sich mit einer weichen Bürste entfernen. Bei starkem Verschleiß, das Lager austauschen.
– Das Lager nass machen und erneut in den Pumpenkanal (Abb. 10) einsetzen und bis zum Anschlag
einschieben.

DE
ONLINEHILFE UND SUPPORT
Schauen Sie sich unsere Tutorial Videos auf dem offiziellen SICCE YOUTUBE Kanal an: www.youtube.
com/SICCEspa.
ENTSORGUNG (NACH RL2002/96/EC)
Gerät darf nicht dem normalen Hausmüll beigefügt werden, sondern muss fachgerecht entsorgt werden.
Wichtig für Deutschland: Gerät über Ihre kommunale Entsorgungsstelle entsorgen. Entsorgung von
Altgeräten: Wenn dieses Symbol eines durchgestrichenen Abfalleimers auf einem Produkt angebracht
ist, unterliegt dieses Produkt der europäischen Richtlinie 2002/96/EC. Alle Elektro- und ElektronikAltgeräte müssen getrennt vom Hausmüll über die dafür staatlich vorgesehenen Stellen entsorgt
werden. Mit der ordnungsgemäßen Entsorgung des alten Geräts vermeiden Sie Umweltschäden und
eine Gefährdung der persönlichen Gesundheit. Weitere Informationen zur Entsorgung des alten Geräts
erhalten Sie bei der Stadtverwaltung, beim Entsorgungsamt oder in dem Geschäft, wo Sie das Produkt
erworben haben.
GARANTIE
Wir garantieren für 3 Jahre ab Kaufdatum (ausschließlich dem Rotor 2) für fehlerhaftes Material
und Fabrikationsfehler. Im Garantiefall schicken Sie bitte das reklamierte Gerät mit der vom Händler
ausgefüllten Garantiekarte und der datierten Kaufquittung oder Rechnung zu dem Händler ein.
Mangelnde Pflege und unsachgemäße Behandlung haben einen Garantieverlust zur Folge. Die Garantie
besteht im Austausch der schadhaften Teile. Die Kosten für Versand und die Rücksendung gehen
zu Lasten des Käufers. SO KÖNNEN SIE DIE GARANTIE FÜR IHR PRODUKT AUF 5 JAHRE
VERLÄNGERN Um unseren Service zu verbessern und die Zufriedenheit unserer Kundinnen und
Kunden zu erhöhen, bietet SICCE Ihnen die Möglichkeit, die Garantie um 2 Jahre zu verlängern.
Hierfür müssen Sie das Produkt lediglich auf unserer Website www.sicce.com beim „Quality Control
Department“ registrieren. Füllen Sie das Formular aus und laden Sie den Kaufbeleg hoch. Im Anschluss
an die korrekte Eingabe der Daten können Sie die Garantie-Anforderung ausfüllen.
ACHTUNG!
Die Kalkablagerung und der natürlicher Verschleiß der Bestandteile könnten eine Steigerung des
Geräusches der Pumpe verursachen . Dies beeinträchtigt jedoch nicht der guter Betrieb der Pumpe. In
diesen Fall wird die Auswechslung des Rotors empfohlen.
TIPPS FÜR EINE LÄNGERE LEBENSDAUER
Wenn Sie die Pumpe nach dem ersten Gebrauch für länger als eine Woche nicht verwenden, empfehlen
wir den Ausbau und die sorgfältige Reinigung der Rotorbaugruppe. Lagern Sie Pumpe und Rotor
getrennt und im Wasser getaucht.

FR
Cher client / Chère cliente, nous vous remercions pour avoir choisi SYNCRA ADVANCED. En achetant cette
nouvelle génération de pompes SYNCRA Silent vous pourrez bénéficier d’un produit à haute efficacité et
avec une faible consommation énergétique. Soigneusement conçue et fabriquée en Italie pour garantir le
maximum de qualité, SYNCRA ADVANCED est conseillée pour aquariums d’eau douce où eau de mer,
fontaines d’intérieur et d’extérieur, systèmes hydroponiques et n’importe quelle application qui demande le
déplacement ou la recirculation d’eaux propres. D’un design modern, les pompes SYNCRA ADVANCED,
silencieuses et de petit encombrement, sont faciles à utiliser et entretenir, grâce aux raccords multi-étage
et à l’absence de vis. SYNCRA ADVANCED peuvent être utilisées submergées dans l’eau aussi bien que
hors de l’eau (en ligne). Nous vous prions de lire attentivement les notices avant l’utilisation et de les garder
pour toute éventuelle consultation ultérieure.
NORMES DE SECURITE
La pompe multifonction SYNCRA ADVANCED est conforme aux normes de sécurité nationales et
internationales.
1) Vérifier que la tension indiquée sur l’étiquette de transformateur corresponde bien à celle de votre
réseau électrique. Cet appareil électrique doit être alimenté par l’intermédiaire d’un disjoncteur différentiel
(dit de sécurité) avec un seuil de déclenchement inférieure ou égal à 30mA.
2) La pompe peut fonctionner en mode «Wet & Dry», immergée ou en ligne (c’est à dire hors de l’eau).
3) Avant de connecter l’appareil électrique au réseau, vérifier que le câble d’alimentation ne soit pas
endommagé.
4) La pompe est construite avec une liaison électrique de type «Z». Le câble et la prise ne peuvent être
ni remplacés ni réparés. En cas de dommages du câble ou de la prise, il est nécessaire de remplacer
toute la pompe.
5) ATTENTION: déconnecter tous les appareils électriques immergés avant une quelconque manutention
dans l’eau. Si la prise de courant est mouillée ou humide, déconnecter l’interrupteur général avant de
débrancher la prise.
6) Pour éviter tout risque de dommage au moteur, la pompe ne doit jamais fonctionner sans eau.
7) La pompe peut être utilisée dans des liquides ou des ambiances dont les températures ne dépassent
pas 35° / 95 °F.
8) Ne pas utiliser l’appareil pour des applications différentes de celles pour lesquelles il à été conçu,
comme par exemple un fonctionnement en salles de bain ou équivalent.
9) Eviter un fonctionnement de la pompe avec des liquides corrosifs ou abrasifs.
10) Cet appareil n’a pas été conçu pour une utilisation par des personnes (y compris des enfants) ayant
une capacité physique, sensorielle ou mentale réduite, sauf en cas de surveillance par une tierce
personne responsable de leur sécurité. S’assurer que les enfants ne touchent pas cet appareil.
11) Pour éviter que des gouttes d’eau coulent le long du câble électrique et mouillent la fiche de courant
ou la prise murale, nous conseillons d’effectuer une boucle du câble en-dessous du niveau de la prise
de courant (Fig. A).
12) Ne pas tirer la pompe par le câble d’alimentation pour la déplacer ou la retirer de l’eau pendant
l’installation ou l’entretien.

FR
13) La pompe ne peut être utilisée que pour les applications ci-dessus; si doté de câble bipolaire elle est
destinée au fonctionnement en intérieur.
14) Si la pompe ou le filtre sont fournis avec un câble de 10 mètres de longueur ou avec un câble d’une
longueur supérieure à 6 pieds pour le type américain (USA), ces appareils sont adaptés à l’emploi à
l’extérieur selon la réglementation internationale.
COMPOSANTS
Les pompes SYNCRA ADVANCED sont conçues pour le démontage presque total des pièces, pour un
meilleur entretien et une plus longue durée de vie.
Ci-dessous la liste des parties et pièces détachées (Fig. B):
1. Moteur completement étanche et submersible
2. Bloc rotor avec bride, turbine et roulement arrière
3. Roulement arrière
4. Joint d’étanchéité
5. Pieds en caoutchouc anti-vibration
6. Préchambre orientable
7. Pré-filtre
8. Raccords de 1’’ (1 pouce)
INSTALLATION – UTILISATION ET ENTRETIEN
Pour l’installation de la pompe SYNCRA ADVANCED, procéder comme suit:
- Connecter le raccord à la sortie de la pompe pour ensuite raccorder un tube flexible avec le diamètre
correct.
- Positionner la pompe dans une zone plate, facilement accessible pour les opérations d’entretien, en
suivant les suggestions sous-indiquées (Fig.C):
- La pompe, si installée en application “en eau”, doit toujours être complètement immergée en eau (Fig. 1).
APPLICATION HORS DE L’EAU (“EN LIGNE”)
On conseille de placer la pompe dans des zones avec une bonne ventilation en évitant qu’elle soit
directement exposée aux sources de chaleur.
Positionner la pompe en évitant des connexions hydrauliques trop longues qui en feront baisser les
prestations.
La pompe ne doit pas être installée au-dessus du niveau de l’eau (Fig.2) car elle n’est pas auto-amorçant,
donc le risque qu’elle fonctionne sans eau ou que des boules d’air se créent serait très élevé. Les
dommages causés par le fonctionnement à sec de la pompe ne sont pas couverts par la garantie.
Pour maximiser le rendement de la pompe, il est préférable de connecter à son aspiration une coude à
large rayon de courbure (Fig. 3).
Il est recommandé d’installer en aspiration et en sortie de la pompe des tuyaux de diamètre égal ou
supérieur au diamètre du raccord fourni. Les tuyaux d’aspiration et de sortie doivent avoir le même
diamètre pour minimiser les pertes de pression (Fig. 4).

FR
Ne pas faire fonctionner la pompe avec la sortie complètement fermé. Toujours permettre un minimum de
débit d’eau afin que le moteur de la pompe soit refroidi et ne fonctionne pas à sec (Fig. 5).
ENTRETIEN
Pour permettre à la pompe SYNCRA ADVANCED de fonctionner sans pertes d’efficience, un simple mais
important entretien régulier est nécessaire. Avant tout intervention d’entretien, débrancher la fiche de
courant, retirer complètement la pompe de l’eau et procéder comme suite:
1) Soulever l’anneau de fermeture de la pre-chambre en tirant l’onglet vers l’extérieur (Fig.6).
2) Retirer l’anneau (Fig.7).
3) Retirer la préchambre de la pompe en tournant et au même temps en tirant vers l’avant (dans le cas
d’encrassement cela peut demander un peu de forces).
4) Retirer le rotor complet de bride (Fig.8)
5) Laver l’ensemble sous l’eau courante, en utilisant une brosse pour enlever tout encrassement.
6) Assembler la pompe dans l’ordre inverse du démontage, en payant attention que le joint soit dans le bon
emplacement et insérer la préchambre, en mouillant le joint pour faciliter l’insertion.
7) Repositionner en place l’anneau de fermeture avec les dents plus grandes vers la pompe et fermer-le
en appuyant sur l’onglet jusqu’à entendre un «clic» (Fig.9).
L’usure éventuelle des joints, même très légère, peut compromettre les performances et l’étanchéité de
la pompe.
IMPORTANT! Le circuit intégré de la pompe a été programmé pour fournir 3 niveaux de protection:
- Protection en cas de rotor bloqué: le bloc ou le fonctionnement anormale du rotor peuvent se
produire en raison de dépôts excessives de saleté ou au fonctionnement de la pompe sans eau. Dans
ce cas, la carte électronique interne active 20 tentatives de démarrage, suivi par un court intervalle de
temps, et d’autres 20 tentatives de correct démarrage de la pompe. Si la pompe après 20+20 tentatives
ne démarre pas, la carte électronique demeurera alimenté mais le moteur sera arrêté. Dans ce cas, pour
redémarrer la pompe il sera nécessaire d’enlever et ré-insérer la fiche dans la prise de courant.
- Protection contre le fonctionnement à sec et Protection thermique: protection du moteur en
cas de fonctionnement sans eau. La pompe s’arrête lorsque il n’y a plus d’eau ou en cas de blocage du
rotor. Lorsque la pompe est retirée de l’eau, le moteur s’arrêt automatiquement.
ATTENTION: lors de l’entretien, ne pas sous-estimer la force magnétique du rotor. Si on perde
accidentellement l’adhérence et l’axe du rotor frappe le roulement arrière (fabriqué en céramique pure), le
risque de les endommager est très élevé. Un accident de ce type peut devenir coûteux à réparer.
ENTRETIEN EXTRAORDINAIRE ET REMPLACEMENT DU ROTOR
Pour un nettoyage approfondi ou le remplacement de l’ensemble rotor (2) procéder comme suite:
Ouvrir la pompe comme indiqué aux points 1,2,3,4 du paragraphe ENTRERIEN.
Nous conseillons d’introduire une solution d’eau et vinaigre pour quelque minute dans l’emplacement
du rotor après l’avoir sorti, afin de favoriser le décalaminage intérieure et une extraction plus facile du
roulement arrière.
- Insérer le crochet fourni (SVE0052 - SVE0054) à l’intérieur du tube de la pompe. (Fig.10)
- Accrocher le roulement et le retirer à l’exterieur.

FR
- Nettoyer le roulement sous l’eau courante (ne jamais utiliser de savon ou de détergent de toute nature,
car ils polluent l’eau: nous vous recommandons d’utiliser une solution de vinaigre et eau), éventuellement
avec une brosse douce pour enlever les dépôts de calcium. Si le roulement est fortement usé, remplacerle par un nouveau.
- Mouiller le roulement et le réinsérer dans le tube de la pompe (Fig.10) en le poussant jusqu’au fond.
SUPPORT EN LIGNE
Nous conseillons de regarder nos vidéos-notices sur notre canal YouTube officiel www.youtube.com/
SICCEspa.
INSTRUCTIONS POUR LA DÉCHARGE CORRECTE DU PRODUIT
SELON LA DIRECTIVE EU 2002/96/EC
“Cet appareil ne doit pas être jeté dans les poubelles domestiques mais doit suivre les procédures
d’élimination prévues pour les déchets électriques. Il peut être pris à un centre spécial de collecte des
déchets spéciaux, mis en place par les autorités locales ou à un revendeur offrant ce service.
La décharge séparément d’un outil électrique évite des conséquences négatives pour l’environnement et
pour la santé et permets de régénérer les matériaux pour avoir une grande économie d’énergie et des
ressources.”
GARANTIE
Ce produit, à l’exclusion du rotor 2, est garanti pendant une période de 3 ans à compter de la date de
l’achat, contre les défauts du matériel et de fabrication. Le certificat de garantie doit être rempli dans toutes
ses parties par le revendeur et devra accompagner l’appareil s’il est restitué pour la réparation, avec le
ticket de caisse ou autre titre d’achat équivalent. La garantie consiste dans le remplacement des pièces
défectueuses. En cas d’utilisation incorrecte, de manipulation ou de négligence de la part de l’acheteur ou
de l’utilisateur, la garantie s’annule et perd son effet immédiatement. La garantie s’annule également en
cas d’absence du ticket de caisse ou d’un titre d’achat équivalent. Les frais d’expédition et de renvoi sont
à la charge de l’acheteur DECOUVREZ COMMENT OBTENIR 5 ANS DE GARANTIE SUR VOTRE
PRODUIT! Pour améliorer le service et la satisfaction de nos clients, SICCE offre la possibilité d’obtenir 2
ans de garantie supplémentaire simplement en enregistrant votre produit sur notre site Internet www.sicce.
com dans la section “Sicce for you / Inscription produit”.
Remplir le formulaire et charger électroniquement le reçu d’achat du produit.
ATTENTION!
Les depôts de calcaire et la naturelle usure des composants pourraient causer une augmentation du bruit
de la pompe, mais ne nuisent pas son bon fonctionnement. Dans ce cas-là, nous recommendons de
remplacer le turbine.
SUGGESTIONS POUR UNE LONGEVITE PROLONGÉE
Si l’on estime, après l’avoir déjà utilisée, de ne pas se servir la pompe pour plus d’une semaine, retirer
l’ensemble rotor de pompe, laver-le, et garder la pompe et rotor séparément.

IT
Gentile cliente, grazie per aver scelto SYNCRA ADVANCED. Con l’acquisto di questa nuova generazione
di pompe SYNCRA Silent, potrà beneficiare di un prodotto efficiente e ad altissimo risparmio energetico.
Rigorosamente prodotte e progettate in Italia per garantire i massimi livelli di qualità, SYNCRA
ADVANCED sono consigliate per utilizzo in acquari d’acqua dolce e marina, fontane decorative sia ad
uso interno che esterno, applicazioni idroponiche e utilizzi dove sia richiesta la movimentazione ed il
ricircolo di acque chiare. Moderne nel design, compatte e silenziose, le pompe SYNCRA ADVANCED
sono di facile uso e manutenzione, con i raccordi a gradini in dotazione e completamente prive di viti.
SYNCRA ADVANCED possono essere utilizzate oltre che sommerse anche nelle applicazioni in linea
fuori dell’acqua. Si consiglia di leggere attentamente le istruzioni prima dell’utilizzo e di conservarle per
consultazioni future.
NORME DI SICUREZZA:
Le pompe multiuso SYNCRA ADVANCED sono conformi alle norme di sicurezza nazionali ed internazionali.
1) Controllare che la tensione riportata sull’etichetta della pompa corrisponda alla tensione di rete.
L’apparecchio deve essere alimentato attraverso un interruttore differenziale (salvavita), la cui corrente
nominale sia inferiore o uguale a 30mA.
2) La pompa può funzionare in modalità “Wet&Dry” (sommersa o fuori dall’acqua).
3) Prima di collegare l’apparecchio alla rete controllare che il cavo e la pompa non risultino in qualche
modo danneggiati.
4) La pompa è costruita con un collegamento di tipo Z. Il cavo e la spina non possono essere sostituiti
o riparati; in caso di danneggiamento sostituire l’intero apparecchio.
5) ATTENZIONE: scollegare tutti gli apparecchi elettrici sommersi prima di eseguire qualsiasi tipo
di manutenzione nell’acqua; nel caso in cui la spina di connessione o la presa di corrente fossero
bagnate, spegnere l’interruttore generale prima di staccare il cavo d’alimentazione.
6) La pompa non deve mai funzionare senza acqua per evitare danni al motore.
7) La pompa può essere utilizzata in liquidi o in ambienti con temperatura non superiore ai 35 °C /
95 °F.
8) Non utilizzare l’apparecchio per scopi diversi da quelli per i quali è stato realizzato, come ad es. in
stanze da bagno o applicazioni simili.
9) Evitare di far funzionare la pompa con liquidi corrosivi ed abrasivi.
10) Questo dispositivo non è progettato per essere utilizzato da persone (inclusi bambini) con ridotte
capacità fisiche, sensoriali e mentali a meno che non siano accompagnati da persone responsabili
per la loro sicurezza.
11) Per evitare che accidentali gocciolamenti bagnino la spina o la presa di corrente realizzare con il
cavo un’ansa sotto il livello della presa (Fig. A).
12) Evitare di sollevare la pompa dal cavo di alimentazione durante l’installazione e la manutenzione.
13) La pompa può essere utilizzata solamente nelle applicazioni suddette ed è destinata esclusivamente
ad uso in ambienti interni (cavo 3 metri).
14) Nel caso la pompa o il filtro siano forniti con cavo di 10 metri oppure con cavo di misura superiore
a 6 piedi per il tipo americano (USA), questi apparecchi sono per uso esterno come prescrive la
normativa internazionale.

IT
COMPONENTI
Le pompe SYNCRA ADVANCED sono state progettate per favorire la quasi totale scomponibilità dei suoi
componenti, per facilitare un corretto uso e manutenzione e garantire una lunga durata nel tempo. Qui
di seguito l’elenco delle singole parti e relativi pezzi di ricambio (Fig. B):
1. Corpo motore completamente sommergibile e isolato con resina bicomponente;
2. Gruppo rotore con flangia e girante e cuscinetto posteriore
3. Cuscinetto posteriore
4. Guarnizioni
5. Gommini antivibrazione
6. Precamera Girevole
7. Prefiltro
8. Raccordi da 1”
INSTALLAZIONE - USO E REGOLAZIONE
Per installare la pompa SYNCRA ADVANCED è necessario procedere come segue:
- Collegate il raccordo alla mandata della pompa al quale poi potete collegare il tubo flessibile di
diametro opportuno.
- Posizionare la pompa in una zona piana dell’acquario o del laghetto, facilmente accessibile per le
operazioni di manutenzione seguendo i suggerimenti sotto indicati (Fig.C)
- Se utilizzata in acqua e non in linea, la pompa deve funzionare sempre completamente immersa
(Fig. 1)
UTILIZZO CON COLLEGAMENTO IN LINEA - Applicazioni DRY
Si consiglia di posizionare la pompa in spazi dove ci sia un’adeguata areazione e la pompa non sia
direttamente esposta a fonti di calore.
Posizionare la pompa in modo da evitare collegamenti idraulici troppo lunghi che ne diminuirebbero
le prestazioni.
La pompa non deve essere posizionata sopra il livello dell’acqua (Fig. 2) perché non è autoadescante
e il rischio che funzioni a secco o che si creino delle bolle d’aria non visibili è molto alto. Danni derivanti
dal funzionamento a secco della pompa non sono coperti da garanzia.
Per massimizzare l’efficienza della pompa, prediligere in aspirazione un tratto rettilineo e/o un gomito
con raggio grande. (Fig. 3)
Si consiglia di utilizzare, in aspirazione e in mandata, tubi di diametro uguale o maggiore al diametro
del portagomma fornito in dotazione. Il tubo di mandata e di aspirazione dovrebbero avere lo stesso
diametro per minimizzare perdite di pressione. (Fig. 4)
Non far funzionare la pompa con mandata completamente chiusa. Lasciare sempre che un minimo
flusso d’acqua tenga il motore della pompa refrigerato e non a secco. (Fig. 5)
MANUTENZIONE
Per un corretto ed efficiente funzionamento SYNCRA ADVANCED richiede una semplice ma
necessaria manutenzione periodica, Staccare innanzitutto la spina dalla presa di corrente elettrica e

IT
procedere come di seguito:
1) Sganciare l’anello di chiusura della voluta tirando la linguetta verso l’esterno (Fig.6)
2) Rimuovere l’anello (Fig. 7).
3) Rimuovere la voluta dalla pompa ruotandola e contemporaneamente tirandola in avanti (in caso
di incrostazioni questa operazione potrebbe richiedere un po’ di forza).
4) Estrarre il rotore completo di flangia (Fig.8)
5) Risciacquare il tutto in acqua corrente, utilizzando uno spazzolino per rimuovere eventuali
incrostazioni.
6) Riassemblare tutto in ordine inverso assicurandosi che la guarnizione sia in posizione corretta e
inserire la voluta, bagnando la guarnizione per agevolare l’inserimento.
7) Rimettere in posizione l’anello con i denti più grandi rivolti verso la pompa e chiuderlo premendo
sulla linguetta fino ad udire un “click”. (Fig.9)
Eventuali lesioni alla guarnizione anche di piccola entità, possono compromettere seriamente le
prestazioni della pompa e pertanto ne comportano la sostituzione.
IMPORTANTE: la scheda elettronica incorporata nella pompa è stata programmata per garantire 3
livelli di protezione:
- Protezione in caso di rotore bloccato: il blocco o il funzionamento anomalo del rotore
potrebbe verificarsi a causa di sporco eccessivo o di funzionamento della pompa in assenza di
acqua. In questo caso la scheda elettronica interna attiverà 20 tentativi di partenza, seguirà un breve
intervallo di tempo, e altri 20 tentativi per far ripartire la pompa correttamente. Se la pompa dopo i
20+20 tentativi non dovesse ripartire automaticamente, la scheda elettronica rimarrà alimentata ma
il motore si spegnerà. In questo caso per riavviare la pompa sarà necessario togliere e re-inserire la
spina alla presa di corrente.
- Protezione marcia a secco e Protezione termica: protezione del motore in caso di
funzionamento senza acqua. La pompa si arresta qualora funzioni senz’acqua o qualora ci sia il
rotore bloccato. Quando la pompa viene estratta dall’acqua, il motore si ferma.
ATTENZIONE: non sottostimate la forza magnetica del gruppo rotore. Se accidentalmente si perde
un po’ la presa e l’ alberino colpisce il cuscinetto posteriore in ceramica pura, il rischio di danneggiare
lo stesso o il cuscinetto è molto alto. Un danno di questo tipo comporta costi elevati di riparazione.
MANUTENZIONE STRAORDINARIA E SOSTITUZIONE DEL GRUPPO ROTORE
Per un’accurata pulizia o sostituzione del gruppo rotore (2) procedere come segue:
Ripetere le operazioni di apertura come indicato nei punti 1,2,3, 4 del paragrafo manutenzione.
Si consiglia di lasciare la pompa sommersa in acqua e aceto per favorire la disincrostazione dell’interno
pompa ed una più facile estrazione della boccola.
- Inserire l’uncino in dotazione (SVE0052 - SVE0054) all’interno del canotto della pompa. (Fig.10)
- Agganciare il cuscinetto e tirarlo verso l’esterno
- Pulire il cuscinetto sotto l’acqua corrente (non usare assolutamente detersivo o detergenti di qualsiasi
genere perché inquinano l’acqua dell’acquario/laghetto: consigliamo di utilizzare una soluzione di
acqua e aceto) eventualmente utilizzando uno spazzolino morbido per rimuovere i depositi calcarei. In
caso sia molto usurato, sostituirlo con uno nuovo.

IT
- Inserire nuovamente il cuscinetto nel canotto della pompa (Fig.10) dopo averlo bagnato e spingerlo
fino in fondo.
ASSISTENZA
Vi consigliamo di prendere visione dei nostri video Tutorial a supporto dell’installazione e manutenzione
dei prodotti, disponibili nel canale ufficiale www.youtube.com/SICCEspa.
AVVERTENZE PER IL CORRETTO SMALTIMENTO DEL PRODOTTO
AI SENSI DELLA DIRETTIVA EUROPEA 2002/96/EC
Alla fine della sua vita utile, il prodotto non deve essere smaltito insieme ai rifiuti urbani. Può essere
consegnato presso gli appositi centri di raccolta differenziata predisposti dalle amministrazioni comunali,
oppure presso i rivenditori che forniscono questo servizio. Smaltire separatamente un elettrodomestico
consente di evitare possibili conseguenze negative per l’ambiente e per la salute favorendo il recupero
dei materiali ed un importante risparmio energetico.
GARANZIA
Questo prodotto, con l’esclusione del gruppo rotore 2, è garantito per un periodo di 3 anni dalla data
di acquisto, da difetti di materiale e lavorazione. Il certificato di garanzia deve essere compilato in
ogni sua parte dal rivenditore, e dovrà accompagnare l’apparecchio, nel caso in cui venga restituito
per la riparazione, assieme allo scontrino fiscale o equivalente. La garanzia consiste nella sostituzione
delle parti difettose qualora non siano stati rilevati uso improprio, manomissione o negligenza da parte
dell’acquirente o utente rendendo nulla la garanzia con decadenza immediata. La garanzia è inoltre
nulla in caso di mancanza dello scontrino fiscale d’acquisto o equivalente. Le spese di spedizione
e rinvio sono a carico dell’acquirente. SCOPRI COME OTTENERE 5 ANNI DI GARANZIA SUL
TUO PRODOTTO Per migliorare il servizio e la soddisfazione dei clienti, SICCE offre la possibilità di
applicare 2 anni extra di garanzia semplicemente registrando il prodotto nel sito web www.sicce.com
alla sessione “Sicce for you/ Registrazione prodotto”. Compilare quindi il modulo nelle sue parti e
caricare elettronicamente la ricevuta d’acquisto del prodotto.
ATTENZIONE!
Depositi di calcare e la naturale usura dei componenti, potrebbero comportare un aumento della
rumorosità della pompa, ma non pregiudicano in alcun modo il buon funzionamento della stessa. In
questo caso raccomandiamo di sostituire il gruppo rotore.
CONSIGLI PER UNA LUNGA DURATA
Nel caso si preveda, dopo averla utilizzata una prima volta, di non impiegare la pompa per un periodo
superiore alla settimana, si consiglia di estrarre il gruppo rotore dalla pompa, lavarlo attentamente, e
conservare pompa e rotore separatamente.

ES
Apreciado cliente, gracias por haber elegido SYNCRA ADVANCED. Con la compra de esta nueva
generación de bombas SYNCRA Silent podrá disponer de un producto de alta eficiencia con un gran
ahorro energético. Para garantizar el máximo nivel de calidad, SYNCRA ADVANCED está totalmente
diseñada y fabricada en Italia y su uso está destinado a acuarios de agua dulce y marina, fuentes
decorativas de uso interior y exterior, sistemas hidropónicos y otras aplicaciones donde sea necesaria
una recirculación independiente de las aguas. Las bombas SYNCRA ADVANCED cuentan con un
diseño moderno y son compactas y silenciosas; además, ofrecen un uso y un mantenimiento fáciles
gracias a sus acoplamientos escalonados y a la ausencia de tornillos. Las bombas SYNCRA ADVANCED
pueden utilizarse sumergidas o en sistemas en línea fuera del agua. Se recomienda leer con atención
estas instrucciones antes de utilizar la bomba y conservarlas para futuras consultas.
NORMAS DE SEGURIDAD:
La bomba multifunción SYNCRA ADVANCED cumple con las normativas de seguridad nacionales e
internacionales.
1) Comprobar que el voltaje de la bomba que se indica en la etiqueta sea igual al de la red eléctrica.
El aparato debe recibir la alimentación a través de un interruptor diferencial (salvavidas) con una
corriente nominal no superior a 30mA.
2) La bomba puede funcionar en modalidad “Wet&Dry” (sumergida o fuera del agua).
3) Antes de conectar el aparato a la red eléctrica, comprobar que ni el cable ni la bomba presenten
daños.
4) La bomba cuenta con una conexión de tipo Z. El cable y el enchufe no pueden sustituirse ni
repararse; si estos presentaran daños se deberá sustituir el aparato en su totalidad.
5) ATENCIÓN: desconectar todos los aparatos eléctricos sumergidos antes de llevar a cabo cualquier
tipo de operación de mantenimiento en el agua; si el enchufe o la toma de corriente estuvieran
mojados, desconectar el interruptor general antes de desconectar el cable de alimentación.
6) La bomba nunca debe funcionar sin agua para evitar daños en el motor.
7) La bomba no puede utilizarse en líquidos ni en ambientes con una temperatura no superior a 35
°C / 95 °F.
8) No utilizar el aparato con fines distintos al fin con el que se ha fabricado, como, por ejemplo, en
cuartos
9) No utilizar la bomba con líquidos corrosivos o abrasivos.
10) Este dispositivo no puede ser utilizado por niños ni por personas con capacidades físicas,
sensoriales o mentales reducidas, a no ser que estos se encuentren bajo la estricta vigilancia de una
persona responsable de su seguridad.
11) Para evitar que pérdidas de agua accidentales puedan mojar el enchufe o la toma de corriente,
realizar un bucle con el cable justo debajo del nivel de la toma (Fig. A).
12) No retirar la bomba del cable de alimentación durante la instalación o el mantenimiento.
13) La bomba puede utilizarse únicamente en las aplicaciones indicadas y solo puede funcionar en
ambientes interiores si dispone de un cable bipolar.

ES
14) Si la bomba o el filtro se suministran acompañados de un cable de 10 metros o con un cable de
longitud superior a 6 pies (mercado norteamericano), significa que estos aparatos pueden destinarse
a un uso en exteriores, según la normativa internacional.
COMPONENTES
Las bombas SYNCRA ADVANCED se han diseñado para permitir el desmontaje de casi la totalidad
de sus componentes, para facilitar un correcto uso y mantenimiento y garantizar una larga vida útil. A
continuación, se indican los componentes y piezas de recambio correspondientes (Fig. B):
1. Motor completamente sumergible y aislado con resina bicomponente
2. Grupo rotor con brida, turbina y cojinete trasero
3. Cojinete trasero
4. Junta tórica
5. Almohadillas antivibración
6. Precámara giratoria
7. Prefiltro
8. Acoplamientos de 1”
INSTALACIÓN - USO Y REGULACIÓN
Para instalar la bomba SYNCRA ADVANCED, es necesario proceder de la siguiente manera:
- Conectar el acoplamiento a la salida de la bomba, al que posteriormente se podrá acoplar el tubo flexible
del diámetro correspondiente.
- Colocar la bomba en una zona llana del acuario o del lago a la que sea fácil acceder para realizar las
operaciones de mantenimiento. Pueden seguirse las recomendaciones indicadas a continuación (Fig.C).
- Si se utiliza en el agua y no en línea, la bomba debe funcionar siempre completamente sumergida (Fig. 1).
USO FUERA DEL AGUA (“EN LÍNEA”) - Aplicación EN SECO
Se recomienda colocar la bomba en espacios donde haya una ventilación adecuada y la bomba
no esté directamente expuesta a fuentes de calor. Evitar una colocación que requiera conexiones
hidráulicas demasiado largas, ya que podrían afectar a su funcionamiento.
La bomba nunca debe montarse por encima del nivel del agua (Fig. 2) porque, al no ser autoaspirante,
el riesgo de que funcione en seco o de que se creen burbujas de aire invisibles es muy alto. Los daños
provocados por un funcionamiento en seco de la bomba no están cubiertos por la garantía.
Para mejorar la eficiencia de la bomba, se recomienda utilizar en tubo recto de entrada y/o un codo
de radio grande (Fig. 3).
Se recomienda que los tubos de entrada y salida tengan un diámetro igual o superior al del racor
flexible suministrado. El tubo de salida y el de entrada deberían presentar el mismo diámetro para
minimizar las pérdidas de presión (Fig. 4).
No utilizar la bomba con la salida completamente cerrada. Dejar que el motor de la bomba se mantenga
siempre refrigerado por un mínimo de flujo de agua y evitar que funcione en seco (Fig. 5).

ES
MANTENIMIENTO
Para ofrecer un funcionamiento correcto y eficiente, la SYNCRA ADVANCED requiere un mantenimiento
periódico, sencillo pero necesario, En primer lugar, desconectar la toma de corriente eléctrica y
proceder de la siguiente manera:
1) Soltar el anillo de cierre de la hélice tirando de la lengüeta hacia fuera (Fig.6).
2) Retirar el anillo (Fig. 7).
3) Retirar la hélice de la bomba girándola y tirando de ella, a la vez, hacia delante (en caso de suciedad,
esta operación podría requerir algo de fuerza).
4) Extraer el rotor junto con la brida (Fig.8).
5) Lavarlo todo con agua corriente y, con la ayuda de un cepillo, eliminar cualquier rastro de suciedad.
6) Montar los componentes en el orden inverso al de desmontaje, comprobando que la junta tórica esté
en la posición correcta y mojada para facilitar el montaje de la hélice.
7) Volver a colocar el anillo con los dientes más grandes orientados hacia la bomba y cerrarlo
presionando en la lengüeta hasta oir un “clic”. (Fig.9).
Si la junta presenta daños, aunque sean leves, esta deberá sustituirse, de lo contrario podrían afectar
seriamente al funcionamiento de la bomba.
IMPORTANTE: la tarjeta electrónica incorporada en la bomba se ha programado para garantizar 3
niveles de protección:
- Protección en caso de rotor bloqueado: el bloqueo o el funcionamiento anómalo del rotor
podría deberse a una presencia excesiva de suciedad o a un funcionamiento en seco de la bomba.
En este caso, la tarjeta electrónica interna activará 20 intentos de arranque, dejará un breve intervalo
de tiempo y volverá a realizar otros 20 intentos para que la bomba arranque correctamente. Si tras
estos 20+20 intentos, la bomba no arranca automáticamente en stand by, la tarjeta electrónica seguirá
recibiendo alimentación pero el motor se apagará. En este caso, para volver a arrancar la bomba será
necesario desconectar y volver a conectar la toma de corriente.
- Protección funcionamiento en seco y Protección térmica: protección del motor en caso
de funcionamiento sin agua. La bomba se detiene siempre que funcione sin agua o el rotor esté
bloqueado. Cuando la bomba se saca del agua, el motor se para.
ATENCIÓN: no subestimar la fuerza magnética del grupo rotor. Si se perdiese accidentalmente algo de
adherencia y el eje del rotor golpeara el cojinete trasero de cerámica pura, el riesgo de dañar tanto el
eje como el cojinete sería muy alto. Un daño de este tipo comportaría costes elevados de reparación.
MANTENIMIENTO EXTRAORDINARIO Y SUSTITUCIÓN DEL GRUPO ROTOR
Para sustituir el grupo rotor (2) o realizar una limpieza a fondo proceder de la siguiente manera:
Repitir como en 1,2,3 y 4 - de MANTENIMIENTO
Se recomienda dejar la bomba sumergida en agua y vinagre para facilitar la limpieza del interior de la
bomba y una mejor extracción del casquillo.
- Introducir el gancho suministrado (SVE0052 - SVE0054) dentro del tubo de la bomba (Fig.10).
- Agarrar el cojinete y tirar de él hacia fuera.
- Limpiar el cojinete con agua corriente (no utilizar jabón ni detergente de ningún tipo porque
contaminarían el agua del acuario, recomendamos emplear una solución de agua y vinagre) y, si es

ES
necesario, utilizar un cepillo suave para eliminar los restos de cal. Si el cojinete presentara un gran
desgaste, proceder a su sustitución.
- Mojar el cojinete y volver a introducirlo en el tubo de la bomba (Fig.10) empujándolo hasta el fondo.
ASISTENCIA
Recomendamos echar un vistazo a nuestros tutoriales de ayuda para la instalación y el mantenimiento
de los productos, disponibles en el canal oficial www.youtube.com/SICCEspa.
ADVERTENCIAS PARA UNA ELIMINACIÓN CORRECTA DEL PRODUCTO
SEGÚN LA DIRECTIVA EUROPEA 2002/96/EC
Al final de su vida útil, el producto no debe eliminarse junto con los desechos urbanos. Puede llevarse
a un centro de gestión de residuos municipal o a una empresa privada que ofrezca estos servicios.
Reciclar los electrodomésticos evita consecuencias negativas para el medio ambiente y para la salud,
permite la reutilización de los materiales y supone un gran ahorro energético.
GARANTÍA
“Este producto, excepto el grupo rotor 2, cuenta con una garantía de 3 años a partir de la fecha
de compra que cubre defectos del material y de fabricación. El certificado de garantía debe ser
cumplimentado debidamente por el vendedor, y se entregará junto con la bomba en caso de solicitar su
reparación, junto con el recibo de la compra o equivalente. La garantía cubre la sustitución de las piezas
defectuosas. En caso de uso impropio, manipulación indebida o negligencia por parte del comprador o
del usuario, la garantía se anulará y perderá su validez inmediatamente. Asimismo, la garantía se anulará
en el caso de que falte el recibo de compra o equivalente. Todos los gastos de envío correrán a cargo
del comprador. CÓMO OBTENER 5 AÑOS DE GARANTÍA EN SU PRODUCTO Para mejorar nuestro
servicio y la satisfacción de nuestros clientes, SICCE ofrece la posibilidad de añadir 2 años adicionales
de garantía, registrando el producto en nuestra página web www.sicce.com en la sección “Sicce for
you/ Registro del Producto”. Para ello, será necesario rellenar correctamente el formulario y adjuntar el
recibo de compra del producto.
¡ATENCIÓN!
Los restos de cal y el desgaste normal de los componentes, podrían aumentar los niveles de ruido
de la bomba, pero estos no afectan de ninguna manera a su buen funcionamiento. En este caso,
recomendamos sustituir el grupo rotor.”
RECOMENDACIONES PARA UNA LARGA DURACIÓN
Si después de utilizar la bomba por primera vez, no está previsto volver a utilizarla durante un periodo
superior a una semana, se recomienda extraer el grupo rotor de la bomba, lavarlo a fondo y guardar
la bomba y el rotor por separado.

NL
Geachte klant, bedankt dat u gekozen heeft voor de SYNCRA ADVANCED. Deze nieuwe generatie Syncra
Silent pompen zijn zeer efficiënt en ontwikkeld en geproduceerd in Italië dit om te voldoen aan de strengste
kwaliteitseisen. De SYNCRA ADVANCED is uitermate geschikt voor het gebruik in zee- en zoetwateraquaria,
decoratieve fonteinen, eiwitafschuimers en waterkoeling systemen. De SYNCRA ADVANCED kan volledig
ondergedompeld of inline (Wet&Dry) gebruikt worden. De pomp heeft een roterende voorkamer die de
installatie in een beperkte ruimte gemakkelijk maakt. De unieke sluitingsring maakt het mogelijk om de
pomp te openen zonder het gebruik van schroeven en gereedschap, dit maakt het onderhoud aan de
pomp eenvoudig. Lees eerst aandachtig en bewaar deze instructies om de SYNCRA ADVANCED op een
correcte wijze te gebruiken.
VEILIGHEIDSNORMEN.
De pomp SYNCRA ADVANCED met zijn vele gebruiksmogelijkheden is conform de nationale en
internationale veiligheidsnormen.
1) Controleer of de op het etiket van de pomp aangeduide spanning overeenkomt met de spanning
van het net. Het apparaat dient gevoed te worden door middel van een differentiële schakelaar
(levenbeschermer) waarvan de nominale stroom lager of gelijk is aan 30mA.
2) De pomp kan functioneren met modaliteit „Wet&Dry“ (Onderdompeld in water of buiten het water).
3) Alvorens het apparaat op het net aan te sluiten, controleer of de kabel en/of de pomp beschadigd zijn.
4) De pomp is vervaardigd met een verbinding van het type Z. De kabel en de stekker kunnen niet
vervangen of gerepareerd worden;Bij beschadiging dient het hele apparaat vervangen te worden.
5) LET OP! haal de stekker van alle elektrische producten uit het stopcontact voordat u onderhoud gaat
uitvoeren of uw handen in het water steekt; als de stekker of de kabel nat zijn, schakel dan eerst de
hoofdschakelaar uit voordat u de stekker uit het stopcontact haalt;
6) De pomp mag niet in werking worden gesteld zonder water om schade aan de motor te voorkomen.
7) De pomp mag niet worden gebruikt in vloeistoffen of in een omgeving met een temperatuur hoger
dan 35°; / 95 °F).
8) Gebruik de pomp niet voor andere doeleinden dan waarvoor de pomp is ontworpen zoals in badkamers
of dergelijke toepassingen;
9) Laat het apparaat niet functioneren met uitbijtende- of wegvretendemiddelen.
10) Dit apparaat is niet ontworpen om gebruikt te worden door personen (inclusief kinderen)
met gereduceerde fysische, zinnelijke en geestelijke capaciteiten, tenzij deze begeleid zijn door
verantwooordijke personen die zorg dragen voor hun veiligheid.
11) Om te voorkomen dat druppels de stekker of het stopcontact nat maken, realiseer met de kabel een
voorwendsel onder het niveau van het stopcontact (Afb.A).
12) De pomp niet optillen middels de voedingskabel tijdens de installatie en het onderhoud.
13) De pomp moet alleen gebruikt worden voor de hierboven genoemde applicaties en is uitsluitend
bestemd voor een intern gebruik.

NL
14) In het geval de pomp of het filter zijn uitgerust met een kabel van 10 meter, of met een kabel van
meer dan 6 voet voor het Amerikaanse (VS) type, zijn de apparaten bestemd voor gebruik buitenshuis,
overeenkomstig de voorschriften van de internationale richtlijnen.
ONDERDELEN
De SYNCRA ADVANCED bestaat uit de volgende onderdelen (Afb. B):
1. Het motorhuis van de pomp kan volledig ondergedompelt worden en is geïsoleerd door een epoxy hars;
2. Rotor Kit inclusief waaier en bodemlager
3. Bodemlager
4. O-Ring
5. Anti-vibratie rubbervoetjes
6. Roterende voorkamer
7. Pomp voorfilter
8. 1 “schroefdraad slangkoppelingen
INSTALLATIE – GEBRUIK EN REGELING
Om de pomp SYNCRA ADAVANCED te installeren ga als volgt te werk:
- Verbind het koppelstuk met de uitgang zodat u de slang met de juiste diameter kunt koppelen.
- Plaats de pomp op een plek zodat u er makkelijk bijkunt indien er onderhoud verricht moet worden.
- Als u de pomp in het water gebruikt en niet in lijn, dan moet de pomp altijd volledig ondergedompeld
blijven. (Afb. 1)
TOEPASSINGEN DROOGOPSTELLING
Het wordt aanbevolen om de pomp in goed geventileerde ruimtes te plaatsen en de pomp niet rechtstreeks
blootstellen aan warmtebronnen.
Plaats de pomp zo dat het niet nodig is om lange aansluitleidingen te gebruiken om op deze manier het
verminderen van de prestaties te voorkomen.
De SYNCRA ADAVNCED is niet zelfaanzuigend en daarom adviseren wij om nooit de pomp boven (Afb.2)
het waterniveau te plaatsen. Op deze manier voorkom je dat de pomp doet drooglopen en of lucht doet
aanzuigen. Schade die worden veroorzaakt door het drooglopen van de pomp zijn uitgesloten van de
garantie.
Gebruik een rechte toevoerleiding om de efficiëntie van de pomp te optimaliseren, het gebruik van bochten
kan invloed hebben op de prestaties van de pomp (Afb. 3).
Wij adviseren om aansluitleidingen te gebruiken die gelijk of groter zijn dan de meegeleverde standaard
slangtules (Afb.4).
Gebruik de pomp niet zodra de uitgang volledig afgesloten is. Een minimale waterstroom is noodzakelijk
om de motor te koelen en om drooglopen van de motor te voorkomen (Afb.5).

NL
ONDERHOUD
Om tot het periodiek onderhoud aan de pomp over te gaan ,trek allereerst de stekker uit het stopcontact
om daarna de pomp uit het water te nemen.
1) Om de plastic sluitingsring van het slakkenhuis te openen moet u de tab naar buiten bewegen (Afb. 6)
2) Verwijder nu de ring (Afb.7)
3) Verwijder het slakkenhuis van de pomp door het gelijkmatig naar voren te bewegen (in het geval dat er
vuil aanwezig is kan het zijn dat u iets meer kracht moet gebruiken).
4) Haal de complete rotor set uit het pomphuis
5) Spoel alles goed af onder stromend water en gebruik een borsteltje om eventuele incrustaties te
verwijderen. Assembleer daarna alles in omgekeerde volgorde.
6) Assembleer daarna alles in omgekeerde volgorde.
7) Plaats de ring met de grootste tanden in de richting van de pomp en sluit deze door de tab naar
beneden te drukken tot u een “klik” hoort. (Afb.9)
Eventuele beschadigingen klein of groot aan de afdichtingen kunnen de prestaties van de pomp op een
ernstige wijze compromitteren en kunnen eventueel tot vervanging lijden.
BELANGRIJK: De ingebouwde printplaat van de pomp is geprogrammeerd om op 3 niveaus bescherming
te bieden:
Bescherming tegen het blokkeren van de rotor: Mocht de rotor blokkeren, vergrendelen (eventueel
door overmatig vuil) en of werken zonder water, dan zal de pomp na 20 startpogingen, gevolgd door een
korte tijdsinterval automatisch stoppen. Mocht dit gebeuren dan gaat de pomp automatisch in stand-by
en de motor gaat uit wel zal de printplaat gevoed blijven. In dit geval moet u eerst de stekker uit het
stopcontact verwijderen en opnieuw insteken om de pomp te herstarten.
Droogloop bescherming en thermische beveiliging: Deze beschermen de motor in het geval van
functioneren zonder water. De pomp stopt wanneer hij werkt zonder water en of de rotor geblokkeerd is.
De pomp zal ook stoppen op het moment dat hij uit het water genomen wordt.
LET OP: onderschat niet de kracht van de magneet. Er is een groot risico aanwezig zodra u enigszins de
grip verliest dat de as van de rotor de onderste lager doet beschadigen. Een beschadiging aan de as of de
lager veroorzaakt hoge reparatie kosten.
SPECIAAL ONDERHOUD EN HET VERVANGEN VAN DE ROTOR
Volg deze instructie voor het schoonmaken of vervangen van de Rotor
Herhaal de acties voor het openen van de rotor zoals beschreven in de rubriek Onderhoud ‘, stap 1,2,3,4.
Om de onderste lager eenvoudig te verwijderen, raden wij aan de pomp een tijdje ondergedompeld te
houden in water met azijn, dit is om het vuil of de kalkaanslag te verwijderen.
-Neem de meegeleverde haak (SVE0052 - SVE0054) en ga hier het pomphuis mee binnen (Afb. 10)
-Haak het onderste lager in en trek het uit het pomphuis
- Reinig het lager onder stromend water (gebruik nooit zeep of wasmiddel in welke vorm dan ook, omdat
ze het aquarium water vervuilen: we raden u aan om alleen een beetje azijn oplossen in water) eventueel
met een zachte borstel de kalkaanslag verwijderen. Indien de lager versleten is, is het beter deze te

NL
vervangen voor een nieuwe.
- Maak het lager een beetje nat en plaats het terug in het pomphuis (Afb. 10)
ONLINE HULP
Bekijk onze instructievideo’s op het SICCE YOU TUBE officiële kanaal www.youtube.com/SICCEspa.
AANWIJZINGEN VOOR EEN JUISTE AFVOER VAN HET PRODUCT VOLGENS
DE EUROPESE RICHTLIJN 2002/96/EC
Aan het einde van zijn bruikbaarheidsduur, mag het product niet samen met het gemeentelijk afval
worden afgevoerd. Het kan worden afgegeven bij de speciale gemeentelijke centra voor gescheiden
afvalinzameling of bij verkopers die deze service aanbieden. Door huishoudelijke apparaten gescheiden
te verwerken, kunnen mogelijk negatieve gevolgen voor het milieu en de gezondheid door een onjuiste
verwerking worden vermeden en kunnen de materialen waaruit het bestaat worden teruggewonnen voor
een aanzienlijke besparing van energie en bronnen.
GARANTIE
Dit product,met uitzondering van de rotor 2, is gegarandeerd voor een periode van 3 jaren vanaf de datum
van aankoop tegen gebreken van het materiaal en van de bewerking. Het certificaat van garantie dient in
elke gedeelte van het formulier door. voor reparatie teruggegeven wordt tezamen met de fiscale bon van
aankoop of een gelijkwaardig document. De garantie betreft de vervanging van de gebrekkige delen. In
geval van een verkeerd gebruik,openbreking of nalatigheid van de koper of van de verbruiker is de garantie
nietig en vervalt onmiddellijk. De garantie is tevens nietig in geval van ontbreking van de fiscale bon van
aankoop of van een gelijkwaardig document. De kosten van verzending en terugzending komen ten laste
van de koper. ONTDEK HOE JE 5 JAAR GARANTIE KUNT KRIJGEN OP HET PRODUCT Om onze
dienstverlening en de tevredenheid van onze klanten te verbeteren, biedt SICCE de mogelijkheid om de
Grantie periode te verlenging met 2 jaar. U hoeft simpelweg alleen uw product te registreren op onze
website www.sicce.com in “Sicce for you / Productregistratie”
Vul het formulier in en upload de aankoopbon van het product. Na het correct invullen van al uw gegevens,
moet u het garantie-uitbreiding verzoek indienen.
LET OP!
Kalkaanslag en natuurlijke slijtage aan de componenten van de pomp kunnen een verhoging van het geluid
van de pomp veroorzaken. Nochtans, beïnvloeden zij niet het functioneren van de pomp. In dit geval,
adviseren wij u om de rotor te vervangen.
TIPS VOOR EEN LANGERE LEVENSDUUR
Mocht u de pomp na de eerste installatie niet gebruiken voor meer dan een week, dan raden wij aan
om de Rotor KIT uit de pomp te nemen, goed schoonmaken en dan de Rotor Kit apart van de pomp te
bewaren.

PT
Prezado cliente, obrigado por escolher SYNCRA ADVANCED. Com a compra desta nova geração de
bombas SYNCRA Silent você terá disponível um produto de alta eficiência com uma grande economia
de energia. Para garantir o nível máximo de qualidade, SYNCRA ADVANCED foi totalmente projetada e
fabricada na Itália e seu uso esta destinado a aquários de água doce e salgada, fontes decorativas de
uso interior e exterior, sistemas hidropônicos e outras aplicações onde e necessário uma recirculação
independente de água. As bombas SYNCRA ADVANCED possuem um design moderno, são compactas
e silenciosas; além do mas, oferecem uma instalação e manuteção faceis de fazer. Graças as suas peças
acopladas que não necessitam de ferrametas. As bombas SYNCRA ADVANCED pode ser utilizadas
submersas ou em sistemas lineares fora da água. Se recemenda ler com atenção estas instruções antes
de ultilizar a bomba e guarda-lás para futuras consultas.
NORMAS DE SEGURANÇA:
A SYNCRA ADVANCED está em conformidade com leis nacionais e internacionais de segurança.
1) Verifique se a tensão do rótulo da bomba corresponde com a da rede de energia. A bomba deve ser
provida de um interruptor diferencial (protetor) através do qual a corrente nominal seja igual ou inferior
a 30mA.
2) A bomba pode funcionar no sistema “Wet & Dry”, dentro ou fora da água.
3) Antes de ligar a bomba à rede elétrica, verifique se o cabo ou a bomba não estão danificados.
4) A bomba tem uma ligação de cabo tipo Z. O cabo e/ou o plugue não podem ser substituídos ou
consertados; em caso de danos, substitua a bomba inteira.
5) ATENÇÃO: Desconecte todos os produtos elétricos submerses antes de fazer qualquer manutenção
no aquário; no caso do plugue ou a tomada de energia, desligue a chave disjuntora antes de desligar
o cabo de energia.
6) A bomba não pode funcionar sem água a fim de não danificar o motor.
7) A bomba pode ser usada em líquidos ou meios com temperaturas abaixo de 35° C / 95° F.
8) Não use a bomba para finalidades diferentes daquelas para as quais ela foi projetada, como por
exemplo em banheiros ou outros tipos de aplicações.
9) Evite usar a bomba em líquidos abrasivos ou corrosives.
10) A bomba não foi projetada para pessoas descapacitadas ou crianças sem supervisão de uma pessoa
responsável pela segurança.
11) Para evitar pingos acidentais no plugue ou na tomada de energia, faça uma volta com o cabo de
maneira que fique abaixo do nível da tomada (Fig. A).
12) Evite desligar a bomba puxando o cabo da tomada durante a instalação ou manutenção.
13) A bomba pode ser usada apenas dentro das aplicações mencionadas acima e serve somente para
espaços internos.
14) No caso em que a bomba e o filtro sejam fornecidos com cabo de 10 metros de comprimento ou
com cabo de medida superior a 6 pés para o tipo americano (EUA), estes aparelhos são destinados a
utilização no exterior como indicado pela normativa internacional.

PT
COMPONENTES
As bombas SYNCRA ADVANCED são constituídas pelos seguintes componentes funcionais (Fig. B):
1. Motor completamente submergível e isolado com resina de bicomponente
2. Conjunto de rotor com flange, turbina e rolamento traseiro
3. Rolamento traseiro
4. Anel de vedação
5. Borrachas anti-vibração
6. Antecâmera rotativa
7. Pré-filtro
8. Acoplamentos de 1”
INSTALAÇÃO DA BOMBA: USO E REGULAGEM
Para instalar a bomba SYNCRA ADVANCED, é necessário proceder da seguinte maneira:
- Ligue a conexão à saída da bomba, que poderá depois, conectar a mangueira de diâmetro
correspondente
- Colocar a bomba numa zona plana do pequeno lago, facilmente acessível para as operações de
manutenção. (Fig.C)
- Se a bomba for usada submersa e em vez de em linha, deve de estar sempre completamente submersa
(Fig. 1)
APLICAÇÕES EM LINHA
É recomendado colocar a bomba em espaços onde exista ventilação apropriada e que a bomba não
esteja directamente exposta a fontes de calor. Coloque a bomba por forma a evitar tubagens hidraulicas
demasiado longas, que reduzem a sua performance. Não coloque a bomba acima do nivel de água
(Fig.2) pois a mesma não é auto ferrável e o risco de trabalhar a seco, ou de bombas de ar invisiveis
criarem uma area de vaccum é muito elevado. Danos causados por a bomba trabalhar a seco estão
excluidos da garantia. Para maximizar a eficiência da bomba, escolha um tubo recto para ligar a entrada
e cotovelos com boa dimensão (Fig. 3) Sugerimos o uso de tubos de diametro igual ou maior aos das
entradas e saidas da própria bomba (Fig. 4) Nunca utilize a bomba com a saida totalmente fechada. Um
minimo de caudal é necessário para manter o interior do motor refrigerado e não trabalhar a seco. (Fig. 5)
MANUTENÇÃO
Para a manutenção periódica da bomba, desligue-a da tomada de energia e só depois pegue a bomba.
1) Soltar o anel de travamento da helice puxando a lingueta para fora (Fig.6)
2) Retirar o anel (Fig.7)
3) Retirar a hélice da bomba girando e puxando, tanto, para frente (em caso de sujeira, esta operação
pode requerer mais força)
4) Removendo o rotor em conjunto com a flange (Fig.8)
5) Lave todas as peças com água, use uma escova macia para retirar qualquer sujeira ou depósitos de

PT
material estranho. Monte a bomba seguindo a ordem inversa.
6) Monte os componentes a ordem inversa da desmontagem, assegurando que o anel de vedação está
na posição correta e lubrificada para facilitar a montagem do impeller.
7) Voltar a colocar o anel com os dentes grandes voltados para cima da bomba e fechar presionando a
aba até ouvir um “click”. (Fig.9)
Qualquer dano aos o-rings, mesmo pequeno, pode causar sérios problemas no desempenho da bomba.
Nesse caso, recomendamos substituir o anel.
IMPORTANTE: o cartão eletrônico incorporado na bomba esta programado para garantir 3 níveis de
proteção:
Proteção em caso de travamento do impeller: Em caso de mau funcionamento, ocasionando o
travamento do impeller (devido a excesso de sujeira ou outro problema qualquer) ou um funcionamento a
seco, o cartão eletrônico ativará 20 tentativas de funcionamento, depois de um curto intervalo de tempo irá
refazes outras 20 tentativas para um correto funcionamento. Se depois dessas 20+20 tentativas a bomba
não funcionar corretamente, ela irá entrar automaticamente em modo de esperar, a placa eletrônica
continuará a ser alimentada, mas o impeller será desligado. Nesse caso, para reiniciar a bomba, você
precisará remover o plugue da tomada e reconecta-lo
Proteção de funcionamento a seco e proteção térmica: proteção da bomba em caso de
funcionamento sem água. A bomba para de funcionar e o impeller se desliga. Quando a bomba é retirada
da água, o impeller para.
ATENÇÃO: não substime o poder da força magnetica. Ao soltar ligeiramente o iman se o eixo bater no
rolamento trazeiro, o risco de danificar o rolamento é muito alto. Danificar o eixo ou o rolamento causará
grandes despesas de reparação.
MANUTENÇÃO ESPECIAL E REPOSIÇÃO GRUPO ROTOR
Para substituir o kit impeller (2) ou realizar uma limpeza completa, siga desta maneira:
Repetir como no 1,2,3 e 4 - da MANUTENÇÃO
Se recomenda colocar a bomba submersa em água com vinagre para facilitar a limpeza do interior da
bomba e melhor remover as crostas.
- Insira os ganchos fornecidos (SVE0052 - SVE0054) dentro do tubo da bomba. (Fig.10)
- Agarre o rolamento e retire-o
- Limpe os rolamentos sob água corrente (nunca use sabão ou detergente de qualquer tipo, porque eles
poluem a água do aquário: recomendamos a utilização de vinagre diluído em água), e se necessário, use
uma escova macia para remover depósitos calcários. Se estiver muito desgastado, nós recomendamos
substitui-lo por un novo.
- Molhar o rolamento e reinseri-lo no tubo da bomba (Fig. 11) empurrando-o para o fundo.
ASSISTÊNCIA
Sugerimos que veja nossos tutoriais em vídeo para apoiar a instalação e manutenção de produtos,
disponível no canal oficial www.youtube.com/SICCEspa.

PT
PRECAUÇÕES PARA DESCARTE CORRETO DO PRODUTO NOS TERMOS
DA DIRECTIVA CE 2002/96 / CE
Se usada ou quebrada, esta bomba não pode ser descartada como lixo comum. Verifique a legislação
vigente e procure centros apropriados para descartar a bomba, ou devolva-a ao revendedor. Descarte
separadamente qualquer components elétrico para não causar danos ao ambiente. Procure centros de
reciclagem desse tipo de material.
GARANTIA
Este produto é totalmente coberto pela lei do consumidor vigente no Brasil. A garantia do produto só
será cumprida pelo revendedor ou importador no caso de apresentação de nota fiscal comprobatória da
compra que prove que o material comprado está no prazo de garantia de 3 anos da data da compra. O
rotor da bomba 2 não possui garantia. A garantia não será dada a produtos em que se prove mal uso,
danos intencionais – como a alteração nas suas caractrerísticas originais ou o corte do plugue de tomada,
retirada de qualquer dos componentes do plugue ou corte do próprio cabo de energia da bomba. quando
adquirir a bomba, peça ao revendedor ou importador para desmontá-la e verificar o estado do rotor. As
despesas de expediçãoe devolução ficam por conta do comprador. DESCUBRA COM OBTER 5 ANOS
DE GARANTIA NO SEU PRODUTO Para melhorar o nosso serviço e aumentar a satisfação dos nossos
clientes, a SICCE oferece a possibilidade de aplicar 2 anos extra de garantia, registando o produto na
nossa página Web www.sicce.com em “Quality Control Department”. Preencha o formulário em todas as
suas partes e envie electrónicamente o comprovante de compra do produto.
ATENÇÃO!
Os restos de calcário e o desgaste normal dos componentes, podem aumentar os níveis de ruídos da
bomba, mas isso não afeta seu funcionamento de nenhuma maneira. Então nesse caso, recomendamos
substituir o kit do impeller.
RECOMENDAÇÕES PARA UMA LONGA DURAÇÃO
Se depois de utilizar a bomba pela primeira vez, não esta previsto voltar a utiliza-la durante um período
superior a uma semana, recomendamos extrair o kit impeller da bomba, lava-lo e guardar a bomba e o
impeller separados.

RU
Уважаемый клиент, благодарим вас за выбор SYNCRA ADVANCED. При покупке
этого нового поколения насосов SYNCRA Silent она будет претендовать на продукт
с высоким уровнем энергосбережения. Произведен и разработан в Италии, чтобы
гарантировать высокий уровень качества. Помпа SYNCRA ADVANCED рекомендуется
для использования в аквариумах с пресной и морской водой, декоративных фонтанах
для внутреннего и наружного использования, гидропоники, где требуется применение
чистой воды. Современный дизайн, компактный размер и тихая работа насоса, SYNCRA ADVANCED являются простыми в использовании и обслуживании, с фитингами
в комплекте. SYNCRA ADVANCED может работать полностью погруженной под воду
или в встроенном состоянии (вне воды) оборудовании. Рекомендуется внимательно
прочитать инструкцию по эксплуатации перед использованием и сохраните ее для
консультаций в будущем.
Инструкция по эксплуатации и безопасности
Помпа SYNCRA ADVANCED - соответствует законам национальной и международной
безопасности.
1) Проверьте, что напряжение на ярлыке помпы соответствует напряжению в
электрической сети. Помпа должна подключаться через устройство защитного
отключения (УЗО) с минимальным током утечки 30 mA.
2) Насос предназначен для использования исключительно в закрытых помещениях и
не может устанавливаться на открытых пространствах.
3) Перед подключением насоса к электрической сети, убедитесь, что кабель и насос
не повреждены.
4) К помпе присоединен кабель типа Z. Кабель и штепсель нельзя заменить или
восстановить; в случае повреждения их заменяют вместе с насосом.
5) ВНИМАНИЕ: отсоедините все электрические приборы перед выполнением любых
манипуляций с любым прибором в воде, или погружении рук в воду; в случае, если
штепсель или электрический выход влажные, отключите общий выключатель
электрического питающего кабеля.
6) Насос не должен работать без воды, чтобы избежать повреждения двигателя.
7) Запрещено эксплуатировать насос без воды или с жидкостями, температура
которых превышает 35° C!
8) Избегайте использование помпы с коррозийными и жесткими жидкостями.
9) Не используйте помпу для работ, отличных от тех, для которых она была
спроектирована, например, в ванной.
10) Данный прибор не предназначен для использования лицами (включая детей)
с ограниченными физическими или умственными способностями, а также
лицами без соответствующего опыта и знаний; в противном случае прибор
должен эксплуатироваться под контролем взрослых или после проведения
соответствующего инструктажа об эксплуатации прибора лицом, ответственным за
технику безопасности. Контролируйте детей, прибор – не игрушка.
11) Чтобы избежать попадания случайных капель на штепсель или в розетку, сделайте
петлю из шнура ниже уровня розетки (рис. A).
12) Избегайте брать помпу за шнур во время ее установки или обслуживания.
13) насос может быть использован только в выше перечисленных программ, и только
для внутреннего использования.

RU
14) Если насос или фильтр поставляются вместе с кабелем 10 метров в длину,
или кабелем более 6 футов в длину американского типа (США), эти устройства
предназначены для использования на открытом воздухе в соответствии с
требованиями международных стандартов.
КОМПОНЕНТЫ
В состав насосов SYNCRA ADVANCED входят следующие функциональные
компоненты (Рис. B):
1. Корпус двигателя полностью погружной и изолированный от попадания влаги с
помощью двухкомпонентной смолы.
2. Ротор в сборе с фланцем и крыльчаткой и задним подшипником
3. Задний подшипник
4 .Кольцо
5. Резиновые антивибрационные ножки
6. Поворотная выпускная камера
7. Фильтр грубой очистки
8. Фитинги 1”
УСТАНОВКА
Для того, чтобы установить помпу SYNCRA ADVANCED необходимо следовать
инструкции:
- Присоедините крепление с насосной станцией к которой Вы сможете затем
присоединить гибкую трубку нужного диаметра.
- Установить насос на ровное основание, которое позволяет легко манипулировать
и поддерживать работу прибора.-
- Если насос используется в погруженном состоянии и не с последовательным
расположением, то он должен быть всегда полностью погруженным. (Рис. 1)
ИСПОЛЬЗОВАНИЕ ВНЕ ВОДЫ
Рекомендуется размещать насос в местах с надлежащей вентиляцией, где насос
не подвергается прямому воздействию источников тепла.
Разместите насос таким образом, чтобы исключить слишком длинное соединения
(трубопровод), которые снизят эффективность его работы.
Не размещайте насос выше уровня воды, так как он не является
“самозаливающимся”, и имеется высокий риск того, что подача воды прекратится
и в насос попадет воздух и воздушные пузырьки создадут вакуум. Повреждение,
вызванное пересыханием насоса, не является гарантийным случаем.
Для максимального увеличения эффективности работы насоса, выберите прямую
впускную трубку, подсоединяемую к угловым или коленчатым патрубкам. (Рис. 3)
Мы рекомендуем использовать впускные и выпускные трубки с диаметром,
равным или большим, чем диаметр резьбовой трубки идущей в комплекте. (Рис.
4)
Не используйте насос с полностью перекрытым выпускным отверстием.
Минимальный поток воды необходим для поддержания внутреннего двигателя
охлажденным и предотвращения пересыхания насоса. (Рис. 5)

RU
УХОД
Для того, чтобы правильно функционировать SYNCRA ADVANCED требует
простого, но необходимого и периодического ухода. Для правильного ухода
за оборудованием прежде всего нужно отсоединить кабель от источника
электропитания и строго придерживаться инструкции по безопасности, а также
исполнять следующую инструкцию:
1) Снять кольцо крепления, потянув за язычок наружу (Рис.6)
2) Снимите кольцо (Рис. 7).
3) Удалить его из насоса, поворачивая его и одновременно потяните ее вперед (в
случае загрязнения это может занять немного силы).
4) Извлеките ротор (Рис.8)
5) Промойте все под проточной водой, используя специальную щетку или ершик,
чтобы удалить любые загрязнения.
6) Собрать все в обратном порядке, убедившись, что уплотнительное кольцо
зафиксировано в правильном положении.
7) Установите на место кольцо и закройте его, нажав на защелку, пока не
услышите “щелчок”. (Рис.9)
Любые травмы уплотнения, даже незначительные, могут серьезно повлиять на
производительность насоса и, следовательно, не влекут замены.
ВАЖНО: электронная плата, встроенная в насос запрограммированна для
обеспечения 3 уровней защиты:
Защита в случае блокировки ротора: блокировка в ходе работы ротора может
возникнуть из-за большого скопления грязи или очень долгой работы насоса
вне воды. В этом случае электронная плата помпы будет активированна после
20 попыток старта в короткий промежуток времени, и еще после 20 попыток
при включении насоса. Если насос после 20+20 попыток не запустился,
электронная плата будет работать, но двигатель выключится. В этом случае,
чтобы перезапустить насос необходимо отключить и вновь вставить вилку
электропровода в розетку.
Тепловая защита насоса от работы вне воды: Насос остановится, если функция
работы без воды не предусмотренна. Когда насос извлекается из воды, ротор
останавливается.
ВНИМАНИЕ: Недооценивайте силу магнита. Если Вы слегка ослабите сцепление
и ось ударит задний подшипник, имеется высокий риск повреждения подшипника.
Поврежденная ось и подшипник приведут к высокой стоимости ремонта.
СПЕЦИАЛЬНОЕ ТЕХНИЧЕСКОЕ ОБСЛУЖИВАНИЕ И ЗАМЕНА РОТОРНОЙ
ГРУППЫ
Для тщательной очистки или замены ротора (2) выполните следующие действия:
Повторите операции открытия, как указано в пунктах 1, 2, 3, 4 пункта технического
обслуживания.
Рекомендуется оставить насос погруженным в воду или уксус, для дальнейшего
удаления накипи
Вставить специальный крюк (SVE0052 - SVE0054) внутри крепления насоса. (Рис.10)
Закрепить подшипник и вытащить его наружу
Очистить подшипник под проточной водой (не использовать стиральный порошок

RU
или моющие средства любого C62 потому что они загрязняют воду аквариума:
рекомендуется использовать раствор воды и уксуса), возможно использование
мягкой щетки для удаления известковых отложений. В случае, если подшипник
очень изношен, замените его на новый.
Вставьте подшипник в крепление насоса (Рис.10) и продвиньте его до упора.
ОНЛАЙН-СПРАВКА
Смотрите обучающие видеоролики на официальном канале THE SICCE YOUTUBE www.youtube.com/SICCEspa.
ИНСТРУКЦИИ ПО ПРАВИЛЬНОЙ УТИЛИЗАЦИИ ПРОДУКЦИИ В
СООТВЕТСТВИИ С ДИРЕКТИВОЙ ЕС 2002/96/EC
Нельзя утилизировать использованный или поломанный товар вместе с
бытовыми отходами. Его необходимо доставить в специальный центр утилизации
электрических отходов. Отнеситесь к утилизации помпы ответственно. Узнайте
всю необходимую информацию у своих местных представителей.
ГАРАНТИЙНЫЕ ОБЯЗАТЕЛЬСТВА
На данную продукцию (ротора) распространяется гарантия сроком на 3 года
с момента покупки. Гарантийный талон должен быть заполнен продавцом
и прилагаться к насосу при его возврате для ремонта вместе с чеком,
подтверждающим покупку товара. Гарантия распространяется на замену всех
дефектных частей. В случае неправильного или небрежного использования,
несанкционированного вмешательства в конструкцию, гарантийные
обязательства немедленно утрачивают силу. Изделие также не подлежит
гарантийному обслуживанию в случае отсутствия чека или другого документа
подтверждающий покупку. Стоимость отправки насоса производителю или
в место ремонта оплачивается покупателем. УЗНАЙТЕ, КАК ПОЛУЧИТЬ
ГАРАНТИЮ НА ВАШ ТОВАР СРОКОМ НА 5 ЛЕТ С целью улучшения
обслуживания и для более полного удовлетворения запросов наших клиентов,
компания SICCE предлагает возможность дополнительного гарантированного
обслуживания сроком на 2 года. Просто зарегистрируйте свой товар на вебсайте
www.sicce.com в раздел “Sicce для вас / Регистрация товара”. Заполните форму
и загрузите чек на приобретенный товар. После того, как вы правильно введете
всю информацию, заполните заявку на продление гарантийного срока.
ВНИМАНИЕ!
Известковые отложения и естественный износ ротора, могут привести к
увеличению уровня шума насоса, но не влияют никоим образом на бесперебойную
работу насоса. В этом случае следует заменить ротор.
СОВЕТЫ:
В случае, если вы не планируете использовать насос более недели, рекомендуем
извлечь ротор из насоса, промойте его, и отложите его отдельно от помпы для
дальнейшего хранения.
Watch the video
SICCE S.r.l.
Via V. Emanuele, 115 · 36050 Pozzoleone (VI) · Italy
Tel. +39 0444 462826 · Fax +39 0444 462828 · P. IVA / VAT 02883090249
info@sicce.com · www.sicce.com
80N576-A 06-2018 © Sicce srl All rights reserved
SICCE USA
1737 Louisville Drive · Knoxville, Tennessee 37921, USA
Ph. +1 865 291-3202 · Fax +1 865 291-3203
sales@sicceus.com · www.sicce.com
SICCE AUSTRALIA Pty Ltd
Perth, WA · Australia
info@sicce.com.au
www.sicce.com
 Loading...