

Sibelmed DATOSPIR touch Quick Start Manual

Quick start guide
DATOSPIR touch
www.sibelmed.com
www.sibelmed.com
511-B00-GR2 Rev. 0
SIBEL S.A. Rosselló 500 Bajos, 08026 Barcelona
National sales: Tel. 93 436 00 08 · e-mail: comercial@sibelmed.com
International sales: Tel. +34 93 436 00 07 · e-mail: export@sibelmed.com
After-sales Service: Tel. +34 93 433 54 50 · e-mail: sat@sibelmed.com
Fax: +34 93 436 16 11 www.sibelmed.com
Class IIa product according to 93/42/CEE Medical Device Directive
SIBEL S.A. is a member of
www.sibelgroup.com
Congratulations, you have acquired a SIBELMED spirometer, a leading brand in the
industry.
Please read the USER MANUAL in order to maximize its using.
The DATOSPIR touc h spirometer is a compact device based in different types of
transducers: Fleisch, Turbine or disposable Lilly, a wide color touch screen, a built-in
temperature sensor and a thermal printer. An internal database is used to store the
tests and an external printer can be connected via USB or Bluetooth.
SETUP
When placing the spirometer make sure that the following conditions are meet:
- Mains connection: 100 to 240V AC.
- Operating temperature: 5 to 40º C
- Relative humidity: < 85 % (without condensation).
- Pressure: 850 to 1060 hPa. (638 to 795 mmHg / 1500 to 0 m aprox.)
- Keep away from splashing water or other liquids.
Note: Read the user’s manual for a safe use of the device.
Use mouthpieces certied acording to Directive 93/42/EEC to
ensure the patient safety and the quality of spirometry.
CALIBRATION
(C) Making a calibration:
1. Press in the main menu.
2. Press in the setup menu.
3. Press in the calibration menu.
Repeat points 2 and 3 of the previous section (B).
5. Press to save the calibration.
4. Once the calibration cycles are completed, the device
should display the “CALIBRATED !!!” message.
The dierence in this mode is that the device not only checks the calibration,
but also stores the new calibration factors.
0197
www.sibelmed.com
www.sibelmed.com
MY FIRST SPIROMETRY step by step
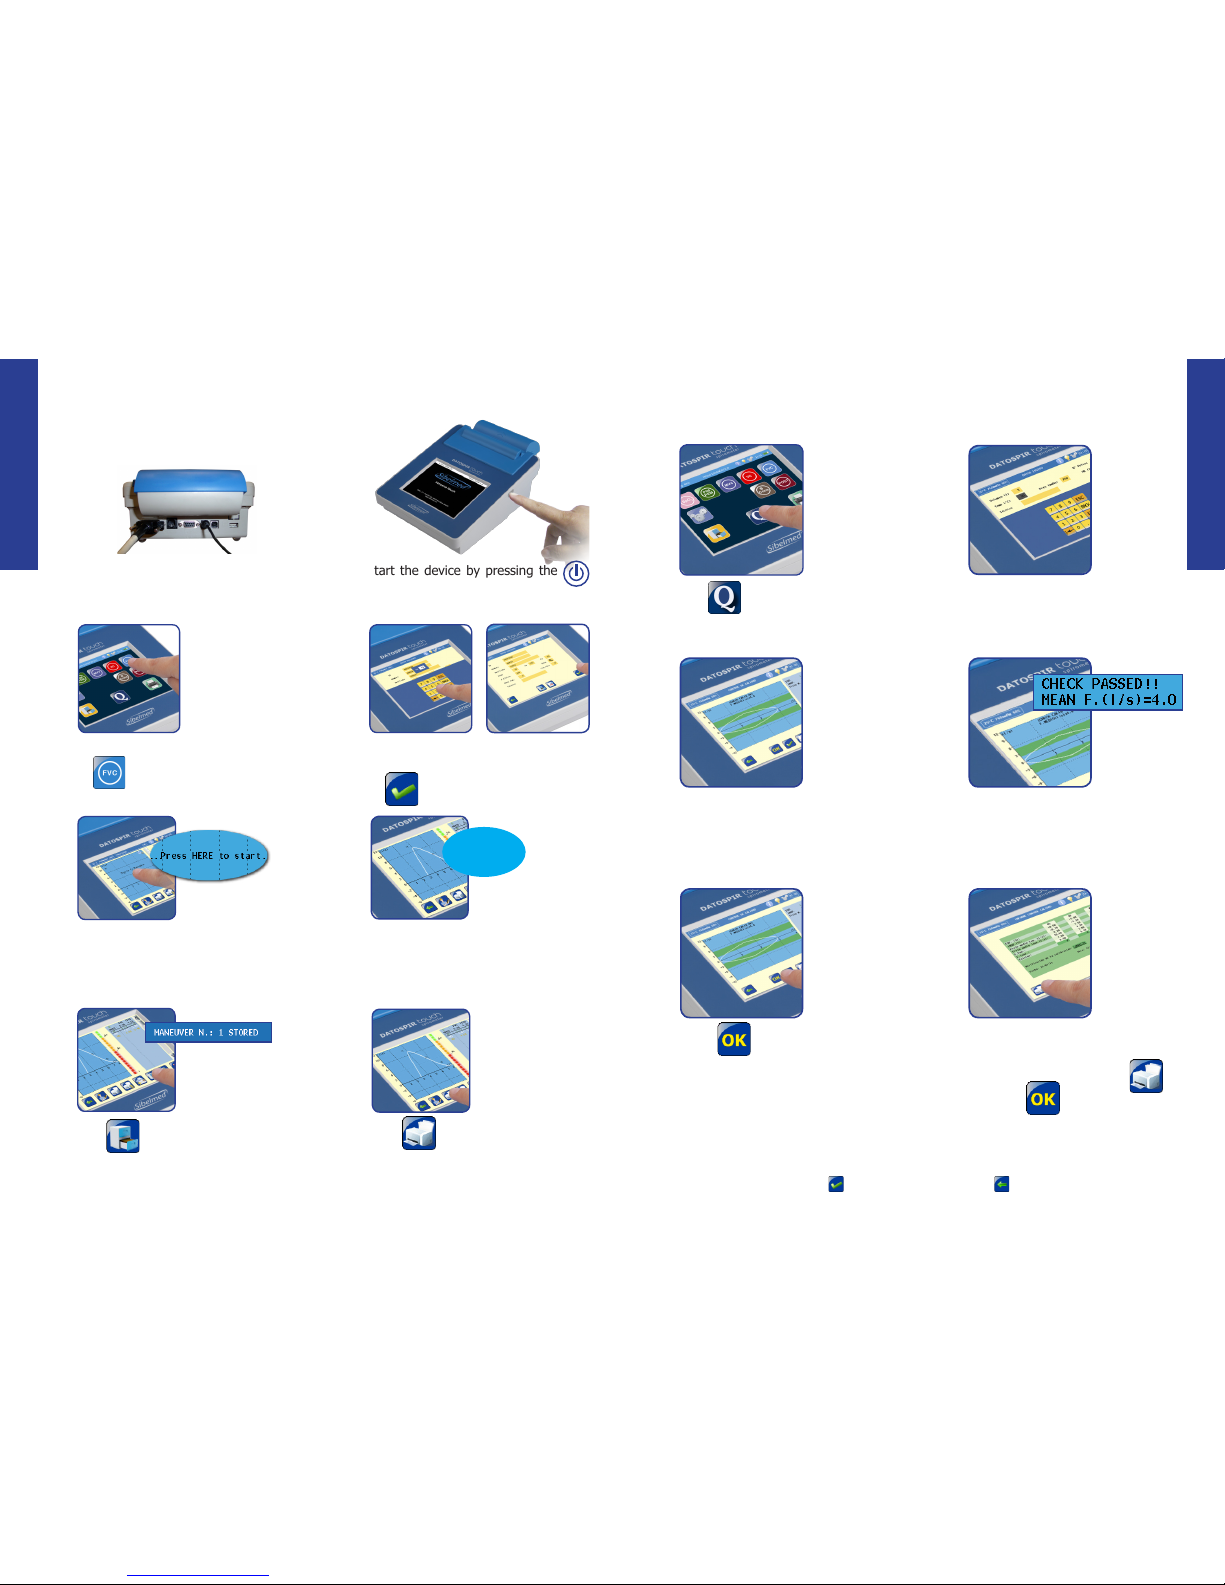
(A) Making a FVC maneuver
(Forced Vital Capacity):
CALIBRATION CHECK
(B) Making the calibration check:
1. Check that the transducer is connected
to the device and the power supply is
connected to the mains.
1. Press in the main menu.
3. Do 3 cycles trying to draw the curve
within the two labeled areas on the screen.
5. Press to save the calibration
check.
3. The device displays the main menu.
Press .
5. The FVC screen is displayed and the
maneover can be started.
7. Press to save the maneuvers. The
message MANEUVER N.: X STORED is
shown. See the Autosave procedure in the
user’s manual.
2. Start the device by pressing the
button for more than 1 second.
2. Enter the syringe volume, temperature,
pressure, etc...
4. Once the calibration cycles are nished
verify that the device displays the message
“CHECK PASSED!!”
6. Next, the device displays on screen
the quality control report. Press to
print it or press to return to the main
menu.
4. Enter patient data: ID, name, surname,
weight, height, age, etc...
Press .
6. Perform the maneuver. Expiration must
continue until the device emits a “Beep!”,
indicating that it has been completed.
Warnings are shown if the maneuver does
not meet the ATS-ERS or NLHEP criteria.
Note: if the calibration program is enabled, when performing point 3/4 you will be asked if you want to
run the calibration program. Press to execute it, otherwise press .
8. Press to print the report of the
test. A progress bar shows the remaining
time for the test to be printed.
Beep!!
 Loading...