

Page 1
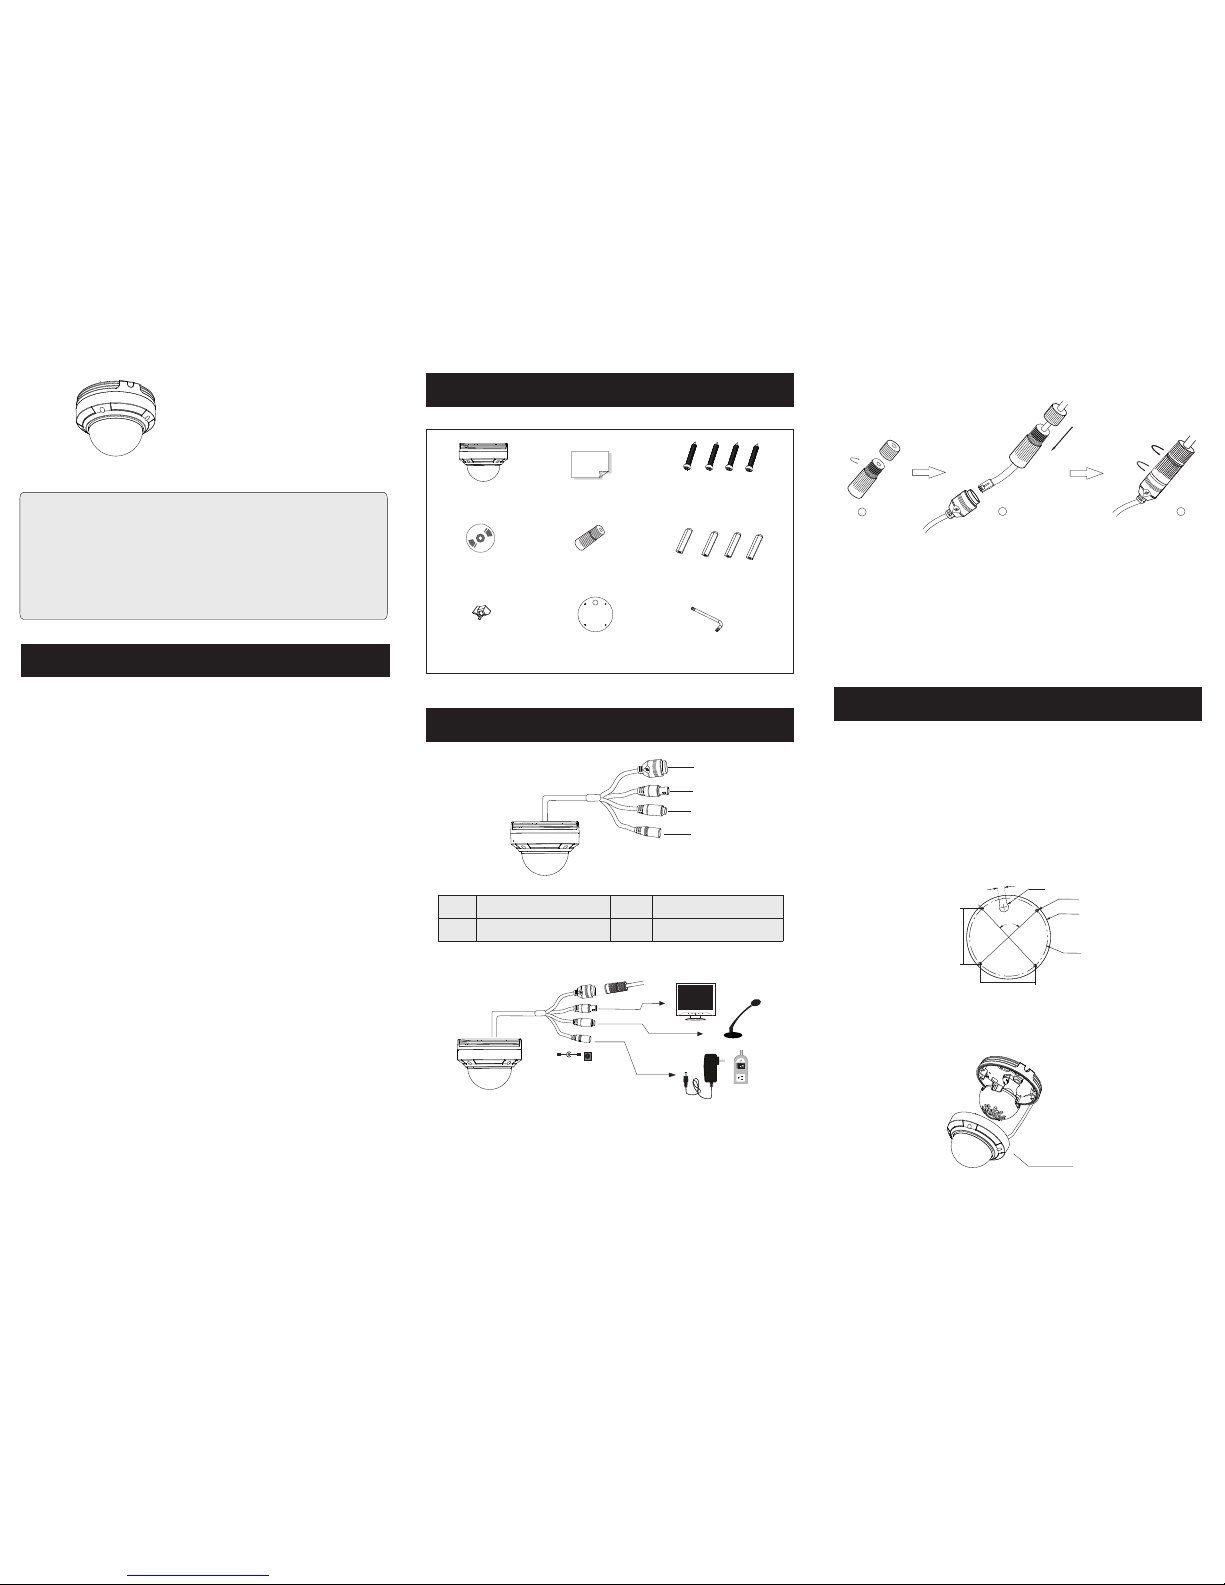
Package
Overview
Installation
2
3
4
► Connec tin g Net wor k Cab le
2
1
3
* 1 It is recomm ended to ins tall the wat er-proo f cap for netwo rk cable con nectio n.
* 2 If th e PoE net work sw itch is u sed to co nnect t he came ra that s uppor ts PoE
pow er suppl y, DC12 V power s upply is n ot requi red.
① Loo sen the n ut from t he main e lemen t.
② Ru
n the n etwor k cable ( witho ut RJ 45 co nnect or) thr ough th e
bot h eleme nts. Th en crimp th e cable wit h RJ 45 c onne cto r.
③ Connect t he ca ble to t he he rmet ic conn ector . The n tigh ten the
nut a nd the ma in cove r.
Thank you for purchasing Sibell. We are always looking to
improve and will update the products or procedures as technology
changes and the industry adapts. If you need further product
assistance please contact your technical support specialist.
Content is subject to change without notice.*
Quick Star t Guide
Network Camera
Cam era
Qui ck star t guide
CD
Water -pro of cap
Pla stic pl ug ×4
Dri ll temp late
Rub ber plu g
Scr ewdri ver
4 tap ping sc rews PA 4×35
Net work Ca ble
MIC I N Cable
CVB S Cable
Pow er Cabl e
1
2
3
4
Ple ase mak e sure th at the wa ll or cei ling is s trong e nough t o
withstand 3 times the weight of the camera. Please install and use the
camera in the dry environment.
Advised: If lens cover is removed, re apply cover within 4 hours
① Drill the screw holes and the cable hole on the wall according to the
drill template.
∅4.3
∅107.5
∅100.0
8.9mm
R6.3
90°
70.7mm
70.7mm
② Loos en the s cre ws to re move th e lower d ome fro m the c amer a.
Low er Dome
Netw or
k Cabl e
1
2
3
4
DC12V
1
Warning and C
aution
■ If the product does not work properly, please contact your dealer or the
nearest service center. Never attempt to disassemble the camera yourself.
(We shall not be responsible for any problems caused by unauthorized
repair or maintenance.)
■ Keep away from liquid while in use due to risks of electric shock
■ When using this product, you must be strict compliance with electrica
safety regulations to reduce the risk of electric shock. When the product
is mounted on the wall or ceiling, the device should be secured firmly.
■ Do not use camera beyond specified voltage rang
■ Do not drop the camera or damage the camera physicall
■ Avoid touching the camera len
■ If cleaning is necessary, please use clean cloth to wipe the lens gently
If the device will not be in use for a long period of time, please cover the
lens with lens cap to protect the device.
■ Do not aim the camera at the sun or extra bright illuminatio
■ Do not place the camera in dusty, damp or extremely hot, or col
situations/locations (the operating temperature is
(-4˚F~122˚F/-20˚C~50˚C), and do not expose it to high
electromagnetism or radiation.
■
To avoid heat accumulation, good ventilation is required for operatin
environment.
■ Regular Maintenance is recommended for all users
To Use Water-proof Cap:
you must have experience in cable termination
Page 2
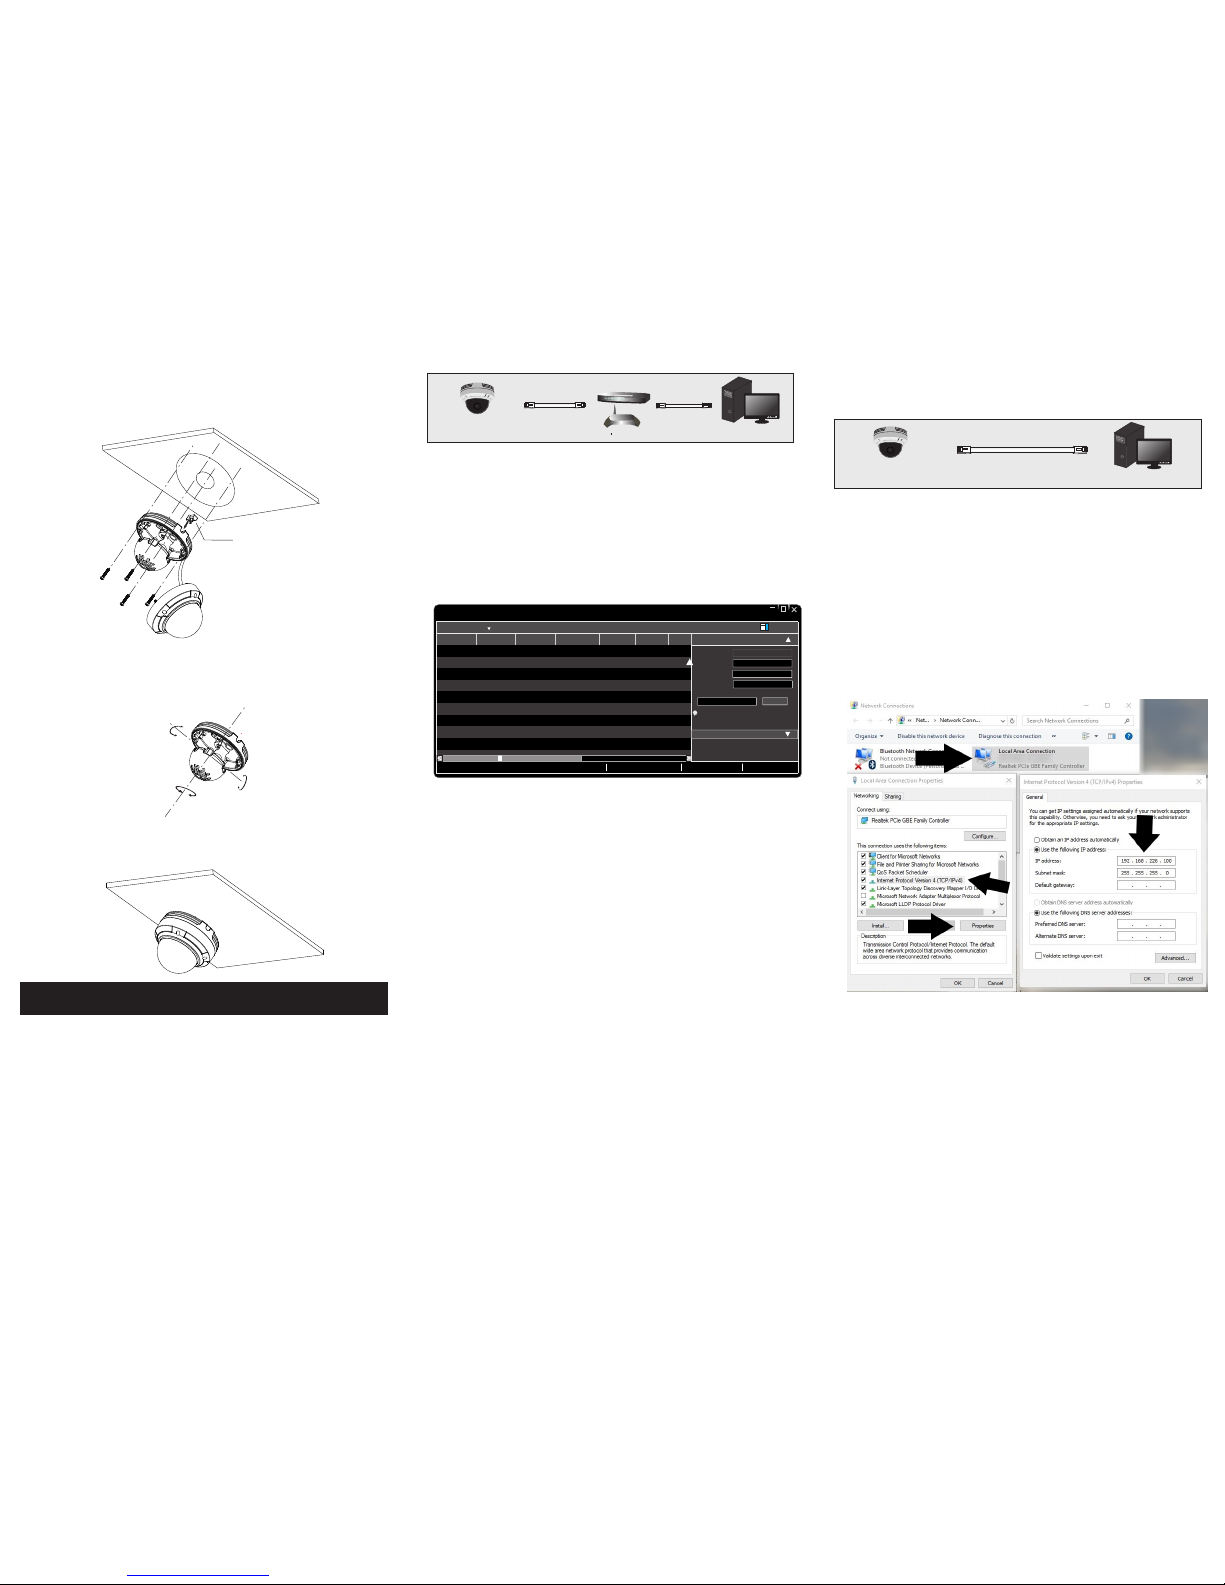
IE Network Connection
5
MENU
MENU
IPC
IPC
N etwor k Cab le N etwor k Cab le
N etwor k Cab le
Swi tch
Rou ter
Com puter
Com puter
③
④ Secure th e mount ing bas e with cam era to the wa ll with sc rews as
shown below.
Rou te and co nnect t he cabl es.
Rot ation 0 °~220 °
Pan 0 °~240 °
Rub ber Plu g
Til t 0°~68 °
⑤ Thre e-ax is ad just ment. B efore a djust men t, pre view th e image o f
the c amera o n a monit or and th en adju st the ca mera ac cor ding t o
the f igure b elow to g et an opt imum an gle.
⑥ Inst all th e low er dom e back to t he came ra and se cure it w ith t he
scr ews.
● SECTION 1: Accessing the camera using the IP Tool
1.**Default Network settings for the camera are:
IP address: 192.168.226.201
Subnet Mask 255.255.255.0
Gateway: 192.168.226.1
2. Connect the IP camera and a Windows computer to a network switch
or router
3. Find IPTool on the CD, and install it on the computer.
4. Determine what the local network scheme is.
Devi ce Netw ork Sea rch
Imme diate R efres h
name
name
name
IPC
IPC
IPC
unkno wn
unkno wn
unkno wn
192.1 68.22 6.201
192.1 68.1. 2
192.1 68.1. 3
80
80
80
9008
9008
9008
255.2 55.
255.2 55.
255.2 55.
Modif y Netwo rk Para meter
Mac Addr ess
IP Addre ss
Modif y
CE :98 :2 3 :75 :35 : 22
192 .16 8 . 226 . 201
255 . 255 . 2 55 . 0
192 .16 8 . 226 . 1
i
Tip: Ent er the ad minis trato r passw ord, and
then mo dify th e netwo rk para meter s.
Total Dev ice: 3
Local I P Addres s:192 .168. 1.4
Subne t Mask: 255.2 55.25 5.0 Gatew ay: 192 .168. 1.1 DN S:210.2 1.196 .6
Devic e Name Devic e Type IP Addre ss Http Po rt Data Po rt
Subne t
Produ ct Mode l
Abou t
Subne t Mask
Gatew ay
Restore IPC Default Configuration
5. Type IPCONFIG within the console > Press Enter
6. Listed is LOCAL AREA CONNECTION with an IP address/Subnet
Mask/Default Gateway
7. Write down the information for local area connection displayed in
Command prompt
8. Double-click to open the IP search tool
9. Under Modify network parameter, change the first 3 DIGITS
(OCTETS) OF THE IP ADDRESS TO MATCH THE NETWORK
SCHEME FROM STEP 5 ABOVE. THE LAST OCTET WILL BE A
DIFFERENT NUMBER, YOU MUST CHOOSE AN IP ADDRESS
THAT IS AVAILABLE ON THE NETWORK TO PREVENT A
CONFLICT. Use the PING command in the command prompt to find
and available IP address.
**ex. C:\user\desktop> ping 192.168.1.199 If the ping “request times
out”, or “destination host unavailable” then the IP address is available for
use.
10. Proceed to enter in the available IP address, and use the same subnet
mask and Default Gateway from step 5
11. Type in the password of the camera:
DEFAULT PW: 123456 > Click MODIFY
12. The camera IP will change if modify is successful
13. You can now access the camera settings via Internet Explorer by
typing http://<ip address of camera>
SECTION 2: Accessing the camera using Internet
Explorer WITHOUT IPTool:
6. After saving your temporary settings on the computer, you can now
access the camera using Internet Explorer. In the address bar type:
http://192.168.226.201
**IMPORTANT: AFTER you have configured the camera with a
permanent IP address. You must repeat steps 2-4 and set your
network adapter back to “obtain an IP address automatically.”
If everything has been setup correctly, in both cases you should be
able to access the camera on the local network using Internet Explorer,
or Sibell NVMS
4-10, BEFORE
proceeding
1. connect the IP camera and a Windows computer to a network
switch or router
2. On the computer, browse to:
a. Control Panel\Network and Internet\Network Connections
3. Right-Click Local Area Connection > Choose Properties
4. Highlight Internet Protocol TCP/IP version 4 > Click the Properties
Button
5. See figure 1 Below for temporary IP configuration
If you do not know your local network scheme refer to Section 1, steps
 Loading...