


G7
Demo User Guide

G7 Demo User Guide
Edition 3.3
July 2004
Demo User Guide written and typeset by Daniel Spreadbury.
See the
About G7 dialog for full G7 credits.
G7 copyright © Sibelius Software Ltd and its licensors 1987–2004
G7 Demo User Guide copyright © Sibelius Software Ltd 2003–2004
Published by Sibelius Software Ltd, The Old Toy Factory, 20–22 City North, Fonthill Road, London
N4 3HF, UK
All rights reserved. This User Guide may not be reproduced, stored in a retrieval system or transmitted in any form or by any means – electronic,
recording, mechanical, photocopying or otherwise – in whole or in part, without the prior written consent of the publisher. Although every care has
been taken in the preparation of this User Guide, neither the publisher nor the authors can take responsibility for any loss or damage arising from
any errors or omissions it may contain.
G7, Sibelius, Scorch, Flexi-time, Espressivo, Rubato, Rhythmic feel, Opus, Inkpen2, magnetic, the G7, Sibelius and double helix logos, G7music.net,
‘The fastest, easiest way to create, play and post tab’ and ‘Play, write and publish songs’ are all trademarks or registered trademarks of Sibelius Soft-
ware Ltd in the USA, UK and other countries. All other trademarks are acknowledged as the property of their respective owners.
2

Contents
Introduction . . . . . . . . . . . . . . . . . . . . . . . . . . . . . . . . . . . . . . . . . . . . . . . . . . . . . . . . . . . . . . . . . . . . . . . .5
Further information . . . . . . . . . . . . . . . . . . . . . . . . . . . . . . . . . . . . . . . . . . . . . . . . . . . . . . . . . . . . . . . . .7
Running for the first time . . . . . . . . . . . . . . . . . . . . . . . . . . . . . . . . . . . . . . . . . . . . . . . . . . . . . . . . . . . . .9
Finding your way around . . . . . . . . . . . . . . . . . . . . . . . . . . . . . . . . . . . . . . . . . . . . . . . . . . . . . . . . . . . .11
Playback . . . . . . . . . . . . . . . . . . . . . . . . . . . . . . . . . . . . . . . . . . . . . . . . . . . . . . . . . . . . . . . . . . . . . . . . . .16
Starting a new score . . . . . . . . . . . . . . . . . . . . . . . . . . . . . . . . . . . . . . . . . . . . . . . . . . . . . . . . . . . . . . . .19
Tab input . . . . . . . . . . . . . . . . . . . . . . . . . . . . . . . . . . . . . . . . . . . . . . . . . . . . . . . . . . . . . . . . . . . . . . . . . .22
Working with lyrics and chords . . . . . . . . . . . . . . . . . . . . . . . . . . . . . . . . . . . . . . . . . . . . . . . . . . . . . . .28
More to try . . . . . . . . . . . . . . . . . . . . . . . . . . . . . . . . . . . . . . . . . . . . . . . . . . . . . . . . . . . . . . . . . . . . . . . .33
3

4

Introduction
Introduction
Thank you for trying G7. Over the next few pages we’ll tell you what G7 can do for you and how to
use this User Guide.
What can G7 do for me?
G7 is the first tab and notation software designed specifically with guitarists and songwriters in
mind. It’s easy to use and so fast to learn that it’ll change the way you play and write music.
If you’re a guitarist, you can create tab or notation instantly using the on-screen fretboard display,
or by playing your MIDI keyboard or guitar directly into the computer using G7’s Flexi-time feature. G7 also loads ASCII tab and MIDI files. You can even scan in notation and turn it into tab so
that you can play it, and the on-screen fretboard will show you how to finger the music as it plays
back.
If you’re a songwriter, you’ll quickly be able to write out songs, add chords, generate accompaniments, hear them play back, and then make audio tracks for burning onto CD, print them out at
publication quality, post them on the Internet, or send them to your friends in MIDI or ASCII tab
format.
If you’re a teacher, you can create educational materials incorporating pictures and colored notes,
or show your students how to play particular pieces using G7’s expressive playback and on-screen
fretboard.
Whether you’re writing for solo guitar or a rock band, G7 will help you produce the results you
want quicker and easier than ever before. With comprehensive support for fretted instruments
from guitar to sitar, from dulcimer to dobro, the only limit is your imagination.
Restrictions of the demo version
This demo version is identical to the full G7 program, except that:
* Kontakt Player, which provides high-quality sample playback, is not included
* saving, exporting and Internet publishing are disabled
* you cannot submit your music for publication on G7Music.net
* you cannot scan printed sheet music using Neuratron PhotoScore Lite
* you can only print a single page (which is watermarked)
* the Guitar Guide, an interactive resource describing different types of guitars, playing tech-
niques and musical styles, is omitted
* most of the 20+ high-quality textures for changing the appearance of the paper and desk in the
main editing window are not included
* some example scores, manuscript papers (templates) and the full on-screen help are omitted.
To find out more about what G7 can do, watch the video tutorials and read the comprehensive feature list at
www.G7info.com.
5

G7 Demo User Guide
About this User Guide
This User Guide isn’t a comprehensive guide to using the G7 demo; it’s designed to introduce you
to the basic operations of the program. The full version of G7 is accompanied by a 200-page
printed manual and extensive on-screen help.
Typography in this User Guide
* Names of computer keys, menus and dialogs are written like this.
* Items in menus and sub-menus are denoted with >, so “choose File > Open” means “choose
Open from the File menu.”
Basic terminology in this User Guide
If you know how to point and click with your mouse, you probably know enough about using computers to use G7. Here are some computer terms used in this User Guide:
* G7 is almost identical on Windows and Mac, but where there are differences, mainly in key-
board shortcuts, the Windows convention is listed first, e.g. “Type
down the
ter, don’t type
* Similarly, “Alt+click or z-click” means hold down the Alt (Windows) or z (Mac) key and click.
* On Windows, to “click” something means to move the mouse arrow over it and click the left
Ctrl (Windows) or X (Mac) key and type A. (Even though A is written as a capital let-
Shift unless explicitly told to do so.)
Ctrl+A or XA” means hold
mouse button. To “right-click” something means to point at it with the mouse and click the right
mouse button.
* To “drag” something means to point at it with the mouse, and then click and hold the left mouse
button (or the only mouse button on Mac) while moving the mouse. To finish dragging, just let
go of the mouse button.
* A “dialog” is a window that asks you for information, with buttons for you to click when you’ve
finished. Most dialogs are accessed by choosing menu items with the mouse, or by typing the
appropriate keyboard shortcut.
* The “numeric keypad” is the rectangle of numbers and other characters at the very right-hand
side of your computer keyboard (unless you have a laptop computer; laptops don’t usually have a
separate numeric keypad.)
* “Return” is the large key to the right of the letter keys. On some keyboards it is labeled with
“
Enter” or a special arrow symbol, but we always call it Return.
* “Enter” is the large key at the bottom right of the numeric keypad. On some keyboards it is unla-
beled, but it still means
* Some keys are labeled differently on different keyboards. We’ll use the standard symbols for
Enter.
these keys on Mac, but here are the corresponding names which may appear on your keyboard:
Mac symbol Mac name Windows equivalent
X Command Ctrl (“Control”)
x Shift Shift
z Option Alt
R Return Return
E Enter Enter (on numeric keypad)
(on main keyboard)
6

Further information
Further information
G7info.com
The G7 website,
demonstrations of key features of the software, plus reviews and details of who’s using G7. You can
also get basic technical help information by searching the online Help Center.
Buying G7
For information about buying G7, click the toolbar button shown on the left, contact your local
Sibelius dealer, see
* North, Central & South America: 888-474-2354 toll-free, email: USA@G7info.com. For techni-
cal problems, see overleaf.
* UK: freephone 0800 458 3111 (+44 20 7561 7999 from outside the UK), email:
UK@G7info.com. For technical problems, see overleaf.
* Australia: 08 82 771 722, email: support@intelliware.com.au
*
Austria: 01 667 4539, email: info@weiss-kadlec.at
*
Belgium, Netherlands, Luxembourg: 09 348 5508 (0032 9 348 5508 from outside Belgium), email:
info@muselec.be
Czech Republic & Slovakia: 0501 454 769, email: tomas@disk.cz
*
* Denmark: 0 86 190 899, email: ss@newmusik.dk
*
Finland: 09 25 86 34 40, email: info@carbonmusic.fi
*
Germany: 030 789 07990 email: vertrieb@m3c-berlin.de
*
Greece: 01 228 2160, email: athanasiadis@nakas.gr or kostas-chr@nakas.gr
*
Hungary: 1 467 3310 / 1 469 0699, email: midisoft@mail.datanet.hu
*
Iceland: 0354 552 1185, email: tonastodin@tonastodin.is
*
Ireland: 01 453 1233, email: source@indigo.ie
*
Italy: 06 3036 3456, email: info@midiware.com
* New Zealand: 09 810-8960, email: dave@computermusic.co.nz
*
Norway: tel: 02 335 3180, fax: 02 335 3189
* Poland: 048 22 646 9708, email: piotr@mbspro.com.pl
*
Singapore & Malaysia: tel: 65 674 93656, email: gmmrkc@pacific.net.sg
*
South Africa: 011 792 8402, email: hohner@hot.co.za
*
South Korea: 02 763 5680, email: midiland@uriel.net
*
Sweden: tel: 08 587 915 00, fax: 08 587 915 99
* Switzerland: 032 322 5274, email: bonjour@giant.ch
*
Other countries: +44 20 7561 7999, email: ROW@G7info.com
www.G7info.com, contains additional information about G7, including video
www.g7info.com, or contact:
7

G7 Demo User Guide
Technical problems
If you have any technical problems running the G7 demo, please first try searching the Help Center
at
www.G7info.com. If you are unable to find a solution to your problem, please contact:
* North, Central & South America: 1-888-280-9995 toll-free (outside of the USA phone 1-925-280-
0600) Monday to Friday 7am–4pm PST (except holidays), email:
*
United Kingdom: 020 7561 7997, Monday to Friday 10am–5pm, email:
G7helpUK@sibelius.com
Other countries: contact the appropriate distributor for your country in the first instance (see
*
G7helpUSA@sibelius.com
previous page).
8
Running for the first time
Running for the first time
Having successfully installed the G7 demo, now run the software for the first time:
* On Windows, choose Start > Programs > Sibelius Software > G7 Demo.
* On Mac, navigate to the G7 Demo folder inside the Applications folder on your hard disk, and
double-click the
Splash screen
A pretty G7 graphic appears for a few seconds, accompanied by a brief musical excerpt. (Should
you want to silence this music at a later date, switch off
ences
dialog; this dialog is in the G7 Demo menu on Mac OS X.)
The Devices dialog
Next, a big dialog called
G7 icon.
Play music at start in the File > Prefer-
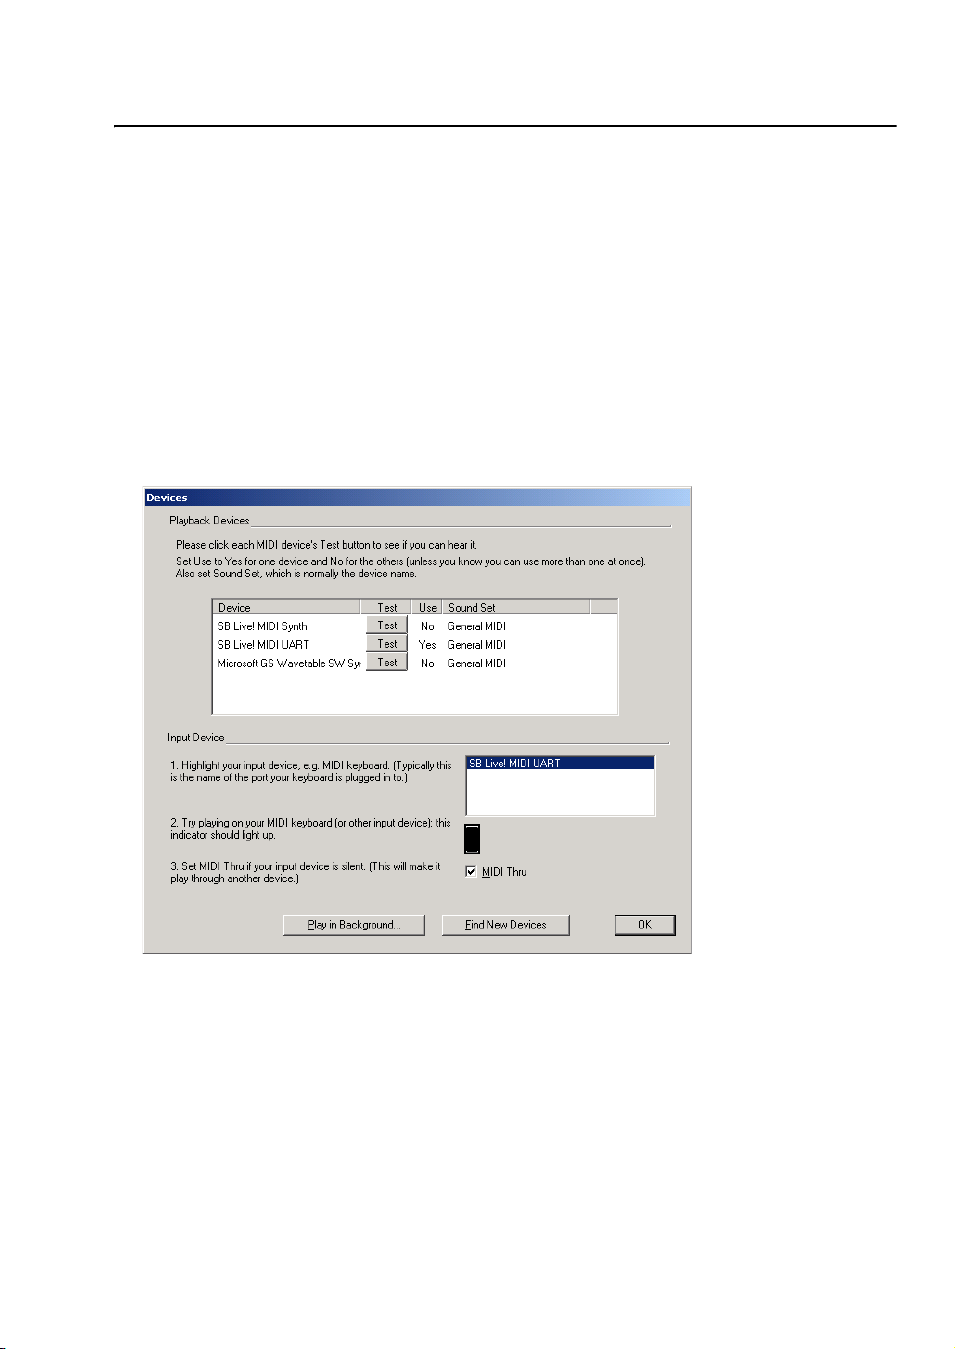
Devices appears:
The top half of the dialog, labeled
* There may well be two or more things listed – such as an internal soundcard and an external
Playback Devices, lists any playback devices you have.
MIDI device. External MIDI devices are normally referred to by the port, and include the words
“MIDI Out.”
* Click Test on each device listed to see how it sounds. You may get no sound if the device is not
properly connected, e.g. if your speakers are not connected to your soundcard or are not
switched on.
* If more than one device is listed, you probably just want to play back through the best-sounding
one of them. To do this, click in the
Use column on the other devices, to turn them to No.
9
G7 Demo User Guide
* On Mac, you may see only one device (QuickTime Music) listed the first time you run G7. If you
don’t have any external MIDI devices, this is fine – but if you do have external devices, you
should click the
or
OMS or FreeMIDI (on Mac OS 9).
Change button in the dialog to choose either Mac OS X MIDI (on Mac OS X),
The bottom half of the dialog, labeled
Input Devices, lists any MIDI input devices you have – i.e. a
MIDI keyboard or MIDI guitar.
* In the event that you have two or more input devices, you can select the one you want to use in
the small panel on the right of the dialog
* Switch on MIDI Thru if and only if you have a keyboard with no built-in sounds – this will make
G7 play back notes played on your keyboard using your soundcard or other playback device
* There is a useful indicator which lights up green when you play on a MIDI keyboard or MIDI
guitar. Use this to check that your keyboard or guitar is plugged in correctly.
Now click
log again by choosing
OK. If you need to change any of these settings again in the future, you can find this dia-
Play > Devices from G7’s menus.
Quick Start
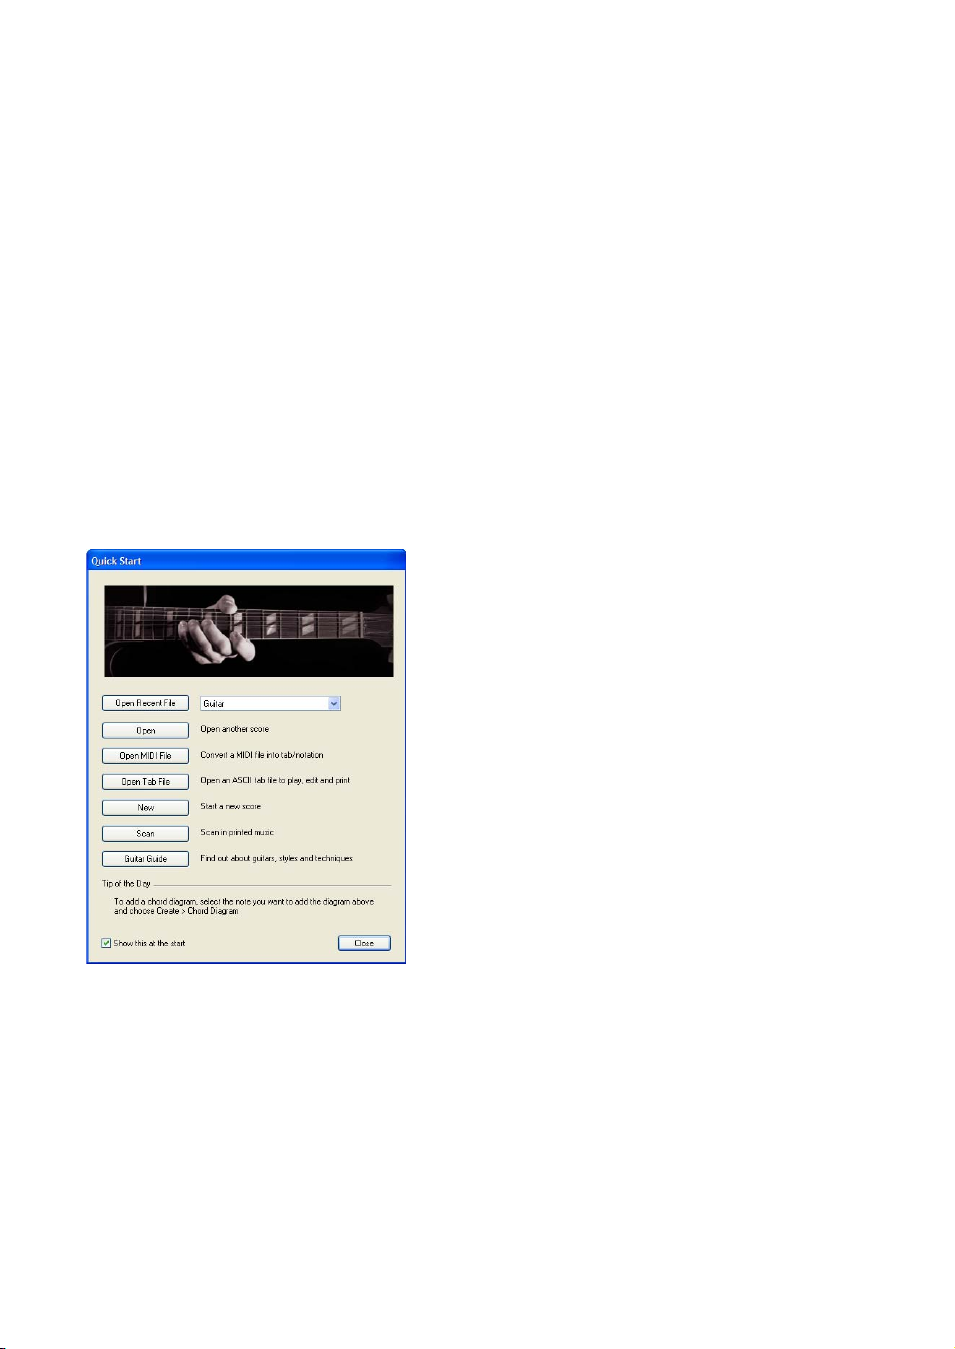
The next (and final) thing that appears is the Quick
Start dialog.
This useful dialog allows you to open any of the last
five songs you were working on, or to start working
with a new score in a variety of ways, e.g. by importing
a MIDI or ASCII tab file, or by scanning some printed
sheet music.
At the bottom of the dialog is the Tip of the Day, which
hopefully tells you something useful you didn’t know
already.
10
If this sort of thing annoys you, switch off
at the start
, and G7 won’t display the Quick Start dia-
Show this
log the next time you start the program. (Should you
decide that you do want this dialog to appear when you
start G7 after all, choose
Show this at the start back on.)
File > Quick Start, and switch
Finding your way around
Finding your way around
Opening a score
To introduce you to the look and feel of G7, let’s open one of the supplied example scores (this is
the word we use to refer generically to files you create in G7).
Click the
Ctrl+O or XO). In the dialog that appears, follow the Example Scores shortcut (inside
the
(On Mac, the Scores folder is inside the G7 program folder; on Windows, the Scores folder is
inside your
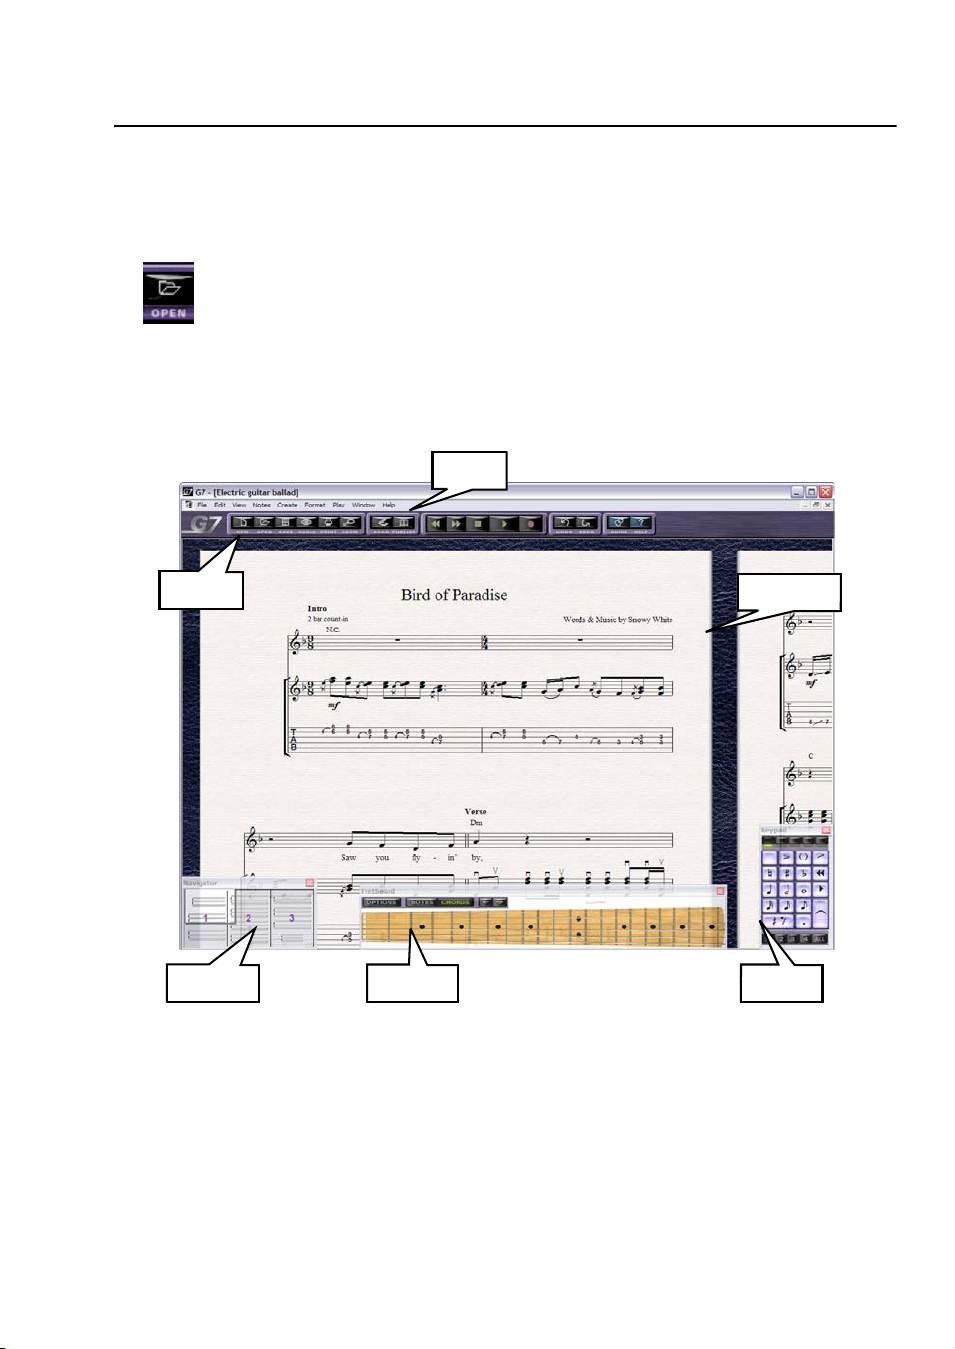
When you’ve opened the score, the music appears, looking somewhat like this:
To ol b ar
Open button on the toolbar (shown on the left), or choose File > Open (shortcut
Scores folder), select one of the scores, then click Open.
My Documents folder.)
Menus
Score view
Navigator
Let’s just take a moment or two to explore the display.
Score view
The bulk of the screen is taken up with the music itself. G7 is completely WYSIWYG (What You
See Is What You Get) – in other words, when you print your score, it will look exactly the same as it
does on the screen. You can think of the screen as a virtual desk, with all the pages of your score
laid out side by side.
Fretboard Keypad
11

G7 Demo User Guide
To move around, you can use the navigator (see below), or you can simply click on a blank part of
the virtual paper and drag the view to where you want it to be. You can also use the
Page Down keys (8 and 9 on Mac) to move the display up and down a screenful at a time, and
the
Home and End keys (4 and 7 on Mac) to move left and right a screenful at a time. Give it a
Page Up and
try.
You can also zoom in to get a closer look at the music, or zoom out to get a view of the
whole page, or even see more than one page at once. To zoom, click the
Zoom button on
the toolbar (shown on the left).
The mouse pointer turns into a magnifying glass icon (which looks like ), and you can then click
the left mouse button to zoom in and the right mouse button to zoom out (on Mac, hold down
and click to zoom out). You can also click and drag the left mouse button to draw a box around a
particular area you want to see more closely. To stop zooming, either click the
or hit the
Esc key (and we’ll see as we go on that the Esc key is useful for stopping all kinds of oper-
Zoom button again
ations).
z
For quicker zooming, you can use keyboard shortcuts to zoom in and out: hold down
dows or
wheel button on your mouse, you can alternatively hold down the
X on Mac, then type + and – to zoom in and out respectively. On Windows, if you have a
Ctrl key and roll the wheel up
Ctrl on Win-
and down to zoom in and out.
Navigator
In addition to simply being able to drag the virtual paper around your virtual
desk, you can use the Navigator, which is the small window in the bottom lefthand corner of the screen.
The Navigator shows you a very small version of your score. The white rectangle indicates the part of the score you can see in the main score view, and
you can drag the rectangle around to move the view around in real time.
You can switch the Navigator on and off by choosing
zXN).
Window > Navigator (shortcut Ctrl+Alt+N or
Because the Navigator is so quick and easy to use, G7 doesn’t use normal scroll bars by default, but
if you find using scroll bars more comfortable, you can switch them on by choosing
.
Bars
View > Scroll
If you have a mouse with a wheel button, you can also use the wheel to scroll around the score,
whether or not you have
* Scroll the wheel up and down to move the page up and down; hold down Alt or z to move a
View > Scroll Bars switched on:
screen at a time
* Hold Shift and scroll the wheel to move the page left and right; hold down Alt or z as well to
move a screen at a time (or a page at a time if the width of the page fits on the screen).
On Windows, to change the scrolling speed, use the
Mouse applet in Control Panel. The precise
options available depend on the drivers installed for your particular mouse, but many mouse drivers offer the option of accelerated scrolling; increasing this allows you to scroll around the score
more quickly using the wheel.
12

Finding your way around
Fretboard
The on-screen Fretboard is just like having a virtual guitarist sitting in front of you, showing you
how to play the music in your score. Because the Fretboard intelligently works out a sensible way of
fingering any music, you can use the fretboard to show you how to play anything in your score –
even if it’s not for guitar! For example, if you select a keyboard chord in the score, the Fretboard
will show how to play it on guitar.
You can also use the Fretboard as an easy way to input notes and chords into your score.
And just for kicks, you can even choose between maple, rosewood and acoustic necks, or between
standard 6-string guitar and 4- or 5-string bass!
You can also choose the size of the Fretboard display; by default the Fretboard opens at its smallest
size, but you can make it larger. Click the
choose
Small, Medium or Large.
Options button in the Fretboard window and then
We’ll talk a lot more about the Fretboard later on. For now, you can hide and show the window by
choosing
Window > Fretboard (shortcut Ctrl+Alt+F or zXF).
Keypad
The Keypad is used for inputting and editing notes in your score. Its design corresponds to the numeric keypad at the right-hand side of your computer’s keyboard
(unless it’s a laptop, which don’t usually have room for a keypad). Typing one of
the keys on your keyboard’s numeric keypad is exactly the same as clicking on one
of the on-screen buttons.
The five black buttons along the top of the keypad correspond to the five different
pages – or “layouts” – of the keypad. You can cycle through them by typing the +
key on the numeric keypad, or by clicking the button marked
keypad. You can also jump to a particular keypad layout using the keys
> on the on-screen
F8–F12 along the top of
your keyboard.
All the most common musical symbols, including notes and accidentals (e.g. flat, sharp and natural signs, used to show that the pitch of a particular note is different from the expected pitch as
determined by the key signature) are on the first two keypad layouts. The third keypad layout is
used for changing the beaming of notes (although G7 beams notes automatically, so you won’t normally need to use this layout). The fourth layout is for articulations (things like pauses, accents and
harmonics), and the fifth layout is a collection of obscure accidentals (things like three-quarter
sharp) which you’ll probably never need, but you can sleep easy knowing they’re all present and
correct should the desire to write a score containing a quarter flat note ever take hold of you!
At the bottom of the keypad are buttons numbered
1–4, with a fifth enigmatically labeled All,
which determine which voice you’re working in. Normally you won’t ever need to use more than
13

G7 Demo User Guide
one voice, but if you’re writing complex music (e.g. for classical guitar) you will sometimes need
two (or possibly more) independent rhythms on the same staff, and this is where voices come in.
As with the Navigator and the Fretboard, you can toggle the Keypad on and off by choosing
Window > Keypad (shortcut Ctrl+Alt+K or zXK).
Other windows
Although we won’t go into the details now, if you sneak a peek into the
see windows called
Mixer and Properties listed there. Try switching on the Mixer, which looks like
Window menu, you’ll also
this:
You can use the Mixer to change the playback of your score in real-time.
Drag the faders up and down to change the volume, or choose a new sound
from the
and off by typing
the Mixer more in
Sound drop-down menu, and so on. You can switch the Mixer on
Ctrl+Alt+M or zXM on your keyboard. We’ll talk about
Playback, later in this User Guide.
Now try choosing Window > Properties (shortcut Ctrl+Alt+P or zXP).
Properties is a small floating palette that allows you to change various
more advanced options, e.g. changing the font of some text, changing to a
different guitar tuning on a tab staff, choosing a different notehead, and so
on. We’ll discuss Properties later in this User Guide.
Toolbar
We’ve already used a couple of buttons on the toolbar, so you’ve probably figured it out by now. The
toolbar offers you quick access to the most commonly-used functions of G7. The buttons are as follows:
* New, Open, Save and Print should be familiar to you from other programs on your computer
* Audio allows you to save an audio track of your score
* Zoom allows you to zoom in and out – see Score view above for more details
* Scan lets you scan sheet music into G7
* Publish transfers your score to our self-publishing web site G7music.net where it can be viewed,
played back and printed by people all over the world
* The next five buttons are standard playback and recording controls, so they shouldn’t seem par-
ticularly mysterious
14

Finding your way around
* Undo and Redo are a kind of time machine, allowing you to undo things you’ve done to your
score, or redo them again if you decide you were right all along
* Guide launches the interactive Guitar Guide, where you can learn all about the different kinds of
guitars, hear examples of different styles of music, and find out both how to perform and write
down special guitar techniques like hammer-ons, pull-offs, bends, slides and harmonics. The
Guitar Guide is not included in the demo version of G7.
* Help opens the on-screen help for G7, a cut-down version of this User Guide. It’s useful as a
quick searchable reference for how to use the basic functions of G7 if you don’t have this User
Guide to hand.
Menus
You probably won’t need to use G7’s menus very often, as you can do most things in G7 in the obvious way – for example, to select something, just click it; to move it, just drag it around or use the
arrow keys. However, lurking in the menus are some of the program’s more advanced features.
We won’t go through each menu in detail here. Instead, we’ll just refer to particular menu items
where appropriate. If you feel like poking around in the menus now, go right ahead – don’t forget
that you can undo just about everything you can do to your score simply by clicking the
Undo but-
ton on the toolbar.
Customizing the display
If you’re feeling adventurous, now might be the time to try customizing G7’s display to suit your
preferences. You can change the textures used for the virtual paper and desktop using View > Tex-
, and even adjust the level of “smoothing” to improve the appearance of the music on the
tures
screen using
View > Smoothing.
15

G7 Demo User Guide
Playback
Now that we know our way around G7’s windows, let’s play back a score.
Click the Play button (shown on the left) or simply hit P to start playback. G7 automatically
hides the Keypad (and Properties window, if it’s open) and zooms in to show you as much
music as possible. A blue line moves through the score as it plays back so you can follow
your place easily.
Playback tools
During playback, the following controls appear:
Flexi-time (shortcut
Rewind (shortcut
Stop (shortcut
Ctrl+Shift+F or
Timec od e / Te mp o
Fast-forward (shortcut Pause (shortcut
Tempo slid e r
You can drag the tempo slider left and right to alter the speed of playback. As you do so, the timecode readout (which normally shows the elapsed time since the start of the score) displays the current speed of the score in beats per minute (BPM) until you release the slider again. When the
slider is at its central position, G7 exactly follows any metronome marks or other tempo indications in the score.
When you’ve had enough of playback, hit
Esc, or click the Stop button. If your computer or play-
back device isn’t fast enough to cope with rewinding or fast-forwarding at high speed, it may occasionally leave a note hanging on when you stop, in which case choose
Play > All Notes Off
(shortcut Shift-O).
Specifying what to play back
* If nothing is selected in your score, G7 will play back the full score from the beginning. To
ensure nothing is selected, click on a blank part of the paper, or hit
* To play from a particular place in the score rather than the start, select a note before hitting P.
* You can also play any instrument on its own – click a blank part of a bar in the instrument so the
bar is enclosed in a blue box, then hit
* You can even play any combination of instruments – simply click a blank part of a bar in one
instrument, and
Ctrl+click or X-click in the other staves you want to play back. (They don’t have
P.
Esc.
to be adjacent.)
Fretboard
The on-screen fretboard is very useful during playback. If it’s not visible, show it by choosing
Window > Fretboard (shortcut Ctrl+Alt+F or zXF). Then click its Setup button. The Setup dia-
16

log allows you to choose which staff’s notes the Fretboard should display during playback, or
whether it should just show you how to play any chord diagrams that are present instead.
By watching the fretboard during playback you can learn how to play difficult passages; don’t forget that you can use the tempo slider on the toolbar to slow playback down so that you can see and
hear what’s going on more clearly.
Note that you can also step through the score one note or chord at a time to learn how to play particularly difficult passages. Click a note or chord in the staff you want to follow, then use the
0 buttons on the Fretboard or the computer keyboard to move back and forth; as you move
through the music, the Fretboard shows how to play each note or chord.
Performance
You’ll notice that G7 doesn’t just play back the notes in your score; it also accurately follows tempo
markings, dynamics (e.g. mf), articulations (e.g. >), special notations such as slides, bends, trills
and glissandos, and repeat structures such as D.C. al Coda. It does all of this with remarkable realism, thanks to a unique set of features accessible from the
Shift-P):
* Espressivo™, the Italian word for ‘expressively’, adds phrasing and expression just like a human
Play > Performance dialog (shortcut
performer would
* Rubato™ is the rhythmic counterpart to Espressivo, allowing G7 to subtly vary the tempo of your
score to add greater expression
* Rhythmic feel™ allows you to choose the ‘groove’ for your score, e.g. G7 can play back using vary-
ing degrees of swing, or accent rhythms in pop, rock and reggae styles.
Playback
1 and
Live Playback
In real life, a musical performance rarely precisely matches what is notated in the score; there are
all manner of nuances of tempo, dynamic and flexibility that cannot easily be reproduced even by
smart features like Espressivo, Rubato and Rhythmic Feel. So if you provide G7 with an actual,
human performance – either from real-time recording using Flexi-time or by importing a MIDI
file – it will preserve it for you using Live Playback.
Live Playback allows G7 to create the cleanest, simplest notation possible, while still exactly recreating your Flexi-time performance or the subtleties of a well-sequenced MIDI file during playback.
Ironically, it does this by storing exactly what you play, right down to the tiniest variations in velocity (how loud a note is), duration (how long you played it for) and rhythmic offset (how much it
deviates from precisely where the beat is).
When Live Playback is switched on, G7 doesn’t use features like Espressivo, Rubato and Rhythmic
Feel. It also doesn’t respond to written directions in the score such as dynamics. It literally plays
back exactly what you played, or what the imported MIDI file sounded like to start with.
Live Playback is switched on by default. To switch it off or on again, simply choose
Playback
. Note that it’s not possible to add Live Playback data to notes entered via the Fretboard,
Play > Live
or using any of the other alphabetic or step-time input methods – Live Playback data is only created by Flexi-time input or by importing a MIDI file.
17

G7 Demo User Guide
What G7 reads
Almost all of the notation in a score should play back correctly right away. G7 reads the following:
* Notes, chords, rests, accidentals, ties, grace notes
* Clefs, key signatures, time signatures
* Instrument names – these determine the sounds used, which you can change if you like using
the Mixer
* Standard articulations, e.g. accent, staccato, marcato, etc.
* Tre m ol os
* Text specifying dynamics such as pp, loud
* Metronome marks such as q = 108
* Repeats, including 1st and 2nd endings (1st-/2nd-time bars) and D.S./D.C. al Fine/Coda
* Lines such as slurs, trills, octave (8va) lines, pedaling, rit./accel., gliss. and hairpins
* Guitar notations such as bends and slides
* Noteheads used in drums and percussion
* Hidden objects, e.g. hidden metronome marks, notes or dynamics.
Note that some of these are ignored when
see
Live Playback above.
Play > Live Playback is switched on, as it is by default –
Mixer
You can use the Mixer window to adjust the sounds used by your score during playback.
18

Starting a new score
Starting a new score
Let’s start our first score in G7 and get used to some of the basic editing and inputting operations of
the program.
New score wizard
When you click the
wizard appears. (A wizard is a special kind of dialog that leads you through a multi-stage
process.) G7’s new score wizard has five pages, which are as follows:
* Choose the instruments from a list of pre-defined manuscript papers or create your own instru-
mentation, and choose the page size and orientation;
* Decide the appearance of the score, e.g. whether to use a traditional or handwritten music
design;
* Set the time signature and tempo of your score;
* Set the key signature of your score;
* Finally, give your score a title, enter the composer/songwriter name, and so on.
New button on the toolbar (or in the Quick Start dialog), a helpful
You move between the pages by clicking the
ard at any stage by clicking
Finish to create a score with whatever settings you’ve already chosen
(and if you want to exit the wizard without creating a score at all, just click
Next and Previous buttons, but you can exit the wiz-
Cancel). You can easily
change any of these settings later on without using the wizard, so don’t feel that you need to know
exactly what you’re going to write before you even get started.
The first page of the wizard looks like this:
The list on the left contains some predefined manuscript papers; if none of these are for exactly the
right instruments, you can start with the
Blank manuscript paper and pick your own instruments,
or start with another manuscript paper and add or remove instruments fromit. In either case, you
19

G7 Demo User Guide
add or remove instruments by clicking the
Add Instruments button. This shows the following dia-
log:
The available instruments are grouped in families. Choose the family in the left-hand list to see the
instruments in that family in the middle list; to add an instrument to your score, choose it from the
middle list, and click
Add. The new instrument will then appear in the right-hand list, with a +
sign in front of it to show you that it is new. The right-hand list is in the order of the staves in the
score. When you add a new instrument to your score, you can change its position in the vertical
order of staves by clicking the
change the order of a staff after it has been created, i.e. if it doesn’t have a
Move Up and Move Down buttons (note, however, that you can not
+ sign in front of its
name.)
Note that you can use up to 16 staves in your score (this means that you could have, say, eight
pianos, since each piano uses two staves).
To remove an instrument, select it in the right-hand list and click the
Remove button.
Once you’re satisfied with your choice of instruments, click OK to close the Instruments dialog,
and click
Next to move on to the next page of the wizard (you could also click Finish at this point if
you’re happy with your score now).
The second page of the wizard allows you to choose the overall appearance or ‘house style’ of your
score, and change the fonts it uses. Choose from the following house styles:
* Standard uses the traditional engraved Opus font, like in printed sheet music
* Handwritten makes your score look as if it were handwritten with an ink pen
* Keyboard is like Standard but with some extra settings specifically for keyboard music
* Lead sheet is like Standard but with some extra settings specifically for lead sheets, such as
‘winged’ repeats to make them more visible
* Keyboard handwritten and Lead sheet handwritten are like Keyboard and Lead sheet, but
with a handwritten look.
If in doubt, just leave it at
Unchanged.
You can also change the text font used by your score: all text (such as title, composer, instrument
names, technique markings, tempo indications etc.) will use the font chosen here by default,
although you can easily change it on a case-by-case basis later on using the Properties window.
Again, if in doubt leave the text font at
Unchanged.
20

Starting a new score
The third page of the wizard allows you to choose a time signature, set a pick-up (upbeat) bar, and
a tempo marking and/or metronome mark to set the speed of your score.
The fourth page allows you to set the key for your score (only relevant if you have notation staves).
The fifth page allows you to enter some basic text, such as the title of the score, the name of the
composer/songwriter, the name of the lyricist, and some copyright information. This text is added
to the first page of your score.
Your first score
Let’s pay a little homage to a world-famous rock band and arrange the first few bars of U2’s With Or
Without You using G7.
* Click the New button on the toolbar or choose File > New
*
Choose the Rock group template from the list on the first page, and click Next
*
We don’t need to change any of the house style settings on the second page, so click Next again
* Choose a 4/4 time signature; we don’t need a pick-up (upbeat) bar, but we do want a metronome
mark, so switch on
Add metronome mark and set it to q = 105. Click Next when you’ve done all
this.
* This song is in D major, so choose that key signature on the next page, and click Next
*
On the final page of the wizard, enter With Or Without You as the title, and U2 as the composer/songwriter, then click
Finish.
You should now see something like this:
Now we need to actually input some music. Read on!
21

G7 Demo User Guide
Tab input
You should now have your empty rock group score up on the screen, just waiting for inspiration to
strike. But before it does...
Ways of inputting notes
There are six main ways of inputting notes in G7:
* Mouse input using the on-screen Keypad and Fretboard windows
* Real-time recording from a MIDI keyboard or MIDI guitar, known as Flexi-time™
* Step-time input from a MIDI keyboard or MIDI guitar
* Alphabetic input, using just the computer’s keyboard
* Importing files from other programs, such as MIDI files or ASCII tab files
* Scanning printed sheet music using PhotoScore Lite.
Over the next few pages we’ll try out some of the above methods, beginning with mouse input.
Mouse input
Let’s start with the rhythm guitar part to With Or Without You, which goes roughly like this:
10
10 7
10
10 7
10
10 7
10
10 7
We’ll input this onto the top Electric Guitar tab staff in our new score using the mouse:
* Switch on the Fretboard window (if it’s not already visible) by choosing Window > Fretboard.
Make sure the Fretboard is in Notes mode (click the
we’ll be inputting notes rather than chords.
* Click the eighth note (quaver) button on the Keypad ( ), or hit 3 on your keyboard’s numeric
keypad. The mouse pointer goes blue – this tells us that it’s ‘loaded’ with a note and ready to be
clicked into the score.
* Click on the tenth fret of the top string on the fretboard; this creates a D on the top string of the
tab staff. (Notice how the caret automatically advances to the next rhythmic position in the bar;
if you wanted to build a chord using the Fretboard instead, you would have to switch it to
Chords mode by clicking the appropriate button.)
* Now we need two 16th notes (semiquavers), so click the appropriate button on the Keypad ( ),
or hit
2 on your numeric keypad. Again, the mouse pointer goes blue.
* Click on the tenth fret on the second string down on the fretboard; this creates an A on the sec-
ond string of the top staff.
* Now click at the seventh fret from the left on the second string down from the top: G7 correctly
notates the note at fret seven.
(Incidentally, you can also input notes by clicking directly on the staff rather than on the Fretboard display. As you move the mouse pointer over the staff, a gray ‘shadow note’ is drawn,
showing you where the note will be created when you click. When you click on a tab staff to
Notes button on the Fretboard window), as
22

Tab input
input a note, G7 creates an open string, then type the fret numbers you want using the numbers
along the top of the main keyboard, e.g. for the tenth fret, just type
* Now hit Esc to stop inputting; Esc clears the Keypad, and if you hit Esc again, any selection in
10.)
the score will also be cleared.
* This little three-note riff is repeated pretty much throughout the song, so now we can copy it.
Click the first note on the top string; it goes blue. Hold down
Shift and click on the third note; all
three notes are surrounded by a single blue box, like this:
* Now hit the R key. This is the shortcut for Edit > Repeat, one of the quick ways of copying things
in G7. Each time you hit
R, another copy of your three note riff is added after the last one. Hit R
three times to complete the first bar.
* Now you’ve got a bar full of the riff, you can select an entire bar’s worth and repeat that all in one
go – give it a try! We need at least eight bars of this riff, so make lots of copies by selecting the
whole bar (by clicking on a blank bit of the staff, so that the bar is surrounded by a single blue
box) and hitting
R.
Flexi-time™ input
If you don’t have a MIDI keyboard or guitar, skip on to
board or step-time
below.
Tab input using the computer key-
Let’s input the bass guitar part in real time using G7’s Flexi-time input method. The bass line is
very simple, and goes something like this:
00000000
22222222
* Select the fifth bar of the Bass Guitar tab staff (where the bass line starts), by clicking a blank
part of the bar, then click the Record button on the toolbar (or type
* Now get ready! You’ll hear one bar of clicks as an introduction, and then you’re recording.
* Play the bass line on your MIDI keyboard or MIDI guitar, keeping it nice and even. Don’t try to
33333333
00000000
0000
Ctrl+Shift+F or xXF).
play the slide up from the G at the end of the bass line where it loops around – we can add that
later on using a line from the
* You may notice that the music appears on the score about one bar later than you played it; this is
Create > Line dialog if we want to.
because G7 has to work out exactly what you played before it can notate it accurately. It’s probably less confusing if you don’t look too closely at the screen as you input – just play in time with
the click.
* Record as many copies of the bass line as you want; you can use the R key (see above) to make
further copies later.
* When you’ve finished, hit Esc to stop recording.
23

G7 Demo User Guide
If the recording was a complete disaster, click
Undo on the toolbar (shortcut Ctrl+Z or XZ) to get
your score back to how it was before you made a fist of it, and try again.
Basic editing
Chances are that a few errors crept into your bass line as you were recording it, in which case you
may now have a few mistakes to correct:
* Play back the bass line on its own by selecting a bar in that staff (i.e. so that it’s surrounded by a
single blue box), then hit
* When you find a wrong note, click on it to select it so that you can edit it. When a note is
P. This will help you spot any wrong notes.
selected, it changes color; in this case, it should turn blue, because it belongs to voice 1. (You can
use up to four polyphonic voices on the same staff; voice 1 is blue, voice 2 is green, voice 3 is yellow, and voice 4 is purple.)
* Once the note is selected, to correct its pitch, you can:
% Play the right note on your MIDI keyboard or MIDI guitar; or
% Type the correct fret number using the numbers on the main keyboard; or
% Use the 3/2 keys to move it up and down if it’s on a notation staff.
* If the length of the note is wrong, you can correct it by selecting it and then choosing the correct
length on the Keypad (using the mouse or numeric keypad).
* If extra notes have appeared that you want to get rid of, just select them and hit Delete.
Tab input using the computer keyboard or step-time
Our arrangement is already almost recognizable, but to complete the sound we need those first few
high notes played on the lead guitar:
14 14 14 14
14 14 15 17 17 17 17
Let’s input this into the lower of the two Electric Guitar staves using keyboard tab input, or steptime input (if you have a MIDI keyboard or guitar).
* Select the second bar so that it’s surrounded by a single blue box
* Hit N (the shortcut for Notes > Input Notes), and the caret appears on the staff at the beginning
of the bar:
If it’s not on the top string, move it up there with the 3 key.
* Hit 6 on the numeric keypad to select a whole note (semibreve) on the Keypad, then type 14
using the number keys on the main keyboard, or play an F# on your MIDI device.
24

Tab input
* Hit space to advance to the start of the next bar (which has no notes in it), then hit space again
to move into the fourth bar
* Hit 5 followed by . (period) on the numeric keypad to choose a dotted half note (dotted minim),
then type
* Hit 1 twice to advance to the start of the next bar
* Hit 6 on the numeric keypad to choose a whole note, then type 14 on the main keyboard (or
14 on the main keyboard, or play another F# on your MIDI device, to input the note
play on your MIDI device) to input the note
* Hit Enter on the numeric keypad to add a tie, which means that the note continues to sound in
the next bar without being restruck (although since our tab staff doesn’t use rhythms, we can’t
see the tie)
* Hit R to repeat this note in the next bar. In tab staves that don’t indicate rhythm, tied notes are
often represented by being bracketed, e.g.
(14). To bracket this note, hit * on the numeric key-
pad ( ).
* Hit Enter again to add a tie to the bracketed note, then hit R to repeat this note in the next bar.
* Hit R to repeat the note one further time, and now hit 5 on the numeric keypad to edit this
newly-repeated note and turn it into a half note (minim).
* Hit 1 to move onto the second half of the bar; the caret reappears. Now type 15 on the main key-
board to input the next note.
* Hit 1 again to move into the next bar.
* Hit 6 on the numeric keypad to choose a whole note (semibreve), then type 17 on the main key-
board to input the note.
* Hit Enter to add a tie, then hit R to repeat the note in the next bar.
* Hit * to bracket the note, then Enter to add a tie, and hit R again. Repeat this step, so you end up
with three bracketed notes.
That’s it for the opening of this song up to the entry of Bono’s vocals – but there are a few further
finishing touches we can add.
Finishing touches
For one thing, the sound used by the rhythm guitar is
not quite right. Choose
Ctrl+Alt+M or zXM) to show the Mixer, click the but-
Window > Mixer (shortcut
ton at the bottom of the appropriate fader (it should be
labeled
the
Acoustic guitar (nylon). Play back the score again –
Rhyth, short for Rhythm Guitar), then using
Sound menu on the right-hand side, choose
that’s much more like it.
The other missing ingredient is a drum track. Thankfully, G7 will write you a drum pattern in various styles
with just a couple of clicks. Choose
Notes > Add Drum Pattern, and the dialog above appears.
25

G7 Demo User Guide
Choose
all the checkboxes on the dialog, then click
Rock, alternative: straight 8ths (120-140 bpm) from the Style drop-down, switch off
OK. Within a few seconds, a drum pattern is written
into your score.
Now hit
P to play the whole score back and admire your handiwork!
Selections and passages
We’ve already mentioned selecting notes, bars and other objects, so let’s quickly examine the different kinds of selections you can make, and the different ways to make them:
* Single selection: a single selected object, made by (say) clicking on a note or using the Ta b or 0/
1/3/2 keys to move around the score; you can tell an object is selected because it will change
color when clicked on
* Multiple selection: more than one selected object, made by (say) clicking on one note, then hold-
ing down
Ctrl or X and clicking on another note. Be aware that a multiple selection doesn’t have
to consist of objects next to each other – you could make a multiple selection containing, say, a
note on one page and a bend line on another page.
* Passage selection: a selection surrounded by a single blue box, made by (say) clicking on a blank
part of a bar, which you can extend by holding down
Shift and clicking on another bar, either in
the same or a different staff. Note that a passage selection always consists of continuous music
(unlike a multiple selection).
* System selection: like a passage selection, but selects all instruments in the score at once and is
surrounded by a double blue box. You can make a system selection by (say)
Ctrl+clicking or X-
clicking on a blank part of a bar; you can then extend it in the same way as a passage selection.
So what can you do with selections? Here are a few of the most useful things:
* Copy: the quickest way is using Alt+click or z-click, but you can also use the standard Ctrl+C or
XC and Ctrl+V or XV shortcuts like in other programs
* Repeat: type R (or choose Edit > Repeat) to repeat the current selection after itself, a very quick
way of e.g. setting up a riff or drum pattern that repeats lots of times
* Tra nspos e: type Shift-T (or choose Notes > Transpose) to transpose to another key, or use 3/2
to transpose up and down a step at a time (hold down Ctrl or X to move in octaves)
* Delete: just hit Delete! Note that deleting a system selection deletes the bars themselves, not just
the music in them.
Adding and deleting bars
G7 automatically creates bars as necessary during note input, but if you want to add more bars to
your score, simply choose
the middle of the score by choosing
Create > Bar at End (shortcut Ctrl+B or XB). You can also add a bar in
Create > Bar (shortcut Ctrl+Shift+B or xXB), which either
creates a bar next to the selected note or other object, or, if nothing is selected, allows you to click
where you want the new bar to be created.
To clear the contents of a bar without deleting the bar itself (e.g. to remove all the notes in it, or to
consolidate a bunch of rests into a single bar rest) click on a blank part of the bar so that it is surrounded by a single blue box, then hit the
Delete key on the keyboard.
26

Tab input
If you used Flexi-time to input the bass line to our little song, you will have ended up with quite a
few empty bars at the end of the score. G7 creates these bars when you record using Flexi-time to
ensure that you never run out of room in your score while recording, but when you’ve finished
recording you probably want to get rid of them.
To delete a bar altogether, make a system selection using
rounded by a double blue box), then hit
Ctrl+clicking or X-clicking one bar, then use Shift-click to extend the selection, and hit Delete to
Delete. You can select multiple bars to delete them by
Ctrl+click or X-click (so that it is sur-
remove all the selected bars.
27

G7 Demo User Guide
Working with lyrics and chords
G7 makes working with chords and lyrics easy. You can automatically create chord symbols based
on the music you input, quickly add chord diagrams, and even generate simple accompaniments
based on the chord diagrams and chord symbols in your score. Adding lyrics is as simple as typing
them in.
Let’s find out how easy it is to do all of the above by writing a simple lead sheet and building it up
into a complete arrangement.
Start a new score
Create a new score based on the
whichever note input method you feel most comfortable with, input the notes of this little Scottish
folk tune, O my love is like a red, red rose:
Lead sheet manuscript paper using a 4/4 time signature. Using
is like
C
is like
C/E
ame
G7
G
June;
Once you’ve created the melody as above, you can add the lyrics, then the chords. So let’s do it!
Typing lyrics
The simplest way of adding lyrics is just by typing them in. The basic procedure is as follows:
* Input the notes for which you want to write lyrics
* Select the note where you want the lyrics to start and choose Create > Text > Lyrics (shortcut
Ctrl+L or XL)
* Start typing lyrics
* Hit space at the end of each word
* Hit – (hyphen) at the end of each syllable within a word
* If a syllable lasts for two or more notes, hit space or – once for each note
* If a word is followed by a comma, period or other punctuation, type it before hitting space.
G7/F
O
O
my love
C
mylove
C/E
F
ared,
Am
lo-dy
red rose
Em
Dm7
- that’ssweet
C/E
that’s
Dm
new
G7
ly- sung
intune.
ly- sprung
C
F6
in
With this in mind, try inputting the following lyrics. Select the first note so that it turns blue, then
type
Ctrl+L or XL; you’ll see a flashing cursor appear. Then type the following:
O my love is like a red, red rose that’s new-ly sprung in June;
O my love is like a me-lo-dy that’s sweet-ly sung in tune.
28

Working with lyrics and chords
Note that for the word ‘my’ on the second line, you should hit
space twice, so that ‘my’ spans the
two eighth notes (quavers) at the end of the bar.
Importing lyrics from other programs
You can also copy and paste lyrics between other programs (such as word processors) and G7,
from one part of a score to another part of the same score in G7, or from one score to a different
one.
Exporting lyrics
To save the lyrics (including any block lyrics) from your score as a text file which you can then edit
in a word processor or other program, choose File > Save Lyrics. This creates a text file of the same
name as your score with the word
lyrics at the end in the same folder as the score itself.
G7 removes hyphens when saving lyrics, and inserts line breaks at sensible places (e.g. at punctuation such as commas, semicolons, colons and periods). It also includes the title, composer and
copyright information if you’ve entered it in the score.
Adding guitar chord diagrams
As is often the case in the guitar world, chord diagrams go by many names: you may have
G7
heard them called chord boxes, chord shapes, fretboard diagrams, guitar frames, or a dozen
other names.
G7’s chord diagram capabilities are quite sophisticated, but let’s just jump right in and create some:
* The first thing to do is tell G7 where you want the chord diagram to go; so select the first note of
the melody so that it turns blue
* Now choose Create > Chord Diagram (shortcut Shift-K). The following dialog appears:
* Our first chord, appropriately enough, is a G7, so choose G from the Key list, 7 from the Type
list, and leave the Bass note set to G
*
In the preview window, a few chord diagrams will be shown. Switch on the Chord names
option to add a text chord symbol above the chord diagram itself.
29

G7 Demo User Guide
* The Show Chords From section at the bottom of the dialog determines which chord diagrams
G7 should show you as possibilities:
% Chord shapes from score makes G7 show any chord diagram you’ve already added to your
score that matches the key, type and bass note options currently chosen.
% Default chord shapes is a built-in set of chord diagrams. There are typically three diagrams
for each chord type, chosen for their playability; the first is normally at or close to the nut, the
second is around the fifth fret, and the third is around the ninth fret, offering a variety of
voicings and playing positions. Note that the default library of chords only contains chords
for the standard 6-string guitar tuning.
% Automatically generated shapes makes G7 generate all of the reasonable ways of fingering
a particular shape at every possible position on the fretboard. This is useful if the shape you
want isn’t included in the default library, or if you want to add diagrams for a non-standard
tuning.
% Chord shapes library allows you to show the chord diagrams you have added to any libraries
you may have created.
* Choose whichever of the shapes you prefer, and click OK. The chord diagram is added to the
score.
* Hit Tab followed by 1 twice to select the C at the beginning of the next bar (or use the mouse if
you prefer), then type
* This time, choose a suitable chord diagram for the chord of C, and click OK to add it to the
Shift-K to bring up the dialog again.
score.
* Hit Tab, then 1 twice to select the D halfway through the bar, and then type Shift-K.
* You need to create a C/E chord (a C major chord in first inversion), so just change the Bass list
to E, choose an appropriate shape, then click
* Refer back to the music example on page 28 to see which chords to add for the rest of the mel-
OK.
ody.
Note that you can manipulate chord diagrams just like all other objects: you can delete them, drag
them around, copy them (with
ent fingerings for the same chord by selecting a chord diagram and choosing
Chord Diagram
(shortcut Ctrl+Shift+K or xXK). If you double-click a chord diagram, the dialog
R or Alt+click or z-click), and so on. You can cycle between differ-
Edit > Alternative
will re-open, allowing you to edit the shape, or even change it to a completely different chord.
Playing back chord symbols and chord diagrams
If you want to check that the chords you’ve entered in your score are the right ones, or if you want
to build up an accompaniment quickly, you can use the Make Notes from Chord Symbols feature, which creates a new instrument in your score and fills it with appropriate chords in a variety
of styles.
So let’s add a simple accompaniment to our little folk song:
* Make sure nothing in your score is selected by clicking on a blank bit of paper, or by hitting Esc
30

Working with lyrics and chords
* Choose Notes > Make Notes from Chord Symbols. The following dialog appears:
* The options are simple, but let’s quickly go through them anyway:
% You can choose between three different instruments to add: Piano, which adds two staves to
your score and splits the chords across the two staves;
notation staff to your score; and
guitar tuning (although you can change this later if you want).
% The Chord style menu lets you control how the chords are realized: Chord every chord
symbol
chord in every beat (regardless of how often the chord changes);
rhythm
your score;
16th note Alberti creates the same kind of pattern using 16th notes (semiquavers); 8th note
arpeggios
rising arpeggios using 16th notes.
The results you would get for each of the options on a guitar notation staff are shown
below:
creates a new chord every time the chord changes; Chord every beat creates a new
allows you to realize the chords in the same rhythm as one of the existing staves in
8th note Alberti creates an Alberti-style pattern using eighth notes (quavers);
creates rising arpeggio patterns in eighth notes, and 16th note arpeggios creates
F
C/E
Guitar (tab), which adds a tab staff using standard 6-string
F
C/E
Guitar (notation), which adds a single
Chords follow score
F
C/E
F
C/E
red,
Chord every chord symbol
red,
redrose
that’s
F
red rose
16th note Alberti
red,
Chord every beat
C/E
that’s
redrose
that’s
F
red,
8th note arpeggio
red,
redrose
that’s
Chords follow score rhythm
redrose
C/E
that’s
red,
F
red,
16th note arpeggio
red rose
8th note Alberti
red rose
that’s
C/E
that’s
31

G7 Demo User Guide
* For now, choose Chord every chord symbol from the Chord style menu, and click OK
*
A progress bar appears for a moment as the chords are written into your score
* You may find that G7 has created the new instrument overlapping your chord diagrams. To
move the staves further apart, triple-click on a bar in your melody staff so that it is surrounded
by a blue box throughout the entire score, then simply drag it downwards. This increases the distance between the two staves throughout the score in a single operation.
You can use this feature more than once to build up different layers of accompaniment – for example, you might want to add a piano playing block chords, and a guitar playing in fingerpicked style.
To do this, just choose
Notes > Make Notes from Chord Symbols again, and G7 will create a new
instrument each time you run the plug-in.
Beware that using the
Make Notes from Chord Symbols feature is not undoable. However, if you
don’t like the results, simply triple-click a bar in the newly-added staff so that it is surrounded with
a blue box throughout the score, and hit
Delete to remove it altogether.
You can also add a simple drum accompaniment to your score: choose Notes > Add Drum Pattern
and have a go.
Printing
If you’re happy with your finished score, you can print it simply by choosing
Ctrl+P or XP). Note that in the demo version of G7, you can only print a single, watermarked page.
File > Print (shortcut
32

More to try
More to try
Tab input on the computer keyboard
To input tab using the computer keyboard, you use the numeric keypad to choose the duration of
notes, as with other note input methods. To get the caret (the vertical blue line that shows you
where you will create notes), select the bar in which you want to start inputting tab and hit
shortcut for
string at a time, and use the
moves you to the next quarter note (crotchet) position in the bar, unless there is another note on
the same string before that next quarter note position (you can change the default rhythmic unit
for the
To add a note in a tab staff, just type the fret number using the number keys on the main keyboard
(not the numeric keypad). To move a note to the string above or below, type
G7 even works out what fret to play to keep it sounding the same.
Notation input on the computer keyboard
Notation input on the computer keyboard is very similar to step-time input (see below), except
that you use the letter keys A–G to specify the pitch of notes, and you can build chords using the
number keys above the letter keys on the main keyboard (not the numeric keypad), e.g. type
add a note a third above the selected note, or
Notes > Input Notes). To move the caret use the 3/2 keys to move it up and down a
0/1 keys to move forward and back through the bar; by default, 1
0/1 keys in the Notes > Note Input Options dialog).
Ctrl+3/2 or X3/2 –
Shift-5 to add a note a fifth below.
N (the
3 to
When you input notes using the computer keyboard, G7 puts the note in the nearest octave to the
previous note, so if you enter a C followed by a G, G7 will place the G a fourth below the C. To
change the octave of a note you’ve entered, just type
vidual notes up and down a step at a time using just the
Ctrl+3/2 or X3/2. You can also move indi-
3/2 keys.
Importing files from other programs
Opening a MIDI or ASCII tab file is as easy as choosing
open, and clicking
about how the file should be imported; click
Open. An options dialog will appear, allowing you to make various choices
OK and the file is imported into G7. You can then edit,
File > Open, finding the file you want to
play or print it as if you had inputted it yourself.
Learning a song with the Fretboard
Having opened a MIDI or ASCII tab file in G7, you can use the Fretboard window to learn how to
play particular passages. Whenever you select a note or chord (by clicking on it), the Fretboard
shows how to play it. You can then use the
0 or 1 Fretboard buttons or computer keys to move
backwards and forwards through the song at your own speed. Alternatively, you can play the song
back very slowly by dragging the tempo slider to the left.
Adding text, lines and other objects
The Create menu contains all of the other musical paraphernalia you’re likely to need. To add an
object (which is the general term we use to cover anything you can click on in your score, e.g.
notes, text, lines, clef changes, key signatures, and so on) to your score, select the note or other
object next to which you want the new object to appear, then choose the option from the
menu, and it’ll be created at that position.
Create
33

G7 Demo User Guide
So what kinds of things can you create using the
* Items such as dynamics (e.g. mf ), text chord symbols (e.g. Cm7), tempo markings (e.g. Fast),
Create menu? Here’s a selection:
technique directions (e.g. TA BU – for tremolo arm bend up), fingerings (e.g. p i m a) and lyrics are all accessed via the
* Hairpins, slurs, bends, wide vibrato lines, string number indicators, 1st- and 2nd-ending brack-
ets and more are found in the
* Chord diagrams – sometimes known as guitar frames, chord shapes, chord boxes or fretboard
diagrams – are added using the
* Change key or time signature with the Create > Key Signature (shortcut K) and Create > Time
Signature
* Change clefs anywhere in your score using the Create > Clef dialog (shortcut Q for “qlef”).
* Add TIFF graphics to your score using Create > Graphic.
* Add special symbols, e.g. for vibrato scoops, using Create > Special Symbol (shortcut Z for
(shortcut T) dialogs.
Create > Text submenu.
Create > Line dialog (shortcut L).
Create > Chord Diagram dialog (shortcut Shift-K).
“zpecial zymbol”).
There’s a useful shortcut to the
(Windows) or
click or
options from the
Control-click (Mac) on a blank bit of paper to make the menu appear. If you right-
Control-click while a note or other object is selected, you get a useful context menu with
Edit menu, such as the ability to change the color of the selected object or move it
Create menu: with nothing selected in your score, right-click
into another voice.
Converting notation to tab and vice versa
You can quickly convert staff notation into tab and vice versa just by copying it between staves. To
convert notation to tab, select the music you want to convert as a passage (so that it is surrounded
with a single blue box), then
matically works out the best way to finger it, according to the settings in the
Fingering Options
dialog, where you can set things like the preferred range of frets to use.
Alt+click or z-click on the tab staff to copy the music across. G7 auto-
Notes > Guitar Tab
To convert tab to notation, do exactly the same operation in reverse: select a passage of tab, then
Alt+click or z-click on the notation staff.
G7 also automatically converts special markings like bends and slides between notation and tab, so
you never need to input them more than once.
Tab styles and tunings
G7 supports a wide variety of tab styles and instrument tunings. The common alternate tunings
for guitars are included in the Create > Instruments dialog, but you can also access more than 25
different guitar tunings (plus many more for other fretted instruments such as dobro, banjo and
lute), and even create your own.
To change the tuning used by an instrument in your score, select a bar in that instrument so that it
is surrounded by a single blue box, then open the Properties window (by choosing
Properties
, or typing Ctrl+Alt+P or zXP) and choose the new tuning from the drop-down list.
The list is in alphabetical order, so all of the tunings for guitars are called things like
(dropped D tuning)
or Guitar tab (open E tuning).
Window >
Guitar tab
34

More to try
Special tab markings
All of the special tab markings – including bends, slides, pre-bends, hammer-ons, pull-offs,
vibrato, harmonics and more – are easy to create in G7. For example:
* To create a bend, select the first note of the bend and choose the bend line from the Create >
Line
dialog (or simply hit J)
* To create a slide, select the first note of the slide and hit the – key on the numeric keypad (or
click the corresponding on-screen button, )
* To create a hammer-on or pull-off, select the first note and hit S to add a slur.
Color
You can change the color of just about any object in your score (e.g. notes, lines, text). Simply select
the object or objects whose color you want to change, then choose
XJ). If you want to make another selection of objects the same color as the last one you chose,
choose
Edit > Reapply Color (shortcut Ctrl+Shift+J or xXJ).
Edit > Color (shortcut Ctrl+J or
Graphics files
You can import monochrome, grayscale or color TIFF graphics into your G7 scores, so you can
easily add illustrations and diagrams to your music. Simply choose
Create > Graphic and select the
file you want to import.
The full version of G7 can also export your scores in a variety of graphics formats, including
Encapsulated PostScript (EPS) and TIFF, so you can quickly and easily create musical examples for
inclusion in documents from word processors, desktop publishing software and other applications.
Kontakt Player
The full version of G7 includes Kontakt Player from Native Instruments, a software synthesizer
specially written by leading audio software company Native Instruments. It includes 20 high-quality samples of guitars, keyboards, drums and more to help you create realistic performances of
your scores.
Sharing your music
Aside from printing it out, G7 allows you share your music in a variety of ways. In the full version,
you can:
* Save an audio track. Click the Audio button on the toolbar to save an audio track of your score,
ready for burning onto audio CD.
* Publish your music on the Internet. send your score straight to our self-publishing web site
G7music.net, or save your score as a Scorch web page that you can post on your own web site.
Visitors to your site can download the free Scorch web browser plug-in to view, play back and
print your music without needing to own G7 themselves.
* Export a MIDI file. You can save a standard MIDI file of your score with a single click.
* Export an ASCII tab file. You can also save an ASCII tab file of the tab staves in your score with a
single click; you can then email it to your friends, or post it to a web site or message board.
35

G7 Demo User Guide
How to buy G7
G7 is available from good music shops, or direct from Sibelius – see
details of your nearest dealer or distributor, or see
www.G7info.com for more details.
Buying G7 on page 7 for
36
 Loading...