

Page 1

G7
User guide
supplement
Page 2

Edition 3.3
July 2004
User Guide Supplement written and typeset by Daniel Spreadbury.
See the
About G7 dialog for full G7 credits.
Please email any suggestions for improvements to this User Guide to
userguide@sibelius.com
(but please do not use this address for suggestions or queries about the G7 program itself – see
the separate
Latest information and technical help sheet for the correct address for your
country).
G7 copyright © Sibelius Software Ltd and its licensors 1987–2004
G7 User Guide Supplement copyright © Sibelius Software Ltd 2004
Published by Sibelius Software Ltd, The Old Toy Factory, 20–22 City North, Fonthill Road, London
N4 3HF, UK
All rights reserved. This User Guide may not be reproduced, stored in a retrieval system or transmitted in any form or by any means – electronic,
recording, mechanical, photocopying or otherwise – in whole or in part, without the prior written consent of the publisher. Although every care has
been taken in the preparation of this User Guide, neither the publisher nor the authors can take responsibility for any loss or damage arising from
any errors or omissions it may contain.
G7, Sibelius, Scorch, Flexi-time, Espressivo, Rubato, Rhythmic feel, Opus, Inkpen2, magnetic, the G7, Sibelius and double helix logos, G7music.net,
‘The fastest, easiest way to create, play and post tab’ and ‘Play, write and publish songs’ are all trademarks or registered trademarks of Sibelius Soft-
ware Ltd in the USA, UK and other countries. All other trademarks are acknowledged as the property of their respective owners.
Page 3

Contents
Introduction . . . . . . . . . . . . . . . . . . . . . . . . . . . . . . . . . . . . . . . . . . . . . . . . . . . . . . . . . . . . . . . . . . . . . . . .4
Updating G7 . . . . . . . . . . . . . . . . . . . . . . . . . . . . . . . . . . . . . . . . . . . . . . . . . . . . . . . . . . . . . . . . . . . . . . . .5
Registering G7 . . . . . . . . . . . . . . . . . . . . . . . . . . . . . . . . . . . . . . . . . . . . . . . . . . . . . . . . . . . . . . . . . . . . . .7
Reference 11
Chord diagrams . . . . . . . . . . . . . . . . . . . . . . . . . . . . . . . . . . . . . . . . . . . . . . . . . . . . . . . . . . . . . . . . . . . .13
Files . . . . . . . . . . . . . . . . . . . . . . . . . . . . . . . . . . . . . . . . . . . . . . . . . . . . . . . . . . . . . . . . . . . . . . . . . . . . . .18
Flexi-time™ . . . . . . . . . . . . . . . . . . . . . . . . . . . . . . . . . . . . . . . . . . . . . . . . . . . . . . . . . . . . . . . . . . . . . . . .19
Kontakt Player . . . . . . . . . . . . . . . . . . . . . . . . . . . . . . . . . . . . . . . . . . . . . . . . . . . . . . . . . . . . . . . . . . . . .22
MIDI devices . . . . . . . . . . . . . . . . . . . . . . . . . . . . . . . . . . . . . . . . . . . . . . . . . . . . . . . . . . . . . . . . . . . . . .30
Mixer . . . . . . . . . . . . . . . . . . . . . . . . . . . . . . . . . . . . . . . . . . . . . . . . . . . . . . . . . . . . . . . . . . . . . . . . . . . . .37
Opening Finale, Allegro and PrintMusic files . . . . . . . . . . . . . . . . . . . . . . . . . . . . . . . . . . . . . . . . . . .40
Saving audio tracks . . . . . . . . . . . . . . . . . . . . . . . . . . . . . . . . . . . . . . . . . . . . . . . . . . . . . . . . . . . . . . . . .42
Saving graphics files . . . . . . . . . . . . . . . . . . . . . . . . . . . . . . . . . . . . . . . . . . . . . . . . . . . . . . . . . . . . . . . .44
Index 47
License Agreement . . . . . . . . . . . . . . . . . . . . . . . . . . . . . . . . . . . . . . . . . . . . . . . . . . . . . . . . . . . . . . . . .49
3
Page 4

Start here
Introduction
This supplement includes details of improvements and new features added to G7 since the publication of the original User Guide.
About this User Guide supplement
This supplement is intended to complement, not replace, your existing G7 User Guide. This
means:
* Whether or not you are installing G7 for the first time, you should follow the installation instruc-
tions in this supplement, not the instructions in the main G7 User Guide.
* The Reference section of this supplement contains:
% three completely new topics (e.g. Kontakt Player, Saving audio tracks, Opening Finale,
Allegro and PrintMusic files
% two revised topics that supersede existing topics in your main G7 User Guide (Chord dia-
grams
and MIDI devices); and
% a number of minor additions to existing topics in your main G7 User Guide (Files, Flexi-
time™
, Mixer, Saving graphics files).
What’s new?
If you’re an existing G7 user who has received this supplement together with a new CD-ROM containing the latest version of the software, you may be interested to know about the most important
improvements, which are:
) that are not included in your main G7 User Guide;
* New integrated Kontakt Player sample player, with 20 high-quality instrumental samples – refer
to
Kontakt Player on page 22 of this supplement
* New Save As Audio Track feature, to allow easy creation of tracks for burning onto audio CDs –
refer to
* New features to improve Flexi-time input from MIDI guitars – refer to Using a MIDI guitar on
page 33 in the
* Chord diagrams can now have fingering text above or below them, and more chord shapes are
supported– refer to
* G7 can now export TIFF graphics – refer to TIFF files on page 46 in the Saving graphics files
Saving audio tracks on page 42 of this supplement
MIDI devices topic in this supplement
Fingering on page 15 in the Chord diagrams topic in this supplement
topic in this supplement
* G7 can now import files from Finale, Finale Guitar and other MakeMusic! Inc. products – refer
to
Opening Finale, Allegro and PrintMusic files on page 40 of this supplement
* The Guitar Guide has been revised and updated with new, high-quality photographic illustra-
tions
* Fully compatible with Mac OS X 10.3 Panther.
All of these improvements are detailed in this supplement.
License agreement
The license agreement at the end of this supplement supersedes the license agreement in your
main G7 User Guide.
4
Page 5

Updating G7
Updating G7
You don’t need to uninstall your existing copy of G7 before installing the new one – just follow the
instructions below to upgrade G7 to the latest version.
Updating G7 for Windows
* Quit G7, if it is running.
* If you haven’t already downloaded the G7 updater from http://www.g7info.com/helpcenter,
do so now.
* Double-click the downloaded G7Update.exe file to launch the updater.
* The updater will tell you to quit all running programs, which you should already have done.
Click
Next.
* You are given the opportunity to read the updated license agreement. This license agreement
supersedes any previous G7 license agreement. Read it, and click
* You will be told that any modified manuscript papers, house style files and other user-editable
components will be copied to a folder called
the update process. Click
* Things will flash and whizz on the screen as G7 is updated. This takes a few seconds.
* You will be told that some files have been copied to the UpdateBackup folder. Click OK.
* You will be told that G7 has been successfully updated. Click Finish.
* You will be asked if you want to run your copy of G7 now. Click Yes (or No, if you wish!).
* G7 will run; you may be prompted that your MIDI device have changed, in which case check the
settings in the
* To verify that your copy of G7 has been successfully updated, choose Help > About G7. At the
Devices dialog that appears, then click OK.
Next.
bottom of the window that appears it should read
UpdateBackup so that they are not overwritten by
Version 3.3.0 build 38. Congratulations!
Next.
If you encounter any problems updating G7, don’t hesitate to contact technical help for assistance.
See the
Latest information and technical help sheet that came in your G7 box for the appro-
priate contact information.
Updating G7 for Mac
* Quit G7, if it is running.
* If you haven’t already downloaded the G7 updater from http://www.g7info.com/helpcenter,
do so now.
* Double-click the downloaded G7 Updater file to launch the updater.
* You are given the opportunity to read the updated license agreement. This license agreement
supersedes any previous G7 license agreement. Read it, and click
* You will be told that no other applications can be running while G7 is updated. Click Continue.
* Things will appear and disappear for a few moments; don’t be alarmed! After a few seconds, a
Accept.
window will appear showing you where the update will be installed. If you have multiple copies
of G7 installed on your computer, you will be able to choose which one to update. Normally,
though, you should just click
Update.
5
Page 6

Start here
* Things flash and whizz as G7 is updated. This can a minute or two, so be patient.
* You will be told that installation was successful. Click Quit.
* Navigate to the G7 folder on your Mac’s hard disk (normally in Applications), and double-click
the
G7 icon to launch the program.
* G7 will run; you may be prompted that your MIDI device have changed, in which case check the
settings in the
* To verify that your copy of G7 has been successfully updated, choose Help > About G7 (in the
G7 menu on Mac OS X). At the bottom of the window that appears it should read Version 3.3.0
build 38
Devices dialog that appears, then click OK.
. Congratulations!
If you encounter any problems updating G7, don’t hesitate to contact technical help for assistance.
See the
Latest information and technical help sheet that came in your G7 box for the appro-
priate contact information.
Obtaining Kontakt Player and the updated Guitar Guide
The downloadable update for G7 does not include the updated Guitar Guide or Kontakt Player. To
obtain these items, you will need to order the G7 upgrade on CD-ROM from the G7 web site, at
http://www.g7info.com/helpcenter.
6
Page 7

Registering G7
Registering G7
You should register your copy of G7 in the first few days of using it. This is quick and easy to do,
and once you have registered, you will be eligible for technical help, future upgrades, and access to
the Help Center on the G7 web site (
If you’re an existing G7 user, you will not need to re-register your copy of G7 after installing this
upgrade.
To protect us against piracy, and to protect you against having your software stolen, unregistered
copies of G7 will not save. But so you can use G7 before you get around to registering it, you will be
able to save for the first five days without registering.
You don’t have to register in the first five days, but if you don’t, saving will be temporarily disabled;
when you subsequently get round to registering, it will be re-enabled. (Please don’t try altering
your computer’s date or reinstalling G7 in order to extend the five days; this will not work and will
instead cause saving to be disabled until you register.)
How to register
You are given the opportunity to register G7 each time you run it, but if you don’t want to register
immediately, just click
time by choosing
Register Later to leave it unregistered. You can get this dialog again at any
Help > Register G7.
www.g7info.com).
When you do want to register, you can do so over the Internet (the quickest and easiest of all), or
alternatively by fax or phone – there’s no registration card to return.
You are guided through the registration process by a simple dialog:
* First, you can choose whether to register On the Internet, or By fax or phone. You are strongly
recommended to register on the Internet, as it’s quick, easy and can be done at any time of the
day or night, 365 days a year.
(If you can’t register on the Internet, see
* Just click Next.
* If your computer isn’t already connected to the Internet, G7 will now prompt you to connect;
click
Connect.
* Once it has established a connection, G7 will check the registration status of your copy; if it has
been registered before it will give you a further message. Click
* You will next be prompted to enter your contact details. We need your name and address details
Registering by phone below.)
Yes to proceed.
to enable you to get technical help, future upgrades, etc. We are committed to your privacy – see
Privacy policy below.
Fill in your details, making sure to fill in all required fields and click
* Next you’re asked to fill in some details about your musical interests, how you heard about G7,
Next.
and so on. You are also shown some basic information about your computer setup that you can
choose to send to us so that we can more easily assist you if you require technical help; you are
not obliged to send this information, but it may save you time later if you send it now.
Fill out all the fields, and click
Finish.
7
Page 8

Start here
* G7 contacts our server, and a few seconds later you will be told that G7 has been successfully
registered.
Registering by phone
We recommend you to register on the Internet instead if possible. But to register by phone:
* Choose Help > Register G7
*
Choose By fax or phone, and click Next.
* Call the appropriate number below, and make sure you can see your computer screen while you
are on the phone
* You will be given a Registration Number (beginning with the letter R) to type into the box on the
screen. When you have typed in the Registration Number, your program will be registered (and
will continue to be able to save).
There’s no need to keep a record of the Computer Number or Registration Number after you have
registered.
Users who purchased in North, Central & South America:
Monday to Friday 7am–4pm PST, except holidays. Call
1-888-280-9995 toll-free (outside the
USA, call 1-925-280-0600). See below for eligibility requirements for educational copies.
Users who purchased in the UK or any other country:
Monday–Friday (except public holidays) 9am–5pm: call
5pm–6pm: call
020 7561 7997 (+44 20 7561 7997)
020 7561 7995 (+44 20 7561 7995);
Running G7 on more than one computer
You can install and register G7 on two computers for your own personal and exclusive use. Both
copies of G7 must be used only by you, and they may not be used simultaneously.
Reinstalling and re-registering G7
If, for any reason, you need to reinstall G7, you can re-register it automatically over the Internet
provided you are reinstalling on the same computer on which you previously had G7 installed.
To re-register, simply use the
Help > Register G7 dialog, in exactly the same way as registering for
the first time. G7 will know that this copy has been registered before.
If you are reinstalling G7 on a different computer, then it will be assumed that you are in fact
installing a second copy of G7 (see
Running G7 on more than one computer above).
Moving G7 to another computer
If you need to move a registered copy of G7 from one computer to another, you can use
Unregister G7
, provided both computers can connect to the Internet.
Help >
When you choose this option, your copy of G7 contacts our server and informs it that the copy
running on that machine is no longer registered, and disables the saving feature on that copy of
G7. You can then install G7 on another computer and use
Help > Register G7 to register G7 over
the Internet in the normal way.
8
Page 9

Registering G7
This method requires that both computers (the one on which you are unregistering G7, and the
one on which you are subsequently registering G7) be able to connect to the Internet. If either or
both of the computers are unable to connect to the Internet, you should contact G7 technical help
for assistance in moving a registered copy of G7 from one computer to another.
Problems registering G7?
If you have problems registering G7, contact technical help; it doesn’t matter if your free entitlement to technical help by telephone has expired.
Privacy policy
When you register G7 with us, we ask for your software’s serial number, your name, address, email,
phone number, and other details such as your musical activities. Some of this information is optional.
We are commited to protecting your privacy. Your registration information is used for things such
as:
* Providing you with technical help and upgrades
* Finding out what kinds of people use our software
* Informing you by post or email about upgrades, etc. (If you don’t want to receive this informa-
tion, just let us know or use the unsubscribe link in our emails).
For full details of the privacy policy, see
http://www.sibelius.com/privacy
9
Page 10

Start here
10
Page 11

Reference
11
Page 12

Reference
12
Page 13
Chord diagrams
Chord diagrams
Chord diagrams (sometimes known as chord boxes, fretboard grids, guitar frames, and so on)
illustrate how to play a particular chord on a guitar or other fretted instrument, by showing which
fingers need to be on which fret on each string. They are usually accompanied by text chord symbols, which G7 can include for you.
Adding chord diagrams
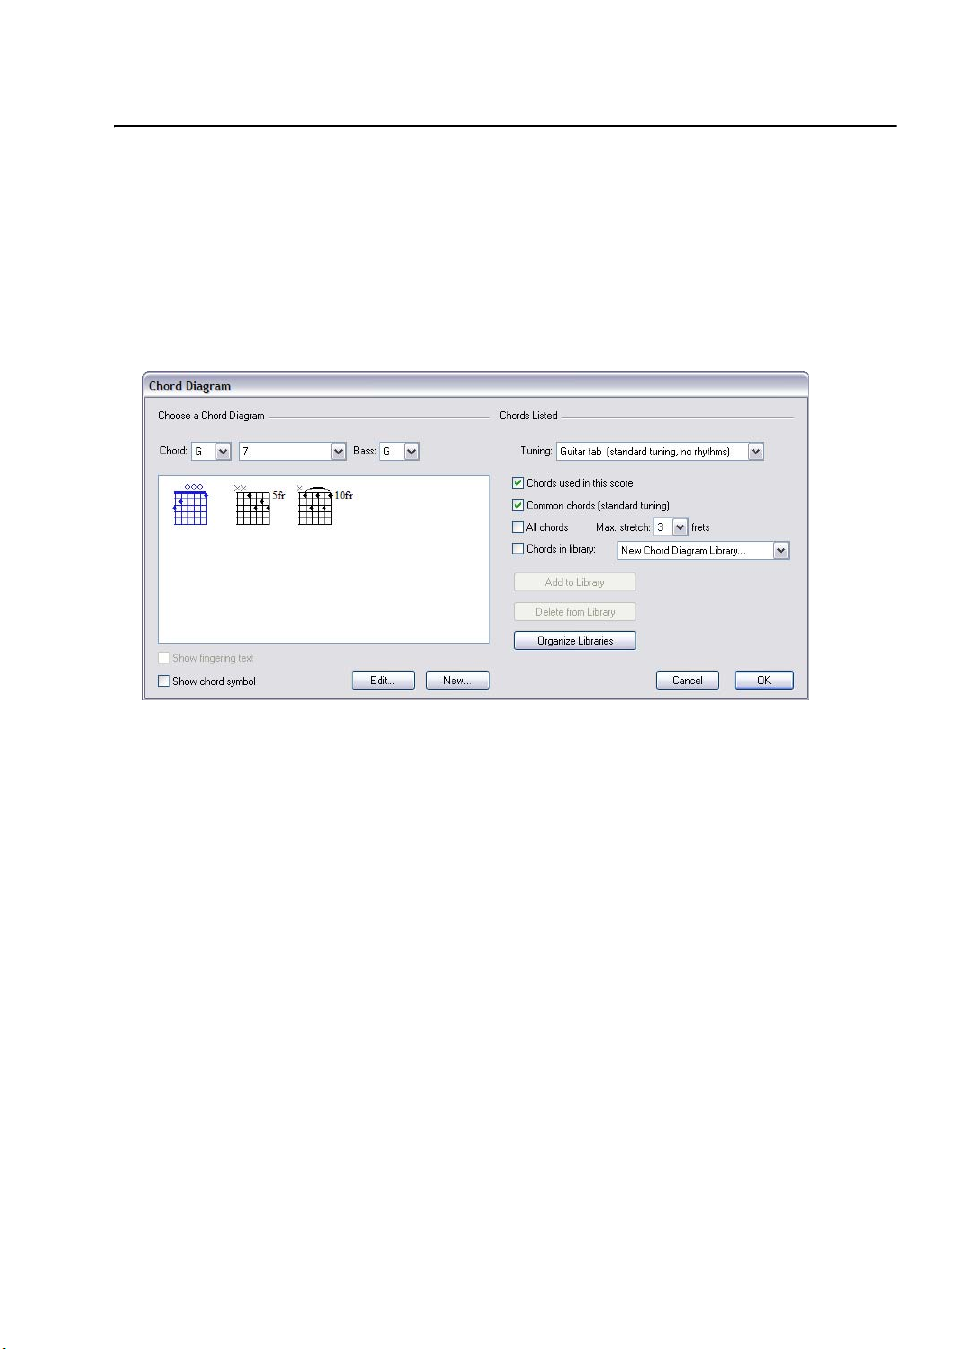
To create a chord diagram above the selected note, choose
Shift-K) to get this dialog:
Create > Chord Diagram (shortcut
* The Choose a Chord Diagram options at the left-hand side of the dialog allow you to set the
basic parameters as follows:
% Chord is the key of the chord you want to use
% The middle list determines the kind of chord, e.g. major, minor, augmented, diminished, etc.
% Bass is the bass note of the chord. By default, it’s set to the same pitch as Chord, but you can
change it if you are writing, say, a G chord with a B as the bottom note.
% The large white rectangle shows you the available chords based on the settings chosen in the
dialog
% Show chord symbol adds a text chord symbol above the chord diagram. Switching this on
also shows the chord symbols in the large white rectangle.
% Clicking Edit or New allows you to edit the selected chord diagram or create a new one which
isn’t listed. See
* The Chords Listed options at the right-hand side of the dialog allow you to specify which chord
Editing and saving chord diagrams below for more details.
diagrams appear in the left-hand side of the dialog:
% Tuning: set this option to the tuning of the guitar you are writing chord diagrams for.
% Chords used in this score displays any chord diagrams already used in the score that match
the options currently chosen in the dialog
% Common chords (standard tuning) shows chord diagrams from a built-in selection for
standard 6-string guitar tuning, chosen for their ease of playing; generally, three different fin-
13
Page 14
Reference
gerings are provided for each chord type: one at (or close to) the nut, one at around the fifth
fret, and one at around the ninth fret.
% All chords tells Sibelius to automatically calculate all the possible fingerings for a given
chord. Note that the shapes generated will be governed by the
Max. stretch setting (see
below). If you are using a special guitar tuning, switching on this option will provide you with
a wide selection of playable shapes for a particular chord, which you can then add to a library.
% Max. stretch n frets determines the maximum distance between the lowest and highest frets
that can be fingered for automatically generated chord diagrams. See
Maximum stretch
below for more details.
% The Chords in library options determine whether Sibelius should display chords from a cus-
tom chord diagram library. See
Chord diagram libraries below for more details.
You can switch on several of the checkboxes at once to list all of their chords together at the lefthand side of the dialog.
When you select one of the chord diagrams at the left-hand side and click
OK, the diagram will be
created above the selected note. If you didn’t have a note selected before you opened the dialog, the
mouse pointer will change color to denote that it’s “loaded” with a chord diagram – just click on
the page where you want it to go.
Maximum stretch
For the automatically generated chord shapes, you can specify the maximum distance that your
fingers can stretch by setting the
Max. stretch option to the desired number of frets.
Editing and saving chord diagrams
If you want to edit a chord diagram shown in the
gram
dialog, select it with the mouse and click the Edit button.
Chord Dia-
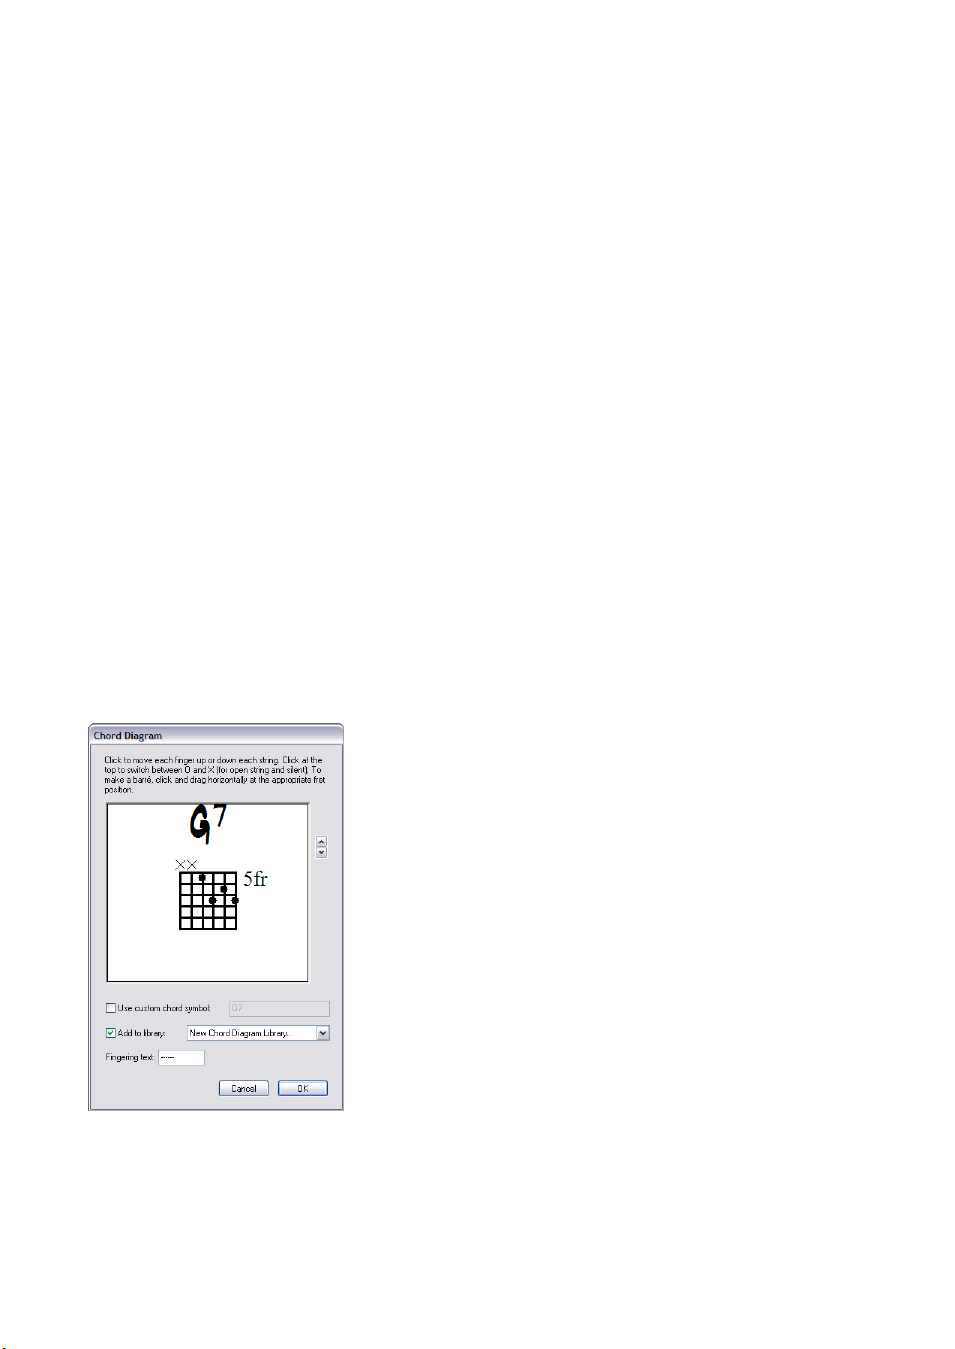
If you want to create a new chord diagram from scratch, click
the
New button. In both cases, you’ll see the dialog shown on
the left.
* To place a dot on a string, simply click where you want the
dot to appear
* To specify that the string should be open or unplayed, click
above the top line of the frame to toggle between the O and X
symbols
* To draw a barré, click and drag across the strings you want to
be barréd
* To set the fret number at the top right of the diagram, click
the arrows to the right of the window.
*To set a different chord symbol than the provided default,
switch on
Use custom chord symbol and type the desired chord symbol; see Chord symbols
below for more details.
When you are happy with the chord diagram, click
14
OK to return to the Chord Diagram dialog.
Page 15

Chord diagrams
If you want to use your edited or new diagram in other scores in future, you should save it into a
chord diagram library, which happens automatically when you click
able library chosen in the drop-down next to the
Add to library checkbox).
OK (as long as you have a suit-
Chord diagram libraries
Libraries make working with chord diagrams very simple. For example, if you always use a specific
set of fingerings for your chords (e.g. jazz voicings, or very simple fingerings for your guitar students), you can set up a library containing just those chords. This makes it much quicker to find
the diagrams you want, and once you’ve set up a library, you can use it in every score you write.
You can even send your library to a friend, or add libraries that others have created.
To cre a t e a li b r ar y, cho ose
Create > Chord Diagram dialog or the Edit Chord Diagram dialog. You will be prompted to type
in a name – make it something memorable like
New Chord Diagram Library... from the drop-down menu in the main
Jazz chords or Easy voicings – then click OK.
To add a chord to your library, simply select it in the white rectangle at the left of the dialog, and
click
Add to Library. (If no library is chosen next to the Chords in library option on the right of
the dialog, you’ll be prompted to choose or create one.)
To use a chord from a library, switch on
Chords in library, choose the appropriate library from the
drop-down, and the chords will be listed at the left-hand side of the dialog.
To remove a chord from your library, make sure
Chords in library is switched on (it’s probably a
good idea to switch off the other three options so only the chords in your library are shown), then
choose the chord you want to remove and click
Delete from library.
If you want to share your chord diagram library with somebody, or want to install a library sent to
you by another user, libraries are stored in the
in your main
Sibelius 3 program folder. Chord library files have the extension .scl.
Chord Shapes folder inside the Resources folder
Fingering
For some guitar scores and educational materials it is conventional to show the fingerings required
to play a particular chord, either above or below (but typically below) each string in a chord diagram. This fingering is represented as a number (1, 2, 3, 4) or in some cases text (e.g. T may be
used to represent the thumb).
G7 allows you to add fingering text to any chord diagram, and you can save fingering in the chord
diagram library for re-use in other scores.
Adding fingering text
To add fingering text to a chord diagram, use the
* Choose Create > Chord Diagram and click New to create a new chord diagram; or
* Double-click an existing chord diagram in your score to open the Chord Diagram dialog, and
click
Edit.
To add fingering text, simply type the desired text in the
* Each string may show a single character as its fingering text.
* You can type any alphanumeric character (i.e. numbers 0-9 and letters A-Z, either upper or
Edit Chord Diagram dialog. Either:
Fingering text box, as follows:
lower case).
15
Page 16

Reference
* Type a hyphen (-) for any string that does not have a fingering.
As you type, the preview window shows how the fingering will appear in the score (though the
characters in the preview window are larger in relation to the size of the chord diagram than they
will appear in the score).
You should switch on the
Add to library option to ensure that the chord diagram and its fingering
are saved for future re-use.
Choosing whether or not fingering text should appear
You can choose whether or not fingering text appears with a chord diagram in the
Diagram
dialog.
Create > Chord
If the selected chord diagram has fingering text defined, the Show fingering text option is
enabled, and you can then switch it on or off as required.
Appearance of fingering text
The appearance of chord diagram fingering text is specified in the
grams
dialog:
* Draw fingering text determines whether the fingering text should be drawn Below diagram
Format > Other > Chord Dia-
(the default) or Above diagram. When fingering text is drawn above the diagram, it is drawn in
line with the O and X symbols. Fingering text takes precedence over the O and X symbols, so if
both a fingering and an O or X should appear over the same string, the fingering text will be displayed.
* Fingering text n spaces from diagram determines the distance from the bottom or top of the
chord diagram that the fingering text will be drawn (the default is 1 space). If fingering text is set
to display above the diagram, this parameter also changes the distance of the O and X symbols
from the frame, to ensure that the fingering text appears in line with the symbols.
* Size n (rel. to 7mm staff) changes the size of the fingering text (the default is 8pt). The finger-
ing text is drawn using the
Chord diagram fret text style (which is also used for the text that
appears to the left or right of the diagram, e.g. “2fr.”). Changing the size of this text style in the
normal way (i.e. in the
House Style > Edit Text Style dialog) will not affect the size of the finger-
ing text – the size of the fingering text must be set using this option.
Chord symbols
In most cases, you won’t need to change the chord symbol above a chord diagram from the default
that Sibelius gives you, but if you want to use a different naming convention, you can create a custom chord symbol for that individual chord diagram:
* In the Create > Chord Diagram dialog, select the chord diagram whose chord symbol you want
to change, and click
* Switch on Use custom chord symbol and type the desired new name, then click OK.
Edit (or click New to create a new chord diagram based on the selected one)
Be aware that chord symbols above chord diagrams are drawn using the Chord symbols text style,
so characters such as
proper musical symbols such as
b and # in the dialogs for defining custom chord symbols will translate into
b and # when you create a chord diagram.
16
Page 17

Chord diagrams
Making chord diagrams play back
Chord diagrams themselves don’t play back, but once you’ve added them to your score, you can use
Notes > Make Notes from Chord Symbols to generate a simple accompaniment from them – see
Playing back chord symbols and chord diagrams in Working with lyrics and chords in
your main G7 User Guide for more information.
Copying, editing and deleting chord diagrams
Chord diagrams can of course be copied, moved and deleted in the usual ways. Once created in
your score, you can edit a chord diagram simply by double-clicking it.
You can also cycle through different fingerings for a selected chord without going back into the
dialog: simply click the diagram once so that it is selected, then choose
gram
(shortcut Ctrl+Shift+K or xXK) repeatedly to cycle through different fingerings, from the
choice specified by the
Chords listed options you last chose in the Create > Chord Diagram dia-
Edit > Change Chord Dia-
log.
Format options
Format > Others > Chord Diagrams dialog contains numerous self-explanatory options con-
The
trolling the design of chord diagrams.
17
Page 18

Reference
Files
File formats
G7 for Mac and G7 for Windows use exactly the same file format. You can move a G7 score
between Mac and Windows without any conversion at all – see below.
G7 can also open files saved from all existing versions of Sibelius for Mac and Windows (at the
time of writing, the latest version of Sibelius is 3.1.3), with some limitations:
* Only Sibelius files with 16 or fewer staves in can be opened in G7
* G7 does not have all of the instruments included in Sibelius. When opening Sibelius files that
contain instruments G7 does not support, these instruments will be renamed as
will still play back correctly.
* Certain publishing features of Sibelius are not supported in G7 (such as hiding empty staves, cue
notes, and so on), so the appearance of the file in G7 may not exactly match its original appearance in Sibelius.
Sharing files with Sibelius users
If you know anybody who uses G7’s “big brother” Sibelius, you can easily share files with them. G7
files can be opened by Sibelius 3 and later (and G7 can open Sibelius 3 files), and if you know anybody who is using Sibelius 2, you can also save from G7 in the Sibelius 2 file format so that you can
share music with them. To save a Sibelius 2 file, choose
from the Save as type drop-down menu.
File > Save As, and select Sibelius 2 (.sib)
Solo, but they
Note that some information will inevitably be lost when saving your G7 file in a format suitable for
opening in Sibelius 2. For example, colored objects will all revert to black when opened in Sibelius
2, and some tab notations are not supported by Sibelius 2. Note also that the conversion process is
one-way: once a Sibelius 2 user has opened and saved your file in Sibelius 2, if you used any features in your score that Sibelius 2 doesn’t understand, they will not be retained if the Sibelius user
later sends the file back to you.
Serial number
Files created with your copy of G7 include your serial number, and can be traced to your copy in
the event of copyright infringement.
Further information
Refer to the
Files topic in your main G7 User Guide for further information.
18
Page 19

Flexi-time™
Flexi-time options
To get the various Flexi-time options, choose
or xXO), which displays this tabbed dialog:
Flexi-time™
Notes > Flexi-time Options (shortcut Ctrl+Shift+O
On the
Flexi-time tab are the following options:
* Flexibility of tempo: controls how G7 follows your speed. If you’re used to playing to a click, set
this to
None (non rubato), and G7 will keep a fixed tempo. The higher you set the flexibility,
the more G7 is inclined to follow your tempo. If you find G7 seems to be changing tempo oddly,
it’s finding you hard to follow, so reduce the flexibility or set it to
* Introduction ... bars: determines how many bars introduction will be played when you start
None (non rubato).
recording
* Record up to ... bars: if there aren’t many bars left in the score for you to record into, this auto-
matically adds enough bars when you start recording
* The Click button takes you directly to the dialog that determines the behavior of the metronome
click during recording.
* Voi ces options:
% Record into one voice allows you to specify a single specific voice to use for your Flexi-time
recording
% Record into multiple voices is an alternative to specifying a specific voice: when switched
on, G7 will automatically split the music into multiple voices, producing clearer notation.
This is the recommended setting.
19
Page 20

Reference
* Enable MIDI time stamps: if you have a computer with dual processors or a hyper-threading
processor, you may find that the rhythm of the notated music becomes increasingly inaccurate
as recording continues. If you encounter this problem, switch on this option (Windows only; the
option is disabled if you do not have dual processors or a hyper-threading processor).
* Replace and Overdub control what G7 does if you record over a passage that already contains
music: if set to
if set to
On the
Notation tab are these options:
* Note Values options:
% Adjust rhythms makes G7 clean up what you’re playing. Leave this on!
% Minimum note value: this sets the shortest note value G7 will write. (Note that this is not a
Replace, G7 will clear the existing music before notating the new music you play;
Overdub, G7 will add the new music you record to the existing music.
quantization unit – G7 quantizes using a complex algorithm that varies with context.)
% Notate: these are options to notate staccato and tenuto; if you are confident of playing the
articulation exactly as you want it to be notated, switch these on. If you find lots of spurious
staccato or tenuto articulations in your score after inputting with Flexi-time, switch them off,
or adjust the
When shorter/longer than thresholds (representing the percentage of the
notated note value) beyond which these articulations are notated.
% Remove rests between notes on drum staves: switched on by default. This option “joins
up” shorter notes to remove superfluous rests in drum parts.
* Keyboard Staves: when inputting onto two staves, the split point determines which notes go
into each staff (notes on or above the split point go into the top staff, and notes below go into the
bottom staff). If you choose
Automatic, G7 will guess where your hands are on the keyboard at
any time and assign notes to staves accordingly. Alternatively, you can specify your own
split point. (Note that in G7, middle C is reckoned as C4 – which may be different from how it is
described in other music programs.)
* Tuplets: for each of the tuplets listed, you can set G7 to detect None/Simple/Moderate/Com-
plex
ones. A “simple” triplet (say) means one with three equal notes. For tuplets such as a quarter note (crotchet) followed by a eighth note (quaver), use
or dotted rhythms, use
* MIDI Messages options:
% Keep program/bank messages imports all program and bank changes using G7’s MIDI
Complex.
message text format, other than program changes at the start which are put in the
Moderate, and for tuplets with rests
Mixer win-
dow. These messages are automatically hidden in the score.
% Keep controller messages similarly imports all controller messages (such as pitch bend,
sustain pedal, channel volume, etc.) and automatically hides them in the score.
% Keep other messages similarly imports any other MIDI messages found in the score.
Fixed
Recommended options
Our recommended Flexi-time options are the default values, as follows:
mum note value
set to Low, Staccato and Tenuto on. For tuplets, set 3 to Simple or Moderate, maybe 6 as
tempo
well, and the others normally to
sixteenth-note (semiquaver), Use multiple voices switched on, Flexibility of
None unless you’re into playing things like septuplets.
20
Adjust rhythms on, Mini-
Page 21

Flexi-time™
Inputting using a MIDI guitar
If you have a MIDI guitar, refer to
Using a MIDI guitar on page 33 for details of how to set up G7
for input from your MIDI guitar.
Cleaning up Flexi-time input
When you input in Flexi-time using a MIDI guitar, you may find that notes are notated longer than
the duration you actually intended, so the notation will look more complex than you want it to. G7
has a useful tool to fix this: simply choose
Notes > Remove Overlapping Notes. This works by
cutting off notes that are already sounding when the next note starts to sound, and it also checks
for and removes “dangling” ties (i.e. ties that do not tie to a following note).
First, select the staff or staves from which you want to remove overlapping notes (or leave nothing
selected to apply the plug-in to the whole score), then choose
. You will be warned to save your score, and when you click OK, the selected passage or the
Notes
Notes > Remove Overlapping
whole score will be processed. When the process is complete, you will be told how many overlapping notes were removed.
Further information
For more information on Flexi-time, refer to your main G7 User Guide.
21
Page 22

Reference
Kontakt Player
G7 comes with Kontakt Player, a software synthesizer specially written for G7 by leading audio
software company Native Instruments (
sound engine of Kontakt, which is a professional software sampling package.
Kontakt Player includes 20 high-quality sounds, of which up to eight can be played simultaneously,
suitable for playing back scores written for a variety of ensembles. The Kontakt Player is also used
by
File > Save as Audio Track, for creating CDs and MP3 files of music; b Saving audio tracks.
Computer requirements
Kontakt Player requires a high-specification computer; please check your computer complies with
this before attempting to use Kontakt Player or
Absolute minimum (for scores that use one or two different sounds):
* Windows: Pentium III or faster, 128Mb+ RAM (196Mb+ for Windows 2000/XP).
* Mac: G3 500 MHz, 128Mb+ (OS 9) or 256Mb+ (OS X) RAM.
Recommended (for scores that use several different sounds):
* Windows: 700Mhz processor or faster, 256Mb+ RAM.
* Mac: G4/G5, 256Mb+ RAM.
www.native-instruments.com). Kontakt Player uses the
File > Save as Audio Track:
In all cases, Kontakt Player requires 375Mb free hard disk space in addition to G7.
These requirements are only approximate as performance also depends on factors like the capabilities of your sound card and hard disk, the particular number of different sounds (slots) a score
uses, and the particular sounds it uses (e.g. strings use more memory than most other sounds).
Reverb is off by default because it uses a lot of processor capacity; if you have a high specification
computer, you can switch it on from the
If your computer is towards the lower end of these specifications, see
below for help on getting the most out of Kontakt Player on your particular system.
ers
Play > Playback Options dialog
Tips for slower comput-
Installing Kontakt Player
If you haven’t already installed Kontakt Player, refer to the installation instructions at the beginning of this User Guide.
Setting up Kontakt Player
Once Kontakt Player is installed, it is set up in a similar way to other playback devices in G7:
* Choose Play > Devices
*
Under Playback devices, you will see Kontakt Player listed; on Windows, set the Use column to
Yes for Kontakt Player and to No for all other playback devices; on Mac, click on its name in the
leftmost column to select it, thereby setting it as the default playback device.
* Click OK.
Now refer to
Audio Setup (Windows) or Audio Setup (Mac) below as appropriate.
22
Page 23

Kontakt Player
Audio Setup (Windows)
The first time you run G7 after installing the
Kontakt Player, its
Audio Setup dialog will
appear. (If you need to change these settings at
a later date, choose
Window > Kontakt Player
and click the Audio Setup button.)
It is recommended that you try different combinations of
Interface and Output Latency
settings to determine the best possible performance on your computer for the types of
music you generally play back. The options
are as follows:
* Interface: depending on the type of soundcard you have installed, you will be able to choose
from three options:
% ASIO: if your soundcard has ASIO drivers, this is the recommended option, as it provides the
lowest latency and best performance. Consult your soundcard manufacturer for details about
whether your soundcard supports ASIO.
% DirectSound: this is the recommended option if your soundcard doesn’t support ASIO. (Win-
dows: This option requires that Microsoft DirectX 8.0 or higher is installed on your com-
puter.)
% Multimedia (MME): this option normally suffers from higher latency than either Direct-
Sound or ASIO, and is therefore only recommended if neither ASIO nor DirectSound give
acceptable results on your computer. When you choose this option you may get a “device in
use” error; if this happens, switch off the
Play music option in File > Preferences > General,
and restart G7.
* Sample Rate: this option determines the quality of the audio output; it cannot be changed from
the default of 44100.
* Output Device: this option allows you to choose the audio device through which you want to
send Kontakt Player’s output; choose your soundcard’s audio output here.
* Output Latency: the delay (latency) that occurs during playback. If you find that playback stut-
ters, try increasing the latency. You don’t need to do this if
Interface is set to ASIO (the latency
gets set automatically).
You can return to this dialog at any time to adjust the settings further.
23
Page 24

Reference
Audio Setup (Mac)
The first time you run G7 after installing Kontakt
Player, its
Audio Setup dialog will appear. (If you need
to change these settings at a later date, choose
Window > Kontakt Player and click the Audio Setup
button.)
Adjust the Output Latency accordingly. The delay that
occurs during playback is determined by the length of
the audio buffer the software passes to your sound
device. On Mac OS 9, OMS introduces a delay when you have Virtual Memory switched on; it is
recommended that you switch off Virtual Memory in the
Memory Control Panel before running
G7.
Settings window
You can adjust further options by choosing
* Master tune: allows you to adjust the default tuning of all instruments by +/- two half-steps
Window > Kontakt Player and clicking Options:
(semitones)
* Animate keyboard during playback: when switched on, this causes the piano keyboard in the
main Kontakt Player window to show which notes are being played by the selected slot during
playback
* If you have a slower computer, switch on Use ECO instrument set; this loads a lower-quality
sample bank that uses less memory and which should give better performance
* Direct From Disk options: when Direct From Disk (DFD) is switched on – so that the DFD Active
button is illuminated – Kontakt Player will buffer sounds direct from your hard disk, rather than
loading them all into RAM before playing. When DFD is on, Kontakt Player uses less RAM, but
performance may suffer if you have a particularly slow hard disk.
Playback via Kontakt Player
Once you have set up Kontakt Player, you can simply play back your score as normal. When you
start playback of a score for the first time (or click
Reset Sounds in the Mixer window in a score
that you previously played back through another MIDI device), there will be a delay of a few seconds as Kontakt Player loads its sounds into memory. Kontakt Player shows you a progress bar as it
does this.
If while loading sounds Kontakt Player says “Physical memory is getting low... really proceed loading?”, we recommend you click
No. (You may be able to click Yes and force it to load one or two
more sounds, but do so at your own risk as if your computer runs out of memory it will probably
crash!)
If you click
Cancel or No while Kontakt Player is loading sounds, then the missing sounds won’t
play. To get these missing sounds to play back, you should adjust your Kontakt Player settings (see
Tips for slower computers below) and then click Reset Sounds in the Mixer. If they still don’t
play, quit and restart G7, or restart your computer.
24
Page 25

Kontakt Player
Tips for slower computers
Because Kontakt Player uses high-quality sounds that take up a lot of memory, it can place high
demands on your computer’s hardware. To judge the best settings for a score, choose the most
complex passage, or a passage in which you encounter playback problems, then try changing the
settings, playing back that section again after each change to judge the improvement.
Try changing the following settings, in this order:
* Switch off reverb: if Use reverb in Play > Playback Options is switched on, switch it off; if CPU
usage (as shown in the Kontakt Player window) is consistently above 70% during playback, you
should definitely switch off reverb; consistently high CPU usage will lead to stuttering and distorted playback.
* Polyphony: open Window > Kontakt Player and look for this: .The right-hand
number represents the maximum number of notes Kontakt Player can play in total (i.e. for all
slots) at once. To change it, double-click the right-hand number, type in the new number, and hit
Return (on the main keyboard). Reduce this to something much lower than the default; e.g. 32
*
Use ECO instrument set: the ECO sounds require 30% less CPU power on average than the full
instrument set – see
* Increase latency: changing the Latency (ms) setting in Play > Devices can reduce or eliminate
stuttering or uneven playback (but latency cannot be changed on Mac OS 9) – see
Settings window above.
Latency on
page 36.
* Share slots: switch on Use the same slot for identical sounds in Play > Playback Options to
reduce the number of slots used overall.
* Limit slots: if sharing slots doesn’t significantly reduce the number of used slots, try limiting
them by setting
* Switch off DFD: you should only switch off DFD if you have a large amount of RAM in your com-
Limit number of slots in Play > Playback Options to (say) 6 or 4.
puter (around 300Mb assigned to the Sibelius application in Mac OS 9, and around 1Gb total
RAM installed for Mac OS X) – see
Settings window above.
Here are some further tips that may help improve performance of the Kontakt Player:
* Don’t run other applications at the same time as G7 and Kontakt Player. For example, if you typ-
ically have an email program or word processor running in the background, try closing it down.
* Don’t allow disk-intensive activities to take place while using G7 and Kontakt Player. For exam-
ple, some disk defragmenting and virus checking software runs in the background while you are
working in other applications.
* If you are running Windows 98/Me, try experimenting with the Hardware acceleration and
Sample rate conversion quality sliders in the Advanced Audio Properties dialog (accessible
by clicking the
* If possible, try installing G7 and Kontakt Player on a computer which has more RAM, a faster
Advanced button on the Audio page of the Multimedia applet in Control Panel).
processor, and/or a separate soundcard (which should be at least DirectSound-compatible, and
preferably ASIO-compatible).
* Mac OS 9 users only: You will need to assign more memory to the G7 application before using
Kontakt Player. Select the
G7 application icon in the Finder, type XI, choose the Memory page,
25
Page 26

Reference
and increase the
Preferred Size accordingly (we recommend assigning at least 100000K), then
restart G7.
Kontakt Player window
The Kontakt Player has its own window from which you can adjust the playback of your score.
Show it by clicking the Kontakt Player button in G7’s Mixer window, or by choosing Window >
Kontakt Player
.
The window is split into three sections:
* Virtual rack: the top section of the window shows the eight “slots” into which instrument sounds
are loaded. Click on the name of a sound in the slot to show the controls specific to that instrument in the instrument header section below.
* Instrument header: shows the settings for a particular slot; see Instrument header below.
* Keyboard: allows you to audition particular sounds by clicking the keys with the mouse; you can
also adjust the pitch bend and modulation wheels with the mouse.
Instrument header
The instrument header allows you to configure the sound loaded into each of Kontakt Player’s
eight slots (even in real time during playback if you want):
* CPU usage: displays the amount of processor power being used, as a percentage
* Total memory: displays the total memory being used by all samples in all slots
* MIDI indicator (MIDI plug icon): flashes when MIDI data is received
* Polyphony (the little note symbols): the left digit indicates the number of notes being played in
that slot at any given moment; you can adjust the polyphony limit by clicking on the right-hand
digit and dragging up and down with the mouse
* RAM usage (the little microchip): displays the size of all samples loaded into RAM for the
selected instrument
* Output: Kontakt Player offers multiple outputs with flexible routing; this option allows you to
select an output for the selected instrument.
The eight dials to the right allow you to adjust further parameters for each sound. Click on the dial
and drag up and down (not round in a circle) to change the dial; hold down the
Shift key for fine
adjustments.
26
Page 27

Kontakt Player
* Tun e: this changes the instrument’s tuning in half-steps (semitones), up to +/- 12 half-steps (one
octave). Hold
* Pan: master stereo placement control for the instrument (if a stereo output is selected). Updat-
Shift and drag to adjust the tuning in cents (1/100th of a half-step).
ing this parameter updates the corresponding control in G7’s Mixer window.
* Vo lu m e: master volume control for the instrument. Likewise, adjusting this parameter adjusts
the corresponding control in G7’s Mixer window. The highest position of the volume fader in the
Mixer corresponds to a volume of 0dB (decibels), which is not the maximum volume possible in
Kontakt, but volumes higher than 0dB can cause “clipping” or distortion when many instruments are playing at the same time. If you adjust the master volume control in the Kontakt
Player window to a volume higher than 0dB, the next time you start playback, it will be reset to
0dB (because this is the volume that corresponds to the Mixer’s volume fader).
In addition, each instrument sample may have up to four other pre-defined adjustable parameters;
each dial is labeled with the name of the parameter. Several sounds include a Reverb parameter;
unless you want different reverb for different sounds, you should leave this alone and instead
switch on reverb both in
Play > Playback Options (see below) and Play > Performance.
Playback Options
Play > Playback Options dialog has some settings for the Kontakt Player to help improve per-
G7’s
formance across a wide range of computers:
* Use Kontakt Player (if installed): this option is switched on by default. If you wish to stop G7
from loading Kontakt Player temporarily but do not wish to uninstall it altogether, switch off this
option, then restart G7. To use Kontakt Player again, switch this option back on, then restart G7.
* Unload sounds when switching scores: this option unloads sounds from your computer’s
memory when you switch between two or more open scores, which saves memory.
* Use reverb (uses more CPU): the reverb produced by Kontakt Player sounds great, but is very
intensive on your computer’s processor; by default, Kontakt Player reverb is switched off. If you
have a fast computer, try switching it on.
* Use the same slot for identical sounds: with this option switched on, if your score uses fewer
than eight different sounds, G7 will nonetheless assign e.g. both staves of a piano to the same
slot. This has the advantage of using less memory, loading fewer samples, and placing less
demand on your computer; the disadvantage is that you cannot set independent pan and volume
settings for each staff if they are played on the same slot. (This is one of many respects in which
slots are like MIDI channels.)
* Limit number of slots: if you find that you are unable to get satisfactory playback when using
the full eight slots, try switching on this option and limiting the number of slots to (say) four.
Using Kontakt Player with other playback devices
You may want to use Kontakt Player to play back some of the staves in your score, and another
MIDI device (or devices) to play back others. This is easy to set up in principle, but in practice you
will encounter varying degrees of latency (delay) depending on both the speed of your computer
and the nature of the other playback devices you are using.
Typically, Kontakt Player is slightly slower to respond to the command to play a note than a hardware MIDI device or your computer’s built-in soundcard, because it has to load the high-quality
27
Page 28

Reference
sounds it uses from disk before it starts playing. As a result, you may need to set a higher latency
for your other MIDI devices to compensate for this delay in the Kontakt Player.
For details on how to adjust latency, refer to
Latency on page 36.
How Kontakt Player works
In order to get the best out of Kontakt Player, you need to know a little about the way it works.
Kontakt Player can play up to eight different sounds at once, drawn from the 20 sounds supplied.
You can think of it as a MIDI device with only eight channels, rather than the normal 16. These
channels are called slots. At the simplest level, this means that it can play back scores with up to
eight staves in them without making any compromises.
However, a staff in your score may potentially use more than one sound due to MIDI program
changes (e.g. if a string bass staff starts arco but later plays pizz.), which may increase the total
number of sounds used in your score above eight.
Because Kontakt Player cannot perform the equivalent of MIDI program changes (where the
sound played by a given MIDI channel can be changed during playback), it is therefore limited to a
total of eight different sounds which occur anywhere in a score.
What this means in practice is that, if your score uses more than eight sounds in total, G7 will
make some compromise decisions for you about how best to play it back. For staves that are in the
same instrumental family (e.g. guitars, keyboards) it will double up staves onto the same slot so
that they all use the same sound – so you may end up with acoustic, electric and bass guitars all
playing back with (say) an electric guitar sound.
You can influence G7’s decisions by adjusting the
Priority option in the Mixer window for a
selected staff. There are three settings for this option:
* High: G7 will try to use the specified sound for this staff at the expense of others. You might set
this option for (say) a solo instrument staff; you might also set it for a staff that includes an
important program change somewhere, e.g. going from arco to pizz.
* Auto: G7 will, all things being equal, try to use the specified sound for this staff. This option
should be set for most staves.
* Low: G7 will happily ignore the specified sound for this staff, if it needs to assign another slot in
order to give a higher-priority staff the correct sound.
Even if you set these options, it may not always be possible to play back the precise combination of
sounds that you’re asking for within the limitations of the eight slots provided by Kontakt Player.
Repeated notes
If your score has consecutive notes of the same pitch in the same staff (or in multiple staves but
playing back through the same Kontakt Player slot), you may find that the second and subsequent
repeated notes do not sound. To solve this, modify the
formance
dialog to values of less than 100%.
Note Durations options in G7’s Play > Per-
28
Page 29

Included sounds
The 20 sounds included with Kontakt Player are as follows:
Kontakt Player
1. Nylon guitar
2. Steel string (vel-lp)
3. Acoustic Flat Pick
4. Tele Open A3
5. Jazz Guitar
6. Les Paul Distorted
7. Les Paul Distorted – Mutes
8. Smooth Jazz Bass
9. Precision Bass Pick Dual
10. Dark Bass
11. Spector slap bass
12. Drawbar organ
13. Large string section
14. GM Drums
15. Grand piano
16. Rhodes
17. Male choir “aah”
18. Tenor sax
19. Trumpet section
20. Female solo “aah”
29
Page 30

Reference
MIDI devices
This section details how to set up playback in G7. Overall playback for the whole program is controlled from the
zXM) controls the sounds and devices used in a particular score.
Setting up for playback
Playback devices section of the Play > Devices dialog lists:
The
* Device: this column shows all the MIDI devices recognized by G7. Even if you have not set up
any external devices, there may well be two or more things listed as playback devices – such as
DLS Music Device (Mac OS X only), QuickTime Music (Mac OS 9 only) or a number of differ-
ent related devices (e.g.
Wavetable SW synth
* Use (Windows only): says whether or not G7 should use it for playback.
* Test (Windows only): click this button to test whether a particular device is connected and
working propertly, and suitable for playback.
* Sound set: this column tells G7 what sounds are available on each of the listed playback devices;
by default, it is set to
sound set). Internal soundcards (and the built-in synths on Macs) generally only have General
MIDI sounds available, so if you don’t have any external MIDI devices, there’s no need to change
this setting.
* Latency (ms): this column displays the latency of each device, measured in milliseconds. You
will not normally need to change this value, unless you want to use multiple devices for playback
simultaneously, one or more of which is software-based (such as the Kontakt Player).
* Sound font or DLS (Mac OS X only): the built-in DLS Music Device on Mac OS X can use any
standard .sf2 or .dls soundfont; this option allows you to choose between any soundfonts you
have installed on your computer.
Play > Devices dialog, and the Window > Mixer dialog (shortcut Ctrl+Alt+M or
A: SB Live! MIDI Synth, B: SB Live! MIDI Synth and Microsoft GS
), and any of them may be used for playback.
General MIDI, except for the Kontakt Player (which has its own dedicated
Depending on whether you use Windows or Mac, refer to the appropriate sections below for help
on setting these options appropriately.
Windows users
On Windows, external MIDI devices listed in the
Device column are normally named after the
port, and so include the words “MIDI Out” or “MPU-401.”
Click
Test on each item in the Devices list to see how it sounds. You may get no sound if the device
is not properly connected, e.g. if your speakers are not connected to your soundcard or are not
switched on.
If you only have an internal soundcard, you should only set the
device – choose the one whose sound you like the best. If
though playback doesn’t, switch any unused devices to
No in the Use column.
Use column to Yes for one listed
Test in the Devices dialog works even
If you have external MIDI devices connected to your computer, you may want to set more than one
playback device to
which are usually represented as two separate MIDI devices (called e.g.
Yes in the Use column. For example, some MIDI devices support 32 channels,
MIDI out A and MIDI out
30
Page 31

MIDI devices
B). In this case, you could set Use to Yes for both these devices, and then choose which instru-
ments play back via which device via the
(shortcut
Ctrl+Alt+M or zXM) – b Mixer.
Device drop-down menu in the Window > Mixer dialog
One further Windows-specific option is found in the Play > Devices dialog: Play in Background
lets you choose whether G7 can play while you’re using other music programs. Some soundcards
can make Windows crash when switching between different music programs. If you find this happens, click
Play in Background, set G7 owns MIDI devices to Always, and click OK.
Mac users
On Mac, the items in the
Devices list are normally named after the device itself (with the name set
in Audio MIDI Setup on Mac OS X, or provided by OMS or FreeMIDI on Mac OS 9).
To test each device, click on the name in the
Devices column. The name of the device you click
turns blue, to indicate that it is the default playback device. By default, G7 will only use this device,
but all of the available devices can be used during playback, if you choose them for particular
staves by adjusting the
Ctrl+Alt+M or zXM) – b Mixer.
There are a few further Mac-specific options on the
* Current MIDI system shows you the active MIDI system; click Change to choose a new one.
When you click
computer. Mac OS 9 may list
OS X MIDI
and DLS Music Device only.
Device drop-down menu in the in the Window > Mixer dialog (shortcut
Play > Devices dialog, as follows:
Change, the options available will depend on what software is installed on your
QuickTime only, OMS, or FreeMIDI; Mac OS X will only list Mac
You m ay o n l y ch oo s e one MIDI system to be used by G7, even if you have more than one avail-
able. You will be prompted to close down G7 and start it again after changing your MIDI system.
* The Quality button (Mac OS X only) is only enabled when the DLS Music Device is in use;
clicking this brings up a dialog that allows you to change the sample rate of the sounds played by
the device; a lower sample rate doesn’t sound quite as good, but reduces the demands on your
computer’s processor, and may help to improve the stability of playback on slower machines.
Use reverb is switched on by default; switching this off also reduces the demands on your com-
puter’s processor. This dialog also contains the option
which (as the name suggests) switches off display smoothing (refer to
Disable smoothing during playback,
Display settings in your
main G7 User Guide) during playback, and switches it back on when you stop. If G7 warns you
about playback problems, we recommend you try switching this option on before you try reducing the sample rate in the
* Show other music programs as devices (Mac OS 9 only) allows G7 to send its output to other
Quality dialog.
music programs, effectively like playing into another program via MIDI input. This should be
switched off by default.
Sound sets
Many external MIDI devices support a wide range of additional sounds, which are only accessible
if you know the bank and program numbers for each sound. You can type these numbers individually for each staff in the
Window > Mixer window if you want, but if an appropriate sound set is
available for your device, this will save a lot of time. A sound set is a file that lists all of the sounds
31
Page 32

Reference
available on a particular device, and also specifies the default sounds G7 use for all the instruments
you may have in your score, so you don’t have to set up these sounds yourself.
Various sound sets are installed by default with G7; if your device isn’t listed in the
umn of the
choose
Play > Devices dialog, a sound set file may be available from G7’s online Help Center –
Help > Help Center.
Sound set col-
On Mac OS X, G7 will try to choose a sound set with the same name as is specified for your MIDI
device in the Audio MIDI Setup utility.
On Mac OS 9, if you use OMS or FreeMIDI to connect your external MIDI devices, a sound set is
automatically generated, so you don’t need to worry about the
Devices
dialog.
Sound Set column in the Play >
On Windows, you’re left to your own devices to choose an appropriate sound set.
If playback doesn’t work
By default, G7 assumes that your playback device is General MIDI compatible, which almost all
soundcards and many keyboards and sound modules are these days. If you don’t know, the easiest
way to check is to play back a score containing different instruments by clicking the Play button on
the toolbar. If this doesn’t work, it may be that:
* You get no sound at all. This means your soundcard or MIDI device isn’t working or isn’t plugged
in properly, or that your computer can play back through several devices and it’s set to the wrong
one.
* You get different sounds but they’re the wrong instruments:
% If the right sounds came out, your device probably obeys the General MIDI standard and
your life is going to be all laughter and sunshine from now on.
% If the wrong sounds came out, you’ll have to adjust the sound set used for that device.
% If your device isn’t compatible with any of the supplied sound sets, you’ll have to tell G7 which
program numbers (sounds) to use in the Mixer window – see
Mixer on page 37 for more
details.
Setting up for MIDI input
The lower half of the
Play > Devices dialog is concerned with MIDI input; the white box at the bot-
tom lists any MIDI input devices you have – e.g. MIDI keyboards or MIDI guitars. In the unlikely
event that you have two or more, you can click the one you want to use.
Try playing notes on your keyboard or guitar while the
Play > Devices dialog is open. If everything
is working as it should, the little black indicator should light up green as you play. If the indicator
doesn’t light up, check your MIDI connections and ensure that you have the correct input device
selected (if more than one is present).
Switch on
MIDI Thru if and only if your MIDI device has no built-in sounds – this will make G7
immediately reproduce notes you play on your keyboard or guitar through your soundcard or
other playback device.
Find New Devices re-checks your playback and playing-in devices in case a new device has unex-
pectedly attached itself to your computer. Note that clicking this button will set the
Use column for
32
Page 33

MIDI devices
all the listed playback devices to
Yes, so don’t forget to set the ones you don’t want to use to No
again afterwards.
External MIDI devices are connected to your computer through an adaptor of some kind; on Mac,
these tend to be external adaptors that plug into the modem, printer or USB port, while on PCs,
adaptors can be external, but it is more common to connect MIDI devices through a special cable
that plugs into the joystick port (gameport) of your soundcard.
Problems with MIDI input
If MIDI input doesn’t seem to work, check that MIDI OUT on the keyboard is connected to MIDI
IN on your computer, and vice versa – not MIDI OUT to MIDI OUT and MIDI IN to MIDI IN. If
your computer has dual MIDI inputs, try also connecting the keyboard to the other MIDI IN
socket.
For further information on setting up your computer for MIDI input, refer to
Windows
and MIDI setup for Mac in your main G7 User Guide.
MIDI setup for
Using a MIDI guitar
G7 allows you to input from a MIDI guitar that supports multiple MIDI channels. If you have a guitar with a hexaphonic pick-up (such as the Roland GK-2A or GK-3) and a guitar MIDI interface
(such as the Axon AX100, Roland GR-33 or GI-20, etc.), G7 can notate exactly what you play, i.e. it
will notate notes played on a particular string on on the correct string in tab, whether you play in
using Flexi-time or step-time input. To set this up, choose
Notes > Note Input Options:
Switch on Use one MIDI channel per guitar string. This option is switched off by default,
*
because most people do not have MIDI guitars. Note: when this option is switched on, the
options in
still invoked when you e.g. copy music from one staff to another – see
options
* Set the Number of strings as appropriate
* Set the MIDI channel of highest pitched string, if necessary. G7 assumes that the strings of
Notes > Guitar Tab Fingering Options have no effect during input (though they are
Guitar tab fingering
in the Tab inpu t topic of your main G7 User Guide for more information).
your MIDI guitar are numbered sequentially; if they are not, consult the documentation for your
guitar MIDI interface, and set its options appropriately.
33
Page 34

Reference
You may also wish to set some of the options under
MIDI Guitar Input Filtering. One of the tradi-
tional problems of inputting using a MIDI guitar is that the software too accurately renders every
note detected by the MIDI pick-up: even if you are able to play cleanly, it’s common for very short
or quiet notes to appear in the score that you had not intended to play; similarly, MIDI pick-ups
occasionally detect high or low harmonics and notate these as very high or very low notes. G7 provides you with tools to tailor the sensitivity of its notation to your playing style.
The options under
* Pitches between x and y. This option is switched off by default (because it would be an inap-
Only notate are as follows:
propriate setting for other MIDI input devices, such as keyboards, that can reasonably play a
wider range of notes than a guitar), but if you are inputting using a MIDI guitar, you may want to
switch this option on and adjust the lower and upper notes you actually intend to be notated.
* Notes with velocities higher than x. To avoid any very quiet notes being notated unintention-
ally, adjust the minimum velocity. Try playing notes as softly as you can on your guitar; when the
note has a high enough velocity to pass the threshold, the little indicator in the dialog will light
up. Set this parameter such that the softest note you are likely to play will be notated.
* Notes longer than x ticks. To avoid very short notes being notated uninentionally, adjust the
minimum length. 256 ticks = 1 quarter note, so the default value of 10 ticks is a little shorter
than a 64th note (hemidemisemiquaver). If this seems to you like the kind of note value you
never think you’d write, set this value to be higher.
Reset sounds
If you open a score which was created on an incompatible MIDI device, G7 recognizes this and
asks if you want to reset the sounds. If you click
Yes, G7 resets the sounds in the score for you.
If you need to reset the sounds yourself (e.g. if you’ve adjusted the sounds in a score and want to
change them back to the defaults), open the Mixer window (shortcut
click
Reset Sounds, which sets the instruments to use the appropriate default sounds for your
Ctrl+Alt+M or zXM), and
current MIDI equipment.
Software devices
As computer power increases, hardware MIDI devices are gradually being replaced by equivalent
software, in some cases surpassing the power, flexibility and quality of the best hardware devices.
Kontakt Player, supplied with G7 (
b Kontakt Player), is a good example: it produces high-qual-
ity sounds of a standard that was only available in hardware devices until recently.
Many other software synthesizers are available, however, and although none of them is directly
supported by G7, it is possible to set them up as playback devices. These range from soundfonts,
which are drop-in replacements for the sounds built-in to your computer’s soundcard, up to samplers such as Gigastudio, or recreations of real instruments such as Hammond organs.
Soundfonts
Whether you can use soundfonts on your computer is determined by the operating system it uses,
and/or the make and model of your soundcard. There are two formats of soundfont, SF2 and DLS.
Many soundfonts are available for download from the web. The most useful ones are complete
34
Page 35

MIDI devices
General MIDI banks, which require no special configuration in G7: simply install the soundfont
bank, then use G7 as normal.
There is no built-in support for soundfonts in Windows or Mac OS 9, but all users of Mac OS X
10.2 or later can use soundfonts without requiring any additional software or hardware. On Windows, support for soundfonts depends on the model of soundcard you have installed in your computer; for example, the SF2 format is supported by the popular Soundblaster series of soundcards.
Consult your soundcard’s documentation for details of which of these formats – if either – it supports, and how to install them.
To use soundfonts on Mac OS X:
* Copy the .sf2 or .dls file into the Library:Audio:Sound:Banks folder on your hard disk
* In G7’s Play > Devices dialog, set the Soundfont column for the DLS Music Device to your cho-
sen soundfont
You can only use a single soundfont bank for playback in G7, so you should ensure that the chosen
bank contains all the required sounds.
VST and DXi instruments
The most common kinds of software playback devices use technologies called VST and DXi. These
software instruments are primarily designed for use with sequencers, but it’s possible to use them
in G7. The precise details of how to use VST or DXi instruments with G7 are beyond the scope of
this User Guide, but the basics are:
* VST and DXi instruments have to be “hosted” within a compatible application; host applications
are typically sequencers (such as Logic, Cubase, et al), but dedicated VST and DXi hosts are
beginning to appear. On Windows, these include Steinberg’s V-STack (
Chainer (
www.defectiverecords.com/vstihost/).
* Once you have your VST instrument installed in a host application, you need to trigger it from
www.xlutop.com/html/chainer.html). On Mac OS X, try VSTi Host (available from
www.steinberg.de) and
G7. The simplest and most reliable way to do this is to host the VST instrument on a separate
machine from G7, and route MIDI out of the computer running G7 and into the host computer.
* However, not everybody has two computers they can dedicate to creating their own virtual band
or orchestra; if you fall into this underprivileged category, you can run G7 and your host application on the same computer and route MIDI from G7 into the host application with the aid of a
software MIDI loopback driver. On Windows, the most common such driver is MIDI Yoke
(
www.midiox.com); on Mac OS X, you can use MIDI Patchbay (available for download from
pete.yandell.com/software/).
* When you install a MIDI loopback driver, it will appear as a device both in G7’s Play > Devices
dialog and in the host application’s MIDI configuration dialog. Set your primary playback device
in G7 to be the MIDI loopback driver, and in your host application set the MIDI input device to
be the same MIDI loopback driver.
* The chief problem with running both G7 and your host application on the same computer may
be significant latency (delay between G7 sending the instructions to play a note and it being
received, processed and played by the host application); latency of up to 1 second is not uncom-
35
Page 36

Reference
mon. This means that using a VST instrument hosted on the same computer is not suitable for
time-sensitive things like Flexi-time input.
* If you want to mix playback of software and hardware devices simultaneously, you will need to
adjust the
Latency (ms) value in G7’s Play > Devices dialog appropriately for each device – see
below.
Latency
When using software devices, such as Kontakt Player or VST instruments, for playback, you may
need to adjust the Latency (ms) column in the Play > Devices dialog to compensate for the delay
between G7 triggering a note and it being played by your software device.
Kontakt Player reports its own latency directly to G7, so you don’t need to worry about setting
latency if you only intend on using Kontakt Player for playback. If, however, you want to play back
some staves with Kontakt Player and others with another MIDI device, set the
Latency (ms) col-
umn for your other MIDI device to the same value as the Kontakt Player.
If you use another software device for playback, you’ll have to work out the latency for yourself. A
good way of doing this is to play back your score and estimate how much behind the movement of
the line that follows playback the notes are actually sounding; then try out different values in the
Play > Devices dialog, playing back your score after changing the values, until the movement of the
playback line and the actual playback match.
Further information
For more details, refer to
in your main G7 User Guide.
MIDI devices, MIDI setup for Windows and MIDI setup for Mac
36
Page 37

Mixer
The Mixer window allows you to change the sounds used by your score during playback.
You can leave the Mixer window open while you work on your score and make changes to the playback even as you listen. Choose
the Mixer.
Using the Mixer
The window is split into two sections. The left-hand side of the window contains mixer controls for
each staff, and you can resize it (explained below) to show more or fewer staves as required. The
right-hand side of the window shows extra settings for the staff selected in the left-hand side of the
Mixer, and can be hidden when it’s not required (see below).
Window > Mixer (shortcut Ctrl+Alt+M or zXM) to show or hide
Mixer
Solo and Mute control
whether the staff sounds
Slider changes the
pan position of the
staff in real time
Instrument name; click this
button to change the settings for this staff
Each staff in your score (plus an extra click track – see
Fader changes the volume
of the staff in real time
MIDI channel
used by staff
Shows/hides the control
panel at the right
Shows the Kontakt
Player window
Click track below) has its own set of con-
Settings for the
selected staff
trols, which work even when the staff is not selected:
* Volume fa d er : drag this up and down to alter the volume of the channel used by the staff. Like
the other settings, this works in real time, so you can change the volume of instruments while
the score is playing back and hear the difference instantly. Note that staves which share the same
MIDI channel will play at the same volume – when adjusting the volume fader for a staff, the
volume faders for any other staves which share the same MIDI channel move simultaneously.
* Pan slider: directly above the volume fader, this horizontal slider allows you to change the pan
(stereo) position of the staff.
* Mute: this button cycles through three levels of mute: muted, half-muted and unmuted. The
button changes color to show the current mute level: gray means unmuted, light blue means
half-muted, and mid-blue means totally muted. (The exception to this is the click track, which
can only be totally muted or unmuted.)
37
Page 38

Reference
* Solo: clicking this button for a particular staff mutes all other staves (if they were not already
muted), so that only the selected staff plays back; clicking the button a second time returns the
staves to their previous state (which usually means un-muting them, so that all staves play back
again).
* The button below each set of faders labeled with the instrument name lights up blue when you
click it, and the controls on the right-hand side of the dialog are updated to show the settings for
that staff. By default, the Mixer will display as much as possible of the full instrument name
under each fader. If you prefer, short instrument names can be shown instead: click the
button in the Mixer and then switch on Use short names.
To resize the Mixer, grab the right-hand edge of the window (or the resize handle at the bottom
right-hand corner) and drag. You can make the Mixer wide enough to show faders for all the staves
in your score (plus the click track), or narrow enough to show only the click track staff. If the Mixer
is narrower than the total width of all the faders, a scroll bar appears, allowing you to scroll left and
right to see faders that are otherwise not visible.
To show the Kontakt Player window, click the Kontakt button in the Mixer; for further details,
b Kontakt Player.
You can show and hide the control panel to the right of the Mixer by clicking the arrow to the right
of the faders. The controls in the right-hand half of the window are as follows:
* Staff: shows the full instrument name of the currently selected staff, so you can be sure you are
changing the right one
* Device: allows you to choose the playback device for the selected staff. The items on this list are
the playback devices listed in the
* Sound: this gives a description of the sound (bank/program number combination) produced by
Play > Devices dialog.
the playback device you’re using. By default this will probably be similar to the name of the staff.
To change the sound used by a staff, click the current sound to get a list of sounds available on
your device. You can check the chosen sound by clicking
* Kontakt Sound: when playing back via the Kontakt Player, this field shows the name of the
Test.
sound actually being used for the selected staff; it may not be the same as the sound you have
specifically chosen if the Kontakt Player needs to use more than eight sounds simultaneously.
* Priority: This option only applies when you are playing back via the Kontakt Player, and gener-
ally does not need any adjustment. If, however, it is particularly important that a given staff plays
back with the correct sound, or that a given staff obeys any instructions that result in program
changes, you can set the
Priority to High, which will make G7 try and assign the correct sound to
this staff, at the expense of others in the score. For more details on how the Kontakt Player
decides to assign sounds for playback,
* Bank High / Bank Low / Program: unless you use specialist MIDI playback equipment, you
b Kontakt Player.
won’t need to change these settings, which allow you to manually specify the bank and program
of any sound on your MIDI device.
MIDI bank select, MSB, or ‘coarse’ controller);
called LSB, or ‘fine’ controller);
Bank High represents MIDI controller 0 (also known as the
Bank Low represents MIDI controller 32 (also
Program is the number (in the range 0–127) of the individual
sound within the selected bank that you want to play.
Display
38
Page 39

Mixer
* Channel: sets the MIDI channel. G7 sets MIDI channels to sensible values automatically (giving
different staves different channels). You can see which MIDI channels are set for each staff on
the left-hand side of the Mixer. Note that on General MIDI-compatible devices, channel 10 is a
special channel used only for drums and unpitched percussion, so don’t use it for other instruments.
* Distance: scales the overall reverb setting for each staff, so a staff set to a distance of 200% will
have twice as much reverb as other staves. This, coupled with the staff ’s volume (set by the volume fader), gives an impression of distance: distant instruments are soft with lots of reverb,
nearby instruments are loud with little reverb. So set the staff’s distance to more or less than
100% if the instrument is further or nearer than the average distance of the ensemble. Values
between about 60% and 140% would be sensible. The overall reverb setting is controlled by the
Play > Performance dialog (shortcut Shift-P).
* Vol ume: a numerical representation of the volume fader on the left-hand side of the window;
changing either the fader position or the numerical control updates the other. Although volume
adjustments can achieve the same effect as
ing fine adjustments to the volume level and
Mute, we recommend you reserve Volume for mak-
Mute for basically switching instruments on and
off.
* Pan: a numerical representation of the pan slider for each staff on the left-hand side of the win-
dow; changing either updates the other. The pan (stereo) position of a staff is represented by a
Pan number from 0 (full left) to 127 (full right). Pan positions from (say) 30 to 90 give subtle
and realistic effects – more extreme values can sound crude, because you’d be unlikely to have
instruments literally on either side of you.
All of the changes you make in the Mixer window are fully undoable – just choose
Edit > Undo
(shortcut XZ or Ctrl+Z) or click the toolbar button.
Click track
Some music programs accompany playback with a metronome click, for example so that you can
play along; if you want G7 to do this, click
ing
option. The Click when recording option controls whether the click sounds while using Flexi-
time recording. You can also change the
the
Mixer window itself.
Click in the Mixer and switch on the Click when play-
Click when playing settings using the Mute button on
You can choose the percussion sounds used by the click track on the first beat of the bar and subsequent beats. The
will click lightly on every eighth note (quaver).
Subdivide beats option is useful in some time signatures such as 6/8, where it
Stress irregular beat groups accents beats in the
bar depending on the beat groups defined for irregular time signatures such as 7/8.
39
Page 40

Reference
Opening Finale, Allegro and PrintMusic files
G7’s built-in Finale file converter allows you to open files created in Finale, Allegro, PrintMusic,
and Finale Guitar, including Finale’s ETF (Enigma) files, provided they have 16 staves or fewer.
Supported versions
G7 can open the following kinds of files:
* .mus files from Finale 98/2000, Allegro 98/2000, PrintMusic 1.0
* .etf files from Finale 98/2000/2001/2002/2003/2004, Finale Guitar
With files from versions earlier than Finale/Allegro 98, the converter asks you to re-save the file
from a newer version of Finale/Allegro to update it; G7 can then open it.
For Finale 2001–2004 and Finale Guitar, you must save your file as an
File); G7 cannot open
Converting a file
In G7, choose
and simply click
delay the file will open. You should then check it and edit it as necessary.
Warning messages
Some files will contain notations that the file converter is aware may not be converted correctly. If
so, during conversion a dialog appears with a list of warnings, giving the severity of each problem
and the staff and bar number where it occurred. Staves are numbered such that the topmost staff is
1 (hidden staves are still counted – for a list of all staves you can look in G7’s
dialog, shortcut I).
The warning list is useful when editing the file after converting it: you may want to use it as a basis
for proof-reading the score.
The warning dialog has a
proof-reader. You can save the warnings at any point – if converting a series of files, the warnings
accumulate so you can wait till the end before saving.
Layout
G7 tries to maintain the same layout as the original file after conversion, but in cases where the
original layout information cannot be determined, G7 will warn you and then lay out the score
itself. If you need to ensure that the layout in G7 matches the original file, open the original file in
Finale, go to the last page, and choose
then be able to determine the layout of the file correctly.
File > Open (shortcut Ctrl+O or XO), find the Finale, Allegro, PrintMusic or .etf file
.mus files from Finale 2001–2004 or Finale Notepad.
Open. A dialog with a few simple options will appear; click OK, and after a short
Save button to save the warnings as a text file to print out or give to a
Edit > Update Layout, then re-save the file as an .etf. G7 will
.etf (Enigma Transportable
Create > Instruments
40
Page 41

Opening Finale, Allegro and PrintMusic files
Supported languages
Files created in Finale Guitar and Finale 2003 or later may contain Unicode text in any language;
on both Windows and Mac, G7 will correctly import English, German and Japanese text from such
files.
G7 will also try to determine the language of text in Finale 2003 or later files by checking the codepage used for encoding the text in the file. Text may not be imported correctly or may not display
at all if your operating system does not support that language. If the file contains text of an
unknown language, you can choose the
options dialog that appears when you open a file.
Default language of the file you are opening in the
Use default language for all text forces G7 to
treat all text (except that which uses music fonts, such as Petrucci) in the Finale file as if it were in
the selected default language; this should normally be switched off.
Mac memory (Mac OS 9 only)
With large files it is possible for the file converter to run out of memory on Mac computers (this is
unlikely to be a problem on Windows). G7 may either tell you that there is no more memory, or it
may just give up converting a file.
If so, you should increase G7’s memory allocation. Select the
and type
XI to see the File Info dialog. Find the Memory area and increase the Preferred Size (as
G7 program file (in the G7 3 folder)
a guide, 25Mb is enough to convert a 2.5Mb Finale file of an orchestral score). It is also a good idea
to switch on virtual memory in the separate
Memory Control Panel (although be aware that play-
back in G7 through QuickTime is adversely affected by having virtual memory switched on).
Quality of the results
The quality of the results is generally good: standard notations normally convert well, and the converter even understands various “fakes” that are commonly used in Finale and turns them into
proper notations in G7.
The limitations are summarized at
http://www.sibelius.com/helpcenter/en/a276
Most of them don’t occur often because they tend to be obscure features in Finale that are seldom
used in practice, e.g. mirrored notes.
41
Page 42
Reference
Saving audio tracks
b Kontakt Player.
Using Kontakt Player, G7 can save a digital audio file of your score, ready to burn straight onto CD
or turn into an MP3 file to post on the Internet.
You must have Kontakt Player installed in order to save audio tracks from G7. You need a high
specification computer to get the best out of this feature – refer to
check the computer requirements before attempting to use
Save As Audio Track
To create a digital audio file of your score in WAV (on Windows) or AIFF (Mac) format:
* If you use Kontakt Player simultaneously with other MIDI devices for playback, only
the staves that are played back through Kontakt Player can be saved as audio. Therefore, you should set up your score so that all staves are played back through Kontakt Player
before you start.
* Before you try to save an audio track, ensure that your score plays back satisfactorily with Kon-
takt Player first –
*
Choose File > Save As Audio Track or click the toolbar button (shown above). (The button is
b Kontakt Player
disabled if Kontakt Player is not installed.)
* If some of the staves in your score are not set to play back through Kontakt Player, G7 asks you if
you want to set all the staves to play back through Kontakt Player now; if you click
ation is canceled
* A simple dialog appears, allowing you to set where the audio file should be saved and what it
should be called. G7 tells you how long the audio file will be, and approximately how much hard
disk space it will occupy.
* If you have a slower computer, it is a good idea to switch off Follow score during recording, as
this will reduce the chance of any clicks or pops getting introduced as the result of your computer trying to keep up with the recording.
* When you are happy with these settings, click Save and playback will begin. The recording takes
place in real time, so G7 will play back your score as normal while the recording is made.
* If you want to stop the recording at any point, click Cancel in the progress window that appears.
The partial audio file will be saved in the specified location. You can use this to record e.g. the
opening of a larger score.
Kontakt Player on page 22 to
File > Save as Audio Track.
No, the oper-
Burning audio files to CD
If you have a CD-R/RW drive (or “CD burner” as they are often known) in your computer, it should
have come supplied with some software for creating data and audio CDs. The exact process for
burning audio files saved from G7 onto an audio CD will vary according to the program supplied
with your CD burner; see its manual for details.
42
Page 43

Saving audio tracks
Creating MP3 files
MP3 (or MPEG Audio Layer 3 to give it its full name) is the most widely-used format for sharing
music on the Internet or via email, as it is much smaller than a WAV or AIFF file. Once you have
saved an audio track from G7, you can easily convert it into an MP3 file – you almost certainly
have software installed on your computer to do just this (for example, Windows Media Player on
Windows and iTunes on Mac can both encode MP3 files).
43
Reference
Page 44

Reference
Saving graphics files
G7 can export (save) a passage or page of music as a picture in various standard graphics file formats. This means you can include music in other documents, e.g. articles, worksheets, essays,
music books, cover designs and posters.
Because most of us prefer not to think about technicalities, G7 takes the strain out of saving graphics files – you generally don’t even need to know which kind of graphics file you need to produce;
just which program you want to use it in.
G7 allows you to save the whole score, a single page, or one or more systems just as easily:
* If you want to save one or more systems, first select the desired systems as a passage, then
choose
File > Save as Graphics
*
If you want to save one or more whole pages, or the whole score, just choose File > Save as
Graphics
.
Save as Graphics dialog has the following options:
The
* Program/Format: lists the programs G7 directly supports, together with the various graphics
file formats that it can save, so if your chosen program isn’t listed, you can choose the most
appropriate format for your software
* Pages: you can choose to export All the pages of your score, the selected systems only, or a range
of pages in much the same way as choosing which pages to print in the
type
1,3,10-23
* Filename
: determines the name of the file given to the exported graphics file; if you save multi-
Print dialog, e.g. you can
ple pages, the name entered here forms the basis of the name of each file (which will be preceded
by the page number of the score), and optionally also the name of the folder
* Save to folder: allows you to choose where the exported graphics file(s) will be saved; click
Browse and choose the desired folder
* Create subfolder: if you choose to export a range of pages or the whole score and you switch
this on, G7 will create a folder to put all the graphics files in, by default taking its name from the
44
Page 45

Saving graphics files
Filename specified above and appending the name of the format; so if you specify a filename of,
say,
Concerto 1st movt and export EPS files, the folder will be called Concerto 1st movt EPS
(although you can change this if you like)
* EPS Graphics: these options are (as the name would suggest) for exporting EPS files:
% Include TIFF preview: allows you to include a monochrome TIFF preview (compressed
using the CCITT modified Huffman RLE scheme) in the EPS file, which will enable most
graphics programs to show you a low-resolution preview of the EPS file before printing
% Embed fonts: with this option switched on, G7 will embed all the fonts used in the docu-
ment in the EPS file. Although embedding fonts increases the size of each EPS file you create,
it ensures that the publisher or printer who wants to use your EPS files can print them correctly without requiring separate copies of the fonts themselves. It is recommended that you
switch on this option, unless you have a good reason not to.
* Size: these options control the size of the saved graphics file; different options are available for
different formats:
% Scale (EMF only): this option is only adjustable for exporting in the EMF format; in theory,
EMF is a vector format and there should be no difference between exporting at, say, 100% or
400%, but in fact the placement of objects within EMF files is not very precise at lower scale
factors. EMFs are saved at 400% by default, which improves the alignment of noteheads and
stems etc.
For other formats, this option is not editable, but as you adjust the
Dots per inch
option
(see below) it updates to show how the chosen dpi affects the output scale factor.
% Dots per inch (TIFF, BMP, PICT only): allows you to control the resolution of exported bit-
map images. The higher the dpi setting, the higher the resolution of the exported file. The
value here gives the quality of the bitmap as compared with a laser printer; so 300 dpi will
look the same quality as a 300dpi laser print.
% Adjust size to improve staves (TIFF, BMP, PICT, EMF only): this option allows G7 to make
slight adjustments to the chosen
Dots per inch/Scale settings in order to ensure that the dis-
tance between all the staff lines in the exported file will be an even number of pixels, which
improves their appearance.
% Use smallest bounding box: defines the dimensions of the resulting graphics file. If this
option is switched off, the graphics file will use the page dimensions of the score (including
the margins) as the bounding box. With the option switched on, the file will be cropped to the
smallest size possible, i.e. just to the edges of the music.
* Options: further options, some of which are only available for certain formats:
% Monochrome (TIFF, BMP only): unless you need to export a score that contains colored
objects (or imported graphics that use color), it’s a good idea to leave this switched on. Saving
monochrome graphics files keeps the size of the resulting file down to the minimum, but
doesn’t compromise any quality (provided you don’t need color).
% Include View menu options: this option specifies whether the current options from the
View menu (such as hidden objects, highlights, note colors and so on) should be included
visibly in the graphics file(s). By default this option is switched off.
45
Page 46

Reference
% Include colored objects: if you have this option switched off (or if Monochrome is
switched on), any colored objects in your score will be colored black in the exported graphics
file
% Substitute: these options do the same as for printing, namely fix bugs in certain graphics
programs that can make lines and braces draw incorrectly.
When you’ve chosen your options, click
OK to export the graphics file(s).
Graphics formats
Graphics file formats fall into two kinds: vector graphics and bitmap graphics.
Vector graphics are scalable – in other words, you can make them larger or smaller without any
degradation in quality – and the files also tend to use less memory than bitmap graphics.
Bitmap graphics are made up of little squares (called ‘pixels’), so are lower quality than vector
graphics, but are supported by a wider variety of programs.
The specific formats available in G7 are as follows:
* Ve ct or : EPS (Mac and Windows), EMF (Windows), PICT (Mac)
* Bitmap: TIFF (Windows and Mac), BMP (Windows).
The TIFF format is detailed below; other formats are detailed in the
Graphics files topic of your
main G7 User Guide.
TIFF files
TIFF (Tagged Image File Format) is a widely-supported bitmap format particularly suitable for
music because it can be compressed efficiently. If you can’t use EPS graphics (e.g. because you don’t
have a PostScript printer), then we recommend using TIFF instead.
TIFF export can use quite a lot of memory as files are exported; however, it should be possible to
export whole pages at up to 1200dpi without problems. Unless you need color in your TIFF files,
keep the
Monochrome option switched on, as this minimizes the size of the saved file.
Further information
For more information, refer to the
46
Graphics files topic in your main G7 User Guide.
Page 47

Index
A
AIFF files . . . . . . . . . . . . . . . . . . . . . . . . . . . . . . . . . . . . . 42
Allegro files . . . . . . . . . . . . . . . . . . . . . . . . . . . . . . . . . . . 40
audio CDs
. . . . . . . . . . . . . . . . . . . . . . . . . . . . . . . . . . . . 42
creating
audio files . . . . . . . . . . . . . . . . . . . . . . . . . . . . . . . . . . . . . 42
audio tracks
. . . . . . . . . . . . . . . . . . . . . . . . . . . . . . . . . . . 42
C
CDs
making . . . . . . . . . . . . . . . . . . . . . . . . . . . . . . . . . . . . . 42
chord diagrams . . . . . . . . . . . . . . . . . . . . . . . . . . . . . . . . 13
. . . . . . . . . . . . . . . . . . . . . . . . . . . . . . . . . . . . . 17
copying
creating . . . . . . . . . . . . . . . . . . . . . . . . . . . . . . . . . . . . 14
deleting . . . . . . . . . . . . . . . . . . . . . . . . . . . . . . . . . . . . 17
. . . . . . . . . . . . . . . . . . . . . . . . . . . . . . . . . . . . . 14
editing
fingering . . . . . . . . . . . . . . . . . . . . . . . . . . . . . . . . . . . 15
libraries . . . . . . . . . . . . . . . . . . . . . . . . . . . . . . . . . . . . 15
maximum stretch
options . . . . . . . . . . . . . . . . . . . . . . . . . . . . . . . . . . . . . 17
playing back . . . . . . . . . . . . . . . . . . . . . . . . . . . . . . . . 17
chord symbols
above chord diagrams
click . . . . . . . . . . . . . . . . . . . . . . . . . . . . . . . . . . . . . . . . . . 39
copying
chord diagrams
Create menu
Chord Diagram
. . . . . . . . . . . . . . . . . . . . . . . . . . . . 14
. . . . . . . . . . . . . . . . . . . . . . . . 16
. . . . . . . . . . . . . . . . . . . . . . . . . . . . . . 17
. . . . . . . . . . . . . . . . . . . . . . . . . . . . . . 13
D
deleting
chord diagrams
. . . . . . . . . . . . . . . . . . . . . . . . . . . . . . . . . . . . . . . . . . . 45
dpi
DXi . . . . . . . . . . . . . . . . . . . . . . . . . . . . . . . . . . . . . . . . . . 35
. . . . . . . . . . . . . . . . . . . . . . . . . . . . . . 17
Finale, Allegro & PrintMusic files
File menu
Save As Audio Track . . . . . . . . . . . . . . . . . . . . . . . . . 42
. . . . . . . . . . . . . . . . . . . . . . . . . . . . . . . . . . . . . . . . . . 18
files
AIFF files . . . . . . . . . . . . . . . . . . . . . . . . . . . . . . . . . . . 42
audio . . . . . . . . . . . . . . . . . . . . . . . . . . . . . . . . . . . . . . 42
audio tracks
file formats . . . . . . . . . . . . . . . . . . . . . . . . . . . . . . . . . 18
Sibelius 2 files . . . . . . . . . . . . . . . . . . . . . . . . . . . . . . . 18
WAV files
Finale files . . . . . . . . . . . . . . . . . . . . . . . . . . . . . . . . . . . . 40
fingering . . . . . . . . . . . . . . . . . . . . . . . . . . . . . . . . . . . . . . 15
Flexi-time
options . . . . . . . . . . . . . . . . . . . . . . . . . . . . . . . . . . . . . 19
fretboard diagrams. . . . . . . . . . . . . . . see chord diagrams
. . . . . . . . . . . . . . . . . . . . . . . . . . . . . . . . . 42
. . . . . . . . . . . . . . . . . . . . . . . . . . . . . . . . . . 42
. . . . . . . . . . . . . . . . . . . . . . . . . . . . . . . . . . . . . 19
. . . . . . . . . . . . . . 40
G
graphics files
exporting
guitar frames. . . . . . . . . . . . . . . . . . . . see chord diagrams
. . . . . . . . . . . . . . . . . . . . . . . . . . . . . . . . . . . 44
H
help
device in use error . . . . . . . . . . . . . . . . . . . . . . . . . . . 23
no sound during playback
notes not sounding in playback . . . . . . . . . . . . . . . . 28
problems with MIDI input . . . . . . . . . . . . . . . . . . . . 33
wrong rhythms in Flexi-time
Help menu
Register Sibelius
. . . . . . . . . . . . . . . . . . . . . . . . . . . . . . 7
. . . . . . . . . . . . . . . . . . . . . 32
. . . . . . . . . . . . . . . . . . 20
I
importing
Finale, Allegro & PrintMusic files . . . . . . . . . . . . . . 40
E
Edit menu
Change Chord Diagram . . . . . . . . . . . . . . . . . . . . . . . 17
exporting
audio (.wav/.aiff) files
graphics
TIFF files
graphics files . . . . . . . . . . . . . . . . . . . . . . . . . . . . . . . . 44
Sibelius 2 files . . . . . . . . . . . . . . . . . . . . . . . . . . . . . . . 18
. . . . . . . . . . . . . . . . . . . . . . . . . . . . . . . . . 46
. . . . . . . . . . . . . . . . . . . . . . . . 42
F
file conversion
K
Kontakt Player . . . . . . . . . . . . . . . . . . . . . . . . . . . . . . . . . 22
M
metronome click
in playback . . . . . . . . . . . . . . . . . . . . . . . . . . . . . . . . . 39
MIDI
. . . . . . . . . . . . . . . . . . . . . . . . . . . . . . . . . . . . . 30
devices
. . . . . . . . . . . . . . . . . . . . . . . . . . . . . . . . . . 21, 33
guitar
messages
MIDI files
converting to audio
MP3
. . . . . . . . . . . . . . . . . . . . . . . . . . . . . . . . . . . 20
. . . . . . . . . . . . . . . . . . . . . . . . . . 42
. . . . . . . . . . . . . . . . . . . . . . . . . . . . . . . . . . . . . . . . . 43
47
Page 48

Index
N
notes
removing overlaps
Notes menu
Remove Overlapping Notes . . . . . . . . . . . . . . . . . . . 21
. . . . . . . . . . . . . . . . . . . . . . . . . . . 21
O
opening
Finale, Allegro & PrintMusic files
overlaps
removing . . . . . . . . . . . . . . . . . . . . . . . . . . . . . . . . . . . 21
. . . . . . . . . . . . . . 40
P
playback
chord diagrams
device in use error . . . . . . . . . . . . . . . . . . . . . . . . . . . 23
Kontakt Player . . . . . . . . . . . . . . . . . . . . . . . . . . . . . . 22
setting up
PrintMusic files . . . . . . . . . . . . . . . . . . . . . . . . . . . . . . . 40
privacy policy . . . . . . . . . . . . . . . . . . . . . . . . . . . . . . . . . . 9
. . . . . . . . . . . . . . . . . . . . . . . . . . . . . 17
. . . . . . . . . . . . . . . . . . . . . . . . . . . . . . . . . . 30
R
recording
. . . . . . . . . . . . . . . . . . . . . . . . . . . . . . . . . . . . 42
onto CD
registering . . . . . . . . . . . . . . . . . . . . . . . . . . . . . . . . . . . . . 7
S
saving
audio tracks
Sibelius-compatible files . . . . . . . . . . . . . . . . . . . . . .18
Sibelius 2 . . . . . . . . . . . . . . . . . . . . . . . . . . . . . . . . . . . . . .18
soundfonts
split point . . . . . . . . . . . . . . . . . . . . . . . . . . . . . . . . . . . . .20
. . . . . . . . . . . . . . . . . . . . . . . . . . . . . . . . .42
. . . . . . . . . . . . . . . . . . . . . . . . . . . . . . . . . . . .34
T
text
fingering on chord diagrams . . . . . . . . . . . . . . . . . . .15
ties
removing unnecessary
TIFF files . . . . . . . . . . . . . . . . . . . . . . . . . . . . . . . . . . . . . .46
tuplets
in Flexi-time
in imported MIDI files . . . . . . . . . . . . . . . . . . . . . . . .20
. . . . . . . . . . . . . . . . . . . . . . . . . . . . . . . . .20
. . . . . . . . . . . . . . . . . . . . . . . .21
V
VST . . . . . . . . . . . . . . . . . . . . . . . . . . . . . . . . . . . . . . . . . .35
W
WAV files . . . . . . . . . . . . . . . . . . . . . . . . . . . . . . . . . . . . .42
Window menu
Kontakt Player
. . . . . . . . . . . . . . . . . . . . . . . . . . . . . . .26
48
Page 49

License Agreement
License Agreement
By installing or using any component of the Software, or by registering the Product, you (an individual or legal entity) agree with the Licensor to be bound by the terms of this License which will
govern your use of the Product. If you do not accept these terms you may within 14 days of purchase return the Product, its packaging and documentation unused and intact to your supplier
together with dated proof of purchase for a full refund.
The Product is copyright © Sibelius Software Limited and its licensors 1987-2004.
1. DEFINITIONS
In this License the following words and expressions have the following meanings:
"Documentation": the G7 User Guide, Technical Help sheet, on-screen help and any other documentation relating to the Software supplied to you
"License": this agreement between you and the Licensor and, if permitted by the context, the conditional license granted to you in this
"Licensor": Sibelius Software Limited, an English company (registered no. 3338819) of The Old Toy Factory, 20-22 City North, Fonthill
"Product": the Software and the Documentation.
"Software": G7, Sibelius Scorch, PhotoScore Lite, Acrobat Reader, QuickTime, Opus and Inkpen2 font families, example music files,
2. License
2.1 (1) The Licensor grants to you a non-exclusive non-transferable license to use the Software in accordance with the Documentation, subject
to the terms of this License and of any discount, offer or scheme which the Product may have been obtained u nder. You may install the Software on at most two computers. Only you may use the Software. You may not use the Software on more than one computer simultaneously.
Any further use is prohibited.
(2) Title to the Product is not transferred to you. Ownership of the Product remains vested in the Licensor, subject to the rights granted to
you under this License. All other rights are reserved.
(3) If the Software was supplied as an upgrade or update from an earlier version, the license to use that earlier version is hereby terminated.
2.2 You may make one printout for your own use of any part of the Documentation provided in electronic form. You shall not make or permit
any third party to make any further copies of any part of the Product whether in eye or machine-readable form.
2.3 You shall not, and shall not cause or permit any third party to, translate, enhance, modify, alter, adapt or create derivative works based on the
Product or any part of it for any purpose (including without limitation for the purpose of er ror correction), or cause the whole or any part of
the Product to be combined with or incorporated into any other program, file or product for any purpose, except as expressly permitted by
the Documentation.
2.4 You shall not, and shall not cause or permit any third party to, decompile, decode, disassemble or reverse engineer the Software in whole or
in part for any purpose.
2.5 You shall not, and shall not cause any third party to, translate, convert, decode or reverse engineer any file in any version of the G7 or Sibel ius
Scorch formats (whether created by your copy of the Software or not), or modify any such file (except by using the Software in accordance
with the Documentation), in whole or in part for any purpose.
2.6 In accordance with the Documentation and subject to compliance with Section 2.1, the Software's "Save as Scorch Web Page" feature and
Sibelius Scorch web browser plug-in may be used to publish music scores on the Internet or by means of CD-ROM, floppy disk or by other
similar means; provided, however, that you shall not and shall not permit any third party to, directly or indirectly, charge or receive any fee,
payment or other consideration for the viewing, playing, printing or other use via Sibelius Scorch or via the Internet of any file which is created by (or based on any file created by) the Software, unless expressly permitted by the Licensor in writing.
2.7 The Produc t or any part of it must not be us ed to infringe any right of copyright or right of privac y, pu blicity or personalit y or any other rig ht
whatsoever of any other person or entity, including without limitation infringement of any such right by use of the Product in conjunction
with any of the scanning programs PhotoScore Lite, PhotoScore MIDI or PhotoScore Professional, or by use of the Product's Internet publishing capability.
3. Copyright
3.1 You acknowledge that copyright in the Product as a whole and in the components of the Product as between you and the Licensor belongs to
the Licensor or its licensees and is protected by copyright laws, national and international, and all other applicable laws. Further details of
the ownership of all copyright in the components of the Product are set out in the Product.
4. Liability of the Licensor
in any form by the Licensor or with the Software.
agreement.
Road, London N4 3HF, UK.
installer, and any other programs or files supplied to you on or with the G7 CD-ROM or download.
49
Page 50

Reference
4.1 The Licensor warrants that the Product will be free from defects in materials and workmanship and perform substantially in accordance
with the Documentation under normal use for a period of 90 days after the date of original purchase (the "Warranty Period"). If a defect in
the Product shall occur during the Warranty Period, the Product may be returned with dated proof of purchase to the Licensor who will at its
sole discretion either return the price paid or repair or replace it free of charge.
4.2 The Licensor shall not be liable for any claim arising from:
(1) any failure or malfunction resulting wholly or to any material extent from your negligence, operator error, use other than in accordance
with the Documentation or any other misuse or abuse of the Product;
(2) any loss of or corruption to any data, however caused, where such loss or corruption could have been avoided or corrected or substantially reduced if you had taken and retained in a secure place appropriate backup copies;
(3) the de compilation or modificat ion of the Software or its me rger with any other program or any m aintenance repair adjustment alteration
or enhanceme nt of the Software by any person other than the Licensor or its authorized agent;
(4) the failure by you to implement recommendations previously advised by the Licensor in respect of, or solutions for faults in, the Product;
(5) any loss or damage whatsoever resulting from any omissions or inaccuracies in any information or data contained in the Produc t.
(6) Except as otherwise expressly provided in Section 4.1, all conditions, warranties, terms representations and undertakings express or
implied, statutory or otherwise in respect of the Product are hereby expressly excluded.
(7) Except as expressly provided in Section 4.1, the Licensor shall have no liability to you for loss of profits, revenue or goodwill or any type
of specia l, indirect or co nsequential loss (including loss or d amages suffered by you as a result of an ac tion brought by a thi rd party) whe ther
such loss is caused by the Licensor's breach of its contractual obligations hereunder or any negligence or other tortious act or omission.
(8) The Licensor's entire liability for breach of its covenants and warranties in this License and for any defect or errors in the Product shall
(except as expressly provided in Section 4.1) be limited to the price paid by you for the Product.
5. Termination
5.1 This License shall terminate automatically upon your destruction of the Product and deletion of all installations of the Software. In addition,
the Licensor may elect to terminate this License in the event of a material breach by you of any condition of this License or of any of your
representations, warranties, covenants or obligations hereunder. Upon notification of such termination by the Licensor, you will immediately delete all copies of the Software from your computer(s), destroy any other copies of the Product or any part thereof, and return the
Product to the Licensor.
6. Miscellaneous
6.1 No failure to exercise and no del ay in exercising on the part of the Licen sor of any right, power or privilege arisi ng hereunder shall operate as
a waiver thereof, nor shall any single or partial exercise of any right, power or privilege preclude any other or further exercise thereof or the
exercise of any other right, po wer or privilege. T he rights and rem edies of the Lic ensor in connect ion herewith are not exclusive of any rights
or remedies provided by law.
6.2 You may not distribute, loan, sub-license, rent, lease (including without limitation renting or leasing a computer on which the Product is
installed) or otherwise transfer the Product to any third party without the Licensor's prior written consent, which the Licensor may grant,
condition or withhold in the Licensor's sole discretion.
6.3 This License is intended by the parties hereto to be a final expression of their agreement with respect to the subject matter hereof and a complete and exclusive statement of the terms of such agreement. This License supersedes any and all prior understandings, whether written or
oral, between you and the Licensor relating to the subject matter hereof.
6.4 (This section only applies if you are resident in the European Union:) This License shall be construed and governed by the laws of England,
and both parties agree to submit to the exclusive jurisdiction of the English courts.
6.5 (This section only applies if you are not resident in the European Union:) This License shall be construed and enforced in accordance with
and governed by the laws of the State of California. Any suit, action or proceeding arising out of or in any way related or connected to this
License shall be brought and maintained only in the United States District Court for the Northern District of California, sitting in the City of
San Francisco. Each party irrevocably submits to the jurisdiction of such federal court over any such suit, action or proceeding. Each party
knowingly, voluntarily and irrevocably waives trial by jury in any suit, action or proceeding (including any counterclaim), whether at law or
in equity, arising out of or in any way related or connected to this License or the subject matter hereof.
50
(License v3.3, 7 April 2004)
 Loading...