

Page 1

User Manual
OMNINAS KD20
Page 2

Page 3

CHAPTER TITLE TABLE OF CONTENTS
TABLE OF CONTENTS
Product Overview
Features . . . . . . . . . . . . . . . . . . . . . . . . . . . . . . . . . 1-2
Package Contents . . . . . . . . . . . . . . . . . . . . . . . . . . . 1-2
System Requirements . . . . . . . . . . . . . . . . . . . . . . . . 1-3
Product Views. . . . . . . . . . . . . . . . . . . . . . . . . . . . . . 1-5
Front View. . . . . . . . . . . . . . . . . . . . . . . . . . . . . . .1-5
Rear View . . . . . . . . . . . . . . . . . . . . . . . . . . . . . . . 1-6
LED Definitions . . . . . . . . . . . . . . . . . . . . . . . . . . . . . 1-7
Getting Started
Hardware Installation 2-2
Removing HDD Trays . . . . . . . . . . . . . . . . . . . . . . . . 2-2
First Instance . . . . . . . . . . . . . . . . . . . . . . . . . . . . 2-2
RAID 1 . . . . . . . . . . . . . . . . . . . . . . . . . . . . . . . . .2-4
Installing Hard Drives . . . . . . . . . . . . . . . . . . . . . . . . 2-6
Connecting the OMNINAS 2-9
Connecting to a Network . . . . . . . . . . . . . . . . . . . . . .2-9
Connecting to Power . . . . . . . . . . . . . . . . . . . . . . . . 2-10
Powering On. . . . . . . . . . . . . . . . . . . . . . . . . . . . . . 2-12
Connecting with the Finder Utility . . . . . . . . . . . . . . . 2-14
Windows & Mac Users. . . . . . . . . . . . . . . . . . . . . . 2-15
Linux Users . . . . . . . . . . . . . . . . . . . . . . . . . . . . . 2-19
Connecting by Web Browser . . . . . . . . . . . . . . . . . 2-20
Web Interface
II
Page 4

CHAPTER TITLE TABLE OF CONTENTS
Overview 3-2
Home Menu . . . . . . . . . . . . . . . . . . . . . . . . . . . . . . . 3-2
Settings Menu . . . . . . . . . . . . . . . . . . . . . . . . . . . . . 3-4
Storage Menu. . . . . . . . . . . . . . . . . . . . . . . . . . . . . . 3-5
Share Menu . . . . . . . . . . . . . . . . . . . . . . . . . . . . . . .3-6
USB Menu . . . . . . . . . . . . . . . . . . . . . . . . . . . . . . . . 3-7
Backup Menu . . . . . . . . . . . . . . . . . . . . . . . . . . . . . .3-8
BT Download Menu . . . . . . . . . . . . . . . . . . . . . . . . . . 3-9
Share Box Menu . . . . . . . . . . . . . . . . . . . . . . . . . . . 3-10
Media Server Menu . . . . . . . . . . . . . . . . . . . . . . . . . 3-11
Launching the Interface. . . . . . . . . . . . . . . . . . . . . . 3-11
Logging In 3-12
User Management 3-13
Viewing User List . . . . . . . . . . . . . . . . . . . . . . . . . . 3-13
Adding Users . . . . . . . . . . . . . . . . . . . . . . . . . . . . . 3-13
Editing Users . . . . . . . . . . . . . . . . . . . . . . . . . . . . . 3-15
Deleting Users . . . . . . . . . . . . . . . . . . . . . . . . . . . . 3-15
Storage Management 3-16
RAID Manager . . . . . . . . . . . . . . . . . . . . . . . . . . . . 3-16
RAID Types . . . . . . . . . . . . . . . . . . . . . . . . . . . . . 3-16
Creating a RAID Mode. . . . . . . . . . . . . . . . . . . . . . 3-17
Disk Manager . . . . . . . . . . . . . . . . . . . . . . . . . . . . . 3-19
Checking Disks . . . . . . . . . . . . . . . . . . . . . . . . . . 3-19
Formatting Disks . . . . . . . . . . . . . . . . . . . . . . . . . 3-20
Auto Mirroring . . . . . . . . . . . . . . . . . . . . . . . . . . . . 3-21
Enabling Auto Mirroring. . . . . . . . . . . . . . . . . . . . . 3-22
Hot-swapping HDDs . . . . . . . . . . . . . . . . . . . . . . . 3-22
Share Management 3-23
Adding Folders . . . . . . . . . . . . . . . . . . . . . . . . . . . . 3-23
Viewing Folder lists . . . . . . . . . . . . . . . . . . . . . . . . . 3-25
Editing Folders. . . . . . . . . . . . . . . . . . . . . . . . . . . 3-26
III
Page 5

CHAPTER TITLE TABLE OF CONTENTS
Deleting Folders. . . . . . . . . . . . . . . . . . . . . . . . . . 3-26
Rebuilding Default Folders. . . . . . . . . . . . . . . . . . . 3-27
System Log 3-28
Clearing Logs . . . . . . . . . . . . . . . . . . . . . . . . . . . . . 3-28
System Backup 3-29
Setting Up Backup Schedules . . . . . . . . . . . . . . . . . . 3-29
Editing Backup Schedules . . . . . . . . . . . . . . . . . . . . 3-30
Deleting Backup Schedules . . . . . . . . . . . . . . . . . . . 3-31
Viewing Backup Logs. . . . . . . . . . . . . . . . . . . . . . . . 3-32
System Configuration 3-33
Configuring Network Settings . . . . . . . . . . . . . . . . . . 3-33
Setting Date and Time. . . . . . . . . . . . . . . . . . . . . . . 3-35
Rebooting and Powering Off . . . . . . . . . . . . . . . . . . . 3-37
Reboot the system . . . . . . . . . . . . . . . . . . . . . . . . 3-37
Power Off . . . . . . . . . . . . . . . . . . . . . . . . . . . . . . 3-37
Reset to Factory Default . . . . . . . . . . . . . . . . . . . . . 3-38
Web Interface Reset. . . . . . . . . . . . . . . . . . . . . . . 3-38
Hardware Reset . . . . . . . . . . . . . . . . . . . . . . . . . . 3-38
Updating Firmware . . . . . . . . . . . . . . . . . . . . . . . . . 3-40
Application Services 3-41
iTunes Server. . . . . . . . . . . . . . . . . . . . . . . . . . . . . 3-41
BT Download . . . . . . . . . . . . . . . . . . . . . . . . . . . . . 3-42
Setting Up BT Downloads . . . . . . . . . . . . . . . . . . . 3-42
Using BT Download . . . . . . . . . . . . . . . . . . . . . . . 3-43
Share Box . . . . . . . . . . . . . . . . . . . . . . . . . . . . . . . 3-48
Remote Access Login . . . . . . . . . . . . . . . . . . . . . . 3-49
Setting Up Media Server . . . . . . . . . . . . . . . . . . . . . 3-52
OMNINAS for Android
Installation 4-2
IV
Page 6

CHAPTER TITLE TABLE OF CONTENTS
Logging In 4-2
Main Menus 4-4
Document Files 4-4
Movie Files 4-5
Photo Files 4-6
Posting to Facebook . . . . . . . . . . . . . . . . . . . . . . . . . 4-7
Video Files 4-8
Music Files 4-9
Torrents 4-10
OMNINAS for iOS
Main Menus 5-2
Configuration 5-3
Connecting to Your OMNINAS 5-3
Opening Document Files 5-4
Viewing Movie Files 5-5
Viewing Photo Files 5-6
Posting to Facebook . . . . . . . . . . . . . . . . . . . . . . . . . 5-6
Troubleshooting
Troubleshooting 6-2
Environmental Control 6-5
System Temperature. . . . . . . . . . . . . . . . . . . . . . . . . 6-5
System Fan Settings . . . . . . . . . . . . . . . . . . . . . . . . . 6-5
V
Page 7

PRODUCT OVERVIEW
Copyright
©2012 by Shuttle® Inc. All Rights Reserved.
No part of this publication may be reproduced, transcribed, stored in a retrieval sys-
tem, translated into any language, or transmitted in any form or by any means such
as electronic, mechanical, magnetic, optical, chemical, photocopy, manual, or other-
wise, without prior written permission from Shuttle® Inc.
Other brands and product names used herein are for identification purposes only and
may be trademarks of their respective owners.
Disclaimer
Shuttle® Inc. shall not be liable for any incidental or consequential damages resulting
from the performance or use of this product.
Shuttle® Inc. makes no representation or warranty regarding the contents of this manual.
English
Information in this manual had been carefully checked for accuracy; however, no
guarantee is given as to the correctness of the contents. For continuing product
improvement, Shuttle® Inc. reserves the right to revise the manual or make changes
to the specifications of this product at any time without notice and obligation to any
person or entity regarding such change. The information contained in this manual is
provided for general use by customers.
This device complies to Part 15 of the FCC Rules. Operation is subject to the following two conditions:
1. This device may not cause harmful interference.
2. This device must withstand any background interference including those that may
cause undesired operation.
Trademarks
Shuttle is a registered trademark of Shuttle Inc.
Intel and Pentium are registered trademarks of Intel Corporation.
Microsoft and Windows are registered trademarks of Microsoft Corporation.
General Notice
Other brand and product names used herein are for identification purposes only and
may be trademarks of their respective owners.
VI
Page 8

PRODUCT OVERVIEW
English
Safety Information
Read the following precautions before setting up a Shuttle Xvision.
Using electrical power
This product should be operated from the type of power indicated on the marking
label. If you are not sure of the type of power available, consult your dealer or local
power company.
Do not allow anything to rest on the power cord. Do not locate this product where
people will walk on the cord.
If an extension cord is used with this product, make sure that the total ampere rating
of the equipment plugged into the extension cord does not exceed the extension cord
ampere rating. Also, make sure that the total rating of all products plugged into the
wall outlet does not exceed the fuse rating.
Do not overload a power outlet, strip or receptacle by plugging in too many devices.
The overall system load must not exceed 80% of the branch circuit rating.
If power strips are used, the load should not exceed 80% of the power strip's input rating.
Using electrical power
Use the product only with the supplied power supply cord set. If you need to replace
the power cord set, make sure that the new power cord meets the following requirements: detachable type, UL listed/CSA certified, type SPT-2, rated 7 A 125 V minimum, VDE approved or its equivalent, 4.6 meters (15 feet) maximum length.
CAUTION for plug as disconnecting device
Observe the following guidelines when connecting and disconnecting power to the
power supply unit:
Install the power supply unit before connecting the power cord to the AC power
outlet.
Unplug the power cord before removing the power supply unit from the com-
puter.
If the system has multiple sources of power, disconnect power from the system
by unplugging all power cords from the power supplies.
VII
Page 9

Product Overview
Chapter 1
Page 10

English
PRODUCT OVERVIEW PRODUCT OVERVIEW
1-1
Page 11

PRODUCT OVERVIEW FEATURES
Features
Embedded Linux
Supports Microsoft
Largest single HDD capacity supported > 4TB
USB 3.0 (front panel) (flash drive, external HDD, hub, printer, digital camera,
®
Windows® and Mac OS
etc.)
SD card reader
RAID 0, 1, JBOD, single HDD supported
Power Consumption (Standby/Operational) 9W/15.5W
Aluminum chassis for improved heat dissipation
Supports USB Wi-Fi module (optional)
Supports media server for video streaming
Easy HDD installation and one button HDD hot swap
Supports scheduled BT Downloading without PC
Built-in ultra quiet fan
English
Elegant ID design with 2.5 mm aluminum for better heat dissipation
Package Contents
QUANTITY DESCRIPTION
1 OMNINAS KD20
1 AC adapter
1 Power cord
1 LAN cable
1Screw pack
1 Installation CD
1 Quick Start Guide (QSG)
1-2
Page 12

PRODUCT OVERVIEW SYSTEM REQUIREMENTS
English
System Requirements
PC Users:
Pentium
Microsoft
Microsoft
3.0 or higher
Must meet minimum RAM requirements for your operating system
CD or DVD drive
Available 10/100/1000 Mbps network Ethernet port
DHCP-configured network (recommended)
Network hub, switch, or router (recommended)
3.5" SATA Hard Drive(s)
Mac Users:
®
III 500Mhz processor or higher
®
Windows® XP Home / Professional / Professional x64 SP3 or later
®
Internet Explorer® 7.0, Firefox® 3.x, Google Chrome or Apple Safari
Mac OS X 10.4 or higher
Apple Safari 3.0 or higher
Must meet minimum RAM requirements for your operating system
CD or DVD drive
Available 10/100/1000 Mbps network Ethernet port
DHCP-configured network (recommended)
Network hub, switch, or router (recommended)
3.5" SATA Hard Drive(s)
Linux Users:
Linux kernel 2.6.x or later
Available 10/100/1000 Mbps network Ethernet port
DHCP-configured network (recommended)
Network hub, switch, or router (recommended)
Smart Phone Users:
Mobile Device: iPhone, iPad, Android phone, Android tablet
Mobile OS: iOS 4.2 and above, Android 2.3 and above
1-3
Page 13

PRODUCT OVERVIEW SYSTEM REQUIREMENTS
Personal Cloud and Remote Access Requirements:
Internet connection
Universal Plug and Play (UPnP™) compatible router or administrative rights to
port forward
Recommended minimum sustained connection speeds for a good Personal
Cloud experience
Download: 2.5 Mbit/s (recommended)
Upload: 500 Kbit/s (recommended)
English
1-4
Page 14
PRODUCT OVERVIEW PRODUCT VIEWS
Note:
21
2 1
1
2
5
6
8
9
3
4
7
English
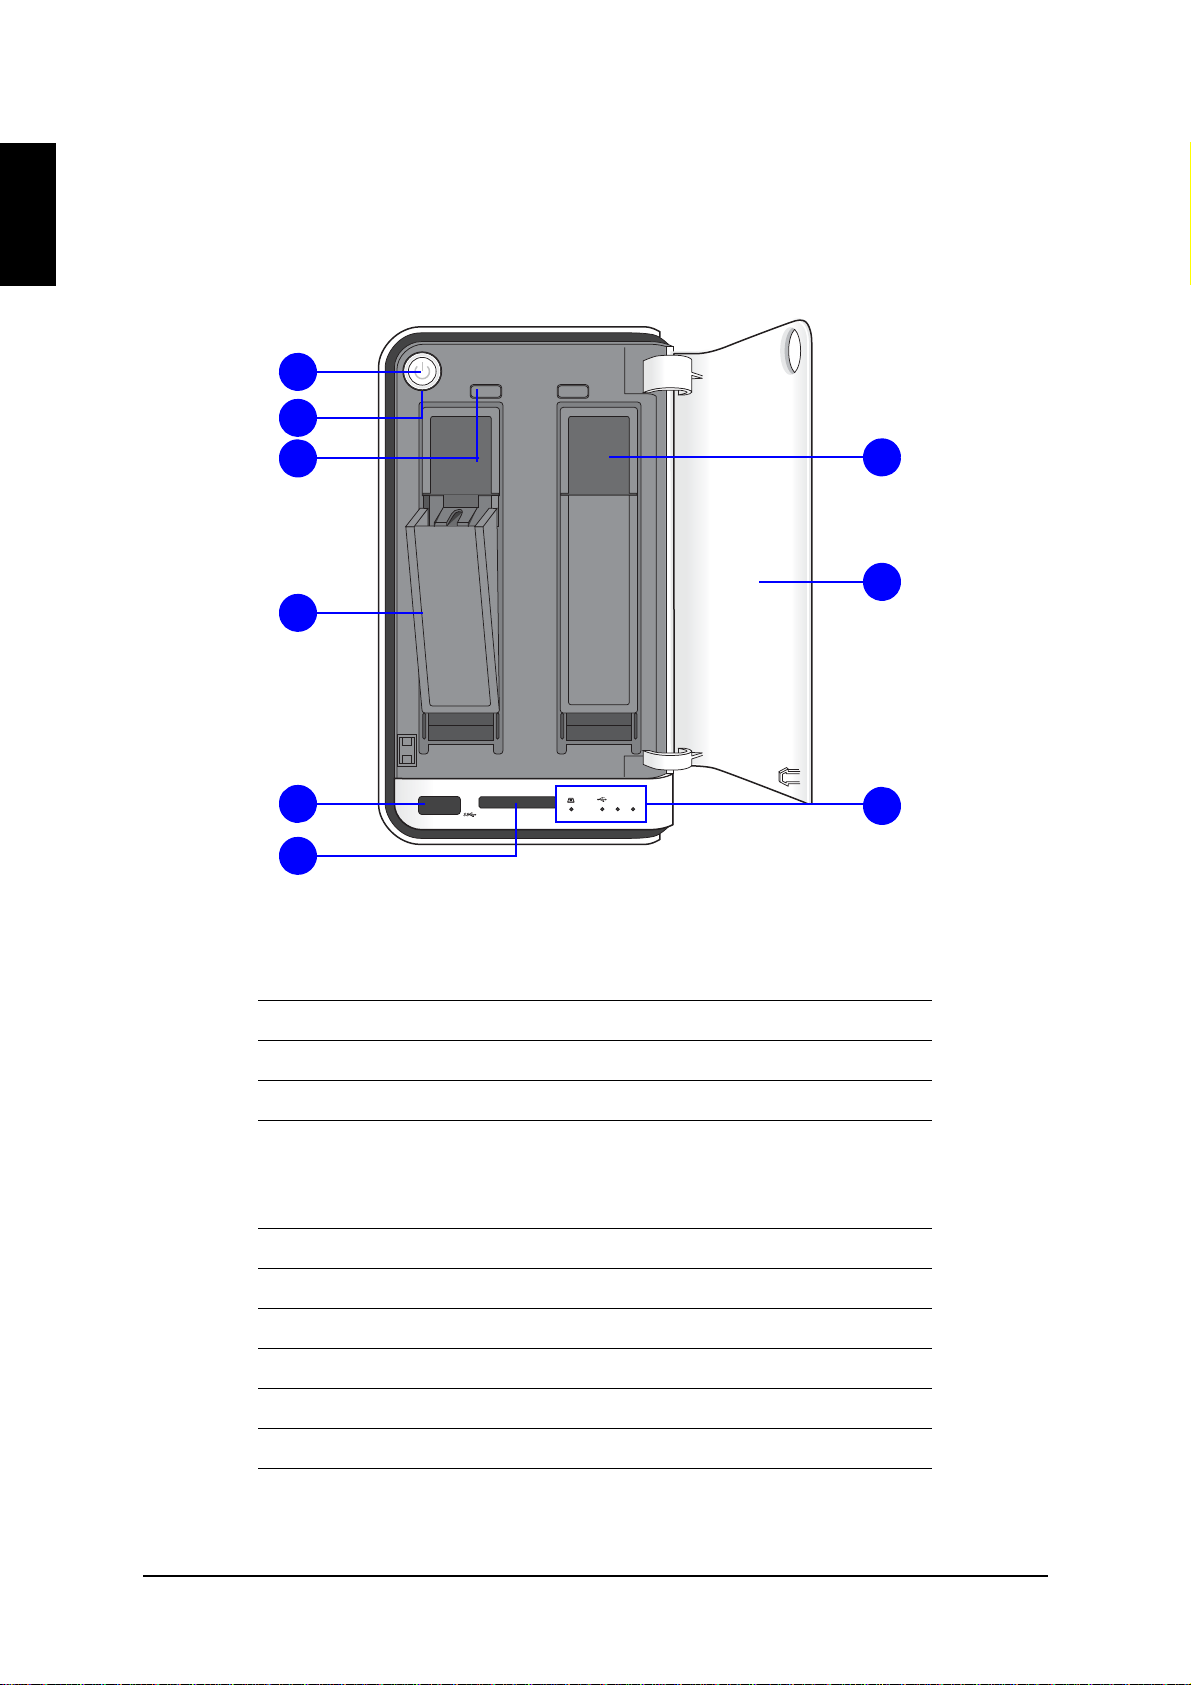
Product Views
Front View
[1.1.1] OMNINAS Front View
Front View Identification
Item Description
1. Power Button
2. Status LED, see LED Definitions
HDD removal buttons (2 = HDD2, 1 = HDD1)
3.
For RAID 1 configuration only.
4. HDD tray release
5. USB 3.0, auto copy supported only through this port
6. SD card reader, auto copy supported only through this port
7. HDD bay (HDD1 is on the right and HDD2 is on the left)
8. Bay cover
9. LED indicators, see LED Definitions
1-5
Page 15
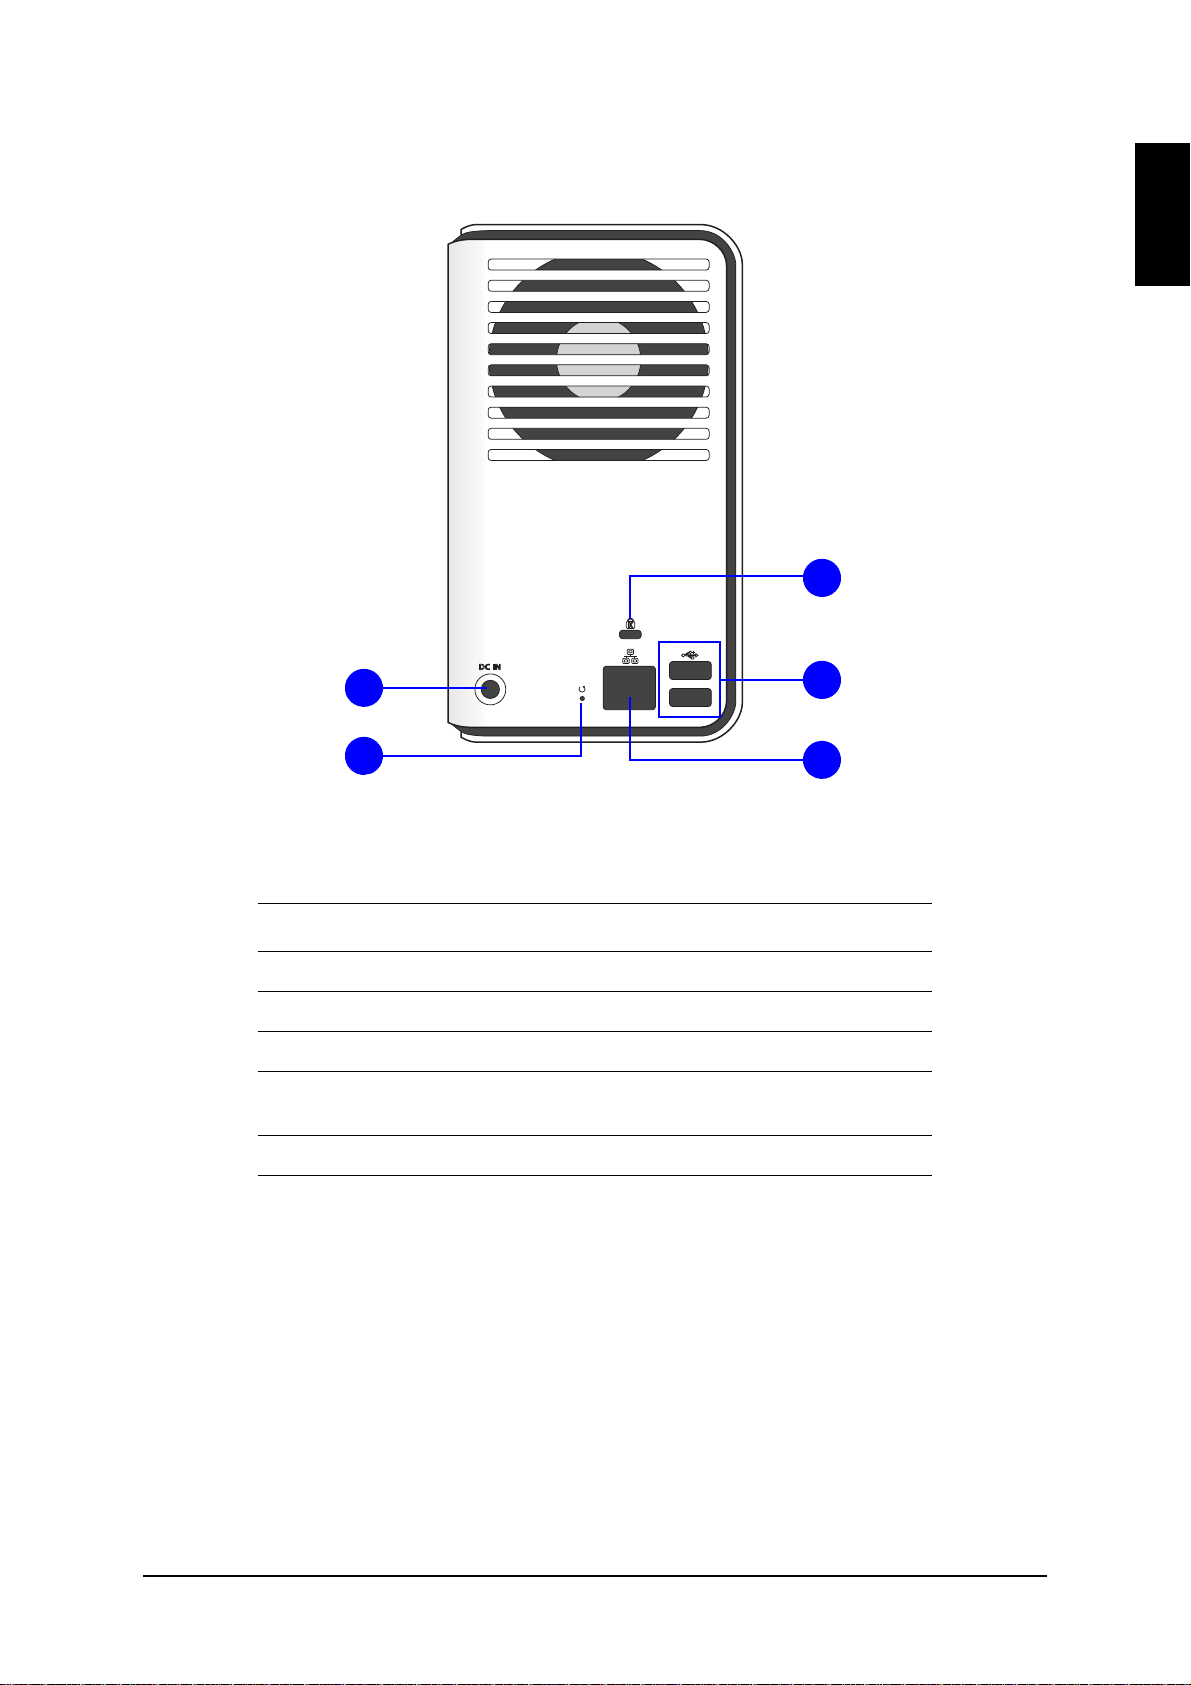
PRODUCT OVERVIEW PRODUCT VIEWS
1
2
3
4
5
Rear View
English
[1.1.2] OMNINAS Rear View
Rear View Identification
I
TEM DESCRIPTION
1. DC IN, power jack
2. Reset button
3. K-Lock security slot
4.
5. LAN Port
USB 2.0 x2 (port 2 is in the upper position port 3 is in the lower
position)
1-6
Page 16
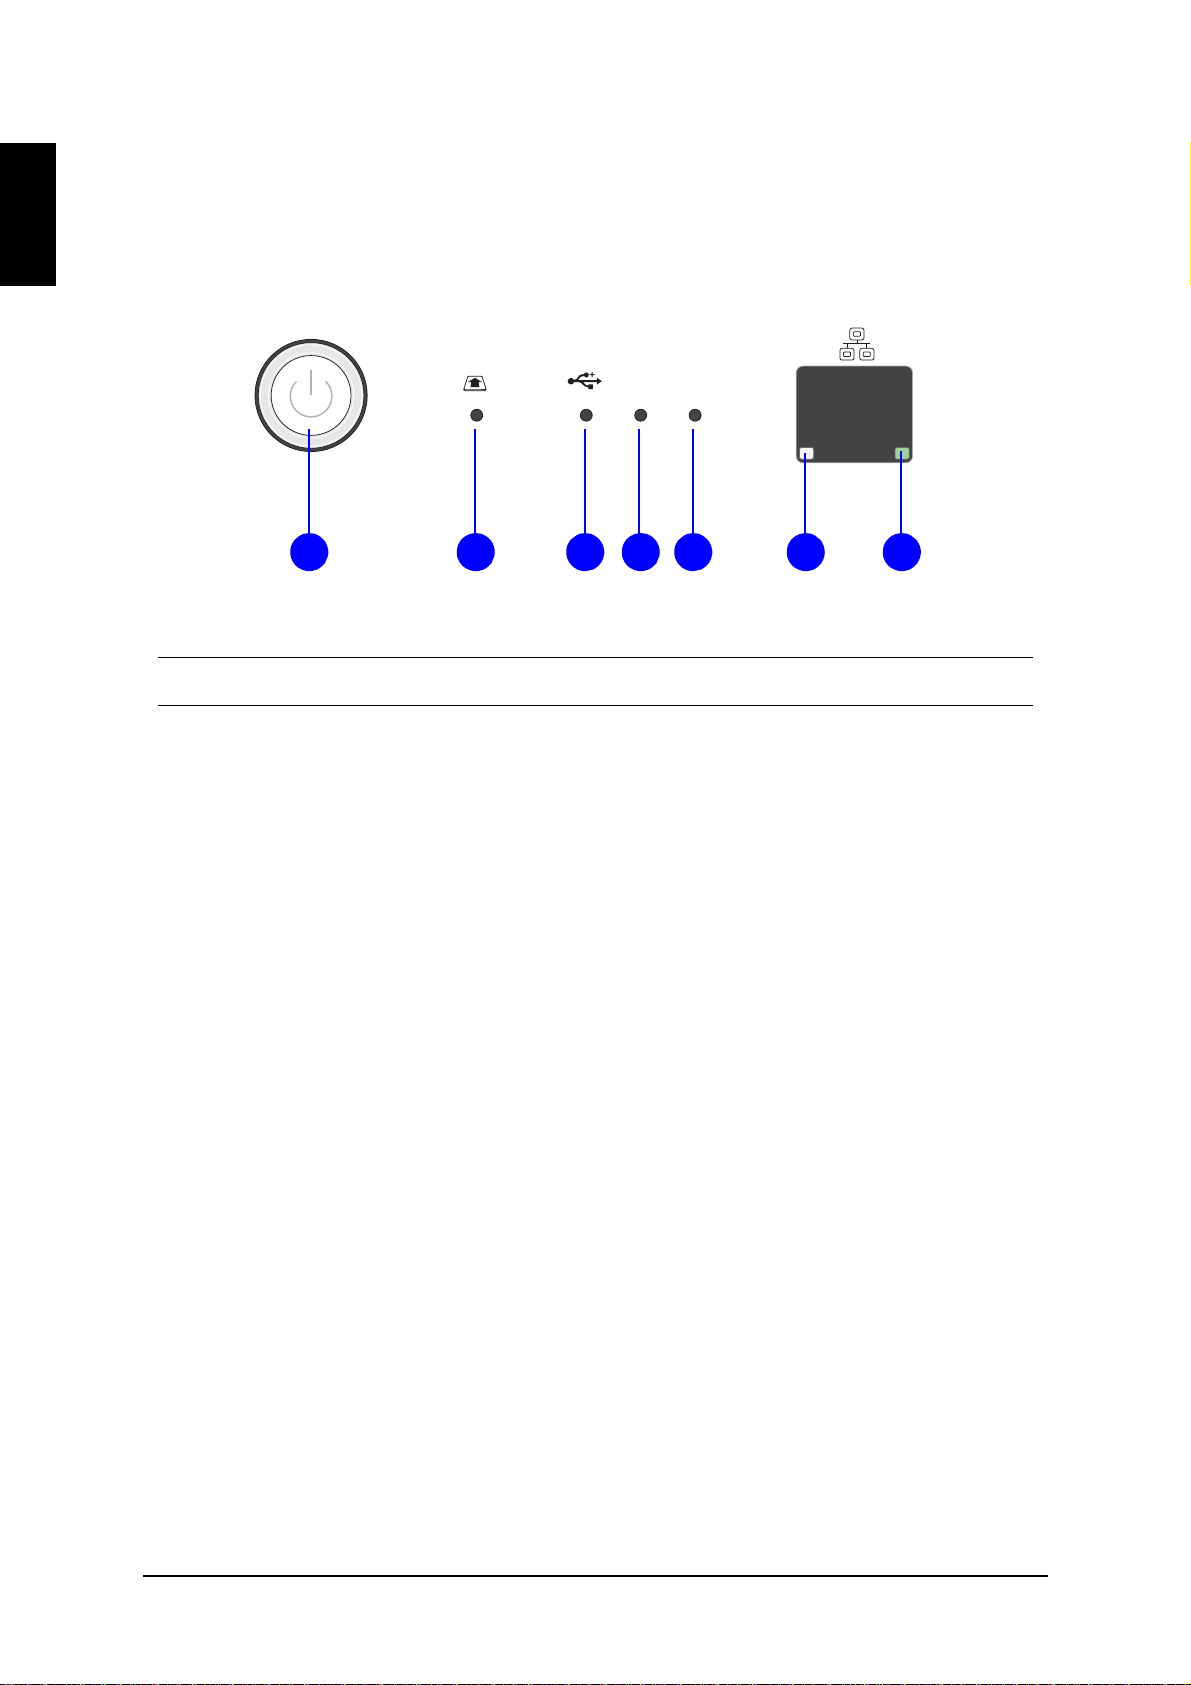
PRODUCT OVERVIEW LED DEFINITIONS
1 2 3 4 5 6 7
English
LED Definitions
The OMNINAS comes with six LED indicators (five in front and one in back). See the
following table for behavior and location descriptions.
21
[1.1.3] LED Indicators on Front Panel
LED Definitions
I
TEM NAME COLOR/CONDITION DESCRIPTION
1-7
Page 17

PRODUCT OVERVIEW LED DEFINITIONS
LED Definitions
1.
Stat us LED
Web UI LED
status
Backup status LED
Blue / Blinking / Audible
Beep
Blue / Solid on / Audible
Beep
Red / Blinking / Audible
Beep
Red / Blinking / Audible
Beep
Blue / Pulsing
Off
Blue / Blinking Web UI in booting sequence
Blue / Solid on / Audible
Beep
Red / Blinking / Audible
Beep
Blue / Solid on / Audible
Beep
Red / Blinking / Audible
Beep
System in booting sequence
System in shut down sequence, audible
beep x 1
System boots successfully, powered on
System fails to boot
Audible beep x 3
System fails to acquire IP address
Audible beep x 3
System in power savings mode. Setting is
adjustable in Settings | General menu.
Web UI is available
Web UI failure, audible beep x 3
Backup successful, audible beep x 3
Backup failure, audible beep x 3
English
2.
3.
4.
Auto copy status
LED
Reset status
SD card status
USB status
HDD 2 status
Blue / Solid on / Audible
Beep
Red / Blinking / Audible
Beep
Red / Blinking / Audible
Beep
Blue / Solid on Active
Off
Blue / Solid on Plugged in / printer connection
Blue / Solid on Active
Off
Blue / Solid on HDD access
Blue / Blinking / Audible
Beep
Red / Solid Failure
Red / Blinking HDD1 rebuilding
Off Not detected
Copy successful, audible beep x 3
Copy failure, audible beep x 3
Reset in progress, audible beep x 1
RAID1 selected, audible beep x 1
1-8
Page 18

PRODUCT OVERVIEW LED DEFINITIONS
English
LED Definitions
5.
6.
7.
HDD1 status
LAN/Speed LED
LAN/Link
(Activity) LED -
Blue / Solid on HDD access
Blue / Blinking / Audible
Beep
Red / Solid Failure
Red / Blinking HDD1 rebuilding
Off Not detected
RAID1 selected, audible beep x 1
ON REAR SIDE
Amber / Solid on Link speed is 100 Mbits/sec.
Green / Solid on Link speed is 1000 Mbits/sec.
Off Off or link speed is 10 Mbits/sec.
Green / Solid on LAN link
Green / Blinking LAN access
Off Disconnected
1-9
Page 19

Getting Started
Chapter 2
Page 20

English
GETTING STARTED GETTING STARTED
2-1
Page 21
PRODUCT OVERVIEW HARDWARE INSTALLATION
IMPORTANT:
21
2 1
21
Hardware Installation
This section includes information to help you install the hard drives in the OMNINAS
before you can begin using your storage device.
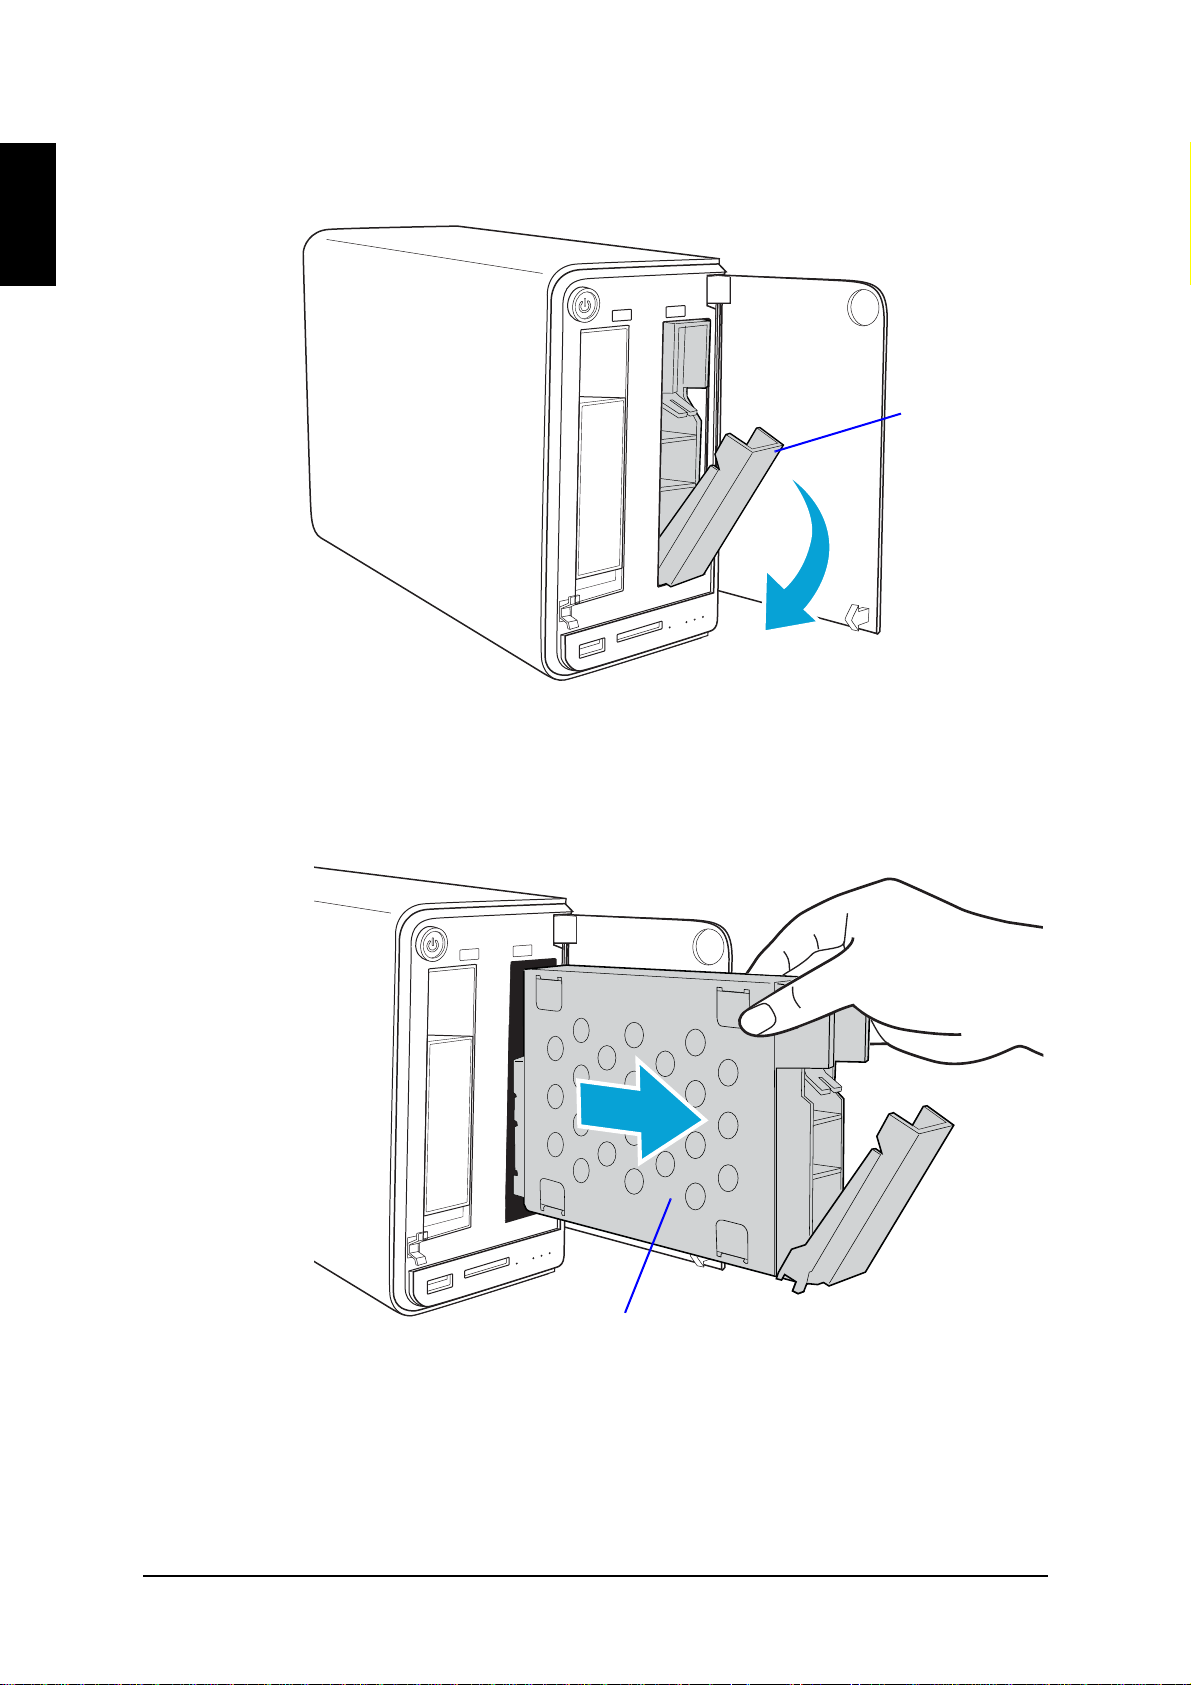
Removing HDD Trays
The OMNINAS supports up to two 3.5” Serial A TA (SA TA) hard drive disks. Follow the
provided guidelines to help you install the hard drives.
First Instance
The following guidelines provide information for first time installation of HDDs, this
also includes a HDD tray under Single, JBOD, and RAID 0 modes.
To prevent data loss or damage to the system, power down your device before
removing a HDD.
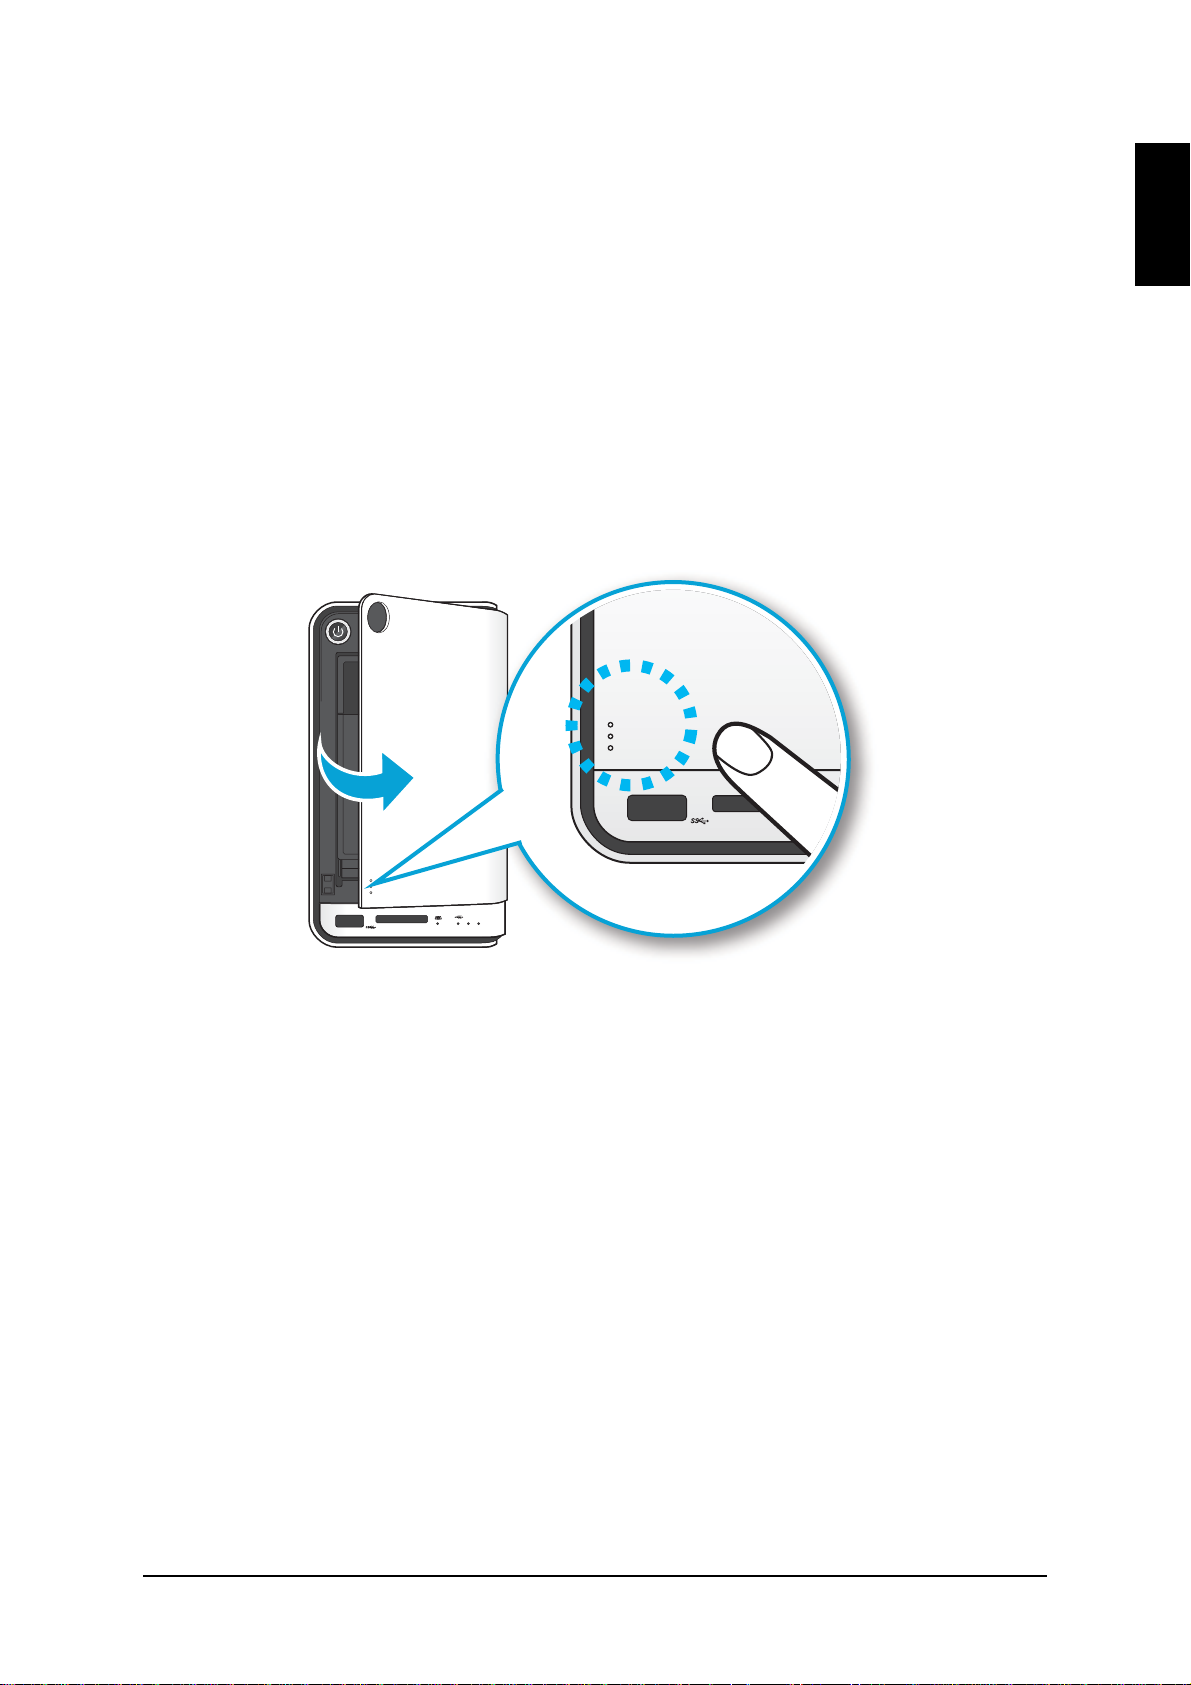
1. If your system is not powered down, press the Power button for three (3) seconds until an audible beep sounds and the LED starts to blink.
English
2. On the bay cover, press in the indicator to open the cover. The cover pops
open.
3. Extend the cover to allow access to the HDD trays.
Opening the HDD Bay Door
2-2
Page 22
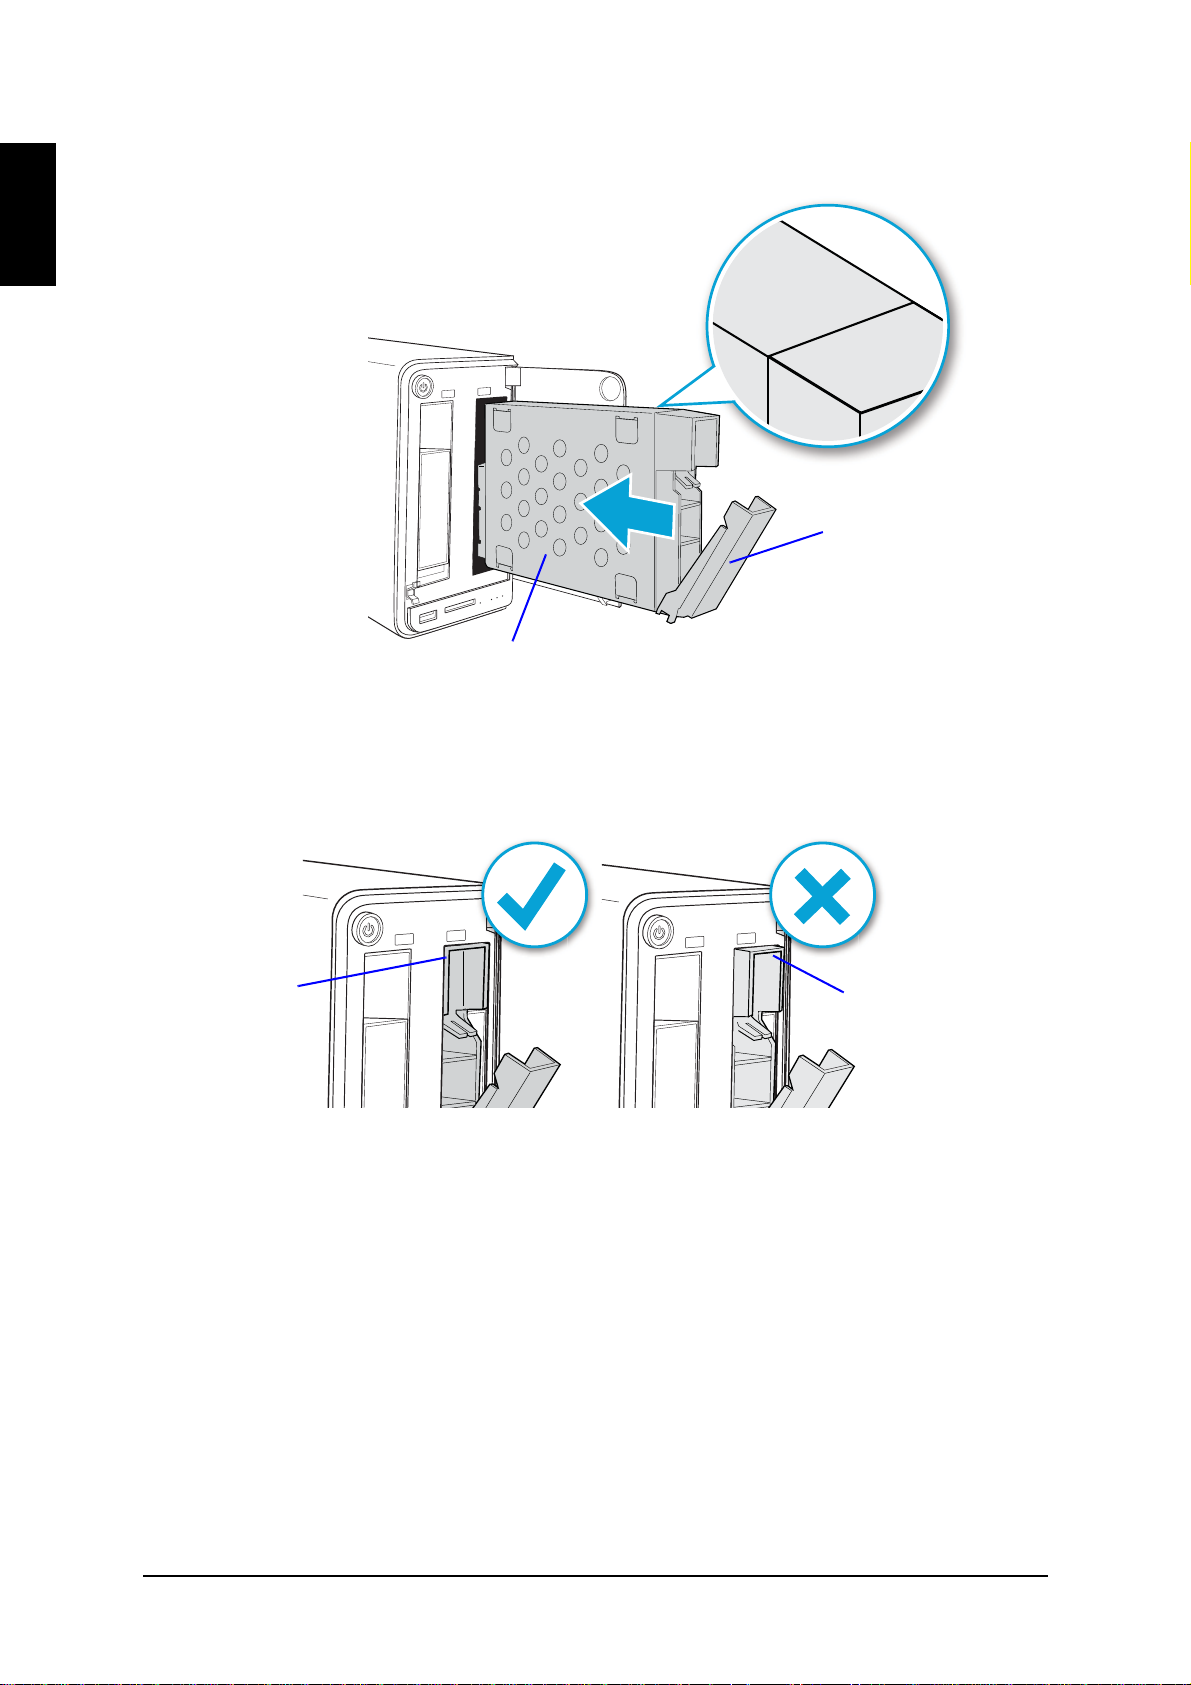
PRODUCT OVERVIEW REMOVING HDD TRAYS
Tray release
Bottom side of tray
English
4. Pull the tray release to unlock the hard disk tray. The HDD slides out if
undocked.
HDD1 Tray Released
5. Grasp the tray and slide it out.
Removing the HDD1 Tray
Place the tray on a clean surface.
2-3
Page 23
PRODUCT OVERVIEW REMOVING HDD TRAYS
IMPORTANT:
RAID 1
The following guidelines provide information for removal of HDDs for RAID 1 mode.
Only RAID 1 supports hot-swap functionality. All other modes require the system to
power down before removal of hard drives.
To maintain RAID 1 data integrity , only remove 1 disk drive. The removal of both
drives may result in data loss or damage to the system.
1. On the bay cover, press in the indicator to open the cover. The cover pops
open.
2. Extend the cover to allow access to the HDD trays.
2 1
English
21
21
Opening the HDD Bay Door
3. Press the Removal button (front panel) until an audible beep sounds and the
LED starts to blink. See following figure.
2-4
Page 24
PRODUCT OVERVIEW REMOVING HDD TRAYS
1
Tray release
Removal
button
Bottom side of tray
English
4. Once the status LED displays solid blue, pull the tray release to unlock the hard
disk tray.
T ray Released
5. Firmly slide out the HDD tray.
Removing the HDD1 Tray
Place the tray on a clean surface.
2-5
Page 25
PRODUCT OVERVIEW INSTALLING HARD DRIVES
HDD1
HDD connectors
Front side
Installing Hard Drives
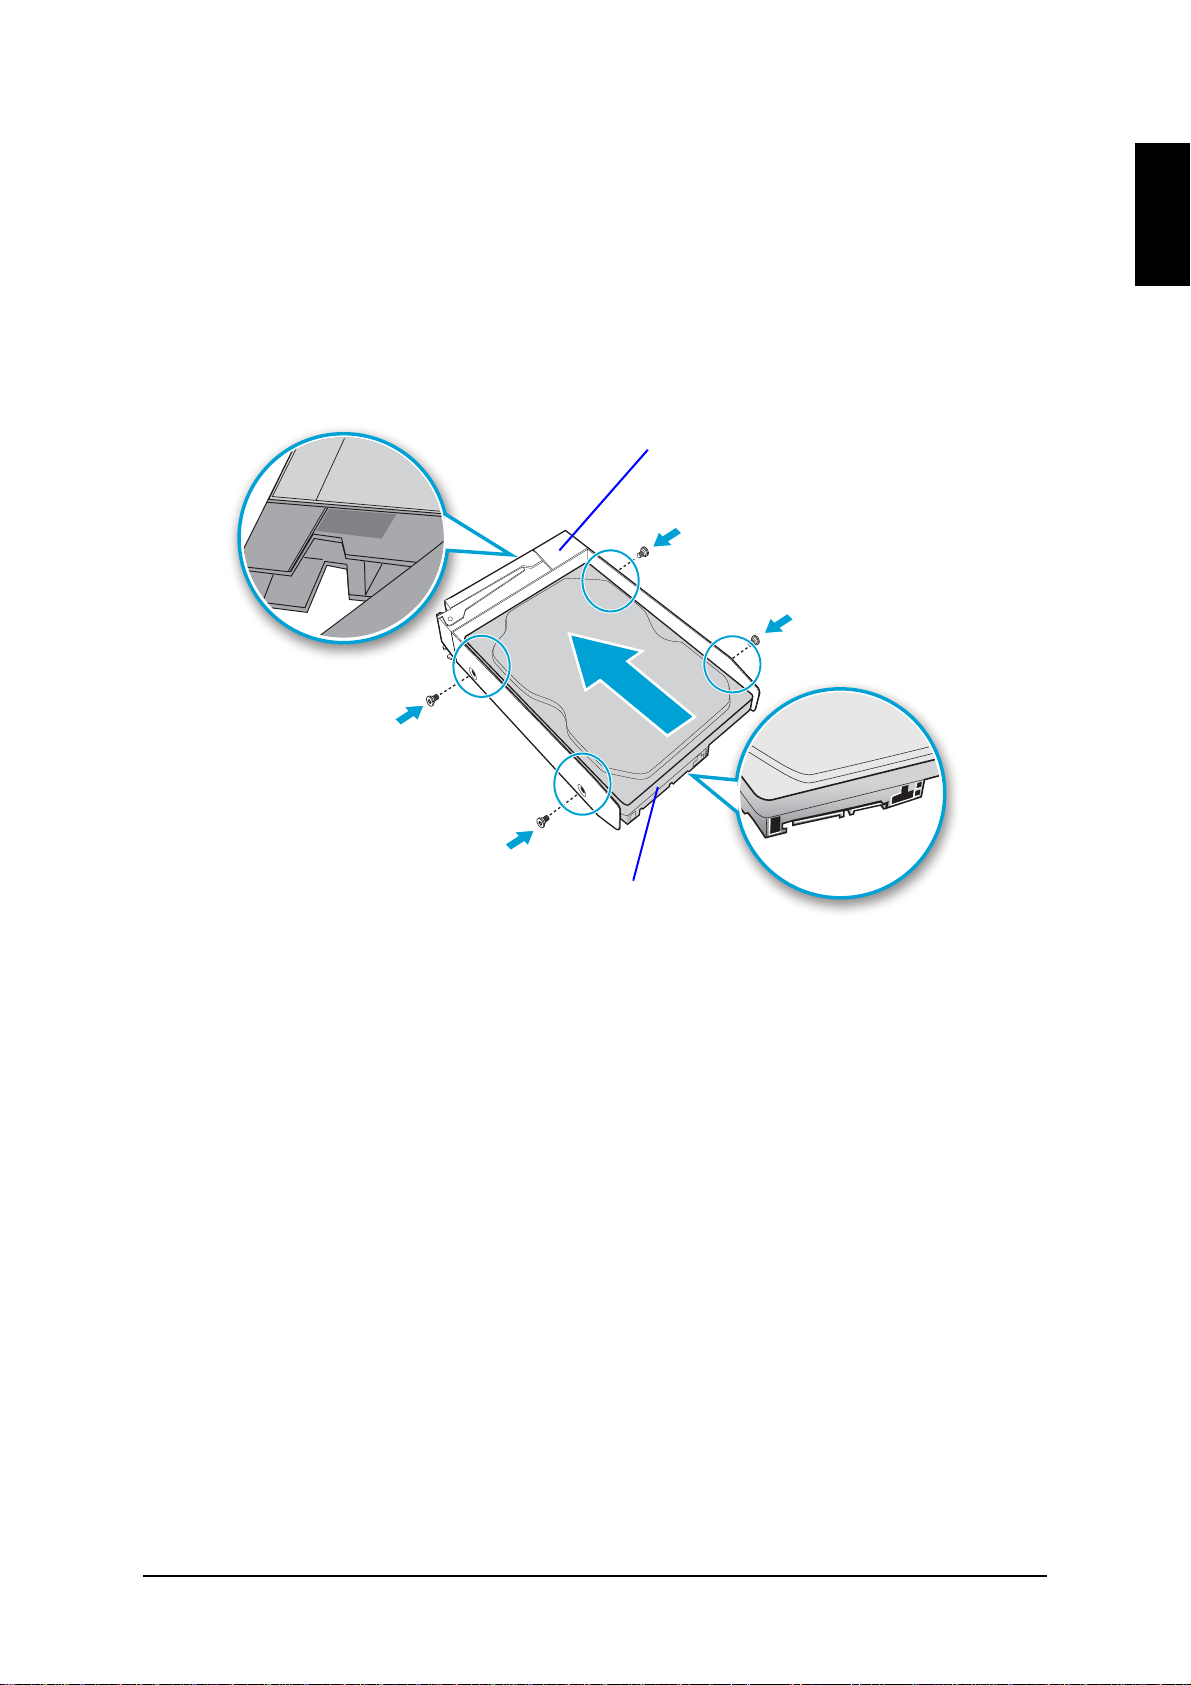
1. Position the HDD as indicated by the following illustration. Make sure the new
HDD is facing up and the connectors are positioned outward. See following Figure.
2. Insert the new HDD tray.
3. Secure with the provided screws.
English
Securing the HDD Screws
4. Turn the HDD assembly over making sure the This side up label is facing up,
see following figure.
2-6
Page 26
PRODUCT OVERVIEW INSTALLING HARD DRIVES
WARNING:
This side up
Bottom side of tray
Tray release
Incorrect
position
Correct
position
English
5. Slide the HDD assembly into place until it is flush in the bay.
Installing the HDD Tray Assembly
HDD tray must be flush with the bay, see following illustration.
HDD Installation Position
2-7
Page 27
PRODUCT OVERVIEW INSTALLING HARD DRIVES
Tray release
6. Raise the tray release to lock the HDD assembly. An audible click sounds when
the tray is locked.
English
Locking the HDD Assembly
7. Close the bay cover.
2 1
21
21
Closing the HDD Bay Cover
To install a second hard disk drive, follow the instructions as provided for the second
HDD.
Your system is now ready to connect a LAN cable. See Connecting to a Network.
2-8
Page 28
PRODUCT OVERVIEW CONNECTING THE OMNINAS
LANWAN
LAN
LAN
English
Connecting the OMNINAS
Connecting to a Network
The OMNINAS must be configured and setup before use. Two connection methods
are supported:
Direct PC/laptop to OMNINAS
Switch/router to OMNINAS
For Windows and Mac users, connecting to a DHCP enabled router is recommended.
For Linux users, a direct PC to OMNINAS connection is recommended.
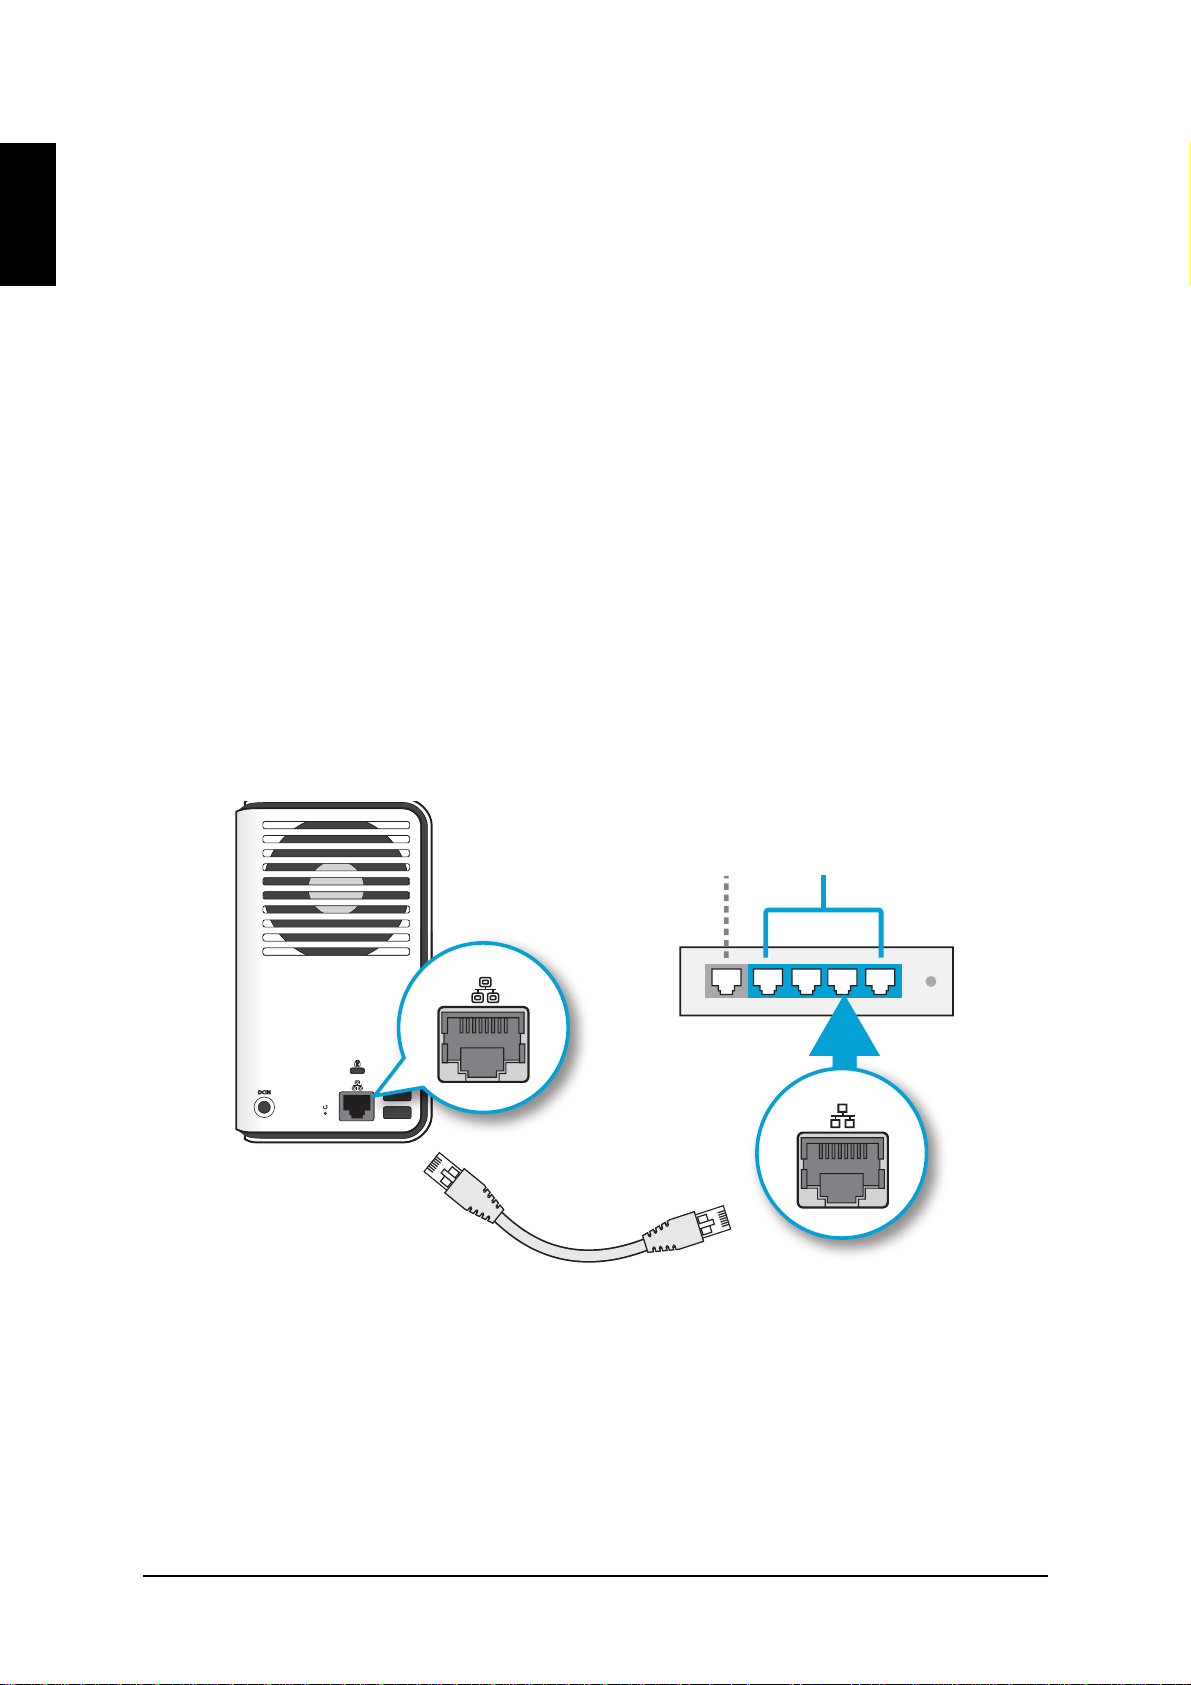
To connect to a switch/router:
1. Connect one end of the provided LAN cable to the LAN port on the OMNINAS.
2. Connect the other end to a LAN port on the DHCP enabled router, see following
figure.
Connecting to a Router
After powering on your OMNINAS, use the Finder utility to detect and log in to your
device.
Your OMNINAS is now ready for powering on. See Connecting to Power.
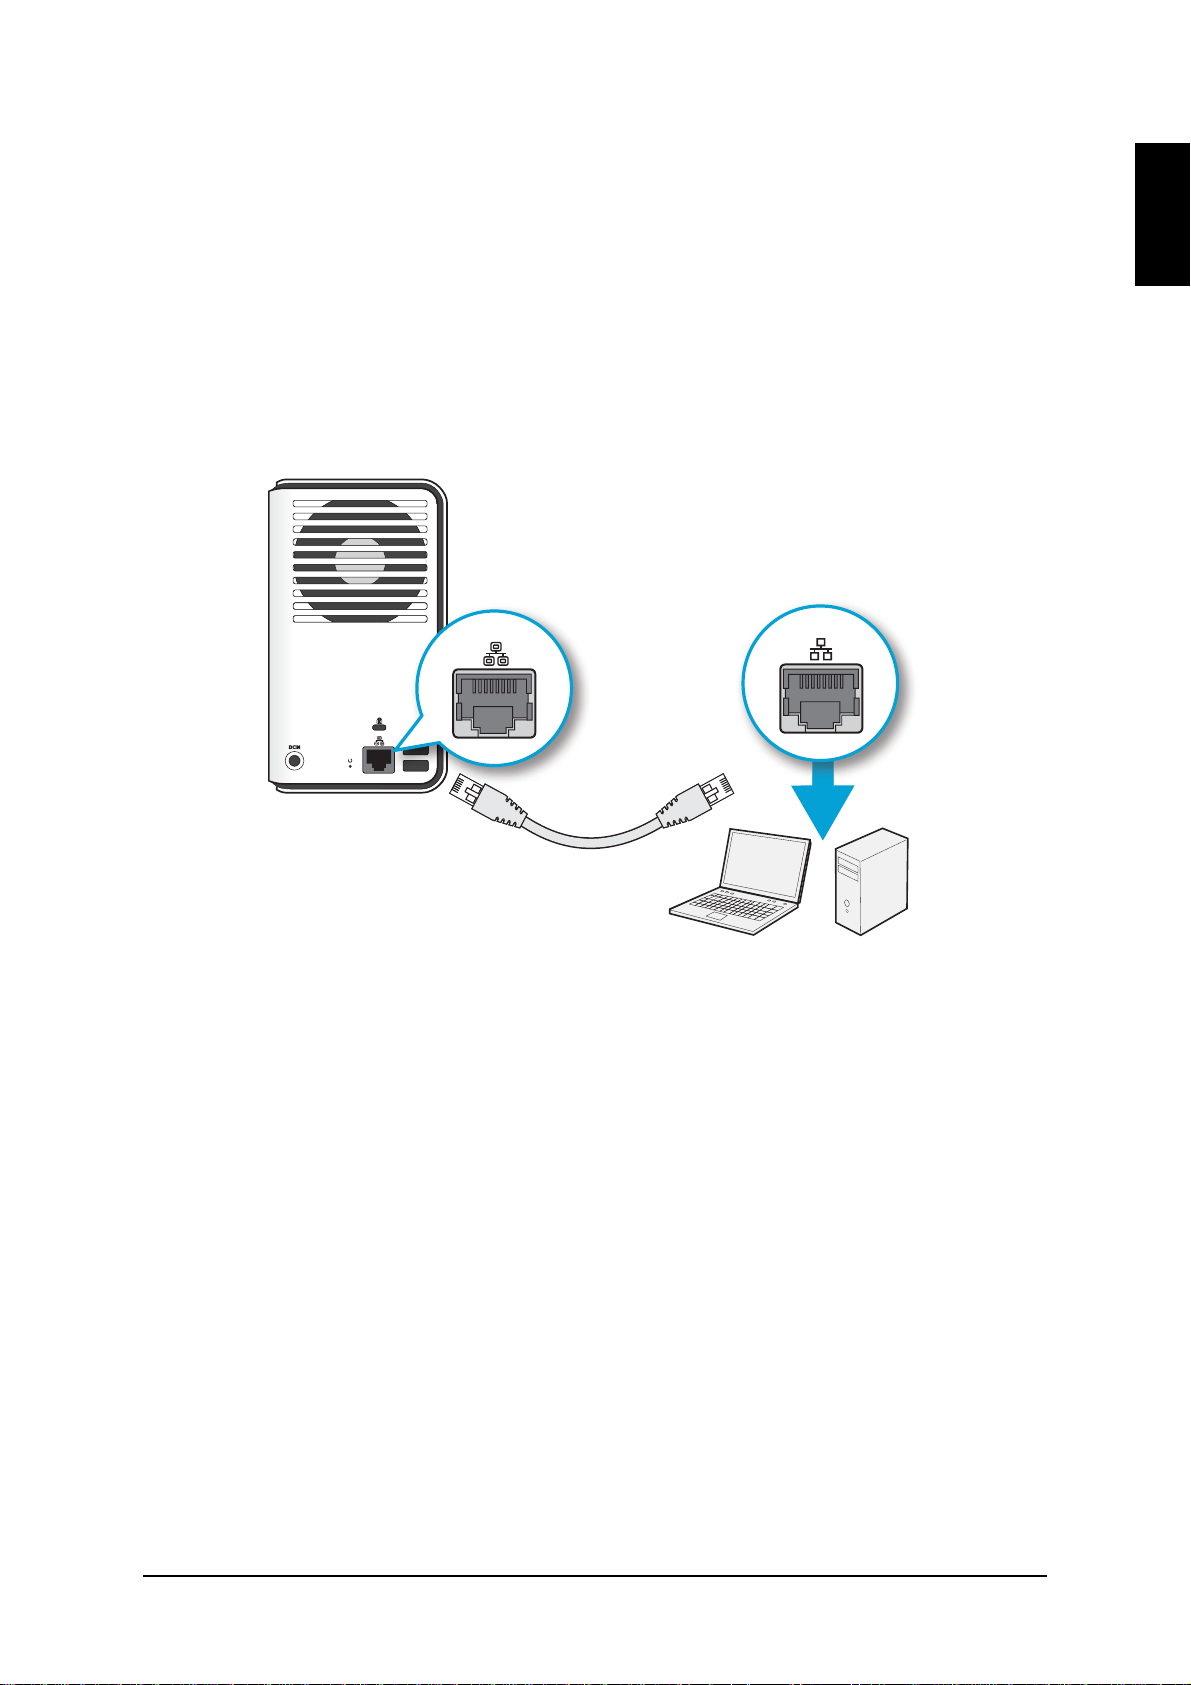
To directly connect to a PC:
2-9
Page 29
PRODUCT OVERVIEW CONNECTING TO POWER
Example:
LAN
PCLaptop
LAN
1. Set your PC/Laptop’s IP settings to match the network subnet group of the
OMNINAS.
OMNINAS default subnet settings: 192.254.100. 200
Configure your PC to these settings: 192.254.100. XXX (Whereas xxx repre-
sents a number from 1 to 254, other than 200).
2. Connect one end of the LAN cable to the OMNINAS.
3. Connect the other end to your PC, see following figure.
English
Connecting to a PC/Laptop
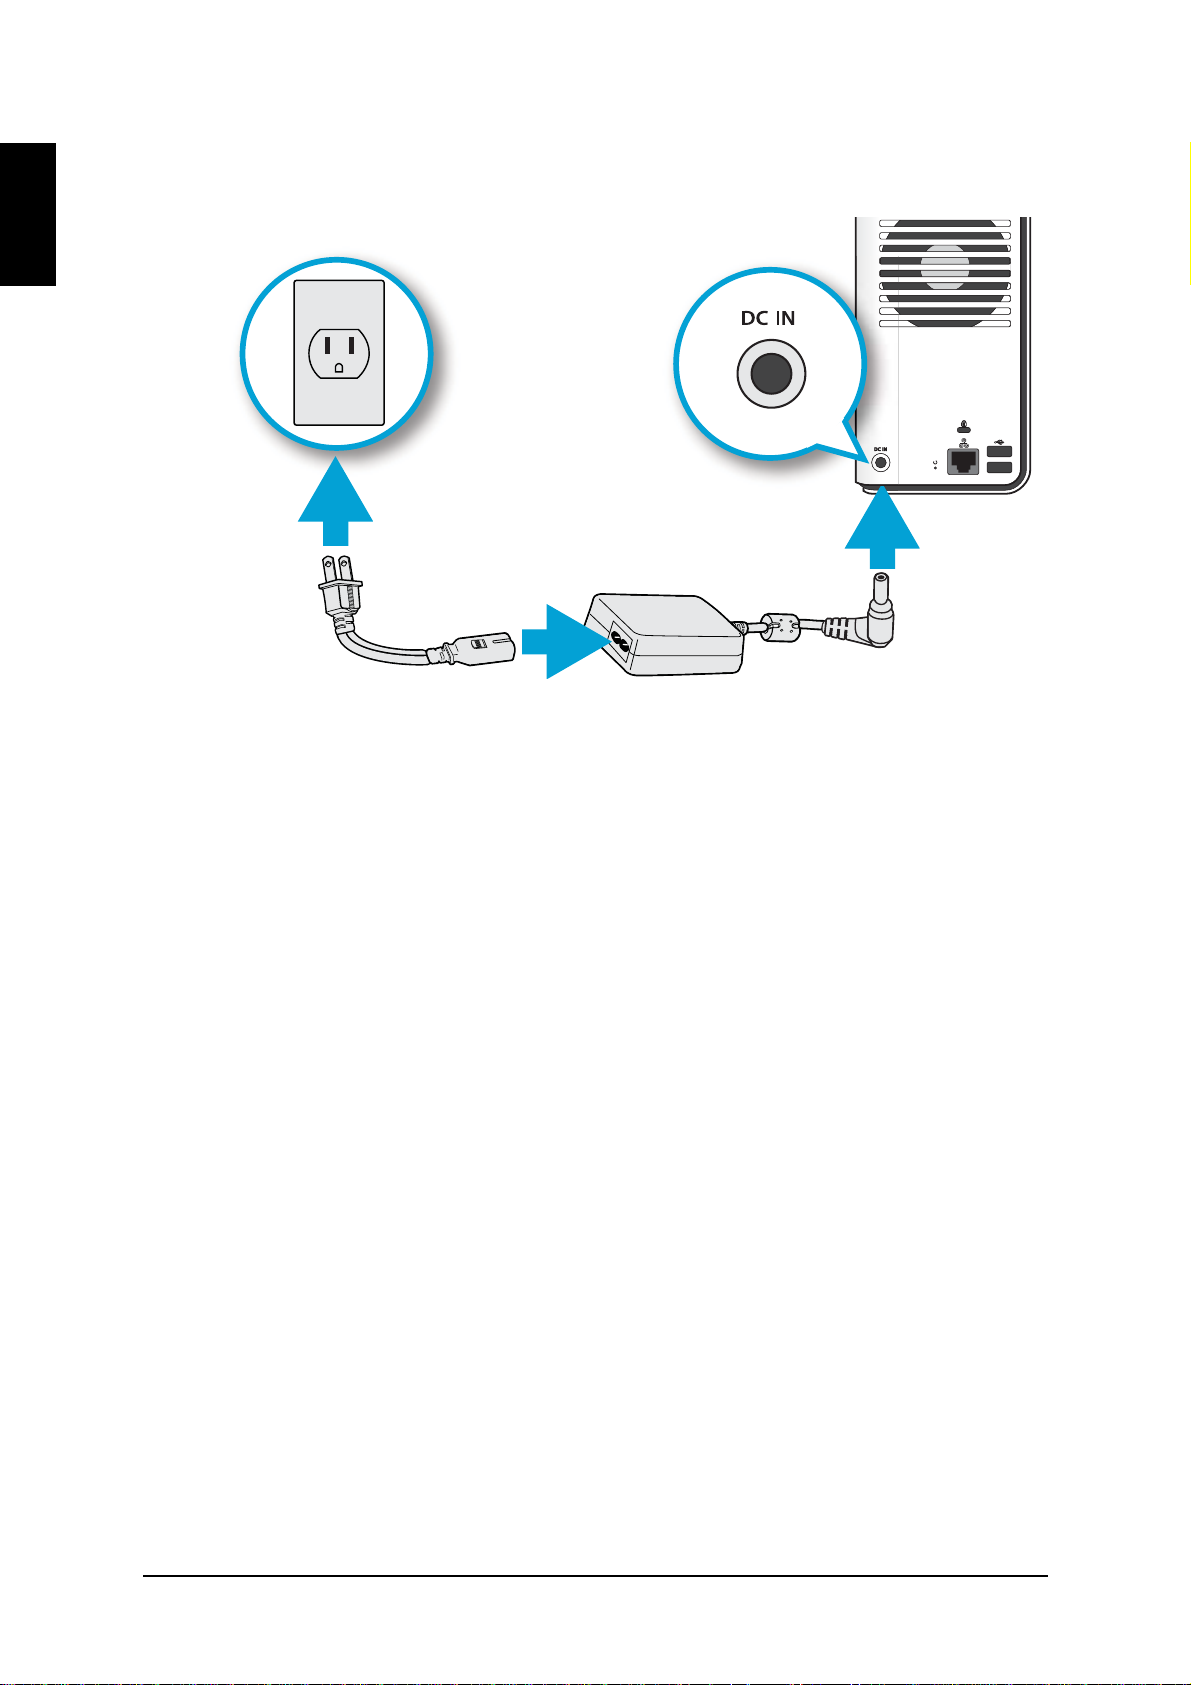
Connecting to Power
1. Connect the power jack to the back of the OMNINAS (DC IN).
2-10
Page 30
PRODUCT OVERVIEW CONNECTING TO POWER
Note:
English
2. Connect one end of the power cable to the supplied power adapter, and the
other end to a wall outlet. See the following figure.
Connecting the Power Adapter
The Power Adapter diagram depicts a typical wall socket. Your region may use
a different socket type.
Your OMNINAS is ready to be powered on. See Powering On.
2-11
Page 31

PRODUCT OVERVIEW POWERING ON
21
Powering On
Press to power on. The status LED starts to blink. This process may take 1
to 2 minutes.
Pressing Power Button
A blinking LED specifies that the system is in the powering-on state. A solid LED
specifies that the OMNINAS has obtained an IP address from the router (DHCP connection). See LED Definitions for further information.
English
In the event of a Red Blinking LED state, the system has failed to obtain an IP
address from the router. The system settings reverts to the default fixed IP address
(169.254.100.200).
Status LED Display During Boot
The HDD LEDs for any installed HDDs also light. See LED Definitions for further information.
2-12
Page 32

English
Note:
21
21
PRODUCT OVERVIEW POWERING ON
HDD LEDs
In the event of failure or improperly installed HDDs, the HDD LEDs blink red.
Additionally, the Finder utility displays a power off message, see the following.
Status LED Displaying HDD Failure
The OMNINAS is now ready for setup and configuration. Connect the system to your
network by using the Finder Utility.
2-13
Page 33

PRODUCT OVERVIEW CONNECTING WITH THE FINDER UTILITY
Connecting with the Finder Utility
The OMNINAS Finder Utility provides easy to use features to help you quickly connect to your OMNINAS. Once a device is detected, information from your OMNINAS,
such as: Domain name, IPv4 address, Mac address and firmware version is displayed
on the main page.
The Finder Utility is available for download from the following location:
http://global.shuttle.com/download/download
English
OMNINAS Finder Utility
Finder Utility Defined
M
ODE DESCRIPTION
Search Click to manually detect devices connected within the same network subgroup.
Connect
Map Network
Drives
Delete Network
Drives
About Click to view OMNINAS Finder Utility information, display purposes only.
Help Click to open a browser window displaying the OMNINAS help menu.
Exit Click to exit the OMNINAS Finder Utility.
Click to access the login screen of the selected device. The web interface of the
device displays through your default browser.
Click to create a shortcut to the selected device on the network. Once connected, you can access the shortcut from your computer or Windows Explorer.
Click to delete a shortcut to the selected device on the network.
Either a web browser or the OMNINAS Finder Utility can be used to detect devices on
the network. We recommend you use the Finder Utility for greater ease.
2-14
Page 34

PRODUCT OVERVIEW CONNECTING WITH THE FINDER UTILITY
IMPORTANT:
Note:
English
Windows & Mac Users
The Finder Utility is required for use in the following steps. It is located on the CD
shipped with your OMNINAS or you can download it from the following location:
http://global.shuttle.com/download/download
The OMNINAS must be connected to a DHCP enabled router before beginning
the setup process.
1. Insert OMNINAS CD-ROM into your CD drive.
The Setting Language prompt displays.
Setting Language Selection
2. Select the operation language (Default: English) and click Apply.
If the selected language in the Setting Language does not match your computer
system’s settings, the OMNINAS Finder Utility reverts to English by default.
After selecting your language settings, the OMNINAS Finder displays.
2-15
Page 35

PRODUCT OVERVIEW CONNECTING WITH THE FINDER UTILITY
All OMNINAS devices available within your subnet group are displayed in the
OMNINAS Found tab.
If devices are not automatically found, click Search to manually perform this
function.
English
OMNINAS Finder Utility Search Function
3. After a device is detected, select an OMNINAS device and click Connect.
Finder Utility Connect Function
Your default web browser opens to display the system initialization screen.
System Initialization Screen.
2-16
Page 36

English
Note:
IMPORTANT:
PRODUCT OVERVIEW CONNECTING WITH THE FINDER UTILITY
The System Initialization screen only displays if new or unformatted HDDs are
installed.
4. Click Start to begin the initialization process.
The RAID Manager screen displays.
Initialization RAID Manager Screen
5. Select a RAID type, and click Create Disk Array. For further information on
RAID type identification, see RAID Manager.
The initialization process will erase all data from the hard drive.
Make sure that the OMNINAS is connected to a power source and is not powered down during this process to prevent damage to the system.
6. Click OK to start the RAID build process.
RAID Initialization Startup Screen
2-17
Page 37

PRODUCT OVERVIEW CONNECTING WITH THE FINDER UTILITY
IMPORTANT:
Note:
7. Click OK to confirm the RAID build process.
RAID Initialization Confirmation Screen
The Rebuilding Process starts and the following display is shown.
Do not power down or disconnect the power adapter to prevent failure or damage to your system.
English
RAID Rebuilding Screen
The time required to rebuild a system is dependent on the RAID type selected
and the size of hard drives.
The designated HDD LED flashes during the rebuilding process.
Additionally, the status LED flashes during the process.
2-18
Page 38

PRODUCT OVERVIEW CONNECTING WITH THE FINDER UTILITY
Note:
English
After the process is complete a beep sounds to announce the process is finished. A rebuild completed screen displays, see the following figure.
Rebuild Complete Screen
The system automatically logs out and resets. The rebuild process is complete.
The login screen displays.
Linux Users
Make sure the OMNINAS and your PC are in the same network subnet group.
1. Connect the OMNINAS to a PC.
2. Power on the PC.
3. Open a web browser. In the address bar, type in the OMNINAS IP address
(default: http://169.254.100.200).
4. Follow the instruction on the browser to complete setup.
2-19
Page 39

PRODUCT OVERVIEW CONNECTING WITH THE FINDER UTILITY
Note:
Note:
Connecting by Web Browser
You can connect to the OMNINAS by using a web browser on a Windows or Mac OS.
You can download the Finder Utility from the following location:
http://global.shuttle.com/download/download
To connect to the OMNINAS administrator page:
1. Insert OMNINAS CD-ROM into your CD drive.
The Setting Language prompt displays.
English
Setting Language Selection
2. Select the operation language (Default: English) and click Apply.
If the selected language in the Setting Language does not match your computer
system’s settings, the OMNINAS Finder Utility reverts to English by default.
After selecting your language settings, the OMNINAS Finder displays.
2-20
Page 40

PRODUCT OVERVIEW CONNECTING WITH THE FINDER UTILITY
Note:
Note:
English
All OMNINAS devices available within your subnet group are displayed in the
NAS Found tab.
If devices are not automatically found, click Search to manually perform this
function.
OMNINAS Finder Utility Search Function
3. Select the IP address as displayed in the IPv4 Address column, 192.168.1.37
as shown in the previous figure.
4. Open a web browser and enter the IP address as selected in the previous step.
If the OMNINAS is not configured to use DHCP, the default IP address is
http://169.254.100.200. Make sure the OMNINAS and the computer connected
to it are under the same subnet.
If the hard drives are not, yet, the System Initialization Process screen displays. You
must configure the disks before continuing.
The Login screen displays.
5. Enter the username and password to login and configure the OMNINAS.
Default
Username: admin
Password:
There is no default password
2-21
Page 41

Web Interface
Chapter 3
Page 42

English
WEB INTERFACE WEB INTERFACE
3-1
Page 43

PRODUCT OVERVIEW OVERVIEW
Overview
The OMNINAS Web Interface allows you to configure your personal settings through
a web browser. The Interface includes access to Settings, Storage, Share, USB,
Backup, BT Download, Remote Access and Media Service. Y ou can use the Interface
to manage your devices from a local or remote location.
Home Menu
English
Administrator Home Menu
Home Menu Settings
I
CON ITEM DESCRIPTION
The Settings menu provides access to the followin g fu nc -
Settings
Storage
Share
USB
Backup
tions: iTunes Server, Network, Date & Time, General, About,
Log, Factory Reset, and Firmware Update.
The Storage menu provides access to the following functions: Auto Mirror, Disk Manager, and RAID Manager.
The Share menu provides access to the following functions:
Add Folder, Fold er List, Add User, and User List.
The USB menu provides access to the following functions:
Printer Setting and Auto Copy.
The Backup menu provides access to the following functions:
Backup Log, Backup Setting List, and Backup Setting.
3-2
Page 44

PRODUCT OVERVIEW HOME MENU
English
Home Menu Settings
I
CON ITEM DESCRIPTION
The BT Download menu provides access to the following
functions: BT Download and BT Setting.
BT Download
Share Box
Media Server
Restart
Note: BT Download and Media Server cannot be enabled at
the same time. To use one function the other must be disabled.
The Share Box menu allows you to enable or disable the
media server function. Sharing is provided through the [Your
host Name]ominas.net web host.
The Media Server menu allows you to enable or disable the
media server function. To use iTunes media sharing, the
Media Server must be enabled.
Note: BT Download and Media Server cannot be enabled at
the same time. To use one function the other must be disabled.
Click to initiate a system restart procedure.
Note: If a process is running, restart is scheduled after com-
pletion of the current process.
Shut Down Click to power down the system.
Logout Click to log off the current user.
3-3
Page 45

PRODUCT OVERVIEW SETTINGS MENU
Settings Menu
The Settings menu includes access to iTunes Server , Network, Date & T ime, General,
About, Log, Factory Reset, and Firmware Update. You can use the Interface to configure your settings from a local or remote location.
English
Settings Menu
Settings Menu Settings
I
CON ITEM DESCRIPTION
Enable or disable the iTunes Server. Enable the function to
iTunes Server
Network
Date & Time
General
About
allow access on iTunes application.
Note: Media Server must be enabled for this function to
work.
Set device name, assign a workgroup, set to DHCP or manu-
ally assign an IP address.
Set the time zone, assign a network time server, or set your
date time settings to mirror your browser.
Note: System time is reset when the power adapter is dis-
connected.
Set the administrator password, power savings time and
interface coding page reference.
Display an overview of the OMNINAS settings and configuration information. This function is for display only.
3-4
Page 46

PRODUCT OVERVIEW STORAGE MENU
English
Settings Menu Settings
I
CON ITEM DESCRIPTION
Log Display and clear all log entries.
Factory Reset
Firmware Update Update device’s firmware.
Home Click to return to the Home menu.
Logout Click to log off the current user.
Reset OMNINAS to factory default settings.
Important: All data and settings are deleted.
Storage Menu
Storage Menu
Storage Settings
CON ITEM DESCRIPTION
I
Display current RAID mode.
Auto Mirror
Enable or disable the auto mirroring function, available only
in RAID 1 mode.
3-5
Page 47

PRODUCT OVERVIEW SHARE MENU
Storage Settings
I
CON ITEM DESCRIPTION
Disk Manager
RAID Manager
Home Click to return to the Home menu.
Logout Click to log off the current user.
Share Menu
Displays internal and external disk information and status
(active, failed, mirroring and mount or unmount an external
drive).
Displays the available disk capacity.
Scan, repair and format system disks.
Set the RAID mode type: single, JBOD, RAID 0, or RAID 1.
Note: Only RAID 1 provides auto mirroring function.
English
Share Menu
Share Menu Settings
I
CON ITEM DESCRIPTION
Add Folder Add public or private folders.
Display list of available folders, edit and delete both user cre-
Folder List
Add User Add user profiles.
ated and default folders.
Note: Deleting default folders prevents the use of media
sharing functions.
3-6
Page 48

PRODUCT OVERVIEW USB MENU
English
Share Menu Settings
CON ITEM DESCRIPTION
I
Display list of available users, edit and delete the user pro-
User List
Home Click to return to the Home menu.
Logout Click to log off the current user.
files.
Note: Administrator account cannot be deleted.
USB Menu
USB Menu
USB Menu Settings
I
CON ITEM DESCRIPTION
Printer Setting Display status information for connected printer devices.
Enable or disable auto copying function to an SD card or a
Auto Copy
Logout Click to log off the current user.
Home Click to return to the Home menu.
external (USB) device.
Note: Auto copy is only available on USB port 1 (front).
3-7
Page 49

PRODUCT OVERVIEW BACKUP MENU
Backup Menu
English
Backup Menu
Backup Menu Settings
I
CON ITEM DESCRIPTION
Backup Log Displays a history list of executed backup events.
Backup Setting List Displays a list of all created back up settings.
Create and schedule backup events from a selected source
file to a target external or second OMNINAS device.
Backup now function is available for instant backup events.
Backup Setting
Home Click to return to the Home menu.
Logout Click to log off the current user.
Note: Events are executed in a sequential or der. The backup
now function does not override an ongoing event. When a
scheduled event is currently running, the backup function
begins once the scheduled event is completed.
3-8
Page 50

PRODUCT OVERVIEW BT DOWNLOAD MENU
English
BT Download Menu
BT Download Menu
BT Download Menu Settings
I
CON ITEM DESCRIPTION
The BT Setting menu allows you to enable or disable the BT
Download function.
Set general and specific downloading settings (always,
BT Setting
BT Download
Home Click to return to the Home menu.
Logout Click to log off the current user.
scheduled).
Note: BT Download and Media Server cannot be enabled at
the same time. To use one function the other must be disabled.
Select files to upload, set preferences, download and upload
rates, and manually control the download functions.
3-9
Page 51

PRODUCT OVERVIEW SHARE BOX MENU
Share Box Menu
English
Share Box Menu
Share Box Menu Settings
I
CON ITEM DESCRIPTION
Enable or disable remote sharing function through the omni-
Share Box Setting
Home Click to return to the Home menu.
Logout Click to log off the current user.
nas.net host servers.
Note: The default Port setting is recommended to avoid get-
ting blocked by your firewall or anti-virus software.
3-10
Page 52

PRODUCT OVERVIEW MEDIA SERVER MENU
English
Media Server Menu
Media Server Menu
Media Server Settings
I
CON ITEM DESCRIPTION
The Media Server menu allows you to enable or disable the
media server function. To use iTunes media sharing, the
Media Server
Home Click to return to the Home menu.
Logout Click to log off the current user.
Media Server must be enabled.
Note: BT Download and Media Server cannot be enabled at
the same time. To use one function the other must be disabled.
Launching the Interface
You can access the OMNINAS Web Interface by using the OMNINAS Finder or
through a web browser.
To use the OMNINAS Finder utility, see Connecting with the Finder Utility.
To use a web browser, see Connecting by Web Browser.
3-11
Page 53

PRODUCT OVERVIEW LOGGING IN
Note:
Note:
IMPORTANT:
Logging In
The login screen appears and prompts for a Username and Password. The default
username is admin. There is no default password.
You can change the language setting on this screen by clicking on the language
drop-down menu.
To login:
English
OMNINAS Login Screen
1. Enter the Username and Password.
Default
Username: admin
Password:
There is no default password
2. Click Enter to access the administration interface.
In the event of a lost password, click on Can’t access my account? to begin
the reset process.
If the Web interface is idle for 10 minutes, the system automatically logs out.
3-12
Page 54

PRODUCT OVERVIEW USER MANAGEMENT
English
User Management
This section provides information for the management of user accounts. The provided
guidelines cover adding, editing, deleting user profiles, as well as viewing of user lists.
Viewing User List
To view, edit or delete user profiles, use the User List screen to manage available
user profiles.
Share User List Screen
The following users are available by default:
admin: The administrator is configured with full access to system administration
and all network shares. This account cannot be deleted.
Adding Users
To create a user, the following information is required:
User name: Can not exceed 32 characters. It is not case sensitive and supports double-byte characters, such as those from Chinese, Japanese, and
Korean types.
Invalid characters are listed below:
" / \ [ ] : ; | = , + * ? < > ` '
3-13
Page 55

PRODUCT OVERVIEW ADDING USERS
Note:
Password: Case-sensitive and supports a maximum of 16 characters. A password of at least 6 characters is recommended.
Share Add User Screen
1. Click on the Add User tab to add a user.
English
2. Fill in the information and click Save.
The Save function redirects you back to the User list tab.
The new added user appears on the list.
Adding a User
Users do not have administrator privileges.
3-14
Page 56

PRODUCT OVERVIEW EDITING USERS
Note:
English
Editing Users
Editing a User
1. Click the User List tab to view a list of available users.
2. Select a user and click Edit to modify.
A prompt displays, edit the desired fields.
3. Click Save to complete changes or Cancel to go back to the User List.
The Username cannot be modified.
Deleting Users
Deleting a User
1. Click the User List tab to view a list of available users.
2. Select a user and click Delete to remove the user.
A confirmation prompt displays.
3. Click OK to delete or Cancel to go back to the User List.
3-15
Page 57

PRODUCT OVERVIEW STORAGE MANAGEMENT
Storage Management
RAID Manager
The Storage function on the main menu provides access to configure and manage
your available storage. The Storage function allows access to RAID Manager, Disk
Manager and Auto Mirror to monitor and change the RAID array on the OMNINAS.
English
RAID Types
Storage RAID Manager Screen
RAID Manager Interface
3-16
Page 58

PRODUCT OVERVIEW RAID MANAGER
IMPORTANT:
IMPORTANT:
CAUTION:
Note:
Important:
English
RAID Types Defined
M
ODE DESCRIPTION
Single A single hard drive is used. All data is lost in the event of a hard drive failure.
RAID functionality is not available in JBOD (Just a Bunch of Disks) mode. Data
is written sequentially on the designated disks. Both hard drives are combined to
JBOD
RAID 0
RAID 1
form a single larger disk.
If you are using two identical HDDs, it is recommended to use RAID 0.
Both hard drives are combined and the available capacity of each disk is added
into a single logical volume. Redundancy or parity is not available. RAID0 offers
the best performance, however, there is no disk failure protection.
If a single disk in RAID 0 fails, the data in both disks is inaccessible due to the
RAID 0 cross-disk writing function.
Dual hard drives are required. RAID 1 is a secure mode, providing mirroring
functionality. The data is duplicated between both HDDs, and, in the event of a
single disk failure, the data is available in the healthy disk. RAID 1 is recommended for disk failure protection. However, available disk space is reduced by
50% due to the mirroring function.
Changing RAID types erases all data stored on your storage disks. If there is
saved data on the drive(s), backup your data before proceeding.
The Disk Manager function displays model, capacity and status of the available hard
drives. You can view the health status, remove, check, format, and unmount a disk
drive.
Creating a RAID Mode
Changing RAID types erases all data stored on your storage disks.If there is
saved data on the drive(s), backup your data before proceeding.
In a Single Disk Volume, a second drive is not supported. Af ter creating a Single
Disk Volume, you must power off the system before installing a second hard
drive.
Prerequisites
[3.1.1] Installing a second hard drive in a Single Disk Volume while the system
is powered on is not recommended.
3-17
Page 59

PRODUCT OVERVIEW RAID MANAGER
Note:
Single: Install 1 x hard disk drive
JBOD, RAID 0, RAID 1: Install 2 x hard disk drives
1. Select Storage and click on the RAID Manager tab.
The current RAID mode is displayed above the available RAID modes, see the following figure.
2. Click on a RAID mode, see RAID Typesto select your preference.
3. Click Create Disk-Array.
English
Creating a RAID Mode
4. A prompt displays, press OK to continue.
5. A prompt displays to confirm the rebuild process, click OK to continue.
The time to rebuild varies depending on RAID Array and HDD size. When it is
complete, the Home screen displays.
6. Log in to enter the interface.
To prevent further dialog prompts, click Prevent this page from creating addi-
tional dialogs and then press OK.
3-18
Page 60

PRODUCT OVERVIEW DISK MANAGER
IMPORTANT:
English
Disk Manager
Disk manager function allows you to check the status of external and internal disks as
well as viewing the formatted capacity of all available disks.
Disk Manager Interface
Checking Disks
Checking disks unmounts a drive(s). Functions such as access, auto copy, and
backup are not available. Do not power off or reboot the system to prevent damage to your system.
1. Select Storage and click on the Disk Manager tab to view your available disks.
From this menu you can view the status and permissible tasks (action) for each HDD.
2. Click Status to view the health condition (Empty, disk unavailable, good, failed,
mirroring) of a HDD.
3. Click Action to view a list of permissible tasks for the selected HDD.
3-19
Page 61

PRODUCT OVERVIEW DISK MANAGER
IMPORTANT:
2
2
3
3
4. Under Formatted Capacity, select a drive and click Check Disk.
English
Checking Disk Function
5. A prompt displays to confirm, click OK to continue.
The process continues. When it is complete, the Disk Manager screen displays.
Formatting Disks
The Format function allows you to format a disk.
The formatting process deletes any data on the disk. Make sure you backup
your data before proceeding. Do not power off or reboot the system to prevent
damage.
1. Click on the Disk Manager to view your available disks.
3-20
Page 62

PRODUCT OVERVIEW AUTO MIRRORING
Note:
English
2. Under Formatted Capacity, select a drive and click Format.
Formatting Disk Function
3. A prompt displays to confirm, click OK to continue.
The process continues. When it is complete, the Disk Manager screen displays.
Auto Mirroring
By using RAID 1, you can duplicate data between two hard drives. A minimum of two
HDDs are required for auto mirroring (RAID 1). The Auto Mirror function allows you to
enable or disable the Auto Mirror function available for RAID 1 mode.
A second hard drive must be installed prior to enabling the auto mirroring function.
Auto mirroring is only available for RAID 1 mode. Depending on the type and
size of HDDs, the rebuilding of your second drive for mirroring may take several
hours. Do not turn off the power or interrupt the system during this process to
prevent damage to the system or your hard drives.
The auto mirroring setup will require the formatting of the new drive. Make sure
you backup all data before starting this process.
To insert a HDD in an empty tray:
1. Power down the system before starting, and remove the empty HDD tray. See
Removing HDD Trays.
3-21
Page 63

PRODUCT OVERVIEW AUTO MIRRORING
Note:
Note:
2. Install the HDD and replace the tray in the empty HDD bay. See Installing Hard
Drives.
3. Power on your system. There is an audible beep and the HDD LEDs light.
4. Proceed with Enabling Auto Mirroring.
Enabling Auto Mirroring
Two hard drives are required for this function.
1. Select Storage and click the Auto Mirror tab.
2. Click Enable to proceed.
English
Auto Mirror Function
3. Click Save to finish the setup.
If a second HDD is not installed, this function is not available.
Hot-swapping HDDs
The Auto Mirror function allows for the swapping of a HDD in RAID 1 mode.
Before you begin, locate the HDD to replace, see Checking Disks in the Disk Man-
ager function.
The rebuilding of a new hard drive may take up to eight hours.
1. Open the HDD bay cover on the front of the system.
3-22
Page 64

PRODUCT OVERVIEW SHARE MANAGEMENT
1
Tray release
Removal
button
English
2. Locate the HDD to replace and press the Release button until an audible beep
sounds.
Hot-swapping a Drive
The corresponding LED no longer displays to indicate the HDD is powered down.
3. Remove the tray and replace the old HDD with a new one.
4. Replace the HDD tray with the new drive in the empty bay.See Installing Hard
Drives.
The corresponding HDD LED lights and the mirroring process starts.
Share Management
The Share function from the main menus provides you access to folders. The Share
function allows access to Add Folder and Folder List.
Adding Folders
You can create private or public shared folders by using the folder share function.
3-23
Page 65

PRODUCT OVERVIEW ADDING FOLDERS
Add Folder allows you to create a new folder. You can determine public or private
access rights.
Share Adding Folder Screen
English
To create a Public folder:
1. In Share, click on Add Folder tab.
2. Enter a folder name and description.
3. Click Public under Share Access.
4. Click Save.
You are automatically redirected to the Folder List and the new folder appears.
To create a Private folder:
1. In Share, click on Add Folder tab.
2. Enter a folder name and description.
3. Click Private under Share Access.
4. Choose the level of access for each user.
3-24
Page 66

English
Note:
PRODUCT OVERVIEW VIEWING FOLDER LISTS
Adding a Private Folder
5. Click Save.
You are automatically redirected to the Folder List and the new folder appears.
Private folder default access for all users is None.
Viewing Folder lists
Folder List provides a view of all folders. The Folder List allows access to Edit and
Delete.
Folder List Screen
3-25
Page 67

PRODUCT OVERVIEW VIEWING FOLDER LISTS
IMPORTANT:
Editing Folders
1. In the Folder List tab, select a folder and click Edit to make changes.
You can change the share attribute (private, public), user access rights or basic
description.
2. Click Save.
English
Editing Available Folders
Deleting Folders
Public, private and default folders can be deleted.
Once a folder is deleted the data stored within the folder is deleted as well. After
deletion, creating folder of the same name will not restore the lost data.
1. In the Folder List tab, select a folder and click Delete.
Deleting Available Folder
2. A prompt displays, click OK to continue or Cancel to return to Folder List.
3-26
Page 68

PRODUCT OVERVIEW VIEWING FOLDER LISTS
IMPORTANT:
Note:
English
3. A confirmation prompt displays, click OK to continue or Cancel to return to
Folder List.
4. The system beeps and returns to the Folder List screen. The folder is deleted.
Default folders (disk, iTunes) are required for iTunes services to function. You
can delete the folders and all stored data will be deleted as well. To enable
iTunes functionality, you will need to rebuild the default folders.
Click the field Prevent this page from creating additional dialogs. to disable
further dialog prompting.
Rebuilding Default Folders
Default shared folders are required for the iTunes server function. If you delete these
folders, iTunes is not available.
To add the default folder, use the rebuild function.
Rebuilding Default Folders
1. In the Folder List tab, click OK to begin the process.
2. A prompt reminding you to enable the iTunes service after rebuilding displays.
Click OK to continue.
A beep sounds and the default folders are listed in the Folder List.
3-27
Page 69

PRODUCT OVERVIEW SYSTEM LOG
System Log
The Log function under Settings provides a history list of system and user log activity .
The Log function allows access to Clear All Logs, Next Page and Last Page. Clear All
Logs deletes all log entries.
To view logs use Next Page, Last Page and scroll bars.
English
System Log Screen
Clearing Logs
To clear a history log, in the Log tab click on Clear All Logs.
3-28
Page 70

PRODUCT OVERVIEW SYSTEM BACKUP
English
System Backup
The Backup function provides you with information on your system. Backup allows
access to Backup Setting, Backup Setting List and Backup Log.
Backup Log Screen
Setting Up Backup Schedules
The Backup Setting function allows you to add a scheduled backup.
1. Select Backup and click on the Backup Setting tab.
2. Select the target source folder on the OMNINAS. In the description field, you
can add a note to help you define this backup.
3-29
Page 71

PRODUCT OVERVIEW EDITING BACKUP SCHEDULES
2
3
4
5
3. Select the backup destination (external USB or second OMNINAS device).
English
Creating a Backup Entry
4. If selecting a secondary OMNINAS device, type in the host name, username
and password to access the secondary device.
Click Scan NAS to search for a device within your network.
5. In Time of Execution, set the schedule time.
6. Select Confirm to backup according to the predefined schedule or select
Backup Now for immediate execution.
Editing Backup Schedules
You can use Backup Settings List to edit or delete current backup schedules in the
task list.
3-30
Page 72

PRODUCT OVERVIEW DELETING BACKUP SCHEDULES
English
1. Click Edit on a backup schedule.
Modifying a Backup List
The Backup Setting screen displays
2. Modify the schedule and click Save Backup Setting.
A beep sounds and an Update Settings Completed prompt displays.
The task is complete.
Deleting Backup Schedules
1. Click Delete from the Action list to delete a scheduled backup.
2. A confirmation prompt displays, click OK to delete or Cancel to return to the
Backup Setting List.
Or
3. Click Delete the whole list to delete all scheduled backups.
A confirmation prompt displays, click OK to delete or Cancel to return to the
Backup Setting List.
Modifying a Backup List
3-31
Page 73

PRODUCT OVERVIEW VIEWING BACKUP LOGS
Viewing Backup Logs
To view a history list of backup tasks, select Backup Log tab. Use the First Page, Previous Page, Next Page, or Last Page to cycle through your history list.
English
Modifying a Backup List
To clear Backup Logs, click Clear Backup Log.
3-32
Page 74

PRODUCT OVERVIEW SYSTEM CONFIGURATION
Note:
English
System Configuration
This section provides information and guidelines to specify network, date and time
settings, reboot and power off, reset to factory defaults, and update your OMNINAS
firmware.
Configuring Network Settings
In the main menu under Settings, click on Network to change the network configuration. You are prompted to enter an OMNINAS name and Workgroup. Assign a static
IP address or select DHCP to allow your router to assign one.
Before beginning, fill in the Name and Workgroup fields.
A suggested naming convention for the device name is to assign the name by the
location or particular use for the OMNINAS device, for example: MediaNAS, MusicNAS, or Family-NAS.
The workgroup is a collection of computer on a defined network. You will need to
know the name of the specific workgroup to assign this name.
DHCP settings:
Your router must be DHCP enabled.
1. In Settings, click the Network tab.
2. Click Automatically assign IP address (DHCP) to have your router designate
an IP address.
3-33
Page 75

PRODUCT OVERVIEW CONFIGURING NETWORK SETTINGS
IMPORTANT:
3. Click Save to set the new configuration.
Setting Network Configuration
English
Static settings (manual):
Before you begin, write down the new IP address, subnet mask, gateway and DNS
settings to provide you with a reference after the system resets.
Manually configuring the network settings will result in the system logging out.
You will need to wait for the system timeout function to expire (10 min.) before a
login is possible.
1. In Settings, click the Network tab.
2. Click Manually assign IP address (DHCP) to set the IP address.
3. Enter the IP address, Subnet Mask, Default Gateway, and DNS server settings.
4. Click Save to set the new configuration.
3-34
Page 76
PRODUCT OVERVIEW SETTING DATE AND TIME
English
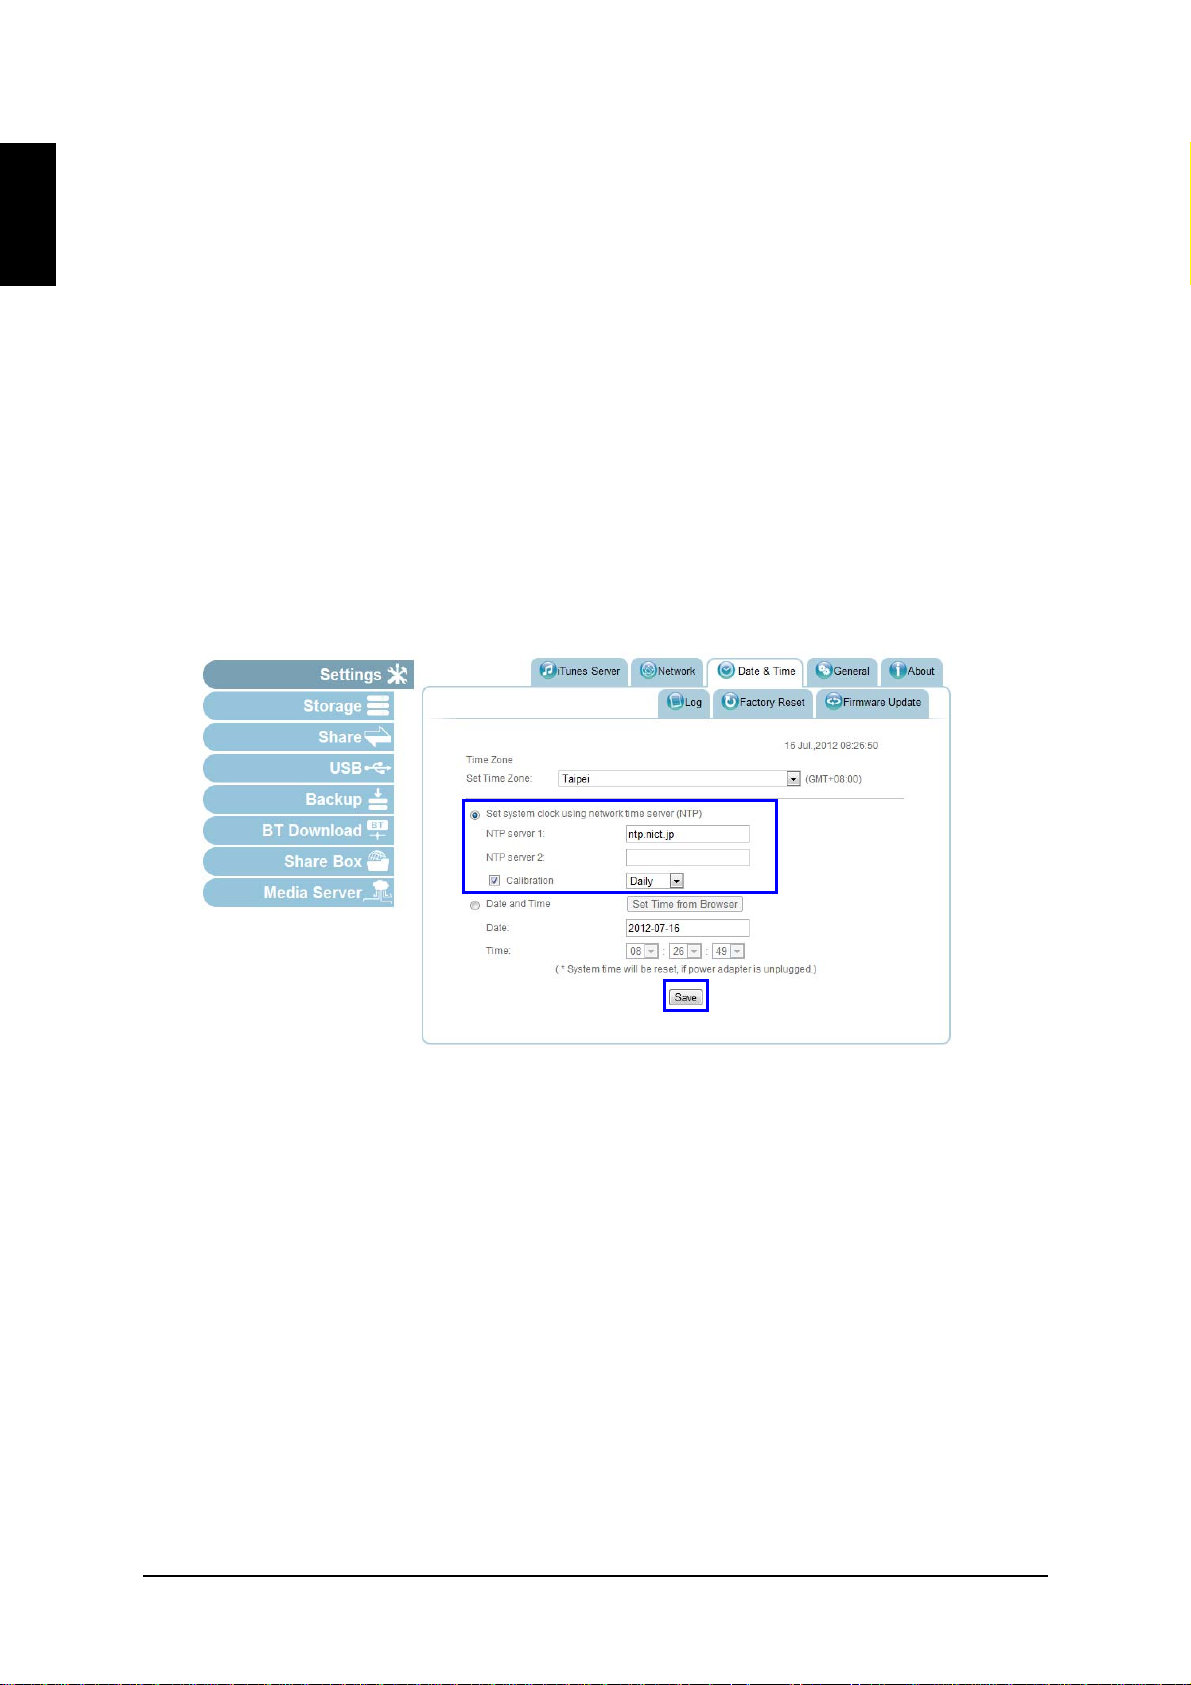
Setting Date and Time
Change the date and time by using the Date & Time function. Set Time Zone allows
you to choose from a list of locations. Set the date and time either through the network time server (NTP) or from a browser.
To set a Network Time Server (NTP)
1. Select Settings, and click the Date & Time tab.
2. Select Set system ... time server (NTP).
3. Enter the URL address of your selected NTP server(s) in the NTP server 1/2
fields.
4. Check Calibration to calibrate Daily, Weekly or Monthly.
5. Click Save to keep selected changes.
Date & Time Settings
Click Date and Time to set time from the browser.
1. Select Settings, and click the Date & Time tab.
2. Select Date and Time.
3. Click Set Time from Browser to automatically update Date and Time.
Or
4. Enter the Date by clicking on the drop-down menu and selecting the date.
5. Set the time by selecting the Hour, Minutes, and Seconds using the drop-down
Time menus.
3-35
Page 77

PRODUCT OVERVIEW SETTING DATE AND TIME
6. Click Save to keep selected changes.
Set Time from Browser Settings
English
3-36
Page 78

PRODUCT OVERVIEW REBOOTING AND POWERING OFF
English
Rebooting and Powering Off
Reboot the system
1. Click Home to return to the home menu.
2. On the home menu, click Restart to reboot the system.
Home Menu Functions
Power Off
The powering off function is activated through the web interface or by pressing the
power button.
Web interface:
1. Click Home to return to the home menu.
2. On the home menu, click Shut Down .
Power button:
On the front panel, press for three seconds.
The system beeps and begins the powering off process, the LED starts to blink
blue (may take 1-2 minutes).
3-37
Page 79

PRODUCT OVERVIEW RESET TO FACTORY DEFAULT
IMPORTANT:
Reset to Factory Default
Reset function sets the administrator user name and password and all stored data to
factory defaults. Make sure you backup your data before proceeding with this function.
Web interface reset function will erase all data and preconfiguration settings.
Web Interface Reset
1. Click on Reset to restore factory default.
English
Factory Reset Screen
Hardware Reset
Hardware rest is available to clear the administrator username and password and
delete user profiles. This procedure does not delete the data from the hard disks.
Make sure the OMNINAS is powered on before starting a hardware reset.
1. Locate the Reset button on the back of the device.
3-38
Page 80

PRODUCT OVERVIEW RESET TO FACTORY DEFAULT
English
2. Insert a thin tool and press the button in for three seconds.
Rest Button Location
3. After a beep sounds, release the button.
4. The system reboots and factory settings are set to default.
5. Log in at this time. See Connecting with the Finder Utility.
3-39
Page 81

PRODUCT OVERVIEW UPDATING FIRMWARE
CAUTION:
Updating Firmware
Firmware Update provides an easy method to update the system’s firmware.
Do not power down or disconnect the power cord during a firmware update to
prevent damage to the system.
1. In the Firmware Update tab, click Browse to select a firmware image.
2. Click Update to begin the update process.
English
Firmware Updating Screen
If the selected firmware image is older or at the same version as the current firmware,
a prompt displays to confirm the updating.
3-40
Page 82

PRODUCT OVERVIEW APPLICATION SERVICES
English
Application Services
Application services provide you with access to specific applications including iTunes
Server, BT Download, Remote Access and Media Server.
iTunes Server
1. In the iTunes Server tab, select on to enable the iTunes Server service.
Select off to disable the service.
2. Click Save to keep changes.
iTunes Server Screen
To access the iTunes server function, open the iTunes application on your PC/Mac.
The OMNINAS device is available under the Shared category of your iTunes application.
3-41
Page 83

PRODUCT OVERVIEW BT DOWNLOAD
IMPORTANT:
BT Download
BT Download allows you to enable BT downloads and specify the download time.
The BT Download function is only available when Media Server and Share Box
services are disabled.
Setting Up BT Downloads
1. Select BT Download, click the BT Setting tab.
English
Selecting BT Downloads
2. Check Enable BT Download.
3. In Download Time Setting, click Always then Save for quick set up.
Enabling BT Downloads
For scheduled downloads, see the following:
3-42
Page 84

PRODUCT OVERVIEW BT DOWNLOAD
English
1. Click Daily Download Time Slot.
2. Select a specific time period and click Save to keep changes.
Enabling BT Downloads
Using BT Download
BT Downloads allows you to specify the maximum rate of concurrent bandwidth
allowed for the OMNINAS. The maximum rate is calculated by dividing the uploaded
data by the amount of downloaded data.
Preferences
Set the default download folder , incoming TCP port, encryption, refresh rate, and total
bandwidth.
1. In BT Download, click to open settings menu.
BT Download Screen
2. Click Preferences to open the Preference screen.
3-43
Page 85

PRODUCT OVERVIEW BT DOWNLOAD
Settings Screen
3. In the Preference screen, set the following settings:
Download to: select the default folder to save downloads
Start transfers ...: select to begin downloading as soon as the entry is added.
English
Network: set the TCP port (Default: 51413).
Note: If modifying the TCP port, make sure the port number is not blocked by
your firewall/router.
Encryption: set this option to enable unencrypted data transfers.
Limited ... bandwidth: Set the download and upload rates. 0 means unlimited
rate. 750 KB/s is the maximum rate.
Alternatively, you can set these settings by selecting T o tal Download Rate or
Total Upload Rate in the Settings screen.
Web Client: set the refresh rate for the web client.
Preference Screen
3-44
Page 86

PRODUCT OVERVIEW BT DOWNLOAD
English
Click Save to continue or Cancel to return to the BT Download menu.
4. In Total Download Rate, set the download rate. 0 means unlimited rate. 750 KB/
s is the maximum rate.
5. In Total Upload Rate, set the upload rate. 0 means unlimited rate. 750 KB/s is
the maximum rate.
6. In Sort by, select the criteria used to display the downloads (Default: Name).
Download Files
1. To download files using BT Download, click to open the file selection
screen.
Opening File Selection
The File selection screen displays.
To upload a file to your OMNINAS, you can choose a file or enter a URL.
2. Click Choose Files, and browse for your target file.
Or
In the URL field, enter your source URL address.
3. Click Upload to add the file to the download task pane or click Cancel to return
to the BT Download.
3-45
Page 87

PRODUCT OVERVIEW BT DOWNLOAD
Or
1 2 3 4 5 6 7
8
9 10
File Selection Screen
File Management
You can view the status and manage the download files by selecting the function buttons on the download task pane.
English
File Management Menus
3-46
Page 88

PRODUCT OVERVIEW BT DOWNLOAD
English
Rear View Identification
I
TEM ICON DESCRIPTION
1. Opens file selection screen
2. Removes selected file from task list
3. Pause selected download
4. Resume selected download
5. Pause all downloads
6. Resume all downloads
7. Op ens inspector pane
8. Set preferences
9. Downloa d progress bar
10. Resume and pause current download
3-47
Page 89

PRODUCT OVERVIEW SHARE BOX
IMPORTANT:
Prerequisite:
Share Box
The Share Box function allows you to setup remote access to your OMNINAS using a
domain name.
OMNINAS supports the following providers: http://www.omninas.net
Share Box function must be enabled and BT Downloads must be disabled to
use the Share Box related services.
Registered account on omninas.net.
To enable remote access, see the following:
1. Select Share Box to open the Share Box Settings screen.
English
Share Box Menu
2. In the Share Box setting, select on to enable the Share Box (remote access)
function.
3. In the Host Name field, enter a host name for your server. This is the registered
name (unique name) that identifies your OMNINAS.
4. In the Password field, enter a password for your server. Enter the password
again in the Password (Confirm) field.
5. Set the Port (Default: 3000) forwarding number.
3-48
Page 90

PRODUCT OVERVIEW SHARE BOX
IMPORTANT:
English
Configuring Share Box Settings
Make sure the port is open if you select a non-default port number. The port
must forward to the fixed LAN IP of the OMNINAS so that connection to the
Share Box service is possible.Make sure the port is open if you set a nondefault port number.
6. Click Save to register and activate your host name and device.
Remote Access Login
1. Open a browser page and enter the following in the address bar:
http://www.omninas.net
The following screen appears.
Enter Your Device Name
3-49
Page 91

PRODUCT OVERVIEW SHARE BOX
2. In the Device Name field, type in the host name as set in the Share Box setting.
See Share Box.
3. Click Connect to continue.
The Share Box connection page displays, see the following figure.
English
Share Box Login Screen
4. Enter the Login and Password of a profile defined in Share Management. See
Adding Users.
After a successful log in, your OMNINAS device and the shared contents are displayed. See following figure.
Share Box Connection Screen
3-50
Page 92

PRODUCT OVERVIEW SHARE BOX
Note:
English
The following is a description of the menus found on the remote Share Box menus.
Share Box Remote Access Screen
I
CON ITEM DESCRIPTION
Parent Click to navigate to the parent folder.
Refresh Click to refresh the screen.
Thumbs
Upload Click to upload the selected file/folder.
New Dir Click to create a new directory in the cu rrent selection.
Download Click to download the selected file.
Rename Click to rename the currently selected file.
Copy Click to duplicate the currently selected file.
Click to set the current folder view settings to Thumb (icon)
view.
Move Click to move the currently selected file/folder.
Delete Click to delete the currently selected file/folder.
Logout Click to log off the current user.
Some menu items are only active after selecting a file or image.
3-51
Page 93
PRODUCT OVERVIEW SETTING UP MEDIA SERVER
IMPORTANT:
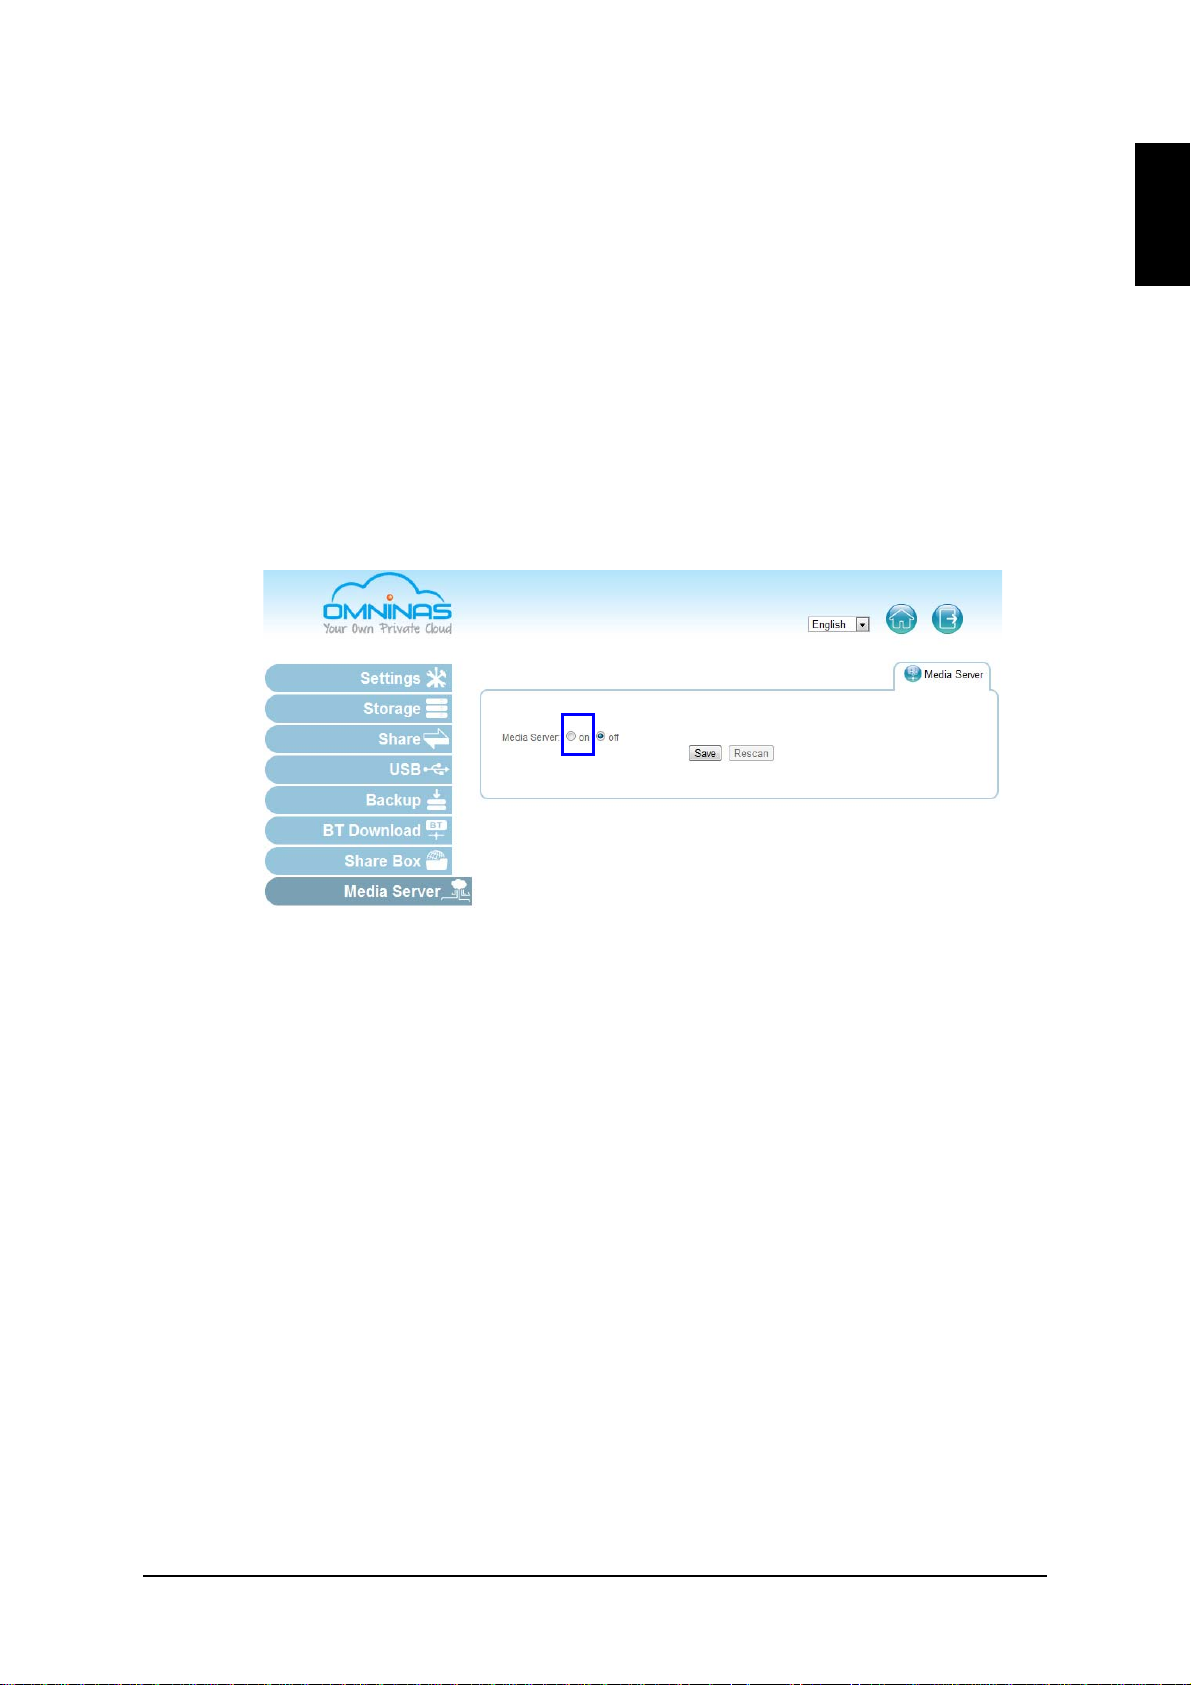
Setting Up Media Server
Media Server on the main menu provides access to this function's settings.
Media Server function must be enabled and BT Downloads must be disabled to
use the media server related services.
1. Select Media Server and click on next to Media Server.
2. Click Rescan to update and verify the new setting.
3. Click Save to keep changes.
English
Setting Up Media Server
You can also click off to turn Media Server off. Click Save to save the changes.
3-52
Page 94

English
PRODUCT OVERVIEW SETTING UP MEDIA SERVER
3-53
Page 95

OMNINAS for Android
Chapter 4
Page 96

English
PRODUCT OVERVIEW OMNINAS FOR ANDROID
4-1
Page 97

PRODUCT OVERVIEW INSTALLATION
The Android OMNINAS application provides you with access to your OMNINAS
device. Tap this application to access the NAS List main screen.
Installation
The OMNINAS application is available for download from your Google Play marketplace. Select the OMNINAS application to download.
Logging In
To log in:
1. Click the OMNINAS icon on the main screen of your Android phone.
English
Logging In
4-2
Page 98

PRODUCT OVERVIEW LOGGING IN
English
2. Enter the server name at the prompt.
Entering a Server Name
3. Enter Username and Password.
4. Click Login to continue or Cancel to return to the previous menu.
Entering Username and Password
4-3
Page 99

PRODUCT OVERVIEW MAIN MENUS
Main Menus
Functions on NAS List main screen include Previous Page, Download, Edit, Add
Folder and Select.
NAS List Main Screen
[4.1.1] NAS List Main Screen Functions
English
I
CON ITEM DESCRIPTION
Previous Page Allows access to a previous screen.
Download Allows access to download.
Edit Allows access to editing tool functions.
Add Folder Allows access to add a folder.
Select Allows selection of files or folders.
Document Files
To open any Document files:
1. From the NAS List main screen tap on Document.
2. Tap any sub-folder to view the files if needed.
4-4
Page 100

PRODUCT OVERVIEW MOVIE FILES
English
3. Tap on any file to view automatically.
Opening Document Files
Movie Files
To open any Movie file(s):
1. From the NAS List main screen tap on Movie.
2. Tap any sub-folder to view the files if needed.
3. Tap on any file to play automatically.
Opening Movie Files
4-5
 Loading...