

Page 1

For the :
XS35
XPC User Guide
Page 2

Shuttle®
XPC Installation Guide
Copyright
©2010 by Shuttle® Inc. All Rights Reserved.
No part of this publication may be reproduced, transcribed, stored in a retrieval system,
translated into any language, or transmitted in any form or by any means such as electronic,
mechanical, magnetic, optical, chemical, photocopy, manual, or otherwise, without prior
written permission from Shuttle® Inc.
Other brands and product names used herein are for identification purposes only and may
be trademarks of their respective owners.
Disclaimer
Shuttle® Inc. shall not be liable for any incidental or consequential damages resulting from
the performance or use of this product.
Shuttle® Inc. makes no representation or warranty regarding the contents of this manual. Information in this manual had been carefully checked for accuracy;however, no
guarantee is given as to the correctness of the contents. For continuing product improvement, Shuttle® Inc. reserves the right to revise the manual or make changes to the specifications of this product at any time without notice and obligation to any person or entity
regarding such change. The information contained in this manual is provided for general
use by customers.
This device complies to Part 15 of the FCC Rules. Operation is subject to the following
two conditions:
1. This device may not cause harmful interference.
2. This device must withstand any background interference including those that may
cause undesired operation.
Trademarks
Shuttle is a registered trademark of Shuttle Inc.
Intel and Pentium are registered trademarks of Intel Corporation.
PS/2 is a registered trademark of IBM Corporation.
AWARD is a registered trademark of Award Software Inc.
Microsoft and Windows are registered trademarks of Microsoft Corporation.
General Notice
Other brand and product names used herein are for identification purposes only and
may be trademarks of their respective owners.
Page 3
Safety Information
Read the following precautions before setting up a Shuttle XPC.
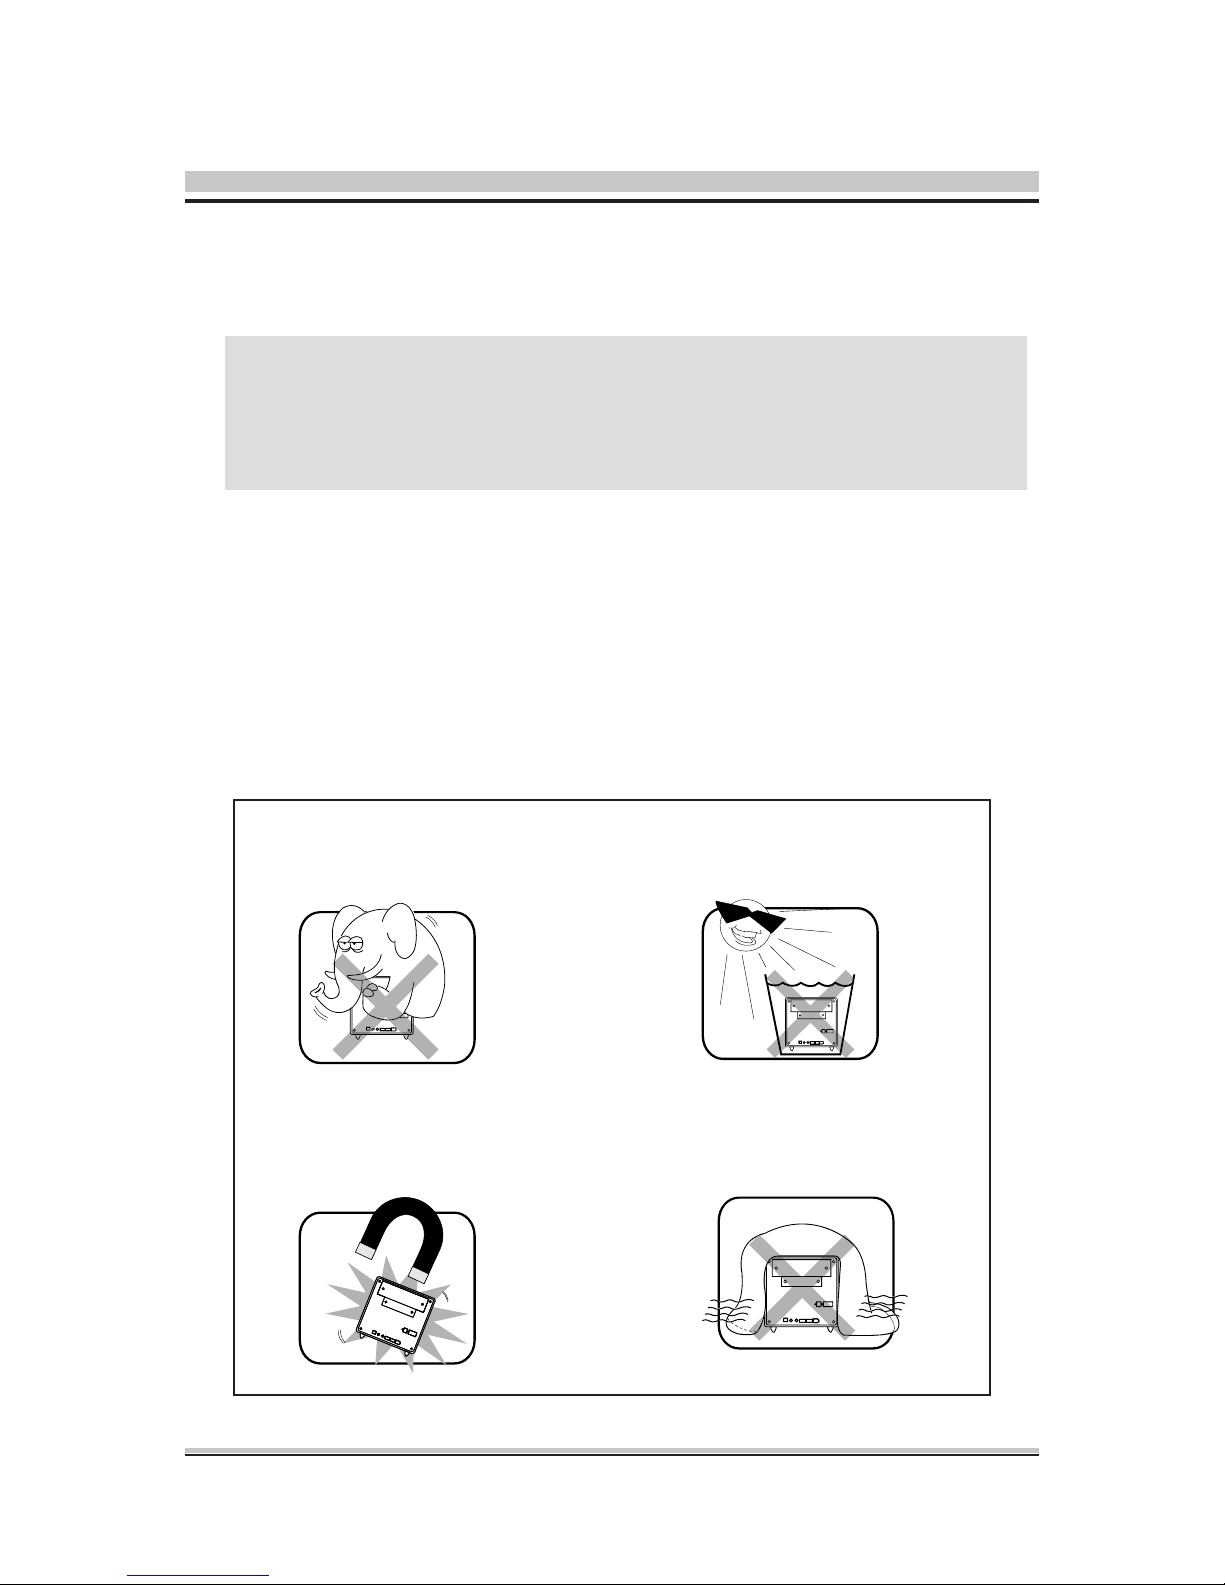
Installation Notices
Do not place this device
underneath heavy loads
or in an unstable position.
Do not expose this device to high
levels of direct sunlight, highhumidity or wet conditions.
Do not use or expose this device
around magnetic elds as magnetic
interference may affect the
performance of the device.
Do not block the air vents
tothis device or impede the
airow in any way.
Laser compliance statement
The optical disc drive in this server is a laser product. The drive's
classication label is lacated on the drive.
CLASS 1 LASER PRODUCT
CAUTION:INVISIBLE LASER RADIATION WHEN OPEN.
AVOID EXPOSURE TO BEAM.
CAUTION
Incorrectly replacing the battery may damage this computer. Replace only
with the same or equivalent as recommended by Shuttle. Dispose of used
batteries according to the manufacturer's instructions.
Page 4

TABLE OF CONTENTS
Driver and Software Installation...................................................................................1
Mainboard Driver DVD ...........................................................................................1
User Manuals .................................................................................................2
Appendix......................................................................................................................3
Starting BIOS ..........................................................................................................3
Enter the BIOS ........................................................................................................3
Main Setup .....................................................................................................6
Advanced ........................................................................................................9
Security Menu ......................................................................................10
Boot Menu ............................................................................................12
Exit Menu .............................................................................................13
Exit ................................................................................................................18
Page 5

1
English
Driver and Software Installation
Motherboard Driver DVD
The Motherboard Driver DVD contains all the motherboard drivers necessary to
optimize the performance of this Shuttle Xvision in a Windows® OS. Install these
drivers after installing Microsoft® Windows®.
Insert the attached DVD into your DVD-ROM drive. The DVD AutoRun screen
should appear. If the AutoRun screen does not appear, double click on Autorun
icon in My Computer to bring up Shuttle Mainboard Software Setup screen.
Navigation Bar Description :
Auto Install Driver/ Utility.
Install Nvidia VGA Driver.
User Manuals - Motherboard Manual
, Quick Guide.
Link to Shuttle Website - Link to shuttle website homepage.
Browse this DVD - Allows you to see contents of this DVD.
The DVD contents attached in XS35 Series motherboard are subject to
change without notice.
Page 6

2
English
User Manuals
Motherboard Manual
Quick Guide
Page 7

3
English
1.1 About BIOS Setup
BIOS SETUP
1.1.1 When to Use BIOS Setup ?
1.1.2 How to Run BIOS Setup ?
You may need to run the BIOS Setup when:
・
An error message appears on the screen during the system
booting
up and is requested to run SETUP.
・
You want to change the default settings for customized
features.
・
You want to reload the default BIOS settings.
To run the BIOS Setup Utility, turn on the notebook and press the
[Del] key during the POST procedure.
If the message disappears before you respond and you still wish
to enter Setup, either restart the system by turning it OFF and
ON, or simultaneously pressing [Ctrl]+[Alt]+[Del] keys to restart.
Be noted that the screen snaps and setting options in this
chapter are for your references only.The actual setting screens
and options on your Notebook may be different because of BIOS
update.
The setup uses a menu interface to allow the user to congure
their system and the features are briey listed as follow.
Press F11 key for Boot Menu.
Page 8

4
English
1.2 BIOS Setup Menu
Once you enter the BIOS Setup Utility, the Main Menu will appear
on the screen. Select the tags to enter the other menus.
Info Menu
Show System Information about BIOS version,CPU features and
Manufacturer
Main Menu
Show system overview about memory size, main HDD or ODD and
setting of system time and date.
Advanced Menu
To select the XD feature enable or disable XD feature only work with
Intel platform + Windows
Security Menu
Install or clear the password settings for supervisor and user.
Boot Menu
Congure Settings during System Boot.
EXIT Menu
Save or discard the changes before leaving the BIOS Setup Menu.
Page 9

5
English
1.2.1
Info Menu
・BIOS Information
BIOS VERSION : BIOS version
EC VERSION : EC version
Build Date : BIOS Build Date
・Processor
・Manufacturer
・Product Name:Product Name
Processor Type
Manufacturer Name
・System Information
This item provides the information about the rmware, processor, and
system memory.
Page 10

6
English
1.2.2 Main Menu
Page 11

7
English
・System Date
This item allows you to set the system date. The date format is
[day:month:date:year].
・System Time
This item allows you to set the system time. The system clock will go
on no matter you shut down the PC or get into sleep mode. The time
format is [hour:minute:second].
Use [ENTER], [TAB] or [SHIFT-TAB] to select a eld.
Use [+] or [-] to congure system Time.
1.2.2 Main Menu
Page 12

8
English
・AHCI Port0
While entering setup,BIOS auto detects the presence of
AHCI
devices. This displays the status of auto detection of
AHCI
devices.
Day
Day of the week, from Sun to Sat, which is
determined by BIOS (read-only).
Month (Month)
The month from 01 (January) to 12
(December).
Date (Date)
The date from 01 to 31.
Year (Year)
The year can be adjusted by users.
Page 13

9
English
1.2.3
Advanced Menu
・Execute-Disable Bit Capability [Enabled]:
When disabled, force the XD feature ag to always return 0.
Page 14

10
English
1.2.4 Security Menu
・Change Supervisor Password
When this item is selected, a message box shall appear on the screen
as below:
Enter New Password
Type a maximum of 6-digit password and press [Enter]. The password
typed now will replace any previously set password from CMOS
memory. You may also press [ESC] to abandon new password setting.
When the Supervisor Password is set, new items Change User
Password and Password Check will be added in the menu.
Select Change User Password to give or to abandon password setting
Page 15

11
English
same as Change Supervisor Password item above.
Note that Supervisor Password eld allows users to enter and change
the settings of the BIOS SETUP UTILITY, while User Password eld
only allows users to enter the BIOS SETUP UTILITY without having
the authorization to make any change.
The Password Check item is used to specify the type of BIOS
password protection that is implemented. Settings are described
below:
Setup
The password is required only when users try to
access to BIOS SETUP UTILITY.
Always
The password is required every time when the
Notebook is powered on or when users try to
access to BIOS SETUP UTILITY.
To clear a set Supervisor Password/ User Password, just press
[Enter] under Change Supervisor Password/ Change User Password
eld when you are prompted to enter the password. Please note that
when Supervisor Password has been cleared, User Password will be
cleared as well. A message box will pop up conrming password will be
disabled. Once the password is disabled, the system will boot and user
can enter setup without entering password.
Page 16

12
English
1.2.5 Boot Menu
・Boot
Congure Settings during System Boot.
・LAN Remote Boot [Enable]:
Boot from LAN or not.
・1st Boot Device
・2nd Boot Device
・3rd Boot Device
Species the boot sequence from the available devices.
A device enclosed in parenthesis has been disabled in the corresponding type menu.
Page 17

13
English
1.2.6 Exit Menu
Page 18

14
English
・Save & Exit Setup
・Discard Changes and Exit
・Discard Changes
・Load Default Settings
Exit system setup after saving the changes.
F10 key can be used for this operation.
Exit system setup without saving any changes.
ESC key can be used for this operation.
Discards changes done so far to any of the setup questions.
F7 key can be used for this operation.
Load Optimal Default values for all the setup questions.
F9 key can be used for this operation.
 Loading...