


System Handbook
Table of contents
Welcome ................................................................................................................1
CE Labelling ...........................................................................................................2
Delivery Scope ........................................................................................................2
General Safety Instructions ......................................................................................2
Assembly and Startup ..............................................................................................3
Problem Handling ...................................................................................................5
Shuttle Mini-PC Complete System ............................................................................6
Connectors of the Shuttle Mini-PC Complete System .................................................6
General Details ......................................................................................................8
Help and Support .................................................................................................12
Welcome
Thank you for purchasing a Shuttle Mini-PC Complete System. Shuttle is pleased to
present you the latest technology which meets the most demanding requirements.
This handbook will help you as you work with your new Shuttle Mini-PC Complete
System. The individual chapters of the handbook explain step by step the most
important components and how to use them. You also have access to a whole range
of technical information by telephone or via the internet. We wish you much enjoyment
with your Shuttle Mini-PC Complete System.
EN
1

CE Labelling
This device meets the requirements of the EU-Directives for CE labelling.
The corresponding CE label on the Shuttle is evidence of this. Please check whether the
Shuttle displays the CE label. If there is no CE label please contact your dealer.
Delivery Scope
The following accessories are included in the delivery with your Shuttle Mini-PC
Complete System. If one of the components listed is not included in the package,
please inform your dealer.
1. Shuttle Mini-PC Complete System
2. Power connection cable
3. Quick Installation Guide
4. Warranty Card
Your Shuttle Mini-PC Complete System can also be accompanied by further
accessories depending on the system.
General Safety Instructions
The information below will help you to use your Shuttle Mini-PC Complete System
correctly and carefully. Please always follow the instructions on the safety notices and
in this handbook:
1. Do not operate your Shuttle Mini-PC Complete System in a cabinet or in a closed
space (such as a box or chest etc.).
2. Never put objects through the openings of the casing. If you should do this you
could be exposed to dangerous voltages.
3. Your Shuttle Mini-PC Complete System is supplied with a cold appliance connection
cable. This is for your safety. Therefore refrain as far as possible from connecting
the device with a power source with another cable. If you are unsure please consult
your local dealer.
4. Do not place any objects on the power cable, and ensure that the cable is
positioned so that people do not trip over it.
EN
2

5. If you connect the Shuttle Mini-PC Complete System to a connector strip, please
ensure that the required amperage of all of the products connected does not exceed the capacity of the connector strip.
6. You should always disconnect your Shuttle Mini-PC Complete System and the
connected appliances from the power and from one another before cleaning.
7. Your Shuttle Mini-PC Complete System must never come into contact with water or
other liquids.
Assembly and Startup
Only place your Shuttle Mini-PC Complete System on surfaces which are stable,
firm, non-slip and even. Do not cover, obstruct or block any of the Shuttle Mini-PC
Complete System‘s openings. These are to prevent overheating. After the suitable
place has been found, you can unp ack your Shuttle Mini-PC Complete System and
the accessories. Please be very careful when unpacking as all of the components are
sensitive to shock. If you do not take care the hard drive can be damaged very easily.
Therefore prevent any shocks to and any unnecessary transporting of the
Shuttle Mini-PC Complete System.
If you do have to open the casing (e.g. when upgrading your system), please adhere
to the following:
1. Disconnect the Shuttle Mini-PC Complete System from the power network and also
remove all connections to connected appliances.
2. Always ensure that the casing is closed firmly and that all of the screws have been
screwed tight before you re-connect the Shuttle Mini-PC Complete System or other
connected appliances to the power network.
Please take a moment to inspect the outside of your Shuttle Mini-PC Complete System.
This also includes components such as the monitor, speakers and other peripherals.
If you notice any external defects such as scratches or dents, please contact the dealer
from whom you bought your Shuttle device. Before you start to connect the peripherals
such as the monitor, speakers or joystick, we recommend that you connect a highvoltage protection device or a UPS (uninterruptible power supply) to the power cable.
Ensure that no long cables are used and that the nearest power source is used.
EN
3
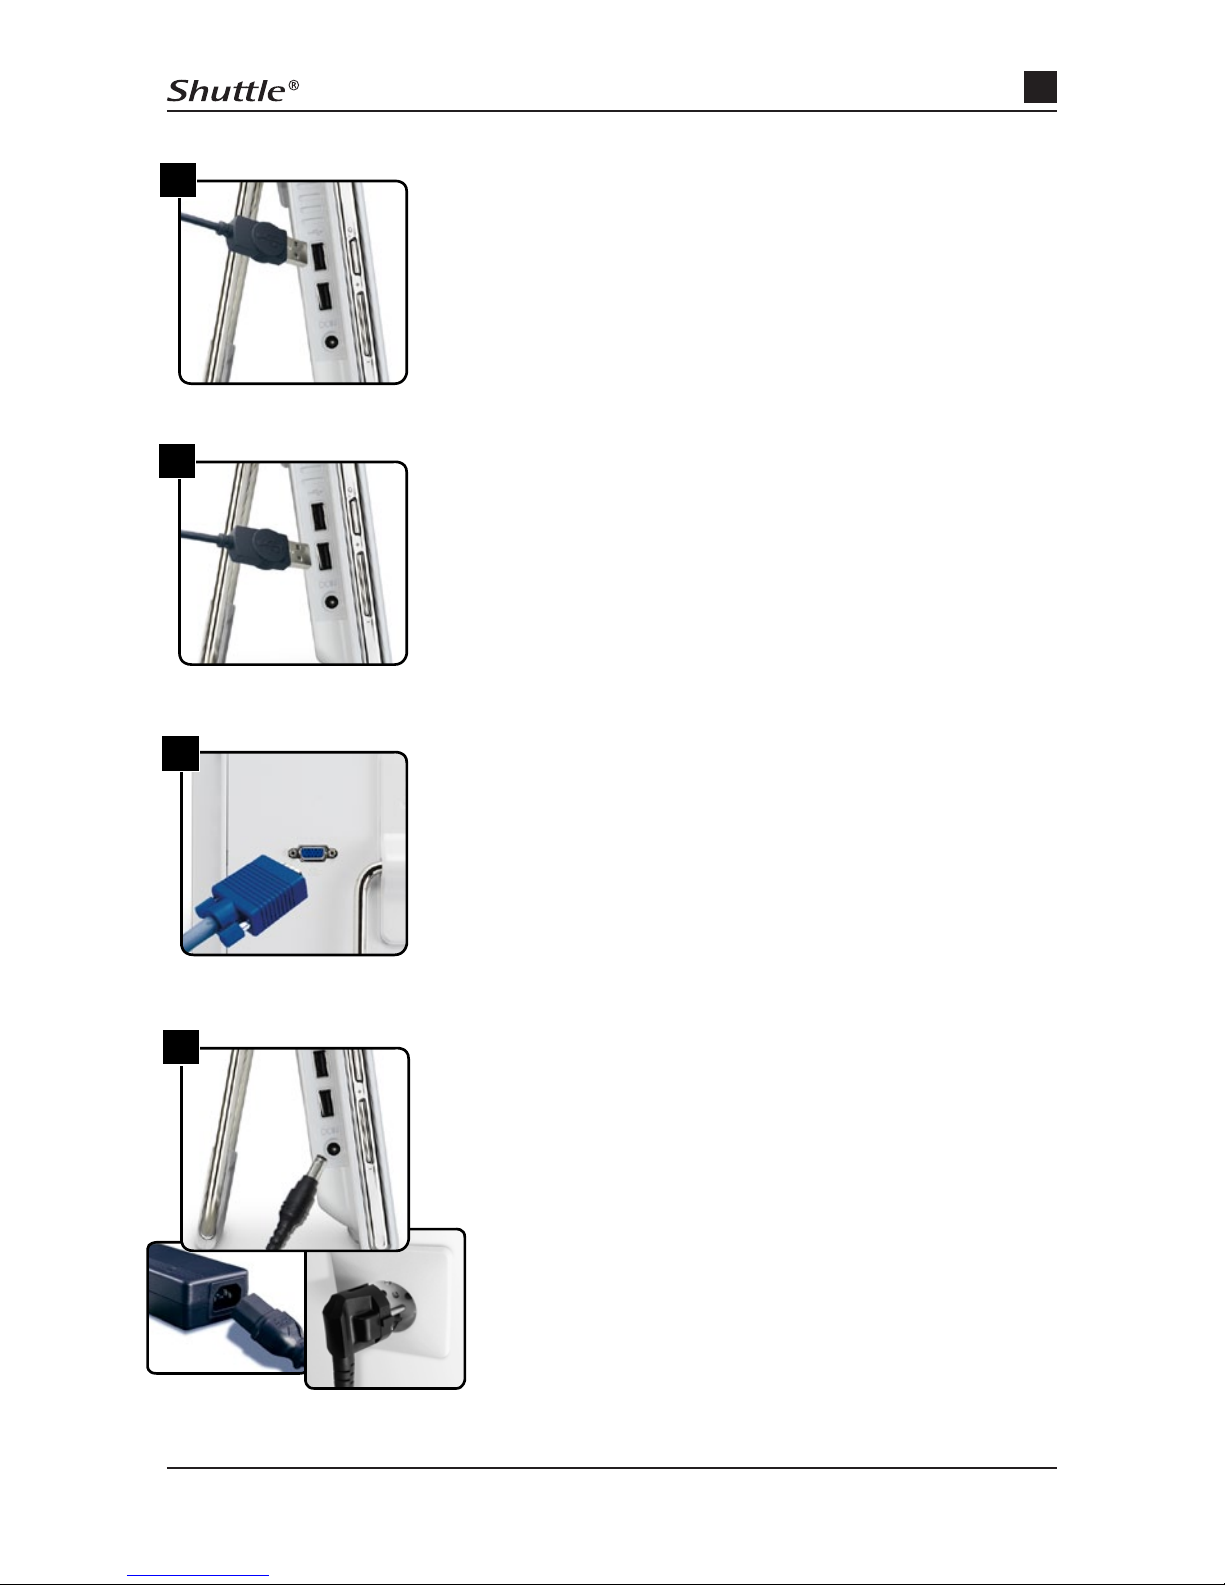
1. Connecting the keyboard
Connect your USB keyboard to any USB connection
located on the side of your computer. Carefully place
the connector into the connection.
2. Connecting the mouse
Also connect your mouse to any USB connection located on the side of your computer. Carefully place the
connector into the connection.
3. Connecting the monitor (optional)
Your Shuttle All-in-One-PC already has an integrated
monitor. For a second monitor connect the monitor
cable (15-pin) to your VGA-connection on the back of
the computer.
4. Power connection
First of all connect the external power supply to the PC
and only then connect the power supply cable from the
socket to the power supply. Ensure that your PC is also
connected to a secured power source.
1.
2.
3.
4.
EN
4

Problem Handling
If you notice any problems with the Shuttle Mini-PC Complete System, you should only
try to correct these in accordance with the instructions detailed here in the handbook.
Improper use of the Shuttle Mini-PC Complete System can be a safety risk and cause
permanent damage to the Shuttle Mini-PC Complete System. You should disconnect
the Shuttle Mini-PC Complete System from the power supply and call the support hotline number stated on the warranty card. You should also indicate immediately if one
of the following problems exists:
•The power cable is damaged or frayed.
•Liquids have penetrated into the Shuttle Mini-PC Complete System.
•The Shuttle Mini-PC Complete System was exposed to rain, water or any other fluids.
•You have dropped the Shuttle Mini-PC Complete System or the casing was damaged.
•The Shuttle Mini-PC Complete System is showing changes in its performance
which indicate that repair is necessary.
There are some important details which you should have available to be able to use
our technical hotline. You can find these on your invoice or on your Shuttle Mini-PC
Complete System:
•Dealer
•Purchase date
•Invoice number
•Product name
•Shuttle ID (you can find this on the back of your Shuttle Mini-PC Complete System)
If you require help or support concerning your Shuttle Mini-PC Complete System,
please visit our website:
Shuttle Complete Systems with Windows Operating System:
http://systemsupport.eu.shuttle.com
Shuttle Complete Systems with Linux Operating System:
http://eu.shuttle.com/linuxsupport
EN
5

Shuttle Mini-PC Complete System
A computer consists of many different components which are both inside and outside
the case. These components are called “hardware“. Each individual hardware
component has an important function.
In order to be able to work in the best possible way with the Shuttle Mini-PC Complete
System, you should get to know the fundamental components and their functions. This
also includes their maintenance.
Connectors of the Shuttle Mini-PC Complete System
Your Shuttle Mini-PC Complete System has the following connectors and operating
controls. Please note that there may be differences in the positioning and what is
included depending on the system. The illustrations should provide you with an overview of the most important connectors.
1. Card reader
2. IDE Status LED
3. Power Status LED
4. WLAN Status LED
5. Blue LED element
6. Power-On-Button
7. (Audio) Microphone
8. (Audio) Headphones
9. (Audio) Line-IN L/R
10. Webcam
11. Microphone
12. Speakers
13. USB Connectors
14. Touchscreen-Display
15. Function Keys for speakers,
display and LED
16. Connector for external power supply
17. Ethernet
18. VGA-output
19. Opening for Kensington-Lock
20. Place of safe-keeping for stylus pen
EN
6

1
5
6
9
8
7
10
11
12
13
17
18
19
14
15
16
20
13
2 3 4
EN
7

General Details
This part of the handbook deals with the following components:
•Mouse
•Keyboard
•Touchscreen
•Card reader
•Case
•Speakers
•Network card
•Webcam
•Microphone
Please take a moment to familiarise yourself with each of these components.
Mouse
The mouse is one of the most important tools for working with the Shuttle Mini-PC
Complete System. It allows you to move the cursor across the screen. You can also use
the mouse to open programs or to work with menus and texts. A standard mouse has
the three following buttons:
Left button
This is used the most frequently. An object is selected with a single click, or you can
place the cursor at any point on the text. When you double-click (two clicks
immediately one after the other) you can open programs or documents.
Right button
With a single click of the right mouse button on an object or any point of the screen
you can open a menu. These menus allow quick access to various frequently used
functions, e.g. cut and paste.
EN
8

Scroll wheel
The scroll wheel allows various options depending on the program. In the internet
browser for example you can use it to move up and down. In a graphics program the
scroll wheel often allows a picture to be zoomed in (i.e. enlarged) or reduced.
Application
Cut and paste?
You can cut and paste texts or carry out other shortcuts (quick commands) with the
mouse. Move the cursor onto an object, press the left button, and keep it pressed.
Now move the cursor to another place and let go of the button.
Cleaning
It is important to keep the mouse clean for best performance. Use a clean cloth with a
little cleaning agent to clean the mouse from the outside. If your mouse has a ball
(on the bottom of the mouse), you should clean this ball regularly. You should also
clean the rollers inside of the mouse with dampened cotton wool.
Keyboard
With the mouse the keyboard is the most important tool for communicating with the
computer. The keyboard makes it possible for you to enter text into the computer, e.g.
for a letter or an email.
Many modern keyboards have what are known as “hot keys“. You can use these to
open your favourite internet sites or frequently used programs. Some can also be used
to control the playback of music or films.
Application
How do I use keyboard shortcuts?
Keyboard shortcuts are a combination of different buttons which activate frequently
used functions. For example if you press CTRL and C, you can copy something, and
CTRL and V allows you to paste the copied object to another location. You can find
other shortcuts in the Help area of the operating system. To start help, press the F1
Key. In Linux Operating Systems you will also find the Help Center in the task bar.
EN
9

Touchscreen
In contrast to normal screens, touching is expressly desirable here. Touchscreens
operate like a mouse – touching with the finger or a special pen, a stylus - moves the
cursor. This transforms clicking and dragging into an experience. A single press on the
screen triggers a mouse click and two touches at the same point one after the other, a
double-click. A right-mouse click is triggered by a longer touch on one position.
Cleaning
You should clean the monitor regularly in order to prevent eye strains. You should be
particularly careful when cleaning as the monitor has a special surface. Do not use
any aggressive cleaning agents and use soft cloths only.
Card Reader
Card readers are a relatively new development in computers and an excellent
alter-native to diskette drives. Card readers can read different formats and are
therefore used for different electronic storage media such as digital cameras, PDAs,
mobile telephones and much more.
You can purchase cards with different storage volumes. Your Shuttle Card Reader
supports many different formats.
Case
The case with its numerous connectors and functions is the main component of your
Shuttle Mini-PC Complete System and includes all of the components which enable
you to work with the computer.
The on-button, the card reader and the many connectors are located on the sides of
the casing.
For more information on the connectors, please consult the connector layout diagram
at the front of this handbook.
EN
10

Speakers
The computer‘s speakers play back the sound of music, games, videos and DVD films.
Depending on the soundcard you can enjoy 2-channel, 4-channel, 8-channel, 5.1 or
7.1 multi-channel sound.
Network (LAN)
The LAN or network connection makes it possible for you to connect computers to one
another at home or in the office, to exchange data or to go online and surf the internet.
If a WLAN network card is installed in your Mini-PC Complete System, wireless
network connections can also be set up.
Webcam
Your All-in-One-PC has an integrated camera to record images and videos. This enables you to take photos with suitable programs or to conduct a video telephone call over
the internet. The camera is firmly fixed at the top edge of the casing.
Microphone
The microphone is located immediately next to the webcam and once activated it
records the sounds and speech of the PC-user making it ideal for telephoning or video
recordings.
EN
11

Help and Support
Remember that the „Help“ function is always available to you if you require answers to
your questions or have problems with the operating system or your computer.
You can access Help by:
•Pressing the F1 key, if you are on the desktop interface
Troubleshooting
My Shuttle Mini-PC Complete System will not start
•Check whether the Shuttle Mini-PC Complete System is turned on.
•Check whether the power cable is connected and the power socket is turned on.
Nothing is displayed on the screen of the All-In-One PC
•Check whether the Shuttle Mini-PC Complete System is turned on.
•Check that the screen brightness setting has not been turned down to the lowest level.
Nothing is displayed on the second connected screen.
•Check whether the monitor is turned on.
•Check whether the monitor is connected to the VGA-output at the back of your
Shuttle Mini-PC Complete System.
•Check whether the monitor is connected and is receiving power.
The touchscreen does not work or not satisfactorily
•Check using the delivered calibration software that the screen is correctly adjusted.
• To check all the settings, connect an external mouse and keyboard to your Shuttle
•Mini-PC Complete System.
I cannot hear any sound
•Check whether the external speakers are plugged into the correct connectors. For
more information on the connectors, please consult the connector layout diagram at
the front of this handbook.
•Are the boxes turned on and are they receiving power?
•Make sure that the volume control is not turned to mute or has not been turned right
down. For devices using the Windows Operating System double-click on the speaker
symbol next to the clock. For devices using the Linux Operating System, select KMixer.
•Is the volume control on the boxes turned on?
EN
12

My keyboard or mouse are not working
•Check whether these peripherals are connected to the right jacks at the PC.
•Remove the cable and clean the respective connectors in order to remove any
possible dirt which may exist.
•If you have a mouse with a ball, try to clean the ball with a soft cloth. You should
also clean the mouse inside with dampened cotton wool.
Further Help:
Via the internet
Shuttle Complete Systems with Windows Operating System:
http://systemsupport.eu.shuttle.com
Shuttle Complete Systems with Linux Operating System:
http://eu.shuttle.com/linuxsupport
By Telephone
Detailed instructions on how to contact the Shuttle Support Hotline are stated on your
warranty card.
EN
13
 Loading...