

USER’S GUIDE
SAFETY NOTES • FEATURES • INSTRUCTIONS • MAINTENANCE & CARE • MORE
DUAL ACTION
POLISHER
MANUAL DE
INSTRUCCIONES
ESPECIFICACIONES TÉCNICAS
LISTA DE PIEZAS
NOTAS SOBRE SEGURIDAD
INSTRUCCIONES
MANTENIMIENTO Y CUIDADO
GARANTÍA
MANUALE DI
ISTRUZIONI
SPECIFICHE
ELENCO DELLE PARTI
NOTE DI SICUREZZA
ISTRUZIONI
MANUTENZIONE E CURA
GARANZIA
MANUEL DE
L’UTILISATEUR
SPÉCIFICATIONS
LISTE DES PIÈCES
CONSIGNES DE SÉCURITÉ
INSTRUCTIONS
MAINTENANCE ET ENTRETIEN
GARANTIE
INSTRUCTIEHANDLEIDING
SPECIFICATIES
ONDERDELENLIJST
VEILIGHEIDSWENKEN
INSTRUCTIES
ZORG EN ONDERHOUD
GARANTIE
ES
FR
IT NL
8mm
ORBIT
2
Dual Action Polisher User’s Guide
TABLE OF CONTENTS
Features ........................................................................................................................................2
Safety Notes ................................................................................................................................3
Warranty .......................................................................................................................................3
Basic Instructions .......................................................................................................................4
Maintenance & Care of Dual Action Polisher .......................................................................6
How to Care for Waxing and Polishing Pads .........................................................................7
How to Wax and Polish .............................................................................................................8
How to Remove Oxidation .......................................................................................................10
Dual Action Polisher Accessories .........................................................................................12
Shurhold Detailing Products ...................................................................................................14
Manual de instrucciones ................................................................................................16
Manuel de l’utilisateur ....................................................................................................18
Manuale di istruzioni .......................................................................................................20
Instructie-handleiding .....................................................................................................22
Specifications/Parts List ..........................................................................................................24
DUAL ACTION
POLISHER
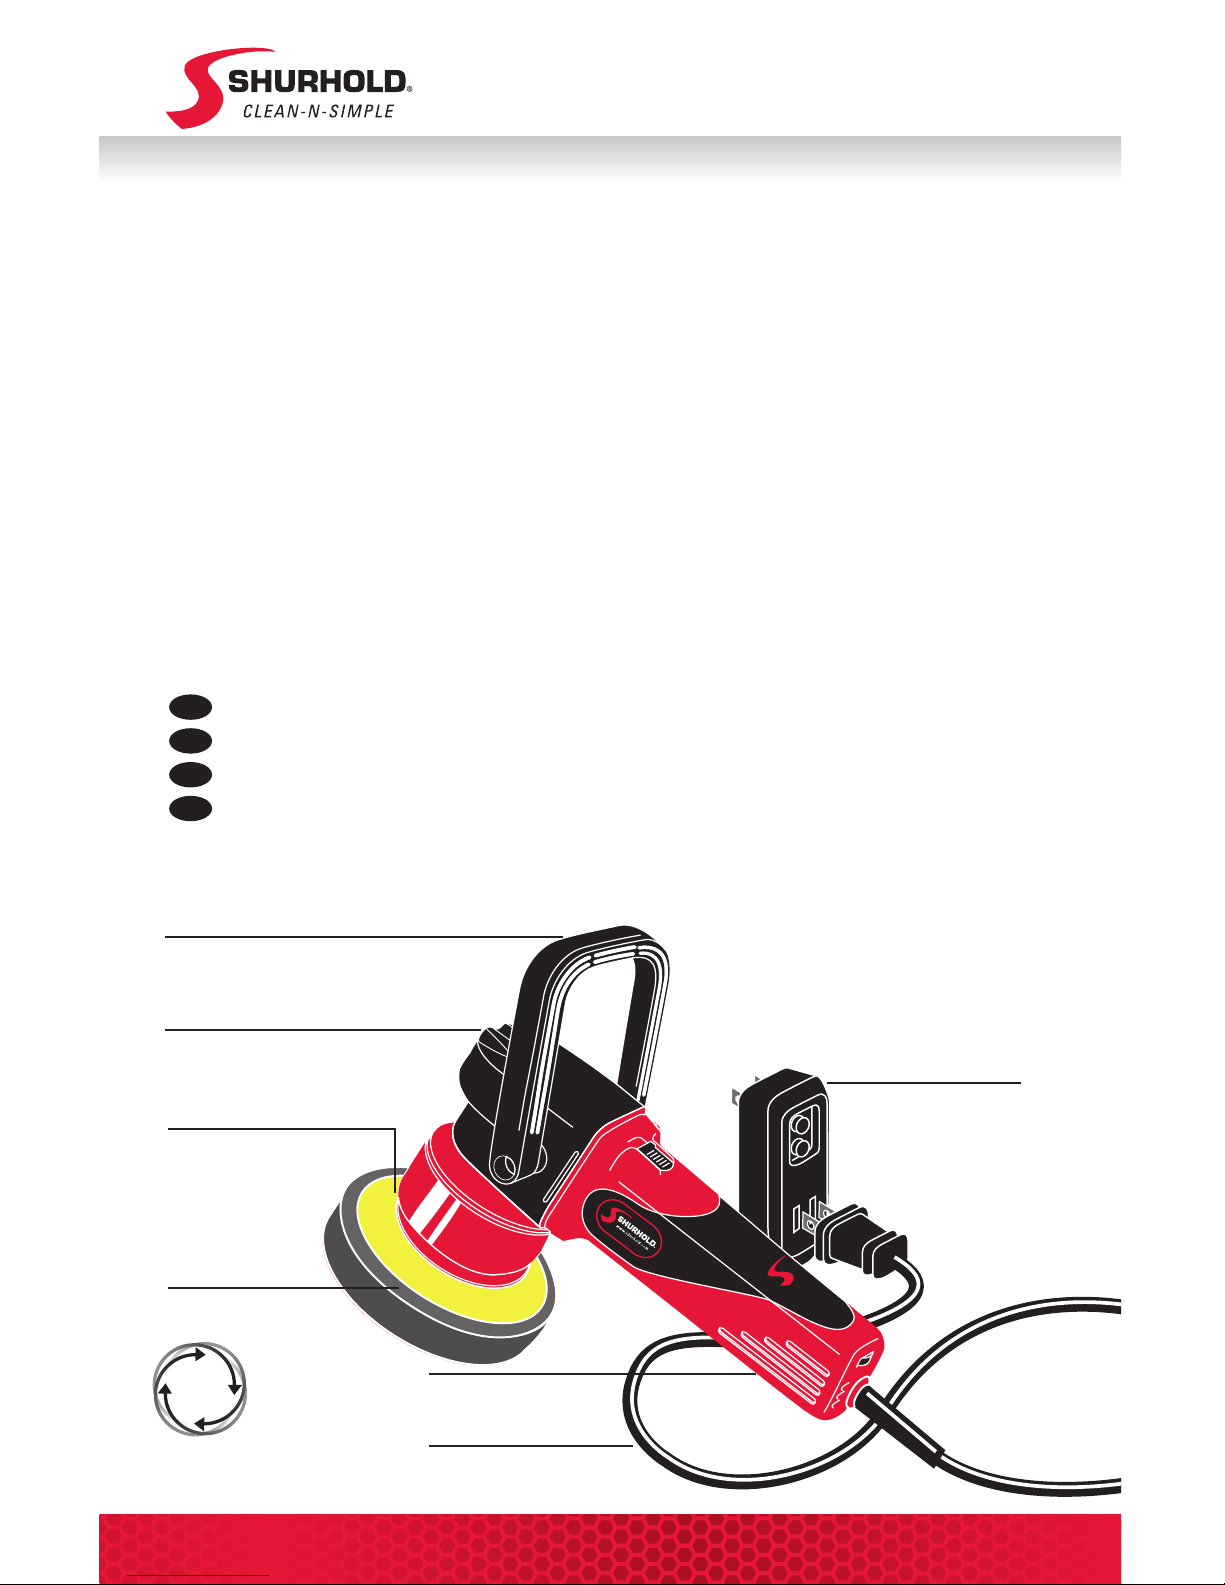
FEATURES
Adjustable “Soft-Touch” D-Handle
Creates Ideal Hand Position
“Soft Touch” Head
Provides Comfort
Quick Change Backing Plate
Change Pads Quickly
Random Orbital Action
Prevents Swirl Marks
Pads sold separately.
Pad oscillates
and rotates on
varying orbits
2500-6500 OPM Motor
Orbits at Ideal Speed
Extra Long 20 Foot Cord
Allows Additional Convenience
GFCI Protected Adapter
Promotes Safe Operation
8mm
ORBIT
ES
FR
IT
NL
3
www.shurhold.com
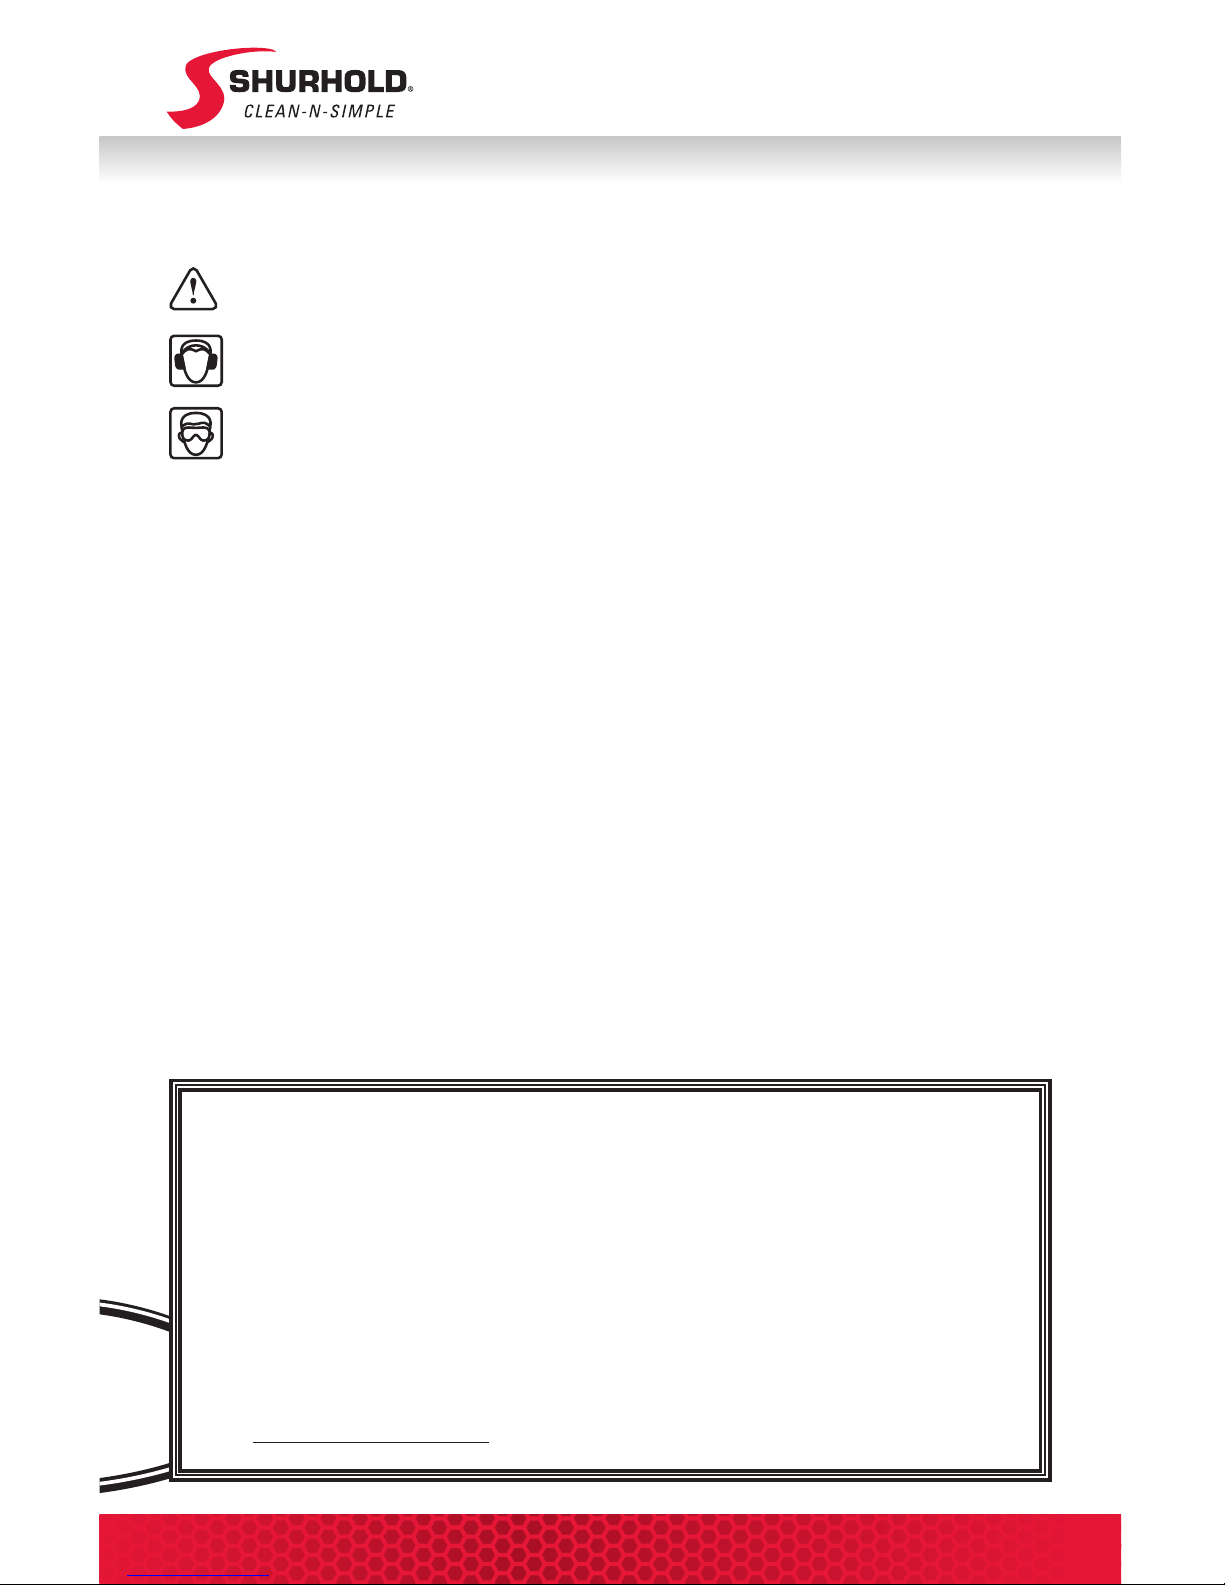
SAFETY NOTES
CAUTION
OBSERVE THE FOLLOWING BEFORE USING
The user is liable for any damage or accidents resulting from use not in
accordance with the intended use.
The noise level can exceed 85 dB(A) during operation.
Wear ear protectors.
Always wear safety goggles when using this machine.
It is recommended to wear gloves, sturdy non-slipping shoes and apron.
• Always disconnect the plug from the socket before carrying out any work on the
machine.
• Only plug-in when machine is switched off.
• Keep power cord clear from working range of the machine.
• Always lead the cord away behind you.
• Never reach into the spinning area of the machine when it is running.
• Only use tools whose permitted speed is at least as high as the highest no-load
speed of the machine.
• Dress properly. Do not wear loose clothing or jewelry. Keep your hair,
clothing and gloves away from moving parts.
• Always remove jewelry and other clothing or objects which may
scratch the surface as you polish.
INTENDED USE
The machine is intended for polishing and sanding of painted or fiberglass surfaces.
For reasons of electrical safety the machine must not be damp or operated in a humid
environment. The machine may only be used for dry sanding, buffing or polishing.
ONE YEAR LIMITED WARRANTY
Dual Action Polisher is warrantied to be free from defects in material and workmanship for a
period of one year from original purchase date.
Damage resulting from, in particular, normal wear and tear, overloading, improper handling, or
caused by the user or other damage caused by not following operating instructions, or any fault
acknowledged at the time of purchase, is not covered under warranty.
Complaints will only be acknowledged if the equipment has not been dismantled before being
sent back to the suppliers or to an authorized SHURHOLD customer support workshop. Store
the operating instructions, safety notes, spare parts list and proof of purchase in a safe place. In
addition, the manufacturer’s current warranty conditions apply.
Visit www.shurhold.com/register to register for your One Year Limited Warranty.
4
Dual Action Polisher User’s Guide
BASIC INSTRUCTIONS
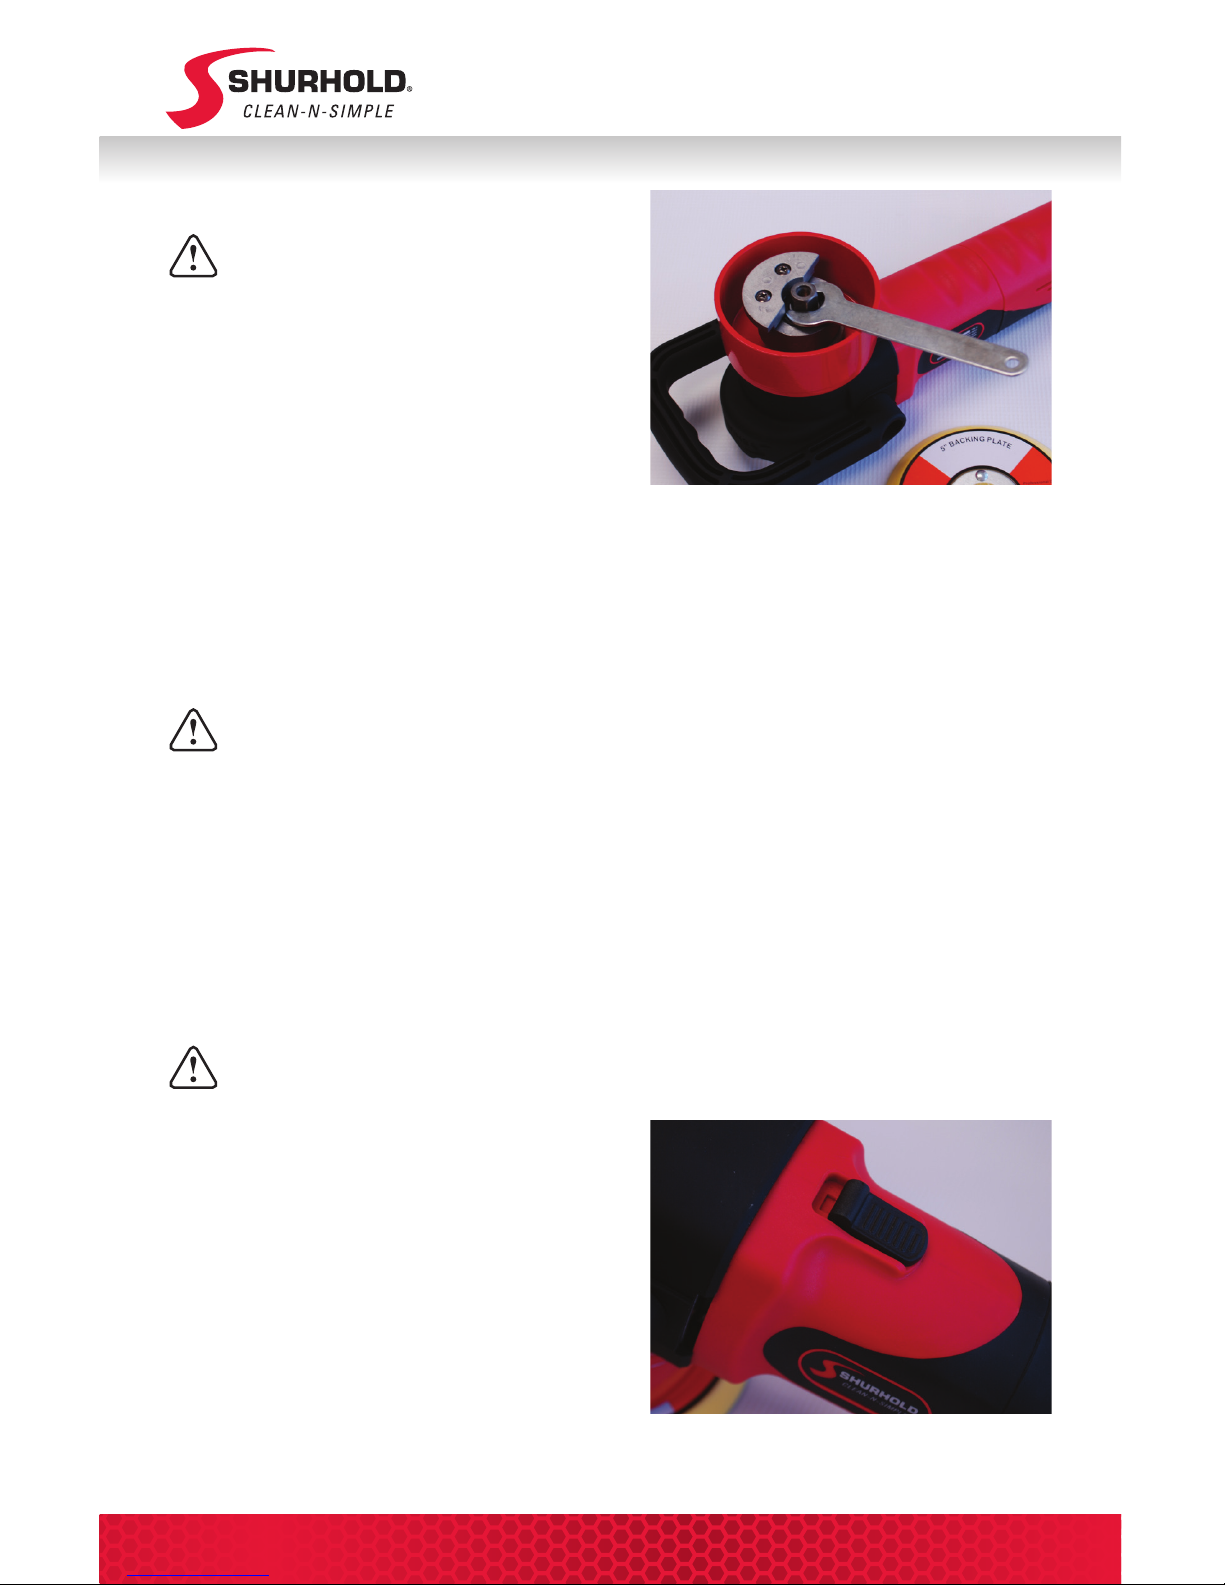
1 CHANGING THE BACKING PLATE
To reduce the risk of injury, turn unit
off and disconnect it from the power
source before installing and removing
accessories, before adjusting or making
repairs. An accidental start-up can cause
injury.
a. Engage the flats of the spindle with the
supplied spindle wrench.
b. While holding the spindle with the
wrench, use your other hand to rotate the plate counterclockwise to remove.
To install the plate, reverse the above procedure.
2 INSTALLING/REMOVING BUFFING PAD OR ABRASIVE DISC
To reduce the risk of injury, turn unit off and disconnect it from the power
source before installing and removing accessories, before adjusting or
making repairs. An accidental start-up can cause injury.
To install pad or disc on Velcro backing plate, center the pad or disc over plate and
press firmly.
To remove pad or disc from Velcro backing plate, grip pad or disc firmly and
pull from plate.
3 TO START AND STOP TOOL
Make certain that the switch is in the “OFF” position, and the power source is
the same as that specified on the tool’s nameplate.
First connect the tool to the power source.
To start tool, slide the power switch
forward until it locks in the on position.
To stop tool, press rear of power switch to
unlock and slide to rear off position.
5
www.shurhold.com
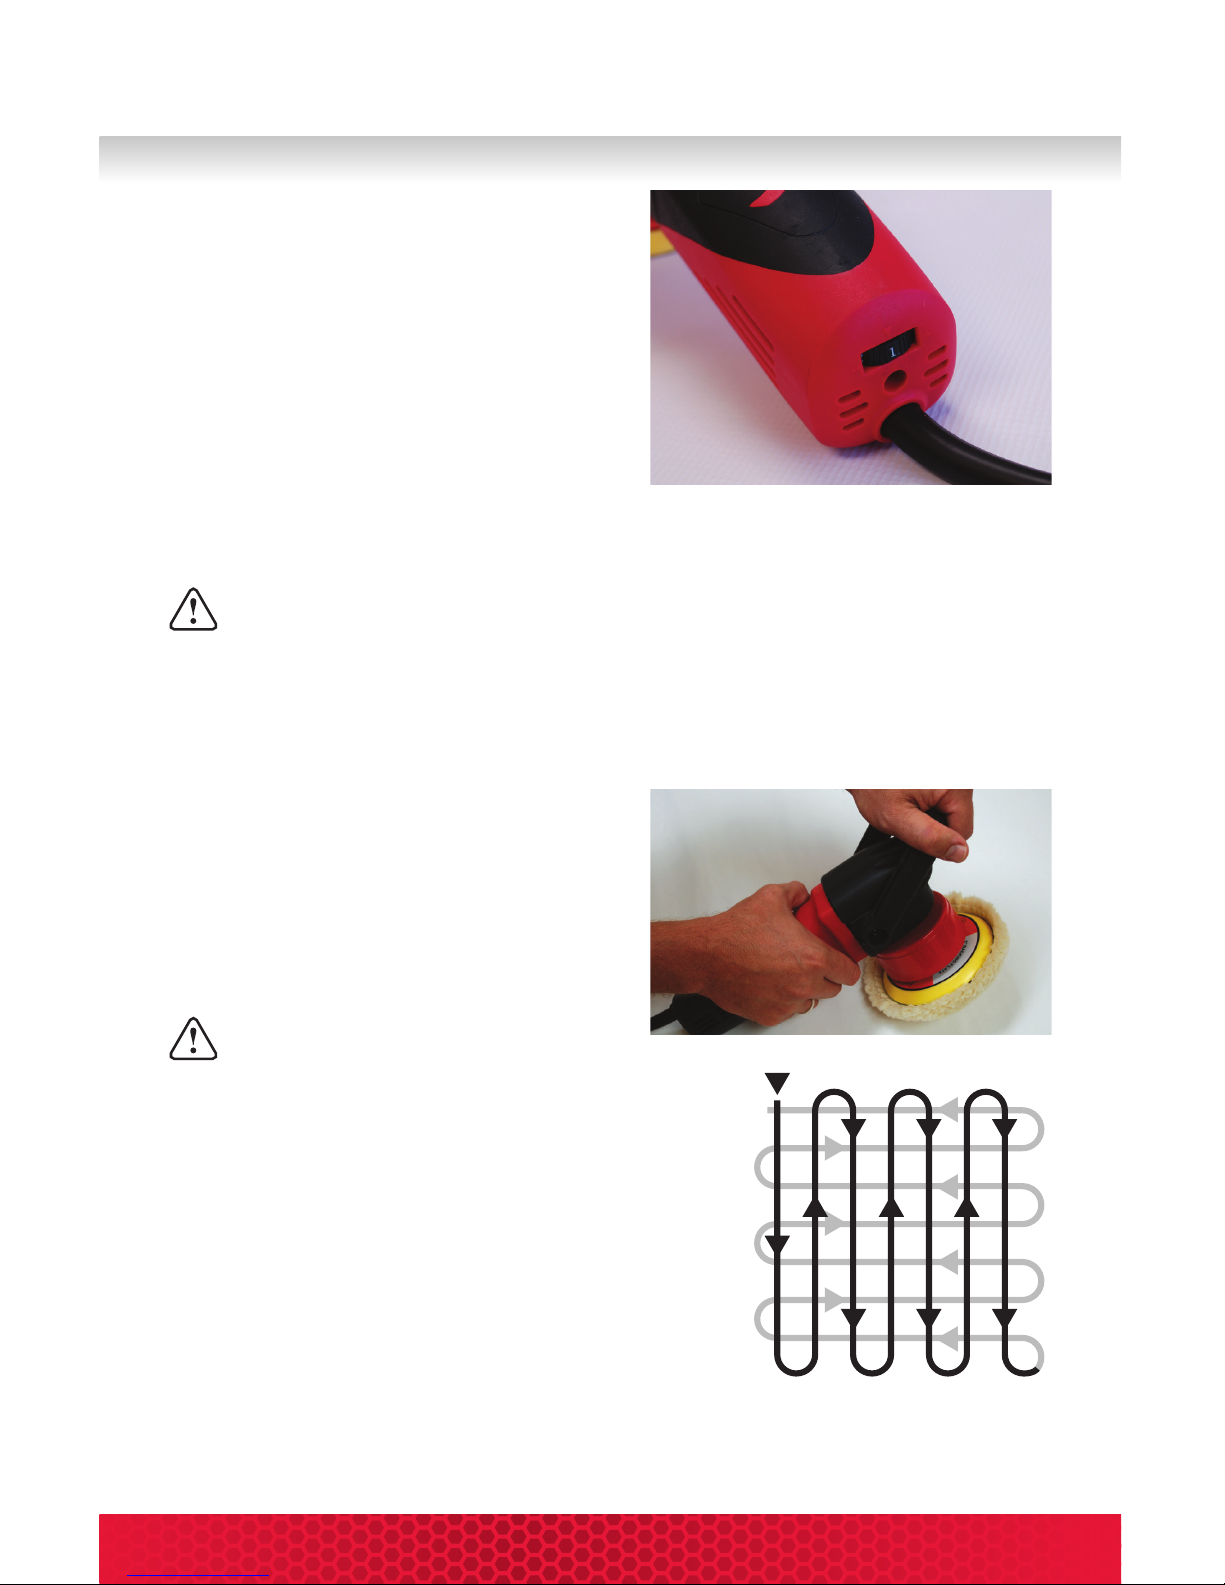
4 SETTING THE SPEED
The machine speed can be set with the
speed dial located at the rear of the unit.
The numbers on the speed dial correspond
approximately with the spindle speeds:
5 USING THE POLISHER
If your workspace is so light that it can be moved by the rotating pad,
anchor it securely to prevent possible bodily injury.
a. Read and follow the directions supplied with the product (polishes, waxes,
cleaners, etc.)
b. Apply a small amount of the product directly to the polishing pad, or work surface
as directed by product manufacturer.
c. Grasp the polisher firmly with both hands.
One hand on auxiliary handle and one on
the motor housing.
d. Position the polisher with the polishing
pad against the work surface and then start
the polisher.
NEVER run or stop the tool when it is
not in contact with the work surface.
• Move the polisher back and forth in a sweeping
motion, over-lapping each previous pass. See diagram
on the right.
• DO NOT apply additional pressure. Allow the polisher
to work under its own weight.
• DO NOT mix products (wax, polish, cleaner, etc.) on
the same pad. Label each pad to prevent confusion.
1: 2500 OPM
2: 3200 OPM
3: 3900 OPM
4: 4600 OPM
5: 5500 OPM
6: 6500 OPM
BEGIN HERE

6
Dual Action Polisher User’s Guide
Always remove the power supply plug from the socket before carrying out any work
on the machine. The cool air openings in the motor casing must always be kept
clean and unobstructed to ensure air circulation. With the exception of carbon brush
replacement (see below), all maintenance and repair work which requires the motor
casing to be opened may only be carried out by an authorized service center. (Please
refer to warranty on page 3.) Keep unit clean and dry. Wipe down and clean after
each use. Do not submerse in water, or get wet. For best results always start with
clean dry pads. See page 7 for pad cleaning directions.
MAINTENANCE & CARE
STEP 1
Remove screw from back housing.
STEP 2
Slide housing off polisher. Locate both carbon brushes,
left and right.
STEP 3
Detach power clip from polisher. Remove old carbon brush.
Remove any additional broken pieces.
STEP 4
While holding spring back, insert new carbon brush into
polisher. Secure brush with spring.
STEP 5
Attach power clip of new brush to the polisher.
Repeat Steps 3 - 5 for other brush.
STEP 6
Once replacement of both brushes is complete, slide back
housing on to polisher and secure with screw.
CARBON BRUSH REPLACEMENT
After extended use, the motor is designed to shut down
indicating the motors carbon brushes require replacement
(2 are included with product). To replace, be sure polisher is
disconnected from the power source, then follow the steps
below.
1
3
5
2
4
6

7
www.shurhold.com
BUFFING PAD CARE
HOW DO I CLEAN
MY BUFFING PADS?
Visit www.shurhold.com/cleanpads for the latest in how-to
videos including the proper cleaning and care of buffing pads.
SAFETY & HANDLING: While this product is environmentally friendly and bio-degradable, please follow
these warnings. This is a concentrated citrus cleaner and may irritate your skin with prolonged exposure.
Due to its powerful cleaning properties, wear old clothes while using. Always wear protective gloves
and safety glasses. Do not mix with bleach or any other concentrated chemical cleaners. Keep unused
powder in a cool, dry place, out of reach of children and pets.
Serious Pad Cleaner
Great for Cleaning and
Rejuvenating Buffing Pads
30803 - 12 oz. Serious Pad Cleaner
Serious Pad Cleaner is scientifically
formulated powdered cleaner for rejuvenating
buffing pads. Mixed with water this cleaner
dissolves compounds and waxes from wool,
foam and blended buffing pads cleaning
them to be used over and over. Also great for
microfiber and cotton bonnets.
Nothing is worse than getting ready to start a job with your Polisher and realizing
your pads are all dirty and gunked up from the previous application. It is very
important to always start a waxing or buffing job with a fresh set of pads. This does
not mean a new set, but rather pads that are in clean and good condition.
Dirty pads will work against you in 2 ways. First, if they are already loaded with wax
or compound they will not work efficiently, greatly increasing the time you will need
for buffing. Second, a dirty pad, one that may have been stored poorly or has grime
embedded in it can really damage your finish by grinding that dirt into the surface.
STEP 1
In a plastic container, mix 1 scoop (included) of Serious Pad Cleaner or 1 tbsp. per 1
gallon (3.78 Liters) of warm water and stir thoroughly. (Mix only what is needed for
application and use within 7 days of mixing or more often with heavy use.)
STEP 2
Soak items to be cleaned for up to 15 minutes. Agitate and brush lightly. Thoroughly
rinse area with clean water. For extremely soiled area, let solution soak in longer.
STEP 3
Wash your pads immediately for easiest cleaning. Serious Pad Cleaner will remove
caked on and saturated compounds and waxes from your pads. Let pads air dry
completely prior to using again. For storing pads in between use, you should use a
clear plastic baggie.
8
Dual Action Polisher User’s Guide
WAXING & POLISHING
WAXING &
POLISHING
Visit www.shurhold.com/waxing for the latest in how-to videos
including the proper technique for waxing and polishing.
Prior to the use of your Shurhold Dual Action Polisher, be sure your boat, car or other
desired surface is clean and dry. Avoid using your polisher on a dirty surface, it may
cause damage, such as scratches or swirls, to the paint or gel coat.
Shurhold recommends that a polymer based wax alternative, such as Shurhold’s Pro
Polish, be used for the most significant improvement in the surface’s appearance. Pro
Polish is a paint and fiberglass/gel coat cleaner, sealant and polish with UV inhibitors
that produces an ultra high gloss finish in one easy step. Formulated with cosmetic
grade ingredients, it contains no fillers or talc, protecting your finish against sun, salt,
acid rain and other harsh environmental elements.
For best results, use Shurhold’s Pro Polish, Pro Polish Pad and Microfiber Bonnet and
follow these steps:
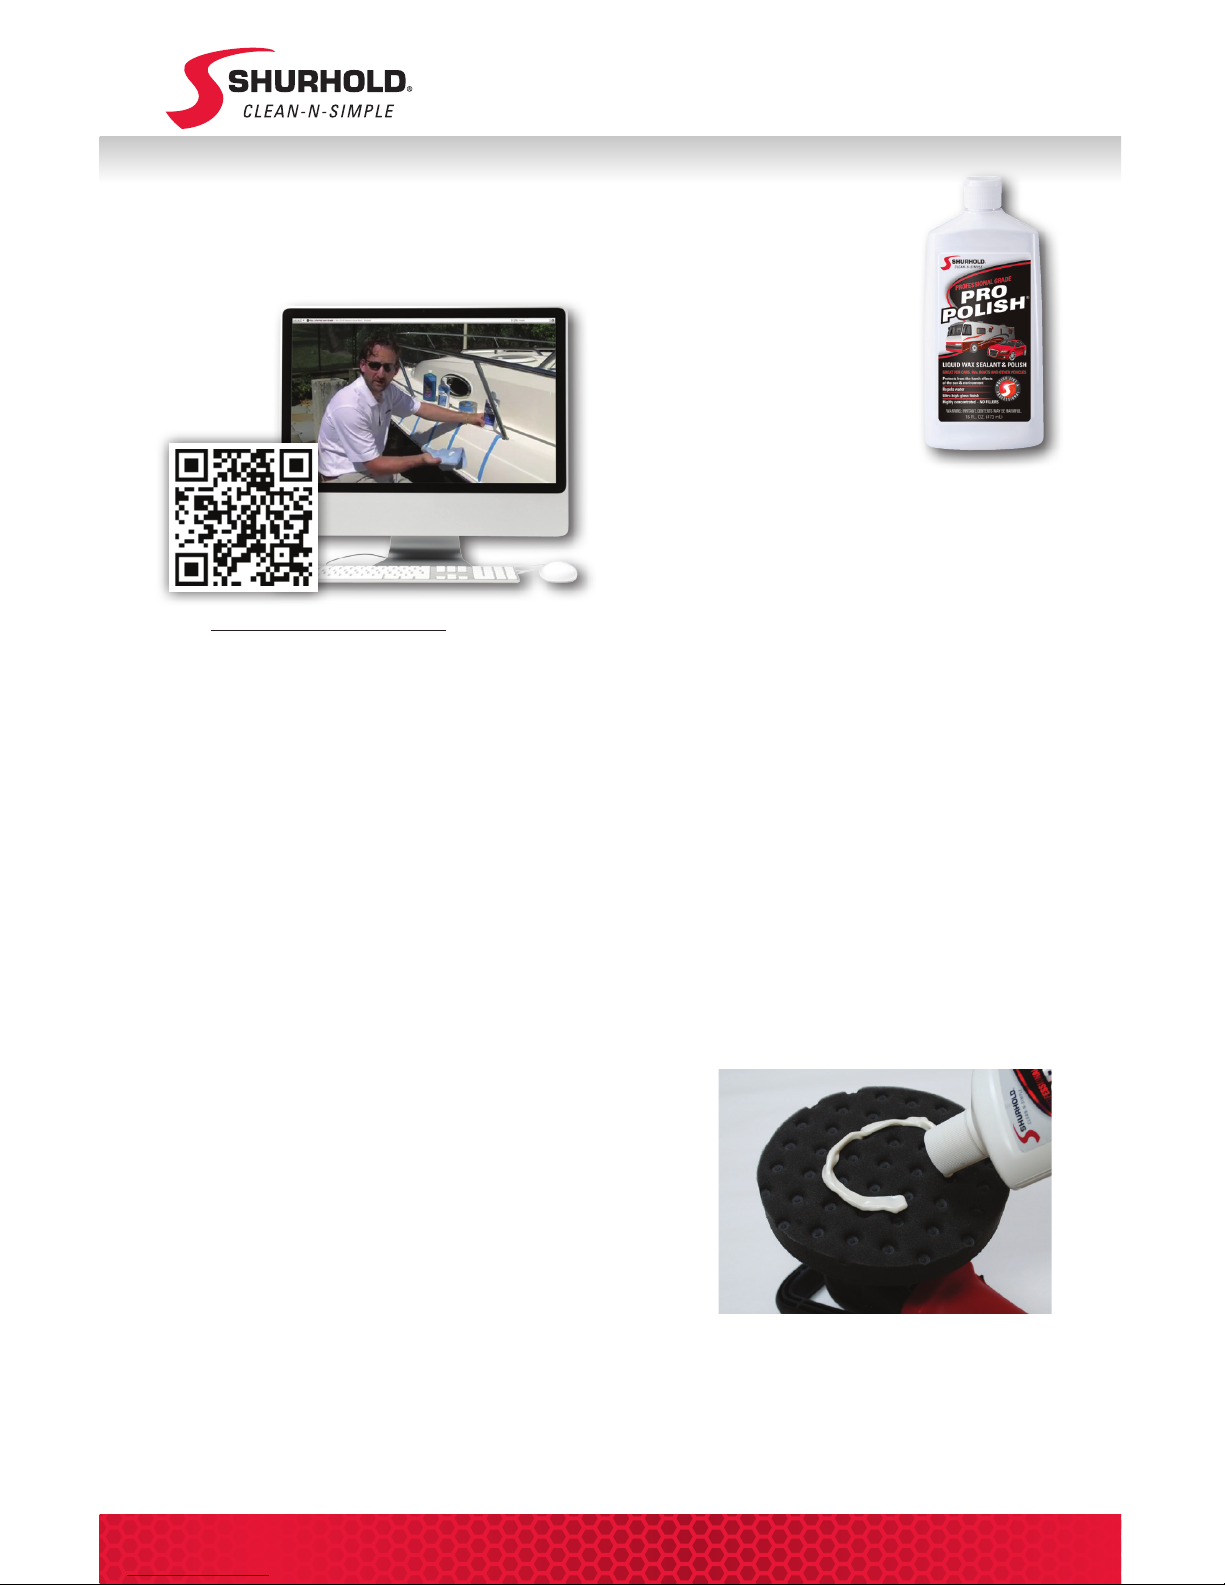
STEP 1
Start with a clean, dry Shurhold Pro Polish pad.
STEP 2
Apply Pro Polish to the pad in a ring pattern, as
shown in Figure A.
STEP 3
With the switch in the off position, dab the pad
against a 2 foot square area to distribute the polish.
Pro Polish
®
Liquid Wax
Sealant & Polish
30202 - 16 oz. (473 mL)
30203 - 1 gal. (3.78 L)
Pro Polish is a surface cleaner,
sealant and polish with UV
inhibitors that produces an ultra
high gloss finish in one easy step. Better than
a wax, Pro Polish is formulated with cosmetic
grade ingredients and contains no fillers or talc,
protecting your finish against sun, salt, acid rain
and other harsh environmental elements.
Figure A

9
www.shurhold.com
BEGIN HERE
STEP 4
Be sure Polisher is off. Turn speed dial to a speed of 2. Hold pad against surface to be
polished, and switch Polisher on. Once the polish has spread well, the Polisher can
be used at a higher speed such as 3 or 4.
STEP 5
Hold pad flat against surface, and slowly move the
pad in the pattern shown to the right. Overlap each
pass halfway, while polishing up and down, then
left to right. DO NOT apply too much pressure. On
a horizontal surface, the weight of the machine is
enough. On a vertical surface, apply light pressure.
STEP 6
Once you’ve polished enough that only a thin haze
layer of polish remains, you may stop. Check to
see you’ve covered all the areas necessary. The
remainder of the polish can then be removed with a
Microfiber Bonnet.
STEP 7
To remove any leftover residue, place the
Microfiber Bonnet directly on the Pro Polish Pad
and work the Bonnet into the same pattern as
Step 5, but on speed 2. You will notice the vapor
barrier on the inside of the Microfiber Bonnet. This
unique design is to prevent any Pro Polish or wax
from transferring onto the Bonnet.

10
Dual Action Polisher User’s Guide
REMOVING OXIDATION
Buff Magic
®
Surface Reconditioner
& Metal Polish
30101 - 22 oz. (624 g)
30121 - 4 lb. (1.8 kg)
Buff Magic is a surface reconditioner and
deoxidizer. Buff Magic is also an incredible
metal polish. It has been formulated to be user
friendly whether buffing by machine or hand.
REMOVING
OXIDATION
Visit www.shurhold.com/buffmagic for the latest in how-to
videos including the proper technique for oxidation removal.
Your Shurhold Dual Action Polisher is the perfect tool for removing minor defects in
paint and gel coat. Defects such as scratches, oxidation, scuffs, chemical etching,
swirl and sand marks can be repaired with the use of the Buff Magic Pad, Buff Magic,
and Dual Action Polisher. Professional polishers use a large wheel spinning at a high
rpm, causing hard-to-avoid burns and swirls. The Shurhold polisher’s dual-action,
oscillating head eliminates this issue. Waxing and buffing is done in half the time, with
half the effort and half the amount of product. Buff Magic is scientifically formulated
with jeweler’s rouge to be a multi-purpose buffing and polishing cream. With each
pass, the gentle abrasives break down, creating a compound that transforms a very
dull finish to ultra glossy. Also ideal for metal, Buff Magic removes oxidation, gelcoat
staining, surface rust, tarnish and minor Plexiglass scratches.
31543151
Premium Buffing Pads
The Right Pad For Any Job
3151 - 6
1
/2" Buff Magic Pad (2 pack)
A general purpose, wool, medium cutting pad.
3154 - 6
1
/2” Buff Magic Foam Pad (2 pack)
A general purpose, foam, light cutting pad.

11
www.shurhold.com
For best results, use Buff Magic, Buff Magic Pad, and our pad fluffing brush and follow
the steps below:
STEP 1
Choose the pad for the job. We recommend using Shurhold’s Wool (medium cutting) or
Foam Buff Magic (light cutting) Pad. Be sure to start the job with a clean, dry pad.
STEP 2
Use a clean, small paint brush and apply a series of X’s to a small 2 foot square area.
Do not apply the Buff Magic to the pad as this will cause premature overloading and
clumping of the pad.
STEP 3
Once the Buff Magic is on the surface, place the pad face directly on the surface of your
boat or vehicle and turn the machine on. Start at a speed of 2. Make sure you do not start
the machine until the pad is on the surface, as this will help to reduce slinging and mess
of the product.
STEP 4
As soon as the machine is on, use the following overlapping pattern. Do not apply a lot of
pressure, let the machine do the work for you.
STEP 5
You should slowly move through the overlapping
pattern a couple of times. If necessary, you can speed
up the tool to a 3 or 4. Remember to turn the tool off
before removing it from the surface.
STEP 6
Use a microfiber towel to remove any excess
material. If the surface has the showroom shine you
are looking for, then you can move on to the next 2
foot square area. If not, you have a deeper level of
oxidation and you may have to repeat these steps a
couple more times.
REMINDER:
Fluff the wool pad in between uses as this will help to keep
the pad from getting too matted down and stop working. Do
not use too much product, less is more. Never apply product
to the pad. Always work a small section at a time. Don’t forget
once you are done with the steps above, you will want to
put a protective coating on the surface to prevent premature
oxidation in the future.
BEGIN HERE

12
Dual Action Polisher User’s Guide
DUAL ACTION POLISHER ACCESSORIES
RECOMMENDED
PRODUCT USE
BAD
Sun Faded Surface
Surface Scratches
Rough & Oxidized
AVERAGE
Light Chalking
Swirl Marks
Light Scratches
NEW
No Swirl Marks
No Scratches
No Haziness
STEP 1
2 - 3 Passes to Remove
Surface Defects with
Buff Magic Pad and
Buff Magic
STEP 1
1 Pass to Remove
Surface Defects with
Buff Magic Pad and
Buff Magic
STEP 1
Go to Step 2
STEP 2
Protect and Seal by
Working in Pro Polish
with Pro Polish Pad
STEP 2
Protect and Seal by
Working in Pro Polish
with Pro Polish Pad
STEP 2
Protect and Seal by
Working in Pro Polish
with Pro Polish Pad
STEP 3
Buff out Pro Polish to a
Showroom Shine with
Microfiber Bonnet
STEP 3
Buff out Pro Polish to a
Showroom Shine with
Microfiber Bonnet
STEP 3
Buff out Pro Polish to a
Showroom Shine with
Microfiber Bonnet
Buff Magic Pad
& Buff Magic
Speed Setting: 3 - 5
Surface Condition
Pro Polish Pad
& Pro Polish
Speed Setting: 2 - 3
Microfiber
Bonnet
Speed Setting: 1 - 2
+

13
www.shurhold.com
Premium Buffing Pads
The Right Pad For Any Job
3151 - 6
1
/2" Buff Magic Pad (2 pack)
A general purpose, wool, medium cutting pad.
3154 - 6
1
/2” Buff Magic Foam Pad (2 pack)
A general purpose, foam, light cutting pad.
3152 - 6
1
/2" Pro Polish Pad (2 pack)
A black foam finessing pad. Use with
Pro Polish for waxing.
3153 - 6
1
/2" Microfiber Bonnet
3201 - 5" Fine Scrubber Pad
3202 - 5" Medium Scrubber Pad
3203 - 5" Coarse Scrubber Pad
3210 - 5" Magic Wool Buffing Pad (2 pack)
For cleaning glass.
31543151 3152 3153 3201 3202 3203 3210
Premium Buffing Brushes
Turn Your Buffer Into A Power Brush
3205 - 6
1
/2" Stiff Brush - White Polypropylene
Most abrasive brush available.
3206 - 6
1
/2" Medium Brush - Yellow Polystyrene
Moderately abrasive brush.
3207 - 6
1
/2" Soft Brush - Yellow Polystyrene
Split end fibers for safe use on most surfaces.
3205
3206
3207
Serious Pad Cleaner
Great for Cleaning and
Rejuvenating Buffing Pads
30803 - 12 oz. Serious Pad Cleaner
Serious Pad Cleaner is scientifically
formulated powdered cleaner for rejuvenating
buffing pads. Mixed with water this cleaner
dissolves compounds and waxes from wool,
foam and blended buffing pads cleaning them
to be used over and over. Also great for microfiber and cotton bonnets.
270
Utility Brush
Lightweight & Heavy Duty
270 - Utility Brush
Great for cleaning buffing pads.
Perfect for upholstery, floor mats,
vinyl, canvas and more. Includes
unique spot scrubber on handle.

14
Dual Action Polisher User’s Guide
DETAILING PRODUCTS
SHURHOLD HANDLES
Shurhold’s exclusive SHUR-LOK quick release system positively locks any Shurhold handle
quickly and easily with all Shurhold accessories. All handles are made of high strength,
corrosion resistant, lightweight aluminum.
PREMIUM BRUSHES
Our premium deck brushes feature an angled head and flared bristles from extra soft
to stiff. They are made from premium hard woods, the bristles are set with rust proof
“Nickel Silver” stapling wire and feature wrap around safety bumpers. The most popular is the soft deck brush! The specially designed split end fibers hold more soap and
water. This brush is safe on gel coat, fiberglass, and paint.
MESH
SPONGE
Bug & Tar Remover.
Non-abrasive mesh covered sponge
removes bugs, stains, tar, grit, and grime
faster and easier.
HOSE NOZZLE
Ergonomic Grip. Die-cast
zinc nozzle body with soft
black vinyl grip. Includes a
hold open clip and stainless steel spring.
WASH MITTS
Shaped thumb and
elastic band for a
comfortable fit. Made
from genuine lambs
wool. Great for washing and polishing.
Can be used wet or dry.
MICROFIBER TOWELS
Wet It, Wring It, Wipe It!
•
Polish and Shine - Super Soft
•
Wash & Clean - Xtra Strong
•
Glass & Mirror - Lint Free

15
www.shurhold.com
Scan now to see our full line.
www.shurhold.com/catalog
SURFACE SQUEEGEE
Flexible Water Blade easily molds to
curved boats and vehicles, drying any
surface in 1/3 the time. Eliminates water
spotting without chamois and towel.
The Flexible Water Blade Adapter
Adjusts 180˚ and extends the reach
of your flexible Water Blade with a
Shurhold handle.
BUCKET BASE
The Bucket Base is a sturdy non skid / non
marking ring that is designed to minimize
sliding, toppling, and damage that can
occur from the movement of Boats and
RV’s. We all use 5 gallon pails whether
we are fishing, diving, carrying tools,
or cleaning. The Bucket Base will stop
problems before they happen.
• Stops buckets from sliding on deck
• Prevents scratches in fiberglass and teak
• Buckets will not fall over
with brushes in them
• U.V. resistant and durable
• Fits all Shurhold buckets
• Fits most manufacturer’s
5 gallon buckets
• It floats
WORLD’S BEST BUCKET
Each bucket comes with a comfort grip
braided nylon rope handle so you don’t
have to worry about rusty metal handles.
It is perfect for holding soap and water
for washing, holding bait, using as a stool,
transferring ice, for painting, and storing or
carrying small items. It’s wide enough to fit
most Shurhold brushes. Plus, the tapered
design allows stacking of multiple buckets
for compact storage.
SHUR-DRY
PVA
Our PVA Towel
absorbs 50%
more than natural
chamois. And the
PVA Sponge absorbs more than any
other sponge.
www.shurhold.com
CATALOG

16
Dual Action Polisher User’s Guide
MANUAL DE INSTRUCCIONES
ES
LISTA DE PIEZAS
(consulte el diagrama en la página 24)
A 1 - Pulidora de acción doble con cable de aliment-
ación
con ICFT de 6 m (20 pies)
B 1 - Bolsa reforzada para transporte
C 1 - Mango lateral intercambiable
D 1 - Mango en D
E 2 - Pernos y arandelas hexagonales
F 1 - Llave hexagonal
G 1 - Placa de soporte para cambio rápido
H 1 - Llave para la placa de soporte
I 2 - Escobillas de carbón de repuesto
J 1 - Manual de instrucciones y guía de usuario
1. ANTES DE PONER EN MARCHA LA
MÁQUINA POR PRIMERA VEZ, TENGA EN
CUENTA LO SIGUIENTE
1A. NOTAS SOBRE SEGURIDAD
• Use siempre gafas de protección cuando utilice
la máquina. Se recomienda usar guantes, calzado de
seguridad antideslizante y delantal de protección.
• Vista siempre ropa apropiada. NO DEBE usar ropa
holgada ni joyas. Mantenga el cabello, la ropa y los
guantes alejados de las partes móviles.
• Antes de realizar alguna tarea en la máquina, desenchúfela.
• Conecte el enchufe únicamente con la máquina
apagada.
• Pase siempre el cable por detrás de usted.
• No intente nunca tocar la zona de trabajo con la
máquina en funcionamiento.
• Cuando use la máquina, mantenga a las personas,
especialmente los niños, a una distancia segura.
1B. USO PREVISTO
Esta máquina está diseñada para pulir, encerar y realizar
el reacabado. Por razones de seguridad eléctrica, la
máquina no debe estar húmeda ni ponerse en funcionamiento en ambientes húmedos.
EL USUARIO ES RESPONSABLE DE TODO DAÑO O
ACCIDENTE ORIGINADO POR USOS NO PREVIS-
TOS DE ESTA MÁQUINA.
2. CÓMO ENCENDER Y APAGAR LA
MÁQUINA
Asegúrese de que el interruptor se encuentre en la
posición de apagado «OFF» antes de comenzar.
a. Conecte la máquina a la fuente de alimentación.
b. Deslice el interruptor de encendido hacia delante
para encender el motor. Deslice el interruptor de encendido hacia atrás para apagar el motor.
3. CÓMO USAR LA PULIDORA
Si el área de trabajo es lo suficientemente liviana como
para moverse al pasar la almohadilla giratoria, fíjela con
firmeza para evitar posibles lesiones.
a. Lea y siga las instrucciones incluidas con el producto
(abrillantadores, ceras, limpiadores, etc.).
b. Aplique una pequeña cantidad del producto directamente en la almohadilla para pulido.
c. Agarre con firmeza la pulidora con ambas manos:
una mano sobre el mango auxiliar y la otra sobre el
alojamiento del motor.
d. Coloque la pulidora con la almohadilla para pulido
sobre la superficie de trabajo y encienda la pulidora.
NUNCA opere ni detenga la máquina si no está en
contacto con la superficie de trabajo.
e. Mueva la pulidora hacia adelante y hacia atrás con
movimientos amplios y superponiendo las pasadas a las
anteriores.
f. NO ejerza presión adicional. Deje que la pulidora
trabaje con su propio peso.
g. No mezcle distintos productos (ceras, abrillantadores o limpiadores) en la misma almohadilla. Etiquete
cada almohadilla para evitar confusiones.
h. La almohadilla para pulido sólo está diseñada para la
aplicación de productos. Retire los residuos de productos con un paño de microfibra.
4. CÓMO INSTALAR/EXTRAER EL DISCO
ABRASIVO
Para reducir el riesgo de lesiones, apague la unidad
y desconéctela de la fuente de alimentación antes
de instalar y retirar accesorios, o realizar ajustes o
reparaciones en la máquina. El encendido accidental de
la máquina puede provocar lesiones.
a. Coloque la máquina en la mesa de trabajo con la
almohadilla orientada hacia arriba.
b. Tire de la almohadilla pulidora usada de la placa de
soporte para cambio rápido para extraerla.
c. Coloque la nueva almohadilla pulidora bien centrada
en la placa de soporte de cambio rápido y apriete con
firmeza.
5. CÓMO CAMBIAR LA ALMOHADILLA DE
RESPALDO
Para reducir el riesgo de lesiones, apague la unidad
y desconéctela de la fuente de alimentación antes de
instalar y quitar accesorios, y antes de realizar ajustes o
reparaciones en la máquina. El encendido accidental de
la máquina puede provocar lesiones.
a. Engrane las partes gruesas del husillo con la llave
para husillos incluida.
b. Sujete el husillo con la llave y, con la otra mano, gire
la almohadilla hacia la izquierda para extraerla.
c. Para instalar la almohadilla, realice este procedimiento en orden inverso.
6. MANTENIMIENTO Y CUIDADO
Antes de realizar alguna tarea en la máquina, desconecte el enchufe de la toma de electricidad.
Mantenga siempre limpias las aberturas para aire frío en
la carcasa del motor y sin obstrucciones para garantizar
que circule el aire.
Únicamente el personal de un centro de servicio
autorizado puede realizar las tareas de mantenimiento y
reparación que requieran abrir la carcasa del motor.

17
www.shurhold.com
GARANTÍA LIMITADA POR UN AÑO
Se garantiza que la pulidora de acción doble no presentará defectos de material ni mano de obra durante un período
de un año desde la fecha de compra original. Esta garantía no cubre los daños resultantes, especialmente, del
desgaste por el uso normal, la sobrecarga, el manejo inadecuado, los provocados por los usuarios ni ningún otro daño
que se produzca por no seguir las instrucciones de manejo, ni tampoco ninguna falta de la que se tenga conocimiento
en el momento de compra.
Se aceptarán reclamaciones siempre que no se haya desarmado el equipo antes de devolverlo a los proveedores o
a un taller autorizado de atención al cliente de SHURHOLD. Conserve las instrucciones de funcionamiento, las notas
de seguridad, la lista de piezas de repuesto y el comprobante de compra en un lugar seguro. Además, se aplican las
condiciones de garantía vigentes del fabricante.
Para obtener más información sobre garantía y reclamaciones, visite www.shurhold.com/register.
CAMBIO DE LA ESCOBILLA DE CARBÓN
Después de un uso prolongado, el motor se ha diseñado
para apagarse e indicar que se requiere cambiar las
escobillas de carbón (se incluyen 2 con el producto). Para
cambiar las escobillas, asegúrese de que la pulidora esté
desconectada de la fuente de alimentación y siga los pasos
que se indican a continuación.
PASO 1
Retire el tornillo de la tapa posterior (el tornillo se encuentra
por encima del mando regulador de velocidad).
PASO 2
Deslice la tapa para retirarla de la pulidora. Encuentre las
dos escobillas de carbón que se encuentran arriba y abajo.
PASO 3
Desenganche la pinza de alimentación de la pulidora. Retire
la escobilla de carbón usada y cualquier parte rota restante.
PASO 4
Manteniendo el resorte apretado, coloque la nueva escobilla de carbón en la pulidora y asegúrela con el resorte.
PASO 5
Coloque la pinza de alimentación de la escobilla nueva en la
pulidora.
PASO 6
Repita los pasos 3 – 5 para instalar la otra escobilla. Cuando
termine de colocar las dos escobillas de repuesto, deslice la
tapa a la posición correcta en la pulidora y asegúrela con el
tornillo.
NOTA. Nos reservamos el derecho de realizar cambios en la información técnica que se incluye en este docu-
mento que puedan derivar de las investigaciones y el trabajo de desarrollo que tienen lugar de manera continua.
1
3
5
2
4
6

18
Dual Action Polisher User’s Guide
MANUEL DE L’UTILISATEUR
FR
LISTE DES PIÈCES
(référez-vous au schéma à la page 24)
A 1 - Polisseuse double action avec cordon
d’alimentation
à disjoncteur de fuite de terre (GFCI) de 6 m (20 pieds)
B 1 - Cabas résistant
C 1 - Poignée latérale interchangeable
D 1 - Poignée en forme de D
E 2 - Boulons hexagonaux et rondelles
F 1 - Clé hexagonale
G 1 - Plaque de support facilement remplaçable
H 1 - Clé de plaque de support
I 2 - Brosses carbone de rechange
J 1 - Manuel de l’utilisateur et guide de l’utilisateur
1. RESPECTER LES CONSIGNES SUIVANTES AVANT LA MISE EN SERVICE
1A. CONSIGNES DE SÉCURITÉ
• Toujours mettre des lunettes de sécurité lors de
l’utilisation de cette machine. Il est recommandé de
mettre des gants, des chaussures de sécurité anti-dérapantes et un tablier.
• Toujours mettre des vêtements appropriés. NE PAS
mettre des vêtements amples ou des bijoux. Éloigner les
cheveux, les vêtements et les gants des pièces mobiles.
• Toujours débrancher la fiche de la prise avant d’utiliser
la machine.
• Ne la brancher que lorsque la machine est arrêtée.
• Toujours faire passer le câble à une bonne distance
derrière soi.
• Ne jamais se diriger dans la zone de travail lorsque la
machine est en marche.
• Maintenir les enfants et toute personne présente sur
les lieux à une distance sûre de la machine électrique.
1B. UTILISATION PRÉVUE
La machine est destinée au polissage, au cirage et au
revernissage. Pour des raisons de sécurité électrique,
la machine ne doit pas être humide ou utilisée dans un
environnement humide.
L’UTILISATEUR EST RESPONSABLE DE TOUT
DOMMAGE OU ACCIDENT RÉSULTANT DU NONRESPECT DES CONSIGNES RELATIVES À L’UTILISATION
DE LA MACHINE.
2. DÉMARRAGE ET ARRÊT DE LA MACHINE
Veiller à ce que l’interrupteur soit placé sur le point « OFF
» avant de démarrer la machine.
a. Connecter la machine au bloc d’alimentation.
b. Faire glisser l’interrupteur pour démarrer le moteur. Le
ramener vers l’arrière pour arrêter le moteur.
3. UTILISATION DE LA POLISSEUSE
Si votre surface de travail est si légère qu’elle peut être
déplacée par le tampon rotatif, fixez-la fermement pour
éviter d’éventuelles blessures corporelles.
a. Lire et respecter les instructions d’emploi fournies
avec le produit (produits d’entretien, cirages, produits de
nettoyage, etc.)
b. Appliquer une petite quantité du produit directement
sur le tampon à polir.
c. Tenir fermement la polisseuse avec les deux mains,
l’une sur la poignée secondaire et l’autre sur le boîtier du
moteur.
d. Placer la polisseuse et le tampon à polir sur la surface
de travail et démarrer la polisseuse. NE JAMAIS actionner ou arrêter la machine lorsqu’elle n’est pas en contact
avec la surface de travail.
e. Faire rentrer et avancer la polisseuse dans un mouvement rectiligne, en veillant à ce qu’il y ait chevauchement
entre un mouvement et le précédent.
f. NE PAS appuyer davantage. Faire fonctionner la polisseuse avec son propre poids.
g. Ne pas mélanger les produits (cirage, produit
d’entretien, produit de nettoyage, etc.) sur le même
tampon. Étiqueter chaque tampon afin de ne pas les
confondre.
h. Le tampon à polir est destiné uniquement à
l’application du produit. Éliminer les résidus du produit à
l’aide d’un tissu en microfibres.
4. INSTALLATION/RETRAIT DU DISQUE
ABRASIF
Pour réduire les risques de blessures, arrêter la machine
et la débrancher du bloc d’alimentation avant l’installation
et le retrait des accessoires, les ajustements et les
réparations. Un démarrage accidentel peut provoquer des
blessures.
a. Placer la machine sur l’établi en orientant le tampon
vers le haut.
b. Tirer sur le tampon lustreur de la plaque de support
facilement remplaçable pour le retirer.
c. Appuyer fermement sur le nouveau tampon lustreur
centré sur la plaque de support facilement remplaçable.
5. REMPLACEMENT DU TAMPON DE SUPPORT
Pour réduire les risques de blessures, arrêter la machine
et la débrancher du bloc d’alimentation avant l’installation
et le retrait des accessoires, les ajustements et les
réparations. Un démarrage accidentel peut provoquer des
blessures.
a. Introduire les graisses de la broche à l’aide de la clé à
broches fournie.
b. Tenir la broche avec la clé et se servir de son autre
main pour faire tourner le tampon dans le sens antihoraire
pour la retirer.
c. Pour installer le tampon, suivre la procédure ci-dessus
dans l’ordre inverse.
6. MAINTENANCE ET ENTRETIEN
Toujours débrancher la fiche d’alimentation de la prise
avant d’utiliser la machine.
Les orifices d’entrée et de sortie d’air frais du boîtier du
moteur doivent toujours rester propres et non bouchés
pour permettre la circulation de l’air.
Tous les travaux de maintenance et de réparation nécessitant l’ouverture du boîtier du moteur ne doivent être
effectués que par un centre de services autorisé.

19
www.shurhold.com
GARANTIE LIMITÉE D’UN AN
La polisseuse double action est couverte par une garantie contre les défauts matériels et accidentels pour une période
d’un an, à compter de la date initiale d’achat. Les dégâts causés notamment par des usures et déchirures ordinaires,
une surcharge, une mauvaise manipulation, par l’utilisateur, ainsi que d’autres dégâts résultant du non-respect des
consignes relatives à l’utilisation, ou tout autre défaut constaté lors de l’achat ne sont pas couverts par la garantie.
Les réclamations ne sont prises en compte que lorsque l’équipement est renvoyé intact aux fournisseurs ou à un
centre d’assistance clientèle SHURHOLD autorisé. Conserver le mode d’emploi, les consignes de sécurité, la liste des
pièces de rechange et la preuve d’achat en lieu sûr. Par ailleurs, les conditions de garantie actuelles définies par le
fabricant sont applicables.
Pour plus de détails sur la garantie et les réclamations, visitez le site www.shurhold.com/register.
REMPLACEMENT DE LA BROSSE CARBONE
Après une longue utilisation, le moteur s’arrête, indiquant
ainsi la nécessité de remplacer les brosses carbone (2 brosses sont incluses avec le produit). Pour les remplacer, veiller à
ce que la polisseuse soit débranchée du bloc d’alimentation,
puis suivre les étapes ci-dessous.
ÉTAPE 1
Retirer la vis du boîtier arrière (elle se trouve au-dessus du
cadran de vitesse).
ÉTAPE 2
Faire glisser le boîtier de la polisseuse pour le retirer. Repérer les deux brosses carbone au-dessus et au-dessous.
ÉTAPE 3
Démonter la pince d’alimentation de la polisseuse. Retirer
l’ancienne brosse carbone. Retirer toute autre pièce brisée.
ÉTAPE 4
Tenir la partie arrière du ressort et insérer la nouvelle brosse
carbone dans la polisseuse. Fixer la brosse à l’aide du ressort.
ÉTAPE 5
Serrer la pince d’alimentation de la nouvelle brosse dans la
polisseuse.
ÉTAPE 6
Répétez les étapes 3 à 5 pour insérer l’autre brosse. Le
remplacement des deux brosses terminé, faire glisser et
poser le boîtier arrière sur la polisseuse et le fixer à l’aide
d’une vis.
REMARQUE : SHURHOLD se réserve le droit de modifier sans préavis les données techniques contenues dans
ces informations, compte tenu des travaux de recherche et de développement en cours.
1
3
5
2
4
6

20
Dual Action Polisher User’s Guide
IT
MANUALE DI ISTRUZIONI
ELENCO DELLE PARTI
(fare riferimento al diagramma a pagina 24)
A 1 - Lucidatore a doppia azione con cavo di
alimentazione GFCI da 6 m
B 1 - Borsa da trasporto per carichi pesanti
C 1 - Impugnatura laterale intercambiabile
D 1 - Impugnatura a D
E 2 - Bulloni a testa esagonale e rondelle
F 1 - Chiave esagonale
G 1 - Piastra di rinforzo di cambio rapido
H 1 - Chiave per piastra di rinforzo
I 2 - Spazzole di ricambio in carbonio
J 1 - Manuale di istruzioni e Guida per l’utente
1. ATTENERSI ALLE ISTRUZIONI SEGUENTI PRIMA DELLA MESSA IN ESERCIZIO
1A. NOTE DI SICUREZZA
• Quando si utilizza questa macchina, indossare sempre occhiali di sicurezza. Si raccomanda di indossare
guanti, robuste scarpe antiscivolo e un grembiale.
• Vestirsi sempre adeguatamente. NON indossare abbigliamento largo né gioielli. Tenere i capelli,
l’abbigliamento e i guanti lontano dalle parti in movimento.
• Scollegare sempre la spina dalla presa prima di
eseguire qualsiasi lavoro sulla macchina.
• Inserire la spina nella presa solo quando la macchina
è spenta.
• Far sempre passare il cavo lontano dietro di sé.
• Non avvicinare mai le mani all’area trattata mentre lo
strumento sta funzionando.
• Tenere i bambini e i passanti a distanza di sicurezza
quando si utilizza lo strumento elettrico.
1B. USO PREVISTO
La macchina è destinata alla lucidatura, ceratura e rifinitura. Per ragioni di sicurezza elettrica, la macchina non
deve essere bagnata né utilizzata in un ambiente umido.
L’UTENTE È RESPONSABILE DI QUALSIASI DAN-
NO O INCIDENTE DERIVANTI DA UN UTILIZZO
NON CONFORME A QUELLO PREVISTO.
2. PER AVVIARE E ARRESTARE LO STRUMENTO
Accertarsi che l’interruttore sia nella posizione “OFF”
(Spento) prima dell’avvio.
a. Collegare lo strumento alla sorgente di alimentazione.
b. Fare scivolare il pulsante dell’interruttore in
avanti per avviare il motore. Fare scivolare il pulsante
dell’interruttore all’indietro per arrestare il motore.
3. UTILIZZO DEL LUCIDATORE
Se l’area da trattare è tanto leggera da poter essere
spostata dal cuscinetto rotante, ancorarla saldamente
per prevenire possibili lesioni corporee.
a. Leggere e seguire le istruzioni fornite assieme al
prodotto (preparati per lucidatura, cere, smacchiatori,
ecc.)
b. Applicare una piccola quantità di prodotto direttamente sul cuscinetto di lucidatura.
c. Afferrare il lucidatore saldamente con entrambe
le mani: una mano sull’impugnatura ausiliaria e una
sull’alloggiamento del motore.
d. Posizionare il lucidatore con il cuscinetto di lucidatura contro la superficie di lavoro e avviare il lucidatore.
NON avviare né arrestare MAI lo strumento quando non
è a contatto con la superficie di lavoro.
e. Spostare il lucidatore in avanti e all’indietro con un
movimento ampio, ripassando parzialmente ciascun
passaggio precedente.
f. NON applicare ulteriore pressione. Lasciare lavorare
il lucidatore sotto il proprio peso.
g. Non miscelare prodotti (cera, lucidatore, smacchiatore, ecc.) sullo stesso cuscinetto. Etichettare ciascun
cuscinetto per evitare confusione.
h. Il cuscinetto di lucidatura è progettato solo per
l’applicazione del prodotto. Rimuovere il residuo di
prodotto con un panno in microfibra.
4. INSTALLAZIONE/RIMOZIONE DI UN
DISCO ABRASIVO
Per ridurre il rischio di lesioni, spegnere l’unità e scollegarla dalla sorgente di alimentazione prima di installare e rimuovere gli accessori, di eseguire regolazioni o
riparazioni. Un avvio accidentale può causare lesioni.
a. Collocare lo strumento sul piano di lavoro con il
cuscinetto rivolto verso l’alto.
b. Tirare il cuscinetto lucidante usato dalla piastra di
rinforzo di cambio rapido per rimuoverlo.
c. Premere il nuovo cuscinetto lucidante saldamente
centrato sulla piastra di rinforzo di cambio rapido.
5. SOSTITUZIONE DEL CUSCINETTO DI
RINFORZO
Per ridurre il rischio di lesioni, spegnere l’unità e scollegarla dalla sorgente di alimentazione prima di installare e rimuovere gli accessori, di eseguire regolazioni o
riparazioni. Un avvio accidentale può causare lesioni.
a. Inserire nelle aperture dell’alberino la chiave per
alberino fornita.
b. Tenendo l’alberino con la chiave, ruotare il cuscinetto in senso antiorario con l’altra mano per rimuoverlo.
c. Per installare il cuscinetto, invertire la procedura
precedente.
6. MANUTENZIONE E CURA
Rimuovere sempre la spina di alimentazione dalla presa
prima di eseguire qualsiasi lavoro sulla macchina.
Le aperture per l’aria fredda dell’involucro protettivo
del motore devono sempre essere tenute pulite e non
ostruite per garantire la circolazione dell’aria. Tutte
le operazioni di manutenzione e di riparazione che
richiedano l’apertura dell’involucro protettivo del motore
possono essere eseguite solo da un centro di assistenza
autorizzato.

21
www.shurhold.com
GARANZIA LIMITATA DI UN ANNO
Il lucidatore a doppia azione è garantito come esente da difetti nei materiali e nella manodopera per un periodo di un
anno dalla data di acquisto originale. I danni derivanti, in particolare, da usura normale, sovraccarico, trattamento
improprio o causati dall’utente o altri danni causati dal mancato rispetto delle istruzioni per l’uso, oppure qualsiasi
difetto riconosciuto al momento dell’acquisto, non sono coperti dalla garanzia.
I reclami saranno accettati solo se l’apparecchiatura non è stata smontata prima di essere restituita ai fornitori o
ad un’officina di supporto clienti autorizzata SHURHOLD. Conservare le istruzioni operative, le note sulla sicurezza,
l’elenco delle parti di ricambio e la prova di acquisto in un luogo sicuro. Inoltre, valgono le attuali condizioni di garanzia
del produttore.
Visitare www.shurhold.com/register per ulteriori informazioni sulla garanzia e sui reclami.
SOSTITUZIONE DELLE SPAZZOLE IN
CARBONIO
Dopo un utilizzo prolungato, il motore è progettato per
spegnersi, ad indicare che le spazzole di carbonio del
motore devono essere sostituite (2 spazzole sono fornite con
il prodotto). Per la sostituzione, accertarsi che il lucidatore
sia scollegato dalla sorgente di alimentazione, quindi
seguire questa procedura.
PASSAGGIO 1
Rimuovere la vite dall’ alloggiamento posteriore (la vite si
trova al di sopra della manopola della velocità).
PASSAGGIO 2
Fare scivolare l’alloggiamento dal lucidatore. Localizzare le
due spazzole in carbonio, superiore e inferiore.
PASSAGGIO 3
Staccare la clip di alimentazione dal lucidatore. Rimuovere
la vecchia spazzola in carbonio. Rimuovere eventuali altri
pezzi rotti.
PASSAGGIO 4
Tenendo la molla compressa, inserire la nuova spazzola in
carbonio nel lucidatore. Fissare la spazzola con la molla.
PASSAGGIO 5
Collegare la clip di alimentazione della nuova spazzola al
lucidatore.
PASSAGGIO 6
Ripetere i passaggi 3 - 5 per l’altra spazzola. Una volta
completata la sostituzione di entrambe le spazzole, far
nuovamente scivolare l’alloggiamento sul lucidatore e
fissarlo con la vite.
NOTA. Ci riserviamo il diritto di apportare modifiche ai dati tecnici contenuti nelle presenti informazioni in con-
seguenza di un lavoro continuo di ricerca e sviluppo.
1
3
5
2
4
6

22
Dual Action Polisher User’s Guide
NL
INSTRUCTIE-HANDLEIDING
ONDERDELENLIJST
(zie afbeelding op pagina 24)
A 1 - Polijstmachine met dubbele
werking met GFCI-netsnoer van 6,0 m
B 1 - Extra stevige draagtas
C 1 - Verwisselbare handgreep aan zijkant
D 1 - D-handgreep
E 2 - Zeskantbouten en borgringen
F 1 - Zeskantsleutel
G 1 - Snelwisselachterplaat
H 1 - Sleutel voor achterplaat
I 2 - Reserve koolborstels
J 1 - Instructiehandleiding en gebruikershandleiding
1. NEEM HET VOLGENDE IN ACHT VOORDAT U HET APPARAAT IN GEBRUIK
NEEMT
1A. VEILIGHEIDSWENKEN
• Draag tijdens het gebruik van dit apparaat altijd een
veiligheidsbril. Het verdient aanbeveling handschoenen,
stevige, antislipschoenen en een voorschoot te dragen.
• Zorg dat uw kleding in orde is. Draag GEEN loszittende kleding of sieraden. Houd uw haar, kleding en
handschoenen uit de buurt van bewegende delen.
• Haal altijd de stekker uit het stopcontact voordat u
onderhoud pleegt aan het apparaat.
• Steek de stekker alleen in het stopcontact als het
apparaat is uitgeschakeld.
• Leid de kabel achter u langs.
• Reik nooit in het werkgebied terwijl het apparaat in
bedrijf is.
• Houd kinderen en omstanders op een veilige afstand
terwijl u met het elektrische apparaat werkt.
1B. BEOOGD GEBRUIK
Het apparaat is bedoeld om te polijsten, in de was
te zetten en opnieuw te politoeren. Om elektrische
veiligheidsredenen mag het apparaat niet vochtig zijn of
worden gebruikt in een vochtige omgeving.
DE GEBRUIKER IS VERANTWOORDELIJK VOOR
EVENTUELE SCHADE OF ONGELUKKEN DIE
VOORTVLOEIEN UIT ANDER DAN HET BEOOGDE GEBRUIK.
2. HET APPARAAT IN- EN UITSCHAKELEN
Zorg dat de schakelaar in de UIT-stand staat voordat u
begint.
a. Sluit het apparaat aan op de voedingsbron,
b. Schuif de schakelaar naar voren om de motor te
starten. Schuif de schakelaar naar achteren om de motor te stoppen.
3. HET POLIJSTAPPARAAT GEBRUIKEN
Als uw werkoppervlak zo licht is dat het door het
draaiende kussen kan worden verplaatst, dient u het
goed vast te zetten om lichamelijk letsel te voorkomen.
a. Lees en volg de aanwijzingen bij het product (polijstmiddel, was, reinigingsmiddelen, enz.).
b. Breng een kleine hoeveelheid van het product
rechtstreeks op het polijstkussen aan.
c. Pak het polijstapparaat met beide handen stevig vast
– één hand op de hulphandgreep en één op de behuizing
van de motor.
d. Plaats het polijstapparaat met het polijstkussen
tegen het werkoppervlak en start het apparaat. Schakel
het apparaat NOOIT in of uit als het geen contact maakt
met het werkoppervlak.
e. Beweeg het polijstapparaat heen en weer in een
vegende beweging, waarbij u de vorige beweging
telkens overlapt.
f. Oefen GEEN extra druk uit. Laat het polijstapparaat
werken onder zijn eigen gewicht.
g. Meng geen producten (was, polijstmiddel, reinigingsmiddel, enz.) op hetzelfde kussen. Label ieder
kussen om verwarring te voorkomen.
h. Het polijstkussen is uitsluitend bedoeld om het
product aan te brengen. Verwijder productrestanten met
een microfiber doek.
4. DE SCHUURSCHIJF INSTALLEREN/VERWIJDEREN
Om het risico van letsel te verkleinen, schakelt u het apparaat uit en trekt de stekker uit het stopcontact voordat
u accessoires installeert en verwijdert, het apparaat bijstelt of reparaties verricht. Als het apparaat per ongeluk
wordt ingeschakeld, kunt u letsel oplopen.
a. Leg het apparaat op de werkbank met het kussen
naar boven gericht.
b. Trek het gebruikte polijstkussen van de snelwisselachterplaat om het te verwijderen.
c. Druk een nieuw polijstkussen stevig in het midden
van de snelwisselachterplaat.
5. HET RESERVEKUSSEN VERWISSELEN
Om het risico van letsel te verkleinen, schakelt u het apparaat uit en trekt de stekker uit het stopcontact voordat
u accessoires installeert en verwijdert, het apparaat bijstelt of reparaties verricht. Als het apparaat per ongeluk
wordt ingeschakeld, kunt u letsel oplopen.
a. Grijp de platte gedeelten van de as met de bijgeleverde assleutel vast.
b. Houd de as met de sleutel vast en gebruik uw andere
hand om het kussen naar links te draaien om het te
verwijderen.
c. Om het kussen te installeren, wordt de hierboven beschreven procedure in omgekeerde volgorde uitgevoerd.
6. ZORG EN ONDERHOUD
Haal altijd de stekker uit het stopcontact voordat u
onderhoud pleegt aan de machine.
De openingen in de motorbehuizing voor luchtkoeling
moeten altijd schoon en vrij worden gehouden zodat de
lucht kan circuleren. Alle onderhoud en reparatiewerk
waarvoor de motorbehuizing moet worden geopend,
mag uitsluitend worden uitgevoerd door een bevoegd
servicecentrum.

23
www.shurhold.com
ÉÉN JAAR BEPERKTE GARANTIE
Het polijstapparaat met dubbele werking is gegarandeerd vrij van materiaal- en fabricagefouten gedurende een
periode van één jaar vanaf de oorspronkelijke aankoopdatum. Schade die voortvloeit, met name, uit normale slijtage,
overbelasting of onjuiste hantering, of die is veroorzaakt door de gebruiker, of andere schade die is ontstaan doordat
de bedieningsinstructies niet zijn opgevolgd, of enig defect dat ten tijde van de aankoop bevestigd is, valt niet onder de
garantie.
Klachten worden alleen erkend als de apparatuur niet uit elkaar genomen is voordat het naar de leverancier of een
gemachtigde SHURHOLD-werkplaats werd teruggestuurd. Bewaar de bedieningsinstructies, veiligheidswenken,
lijst met reserveonderdelen en uw bewijs van aankoop op een veilige plaats. Bovendien zijn de huidige
garantievoorwaarden van de fabrikant van toepassing.
Ga naar www.shurhold.com/register voor nadere informatie over de garantie en klachten.
DE KOOLBORSTEL VERVANGEN
Na langdurig gebruik schakelt de motor uit, hetgeen
aangeeft dat de koolborstels van de motor moeten worden
vervangen (er worden 2 borstels bij dit product geleverd).
Om de borstels te vervangen, dient u te zorgen dat het
polijstapparaat is losgekoppeld van de stroomvoorziening;
volg vervolgens onderstaande stappen.
STAP 1
Verwijder de schroef van de behuizing van de achterplaat
(de schroef bevindt zich boven de snelheidsregeling).
STAP 2
Schuif de behuizing van het polijstapparaat. Vind beide
koolborstels aan de boven- en onderkant.
STAP 3
Maak de klem los van het polijstapparaat. Verwijder de oude
koolborstel. Verwijder eventuele afgebroken stukken.
STAP 4
Houd de veer naar achteren en plaats een nieuwe
koolborstel in het polijstapparaat. Zet de borstel met de veer
vast.
STAP 5
Bevestig de klem van de nieuwe borstel aan het
polijstapparaat.
STAP 6
Herhaal stap 3-5 voor de andere borstel. Na vervanging
van beide borstels schuift u de behuizing weer op het
polijstapparaat en zet hem met de schroef vast.
NB: We behouden ons het recht voor om de technische gegevens in deze handleiding op basis van doorlopend
onderzoek en ontwikkelingswerk te wijzigen.
1
3
5
2
4
6

SPECIFICATIONS
www.shurhold.com24
Shurhold Industries, Inc.
3119 S.W. 42nd Avenue • Palm City, Florida 34990-5558
Tel: 772-287-1313 • Fax: 772-286-9620 • email: info@shurhold.com
©2015, Shurhold Industries, Inc. All rights reserved. We reserve the right to make changes to the
technical data contained in this information as a result of ongoing research and development work.
A
F
C
D
E
I
H
G
B
J
SPECIFICATIONS ESPECIFICACIONES SPÉCIFICATIONS SPECIFICHE SPECIFICATIES
TÉCNICAS
Rated Voltage Voltaje nominal Tension nominale Tensione nominale Nominale spanning 120V AC / 230V CA
Orbit Diameter Size Tamaño del diámetro de órbita Diamètre orbital Diametro dell’orbita Diameter omwenteling 5/16” (8mm)
Frequency Frecuencia Fréquence Frequenza Frequentie 60Hz/50Hz
Thread Size Tamaño de la rosca Taille du filetage Filettatura Schroefdraadafmeting 5/16”- 24
Rated Current Corriente nominal Courant nominal Corrente nominale Nominale ingangsstroom 4.2 Amp
Velcro Backing Plate Size Tamaño de la placa Taille de la plaque Dimensione della piastra Velcro-afmeting 5” - 6”
de soporte de Velcro de support Velcro di rinforzo in Velcro achterplaat 127 - 152mm
Rated Power Potencia nominal Puissance nominale Potenza nominale Nominaal vermogen 500 W
Polishing Pad Size Tamaño de almohadilla Taille du tampon à polir Dimensione del cuscinetto Afmeting polijstkussen 5.5” - 6.5”
pulidora di lucidatura 140 - 165mm
Variable Speed Velocidad variable Vitesse variable Velocità variabile Regelbare snelheid 2500 - 6500 OPM
Net Weight Peso neto Poids net Peso netto Netto gewicht 4.8lb (2,2kg)
Power Cord Cable de alimentación Cordon d’alimentation Cavo di alimentazione Netsnoer 20’ (6m)
6-SPEED 6 OPCIONES 6-REGLAGES 6 IMPOSTAZIONI 6-SNELHEDEN
SETTINGS
DE VELOCIDAD DE VITESSE DI VELOCITÀ
Waxing & Buffing Encerado y bruñido Cirage et polissage Ceratura e pulitura In de was zetten en opwrijven 1: 2500 OPM
Waxing & Buffing Encerado y bruñido Cirage et polissage Ceratura e pulitura In de was zetten en opwrijven 2: 3200 OPM
Polishing & Cleaning Pulido y limpieza Polissage et nettoyage Lucidatura e pulizia Polijsten en reinigen 3: 3900 OPM
Polishing & Cleaning Pulido y limpieza Polissage et nettoyage Lucidatura e pulizia Polijsten en reinigen 4: 4600 OPM
Removing Paint Defects Eliminación de remolinos Élimination des défauts de peinture Rimozione di difetti Verfdefecten en 5: 5500 OPM
& Swirls y defectos de pintura et des marques de polissage e volute della vernice draaisporen verwijderen
Removing Paint Defects Eliminación de remolinos Élimination des défauts de peinture Rimozione di difetti Verfdefecten en 6: 6500 OPM
& Swirls y defectos de pintura et des marques de polissage e volute della vernice draaisporen verwijderen
GB
ES
FR IT NL
PART LIST
A 1 - Dual Action Polisher with 20’ Cord and GFCI Protected Adapter
B 1 - Heavy Duty Carrying Bag
C 1 - Interchangeable Side Handle
D 1 - D-Handle
E 2 - Hex Bolts and Washers
F 1 - Hex Wrench
G 1 - Quick Change Backing Plate
H 1 - Backing Plate Wrench
I 2 - Replacement Carbon Brushes
J 1 - Instruction Manual and User’s Guide
rev. 071415
 Loading...