

Page 1

Model MX692
User Guide
SHURE MX692 WIRELESS BOUNDARY MICROPHONE TRANSMITTER
• Integrated functionality of Microflex
cardioid cartridge with UC1 UHF
wireless transmitter
• Frequency agile transmitter offers
191 user selectable channels for
both UA and UB country codes
• User programmable touch-sensitive
switch and status LED (4 operational
modes)
• 9V battery-powered with 3-stage
battery life LED indicator
• Thread mount cartridge connection
for easy field replacement
• Internally mounted antenna
• Requires Shure UC4 receiver (sold
separately)
27A8828 (CE)
©2003 Shure Incorporated
Printed in U.S.A.
Page 2

LANGUAGES
Table of Contents: English . . . . . . . . . . . . . . . . . . . . . . . . . . . . . . . .3
Contenido: Español . . . . . . . . . . . . . . . . . . . . . . . . . . . . . . . . . . . . .19
Table des matières : Français . . . . . . . . . . . . . . . . . . . . . . . . . . . . .35
A Tabela de Conteúdo: Portuguese . . . . . . . . . . . . . . . . . . . . . . . .51
Page 3

TABLE OF CONTENTS: ENGLISH
Introduction . . . . . . . . . . . . . . . . . . . . . . . . . . . . . . . . . . . . . . . . . . . . . . . . . . 4
Microphone Components. . . . . . . . . . . . . . . . . . . . . . . . . . . . . . . . . . . . . . . . 5
Replacing the Battery . . . . . . . . . . . . . . . . . . . . . . . . . . . . . . . . . . . . . . . . . . 6
Gain and Channel Settings . . . . . . . . . . . . . . . . . . . . . . . . . . . . . . . . . . . . . . 7
Adjusting the Transmitter Gain Level. . . . . . . . . . . . . . . . . . . . . . . . . . . . . . . 8
Notes on Microphone Use . . . . . . . . . . . . . . . . . . . . . . . . . . . . . . . . . . . . . . . 9
Positioning the Microphone . . . . . . . . . . . . . . . . . . . . . . . . . . . . . . . . . . . . . 10
Positioning multiple Microphones . . . . . . . . . . . . . . . . . . . . . . . . . . . . . . . . 11
Positioning Your Receiver . . . . . . . . . . . . . . . . . . . . . . . . . . . . . . . . . . . . . . 12
Removing the Grille . . . . . . . . . . . . . . . . . . . . . . . . . . . . . . . . . . . . . . . . . . . 13
Additional or Replacement Cartridges . . . . . . . . . . . . . . . . . . . . . . . . . . . . . 14
The Internal DIP Switches . . . . . . . . . . . . . . . . . . . . . . . . . . . . . . . . . . . . . . 15
Customizing Microphone Behavior . . . . . . . . . . . . . . . . . . . . . . . . . . . . . . . 16
Troubleshooting . . . . . . . . . . . . . . . . . . . . . . . . . . . . . . . . . . . . . . . . . . . . . . 17
Specifications. . . . . . . . . . . . . . . . . . . . . . . . . . . . . . . . . . . . . . . . . . . . . . . . 18
English – 3
Page 4

INTRODUCTION
The Shure MX692 Microphone and Wireless Transmitter brings the flexibility and ease of wireless
microphone use to the well-established Microflex line of installed-sound microphones. Modeled after
the popular MX392 boundary microphone, the MX692 maintains the MX392’s sleek profile, modern
design, and ease of customization. In addition, the MX692 includes a built-in Shure UC wireless
transmitter, allowing freedom of microphone placement and movement. Drilling wire exit holes in
desks and tabletops is a thing of the past.
With the flexibility to move from room-to-room and system-to-system, the MX692 increases the
effectiveness of most any boardroom, classroom, or other sound installation.
English – 4
Page 5
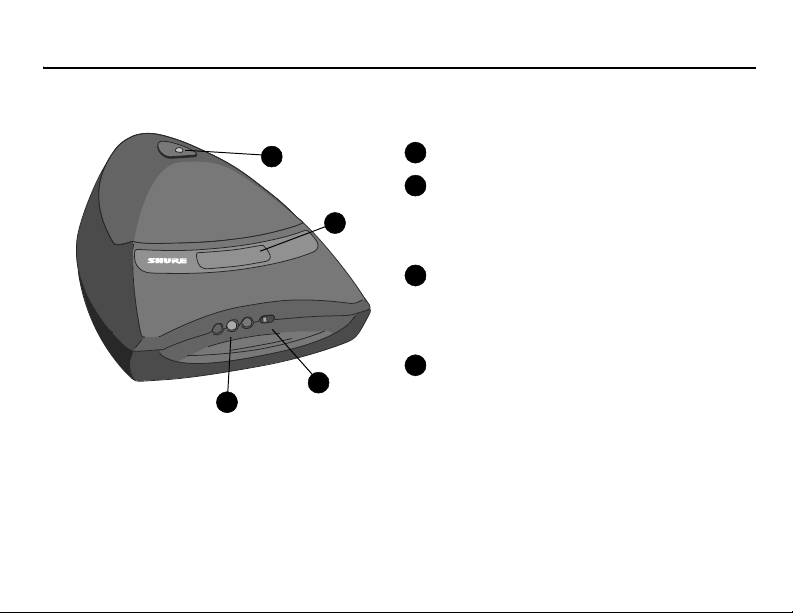
MICROPHONE COMPONENTS
1
2
MICROFLEX
•
H
S
U
P
•
3
4
1
2
3
4
English – 5
Microphone Active LED
Touch-sensitive switch
Touch to mute or activate microphone,
depending on logic settings (see
page 16)
Battery Charge Indicator
Green: 2 to 8 Hours
Amber: 45 minutes to 2 hours
Red: 45 minutes or less
Power switch
Page 6
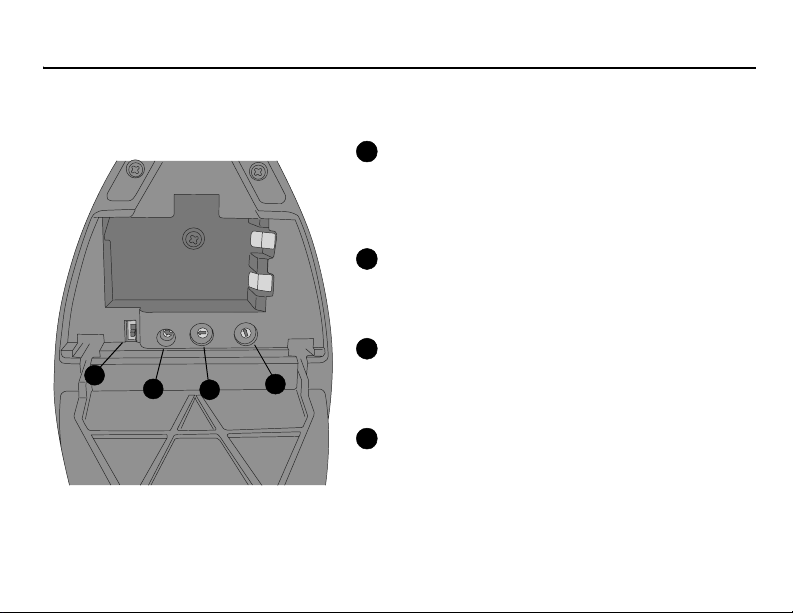
GAIN AND CHANNEL SETTINGS
To access gain and channel settings, open the battery compartment (see page 7).
1
Input Attenuation Control
This two position switch lets you select either 0 dB
or -20 dB attenuation, depending on the volume of
the speaker’s voice. Use the 0dB position for normal voices. Use the -20dB position for loud voices.
2
Transmitter Output Gain Control
Changes the audio level to accommodate various
input volumes. Use the supplied screwdriver
5
4
3
2
3
6
4
2
7
1
1
5
8
0
0
9
6
A
F
9
B
E
7
D
C
8
1
2
3
4
(Xcelite R3322 or equivalent) to make adjustments.
3
Channel Setting Control
Rotating the Channel dial changes the Channel
setting. Use the supplied screwdriver (Xcelite
R3322 or equivalent) to make adjustments.
4
Group Setting Control
Rotating the Group dial changes the Group setting.
Use the supplied screwdriver (Xcelite R3322 or
equivalent) to make adjustments.
English – 6
Page 7

REPLACING THE BATTERY
To access the battery compartment, as well as the internal gain and channel settings, turn the
microphone over. Unlatch and open the battery compartment door.
To remove the battery, simply lift up on the edge opposite the contact points.
English – 7
Page 8

ADJUSTING THE TRANSMITTER GAIN LEVEL
The transmitter audio gain level has been factory preset to the mid position. For optimal performance, adjust the audio gain control on the bottom of the transmitter so that the audio LED meter on
the receiver regularly reaches amber and will momentarily flash red during the loudest sounds.
CHANGING THE TRANSMITTER GROUP/CHANNEL SETTINGS
1. Turn the transmitter off and open the battery compartment to expose the GROUP
and CHANNEL switches.
2. Using the supplied screwdriver, rotate the GROUP switch until the desired setting
is reached. Then rotate the CHANNEL switch until the desired setting is reached.
IMPORTANT: Use a single group and successive channels when setting frequencies.
Transmitter GROUP and CHANNEL settings must match receiver GROUP and CHANNEL
settings.
English – 8
Page 9

NOTES ON MICROPHONE USE
• This wireless microphone operates from 782–806 MHz (UA) and from 692–716 (UB)
frequencies. These broadcast frequencies may be used exclusively in Canada, the
U.S., Mexico, all Central and South American countries, and Australia.
• Do not use the MX692 microphone on metal surfaces.
• Do not place laptop computers, open or closed, in front of the microphone during use.
• When using multiple wireless systems, use a single group and successive channels.
This will avoid interference between systems.
• The MX692 wireless microphone/transmitter uses the Shure UC4 wireless receiver.
English – 9
Page 10

POSITIONING THE MICROPHONE
With the standard cardioid cartridge installed, the
MX692 will pick up audio at conversational volume levels
within 1.5 M (5 ft.) in a 130 degree radius.
As a general rule for tables with multiple seats, a single
microphone should be used for every two people speaking.
130°
< 1.5M (5 FT.)
English – 10
Page 11

POSITIONING MULTIPLE MICROPHONES
In any installation, good vocal amplification can be
achieved by following the positioning rules on page
10.
For information on receiver setup and positioning,
see your UC4 Wireless System user guide.
English – 11
Page 12

POSITIONING YOUR RECEIVER
>3 M (10 ft.)
<15 M (50 ft.)
UC4MX692
72
The receiver may be wall-mounted or used in conjunction with a remote antenna system, such as
the Shure UA500. The distance between transmitter and antenna should never be greater than 15
meters (50 feet) or less than 3 meters (10 feet). See your UC4 user manual for additional information
on receiver and system setup.
English – 12
Page 13

REMOVING THE GRILLE
1.O
t
4
5.I
pen the battery compartmen
2. Remove the battery
3. Loosen and remove the screw at the base of the
battery compartment
. Remove the retainer
nsert the screwdriver into the opening above the
battery compartment
6. Press gently on the underside of the microphone
grille with the tip of the screwdriver until the grille
pops out
English – 13
Page 14

ADDITIONAL OR REPLACEMENT CARTRIDGES
Additional or replacement cartridges may be purchased for the MX692. For more information or
to order cartridges, contact the Shure service department or an authorized Shure service center.
Omnidirectional Cartridge ............................................ R183
Supercardioid Cartridge ...............................................R184
Cardioid Cartridge........................................................R185
To replace the microphone cartridge:
1. Remove the grille (see page 13)
2. Loosen the screw and remove the cartridge clamp
3. Turn and remove the existing cartridge
4. Reverse procedure to install new cartridge
English – 14
Page 15

THE INTERNAL DIP SWITCHES
21 *'+
&
The behavior of the touch-sensitive switch on the microphone’s front panel (see page 5) can be
customized using the internal DIP switches. See page 16 for customization options.
English – 15
Page 16
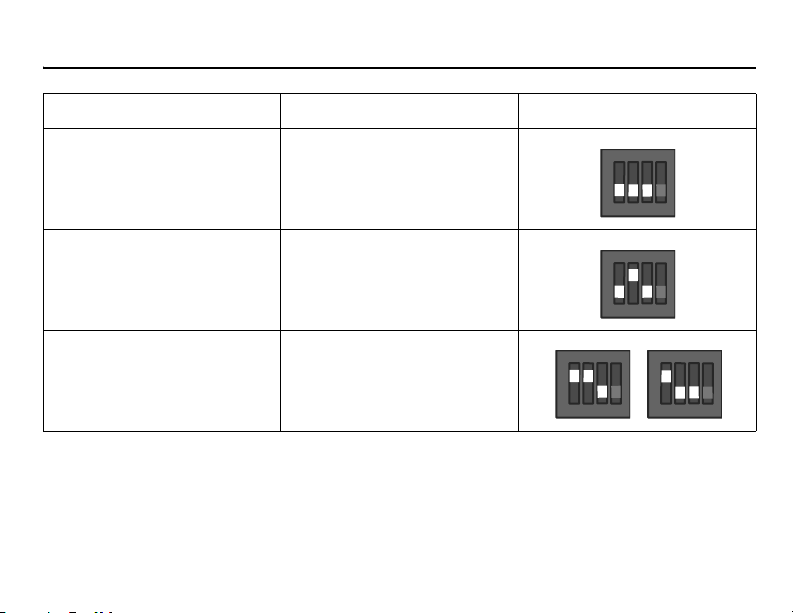
CUSTOMIZING MICROPHONE BEHAVIOR
DESIRED SWITCH BEHAVIOR DESIRED LED BEHAVIOR DIP SWITCH SETTING
Push to mute, release to talk (as
shipped)
Push to talk release to mute LED on when microphone is
Toggle: push on/push off LED on when microphone is
LED on when microphone is
active
active
active
English – 16
D
H
G
0
4
N
O
2C
3
1
2
4
G
N
D
O
H
0
4
2C
3
1
2
4
G
N
D
O
H
0
4
2C
3
1
2
4
G
N
D
O
H
0
4
2C
3
1
2
4
Page 17

TROUBLESHOOTING
If your system is properly configured and you are having troubles, check the following:
• Make sure both the transmitter and the receiver are turned on
• Check the MX692 battery gauge, and replace the battery if necessary
• Make sure the transmitter and receiver frequency group/channel settings are identical
• Make sure there is an unobstructed line-of-sight between the transmitter and receiver
• If necessary, reposition the receiver, or decrease the distance between transmitter
and receiver
• Remove local sources of RF interference, such as lighting equipment
For in-depth troubleshooting, see your UC Wireless System user guide.
English – 17
Page 18

SPECIFICATIONS
Open-circuit output level
-18.0 ± 4.0 dBV/Pa @ 1 kHz, free field
Frequency response
Refer to Sheet 4 for typical response and limits
Polar pattern
Cardioid
Current drain
62 ± 10 mA, typical (Vss = 6.0 to 9.6 VDC)
Battery life
7 hours (Based on Duracell alkaline MN1604)
Dynamic range
100 dB minimum
Polarity
Positive pressure on the diaphragm produces
a positive voltage on pin 2 of the XLR output of
the UC4 receiver.
Transducer type
Electret condenser
Temperature Range
Operating: (20° to 120° F)
Storage: (-20° to 165° F)
Operating Frequency Range
692–806 MHz
RF Power Output
50 mW Max (conducted)
3 mW Typical (radiated)
Certifications
Type accepted under FCC Part 74 (FCC ID
DD4MX692). Certified by IC in Canada under
RSS-123 and RSS-102. (IC:216A-MX692.)
Operation of this device is subject to the following two conditions: (1) this device may not
cause interference, and (2) this device must
accept any interference, including interference
that may cause undesired operation of the device.
Licensing Information
Changes or modifications not expressly approved by Shure Incorporated could void your
authority to operate this equipment.
Licensing of Shure wireless microphone
equipment is the user’s responsibility, and licensability depends on the user’s classification
and application, and on the selected frequency. Shure strongly urges the user to contact
the appropriate telecommunications authority
concerning proper licensing, and before
choosing and ordering frequencies
English – 18
 Loading...