

Page 1
AXIENT® DIGITAL
ADX1M Micro Bodypack Transmitter
USER GUIDE
Le Guide de l’Utilisateur
Guia del Usuario
Manual do Usuário
© 2018 Shure Incorporated
27A33406 (Rev. 1)
Printed in U.S.A.
Page 2

Page 3
IMPORTANT SAFETY INSTRUCTIONS
1. READ these instructions.
2. KEEP these instructions.
3. HEED all warnings.
4. FOLLOW all instructions.
5. DO NOT use this apparatus near water.
6. CLEAN ONLY with dry cloth.
7. DO NOT block any ventilation openings. Allow sufficient distances for adequate ventilation and install in accordance with the manufacturer’s instructions.
8. DO NOT install near any heat sources such as open flames, radiators, heat registers,
stoves, or other apparatus (including amplifiers) that produce heat. Do not place any open
flame sources on the product.
9. DO NOT defeat the safety purpose of the polarized or groundingtype plug. A polarized
plug has two blades with one wider than the other. A grounding type plug has two blades
and a third grounding prong. The wider blade or the third prong are provided for your
safety. If the provided plug does not fit into your outlet, consult an electrician for replacement of the obsolete outlet.
10. PROTECT the power cord from being walked on or pinched, particularly at plugs, convenience receptacles, and the point where they exit from the apparatus.
11. ONLY USE attachments/accessories specified by the manufacturer.
12. USE only with a cart, stand, tripod, bracket, or table specified by the manufacturer, or sold with the apparatus. When a cart is used, use caution when
moving the cart/apparatus combination to avoid injury from tip-over.
13. UNPLUG this apparatus during lightning storms or when unused for long
periods of time.
14. REFER all servicing to qualified service personnel. Servicing is required when the apparatus has been damaged in any way, such as power supply cord or plug is damaged,
liquid has been spilled or objects have fallen into the apparatus, the apparatus has been
exposed to rain or moisture, does not operate normally, or has been dropped.
15. DO NOT expose the apparatus to dripping and splashing. DO NOT put objects filled with
liquids, such as vases, on the apparatus.
16. The MAINS plug or an appliance coupler shall remain readily operable.
17. The airborne noise of the Apparatus does not exceed 70dB (A).
18. Apparatus with CLASS I construction shall be connected to a MAINS socket outlet with a
protective earthing connection.
19. To reduce the risk of fire or electric shock, do not expose this apparatus to rain or
moisture.
20. Do not attempt to modify this product. Doing so could result in personal injury and/or
product failure.
21. Operate this product within its specified operating temperature range.
This symbol indicates that dangerous voltage constituting a risk of
electric shock is present within this unit.
This symbol indicates that there are important operating and maintenance instructions in the literature accompanying this unit.
WARNING: This product contains a chemical known to the State of California to cause cancer and birth
defects or other reproductive harm.
CONSIGNES DE SÉCURITÉ IMPORTANTES
1. LIRE ces consignes.
2. CONSERVER ces consignes.
3. OBSERVER tous les avertissements.
4. SUIVRE toutes les consignes.
5. NE PAS utiliser cet appareil à proximité de l'eau.
6. NETTOYER UNIQUEMENT avec un chiffon sec.
7. NE PAS obstruer les ouvertures de ventilation. Laisser des distances suffisantes pour
permettre une ventilation adéquate et effectuer l'installation en respectant les instructions
du fabricant.
8. NE PAS installer à proximité d'une source de chaleur telle qu'une flamme nue, un
radiateur, une bouche de chaleur, un poêle ou d'autres appareils (dont les amplificateurs)
produisant de la chaleur. Ne placer aucune source à flamme nue sur le produit.
9. NE PAS détériorer la sécurité de la fiche polarisée ou de la fiche de terre. Une fiche
polarisée comporte deux lames dont l'une est plus large que l'autre. Une fiche de terre
comporte deux lames et une troisième broche de mise à la terre. La lame la plus large ou
la troisième broche assure la sécurité de l'utilisateur. Si la fiche fournie ne s'adapte pas à
la prise électrique, demander à un électricien de remplacer la prise hors normes.
10. PROTÉGER le cordon d'alimentation afin que personne ne marche dessus et que rien ne
le pince, en particulier au niveau des fiches, des prises de courant et du point de sortie
de l'appareil.
11. UTILISER UNIQUEMENT les accessoires spécifiés par le fabricant.
12. UTILISER uniquement avec un chariot, un pied, un trépied, un support ou
une table spécifié par le fabricant ou vendu avec l'appareil. Si un chariot
est utilisé, déplacer l'ensemble chariot-appareil avec précaution afin de ne
pas le renverser, ce qui pourrait entraîner des blessures.
13. DÉBRANCHER l'appareil pendant les orages ou quand il ne sera pas utilisé pendant
longtemps.
14. CONFIER toute réparation à du personnel qualifié. Des réparations sont nécessaires
si l'appareil est endommagé d'une façon quelconque, par exemple : cordon ou prise
d'alimentation endommagé, liquide renversé ou objet tombé à l'intérieur de l'appareil,
exposition de l'appareil à la pluie ou à l'humidité, appareil qui ne marche pas normalement ou que l'on a fait tomber.
15. NE PAS exposer cet appareil aux égouttures et aux éclaboussements. NE PAS poser
des objets contenant de l'eau, comme des vases, sur l'appareil.
16. La prise SECTEUR ou un coupleur d’appareil électrique doit rester facilement utilisable.
17. Le bruit aérien de l'appareil ne dépasse pas 70 dB (A).
18. L'appareil de construction de CLASSE I doit être raccordé à une prise SECTEUR dotée
d'une protection par mise à la terre.
19. Pour réduire les risques d'incendie ou de choc électrique, ne pas exposer cet appareil à
la pluie ou à l'humidité.
20. Ne pas essayer de modifier ce produit. Cela risque de causer des blessures et/ou la
défaillance du produit.
21. Utiliser ce produit dans sa plage de températures de fonctionnement spécifiée.
Ce symbole indique la présence d'une tension dangereuse dans
l'appareil constituant un risque de choc électrique.
Ce symbole indique que la documentation fournie avec l'appareil contient des instructions d'utilisation et d'entretien importantes.
Page 4
INSTRUCCIONES IMPORTANTES DE SEGURIDAD
1. LEA estas instrucciones.
2. CONSERVE estas instrucciones.
3. PRESTE ATENCION a todas las advertencias.
4. SIGA todas las instrucciones.
5. NO utilice este aparato cerca del agua.
6. LIMPIE UNICAMENTE con un trapo seco.
7. NO obstruya ninguna de las aberturas de ventilación. Deje espacio suficiente para
proporcionar ventilación adecuada e instale los equipos según las instrucciones del
fabricante.
8. NO instale el aparato cerca de fuentes de calor tales como llamas descubiertas, radiadores, registros de calefacción, estufas u otros aparatos (incluyendo amplificadores) que
produzcan calor. No coloque artículos con llamas descubiertas en el producto.
9. NO anule la función de seguridad del enchufe polarizado o con clavija de puesta a tierra.
Un enchufe polarizado tiene dos patas, una más ancha que la otra. Un enchufe con puesta a tierra tiene dos patas y una tercera clavija con puesta a tierra. La pata más ancha
o la tercera clavija se proporciona para su seguridad. Si el tomacorriente no es del tipo
apropiado para el enchufe, consulte a un electricista para que sustituya el tomacorriente
de estilo anticuado.
10. PROTEJA el cable eléctrico para evitar que personas lo pisen o estrujen, particularmente
en sus enchufes, en los tomacorrientes y en el punto en el cual sale del aparato.
11. UTILICE únicamente los accesorios especificados por el fabricante.
12. UTILICE únicamente con un carro, pedestal, trípode, escuadra o mesa del
tipo especificado por el fabricante o vendido con el aparato. Si se usa un
carro, el mismo debe moverse con sumo cuidado para evitar que se vuelque
con el aparato.
13. DESENCHUFE el aparato durante las tormentas eléctricas, o si no va a ser utilizado por
un lapso prolongado.
14. TODA reparación debe ser llevada a cabo por técnicos calificados. El aparato requiere
reparación si ha sufrido cualquier tipo de daño, incluyendo los daños al cordón o enchufe
eléctrico, si se derrama líquido sobre el aparato o si caen objetos en su interior, si ha sido
expuesto a la lluvia o la humedad, si no funciona de modo normal, o si se ha caído.
15. NO exponga este aparato a chorros o salpicaduras de líquidos. NO coloque objetos
llenos con líquido, tales como floreros, sobre el aparato.
16. El enchufe de alimentación o un acoplador para otros aparatos deberá permanecer en
buenas condiciones de funcionamiento.
17. El nivel de ruido transmitido por el aire del aparato no excede de 70 dB(A).
18. Los aparatos de fabricación CLASE I deberán conectarse a un tomacorriente de ALIMENTACION con clavija de puesta a tierra protectora.
19. Para reducir el riesgo de causar un incendio o sacudidas eléctricas, no exponga este
aparato a la lluvia ni a humedad.
20. No intente modificar este producto. Hacerlo podría causar lesiones personales y/o la falla
del producto.
21. Utilice este producto únicamente dentro de la gama de temperaturas de funcionamiento
especificadas.
Este símbolo indica que la unidad contiene niveles de voltaje peligrosos
que representan un riesgo de choques eléctricos.
Este símbolo indica que la literatura que acompaña a esta unidad contiene instrucciones importantes de funcionamiento y mantenimiento.
IMPORTANTES INSTRUÇÕES DE SEGURANÇA
1. LEIA estas instruções.
2. GUARDE estas instruções.
3. PRESTE ATENÇÃO a todas as instruções.
4. SIGA todas as instruções.
5. NÃO use este aparelho perto de água.
6. LIMPE SOMENTE com um pano seco.
7. NÃO bloqueie nenhuma das aberturas de ventilação. Deixe distâncias suficientes para
ventilação adequada e instale de acordo com as instruções do fabricante.
8. NÃO instale próximo de nenhuma fonte de calor, tais como fogo aceso, radiadores,
bocais de aquecimento, fornos ou outros aparelhos que produzam calor (inclusive amplificadores). Não coloque fontes de chamas sobre o produto.
9. NÃO inutilize as características de segurança do conector polarizado ou com pino de
aterramento. Um conector polarizado possui duas lâminas com uma mais larga do que a
outra. Um conector com pino de aterramento possui duas lâminas e um terceiro pino de
aterramento. É fornecida uma lâmina mais larga ou o terceiro pino para a sua segurança.
Se por acaso o conector não se encaixar na tomada, chame um eletricista para substituir
a tomada obsoleta.
10. PROTEJA o cabo de alimentação, evitando que seja pisado ou que enrosque, especialmente nos conectores, nas tomadas elétricas de emprego geral e no ponto onde elas
saem do aparelho.
11. USE SOMENTE acessórios/apetrechos especificados pelo fabricante.
12. USE somente com um carrinho, pedestal, tripé, suporte ou mesa especificados pelo fabricante ou vendidos com o aparelho. Quando utilizar um
carrinho, tenha cuidado ao movimentar o conjunto aparelho/carrinho para
evitar danos com a queda do mesmo.
13. DESLIGUE este aparelho da tomada elétrica durante tempestades com relâmpagos ou
quando não seja utilizado por longo período.
14. DEIXE toda a manutenção sob a responsabilidade de uma equipe de manutenção
qualificada. É necessário realizar a manutenção quando por algum motivo o aparelho
tiver sido danificado de alguma forma, como por exemplo por dano do cabo de alimentação elétrica ou do seu conector, por derramamento de líquido ou queda de objetos no
aparelho, se o aparelho tiver sido exposto à chuva ou à umidade, não esteja operando
normalmente ou tenha sofrido queda.
15. NÃO exponha o aparelho a respingos ou goteiras. NÃO coloque objetos cheios de
líquidos, tais como vasos, sobre o aparelho.
16. O plugue MAINS (rede elétrica) ou um acoplador de aparelho deve estar sempre pronto
para operação.
17. O ruído aéreo do Aparelho não ultrapassa 70 dB (A).
18. O aparelho com construção CLASSE I deve estar conectado à tomada da rede elétrica
com ligação à terra.
19. Para reduzir o risco de incêndio ou choque elétrico, não exponha este aparelho à chuva
ou umidade.
20. Não tente alterar este produto. Isso poderá resultar em lesão pessoal e/ou falha do
produto.
21. Opere este produto dentro da faixa de temperatura de operação especificada.
Este símbolo indica que existe nesta unidade tensão perigosa que
apresenta risco de choque elétrico.
Este símbolo indica que existem instruções operação e manutenção
importantes na literatura que acompanha esta unidade.
Page 5

WARNING
• Battery packs may explode or release toxic materials. Risk of fire or burns. Do not open, crush, modify, disassemble, heat above 140°F (60°C), or incinerate.
• Follow instructions from manufacturer
• Only use Shure charger to recharge Shure rechargeable batteries
• WARNING: Danger of explosion if battery incorrectly replaced. Replace only with same or equivalent type.
• Never put batteries in mouth. If swallowed, contact your physician or local poison control center
• Do not short circuit; may cause burns or catch fire
• Do not charge or use battery packs other than Shure rechargeable batteries
• Dispose of battery packs properly. Check with local vendor for proper disposal of used battery packs.
• Batteries (battery pack or batteries installed) shall not be exposed to excessive heat such as sunshine, fire or the like
Note: Use only with the included power supply or a Shure-approved equivalent.
Please follow your regional recycling scheme for batteries, packaging, and electronic waste.
IPx7 Rating
The Shure ADX1M micro body pack transmitter has been tested to IEC 62529 with a rating of IPx7 (Fresh water only, 1 meter depth for 30 minutes.
• Do not use body pack under water if it is damaged
• Do not subject the body pack to excessive shock, vibration, pressure, dropping, impact, or placing a heavy object on it. Doing so may invalidate the IPx7 rating.
• Always ensure the battery contacts are dry before installing in body pack
WARNING: This product contains a chemical known to the State of California to cause cancer and birth defects or other reproductive harm.
低功率電波輻射性電機管理辦法
第十二條
經型式認證合格之低功率射頻電機,非經許可,公司、商號或使用者均不得擅自變更頻率、加大功率或變更原設計之特性及功能。 第十四條
低功率射頻電機之使用不得影響飛航安全及干擾合法通信;經發現有干擾現象時,應立即停用,並改善至無干擾時方得繼續使用。前項合法通信,指依電信法規定作
業之無線電通信。低功率射頻電機須忍受合法通信或工業、科學及醫療用電波輻射性電機設備之干擾。
AVERTISSEMENT
• Les accus risquent d’exploser ou d’émettre des matières toxiques. Risque d’incendie ou de brûlures. Ne pas ouvrir, écraser, altérer, démonter, chauffer au-dessus de 60 °C (140 °F) ou incinérer.
• Suivre les instructions du fabricant
• Utiliser uniquement un chargeur Shure pour recharger les accus rechargeables Shure
• AVERTISSEMENT : Danger d’explosion si l’accu est mal placé. Remplacer uniquement avec le même type ou un type équivalent.
• Ne jamais mettre les accus dans la bouche. En cas d’ingestion, contacter un médecin ou le centre anti-poison local
• Ne pas court-circuiter ; cela risque de causer des brûlures ou un incendie
• Ne pas charger ou utiliser des accus autres que les accus rechargeables Shure
• Mettre les accus au rebut de manière appropriée. Vérifier auprès du fournisseur local la manière appropriée de mettre au rebut les accus usagés.
• Les accus (bloc accu ou accus installés) ne doivent pas être exposés à une chaleur excessive, p. ex. lumière du soleil, feu ou similaire
Remarque : Utiliser exclusivement avec le bloc d’alimentation inclus ou un produit équivalent approuvé par Shure.
Suivre le plan de recyclage régional en vigueur pour les accus, l’emballage et les déchets électroniques.
Indice IPx7
L’émetteur de poche micro Shure ADX1M a été testé et est conforme à la norme IEC 62529 avec un indice IPx7 (eau douce uniquement, 1 mètre de profondeur
pendant 30 minutes).
• Ne pas utiliser l’émetteur de poche sous l’eau s’il est endommagé
• Ne pas soumettre l’émetteur de poche à des chocs, vibrations, pressions, chutes excessif et ne pas y poser d’objet lourd. Cela risque d’invalider l’indice IPx7.
• Toujours vérifier que les contacts de l’accu sont secs avant de l’insérer dans l’émetteur de poche
AVERTISSEMENT : Ce produit contient un produit chimique reconnu par l’État de Californie comme pouvant entraîner le cancer, des malformations congénitales
ou d’autres troubles de l’appareil reproducteur.
低功率電波輻射性電機管理辦法
第十二條
經型式認證合格之低功率射頻電機,非經許可,公司、商號或使用者均不得擅自變更頻率、加大功率或變更原設計之特性及功能。 第十四條
低功率射頻電機之使用不得影響飛航安全及干擾合法通信;經發現有干擾現象時,應立即停用,並改善至無干擾時方得繼續使用。前項合法通信,指依電信法規定作
業之無線電通信。低功率射頻電機須忍受合法通信或工業、科學及醫療用電波輻射性電機設備之干擾。
Page 6

ADVERTENCIA
• Los conjuntos de baterías pueden estallar o soltar materiales tóxicos. Riesgo de incendio o quemaduras. No abra, triture, modifique, desarme, caliente a más
de 60°C (140°F) ni incinere.
• Siga las instrucciones del fabricante
• Utilice únicamente el cargador Shure para cargar las baterías recargables Shure.
• ADVERTENCIA: Si se sustituye la batería incorrectamente, se crea el riesgo de causar una explosión. Sustitúyala únicamente por otra igual o de tipo
equivalente.
• Nunca ponga baterías en la boca. Si se tragan, acuda al médico o a un centro local de control de envenenamiento
• No ponga en cortocircuito; esto puede causar quemaduras o incendios
• No cargue ni utilice baterías diferentes de las baterías recargables Shure.
• Deseche los conjuntos de baterías de forma apropiada. Consulte al vendedor local para el desecho adecuado de conjuntos de baterías usados.
• Las baterías (conjuntos de baterías o baterías instaladas) no deben exponerse al calor excesivo causado por la luz del sol, las llamas o condiciones similares.
Nota: Use solo con la fuente de alimentación incluida o una equivalente aprobada por Shure.
Se recomienda respetar las normas de reciclado de la región relativas a desechos electrónicos, empaquetado y baterías.
IPx7 Rating
The Shure ADX1M micro body pack transmitter has been tested to IEC 62529 with a rating of IPx7 (Fresh water only, 1 meter depth for 30 minutes.
• Do not use body pack under water if it is damaged
• Do not subject the body pack to excessive shock, vibration, pressure, dropping, impact, or placing a heavy object on it. Doing so may invalidate the IPx7 rating.
• Always ensure the battery contacts are dry before installing in body pack
ADVERTENCIA: Este producto contiene una sustancia química conocida en el Estado de California como causante del cáncer y de defectos congénitos y otros
tipos de toxicidad reproductiva.
低功率電波輻射性電機管理辦法
第十二條
經型式認證合格之低功率射頻電機,非經許可,公司、商號或使用者均不得擅自變更頻率、加大功率或變更原設計之特性及功能。 第十四條
低功率射頻電機之使用不得影響飛航安全及干擾合法通信;經發現有干擾現象時,應立即停用,並改善至無干擾時方得繼續使用。前項合法通信,指依電信法規定作
業之無線電通信。低功率射頻電機須忍受合法通信或工業、科學及醫療用電波輻射性電機設備之干擾。
ATENÇÃO
• Baterias podem explodir ou liberar materiais tóxicos. Risco de incêndio ou queimaduras. Não abra, esmague, modifique, desmonte, aqueça acima de 60 °C
(140 °F) ou incinere.
• Siga as instruções do fabricante
• Use somente carregador Shure para recarregar baterias Shure recarregáveis
• ATENÇÃO: Perigo de explosão se a bateria for substituída incorretamente. Substitua somente pelo mesmo tipo ou por um equivalente.
• Nunca ponha baterias na boca. Se engolida, procure um médico ou centro local de controle de veneno
• Não provoque curto-circuito; isto pode causar queimaduras ou incêndios
• Não carregue nem use baterias que não sejam baterias recarregáveis Shure
• Descarte as baterias apropriadamente. Verifique com o fornecedor local a forma correta de descarte de baterias usadas.
• Baterias (a embalagem ou as baterias instaladas) não devem ser expostas a calor excessivo como luz do sol, fogo etc.
Observação: Use somente com a fonte de alimentação inclusa ou uma equivalente aprovada pela Shure.
Siga o esquema de reciclagem de sua região para baterias, embalagem e resíduos eletrônicos.
Classificação IPx7
O transmissor micro bodypack Shure ADX1M foi testado para IEC 62529 com uma classificação de IPx7 (Somente água doce, 1 metro de profundidade por 30
minutos.
• Não use o bodypack embaixo d'água se ele estiver danificado
• Não submeta o bodypack a excesso de choque, vibração, pressão, queda, impacto nem coloque um objeto pesado sobre ele. Fazer isso pode invalidar a classificação IPx7.
• Sempre certifique-se de que os contatos da bateria estejam secos antes de instalar no bodypack
ATENÇÃO: De acordo com o Estado da Califórnia, este produto contém um produto químico que causa câncer e defeitos de nascimento ou outros danos
reprodutivos.
低功率電波輻射性電機管理辦法
第十二條
經型式認證合格之低功率射頻電機,非經許可,公司、商號或使用者均不得擅自變更頻率、加大功率或變更原設計之特性及功能。 第十四條
低功率射頻電機之使用不得影響飛航安全及干擾合法通信;經發現有干擾現象時,應立即停用,並改善至無干擾時方得繼續使用。前項合法通信,指依電信法規定作
業之無線電通信。低功率射頻電機須忍受合法通信或工業、科學及醫療用電波輻射性電機設備之干擾。
Page 7
ADX1M Axient Digital Micro Bodypack Transmitter
ADX series transmitters deliver impeccable audio quality and RF performance, and are equipped with ShowLink® remote control for real-time parameter
adjustments and interference avoidance. This transmitter features wideband tuning, High Density (HD) mode, encryption, and advanced rechargeability.
The contoured form factor and lightweight PEI plastic construction offer both comfort and heat resistance. The membrane switches and LEMO connector
protect against moisture, while the OLED display provides excellent visibility in low-light environments.
Features
Performance
• 20 Hz to 20 kHz range with flat frequency response
• Automatic input staging optimizes gain setting
• Internal adaptive antenna optimizes signal when ADX1M is worn against the body
• Diversity ShowLink-enabled for remote transmitter control and automatic interference avoidance
• AES 256-bit encryption-enabled for secure transmission
• >120 dB, A-weighted, System Gain @ +10
• Digital output: >125dB, A-weighted (Dante, AES3, AES67)
• 100 meter (300 feet) line-of-sight operating range
• Selectable modulation modes optimize performance for spectral efficiency
- Standard – optimal coverage, low latency
- High density – dramatic increase in max system channel count
• Built-in tone generator and RF markers to facilitate walk-testing
• Switchable power levels = 2/10/20 mW (region dependent)
• Frequency Diversity selection using two bodypacks
• Shure SB910M rechargeable batteries for up to 7 hours of runtime, precision metering, and zero memory effect
Design
• Small and streamlined design for better concealment and wear
• Ultem® PEI plastic construction for heat resistance and durability
• Detachable belt clip
• Membrane-style buttons and LEMO connection protect against sweat and moisture ingress
• Recessed LEMO connector
• High-contrast OLED display
Included Components
SB910M Shure Rechargeable Battery 95A24863
Belt clip 44A12547
Optional Accessories
SB910M Shure Rechargeable Battery 95A24863
Replacement belt clip 44A12547
7
Page 8
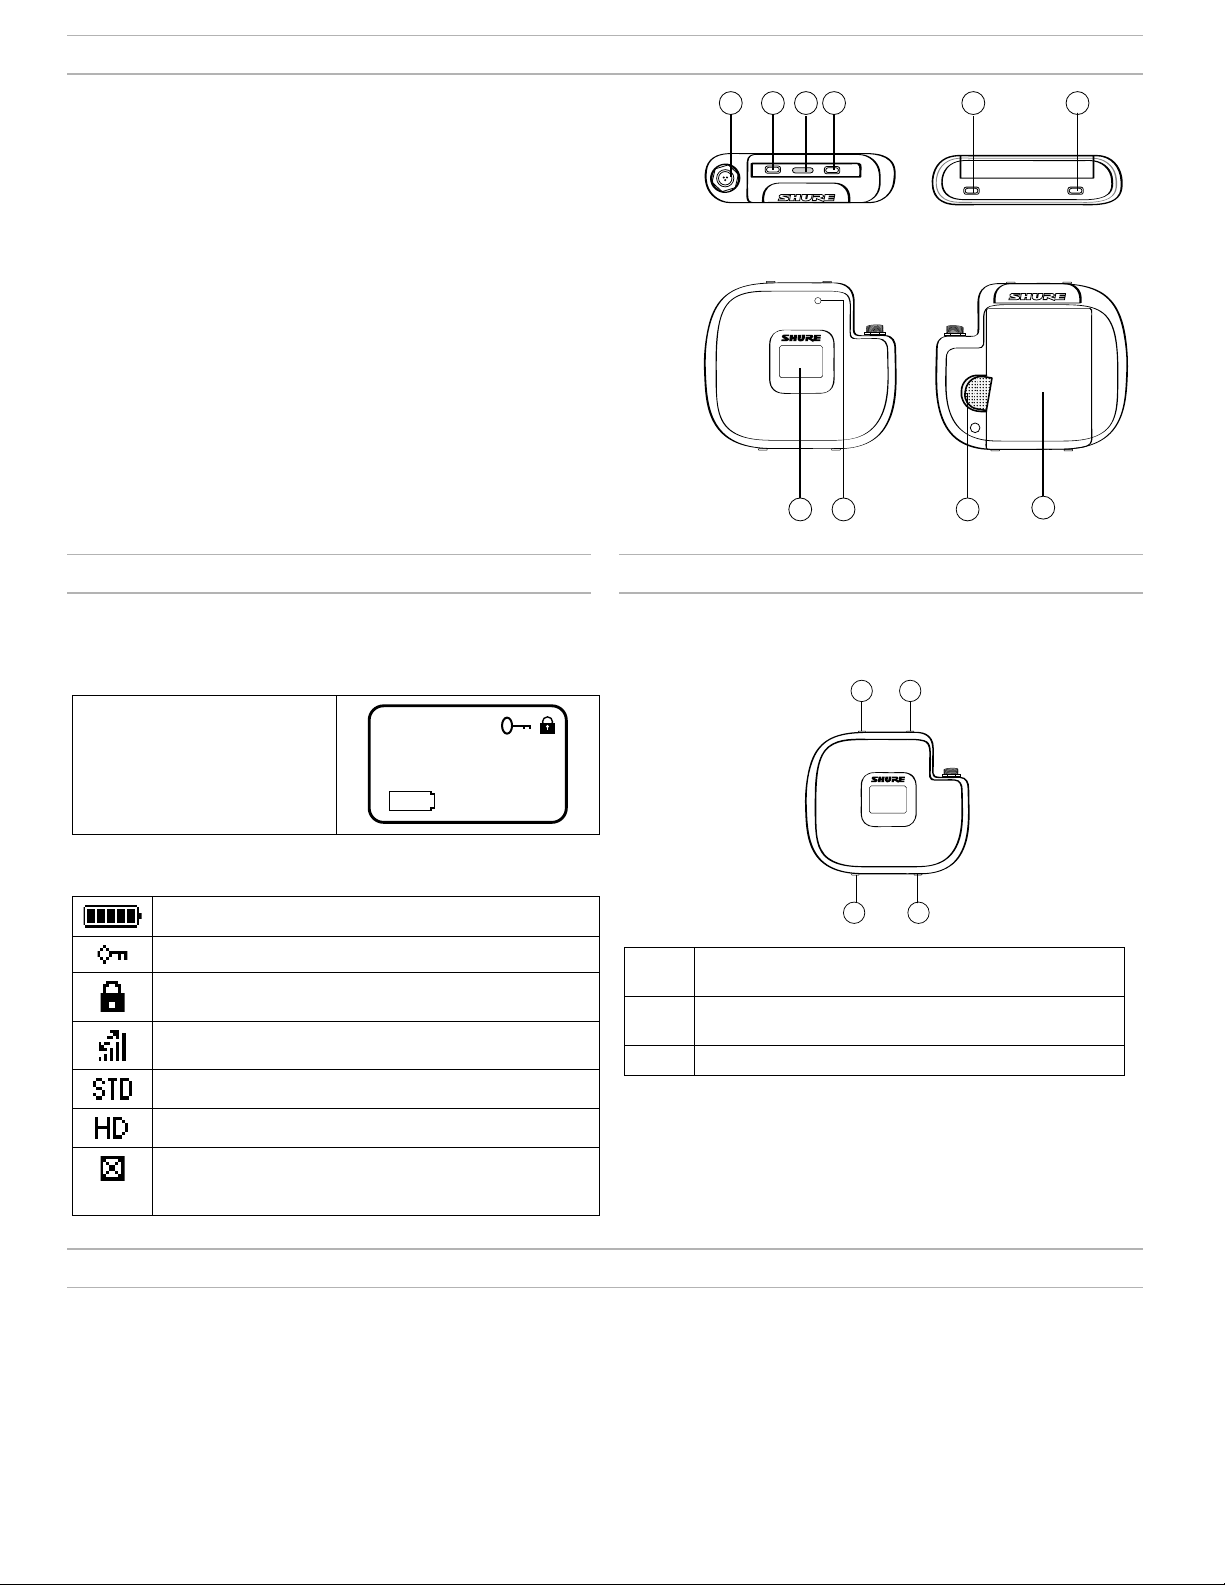
ADX1M Transmitter Overview
① Input Jack
Connects to a 3-Pin LEMO connector
microphone or instrument cable.
⑥ Enter Button (O)
Selects menu screens for editing and
confirms parameter changes.
1 2 3 4 5 6
② Up Button (⋀)
Use to navigate through parameter
menus and to change settings.
③ Infrared (IR) Port
Align with the receiver IR port during
an IR Sync for automated transmitter
tuning and setup.
④ Power and Exit Button (X)
Press and hold to turn transmitter
on or off. Acts as a 'back' button
to return to previous menus or
parameters without confirming a
value change.
⑤ Down Button (⋁)
Use to navigate through parameter
menus and to change settings.
⑦ Display
View menu screens and settings.
Press any button to activate the
backlight.
⑧ Power LED
- Green = unit is powered on
- Red = low battery, Mute Mode enabled,
input overload, or battery error (see
Troubleshooting)
⑨ Battery Latch
Latch to secure the battery.
⑩ Battery
Shure rechargeable battery.
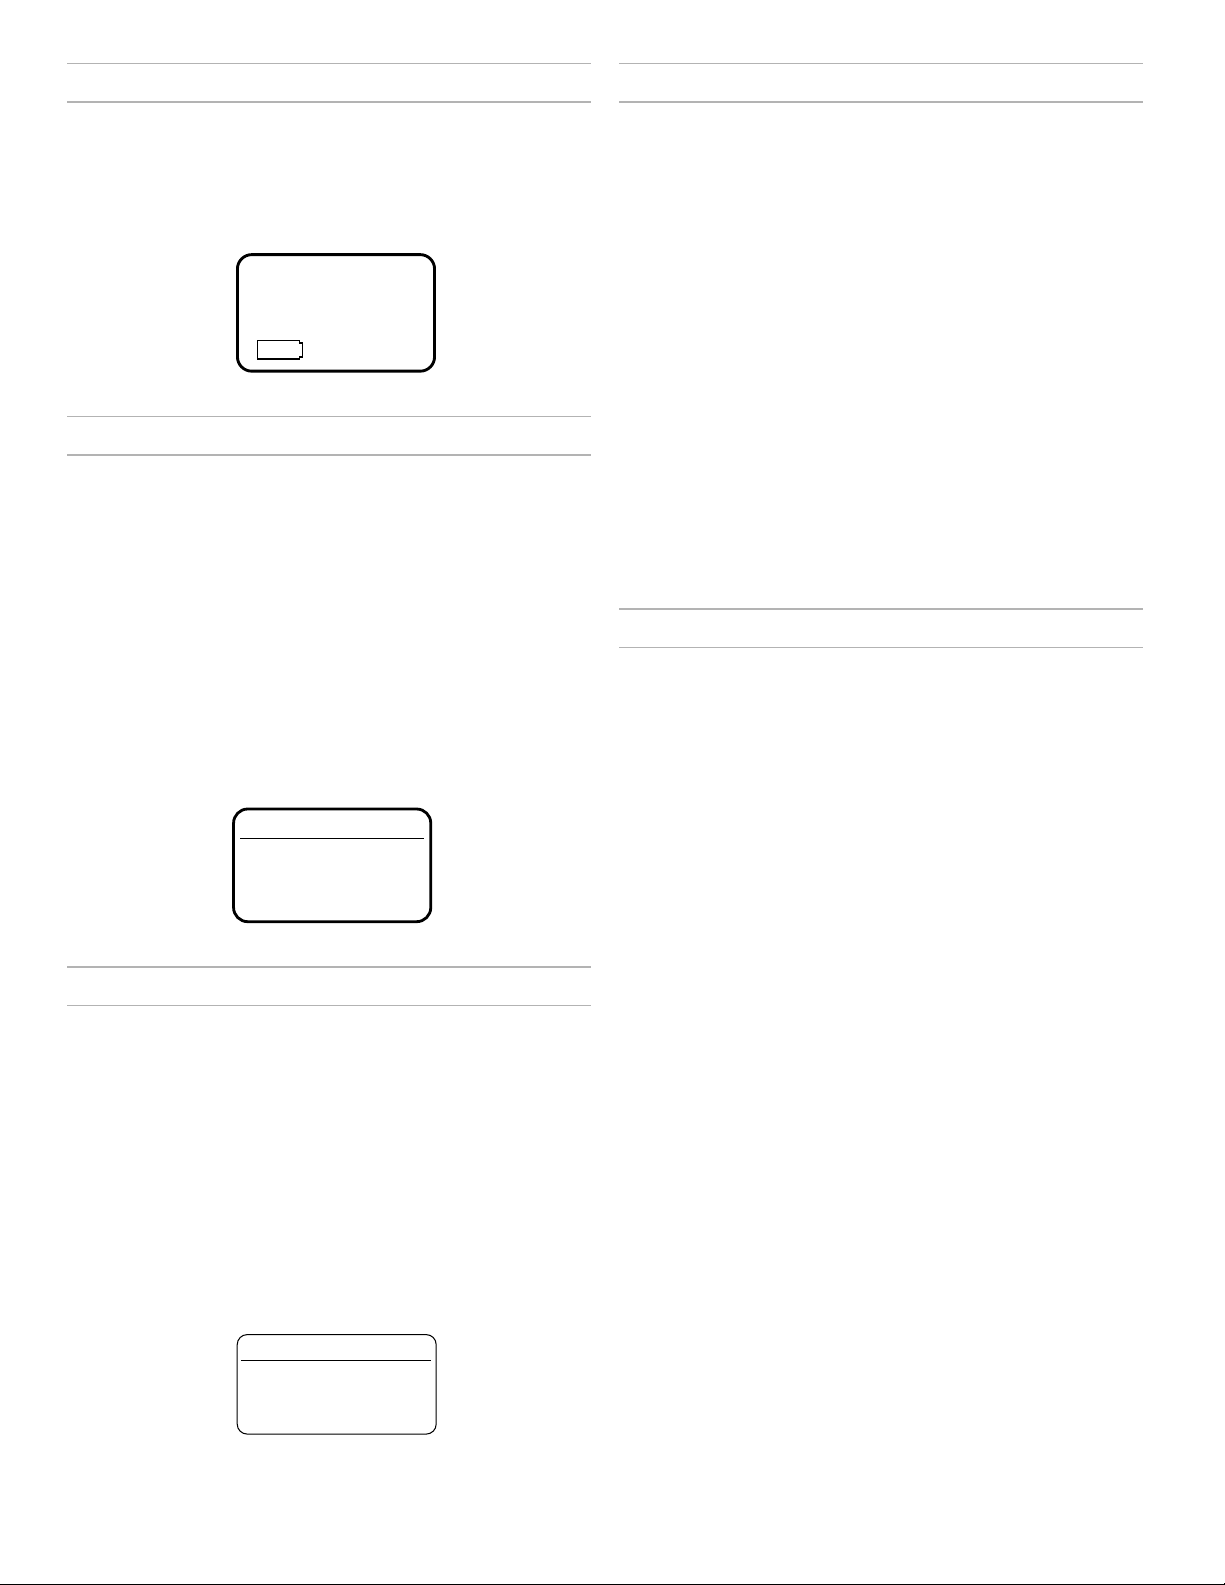
Home Screen Display
The home screen shows transmitter information and status.
Tip: There are four options to choose the information shown on the home
screen. Use the arrow buttons to select one of the following choices:
• Name
• Frequency Setting
• Group (G) and Channel (C)
• Device ID
Shure
470.200MHz
7:45
Top Bottom
Front Rear
ADX1M
7
98
10
Transmitter Controls
Use the controls to navigate through parameter menus and change
values.
X
^
ADX1M
The following icons appear to indicate transmitter settings:
^
Battery runtime in hours and minutes or bar display
Key: Displayed when encryption is enabled
Lock: Displayed when controls are locked. Icon will flash if
access is attempted to a locked control (power or menu).
ShowLink signal strength displays 0 to 5 bars
STD: Standard Transmission Mode
HD: High Density Transmission Mode
Box: When the box has an "x", Mute Mode is on and
engaged. If the box is empty, Mute Mode is on, but not
engaged.
∨∧ Use to scroll through menu screens and to change param-
X
O
Tip: Use the following control shortcuts for quick set up:
• Hold the ∧ and X buttons while powering on to lock the transmitter
• Hold the O and X buttons while powering on to set the transmitter RF
output to mute
eter values.
Acts as a back button to return to previous menus or pa-
rameters without confirming a value change.
Enters menu screens and applies parameter changes.
O
Locking the Interface
Lock transmitter interface controls to prevent accidental or unauthorized changes to parameters. The lock icon appears on the home screen when the
interface lock is enabled.
1. From the Utilities menu, navigate to Lock and select one of the following lock options:
- None: The controls are unlocked
- Power: The power switch is locked
- Menu: The menu parameters are locked
- All: The power switch and menu parameters are locked
2. Press O to save.
Tip: To quickly unlock a transmitter: Press O twice, select None, and press O.
8
Page 9
Shure Rechargeable Batteries
Shure lithium-ion batteries offer a rechargeable option for powering the transmitters. Batteries quickly charge to 50% capacity in one hour and reach full
charge within three hours.
Single chargers and multiple bay chargers are available to recharge the Shure batteries.
Caution: Only charge Shure rechargeable batteries with a Shure battery charger.
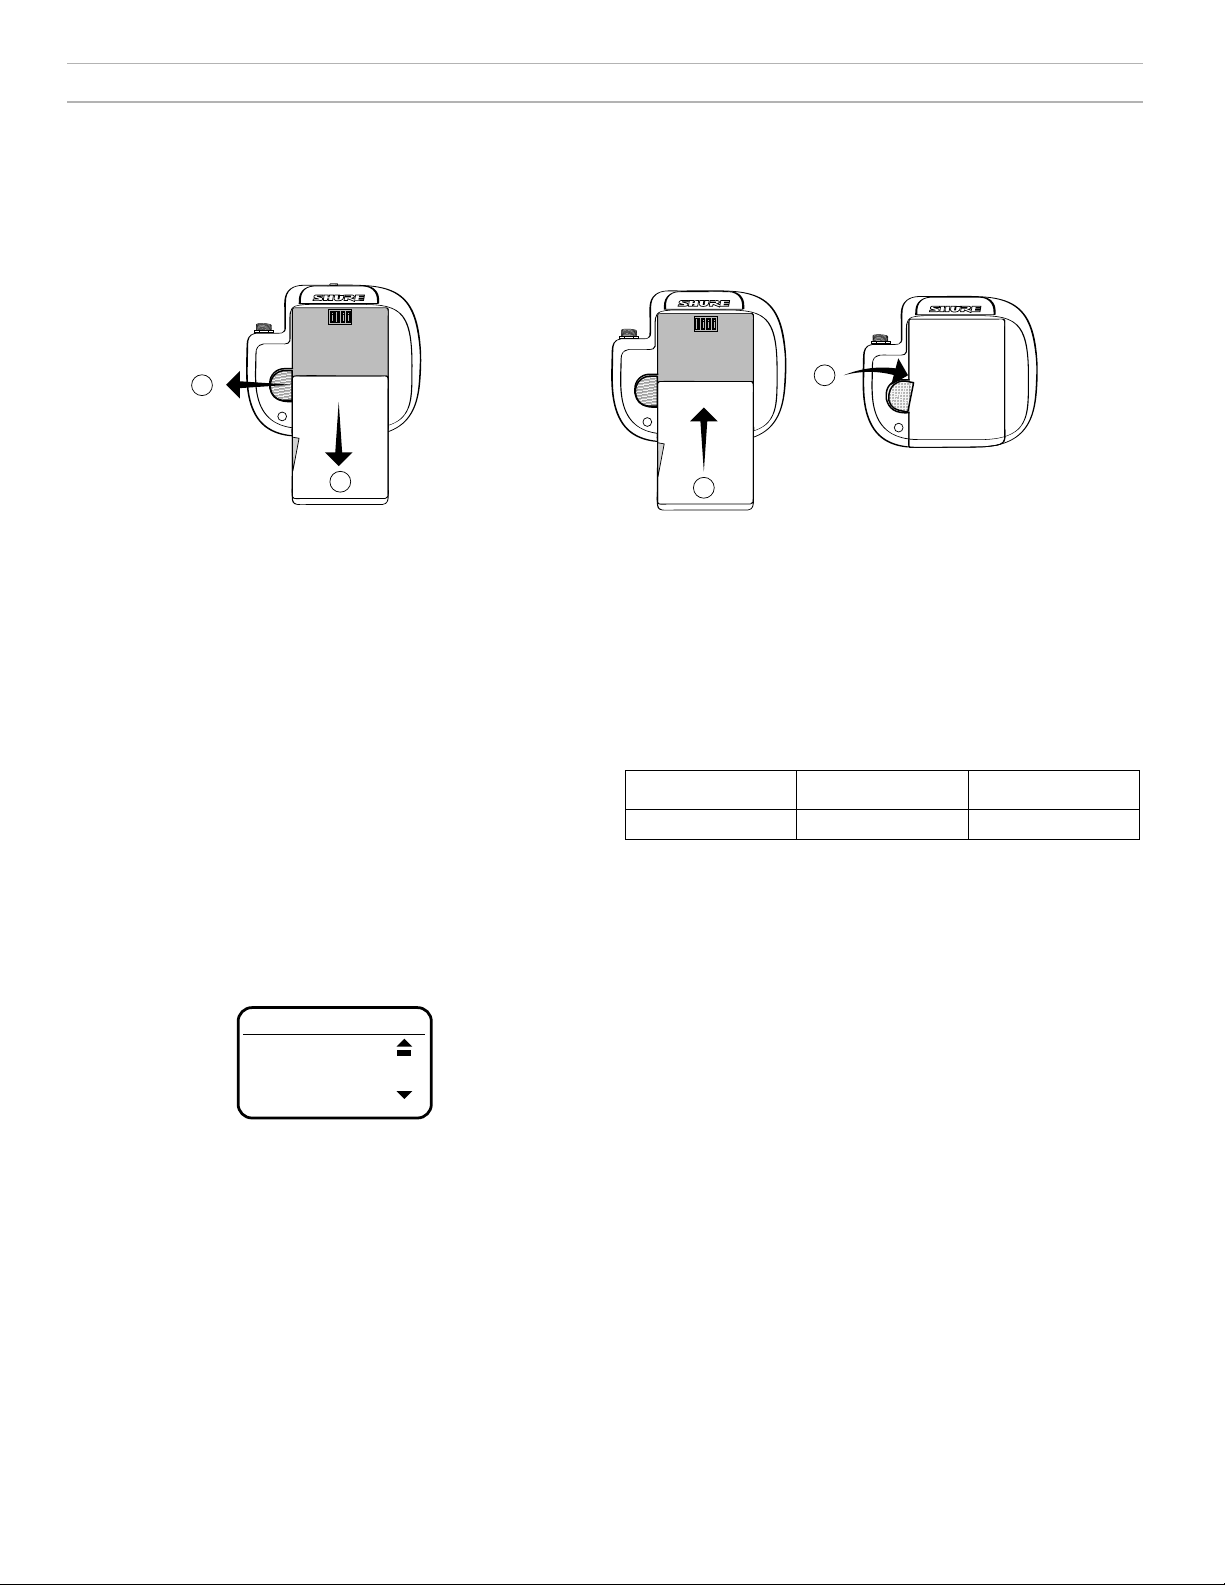
Battery Installation
1
2
Removing the Battery
① Pull back to disengage the battery latch.
② Slide the battery out of the transmitter.
Checking Battery Info
When using a Shure rechargeable battery, the receiver and transmitter
home screens display the number of hours and minutes remaining.
Detailed information for the battery is displayed Battery menu of the
transmitter: Utilities > Battery
• Battery Life: Runtime reported in bar display and time
(hours:minutes)
• Charge: Percentage of charge capacity
• Health: Percentage of current battery health
• Cycle Count: Total of the number of charging cycles for the installed
battery
• Temperature: Battery temperature reported in Celsius and Fahrenheit
Charge
85%
2
1
Installing the Battery
① Slide the battery into the transmitter.
② Fully engage the latch to secure the battery
ADX1M SB910M Battery Runtime
Note: Higher RF power levels decrease battery runtime. Battery runtime
varies with battery age and environmental conditions.
2 mW 10 mW 20 mW
6.5 to 8.5 hours 6.0 to 8.0 hours 5.0 to 6.0 hours
Important Tips for Care and Storage of Shure
Rechargeable Batteries
Proper care and storage of Shure batteries results in reliable performance
and ensures a long lifetime.
• Always store batteries and transmitters at room temperature
• Ideally, batteries should be charged to approximately 40% of capacity
for long-term storage
• Periodically clean the battery contacts with alcohol to maintain ideal
contact
• During storage, check batteries every 6 months and recharge to 40% of
capacity as needed
For additional rechargeable battery information, visit www.shure.com.
9
Page 10
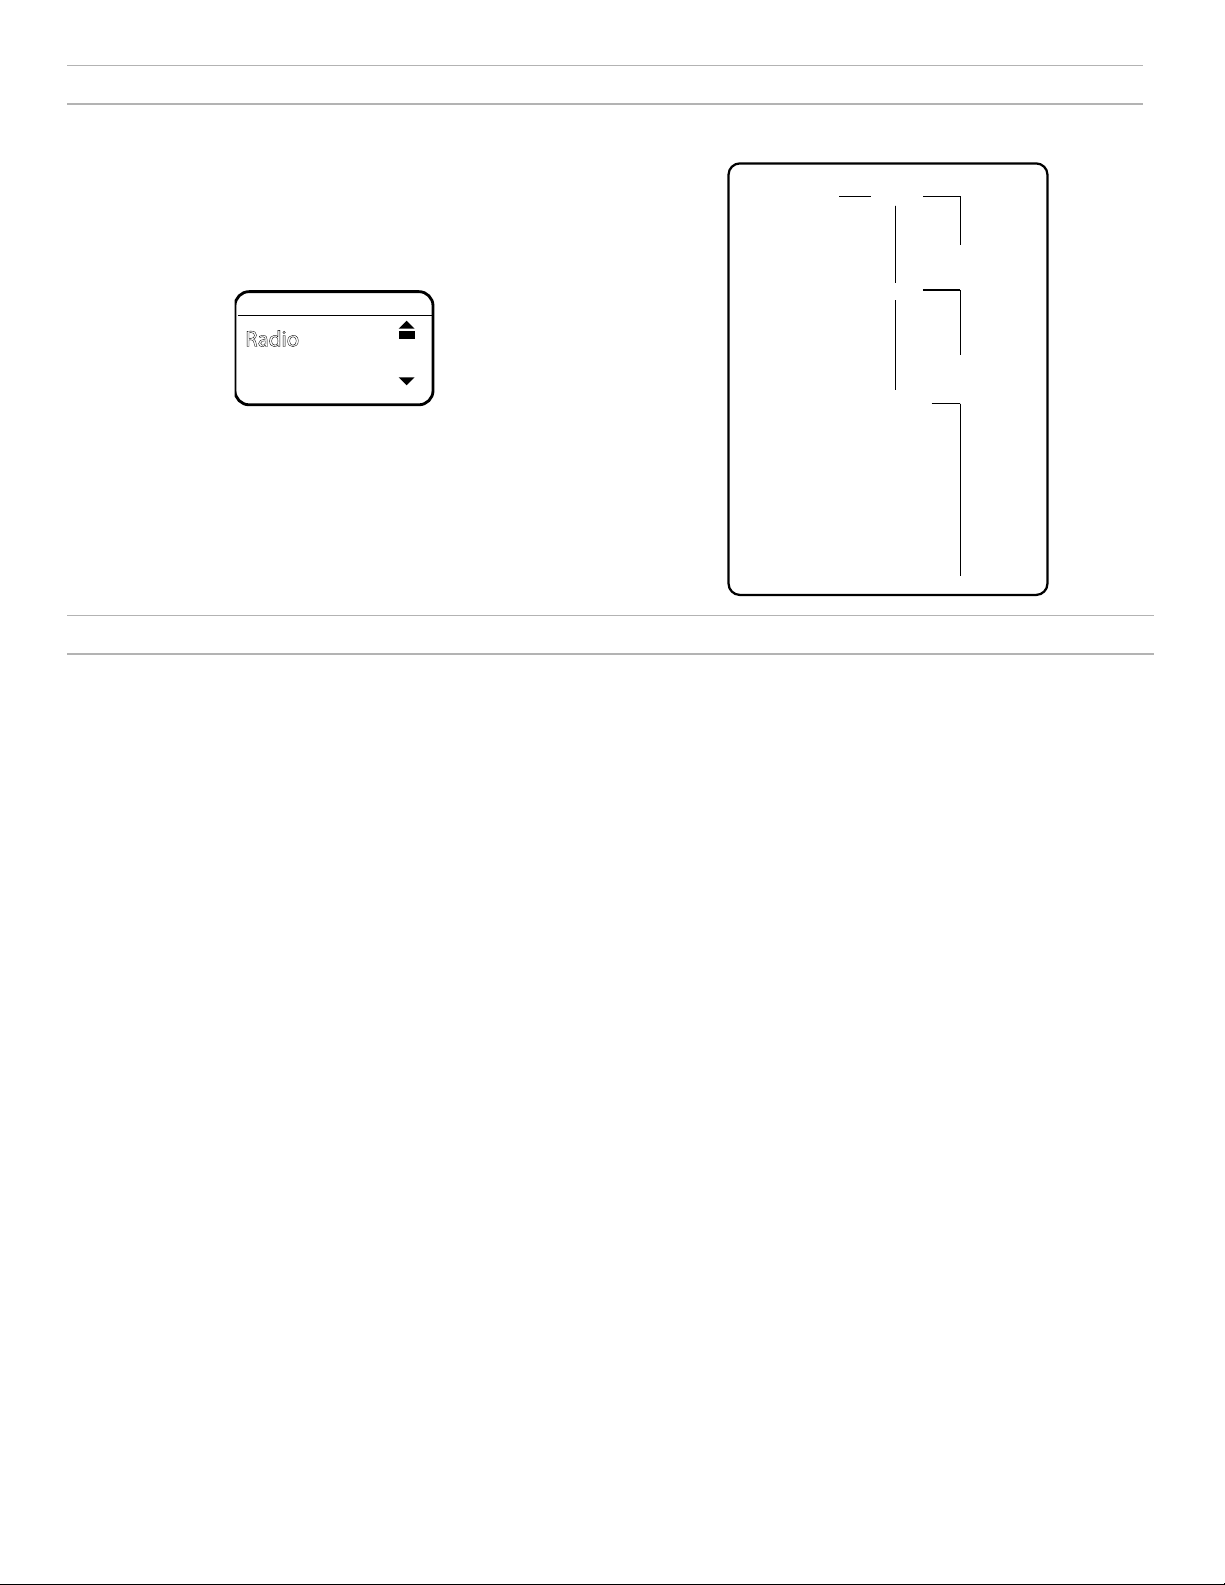
Menu Parameters
The Main menu organizes the available transmitter parameters into three
sub-menus:
• Radio
• Audio
• Utilities
Tip: Use the arrow buttons to scroll between the sub-menus.
Main
Radio
Menu Map
Main Menu
Radio
Audio
Freq
Power
Output
Oset
Polarity
Mute
Tone Gen
Tips for Editing Menu Parameters
• To access the menu options from the home screen, press O . Use the
arrow buttons to access additional menus and parameters.
• A menu parameter will blink when editing is enabled
• To increase, decrease or change a parameter, use the arrow buttons
• To save a menu change, press O
• To exit a menu without saving a change, press X
Menu Parameter Descriptions
Radio Menu
Freq
Press the O button to enable editing of a group (G:) channel
(C:) or frequency (MHz). Use the arrow buttons to adjust the
values. To edit the frequency, press the O button once to edit
the first 3 digits, or twice to edit the second 3 digits.
Power
Higher RF power settings can extend the range of the
transmitter.
Note: Higher RF power settings decrease battery runtime.
Output
Sets the RF output to On or Mute.
- On: RF signal is active
- Mute: RF signal is inactive
Audio Menu
Offset
Adjust Offset level to balance mic levels when using two
transmitters or when assigning multiple transmitters to
receiver slots. Adjustment range: -12 dB to +21 dB.
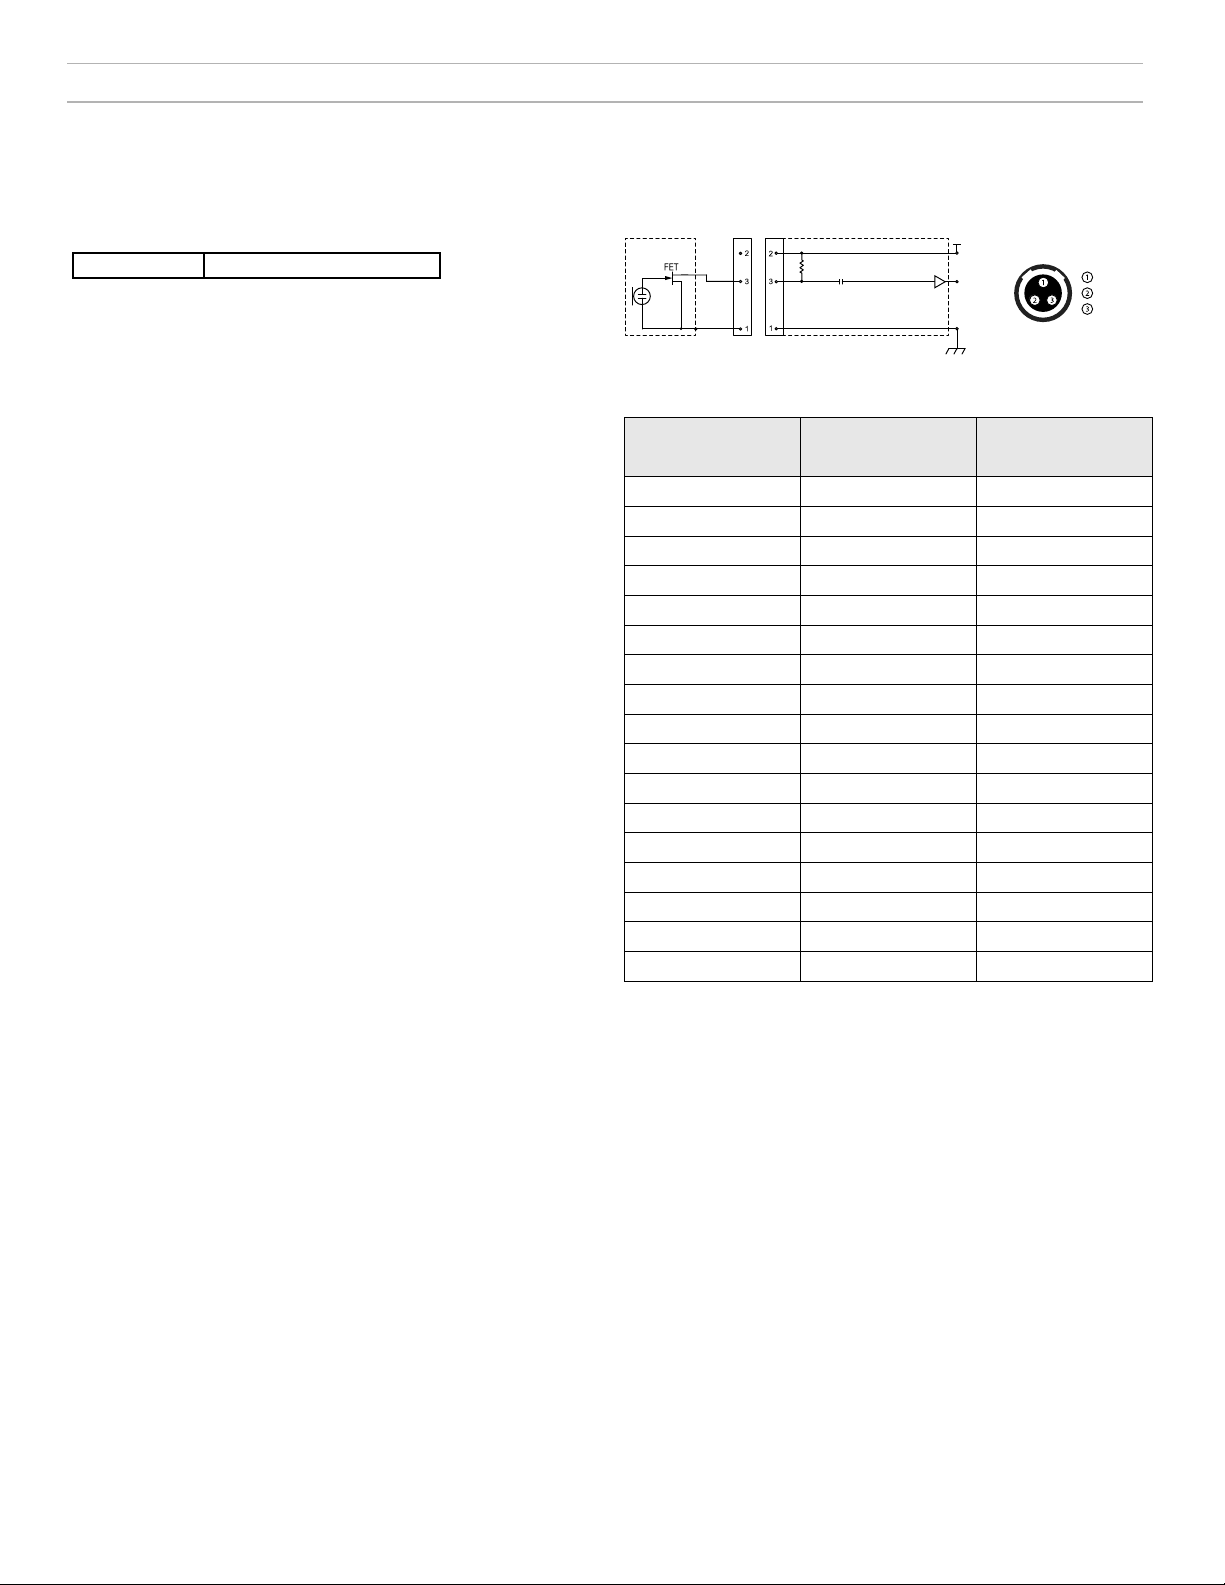
Polarity
Selectable polarity assignment for audio input connector:
- Pos: Positive pressure on microphone diaphragm produces positive voltage on pin 2 (with respect to pin 3 of XLR output) and the
tip of the TRS output.
- Neg: Positive pressure on microphone diaphragm produces negative voltage on pin 2 (with respect to pin 3 of XLR output) and the
tip of the TRS output.
Mute
When enabled, the power button is configured as a mute
switch for the audio output. Press the power button to mute
or un-mute the audio. Exit mute mode to return the power
button to its normal functionality.
Tone Gen
Transmitter will generate a continuous test tone:
- Freq: The tone can be set to 400 Hz or 1000 Hz.
- Level: Adjusts of the output level of the test tone.
Utilities Menu
Device ID
Locks
Locks the transmitter controls and power switch.
Link Info
SL Test
Marker
Battery
Talk Sw
Identify
About
Reset All
Utilities
Device ID
Locks
Link Info
SL Test
Marker
Battery
Talk Sw
Identify
About
Reset All
Assign a device ID of up to 9 letters or numbers.
- None: The controls are unlocked
- Power: The power switch is locked
- Menu: The menu parameters are locked
- All: The power switch and menu parameters are locked
Displays the following information about the link between a transmitter and receiver:
- Not Linked: The transmitter is not linked to a receiver
- Linked: The transmitter is linked to a receiver. Select Unlink? to free the transmitter from the
receiver link.
- Unlinked: The transmitter is not linked to a receiver
ShowLink test tool to measure the boundaries of ShowLink coverage.
When enabled, press the enter button to drop a marker in Wireless Workbench.
Displays battery information:
- Battery Life: Runtime reported in bar display and time (hours:minutes)
- Charge: Percentage of charge capacity
- Health: Percentage of current battery health
- Cycle Count: Total of the number of charging cycles for the installed battery
- Temperature: Battery temperature reported in Celsius and Fahrenheit
Indicates the status of the talk switch.
When enabled, Identify flashes the display of the receiver linked to the
transmitter.
Displays the following transmitter information:
- Model Displays the model number
- Band Displays the tuning band of the transmitter
- FW Version Installed firmware
- HW Version Hardware version
- Serial Num Serial number
Restores all transmitter parameters to factory settings.
10
Page 11
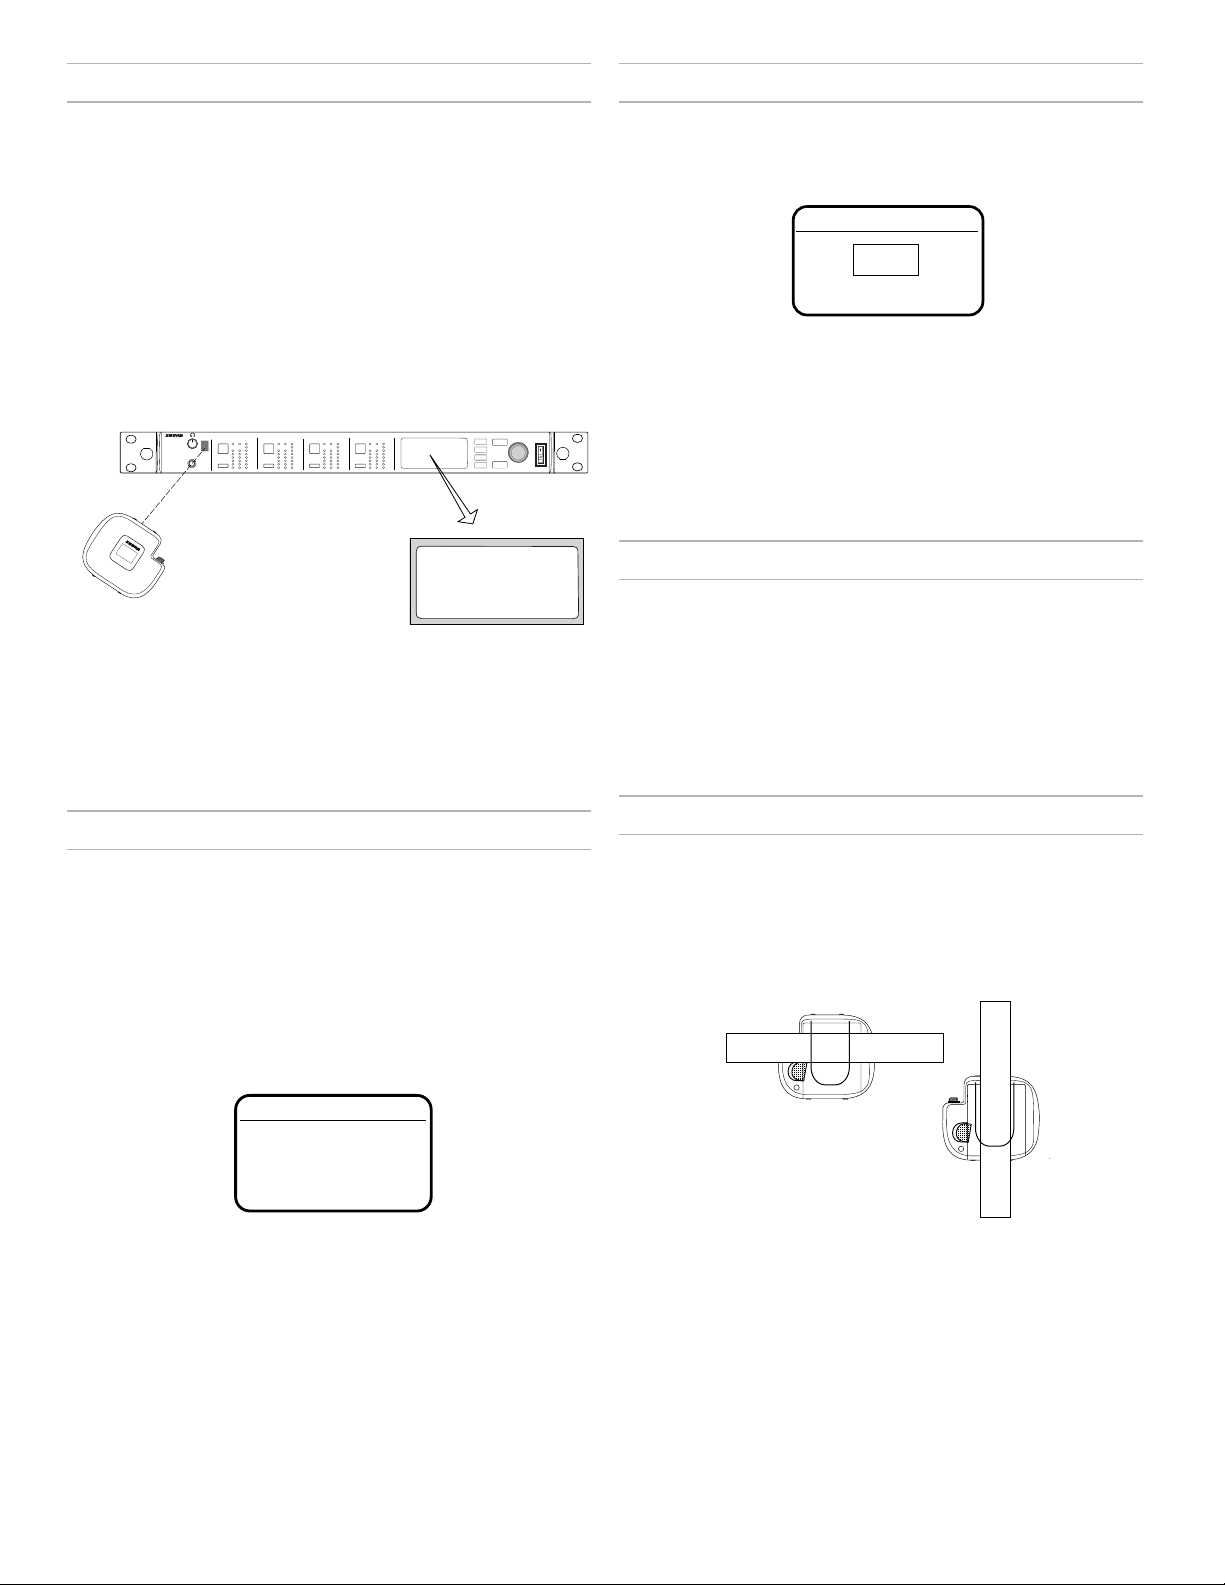
IR Sync
RF Mute
Use IR Sync to form an audio channel between the transmitter and
receiver.
Note: The receiver band must match the band of the transmitter.
1. Select a receiver channel.
2. Tune the channel to an available frequency using group
scan or manually turn to an open frequency.
3. Power on the transmitter.
4. Press the SYNC button on the receiver.
5. Align the IR windows between the transmitter and the receiver so that
the IR LED illuminates red. When complete, Sync Success! appears.
The transmitter and receiver are now tuned to the same frequency.
AD4Q
Axient Digital
Wireless Receiver
IR
AUDIO
RX 1
A B
OL
1
SYNC
RX 3RF
AUDIO
RX 2RF
A B
OL
3
2
SYNC
SYNC
RF
AUDIO
RX 4RF
AUDIO
A B
A B
OL
OL
4
SYNC
NAVIGATE
POWER
CONTROL
PUSH
<15 cm (6 in.)
ADX1M
Sync Success!
Note:
Any change to the encryption status on the receiver (enabling/disabling
encryption) requires a sync to send the settings to the transmitter. New
encryption keys for the transmitter and receiver channel are generated
on every IR sync, so to request a new key for a transmitter, perform an IR
sync with the desired receiver channel.
RF Mute prevents transmission of the audio by suppressing the RF signal,
while allowing the transmitter to remain powered-on. The home screen
displays RF MUTED in this mode.
RF Output
Mute
1. From the Radio menu, navigate to Output.
2. Choose one of the following options:
- On: RF signal is active
- Mute: RF signal is disabled
3. Press O to save.
Turning the transmitter off and on, or replacing the battery will restore
Output to On.
Power-on RF Mute
Power-on RF Mute places the transmitter in RF Mute mode immediately
when turned on.
• Starting with the transmitter off, press and hold the X and O buttons at
the same time.
• Continue to hold the until the RF Muted message appears on the home
screen
Tip: To turn the RF Output on, navigate to Radio > Output and select On.
Setting the Frequency Manually
The transmitter can be manually tuned to a specific group, channel, or
frequency.
1. Navigate to the Radio menu and select Freq.
2. Scroll to select G: and C: to edit the group and channel, or select
the frequency parameter (MHz). When editing the frequency, press
O once to edit the first 3 digits, or twice to edit the last 3 digits.
3. Use the ∧∨ buttons to adjust the group, channel, or frequency.
4. Press O to save, and then press X when finished.
Freq
G: 1 C:1
470.700 MHz
Wearing the Bodypack Transmitter
Clip the transmitter to a belt or slide a guitar strap through the transmitter
clip as shown.
For best results, the belt should be pressed against the base of the clip.
Tip: The clip can removed and rotated 180 degrees to increase mounting
options.
11
Page 12
Input Overload
ShowLink Test
The OVERLOAD message appears when the audio input experiences a
high-level signal. The power LED turns red as an additional indicator of an
overload. Reduce the input signal or enable the input pad to remove the
overload condition.
Tip: To enable the input pad, navigate to Audio > Pad and select -12 dB.
Shure
OVERLOAD
7:45
Tone Generator
The transmitter contains an internal tone generator that produces a continuous audio signal. The tone is helpful when conducting a sound check or
for troubleshooting the audio signal chain. The level of the tone is adjustable from -60 dB to 0 dB and the frequency can be set to 400 Hz or 1000
Hz.
Tip: Always start with the level set to -60 dB to avoid overloading speakers
or headphones.
1. From the Audio menu select Tone Gen.
2. Set the frequency to 400 Hz or 1000 Hz.
3. Select Level and use the arrow buttons adjust the value between -60 dB and 0 dB.
Turn off the tone by selecting Off from the menu or by cycling the transmitter power.
The ShowLink Test is a tool to find the boundaries of the ShowLink coverage area. When the ShowLink test is activated, a five-bar display indicating the link quality is shown on the screen. As the transmitter moves away
from the access point, the number of bars will decrease. ShowLink control
is maintained as long as 1 bar is displayed.
If the transmitter is beyond the coverage range, ShowLink control will not
be possible. However, the audio signal will not be affected or interrupted
as long as the transmitter is within range of the RF signal.
To improve coverage, adjust the location of your access points or place
additional access points to extend coverage.
To activate the ShowLink Test:
1. From the Utilities menu, navigate to SL Test.
2. Press the O button to start the test and walk the transmitter around
the coverage area. Monitor the number of bars displayed and
the state of the ShowLink icon. Coverage boundaries are indicated by 0 bars displayed or the ShowLink icon is empty.
3. Press the X button to exit the ShowLink test.
Tip: During a ShowLink test, press O (enter) to drop a marker in Wireless
Workbench.
Updating Firmware
Firmware is embedded software in each component that controls functionality. Periodically, new versions of firmware are developed to incorporate
additional features and enhancements. To take advantage of design improvements, you can upload and install new versions of the firmware by
using the Shure Update Utility. The Shure Update Utility is available for
download from http://www.shure.com/.
Tone Gen
Tone: 400Hz
Level: -60db
Matching Audio Levels with Mic Offset
When linking two or more transmitters to a receiver, there may be a difference in volume levels between microphones or instruments. If this occurs,
use the Offset function to match the audio levels and eliminate audible
volume differences between transmitters. If using a single transmitter, set
Offset to 0 dB.
1. Turn on the first transmitter and perform a sound check to test
the audio level. Turn off the transmitter when finished.
2. Turn on the second transmitter and perform a sound check to
test the audio level. Repeat for any additional transmitters.
3. If there is an audible difference in the sound level between the transmitters, navigate to the Offset menu (Audio
> Offset) in the transmitter to increase or decrease
the Offset in realtime to match the audio levels.
Mic Offset
+3 dB
Firmware Versioning
When performing an update, first download firmware to the receiver, and
then update transmitters to the same firmware version to ensure consistent operation.
The firmware numbering for Shure devices uses the following format:
MAJOR.MINOR.PATCH (e.g., 1.2.14). At a minimum, all devices on the
network (including transmitters), must have the same MAJOR and MINOR
firmware version numbers (e.g., 1.2.x).
Updating the Transmitter
1. Download the firmware to the receiver.
2. Access the following menu from the receiver:
Device Conguration > Tx Firmware Update.
3. Align the IR ports between the transmitter and the receiver. IR ports must be aligned for the entire download, which can take 50 seconds or longer.
Tip: The red alignment LED will turn on when the alignment is correct.
4. Press ENTER on the receiver to begin the download to the transmitter.
The receiver will display the progress of the update as a percentage.
12
Page 13
Specifications
LEMO
Top View of Bodypack
Mic Offset Range
-12 to 21 dB (in 1 dB steps)
Battery Type
Shure SB910M Rechargeable Li-Ion
Battery Runtime
@ 10 mW
Shure SB910M up to 7 hours
Dimensions
60.4 mm x 68.0 mm x 22.1 mm (2.4 in. x 2.7 in. x 0.9 in.) H x W x D
Weight
53 g (1.9 oz.), Without Battery
Housing
Plastic
Operating Temperature Range
-18°C (0°F) to 63°C (145°F)
Note: Battery characteristics may limit this range.
Storage Temperature Range
-29°C (-20°F) to 74°C (165°F)
Note: Battery characteristics may limit this range.
Audio Input
Connector
Lemo Connector
Configuration
Unbalanced
Impedance
8.2 MΩ
Maximum Input Level
1 kHz at 1% THD
Preamplifier Equivalent Input Noise (EIN)
System Gain Setting ≥ +20
-120 dBV, A-weighted, typical
RF Output
Antenna Type
Integrated Helical
Impedance
50 Ω
Occupied Bandwidth
<200 kHz
Modulation Type
Shure Axient Digital Proprietary
Power
2 mW, 10 mW, 20 mW
See Frequency Range and Output Power table, varies by region
ShowLink
Network Type
IEEE 802.15.4
Antenna Type
Zigbee Dual Conformal
Frequency Range
2.40 to 2.4835 GHz (24 Channels)
RF Output Power
10 dBm (ERP)
varies by region
Input Connector Diagram
LEMO
SHIELD
.
1µF
5 V DC
Audio Input
Ground
Ground
Bias Voltage
Audio Input
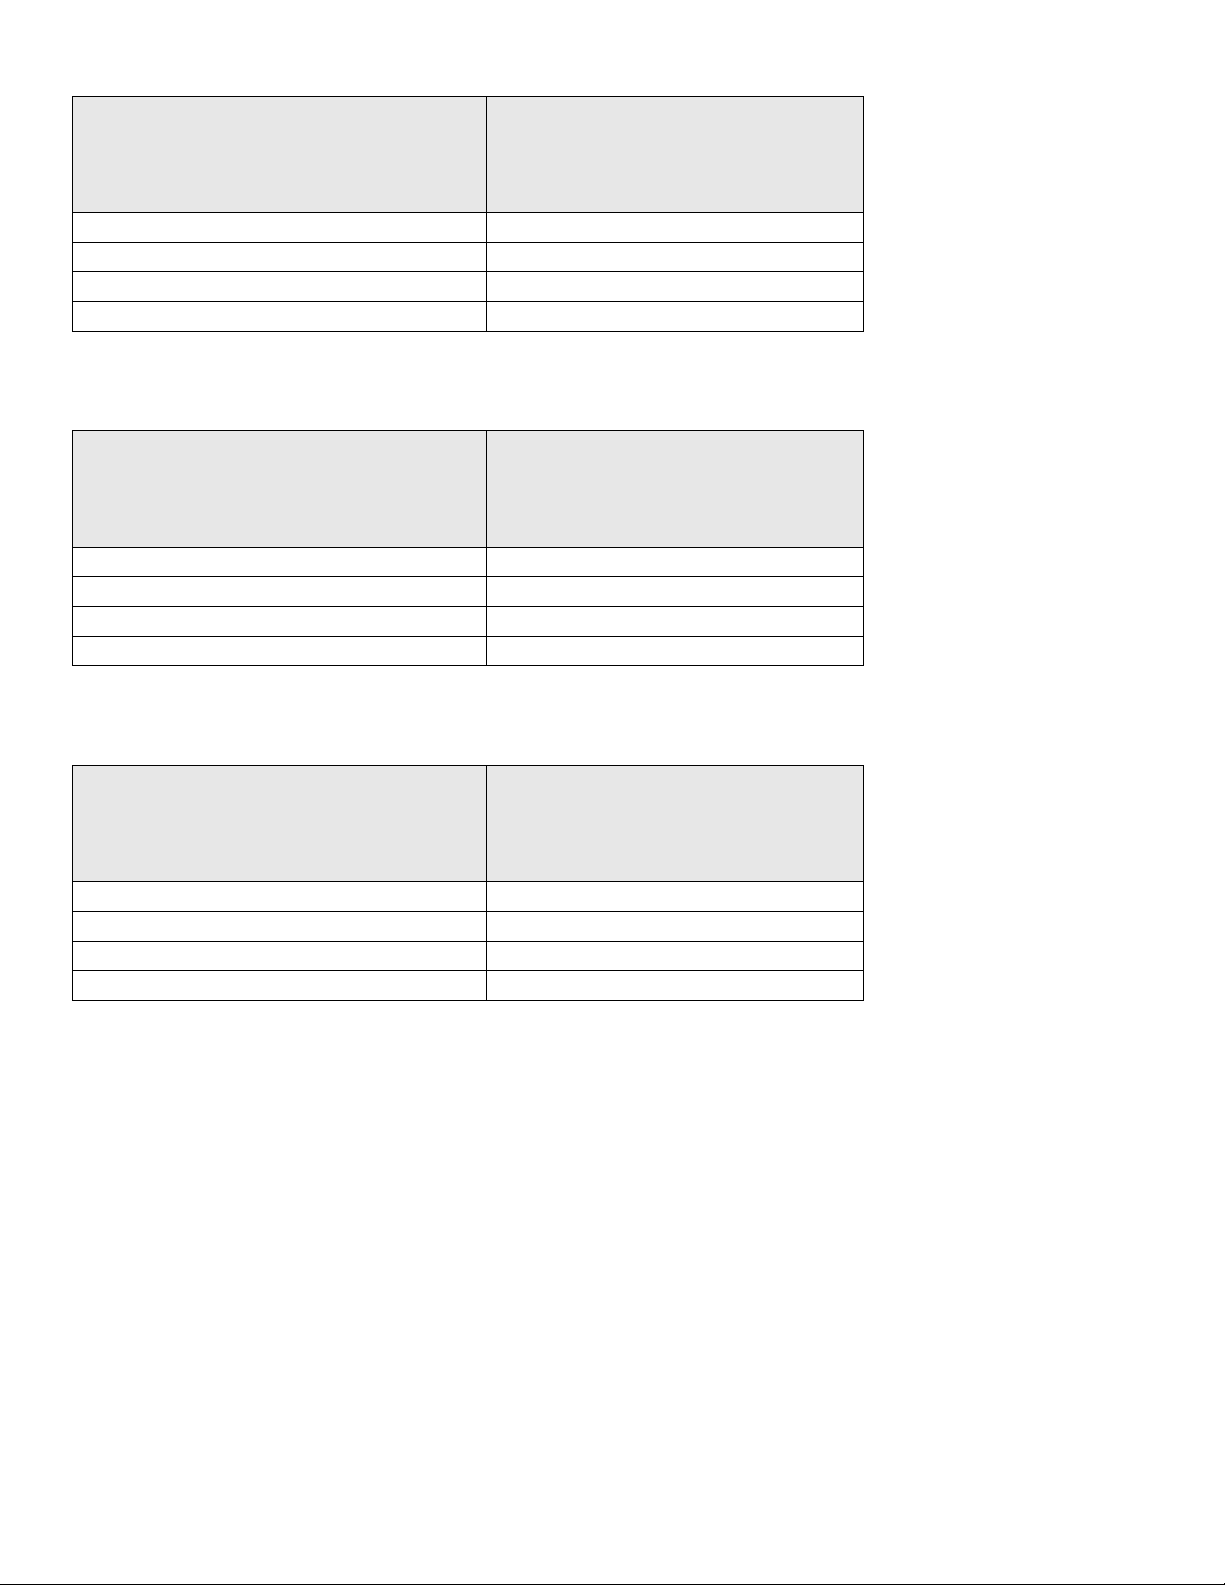
Frequency Bands and Transmitter RF Power
Band
G53 470 to 510 2/10/20
G54 479 to 565 2/10/20
G55† 470 to 636 2/10/20
G56 470 to 636 2/10/20
G57△ 470 to 616* 2/10/20
G62 510 to 530 2/10/20
H54 520 to 636 2/10/20
K53† 606 to 698 2/10/20
K54△ 606 to 663** 2/10/20
K55 606 to 694 2/10/20
K56 606 to 714 2/10/20
K57 606 to 790 2/10/20
K58 622 to 698 2/10/20
L54 630 to 787 2/10/20
R52† 794 to 806 2/10/20
JB 806 to 810 2/10
X55 941 to 960 2/10/20
*with a gap between 608 to 614 MHz.
**with a gap between 608 to 614 MHz and a gap between 616 to 653
MHz.
***power delivered to the antenna port.
†operation mode varies according to region. In Brazil, High Density mode
is used.
△Output power limited to 10 mW above 608 MHz.
Frequency Range
(MHz)
RF Power (mW)***
13
Page 14
K55 606-694 MHz
Country Code
Code de Pays
Codice di paese
Código de país
Länder-Kürzel
A, B, BG, CH, CY, CZ, D, DK, EST, F *
FIN, GB, GR, H, HR, I, IRL, IS, L, LT *
M, N, NL, P, PL, RO, S, SK, SLO, TR *
all other countries *
* This equipment may be capable of operating on some frequencies not authorized in your region. See Licensing Information.
G56 470-636 MHz
Country Code
Code de Pays
Codice di paese
Código de país
Länder-Kürzel
A, B, BG, CH, CY, CZ, D, DK, EST, F *
FIN, GB, GR, H, HR, I, IRL, IS, L, LT *
M, N, NL, P, PL, RO, S, SK, SLO, TR *
all other countries *
Frequency Range
Gamme de frequences
Gamme di frequenza
Gama de frequencias
Frequenzbereich
Frequency Range
Gamme de frequences
Gamme di frequenza
Gama de frequencias
Frequenzbereich
* This equipment may be capable of operating on some frequencies not authorized in your region. See Licensing Information.
K57 606-790 MHz
Country Code
Code de Pays
Codice di paese
Código de país
Länder-Kürzel
A, B, BG, CH, CY, CZ, D, DK, EST, F *
FIN, GB, GR, H, HR, I, IRL, IS, L, LT *
M, N, NL, P, PL, RO, S, SK, SLO, TR *
all other countries *
* This equipment may be capable of operating on some frequencies not authorized in your region. See Licensing Information.
Frequency Range
Gamme de frequences
Gamme di frequenza
Gama de frequencias
Frequenzbereich
14
Page 15

Certifications
Certified under FCC Part 15 and FCC Part 74.
Certified in Canada to RSS-210.
FCC ID: DD4ADX1MG57, DD4ADX1MK54, DD4ADX1MX55. IC: 616A-ADX1MG57, 616A-ADX1MK54.
This device complies with Industry Canada licence-exempt RSS standard(s). Operation of this device is subject to the following two conditions: (1) this
device may not cause interference, and (2) this device must accept any interference, including interference that may cause undesired operation of the
device. Le présent appareil est conforme aux CNR d'Industrie Canada applicables aux appareils radio exempts de licence. L'exploitation est autorisée
aux deux conditions suivantes : (1) l'appareil ne doit pas produire de brouillage, et (2) l'utilisateur de l'appareil doit accepter tout brouillage radioélectrique
subi, même si le brouillage est susceptible d'en compromettre le fonctionnement.
Meets essential requirements of the following European Directives:
• WEEE Directive 2002/96/EC, as amended by 2008/34/EC
• RoHS Directive 2011/65/EU
Note: Please follow your regional recycling scheme for batteries and electronic waste
This product meets the Essential Requirements of all relevant European directives and is eligible for CE marking.
Hereby, Shure Incorporated declares that the radio equipment is in compliance with Directive 2014/53/EU. The full text of the EU declaration of conformity is available at the following internet address: http://www.shure.com/europe/compliance
Authorized European representative:
Shure Europe GmbH
Headquarters Europe, Middle East & Africa
Department: EMEA Approval
Jakob-Dieffenbacher-Str. 12
75031 Eppingen, Germany
Phone: +49-7262-92 49 0
Fax: +49-7262-92 49 11 4
Email: EMEAsupport@shure.de
LICENSING INFORMATION
Licensing: A ministerial license to operate this equipment may be required in certain areas. Consult your national authority for possible requirements.
Changes or modifications not expressly approved by Shure Incorporated could void your authority to operate the equipment. Licensing of Shure wireless
microphone equipment is the user’s responsibility, and licensability depends on the user’s classification and application, and on the selected frequency.
Shure strongly urges the user to contact the appropriate telecommunications authority concerning proper licensing, and before choosing and ordering
frequencies.
Information to the user
This equipment has been tested and found to comply with the limits for a Class B digital device, pursuant to Part 15 of the FCC Rules. These limits are
designed to provide reasonable protection against harmful interference in a residential installation. This equipment generates uses and can radiate radio
frequency energy and, if not installed and used in accordance with the instructions, may cause harmful interference to radio communications. However,
there is no guarantee that interference will not occur in a particular installation. If this equipment does cause harmful interference to radio or television
reception, which can be determined by turning the equipment off and on, the user is encouraged to try to correct the interference by one or more of the
following measures:
• Reorient or relocate the receiving antenna.
• Increase the separation between the equipment and the receiver.
• Connect the equipment to an outlet on a circuit different from that to which the receiver is connected.
• Consult the dealer or an experienced radio/TV technician for help.
Australia Warning for Wireless
This device operates under an ACMA class licence and must comply with all the conditions of that licence including operating frequencies. Before 31
December 2014, this device will comply if it is operated in the 520-820 MHz frequency band. WARNING: After 31 December 2014, in order to comply,
this device must not be operated in the 694-820 MHz band.
This device complies with Industry Canada licence-exempt RSS standard(s). Operation of this device is subject to the following two conditions: (1) this
device may not cause interference, and (2) this device must accept any interference, including interference that may cause undesired operation of the
device.
Le présent appareil est conforme aux CNR d'Industrie Canada applicables aux appareils radio exempts de licence. L'exploitation est autorisée aux deux
conditions suivantes : (1) l'appareil ne doit pas produire de brouillage, et (2) l'utilisateur de l'appareil doit accepter tout brouillage radioélectrique subi,
même si le brouillage est susceptible d'en compromettre le fonctionnement.
Canada Warning for Wireless
This device operates on a no-protection, no-interference basis. Should the user seek to obtain protection from other radio services operating in the
same TV bands, a radio licence is required. For further details, consult Innovation, Science and Economic Development Canada’s document Client
Procedures Circular CPC-2-1-28, Voluntary Licensing of Licence-Exempt Low-Power Radio Apparatus in the TV Bands.
Ce dispositif fonctionne selon un régime de non brouillage et de non protection. Si l’utilisateur devait chercher à obtenir une certaine protection contre
d’autres services radio fonctionnant dans les mêmes bandes de télévision, une licence radio serait requise. Pour en savoir plus, veuillez consulter la
Circulaire des procédures concernant les clients CPC 2 1 28, Délivrance de licences sur une base volontaire pour les appareils radio de faible
puissance exempts de licence et exploités dans les bandes de télévision d’Innovation, Sciences et Développement économique Canada.
15
Page 16

Émetteur de poche micro numérique ADX1M Axient
Les émetteurs de la série ADX offrent une qualité audio et des performances RF impeccables et sont équipés d’une télécommande ShowLink® pour régler les
paramètres en temps réel et éviter toute interférence. Cet émetteur réunit les fonctions large plage de réglage, mode Haute Densité (HD), cryptage et recharge
facile. Le facteur de forme profilé et la conception en plastique PEI léger apportent confort et résistance à la chaleur. Les interrupteurs à membrane et le connecteur LEMO offrent une protection contre l’humidité tandis que l’affichage OLED affiche une excellente visibilité dans les environnements peu éclairés.
Caractéristiques
Performances
• Plage allant de 20 Hz à 20 kHz avec réponse en fréquence linéaire
• Réglage du gain optimisé par l’activation automatique des étages d’entrée
• L’antenne adaptative interne optimise le signal lorsque l’ADX1M est porté près du corps
• Diversity ShowLink pour la commande à distance de l’émetteur et l’évitement automatique des interférences
• Cryptage AES 256 bits une transmission sécurisée
• > 120 dB, pondéré en A, gain du système @ +10
• Sortie numérique : > 125 dB, pondéré en A (Dante, AES3, AES67)
• Plage de fonctionnement de 100 mètres (300 pieds) dans la ligne de visée
• Modes de modulation sélectionnables qui optimisent les performances en matière d’efficacité spectrale
- Standard — couverture optimale, faible latence
- High Density — accroissement important du nombre de canaux max. du système
• Générateur de fréquences et marqueurs HF intégrés pour faciliter les tests en marchant
• Niveaux de puissance commutables = 2/10/20 mW (selon la région)
• Sélection du mode Diversity de fréquence avec deux émetteurs ceinture
• Accus rechargeables Shure SB910M pour une autonomie de fonctionnement jusqu’à 7 heures, mesure précise sans effet-mémoire
Conception
• Conception compacte et épurée pour un masquage et une portabilité optimaux
• Conception en plastique PEI Ultem® durable et résistant à la chaleur
• Attache pour ceinture amovible
• Boutons de type membrane et connexion LEMO pour éviter la pénétration de sueur et d’humidité
• Connecteur LEMO renfoncé
• Affichage OLED à contraste élevé
Accessoires fournis
Accu rechargeable Shure SB910M 95A24863
Attache pour ceinture 44A12547
Accessoires en option
Accu rechargeable Shure SB910M 95A24863
Attache pour ceinture de rechange 44A12547
16
Page 17

Généralités sur l’émetteur ADX1M
① Jack d’entrée
Permet de connecter un microphone
ou un câble d’instrument muni d’un
connecteur LEMO à 3 broches.
② Bouton d’augmentation (⋀)
Servent à naviguer dans les différents
menus de paramètres et à en modifier
les réglages.
③ Port infrarouge (IR)
À aligner sur le port infrarouge du
récepteur pendant la synchronisation
IR pour effectuer le réglage et la
configuration automatiques de
l’émetteur.
④ Bouton d’alimentation et Quitter (X)
Appuyer sans relâcher pour mettre
l’émetteur sous ou hors tension.
Fonctionne comme un bouton
« précédent » pour revenir aux menus
ou paramètres précédents sans valider
la modification d’une valeur.
⑤ Bouton de réduction (⋁)
Servent à naviguer dans les différents
menus de paramètres et à en modifier les
réglages.
⑥ Bouton Entrée (O)
Sélectionne les écrans de menu pour
modifier et valider les paramètres.
⑦ Affichage
Affiche les écrans de menu et les réglages.
Appuyer sur n’importe quel bouton pour
activer le rétroéclairage.
⑧ LED d’alimentation
- Verte = l’unité est sous tension
- Rouge = faible charge de l’accu, mode
Coupure du son activé, surcharge d’entrée
ou erreur d’accu (voir Dépannage)
⑨ Couvercle d’accu
Couvercle de fixation de l’accu.
⑩ Accu
Accu rechargeable Shure.
Affichage de l’écran d’accueil
L’écran d’accueil affiche les informations et l’état de l’émetteur.
Conseil : quatre options permettent de choisir les informations à afficher sur
l’écran d’accueil. Utiliser les boutons fléchés pour sélectionner l’une des options
suivantes :
1 2 3 4 5 6
Top Bottom
Front Rear
ADX1M
7
98
10
Commandes de l’émetteur
Utiliser les commandes pour naviguer dans les différents menus de paramètres et
en modifier les valeurs.
X
^
• Nom
• Réglage de fréquence
• Groupe (G) et Canal (C)
• Identifiant de l’appareil
Shure
470.200MHz
7:45
Les icônes suivantes apparaissent pour indiquer les réglages de l’émetteur :
Durée de fonctionnement des piles/de l’accu en heures et minutes ou affichage à barres
Clé : affichée lorsque le cryptage est activé
Cadenas : affiché lorsque les commandes sont verrouillées.
L’icône clignote en cas de tentative d’utilisation d’une commande verrouillée (alimentation ou menu).
Force du signal ShowLink affichée de 0 à 5 barres
STD : mode de transmission standard
HD : mode de transmission haute densité
Case à cocher : lorsqu’elle est cochée (x), le mode Coupure
du son est activé et engagé. Si elle n’est pas cochée, le mode
Coupure du son est activé mais pas engagé.
Verrouillage de l’interface
ADX1M
^
O
∨∧ Servent à faire défiler les différents menus et à modifier les val-
X
O
Conseil : utiliser les raccourcis suivants pour la configuration rapide :
• Appuyer sans relâcher sur les boutons ∧ et X pendant la mise en marche pour
verrouiller l’émetteur
• Appuyer sans relâcher sur les boutons O et X pendant la mise en marche pour
couper le son de la sortie HF de l’émetteur
eurs des paramètres.
Fonctionne comme un bouton « précédent » pour revenir aux
menus ou paramètres précédents sans valider la modification
d’une valeur.
Sert à accéder aux menus et à valider les modifications de
paramètres.
Verrouiller les commandes de l’interface de l’émetteur pour éviter toute modification accidentelle ou non autorisée des paramètres. L’icône de verrouillage apparaît sur la
page d’accueil lorsque le verrouillage de l’interface est activé.
1. Dans le menu Utilities, naviguer vers Lock et sélectionner l’une des options de verrouillage suivantes :
- None: les commandes sont déverrouillées
- Power: l’interrupteur d’alimentation est verrouillé
- Menu: les paramètres du menu sont verrouillés
- All: l’interrupteur d’alimentation et les paramètres du menu sont verrouillés
2. Appuyer sur O pour enregistrer.
Conseil : pour déverrouiller rapidement un émetteur : appuyer deux fois sur O, sélectionner None et appuyer sur O.
17
Page 18

Accus rechargeables Shure
Les accus Shure au lithium-ion constituent une option rechargeable d’alimentation des émetteurs. Les accus sont rapidement chargés à 50 % de leur capacité en une
heure et complètement chargés en trois heures.
Des chargeurs simples et des chargeurs à plusieurs baies sont disponibles pour recharger les accus Shure.
Attention : charger uniquement les accus rechargeables Shure avec un chargeur d’accu Shure.
Mise en place des piles/de l’accu
1
2
Retrait de l’accu
① Tirer pour désengager le couvercle de l’accu.
② Faire glisser l’accu pour l’extraire de l’émetteur.
Vérification des informations relatives à l’accu
Quand on utilise un accu rechargeable Shure, le nombre d’heures et de minutes
restantes est affiché sur l’écran d’accueil du récepteur et de l’émetteur.
Des informations détaillées relatives à l’accu sont affichées dans le menu Battery
de l’émetteur : Utilities > Battery
• Battery: type de chimie des piles ou de l’accu mis en place (Shure, alcaline,
lithium, NiMH)
• Bars: indique le nombre de barres affichées
• Time: durée de fonctionnement de l’accu
• Charge: pourcentage de capacité de charge
• Health: pourcentage de santé actuel de l’accu
• Cycle Count: nombre de cycles de charge total pour l’accu mis en place
Charge
85%
2
1
Installation de l’accu
① Faire glisser l’accu dans l’émetteur.
② Engager entièrement le couvercle pour maintenir l’accu
Autonomie restante de l’accu ADX1M SB910M
Remarque : des niveaux de puissance RF élevés réduisent l’autonomie de
l’accu. L’autonomie de l’accu varie en fonction de son âge et des conditions
environnementales.
2 mW 10 mW 20 mW
6,5 à 8,5 heures 6,0 à 8,0 heures 5,0 à 6,0 heures
Conseils importants pour l’entretien et le
stockage des accus rechargeables Shure
L’entretien et le stockage appropriés des accus Shure permettent d’obtenir des
performances fiables et prolongent la durée de vie utile.
• Toujours stocker les accus et les émetteurs à température ambiante
• Idéalement, il faudrait que les accus soient chargés à environ 40 % de leur capacité pour le stockage à long terme
• Nettoyer périodiquement les contacts de l’accu avec de l’alcool pour maintenir
un contact idéal
• Pendant le stockage, vérifier les accus tous les 6 mois et les recharger à 40 %
de leur capacité selon le besoin
Pour de plus amples renseignements sur les accus rechargeables, visiter www.
shure.com.
18
Page 19

Paramètres de menu
Le menu Main organise les paramètres de l’émetteur disponibles en trois
sous-menus :
• Radio
• Audio
• Utilities
Conseil : utiliser les boutons fléchés pour se déplacer parmi les sous-menus.
Main
Radio
Conseils pour modifier les paramètres de menu
• Pour accéder aux options du menu à partir de l’écran d’accueil, appuyer sur O.
Utiliser les boutons fléchés pour accéder aux autres menus et paramètres.
• Un paramètre de menu clignote lorsque la modification est activée
• Pour augmenter, diminuer ou modifier un paramètre, utiliser les boutons fléchés
• Pour enregistrer une modification du menu, appuyer sur O
• Pour quitter un menu sans enregistrer de modification, appuyer sur X
Description des paramètres de menu
Menu Radio
Fréq.
Appuyer sur le bouton O pour activer la modification d’un groupe (G:), d’un
canal (C:) ou d’une fréquence(MHz). Utiliser les boutons fléchés pour modifier
les valeurs. Pour modifier la fréquence, appuyer une fois sur le bouton O
pour modifier les 3 premiers chiffres ou deux fois pour modifier les 3 chiffres
suivants.
Power
Des réglages à forte puissance RF peuvent étendre la portée de l’émetteur.
Remarque : des réglages à forte puissance RF réduisent l’autonomie de l’accu.
Output
Règle la sortie RF sur On ou Mute.
- On : le signal HF est actif
- Mute : le signal RF est inactif
Menu Audio
Offset
Régler le niveau d’Offset du micro pour équilibrer les niveaux de micro lors
de l’utilisation de deux émetteurs pour la fonction Diversity de fréquence ou
lorsque plusieurs émetteurs sont affectés aux emplacements pour récepteur.
Plage de réglage = -12 dB à +21 dB.
Polarity
Affectation de polarité sélectionnable pour les émetteurs à connecteur LEMO :
- Pos: une pression positive sur le diaphragme produit une tension positive sur la
broche 2 (par rapport à la broche 3 de la sortie XLR) et la pointe de la sortie TRS.
- Neg: une pression positive sur le diaphragme produit une tension négative sur la
broche 2 (par rapport à la broche 3 de la sortie XLR) et la pointe de la sortie TRS.
Mute
Lorsque ce mode est activé, l’interrupteur d’alimentation est configuré en tant
qu’interrupteur de coupure du son :
- Interrupteur d’alimentation activé : signal audio actif
- Interrupteur d’alimentation désactivé : signal audio coupé
Tone Gen
L’émetteur génèrera une fréquence de test continue :
- Freq : la fréquence peut être réglée à 400 Hz ou 1 000 Hz.
- Level : permet de régler le niveau de sortie de la fréquence de test.
Arborescence de menu
Main Menu
Radio
Audio
Utilities
Freq
Power
Output
Oset
Polarity
Mute
Tone Gen
Device ID
Locks
Link Info
SL Test
Marker
Battery
Talk Sw
Identify
About
Reset All
Menu Utilities
Device ID
Attribuer un code appareil de 9 lettres ou chiffres maximum.
Locks
- None: les commandes sont déverrouillées
- Power: l’interrupteur d’alimentation est verrouillé
- Menu: les paramètres du menu sont verrouillés
- All: l’interrupteur d’alimentation et les paramètres du menu sont verrouillés
Verrouille les commandes et l’interrupteur d’alimentation de l’émetteur.
Informations relatives au jumelage
Affiche les informations suivantes sur le jumelage entre un émetteur et un
récepteur :
- Not Linked : l’émetteur n’est pas lié à un récepteur
- Linked : l’émetteur est lié à un récepteur. Sélectionner Unlink? pour annuler le
jumelage entre l’émetteur et le récepteur.
- Unlinked : l’émetteur n’est pas lié à un récepteur
Test SL
Outil de test ShowLink permettant de mesurer les limites d’une couverture
ShowLink.
Alternat
Indique l’état de l’alternat.
Marker
Lorsque cette option est activée, appuyer sur le bouton enter pour ajouter un
marqueur dans Wireless Workbench.
Battery
Affiche les informations des piles/de l’accu :
- Battery: type de chimie des piles ou de l’accu mis en place (rechargeable Shure,
alcaline, lithium, NiMH)
- Bars: indique le nombre de barres affichées
- Time: durée de fonctionnement de l’accu
- Charge: pourcentage de capacité de charge
- Health: pourcentage de santé actuel de l’accu
- Cycle Count: nombre de cycles de charge enregistrés pour l’accu mis en place
About
Affiche les informations suivantes sur l’émetteur :
- Model affiche le numéro du modèle
- Band affiche la bande d’accord de l’émetteur
- FW Version firmware installé
- HW Version version du matériel
- Serial Num numéro de série
Reset All
Restaure les paramètres d’usine pour tous les paramètres de l’émetteur.
19
Page 20

Synchro IR
Coupure RF
Utiliser la synchronisation IR pour créer un canal audio entre l’émetteur et le
récepteur.
Remarque : la bande du récepteur doit coïncider avec celle de l’émetteur.
1. Sélectionner un canal de récepteur.
2. Régler le canal sur une fréquence disponible à l’aide de la fonction de
scan du groupe ou rechercher manuellement une fréquence ouverte.
3. Allumer l’émetteur.
4. Appuyer sur le bouton SYNC du récepteur.
5. Aligner les fenêtres IR de l’émetteur et du récepteur afin que la LED IR
s’allume en rouge. Une fois l’opération terminée, Sync Success! s’affiche.
L’émetteur et le récepteur sont maintenant réglés sur la même fréquence.
AD4Q
Axient Digital
Wireless Receiver
IR
AUDIO
RX 1
A B
OL
1
SYNC
RX 3RF
AUDIO
RX 2RF
A B
OL
3
2
SYNC
SYNC
RF
AUDIO
RX 4RF
AUDIO
A B
A B
OL
OL
4
SYNC
NAVIGATE
POWER
CONTROL
PUSH
<15 cm (6 in.)
ADX1M
Sync Success!
Remarque :
toute modification de l’état de cryptage du récepteur (activation ou désactivation
du cryptage) nécessite une synchronisation pour transférer les réglages à l’émetteur. De nouvelles clés de cryptage pour le canal de l’émetteur et du récepteur
sont générées à chaque synchronisation infrarouge. Pour demander une nouvelle
clé pour un émetteur, effectuer une synchronisation IR avec le canal de récepteur
souhaité.
La coupure HF empêche la transmission du son en supprimant le signal HF
tout en permettant à l’émetteur de rester sous tension. L’écran d’accueil affiche
RF MUTED dans ce mode.
RF Output
Mute
1. Dans le menu Radio, naviguer vers Output.
2. Choisir l’une des options suivantes :
- On : le signal HF est actif
- Mute : le signal HF est désactivé
3. Appuyer sur O pour enregistrer.
Éteindre puis rallumer l’émetteur ou remplacer les piles/l’accu redéfinit l’option
Output sur On.
Coupure HF à la mise sous tension
La coupure HF à la mise sous tension place l’émetteur en mode RF Mute dès qu’il
est allumé.
• En commençant avec l’émetteur éteint, appuyer sans relâcher sur le bouton X,
puis mettre l’émetteur sous tension
• Continuer à appuyer sur le bouton X jusqu’à ce que le message RF Muted apparaisse sur l’écran d’accueil
Conseil : pour activer la sortie RF, aller à Radio > Output et sélectionner On.
Réglage manuel des fréquences
L’émetteur peut être réglé manuellement sur un groupe, un canal ou une
fréquence spécifique.
1. Naviguer jusqu’au menu Radio et sélectionner Freq.
2. Accéder à G: et C: pour modifier le groupe et le canal, ou sélectionner le paramètre de fréquence (MHz). En cas de modification de la
fréquence, appuyer une fois sur O pour activer la modification des trois
premiers chiffres ou deux fois pour modifier les trois derniers chiffres.
3. Utiliser les boutons ∧∨ pour régler le groupe, le canal ou la fréquence.
4. Appuyer sur O pour enregistrer, puis sur X une fois terminé.
Freq
G: 1 C:1
470.700 MHz
Port de l’émetteur de ceinture
Accrocher l’émetteur à une ceinture ou glisser une sangle de guitare dans l’attache
de l’émetteur comme illustré.
Pour obtenir les meilleurs résultats, la ceinture doit être appuyée contre la base de
l’attache.
Conseil : l’attache peut être retirée et tournée de 180 degrés pour d’autres options
de montage.
20
Page 21

Surcharge d’entrée
Test de la liaison ShowLink
Le message OVERLOAD s’affiche quand l’entrée audio reçoit un signal d’un
niveau élevé. La LED d’alimentation devient rouge pour fournir une autre indication de surcharge. Réduire le signal d’entrée ou activer l’atténuateur d’entrée
pour supprimer la surcharge.
Conseil : pour activer l’atténuateur d’entrée, aller à Audio > Pad et sélectionner
-12 dB.
Shure
OVERLOAD
7:45
Générateur de fréquences
L’émetteur comprend un générateur de fréquences interne qui produit un signal audio continu qui facilite le test du son ou le dépannage de la chaîne du
signal audio. Le niveau de la fréquence peut être réglé entre -60 et 0 dB et la
fréquence peut être réglée à 400 Hz ou 1 000 Hz.
1. Dans le menu Audio, sélectionner Tone Gen.
2. Régler la fréquence sur 400 Hz ou 1000 Hz.
3. Sélectionner Level et utiliser les boutons fléchés
pour régler la valeur entre -60 et 0 dB.
Conseil : toujours commencer en réglant le niveau à -60 dB pour éviter de surcharger les haut-parleurs ou les casques.
Pour désactiver la fréquence, sélectionner Off dans le menu ou rallumer
l’émetteur.
Le test ShowLink permet de trouver les limites de la zone de couverture
ShowLink. Quand le test ShowLink est activé, un affichage à cinq barres
indiquant le niveau de qualité du signal apparaît sur l’écran. À mesure que
l’émetteur s’éloigne du point d’accès, le nombre de barres diminue. Le contrôle
ShowLink est maintenu tant qu’une barre est affichée.
Si l’émetteur se trouve au-delà de la portée, le contrôle ShowLink n’est pas
possible ; toutefois, le signal audio n’est ni affecté ni interrompu tant que
l’émetteur est à portée du signal RF. Pour améliorer la couverture, ajuster l’emplacement des points d’accès ou placer des points d’accès supplémentaires
pour étendre la couverture.
Pour activer le test ShowLink :
1. Dans le menu Utilities, naviguer vers SL Test.
2. Appuyer sur le bouton O pour lancer le test et parcourir la zone de
couverture en marchant avec l’émetteur. Surveiller le nombre de barres
affichées ainsi que l’état de l’icône ShowLink. Les limites de la couverture
se traduisent par l’affichage de 0 barre ou par une icône ShowLink vide.
3. Appuyer sur le bouton X pour quitter le test ShowLink.
Conseil : pendant le test ShowLink, appuyer sur O (entrée) pour ajouter un marqueur dans Wireless Workbench.
Mise à jour du firmware
Les firmwares sont des logiciels intégrés à chaque appareil pour en contrôler
les fonctionnalités. Régulièrement, de nouvelles versions de firmware sont
développées pour y incorporer des fonctions supplémentaires et y apporter des
améliorations. Pour tirer parti des améliorations en matière de conception, il est
possible de télécharger et d’installer les nouvelles versions de firmware à l’aide
de Shure Update Utility. Pour télécharger Shure Update Utility, rendez-vous à
l’adresse http://www.shure.com/.
Tone Gen
Tone: 400Hz
Level: -60db
Égalisation des niveaux audio avec
l’offset du micro
Lors de la liaison d’au moins deux émetteurs à un récepteur, les microphones
ou instruments peuvent présenter des niveaux sonores différents. Si cela se
produit, utiliser la fonction Offset pour égaliser les niveaux audio et supprimer
les différences de volume audibles entre les émetteurs. Si un seul émetteur est
utilisé, régler le paramètre Offset sur 0 dB.
1. Allumer le premier émetteur et effectuer une vérification du son pour
tester le niveau de ce dernier. Éteindre l’émetteur une fois terminé.
2. Allumer le deuxième émetteur et effectuer une vérification du son pour tester le niveau de ce dernier. Faire de même pour tous les autres émetteurs.
3. S’il existe une différence audible du niveau sonore entre les
deux émetteurs, naviguer jusqu’au menu Offset (Audio >
Offset) de l’émetteur pour augmenter ou diminuer le paramètre
Offset en temps réel afin d’égaliser les niveaux audio.
Mic Offset
Gestion des versions de firmware
Lors d’une mise à jour, commencer par télécharger le firmware sur le récepteur, puis mettre à jour les émetteurs à la même version de firmware pour obtenir un fonctionnement homogène.
La version du firmware des appareils Shure est numérotée sous la forme suivante : MAJEUR.MINEUR.PATCH (p. ex. 1.2.14). Au minimum, tous les appareils
du réseau (y compris les émetteurs) doivent avoir les mêmes numéros de version de firmware MAJEUR et MINEUR (p. ex., 1.2.x).
Mise à jour de l’émetteur
1. Transférer le firmware dans le récepteur.
2. Accéder au menu suivant du récepteur :
Device Conguration > Tx Firmware Update.
3. Aligner les ports IR de l’émetteur et du récepteur. Les ports IR
doivent rester alignés pendant toute la durée du téléchargement, ce qui peut prendre 50 secondes ou plus.
Conseil : la LED d’alignement rouge s’allume une fois les deux appareils correctement alignés.
4. Appuyer sur ENTER sur le récepteur pour commencer le
téléchargement vers l’émetteur. Le récepteur affiche la progression de la mise à jour sous forme de pourcentage.
+3 dB
21
Page 22

Caractéristiques
LEMO
Top View of Bodypack
Plage d'offset du micro
-12 à 21 dB (par paliers de 1 dB)
Type d'accu
Shure SB910M Li-ion rechargeable
Durée de fonctionnement des piles
@ 10 mW
Shure SB910M jusqu'à 7 heures
Dimensions
60.4 mms x 68.0 mms x 22.1 mms (2,4 po x 2,7 po x 0,9 po) H x L x P
Poids
53 g (1,9 oz), Sans accu
Boîtier
Plastique
Plage de températures de fonctionnement
-18°C (0°F) à 63°C (145°F)
Remarque : Les caractéristiques des piles peuvent limiter cette plage.
Plage de températures de stockage
-29°C (-20°F) à 74°C (165°F)
Remarque : Les caractéristiques des piles peuvent limiter cette plage.
Entrée audio
Connecteur
Connecteur LEMO
Configuration
Asymétrique
Impédance
8,2 MΩ
Niveau d'entrée maximum
1 kHz avec DHT de 1 %
Bruit d’entrée équivalent du préamplificateur
Réglage de gain du système ≥ +20
-120 dBV, pondéré en A, typique
Sortie HF
Type d'antenne
Intégré hélicoïdal
Impédance
50 Ω
Bande passante occupée
<200 kHz
Type de modulation
Numérique exclusive Axient de Shure
Alimentation
2 mW, 10 mW, 20 mW
Voir tableau de gamme de fréquences et de puissance de sortie, varie suivant la région
ShowLink
Type de réseau
IEEE 802.15.4
Type d'antenne
Conforme Zigbee Dual
Plage de fréquences
2,40 à 2,4835 GHz (24 Canaux)
Puissance de sortie HF
10 dBm (PAR)
varie suivant la région
Schéma de connecteur d’entrée
LEMO
SHIELD
.
1µF
5 V DC
Audio Input
Ground
Ground
Bias Voltage
Audio Input
Bandes de fréquences et puissance HF de
l’émetteur
Bande
Plage de fréquences
(MHz)
G53 470 à 510 2/10/20
G54 479 à 565 2/10/20
G55† 470 à 636 2/10/20
G56 470 à 636 2/10/20
G57△ 470 à 616* 2/10/20
G62 510 à 530 2/10/20
H54 520 à 636 2/10/20
K53† 606 à 698 2/10/20
K54△ 606 à 663** 2/10/20
K55 606 à 694 2/10/20
K56 606 à 714 2/10/20
K57 606 à 790 2/10/20
K58 622 à 698 2/10/20
L54 630 à 787 2/10/20
R52† 794 à 806 2/10/20
JB 806 à 810 2/10
X55 941 à 960 2/10/20
Remarque : *avec un vide entre 608 et 614 MHz.
Remarque : **avec un vide entre 608 et 614 MHz et un vide entre 616 et
653 MHz.
Remarque : ***puissance fournie au port d’antenne.
Remarque : †le mode d’utilisation varie en fonction de la région. Au Brésil, le
mode haute densité est utilisé.
Remarque : puissance de sortie△ limitée à 10 mW au-delà de 608 MHz.
Puissance HF
(mW)***
22
Page 23

K55 606-694 MHz
Country Code
Code de Pays
Codice di paese
Código de país
Länder-Kürzel
Frequency Range
Gamme de frequences
Gamme di frequenza
Gama de frequencias
Frequenzbereich
A, B, BG, CH, CY, CZ, D, DK, EST, F *
FIN, GB, GR, H, HR, I, IRL, IS, L, LT *
M, N, NL, P, PL, RO, S, SK, SLO, TR *
all other countries *
* This equipment may be capable of operating on some frequencies not authorized in your region. See Licensing Information.
G56 470-636 MHz
Country Code
Code de Pays
Codice di paese
Código de país
Länder-Kürzel
Frequency Range
Gamme de frequences
Gamme di frequenza
Gama de frequencias
Frequenzbereich
A, B, BG, CH, CY, CZ, D, DK, EST, F *
FIN, GB, GR, H, HR, I, IRL, IS, L, LT *
M, N, NL, P, PL, RO, S, SK, SLO, TR *
all other countries *
* This equipment may be capable of operating on some frequencies not authorized in your region. See Licensing Information.
K57 606-790 MHz
Country Code
Code de Pays
Codice di paese
Código de país
Länder-Kürzel
Frequency Range
Gamme de frequences
Gamme di frequenza
Gama de frequencias
Frequenzbereich
A, B, BG, CH, CY, CZ, D, DK, EST, F *
FIN, GB, GR, H, HR, I, IRL, IS, L, LT *
M, N, NL, P, PL, RO, S, SK, SLO, TR *
all other countries *
* This equipment may be capable of operating on some frequencies not authorized in your region. See Licensing Information.
23
Page 24

Homologations
Homologué selon la partie 15 et la partie 74 des réglementations FCC.
Homologué au Canada selon RSS-210.
Code FCC : DD4ADX1MG55, DD4ADX1MG57, DD4ADX1MK53, DD4ADX1MK54, DD4ADX1MX55. IC : 616A-ADX1MG55, 616A-ADX1MK53.
Cet appareil est conforme à la ou aux normes RSS d’exemption de licence d’Industrie Canada. L’utilisation de ce dispositif est assujettie aux deux conditions suivantes : (1) ce dispositif ne doit pas causer d’interférences et (2) ce dispositif doit accepter toutes les interférences, y compris celles qui pourraient provoquer un
fonctionnement non souhaitable de l’appareil. Le présent appareil est conforme aux CNR d’Industrie Canada applicables aux appareils radio exempts de licence.
L’exploitation est autorisée aux deux conditions suivantes : (1) l’appareil ne doit pas produire de brouillage, et (2) l’utilisateur de l’appareil doit accepter tout brouillage radioélectrique subi, même si le brouillage est susceptible d’en compromettre le fonctionnement.
Conforme aux exigences essentielles des directives européennes suivantes :
• Directive DEEE 2002/96/CE, telle que modifiée par 2008/34/CE
• Directive RoHS 2011/65/CE
Remarque : Suivre le plan de recyclage régional en vigueur pour les accus et les déchets électroniques
Ce produit est conforme aux exigences essentielles de toutes les directives européennes applicables et est autorisé à porter la marque CE.
Le soussigné, Shure Incorporated, déclare que l’équipement radioélectrique est conforme à la directive 2014/53/UE. Le texte complet de la déclaration UE de conformité est disponible à l’adresse internet suivante : http://www.shure.com/europe/compliance
Représentant agréé européen :
Shure Europe GmbH
Siège Europe, Moyen-Orient et Afrique
Service : Homologation EMEA
Jakob-Dieffenbacher-Str. 12
75031 Eppingen, Allemagne
Téléphone : +49-7262-92 49 0
Télécopie : +49-7262-92 49 11 4
Courriel : EMEAsupport@shure.de
RENSEIGNEMENTS SUR L’OCTROI DE LICENCE
Autorisation d’utilisation : Une licence officielle d’utilisation de ce matériel peut être requise dans certains pays. Consulter les autorités compétentes pour les exigences éventuelles. Tout changement ou modification n’ayant pas fait l’objet d’une autorisation expresse de Shure Incorporated peut entraîner la nullité du droit
d’utilisation de l’équipement. La licence d’utilisation de l’équipement de microphone sans fil Shure demeure de la responsabilité de l’utilisateur, et dépend de la
classification de l’utilisateur et de l’application prévue par lui ainsi que de la fréquence sélectionnée. Shure recommande vivement de se mettre en rapport avec les
autorités compétentes des télécommunications pour l’obtention des autorisations nécessaires, et ce avant de choisir et de commander des fréquences.
Information à l’utilisateur
Cet équipement a été testé et déclaré conforme aux limites pour les appareils numériques de classe B, selon la section 15 des règlements de la FCC. Ces limites
sont destinées à assurer une protection raisonnable contre les interférences nuisibles dans une installation résidentielle. Cet équipement produit, utilise et peut
émettre de l’énergie radio électrique et, s’il n’est pas installé et utilisé conformément aux présentes instructions, peut causer des interférences nuisibles aux communications radio. Il n’existe toutefois aucune garantie que de telles interférences ne se produiront pas dans une installation particulière. Si cet équipement produit
des interférences nuisibles à la réception d’émissions de radio ou de télévision, ce qui peut être établi en mettant l’appareil sous, puis hors tension, il est recommandé à l’utilisateur d’essayer de corriger le problème en prenant l’une ou plusieurs des mesures suivantes :
• Réorienter ou déplacer l’antenne réceptrice.
• Augmenter la distance séparant l’équipement du récepteur.
• Brancher l’équipement sur un circuit électrique différent de celui du récepteur.
• Consulter le distributeur ou un technicien radio et télévision.
Avertissement Australie pour le sans fil
Cet appareil fonctionne sur la base d’une licence de l’ACMA et doit respecter toutes les conditions de cette licence, y compris les fréquences de fonctionnement.
D’ici au 31 décembre 2014, cet appareil les respecte s’il fonctionne dans la bande de fréquences 520–820 MHz. AVERTISSEMENT : pour les respecter après le
31 décembre 2014, cet appareil devra fonctionner dans la bande 694-820 MHz.
Cet appareil est conforme à la ou aux normes RSS d’exemption de licence d’Industrie Canada. L’utilisation de ce dispositif est assujettie aux deux conditions suivantes : (1) ce dispositif ne doit pas causer d’interférences et (2) ce dispositif doit accepter toutes les interférences, y compris celles qui pourraient provoquer un
fonctionnement non souhaitable de l’appareil.
Le présent appareil est conforme aux CNR d’Industrie Canada applicables aux appareils radio exempts de licence. L’exploitation est autorisée aux deux conditions
suivantes : (1) l’appareil ne doit pas produire de brouillage, et (2) l’utilisateur de l’appareil doit accepter tout brouillage radioélectrique subi, même si le brouillage
est susceptible d’en compromettre le fonctionnement.
24
Page 25

Microtransmisor digital de la unida portátil ADX1M Axient
Los transmisores de la serie ADX ofrecen calidad de audio y rendimiento de RF impecables y están equipados con un control remoto ShowLink® para ajustar en
tiempo real los parámetros y la eliminación de interferencias. Este transmisor cuenta con amplia sintonización, modo de alta densidad (HD), cifrado y recarga
avanzada. Su forma compacta y su fabricación en plástico de peso liviano (PEI) ofrece comodidad y resistencia a la humedad. Los interruptores de membrana y
conector LEMO lo protegen contra la humedad, mientras que la pantalla OLED ofrece una excelente visibilidad en ambientes poco iluminados.
Características
Presentaciones
• Banda de frecuencias de 20 Hz a 20 kHz con respuesta de frecuencia uniforme
• Preparación automática de audio que optimiza la configuración de la ganancia
• La antena adaptable interna optimiza la señal cuando el ADX1M se encuentra contra el cuerpo
• Diversity ShowLink: habilitado para el control remoto del transmisor y la anulación automática de interferencia
• Cifrado AES de 256 bits activado para transmisiones seguras
• >120 dB, ponderación A, Ganancia del Sistema a +10
• Salida digital: >125 dB, ponderación A (Dante, AES3, AES67)
• Rango de operación de línea visual de 100 metros (300 pies)
• Modos de modulación seleccionable para optimizar el rendimiento de la eficiencia espectral
- Estándar: cobertura óptima, latencia baja
- Alta densidad: aumento drástico en el recuento máximo de canales del sistema
• Generador de tonos incorporado y marcadores de RF para facilitar las pruebas de cambio de posición
• Niveles de alimentación conmutable = 2/10/20 mW (dependen de la región)
• Selección Diversity de frecuencia utilizando dos dispositivos portátiles
• Baterías recargables Shure SB910M de hasta 7 horas de funcionamiento, medidas de precisión y efecto de memoria nulo
Diseño
• Diseño simplificado y pequeño para que sea más discreto y para mejorar su colocación
• Ultem® fabricación de plástico PEI para resistencia al calor y durabilidad
• Gancho desmontable para cinturón
• Los botones diseño de membrana y la conexión LEMO lo protegen contra el sudor y la entrada de humedad
• Conector LEMO empotrado
• Pantalla OLED de alto contraste
Componentes incluidos
Batería recargable Shure SB910M 95A24863
Gancho para cinturón 44A12547
Accesorios opcionales
Batería recargable Shure SB910M 95A24863
Gancho de repuesto para cinturón 44A12547
25
Page 26

Descripción general del transmisor ADX1M
① Conector de entrada
Se conecta a un cable de micrófono
de conector LEMO de 3 clavijas o
instrumentos.
② Botón para subir (⋀)
Se usan para avanzar por los menús
de parámetros y cambiar los ajustes.
③ Puerto infrarrojo (IR)
Se alinea con el puerto IR del
receptor durante una sincronización
IR para sintonización y programación
automática del transmisor.
④ Botón de alimentación y salir (X)
Mantenga pulsado para encender o
apagar el transmisor. Actúa como el
botón 'atrás' para regresar a menús o
parámetros previos sin confirmar un
cambio de valores.
⑤ Botón para bajar (⋁)
Se usan para avanzar por los menús
de parámetros y cambiar los ajustes.
⑥ Botón Enter (O)
Se usa para entrar a vistas de menús para
editar y confirmar cambios en los parámetros.
⑦ Pantalla
Muestra las pantallas de menú y los valores
de configuración. Pulse cualquiera de los
botones para activar la iluminación de fondo.
⑧ LED de alimentación
- Verde = unidad encendida
- Rojo = batería con poca carga, modo de silenciamiento activado, sobrecarga de entrada o
error de batería (vea Localización de averías)
⑨ Cierre de la batería
Cierre para asegurar la batería.
⑩ Batería
Batería recargable Shure.
Disposición de la pantalla inicial
La pantalla inicial muestra la información y el estado del transmisor.
Sugerencia: Existen cuatro opciones para elegir la información que se muestra
en la pantalla de inicio. Utilice los botones de flechas para seleccionar una de las
siguientes opciones:
1 2 3 4 5 6
Top Bottom
Front Rear
ADX1M
7
98
10
Controles del transmisor
Se usan los controles para avanzar por los menús de parámetros y cambiar
valores.
X
^
• Nombre
• Configuración de la frecuencia
• Grupo (G) y canal (C)
• ID del dispositivo
Shure
470.200MHz
7:45
Los iconos siguientes aparecen para indicar los ajustes del transmisor:
Tiempo de funcionamiento de la batería en horas y minutos o
pantalla de barra
Llave: aparece cuando el cifrado está habilitado
Candado: aparece cuando los controles están bloqueados. El
ícono destellará si se intenta acceder a un control bloqueado
(de alimentación o menú).
ShowLink muestra la intensidad de la señal de 0 a 5 barras
STD: Modo de transmisión estándar
HD: Modo de transmisión de alta densidad
Cuadro: cuando el cuadro tiene una “x”, el modo Silenciamiento
está encendido y activado. Si el cuadro está vacío, el modo
Silenciamiento está encendido, pero no está activado.
Bloqueo de la interfaz
ADX1M
^
O
∨∧ Se usan para desplazarse por las pantallas de menú y
X
O
Sugerencia: use los siguientes accesos directos de los controles para la configuración rápida:
• Sostenga los botones ∧ y X mientras enciende para bloquear el transmisor
• Presione los botones O y X mientras enciende para silenciar la salida de RF del
transmisor
para cambiar los valores de los parámetros.
Actúa como botón ‘atrás’ para regresar a menús o
parámetros previos sin confirmar un cambio de valores.
Sirve para entrar a vistas de menús y confirmar cambios
de parámetros.
Bloquee los controles de la interfaz del transmisor para prevenir cambios accidentales o no autorizados a los parámetros. El ícono de candado aparece en la pantalla de
inicio cuando se activa el bloqueo de la interfaz.
1. En el menú Utilities, desplácese a Lock y seleccione una de las siguientes opciones bloqueadas:
- None: los controles están desbloqueados
- Power: el interruptor de alimentación está bloqueado
- Menu: los parámetros del menú están bloqueados
- All: el interruptor de alimentación y los parámetros del menú están bloqueados
2. Presione O para guardar.
Sugerencia: para desbloquear rápidamente un transmisor: Presione O, dos veces, seleccione None y presione O.
26
Page 27

Baterías recargables Shure
Las baterías de litio ofrecen una opción recargable para encender los transmisores. Las baterías se cargan rápidamente al 50 % de capacidad en una hora y alcanzan la
carga completa en tres horas.
Los cargadores individuales y los cargadores de bahías múltiples están disponibles para recargar las baterías de Shure.
Advertencia: cargue las baterías recargables de Shure solo con un cargador para baterías de Shure.
Instalación de la batería
1
2
Para extraer la batería
① Jale hacia atrás para retirar el cierre de la batería.
② Deslice la batería para extraerla del transmisor.
Revisión de la información de la batería
Cuando se utiliza una batería recargable Shure, las pantallas de inicio del receptor y transmisor muestran la cantidad de horas y minutos restantes.
Se muestra la información detallada para la batería en el menú Battery del transmisor: Utilities > Battery
• Battery: el tipo de química de la batería instalada (Shure, alcalina, litio, NiMH)
• Bars: indica el número de barras mostradas
• Time: tiempo de funcionamiento de la batería
• Charge: porcentaje de capacidad de carga
• Health: porcentaje de la condición actual de la batería
• Cycle Count: total de la cantidad de ciclos de carga de la batería instalada
Charge
85%
2
1
Instalación de la batería
① Coloque la batería dentro el transmisor.
② Enganche completamente el cierre para asegurar la batería
Tiempo de funcionamiento de la batería
SB910M ADX1M
Nota: los niveles de potencia de RF más altos acortan el tiempo de funcionamiento de la batería. El tiempo de funcionamiento de la batería varía según el tiempo
que tenga la batería y las condiciones ambientales.
2 mW 10 mW 20 mW
6,5 a 8,5 horas 6,0 a 8,0 horas 5,0 a 6,0 horas
Sugerencias importantes para el cuidado y
almacenamiento de baterías recargables Shure
El cuidado y almacenamiento adecuado de baterías Shure resulta en rendimiento
confiable y asegura una vida útil prolongada.
• Siempre almacene las baterías y transmisores a temperatura ambiente
• En el caso ideal, las baterías deberán estar cargadas a aproximadamente un
40 % de su capacidad para almacenarlas por un período prolongado.
• Limpie periódicamente los contactos de la batería con alcohol para mantener
un contacto ideal
• Durante el almacenamiento, revise las baterías cada 6 meses y recárguelas a
un 40 % de su capacidad, según sea necesario
Para obtener información adicional sobre baterías recargables, visite www.shure.
com.
27
Page 28

Parámetros del menú
El menú Main organiza los parámetros disponibles del transmisor en tres
submenús:
• Radio
• Audio
• Utilities
Sugerencia: utilice los botones de flechas para avanzar entre los submenús.
Mapa del menú
Main Menu
Radio
Freq
Power
Output
Main
Radio
Sugerencias para editar parámetros del menú
• Para acceder a las opciones del menú desde la pantalla inicial, presione
O. Utilice los botones de flechas para acceder a los parámetros y menús
adicionales.
• Un parámetro del menú destella cuando es posible editarlo
• Para aumentar, reducir o cambiar el valor de un parámetro, utilice los botones
de flecha
• Para guardar los cambios hechos en un menú, pulse O
• Para salir de un menú sin guardar los cambios hechos, pulse X
Descripciones de los parámetros del menú
Menú del radio
Frec.
Presione el botón O para habilitar la edición de un grupo (G:) canal (C:) o
frecuencia (MHz). Utilice los botones de flechas para ajustar los valores. Para
editar la frecuencia, presione el botón O una vez para editar los primeros 3
dígitos, o dos veces para editar los siguientes 3 dígitos.
Power
Los ajustes de mayor potencia de RF pueden ampliar el rango del transmisor.
Nota: Los ajustes de mayor potencia de RF acortan el tiempo de funcionamiento de
la batería.
Output
Configura la salida de RF en activo o en silencio.
- On: la señal de RF está activa
- Mute: la señal de RF está inactiva
Menú Audio
Offset
Ajuste el nivel de Offset para equilibrar los niveles del micrófono cuando
utilice dos transmisores para una diversidad de frecuencia o cuando asigne
varios transmisores a las ranuras del receptor. Rango de ajuste: –12 dB a +21
dB.
Polarity
Asignación de polaridad seleccionable para los transmisores con conector
LEMO:
- Pos: una presión positiva en el diafragma del micrófono produce un voltaje positivo en la clavija 2 (con respecto a la clavija 3 de la salida XLR) y en la punta de la
salida TRS.
- Neg: una presión negativa en el diafragma del micrófono produce un voltaje negativo en la clavija 2 (con respecto a la clavija 3 de la salida XLR) y en la punta de
salida TRS.
Mute
Cuando está activado, el interruptor de encendido se configura como
interruptor de silenciamiento del audio:
- Interruptor en posición de encendido: señal de audio activada
- Interruptor en posición de apagado: señal de audio silenciada
Tone Gen
El transmisor generará un tono continuo de prueba:
- Freq: el tono se puede fijar en 400 Hz o 1000 Hz.
- Level: permite el ajuste del nivel de salida del tono de prueba.
Audio
Utilities
Oset
Polarity
Mute
Tone Gen
Device ID
Locks
Link Info
SL Test
Marker
Battery
Talk Sw
Identify
About
Reset All
Menú de utilidades
Device ID
Asigna una Id. del dispositivo hasta de 9 letras o números.
Locks
- None: los controles están desbloqueados
- Power: el interruptor de alimentación está bloqueado
- Menu: los parámetros del menú están bloqueados
- All: el interruptor de alimentación y los parámetros del menú están bloqueados
Bloquea los controles del transmisor y el interruptor de alimentación.
Enlace de información
Muestra la siguiente información sobre el enlace entre un transmisor y el
receptor:
- Not Linked: el transmisor no está enlazado a un receptor
- Linked: el transmisor está enlazado a un receptor. Seleccione Unlink? para liberar el transmisor del enlace con el receptor.
- Unlinked: el transmisor no está enlazado a un receptor
Prueba SL
Herramienta de prueba de ShowLink para medir los límites de la cobertura de
ShowLink.
Interruptor para hablar
Indica el estado del interruptor para hablar.
Marker
Cuando está activado, pulse el botón enter para desplegar un marcador en
Wireless Workbench.
Battery
Muestra información de la batería:
- Battery: el tipo de química de la batería instalada (recargable Shure, alcalina,
litio, NiMH)
- Bars: indica el número de barras mostradas
- Time: tiempo de funcionamiento de la batería
- Charge: porcentaje de capacidad de carga
- Health: porcentaje de la condición actual de la batería
- Cycle Count: registro de la cantidad de ciclos de carga de la batería instalada
About
Muestra la siguiente información del transmisor:
- Model muestra el número de modelo
- Band muestra la banda de sintonización del transmisor
- FW Version firmware instalado
- HW Version versión del Hardware
- Serial Num número de serie
Reset All
Restaura todos los parámetros del transmisor a la configuración de fábrica.
28
Page 29

Sincronización infrarroja
Silenciamiento de RF
Use la sincronización infrarroja para formar un canal de audio entre el transmisor
y el receptor.
Nota: la banda del receptor debe coincidir con la banda del transmisor.
1. Seleccione un canal del receptor.
2. Sintonice el canal en una frecuencia disponible usando el escaneo en grupo o gire manualmente a una frecuencia abierta.
3. Encienda el transmisor.
4. Pulse el botón SYNC en el receptor.
5. Alinee las ventanas IR entre el transmisor y el receptor para que el LED
de IR se encienda en rojo. Al terminar, aparece Sync Success!. Ahora
están sincronizados en la misma frecuencia el transmisor y el receptor.
AD4Q
Axient Digital
Wireless Receiver
IR
AUDIO
RX 1
A B
OL
1
SYNC
RX 3RF
AUDIO
RX 2RF
A B
OL
3
2
SYNC
SYNC
RF
AUDIO
RX 4RF
AUDIO
A B
A B
OL
OL
4
SYNC
NAVIGATE
POWER
CONTROL
PUSH
<15 cm (6 in.)
ADX1M
Sync Success!
Nota:
cualquier cambio al estado de cifrado (cifrado habilitado/deshabilitado) requiere
una sincronización para enviar las configuraciones al transmisor. Se generan
nuevas contraseñas de cifrado para el canal del receptor y transmisor en cada
sincronización de IR, de manera que, para solicitar una nueva contraseña para un
transmisor, debe realizar una sincronización de IR con el canal receptor deseado.
Configuración de la frecuencia
manualmente
El silenciamiento de RF impide la transmisión de audio al suprimir la señal de RF,
mientras permite que el transmisor permanezca encendido. La pantalla de inicio
muestra RF MUTED en este modo.
RF Output
Mute
1. En el menú Radio, navegue a Output.
2. Elija una de las siguientes opciones:
- On: la señal de RF está activa
- Mute: la señal de RF está inactiva
3. Presione O para guardar.
Para restablecer Output a On apague el transmisor y vuélvalo a encender o extraiga y vuelva a colocar la batería.
Silenciamiento de RF durante el
encendido
El silenciamiento de RF en encendido coloca al transmisor en el modo de silenciamiento de RF inmediatamente al estar activado.
• Empezando con el transmisor apagado, mantenga oprimido el botón X y
enciéndalo
• Siga oprimiendo el botón X hasta que aparezca el mensaje RF Muted en la pantalla inicial
Sugerencia: para encender la salida de RF, desplácese a Radio > Output y seleccione On.
Uso del transmisor de cuerpo
El transmisor se puede ajustar manualmente a un grupo específico, canal o
frecuencia.
1. Desplácese al menú de Radio y seleccione Freq.
2. Desplácese para seleccionar G: y C: para editar el grupo y el canal,
o seleccione el parámetro de frecuencia (MHz). Cuando edite la frecuencia, presione O una vez para habilitar la edición de los primeros tres dígitos o dos veces para editar los siguientes tres dígitos.
3. Utilice los botones ∧∨ para ajustar el grupo, el canal o la frecuencia.
4. Pulse O para guardar los cambios y luego pulse X para terminar.
Freq
G: 1 C:1
470.700 MHz
Enganche el transmisor a un cinturón o deslice una correa de guitarra a través del
gancho del transmisor, de la manera ilustrada.
Para obtener los mejores resultados, presione la correa contra la base del gancho.
Sugerencia: el clip puede quitar y girar a 180 grados para incrementar las opciones de montaje.
29
Page 30

Sobrecarga de entrada
Prueba de ShowLink
El mensaje OVERLOAD se muestra cuando la entrada de audio experimenta una
señal de alto nivel. El LED de alimentación se pondrá en rojo como indicador
adicional de una sobrecarga. Reduzca la señal de entrada o habilite el atenuador de entrada para eliminar la sobrecarga.
Sugerencia: para habilitar el atenuador de entrada, desplácese a Audio > Pad
y seleccione -12 dB.
Shure
OVERLOAD
7:45
Generador de tonos
El transmisor contiene un generador de tonos interno que produce una señal
de audio continua. El tono es útil al realizar una revisión de sonido o para resolver problemas de la cadena de señal de audio. El nivel del tono se puede
ajustar de -60 dB a 0 dB y la frecuencia, en 400 Hz o 1000 Hz.
1. Desde el menú Audio seleccione Tone Gen.
2. Fije la frecuencia en 400 Hz o 1000 Hz.
3. Seleccione Level y use los botones de flecha para
ajustar los valores entre –60 dB y 0 dB.
Sugerencia: siempre empiece con el nivel establecido en –60 dB para evitar
sobrecargar los altavoces o los audífonos.
Apague el tono seleccionando Off en el menú o haciendo circular la alimentación del transmisor.
La prueba de ShowLink es una herramienta para encontrar los límites de la
zona de cobertura de ShowLink. Cuando se activa la prueba de ShowLink,
se muestra una visualización de 5 barras para indicar el nivel de calidad de la
señal. A medida que el transmisor se aleja del punto de acceso, la cantidad de
barras disminuye. El control de ShowLink se mantiene mientras se vea 1 barra.
Si el transmisor queda fuera de la zona de cobertura, no será posible el control
de ShowLink; sin embargo, no se afectará ni se interrumpirá la señal de audio
siempre que el transmisor esté dentro del rango de la señal de RF. Para mejorar la cobertura, ajuste la ubicación de su punto de acceso o coloque otros
puntos de acceso para ampliar la cobertura.
Para activar la prueba de ShowLink:
1. en el menú Utilities, navegue a SL Test.
2. Presione el botón O para iniciar la prueba y realice un recorrido con el transmisor alrededor de la zona de cobertura. Supervise
la cantidad de barras que se muestran y el estado del ícono
de ShowLink. Los límites de la cobertura se indican por medio de 0 barras o el ícono de ShowLink aparece vacío.
3. Pulse el botón X para salir de la prueba de ShowLink.
Sugerencia: durante una prueba de ShowLink, presione O (enter) para desplegar un marcador en Wireless Workbench.
Actualización del firmware
El Firmware es un software incorporado en cada componente que controla su
funcionamiento. Periódicamente, se desarrollan nuevas versiones del firmware
para incorporar características y mejoras adicionales. Para aprovechar las mejoras de diseño, las nuevas versiones del firmware se pueden cargar e instalar
con Shure Update Utility. La herramienta Shure Update Utility se puede descargar desde http://www.shure.com/.
Tone Gen
Tone: 400Hz
Level: -60db
Niveles de audio coincidentes con
compensación de micrófono
Al vincular dos o más transmisores a un receptor, puede haber una diferencia
en los niveles de volumen entre micrófonos o instrumentos. Si esto sucede,
utilice la función Offset para emparejar los niveles de audio y eliminar las
diferencias de volumen audible entre los transmisores. Si utiliza un transmisor
sencillo, configure Offset a 0 dB.
1. Encienda el primer transmisor y lleve a cabo una prueba de sonido
para determinar el nivel de audio. Apague el transmisor al finalizar.
2. Encienda el segundo transmisor y lleve a cabo una prueba de sonido para determinar el nivel de audio. Repita
el proceso para cualquier transmisor adicional.
3. Si existe una diferencia perceptible entre la intensidad sonora de los
transmisores, navegue al menú Offset (Audio > Offset) del transmisor
para aumentar o reducir la Offset hasta uniformar los niveles de audio.
Mic Offset
Versiones del firmware
Cuando realice una actualización, descargue primero el firmware del receptor y
luego actualice los transmisores con firmware de la misma versión para asegurar un funcionamiento consistente.
La numeración del firmware para los dispositivos Shure utiliza el siguiente
formato: PRINCIPAL.MENOR. PARCHE (ejemplo: 1.2.14). Como mínimo,
todos los dispositivos en la red (incluyendo los transmisores), deben tener los
mismos números de versión PRINCIPAL y MENOR del firmware (por ejemplo,
1.2.x).
Actualización del transmisor
1. Descargue el firmware al receptor.
2. Acceda al siguiente menú desde el receptor:
Device Conguration > Tx Firmware Update.
3. Alinee los puertos IR entre el transmisor y el receptor. Los
puertos IR deben estar alineados durante toda la descarga, la cual puede tardar 50 segundos o más.
Sugerencia: el LED de alineación rojo se encenderá cuando la alineación sea
correcta.
4. Presione ENTER en el receptor para iniciar la descarga al transmisor. El
receptor mostrará el progreso de la actualización como porcentaje.
+3 dB
30
Page 31

Especificaciones
LEMO
Top View of Bodypack
Rango de compensación de micrófono
-12 a 21 dB (en incrementos de 1 dB)
Tipo de batería
Shure SB910M Iones de litio recargable
Tiempo de funcionamiento de la batería
@ 10 mW
Shure
SB910M
Dimensiones
60.4 mm x 68.0 mm x 22.1 mm (2,4 pulg x 2,7 pulg x 0,9 pulg) Al x an x pr
Peso
53 g (1,9 oz), Sin batería
Caja
Plástico
Gama de temperatura de funcionamiento
-18°C (0°F) a 63°C (145°F)
Nota: Las características de la pila podrían limitar este rango.
Intervalo de temperaturas de almacenamiento
-29°C (-20°F) a 74°C (165°F)
Nota: Las características de la pila podrían limitar este rango.
has-
ta 7 horas
Entrada de audio
Conector
Conector Lemo
Configuración
Desequilibrada
Impedancia
8,2 MΩ
Nivel máximo de entrada
1 kHz con 1% THD
Ruido de entrada equivalente (EIN) en preamplificador
Ganancia de sistema ≥ +20
-120 dBV, Ponderación A, típico
Salida de RF
Tipo de antena
Helicoidal integrada
Impedancia
50 Ω
Ancho de banda ocupado
<200 kHz
Tipo de modulación
digital patentado Shure Axient
Alimentación
2 mW, 10 mW, 20 mW
Consulte la tabla de intervalos de frecuencia y potencia de salida, varía según la región
ShowLink
Tipo de red
IEEE 802.15.4
Tipo de antena
Zigbee Dual Conformal
Rango de frecuencias
2,40 a 2,4835 GHz (24 Canales)
Potencia RF de salida
10 dBm (Energía irradiada efectiva (ERP))
varía según la región
Diagrama del conector de entrada
LEMO
SHIELD
.
1µF
5 V DC
Audio Input
Ground
Ground
Bias Voltage
Audio Input
Bandas de frecuencias y potencia de RF del
transmisor
Banda
Rango de frecuencias (MHz)
G53 470 a 510 2/10/20
G54 479 a 565 2/10/20
G55† 470 a 636 2/10/20
G56 470 a 636 2/10/20
G57△ 470 a 616* 2/10/20
G62 510 a 530 2/10/20
H54 520 a 636 2/10/20
K53† 606 a 698 2/10/20
K54△ 606 a 663** 2/10/20
K55 606 a 694 2/10/20
K56 606 a 714 2/10/20
K57 606 a 790 2/10/20
K58 622 a 698 2/10/20
L54 630 a 787 2/10/20
R52† 794 a 806 2/10/20
JB 806 a 810 2/10
X55 941 a 960 2/10/20
Nota: *con un espacio entre 608 a 614 MHz.
Nota: **con un espacio entre 608 y 614 MHz y un espacio entre 616 y 653
MHz.
Nota: ***potencia suministrada al puerto de antena.
Nota: el modo de †operación varía según la región. En Brasil, se utiliza el
modo de alta densidad.
Nota: △potencia de salida limitada a 10 mW por encima de 608 MHz.
Potencia de RF
(mW)***
31
Page 32

K55 606-694 MHz
Country Code
Code de Pays
Codice di paese
Código de país
Länder-Kürzel
Frequency Range
Gamme de frequences
Gamme di frequenza
Gama de frequencias
Frequenzbereich
A, B, BG, CH, CY, CZ, D, DK, EST, F *
FIN, GB, GR, H, HR, I, IRL, IS, L, LT *
M, N, NL, P, PL, RO, S, SK, SLO, TR *
all other countries *
* This equipment may be capable of operating on some frequencies not authorized in your region. See Licensing Information.
G56 470-636 MHz
Country Code
Code de Pays
Codice di paese
Código de país
Länder-Kürzel
Frequency Range
Gamme de frequences
Gamme di frequenza
Gama de frequencias
Frequenzbereich
A, B, BG, CH, CY, CZ, D, DK, EST, F *
FIN, GB, GR, H, HR, I, IRL, IS, L, LT *
M, N, NL, P, PL, RO, S, SK, SLO, TR *
all other countries *
* This equipment may be capable of operating on some frequencies not authorized in your region. See Licensing Information.
K57 606-790 MHz
Country Code
Code de Pays
Codice di paese
Código de país
Länder-Kürzel
Frequency Range
Gamme de frequences
Gamme di frequenza
Gama de frequencias
Frequenzbereich
A, B, BG, CH, CY, CZ, D, DK, EST, F *
FIN, GB, GR, H, HR, I, IRL, IS, L, LT *
M, N, NL, P, PL, RO, S, SK, SLO, TR *
all other countries *
* This equipment may be capable of operating on some frequencies not authorized in your region. See Licensing Information.
32
Page 33

Certificaciones
Certificado de acuerdo con FCC Parte 15 y FCC Parte 74.
Certificado en Canadá según la norma RSS-210.
IDENT.FCC: DD4ADX1MG55, DD4ADX1MG57, DD4ADX1MK53, DD4ADX1MK54, DD4ADX1MX55. IC: 616A-ADX1MG55, 616A-ADX1MK53.
Este dispositivo cumple las normas RSS de excepción de licencia de Industry Canada. El uso de este dispositivo está sujeto a las dos condiciones siguientes: (1)
no se permite que este dispositivo cause interferencias, y (2) este dispositivo deberá aceptar cualquier interferencia, incluso la que pudiera causar su mal funcionamiento. Le présent appareil est conforme aux CNR d'Industrie Canada applicables aux appareils radio exempts de licence. L'exploitation est autorisée aux deux
conditions suivantes : (1) l'appareil ne doit pas produire de brouillage, et (2) l'utilisateur de l'appareil doit accepter tout brouillage radioélectrique subi, même si le
brouillage est susceptible d'en compromettre le fonctionnement.
Cumple los requisitos de las siguientes directrices europeas:
• Directriz WEEE 2002/96/EC, según enmienda 2008/34/EC
• Directriz RoHS 2011/65/EU
Nota: Se recomienda respetar las directrices de reciclado de la región relativas a desechos electrónicos y de baterías
Este producto cumple los requisitos esenciales de las directrices europeas pertinentes y califica para llevar el distintivo CE.
Por la presente, Shure Incorporated declara que el equipo radioeléctrico es conforme con la Directiva 2014/53/UE. El texto completo de la declaración UE de conformidad está disponible en la dirección Internet siguiente: http://www.shure.com/europe/compliance
Representante europeo autorizado:
Shure Europe GmbH
Casa matriz en Europa, Medio Oriente y África
Departamento: Aprobación para región de EMEA
Jakob-Dieffenbacher-Str. 12
75031 Eppingen, Alemania
Teléfono: +49-7262-92 49 0
Fax: +49-7262-92 49 11 4
Email: info@shure.de
INFORMACION DE LICENCIA
Licencia de uso: Se puede requerir una licencia ministerial para utilizar este equipo en algunas áreas. Consulte a la autoridad nacional para posibles requisitos.
Los cambios o modificaciones que no tengan la aprobación expresa de Shure Incorporated podrían anular su autoridad para usar el equipo. La obtención de
licencias para los equipos de micrófonos inalámbricos Shure es responsabilidad del usuario, y la posibilidad de obtenerlas depende de la clasificación del usuario
y el uso que va a hacer del equipo, así como de la frecuencia seleccionada. Shure recomienda enfáticamente que el usuario se ponga en contacto con las autoridades de telecomunicaciones correspondientes respecto a la obtención de licencias antes de seleccionar y solicitar frecuencias.
Información para el usuario
Este equipo ha sido probado y hallado en cumplimiento con los límites establecidos para un dispositivo digital categoría B, según la Parte 15 de las normas
de la FCC. Estos límites han sido diseñados para proporcionar una protección razonable contra las interferencias perjudiciales en instalaciones residenciales.
Este equipo genera, utiliza y puede irradiar energía de radiofrecuencia y, si no se instala y utiliza de acuerdo con las instrucciones, puede causar interferencias
perjudiciales a las comunicaciones de radio. Sin embargo, no se garantiza que no ocurrirán interferencias en una instalación particular. Si este equipo causara
interferencias perjudiciales a la recepción de radio o televisión, que se puede determinar apagando y encendiendo el equipo, se recomienda tratar de corregir la
interferencia realizando una de las siguientes acciones:
• Cambie la orientación o la ubicación de la antena receptora.
• Aumente la distancia entre el equipo y el receptor.
• Conecte el equipo a un tomacorriente de un circuito diferente al que está conectado el receptor.
• Consulte al concesionario o a un técnico de radio/TV con experiencia para recibir ayuda.
Advertencia para sistemas inalámbricos en Australia
Este dispositivo funciona con una licencia de categoría ACMA y debe satisfacer todas las condiciones de dicha licencia, incluyendo las frecuencias de trabajo.
Antes del 31 de diciembre de 2014, este dispositivo cumple si se lo usa en la banda de 520–820 MHz. ADVERTENCIA: Después del 31 de diciembre de 2014,
para que cumpla, este dispositivo no deberá ser utilizado en la banda de 694–820 MHz.
Este dispositivo cumple las normas RSS de excepción de licencia de Industry Canada. El uso de este dispositivo está sujeto a las dos condiciones siguientes:
(1) no se permite que este dispositivo cause interferencias, y (2) este dispositivo deberá aceptar cualquier interferencia, incluso la que pudiera causar su mal
funcionamiento.
Le présent appareil est conforme aux CNR d'Industrie Canada applicables aux appareils radio exempts de licence. L'exploitation est autorisée aux deux conditions
suivantes : (1) l'appareil ne doit pas produire de brouillage, et (2) l'utilisateur de l'appareil doit accepter tout brouillage radioélectrique subi, même si le brouillage
est susceptible d'en compromettre le fonctionnement.
33
Page 34

Transmissor Micro Bodypack Digital Axient ADX1M
Os transmissores da série ADX oferecem qualidade de áudio e desempenho de RF impecáveis, e são equipados com controle remoto ShowLink® para ajustes
de parâmetro em tempo real e anulação de interferência. Este transmissor inclui sintonia ampla, modo de Alta Densidade (HD), criptografia e opções de recarga
avançada. A construção em plástico PEI leve e fator forma delineado oferecem conforto e resistência a calor. Os switches de membrana e conector LEMO protegem contra umidade, enquanto a tela OLED fornece excelente visibilidade em ambientes com pouca luz.
Recursos
Desempenho
• Faixa de 20 Hz a 20 kHz com resposta de frequência plana
• A preparação de entrada automática otimiza a configuração de ganho
• A antena interna adaptável otimiza o sinal quando o ADX1M é utilizado em contato com o corpo
• Diversidade compatível com ShowLink para controle remoto dos transmissores e prevenção automática contra interferências
• Criptografia AES de 256 bits ativada para transmissão segura
• >120 dB, ponderado em A, ganho do sistema a +10
• Saída digital: >125 dB, ponderado em A (Dante, AES3, AES67)
• Faixa de operação de linha de vista de 100 metros (300 pés)
• Os modos de modulação selecionáveis otimizam o desempenho para eficiência espectral
- Padrão — cobertura ideal, baixa latência
- Alta densidade — aumento dramático na contagem máxima de canais do sistema
• Gerador de tom integrado e marcadores de RF para facilitar o teste de caminhada
• Níveis de Potência Comutáveis = 2/10/20 mW (dependendo da região)
• Seleção de Diversidade de Frequência usando dois bodypacks
• Baterias recarregáveis Shure SB910M para até 7 horas de tempo de operação, medição de precisão e vício zero da bateria
Design
• Design pequeno e simplificado para melhor ocultação e uso
• Construção em plástico PEI Ultem® para resistência ao calor e durabilidade
• Presilha de cinto removível
• Os botões em estilo membrana e a conexão LEMO protegem contra entrada de suor e umidade
• Conector LEMO rebaixado
• Tela OLED de alto contraste
Componentes Incluídos
Bateria Recarregável Shure SB910M 95A24863
Garra para cinto 44A12547
Acessórios Opcionais
Bateria Recarregável Shure SB910M 95A24863
Garra para cinto de reposição 44A12547
34
Page 35

Visão Geral do Transmissor ADX1M
① Tomada de Entrada
Conecta-se a um microfone ou cabo
de instrumento com conector LEMO de
3 pinos.
② Botão Para Cima (⋀)
Use para navegar pelos menus de
parâmetros e alterar configurações.
③ Porta de Infravermelho (IR)
Alinhe com a porta de IR do
receptor durante uma Sincronização
Infravermelha para sintonia e
configuração automáticas do
transmissor.
④ Botão Liga/Desliga e Sair (X)
Pressione e mantenha pressionado
para ligar ou desligar o transmissor.
Funciona como um botão "voltar" para
retornar aos menus ou parâmetros
anteriores sem confirmar uma alteração
de valor.
⑤ Botão Para Baixo (⋁)
Use para navegar pelos menus de
parâmetros e alterar configurações.
⑥ Botão Enter (O)
Seleciona as telas de menu para edição e
confirma alterações de parâmetros.
⑦ Mostrador
Exibe telas de menus e configurações.
Pressione qualquer botão para ativar a
iluminação de fundo.
⑧ LED de Alimentação
- Verde = unidade está ligada
- Vermelho = bateria fraca, Modo Mudo ativado,
sobrecarga de entrada ou erro da bateria (consulte Resolução de Problemas)
⑨ Trava da Bateria
Trave para prender a bateria.
⑩ Bateria
Bateria recarregável Shure.
Exibição da Tela Inicial
A tela inicial mostra informações sobre o transmissor e o status.
Dica: Há quatro opções para escolher as informações que são exibidas na tela
inicial. Use as setas para selecionar uma das seguintes opções:
1 2 3 4 5 6
Top Bottom
Front Rear
ADX1M
7
98
10
Controles do Transmissor
Use os controles para navegar pelos menus de parâmetros e alterar valores.
X
^
• Nome
• Configuração de Frequência
• Grupo (G) e Canal (C)
• ID do Dispositivo
Shure
470.200MHz
7:45
Os seguintes ícones aparecem para indicar configurações do transmissor:
Tempo de operação da bateria em horas e minutos ou mostrador da barra
Chave: Exibida quando a criptografia está ativa
Trava: Exibida quando os controles estão bloqueados. O ícone
piscará se for feita uma tentativa de acessar um controle bloqueado (alimentação ou menu).
A intensidade do sinal do ShowLink exibe de 0 a 5 barras
STD: Modo de Transmissão Padrão
HD: Modo de Transmissão de Alta Densidade
Caixa: Quando a caixa tem um “x”, o Modo Mudo está ativado
e acionado. Se a caixa está vazia, o Modo Mudo está ativado,
mas não está acionado.
ADX1M
^
O
∨∧ Utilize para percorrer as telas do menu e para alterar va-
X
O
Dica: Use os seguintes atalhos de controle para uma configuração rápida:
• Mantenha os botões ∧ e X pressionados ao ligar para bloquear o transmissor
• Mantenha os botões O e X pressionados ao ligar para definir a saída de RF do
transmissor para mudo
lores de parâmetros.
Funciona como um botão "voltar" para retornar aos
menus ou parâmetros anteriores sem confirmar uma alteração de valor.
Entra nas telas de menu e confirma alterações de
parâmetros.
Bloqueio da Interface
Bloqueie os controles da interface do transmissor para evitar alterações acidentais ou não autorizadas dos parâmetros. O ícone de bloqueio é mostrado na tela inicial
quando o bloqueio da interface está ativado.
1. No menu Utilities, navegue até Lock e selecione uma das seguintes opções de bloqueio:
- None: Os controles estão desbloqueados
- Power: O botão Liga/desliga está bloqueado
- Menu: Os parâmetros do menu estão bloqueados
- All: O botão Liga/desliga e os parâmetros do menu estão bloqueados
2. Pressione O para salvar.
Dica: Para desbloquear rapidamente um transmissor: Pressione O duas vezes, selecione None e pressione O.
35
Page 36

Baterias Recarregáveis Shure
As baterias de lítio Shure oferecem uma opção recarregável para alimentar os transmissores. As baterias são carregadas rapidamente até 50% da capacidade em uma
hora e alcançam a carga completa em três horas.
Carregadores individuais ou carregadores de várias baias estão disponíveis para recarregar as baterias Shure.
Cuidado: Somente carregue as baterias recarregáveis Shure usando um carregador de bateria Shure.
Instalação da Bateria
1
2
Remoção da Bateria
① Puxe para trás para desengatar a trava da bateria.
② Deslize a bateria para fora do transmissor.
Verificação das Informações da Bateria
Ao utilizar uma bateria recarregável Shure, as telas iniciais do receptor e do transmissor exibem as horas e os minutos restantes.
Informações detalhadas sobre a bateria são exibidas no menu Battery do transmissor: Utilities > Battery
• Battery: Tipo de química da bateria instalada (Recarregável Shure, Alcalina,
de Lítio, NiMH)
• Bars: Indica o número de barras exibidas
• Time: Tempo de operação da bateria
• Charge: Porcentagem da capacidade de carga
• Health: Porcentagem do estado atual da bateria
• Cycle Count: Total do número de ciclos de carregamento da bateria instalada
Charge
85%
2
1
Instalação da Bateria
① Deslize a bateria para dentro do transmissor.
② Engate completamente a trava para prender a bateria
Tempo de Operação da Bateria SB910M do
ADX1M
Observação: Níveis de potência de RF mais altos diminuem o tempo de operação
da bateria. O tempo de operação da bateria varia de acordo com a idade da bateria e as condições ambientais.
2 mW 10 mW 20 mW
6,5 a 8,5 horas 6,0 a 8,0 horas 5,0 a 6,0 horas
Dicas Importantes para Cuidar e Armazenar
Baterias Recarregáveis Shure
Cuidado e armazenamento corretos das baterias Shure resultam em desempenho
confiável e asseguram um longo tempo de vida.
• Sempre armazene as baterias e os transmissores em temperatura ambiente
• De forma ideal, as baterias devem ser carregadas até aproximadamente 40%
da capacidade para armazenamento de longo prazo
• Limpe os contatos da bateria com álcool periodicamente para manter o contato
ideal
• Durante o armazenamento, verifique as baterias a cada 6 meses e recarregue
até 40% da capacidade conforme necessário
Para mais informações sobre baterias recarregáveis, acesse www.shure.com.
36
Page 37

Parâmetros do Menu
O menu Main organiza os parâmetros disponíveis do transmissor em três
submenus:
• Radio
• Audio
• Utilities
Dica: Use os botões de seta para rolar pelos submenus.
Main
Radio
Dicas para Editar Parâmetros de Menu
• Para acessar as opções de menu a partir da tela inicial, pressione O. Use os
botões de seta para acessar menus e parâmetros adicionais.
• Um parâmetro de menu pisca quando a edição está ativada
• Para aumentar, diminuir ou alterar um parâmetro, use os botões de seta
• Para salvar uma alteração de menu, pressione O
• Para sair de um menu sem salvar uma alteração, pressione X
Descrições dos Parâmetros do Menu
Menu do Rádio
Frequência
Pressione o botão O para ativar a edição de um grupo (G:), canal (C:) ou
frequência (MHz). Use os botões de seta para ajustar os valores. Para editar a
frequência, pressione o botão O uma vez para editar os primeiros 3 dígitos, ou
duas vezes para editar os 3 dígitos subsequentes.
Power
Configurações de potência de RF mais altas podem estender o alcance do
transmissor.
Observação: configurações de potência de RF mais altas diminuem o tempo de operação da bateria.
Output
Define a saída de RF para On ou Mute.
- On: Sinal de RF está ativo
- Mute: Sinal de RF está inativo
Menu do Áudio
Offset
Ajuste o nível de Offset para balancear os níveis do microfone ao usar dois
transmissores para diversidade de frequência ou atribuir vários transmissores
para os slots do receptor. Faixa de ajuste: –12 dB a +21 dB.
Polarity
Atribuição de polaridade selecionável para os transmissores do conector
LEMO:
- Pos: Pressão positiva no diafragma do microfone produz uma tensão positiva no
pino 2 (em relação ao pino 3 da saída XLR) e na ponta da saída TRS.
- Neg: Pressão positiva no diafragma do microfone produz uma tensão negativa no
pino 2 (em relação ao pino 3 da saída XLR) e na ponta da saída TRS.
Mute
Quando ativado, o botão liga/desliga é configurado como um botão de mudo
para o áudio:
- Botão liga/desliga ligado: sinal de áudio ligado
- Botão liga/desliga desligado: sinal de áudio mudo
Tone Gen
O transmissor gerará um tom de teste contínuo:
- Freq: O tom pode ser definido para 400 Hz ou 1.000 Hz.
- Level: Permite ajuste do nível de saída do tom de teste.
Mapa do Menu
Main Menu
Radio
Audio
Utilities
Freq
Power
Output
Oset
Polarity
Mute
Tone Gen
Device ID
Locks
Link Info
SL Test
Marker
Battery
Talk Sw
Identify
About
Reset All
Menu Utilitários
Device ID
Atribua uma ID do dispositivo de até 9 letras ou números.
Locks
- None: Os controles estão desbloqueados
- Power: O botão Liga/desliga está bloqueado
- Menu: Os parâmetros do menu estão bloqueados
- All: O botão Liga/desliga e os parâmetros do menu estão bloqueados
Bloqueia os controles e o botão liga/desliga do transmissor.
Informações sobre a Conexão
Exibe as seguintes informações sobre a conexão entre um transmissor e
receptor:
- Not Linked: O transmissor não está conectado a um receptor
- Linked: O transmissor está conectado a um receptor. Selecione Unlink? para
liberar o transmissor da conexão do receptor.
- Unlinked: O transmissor não está conectado a um receptor
Teste do SL
Ferramenta de teste do ShowLink para medir os limites de cobertura do
ShowLink.
Talk Sw
Indica o status do switch de voz.
Marker
Quando ativado, pressione o botão enter para adicionar um marcador no
Wireless Workbench.
Battery
Exibe informações da bateria:
- Battery: O tipo de química da bateria instalada (Recarregável Shure, Alcalina,
de Lítio, NiMH)
- Bars: Indica o número de barras exibidas
- Time: Tempo de operação da bateria
- Charge: Porcentagem da capacidade de carga
- Health: Porcentagem do estado atual da bateria
- Cycle Count: Registro do número de ciclos de carregamento da bateria instalada
About
Exibe as seguintes informações do transmissor:
- Model Exibe o número do modelo
- Band Exibe a banda de sintonia do transmissor
- FW Version Firmware instalado
- HW Version Versão do hardware
- Serial Num Número de série
Reset All
Restaura todos os parâmetros do transmissor para as configurações de
fábrica.
37
Page 38

Sincronização infravermelha
Emudecimento de RF
Use a Sincronização Infravermelha para formar um canal de áudio entre o transmissor e o receptor.
Observação: A banda do receptor deve coincidir com a banda do transmissor.
1. Selecione um canal do receptor.
2. Ajuste o canal para uma frequência disponível usando a procura de
grupo ou alterne manualmente para uma frequência aberta.
3. Ligue o transmissor.
4. Pressione o botão SYNC no receptor.
5. Alinhe as janelas de infravermelho entre o transmissor e o receptor para que o LED do infravermelho acenda em vermelho.
Quando concluído, Sync Success! aparece. O transmissor e receptor agora estão sintonizados na mesma frequência.
AD4Q
Axient Digital
Wireless Receiver
IR
AUDIO
RX 1
A B
OL
1
SYNC
RX 3RF
AUDIO
RX 2RF
A B
OL
3
2
SYNC
SYNC
RF
AUDIO
RX 4RF
AUDIO
A B
A B
OL
OL
4
SYNC
NAVIGATE
POWER
CONTROL
PUSH
<15 cm (6 in.)
ADX1M
Sync Success!
Observação:
Qualquer alteração no status de criptografia no receptor (ativar/desativar criptografia) exige uma sincronização para enviar as configurações ao transmissor. Novas
chaves de criptografia para o canal do transmissor e do receptor são geradas em
cada sincronização infravermelha. Portanto, para solicitar uma nova chave para
um transmissor, execute uma sincronização infravermelha com o canal do receptor desejado.
O Emudecimento de RF evita transmissão do áudio suprimindo o sinal de RF, enquanto permite que o transmissor permaneça ligado. A tela inicial exibe RF MUTED
neste modo.
RF Output
Mute
1. No menu Radio, navegue até Output.
2. Selecione uma das seguintes opções:
- On: Sinal de RF está ativo
- Mute: Sinal de RF está desativado
3. Pressione O para salvar.
Desligar e ligar o transmissor, ou substituir a bateria restaurará a Output para On.
Ligar o Emudecimento de RF
Ligar o Emudecimento de RF coloca o transmissor no Modo Mudo de RF imediatamente ao ligar.
• Começando com o transmissor desligado, pressione e mantenha pressionado o
botão X, então ligue a alimentação
• Continue a manter o botão X pressionado até que a mensagem RF Muted apareça na tela inicial
Dica: Para ligar a Saída de RF, navegue até Radio > Output e selecione On.
Como Usar o Transmissor Bodypack
Configuração Manual da Frequência
O transmissor pode ser sintonizado manualmente para um grupo, canal ou frequência específica.
1. Navegue até o menu Radio e selecione Freq.
2. Role para selecionar G: e C: para editar o grupo e canal, ou selecione o parâmetro da frequência (MHz). Ao editar a frequência, pressione O uma vez para ativar a edição dos primeiros três
dígitos, ou duas vezes para editar os últimos três dígitos.
3. Use os botões ∧∨ para ajustar o grupo, o canal ou a frequência.
4. Pressione O para salvar e então, pressione X ao concluir.
Freq
G: 1 C:1
470.700 MHz
Prenda com presilha o transmissor a um cinto ou passe uma cinta de guitarra pela
presilha do transmissor conforme mostrado.
Para obter os melhores resultados, o cinto deve ser pressionado contra a base da
presilha.
Dica: A presilha pode ser removida e girada 180 graus para aumentar as opções
de montagem.
38
Page 39

Sobrecarga na Entrada
Teste do ShowLink
A mensagem OVERLOAD é exibida quando a entrada de áudio enfrenta sinal de
nível alto. O LED de alimentação ficará vermelho como um indicador adicional
de sobrecarga. Reduza o sinal de entrada ou ative o atenuador de entrada
para remover a sobrecarga.
Dica: Para ativar o atenuador de entrada, navegue até Audio > Pad e selecione -12 dB.
Shure
OVERLOAD
7:45
Gerador de Tom
O transmissor contém um gerador de tom interno que produz um sinal de
áudio contínuo. O tom é útil ao executar uma verificação de som ou para resolução de problemas da cadeia do sinal de áudio. O nível do tom é ajustável
de –60 dB a 0 dB e a frequência pode ser definida para 400 Hz ou 1.000 Hz.
1. No menu Audio, selecione Tone Gen.
2. Defina a frequência para 400 Hz ou 1000 Hz.
3. Selecione Level e use os botões de seta para ajustar o valor entre –60 dB e 0 dB.
Dica: Sempre comece com o nível definido em –60 dB para evitar sobrecarregar os alto-falantes ou fones de ouvido.
Desative o tom selecionando Off no menu ou desligando e ligando novamente
o transmissor.
O Teste do ShowLink é uma ferramenta para encontrar os limites da área de
cobertura do ShowLink. Quando o teste do ShowLink é ativado, uma exibição
de cinco barras é mostrada na tela indicando o nível da qualidade do sinal.
Conforme o transmissor se distancia do ponto de acesso, o número de barras
diminui. O controle do ShowLink é mantido contanto que pelo menos 1 barra
seja exibida.
Se o transmissor estiver fora da faixa de cobertura, o controle do ShowLink
não será possível; no entanto, o sinal de áudio não será afetado ou interrompido contanto que o transmissor esteja dentro da faixa do sinal de RF. Para melhorar a cobertura, ajuste a localização dos seus pontos de acesso ou coloque
pontos de acesso adicionais para aumentar a cobertura.
Para ativar o Teste do ShowLink:
1. No menu Utilities, navegue até SL Test.
2. Pressione o botão O para iniciar o teste e desloque o transmissor ao
redor da área de cobertura. Monitore o número de barras exibidas
e o estado do ícone do ShowLink. Os limites de cobertura são indicados por 0 barras exibidas ou com o ícone do ShowLink vazio.
3. Pressione o botão X para sair do teste do ShowLink.
Dica: Durante um teste do ShowLink, pressione O (enter) para colocar um marcador no Wireless Workbench.
Atualização do Firmware
O firmware é um software integrado em cada componente que controla funcionalidades. Periodicamente, novas versões de firmware são desenvolvidas para
incorporar recursos adicionais e melhorias. Para se beneficiar das melhorias
no projeto, novas versões de firmware podem ser carregadas e instaladas
utilizando a ferramenta Shure Update Utility. O Shure Update Utility está disponível para download em http://www.shure.com/.
Tone Gen
Tone: 400Hz
Level: -60db
Como Corresponder os Níveis de Áudio
à Compensação do Microfone
Ao vincular dois ou mais transmissores a um receptor, pode haver uma diferença nos níveis de volume entre microfones ou instrumentos. Se isso ocorrer, use a função Offset para corresponder os níveis de áudio e eliminar as
diferenças audíveis de volume entre os transmissores. Se for utilizar um único
transmissor, ajuste Offset para 0 dB.
1. Ligue o primeiro transmissor e execute uma verificação de som
para testar o nível de áudio. Desligue o transmissor ao terminar.
2. Ligue o segundo transmissor e execute uma verificação de som para
testar o nível de áudio. Repita para quaisquer transmissores adicionais.
3. Se houver uma diferença audível no nível de som entre os transmissores, navegue até o menu Offset (Audio >
Offset) no transmissor para aumentar ou diminuir o Offset
em tempo real para corresponder aos níveis de áudio.
Mic Offset
Versões do Firmware
Ao executar uma atualização, primeiro faça download do firmware para o
receptor, depois atualize os transmissores com a mesma versão do firmware
para assegurar operação consistente.
A numeração do firmware para dispositivos Shure usa o seguinte formato:
PRINCIPAL.SECUNDÁRIO.PATCH (por exemplo, 1.2.14). No mínimo, todos
os dispositivos na rede (inclusive transmissores) devem ter os mesmos números de versão de firmware PRINCIPAL e SECUNDÁRIO (por exemplo, 1.2.x).
Atualização do Transmissor
1. Faça download do firmware para o receptor.
2. Acesse o seguinte menu do receptor:
Device Conguration > Tx Firmware Update.
3. Alinhe as portas de IR entre o transmissor e o receptor. As
portas de IR devem permanecer alinhadas durante todo o
download, que pode demorar 50 segundos ou mais.
Dica: O LED de alinhamento vermelho acenderá quando o alinhamento estiver
correto.
4. Pressione ENTER no receptor para começar o download para o transmissor.
O receptor exibirá o progresso da atualização como uma porcentagem.
+3 dB
39
Page 40

Especificações
LEMO
Top View of Bodypack
Faixa de Compensação do Microfone
-12 a 21 dB (em passos de 1 dB)
Tipo de Bateria
Shure SB910M Li-íon Recarregável
Tempo de Operação da Bateria
@ 10 mW
Shure
SB910M
Dimensões
60.4 mm x 68.0 mm x 22.1 mm (2,4 pol. x 2,7 pol. x 0,9 pol.) A x L x P
Peso
53 g (1,9 oz.), Sem Bateria
Alojamento
Plástico
Faixa de Temperatura de Operação
-18°C (0°F) a 63°C (145°F)
Observação: As características da bateria podem limitar esta faixa.
Faixa de Temperatura de Armazenamento
-29°C (-20°F) a 74°C (165°F)
Observação: As características da bateria podem limitar esta faixa.
até 7 horas
Entrada de Áudio
Conector
Conector Lemo
Configuração
Desbalanceado
Impedância
8,2 MΩ
Nível Máximo de Entrada
1 kHz a 1% THD
Ruído de Entrada Equivalente (EIN) do Pré-amplificador
Configuração de Ganho do Sistema ≥ +20
-120 dBV, Ponderação A, típico
Saída de RF
Tipo de Antena
Helicoidal Integrada
Impedância
50 Ω
Largura de Banda Ocupada
<200 kHz
Tipo de Modulação
Axient Shure Proprietário Digital
Alimentação Elétrica
2 mW, 10 mW, 20 mW
Consulte a tabela de Faixa de Frequências e Potência de Saída, varia conforme a região
ShowLink
Tipo de Rede
IEEE 802.15.4
Tipo de Antena
Isolante Duplo Zigbee
Faixa de Frequência
2,40 a 2,4835 GHz (24 Canais)
Potência de Saída de RF
10 dBm (ERP)
varia conforme a região
Diagrama do Conector de Entrada
LEMO
SHIELD
.
1µF
5 V DC
Audio Input
Ground
Ground
Bias Voltage
Audio Input
Bandas de Frequência e Potência de RF do
Transmissor
Banda
Faixa de Frequência
(MHz)
G53 470 a 510 2/10/20
G54 479 a 565 2/10/20
G55† 470 a 636 2/10/20
G56 470 a 636 2/10/20
G57△ 470 a 616* 2/10/20
G62 510 a 530 2/10/20
H54 520 a 636 2/10/20
K53† 606 a 698 2/10/20
K54△ 606 a 663** 2/10/20
K55 606 a 694 2/10/20
K56 606 a 714 2/10/20
K57 606 a 790 2/10/20
K58 622 a 698 2/10/20
L54 630 a 787 2/10/20
R52† 794 a 806 2/10/20
JB 806 a 810 2/10
X55 941 a 960 2/10/20
Observação: *Com um intervalo entre 608 e 614 MHz.
Observação: **Com um intervalo entre 608 e 614 MHz e um intervalo entre
616 e 653 MHz.
Observação: ***Alimentação entregue à porta da antena.
Observação: †O modo de operação varia de acordo com a região. No Brasil,
utiliza-se o modo de Alta Densidade.
Observação: △Alimentação de saída limitada a 10 mW acima de 608 MHz.
Potência de RF
(mW)***
40
Page 41

K55 606-694 MHz
Country Code
Code de Pays
Codice di paese
Código de país
Länder-Kürzel
Frequency Range
Gamme de frequences
Gamme di frequenza
Gama de frequencias
Frequenzbereich
A, B, BG, CH, CY, CZ, D, DK, EST, F *
FIN, GB, GR, H, HR, I, IRL, IS, L, LT *
M, N, NL, P, PL, RO, S, SK, SLO, TR *
all other countries *
* This equipment may be capable of operating on some frequencies not authorized in your region. See Licensing Information.
G56 470-636 MHz
Country Code
Code de Pays
Codice di paese
Código de país
Länder-Kürzel
Frequency Range
Gamme de frequences
Gamme di frequenza
Gama de frequencias
Frequenzbereich
A, B, BG, CH, CY, CZ, D, DK, EST, F *
FIN, GB, GR, H, HR, I, IRL, IS, L, LT *
M, N, NL, P, PL, RO, S, SK, SLO, TR *
all other countries *
* This equipment may be capable of operating on some frequencies not authorized in your region. See Licensing Information.
K57 606-790 MHz
Country Code
Code de Pays
Codice di paese
Código de país
Länder-Kürzel
Frequency Range
Gamme de frequences
Gamme di frequenza
Gama de frequencias
Frequenzbereich
A, B, BG, CH, CY, CZ, D, DK, EST, F *
FIN, GB, GR, H, HR, I, IRL, IS, L, LT *
M, N, NL, P, PL, RO, S, SK, SLO, TR *
all other countries *
* This equipment may be capable of operating on some frequencies not authorized in your region. See Licensing Information.
41
Page 42

Certificações
Certificado de acordo com a Parte 15 e Parte 74 da FCC.
Certificado no Canadá sob a RSS-210.
ID da FCC: DD4ADX1MG55, DD4ADX1MG57, DD4ADX1MK53, DD4ADX1MK54, DD4ADX1MX55. IC: 616A-ADX1MG55, 616A-ADX1MK53.
Este dispositivo está em conformidade com a(s) normas(s) RSS de isenção de licença da Indústria Canadense. A operação deste dispositivo está sujeita às seguintes condições: (1) este dispositivo não pode causar interferência; e (2) este dispositivo deve aceitar quaisquer interferências, incluindo algumas que possam
causar operação não desejada do dispositivo. Le présent appareil est conforme aux CNR d'Industrie Canada applicables aux appareils radio exempts de licence.
L'exploitation est autorisée aux deux conditions suivantes : (1) l'appareil ne doit pas produire de brouillage, et (2) l'utilisateur de l'appareil doit accepter tout brouillage radioélectrique subi, même si le brouillage est susceptible d'en compromettre le fonctionnement.
Atende aos requisitos essenciais das seguintes Diretivas Europeias:
• Diretiva WEEE 2002/96/EC como emendada pela 2008/34/EC.
• Diretiva RoHS 2011/65/EU.
Observação: Siga o esquema de reciclagem regional para resíduos eletrônicos.
Atende a todos os requisitos essenciais das Diretivas Europeias relevantes e pode exibir a marca CE.
O(a) abaixo assinado(a) Shure Incorporated declara que o equipamento de rádio está em conformidade com a Diretiva 2014/53/UE. O texto integral da
declaração de conformidade está disponível no seguinte endereço de Internet: http://www.shure.com/europe/compliance
Representante Autorizado Europeu:
Shure Europe GmbH
Headquarters Europe, Middle East & Africa
Department: EMEA Approval
Jakob-Dieffenbacher-Str. 12
75031 Eppingen, Alemanha
Telefone: +49-7262-92 49 0
Fax: +49-7262-92 49 11 4
E-mail: info@shure.de
INFORMAÇÕES SOBRE A LICENÇA
Licença: Em determinados locais, pode ser necessário obter uma autorização ministerial para operar este equipamento. Consulte a sua autoridade nacional sobre
possíveis requisitos. Alterações ou modificações não expressamente aprovadas pela Shure Incorporated podem anular a autorização do usuário para a operação
do equipamento. A licença do equipamento de microfone sem fio da Shure é de responsabilidade do usuário e a licença depende da classificação e aplicação
do usuário e da freqüência selecionada. A Shure recomenda enfaticamente ao usuário contatar a devida autoridade de telecomunicações com relação à devida
licença antes de escolher e encomendar as frequências.
Informações para o usuário
Este equipamento foi testado e está de acordo com os limites para um dispositivo digital Classe B, segundo a Parte 15 das Normas do FCC. Estes limites foram
projetados para fornecer razoável proteção contra interferência prejudicial em uma instalação residencial. Este equipamento gera, usa e pode irradiar energia de
radiofrequência e, se não for instalado e usado conforme as instruções, pode causar interferência prejudicial às comunicações de rádio. Entretanto, não há garantias de que não ocorrerão interferências em uma determinada instalação. Se este equipamento causar interferência prejudicial à recepção de rádio ou televisão, o
que pode ser determinado ao desligar e ligar o equipamento, o usuário deve tentar corrigir a interferência tomando uma das seguintes medidas:
• Reoriente ou mude de lugar a antena receptora.
• Aumente a distância entre o equipamento e o receptor.
• Conecte o equipamento a uma tomada de um circuito diferente do circuito da tomada onde o receptor está conectado.
• Consulte o fabricante do equipamento ou um técnico de rádio/televisão experiente.
Advertência Australiana para Conexão sem fio
Este dispositivo opera sob licença tipo ACMA e deve estar em conformidade com todas as condições dessa licença, incluindo frequências de operação. Antes
de 31 de dezembro de 2014, este dispositivo deve estar em conformidade se for operado na banda de frequência de 520 a 820 MHz. ATENÇÃO: Após 31 de
dezembro de 2014, para estar em conformidade, este dispositivo não deve ser operado na banda de 694 a 820 MHz.
Este dispositivo está em conformidade com a(s) normas(s) RSS de isenção de licença da Indústria Canadense. A operação deste dispositivo está sujeita às seguintes condições: (1) este dispositivo não pode causar interferência; e (2) este dispositivo deve aceitar quaisquer interferências, incluindo algumas que possam
causar operação não desejada do dispositivo.
Le présent appareil est conforme aux CNR d'Industrie Canada applicables aux appareils radio exempts de licence. L'exploitation est autorisée aux deux conditions
suivantes : (1) l'appareil ne doit pas produire de brouillage, et (2) l'utilisateur de l'appareil doit accepter tout brouillage radioélectrique subi, même si le brouillage
est susceptible d'en compromettre le fonctionnement.
42
Page 43

Page 44

Europe, Middle East, Africa:
PT. GOSHEN SWARA INDONESIA
Kompleks Harco Mangga Dua Blok L No. 35 Jakarta Pusat
I.16.GSI31.00501.0211
 Loading...