

Page 1
MODEL W15HT/58
HANDHELD WIRELESS
MICROPHONE-TRANSMITTER
The W15HT/58’s normal operating range is about 100
meters (330 feet). Operation at greater distances-300
meters (about 1,000 feet) or more-is often accomplished, but the determining factors in each installation will
be reflections, obstacles and interference.
The microphone is supplied with a zippered carrying/storage bag, a swivel adapter for mounting the
W15HT/58 on most desk and floor stands, a lockplate
for locking the microphone in the “on” position, and a
small screwdriver for adjusting the transmitter gain.
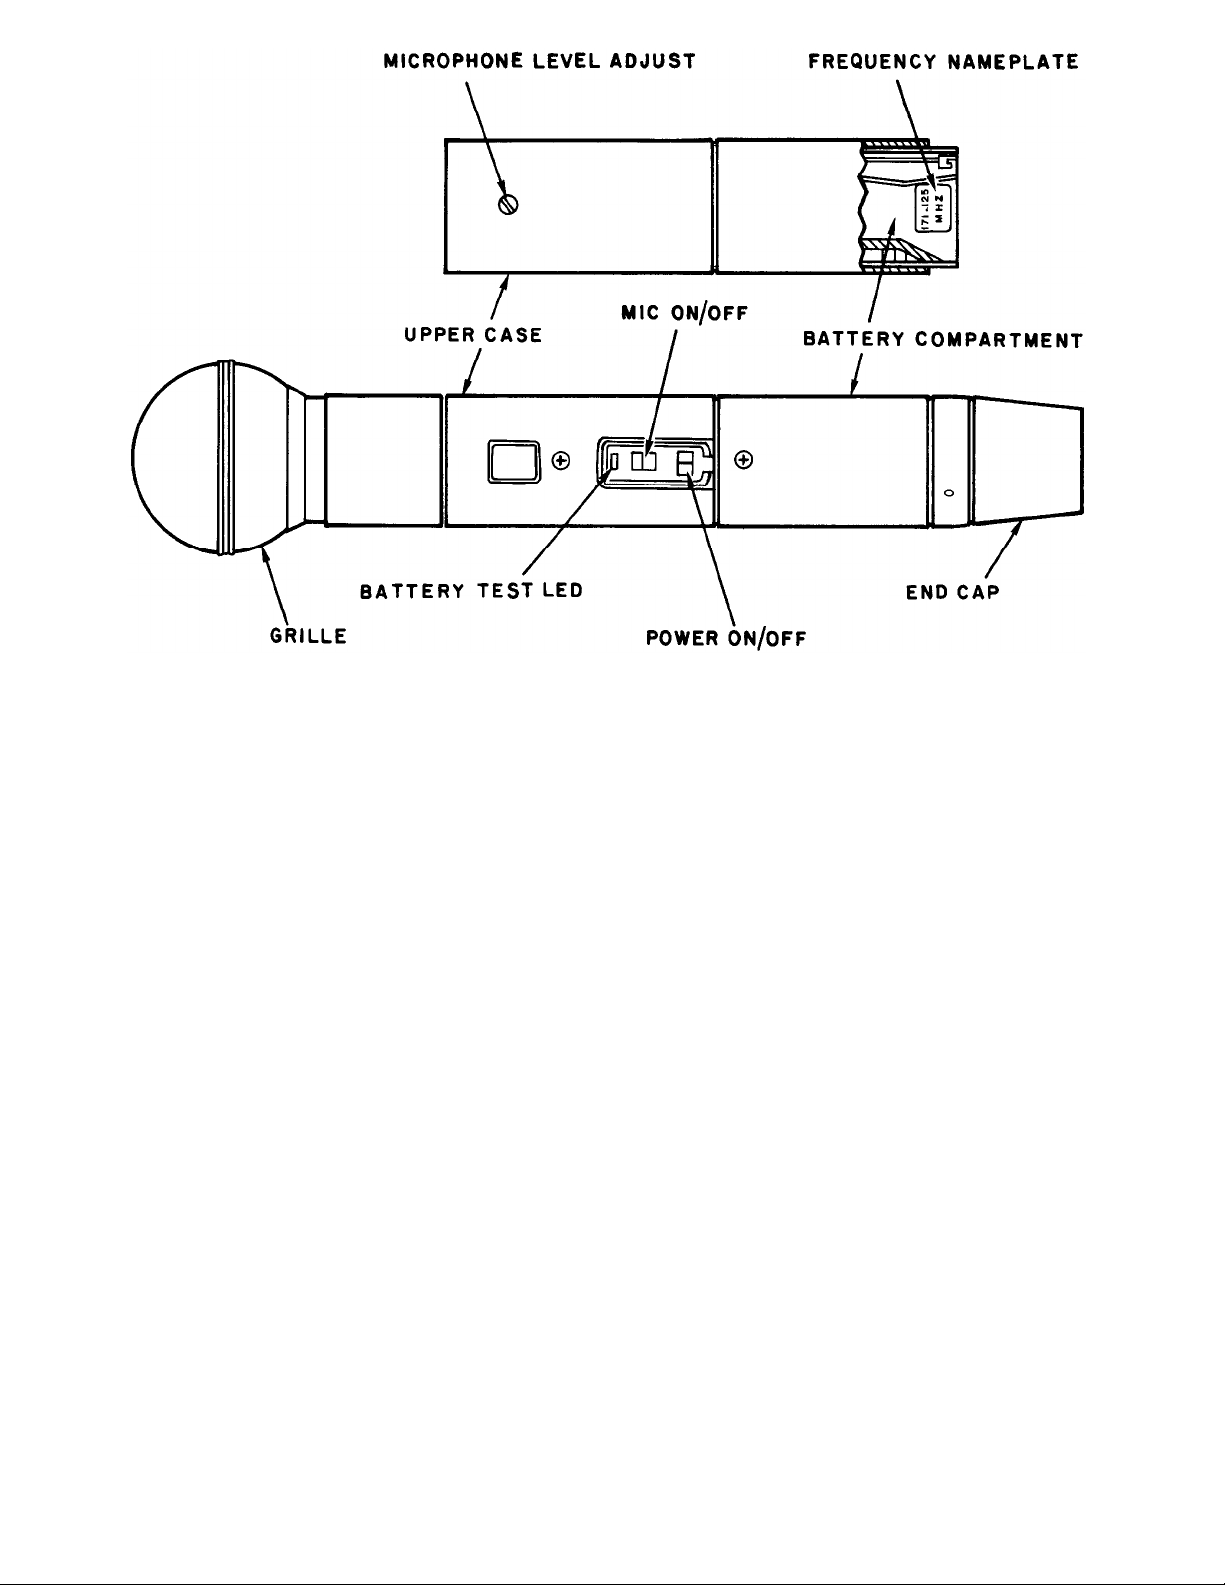
DESCRIPTION (see Figure 1)
ANTENNA: The W15HT/58’s antenna is not visible. It
consists of the case and grille, and a wire coil inside the
end cap.
BATTERY (not supplied): Only alkaline (Duracell
MN1604 or equivalent), lithium (Kodak U9VL or
equivalent), or heavy duty nickel-cadmium (8.4-volt)
transistor-radio-type batteries should be used. A fresh
alkaline battery should provide approximately 12 hours
of operation, a lithium battery about 35 hours, and a
fully charged, heavy-duty nicad approximately 3 hours.
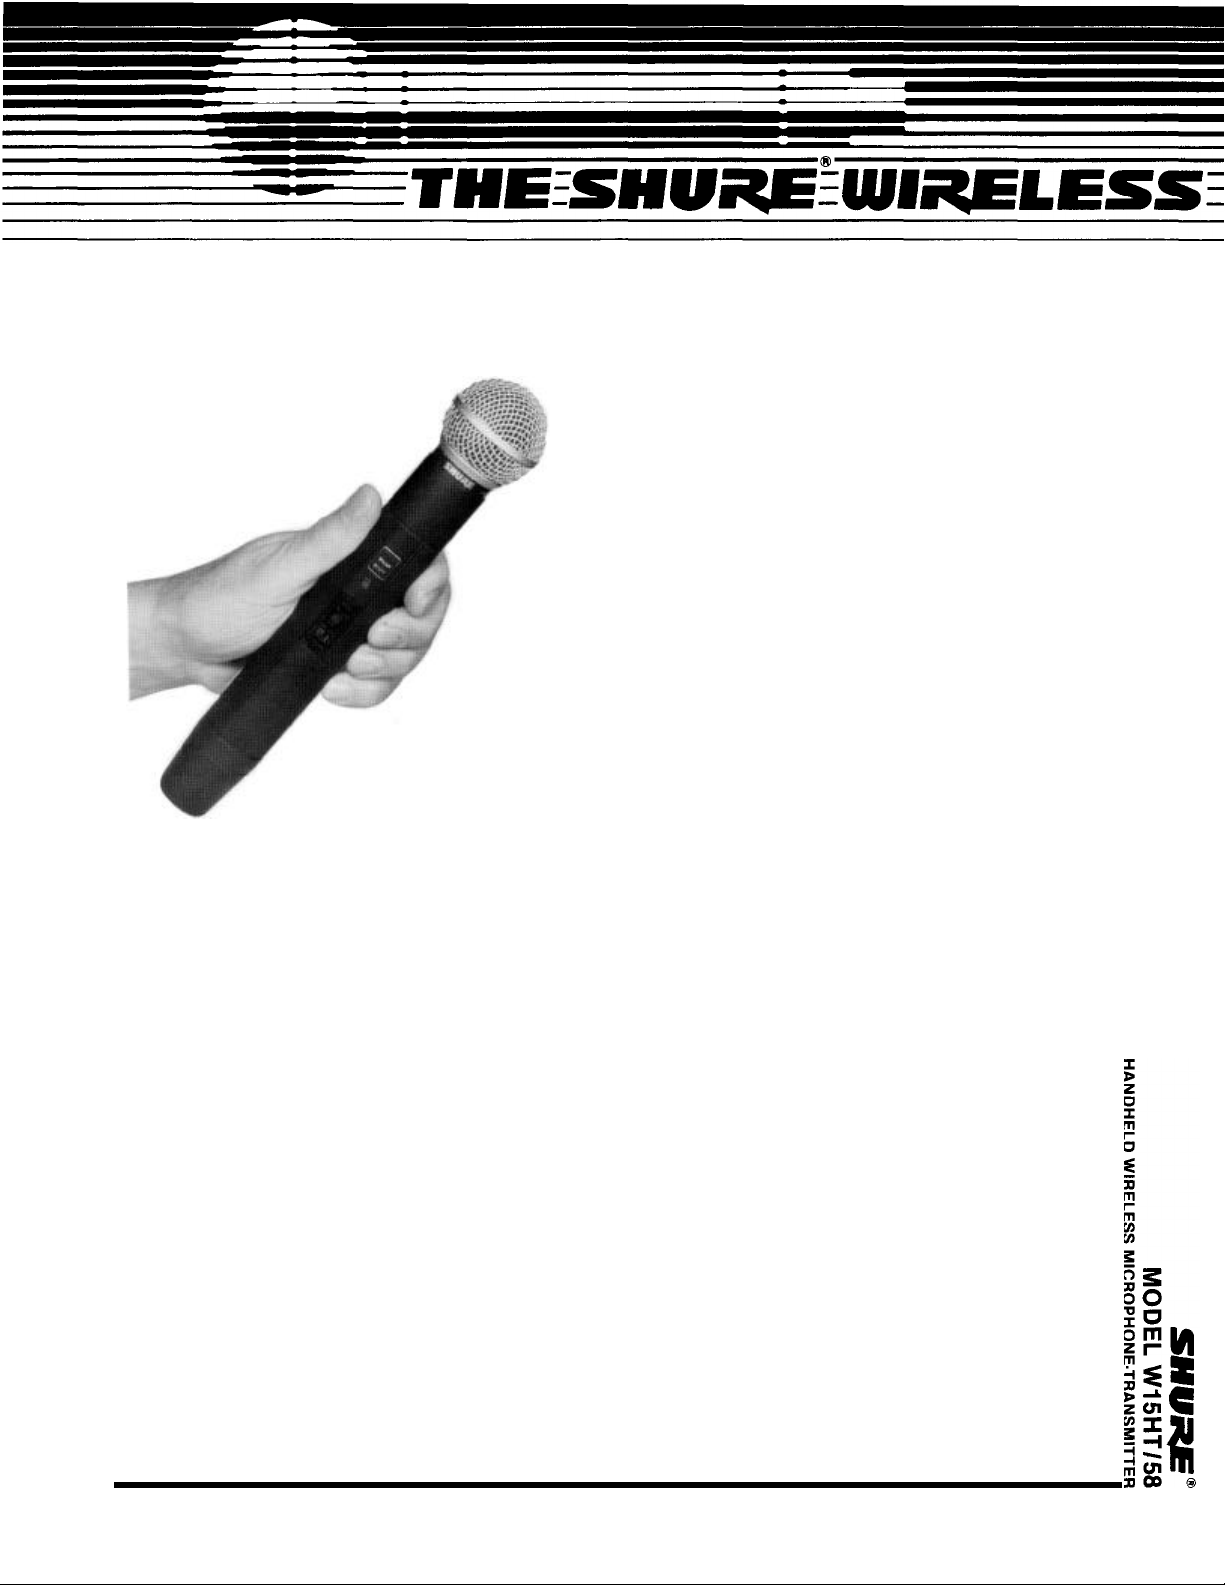
The Shure Model W15HT/58 is a handheld
microphone and radio transmitter for use with Shure
Wireless Microphone receivers. The W15HT/58 uses the
legendary Shure SM58 unidirectional dynamic microphone cartridge as its transducer element. Small, compact and lightweight, the W15HT/58 is humanengineered for reliable, unobtrusive operation. The case
is finished in satin black enamel and ridged over its
length for optimum gripping. The cartridge is easily
removed and is interchangeable with other Shure
Wireless Microphone cartridges.
All operating controls are located in a single area on
the microphone’s outer surface, and are recessed to
minimize accidental movement.
The W15HT/58 uses a standard 9-volt transistorradio-type battery (alkaline, lithium or heavy-duty nickelcadmium recommended). The long-life alkaline battery
is easily obtained, and battery replacement is easily accomplished through a locking end cap. An LED indicator provides information on battery condition.
The transmitter operates at a single, crystalcontrolled frequency in the VHF band between 150 and
216 MHz. A total of 15 frequencies, computer-selected
for interference-free operation, are readily available,
and other frequencies can be specially ordered. This
means that a number of wireless microphone systems
can be operated in a single sound installation,
simultaneously and without intermodulation problems.
BATTERY COMPARTMENT: A locking twist-off end
cap exposes the battery compartment.
BATTERY TEST LED lndicator: Flashes briefly when
the POWER Switch is turned on and a “good” battery is
installed. Indicator will be on and clearly visible in room
light when the battery voltage drops to approximately
7.0 volts.
END CAP: The push-twist-remove end cap functions
as both battery cover and antenna coil holder. Note that
the end cap is color-coded internally to reflect the
W15HT/58’s operating frequency as follows:
Color
Green 163-168 MHz Brown-Red 188-192 MHz
Yellow 168-175 MHz Brown-Blue
White-Red 175-177 MHz Brown-Orange 192-196 MHz
White-Blue
White-Orange 180-182 MHz Brown-Yellow
White-Green 182-185 MHz Gray-Red
White-Yellow
Frequency
177-180 MHz Brown-Green 196-201 MHz
185-188 MHz Gray-Blue
Color
Frequency
191-195 MHz
199-204 MHz
204-210 MHz
210-216 MHz
FREQUENCY NAMEPLATE: Located inside the battery compartment, the nameplate specifies the
W15HT/58’s operating frequency. Note that the
operating frequency must be within the end cap frequency range (see above).
222 HARTREY AVENUE, EVANSTON, ILLINOIS 60202-3696 U.S.A. l PHONE (312) 866-2200 l TELEX 4330191 l FAX (312) 866-2279
Copyright 1988; Shure Brothers Inc.
27A2455 (HC) Printed in U.S.A.
Page 2
W15HT/58 WIRELESS MICROPHONE
FIGURE 1
GRILLE:
Protects the SM58 acoustic transducer of the
W15HT/58, and helps minimize the effects of breath
sounds and wind noise.
MICROPHONE LEVEL Rotary Control: Used in con-
junction with the wireless microphone receiver, this
control provides audio level adjustments for various
sound sources. A small screwdriver is supplied to make
adjustments. (NOTE: The supplied screwdriver has a
plastic blade; use of a metal-blade screwdriver may
damage the rotary control.) A rubber plug is provided to
cover the adjustment hole if desired.
MICROPHONE ON/OFF Slide Switch: Permits the
user to “mute” the microphone without turning the
transmitter off. This avoids the “pop” that may accompany power turn-on and turn-off, and generally prevents
pickup of unwanted signals by an “open” receiver.
POWER ON/OFF Slide Switch: Applies power to the
transmitter circuitry. Like the Microphone On/Off
switch, it is a low-profile type and is oriented perpendicular to the Microphone On/Off switch to further prevent accidental turn-off.
UPPER CASE: In addition to the controls, this section
contains the transmitter circuitry.
LOCKPLATE: Used to lock the controls against
accidental movement. Installed by removing the upper
case screw just above the control area, inserting the
lockplate, and replacing the screw.
SETUP
With the transmitter POWER ON/OFF Switch in the
OFF position, remove the end cap (push in, twist
counterclockwise, and pull). Insert a new 9-volt alkaline
or lithium battery in the compartment (carbon-zinc batteries will work, but they provide a diminished operating
life of about 2.5 hours). Observe the proper
polarity: the large (negative) terminal in the large
channel and the small (positive) terminal in the small
channel (see battery compartment label).
Operation with a fully charged, heavy-duty, 8.4-volt
nickel-cadmium rechargeable battery is also permissible and will provide approximately 3 hours of operation.
IMPORTANT: Do not use a “conventional” 9-volt-sized
nickel-cadmium battery; its 7.2-volt output will not
operate the transmitter properly.
BATTERY CHECK
Turn the POWER Switch on and observe the Battery
Test LED. The LED should light momentarily, indicating
adequate voltage. If it remains lit (clearly visible in nor-
mal room light), the battery voltage has dropped below
7.0 volts and should be replaced (alkaline or lithium) or
recharged (nicad). If it does not light at all, the battery
should be discarded.
SETTING AUDIO LEVEL
Place the POWER Switch of the receiver in the ON
position. The green POWER LED will light.
Move the microphone POWER ON/OFF Switch to the
On position. Observe the receiver RF SIGNAL LEVEL Indicator. In the Shure W20R receiver, the yellow signal
LED should be continually lit, indicating adequate RF
signal strength for good transmission. If the LED continually flickers or does not light, consult the
Troubleshooting section of the receiver manual.
In the Shure W25DR receiver, one of the green LED
segments should light, indicating adequate RF signal
strength for good transmission. A yellow LED indication
means less than optimum signal transmission and/or
reception, and a red LED indicates less than satisfactory operation.
2
Page 3

Move the W15HT/58’s MICROPHONE ON/OFF Switch
to the ON position. The receiver audio level display
should now respond to varying sound levels.
Sound Pressure Levels
Normal. The W15HT/58’s Microphone Level control
has been factory-set to provide optimum audio modulation at the receiver under typical operating conditions,
as indicated by LED illumination in the -10 to 0 range
(see Figure 2). Readings in this area will yield the
highest dynamic range without overload and resulting
distortion.
AUDIO LEVEL DISPLAY
FIGURE 2
High. For high sound pressure level (SPL) applica-
tions such as loud singing or musical instruments, the
preset microphone level may be too high. To avoid an
overload and potential distortion condition, use the supplied screwdriver to turn the Microphone Level control
down (counterclockwise; see Figure 3). This adjustment
should be made under the expected operating conditions, that is, with the high SPL singer or musical instru-
ment in use at the microphone. Turn the control down
until the optimum (-10 to 0) readings are obtained.
HIGH SPL GAIN ADJUSTMENT
FIGURE 3
Low. Low SPL conditions such as soft-spoken in-
dividuals or conditions where the microphone must be
at a greater-than-normal distance from the sound
source, may require an increase in the microphone gain
setting. To correct for a low-level condition, turn the
Microphone Level control up (clockwise; see Figure 4)
until a proper (-10 to 0) LED reading is obtained.
RECEIVER GAIN
The rear-panel receiver OUTPUT can be adjusted us-
ing the receiver’s MICROPHONE OUTPUT LEVEL con-
trol. In this way, the wireless system output can be
made identical to that of a conventional wired
microphone, avoiding extreme differences in mixer input level settings. Turning the MICROPHONE OUTPUT
LEVEL control counterclockwise decreases the output
level, and turning it clockwise increases the output.
LOW SPL GAIN ADJUSTMENT
FIGURE 4
NOTE: The W25DR receiver’s OUTPUT LEVEL control
does not function with the OUTPUT switch in the LINE
position.
OPERATION
1.
Turn on the microphone and receiver POWER
Switches.
Make sure the W15HT/58 Microphone On/Off
2.
switch is on.
Talk into the microphone (or play a musical instru-
3.
ment) and observe the receiver display for proper
audio and RF indications.
4.
Continue talking or playing and move around the
performing area. In each area, observe the receiver
display and make sure the RF signal strength is
adequate (the audio level should not change with
movement around the performing area, only with
changes in source loudness).
If the W15HT/58 is to be operated continuously, at-
5.
tach the plastic control lockplate to avoid accidental movement of the controls. Remove the screw
just above the control panel. Insert the protruding
tip of the lockplate in the slot below the Battery
Test LED and secure it with the screw previously
removed. NOTE:
the lockplate is clear plastic and
permits viewing the control positions and access
to the POWER switch.
Normal operation is shown by steady illumination of
the yellow RF SIGNAL LED on the Shure W20R receiver,
or by illumination of any green LED of the RF SIGNAL
LEVEL display on the W25DR receiver. Weak signals are
evidenced by intermittent operation of the W20R LED
and by illumination of the lower LEDs on the W25DR.
In most cases, the problem of weak RF signal
strength is also indicated by audible evidence: signal
dropout, either continuous or intermittent, or noisy,
distorted operation. The condition is generally caused
by RF signal blocking or operation beyond the system
capability. Refer to the Troubleshooting section of the
receiver manual for remedies.
Feedback-the annoying howl or squeal heard in the
sound system- is as much a problem in wireless microphones as in wired mics. Checking microphone operation throughout the performing area will probably uncover any locations that are prone to audio feedback. If
the problem cannot be solved by a slight lowering of the
receiver output level or the associated amplifier gain,
relocation of the loudspeakers or possibly professional
equalization of the sound system is recommended.
3
Page 4

IMPORTANT
Every
wireless microphone installation is a unique
situation, and can present a variety of problems.
Never attempt a live performance without a
“walkthrough” first. And if major changes (furniture, scenery, etc.) were made since the
walkthrough, check the wireless microphone
operation again.
SPECIFICATIONS
RF Power Output
50 mW maximum; 15 mW typical
Modulation
FM (54F3) ± 12 kHz deviation, 50 µsec pre-emphasis
Modulation Limiter
Internal compressor
Audio Level Adjustment Range
>40 dB
Antenna
Integral dipole; end-loading provided by wire coil in
battery cap
Transducer Type
Dynamic
Frequency Response
See Figure 5
TYPICAL FREQUENCY RESPONSE
FIGURE 5
Polar Pattern
Unidirectional (cardioid), uniform with frequency,
symmetrical about axis (see Figure 6)
TYPICAL POLAR PATTERNS
FIGURE 6
Maximum SPL
(for 3% THD at 1 kHz)
118 dB or greater, level control full clockwise; 138 dB
or greater, level control set for 20 dB attenuation
Noise
(level control full clockwise)
SPL equiv. max., A-weighted . . . . . . . . . . .
30 dB
SPL equiv. max., per DIN 45 405 . . . . . . . . . . . . . 33 dB
Power
Battery Type:
9-volt alkaline (NEDA 1604A) or
lithium; 8.4-volt nicad optional
Battery Life:
12 to 14 hours typical (alkaline);
approximately 35 hours (lithium); 3
hours typical (8.4-volt nicad; per
charge)
Current Drain: 24 mA typical; 28 mA maximum
Case
Matte black enamel high-impact thermoplastic and
steel with matte chrome steel grille
Dimensions
See Figure 7
OVERALL DIMENSIONS
FIGURE 7
Net Weight
410 grams (14.5 oz); 455 grams (16.1 oz) with battery
ANTENNA
The W15HT/58’s antenna uses a loading coil tuned to
the operating frequency of the transmitter (see table
under End Cap description). End caps of different
wireless microphone transmitters should not be intermixed or improper operation may result.
The transmitting antenna is omnidirectional, that is, it radiates
equally in all directions. For optimum wireless
microphone applications, the area between the
W15HT/58 and the receiver should be as free of RF
obstructions as possible.
TRANSDUCER
The dynamic transducer has a unidirectional (cardioid) pickup pattern that is uniform with frequency and
symmetrical about the axis of the microphone. The
unidirectional pickup pattern discriminates against
sounds coming from the rear, permitting higher gain-
before-feedback in sound reinforcement applications.
With its uniform cardioid pattern and wide frequency
response, the W15HT/58 can selectively mike a particular voice in a vocal group or instrument in an ensemble, minimizing the occurrence of microphone “bleed”.
BATTERIES
Careful battery selection, installation, use and care
will help avoid problems in wireless microphone use.
The optimum combination of reliability, long life,
availability and low cost at this time is the manganesealkaline, or alkaline, battery. A word of caution about
alkaline batteries: they are not all the same size. Make
certain the battery you buy will make contact inside the
battery compartment.
Nine-volt lithium batteries offer more than twice the
service life and greatly increased shelf life over comparable alkaline batteries.
Nickel-cadmium (nicad) batteries offer convenience
and long-term economy, but the tradeoff is in shorter expected life per charge. In addition, forgetting to
recharge can be disastrous.
Another major consideration in nicads is that of
operating voltage. The “heavy-duty” 8.4-volt nicads are
satisfactory for use in this microphone, but the “9-voltsize” nicads commonly found in stores supply only 7.2
volts and will not provide satisfactory wireless perfor-
mance.
4
Page 5

Carbon-zinc batteries are the least useful for wireless
microphone operation. Their low cost is more than offset by their extremely short operating and shelf life.
Although the “heavy-duty” (HD) carbon-zinc types offer
better low-temperature performance and service capacity at moderate to high current drain, they will not offer
appreciably better transmitter performance than standard carbon-zinc batteries.
Although battery operation is inhibited at low
temperatures, storing batteries at low temperatures will
increase their shelf life. They should be sealed in bags
and, when ready for use, allowed to warm up to room
temperature (never heated!). Cold-stored batteries
should be used as soon as possible after bringing up to
room temperature.
Battery life is shortened by storage in hightemperature locations such as on amplifiers or in
vehicles exposed to direct sunlight.
RECOMMENDED RANGES
Alkaline
Temperature 0° to 38°C
Shelf Life 30 months 10 years
(room
temperature;
to 80% of
capacity
(32° to
100°F) 160°F) 113°F)
Lithium
0° to 71°C 7° to 32°C
(32° to (45° to 90°F) (-4° to
Carbon-Zinc
6 to 12
months
Nicad
-20 to 45°C
10 to 80
days
The battery should be removed if the microphone
malfunctions, or if it is to be stored for a long period.
Most batteries have a protective jacket, but partly or
completely exhausted batteries are more prone to
leakage.
Do not attempt to recharge replaceable (primary) bat-
teries using “chargers”, heat or other methods. This
may cause leakage or explosion. Do not disassemble
batteries or dispose of them in fire.
Battery Type
Alkaline
Lithium Kodak U9VL
NickelCadmium
Carbon-
Zinc
Carbon-
Zinc
(HeavyDuty)
Manufacturer and
Bright Star 7590
Duracell MN1604
ESB A1604
Eveready 522
IEC 6LF22
NEDA 1604A
Panasonic 6AM6
Radio Shack 23-553
Ray-O-Vac A1604
U.S. Military BA3090
Varta 4022
SAFT PS-9
Sears 9375
Varta TR7/8
Duracell M1604
Eveready 216
Ray-O-Vac 1604
Radio Shack 23-464
Duracell
M1604HD
Eveready 1222
Ray-O-Vac D1604
Radio Shack 23-583
Number
Volts
9.0
9.0
8.4
9.0
9.0
Expected Life
12 to 14
hours
Approximately
35 hours
2.5 to 3.5
hours per
charge
2.5 hours
2.5 hours
REPLACEMENT PARTS
Microphone Cartridge
Screen and Grille Assembly
End Cap
................
........................
................
RK143G
90-4049 (specify frequency)
R149
FURNISHED ACCESSORIES
Lockplate
Carrying/Storage Bag
. . . . . . . . . . . . . . . . . . . . . . . . . . . . . . .
65A1611
. . . . . . . . . . . . . . . . . . .
26B11
Screwdriver . . . . . . . . . . . . . . . . . . . . . . . . . . . . . 65A1587
Swivel Adapter
Adjustment Hole Plug
. . . . . . . . . . . . . . . . . . . . . . .
. . . . . . . . . . . . . . . . . .
WA370
66A233
OPTIONAL ACCESSORY
Windscreen
. . . . . . . . . . . . . . . . . . . . . .
A58WS Series
FCC CERTIFICATION
The Shure Model W15HT/58 microphone is Type-
Accepted under Federal Communications Commission
Parts 90 and 74. Licensing of Shure wireless micro-
phone equipment is the user’s responsibility, and licensability depends on the user’s classification and
application, and on the selected frequency. Shure
strongly urges the user to contact the appropriate
telecommunications authority before choosing and
ordering frequencies other than factory-preset frequencies. This recommendation applies to both original
equipment purchase and subsequent frequency
modification by Shure.
WARRANTY SERVICE
If your Shure wireless microphone equipment should
require servicing under the Shure warranty, please contact:
Shure Brothers Inc.
Attention: Service Department
222 Hartrey Avenue
Evanston, Illinois 60202-3696 U.S.A.
Telephone: (312) 866-5730
All claims of defects or shortage should be directed
to the above address. Please furnish model number,
operating frequency, and date, place and proof of pur-
chase (such as a copy of the sales receipt) to establish
warranty. Your letter should include all pertinent details
including applicable model or part numbers and a brief
description of the problem. Do not return any units or
parts to Shure unless requested to do so by Shure’s Service Department. Any returned items must have prior
authorization. Unauthorized returns are delayed in
handling; these delays can be avoided by contacting
Shure in advance and furnishing the necessary information.
If you are requested to return the equipment by
Shure’s Service Department, package the unit (with all
information requested) as follows: Check to see that
all parts are present and in place. If the orginal carton is
not available, place the unit in a strong shipping carton
at least 13 mm (6 in.) larger in all three dimensions than
the unit. Fill the surrounding space with a resilient
packing material such as shredded paper, excelsior,
Styrofoam, etc. Seal and mark the carton in accordance
with postal regulations and ship it prepaid to the Shure
Service Department.
It is extremely important that the packaged unit be
well-packed and fully insured. Damage claims are subject to settlement between the shipper and the carrier,
and this can delay repair and return of the unit.
Shure reserves the right to make design changes and
product improvements without assuming any obligation
to install these changes or improvements on any previously manufactured products. Shure also reserves the
right to ship new and/or improved products which are
similar to the form, fit and function of the originally
ordered products.
5
 Loading...