

Page 1
DIS Digital Conference System
SW 6000
User Manual
SW 6005 CAA Conference Adminis t ra t io n Application
Version 6.2.184 +
@2014 Shure Incorporated User Manual SW 6005 CAA ver 6.2 RevA.docx
Page 2

@2014 Shure Incorporated User Manual SW 6005 CAA ver 6.2 RevA.docx
Page 3
1 List of Contents
1 List of Contents .............................................. 3
2 Introduction ................................................... 5
3 Features ........................................................... 6
3.1 SW 6000 General description ............. 6
3.2 CAA Features ............................................ 6
4 Operating instructions ............................... 7
4.1 Starting the CAA ...................................... 7
4.2 Login ............................................................ 8
General screen functionality ............... 9 4.2.1
Search List .................................................. 9 4.2.2
Language Tabs .......................................... 9 4.2.3
Buttons ......................................................... 9 4.2.4
4.3 Conference ............................................. 11
Conference Mode .................................. 14 4.3.1
Microphone Operation Mode .......... 16 4.3.3
Delegate Seat Table ............................. 17 4.3.4
Agenda ...................................................... 20 4.3.5
4.4 Tables ....................................................... 26
Delegates .................................................. 26 4.4.1
Groups ....................................................... 28 4.4.2
Default Delegate Seat Table ............. 29 4.4.3
4.5 Messages ................................................. 31
4.6 Reports .................................................... 32
Conference Log Report ....................... 32 4.6.1
Delegate Conference Report ............ 35 4.6.2
Delegate Table Report ........................ 36 4.6.3
Agenda Report ....................................... 37 4.6.4
Delegate Statistical Report ............... 38 4.6.5
Search in Voting Results .................... 41 4.6.6
4.7 Setup/Equipment ................................ 43
Conference Units ................................... 43 4.7.1
Interpreter Units ................................... 46 4.7.2
Audio Output Units (AO) ................... 48 4.7.3
Ambient Microphones (AM) ............ 49 4.7.4
Conference Displays (CDA) .............. 50 4.7.5
@2014 Shure Incorporated User Manual SW 6005 CAA ver 6.2 RevA.docx
4.8 Setup/Configurations ......................... 55
4.9 Setup/User Type ................................... 68
4.10 Setup/Language .................................... 74
4.11 Setup/Rooms ......................................... 78
4.12 Setup/Database ..................................... 80
4.13 Connect to Database ............................ 80
4.14 Tools .......................................................... 81
5 SW 6000 Backup Utility ........................... 82
5.1 Backing up data ..................................... 82
5.2 Restoring data to same database .... 83
Chip Card (CC) ........................................ 51 4.7.6
Web Service ............................................. 53 4.7.7
Conference Import/Export Mode .. 54
Agenda Subject Configuration ......... 55 4.8.1
Reply Configuration ............................. 56 4.8.2
Voting Configuration ........................... 57 4.8.3
Mimic Configuration ............................ 63 4.8.4
CDA Configuration ................................ 65 4.8.5
Delegate List Configuration .............. 65 4.8.6
Print Server Configuration ................ 66 4.8.7
Speech Time Configuration ............... 66 4.8.8
Speaker Type Configuration ............. 67 4.8.9
Web Service Configuration ............... 67 4.8.10
Conference Type Configuration ...... 67 4.8.11
Languages ................................................ 74 4.10.1
Labels ......................................................... 75 4.10.2
Label Groups ........................................... 76 4.10.3
Shortcut to Commands ....................... 76 4.10.4
Report Names ......................................... 77 4.10.5
DC6990 Language ................................. 78 4.10.6
Create Rooms .......................................... 78 4.11.1
Room Configuration ............................. 79 4.11.2
Create Database Connections .......... 80 4.12.1
Tools/System Messages ..................... 81 4.14.1
Tools/License Information ............... 81 4.14.2
4.7.8
Page 4

5.3 Restoring data to other database ... 84
@2014 Shure Incorporated User Manual SW 6005 CAA ver 6.2 RevA.docx
Page 5

DIS Digital Conference System User Manual
2 Introduction
The SW 6000 Conference Management Software
is designed to operate with hardware units in
the DCS 6000 Digital Conference System.
SW 6000 opens a completely new way of
managing conferences.
DCS 6000 Digital Conference System is a
complete “State of the Art” fully digital
integrated interpretation, discussion and voting
system offering interpretation, language
distribution, conference microphone and voting
facilities with attendance check with Chip Card™.
The DCS 6000 system is based on a new, unique
digital DATA and AUDIO bus using standard
network cable. This ensures a very cost effective
installation and easy set-up of portable systems.
A total of 4000 units (delegate or interpreter
units) can be connected to the system.
5 User Manual SW 6005 CAA ver 6.2 RevA.docx
Page 6

DIS Digital Conference System User Manual
3 Features
3.1 SW 6000 General description
The SW 6000 software package consists of
following main applications:
• SW 6005 CAA Conference Administrator
Application
• SW 6008 CUA Conference User
Application
• SW 6090 CDA Conference Display
Applications
• SW 6032 ECA External Control
Application
The functionality in the SW 6000 applications is
controlled by the following standard system
modules:
• SW 6010 Microphone Control
• SW 6012 Agenda Control
• SW 6015 Messaging
• SW 6018 Mimic/synoptic layout
• SW 6020 Delegate Information Table
• SW 6032 Interpretation Control
• SW 6050 Multiple Languages
• SW 6060 Parliamentary Voting
• SW 6070 Chip Card Registration
• SW 6071 Chip Card Programming
• SW 6080 Multiple Room Control
• SW 6085 Streaming Application Control
of SW 70xx Streaming application
• SW 6086 Web Service Interface
(Dynamic data)
In addition to the standard modules a number of
advanced modules are available to expand the
features further in the SW 6000.
• SW 6110 Advanced Microphone Control
• SW 6112 Advanced Agenda Control
• SW 6125 Advanced Speech Time Control
• SW 6186 Advanced Import/Export of
meetings
The SW 6000 software package has the following
main features:
• Client/server system for multiple PCs
• Multiple user profiles with different
functionality
• Full language support
• Very user friendly graphical design of
high quality
• Data stored in SQL database format
• Voting from CUA screen
3.2 CAA Features
The main features of the CAA Conference
Administration Application are:
• Used by the people mainly outside the
conference room who are responsible for
creating and maintaining basic
conference data such as conferences,
delegates, delegate lists, messages etc.
and who monitor the system status
during conferences.
6
User Manual SW 6005 CAA ver 6.2 RevA.docx
Page 7
DIS Digital Conference System User Manual
After the CAA has been
installed, the CAA shortcut is
placed on the Desktop and in
Clicking the CAA shortcut will
start the application
A small window will appear
while the application is starting
4 Operating instructions
4.1 Starting the CAA
the start folder.
up.
Figure 4.1-A
7
User Manual SW 6005 CAA ver 6.2 RevA.docx
Page 8
DIS Digital Conference System User Manual
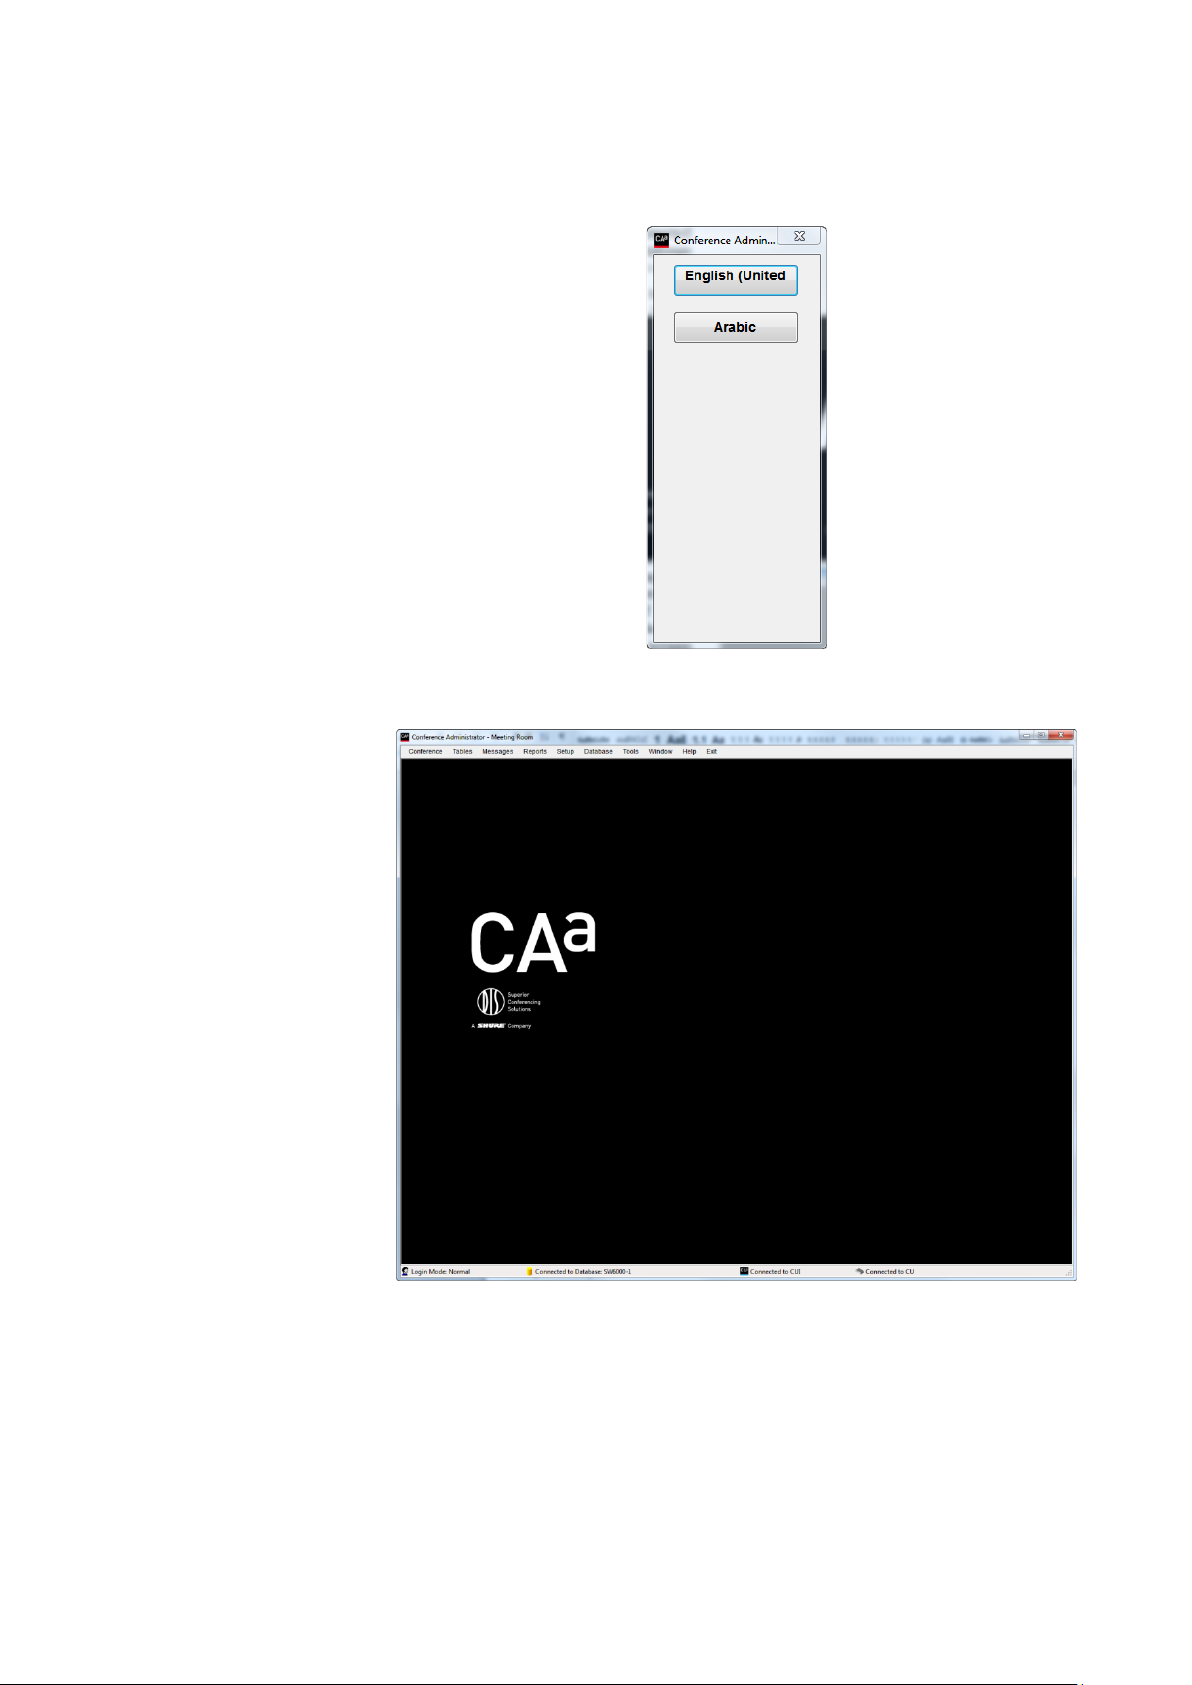
When the application is started
the user must select a language
one language is in use,
then the Login screen is not
A user ID or password is not
required. If restricted access to
the CAA application is needed,
logon when starting up
After selecting the language the
application will present the
following screen. If the
application is run for the first
time you will see this screen
directly. At the top of the
screen a menu provides access
4.2 Login
if more languages are in use.
If only
presented.
use the standard Windows
Windows.
Figure 4.2-A
to all the different CAA screens:
Figure 4.2-B
8
User Manual SW 6005 CAA ver 6.2 RevA.docx
Page 9
DIS Digital Conference System User Manual
The following describes the
general functionality that
applies to all screens in the
Conference Administration
[Add]
Press the button to add a new record. That can be a conference, a delegate, a
message or similar record. When the screen is in edit mode then all fields will be
sand coloured. When the adding of information is complete (possibly for several
languages) then press the [Update] button to save the information.
[Delete]
Press the button to delete selected record information. That can be a delegate, a
conference or similar. Information for the record in all languages will be deleted.
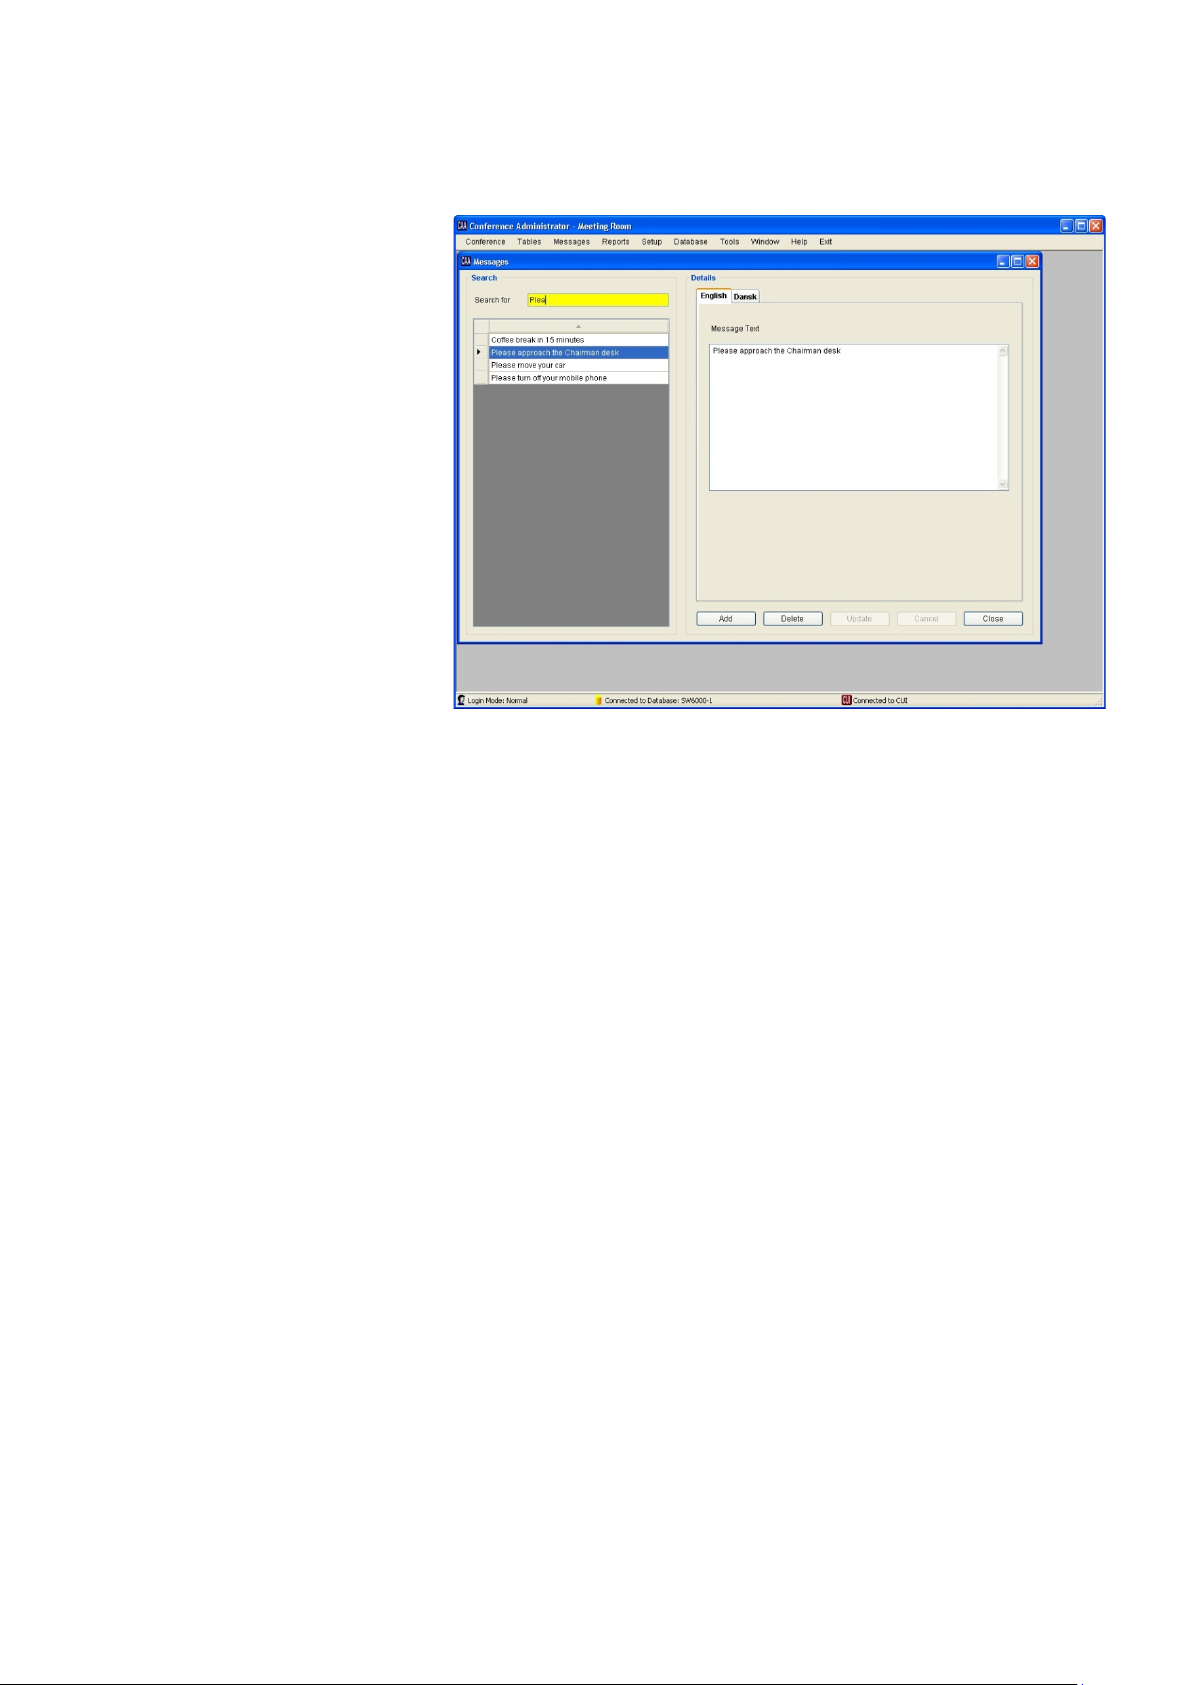
General screen functionality 4.2.1
Application (CAA).
The above example shows the screen for creating and editing messages.
Search List 4.2.2
The left side of the screen will display a list of
messages that allow the user to search for and
select a specific message to edit. The ’Search
for...’ field provides free text search on the texts
displayed in the list. Entering the text ’Plea’ in
the shown example would place focus on the
Language Tabs 4.2.3
The right side is for the actual functionality
related to the menu selection. A tab for each
language will be available. The user can flip
through the language tabs when creating or
editing data thereby entering a translation for
the different languages. The system will require
the user to enter data for the default language,
Buttons 4.2.4
Figure 4.2-C
first message where the text is found. In this case
‘Please approach the Chairman...’ would be
found.
A vertical scroll bar will appear to enable
scrolling down the message list if additional
ones exist off the screen.
which is the language on the first tab from the
left (e.g. English).
Entering data for the rest of the languages is
optional.
Selected fields will be highlighted in yellow.
Throughout this manual buttons will be referred to by putting the button text in brackets like [Add]. The
following buttons are generally implemented on all screens:
9
User Manual SW 6005 CAA ver 6.2 RevA.docx
Page 10

DIS Digital Conference System User Manual
[Update]
When the user is adding or editing information the changes are saved by pressing
this button. Editing existing information is done simply by selecting the information
and changing it. The fields will be sand coloured to show that the screen is in edit
mode.
[Copy]
Select one configuration and press this button. A copy of the configuration selected
will be created.
[Cancel]
Press the button to avoid saving changes just made or saving a newly added record.
If an existing record was being edited then the old data will reappear.
[Close]
Press the button to close the window. All windows must be closed before exiting the
CAA
10
User Manual SW 6005 CAA ver 6.2 RevA.docx
Page 11
DIS Digital Conference System User Manual
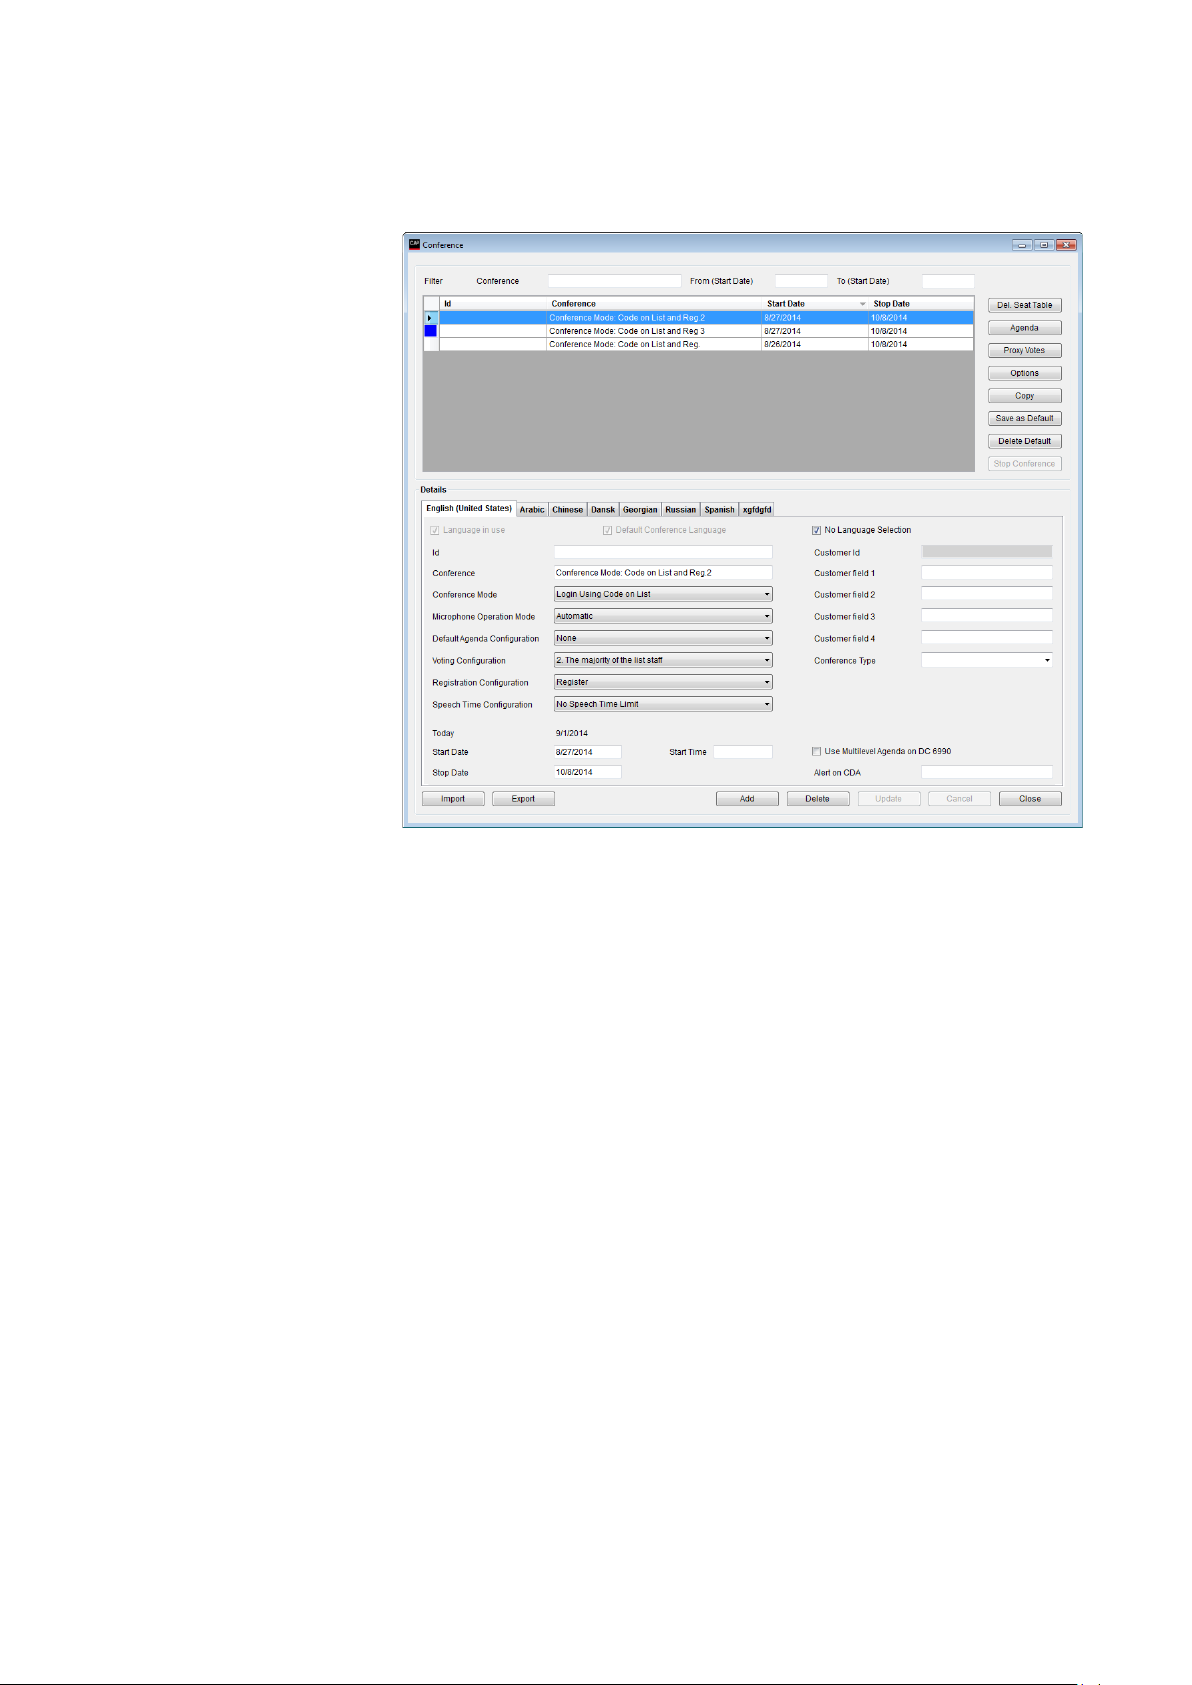
Clicking the ‘Conference’
brings up the ‘Conference’
This screen is used to
delegate lists assigned to
to specify operation
parameters to be set
when the conference is
Any number of
conferences can be
The names of the
like ‘Sales Meeting’
or ‘Annual Meeting’
Language in use
The ‘Language in use’ option enables the use of languages during a conference.
Only those languages that have been selected before a conference is started
will be available to the users. The default language selected during the
installation will always be enabled and cannot be disabled.
Default Conference
The ‘Default Conference Language’ displays the default language selected
during the installation. It is set per default and cannot be disabled. Missing
labels in other languages will show the default language label instead.
No Language Selection
The ‘No Language Selection’ option disables the language selection when used
with conference modes ‘No login’, ‘Prepared Delegate Seat Table’ or ‘Automatic
in the default language, when the conference is started. When using the
conference modes ‘Login Using Code…’ the user will be presented for the CUA
Login screen, when the conference is started.
Id
An alpha-numerical value use to identify the conference.
Conference
Title of the conference. Max. 50 characters.
Conference Mode
The conference mode determines how delegates are known to the system.
Please refer to the section’ Conference Mode’.
Microphone Operation
Select the microphone mode to be used when the conference is started.
Options are ‘Automatic’, ‘Manuel’, ‘FIFO’ and ‘VOX (Voice active)’. VOX option
Please refer to the section ‘
Operation
’.
4.3 Conference
page.
create conferences with
a specific conference, and
activated.
created.
conferences will normally
be a specific conference
name
running a limited period
of time.
Language
Figure 4.3-A
Login on Preferred Seat’. The user will be presented for the CUA Main screen
Mode
only if the CU 6105/6110 features this mode.
4.3.2
11
Microphone
User Manual SW 6005 CAA ver 6.2 RevA.docx
Mode
Page 12

DIS Digital Conference System User Manual
Default Agenda
The default agenda subject configuration for the conference can be set using a
dropdown box.
A set of agenda subject configurations is created in
‘Setup/Configurations/Agenda Subject Configuration’.
Voting Configuration
The default voting configuration for the conference can be set using a
dropdown box.
in ‘Setup/Configurations/Voting
Configuration’. The default voting configuration for the conference can always
be changed in the CUA before a voting session is started.
Registration
The dropdown selection ‘Registration Configuration’ in is used to select the
registration configuration for the conference.
.
Speech Time
The default speech time configuration for the conference can be set using a
dropdown box.
Time Configuration’. The speech time configurations for the conference can
always be changed in the CUA.
Start / Stop Dates
The date fields are used to specify when the conference is to be held.
Conferences are only visible in the CUA Application if today’s date falls on or
between these two dates.
Start Time
The start time of the conference can be specified in this field.
Customer Id
Field, which is filled in during an import from another system. The field cannot
be edited.
Customer field 1-4
Four user defined fields for entering data about the conference.
Use Multilevel Agenda
Field for enabling the display of multilevel agenda on the DC6990P. If not
ticked only the active subject (or sub-subject) is shown
Alert on CDA
Text inserted in this field is used to make a notification on a CDA display.
When filled in, a button on the CUA/Agenda is visible enabling a user to
The button is
available if a text string is filled in and the user has User Type rights to
“Agenda Control”.
[Delegate Seat Table]
Press this button to call the function for creating a delegate seat table for the
conference.
Code on Preferred Seat’ or ‘Automatic Login on Preferred Seat’.
Please refer to the section ‘4.3.5 Agenda’.
Configuration
A set of voting configurations is created
Configuration
If no registration configuration is selected, registration is not available for the
conference.
Note. Please refer to the ‘User Manual SW 6000 Registration Facility ver
6.x’ for detailed use of the Registration facility
Configuration
on DC 6990
A set of speech time configurations is created in ‘Setup/Configurations/Speech
display the text typed in this field on a CDA Screen (overlay).
The button is only enabled if the conference mode is set to ‘Prepared delegate
seat table’, ‘Login using code on Seat’, ‘Login using code on List’, ‘Login Using
12
User Manual SW 6005 CAA ver 6.2 RevA.docx
Page 13
DIS Digital Conference System User Manual
[Agenda]
Clicking this button bring the ‘Agenda’ popup used for creating an Agenda to a
conference.
’.
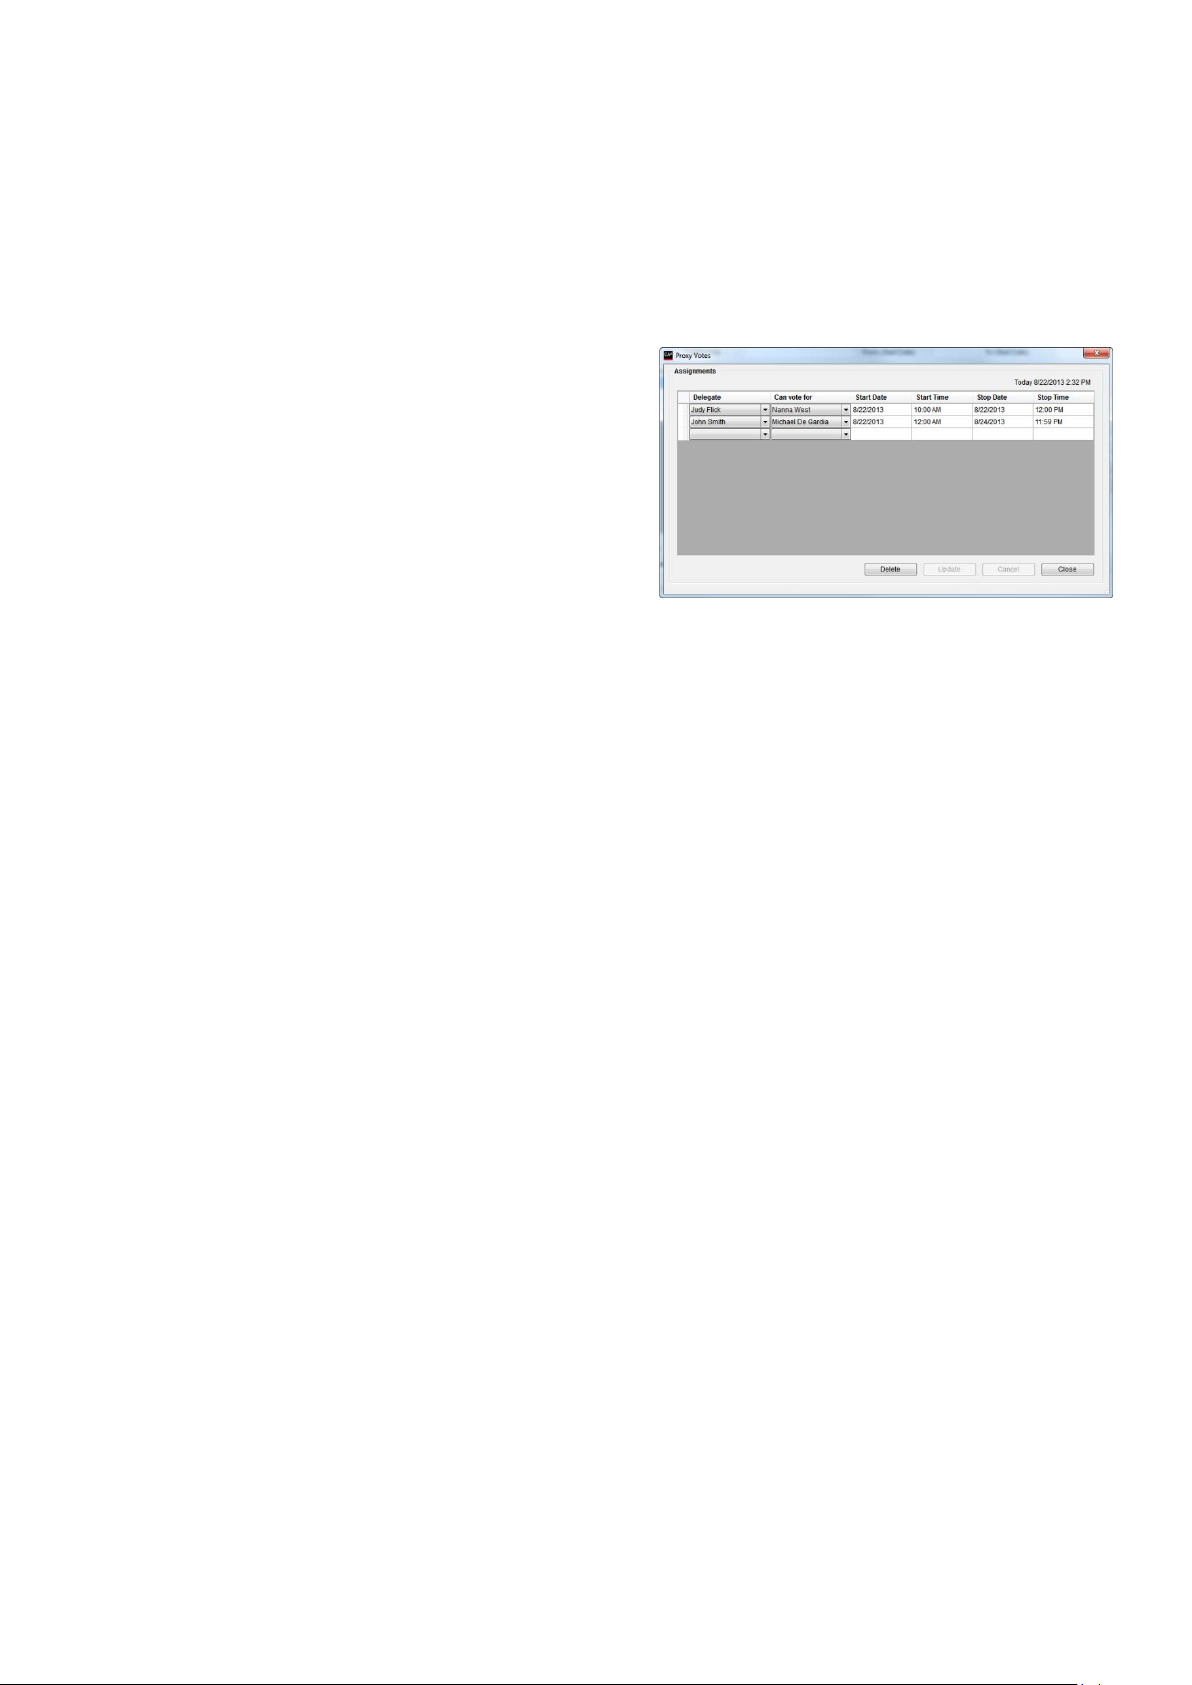
[Proxy Votes]
Some conference units are
supplied with an extra
“voting” button. This button
can be used for casting a
” button shows
a list, where Delegates are
assigned permission for
If time and/or date entries
are made the delegated
votes are only valid within
these.
If only date entries are made the delegated votes are valid from 00.00-23.59
within these.
If no time or date entries are made the delegated votes are valid throughout
the entire conference.
[Options]
The ‘Option’ button brings the ‘Option’ popup, which is used to set operation
settings of the system used when starting the Conference.
Please refer to the section ‘Options’.
[Copy]
The ‘Copy’ button makes a copy of the selected conference. Both ‘Delegate seat
table’, ‘Agenda’, ‘Delegated votes’ and ‘Option’ settings are copied.
[Save as default]
The ‘Save as default’ button saves the conference data from the currently
marked conference and inserts this data per default when creating new
conferences.
[Delete default]
The ‘Delete default’ button deletes default conference data.
[Stop conference]
Use this button to stop a conference
Please refer to the section ‘
Agenda
vote for another person. The
“Proxy Votes
voting for another delegate.
Figure 4.3-B
13
User Manual SW 6005 CAA ver 6.2 RevA.docx
Page 14

DIS Digital Conference System User Manual
Prepared Delegate
This mode is used to
create a list of
delegates with
names of all the
delegates attending
delegate is assigned
a seat with a
microphone. The
gnment of seats
is done by clicking
button. Se later
section: ‘Creating a
Delegate Seat Table’.
A seat, having a PC running the CUA Application, will show the name and other
information of the delegate on the Language Selection Screen and other screens and
on various lists.
Login Using Code
Selecting this option will allow permanent delegates to login at the CUA Application
using their individual ‘login code’.
Using Chip
Delegates using conference units without chip card reader will be shown on various
delegate screens/lists with the seat number instead of their name.
Login Using Code
Selecting this option will allow permanent delegates to be assigned a specific seat
with a microphone. The delegates has to login at the CUA Application using their
Setup: Using Chip
inserted in the conference unit. Then the user will not be presented for a login
Delegates using conference units without chip card reader will be shown on various
delegate screens/lists with the seat number instead of their name.
Login Using Code
Selecting this option will allow delegates present on a Delegate Seat Table to login at
the CUA Application using their individual login codes at any seat.
/Chip Card Setup: Using Chip
ented for a login
Delegates using conference units without chip card reader will be shown on various
delegate screens/lists with the seat number instead of their name.
Conference Mode 4.3.1
Select one of the seven available modes for the conference:
Seat Table
the conference. Each
assi
the ‘Del. Seat Table’
Figure 4.3-C
If the functionality “Setup/Equipment/Chip Card (CC)/Chip Card Setup:
Cards in Conference Units” is selected, the login code is taken from a chip card
inserted in the conference unit. In this case the user will not be presented for a login
screen when starting the CUA.
on Seat
individual login codes, but the delegate can only login to the seat assigned to him.
If the functionality “Setup/Equipment/Chip Card (CC)/Chip Card
Cards in Conference Units” is selected, the login code is taken from a chip card
screen when starting the CUA.
on List
If the functionality “Setup/Equipment/Chip Card (CC)
Cards in Conference Units” is selected, the login code is taken from a chip card
inserted in the conference unit. Then the user will not be pres
screen when starting the CUA.
14
User Manual SW 6005 CAA ver 6.2 RevA.docx
Page 15

DIS Digital Conference System User Manual
Login Using Code
Selecting this option will allow the delegates to have pre-assigned seats. The
delegates can either login at the designated seat by using the Login button or login
s logged in
Also, it is possible to move the delegates and assign other user types during the
more, it is possible to mix units with and without chip card reader and assign
names to all units. Delegates using conference units without chip card reader will be
shown on various delegate screens/lists with the seat number instead of their name.
Automatic Login
Selecting this option will allow the delegates to have pre-assigned seats. The
delegates can either login automatically at the designated seat or login with chip
n, the CUA always allows for automatic login at the
and allows for alternative login with
at the delegates are automatically logged in
ere a
Furthermore, it is possible to mix units with and without chip card reader and assign
names to all units. Delegates using conference units without chip card reader will be
shown on various delegate screens/lists with the seat number instead of their name.
No login
This option will not use names of delegates. All Delegate seat tables will show the
seat number.
In this mode, the ‘Delegates’ screen will not be available at the CUA application
on Preferred Seat
with chip card/code at other seats.
In systems without chip card login, the CUA always allows for login at the designated
seat using the Login button and alternative login of other delegates with code login.
In systems with chip card login, the CUA prompts for code login at the designated
seat if there is no chip card reader available and allows for alternative login with
another code login. If there is a chip card reader available, the CUA prompts for chip
card login.
The ‘Login Using Code on Preferred Seat’ mode differs from the ‘Prepared Delegate
Seat Table’ mode in the sense that the delegates are not registered a
before they login using the Login button or login with chip card/code.
meeting (except for seats where a chip card has been inserted) from the CUA mimic.
Further
on Preferred Seat
card/code at other seats.
In systems without chip card logi
designated seat and alternative login of other delegates with code login.
In systems with chip card login, the CUA prompts for code login at the designated
seat if there is no chip card reader available
another code login. If there is a chip card reader available, the CUA prompts for chip
card login.
The ‘Automatic Login on Preferred Seat’ mode differs from the ‘Login Using Code on
Preferred Seat’ mode in the sense th
when the system operates without chip card login.
Similar to the ‘Login Using Code on Preferred Seat’ mode it is possible to move the
delegates and assign other user types during the meeting (except for seats wh
chip card has been inserted) from the CUA mimic.
15
User Manual SW 6005 CAA ver 6.2 RevA.docx
Page 16

DIS Digital Conference System User Manual
Manual
All delegates speak requests are inserted into the Request list. Their microphones
are turned on when Chairman grants the individual delegate the right to speak.
Microphones with Chairman priority will always be turned on.
Automatic
All delegates speak requests causes their microphone to turn on if the maximum
number of speakers is not reached. Otherwise the speak request will be rejected.
Microphones with Chairman priority will always be turned on.
FIFO
First In First Out. All delegates speak requests causes their microphone to turn on if
the maximum number of speakers is not reached. Otherwise the speak request will
Microphones with Chairman priority will always be turned on directly.
VOX
Speaking into a Delegate microphone will turn on the microphone if the maximum
number of Delegates is not reached. Otherwise the speak request will be rejected.
d. Otherwise the speak request will be rejected.
is reached.
Operation settings for the VOX mode can be set on the CU 6105/6110.
Manual + Reply
Same a ‘Manual’ mode however the Reply option is enabled
Automatic + Reply
Same a ‘Automatic’ mode however the Reply option is enabled
VOX + Reply
Same a ‘VOX’ mode however the Reply option is enabled
Microphone Operation Mode 4.3.3
The Microphone operation mode (system mode) can always be changed during a conference using the
Conference page in the CUA.
Individual microphone settings which might be assigned to any conference unit are not overridden. See
section Setup/User Type for further details about Individual microphone settings.
The following operations modes (system modes) can be pre-selected for the conference:
be inserted onto the request list. The first on the request list will be turned on when
one of the active microphones is turned off.
Speaking into a Chairman microphone will turn on the microphone if the maximum
number of Open Mics is not reache
Chairman units will interrupt a Delegate unit if the maximum number of Open Mics
16
User Manual SW 6005 CAA ver 6.2 RevA.docx
Page 17
DIS Digital Conference System User Manual
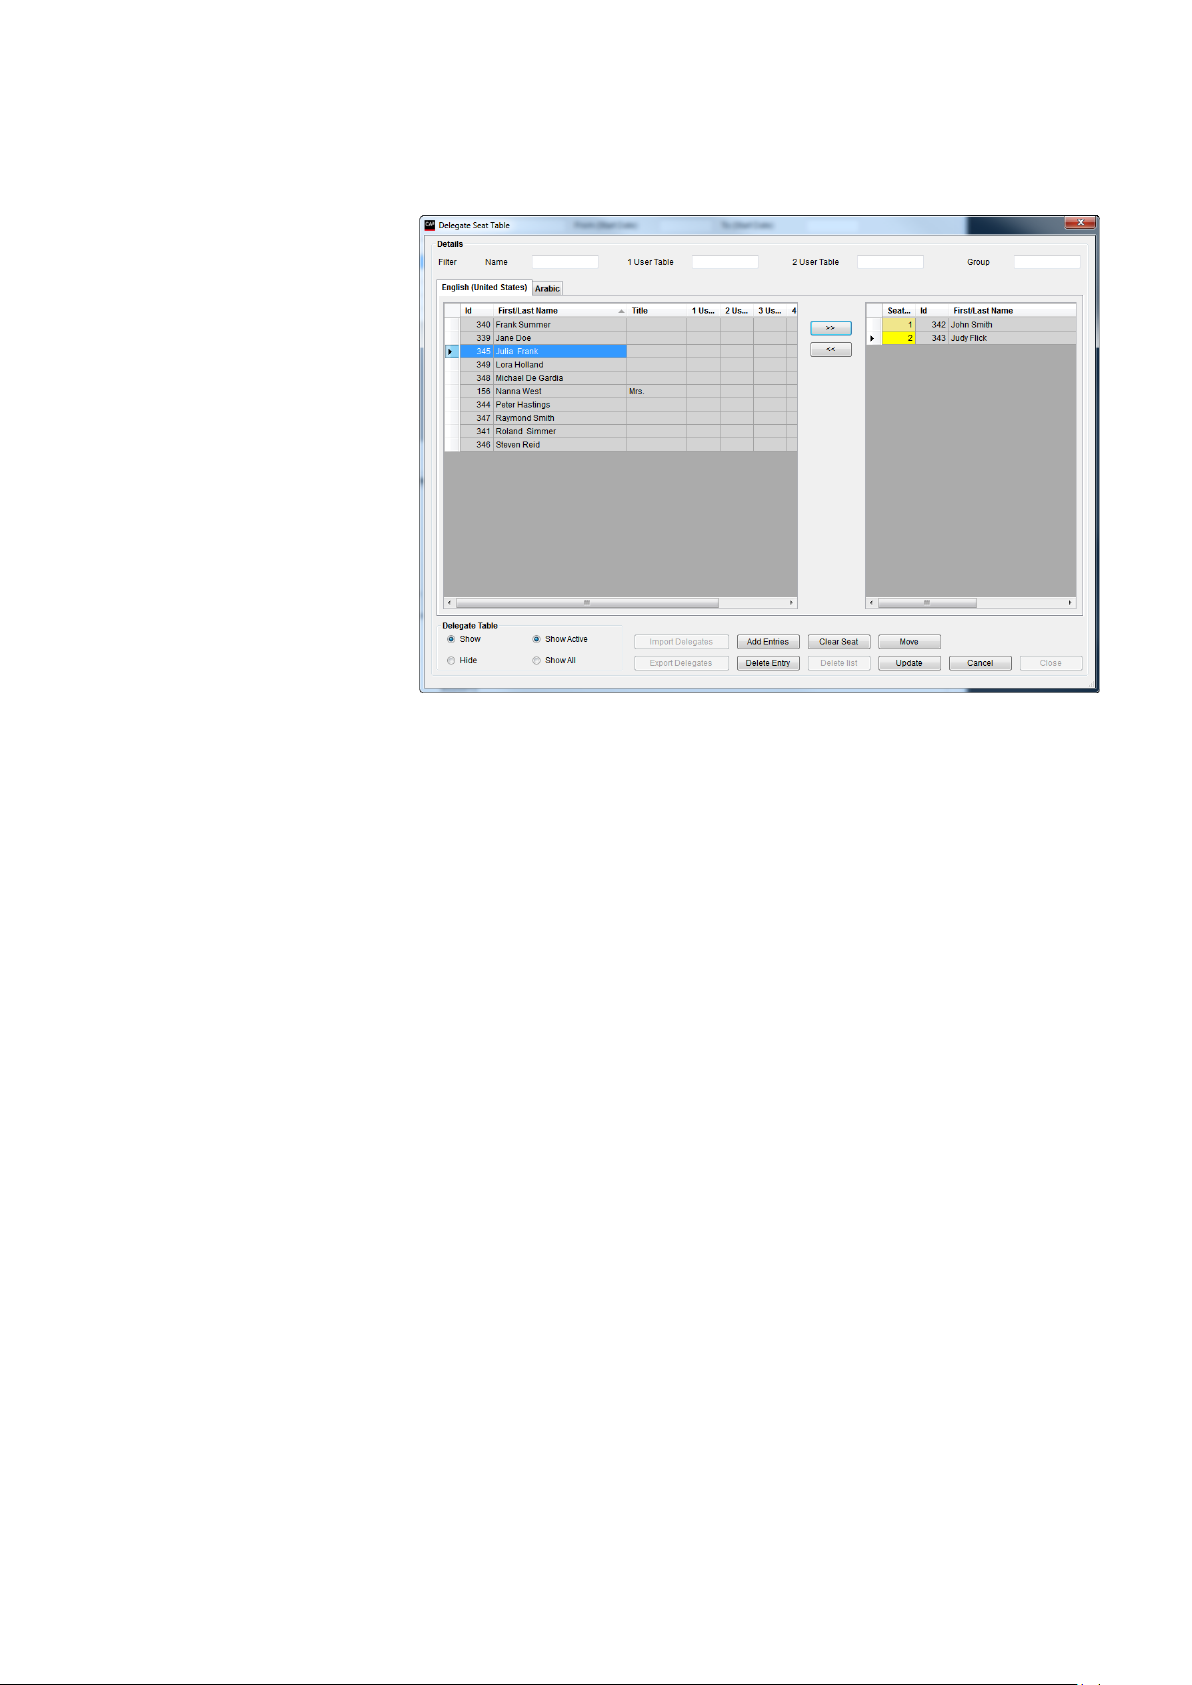
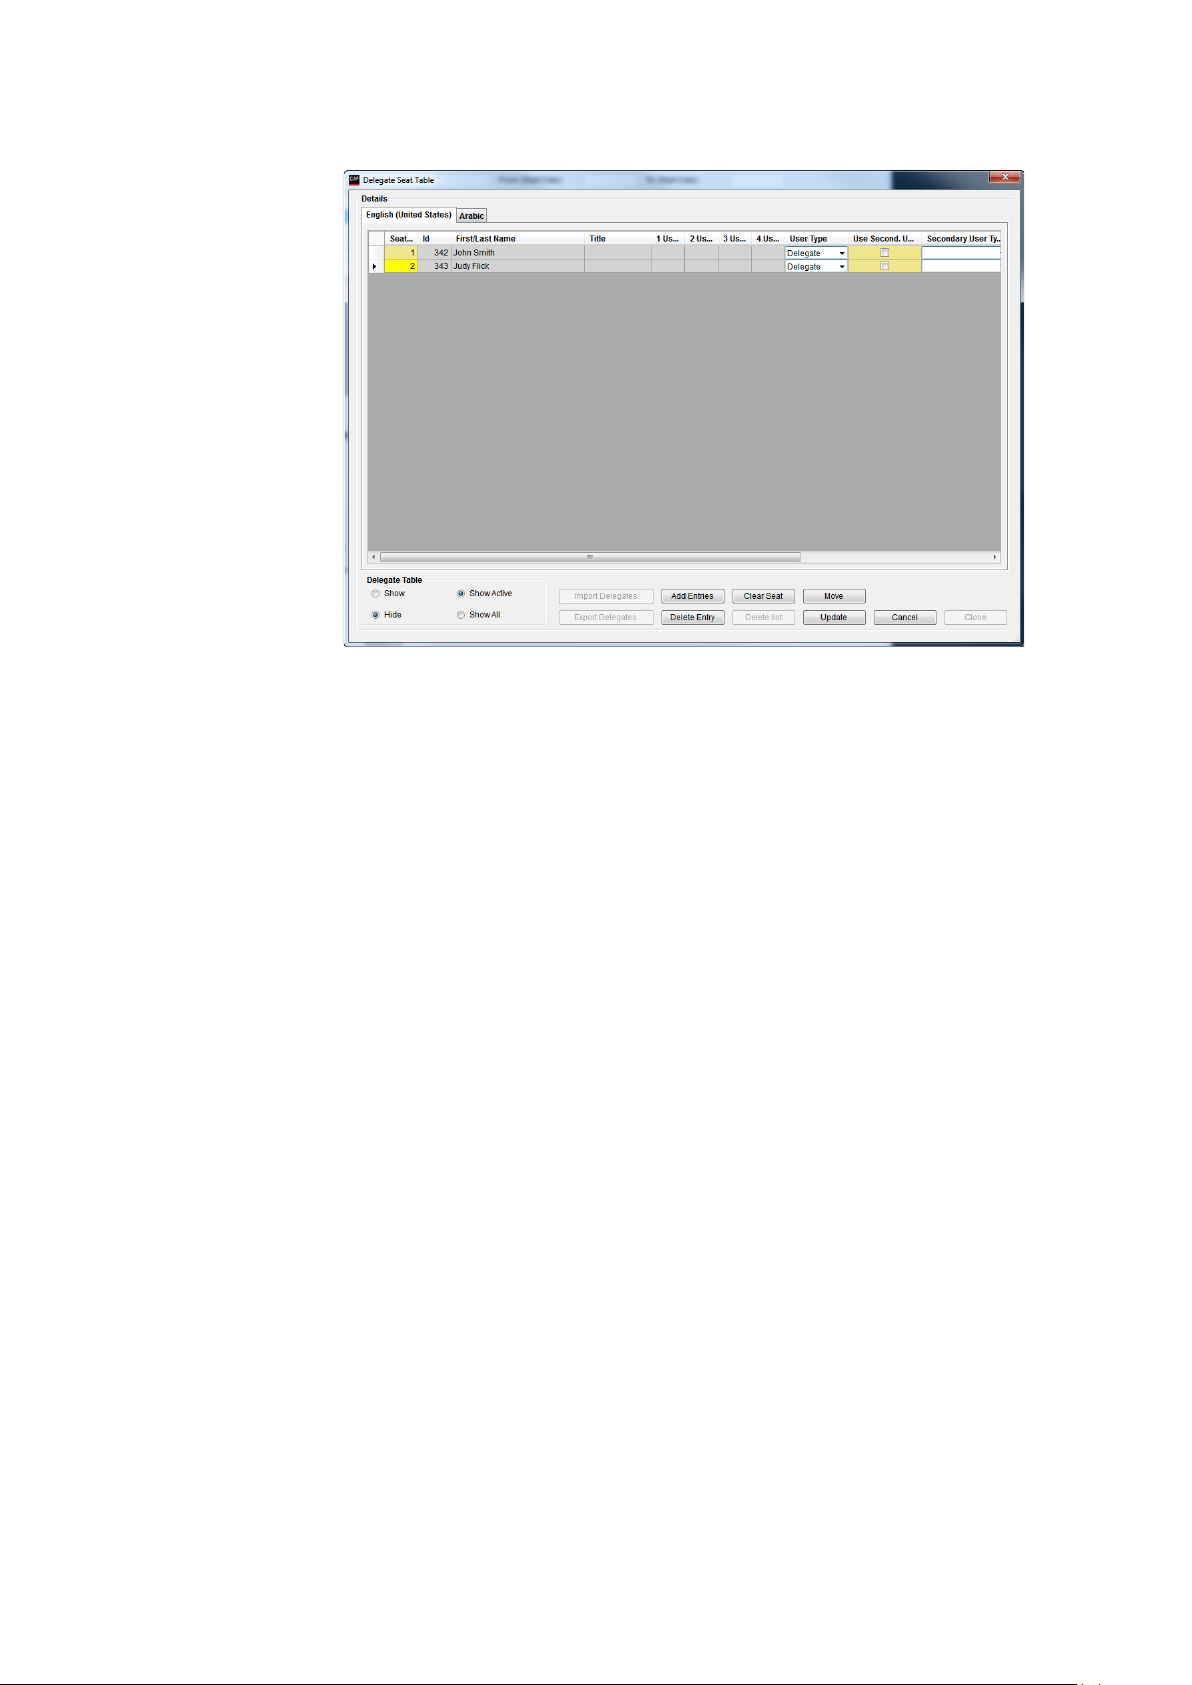
Press the [Del. Seat Table]
button to call the function for
The button is only enabled if
[>>]
Existing delegates from the Delegates database will be shown in the left window.
Selecting a delegate and then clicking ‘>>’ will place the delegate in seat number 1 in
Selecting a seat occupied by a delegate, before clicking ‘>>’ will place the delegate in a
new seat.
[<<]
Selecting a seat and clicking ‘<<’ will remove a delegate from a seat.
Clicking ‘Clear Seat will also remove a delegate from a seat.
[Show] Delegate
Clicking this button will show the ‘Delegate’ database window.
[Hide] Delegate
Clicking the ‘Hide’ button will remove the Delegate window.
Delegate Seat Table 4.3.4
creating a Delegate Seat
Table for the conference.
the conference mode is set to
• ‘Prepared Delegate Seat
Table’
• ‘Login Using Code on Seat’
• ‘Login Using Code on List’
• ‘Login Using Code on
Preferred Seat’
• ‘Automatic Login on
Preferred Seat’.
Table
Table
Figure 4.3-D
the delegate seat table. The seat will automatically be generated, when clicking ‘>>’.
Selecting an empty seat before clicking ‘>>’ will place the delegate in that seat.
17
User Manual SW 6005 CAA ver 6.2 RevA.docx
Page 18
DIS Digital Conference System User Manual
It is now possible to assign specific values for the conference, different from the
. The following values can be
a secondary user type on seat types
assigning a secondary user type used on seat types
assigning a character used for a voting calculation for groups with
Microphone Attenuation – assigning an individual microphone level
[Show Active]
Clicking ‘Show Active’ will show all delegates in the Delegates Database marked as
‘Active’.
[Show All]
Clicking ‘Show All’ will show all delegates in the Delegates Database.
[Import
Use this button to import a list of names from an XML file or to use the default
delegate seat table created in the CAA/Tables/Default Delegate Seat Table.
[Export
Use this button to export a list of names to an XML file.
entries made for the delegate in the Delegate Table
changed:
User Type – assigning an individual user type
Use Second. User Type – enabling the use of
‘Secondary seat’
Secondary User Type –
‘Secondary seat’
Group – assigning a group e.g. for group speech time
Voting Weight – assigning a numerical value giving the number of votes the user has
Voting Group –
different voting rights
Delegates]
Delegates]
18
User Manual SW 6005 CAA ver 6.2 RevA.docx
Page 19
DIS Digital Conference System User Manual
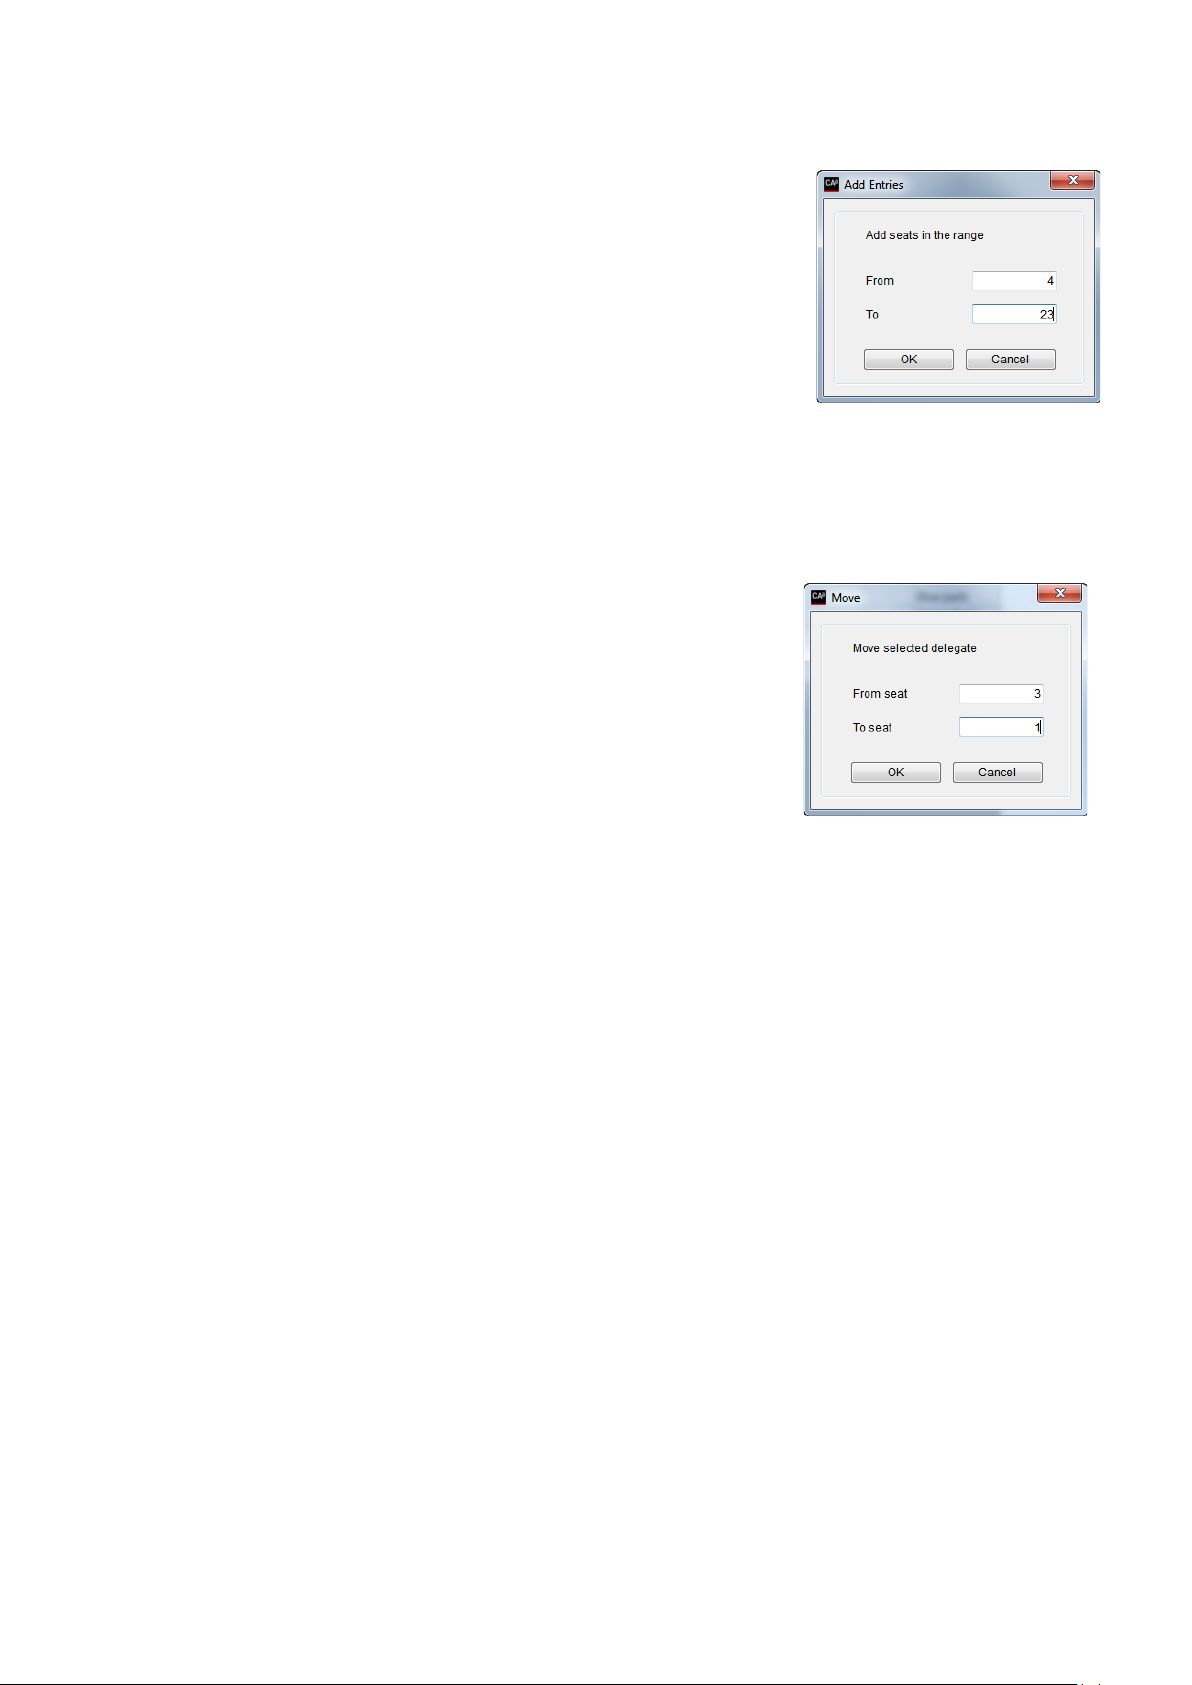
[Add Entries]
Press this button to create the number of seats,
which will be used for the conference.
[Delete Entry]
Press this button to delete a selected seat.
[Clear Seat]
Press the button to remove a delegate from a
selected seat.
[Delete list]
Press this button to delete all seats.
[Move]
Press this button to move a delegate from one seat
to another.
Figure 4.3-E
Figure 4.3-F
19
User Manual SW 6005 CAA ver 6.2 RevA.docx
Page 20
DIS Digital Conference System User Manual
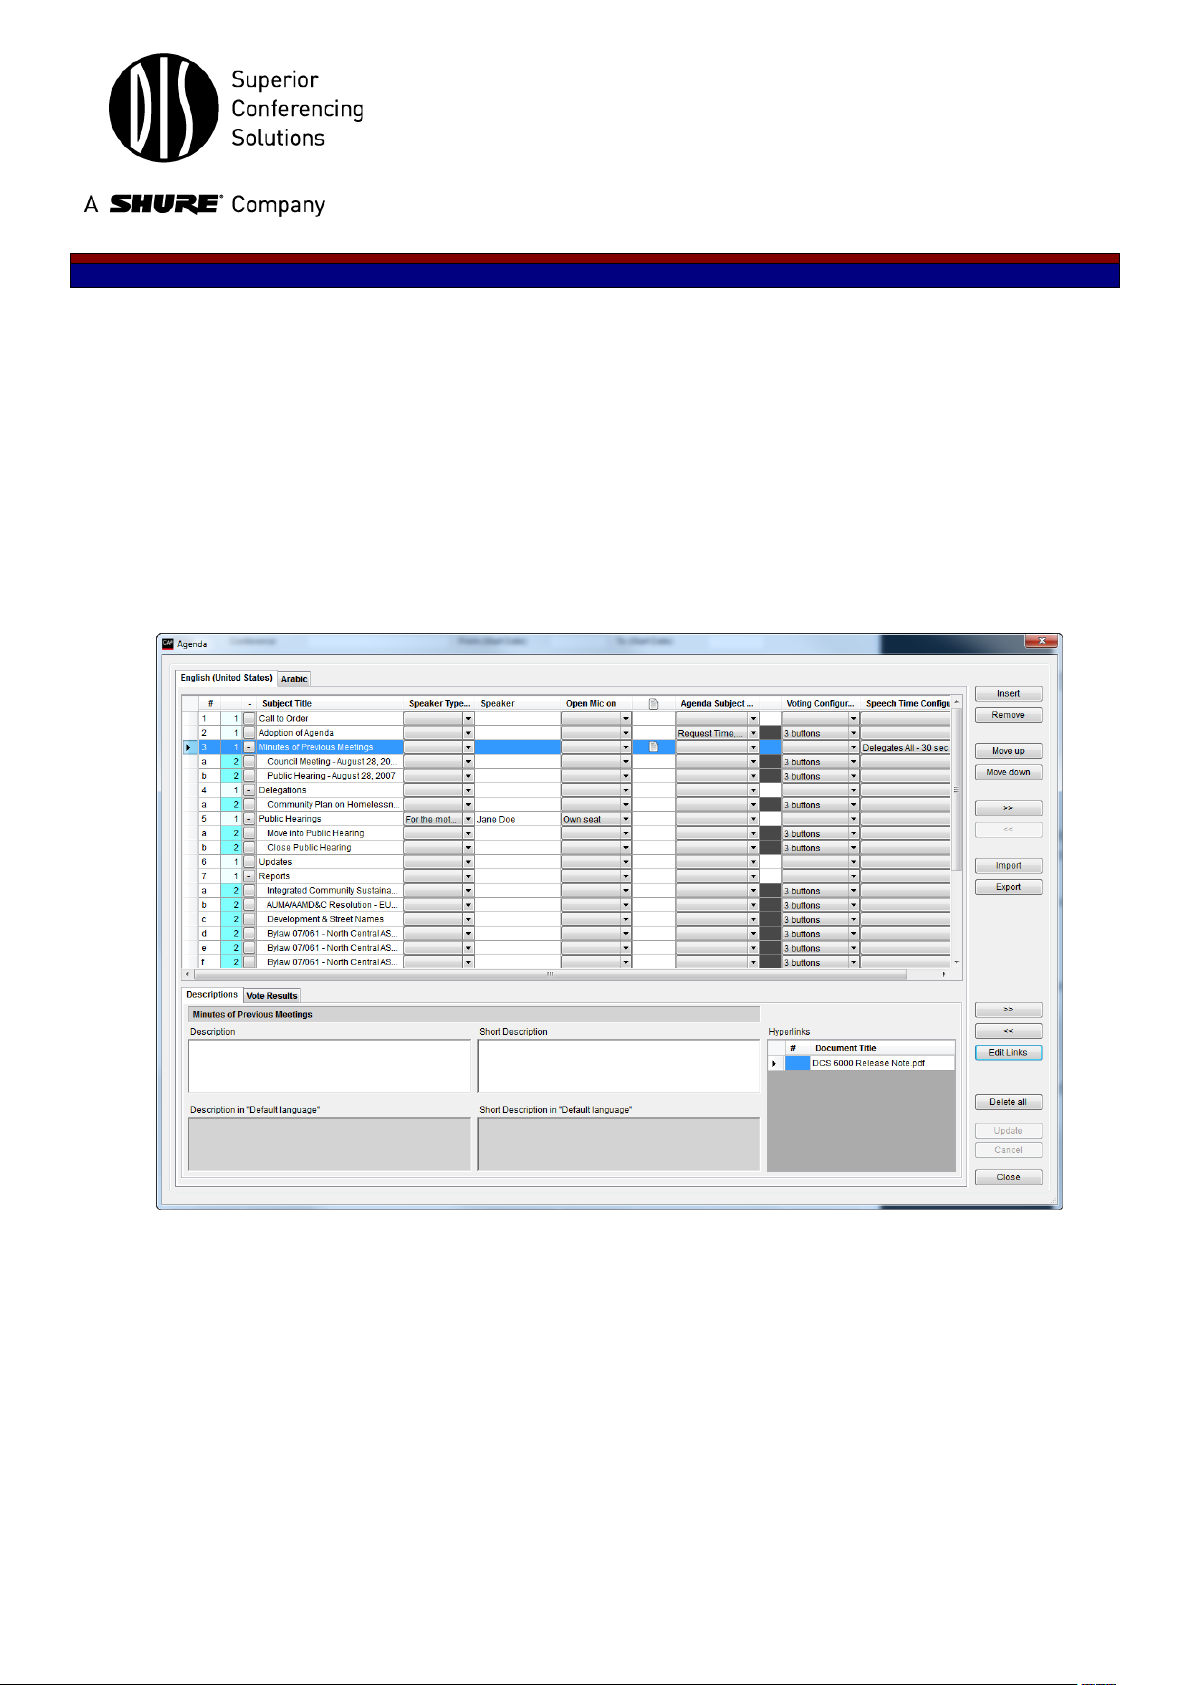
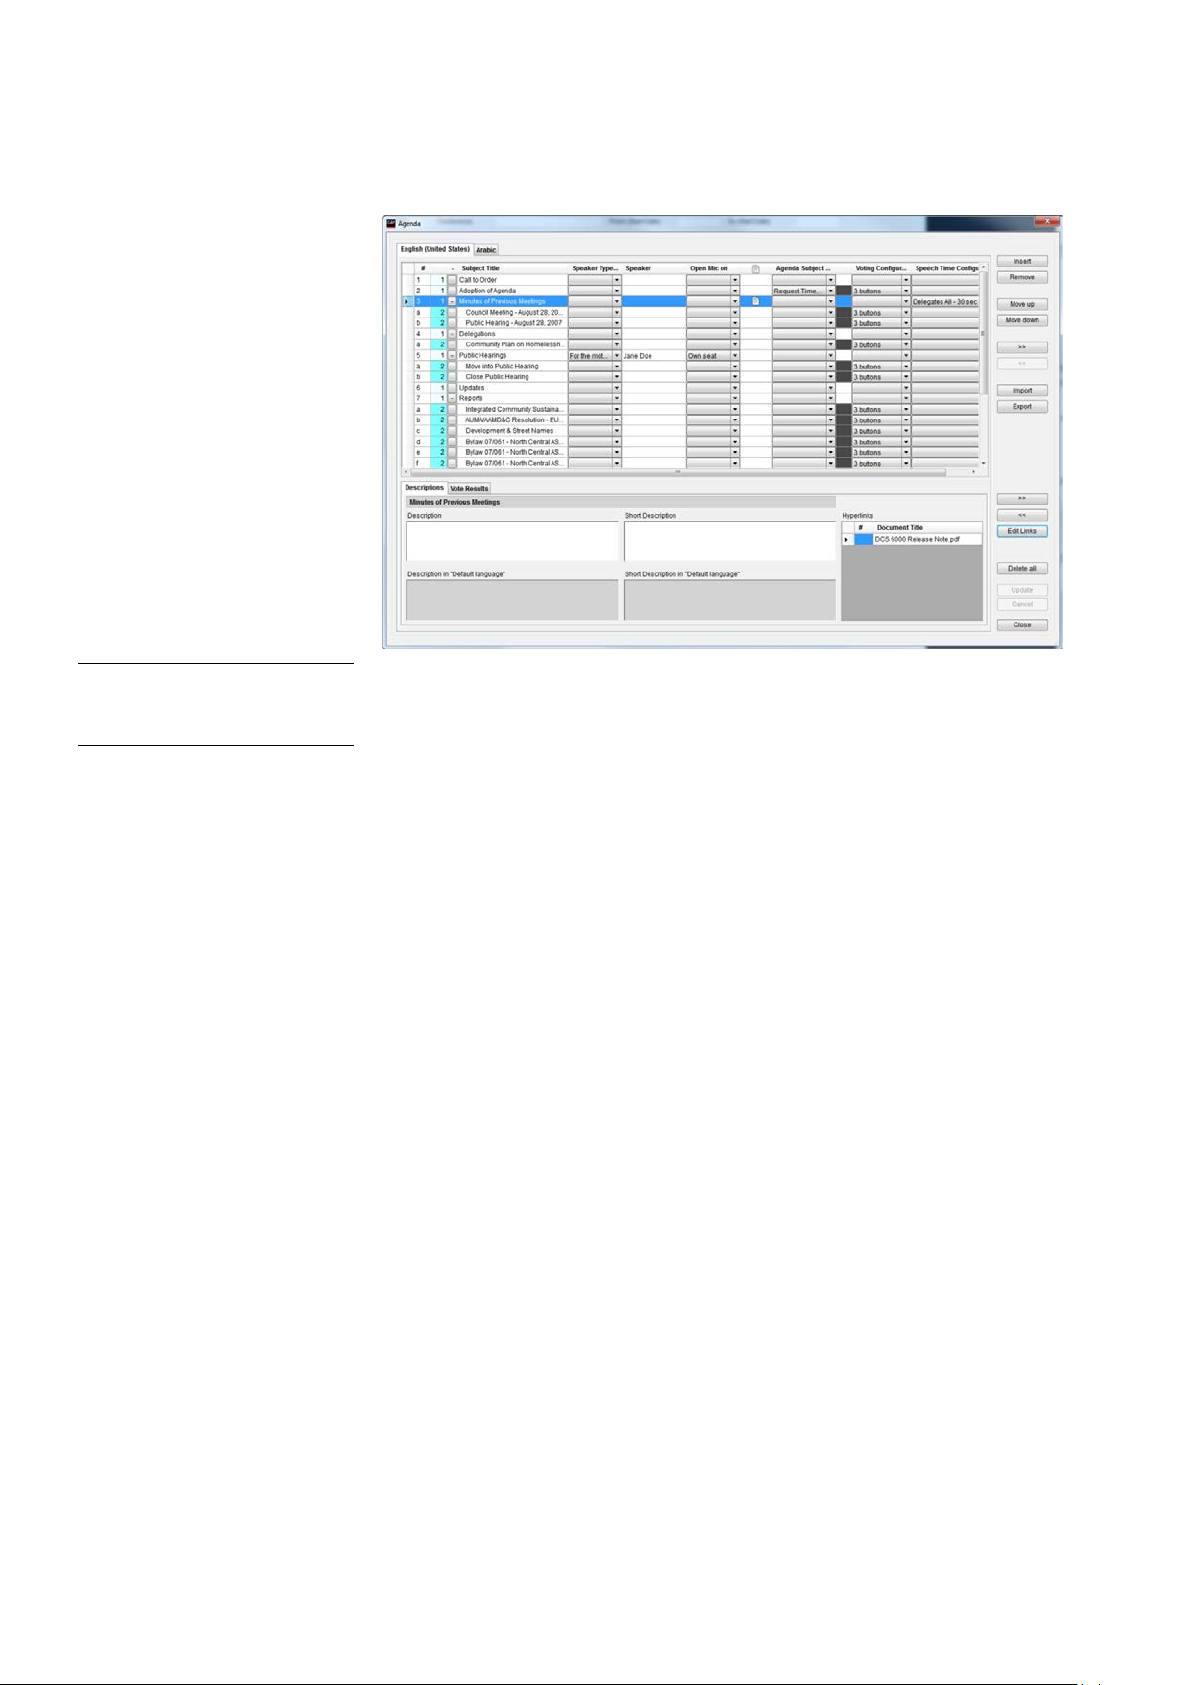
The agenda is a list of
subjects with a title and
Adding subjects build the
New subjects are added
automatically when
entering text on a blank
The agenda shows all
subjects including
An agenda can be created
using the buttons to the
the default
conference language.
#
Field for numbering the subjects. The field can be empty.
(blank)
This field indicates the ‘level’ of the subject. Each level is marked with a
different color.
-/+
Expand and collapses the sub-subjects.
Subject Title
Field for entering the main subject and sub-subjects. For each main subject it
is possible to type in a number of sub-subject activates with ’>>’. There can
subjects (6 levels including the main
number. Each sub-subject is shown with indention as well.
Max. number of characters: 1000
Speaker Type
A speaker type can be selected from a drop-down list. If speaker type is
selected the speaker type is shown before the speaker name in the CUA and
ame is
itle is
empty. Speaker types are created in CAA/Setup/Configurations/Speaker
Type Configuration.
Agenda 4.3.5
description.
Agenda one by one.
line below the last subject.
indentation.
right
Note: Rows must not be left
blank in
Configuration
Figure 4.3-G
be a maximum of 5 levels of subsubject). The level is marked in the second column with a color and a level
the CDA Agenda. If speaker type is not selected only the speaker n
shown. Speaker type is only shown in the CUA and CDA if the subject t
20
User Manual SW 6005 CAA ver 6.2 RevA.docx
Page 21

DIS Digital Conference System User Manual
Speaker
It is possible to insert an unlimited number of speakers as sub-subject to a
main subject or a sub-subject. Each speaker is normally assigned each a sub-
peaker is
Alternatively, the speaker name can be typed in the speaker field at the
If a subject with a speaker is set current in the CUA/Agenda screen the
shown in the CUA/Agenda and CDA/Agenda. The subject title is shown
instead.
Open Mic On
Using a dropdown box it is possible to select at what seat the microphone for
a speaker shall be opened. The choices are:
the CAA/Setup/Equipment/Conference Units/Seat Type. The speaker name
will be shown in the CUA and CDA.
“Document”
This field indicates is one or more documents are linked to the subject
Agenda Subject
Drop down list for selecting different agenda subject configurations for
individual agenda subjects..
Indication column. The field is black if a voting configuration is selected for
the subject.
Voting Configuration
Field for assigning voting configurations for the individual agenda subjects.
Speech Time
Drop down list for selecting different speech time configurations for the
individual agenda subjects.
[Insert]
This button inserts a blank row above the selected row allowing the user to
add a new subject.
[Remove]
This button deletes the selected subject unless a vote result exists for the
subject.
[Move up]
This button moves the selected subject one row up allowing the user to
reorder the agenda.
[Move down]
This button moves the selected subject one row down allowing the user to
reorder the agenda.
[ >> ]
This button increases indentation one level. A limit of 6 indentation levels
must apply.
[ << ]
This button decreases indentation one level.
subject i.e. at level 3 below a level 2 subject like “Reply”. The s
selected by clicking the speaker field at the subject. A popup will open, listing
the delegates assigned to the conference in the Delegate Seat Table.
subject.
microphone for the speaker will be set active on the seat, selected in the field
‘Open Mic On’.
If the subject title is empty the speaker name is shown in the CUA/Agenda
and CDA/Agenda. If the subject title is not empty the speaker name is not
Empty: No microphone opens when the subject is set current.
Configuration
Configuration
Own seat: The microphone opens at the seat where the speaker is logged in.
Podium “x”: The microphone opens at the seat configured as Podium “x” in
21
User Manual SW 6005 CAA ver 6.2 RevA.docx
Page 22
DIS Digital Conference System User Manual
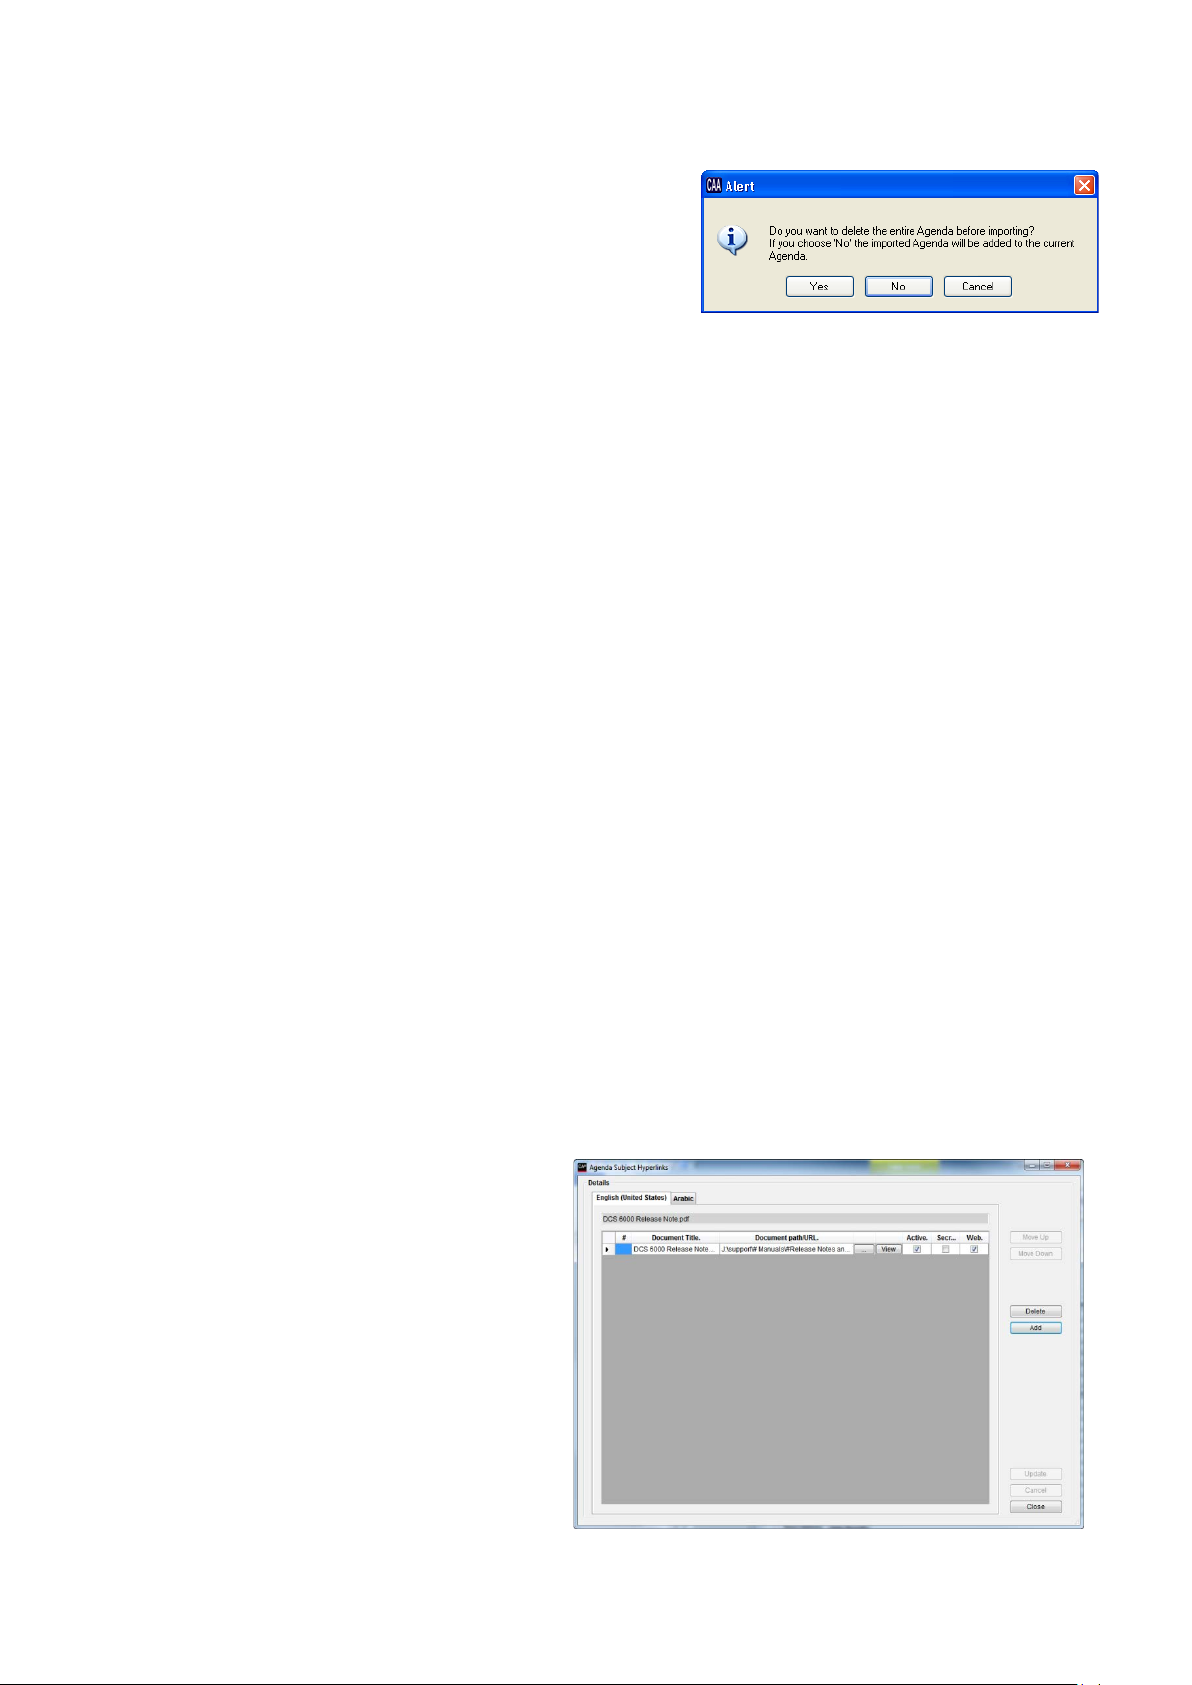
[Import]
Import an agenda from an XML
file.
the option of deleting an existing
agenda or add the import to the
existing agenda
[Export]
Export the agenda to an XML file.
[Delete all]
This button deletes all subjects. You have to confirm your choice.
Descriptions
Description
A long description of a subject (main subject or subsubject) can be inserted. This description is shown in
the CUA/Agenda in the description window when a
subject is selected.
Max. number of characters: 10.000
Short Description
A short description, typical one line can be typed for a
subject (main subject or sub-subject). This short
description is shown in the CUA/Agenda and
CDA/Agenda but only for the main subject.
Max. number of characters: 500
Description in
When adding the description of an agenda subject to
other languages the description for the default
language can be seen in the ‘Default language
description’ window. This will ease the translation to
the other languages
Short Description
This window shows the short description in the
default language easing the task of making a
translation to another language.
Hyperlinks
This window shows the hyperlinks to document
attached to the agenda subject. Hyperlink are created
and edited using the [Edit Links] button
[Edit Links]
Clicking this button will show the ‘Agenda Subject
Hyperlinks’ dialog.
A dialog box will be presented for
Figure 4.3-H
“Default language”
in “Default
language
22
User Manual SW 6005 CAA ver 6.2 RevA.docx
Page 23
DIS Digital Conference System User Manual
Figure 4.3-I
Hyperlinks can be attached either by typing the
Web Service Interface for use in third part application
like streaming applications.
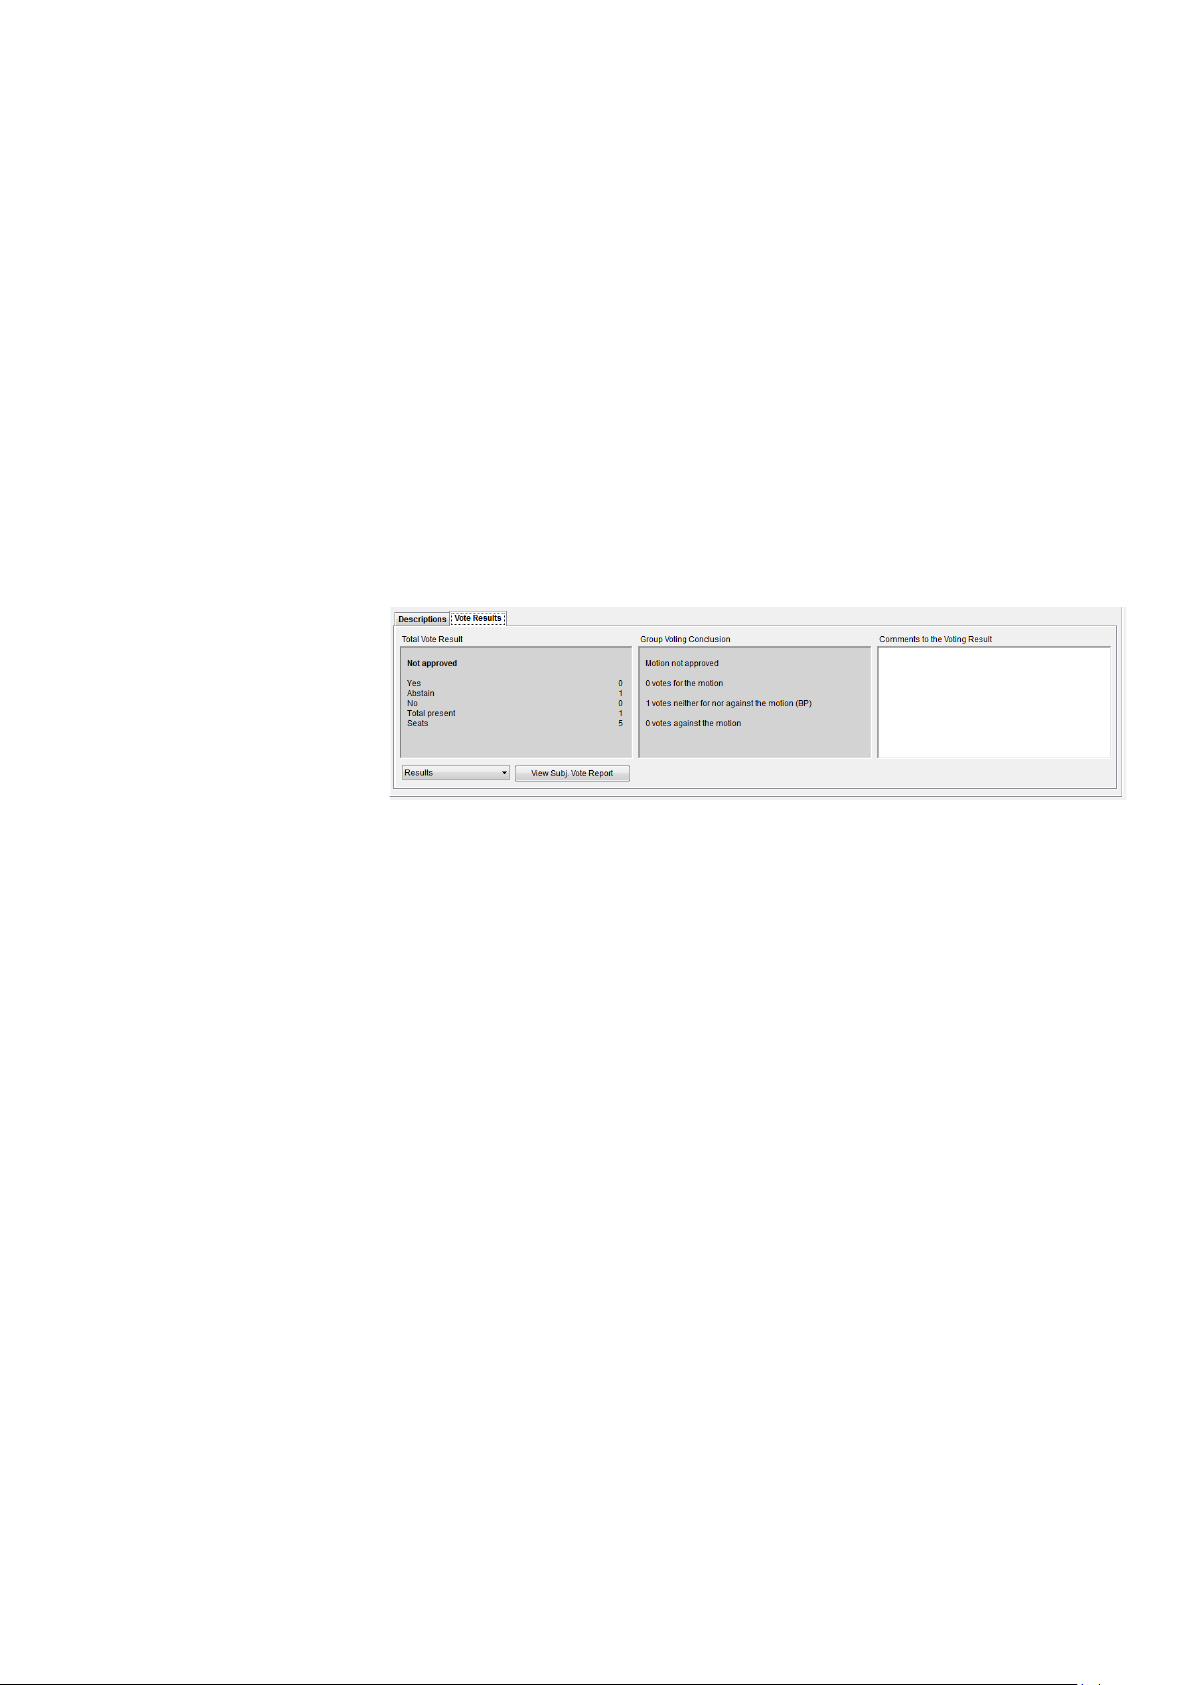
Vote Results
Figure 4.3-J
Total Vote Result
Shows the voting result as configured in the Vote
Result table in the CAA/Setup/Configurations/Voting
Voting configuration result text 1-9: Result 1-9
Group Voting
Field used to display the voting conclusion in a format
specified by customer
Comments to the
Field for inserting comments to the voting results
Results
Dropdown list to select a Voting Report to print:
Result
Result with Groups
Simple
[View Subject Vote
Prints the Subject Vote report in PDF format.
Document Title and the path to the document or it can
be attached using the […] button.
Attached documents can be viewed using the [View]
button.
Hyperlinks can have the following attributes:
Active The document can be viewed in the CUA.
Secret The document can be viewed in the CUA by the
users who in the User Type has been assigned to view
secret documents.
Web The document links are available in the SW 6000
Conclusion
Voting Results
Report]
Configuration in the following format:
Approved/not approved
•
•
•
23
User Manual SW 6005 CAA ver 6.2 RevA.docx
Page 24
DIS Digital Conference System User Manual
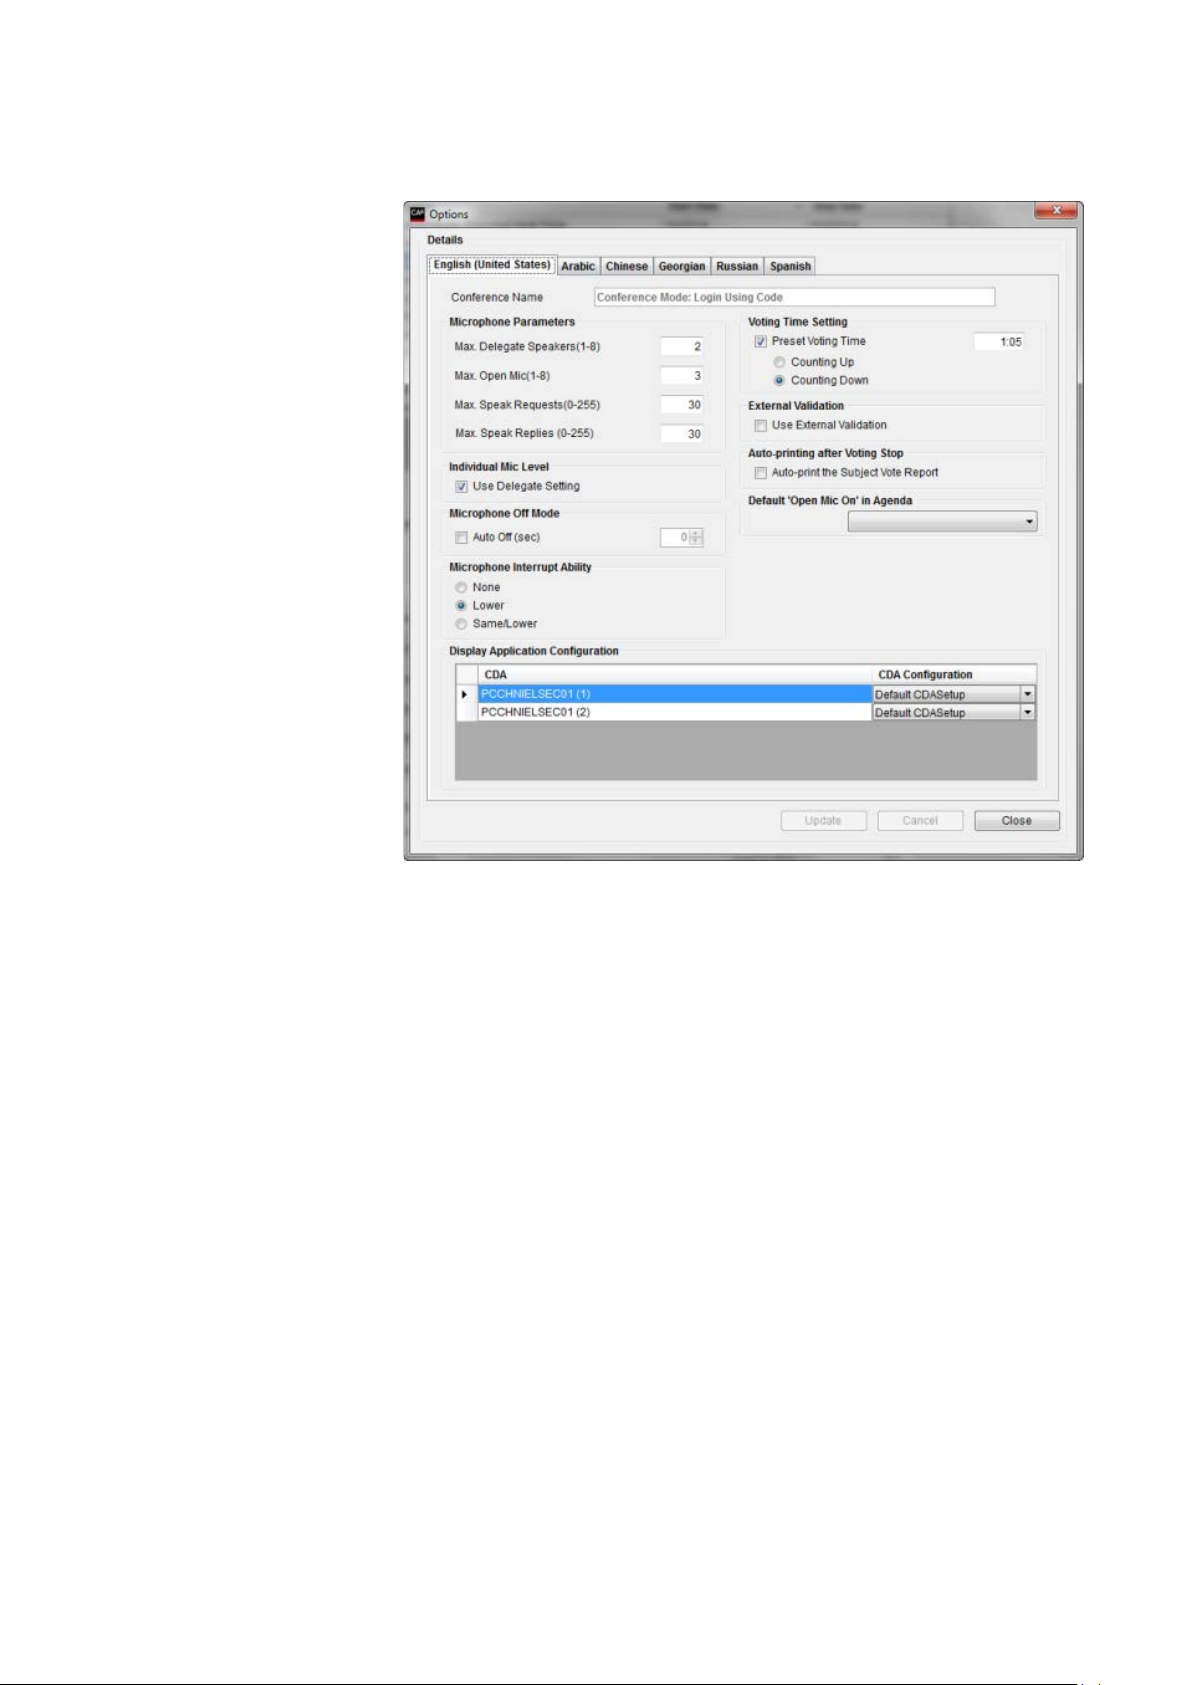
The ‘Options’ button
opens the ‘Options’
popup, which is used to
used when
Microphone
Max. Delegate
Set the maximum Delegates allowed. The value can
be set from 1 to 8.
Max. Open Mic
Set the maximum open conference units allowed.
This included both Delegate Units and Chairman
Units. The value can be set from 1 to 8.
Max. Speak Requests
Set the maximum no of names in “Request to
speak” queue. The value can be set from 0 to 255.
Max. Speak Replies
Set the maximum no of names in “Reply” queue.
The value can be set from 0 to 255.
Individual Mic Level
Use Delegate Setting
When ticked, the microphone level will be set
according to the setting in the ‘Delegate Seat Table’
Microphone Off Mode
Auto Off (sec)
When ticked a Conference unit will switch of after
the time set, if nobody is talking in the microphone.
Microphone Interrupt
None
Cannot interrupt another speaker.
Lower
Can interrupt a speaker with a speak priority less
than own speak priority.
Same/Lower
Can interrupt a speaker with the same speak
priority or a speak priority which is less than own
speak priority.
Options 4.3.5.1
set the system operation
settings,
starting the Conference.
Parameters
Ability
Figure 4.3-K
Speakers
24
User Manual SW 6005 CAA ver 6.2 RevA.docx
Page 25

DIS Digital Conference System User Manual
Voting Configuration
Preset Voting Time
When ticked the voting time is enabled. After the
time set, the voting session will stop automatically.
Counting up
Select this option to make voting time counters
display elapsed time starting from zero and
counting up.
Counting down
Select this option to make voting time counters
display elapsed time starting at the time limit and
counting down to zero.
External Validation
Use External
When ticked External Validation e.g. external
biometric validation using finger print recognition
led. External validation is
only available if the current conference is of type
‘Login using code’, ‘Login using code and list’ or
‘Login using code on list’. It is also a prerequisite
popup is required, when using Registration at the
conference.
Auto Printing after
Autoprint the Subject
When selected a configured printer will print the
‘Subject Vote Report’ after a voting session is
stopped
Default ‘Open Mic On’ in
This selection determines the default (Podium or
Own place) when a Speakers is selected to a
subject.
Display Application
It is possible to have up to 8 CDA applications
running.
ns can be created in
the CAA application. For each conference it is
For more information about CDA configurations
please refer to the ‘User Manual SW 6090 CDA’.
Validation
or iris scanners is enab
that chip card is used.
The option shall also be ticked if a Registration
Voting Stop
Vote Report
Agenda
Configuration
Various display configuratio
possible to assign any created configuration to any
of the CDA applications running.
25
User Manual SW 6005 CAA ver 6.2 RevA.docx
Page 26
DIS Digital Conference System User Manual
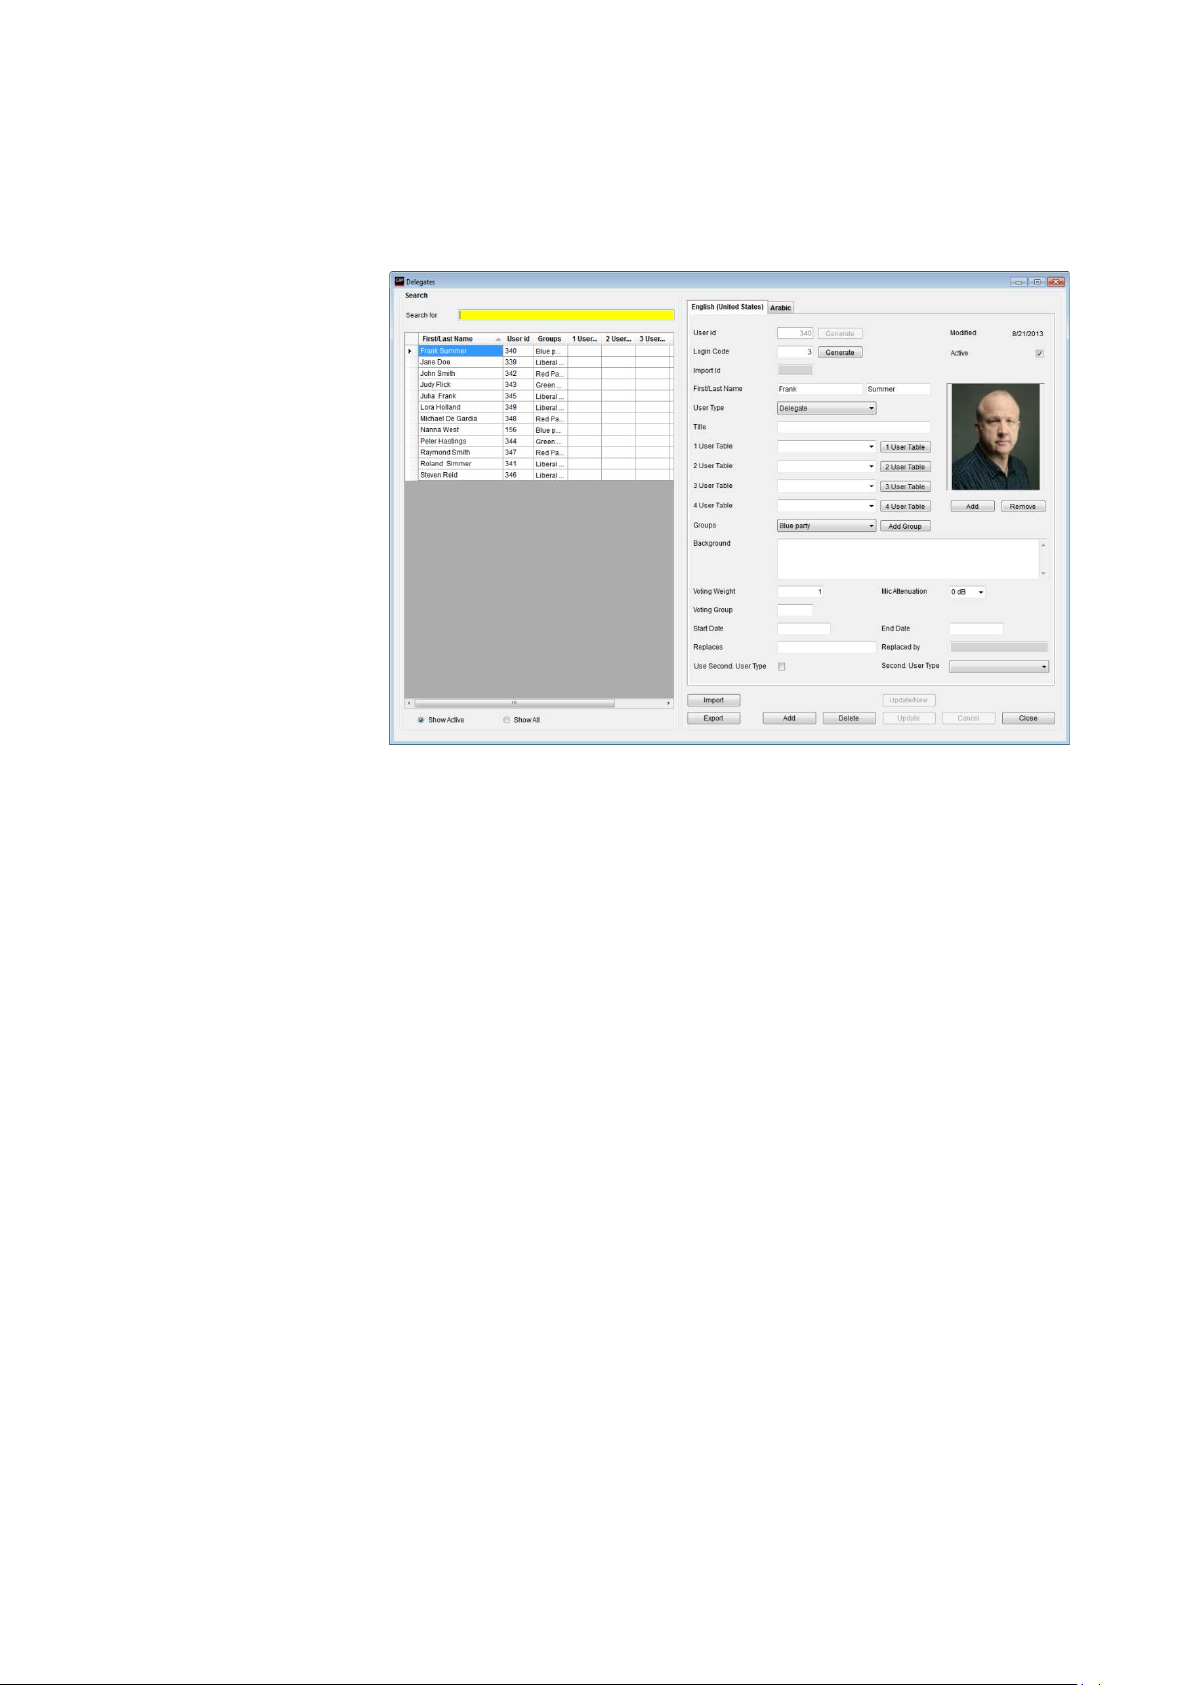
Delegates who attend
conferences can be created
User Type fields are all
to be
User id
A numeric value up to 5 digits, unique for each delegate, which is identifying the User.
When a delegate is added to the list of delegates, the ID cannot be changed. If chip
cards are in use, this ID has to match the ‘Delegate Id’ programmed on the card.
Login Code
Enter a unique login code to be used by the delegate for logging in to the CUA
Application.
[Generate]
Press the button to generate a random number for the User id/Login Code. When
adding new delegates, unique User id/Login Codes will automatically be assigned.
First/Last Name
First and last name of the delegate.
User Type
Select one of the existing user types from the drop down list. The user type will
determine what screens, buttons, individual microphone settings and functionality
will apply to the delegate’s CUA Application and microphone operation when the
delegate is logged in.
Title
Title or position of the delegate.
1-4 User Table
Four user-defined fields are available for entering various text information. Their
labels can be set to describe the content of the fields from the label screen. Their label
numbers are 1204 to 1207. Write any text or select predefined text from the drop
down list.
[1-4 User table]
Pressing the buttons will call popup screens that allow the user to create and
maintain predefined selections for each of these four fields.
The description of the fields can be changed in ‘CAA/Setup/Language/Labels’.
Groups
A delegate can be assigned a group of delegate. This is useful if ‘Group Speech Time’ is
used.
[Add Group]
This button will bring a popup for adding delegate groups.
4.4 Tables
Delegates 4.4.1
using this screen.
User id, Login Code, Name,
and
mandatory and have
filled in.
Figure 4.4-A
26
User Manual SW 6005 CAA ver 6.2 RevA.docx
Page 27

DIS Digital Conference System User Manual
Background
The user can enter any free text information here to be displayed on the Delegate
information screen in the CUA Application.
Voting Weight
This field is used to insert a numerical value given the number of votes the user has.
Default value is ‘1’ (one).
Mic Attenuation
Use this setting to assign individual microphone level to a delegate. The setting can be
from 0 to -6.
Voting Group
This field is used to insert a character to be using in the voting calculations i.e. ‘F’ for
French and ‘N’ for Nederland if the two groups have different voting rights
Start Date
Date field for entering from which date the delegate is active. The start date cannot be
after the stop date. It is possible to enter a start date but no stop date.
Stop Date
Date field for entering the stop date where the delegate is not active anymore. The
stop date cannot be before the start date. It is possible to enter a start date but no
stop date.
Replaces
If the delegate is replacing another delegate, a delegate to replace can be found by
clicking the field. A popup will show the list of active delegates. Delegates selected
cannot be replaced by other delegates nor be replacing other delegates.
Replaced by
If a delegate is replaced by another delegate this field show the ‘First/Last Name’ of
the delegate who has replaced.
Use Second. User
Tick box to select if the user shall use another user type on another seat during the
conference. If ticked the user will get the User Type specified in ‘Second. User Type’
when logged into a seat configured as ‘Secondary seat’ in
CAA/Setup/Equipment/Conference Units/Seat Type.
Second. User
Dropdown box for selecting the User Type which shall be applied to the delegate
when logging in on a seat configured as ‘Secondary seat’ in
CAA/Setup/Equipment/Conference Units/Seat Type
Active
A delegate can be marked as ‘Active’ If marked as active, he will be shown in list
sorted by ‘Active’
Picture
A picture of the delegate can be inserted using the [Add] button and removed using
the [Remove] buttons.
A picture added will be displayed on the Delegate information screen in the CUA
Application.
[Add] (picture)
Press the button to call a standard Windows interface to select picture files
(maximum size 30 Kb – picture format WxH = 115x120).
Pictures are replaced by adding a new one.
[Remove]
Press the button to remove a picture from the delegate record.
Type
Type
(picture)
27
User Manual SW 6005 CAA ver 6.2 RevA.docx
Page 28

DIS Digital Conference System User Manual
This table is used to create
groups used when assigning
group speech time
configurations and also when
The Group table can also be
opened from
Group name
Name of the group.
Group
Abbreviation of the group name (max. 3 digits).
Number of
A numeric number indicating the number of delegates which are member of the
group (max. 4 digits).
Sort order
A sort order number that determines in which order the groups are shown. The
lowest number is shown first.
Description
A description of the group.
Groups 4.4.2
counting votes.
CAA/Tables/Delegates [Add
Group].
Abbreviation
Delegates
Figure 4.4-B
28
User Manual SW 6005 CAA ver 6.2 RevA.docx
Page 29

DIS Digital Conference System User Manual
The default seat table is used to
create a standard seating
which can be used, when
[>>]
Existing delegates from the Delegates database will be shown in the left window.
Selecting a delegate and then clicking ‘>>’ will place the delegate in seat number 1 in
Selecting a seat occupied by a delegate, before clicking ‘>>’ will place the delegate in a
new seat.
[<<]
Selecting a seat and clicking ‘<<’ will remove a delegate from a seat.
Clicking ‘Clear Seat will also remove a delegate from a seat.
[Show Active]
Clicking ‘Show Active’ will show all delegates in the Delegates Database marked as
‘Active’.
[Show All]
Clicking ‘Show All’ will show all delegates in the Delegates Database.
[Add Entries]
Press this button to create the number of seats,
which will be used for the conference.
[Delete Entry]
Press this button to delete a selected seat.
[Clear Seat]
Press the button to remove a delegate from a
selected seat.
[Delete list]
Press this button to delete all seats.
Default Delegate Seat Table 4.4.3
creating conferences.
Figure 4.4-C
the default delegate seat table. The seat will automatically be generated, when clicking
‘>>’.
Selecting an empty seat before clicking ‘>>’ will place the delegate in that seat.
Figure 4.4-D
29
User Manual SW 6005 CAA ver 6.2 RevA.docx
Page 30

DIS Digital Conference System User Manual
[Move]
Press this button to move a delegate from one seat
to another.
Figure 4.4-E
30
User Manual SW 6005 CAA ver 6.2 RevA.docx
Page 31

DIS Digital Conference System User Manual
This screen is used to create
pre-recorded messages that
can be used by delegates who
have access to the message
If a message is created in
a delegate logged in using
English can read and send the
message in English and a
will read the Danish version of
4.5 Messages
screen in the CUA Application.
A maximum of 4000 characters
can be used for each message.
several language versions then
delegate logged in using Danish
the received message etc.
Figure 4.5-A
31
User Manual SW 6005 CAA ver 6.2 RevA.docx
Page 32

DIS Digital Conference System User Manual
The Conference Log reports
lists events taking place
during a conference in
Two reports are available
down list
Login and logout
4.6 Reports
The following groups of reports are available:
Figure 4.6-A
All reports are created as PDF files.
Conference Log Report 4.6.1
chronological order.
in the drop‘Choose Report’:
• Conference log
•
activity
Figure 4.6-B
32
User Manual SW 6005 CAA ver 6.2 RevA.docx
Page 33

DIS Digital Conference System User Manual
Select a conference from
the list on the left side of
‘Conference log’
When the report is created
it is displayed for viewing
Conference log 4.6.1.1
The Conference Log report lists all events that take place during a conference in chronological order.
the screen.
Select the
report in the dropdown list
and press [Create Report]
in a PDF viewer.
Figure 4.6-C
33
User Manual SW 6005 CAA ver 6.2 RevA.docx
Page 34

DIS Digital Conference System User Manual
Select a conference from
the list on the left side of
in the
dropdown list and press
When the report is created
it is displayed for viewing
in the Delegate Table
different from Delegate or
logging into a seat after a
Delegate or Chairman has
logged in will be listed in
the report as Deputy.
Login and logout activity 4.6.1.2
This report shows all login/logout activity during the conference.
the screen.
Select the ‘Login and logout
activity’ report
[Create Report]
in a PDF viewer.
Delegates, with a User Type
Chairman user type, who is
Figure 4.6-D
34
User Manual SW 6005 CAA ver 6.2 RevA.docx
Page 35

DIS Digital Conference System User Manual
The Delegate Conference
Report lists all delegates
have been part of a
down list ‘Choose
Select a conference from
the list on the left side of
Select whether the
delegate names or seat
When the report is created
it is displayed for viewing
Delegate Conference Report 4.6.2
that
conference either sorted by
‘Delegate Name’ or by ‘Seat
Number.
The dropReport’ is only used if there
are customised reports.
the screen.
delegates shall be sorted by
numbers using the Sort
Order radio buttons.
Press [Create Report]
in a PDF viewer.
.
Figure 4.6-E
35
User Manual SW 6005 CAA ver 6.2 RevA.docx
Figure 4.6-F
Page 36

DIS Digital Conference System User Manual
The Delegate Table Report
lists all delegates in the
for a
Conference with an option
only the delegates marked
active in the ‘Delegate
down list ‘Choose
Select a conference from
the list on the left side of
Select whether the report
shall contain only active
the database using the
‘Delegates Active/All
When the report is created
it is displayed for viewing
Delegate Table Report 4.6.3
Delegate Table
for showing all delegates or
Table.
The dropReport’ is only used if there
are customised reports.
.
the screen.
delegates or all delegates in
buttons.
Press [Create Report]
in a PDF viewer.
Figure 4.6-G
36
User Manual SW 6005 CAA ver 6.2 RevA.docx
Page 37

DIS Digital Conference System User Manual
The Agenda Reports
displays the agenda of a
Two reports are available
down list
Without voting
With voting
Select a conference from
the list on the left side of
Select the ‘without voting
When the report is created
it is displayed for viewing
Agenda Report 4.6.4
selected conference.
in the drop‘Choose Report’:
•
results
•
results
.
Agenda Report without voting results 4.6.4.1
the screen.
result’ report in the ‘Chose
Report’ dropdown list
Press [Create Report]
in a PDF viewer
37
User Manual SW 6005 CAA ver 6.2 RevA.docx
Page 38

DIS Digital Conference System User Manual
Select a conference from
the list on the left side of
Select the ‘with voting
When the report is created
it is displayed for viewing
The Delegate Statistical
Reports lists delegates
speaking information and
the number of conferences
delegates has participated
Agenda Report with voting results 4.6.4.2
the screen.
result’ report in the ‘Chose
Report’ dropdown list
Press [Create Report]
in a PDF viewer
Delegate Statistical Report 4.6.5
in.
The reports are available in
three versions:
• All delegates
• Delegate detailed
• Delegate
Figure 4.6-H
38
User Manual SW 6005 CAA ver 6.2 RevA.docx
Page 39

DIS Digital Conference System User Manual
Select the ‘All delegates’
report in the dropdown list
Enter the ‘Start Date’ and
Optional select a ‘User
When the report is created
it is displayed for viewing
All delegates 4.6.5.1
This reports list total speech time and number of conference participated for all active delegates in the
‘Delegate Table’ within a specified period of time.
‘End Date’.
Type’.
Optional select a ‘Group’.
Press [Create Report]
in a PDF viewer
Figure 4.6-I
39
User Manual SW 6005 CAA ver 6.2 RevA.docx
Page 40

DIS Digital Conference System User Manual
Select the ‘Delegate
detailed’ report in the
Enter the ‘Start Date’ and
‘Delegate’ in the
‘Delegate Filter dropdown
When the report is created
it is displayed for viewing
Select the ‘Delegate’ report
in the dropdown list
Enter the ‘Start Date’ and
Select the ‘Delegate’ in the
‘Delegate Filter dropdown
When the report is created
it is displayed for viewing
Delegate detailed 4.6.5.2
This reports list a summary of total speech time and number of conference participated for a selected
delegates in the ‘Delegate Table’ within a specified period of time.
The report does also list all agenda subject, where the selected delegate has participatedwith login/logout
time and speech time for each subject
dropdown list
‘End Date’.
Select the
list
Press [Create Report]
in a PDF viewer
Delegate 4.6.5.3
This reports list a summary of total speech time and number of conference participated for a selected
delegates in the ‘Delegate Table’ within a specified period of time.
‘End Date’.
list
Press [Create Report]
Figure 4.6-J
Figure 4.6-K
in a PDF viewer
40
User Manual SW 6005 CAA ver 6.2 RevA.docx
Page 41

DIS Digital Conference System User Manual
The Search in Voting
Results menu offers
es for
including individual voting
Individual
Option for selecting a search of individual voting results. The options Individual
Results and Total Results are mutually exclusive.
Total Results
Option for selecting a search of the total voting results. The options Individual Results
and Total Results are mutually exclusive.
Voting
Option for selecting a voting configuration. The Voting Configuration must be
selected to make a search for voting results.
Conference
Option for entering a conferencing name to limit the number of conferences in the
search.
From/to date
Option for entering a date interval to limit the number of search results.
[Search]
Button for starting a search based on the selected search parameters.
[Close]
Button for closing the Search in Voting Results menu.
[Print Subject
Button for generating a detailed voting report. The report contains the name of the
conference, the voting subject, the total vote results, the group voting result, the
group voting conclusion, the delegates absent and the individual voting result.
[Print Simple
Button for generating a short voting report. The report contains the name of the
conference, the voting subject, the total vote results and the individual voting result.
Sum of Lines
Field for displaying the number of search results in the Search table.
[Individual
Options only available when selecting Individual Results and Voting Configuration.
Delegates
Option for selecting a delegate from the Delegate Table and view the individual voting
results of that delegate.
Group
Option for selecting a group and view the individual voting results of the delegates of
that group.
Vote 1-5
Options for selecting voting results. The options available depend on the selected
Voting Configuration. If there are no options enabled, all voting results will be shown.
If only some of the options are enabled, only the selected voting results will be shown.
Search in Voting Results 4.6.6
different possibiliti
searching voting results
results.
Results
Configuration
Vote Report]
Vote Report]
Figure 4.6-L
Results]
41
User Manual SW 6005 CAA ver 6.2 RevA.docx
Page 42

DIS Digital Conference System User Manual
Show in result
Options for displaying the voting results in the Search table to the left.
Total Vote Result
Option for displaying the voting conclusion (Approved/Not Approved) in the Search
table to the left.
[Total Results]
Options only available when selecting Total Results and Voting Configuration.
and/or
Options for selecting the conditions of the voting result search. The ‘and’ condition
requires that all the conditions are fulfilled in order for a voting result to be included
in the search. The ‘or’ condition requires that one of the conditions is fulfilled in order
for a voting result to be included in the search.
Vote 1-9
Options for up to 9 different voting results. The options are defined in the selected
voting configuration.
=, <>, <, <=, >, >=
Options for filtering the voting results based on syntax.
[blank]
Field for entering a numerical value used in combination with the chosen syntax.
Show in result
Options for displaying the voting results in the Search table to the left.
Total Vote Result
Option for displaying the voting conclusion (Approved/Not Approved) in the Search
table to the left.
view
view
42
User Manual SW 6005 CAA ver 6.2 RevA.docx
Page 43

DIS Digital Conference System User Manual
This screen is used to
configure the seat
nment setting up
relations between
Seats are automatically
application when
information about new
units is received from the
table can be sorted in
accordance to the various
columns by clicking the
header.
Units in room
Type in the Room # to filter the list to shown only units placed in the room selected.
Room #
If rooms are linked together for combining system in more room, this field is used for
identifying which room, the unit is located in. The room number is selected by use of a
drop down box, with a list of configured rooms. The available rooms are set in
Setup/Rooms/Room Configuration.
Seat #
The seat number must be unique and is used to identify the seat on lists, reports and on
the mimic diagram. It can have a maximum of five numeric characters.
Serial #
Each microphone has a unique serial number encoded into the unit from the factory.
The number 000.000.000 must be used to create a seat with a computer but no
microphone.
Seat Type
This field is identifying the use of the seat, where the conference unit has been placed.
The entries are:
The other labels are only used for identifying the unit, but do not give any functionality.
DM unit
type
The connected unit is a Delegate Unit.
CM unit
type
The connected unit is a Chairman Unit.
DV unit
type
The connected unit is a Voting Unit.
4.7 Setup/Equipment
Conference Units 4.7.1
assig
microphones, seat numbers
and computers running the
CUA Application.
created by the CU Interface
CU 6105/6110 Central
Unit.
The
Note: If a seat has been created, it will not be deleted automatically if the unit is not connected to the CU
6105/6110 anymore.
Un-used ‘Seats’ have to be deleted manually.
Figure 4.7-A
43
User Manual SW 6005 CAA ver 6.2 RevA.docx
Page 44

DIS Digital Conference System User Manual
Podium x
If a seat has been set to the Seat Type “Podium x” microphone, the unit on
this seat will be turned on with the “Podium x” button on the CUA. There
can be up to three different podium microphones. Podium microphones
cannot be assigned to CUA’s or DC 6990 P’s.
Secondary
seat
If a seat has been set to Seat Type ‘Secondary seat’, a delegate assigned
with a secondary user type, will change to the secondary user type when
logged in at the secondary seat.
Technician
If a seat has been marked as a ‘Technician’, a CUA application running on a
PC assigned to this seat will not be logged out, when starting a conference.
PC
The seat is attached to a PC.
Use Serial #
If delegate units connected are
sharing a microphone, this field is
Note: Chairman units as well as
portable units does not support
has to be connected to the same
chain on the CU.
User Type
Specifies the default user type that applies to the CUA Application and the microphone
units when no one is logged in at the seat or a conference is not started.
Computer
The computers running the CUA application are identified by their Windows computer
name. A computer name must be specified if a PC with CUA application is assigned to
he ‘Serial No’ can be inserted as
Client must identify console number in call as well for the link to be established
between client on server and CUI.
UI on
Dropdown list to select the CUA Layout type for the Computer selected
Mic
This field is used to apply individual microphone level to a seat. The values are between
0 and -6.
LS
This field is used to apply individual speaker level to a seat. The values are between 0
and -6.
used to identify the units sharing a
microphone.
In the example unit 000.167.059
is using the microphone from unit
000.167.109
Figure 4.7-B
sharing microphone.
Note: Units sharing a microphone
Name
the seat. It allows the PCs to send messages to each other via the network using MSMQ
and allows the CUA to control the microphone unit assigned to this seat. The field must
be left blank if no PC is attached to the microphone unit. Must be unique.
If a seat with a PC running the CUA application for a technician, this position does
normally not have a microphone assigned, t
‘000.000.000’.
For a Technician, the fields ‘Seat type’ must be selected as ‘Technician’.
For applications running as a session on a terminal server the computer name should be
set so that terminal server and client console is identified e.g. “ServerName~3” is used
to identify a CUA running on terminal server “ServerName” and using client assigned to
console number 3.
Computer
44
User Manual SW 6005 CAA ver 6.2 RevA.docx
Page 45

DIS Digital Conference System User Manual
Runtime Seat
This field enables/disables automatic CUA seat assignment.
Ext. Val.
This field indicates whether external validation equipment is available for the seat.
Comments
The text ‘Inserted by CU’ with a time stamp is displayed when the seat was created
automatically by the system. The field can be used to store comments of any kind.
Mic on
Red colour indicates that the microphone is ON. Green colour indicates that the
microphone is in request.
The number in the green indication indicates the number in the request queue.
[Save settings
Pressing this button will save the current state of the system into the flash memory in
the CU 6105/6110.
[Mic check]
Will check a selected seat’s microphone by trying to turn on the microphone (for two
seconds).
[PC check]
Will check that MSMQ is running on the computer whose name is specified for the
selected seat.
[Mic scan]
This button starts a scanning of all microphones, by switching them On and OFF one by
one.
[Replace Unit]
This functionality is used for replacing a defective conference unit or switch units
between the seat:
1
Identify the seat number for the defective unit and remove it.
2
Connect the new unit to the CU. The new unit will after a short time show up as the
last unit on the list.
3
Select the line in the ‘Seat’ window with the new microphone.
4
Click ‘Replace microphone’ and the following dialog window will appear:
5
Type in the seat number for the defective unit.
6
Click OK. The new microphone has now replaced the defective one and has got the
functionality and Seat number of the defective microphone. Click OK.
Note: If the microphone was assigned a PC running the CUA interface this User has to logout and login
again for getting control of the new microphone.
Assignment
in CU]
Figure 4.7-C
Figure 4.7-D
45
User Manual SW 6005 CAA ver 6.2 RevA.docx
Page 46

DIS Digital Conference System User Manual
This screen is used to
configure the use of
are automatically
by the CUI
Interface application when
information about new
units is received from the
accordance to the various
s by clicking the
has been
created, it will not be
used units have to be
.
Units in room
Type in the Room # to filter the list to shown only units placed in the room selected.
Room #
If rooms are linked together for combining system in more room, this field is used for
identifying which room, the unit is located in. The room number is selected by use of a
drop down box, with a list of configured rooms. The available rooms are set in
Setup/Rooms/Room Configuration.
Serial #
Each unit has a unique serial number encoded into the unit from the factory.
Booth #
This field is used to enter the booth number, where the interpreter set is placed. Each
booth can max. be assigned 32 interpreter units. The Language Channel assigned to
the booth is assigned at the ‘Booth Ch. Assignment’.
A-language
This information field is for informing the channel number (and language assigned to
this channel) which is assigned as the A-channel. This is set automatically.
Desk #
Each interpreter booth can use multiple desks. This field is used to identify the desk
no.
B-language
This field is used for assigning a language channel to the B-language of the interpreter
set.
B-mode
This field is used to set the mode for the B-channel:
All
All channels at the interpreter set can be set to a B-channel.
One
One channel set as ‘B-language’ can be used at the B-language.
None
The B-language is not in use.
Comments
The text ‘Inserted by CU’ with a time stamp is displayed when the unit was created
automatically by the system. The field can be used to store comments of any kind.
Interpreter Units 4.7.2
Interpreter Units and
Interpretation Channels.
Entries
inserted
CU Central Unit.
The table can be sorted in
column
header on top.
Note: If an entry
deleted automatically, if the
unit is not connected to the
CU Central Unit anymore.
Undeleted manually
Figure 4.7-E
46
User Manual SW 6005 CAA ver 6.2 RevA.docx
Page 47

DIS Digital Conference System User Manual
AB Switch
Set to ‘On’ the interpreter can switch between the A and B-language with the
microphone ‘On’.
Backlight
Set to ‘On’ switches on the backlight in the LCD display in the interpreter set.
Floor toggle
Set to ‘On’ enable the toggle of the Floor button.
Mic on
Red colour indicates that the microphone is ‘On’.
Interlock modes
Complete
lock
When ticked, no interpreter can switch ‘On’ his microphone to an
occupied channel.
No interlock
When ticked any interpreter can switch ‘On’ his microphone to an
occupied channel. The interpreter who was occupying the channels will
be switched ‘Off’.
Inter booth
lock
A can interrupt A
When ticked, an interpreter can switch ‘On’ his
microphone on his A-channel to a channel occupied
The interpreter who was occupying the channels
will be switched ‘Off’.
A can interrupt B
When ticked, an interpreter can switch ‘On’ his
microphone on his A-channel to a channel occupied
The interpreter who was occupying the channels
will be switched ‘Off’.
A can interrupt
A+B
When ticked, an interpreter can switch ‘On’ his
microphone on his A-channel to an occupied
The interpreter who was occupying the channels
will be switched ‘Off’.
Conference
Abbreviation
When ticked the abbreviation of the language will be shown in the
channel selector display in conference units.
Channel
numbers
When ticked the channel number will be shown in the channel selector
display in conference units.
Please note that Channel Selector Units will always show channel
numbers.
[Replace Unit]
Replaces a unit. See procedures in previous section Setup/Equipment/Conference
Units.
[Save settings in
Pressing this button will save the current state of the system into the flash memory in
the CU 6105/6110.
After making a setting of a system, it is advisable to save the settings in the CU. Please
also refer to the CU User Manual.
Booth Ch.
Use this table to set the language to be used in each interpreter booth. Several booth
can have the same language channels.
Language
Channel in
use (0-31)
Type in the number of channels to be used. Pressing [Update] will
update the Channel/Language window to show the number of channels
in use.
Language
A language can then be assigned to the channels in use.
by an interpreter using his A-channel.
Units CS Display
CU]
by an interpreter using his B-channel.
channel.
Assignment
Channels
47
User Manual SW 6005 CAA ver 6.2 RevA.docx
Page 48

DIS Digital Conference System User Manual
This screen is used to
configure the AO Units
are automatically
application when
information about new
units is received from the
has been
created, it will not be
to be
Units in room
Type in the Room # to filter the list to shown only units placed in the room selected.
Room #
If rooms are linked together for combining system in more room, this field is used for
identifying which room, the unit is located in. The room number is selected by use of a
drop down box, with a list of configured rooms. The available rooms are set in
Setup/Rooms/Room Configuration.
Serial #
Each unit has a unique serial number encoded into the unit from the factory.
Function
Field, which can be used to identify the function of the unit. This description is used
to identify the units in the CUA application.
Comments
The text ‘Inserted by CU’ with a time stamp is displayed when the unit was created
automatically by the system. The field can be used to store comments of any kind.
Channel and
The Channel and Volume can be set for each of the outputs at the AO unit.
Audio Output Units (AO) 4.7.3
connected.
Entries
inserted by the CU Interface
CU Central Unit.
Note: If an entry
deleted automatically, if the
unit is not connected to the
CU anymore.
Un-used units have
deleted manually.
Volume Settings
Figure 4.7-F
48
User Manual SW 6005 CAA ver 6.2 RevA.docx
Page 49

DIS Digital Conference System User Manual
This screen is used to
configure the Ambient
Entries are automatically
application when
information about new
units is received from the
Note: If an entry has been
created, it will not be
Unused units have to be
deleted manually.
Units in room
Type in the Room # to filter the list to shown only units placed in the room selected.
Room #
If rooms are linked together for combining system in more room, this field is used for
identifying which room, the unit is located in. The room number is selected by use of
a drop down box, with a list of configured rooms. The available rooms are set in
Setup/Rooms/Room Configuration.
Serial #
Each unit has a unique serial number encoded into the unit from the factory.
Comments
The text ‘Inserted by CU’ with a time stamp is displayed when the unit was created
automatically by the system. The field can be used to store comments of any kind.
Ambient Microphones (AM) 4.7.4
Microphone connected.
inserted by the CU Interface
CU Central Unit.
deleted automatically, if the
unit is not connected to the
CU anymore.
Figure 4.7-G
49
User Manual SW 6005 CAA ver 6.2 RevA.docx
Page 50

DIS Digital Conference System User Manual
This screen is used to
configure the Conference
For more information
about CDA configurations
please refer to the ‘User
Conference Displays (CDA) 4.7.5
Display Application (CDA).
Up to 16 CDA applications
can be configured.
Manual SW 6090 CDA’.
Figure 4.7-H
50
User Manual SW 6005 CAA ver 6.2 RevA.docx
Page 51

DIS Digital Conference System User Manual
Chip Card functionality is a
feature where delegates
to the
Card contains
information like User ID,
Login Code and Location ID,
which the DCS 6000 system
uses to identify the user of
the Conference Unit by
getting the personal details
from the ‘delegate’ database
When a conference is started with conference mode: ‘Login Using Code’, ‘Login Using Code on Seat’,
Login Using Code on List’, ‘Login Using Code on Preferred Seat’, or ‘Automatic Login on Preferred Seat’
If the card is not inserted or is invalid, the microphone and voting button are not usable, however the
loudspeaker and channel selector will still work
[Chip Card
If chip cards have to be used
in the system click this button
Using Chip Cards in
Tick this option, if chip cards are to be used in the system
Chip Card (CC) 4.7.6
identify themselves
system by use of a DIS Chip
Card. The Chip
in the SW 6000.
Figure 4.7-I
units are checked for a valid chip card.
When a card is inserted in a conference unit, the software will identify the user by matching the ‘User ID’
in the ‘Delegate’ database with the ‘User ID’ on the card. After this match the ‘Login Code’ will be checked
and first then the cards will be accepted.
The microphone button will then work, however depending on the ‘User type’ of the logged in person,
the person may be allowed to vote.
Setup]
Figure 4.7-J
Conference Units
51
User Manual SW 6005 CAA ver 6.2 RevA.docx
Page 52

DIS Digital Conference System User Manual
Location ID
This ID is used to make cards usable only in the
installation, they are intended for. Insert a four or five
programmed from DIS, the
‘Location id’ is marked on the package containing the
chip cards.
File number
The entry determines where the information is place on
the card.
This field has to be set to ‘1’ (one) if the cards in use are
delivered from DIS.
After clicking [Close], you will be prompted to restart all SW 6000 applications including
the CUI.
[Program
The list to the left shows all
names in the Delegate Table.
Select the Delegate for which
a Chip Card has to be
After selecting the Delegates,
Note. Programming is only
possible if the CP 6000 Chip
[Program Chip Card]
Click this button to program chip cards for the selected
Delegates. You will be prompted to insert the cards to be
programmed.
[Abort Programming]
Click this button to abort the programming.
[Clear List]
Click this button to un-select all selected Delegates.
[Read
Click this button to read the information on the inserted chip card.
[Clear]
Click this button to clear the chip card information fields.
[Delegate
If a card is inserted in the chip card reader, the information (User Id, Login Code, Name,
Location Id) will be shown in the fields above the button. Clicking [Delegate Details] will
bring a popup showing all details about the delegate.
[Delete
Clicking this card will erase the programmed information on the card.
Delegate information in the Delegates Database will not be deleted.
digit number identifying your installation.
If cards are delivered pre-
Selected
Names]
Information]
programmed.
click the button.
Card reader is installed.
Figure 4.7-K
Details
Information]
52
User Manual SW 6005 CAA ver 6.2 RevA.docx
Page 53

DIS Digital Conference System User Manual
This screen is used to setup
the connection parameters
SW 6086 Web
For details about the SW
6086 Web Service Interface
to ‘User Manual
SW 6086 Web Service
Web Service Address
Field for entering the web service address
Web Service
Field for entering the web service administrator address
Send Delegate details
Tick this option if delegate details (text and picture) shall be sent to the web
service
Send Delegate
Tick this option if delegate login/logout information shall be sent to the
web service
Send Agenda Links
Tick this option if agenda links shall be sent to the web service
Send Prepare Meeting
Tick this option if SW 7085 Streaming Software is in use.
Web Service password
Field for entering password for the web service interface to be verified by
the web service
Web Streaming password
Field for entering password for the web service to be verified by the web
service interface
Web Service 4.7.7
for the
Service Interface.
please refer
Interface’.
Figure 4.7-L
Administrator Address
Login/Logout
53
User Manual SW 6005 CAA ver 6.2 RevA.docx
Page 54

DIS Digital Conference System User Manual
The default Import/Export
mode for conferences is
Alternatively Import/Export
can be done through a third
For more information about
using this option please refer
to the ‘User Manual SW 6186
Conference Import/Export Mode 4.7.8
to/from a file folder.
party web service.
Advanced Import-Export’.
54
User Manual SW 6005 CAA ver 6.2 RevA.docx
Page 55

DIS Digital Conference System User Manual
This screen is used to
specify a number of agenda
can be
applied to a subject on an
Name
Name of the agenda subject configuration
On setting
Empty Request and
Reply List
When selected the Microphone Request and Reply list is
emptied, when the subject is set active
Close Delegate Speakers
When selected the microphone is switched Off for all
Delegate speakers, when the subject is set active
Reset Group Speech
Time
If returning to the subject the accumulated Group Speech
Time is reset.
Reset Delegate Speech
Time
If returning to the subject the accumulated Delegate
Speech Time is reset.
Request Time Limit
When selected a Request time limit is applied. When the
request time limit is reached the request list is closed and
can still set
delegate units in Request. The list can be re-opened by
users with ‘Request List Control’ rights.
Speech
One Speech pr. Delegate
When selected a user can only request to speak one time
for each subject.
Reply
A reply configuration for the subject can be selected using the dropdown list. If no
configuration is selected the default reply configuration will be used. The [Edit]
button brings the ‘Reply Configuration’ screen. For details, please see next chapter.
4.8 Setup/Configurations
Agenda Subject Configuration 4.8.1
subject configurations.
The configurations
Agenda or to a conference as
a default configuration.
Agenda Subject
active
Figure 4.8-A
no more requests are accepted from Delegate.
A user with ‘Microphone Control’ rights
Limitations
Configuration
55
User Manual SW 6005 CAA ver 6.2 RevA.docx
Page 56

DIS Digital Conference System User Manual
This screen is used to specify a
number of reply configurations.
can be
applied to a subject on an
The ‘Default’ configuration will
set active,
where no Reply
Name
Name of the agenda subject configuration
Reply#
Each reply configuration can contain up to 10 reply options numbered from 0 to 9. The
‘default’ configuration cannot be deleted but changed. The default configuration is used
always except when an agenda subject has been applied another configuration (see the
chapter ‘Agenda Configuration’.
Label
The Label name specifies the label in the reply button.
Color
Specifics the color indication of the reply option.
Do not specify Red or Green color as those colors is used for Speak and Request
indication.
Priority
Priority 1 to 10 can be specified. Replies with higher priority will be shown first in the
reply list.
Comment
Described the reply option. This description is used in the CUA Layout 2 to 4 to guide the
chairman.
Reply Configuration 4.8.2
The configurations
Agenda.
be used when
• No conference is started
• No Subject is set active
• A Subject is
Configuration is applied
Hint:
Figure 4.8-B
56
User Manual SW 6005 CAA ver 6.2 RevA.docx
Page 57

DIS Digital Conference System User Manual
This screen is used to specify a
number of voting
specified as different named
, which can be
applied when starting a voting
can be
n an
onference as a
1 (Total1)
This is the “Yes” button
2 (Total2)
This is the “Abstain” button
3 (Total3)
This is the “No” button
Present
The colour specified here will be used to indicate
Presence in the CUA and mimics
Cancel
This is a ‘Cancel’ button. If this is ticked, this button
will be shown on the CUA.
Voting Configuration 4.8.3
configurations.
Voting configurations are
configurations
session.
The configurations
applied to a subject i
Agenda or to a C
default configuration.
Voting buttons 4.8.3.1
Voting configurations can be created with 1 to 5 buttons.
A conference unit with 3 voting buttons cannot vote if a voting session is started with 4 or 5 button voting
configuration.
A label for each of the buttons to be used in CUA Application like ‘Yes’, ‘No’ and ‘Abstain’ and a colour that
is used on the mimic diagrams when displaying vote results can be specified.
When a voting session is closed the total of the different button presses are counted and stored in five
totals, which can be referred to from the Quorum, Passed and the 9 vote display column formulas.
Please note that the DIS voting units are supplied either with 3 or 5 voting buttons. The 5 voting button
configuration is standard.
4.8.3.1.1 Units with 3 voting buttons
The buttons are numbered as shown in the next figures:
Figure 4.8-C
57 User Manual SW 6005 CAA ver 6.2 RevA.docx
Page 58

DIS Digital Conference System User Manual
1 (Total1)
This is the “++” button on standard DIS Conference Units.
2 (Total2)
This is the “Yes” button on standard DIS Conference Units
3 (Total3)
This is the “Abstain” button on standard DIS Conference
Units.
4 (Total4)
This is the “No” button on standard DIS Conference Units.
5 (Total5)
This is the “--” button on standard DIS Conference Units.
Present
The colour specified here will be used to indicate the
Presence in the CUA and mimics
Cancel
This is a ‘Cancel’ button. If this is ticked, this button will
be shown on the CUA.
Secret Voting
Individual result will not be shown on the mimic displays
Show whether
When ticked an (neutral) indication is given in ‘CDA Mimic’ screen and ‘CDA
Individual Voting Result’ screen that a delegate has voted
CUA Secret
When ticked the indication in the CUA Voting buttons will not visually reveal the
casted vote
CDA Interim
Results on the CDA voting displays will be updated during the voting session as the
delegates enter the votes
Delegate Interim
Results on the CUA voting screen will be updated during the voting session as the
delegates enter the votes
Chairman
Results on the CUA voting screen on a user with ‘Chairman’ rights will be updated
during the voting session
Use Voting
A weight value for each delegate permanently created in the Delegate Table can be
specified. The Delegate’s vote will be multiplied with this value if the parameter is
The five totals for the buttons store the result after the multiplication with the weight
values
Use Quorum
The Quorum formula is only used if this parameter is checked. Otherwise the Quorum
formula field must be blank
No attendance
No attendance check is performed before a voting
4.8.3.1.2 Units with 5 voting buttons
The buttons are numbered as shown in the next figures:
Parameters 4.8.3.2
Vote is cast
Voting
Result
Result
Interim Result
Weight
checked. If the login mode is ‘Prepared delegate seat table’ then the weight value will
be taken from the delegate seat table instead of the Delegate Table
An example of the purpose could be a shareholder meeting where each shareholder
has as many votes as he has shares. In this case you must enter the amount of shares
in his weight field in the delegate table before a voting session. When a session using
this parameter is performed his vote will automatically be multiplied with his amount
of shares when the result is calculated
Formula
An attendance check can be performed in all modes. Attendance check options are:
check
Attendance check 4.8.3.3
58 User Manual SW 6005 CAA ver 6.2 RevA.docx
Page 59

DIS Digital Conference System User Manual
Automatic
The total present is calculated as the sum of delegates who pressed a voting button
during the voting session.
Manual
An attendance check voting session must be performed before a voting session with
this setting can be started.
The total present is counted as the sum of delegates who pressed the [Present]
button during this session.
Manual (for
An attendance check voting session must be performed before a voting session with
this setting can be started.
The total present is counted as the sum of delegates who pressed the [Present]
The total present counted in this session is used until a new attendance check is
performed
Login Total
The total present is calculated as the sum of delegates who is logged in during the
voting session. Delegates who log in during the session is also counted
Mandatory Login
If a seat is selected for this parameter, a voting session cannot be started unless a
user is logged into this seat.
Example 1
At least 2/3 of the number of appointed
members (120) must be present.
80 and above is OK
sum(Present) >= 120*(2/3)
or
TotalPresent >= 120*(2/3)
Example 2
More that 2/3 of the number of appointed
members (120) must be present.
81 and above is ok but 80 and below is not ok
sum(Present) > 120*(2/3)
or
TotalPresent > 120*(2/3)
Example 3
Quorum is obtained if the given votes are more
than 60.
Total1+Total2+Total3>60
Example 4
Quorum is obtained if the given ‘Yes’ votes are
more than 2/3 of the ‘Present’.
Total1>Sum(Present)*(2/3)
Or
Total1>TotalPresent*(2/3)
Calculated
session)
button during this session.
Seat
Quorum formula 4.8.3.4
The user can define a formula in this field that will determine if a voting session is legal or not. A Quorum
is normally based on a calculation of present delegates being equal to or more than a required number.
The Quorum formula is calculated after stopping the vote session but before displaying the result. If the
result of the Quorum formula is 1 it is interpreted as ‘Quorum obtained’. Anything else is interpreted as
‘Quorum not obtained’.
Please refer to the paragraph “Use of Voting Group parameter” for details about the variables to use.
Here are some different examples that show ways of calculating:
59
User Manual SW 6005 CAA ver 6.2 RevA.docx
Page 60

DIS Digital Conference System User Manual
Example 5
Passed if Yes votes are more than No votes
Total1>Total3
Example 6
Passed if Yes votes are more than No+Abstain
votes
Total1>Total2+Total3
Example 7
We have exactly 120 appointed Members and
more than half of them must vote Yes
regardless of how many of them are present
during the voting:
sum(Vote1) > 60
Example 8
Exactly half or more of the present delegates
must vote Yes:
sum(Vote1) >= (sum(Present) / 2)
Example 9
Total number of YES votes
Total1
Example 10
Total number of ABSTAIN votes
Total2
Example 11
Total number of NO votes
Total3
Example 12
To calculate the sum of those who did not vote
at all
TotalPresent-Total1-Total2-Total3
Example 13
To display the total count of available seats in
the hall
TotalSeats+TotalDelegatedVotes
Passed formula 4.8.3.5
A vote session can result in either ‘Passed’ or ‘Not passed’. If the Quorum formula is used and the result is
“true” being ‘Quorum obtained’ the result is calculated based on the formula specified in the Passed field.
If the result of the formula is ‘true’ the result is ‘Passed’
If the result of the formula is anything else than ‘true’ the result is ‘Not passed
If Quorum was not obtained the result is always ‘Not passed – Quorum not met’ regardless of the result of
this calculation.
The result of the Passed formula is displayed on the various vote result screens right after finishing the
vote session. ‘Passed’ is in clear green colour and ‘Not passed’ in clear red colour.
Please refer to the paragraph “Use of Voting Group parameter” for details about the variables to use.
Here are some different examples that show ways of calculating:
Vote display column formula 4.8.3.6
The result of the voting sessions is displayed on several CUA screens or CDA screens in different ways.
Either as plain numbers due to the limited space on the screen or as column charts with numbers.
Up to nine different results column formulas with labels can be used. For each of the column formulas the
user must specify a header label, colour and a width. The widths are used on the CUA and CDA Result
screen.
Please refer to the paragraph “Use of Voting Group parameter” for details about the variables to use.
Here are some different examples that show ways of calculating:
60
User Manual SW 6005 CAA ver 6.2 RevA.docx
Page 61

DIS Digital Conference System User Manual
Field
Field type
Description
Vote1
Integer
Value = 1 for individual Delegates who pressed button 1. Can be used to
calculate totals depending on Parameter
Vote2
Integer
Value = 1 for individual Delegates who pressed button 2. Can be used to
calculate totals depending on Parameter
Vote3
Integer
Value = 1 for individual Delegates who pressed button 3. Can be used to
calculate totals depending on Parameter
Vote4
Integer
Value = 1 for individual Delegates who pressed button 4. Can be used to
calculate totals depending on Parameter
Vote5
Integer
Value = 1 for individual Delegates who pressed button 5. Can be used to
calculate totals depending on Parameter
Present
Integer
Value is always 1. Can be used to calculate totals depending on
Parameter
Voting Group
Parameter
Character(3)
A way of grouping the permanently created delegates. This could be
political party membership or nationality etc.
Weight
Integer
A value indicating the Delegate’s weight in vote sessions. It could be
number of shares etc.
Total1
Integer
Sum of delegates who pressed button 1. Multiplied with Weight if
‘Weight in use’ parameter is checked.
Total2
Integer
Sum of delegates who pressed button 2. Multiplied with Weight if
Weight in use parameter is checked.
Total3
Integer
Sum of delegates who pressed button 3. Multiplied with Weight if
Weight in use parameter is checked.
Total4
Integer
Sum of delegates who pressed button 4. Multiplied with Weight if
Weight in use parameter is checked.
Total5
Integer
Sum of delegates who pressed button 5. Multiplied with Weight if
Weight in use parameter is checked.
TotalSeats
Integer
Sum of Seats configured in CAA/Setup/Equipment/Conference Units
TotalPresent
Integer
Sum of delegates who have indicated presence using the Present button
during attendance check and delegates who did not participate in the
Voting weight is taken into account.
TotalAttendance
Integer
Sum of delegates with voting right who have indicated presence using
the Present button during attendance check.
Voting weight is taken into account.
TotalVotes
Integer
Sum of the logged in users with voting right multiplied with Weight if
Weight in use parameter is checked
TotalLoggedIn
Integer
Sum of the logged in users with voting right
TotalDelegatedVotes
Integer
Sum of the votes, which has been delegated to others right multiplied
with Weight of the delegated vote if Weight in use parameter is checked
4.8.3.6.1 Formula fields
Instead of hard-coding a set of predefined rules a number of formula fields can be implemented. Each of
the formula fields allow the user to specify a formula calculation using the below command syntax.
attendance check but did participate in the voting session.
61
User Manual SW 6005 CAA ver 6.2 RevA.docx
Page 62

DIS Digital Conference System User Manual
+
Add
-
Minus
/
Divide
*
Multiply
and
Two statements combined with ‘and’ shall fulfil condition
or
One of two statements combined with ‘or’ shall fulfil condition
sum(voting_group')
Sum of the given votes for a Voting Group
sum('voting_group',condition)
Sum of the given votes for the Group ‘ABC’ fulfilling the ‘condition’
iif (condition,truepart,falsepart)
If the ‘condition’ is true then the ‘truepart’ is shown, if not the
‘falsepart’ is shown
convert(number,'System.Int32')
Converts a decimal number to the lower integer part.
Example 1:
convert(TotalPresent/4,'System.Int32')+1,
convert(TotalPresent/4,'System.Int32'))
Example 15
To get all delegates with ‘Voting Group’ = 'ABC'
who has cast a vote.
in quotes and use
the SUM-function (you are in fact creating a
sum of the individual results...)
SUM('ABC')
Example 16
To get all delegates with ‘Voting Group’ = 'ABC'
who has pressed button 1 use the expression
SUM('ABC', VOTE1)
Example 17
So if the statement that "passed" is true if yesvotes for ABC-delegates are greater than novotes for DEF-delegates.
SUM('ABC',VOTE1) > SUM('DEF',VOTE3)
[Edit]
The button [Edit] is showing a window for creating the SQL statement.
The user can cut and paste from the textbox displaying it. An advanced user may
want to copy the statement to the Microsoft Enterprise Manager’s SQL analyzer to try
out different syntax possibilities or to debug the formulas.
4.8.3.6.2 Syntaxes
The following syntaxes are valid:
convert(3,'System.Int32') = 3
convert(2.5,'System.Int32') = 2
Example 2 (25% of Total present is always rounded up to the nearest
integer):
iif(convert(TotalPresent/4,'System.Int32')<TotalPresent/4,
4.8.3.6.3 Use of Voting Group parameter
Use of delegate ‘Voting Group’ parameter is a way of counting votes from group of delegates separately
and use this count in calculating Quorum or Passed/Not passed results.
In the following the ‘Voting Group’ parameter ABC has been used for some delegates and DEF for others.
Enclose the ‘Voting Group’
Special buttons 4.8.3.7
62
User Manual SW 6005 CAA ver 6.2 RevA.docx
Page 63

DIS Digital Conference System User Manual
[Preview]
This button present a screen preview of the selected parameters
The Mimic is a graphical
overview of the conference
Each seat has a coloured dot
showing microphone and login
It is possible to make several
mimic diagrams that can be
selected for specific
Name
Name of the mimic diagram that will be shown on the drop down list on the
Conference screen.
CUA Mimic
One of the mimic diagrams must be marked as default to be used by the system when
no conference is started.
Display IS Label
To display the interpreter set labels on the mimic diagram the ‘Display Label’ must be
checked. The CDA application has to be restarted in order for the changes to be
applied.
Default: Menu
Tick this option to enable the Menu button in the mimic diagram per default. When
touching the dot representation of a microphone in the mimic diagram a menu is
presented directly.
Default: Mic
Tick this option to enable microphone handling. When touching the dot
representation of a microphone in the mimic diagram the microphone is directly
turned on/off.
[Add Image]
Press the button to select a graphic file (bitmap file) through a standard Windows file
selection window. The bitmap must be greater than 150x100 pixels. File formats
e image
The bitmaps can be created using various standard tools like Microsoft Paint. The full
size of the bitmap is shown in full resolution in the ‘Edit window’ and in the CUA.
[Edit Image]
Press the button to call a window allowing the user to edit the mimic diagram as
described in the section below. The bitmap will be shown in a scalable window in
correct aspect ratio.
Mimic Configuration 4.8.4
room or hall.
status.
conferences.
On/Off
‘bmp’, ‘tiff’, ‘png’, ‘jpg’ are valid graphical file formats. The aspect ratio of th
shown in the Preview window might not be correct.
Figure 4.8-D
63
User Manual SW 6005 CAA ver 6.2 RevA.docx
Page 64

DIS Digital Conference System User Manual
The screen presents a full
screen view of the imported
bitmap allowing the user to
add and edit seats, and to add
buttons for special
on the image
calls a popup menu presenting
The dots and buttons inserted
use of the popup menu can
be arranged by a standard
Windows drag and drop
Seat numbers are displayed
when the mouse is positioned
Remove selected
Right click on a button or a dot and select this option to remove it from the mimic
diagram
Import all
Will create a dot on the screen for each entry in the seat table that has not been put
on the mimic yet.
Dot size can be adjusted in the file
Insert one seat
Displays a list of all seats not already on the mimic allowing the user to select a single
seat. The dot is created where the mouse is pointing.
Remove all seats
Will delete all dots on the screen.
Return, Next Mic
Will insert the buttons [Return], [Next Mic On], [Delegates Off], [All Req Off],
[Exclusive], [STF], [Ambient], [CU Line in] and [Menu].
[Menu]
The button [Menu] switches the functionality of the mimic diagram (in the CUA)
between presenting a menu or switching On/Off the microphone directly when
touching the dot representing of a microphone
Return
Will return to the previous screen presenting the user with a popup ‘Save changes
yes/no?’. If ‘No’ is selected all the changes are lost.
[Return]
The button [Return] closes the mimic diagram (in the CUA) and returns to previous
screen
Edit image 4.8.4.1
functionality.
Right clicking
the different options.
by
function.
over a dot.
item
unassigned seats
On etc.
Figure 4.8-E
Not removable button 4.8.4.2
The dot sizes are configured in the file ‘prjCAA.exe.config’ in the folder ‘..\Program Files
(x86)\DIS\Conference Administrator Application’. The setting ‘MimicRelativeSeatSize’ defines the size.
Default value is 0.02.
Dot sizes 4.8.4.3
<setting name="MimicRelativeSeatSize" serializeAs="String">
<value>0.02</value>
64
User Manual SW 6005 CAA ver 6.2 RevA.docx
Page 65

DIS Digital Conference System User Manual
This screen is used to make
configurations for the use of
can be
created to assign the CDA
s individual
For more information about
CDA configurations please
refer to the ‘User Manual SW
This screen allows the user to
set the column widths for the
Application, which show
The total width is a fixed
determined by the maximum
ailable space on the screens.
The individual columns can be
omitted from the lists by
entering zero in the width field.
The ‘Show Name’ content is
defined in the ‘User Type’
also be selected when
configuring the ‘Show Name’
content.
CDA Configuration 4.8.5
the CDA application.
Multiple configurations
application
configurations.
6090 CDA’.
Delegate List Configuration 4.8.6
different lists in the CUA and
CDA
Delegates.
av
Only the ‘Show Name’ column is
mandatory.
setting.
The fields ‘User Type, Group
and Group Abbreviation’ can
Figure 4.8-F
Figure 4.8-G
65
User Manual SW 6005 CAA ver 6.2 RevA.docx
Page 66

DIS Digital Conference System User Manual
This screen allows the user to configure a
print server for the print button in the
This screen allows the user to
configure different speech time
For more information on the
speech time configuration
please refer to the Advanced
Speech Time Control User
Print Server Configuration 4.8.7
CUA.
Figure 4.8-H
Speech Time Configuration 4.8.8
configurations.
Manual.
Figure 4.8-I
66
User Manual SW 6005 CAA ver 6.2 RevA.docx
Page 67

DIS Digital Conference System User Manual
This screen allows the user to
configure different speaker
The speaker types are used in
delegates to be shown by
speaker type and name in the
This screen allows the user to
configure different conference
types used when multiple
ming to the
Speaker Type Configuration 4.8.9
types.
the Agenda for configuring the
CUA and CDA.
Web Servi ce Conf i gur ation 4.8.10
This menu item allows the user to open a web
page for configuring the SW 70xx Streaming
Software or other third parts application, which
allows a web page for configuring.
Conference Type Configuration 4.8.11
rooms are strea
same web application
Figure 4.8-J
For more information on the streaming
configuration please refer to the document ‘SW
70xx Streaming and Archiving Software’
Figure 4.8-K
67
User Manual SW 6005 CAA ver 6.2 RevA.docx
Page 68

DIS Digital Conference System User Manual
This screen is used to create
and maintain the various ‘User
that can be assigned to
buttons or special
to a
A number of standard user
types are created automatically
They can be modified or
deleted except the Chairman
egate. The Chairman
and Delegate user type can
only be modified but not
Delegates
Shows names, titles, pictures and other information for the delegates attending the
conference.
Microphones
Microphone management, speakers list, speak request list and last five speakers.
Allows the user to open and close microphones.
‘Set Timers’ default Shows the speech time timers in the CUA/Microphones instead
of the Last 5 Speakers.
The group abbreviation is shown in the ‘Group Speech Time’
window in the CUA
Mimic Diagram
Graphical overview of the room or hall showing login and microphone status and
allowing the user to turn microphones on and off, log delegates in and out and set
individual volume level of microphones.
4.9 Setup/User Type
Types’
delegates and seats.
It is used to specify the screens,
functionalities that apply
delegate or a seat’s profile.
during installation.
and Del
deleted.
Screens 4.9.1.1
The options specify which screens will available to the user of the CUA Application:
Group Name Group name is shown in the ‘Group Speech Time’ window in the CUA
Group Abbreviation
Figure 4.9-A
68
User Manual SW 6005 CAA ver 6.2 RevA.docx
Page 69

DIS Digital Conference System User Manual
Agenda
Shows the agenda for the current conference.
This selection is default. If selected the [Description] button in
[Description] button in the CUA
Result
Shows the voting result.
Messages
Allows delegates to exchange written or pre-recorded messages between each other.
Conference
Starting and stopping a conference and setting conference parameters
Logout Button
Show the logout button on the CUA
Web Browser
Shows the web browser
Agenda – Description
the CUA Agenda will show:
Agenda – Title and Description If selected the
Agenda shall show:
69
User Manual SW 6005 CAA ver 6.2 RevA.docx
Page 70

DIS Digital Conference System User Manual
Interpretation
Allow the user to control and monitor the status of the interpreter units.
Display Control
This page is use to select the screen to be shown on the CDA displays
System Messages
Displays important system messages generated by the DCS6000 system
Volume Control
Adjusting the CU 6105/6110 volume controls and adjusting individual microphone
unit volume controls.
Mic Attenuation
Adjusting individual microphone unit volume controls.
AO Unit Control
Control the channel setting and output volume of connected AO units.
Speak
Button for requesting to speak with the same functionality as the button on the
microphone unit.
Exclusive
Button for requesting the exclusive right to speak. Will turn off all delegate
microphones.
This button will only work, if the user has ‘Speak Priority’ = Chairman
Podium
Button for turning On/Off the Podium microphone(s).
CU Line input
Button for switching On/Off the Line input at the CU
STF (Speaking
Indication button. Turns red if an interpreter presses his STF button.
Start Voting
Button for starting a Voting session
Mute (Own
Button for temporary muting an open microphone. Either the [Mute] or the [Reply]
button can be selected
Reply
Button for requesting to give a reply. Either the [Mute] or the [Reply] button can be
selected
Set Agenda
When enabled three buttons for setting agenda subject status in the CUA are
available. The subject status could be: Cancelled, Postponed or New.
Microphone
With this option the user has control of microphones in the CUA Microphone screen
and Interpreter Screen.
Request List
With this option the user has the right to close and hide the request list for all as well
as to close the request queue for all except a ‘Technician’ user (Seat type: Technician).
Speech Time
With this option the user has the right to set speaking time in a CUA.
Manual Voting
With this option the user has the right to type in a voting result using a dialog box.
Show Voting
This option enables the display of the voting pop-up when the Start Voting button has
been activated.
Control menu 4.9.1.2
The ‘Control menu’ is a sub-menu in the CUA giving access to screens for setting conference parameters,
adjusting CU volume controls and adjusting individual microphone unit volume controls
Control
Panel Buttons 4.9.1.3
These options specify which panel buttons will be available to the user of the CUA Application:
(Speak)
Too Fast)
Microphone)
Status
Functionality 4.9.1.4
These parameters specify special functionality that applies to seats or delegates of this user type:
Control Button
Control
Control
Results
Dialog
70
User Manual SW 6005 CAA ver 6.2 RevA.docx
Page 71

DIS Digital Conference System User Manual
Database
A user with this functionality can switch his application between two or more
systems.
Streaming
With this option the user has the right to control streaming and archiving.
Delegate Votes
With this option the user has the right to display the ‘Delegate Votes Status’
information on the CUA Result screen.
Controls On
With this option the user has access to the control buttons on the mimic diagram in
the CUA.
Speaker List on
With this option the user has access to the Speakers list on the CUA and on the
DC6990P (not the Request list).
Request List on
With this option the user has access to the Speakers and Request list on the CUA and
on the DC6990P.
Print Vote Result
With this option the user has access to a button on the voting results screen enabling
the user to print the voting result.
Operation mode
Speak priority
Interrupt ability
Chairman
Use CU mode
5
<=
Delegate
Use CU mode
1
Use CU mode
VIP
Use CU mode
2
Use CU mode
Operation
Use CU mode, FIFO, Manual, Automatic, VOX, Manual+Reply,
Automatic+Reply or VOX+Reply.
Speak Priority
1(Delegate), 5 (Chairman), 4, 3, 2 (VIP) or No Speaking Rights
Chairman (5) is the highest priority and the microphone will
In the Request list in the CUA, a user with higher speak
priority will be placed before a user with lower speak priority.
Selection
Control
Status
Mimic
Main
Main
Button
Microphone Parameters 4.9.1.5
This setting is used to assign individual ‘Modes’ to Users or Seats. For most applications, the ‘Operation
Mode’ is set to ‘Use CU mode’. It means that the operation mode for the users is following setting made on
the CU, i.e. if the system is running in Manual mode the Delegates will run in Manual mode.
The Standard CU modes are found in the following table:
4.9.1.5.1 Standard System setting
Figure 4.9-B
However for certain applications, it is desirable to assign individual operations mode, where the user will
always run in the selected mode independently of the ‘System Setting’.
4.9.1.5.2 Individual modes
Mode
See explanation of the modes in the Conference section
always be turned on regardless of operation mode.
71
User Manual SW 6005 CAA ver 6.2 RevA.docx
Page 72

DIS Digital Conference System User Manual
Interrupt
Determines the microphone’s ability to interrupt another
speaker if the maximum number of speakers is reached.
Use CU mode
The interrupt ability will follow the setting made in the CU.
Not allowed
Cannot interrupt another speaker
<=
Can interrupt a speaker with the same speak priority or a speak
priority which is less than own speak priority.
<
Can interrupt a speaker with a speak priority less than own speak
priority
Right to Vote
With this option the user has the right to vote.
Right to Vote
With this option the user has the right to vote after the voting session has been
paused.
Voting on CUA
A user with this right can vote pro the CUA display. When this option is set, then
voting buttons on a connected conference unit will be disabled.
Right to set
With this option the user has the right to set a subject active.
Use Validation
Ext. Validation With this option the user can use external validation on a delegate
user type.
and ‘External Validation’ is ticked in
Speech Time
This option applies individual speech time limit (0:00:00-9:59.59) to the user type. If
the option is not enabled, the user type will not have any speech time applied even
though a speech time configuration based on user types is active.
No Speech Time
This option applies a no speech time configuration to the user type.
Show own
This option enables the user type only to see own speech time in the CUA.
Setting
User Rights 4.9.1.6
These parameters specify special functionality that applies to seats or delegates of this user type:
when Paused
Subject active
CUA validation, Simple This Option is only available for the user if Registration is in
use at the Conference
CAA/Equipment/Conference Units. The option is used to enable/disable a popup on
the CUA when a chip card is inserted in the attached conference unit. When enabled,
the user is not registered/logged in before he has pressed a ‘Registration’ button on
the popup:
Limit
Speech Time
72
User Manual SW 6005 CAA ver 6.2 RevA.docx
Page 73

DIS Digital Conference System User Manual
Show Everyone’s
This option enables the user type to see the speech time of all delegates in the CUA.
Multiple
Is the option ‘One speech pr. Subject’ is active (configured in ‘Agenda Subject
Configuration’) only users with ‘Multiple Speeches per Subject’ are allowed to speak
multiple times.
View ‘Secret’
When enabled the user can view open links to documents, which has the attribute
‘Secret’
Speech Time
Speeches per
subject
agenda links
73
User Manual SW 6005 CAA ver 6.2 RevA.docx
Page 74

DIS Digital Conference System User Manual
The CUA Application and the
Conference Administration
Application (CAA) offer full
support for multiple
Default
The default language, which is created during the installation, is marked as the
default language.
Name
Name of the language (this will be displayed on the language selection buttons on the
CUA Application and on the language tabs of the different screens in this application).
Culture Name
Selects the standard Windows culture that applies to the language. These languages
must also be installed manually on Windows on all PCs that will use the language.
Culture
Field for showing the associated culture identifier for the selected culture name.
[Select Font]
Use this button to change of the font and font size in the CAA for this language (Arial
is currently the default for the SW 6000 applications).
Font
Field for showing the selected font.
Font size
Field for showing the selected font size. (Font size 10 is the default size for labels and
data fields).
Bold
All text and labels will be in Arial Bold if this option is selected.
4.10 Setup/Language
Languages 4.10.1
languages.
.
Language
identifier
Figure 4.10-A
74
User Manual SW 6005 CAA ver 6.2 RevA.docx
Page 75

DIS Digital Conference System User Manual
This screen allows the user to
enter a complete translation of
all labels and system text used
however the maximum
useable number of characters
might be limited in the
allows the user to select the
labels grouped by application
must be
package are labels for some
language, which can be
imported.
[Import Language]
Use this button to import a set of labels for one language in XML format. Only
one language at a time can be imported. Before importing select the language,
where you want to import the labels. Only languages with the same culture
code can be imported.
[Export Language]
Use this button to export a set of labels for one language in XML format. Only
one language at a time can be exported. The exported language file can be
edited using the ‘Label editor’ program.
Labels 4.10.2
in the CUA and CAA
Application. Maximum amount
of charters per label is 100
application, where the label is
used.
A drop down box ‘Label Group’
and screen.
Labels for the ‘Default
language’ that is selected
during installation
created or imported.
In the SW 6000 installation
Special buttons 4.10.2.1
Figure 4.10-B
75
User Manual SW 6005 CAA ver 6.2 RevA.docx
Page 76

DIS Digital Conference System User Manual
This screen allows the user
to change the labelling of a
Label G r oups 4.10.3
label group.
Shortcut to Commands 4.10.4
Placing an &-sign before the label text will invoke the function, that the button can be activated with
Alt+”the letter after the & sign”
If the underline has to be present before the Alt-key is pressed, the following has to be done:
1. Right click on the desktop and select ’Properties’
2. Select ’Appearance’
3. Activate the button ’Effects..’
4. Remove the tick mark in ’Hide underlined letters for keyboard navigation until I press the Alt key’
In Vista and Windows 7 the setting is in “Ease of use” in desktop properties.
Figure 4.10-C
76
User Manual SW 6005 CAA ver 6.2 RevA.docx
Page 77

DIS Digital Conference System User Manual
Report name in folders
Report shown in CAA - Reports
name
Report Names 4.10.5
Report Names are not translated in the label editor but translated is done by changing part of the report
name. The reports are placed in the ‘Reports’ folders at this path: …\Program Files (x86)\DIS\Conference
Administrator Application\Reports.
Applied rules
The names shown in the drop-down box in the CAA are generated directly from the file names for the
reports in the CAA report folder. This is done for making the report section generic with the purpose that
additional reports can be added without making any programming. The side effect is, that report names
are not translated in the label editor, but translation has to be done by changing part of the report name.
The renaming of the report can be done following those guidelines:
1. The first word in the filename is ignored and is not shown in the CAA. This name should not be
translated due to the categorization of the reports, but is in praxis without importance.
2. If the second word is ‘default’ then this must be maintained and not translated as the reports
containing the word ‘default’ will be used as the default reports in the CAA. The ‘default’ note can
of course be move to another report.
3. If the second word is ‘subreport’ the report are not to be translated, as the report is used as
reference for other reports. If renamed the other reports will fail. ‘Subreports’ are not shown in
the CAA so renaming is unnecessary
4. The rest of the file name (of course exclusive the file end .rdlc) can be translated.
Example
77
User Manual SW 6005 CAA ver 6.2 RevA.docx
Page 78

DIS Digital Conference System User Manual
This screen allows the user to select the language of the
dynamic text in the DC 6990 units. The dynamic text
the text strings that come from the SW 6000
such as Delegate Names, Agenda Items and Conference
Language is not available as
After selecting the language of the dynamic text the CUI
application must be restarted for the selection to
become active. A CAA alert will pop up when updating
This screen is used listing the rooms,
which can be connected together.
for the rooms are created
Room #
An integer value, numbering the rooms
Name
Description of the room
Master
Indicating that this room is the default room, where the CU is located.
DC6990 Language 4.10.6
refers to
Names.
If the selected DC 6990
static labels on the DC 6990 the user must select another
available language for the static labels.
Figure 4.10-D
the DC 6990 Language prompting the user to restart the
CUI.
4.11 Setup/Rooms
Create Rooms 4.11.1
Configurations
in ‘Setup/Rooms/Room Configuration’.
Figure 4.10-E
Figure 4.11-A
78
User Manual SW 6005 CAA ver 6.2 RevA.docx
Page 79

DIS Digital Conference System User Manual
This screen is used to create
configurations for the unit in
each room listed in
can be
to be used for one room only,
and create the needed
For each of the rooms in the
, a list of created
setups is shown in the right
panel. One of those Setups can
then be selected for the room.
This is done for each room.
[Add] [Delete]
The buttons are used when creating the setups.
[Conference
When a new setup is created, this button is used to show the Seat table for the units
in this room. The functionality of the units can then be changed as described in
Setup/Equipment/Conference Units.
[Interpreter
When a new setup is created, this button is used to show the table for the interpreter
sets in this room. The functionality of the units can then be changed as described in
Setup/Equipment/Interpreter Units.
[AO Output
When a new setup is created, this button is used to show the table for the AO output
units in this room. The functionality of the units can then be changed as described in
Setup/Equipment/Audio Output Units (AO).
[Activate
When each room has been assigned the Setup to be used, this button activates the
setup.
Room Configuration 4.11.2
‘Setup/Rooms/Create Rooms’.
Multiple configurations
made for each room.
If multiple configurations are
then create one room in
‘Setup/Rooms/Create Rooms’
configurations in
‘Setup/Rooms/Room
Configuration’.
Left window is showing the list
of rooms.
left panel
Units]
Units]
Units]
Figure 4.11-B
selected setups]
79
User Manual SW 6005 CAA ver 6.2 RevA.docx
Page 80

DIS Digital Conference System User Manual
This screen is used to create
connections to other databases
This screen is used to switch
between the database
connection made in the ‘Create
4.12 Setup/Database
Create Dat abase Connections 4.12.1
definitions for the CAA and
CUA applications.
Figure 4.12-A
4.13 Connect to Database
Database Connections’ screen.
Figure 4.13-A
80
User Manual SW 6005 CAA ver 6.2 RevA.docx
Page 81

DIS Digital Conference System User Manual
This screen is used to view
system messages generated by
SW 6000 Conference
to a file using the ‘Save to file’
This screen is used to view
license information for the SW
The License Information
window displays a list of how
many licenses are available
per software applications and
information on how many
licenses are currently in use
for the different software
4.14 Tools
Tools/System Messages 4.14.1
the
Management Software. The
system messages can be saved
button.
Tools/ Li cense Information 4.14.2
6000 Conference Management
Software.
modules based on the loaded
software license.
The ‘Licenses In Use’ provides
applications.
Figure 4.14-A
81
User Manual SW 6005 CAA ver 6.2 RevA.docx
Figure 4.14-B
Page 82

DIS Digital Conference System User Manual
1
Close all SW 6000
applications.
2
Start the application by
clicking the SW6000
DataBase Backup Utility
shortcut in the Start menu.
3
The utility will start.
Select ‘Backup”.
This is the
name of the PC, where the
the name of the database.
Normally this will be
‘Use Windows
Fill in the Backup file path
or use the
suggested name.
Click the [Backup] button.
4
Click [Yes] to start backing
up the database.
5
The data will be backed up
and when finished the
message box ‘Backup
to close the application.
5 SW 6000 Backup Utility
This application is used to backup and restore the SW 6000 database. You need to have ‘Local
Administrator Rights’ to perform a Backup and Restore procedure.
5.1 Backing up data
The procedure for backing up data is a follows:
Fill in the fields:
Server Name
database is installed.
Database Name: This is
‘SW6000-1’.
Select
Authentication’.
and name
Figure 5.1-A
Database is complete’ will
show.
Click [OK] and click [Exit]
82
Figure 5.1-B
Figure 5.1-C
User Manual SW 6005 CAA ver 6.2 RevA.docx
Page 83

DIS Digital Conference System User Manual
1
Close all SW 6000
applications.
2
Start the application by
clicking the SW6000
DataBase Backup Utility
shortcut in the Start menu.
3
The utility will start.
Select ‘Restore”
This is the
name of the PC, where the
This is
the name of the database.
Normally this will be
1’, but it has to
be the same as when the
‘Use Windows
the […] button.
Click the [Restore] button.
4
Click [Yes] to start
restoring the database.
5
The data will be restored
and when finished the
message box ‘Restore
Click [OK] and click [Exit]
5.2 Restoring data to same database
The procedure for restoring data to the same database as the backup is as follows:
Fill in the fields:
Server Name
database is installed.
Database Name
‘SW6000-
data was backed up.
Select
Authentication’.
Select the backup file using
Database is complete’
to close the application.
Figure 5.2-A
Figure 5.2-B
Figure 5.2-C
83
User Manual SW 6005 CAA ver 6.2 RevA.docx
Page 84

DIS Digital Conference System User Manual
1
Close all SW 6000
applications.
2
Start the application by
clicking the SW6000
DataBase Backup Utility
shortcut in the Start menu.
3
The utility will start.
Select ‘Restore”
This is the
name of the PC, where the
This is the
name of the database,
This is the
name of the database,
which has to be restored
Select ‘Use Windows
Select the back using the
[…] button
Click the [Restore] button.
4
Click [Yes] to start
restoring the database.
5
The data will be restored
and when finished the
message box ‘Restore
Click [OK] and click [Exit]
5.3 Restoring data to other database
The procedure for restoring data to another database than the backup is as follows:
Fill in the fields:
Server Name
database is installed.
Old Database
which was backed up (ex.
SW6000-1).
New Database
(ex. SW6000-3).
Authentication’
Figure 5.3-A
Figure 5.3-B
Database is complete’
to close the application.
84
Figure 5.3-C
User Manual SW 6005 CAA ver 6.2 RevA.docx
Page 85

DIS Digital Conference System User Manual
85
User Manual SW 6005 CAA ver 6.2 RevA.docx
Page 86

Page 87

www.shure.com
United States, Canada, Latin
Email: info@shure.com
Europe, Middle East, Africa:
Asia, Pacific:
America, Caribbean:
Shure Incorporated
5800 West Touhy Avenue
Niles, IL 60714-4608
USA
Phone: +1 847 600 2000
Fax: +1 847 600 1212 (USA)
Fax: +1 847 600 6446
Shure Europe Gmbh
Jakob-Dieffenbacher-Str. 12
75031 Eppingen
Germany
Phone: +49 (0) 7262-9249-100
Fax: +49 (0) 7262-9249-114
Email: info@shure.de
Shure Asia Limited
22/F, 625 King's Road
North Point, Island East,
Hong Kong
Phone: (+852) 2893-4290
Fax: (+852) 2893-4055
Email: info@shure.com.hk
 Loading...