

Page 1
222 HARTREY AVE.. EVANSTON. IL. 60204 U.S.A.
AREA CODE 312/866.2200 CABLE: SHUREMICRO
TWX:
910-231-0048 TELEX: 72.4381
OPERATION AND SERVICE MANUAL
MODEL SR107
AUDIO EQUALIZER
I
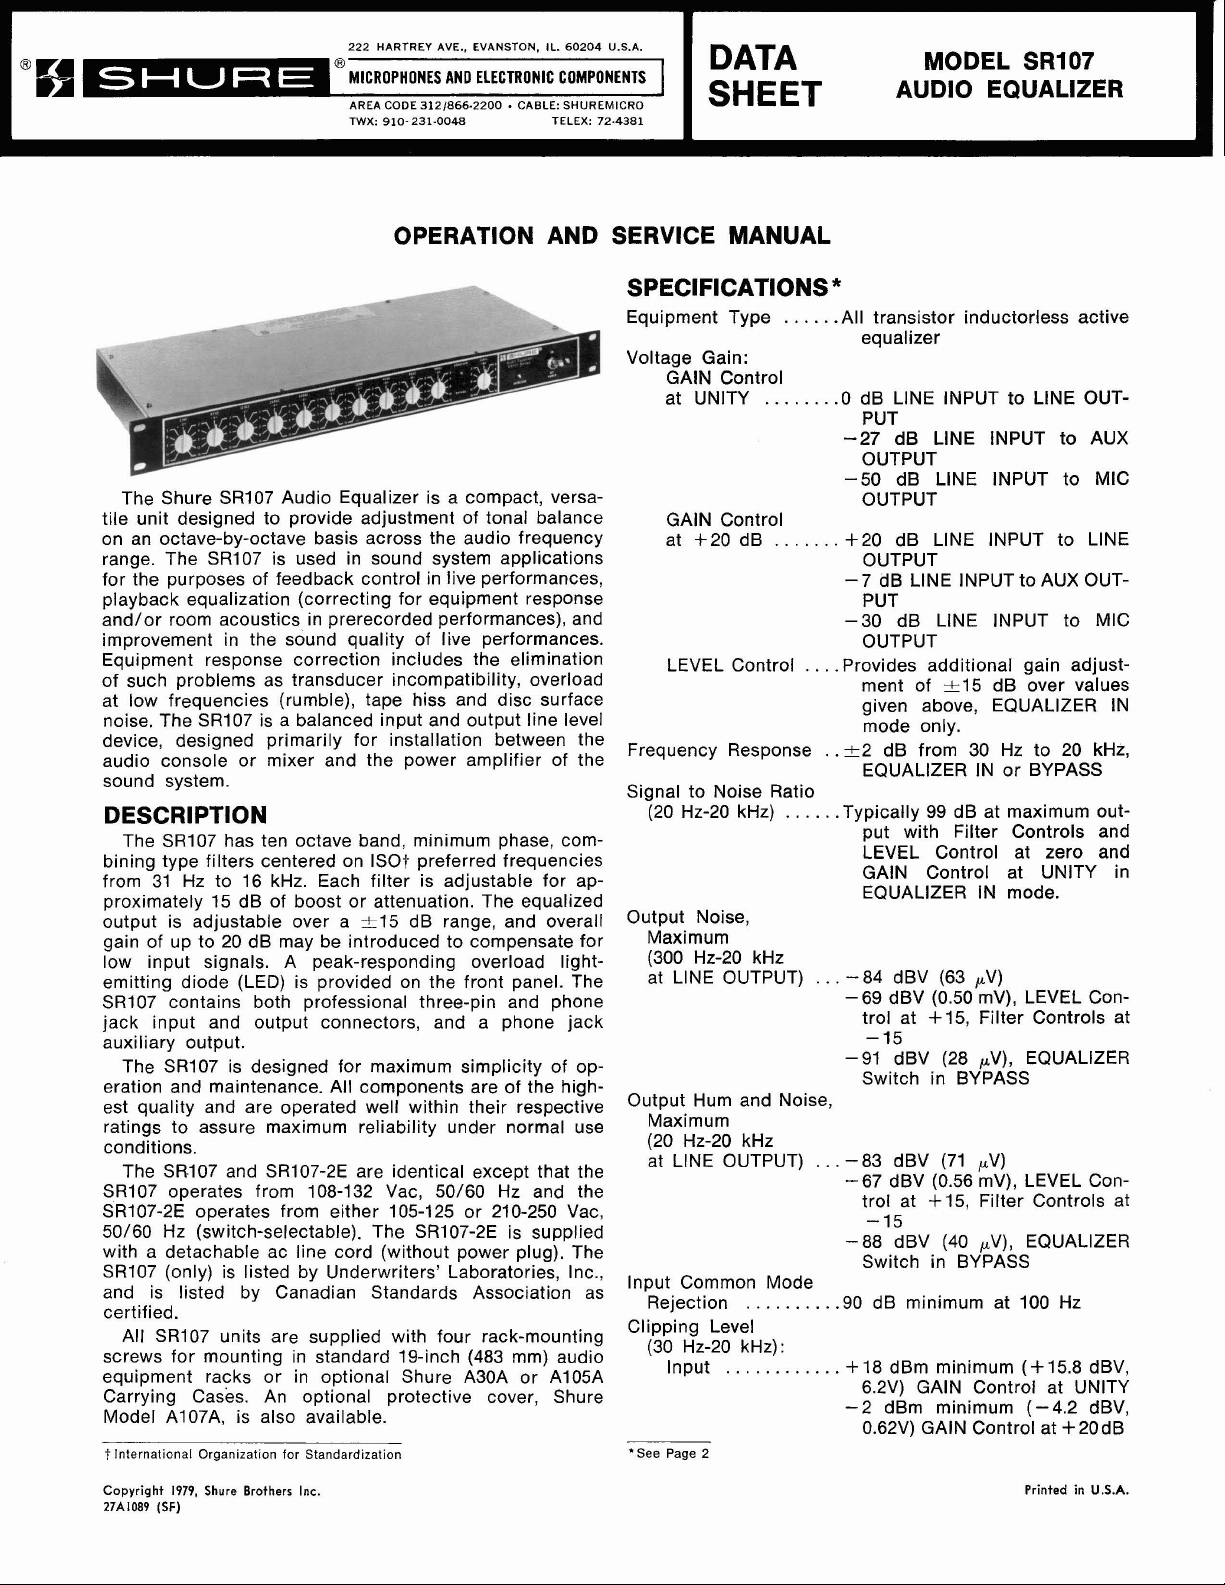
The Shure SR107 Audio Equalizer is a compact, versatile unit designed to provide adjustment of tonal balance
on an octave-by-octave basis across the audio frequency
range. The
for the purposes of feedback control in live performances,
playback equalization (correcting for equipment response
and/or room acoustics in prerecorded performances), and
improvement in the sound quality of live performances.
Equipment response correction includes the elimination
of such problems as transducer incompatibility, overload
at low frequencies (rumble), tape hiss and disc surface
noise. The
device, designed primarily for installation between the
audio console or mixer and the power amplifier of the
sound system.
SR107 is used in sound system applications
SR107 is a balanced input and output line level
DESCRIPTION
The SR107 has ten octave band, minimum phase, com-
bining type filters centered on
from 31 Hz to 16 kHz. Each filter is adjustable for ap-
proximately 15 dB of boost or attenuation. The equalized
output is adjustable over a
gain of up to 20 dB may be introduced to compensate for
low input signals. A peak-responding overload
emitting diode (LED) is provided on the front panel. The
SR107 contains both professional three-pin and phone
jack input and output connectors, and a phone jack
auxiliary output.
The
SR107 is designed for maximum simplicity of operation and maintenance. All components are of the highest quality and are operated well within their respective
ratings to assure maximum reliability under normal use
conditions.
The
SR107 and SR107-2E are identical except that the
SR107 operates from 108-132 Vac, 50/60 Hz and the
SR107-2E operates from either 105-125 or 210-250 Vac,
50/60 Hz (switch-selectable). The SR107-2E is supplied
with a detachable ac line cord (without power plug). The
SR107 (only) is listed by Underwriters' Laboratories, Inc.,
and is listed by Canadian Standards Association as
certified.
All
SR107 units are supplied with four rack-mounting
screws for mounting in standard 19-inch (483 mm) audio
equipment racks or in optional Shure
Carrying Cases. An optional protective cover, Shure
Model A107A, is also available.
t
International
Organization
for
Standardization
ISO? preferred frequencies
215 dB range, and overall
light-
A30A or A105A
SPECIFICATIONS
Equipment Type
Voltage Gain:
GAlN Control
at UNITY
GAlN Control
at +20 dB
LEVEL Control
Frequency Response
Signal to Noise Ratio
(20 Hz-20 kHz) .Typically 99 dB at maximum out-
Output Noise,
Maximum
(300 HZ-20
at LINE OUTPUT) -84 dBV (63 pV)
Output Hum and Noise,
Maximum
(20 HZ-20
at LINE OUTPUT)
lnput Common Mode
Rejection
Clipping Level
(30 HZ-20
Input
'See
Page
2
.......
kHz
kHz
.........
kHz):
............
*
.....
.All transistor inductorless active
equalizer
.O
dB LINE INPUT to LINE OUTPUT
-27
dB LlNE INPUT to AUX
OUTPUT
-50 dB LlNE INPUT to MIC
OUTPUT
.......
+20 dB LINE INPUT to LINE
OUTPUT
-7 dB LlNE INPUT
PUT
-30 dB LlNE INPUT
OUTPUT
...
.Provides additional gain adjust-
ment of k15 dB over values
given above, EQUALIZER IN
mode only.
.
.%2 dB from 30 Hz to 20 kHz,
EQUALIZER IN or BYPASS
.....
put with Filter Controls and
LEVEL Control at zero and
GAlN Control at UNITY in
EQUALIZER IN mode.
...
-
69 dBV (0.50 mV), LEVEL Control at
-
-91
Switch in BYPASS
...
-
83 dBV (71 pV)
-
67 dBV (0.56 mV), LEVEL Control at +15, Filter Controls at
-15
-88
Switch in BYPASS
.90 dB minimum at 100 Hz
+18 dBm minimum (+15.8 dBV,
6.2V) GAlN Control at UNITY
-2
0.62V) GAlN Control at + 20dB
+15, Filter Controls at
15
dBV (28 pV), EQUALIZER
dBV (40 pV), EQUALIZER
dBm minimum (-4.2 dBV,
to AUX OUT-
to MIC
Copyright
27Al089
1979,
(SF)
Shure
Brothers
Inc.
Printed
in
U.S.A.
Page 2
I
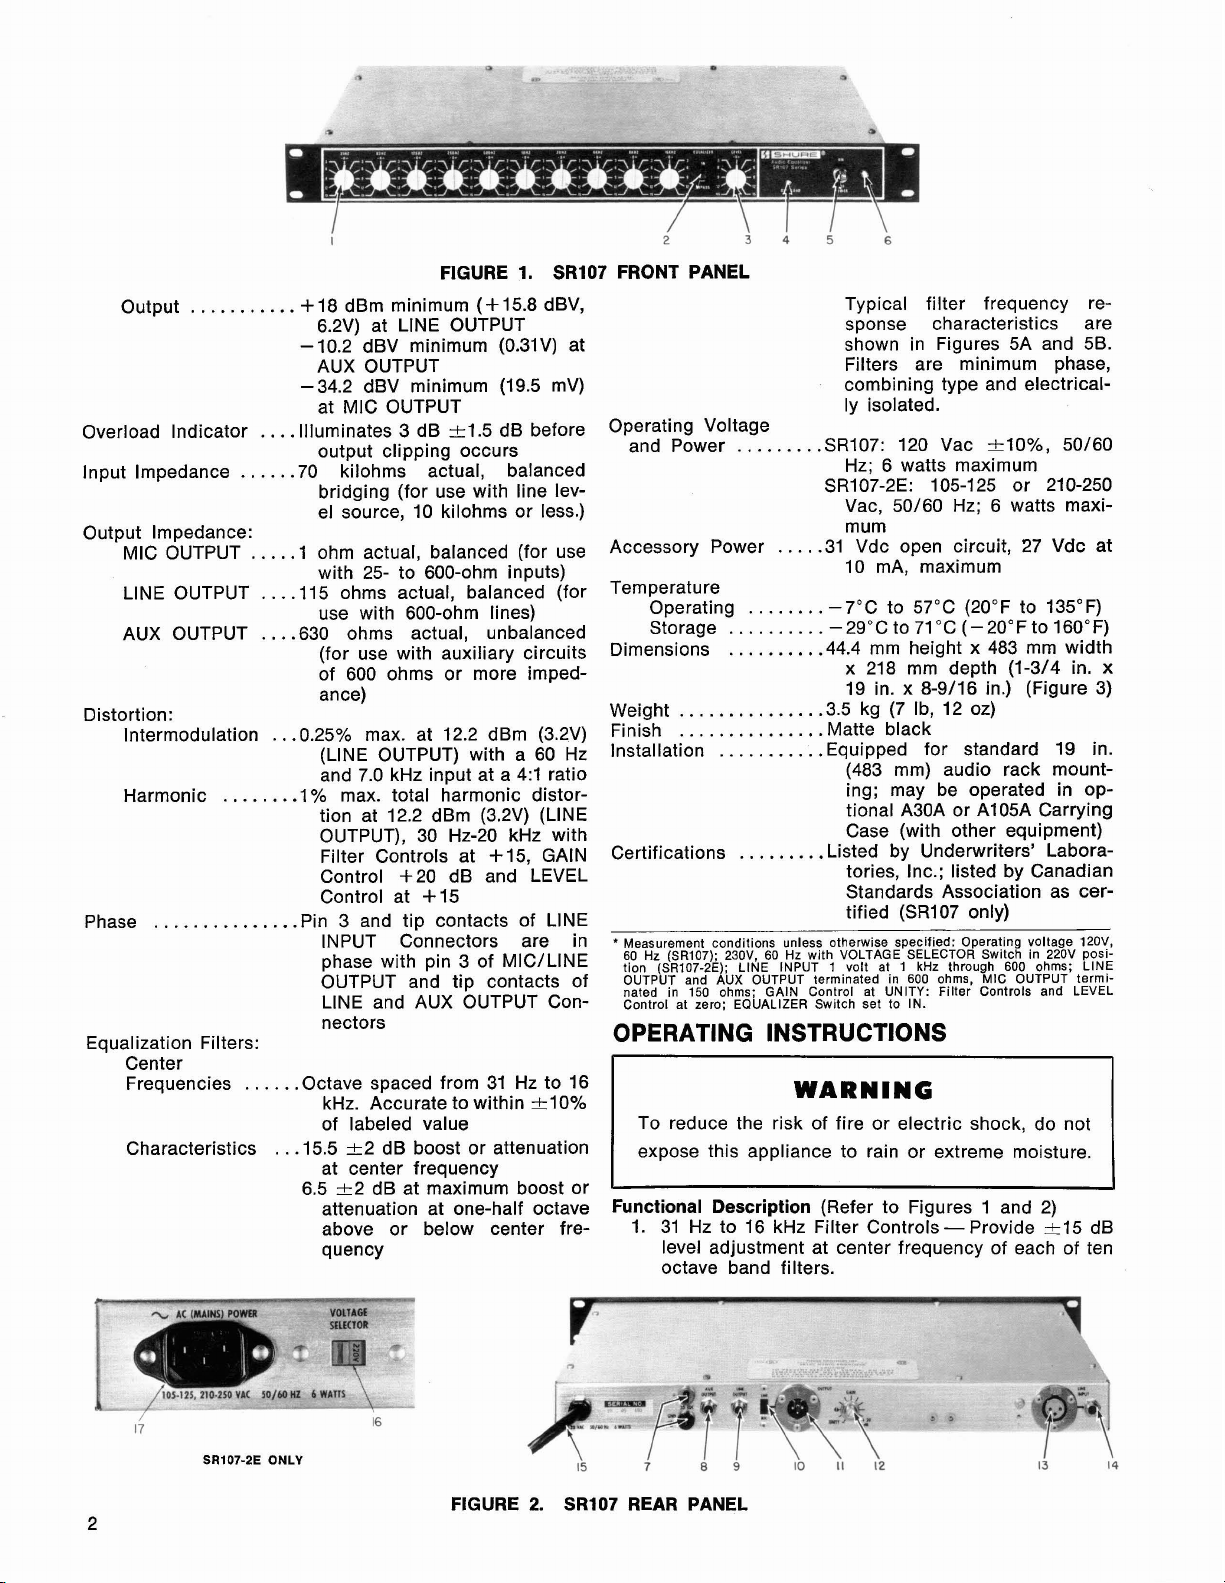
FIGURE
Output
Overload Indicator
Input Impedance
Output Impedance: mum
MIC OUTPUT
LINE OUTPUT
AUX OUTPUT
Distortion: Weight .3.5 kg
lntermodulation
Harmonic
Phase
Equalization Filters:
Center
Frequencies
Characteristics
...........
.......
...............
+18 dBm minimum (+15.8 dBV,
-10.2
-34.2
....
Illuminates 3 dB 21.5 dB before
.....
.70 kilohms actual, balanced Hz; 6 watts maximum
....
.I
...
.I15 ohms actual, balanced (for
...
.630 ohms actual, unbalanced Storage -29°C to 71°C (-2O0Fto 160°F)
..
.0.25% max. at 12.2 dBm (3.2V)
.I% max. total harmonic distor-
Pin 3 and tip contacts of
.....
.Octave spaced from 31 Hz to 16
..
.15.5 f 2 dB boost or attenuation
6.5
6.2V) at LINE OUTPUT
dBV minimum (0.31V) at
AUX OUTPUT Filters are minimum phase,
dBV minimum (19.5 mV)
at MIC OUTPUT ly isolated.
output clipping occurs
bridging (for use with line level source, 10 kilohms or less.)
ohm actual, balanced (for use
with 25- to 600-ohm inputs)
use with 600-ohm lines)
(for use with auxiliary circuits
of 600 ohms or more
ance)
(LINE OUTPUT) with a 60 Hz Installation
and 7.0 kHz input at a
tion at 12.2
OUTPUT), 30 Hz-20 kHz with
Filter Controls at +15, GAIN Certifications .Listed by Underwriters' LaboraControl +20 dB and LEVEL tories, Inc.; listed by Canadian
Control at +15
INPUT Connectors are in
phase
OUTPUT and tip contacts of
LlNE and AUX OUTPUT Con-
nectors
kHz. Accurate to within
of labeled value
at center frequency
t2 dB at maximum boost or
attenuation at one-half octave
above or below center frequency
dBm (3.2V) (LINE
with
pin
1.
4:l ratio
of
MIC/L'NE
SR107 FRONT PANEL
imped-
LINE
t10%
2
Operating Voltage
and Power
Accessory Power
Temperature
Operating
34
.........
SR107: 120 Vac t lo%, 50/60
SR107-2E: 105-125 or 210-250
...a
-31 Vdc open circuit, 27 Vdc at
........
5
Typical filter frequency response characteristics are
shown in Figures 5A and
combining type and electrical-
Vac, 50/60 Hz; 6 watts maxi-
10
-7°C to 57°C (20°F to 135°F)
..........
Dimensions
.........
.44.4 mm height x 483 mm width
x 218 mm depth (1-314 in. x
19 in. x 8-9/16 in.) (Figure 3)
..............
Finish
...............
..........
Matte black
.Equipped for standard 19 in.
(483 mm) audio rack mount-
ing; may be operated in optional
Case (with other equipment)
........
Standards Association as certified (SR107 only)
*
Measurement conditions unless otherwise specified: Operating voltage
60
Hz
(SR107). 230V 60
tion (~~107-2i). LI~E INPUT 7 volt at 1
OUTPUT
nated in
control at zero;
and
A'UX
150 ohms;
OPERATING INSTRUCTIONS
I
I
TO reduce the risk of fire or electric shock, do not
I
I
expose this appliance to rain or extreme moisture.
I
Functional Description (Refer to Figures 1 and 2)
1.
31 Hz to 16 kHz Filter Controls- Provide _+I5 dB
level adjustment at center frequency of each of ten
octave band filters.
Hz
with VOLTAGE SELECTOR Switch in 220V posi-
OUTPUT terminated in 600
GAlN Control at UNITY:
EQUALIZER
Switch set to
WARNING
6
mA, maximum
(7
Ib, 12 oz)
A30A or A105A Carrying
kHz
through 600 ohms. LlNE
ohms, MIC
Filter Controls and LEVEL
IN.
OUTPUT'
58.
I~OV,
termi-
I
I
I
I
I
2
SO/M
w.
6
WLlTS
17
SR107-2E
ONLY
16
FIGURE
15
2.
SR107 REAR PANEL
7
8
9
10
11
12
13
14
Page 3
EQUALIZER IN/BYPASS Slide Switch - Disables
filters and LEVEL Control in BYPASS position and
returns gain of Equalizer (LINE INPUT to LlNE OUT-
PUT) to value determined by rear-panel GAlN Control.
LEVEL Control -Operative only in EQUALIZER IN
mode. Provides adjustment of Equalizer output level
+I5 dB to compensate for changes in gain re-
of
sulting from Filter adjustments.
-
OVERLOAD LED
dication when peaks in output signal approach
actual clipping level of output amplifier.
POWER
unit.
Power-On lndicator Lamp
being applied to unit.
30 VDC Accessory Power Jacks
open circuit (27 Vdc at 10
equipment.
AUX OUTPUT Phone Jack- Provides unbalanced
low-impedance output for connection to audio console or amplifier-mixer link input.
LlNE OUTPUT Phone Jack
unbalanced line level output to power amplifier.
MIC/LINE Slide Switch - Connects line level or
low-impedance microphone level signal to 3-pin
OUTPUT Connector.
OUTPUT 3-Pin Male Connector
anced output at either line level or low-impedance
microphone level as selected by
May be unbalanced externally.
GAlN Control
from UNITY to +20 dB to accommodate various
input and output requirements. Operates in both
EQUALIZER IN and BYPASS modes.
LlNE INPUT 3-Pin Female Connector
balanced bridging, high-impedance input connec-
tion from audio console or mixer-preamplifier. May
be unbalanced externally.
LlNE INPUT Phone Jack
unbalanced bridging, high-impedance input con-
nection from audio console or mixer-preamplifier.
Ac Grounded Line Cord -Connects unit to ac
power source
VOLTAGE SELECTOR Slide Switch
lection of 105-125 or 210-250
tion
AC (MAINS) POWER 3-Pin Connector
unit to ac (mains) power source via supplied line
cord
General Operating Instructions
The
SR107 Audio Equalizer is primarily intended for
connection in a sound system between the output of an
audio console or mixer-preamplifier and the input to the
power
level input to the Equalizer and utilizes its line level output to drive the power amplifier. In a system using a
limiter or compressor between the mixer and power amplifier, the
limiter or compressor and power amplifier to achieve
best signal-to-noise performance.
Out and Link In jacks of a console or mixer equipped
with these jacks. The
operation at the lower signal levels characteristic of this
location and is equipped with an auxiliary output of appropriate level for the Link In connection. In the follow-
amplifier(s). A typical installation provides a line
An alternate location for the
ON/OFF Switch - Controls ac power to
(SR107-2E only).
(SR107-2E only).
SR107 should be connected between the
Provides peak signal visual in-
-
Indicates ac power is
-
Provide 31 Vdc
mA max.) for accessory
-
Provides balanced or
-
Provides bal-
MIC/LINE switch.
-
Provides gain adjustment range
-
Provides
-
Provides balanced or
(SR107 only).
SR107 is between the Link
SR107 can provide satisfactory
-
Vac 50/60
Permits se-
Hz
-
Connects
opera-
ing general operating procedure, variations in connec-
tion for Link operation are indicated where applicable.
1. Using hardware provided, install
Equalizer securely in standard 19 in. (483 mm) rack
or optional
making electrical connections.
2. Connect audio console or mixer-preamplifier line
level output to
or phone jack (13. 14). (For Link use, connect link
output of console or mixer to either
INPUT Connector.)
3. Connect
OUTPUT Connector (9, 11) to power amplifier input.
If 3-pin connector is used, place
in LlNE position. (For Link use, connect
OUTPUT (8) to link input of console or mixer.)
4. Place all Filter Controls (1) and LEVEL Control (3)
in zero position. Move EQUALIZER
Switch (2) to BYPASS. Set GAlN Control (12) to
UNITY. (For Link use, set GAlN Control to
SR107: Connect ac line cord (15) to grounded 108-
5.
132V, 50/60 Hz ac source.
SR107-2E: Move VOLTAGE SELECTOR Switch (16)
to 115V or 220V position as appropriate. Attach
suitable
insert chassis connector into AC (MAINS) POWER
Connector (17). Connect ac line cord to grounded
105-125V or 210-250V, 50/60 Hz ac source.
6. Position speakers in desired operating locations
and aim for uniform coverage of audience area.
Position microphones (if used) as required by per-
formance or application involved. Basic precautions
relative to microphone and speaker locations
should be observed to reduce feedback potential.
Set all tone controls in audio console or mixer to
their zero or flat position. Set output phase switch
(if any) to
7. Apply power to sound system. Place POWER ON/
OFF Switch (5) in ON position. Power-On lndicator
Lamp (6) will go on, indicating operation of unit.
8. Using voice, program material or tone generator
(such as Shure Model
system, increase console or mixer output level until
SR107 OVERLOAD lndicator (4) flickers. Increase
volume control on power amplifier until amplifier
clipping distortion is evident. OVERLOAD lndicator
now indicates onset of clipping in both
power amplifier. NOTE: This step does not apply
to Link operation.
9. Using voice or program material as source, adjust
console or mixer output to provide desired sound
level in room. (For Link use, adjust individual channel volume controls for desired mix and set to level
that will cause only occasional flickering of
OVERLOAD lndicator on peaks of high level program material.) If microphones are used as sound
source, satisfactory sound level may not be possible
due to feedback. In this case, set volume to stable
point just below feedback level.
10. Operation of
flickers slightly, on only the loudest program peaks,
is recommended. This will maximize signal-to-noise
ratio, but will generally not result in audible distortion since lndicator threshold is 3 dB below actual
clipping level.
Operating with OVERLOAD lndicator always off may
result in less than optimum signal-to-noise per-
formance.
A30A or A105A Carrying Case prior to
SR107 LlNE INPUT 3-pin connector
SR107 LlNE OUTPUT phone jack or 3-pin
&pin male power plug to ac line cord and
0" or in-phase condition.
A15TG) for input to sound
SR107 such that OVERLOAD lndicator
SR107 Audio
SR107 LlNE
MIC/LINE Switch
SR107 AUX
IN/BYPASS
$20 dB.)
SR107 and
SR107
Page 4
If OVERLOAD Indicator is flashing brightly or on
constantly, operating level is too high and will cause
distortion, and may result in less than full power
output from the sound system.
11. Set EQUALIZER Switch to IN position. Adjust Filter
Controls for particular equalization objective. See
procedures for feedback control, and playback and
live performance equalization in following sections.
While adjusting Equalizer Filter Controls, use
LEVEL Control to maintain desired volume in room.
Do not attempt equalization beyond bandwidth
limits of sound system. For best results, keep
number of Filter Controls used to a minimum, and
adjust each control no more than required.
12. After equalization, perform listening check of audience area to be sure that sound quality is satisfactory throughout room.
Mounting and Ventilation
The SR107 Audio Equalizer is designed for rack-mount-
ing in a 483 mm (standard 19 in.) audio equipment rack
and is supplied with the necessary mounting hardware
(see Figure 3).
SR107 may also be operated while mounted in a
The
Shure
A30A or A105A Carrying Case. The A30A has a
panel height capacity of 88.9 mm
(3% in.) for two SR107s
or one SR107 and one other unit of 44.4 mm (1% in.)
height. The
A105A has a panel height of 178 mm (7 in.)
and will accommodate up to four units with panel heights
equal to that of the
SR107.
No special precautions are required for ventilation. The
SR107 may be operated over a temperature range of - 7"
to 57°C (20" to 135°F) in continuous duty without
derating.
Power Supply
The SR107 is furnished with a three-conductor power
cable and three-prong grounded plug (15). Connect the
SR107 to an outlet which supplies 108 to 132 volts ac,
50/60
Hz
power. The maximum power consumption at
120 volts under normal operating conditions is 6 watts
(0.05 amperes at 120 volts).
If extension cords are re-
quired, a high-quality, 18 gauge or larger cord should
be used.
r
18-9/16 IN]
197
mm'
483
443
mrn
I
I9
IN]-
rnm
117
7/16
IN
I
17-314 IN)
1
--
"NOT INCLUDING CABLE/CONNECTOR CLEARIWCE DEPTH
FIGURE
OVERALL DIMENSIONS
The SR107-2E is furnished with a three-conductor detachable line cord without a power plug. Obtain a suitable
3-pin male power plug and attach it to the line cord. The
plug should be installed by qualified service personnel.
(Brown lead goes to "hot" or "live" terminal, blue lead
to neutral terminal, and
green/yellow lead to ground or
earth terminal.) Connect the equipment end of the line
cord to the AC (MAINS) POWER Connector (17) on the
rear panel of the SR107-2E. Select the proper operating
voltage (1 15V for 105-125V supply or 220V for 210-250V
supply). Maximum power consumption at either operating
voltage is 6 watts.
A POWER ON-OFF toggle switch (5) on the front panel
controls the application of ac power to the
red indicator lamp (6) indicates the power-on condition.
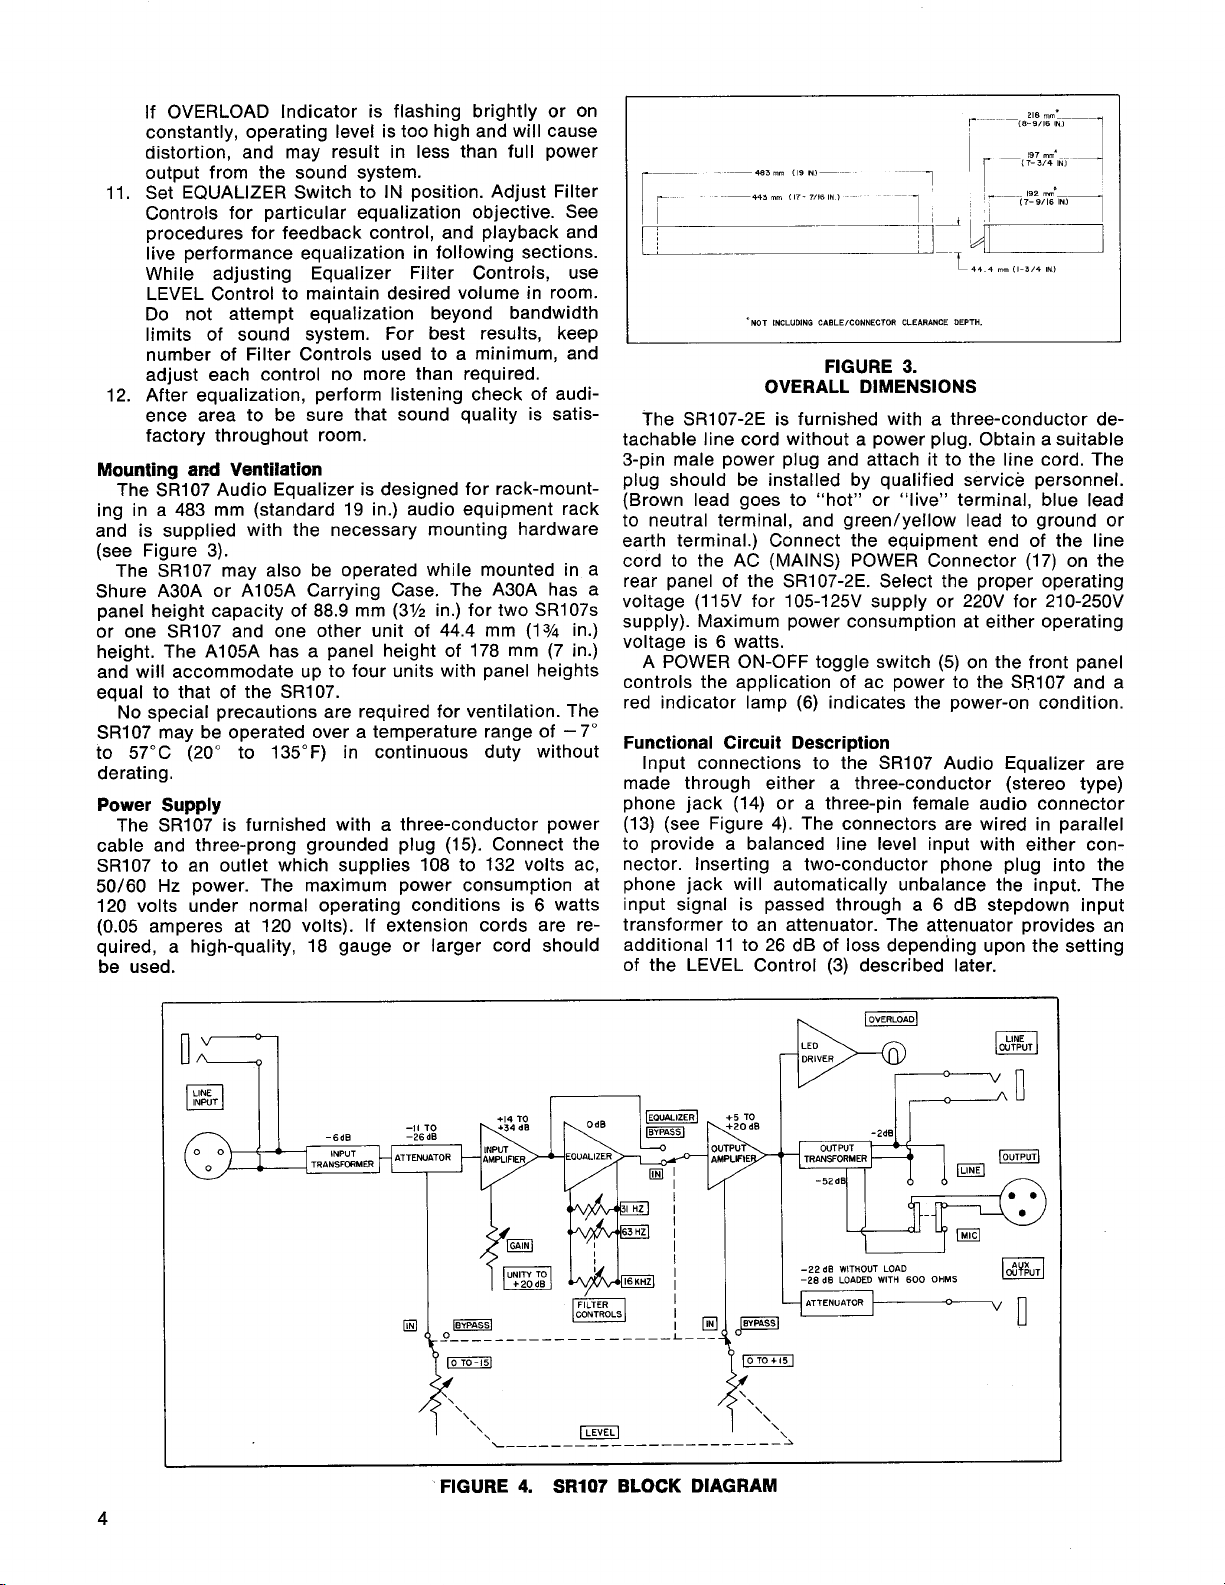
Functional Circuit Description
Input connections to the SR107 Audio Equalizer are
made through either a three-conductor (stereo type)
a
phone jack (14) or
three-pin female audio connector
(13) (see Figure 4). The connectors are wired in parallel
to provide a balanced line level input with either connector. Inserting a two-conductor phone plug into the
phone jack will automatically unbalance the input. The
input signal is passed through a 6 dB
transformer to an attenuator. The attenuator provides an
additional 11 to 26 dB of loss depending upon the setting
of the LEVEL Control (3) described later.
I44
4
mm
11-314 IN)
3.
SR107 and a
stepdown input
FIGURE
4.
SR107 BLOCK DIAGRAM
Page 5
The next stage is an input amplifier which has a gain
of 14 to 34 dB depending on the setting of the rear panel
GAlN Control (12). The output of the amplifier is fed to
two cascaded differential amplifier stages which com-
prise the equalizer boost and cut circuitry. The individual
active gyrator resonators for 31 Hz, 125 Hz, 500 Hz, 2 kHz
and 8 kHz are connected to the first of the differential
amplifiers and provide control of these frequency bands.
The second amplifier is connected to the 63 Hz, 250 Hz,
4
1 kHz,
kHz, and 16 kHz active resonators for control of
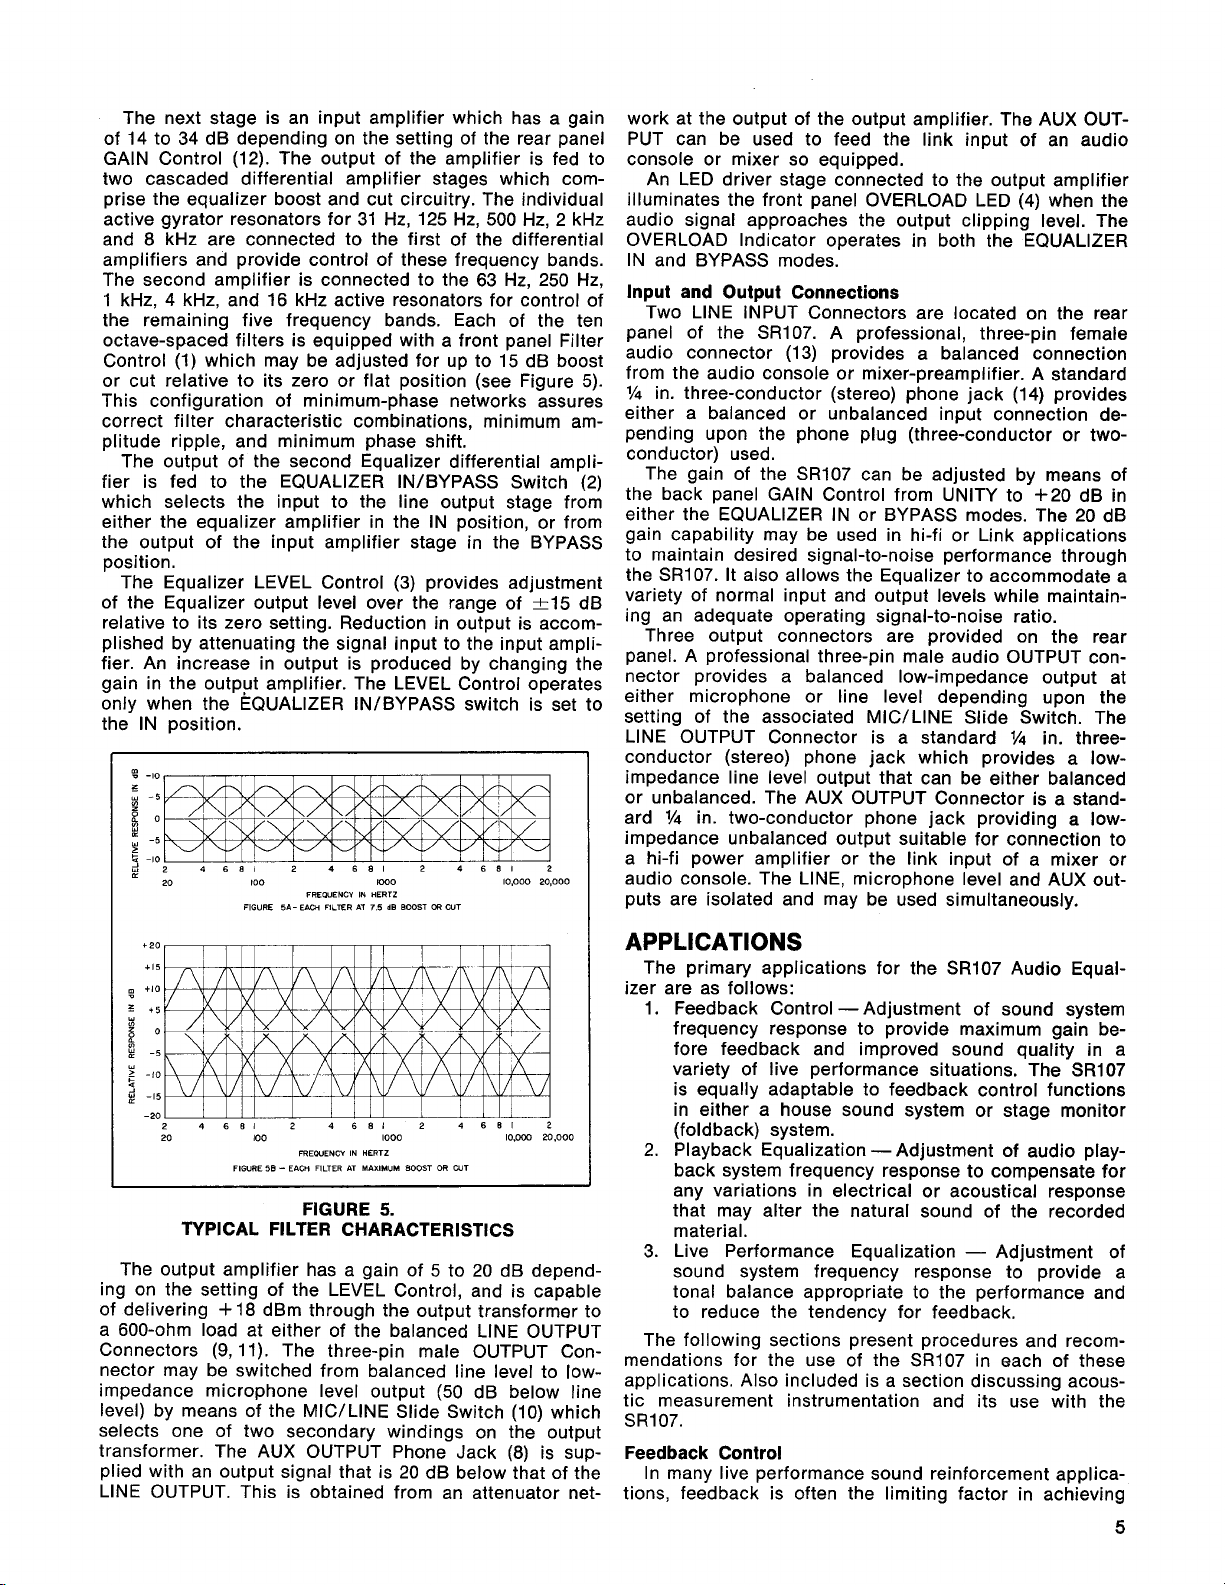
the remaining five frequency bands. Each of the ten
octave-spaced filters is equipped with a front panel Filter
Control (1) which may be adjusted for up to 15 dB boost
or cut relative to its zero or flat position (see Figure 5).
This configuration of minimum-phase networks assures
correct filter characteristic combinations, minimum am-
plitude ripple, and minimum phase shift.
The output of the second Equalizer differential ampli-
fier is fed to the EQUALIZER
IN/BYPASS Switch (2)
which selects the input to the line output stage from
either the equalizer amplifier in the IN position, or from
the output of the input amplifier stage in the BYPASS
position.
(3)
The Equalizer LEVEL Control
of the Equalizer output level over the range of
provides adjustment
215 dB
relative to its zero setting. Reduction in output is accomplished by attenuating the signal input to the input ampli-
fier. An increase in output is produced by changing the
gain in the output amplifier. The LEVEL Control operates
only when the EQUALIZER
INIBYPASS switch is set to
the IN position.
I
-10
z
U
-5
g
0
P
$
-5
-10
u
20 100 KO0 IOPOO 20,000
FIGURE 5A-
FREWENCY IN HERTZ
Em FILTER AT
7.5 dB
BOOST
OR
CUT
work at the output of the output amplifier. The AUX OUT-
PUT can be used to feed the link input of an audio
console or mixer so equipped.
An LED driver stage connected to the output amplifier
illuminates the front panel OVERLOAD LED (4) when the
audio signal approaches the output clipping level. The
OVERLOAD Indicator operates in both the EQUALIZER
IN and BYPASS modes.
Input and Output Connections
Two LlNE INPUT Connectors are located on the rear
panel of the
SR107. A professional, three-pin female
audio connector (13) provides a balanced connection
from the audio console or mixer-preamplifier. A standard
1/4
in. three-conductor (stereo) phone jack (14) provides
either a balanced or unbalanced input connection depending upon the phone plug (three-conductor or
two-
conductor) used.
The gain of the
the back panel
SR107 can be adjusted by means of
GAlN Control from UNITY to +20 dB in
either the EQUALIZER IN or BYPASS modes. The 20 dB
gain capability may be used in hi-fi or Link applications
to maintain desired signal-to-noise performance through
SR107. It also allows the Equalizer to accommodate a
the
variety of normal input and output levels while maintain-
ing an adequate operating signal-to-noise ratio.
Three output connectors are provided on the rear
panel. A professional three-pin male audio OUTPUT con-
a
nector provides
balanced low-impedance output at
either microphone or line level depending upon the
setting of the associated
LlNE OUTPUT Connector is a standard
MIC/LINE Slide Switch. The
1/4
in. three-
conductor (stereo) phone jack which provides a low-
impedance line level output that can be either balanced
a
or unbalanced. The AUX OUTPUT Connector is
1/4
ard
in. two-conductor phone jack providing a low-
stand-
impedance unbalanced output suitable for connection to
a hi-fi power amplifier or the link input of a mixer or
audio console. The LINE, microphone level and AUX outputs are isolated and may be used simultaneously.
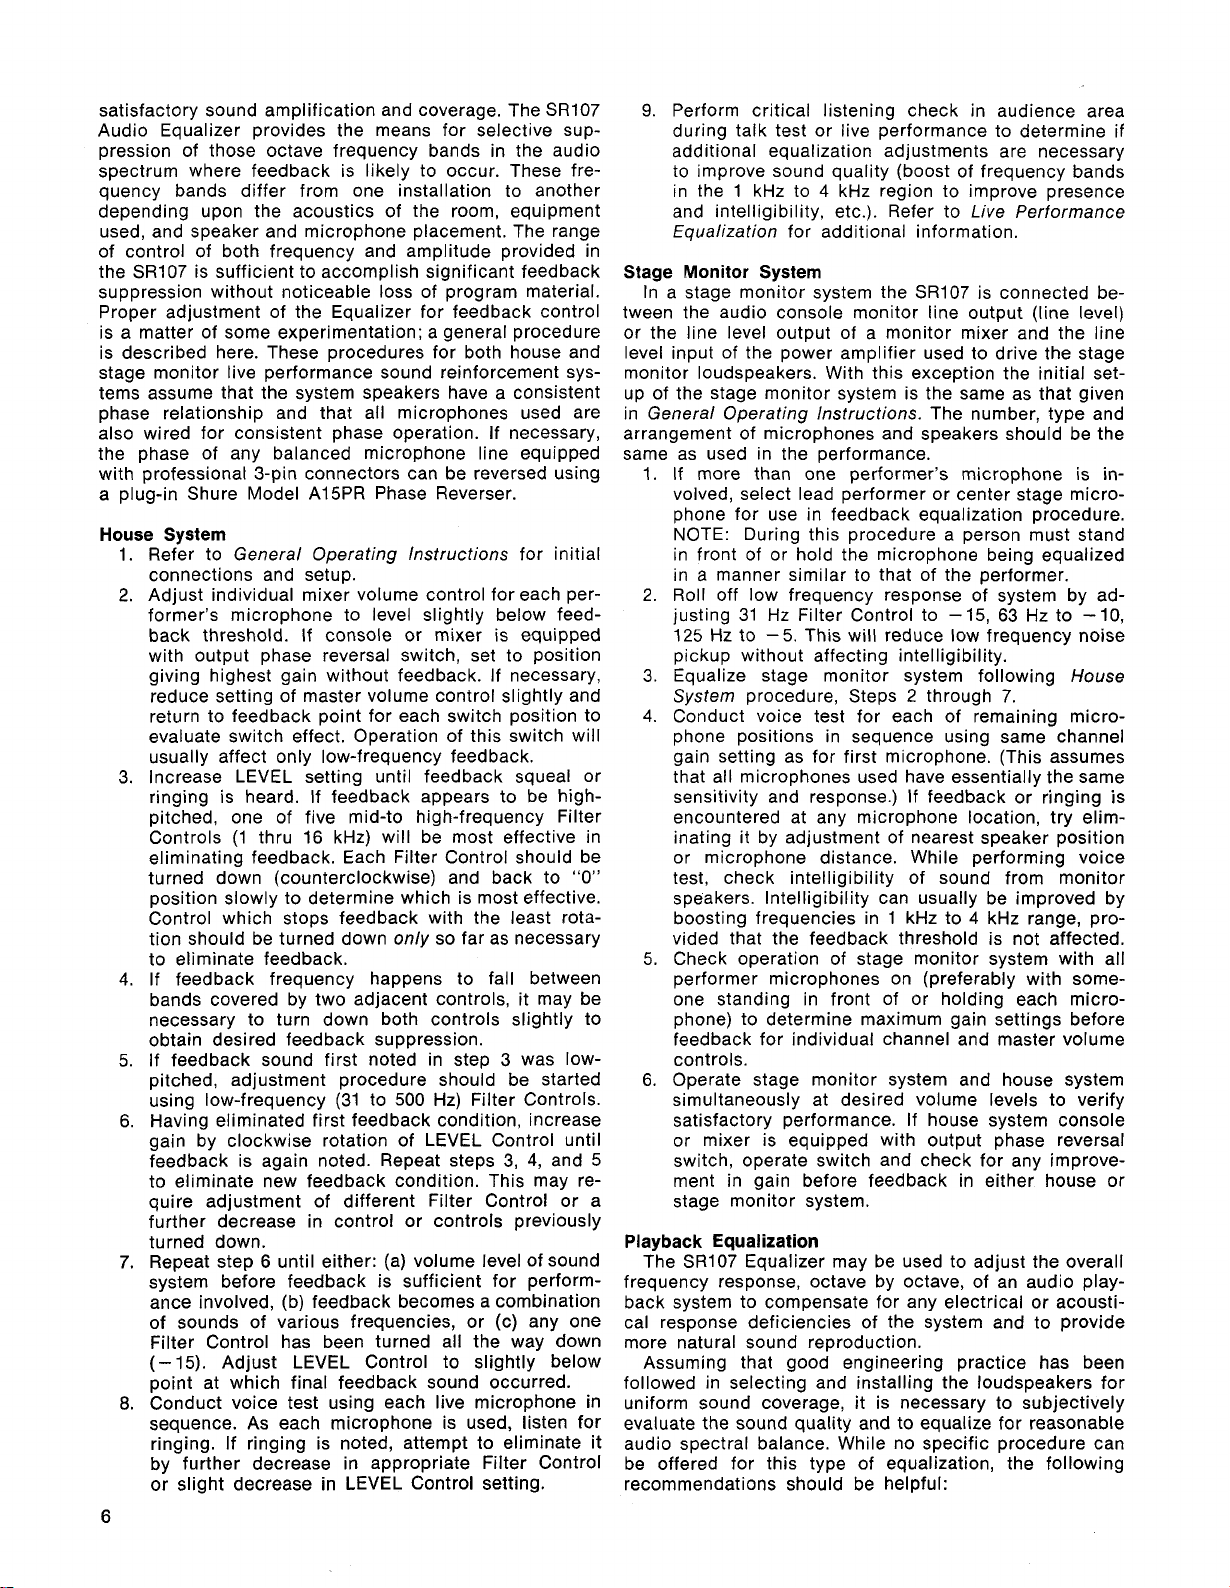
t20
+I5
t10
15
U
H
O
p
-5
u
:
-I0
g
-I5
-20
4
2
20 100 1000 IO.WO 20.000
681
2
4
681
FIGURE50 -EACH FILTER AT MAXIMUM BOOST OR
FREWENCV IN HERTZ
2
4
CUT
681
2
FIGURE 5.
TYPICAL FILTER CHARACTERISTICS
The output amplifier has a gain of 5 to 20 dB depend-
ing on the setting of the LEVEL Control, and is capable
+
of delivering
18 dBm through the output transformer to
a 600-ohm load at either of the balanced LlNE OUTPUT
(9,
Connectors
nector may be switched from balanced line level to
11). The three-pin male OUTPUT Conlow-
impedance microphone level output (50 dB below line
level) by means of the
MIC/LINE Slide Switch (10) which
selects one of two secondary windings on the output
(8)
transformer. The AUX OUTPUT Phone Jack
is sup-
plied with an output signal that is 20 dB below that of the
LlNE OUTPUT. This is obtained from an attenuator net-
APPLICATIONS
The primary applications for the SR107 Audio Equal-
izer are as follows:
1. Feedback Control -Adjustment of sound system
frequency response to provide maximum gain before feedback and improved sound quality in a
variety of live performance situations. The
is equally adaptable to feedback control functions
in either a house sound system or stage monitor
(foldback) system.
2. Playback Equalization -Adjustment of audio play-
back system frequency response to compensate for
any variations in electrical or acoustical response
that may alter the natural sound of the recorded
material.
3.
Live Performance Equalization - Adjustment of
sound system frequency response to provide a
tonal balance appropriate to the performance and
to reduce the tendency for feedback.
The following sections present procedures and recom-
mendations for the use of the
SR107 in each of these
applications. Also included is a section discussing acous-
tic measurement instrumentation and its use with the
SR107.
Feedback Control
In many live performance sound reinforcement applica-
tions, feedback is often the limiting factor in achieving
SR107
Page 6
satisfactory sound amplification and coverage. The SR107
Audio Equalizer provides the means for selective sup-
pression of those octave frequency bands in the audio
spectrum where feedback is likely to occur. These fre-
quency bands differ from one installation to another
depending upon the acoustics of the room, equipment
used, and speaker and microphone placement. The range
of control of both frequency and amplitude provided in
SR107 is sufficient to accomplish significant feedback
the
suppression without noticeable loss of program material.
Proper adjustment of the Equalizer for feedback control
is a matter of some experimentation; a general procedure
is described here. These procedures for both house and
stage monitor live performance sound reinforcement sys-
tems assume that the system speakers have a consistent
phase relationship and that all microphones used are
also wired for consistent phase operation. If necessary,
the phase of any balanced microphone line equipped
with professional 3-pin connectors can be reversed using
a plug-in Shure Model
House System
1. Refer to General Operating Instructions for initial
connections and setup.
2.
Adjust individual mixer volume control for each performer's microphone to level slightly below feedback threshold. If console or mixer is equipped
with output phase reversal switch, set to position
giving highest gain without feedback. If necessary,
reduce setting of master volume control slightly and
return to feedback point for each switch position to
evaluate switch effect. Operation of this switch will
usually affect only low-frequency feedback.
3, Increase LEVEL setting until feedback squeal or
ringing is heard. If feedback appears to be
pitched, one of five mid-to high-frequency Filter
Controls
eliminating feedback. Each Filter Control should be
turned down (counterclockwise) and back to
position slowly to determine which is most effective.
Control which stops feedback with the least rotation should be turned down only so far as necessary
to eliminate feedback.
4.
If feedback frequency happens to fall between
bands covered by two adjacent controls, it may be
necessary to turn down both controls slightly to
obtain desired feedback suppression.
If feedback sound first noted in step 3 was
5.
pitched, adjustment procedure should be started
using low-frequency (31 to 500 Hz) Filter Controls.
6. Having eliminated first feedback condition, increase
gain by clockwise rotation of LEVEL Control until
feedback is again noted. Repeat steps 3,
to eliminate new feedback condition. This may require adjustment of different Filter Control or a
further decrease in control or controls previously
turned down.
7. Repeat step
system before feedback is sufficient for perform-
ance involved, (b) feedback becomes a combination
of sounds of various frequencies, or (c) any one
Filter Control has been turned all the way down
(-15). Adjust LEVEL Control to slightly below
point at which final feedback sound occurred.
8.
Conduct voice test using each live microphone in
sequence. As each microphone is used, listen for
ringing. If ringing is noted, attempt to eliminate it
by further decrease in appropriate Filter Control
or slight decrease in LEVEL Control setting.
(1
Al5PR Phase Reverser.
high-
thru 16 kHz) will be most effective in
"0"
low-
4,
and 5
6 until either: (a) volume level of sound
9. Perform critical listening check in audience area
during talk test or live performance to determine if
additional equalization adjustments are necessary
to improve sound quality (boost of frequency bands
1
in the
and intelligibility, etc.). Refer to Live Performance
Equalization for additional information.
Stage Monitor System
In a stage monitor system the
tween the audio console monitor line output (line level)
or the line level output of a monitor mixer and the line
level input of the power amplifier used to drive the stage
monitor loudspeakers. With this exception the initial setup of the stage monitor system is the same as that given
in General Operating Instructions. The number, type and
arrangement of microphones and speakers should be the
same as used in the performance.
1.
If more than one performer's microphone is involved, select lead performer or center stage microphone for use in feedback equalization procedure.
NOTE: During this procedure a person must stand
in front of or hold the microphone being equalized
in a manner similar to that of the performer.
2.
Roll off low frequency response of system by adjusting 31 Hz Filter Control to
125 Hz to -5. This will reduce low frequency noise
pickup without affecting intelligibility.
3. Equalize stage monitor system following House
System procedure, Steps
4. Conduct voice test for each of remaining micro-
phone positions in sequence using same channel
gain setting as for first microphone. (This assumes
that all microphones used have essentially the same
sensitivity and response.) If feedback or ringing is
encountered at any microphone location, try elim-
inating it by adjustment of nearest speaker position
or microphone distance. While performing voice
test, check intelligibility of sound from monitor
speakers. Intelligibility can usually be improved by
boosting frequencies in
vided that the feedback threshold is not affected.
5. Check operation of stage monitor system with all
performer microphones on (preferably with someone standing in front of or holding each microphone) to determine maximum gain settings before
feedback for individual channel and master volume
controls.
6.
Operate stage monitor system and house system
simultaneously at desired volume levels to verify
satisfactory performance. If house system console
or mixer is equipped with output phase reversal
switch, operate switch and check for any improvement in gain before feedback in either house or
stage monitor system.
Playback Equalization
SR107 Equalizer may be used to adjust the overall
The
frequency response, octave by octave, of an audio playback system to compensate for any electrical or acoustical response deficiencies of the system and to provide
more natural sound reproduction.
Assuming that good engineering practice has been
followed in selecting and installing the loudspeakers for
uniform sound coverage, it is necessary to subjectively
evaluate the sound quality and to equalize for reasonable
audio spectral balance. While no specific procedure can
be offered for this type of equalization, the following
recommendations should be helpful:
kHz to 4 kHz region to improve presence
SR107 is connected be-
-
15, 63 Hz to
2
through 7.
1
kHz to 4 kHz range, pro-
-
10,
Page 7

Refer to General Operating lnstructions for connec-
tions and setup.
Use typical program source and program material.
Locate listening position in main audience area so
that what is heard is typical of what most of the
audience will hear. If practical, the
SR107 should
be at this location (temporarily) for ease of adjustment.
As Filter Control adjustments are made, adjust
LEVEL Control to maintain initial volume level, using
EQUALIZER
INIBYPASS Switch to compare equalized to unequalized sound level and quality.
Bass guitar, string bass or kick bass drum sounds
are most affected by 63 Hz and (to a lesser degree)
125 Hz Filter Controls. Avoid excessive boost of
these frequencies or low-frequency overload may
occur.
Power supply hum (60 Hz) and certain types of
turntable rumble may be suppressed using 63 Hz
Filter Control. The 31 Hz Control may also be helpful for very low frequency turntable sounds.
The
8
kHz Filter Control is most effective in con-
trolling "brightness" of the sound, especially affect-
8
ing speech sibilance and cymbal sounds. The
kHz
and 16 kHz Filter Controls may also be used to
reduce record noise and tape hiss.
Vocal performer sound is affected most by variations in the Filter Controls covering the 1 kHz to
4
kHz range.
If room resonance is encountered where frequencies in a certain band are accentuated, some ad-
justment of speaker positions may correct the
condition. If this is not practical, experiment with
attenuation of the octave bands in the suspect fre-
quency region. The low-frequency octaves (32
through 250 Hz) are often affected by room characteristics. A typical subjective effect is that of a
"boomy bass" sound.
Use tone controls on the console or mixer (if so
equipped) for broadband adjustment of the high
or low end of the audio spectrum.
Live Performance Equalization
Equalization of a sound reinforcement system for live
entertainment applications is similar to that described in
Playback Equalization except that microphones and performers constitute the sound source. Utilize this section
where applicable in live performance equalization.
In most indoor sound system installations, the
SR107
Audio Equalizer is adjusted first for feedback control as
previously described. Additional adjustments may then
be made to improve sound quality. This second level of
adjustment is usually performed during a rehearsal where
the performers and musicians are present and the sound
aspects of the total performance can be evaluated. It is
important to note that this secondary equalization process
can affect the feedback threshold previously achieved
and should therefore be performed with caution.
SR107 was not previously connected to the sound
If the
system, refer to General Operating lnstructions for con-
nection and setup instructions. Preliminary adjustment of
the Equalizer can be made using recorded program
material typical of the live performance.
The recommendations given in Playback Equalization
should be considered along with the following:
1. While judgements of sound quality should be made
in the main audience area, it is advisable to check
a number of locations throughout the area for
significant variations in response. If such are en-
countered, speaker location and aiming should be
reviewed.
2. Any increase in Filter Control setting (clockwise
rotation) previously adjusted for feedback suppression should be done with care. In the case of a
reverberant room where an audience would significantly increase the sound absorption, this may
be
possible.
3. Intelligibility and presence for vocal performances
may be improved by slight increases of system
response in the
4.
Adjustment of the response of a particular micro-
1
kHz to 4 kHz region.
phone must be made through the use of the console
or mixer tone controls for that particular channel.
If an individual channel exhibits a "hollow" or unnatural sound, the gain of that channel may be
near feedback threshold and should be reduced.
5.
If the room is acoustically "dead" (carpeted, upholstered seats, acoustic wall treatment), the sound
system output may seem deficient in the lower mid-
range frequency region. In this case, slight boosting
of the frequency bands in the range of
4
kHz is appropriate. If the room is "live" or rever-
1
kHz to
berant, the sound may seem excessively "bright"
8
and some attenuation of the octave bands at
kHz
and 16 kHz may provide a more uniform response.
In outdoor applications, attenuation of both low and
high frequencies may be experienced. Boosting
8
octave bands 125 Hz and below,
kHz, and 16 kHz
may be helpful but must be performed carefully to
avoid excessive amplifier and speaker drive levels.
6. Occasionally a combination of program material
and room resonance produces a
"boomy" sound in
which some low frequencies are accentuated. At-
tenuation of the 63, 125 or 250 Hz Filter Controls
will suppress this characteristic.
Equalization Instrumentation
While the final measure of any equalization effort is a
subjective judgement of the quality of the sound delivered
to the audience, acoustic measurement instrumentation
is available which can be of considerable assistance in
more efficient and consistent equalization procedures.
The equipment consists of a pink noise generator
(equal sound energy per octave), an equalization analyzer
and an omnidirectional analyzer microphone with a
known frequency response. The analyzer generally pro-
vides a display of input signal amplitude versus frequency
1/3
in either octave or
octave bands for the complete
audio spectrum.
In general, equalization analyzer equipment is used to
measure sound system performance instead of performing the subjective evaluations previously discussed. Connection, setup and operation of the
SR107 remains the
same. Recommendations regarding various equalization
objectives are also generally applicable. Operation of the
analyzer equipment is in accordance with the manufac-
turer's instructions.
Usually, the analyzer equipment is used first to establish the desired house curve or preferred sound system
response characteristic. For playback equalization, the
analyzer microphone is located in the main audience
area and connected to the equalization analyzer input.
The noise generator is connected to the audio console
or mixer input and the volume adjusted to provide a
sound level sufficiently above the room ambient noise
level. The analyzer should be placed close to the
SR107
so that as Equalizer adjustments are made, the results
are easily observed. Adjustment for a flat response in the
Page 8

audience area of a large room will usually result in an
overly bright sound. Common practice is to adjust for
3
dB per octave rolloff of the high frequencies starting
at about 1 kHz. Frequency response is then checked in
other locations in the audience area and, if necessary,
the Equalizer is readjusted slightly to improve the aver-
age response for the entire audience area. Final equaliza-
tion adjustments are based on listening tests using
typical program material.
Equalization of a sound reinforcement system using
instrumentation is similar to playback equalization. The
sound system is equalized initially to produce the desired
house curve with all microphones turned off. The individ-
ual microphone volume controls are then increased to
the approximate use settings, slightly below the feed-
back threshold. The
creased slowly while observing the equalization analyzer.
As the feedback threshold is approached the analyzer
will show a prominent increase in amplitude of the frequency band where feedback is about to occur. The
appropriate
until the amplitude increase disappears. This process is
continued until the major feedback tendencies have been
suppressed and a reasonable sound volume level is being
produced. A talk or performance test of each open microphone is then conducted and the quality of the sound
produced is sampled by listening in various locations
throughout the audience area. Additional equalization adjustments are made based on the listening evaluation
and taking care to avoid any significant reduction in the
feedback threshold previously achieved.
Equalization of a stage monitor system using analyzer
equipment is similar to playback or house system equalization except measurements and evaluation are confined
to the performer's stage area. The pink noise generator
is connected to the mixer input and the mixer volume
adjusted to provide an output from the monitor speakers
significantly above the ambient noise level. A person is
placed in front of the lead performer's microphone (to
simulate performance conditions) and the analyzer mi-
crophone is placed
sample the sound field in that area. The analyzer micro-
phone output is viewed on the equalization analyzer and
initial response adjustments, such as low frequency
off, are made. The mixer volume control for the performer's microphone is then set to a stable point slightly
below the feedback threshold. The
is gradually increased until an obvious increase in am-
plitude over a narrow frequency band is noted on the
equalization analyzer. This is the onset of feedback and
the appropriate
the system response in this area. This process is continued until satisfactory gain before feedback and a
desired response is achieved. A voice test of each performer microphone position is made to determine if a
similar feedback threshold is attainable. Final adjustment
of the
available) is made to improve quality or intelligibility of
the sound presented to the performers.
Connecting a VU Meter
An external VU meter may be connected to the
OUTPUT of the SR107 with a series resistor (see Figure
6). Use a true VU meter (such as
resistor connected as shown. The resistor should be
Yz-watt carbon 5%. With a 600-ohm load zero VU is
$4
dBm.
SR107 Filter Control setting is then reduced
SR107 and/or individual channel tone controls (if
SR107 LEVEL Control is then in-
next to the person at ear level to
roll-
SR107 LEVEL Control
SR107 Filter Control is used to reduce
LlNE
Simpson 1349) and a
3600
TIP WIRE
/
TO LlNE LEVEL
OUTPUT PHONE JACK
I
NO CONNECTION TO SLEEVE REQUIRED.
NOTE
EXTERNAL VU METER
5%
FIGURE
6.
I
I
SERVICE INSTRUCTIONS
Service
SR107 Audio Equalizer uses components of the
The
highest quality, operating well within their respective
ratings to assure long life.
WARNING
Voltages in this equipment are hazardous to life.
Refer servicing to qualified service personnel.
Replacement Parts
Parts that are readily available through local electronic
parts distributors are not shown on the accompanying
Parts List. Their values are shown on the Circuit Diagram
(Figure 11). Commercial parts not readily available and
unique parts are shown on the Parts List and may be
ordered directly from the factory.
The commercial alternates shown on the Parts List are
not necessarily equivalents, but are electrically and mechanically similar, and may be used in the event that
direct factory replacements are not immediately available. To maintain the highest possible performance and
reliability, Shure factory replacement parts should be
used. When ordering replacement parts, specify the
Shure Replacement Kit Number, description, product
model number and serial number.
Cover Removal
To service components inside the chassis, the pro-
tective top cover must be removed. This is done by
removing eight screws from the top surface and lifting
the cover off.
Fuse Replacement
The Equalizer is provided with a wired-in main power
F1 which is rated at 1/16A, 250V, Slo-Blo for the
fuse
SR107 and 1/8A, 250V, Slo-Blo for the SR107-2E. If replacement becomes necessary, replace with identical
fuse. Insulating tubing should be used on the fuse leads
and to cover the metal end caps of the fuse.
Knob Replacement
All front panel rotary control knobs are pull-off types
and are interchangeable.
Ferrite Beads
Ferrite beads are used on the signal leads to all input
and output connectors except the AUX OUTPUT. Be sure
to replace the ferrite beads wherever they have been
removed during servicing.
Printed Circuit Board Removal
SR107 chassis contains two printed circuit board
The
assemblies, the Amplifier Board and the Equalizer Board
identified as
A1 may be made accessible for servicing by disconnect-
A1 and A2 in Figure 7. The foil side of board
Page 9

FIGURE 7.
SR107 TOP VIEW, COVER REMOVED
ing the leads from the push-on board terminals S and R,
and removing the four Phillips head screws securing the
board. The rear edge of the board (side nearest the back
panel) can then be raised, tilting the board toward the
front panel until it is in an upright position.
The foil side of board A2 may be made accessible in a
similar manner by disconnecting the lead from the
on board terminal A and removing a total of six Phillips
head screws securing the board.
Replacement board assemblies are supplied with a
number of the interconnecting wires already cut to length
and soldered to board terminals. If either of the two
boards in the
assembly should be examined first to determine which
leads are already soldered in place. Those leads which
are duplicated on the new board assembly should be
soldered at the point of origin and removed from the
chassis along with the board. Note the lead colors and
points of connection before unsoldering to avoid confusion when installing the new board. Refer to the Circuit
Diagram, Figure 11 for lead identification.
SR107 are to be replaced, the new board
push-
un-
Transistor, Diode and LED Removal
All transistors and diode rectifiers used in the SR107
are mechanically supported by their leads. When replacing these devices, proper lead configurations must be
G
low-
and E,
followed. Minimum soldering heat (preferably with a
wattage soldering iron) should be used to avoid damage
to the device. Transistor lead codes are included in the
Notes to Circuit Diagram (Figure
To replace light-emitting diode (LED) D6, mounted on
the front panel, use a long-nose pliers to remove the
mounting ring from the rear of the LED. Press against
the front-panel projection of the LED lens to force it out
the back through the mounting clip. Disconnect the gray
and orange leads from push-on terminals
respectively, on printed circuit board
8).
A1 and remove the
defective assembly.
To install the new assembly, insert the LED in the
mounting collar in the front panel. Slide the mounting
ring over the leads and push it firmly onto the mounting
collar, securing the LED in the panel.
The Shure replacement LED is supplied with gray and
orange leads attached. Thread the leads through the
grommet in the shield separating the power supply from
the signal circuit components. Connect the gray lead to
G
terminal
and the orange lead to terminal E on board
Al.
Active Component Checking
Defective transistors and diode rectifiers may be lo-
cated by use of a standard ohmmeter such as a
260. Polarity of the ohmmeter must be verified before
these checks are made.
With a known diode orientation, measure the diode
resistance in the forward and reverse directions. The
lowest meter reading will establish the "minus" probe
while the other probe will be "plus." Some ohmmeters
are not polarized in this manner with relation to "volts
plus probe" and "volts minus probe." With the ohm-
meter "plus" probe on the anode end of a diode and the
"minus" probe on the cathode end, the ohmmeter should
read approximately 2000 ohms or less. With the meter
probes reversed, a reading of about 10,000 ohms or more
should be obtained. If either of these conditions is not
met, the diode should be replaced.
To check transistors, the ohmmeter should be set to
the 100- or 1,000-ohm scale. Transistors and diodes must
be removed from the circuit before testing. If all condi-
tions in the following table are met, the transistor may
be considered free of any major defect; if any of the
following conditions are not met, the transistor should be
replaced. See Notes to Circuit Diagram (Figure
transistor lead codes.
Simpson
8)
for
Page 10

Ohmmeter Connections Ohmmeter Readina resistor between the +30 Vdc sup~lv and the orange
-
~-~~--~-~
"Plus" Lead "Minus" Lead Transistor Transistor
Collector Emitter High High with an ohmmeter; the ohmmeter may damage the LED
Emitter Collector High High or give erroneous readings.
Collector Base
Emitter Base
Base Collector Low High
Base Emitter Low
*
NO^
a
s~gn~f~cant measurement
To check the LED OVERLOAD indicator disconnect the
orange LED lead from terminal E of the amplifier printed
circuit board
--
~
NPN PNP
~igh Low
A1 and connect a 1, 1.5, or 2.2 kilohm as shaded areas in Figures 9 and 10.
Low
*
-
lead (gray lead still grounded).
when power is applied to the Equalizer. If it does not
light
it
should
Service Illustrations
The parts location photo (Figure
with the overall Circuit Diagram (Figure 11) provides
identification of all chassis-mounted assemblies and components. Reference to the overall Circuit Diagram and
the Printed Circuit Board Parts Location drawings (Fig-
ures 9 and 10) provides the means for quickly locating
board-mounted components. Foil circuit paths are shown
be
replaced.
he
NO~E:
7)
*LED
should light
D~
not
check
used in conjunction
LED^
REPLACEMENT PARTS LIST
Reference
Designation
CHASSIS-MOUNTED PARTS AND ASSEMBLIES
A1
A2
C3
C4
C5
C6
Dl -D5
D6
F1
F1
J1, J4
Replacement
Kit No.
*
-
-
-
-
-
-
RKC21
RKC133
-
-
-
(See
Qty.
-
-
-
-
-
-
4
1
-
-
-
90A2236
90A2239
866628
8611628
86B632
86J628
86A404
90A1989
80A297
80A322
90R2600
Figures 7,
Replacement Kit Consists Of:
Part No.
9, 10
Printed Circuit Board Assembly
(Amplifier)
Printed Circuit Board Assembly
(Equalizer)
Capacitor, Electrolytic,
,F, 15V
400
Capacitor, Electrolytic,
,F, 40V
250
Capacitor, Electrolytic,
1000
Capacitor, Electrolytic,
47 or 50
Silicon Rectifier,
Diode Assembly, Light-Emitting
Fuse, AC, 1
Pigtail
Fuse, AC, 1 /8A, 250V, Slo-Blo,
Pigtail (SR107-2E)
Connector, Phone Jack,
3-Conductor, Open Circuit, LlNE
INPUT and LlNE OUTPUT
and
-
-
Description
,F, 40V
pF,
35V min.
/16A, 250V, Slo-Blo,
(SR107)
11)
100V, 112A
Commercial
Alternate
None
None
Sprague
WH11 D407G016K
CDE BR250-50
Sprague TVA 1316
Sprague
CDE NLW 50-50
Motorola 1
Monsanto MV5023
Littelfuse 31 5.062
Littelfuse 31 5.125
Switchcraft
30D-TE1200;
N4002
128
J2
J3
*
Parts listed as RKC Kits should be ordered by that kit number. Any orders received for piece parts where RKC Kit number is
shown will be shipped in RKC quantities.
10
RKl19P
RK122P
95A482
1
95A198
1
Connector, Female, 3-Pin
Audio, LlNE INPUT
Connector, Male, 3-Pin
Audio, OUTPUT
Switchcraft C3F
Switchcraft C3M
Page 11

REPLACEMENT PARTS LIST - Continued
Reference
Designation
J 5
J6-J7
J8
L1 -L8
MP1
P L1
R1
R2-R11
R12
SI
S 1
S2
S3
S4
TI
T2
T2
T3
W1
W1
Replacement
Kit No.
RKC68
RKC105
*
-
RKC45
-
-
-
-
A
-
-
A
A
-
-
-
-
-
Qty.
1
1 ea.
-
A
-
1
-
-
-
-
-
-
-
-
-
-
-
A
-
-
Replacement Kit Consists Of:
Part No.
958446
95A226
958226
95A689
80A253
90A2594
80A79
46A057
46A76
46A058
9082600
90D2600
5581 19
55C119
55A116
90C2150
51A263
51 A270
51A235
95A632
90A1888
Connector, Phone Jack,
2-Conductor, Open Circuit,
AUX OUTPUT
DC Receptacle, Red and
Black
Connector, 3-Pin, AC
(MAINS) POWER
Ferrite Bead Ring
Knob Assembly, White, Filter
Controls and LEVEL
Lamp, Indicator
Potentiometer, Center Tapped,
Special Taper,
Potentiometer, Special Taper,
250K, Filter Controls
Potentiometer, Screwdriver
Adjust, Modified Log Taper,
10K, GAIN
Switch, Toggle, SPST, POWER
ON-OFF
Switch, Toggle, SPST, POWER
ON-OFF
Switch, Slide, DPDT,
EQUALIZER IN-BYPASS
Switch, Slide, DPDT,
MIC-LINE
Switch, Slide, DPDT,
VOLTAGE SELECTOR
Transformer and Shield
Assembly, Line Level Input
Transformer, Power
Transformer, Power (SR107-2E)
Transformer, Line and Microphone
Level Output
Line Cord and 3-Conductor
Ac Plug Assembly
Line Cord and 3-Conductor
Ac Female Connector Assembly
(SRl07-2E)
(SR107)
(SRI 07-2E)
Description
(SR107-2E)
20K, LEVEL
(SR107)
(SR107)
(SR107-2E)
Commercial
Alternate
Switchcraft 11
None
None
Stackpole 57-0180;
Ferronics 21-030J
None
Leecraft 36N1311-6
None
None
None
Cutler-Hammer
7501 K13
None
Switchcraft
Switchcraft 46206LR
None
None
None
None
None
Belden 17408
None
46206LR
*
Parts listed as RKC Kits should be ordered by that kit number. Any orders received for piece parts where RKC Kit number is
shown will be shipped in RKC quantities.
Page 12

REPLACEMENT PARTS LIST
-
Continued
Reference
Designation
AMPLIFIER (BOARD Al)
C101, (2103C104
C102, C108
C106
C109
Dl 01-Dl 03
Q101, Q103,
Q108-Q110
Q102, Q104,
Q107
Replacement
Kit No.
-
-
-
-
-
-
-
Replacement Kit Consists
*
Qty.
-
-
-
-
-
-
Part No.
86A630
868629
86A646
86F628
86A415
86A350
86A348
Description
Capacitor, Electrolytic,
4.7 or 5
Capacitor, Electrolytic,
22
Capacitor, Electrolytic,
100
Capacitor, Electrolytic,
400
Diode, Silicon, Computer, 75V
Transistor, Silicon, NPN
Transistor, Silicon, Low
Power, PNP
,F, 35V
,F, 35V
,F, 25V
,F,
25V
Of:
Commercial
Alternate
Sprague 30D-TE1303; CDE NLW-5-50
Sprague
226G050CE10;
Mallory MTV-25CD35
CDE NLW-100-25;
Sprague TE-1211
Sprague TVA-1209
TI or GE 1
Motorola 2N5210
Motorola or
Fairchild
502D-
N4148
2N5087
Q105
Q106
EQUALIZER (BOARD A2)
C201 -C202
C203
C204, C222,
C223
C205
C206
C207, C211
C208, C210
C209, C213
RKC65
RKC66
-
-
-
-
-
-
-
-
1
1
-
-
-
-
-
-
-
-
86A334
86A335
86A630
50XA330A
50XA271A
50WA122
50WA472
50WA183
50WA102
50WA683
Transistor, Silicon, NPN
Transistor, Silicon, PNP
Capacitor, Electrolytic,
4.7 or 5
Capacitor, Mica,
33
Capacitor, Mica,
270
Capacitor, Mylar,
.0012 ,F,
Capacitor, Mylar,
.0047 ,F, &5%, lOOV
Capacitor, Mylar,
.018
Capacitor, Mylar,
.001 ,F, k5%, 10OV
Capacitor, Mylar,
.068 ,F, +5%, 1OOV
pF, 35V
pF, 50V
pF, +5%, 50V
f
5%, lOOV
,F,
+5%, 100V
TI TIS92
TI TIS93
Sprague 30D-TE1303; CDE NLW-5-50
CDE
ED330J03
CDE ED271 J03
WMC08D12**
CDE
CDE WMC08D47*
CDE MFP-05S18**
CDE WMC08D1*
CDE MFP-05S68*
*
*
*
*
Parts listed as RKC Kits should be ordered by that kit number. Any orders received for piece parts where RKC Kit number is
shown will be shipped in RKC quantities.
*'
Cornell-Dubilier alternate part has
*lo%
tolerance; select to
55%
if
possible.
Page 13

REPLACEMENT PARTS LIST - Continued
Reference
Designation
C212, C225,
C227
C214, C226
C215
C216
C217
C218, C232
C219
C220
C221
C224
C228
C229-C230
C231
C233
C245
D201
Q2014203,
Q205-(2208,
(2210,
Q216-Q220,
Q226-Q230
(2204, (2209,
Q211 -Q215,
Q221-Q225
Replacement
Kit No.
-
-
-
-
-
-
-
-
-
-
-
-
-
-
-
-
-
Qty.
-
-
-
-
-
-
-
-
-
-
-
-
-
-
-
-
-
Replacement
Part No.
50WA103
50WA333
50WA274
50WA224
50WA105
50WA684
50WA505
50XA151A
50XA331A
50WA222
50WA393
50WA154
50WA474
50WA205
86H628
86A415
86A350
86A348
Kit Consists
Description
Capacitor, Mylar,
.01 ,F, +5%, lOOV
Capacitor, Mylar,
,033 ,F, *5%, lOOV
Capacitor, Mylar,
,F,
f
.27
Capacitor, Mylar,
.22
Capacitor, Mylar,
1.0
Capacitor, Mylar,
.68
Capacitor, Mylar,
5.0
Capacitor, Mica,
150
Capacitor, Mica,
330
Capacitor, Mylar,
.0022 ,F, +55,1OOV
Capacitor, Mylar,
.039 ,F, as%,
Capacitor, Mylar,
.15pF,
Capacitor, Mylar,
.47
Capacitor, Mylar,
2.0
Capacitor, Electrolytic,
80
Diode, Silicon, Computer, 75V
Transistor, Silicon, NPN
Transistor, Silicon, Low
Power, PNP
5%, 50V
,F, +5%, 1OOV
,F, +5%, 50V
,F, +5%, 50V
,F, +5%, 1 OOV
pF, +5%, 50V
pF, 15%, 50V
+5%, 1OOV
,F, +5%, 50V
,F, *5%, 50V
,F, 25V
Of:
IOOV
Commercial
Alternate
CDE MFP-05S1*'
CDE MFD-05S33*
CDE MFP-05P27*
CDE MFP-05P22'*
CDE MFP-O5Wl
CDE MFP-05P68'
CDE MFP-05W5**
CDE ED-1 51 J03
CDE ED-331 J03
WMC-08D22*
CDE
CDE MFP-05S39"
CDE MFP-05P15**
CDE MFP-05P47
CDE MFP-05W2**
CDE-N LW-75-25
TI or GE 1
Motorola 2N5210
Motorola or
Fairchild
*
N4148
2N5087
*
*
*
*
*
*
Parts listed as RKC Kits should be ordered by that kit number. Any orders received for piece parts where RKC Kit number is
shown will be shipped
**
Cornell-Dubilier alterhate part has
in
RKC quantities.
*lo%
tolerance; select to
*5%
if possible.
Page 14

NOTES TO CIRCUIT DIAGRAM
General
Shure part numbers are not shown in the Parts List accompanying the Circuit Diagram (Figure 11) if parts are
readily available through local electronics parts suppliers.
In these instances, the Circuit Diagram shows only the
reference designation and value of the standard parts.
All capacitor values are shown in microfarads unless
otherwise designated. All non-electrolytic capacitors are
100 working volts dc or more unless otherwise specified.
x
Electrolytic capacitors are shown in microfarads
All resistor values are shown in ohms
sistors are '/!-watt, 10% tolerance unless otherwise
specified.
Transistor lead codes are shown in Figure 8. Accept-
able replacements are shown in the Parts List.
The following ground symbols denote:
Chassis Ground
Circuit Ground
Printed Circuit Board Ground (7
Troubleshooting
A general troubleshooting process is as follows: If the
SR107 is completely "dead," check the ac power source,
fuse and power supply output (30 Vdc at pin V or T of
printed circuit board Al).
on but the output is distorted, low or not present, apply
an input signal as described under Ac Voltage Measurements below and determine that the input and output
voltage for each board assembly is correct. If an incor-
rect ac voltage is found at either board output, perform
Dc Voltage Measurements as described below to isolate
the problem area.
AC Voltage Measurements
The numbers within rectangular symbols on the
Circuit Diagram denote the ac voltage at that point under
the following test conditions:
1.
Voltage measured with respect to chassis unless
otherwise indicated.
2. Line Voltage:
50160 Hz with VOLTAGE SELECTOR Switch in 220V
position
3. All front panel Filter Controls at zero except 1 kHz
Control at
Switch set to IN.
4.
Input 1 volt at 1 kHz through 600 ohms. LINE OUTPUT terminated in 600 ohms. AUX OUTPUT not
loaded.
/f7
1
-
-
If
the Power Indicator Lamp is
120V, 50160 Hz (SR107) or 230V,
(SR107-2E).
-
15. LEVEL Control at zero; EQUALIZER
GAIN Control at UNITY.
(k=1000). Re-
volts.
5. Measurements made with ac VTVM of 1 megohm
or greater input impedance.
(*)
NOTE: Measurements of voltage
Q203 and Q208 made with 22 kilohm isolation resistor at tip of VTVM probe.
6. Ac voltage measurements may vary
values shown.
DC Voltage Measurements
The number within elliptical symbols
Circuit Diagram denotes the dc voltage at that point
under the following test conditions:
1. Voltages measured with respect to chassis unless
otherwise indicated.
2. Line voltage:
50160 Hz with VOLTAGE SELECTOR Switch in
220V position
3. No input signal applied.
4.
Dc voltage measurements may vary f 20% from
values shown.
5. Measurements made with VTVM of 10 megohms or
greater input impedance.
NOTE: Measurements of voltage at collector Q208
made with 22 kilohm isolation resistor at
tip of VTVM probe.
Resistance Measurements
With the ac line cord disconnected from the ac source
and the POWER ON-OFF Switch in the OFF position, the
following ohmmeter measurements may be made.
1. Transformers may be checked for continuity of
each winding.
2. To test transistors, diodes or the LED, see Active
Component Checking.
120V, 50160 Hz (SR107) or 230V,
(SR107-2E).
FIGURE
TRANSISTOR LEAD CODES
8.
at collector of
%20% from
0
on the
Page 15

FIGURE
9.
AMPLIFIER CIRCUIT BOARD
PARTS LOCATION
2236-31680-4
FIGURE
10.
EQUALIZER CIRCUIT BOARD
PARTS LOCATION
Page 16

IgO
LX)/w
0
WATTS
VAL
HZ
WHT
-
--
POWER
5
I
L
KCD
ICO
IW
X3
VDC
I
2
RED
h
GflN
rf7
FIGURE
11.
--
SR107.2E POWER SUPPLY
-.
SR107 AUDIO EQUALIZER CIRCUIT DIAGRAM
Page 17

AMPLIFIER
BOARD
(A\)
NOTES
:
I,
SPECIFIED. ALL RESISTORS l/4 WATT,
10%
UNLESS OTHERWISE
EQUALIZER
BOARD
I
(~ai
rt/
CHASSIS GROUND
0
4.
VOLTAGE MEASUREMENTS
PANEL CONTROLS AT
AND
MENTS TO
LINE
A.C. VOLTAGES MEASURED WlTH I VOLT,
THROUGH
D.C.
5.
f
TIP OF PROBE.
REAR
-
I20
VOLTAGES
TAKEN
D.C.
VOLTAGE
PANEL
GAIN
BE
TAKEN USING A
V.A.C.,
60
600a
WlTH
LINE OUTPUT
M~ASURED
22
1-1
TO
BE
CENTER
CONTROL AT FULL
Hz. ALL VOLTAGES SHOWN
KOHM
ROTATION EXCEPT
10
WITH
ISOLATION RESISTOR
.$.
CIRCUIT
GROUND
MADE
MEGOHM VTVM. A.C.
WADW
ZERO
A.C
VOLTAGE
WlTH
ALL FRONT
CCW
RDTATION. ALL
l
KHz
WlTH
SIGNAL
BOARD
I
ARE
INPUT
600n.
APPLIED.
KHz
AT
CONTROL
*20Z
AT -15,
MEASURE-
FIGURE
11.
SR107 AUDIO EQUALIZER CIRCUIT DIAGRAM
Page 18

Page 19

The Audio Equalizer shall be a rack-mounted 120-volt,
50/60 Hz line-operated all silicon transistor active audio
frequency equalizer for use as a component of a sound
system to adjust the overall system frequency response.
The Equalizer shall contain a total of ten octave band,
minimum phase, combining type filters extending over
the frequency range of 31 Hz to 16 kHz. Each shall be
adjustable for approximately 15 dB of boost or attenuation. The equalized output shall be adjustable over a
215 dB range.
The Equalizer shall include a switch to disconnect the
equalization circuitry and permit operation in a bypass
mode. Gain in either the equalizer in or the bypass mode
shall be adjustable from unity to approximately 20 dB
through the use of a rear-panel control.
The Equalizer shall be equipped with a peak-responding overload indicator to provide a visual indication
approximately 3 dB before output clipping occurs in
either equalizer in or bypass operation. The overload
(LED)
indicator shall be a light-emitting diode
mounted
in the front panel.
*
All specifications apply to Model SR107-2E except for the
operating voltage range which is 105-125 or 210-250 volts,
50/60
Hz
ac for
this
model.
The Equalizer shall have a high-impedance balanced
input suitable for operation from a line level source of 10
kilohms or less. Two parallel-wired
LlNE INPUT connectors, a three-pin female professional audio type and a
three-conductor
%-inch phone jack, shall be provided.
Outputs shall include: a three-pin male profesional audio
OUTPUT connector switchable by means of a
MIC/LINE
slide switch to line level or microphone level output, a
LlNE OUTPUT three-conductor %-inch phone jack, and
an AUX OUTPUT two conductor
%-inch phone jack. The
microphone and line level outputs shall be balanced and
low impedance. The auxiliary output shall be unbalanced
and low impedance.
A
POWER ON-OFF Switch and power-on indicator lamp
shall be provided on the front panel.
The Equalizer shall be enclosed in a metal housing de-
signed for rack-mounting in a standard 19-inch (483
mm)
audio equipment rack, or mounting in an accessory
vinyl-covered wood portable case. Overall dimensions
shall be
in width, and 218 mm
44.4.mm (1-3/4 inch) in height, 483 mm
(8-9116 inch) in depth. The weight
shall be no more than 3.5 kg
(7
Ib, 12 oz).
(19
inch)
Any Equalizer not meeting all of the above specifications shall be deemed unacceptable under this specification. The Audio Equalizer shall be a Shure Model
SR107.
GUARANTEE
This Shure product is guaranteed in normal use to be
free from electrical and mechanical defects for a period
of one year from date of purchase. Please retain proof
of purchase date. This guarantee includes all parts and
labor. This guarantee is in lieu of any and all other
guarantees or warranties, express or implied, and there
shall be no recovery for any consequential or incidental
damages.
SHIPPING INSTRUCTIONS
Carefully repack the unit and return it prepaid to:
Shure Brothers Incorporated
Attention: Service Department
1501 West Shure Drive
Arlington Heights, Illinois 60004
If outside the United States, return the unit to your dealer
or Authorized Shure Service Center for repair. The unit
will be returned to you prepaid.
Page 20

 Loading...