

Page 1

Page 2

Page 3

new drawing.
Sound Isolating™ Earphones
Shure Sound Isolating™ Earphones, built
with balanced armature speakers, deliver
a detailed soundstage free from outside
noise. The powerful and stylish Shure SE
earphones come with a detachable cable,
adapters, a durable carrying case, and
interchangeable Sound Isolating™ sleeves
for a comfortable and personalized fit.
©2010 Shure Incorporated
27A13835 (Rev. 1)
Printed in China
Page 4
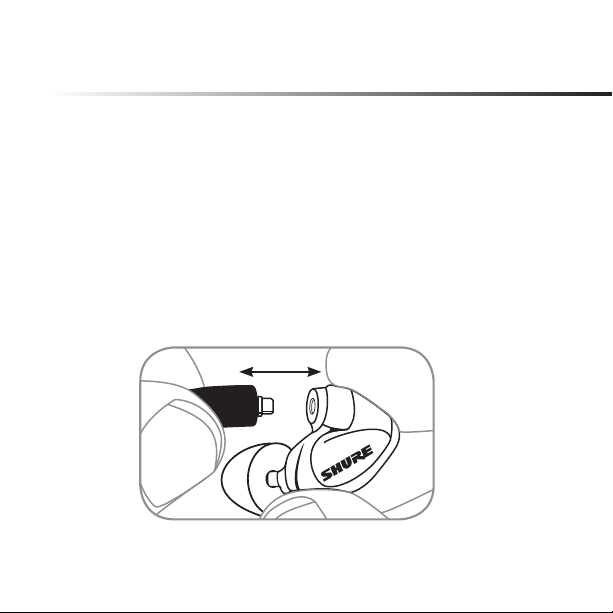
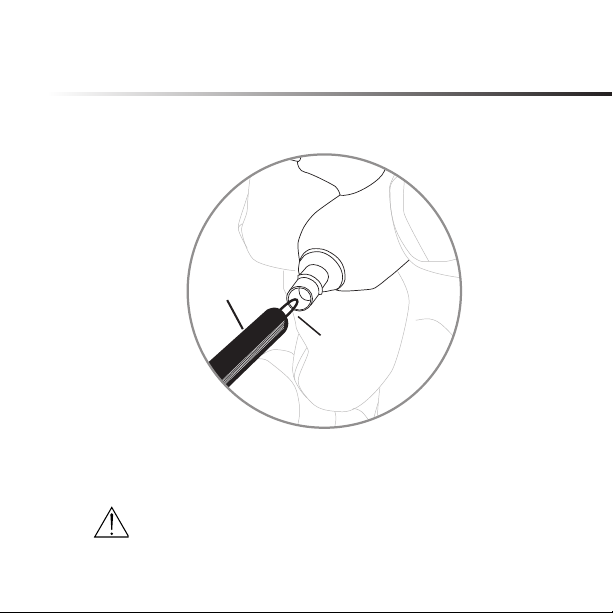
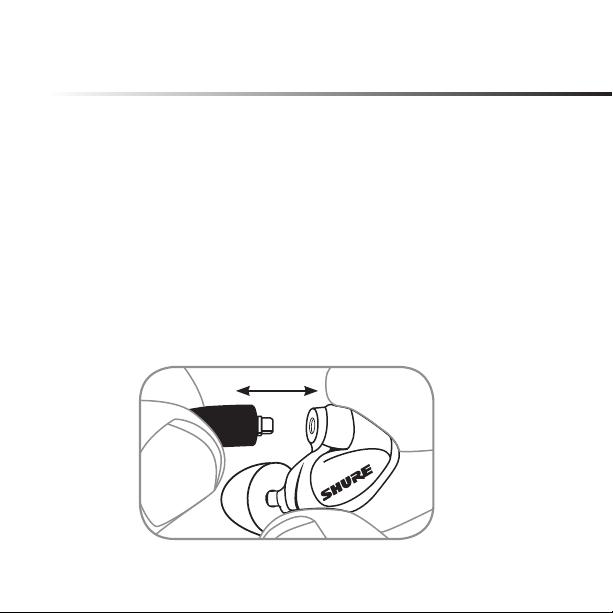
Detachable Cable
You may need to detach the cable from the earphones to attach optional components or to
replace the cable if it becomes damaged. The cable connection is not designed for everyday use, and to prevent accidental separation, the connector has a snug fit. Take special
care to prevent damage to the earphone and connector.
• Do not use pliers or other tools.
• Grasp the connector and the earphone as close as possible to where they join.
• Pull straight apart—do not twist. Cable is a snap fit, not threaded.
• Do not pull on the cable or put any pressure on the earphone nozzle.
• Listen for a click when connecting.
• When reattaching the cable, match the “L” and “R” markings. For clear cables and
earphones, match the color dots (Red = Right, Blue = Left).
Note: If you pull at an angle, the connector will not detach.
Audible click when
properly seated
Page 5
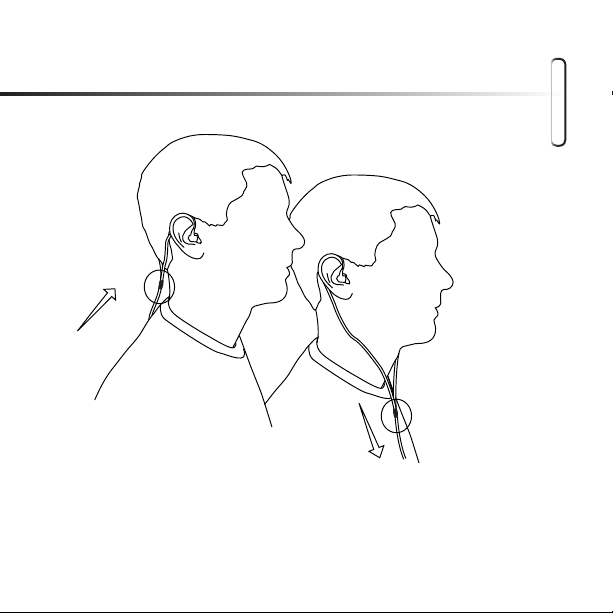
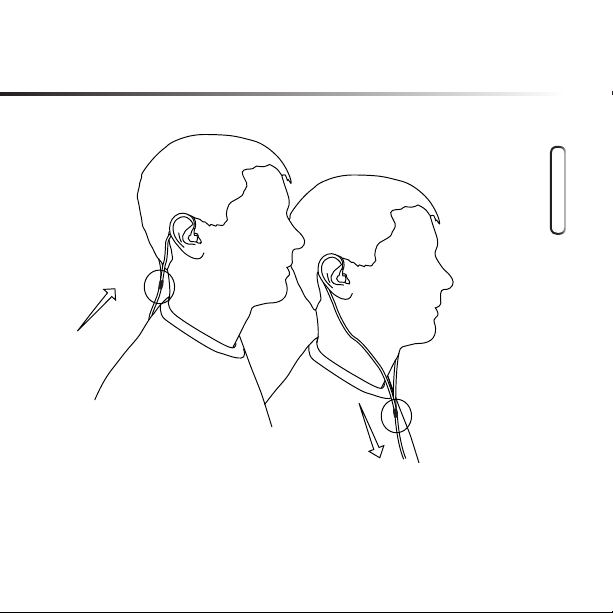
Wearing the Earphones
The following are some suggested ways of wearing the earphones.
english
Wearing the cable over the ear
and securing it behind the head
can help keep the earphones in
place during physical activity
Tighten the cable and take up
slack by raising the cable cinch.
Page 6

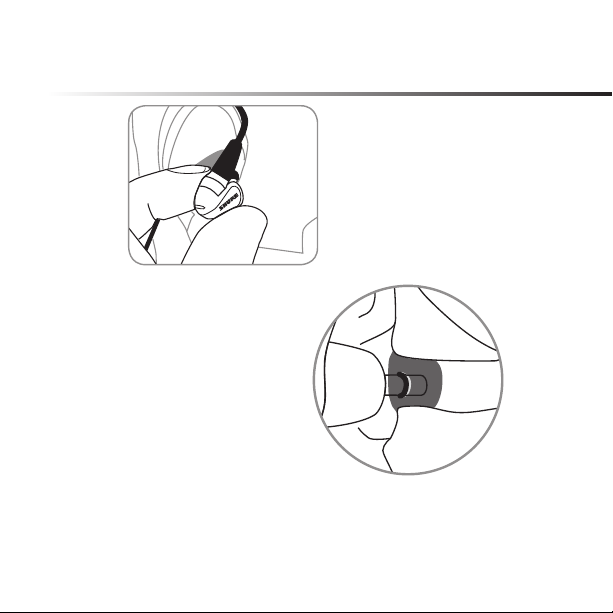
Inserting the Earphones
Insert the earphones so they form
a tight seal. The fit of the earphone
can greatly affect sound quality.
Important: If there seems to
be a lack of low frequency
response (bass), this means
that the earphone sleeve
is not forming a tight seal.
Gently push the earphone
deeper into the ear canal or
try a different sleeve.
Warning:Do not push the earphone sleeve beyond the ear canal opening.
Page 7

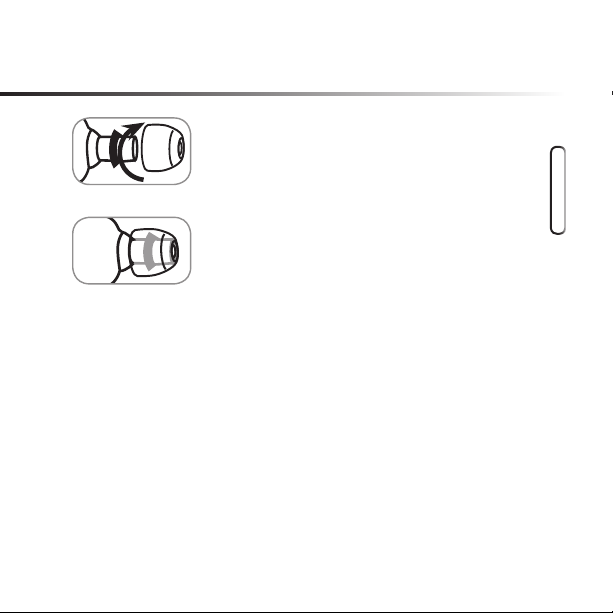
Changing Sleeves
Twist and pull to remove the sleeve from the nozzle.
Slide on a new sleeve so that it completely covers
the barb and the nozzle.
Caution: If the barb or any of the nozzle is exposed, the sleeve is not properly installed.
Replace sleeves if they do not tightly grip the nozzle.
To ensure proper fit and performance, use only sleeves supplied by Shure (unless using custom molded sleeves).
english
Page 8
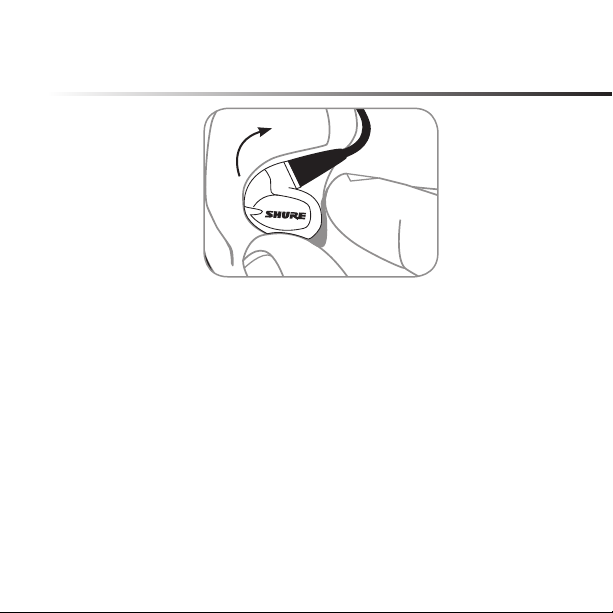
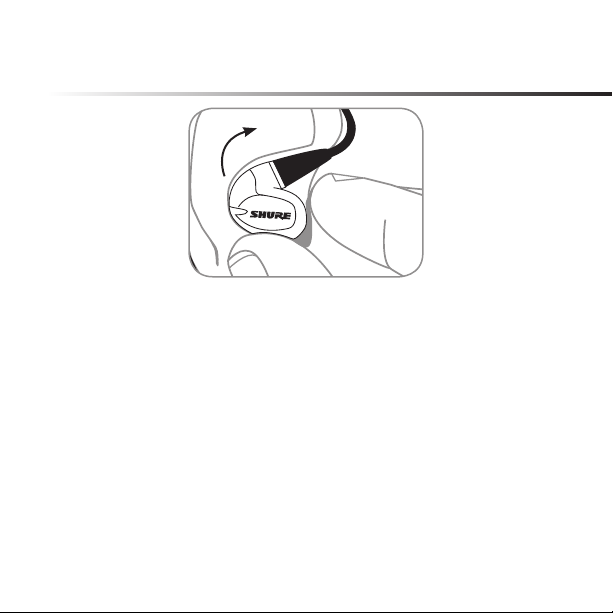
Removing the Earphones
Grasp the body of earphone and gently twist to remove.
Note: Do not pull on cable to remove earphone.
Page 9
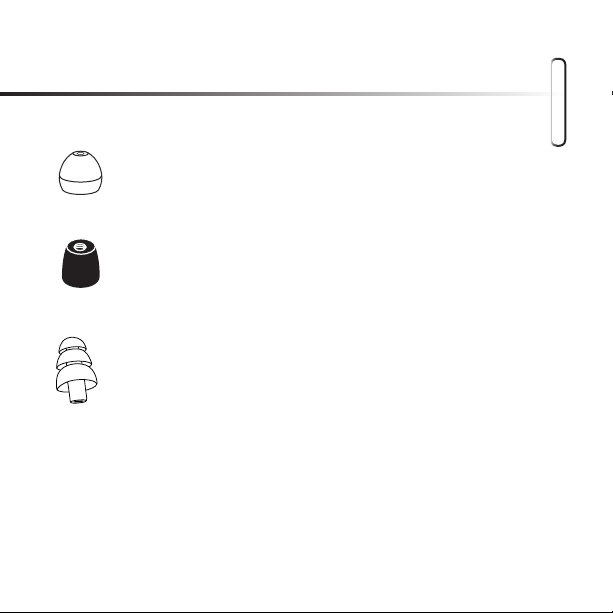
Choosing a Sleeve
Select an earphone sleeve that provides the best fit and sound isolation. It
should be easy to insert, fit comfortably, and easy to remove.
Soft Flex Sleeves: In small, medium, and large sizes. Made from pliable rubber.
Soft Foam Sleeves: Compress the foam sleeve between your fingers
and insert into the ear canal. Hold in place for about ten seconds while
the foam expands.
Triple-Flange Sleeves: If desired, use scissors to trim the stem
on the sleeve.
english
Page 10
Cleaning the Earphone Nozzle
If you notice a change in sound quality, remove the sleeve and check the nozzle
of your earphone. If nozzle is blocked, clear obstruction by
using wire loop end of cleaning tool.
Cleaning
Tool
Wire Loop
Caution: When cleaning, do not force any object through the earphone nozzle!
This will damage the earphone sound filter.
Warning: The cleaning tool is only to be used to clean the earphones.
Any other use, such as using the tool to clean ears, could result in injury.
Page 11

Accessories
• Earphone Sleeves
• Replacement Cables
• Carrying Cases
For more information visit www.shure.com
• Music Phone Accessory Cables
• Volume Control
• Adapters
english
Page 12

Maintenance
• Careful maintenance ensures a tight seal between the sleeve and nozzle, improving
sound quality and product safety.
• Keep the earphones and sleeves as clean and dry as possible.
• To clean sleeves, remove them from earphones, gently rinse in warm water and air
dry. Foam sleeves require a longer drying time. Inspect for damage and replace if
necessary. Ear sleeves must be completely dry before reusing.
• Wipe the earphones and sleeves with mild antiseptic to avoid infections. Do not use
alcohol-based disinfectants.
• Do not expose earphones to extreme temperatures.
• Replace the sleeves if they do not fit properly.
• Do not attempt to modify this product. Doing so will void the warranty and could result in
personal injury and/or product failure.
• Note: The cable connectors to the earphones may collect debris or other deposits that
can affect audio quality. If this happens, disconnect the cables and clean them using a
dry cotton swab.
WARNING: This product contains a chemical known to the State of California to cause
cancer and birth defects or other reproductive harm.
Page 13
Technical Specifications
SE535 SE425
Transducer type Triple balanced-
armature drivers
Dual balanced-armature
drivers
Sensitivity (at 1khz) 119 dB SPL/mW 109 dB SPL/mW
Impedance (at 1kHz) 36 W 22 W
Frequency Range 18 Hz - 19 kHz 20Hz - 19kHz
Input connector 3.5mm (1/8 in.) gold-plated stereo plug
Net weight 30 g (1 oz.) 29.5 g (1.04 oz)
Operational temperature -18° C to 57° C (0° F to 135° F)
Storage temperature -29° C to 74° C (-20° F to 165° F)
english
Page 14
CERTIFICATION
Eligible to bear CE Marking. Conforms to EMC Directive 2004/108/EC. Meets applicable
tests and performance criteria in European Standard EN55103 (1996) parts 1 and 2, for
residential (E1) and light industrial (E2) environments. The Declaration of Conformity can
be obtained from the address below.
Shure Europe GmbH
Authorized European representative:
Shure Europe GmbH
Headquarters Europe, Middle East & Africa
Department: EMEA Approval
Wannenacker Str. 28
D-74078 Heilbronn, Germany
Phone: +49 7131 72 14 0
Fax: +49 7131 72 14 14
Email: EMEAsupport@shure.de
Page 15
new drawing.
Écouteurs Sound Isolating™
Les écouteurs Sound Isolating™ de
Shure, munis de haut-parleurs à armature
équilibrée, offrent un espace sonore précis sans bruit de fond extérieur. Les écouteurs SE de Shure, puissants et élégants,
sont livrés avec un câble détachable, des
adaptateurs, un solide étui de transport
et avec des inserts Sound Isolating™ interchangeables permettant un ajustement
confortable et personnalisé.
Page 16
Câble détachable
Il peut s’avérer nécessaire de détacher le câble des écouteurs afin de fixer des composants
en option ou de remplacer le câble s’il est endommagé. La connexion du câble n’est pas
conçue pour un usage fréquent et, afin d’empêcher la séparation par mégarde, le connecteur possède un ajustement serré. Faire très attention à ne pas endommager l’écouteur
et le connecteur.
• Ne pas utiliser de pinces ou d’autres outils.
• Saisir le connecteur et l’écouteur aussi près que possible de leur jonction.
• Séparer en tirant tout droit—ne pas tourner. Le câble est encliquetable, pas fileté.
• Ne pas tirer sur le câble ni exercer de pression sur l’embout de l’écouteur.
• Un déclic doit se faire entendre lors de la connexion.
• Pour rebrancher le câble, faire correspondre les marquages « L » et « R ». Pour les
câbles et les écouteurs transparents, faire correspondre les points de couleur (rouge =
droit, bleu = gauche).
Remarque : Si on tire en biais, le connecteur ne se détachera pas.
Déclic audible une fois
correctement en place
Page 17
Port des écouteurs
Voici des suggestions pour le port des écouteurs.
français
Le port du câble autour de
l’oreille et son serrage derrière
la tête contribue à maintenir les
écouteurs en place lors d’activité
physique.
Autour de l’oreille vers l’arrière
Tendre le câble et supprimer
le jeu en remontant la fixation
du câble.
Page 18
Mise en place des écouteurs
Insérer les écouteurs pour obtenir
un joint étanche. La manière dont
on positionne l’écouteur peut grandement influencer la qualité sonore.
Important : Si la réponse en
basse fréquence (graves)
semble faible, cela veut dire
que l’insert de l’écouteur ne
forme pas un joint étanche.
Enfoncer doucement
l’écouteur plus profondément dans le conduit auditif
ou essayer un insert différent.
Avertissement :Ne pas pousser l’insert de l’écouteur au-delà de l’entrée
du conduit auditif.
Page 19
Changement des inserts
Tourner et tirer l’insert afin de l’enlever de l’embout.
Enfiler un insert neuf pour recouvrir complètement la
butée et l’embout.
Attention : Si la butée ou une quelconque partie de
l’embout est visible, l’insert n’a pas été correctement
installé. Remplacer les inserts s’ils ne maintiennent
pas fermement l’embout.
Pour garantir une parfaite adaptation et des performances optimales, n’utiliser que
les inserts fournis par Shure (sauf en cas d’utilisation d’inserts moulés sur mesure)
français
Page 20
Retrait des écouteurs
Saisir le corps de l’écouteur et le tourner doucement
pour le retirer.
Remarque : Ne pas tirer sur le câble pour retirer
l’écouteur.
Page 21

Choix d’un insert
Sélectionner l’insert d’écouteur qui s’ajuste le mieux et offre la meilleure isolation acoustique. Il doit s’introduire facilement, s’ajuster confortablement et se retirer facilement.
Inserts flexibles souples : Disponibles en formats petit, moyen et
grand. Fabriqués en caoutchouc souple.
Inserts en mousse : Comprimer l’insert en mousse entre les doigts et
l’insérer dans le conduit auditif. Maintenir en place pendant environ
dix secondes pendant que la mousse se dilate.
Inserts à triple ailette : Si on le souhaite, utiliser des ciseaux pour
couper l’extrémité de l’insert.
français
Page 22

Nettoyage de l’embout d’écouteur
Si la qualité du son change, enlever l’insert et vérifier l’embout de l’écouteur. Si
l’embout est obstrué, le déboucher à l’aide de la boucle de fil métallique de l’outil
de nettoyage.
Boucle de nettoyage
anti-cérumen
Embout
Attention : Lors du nettoyage, ne pas faire entrer de force quelque objet que
ce soit dans l’embout d’écouteur ! Cela endommagerait le filtre acoustique de
l’écouteur.
Avertissement : L’outil de nettoyage doit être utilisé uniquement pour nettoyer
les écouteurs. Toute autre utilisation, comme par exemple l’utilisation de l’outil
pour nettoyer les oreilles, risque de causer des blessures.
Page 23

Accessoires
• Inserts d’écouteurs
• Câbles de rechange
• Étuis de transport
• Câbles adaptateur pour téléphone -
lecteur MP3
Pour de plus amples renseignements, visiter www.shure.com
• Commande du volume
• Adaptateurs
français
Page 24

Maintenance
Un entretien scrupuleux assure une bonne étanchéité entre l’insert et l’embout, ce qui améliore la qualité du son et la sécurité du produit.
• Garder les écouteurs et les inserts aussi propres et secs que possible.
• Pour nettoyer les inserts, les retirer des écouteurs, les rincer doucement à l’eau tiède et
les laisser sécher à l’air. Les inserts en mousse nécessitent un temps de séchage plus
long. Vérifier s’ils ne sont pas endommagés et les remplacer si nécessaire. Les inserts
d’écouteurs doivent être complètement secs avant d’être réutilisés.
• Essuyer les écouteurs et les inserts avec un antiseptique doux pour éviter les infections.
Ne pas utiliser de désinfectants à base d’alcool.
• Ne pas exposer les écouteurs à des températures extrêmes.
• Remplacer les inserts s’ils ne s’adaptent pas correctement.
• Ne pas essayer de modifier ce produit. Une telle opération annule la garantie et risque
de causer des blessures et/ou la défaillance du produit.
Remarque : Des débris ou autres dépôts peuvent s’accumuler dans les connecteurs des
câbles aux écouteurs, réduisant ainsi la qualité sonore. Dans ce cas, débrancher les câbles
et les nettoyer avec une tige de coton sèche.
Page 25

Caractéristiques Techniques
SE535 SE425
Type de transducteur Haut-parleurs triples
à palette équilibrée
Sensibilité (à 1 kHz) 119 dB SPL/mW 109 dB SPL/mW
Impédance (à 1 kHz) 36 W 22 W
Gamme de fréquences 18 Hz - 19 kHz 20Hz - 19kHz
Connecteur d’entrée Fiche stéréo de 3,5 mm (1/8 po), plaqué or
Poids net 30 g (1 oz.) 30 g (1 oz.)
Température de
-18 à 57 °C (0 à 135 °F)
fonctionnement
Température de
-29 à 74 °C (-20 à 165 °F)
stockage
Haut-parleurs
doubles à palette
équilibrée
français
Page 26

Homologation
Autorisé à porter la marque CE. Conforme à la directive CEM 2004/108/CE. Conforme aux
critères applicables de test et de performances de la norme européenne EN55103 (1996) parties 1 et 2 pour les environnements résidentiels (E1) et d’industrie légère (E2). La déclaration
de conformité peut être obtenue de l’adresse ci-dessous.
Shure Europe GmbH
Authorized European representative:
Shure Europe GmbH
Headquarters Europe, Middle East & Africa
Department: EMEA Approval
Wannenacker Str. 28
D-74078 Heilbronn, Germany
Phone: +49 7131 72 14 0
Fax: +49 7131 72 14 14
Email: EMEAsupport@shure.de
Page 27

new drawing.
Sound Isolating™ Ohrhörer
Sound Isolating™ Ohrhörer von
Shure mit Lautsprechern, die ein vierpoliges Ankersystem aufweisen,
bieten ein detailliertes Hörumfeld, das
keine Außengeräusche aufweist. Im
Lieferumfang der leistungsstarken und
modischen Shure SE-Ohrhörer sind ein
abnehmbares Kabel, Adapter, ein robustes Aufbewahrungsetui sowie austauschbare Sound Isolating™ Ohrhörermuffen
für Tragekomfort durch individuelle
Passform enthalten.
Page 28

Abnehmbares Kabel
Evtl. muss das Kabel von den Ohrhörern abgenommen werden, um optionale
Komponenten anzubringen oder um es zu ersetzen, falls es beschädigt wurde. Die
Kabelverbindung ist nicht für den täglichen Gebrauch konzipiert und der Anschluss weist
Passsitz auf, um versehentliches Lösen der Verbindung zu verhindern. Sorgfältig darauf
achten, eine Beschädigung des Ohrhörers und des Anschlusses zu verhindern.
• Keine Zange oder andere Werkzeuge verwenden.
• Den Anschluss und den Ohrhörer möglichst nahe an der Verbindungsstelle ergreifen.
• Gerade auseinander ziehen — nicht verdrehen. Das Kabel weist einen Rastsitz auf, es
hat kein Gewinde.
• Nicht am Kabel ziehen oder irgendwelchen Druck auf die Ohrhörer-Schallöffnung
ausüben.
• Beim Anschließen auf ein Klickgeräusch achten.
• Beim Wiederanbringen des Kabels auf die Markierungen „L“ und „R“ achten. Bei
durchsichtigen Kabeln und Ohrhörern die Farbmarkierungen zuordnen (rot = rechts,
blau = links).
Hinweis: Wenn angewinkelt gezogen wird, löst sich der Anschluss nicht.
Klickgeräusch hörbar,
wenn einwandfreier
Sitz erzielt wurde
Page 29

Tragen der Ohrhörer
Nachfolgend sind eine Trageweisen der Ohrhörer dargestellt.
deutsch
Das Kabel straffen und den
Durchhang beseitigen, indem das
Kabelröhrchen hochgeschoben wird.
Über dem Ohr nach hinten
Page 30

Einlegen der Ohrhörer
Die Ohrhörer derart einlegen, dass eine
dichte Versiegelung bewirkt wird. Der
Sitz der Ohrhörer kann sich erheblich
auf die Audioqualität auswirken.
Wichtig: Falls der
Bassfrequenzgang mangelhaft erscheint, bedeutet
dies, dass durch die
Ohrhörermuffe keine dichte
Versiegelung bewirkt wird.
Den Ohrhörer behutsam
tiefer in den Gehörgang
drücken oder eine andere
Muffe ausprobieren.
Achtung:Die Ohrhörermuffe nicht weiter als die Gehörgangöffnung hinein drücken.
Page 31

Auswechseln der Muffen
Die Muffe drehen und an ihr ziehen, um sie von
der Schallöffnung zu entfernen. Eine neue Muffe
darüber schieben, so dass sie den Widerhaken und
die Schallöffnung völlig abdeckt.
Vorsicht: Liegt der Widerhaken oder irgendein Teil
der Schallöffnung frei, ist die Muffe nicht richtig angebracht. Die Muffen ersetzen, falls sie nicht fest auf
der Schallöffnung sitzen.
Nur die von Shure gelieferten Muffen verwenden, um einwandfreien Sitz und optimale Leistung sicherzustellen, (es sei denn, individuell geformte Ohrpassstücke
werden verwendet).
deutsch
Page 32

Entfernen der Ohrhörer
Das Gehäuse des Ohrhörers ergreifen und zum
Entfernen behutsam drehen.
Hinweis: Nicht am Kabel ziehen, um die Ohrhörer zu
entfernen.
Page 33

Auswahl einer Muffe
Eine Ohrhörermuffe auswählen, die den besten Sitz und die optimale Schallisolierung
bietet. Sie sollte sich leicht einführen lassen, bequem sitzen und einfach zu entnehmen sein.
Weiche, flexible Muffen: In kleinen, mittleren und großen
Ausführungen. Aus formbarem Silikongummi hergestellt.
Weiche Schaumstoffmuffen: Die Schaumstoffmuffen zwischen den
Fingern zusammen drücken und in den Gehörgang einführen.
Ungefähr zehn Sekunden lang festhalten, während sich der
Schaumstoff ausdehnt.
Muffen mit Dreifachflansch: Auf Wunsch den Schaft der Muffe
mit einer Schere auf die gewünschte Länge zuschneiden.
deutsch
Page 34

Reinigen der Ohrhörer-Schallöffnung
Falls eine Änderung der Audioqualität wahrnehmbar ist, die Muffe entfernen und die
Schallöffnung Ihres Ohrhörers untersuchen. Falls die Schallöffnung blockiert ist, die
Verstopfung mittels des Drahtschleifenendes des Reinigungswerkzeugs beseitigen.
Ohrenschmalz-
Reinigungsschlaufe
Schallöffnung
Vorsicht: Beim Reinigen nichts mit Gewalt durch die Ohrhörer-Schallöffnung
drücken! Sonst würde dadurch der Tonfilter des Ohrhörers beschädigt.
Achtung: Das Reinigungswerkzeug dient nur zum Reinigen der Ohrhörer.
Jegliche andere Verwendung, wie z. B. zum Säubern der Ohren, könnte zu
Verletzungen führen.
Page 35

Zubehör
• Ohrhörermuffen
• Ersatzkabel
• Aufbewahrungsetuis
• Musik-/Telefonzubehörkabel
Weitere Informationen sind im Internet unter www.shure.com zu finden.
• Lautstärkeregler
• Adapter
deutsch
Page 36

WARTUNG
Sorgfältige Pflege gewährleistet eine gute Versiegelung zwischen der Muffe und der
Schallöffnung, wodurch Audioqualität und Produktsicherheit verbessert werden.
• Die Ohrhörer und Muffen möglichst sauber und trocken halten.
• Zum Reinigen der Muffen diese von den Ohrhörern abnehmen, behutsam in warmem
Wasser abspülen und an der Luft trocknen lassen. Schaumstoffmuffen erfordern eine
längere Trocknungszeit. Auf Schäden untersuchen und bei Bedarf ersetzen. Ohrmuffen
müssen völlig trocken sein, bevor sie wieder verwendet werden.
• Die Ohrhörer und die Muffen mit einem milden antiseptischen Mittel abwischen, um
Infektionen zu verhüten. Keine Desinfektionsmittel auf Alkoholbasis verwenden.
• Die Ohrhörer keinen extremen Temperaturen aussetzen.
• Die Muffen ersetzen, falls sie nicht richtig passen.
• Nicht versuchen, dieses Produkt zu modifizieren. Ansonsten wird die Garantie hinfällig
und es könnte zu Verletzungen und/oder zum Produktausfall kommen.
Hinweis: An den Kabelanschlüssen der Ohrhörer können sich Unrat oder andere
Rückstände ansammeln, die die Audioqualität beeinträchtigen können. Falls dies geschieht, die Kabel abnehmen und mit einem trockenen Wattestäbchen reinigen.
Page 37

TECHNISCHE DATEN
SE535 SE425
Übertragertyp Dreifach-Treiber
mit vierpoligem
Ankersystem
Empfindlichkeit
(bei 1 kHz)
119 dB
Schalldruckpegel/mW
Impedanz (bei 1 kHz) 36 W 22 W
Frequenzbereich 18 Hz - 19 kHz 20Hz - 19kHz
Eingang Vergoldeter 3,5-mm-Stereostecker
Nettogewicht 30 g 29.5 g
Betriebstemperatur -18 bis 57 °C
Lagerungstemperatur -29 bis 74 °C
Zweifach-Treiber
mit vierpoligem
Ankersystem
109 dB
Schalldruckpegel/mW
deutsch
Page 38

ZERTIFIZIERUNG
Zur CE-Kennzeichnung berechtigt. Entspricht der Richtlinie zur elektromagnetischen Verträglichkeit 2004/108/EG. Erfüllt die Prüfungs- und Leistungskriterien
der europäischen Norm EN 55103 (1996) Teil 1 und 2 für Wohngebiete (E1) und
Leichtindustriegebiete (E2). Die Konformitätserklärung ist über die unten stehende Adresse erhältlich.
Shure Europe GmbH
Authorized European representative:
Shure Europe GmbH
Headquarters Europe, Middle East & Africa
Department: EMEA Approval
Wannenacker Str. 28
D-74078 Heilbronn, Germany
Phone: +49 7131 72 14 0
Fax: +49 7131 72 14 14
Email: EMEAsupport@shure.de
Page 39

new drawing.
Auricolari Sound Isolating™
Gli auricolari Shure Sound Isolating™,
con diffusori con armatura bilanciata, offrono un suono nitido e privo di rumori di
fondo. Gli auricolari Shure SE, eleganti
e potenti, sono dotati di cavo staccabile,
adattatori, custodia da trasporto resistente
ed inserti Sound Isolating™ intercambiabili per consentire un adattamento confortevole e personalizzato.
Page 40

Cavo staccabile
Per collegare componenti opzionali o per sostituire il cavo stesso, se danneggiato, può
essere necessario scollegare il cavo dagli auricolari. Il collegamento del cavo non va fatto
ogni giorno; per evitare un distacco accidentale, il connettore è dotato di blocco. Prestate
una particolare attenzione a non danneggiare auricolare e connettore.
• Non usate pinze nè altri attrezzi.
• Afferrate il connettore e l’auricolare avvicinandoli il più possibile per collegarli.
• Per scollegarli, tirateli mantenendoli diritti, senza ruotarli. Il cavo si fissa a scatto, non
va avvitato.
• Non tirate il cavo nè premete sull’ugello dell’auricolare.
• Effettuando il collegamento, sentirete uno scatto.
• Quando ricollegate il cavo, fate corrispondere le scritte “L” (sinistro) ed “R” (destro). Nel
caso di cavi ed auricolari trasparenti, fate corrispondere i punti colorati (rosso = destro,
blu = sinistro).
Nota: tirando il connettore, mantenendolo però angolato, questo non si scollega.
Il corretto
posizionamento è
segnalato da uno scatto.
Page 41

Posizionamento degli auricolari
Di seguito, alcuni suggerimenti su come indossare gli auricolari.
italiano
Per mantenere gli auricolari in posizione
durante l’attività fisica, indossate il cavo
sopra l’orecchio e fissatelo dietro la nuca.
Sopra l’orecchio con il cavetto dietro
Stringete il cavo e riducete il gioco
dei due cavetti tirando il fermo verso
l’alto.
Page 42

Inserimento degli auricolari
Inserite gli auricolari in modo da creare
una tenuta acustica. Il posizionamento
dell’auricolare può influire in modo significativo sulla qualità del suono.
Importante: se avete
l’impressione che la risposta
alle basse frequenze (toni
bassi) sia scadente, la tenuta dell’inserto dell’auricolare
non è corretta. Con
delicatezza, inserite più a
fondo l’auricolare nel canale
uditivo o provate un diverso
inserto.
Avvertenza:non spingete l’inserto dell’auricolare oltre l’apertura del canale uditivo.
Page 43

Cambio degli inserti
Ruotate e tirate l’inserto per rimuoverlo dall’ugello.
Applicate un nuovo inserto facendolo scorrere in
modo che ricopra completamente il corpo e l’ugello.
Attenzione: se il corpo o una qualsiasi parte
dell’ugello è visibile, l’inserto non è stato installato
correttamente. Sostituite gli inserti se non aderiscono saldamente all’ugello.
Per ottenere posizionamento e prestazioni corretti, usate esclusivamente inserti forniti da Shure (a meno che non usiate inserti/protesi sagomate su misura).
italiano
Page 44

Rimozione degli auricolari
Afferrate il corpo dell’auricolare e ruotatelo delicatament
per rimuoverlo.
Nota: non tirate il cavo per rimuovere gli auricolari.
Page 45

Selezione di un inserto
Selezionate l’inserto dell’auricolare che fornisce il migliore posizionamento ed isolamento acustico. L’inserto deve essere agevole da inserire, comodo da indossare e
facile da togliere.
Inserti flessibili morbidi Misura piccola, media e grande. In gomma
flessibile.
Inserti in schiuma poliuretanica morbida Prima di inserire l’inserto in
schiuma poliuretanica nel canale uditivo, comprimetelo tra le dita.
Quindi, inserite l’auricolare tenendolo fermo per circa 10 secondi
mentre la schiuma si espande.
Inserti tripli Se lo desiderate, rifilate accuratamente la punta
dell’inserto con un paio di forbici.
italiano
Page 46

Pulizia dell’ugello dell’auricolare
In presenza di un deterioramento della qualità del suono, rimuovete l’inserto e controllate l’ugello dell’auricolare. Se è ostruito, liberatelo servendovi dell’estremità in fil
di ferro dello strumento per l’asportazione del cerume.
Strumento per
l'asportazione del
cerume
Apertura di
emissione del
suono
Attenzione: Durante le operazioni di pulizia, non forzate alcun oggetto attraverso
l’ugello dell’auricolare per evitare di danneggiare il filtro audio dell’auricolare
stesso.
Avvertenza: lo strumento deve essere utilizzato soltanto per la pulizia degli auricolari. Qualsiasi altro impiego, ad es. la pulizia delle orecchie, può provocare
un infortunio.
Page 47

Accessori
• Inserti per auricolari
• Cavi di ricambio
• Custodie da trasporto
• Cavi accessori per Music Phone
Per ulteriori informazioni, visitate il sito www.shure.com
• Controllo del volume
• Adattatori
italiano
Page 48

Manutenzione
L’accurata manutenzione garantisce la tenuta ottimale tra inserto ed apertura di emissione
del suono, migliorando la qualità del suono e la sicurezza del prodotto.
• Mantenete auricolari ed inserti il più possibile puliti ed asciutti.
• Per pulire gli inserti, rimuoveteli dagli auricolari, risciacquateli delicatamente in acqua
tiepida e fateli asciugare all’aria. Gli inserti in schiuma poliuretanica richiedono un tempo
di asciugatura maggiore. Verificate che gli inserti non presentino danni; se necessario,
sostituiteli. Gli inserti devono essere completamente asciutti prima dell’uso.
• Applicate un disinfettante neutro ad auricolari e inserti per prevenire eventuali infezioni.
Non adoperate disinfettanti a base di alcol.
• Non esponete gli auricolari a temperature estreme.
• Sostituite gli inserti se non si inseriscono correttamente.
• Non tentate di modificare il prodotto. Tale operazione annulla la garanzia e può causare
infortuni e/o il guasto del prodotto stesso.
Nota: sui connettori dei cavi collegati agli auricolari si possono accumulare impurità o altri
depositi in grado di compromettere la qualità dell’audio. In tal caso, scollegate i cavi e puliteli con un bastoncino cotonato asciutto.
Page 49

Dati Tecnici
SE535 SE425
Tipo di trasduttore Triple balanced-
armature drivers
Sensibilità (ad 1 kHz) SPL di 119 dB/mW SPL di 109 dB/mW
Impedenza (ad 1 kHz) 36 W 22 W
Gamma di frequenze 18 Hz - 19 kHz 20Hz - 19kHz
Connettore d’ingresso Mini jack stereo da 3,5 mm placcato in oro
Peso netto 30 g (1 oncia) 29.5 g (1,04 oncia)
Temperatura di
da -18 a 57 °C (da 0 a 135 °F)
funzionamento
Temperatura a
da -29 a 74 °C (da -20 a 165 °F)
magazzino
Driver con armatura
bilanciata doppia
italiano
Page 50

Omologazioni
Contrassegnabile con il marchio CE. Conforme alla direttiva sulla compatibilità
elettromagnetica 2004/108/CE. Soddisfa i criteri di prestazione e le verifiche pertinenti
specificati nella norma europea EN55103 (1996) parti 1 e 2 relativa ad ambienti domestici (E1) e industriali leggeri (E2). La dichiarazione di conformità può essere ottenuta
dall’indirizzo riportato di seguito.
Shure Europe GmbH
Authorized European representative:
Shure Europe GmbH
Headquarters Europe, Middle East & Africa
Department: EMEA Approval
Wannenacker Str. 28
D-74078 Heilbronn, Germany
Phone: +49 7131 72 14 0
Fax: +49 7131 72 14 14
Email: EMEAsupport@shure.de
Page 51

Auriculares aislantes de sonido
Sound Isolating™
Los auriculares aislantes de sonido
Sound Isolating™ de Shure, con estructura balanceada, entregan un sonido
detallado libre del ruido externo. Los
poderosos y elegantes auriculares SE de
Shure vienen con cable desconectable,
adaptadores, un estuche de transporte
duradero y mangas Sound Isolating™
intercambiables para una colocación cómoda y personalizada.
Page 52

Cable desconectable
Puede ser necesario desconectar el cable de los auriculares para conectar componentes
opcionales o para cambiar el cable si éste se daña. La conexión del cable no está diseñada para uso diario, y para evitar la separación accidental, el conector tiene un calce ceñido.
Tenga cuidado especial para impedir daño al auricular y al conector.
• No utilice pinzas u otras herramientas.
• Tome el conector y el audífono lo más cerca posible del punto donde se juntan.
• Tire recto para separarlos—no tuerza. El cable es de calce a presión, no roscado.
• No tire del cable ni aplique presión en la punta del auricular.
• Debe escuchar un clic cuando haga la conexión.
• Cuando reconecte el cable, haga coincidir las marcas “L” y “R”. En el caso de cables
y auriculares transparentes, haga coincidir los puntos de color (rojo = derecha, azul =
izquierda).
Nota: Si tira de la conexión en un ángulo, el conector no se desconectará.
Se debe escuchar un
clic cuando se asientan
correctamente
Page 53

Uso de los auriculares
Las siguientes son algunas formas sugeridas de utilizar los auriculares.
espanol
Si se coloca el cable sobre la oreja y
se asegura detrás de la cabeza puede
ayudar a mantener los auriculares en su
lugar durante la actividad física.
Sobre la oreja, hacia atrás
Tense el cable y recoja la holgura
levantando el manguito del cable.
Page 54

Inserción de los auriculares
Inserte los auriculares de manera que
formen un sello entre el auricular y
el oído. El calce del auricular puede
afectar significativamente la calidad
del sonido.
Importante: Si parece haber
una falta de la respuesta a
frecuencias bajas (graves),
quiere decir que la manga
aislante del auricular no
hace un sello con el oído.
Suavemente empuje el
auricular más adentro del
canal auditivo o pruebe una
manga diferente.
Advertencia:No empuje la manga del auricular más allá de la entrada del canal auditivo.
Page 55

Cambio de las mangas
Tuerza y tire para quitar la manga de la punta.
Coloque una nueva manga para que cubra completamente la punta.
Precaución: Si cualquier parte de la punta
queda expuesta, la manga no está bien instalada.
Reemplace las mangas si no sujetan ajustadamente
la punta.
Para asegurar un sello y funcionamiento correctos, use solamente mangas suministradas por Shure (a menos que use mangas moldeadas a la medida).
espanol
Page 56

Retiro de los auriculares
Sujete el cuerpo del auricular y gírelo levemente para
quitarlo.
Nota: No tire del cable para retirar los auriculares.
Page 57

Selección de una manga
Seleccione una manga que provea el mejor calce y aislamiento de sonido. Debe
ser fácil de insertar y quitar, y debe calzar cómodamente.
Mangas flexibles suaves: En tamaños pequeño, mediano y grande.
Hechas de goma flexible.
Mangas de espuma suaves: Comprima la espuma de la manga entre
los dedos e inserte en el canal auditivo. Mantenga en su lugar por
unos diez segundos mientras la espuma se expande.
Mangas de tres pestañas: Si lo desea, use tijeras para recortar
la punta en la manga.
espanol
Page 58

Limpieza de la punta del auricular
Si se observa un cambio en la calidad sonora, quite la manga y revise la punta del
auricular. Si la punta está obstruida, quite la obstrucción usando el extremo con el
bucle de alambre de la herramienta de limpieza.
Alambre para
quitar cera
Punta
Precaución: Durante la limpieza, ¡no fuerce ningún objeto a través de la punta
del auricular! Esto dañará el filtro de sonido del auricular.
Advertencia: La herramienta de limpieza debe usarse únicamente para limpiar
los auriculares. Emplearlo para un fin diferente, como por ejemplo para limpiarse los oídos, podría causarle lesiones.
Page 59

Accesorios
• Mangas para auriculares
• Cables de repuesto
• Estuches de transporte
• Cables de accesorio para teléfono
Para más información, visite www.shure.com
reproductor de música
• Control de volumen
• Adaptadores
espanol
Page 60

Mantenimiento
El mantenimiento cuidadoso asegura que haya un sello hermético entre la manga y la
punta, lo cual mejora la calidad sonora y la seguridad del producto.
• Mantenga los auriculares y mangas lo más limpios y secos posible.
• Para limpiar las mangas, quítelas de los auriculares, lávelas cuidadosamente en
agua tibia y déjelas secar al aire. Las mangas de espuma requieren más tiempo para
secarse. Inspeccione en busca de daños y reemplace si es necesario. Las mangas
para los oídos deberán estar completamente secas antes de usarlas.
• Limpie los auriculares y mangas con un antiséptico suave para evitar las infecciones.
No use desinfectantes a base de alcohol.
• No exponga los auriculares a temperaturas extremas.
• Reemplace las mangas si no se ajustan adecuadamente.
• No intente modificar este producto. El hacerlo anula la garantía y podría causar
lesiones personales y/o la falla del producto.
Nota: Los conectores de cables de los auriculares pueden acumular desechos y otros
depósitos que afectan la calidad sonora. Si esto ocurre, desconecte los cables y límpielos
con un palillo con algodón seco.
Page 61

Especificaciones Tecnicas
SE535 SE425
Tipo de transductor Cápsulas con inducido
Sensibilidad (a 1 kHz)) 119 dB SPL/mW 109 dB SPL/mW
Impedancia (a 1 kHz) 36 W 22 W
Gama de frecuencias 18 Hz - 19 kHz 20Hz - 19kHz
Gama de frecuencias Enchufe estereofónico de 3,5 mm (1/8 pulg),
Peso neto 30 g (1 oz.) 29.5 g (1,04 oz)
Temperatura de
funcionamiento
Temperatura de
almacenamiento
equilibrado triple
contactos chapados en oro
-18°C a 57°C (0°F a 135°F)
-29°C a 74°C (-20°F a 165°F)
Cápsulas con inducido
equilibrado doble
espanol
Page 62

Certificaciones
Califica para llevar la marca CE. Cumple con la directiva de EMC 2004/108/EC. Se
ajusta a los criterios correspondientes de verificación y funcionamiento establecidos en
la norma europea EN55103 (1996), partes 1 y 2, para zonas residenciales (E1) y zonas
de industria ligera (E2). La declaración de conformidad se puede obtener obtener de la
siguiente dirección:
Shure Europe GmbH
Authorized European representative:
Shure Europe GmbH
Headquarters Europe, Middle East & Africa
Department: EMEA Approval
Wannenacker Str. 28
D-74078 Heilbronn, Germany
Phone: +49 7131 72 14 0
Fax: +49 7131 72 14 14
Email: EMEAsupport@shure.de
Page 63

Page 64

SHURE Incorporated http://www.shure.com
United States, Canada, Latin America, Caribbean:
5800 W. Touhy Avenue, Niles, IL 60714-4608, U.S.A.
Phone: 847-600-2000 U.S. Fax: 847-600-1212 Int’l Fax: 847-600-6446
Europe, Middle East, Africa:
Shure Europe GmbH, Phone: 49-7131-72140 Fax: 49-7131-721414
Asia, Pacific:
Shure Asia Limited, Phone: 852-2893-4290 Fax: 852-2893-4055
 Loading...