

Page 1
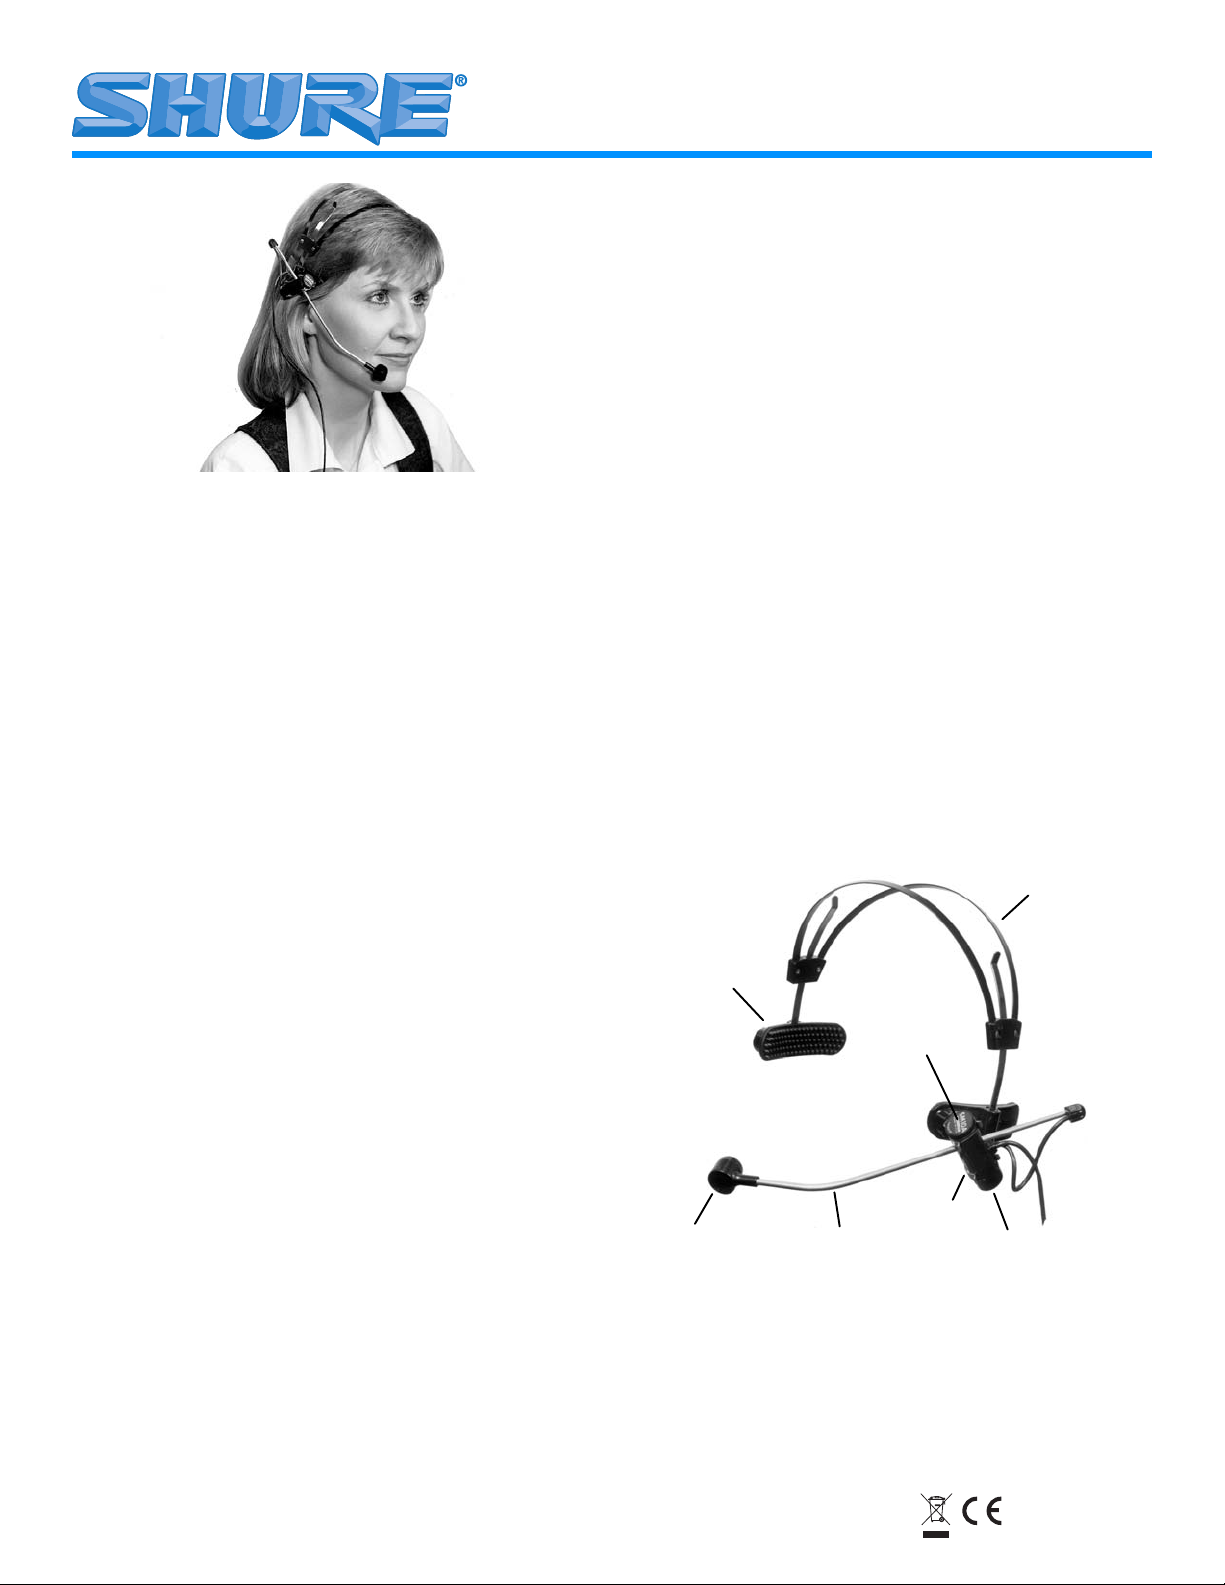
MODEL SM10A
DYNAMIC HEAD-WORN MICROPHONE
The Shure SM10A is a low-impedance, unidirectional dynamic
microphone designed for close-talk head-worn applications such as
remote-site sports broadcasting and corporate intercom systems. It
is also ideal for singing drummers, keyboard artists, and other
performers who need a head-worn vocal microphone with superior
noise rejection and a smooth, natural-sounding frequency response.
The SM10A is very lightweight and is typically mounted on the
supplied steel headband assembly. An adjustable pivot on the
headband assembly allows the microphone boom to be moved 20
in any direction. The boom also slides out so the microphone can be
positioned up to 89 mm (3 1/2 in.) from the pivot housing. A supplied
windscreen reduces wind noise and explosive breath sounds. A belt
clip that fits over the XLR connector and attaches to the user's belt
or waistband provides cable strain relief.
Features
Model SM10A Microphone
User Guide
MOUNTING THE SM10A ON THE HEADBAND
1. Twist the lower headband arms 90° so they are perpendicular
to the headband. As supplied, the retaining clip is positioned
for left side operation. See Figure 1.
NOTE: For right side usage (see photo), remove the retaining
clip and attach it to the other (unused) hole in the headband
arm so the screw is at the top.
2. Snap the microphone pivot housing into the retaining clip with
the pivot adjustment knob upward and the microphone toward
the front.
3. Loosen the pivot adjustment knob and position the boom so
that the microphone is near the side of the user's mouth. Then
tighten the pivot adjustment knob.
4. Place the assembled microphone on the user's head and pull
the headband arms downward until they are just above the
ears.
5. Loosen the pivot adjustment knob and position the microphone as close as possible to the corner of the user's mouth.
Then tighten the adjustment knob.
NOTE: For proper operation, the microphone should be less
than 25 mm (1 in.) from the corner of the mouth–away from
the center of the mouth. This will eliminate explosive breath
sounds (“pop”).
6. Snap the belt clip over the groove in the XLR connector at the
°
end of the microphone wire. Then attach the clip to the user's
belt or waistband.
7. Plug the microphone XLR connector into a microphone cable
or preamplifier.
Headband
• Designed for close-talk operation; ideal for use in noisy environments
• Unidirectional (cardioid) polar pattern for superior rejection of
unwanted sound
• Smooth, natural-sounding frequency response
• Adjustable microphone boom with locking pivot can be moved
20
°
in any direction and extends to 89 mm (3 1/2 in.)
• Light weight headband minimizes user fatigue and does not
interfere with eyeglasses
• Rugged stainless steel, aluminum and high-impact plastic construction
• A clip that fits over the XLR connector and attaches to the user's
belt or waistband, providing cable strain relief.
©2005, Shure Incorporated
27C3125 (Rev. 3)
Headband Arm
Pivot
Adjustment
Knob
Retaining Clip
Microphone
Boom
Pivot Housing
SM10A POSITIONED FOR LEFT SIDE OPERATION
FIGURE 1
Printed in U.S.A.
Page 2
SPECIFICATIONS
Type
Dynamic, close-talk
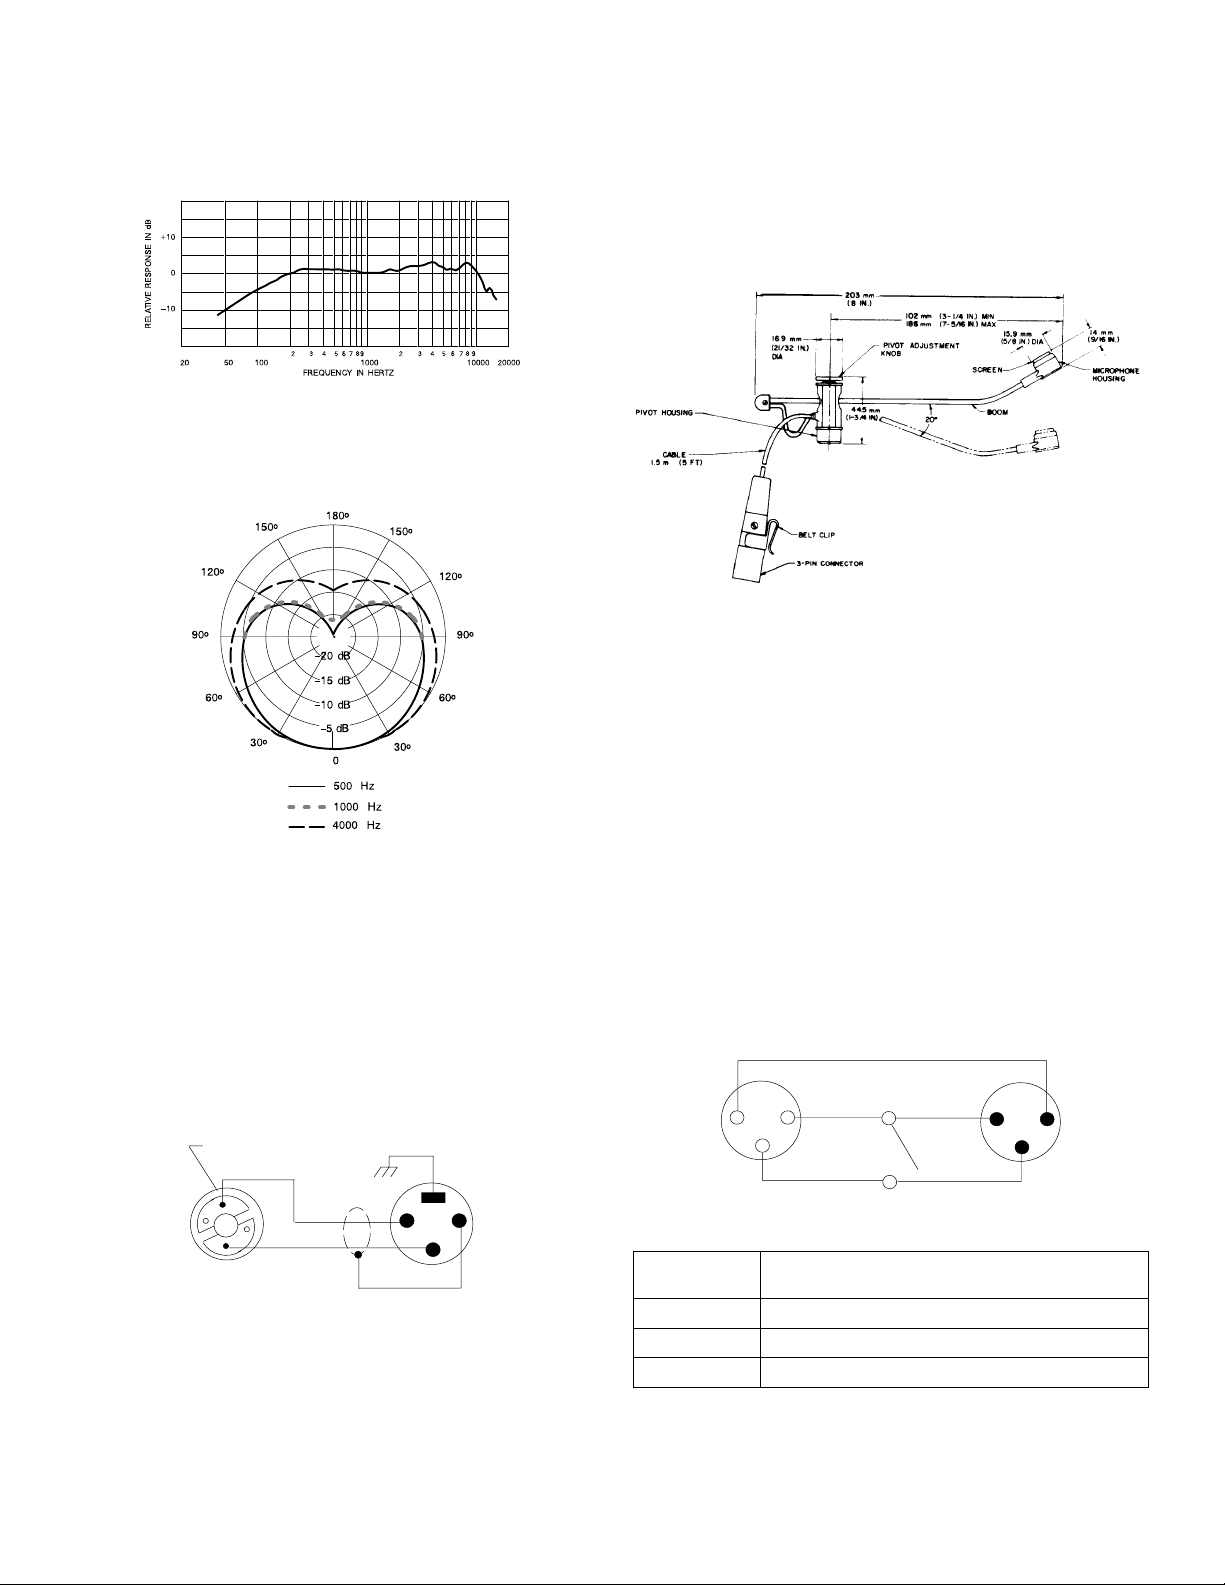
Frequency Response (at 8 mm [5/16 in.])
50 to 15,000 Hz (see Figure 2)
TYPICAL FREQUENCY RESPONSE
FIGURE 2
Polar Pattern
Cardioid, uniform with frequency, symmetrical about axis (see
Figure 3)
TYPICAL POLAR PATTERN
FIGURE 3
lmpedance
Rated at 150 Ω (223 Ω actual)
Sensitivity (1,000 Hz at 8 mm (5/16 in.)
Open Circuit Voltage: –65.0 dBV/Pa* (0.45 mV)
*1 Pa = 94 dB SPL
Hum Sensitivity (typical)
35.5 dB equivalent SPL in a 1 mOe field
Polarity
Positive pressure on diaphragm produces positive voltage on
pin 2 of microphone connector. See Figure 4.
CARTRIDGE XLR CONNECTOR
RED CODED SIDE
RED
Connector
Professional three-pin male XLR audio connector.
Cable
Non-detachable, 1.5 m (5 ft), two-conductor, shielded,
plastic-jacketed
Case
Black thermoplastic microphone and pivot housing, anodized
aluminum end caps, stainless steel grille, and boom
Dimensions
See Figure 5
SM10A AND HEADBAND ASSEMBLY DIMENSIONS
FIGURE 5
Net Weight
78 grams (2.7 ounces) less cable and connector
Packaged Weight
950 grams (2 lbs., 1 1/2 oz)
Certification
Eligible to bear CE Marking. Conforms to European EMC Directive 89/336/EEC. Meets applicable tests and performance criteria in European Standard EN55103 (1996) parts 1 and 2, for
residential (E1) and light industrial (E2) environments.
ON-OFF SWITCH MODIFICATION
As supplied, the SM10A does not include an on-off switch. However, one can be easily constructed using a Switchcraft T3F 3-pin female professional audio connector, or equivalent, with an integral
switch. This connector can be attached to the cable connecting the
SM10A to the PA system. Refer to the wiring diagram in Figure 6.
NOTE: In order for the switch to be silent, phantom power must
not be active on this input channel.
J1
INPUT
2
1
3
S1
J2
OUTPUT
2
1
3
BLK
SM10A WIRING DIAGRAM
FIGURE 4
12
3
Reference
ON-OFF SWITCH WIRING DIAGRAM
FIGURE 6
Part Description
Designator
J1 3-Pin female audio connector, chassis mount
J2 3-Pin male audio connector, chassis mount
S1 Miniature toggle switch, SPST
2
Page 3

ARCHITECTS' SPECIFICATIONS
The microphone shall be a Shure Model SM10A or equivalent. The
microphone shall be a moving-coil (dynamic) type with a frequency
response of 50 to 15,000 Hz. The unit shall have a cardioid polar
characteristic. The cancellation at the rear shall be 15 to 20 dB.
The microphone shall be low impedance with a rated impedance
of 150 ohms for connection to microphone inputs rated at 19 to 300
ohms. The microphone output shall be -65.0 dB where 0 dB = 1 volt
per 10 microbars. The microphone shall be a head-worn type, and
shall be provided with a 1.5 m (5 ft), non-detachable, two-conductor, shielded cable with a professional, three-pin, audio connector
designed to mate with Cannon XL series, Switchcraft A3 (Q.G.) series or equivalent connectors. The microphone shall also be provided with a headband, connector belt clip, and foam windscreen.
The overall dimensions of the microphone shall be 203 mm (8 in.)
in length and 44.5 mm (1-3/4 in.) in maximum height (pivot housing). The microphone housing shall be 15.9 mm (5/8 in.) in diameter and 14 mm (9/16 in). in height.
SUPPLIED ACCESSORIES AND REPLACEMENT PARTS
The following furnished accessories and replacement parts may be
ordered through your Authorized Shure Dealer or directly from
Shure Incorporated.
Connector Belt Clip . . . . . . . . . . . . . . . . . . . . . . . . . . . . RK200BC
Windscreen . . . . . . . . . . . . . . . . . . . . . . . . . . . . . . . . .RK184WS
Microphone Cartridge . . . . . . . . . . . . . . . . . . . . . . . . . . . . . . .R93
Headband Assembly . . . . . . . . . . . . . . . . . . . . . . . . . . . 90A3997
Retaining Clip . . . . . . . . . . . . . . . . . . . . . . . . . . . . . . . .53A1801A
3
Page 4

MODÈLE SM10A
MICROPHONE ÉLECTRODYNAMIQUE SUR SERRE-TÊTE
Le modèle SM10A Shure est un microphone électrodynamique,
unidirectionnel, à faible impédance conçu pour les situations où le
microphone doit être porté sur serre-tête près de la bouche, par
exemple pour le reportage sportif radiodiffusé ou télévisé sur site
ou les systèmes d'interphone d'entreprises. Il est aussi idéal pour
les batteurs, les pianistes et tout autre artiste qui a besoin d'un microphone pour captage vocal sur serre-tête ayant un rejet supérieur des bruits et une réponse en fréquence lisse et naturelle.
Sur le serre-tête, un pivot réglable permet au flexible du microphone d'être déplacé de 20° dans toutes les directions. Le flexible
s'étend de façon à pouvoir positionner le microphone jusqu'à 89
mm (3 1/2 po) du logement du pivot. Une bonnette anti-vent réduit
les bruits de vent et les bruits d'explosions dus à la respiration.
Une attache pour ceinture s'adapte par-dessus le connecteur XLR
et se fixe à la ceinture de l'utilisateur ; elle sert aussi à soulager la
tension du câble.
Avantages
• Conçu pour l'utilisation de proximité ; idéal pour les environnements bruyants
• Courbe de directivité unidirectionnelle (à configuration cardioïde) pour un rejet supérieur des sons indésirables
• Réponse en fréquence lisse et naturelle
• Le flexible de microphone réglable à pivot verrouillable peut être
déplacé de 20
°
dans toutes les directions et s'étend jusqu'à 89
mm (3 1/2 po)
• Le serre-tête léger minimise la fatigue de l'utilisateur et ne gêne
pas le port de lunettes
• Construction robuste en acier inoxydable, aluminium et plastique résistant aux chocs
• Une attache s'adapte par-dessus le connecteur XLR et se fixe à
la ceinture de l'utilisateur ; elle sert aussi à soulager la tension
du câble.
MONTAGE DU SM10A SUR LE SERRE-TÊTE
1. Tourner les bras inférieurs du serre-tête de 90° de façon à ce
qu'ils soient perpendiculaires au serre-tête. Tel que fourni, le
clip de retenue est positionné pour l'utilisation du côté gauche.
Voir figure 1.
REMARQUE : Pour l'utilisation du côté droit (voir photo),
retirer le clip de retenue et le fixer à l'autre trou (libre) du bras
du serre-tête de façon à ce que la vis soit en haut.
2. Encliqueter le logement du pivot du microphone dans le clip
de retenue en plaçant le bouton de réglage du pivot vers le
haut et le microphone vers l'avant.
3. Desserrer le bouton de réglage du pivot et positionner le flexible de façon à ce que le microphone soit près de la bouche de
l'utilisateur. Serrer ensuite le bouton.
4. Placer le tout sur la tête de l'utilisateur et tirer les bras du
serre-tête vers le bas jusqu'à ce qu'ils soient au-dessus des
oreilles.
5. Desserrer le bouton de réglage du pivot et positionner le
microphone aussi près que possible du coin de la bouche de
l'utilisateur. Serrer ensuite le bouton.
REMARQUE :
Pour un fonctionnement correct, le microphone
doit être à moins de 25 mm (1 po) du coin de la bouche, sur le
côté. Cela élimine les bruits de respiration (plosives).
6. Encliqueter l'attache pour ceinture sur la rainure du connecteur type XLR de l'extrémité du fil du microphone. Puis fixer
l'attache à la ceinture de l'utilisateur.
7. Brancher le connecteur type XLR du microphone dans un
câble de microphone ou un préamplificateur.
Serre-tête
Brass de
serre-tête
Boton de
réglage de
pivot
Clip de retenue
Microphone
Flexible
Logement de
pivet
SM10A POSITIONNÉ POUR L'UTILISATION DU CÔTÉ GAUCHE
FIGURE 1
CARACTÉRISTIQUES
Type
Électrodynamique, de proximité
Réponse en fréquence (à 8 mm [5/16 po])
50 à 15.000 Hz (voir figure 2)
RÉPONSE EN FRÉQUENCE TYPIQUE
FIGURE 2
4
Page 5

Courbe de directivité
Réponse cardioïque, uniforme en fréquence, symétrique par rapport à l'axe (voir Figure 3)
COURBE DE DIRECTIVITÉ TYPIQUE
FIGURE 3
lmpédance
Valeur nominale à 150 W (223 W réelle)
Sensibilité (1000 Hz à 8 mm [5/16 po])
Tension de circuit ouvert : -65,0 dBV/Pa* (0,45 mV)
*1 Pa = 94 dB NPA
Sensibilité au ronflement (typique)
35,5 dB équivalents NPA dans un champ de 1 mOe
Polarité
Une pression positive sur le diaphragme produit une tension positive sur la broche 2 du connecteur du microphone. Voir figure 4.
Poids net
78 grammes (2,7 oz) sans câble ni connecteur
Poids emballé
950 grammes (2 lb, 1 1/2 oz)
Homologation
Autorisé à porter la marque CE. Conforme à la directive CEM
européenne 89/336/CEE. Conforme aux critères applicables de
test et de performances de la norme européenne EN55103
(1996) parties 1 et 2 pour les environnements résidentiels (E1)
et d'industrie légère (E2).
MODIFICATION DE L'INTERRUPTEUR MARCHE-ARRÊT
Tel que fourni, le SM10A ne comprend pas d'interrupteur marche-arrêt. Toutefois, il est facile d'en construire un en utilisant un connecteur audio professionnel femelle à 3 broches Switchcraft T3F, ou
l'équivalent, et un interrupteur intégré. Ce connecteur peut être fixé
au câble reliant le SM10A au système de sonorisation. Consulter le
schéma de câblage de la figure 6
REMARQUE : Pour que l'interrupteur soit silencieux, l'alimentation fantôme ne doit pas être active sur cette voie d'entrée.
ENTRÉE J1 SORTIE J2
2
1
3
S1
SCHÉMA DE CÂBLAGE DE L'INTERRUPTEUR
MARCHE-ARRÊT
FIGURE 6
2
1
3
CAPSULE CONNECTEUR TYPE XLR
ôT
É
CODÉ ROUGE
C
ROUGE
12
NOIR
3
SCHÉMA DE CÂBLAGE DU SM10A
FIGURE 4
Connecteur
Connecteur audio XLR mâle professionnel trois broches.
Câble
Non détachable, 1,5 m (5 pi), à deux conducteurs, blindé, chemisé en plastique
Corps
Microphone et logement de pivot en thermoplastique, capuchons d'extrémité en aluminium anodisé, grille en acier inoxydable et flexible noirs
Dimensions
Voir figure 5
LOGEMENT
DE PIVOT
CÂBLE de 1,5 m
16,9 mm de
DIAMÈTRE
203 mm
44,5 mm
102 mm MIN.
186 mm MAX.
BOUTON DE RÉGLAGE
DE PIVOT
20°
ÉCRAN
15,9 mm de
DIAMÈTRE
FLEXIBLE
14 mm
BOÎTIER DU
MICROPHONE
Référence Description de la pièce
J1 Connecteur audio femelle à 3 broches,
montage sur châssis
J2 Connecteur audio mâle à 3 broches, montage
sur châssis
S1 Interrupteur à bascule miniature, unipolaire uni-
directionnel
ACCESSOIRES FOURNIS ET PIÈCES DE RECHANGE
Les accessoires fournis et les pièces de rechanges suivants peuvent être commandés auprès d'un distributeur Shure agréé ou directement de Shure Incorporated.
Attache pour ceinture de connecteur . . . . . . . . . . . . . . RK200BC
Bonnette anti-vent . . . . . . . . . . . . . . . . . . . . . . . . . . . .RK184WS
Capsule de microphone . . . . . . . . . . . . . . . . . . . . . . . . . . . . .R93
Ensemble de serre-tête . . . . . . . . . . . . . . . . . . . . . . . . .90A3997
Clip de retenue . . . . . . . . . . . . . . . . . . . . . . . . . . . . . . .53A1801A
ATTACHE POUR CEINTURE
CONNECTEUR À 3 BROCHES
DIMENSIONS DE L'ENSEMBLE SM10A ET SERRE-TÊTE
FIGURE 5
5
Page 6

MODELL SM10A
DYNAMISCHES AM KOPF GETRAGENES MIKROFON
Das Shure SM10A ist ein niederohmiges, dynamisches; am Kopf
getragenes Richtmikrofon für das Sprechen unmittelbar am Mikrofon wie zum Beispiel Sportberichterstattung am Austragungsort
oder Wechselsprechanlagen in Unternehmen. Es ist außerdem
hervorragend geeignet für Schlagzeuger, Keyboard-Spieler und
andere Vorführende, die ein am Kopf getragenes Mikrofon mit
überlegener Rauschunterdrückung und einem ausgeglichenen,
natürlich klingenden Frequenzgang benötigen.
Mit einem einstellbaren Gelenk am Kopfband kann der Mikrofonträger um 20° in jeder Richtung bewegt werden. Der Träger läßt
sich außerdem herausziehen, so daß das Mikrofon bis zu 89 mm
vom Gelenkgehäuse angeordnet werden kann. Ein mitgelieferter
Windschutz reduziert Wind- und Atemgeräusche. Ein Gürtelclip
kann am XLR-Stecker angebracht und am Gürtel oder Hosen-/Rockbund des Benutzers befestigt werden, wodurch eine
Zugentlastung des Kabels erreicht wird.
5. Den Gelenk-Einstellknopf lösen und das Mikrofon so anordnen, daß es sich so nahe wie möglich am Mundwinkel des
Benutzers befindet. Dann den Einstellknopf festziehen.
HINWEIS: Für einwandfreien Betrieb sollte sich das Mikrofon
weniger als 25 mm vom Mundwinkel entfernt befinden - weg
von der Mitte des Mundes. Dadurch werden Stoßlaute beim
Atmen vermieden.
6. Den Gürtelclip über die Rille im XLR-Stecker am Ende des
Mikrofonkabels anbringen. Dann den Clip am Gürtel oder
Hosen-/Rockbund des Benutzers befestigen.
7. Den XLR-Stecker des Mikrofons an ein Mikrofonkabel oder
einen Vorverstärker anschließen.
Kopfband
Merkmale
• Entwickelt für Sprechen nahe am Mikrofon, ideal für Verwendung in lauten Umgebungen
• Unidirektionale Richtcharakteristik (Nierencharakteristik) für
eine überragende Unterdrückung von unerwünschten Geräuschen
• Ausgeglichener, natürlich klingender Frequenzgang
• Einstellbarer Mikrofonträger mit feststellbarem Gelenk kann um
20
°
in jeder Richtung bewegt werden und läßt sich bis zu 89 mm
herausziehen
• Leichtes Kopfband minimiert die Ermüdung des Benutzers und
stört nicht beim Tragen einer Brille
• Hergestellt aus robustem Edelstahl, Aluminium und hochfestem
Kunststoff
• Ein Clip kann am XLR-Stecker angebracht und am Gürtel oder
Hosen-/Rockbund des Benutzers befestigt werden, wodurch
eine Zugentlastung des Kabels erreicht wird.
ANBRINGEN DES SM10A AN DAS KOPFBAND
1. Die unteren Kopfband-Arme um 90° drehen, so daß sie senkrecht zum Kopfband stehen. Im Lieferzustand befindet sich die
Halteklammer an der linken Seite. Siehe Abbildung 1.
HINWEIS: Für Verwendung an der rechten Seite (siehe Foto)
die Halteklammer abnehmen und an der anderen (nicht
verwendeten) Öffnung im Kopfband-Arm anbringen, so daß
die Schraube sich oben befindet.
2. Das Mikrofon-Gelenkgehäuse in der Halteklammer so einrasten
lassen, daß der Gelenk-Einstellknopf sich oben befindet und das
Mikrofon nach vorne weist.
3. Den Gelenk-Einstellknopf lösen und den Mikrofonträger so
anordnen, daß das Mikrofon sich nahe am Mund des Benutzers
befindet. Dann den Gelenk-Einstellknopf festziehen.
4. Die Mikrofoneinheit auf den Kopf setzen und die KopfbandArme nach unten ziehen, bis sie sich gerade über den Ohren
befinden.
Kopfband-Arm
GalenkEinstellknopf
Halteklammer
Mikrofon
Träger
Galenkgehäuse
SM10A FÜR VERWENDUNG AN DER LINKEN SEITE
ANGEORDNET
ABBILDUNG 1
TECHNISCHE DATEN
Typ
Dynamisch, Nahbereich
Frequenzgang (bei 8 mm)
50 bis 15.000 Hz (siehe Abbildung 2)
TYPISCHER FREQUENZGANG
ABBILDUNG 2
6
Page 7

Richtcharakteristik
Nierencharakteristik mit gleichförmigem Frequenzgang, achsensymmetrisch (siehe Abbildung 3)
TYPISCHE RICHTCHARAKTERISTIK
ABBILDUNG 3
Impedanz
Nennwert 150 Ω (Istwert 223 Ω)
Empfindlichkeit (1000 Hz bei 8 mm)
Leerlaufspannung: -65,0 dBV/Pa* (0,45 mV)
*1 Pa = 94 dB Schalldruckpegel
Ausgangsempfindlichkeit (typisch)
Entspricht 35,5 dB Schalldruckpegel in einem Feld mit 1 mOe
Polarität
Positiver Druck an der Membran erzeugt positive Spannung an
Stift 2 des Mikrofonsteckers. Siehe Abbildung 4.
KAPSEL XLR-STECKER
SEITE MIT ROTER
KENNZEICHNUNG
ROT
12
SCHWARZ
SM10A SCHALTPLAN
ABBILDUNG 4
Stecker
Dreipoliger Profi-XLR-Tonstecker
Kabel
Nicht abnehmbar, 1,5 m, zweiadrig, abgeschirmt, Kunststoffummantelt
Gehäuse
Schwarzes Mikrofon-und Gelenk-Thermoplastgehäuse, eloxierte Aluminium-Endkappen, Edelstahl-Grill und -Träger
Abmessungen
Siehe Abbildung 5
GELENKGEHÄUSE
KABEL 1,5 m
16,9 mm
DURCHMESSER
203 mm
44,5 mm
102 mm MIN.
186 mm MAX.
GELENK–EINSTELLKNOPF
20°
WINDSCHUTZ
3
15,9 mm
DURCHMESSER
TRÄGER
14 mm
MIKROFONGEHÄUSE
Nettogewicht
78 g ohne Kabel und Stecker
Versandgewicht
950 g
Zertifizierung
Zur CE-Kennzeichnung berechtigt. Entspricht der EG-Vorschrift
zur elektromagnetischen Verträglichkeit 89/336/EEC. Erfüllt die
Prüfungs- und Leistungskriterien der europäischen Norm EN
55103 (1996) Teil 1 und 2 für Wohngebiete (E1) und Leichtindustriegebiete (E2).
AUSSTATTUNG MIT EIN/AUS-SCHALTER
Im Lieferzustand verfügt das SM10A nicht über einen
Ein/Aus-Schalter. Mit einer 3-poligen Profi-Tonsteckerbuchse
mit integriertem Schalter Switchcraft T3F oder gleichwertig läßt
sich jedoch auf einfache Weise ein Schalter vorsehen. Diese
Steckbuchse kann an das Kabel angeschlossen werden, das
den SM10A mit der PA-Anlage verbindet. Siehe den Schaltplan
in Abbildung 6.
HINWEIS: Damit der Schalter keine Geräusche erzeugt, darf
in diesem Eingangskanal keine Phantomspeisespannung aktiv
sein.
EINGANG J1 AUSGANG J2
2
1
3
S1
2
1
3
SCHALTPLAN FÜR EIN/AUS-SCHALTER
ABBILDUNG 6
Referenzbezeich-
Teilebeschreibung
nung
J1 3-polige Tonsteckerbuchse,
Chassisbefestigung
J2 3-poliger Tonstecker, Chassisbefestigung
S1 Miniatur-Kippschalter, einpoliger Ein- und
Ausschalter
MITGELIEFERTE ZUBEHÖRTEILE UND ERSATZTEILE
Die folgenden mitgelieferten Zubehörteile und Ersatzteile können
über den Shure-Vertragshändler oder direkt von Shure Incorporated bestellt werden.
Stecker-Gürtelclip . . . . . . . . . . . . . . . . . . . . . . . . . . . . . RK200BC
Windschutz . . . . . . . . . . . . . . . . . . . . . . . . . . . . . . . . . .RK184WS
Mikrofonkapsel . . . . . . . . . . . . . . . . . . . . . . . . . . . . . . . . . . . .R93
Kopfbandeinheit . . . . . . . . . . . . . . . . . . . . . . . . . . . . . . .90A3997
Halteklammer . . . . . . . . . . . . . . . . . . . . . . . . . . . . . . . .53A1801A
GÜRTELCLIP
3–POLIGER STECKER
ABMESSUNGEN SM10A UND KOPFBAND-EINHEIT
ABBILDUNG 5
7
Page 8

MODELO SM10A
MICROFONO DINAMICO DE CABEZA
El SM10A de Shure es un micrófono dinámico unidireccional de
baja impedancia con soporte para la cabeza que sirve para usos
tales como la difusión de eventos deportivos desde un sitio remoto
o para sistemas de intercomunicación. También es ideal para bateristas, artistas del teclado y otros artistas que necesitan un micrófono para voz sujeto a la cabeza con un nivel superior de rechazo
de ruidos y una respuesta de frecuencias uniforme y de sonido
natural.
Un pivote ajustable en la banda de la cabeza permite mover el brazo del micrófono 20° en cualquier dirección. El brazo también
puede deslizarse hacia afuera, permitiendo colocarlo a una distancia de hasta 89 mm (3-1/2 pulg) de la caja giratoria. El paravientos
provisto reduce los ruidos causados por el viento y por los sonidos
explosivos del aliento. Un gancho para cinturón se fija sobre el
conector XLR y se engancha en el cinturón o la pretina del usuario
para aliviar los esfuerzos sufridos por el cable.
Características
• Diseñado para usarse a poca distancia de la boca; ideal para
usarse en entornos ruidosos
• Patrón polar unidireccional (cardioide) para un nivel superior de
rechazo de los sonidos no deseados
• Respuesta de frecuencia uniforme y de sonido natural
• El brazo ajustable del micrófono y su pivote con traba pueden
moverse 20
°
en cualquier dirección y extenderse hasta 89 mm
(3 1/2 pulg)
• La cinta liviana reduce al mínimo la fatiga del usuario y no interfiere con los anteojos
• Fabricación con acero inoxidable resistente, aluminio y plástico
con alta resistencia a impactos
• Un gancho se fija sobre el conector XLR y se engancha en el
cinturón o la pretina del usuario para aliviar los esfuerzos sufridos por el cable.
MONTAJE DEL SM10A EN LA CINTA PARA CABEZA
1. Gire los brazos inferiores de la cinta 90° de modo que
queden perpendiculares respecto a ésta. La pinza retenedora se entrega colocada para usarse en el lado izquierdo.
Vea la Figura 1.
NOTA: Para usarla en el lado derecho (vea la foto), quite la
pinza retenedora y fíjela al otro agujero (no usado) en el
brazo de la cinta para cabeza, de modo que su tornillo quede
orientado hacia arriba.
2. Enganche la caja giratoria del micrófono en la pinza retenedora, con la perilla de ajuste de pivote hacia arriba y el micrófono hacia el frente.
3. Suelte la perilla de ajuste de pivote y coloque el brazo del
micrófono de modo que éste se encuentre cerca del lado de la
boca del usuario. Después apriete la perilla de ajuste de
pivote.
4. Coloque el micrófono armado en la cabeza del usuario y tire
de los brazos de la cinta para cabeza hacia abajo hasta que
queden justo arriba de las orejas.
5. Suelte la perilla de ajuste de pivote y coloque el brazo del
micrófono de modo que éste se encuentre lo más cerca
posible del extremo de la boca del usuario. Después apriete la
perilla de ajuste.
NOTA: Para obtener el rendimiento correcto, el micrófono
debe hallarse a menos de 25 mm (1 pulg) del extremo de la
boca, alejado del centro de la boca. Esto elimina los sonidos
explosivos (chasquidos) causados por el aliento.
6. Enganche el gancho para cinturón sobre la ranura del conector XLR que está en el extremo del alambre del micrófono.
Después fije el gancho al cinturón o la pretina del usuario.
7. Enchufe el conector XLR del micrófono a un cable de micrófono o a un preamplificador.
Cinta para cabeza
Brazo de cinta
Perilla de ajuste
de pivote
Pinza retenedora
Micrófono
Brazo
Caja giratoria
SM10A CONFIGURADO PARA USO EN LADO IZQUIERDO
FIGURA 1
ESPECIFICACIONES
Tipo
Dinámico, para captación a corta distancia
Respuesta de frecuencias (a 8 mm [5/16 pulg])
50 a 15.000 Hz (vea la Figura 2)
RESPUESTA DE FRECUENCIA TIPICA
FIGURA 2
8
Page 9

Patrón polar
Cardioide, uniforme respecto a la frecuencia, simétrico respecto
a su eje (vea la Figura 3)
PATRON POLAR TIPICO
FIGURA 3
Impedancia
Nominal: 150 Ω (Real: 223 Ω)
Sensibilidad (1000 Hz a 8 mm [5/16 pulg])
Voltaje en circuito abierto: -65,0 dBV/Pa* (0,45 mV)
*1 Pa = 94 dB SPL
Sensibilidad a zumbidos (típica)
SPL equivalente de 35,5 dB en un campo de 1 mOe
Polaridad
Una presión positiva sobre el diafragma produce un voltaje
positivo en la clavija 2 del conector del micrófono. Vea la
Figura 4.
CAPSULA CONECTOR XLR
Lado Rojo
Rojo
12
Negro
3
DIAGRAMA DE ALAMBRADO DEL SM10A
FIGURA 4
Conector
Conector profesional de audio XLR macho de tres clavijas.
Cable
Permanente, de 1,5 m (5 pies), dos conductores con blindaje y
forro de plástico
Caja
Caja del micrófono y giratoria de plástico negro, tapas terminales de aluminio anodizado, rejilla y brazo de micrófono de acero
inoxidable
Dimensiones
Vea la Figura 5.
203 mm
(8 pulg)
CAJA GIRATORIA
CABLE 1,5 m
(5 pies)
16,9 mm
(21/32
pulg) de
DIAMETRO
44,5 mm
(1–3/4
pulg)
102 mm (3–1/4 pulg) MIN.
186 mm (3–5/16 pulg) MAX
PERILLA DE AJUSTE
DE PIVOTE
20°
15,9 mm (5/8 pulg)
de DIAMETRO
REJILLA
BRAZO
14 mm
(9/16 pulg)
CAJA DEL
MICROFONO
Peso neto
78 gramos (2,7 oz) sin incluir el cable ni el conector
Peso embalado
950 gramos (2 lb 1 1/2 oz)
Certificaciones
Califica para llevar las marcas CE. Cumple la directiva europea
89/336/EEC de compatibilidad electromagnética. Se ajusta a los
criterios correspondientes de verificación y funcionamiento establecidos en la norma europea EN55103 (1996), partes 1 y 2,
para zonas residenciales (E1) y zonas de industria ligera (E2).
MODIFICACION DE INTERRUPTOR DE ENCENDIDO
El SM10A se suministra sin un interruptor de encendido. Sin embargo, es posible añadir uno fácilmente usando un conector de audio profesional hembra Switchcraft T3F de 3 clavijas, o uno
equivalente, con un interruptor incorporado. Este conector puede
fijarse al cable que conecta al SM10A al sistema de sonido. Consulte el diagrama de alambrado en la Figura 6.
NOTA: Para que el interruptor funcione de forma silenciosa, la
alimentación Phantom no debe estar activa en este canal de
entrada.
ENTRADA J1 SALIDA J2
2
1
3
S1
2
1
3
DIAGRAMA DE ALAMBRADO PARA INTERRUPTOR
FIGURA 6
Designador Descripción
J1 Conector de audio hembra de 3 clavijas,
montado en chasis
J2 Conector de audio macho de 3 clavijas,
montado en chasis
S1 Interruptor miniatura, 1 polo, 1 tiro
ACCESORIOS SUMINISTRADOS Y REPUESTOS
Los siguientes accesorios y repuestos pueden pedirse a través del
concesionario autorizado de Shure o directamente de Shure Incorporated.
Gancho para cinturón . . . . . . . . . . . . . . . . . . . . . . . . . . RK200BC
Paravientos . . . . . . . . . . . . . . . . . . . . . . . . . . . . . . . . .RK184WS
Cápsula de micrófono . . . . . . . . . . . . . . . . . . . . . . . . . . . . . .R93
Conjunto de cinta para cabeza . . . . . . . . . . . . . . . . . . . .90A3997
Pinza retenedora . . . . . . . . . . . . . . . . . . . . . . . . . . . . . .53A1801A
GANCHO PARA CINTURON
CONECTOR DE 3 CLAVIJAS
DIMENSIONES DEL SM10A Y CINTA PARA CABEZA
FIGURA 5
9
Page 10

MODELLO SM10A
MICROFONO A CUFFIA DINAMICO
Il modello Shure SM10A è un microfono dinamico unidirezionale,
a bassa impedenza, adatto ad applicazioni in cui occorre tenere il
microfono vicino alla bocca e avere le mani libere: per esempio,
durante le cronache di eventi sportivi o durante l'uso di impianti citofonici aziendali. È l'ideale anche per batteristi, tastieristi e altri artisti che hanno bisogno di un microfono a cuffia con un'ottima
reiezione del rumore e con una risposta in frequenza regolare e
che offra suoni naturali.
Uno snodo regolabile, situato sul supporto, permette di spostare il
braccio del microfono di 20° in qualsiasi direzione. Il braccio, estraibile, permette di allontanare il microfono fino a 89 mm (3 1/2 in)
dall'alloggiamento dello snodo. Un antivento in dotazione riduce
sia i rumori del vento che gli schiocchi della respirazione. Il fermaglio, adattabile sul connettore XLR, può essere fissato alla cintura
o in vita e funziona da pressacavo.
Caratteristiche
• Studiato per l'uso a distanza ravvicinata; ideale in ambienti
rumorosi.
• Diagramma polare unidirezionale (cardioide) che offre una
reiezione superiore dei suoni indesiderati.
• Risposta in frequenza regolare, che offre suoni naturali.
• Braccio regolabile, con snodo spostabile di 20
º
in qualsiasi
direzione e bloccabile, estensibile fino a 89 mm (3 1/2 in).
• Supporto leggero, che non affatica e non ostacola l'uso degli
occhiali.
• Costruzione in robusto acciaio inossidabile, alluminio e
plastica molto resistente agli urti.
• Dotato di un fermaglio adattabile sul connettore XLR, che si
fissa alla cintura o a in vita e che funziona da pressacavo.
FISSAGGIO DEL MICROFONO SM10A AL SUPPORTO
1. Girate i bracci inferiori di 90° in modo che siano perpendico-
lari al supporto. La clip viene fornita già posizionata per l'uso
sul lato sinistro. Vedi Figura 1.
NOTA : per usare la clip sul lato destro (vedi fotografia),
staccatela e attaccatela all'altro foro disponibile sul braccio del
supporto, in modo che la vite sia sulla parte superiore.
2. Fate scattare l'alloggiamento dello snodo nella clip, con la
manopola di regolazione dello snodo orientata verso l'alto e il
microfono orientato verso la parte anteriore.
3. Allentate la manopola di regolazione dello snodo e posizion-
ate il braccio in modo che il microfono sia vicino alla parte laterale della bocca, quindi serrate la manopola.
4. Collocate il microfono così montato sulla testa e tirate i bracci
del supporto verso il basso finché sono direttamente sopra le
orecchie.
5. Allentate la manopola di regolazione dello snodo e posizionate il microfono quanto più vicino possibile all'angolo della
bocca, quindi serrate la manopola.
NOTA : per ottenere una ripresa sonora soddisfacente è necessario che il microfono si trovi a meno di 25 mm (1 pollice)
dall'angolo della bocca, lontano dal centro della bocca stessa;
si eliminano così gli schiocchi della respirazione.
6. Fate scattare il fermaglio sulla scanalatura praticata nel
connettore XLR, all'estremità del cavo del microfono,
quindi fissate il fermaglio alla cintura o alla fascia in vita.
7. Collegate il connettore XLR a un preamplificatore o a un cavo
per microfono.
Supporto
Braccio del
supporto
Manopola di
regolazione
dello snodo
Clip
Microfono Braccio
Allogiamento dello snodo
IL MODELLO SM10A POSIZIONATO PER IL FUNZIONAMENTO
SUL LATO SINISTRO
FIGURA 1
DATI TECNICI
Tipo
Dinamico, per uso ravvicinato.
Risposta in frequenza (a 8 mm [5/16 pollici])
Da 50 a 15.000 Hz (vedi Figura 2).
TIPICA RISPOSTA IN FREQUENZA
FIGURA 2
10
Page 11

Diagramma polare
T
Cardioide, costante al variare della frequenza, simmetrico rispetto all'asse (vedi Figura 3).
DIAGRAMMA POLARE TIPICO
FIGURA 3
lmpedenza
Valore nominale 150 Ω (valore effettivo 223 Ω)
Sensibilità (1000 Hz a 8 mm [5/16 di pollice])
Tensione a circuito aperto: -65,0 dBV/Pa* (0,45 mV)
*1 Pa = 94 dB di SPL
Sensibilità al ronzio (valore tipico)
SPL equivalente di 35,5 dB in un campo di 1 millioersted
Polarità
Una pressione sonora positiva sul diaframma produce una tensione positiva sul piedino 2 del connettore del microfono. Vedi
Figura 4.
CAPSULA CONNETTOREXLR
LATO CODIFICATO
IN ROSSO
ROSSO
12
NEGRO
3
Peso netto
78 grammi (2,7 once) senza cavo e connettore
Peso della confezione
950 grammi (2 libbre e 1 1/2 oncia)
Omologazioni
Contrassegnabile con il marchio CE. Conforme alla direttiva europea sulla compatibilità elettromagnetica 89/336/CEE. Soddisfa i
criteri di prestazione e le verifiche pertinenti specificati nella norma
europea EN 55103 (1996) parti 1 e 2 relativa ad ambienti domestici
(E1) e industriali leggeri (E2).
MODIFICA PER L'USO DI UN INTERRUTTORE DI
ALIMENTAZIONE
Il modello SM10A non è dotato di un interruttore di alimentazione;
tuttavia è facile costruirne uno mediante un connettore audio per
uso professionale Switchcraft T3F femmina a tre piedini, o equivalente, con un interruttore integrale. Questo connettore può essere
collegato al cavo che collega lo SM10A all'impianto di diffusione
sonora. Vedere lo schema circuitale della figura 6.
NOTA : affinché l'interruttore non emetta suoni, su questo canale
d'ingresso non deve essere inserita nessuna alimentazione
phantom.
J1 INGRESSO J2 USCITA
2
1
3
S1
SCHEMA CIRCUITALE DELL'INTERRUTTORE DI
ALIMENTAZIONE
FIGURA 6
2
1
3
SCHEMA CIRCUITALE DEL MODELLO SM10A
FIGURA 4
Connettore
Audio, XLR, maschio, a tre piedini, per uso professionale.
Cavo
Non scollegabile, da 1,5 m (5 piedi), a due conduttori, schermato, con guaina di plastica.
Involucro
Alloggiamento dello snodo e microfono: materiale termoplastico
nero; cappucci terminali: alluminio anodizzato; griglia: acciaio
inossidabile; braccio.
Dimensioni
Vedi figura 5
203 mm
(8 pollici)
102 mm (3–1/4 di pollice) min.
ALLOGGIAMENTO
DELLO SNODO
CAVO DA 1,5 m
(5 piedi)
DIAMETRO: 16,9 mm
(21/32 di pollice)
FERMAGLIO
CONNETTORE A 3 PIEDINI
44,5 mm
(1 pollice
e 3/4)
MANOPOLA DI
REGOLAZIONE
DELLO SNODO
186 mm (3–5/16 di pollice) max.
20°
DIAMETRO: 15,9 mm
(5/8 di pollice)
GRIGLIA
BRACCIO
14 mm (9/16
di pollice)
ALLOGGIAMEN
DEL MICROFON
DIMENSIONI DEL GRUPPO SM10A-SUPPORTO
FIGURA 5
Riferimento Descrizione del componente
J1 Connettore audio femmina a 3 piedini, da
fissare allo chassis
J2 Connettore audio maschio a 3 piedini, da
fissare allo chassis
S1 Interruttore unipolare tipo miniatura, a due
posizioni
ACCESSORI IN DOTAZIONE E PARTI DI RICAMBIO
Gli accessori in dotazione e le parti di ricambio che seguono sono
ordinabili presso il concessionario Shure o direttamente presso la
Shure Incorporated.
Fermaglio da connettore . . . . . . . . . . . . . . . . . . . . . . . . RK200BC
Antivento . . . . . . . . . . . . . . . . . . . . . . . . . . . . . . . . . . .RK184WS
Capsula . . . . . . . . . . . . . . . . . . . . . . . . . . . . . . . . . . . . . . . . .R93
Gruppo del supporto . . . . . . . . . . . . . . . . . . . . . . . . . . . .90A3997
Clip . . . . . . . . . . . . . . . . . . . . . . . . . . . . . . . . . . . . . . . .53A1801A
11
Page 12

SHURE Incorporated http://www.shure.com
United States, Canada, Latin America, Caribbean:
5800 W. Touhy Avenue, Niles, IL 60714-4608, U.S.A.
Phone: 847-600-2000 U.S. Fax: 847-600-1212 Intl Fax: 847-600-6446
Europe, Middle East, Africa:
Shure Europe GmbH, Phone: 49-7131-72140 Fax: 49-7131-721414
Asia, Pacific:
Shure Asia Limited, Phone: 852-2893-4290 Fax: 852-2893-4055
 Loading...