

Page 1

SBC240 -- 2-Bay Networked Charger
IMPORTANT SAFETY INSTRUCTIONS
1. READ these instructions.
2. KEEP these instructions.
3. HEED all warnings.
4. FOLLOW all instructions.
5. DO NOT use this apparatus near water.
6. CLEAN ONLY with dry cloth.
7. DO NOT block any ventilation openings. Allow sufficient distances for adequate ventilation and install in accor
dance with the manufacturer’s instructions.
8. DO NOT install near any heat sources such as open flames, radiators, heat registers, stoves, or other appara
tus (including amplifiers) that produce heat. Do not place any open flame sources on the product.
9. DO NOT defeat the safety purpose of the polarized or grounding type plug. A polarized plug has two blades
with one wider than the other. A grounding type plug has two blades and a third grounding prong. The wider
blade or the third prong are provided for your safety. If the provided plug does not fit into your outlet, consult an
electrician for replacement of the obsolete outlet.
10. PROTECT the power cord from being walked on or pinched, particularly at plugs, convenience receptacles,
and the point where they exit from the apparatus.
11. ONLY USE attachments/accessories specified by the manufacturer.
12. USE only with a cart, stand, tripod, bracket, or table specified by the manufacturer, or sold with the apparatus.
When a cart is used, use caution when moving the cart/apparatus combination to avoid injury from tip-over.
13. UNPLUG this apparatus during lightning storms or when unused for long periods of time.
14. REFER all servicing to qualified service personnel. Servicing is required when the apparatus has been dam
aged in any way, such as power supply cord or plug is damaged, liquid has been spilled or objects have fallen
into the apparatus, the apparatus has been exposed to rain or moisture, does not operate normally, or has
been dropped.
15. DO NOT expose the apparatus to dripping and splashing. DO NOT put objects filled with liquids, such as vas
es, on the apparatus.
16. The MAINS plug or an appliance coupler shall remain readily operable.
17. The airborne noise of the Apparatus does not exceed 70dB (A).
18. Apparatus with CLASS I construction shall be connected to a MAINS socket outlet with a protective earthing
connection.
19. To reduce the risk of fire or electric shock, do not expose this apparatus to rain or moisture.
20. Do not attempt to modify this product. Doing so could result in personal injury and/or product failure.
1/13
Page 2
21. Operate this product within its specified operating temperature range.
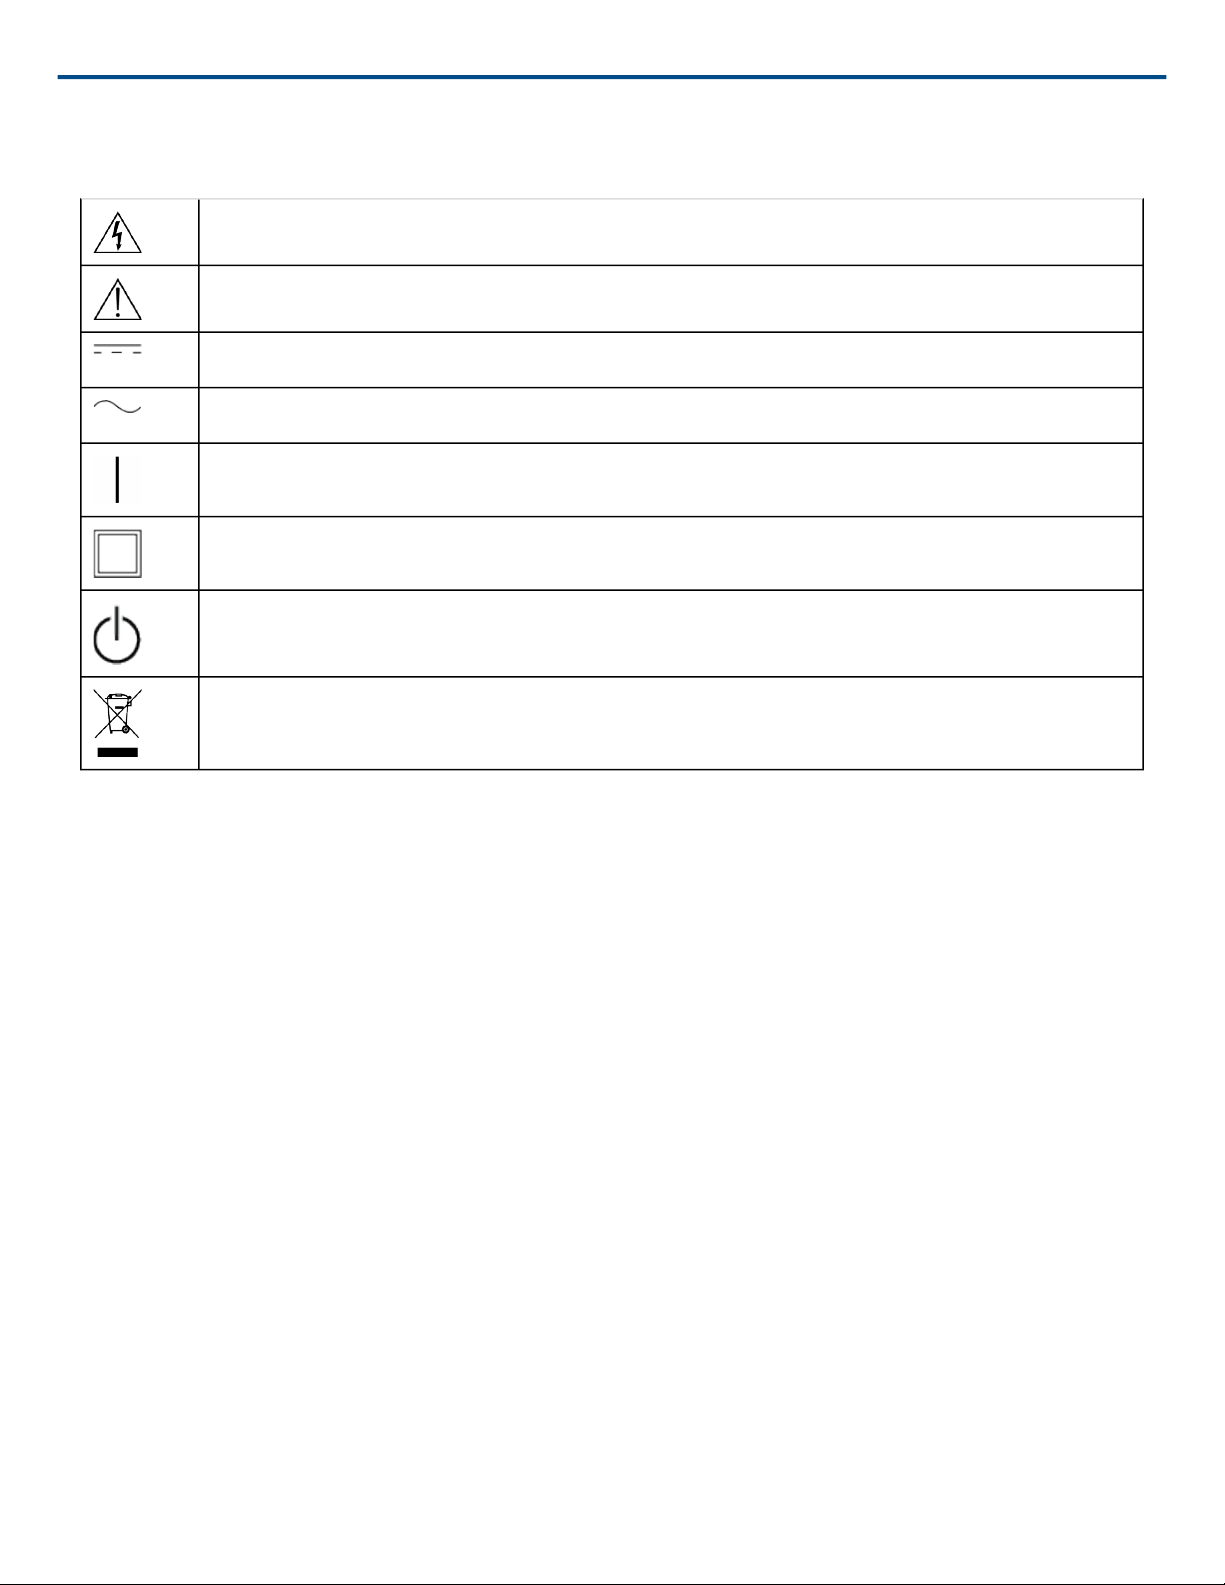
Explanation of Symbols
Caution: risk of electric shock
Caution: risk of danger (See note.)
Direct current
Alternating current
On (Supply)
Equipment protected throughout by DOUBLE INSULATION or REINFORCED INSULATION
Shure Incorporated
Stand-by
Equipment should not be disposed of in the normal waste stream
WARNING: Voltages in this equipment are hazardous to life. No user-serviceable parts inside. Refer all servicing
to qualified service personnel. The safety certifications do not apply when the operating voltage is changed from
the factory setting.
WARNING
• Battery packs may explode or release toxic materials. Risk of fire or burns. Do not open, crush, modify, disas
semble, heat above 140°F (60°C), or incinerate.
• Follow instructions from manufacturer
• Only use Shure charger to recharge Shure rechargeable batteries
• WARNING: Danger of explosion if battery incorrectly replaced. Replace only with same or equivalent type.
• Never put batteries in mouth. If swallowed, contact your physician or local poison control center
• Do not short circuit; may cause burns or catch fire
• Do not charge or use battery packs other than Shure rechargeable batteries
• Dispose of battery packs properly. Check with local vendor for proper disposal of used battery packs.
• Batteries (battery pack or batteries installed) shall not be exposed to excessive heat such as sunshine, fire or
the like
Caution: Do not transport chargers with batteries inserted.
Warning: Do not charge batteries in enclosed spaces without proper ventilation.
WARNING: This product contains a chemical known to the State of California to cause cancer and birth defects or
other reproductive harm.
2/13
Page 3

Shure Incorporated
Please follow your regional recycling scheme for batteries, packaging, and electronic waste.
Note: Model information and power ratings are labeled on the bottom of the unit.
General Description
The SBC240 networked docking charger provides a compact charging and storage solution for any combination of
2 SB910/SB920 batteries or ADX1, ADX2, or ADX2FD transmitters using Shure rechargeable batteries. The charg
er is network-enabled to allow for remote monitoring of charger and battery parameters using Shure Wireless
Workbench software. Connect up to 4 SBC240 chargers together to share power and network connectivity.
Features
• Charging for any combination of up to 2 SB910/SB920 batteries or ADX1, ADX2, or ADX2FD transmitters using
Shure rechargeable batteries
• Connect up to 4 chargers together to share power and network connections and save space
• LEDs indicate charge status and battery errors
• Storage mode to prepare batteries for long-term storage
• Network-enabled for remote monitoring
®
Furnished Accessories
Power supply PS60
Allen wrench 95A28936
Screw 30B28875
Note: Model availability depends on region. See your local Shure dealer or distributor for details.
3/13
Page 4
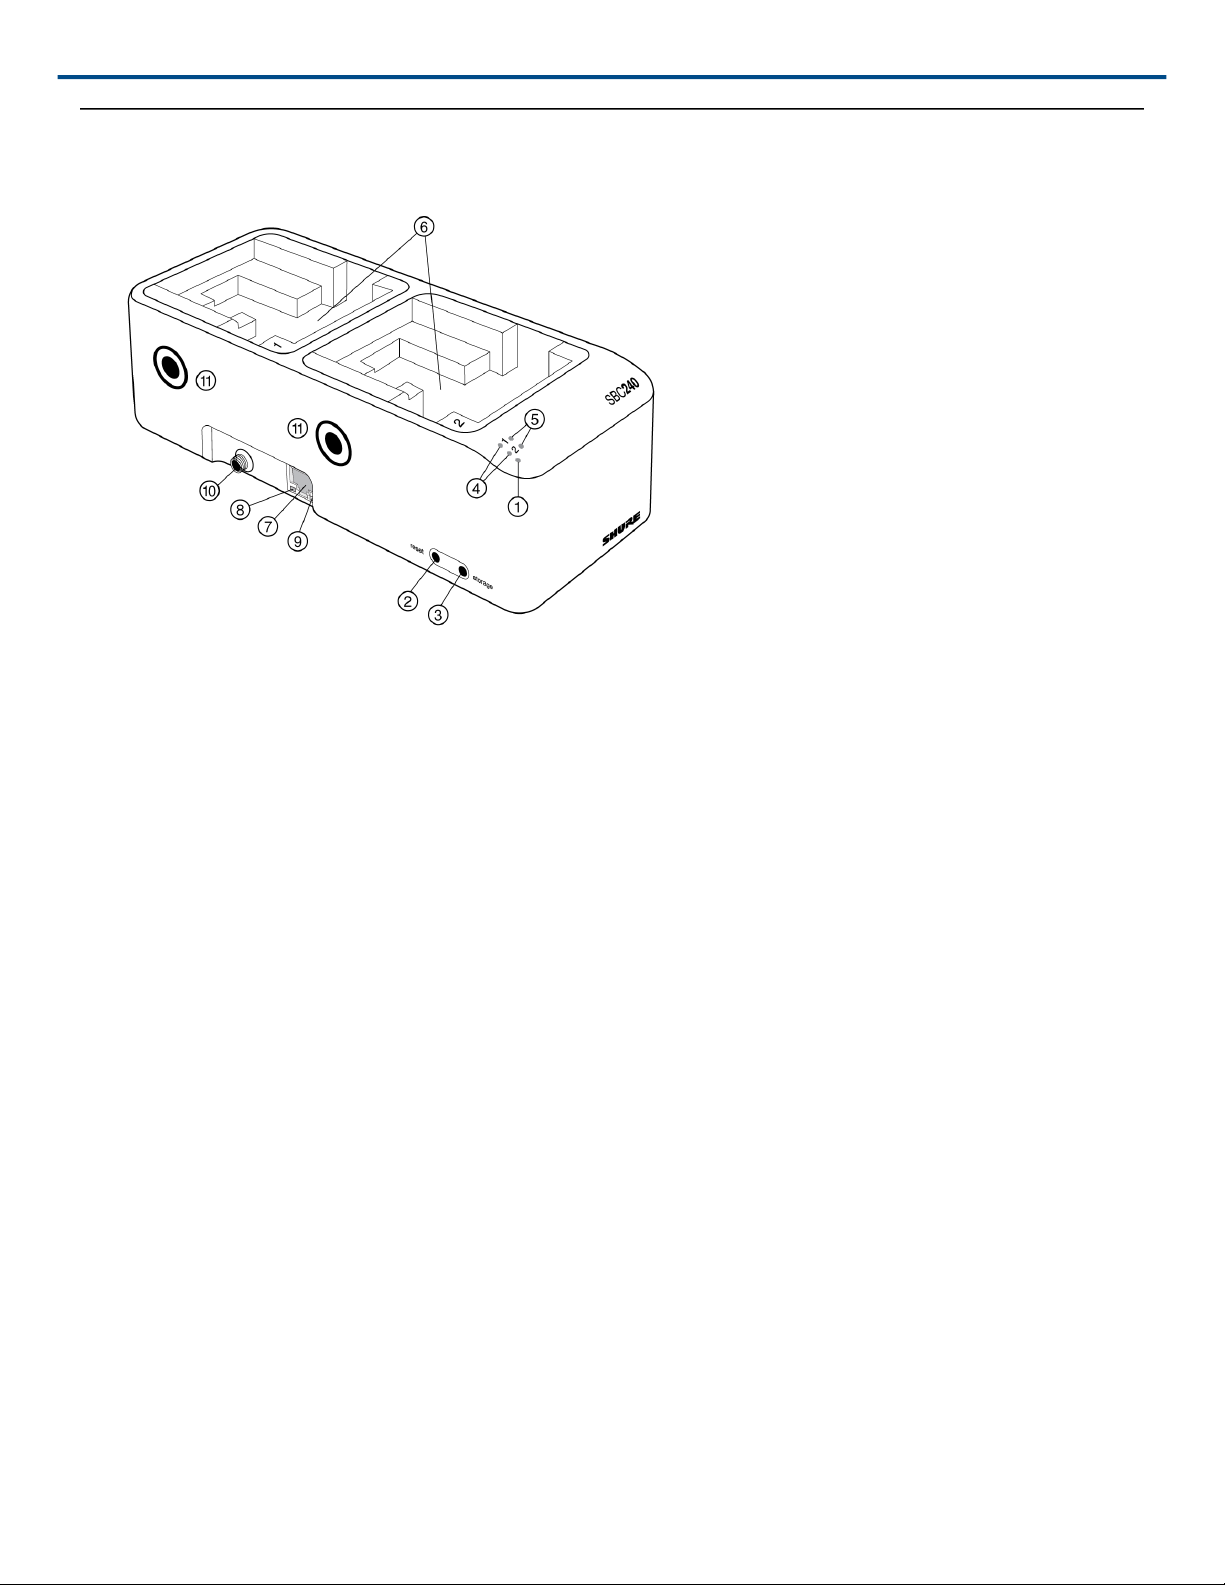
Controls and Connectors
Shure Incorporated
① Power LED
• White = Power is on
• Red = Charger is in storage mode
② Reset Button
Press and hold to restore charger factory settings, including network settings.
③ Storage Mode Button
Press and hold to activate storage mode, which charges or discharges batteries to the optimal voltage for longterm storage.
④ Charging Status LED
• Red = Charging
• Green = Charging complete
• Amber = Battery is in storage mode
⑤ Error LED
Flashes amber to indicate a problem charging batteries. Errors are also displayed in Wireless Workbench. See
LED Indicators for details.
⑥ Charging Slots
Charges any combination of 2 SB910 or SB920 batteries or ADX1, ADX2, or ADX2FD transmitters.
⑦ Ethernet Port
Connect to a network to remotely monitor batteries and control charger settings using Wireless Workbench.
4/13
Page 5

⑧ Ethernet Link Speed LED (Amber)
• Off = 10 Mbps
• On = 100 Mbps
⑨ Ethernet Status LED (Green)
• Off = No network link
• On = Network link established
• Flashing = Network link active
⑩ Power Input
Connect to power supply.
⑪ Charger Connector
Use supplied screws and Allen wrench to connect up to 4 chargers to 1 power supply.
Shure Incorporated
Power
1. Connect DC power cable to input jack. Finger tighten lock nut for a secure connection.
2. Connect power supply to AC power outlet.
WARNING:
• Do not use pliers or any other tools to tighten lock nut. DC power cable must be attached before charger unit is
installed.
• Do not plug in power supply unit until DC connection and charger are in place.
• After securing the charger, plug the power cable into a properly grounded outlet.
The charger has no power switch. When plugged in, the power LED illuminates. The charging LEDs illuminate af
ter batteries are inserted.
Power Save Mode
Use power save mode to charge batteries with the charger’s network functionality off.
1. Disconnect the power cable from the AC power outlet.
2. Press and hold storage while reconnecting to the AC power outlet.
3. When the charge status and error LEDs flash amber, release the button.
The charger remains in power save mode until you power off the charger.
Note: Transmitters docked with the power switch in the ON position will power on when fully charged. To avoid un
wanted audio and unnecessary battery drain, ensure all transmitters are switched OFF before charging.
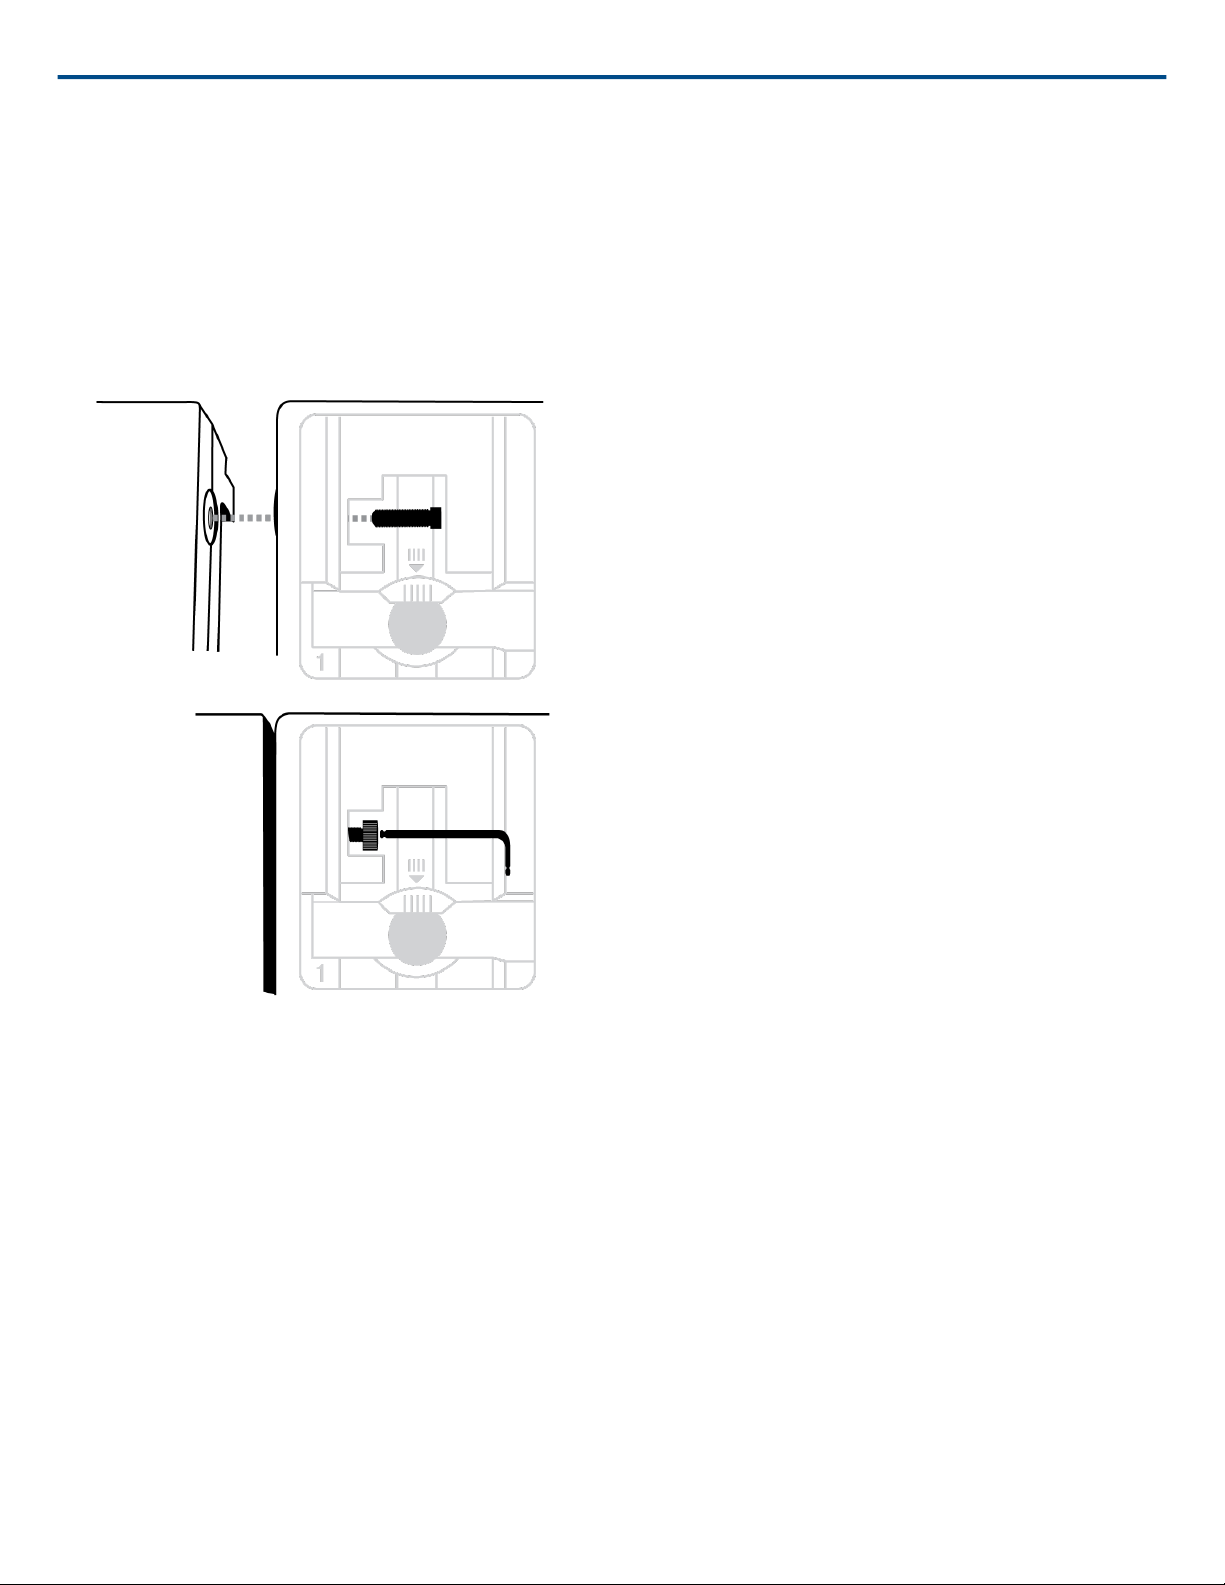
Adding a Charger
To save space and reduce clutter, up to 4 chargers can share 1 power supply and Ethernet connection.
1. Unplug charger from the power source.
5/13
Page 6
Shure Incorporated
2. Insert screws into the charger connector.
3. Align units and tighten screws using the supplied Allen wrench until they fit together securely.
Important: Do not overtighten.
4. Repeat above steps to connect up to 4 chargers.
5. Connect DC power cable and Ethernet cable to the inputs on the side of the charger.
Note: A maximum of 4 chargers can share power and network connectivity. Only connect SBC240 chargers to the
charger connectors.
6/13
Page 7
Shure Incorporated
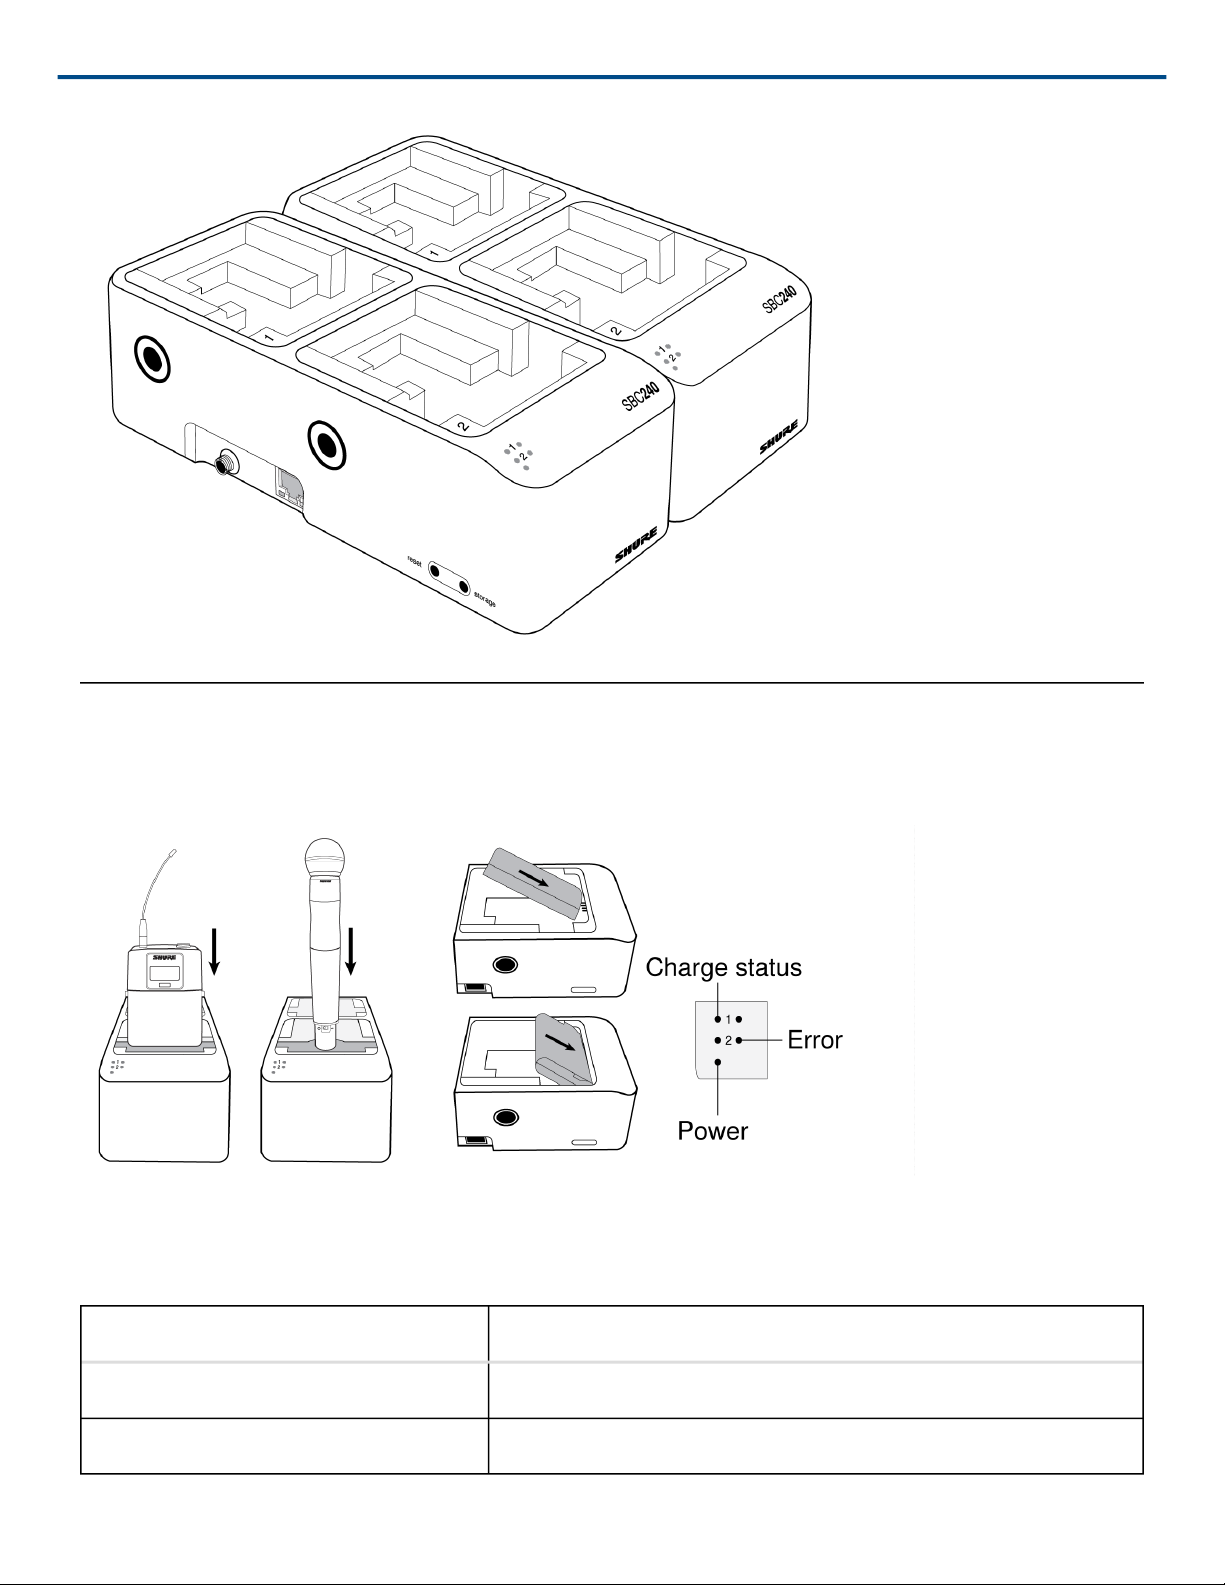
Charging
To charge, place batteries and transmitters into the charging bays as shown. The LEDs illuminate to indicate bat
tery status.
Warning: Do not insert transmitters using AA batteries.
LED Indicators
Color State
Charge status LED red Charging
Charge status LED green Charging complete
7/13
Page 8

Shure Incorporated
Color State
Error LED amber flashing Charging stopped. To resume charging, try these solutions:
1. Check that the battery contacts are clean and undamaged. If
contacts are dirty or damaged, the charger might not detect the
batteries.
2. Check the temperature. If the battery temperature is above 60°C
or below 0°C, the error LED flashes.
3. Contact Shure service. Battery may be discharged beyond re
covery or have internal problems. Replace battery.
• Error LED amber steady on 4 charg
ers
• Error LED amber flashing on 5th
charger
• Charge status LED red
• Error LED amber flashing
• Charge status LED green
• Error LED amber flashing
Power LED red Charger is in storage mode. Batteries are charging or discharging
• Power LED red
• Charge status LED amber
• Power LED red
• Charge status LED red flashing
Too many chargers (more than 4) are connected to each other. Re
move additional chargers.
Battery too warm. Charging stops at 80% of full capacity. Allow bat
tery to cool below 45°C to resume charging to full capacity.
Charging complete, but battery temperature is too warm or cold
(over 60°C or below 0°C).
to storage voltage.
Batteries are ready for storage.
Batteries are approaching storage voltage.
Power LED white flashing Charger firmware is being updated.
All LEDs flashing Hardware identification.
Tip: Wireless Workbench provides more detailed battery status information.
Storage Mode
To store batteries for longer than 8 days, use the charger's storage mode. Each battery will be charged or dis
charged to 3.8 volts, which is ideal for long-term storage.
8/13
Page 9
Shure Incorporated
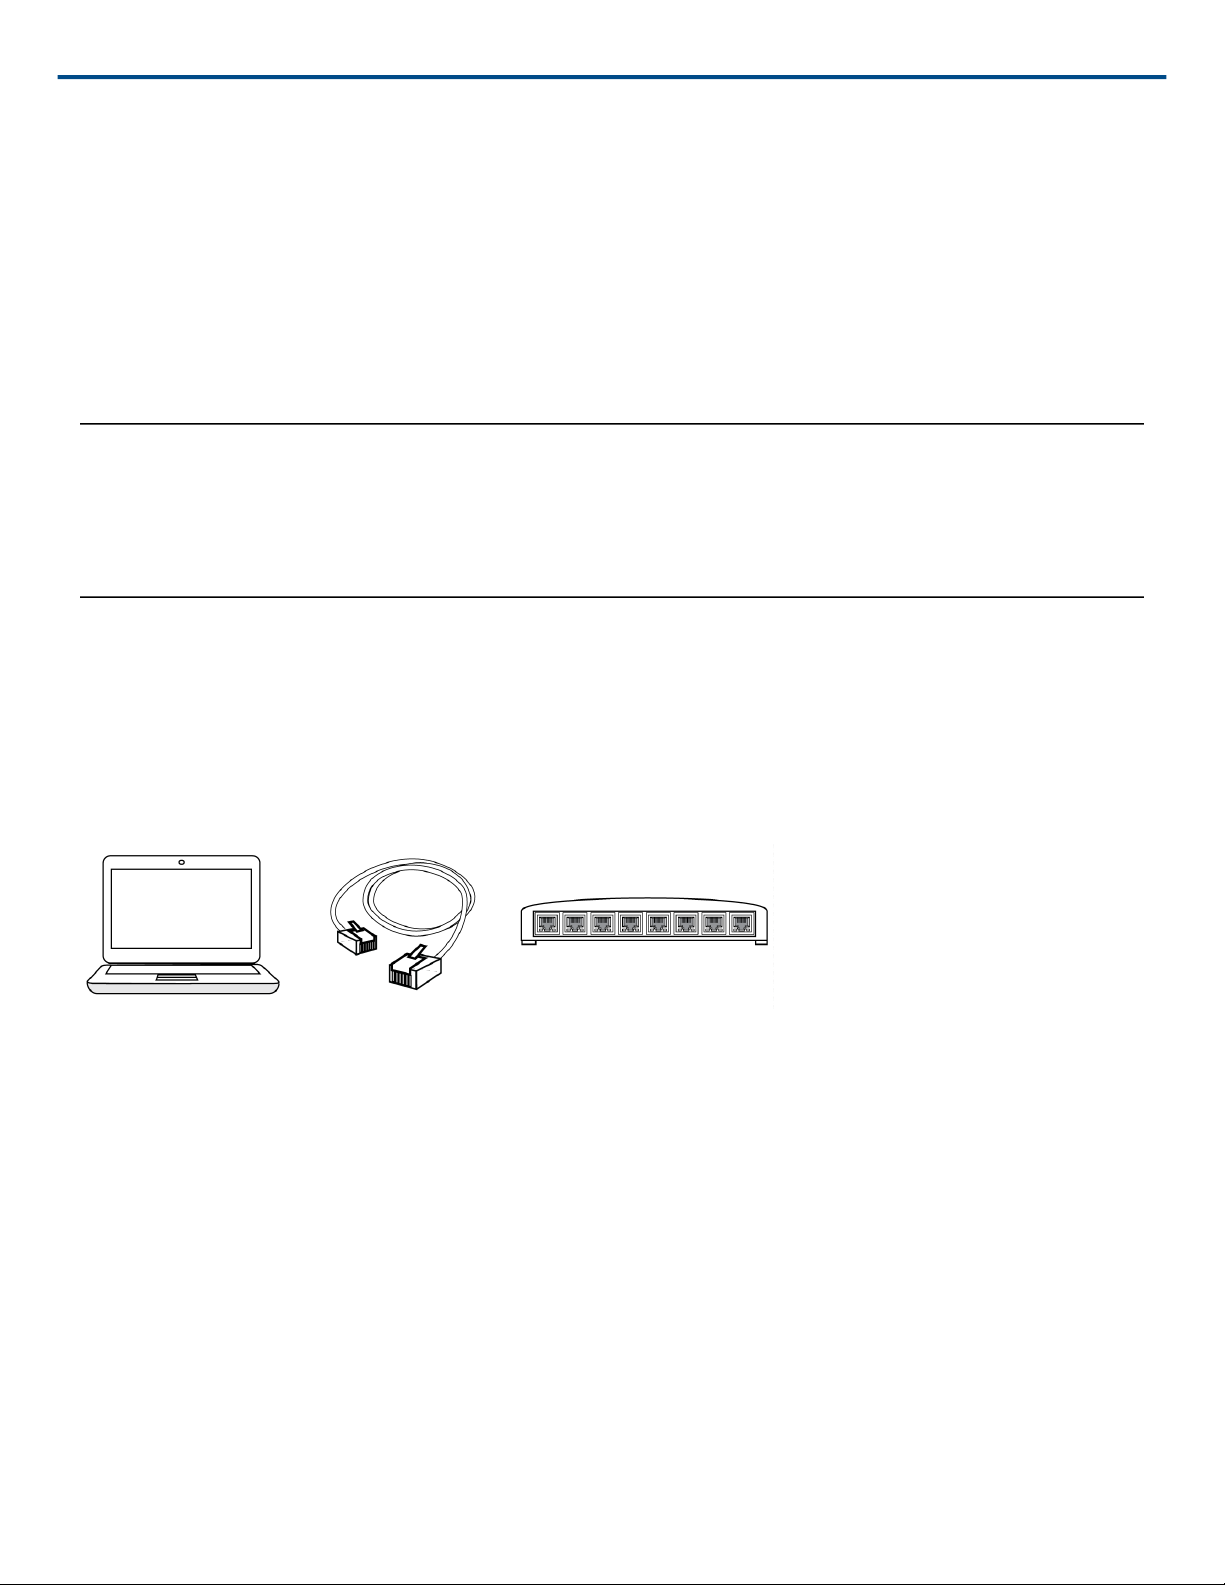
To enter storage mode, press and hold storage for 3 seconds until the power LED turns red. The batteries will be
gin charging or discharging to 3.8 volts, which may take several hours. The LEDs indicate when the battery is ap
proaching storage voltage or at storage voltage.
To exit storage mode, press and hold storage. The power LED changes to white and batteries resume charging
normally.
When batteries are ready for storage, remove them from the charger and place in a temperature-controlled area.
Recommended battery storage temperature is 10°C (50°F) to 25°C (77°F).
Note: Run storage mode once every 6 months to maintain the storage voltage.
Restoring Factory Settings
Press and hold reset to restore factory settings. All LEDs will flash and turn off as the charger reboots.
IP addressing will be set to automatic, and charger will be in charging mode.
Connecting Shure Devices to Wireless Workbench
Wireless Workbench lets you control and monitor devices over the network. To get started, visit http://
www.shure.com/wwb (http://www.shure.com/wwb) and download Wireless Workbench software. Wireless Work
bench communicates with connected devices over a standard Ethernet network.
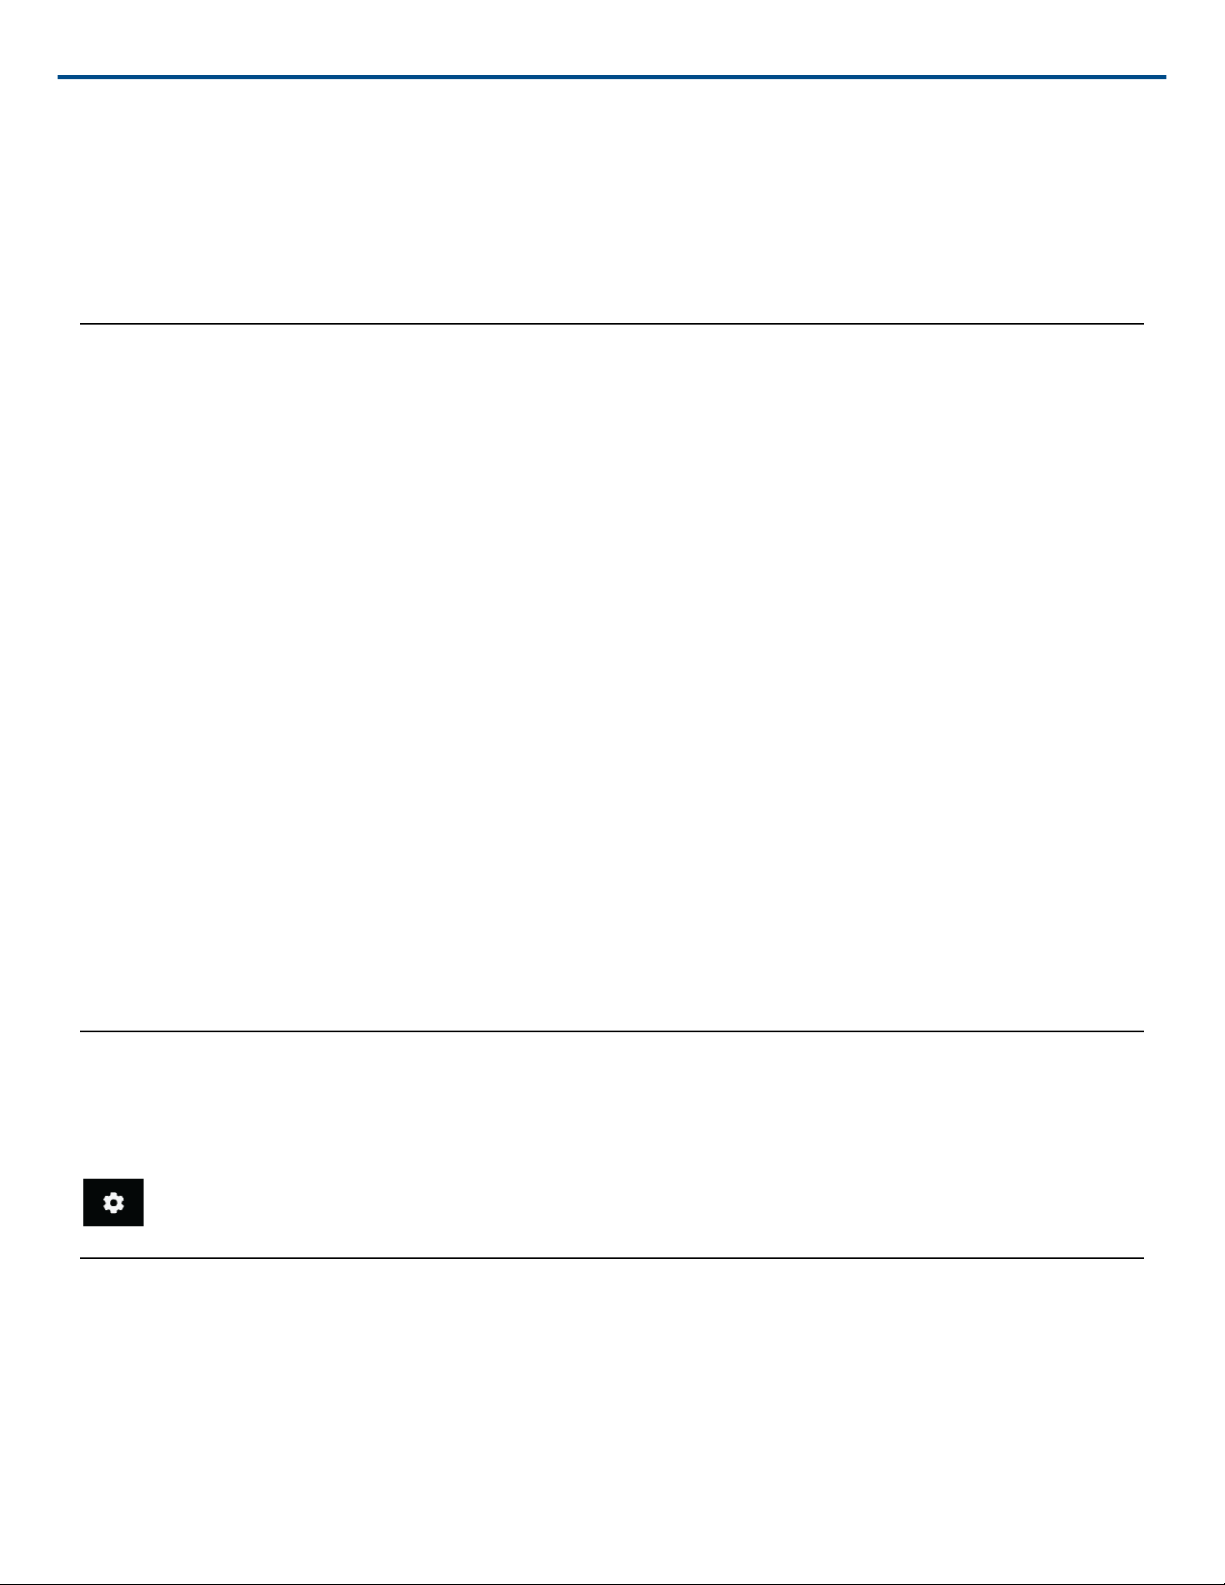
Required equipment: Shure device, computer with Wireless Workbench installed, Cat 5 (or better) Ethernet ca
ble, and router or network switch
1. Connect the device to your computer with a shielded Cat 5 (or better) Ethernet cable to ensure reliable network
performance. If you have multiple devices to manage, connect each device to a router or network switch. The
Ethernet port LEDs on your device will illuminate to indicate network connectivity. Verify that Shure devices can
see each other by looking for the network connectivity icon on the front panel (location varies).
2. For most applications, use the Automatic mode (default) to let your switch or router assign an IP address using
DHCP addressing. If no DHCP server is present, your devices will fall back to a link-local address in the
169.254.xxx.xxx range. If you need to assign specific IP addresses, set the IP mode to Manual in the Network
menu. Find model-specific instructions at http://shure-community.custhelp.com/posts/a21b97f121 (http://shurecommunity.custhelp.com/posts/a21b97f121).
3. Open Wireless Workbench software.
4. Select a Network Interface in the pop-up window. Choose the network that most closely matches the Ethernet
port where your devices are connected.
5. Your device will appear in the Inventory tab when the connection is successful.
9/13
Page 10
Shure Incorporated
Configuration Tips
• Check your firewall settings to make sure Wireless Workbench has access to your network
• Use multiple Ethernet switches to extend the network for larger installations
For more help, visit the Help menu in Wireless Workbench or http://www.shure.com/wwb (http://www.shure.com/
wwb).
Monitoring Batteries with Wireless Workbench
Wireless Workbench provides detailed information for batteries currently docked in the charger. You can also view
battery error notifications and change the charger's network settings.
Click the Inventory tab to view your charger in Wireless Workbench. The charger properties panel provides differ
ent battery statistics:
Charge
Displays charge as a percentage of the total battery capacity. Also shows time remaining to full charge.
Health
Displays health of selected battery as a percentage of the charge capacity of a new battery. Charge capacity (bat
tery life when fully charged) will decline as a result of repeated charge cycles, age, or storage conditions.
Cycle
Displays total number of times that the battery has undergone one full count of discharge and charge. Recharging
after discharging halfway counts as one half of a cycle. Recharging after discharging a quarter of the way counts
as one quarter of a cycle.
Temperature
Displays battery temperature (in Celsius and Fahrenheit) and status.
Charger Network Settings
To adjust charger network settings, open the charger properties panel in Wireless Workbench. Click the gear icon
to set the IP mode and IP address, view the MAC address, and view firmware version.
Connecting to an External Control System
The SBC240 networked charger connects to external control systems such as AMX or Crestron via the Ethernet.
For a comprehensive list of command strings, visit pubs.shure.com/guide/SBC240 (http://pubs.shure.com/guide/
SBC240).
• Connection: Ethernet (TCP/IP; SBC240 is the client)
• Port: 2202
10/13
Page 11
Shure Incorporated
Vertical Mounting
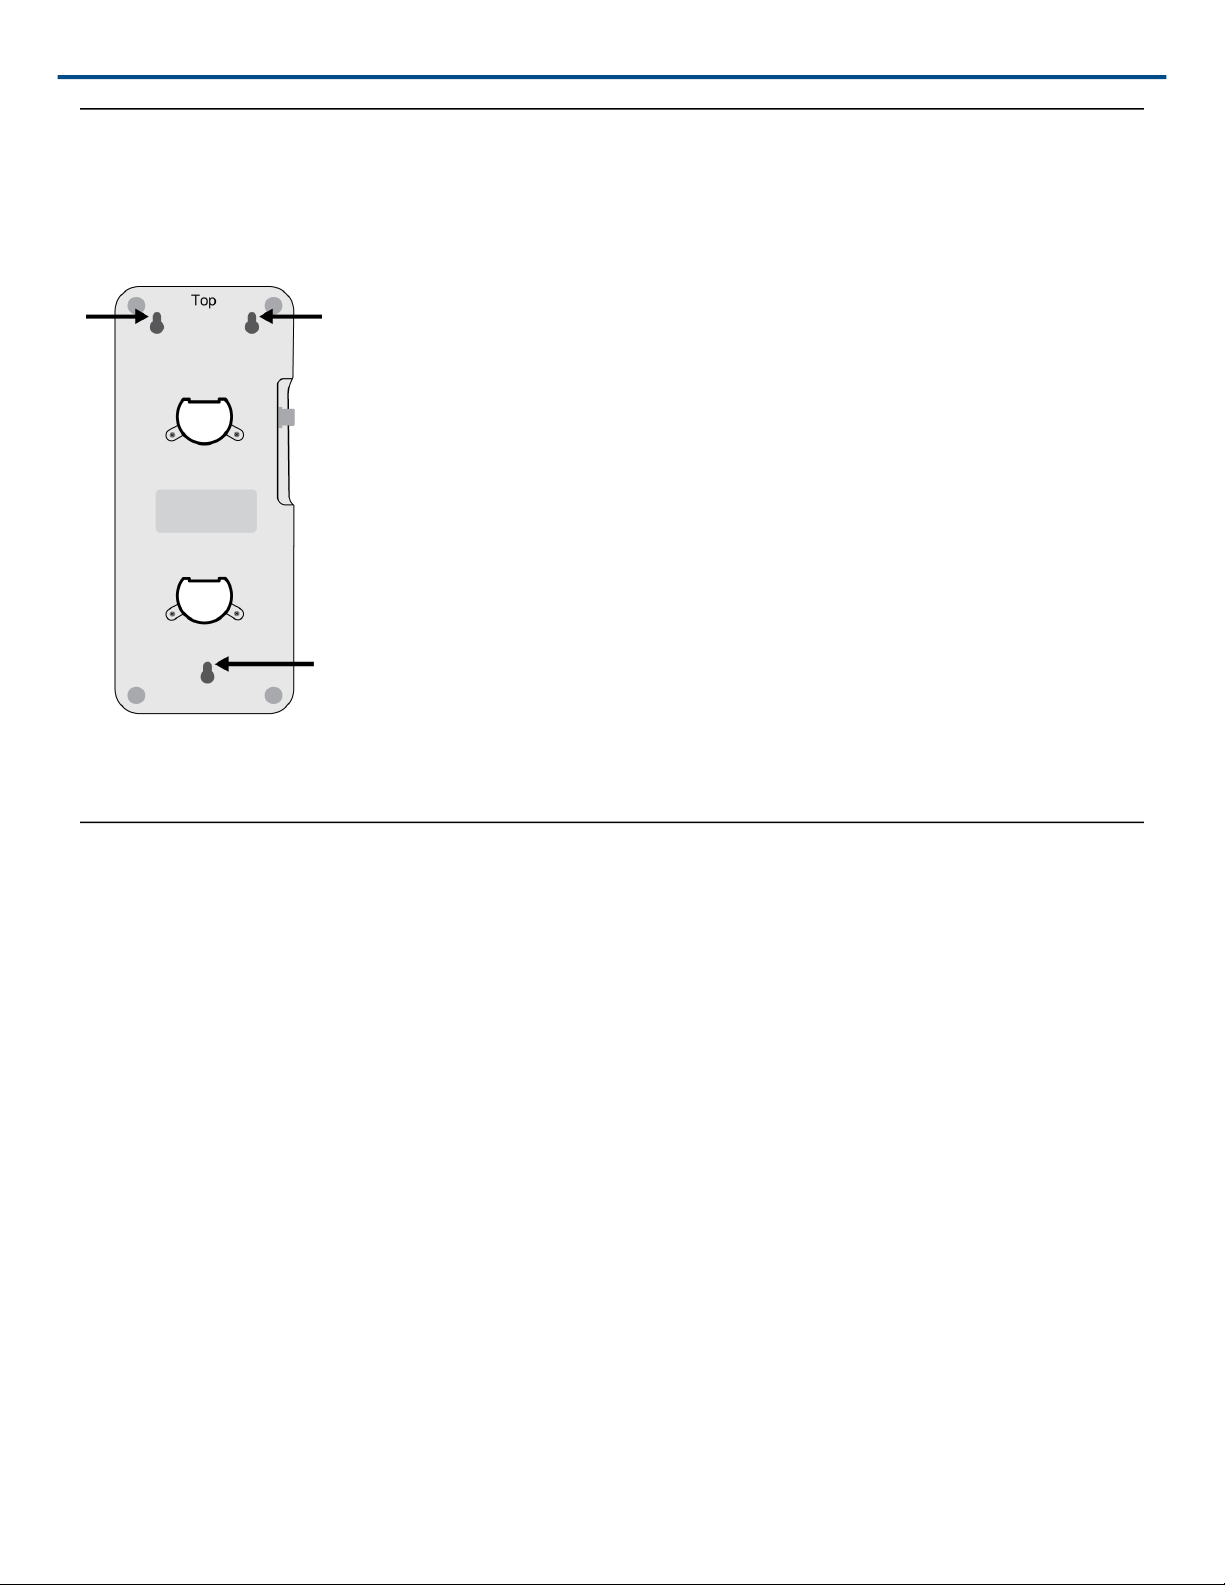
Three mounting points on the bottom of the charger fit #6 round or pan head screws. Mount to a hard surface us
ing 3 screws that are long enough to secure the charger. To mount, orient the charger so that the 2 mounting
points are on top as shown.
Warning: Only charge SB910 or SB920 batteries in charger when it is mounted vertically. Do not charge transmit
ters.
Specifications
SBC240
Compatible Batteries
Up to 2 SB910 or SB920
Compatible Transmitters
Up to 2 ADX1, ADX2, or ADX2FD
Charge Current
1.25 A maximum
Charge Time
1 hour = 50% charged; 3 hours = 100% charged
External Power Supply
PS60
11/13
Page 12

Power Requirement
15 V, 3.33 A maximum
Housing
Molded Plastic
Dimensions
65.25 x 88.74 x 210.82 mm (2.57 x 3.49 x 8.30 in.) H x W x D
Weight
0.45 kg (1 lb) without battery
Operating Temperature Range
-18°C (0°F) to 50°C (122°F)
Note: Battery characteristics may limit this range.
Shure Incorporated
Storage Temperature Range
-29°C (-20°F) to 74°C (165°F)
Note: Battery characteristics may limit this range.
Network Interface
10/100 Mbps Ethernet
Network Addressing Capability
DHCP or Manual IP address
Certifications
Meets essential requirements of all applicable European Directives.
Eligible for CE marking.
The CE Declaration of Conformity can be obtained from: www.shure.com/europe/compliance
Authorized European representative:
Shure Europe GmbH
Headquarters Europe, Middle East & Africa
Department: EMEA Approval
Jakob-Dieffenbacher-Str. 12
75031 Eppingen, Germany
Phone: +49-7262-92 49 0
Fax: +49-7262-92 49 11 4
12/13
Page 13

Shure Incorporated
Email: [email protected]
Operation of this device is subject to the following two conditions: (1) this device may not cause interference, and
(2) this device must accept any interference, including interference that may cause undesired operation of the de
vice.
Le présent appareil est conforme aux CNR d'Industrie Canada applicables aux appareils radio exempts de li
cence. L'exploitation est autorisée aux deux conditions suivantes : (1) l'appareil ne doit pas produire de brouillage,
et (2) l'utilisateur de l'appareil doit accepter tout brouillage radioélectrique subi, même si le brouillage est suscepti
ble d'en compromettre le fonctionnement.
Authorized under the verification provision of FCC Part 15B.
CAN ICES-3 (B)/NMB-3 (B)
Information to the user
This equipment has been tested and found to comply with the limits for a Class B digital device, pursuant to Part
15 of the FCC Rules. These limits are designed to provide reasonable protection against harmful interference in a
residential installation. This equipment generates uses and can radiate radio frequency energy and, if not installed
and used in accordance with the instructions, may cause harmful interference to radio communications. However,
there is no guarantee that interference will not occur in a particular installation. If this equipment does cause harm
ful interference to radio or television reception, which can be determined by turning the equipment off and on, the
user is encouraged to try to correct the interference by one or more of the following measures:
• Reorient or relocate the receiving antenna.
• Increase the separation between the equipment and the receiver.
• Connect the equipment to an outlet on a circuit different from that to which the receiver is connected.
• Consult the dealer or an experienced radio/TV technician for help.
Note: EMC conformance testing is based on the use of supplied and recommended cable types. The use of other
cable types may degrade EMC performance.
Changes or modifications not expressly approved by Shure Incorporated could void your authority to operate this
equipment.
Please consider the environment, electric products and packaging are part of regional recycling schemes and do
not belong to regular household waste.
13/13
 Loading...