

Page 1
© 2014 Shure Incorporated
27A24480 (Rev. 1)
WIRED MICROPHONE
PGA STUDIO MICROPHONE KIT
USER GUIDE
Le Guide de l’Utilisateur
Guia del Usuario
Guida dell’Utente
Руководство пользователя
Bedienungsanleitung
日本語
繁體中文
Manual do Usuário
사용자 가이드
Panduan Pengguna
Printed in U.S.A.
Page 2
3
PG Alta™ Studio Starter Kit
PG Alta Microphones
Congratulations on the purchase of a new Shure PG Alta series
microphone. The PG Alta series delivers professional quality
audio at an affordable price, with solutions for capturing nearly
any source, including voice, acoustic instruments, drums,
and amplified electric instruments. Suitable for live and studio
applications, PG Alta microphones are built to last, and meet
the same rigorous quality testing standards that make all Shure
products trustworthy and reliable.
General Rules for Use
• Do not cover any part of the microphone grille with your hand,
as this will adversely affect microphone performance.
• Aim the microphone toward the desired sound source (such
as the talker, singer, or instrument) and away from unwanted
sources.
• Place the microphone as close as practical to the desired
sound source.
• Work close to the microphone for extra bass response.
• Use only one microphone to pick up a single sound source.
• For better gain before feedback, use fewer microphones.
• Keep the distance between microphones at least three times
the distance from each microphone to its source (“three to one
rule”).
• Place microphones as far as possible from reflective surfaces.
• Add a windscreen when using the microphone outdoors.
• Avoid excessive handling to minimize pickup of mechanical
noise and vibration.
Studio Microphone Kit
The microphones included in this kit provide solutions for
recording almost any source.
Included Components
• PGA52 Dynamic Microphone
• PGA57 Dynamic Microphone
• (2) PGA181 Condenser Microphones
Applications
• Drums
• Vocals
• Acoustic Guitar
• Full Bands
• Guitar/Bass Amplifiers
• Strings
• Brass and Woodwinds
• Piano
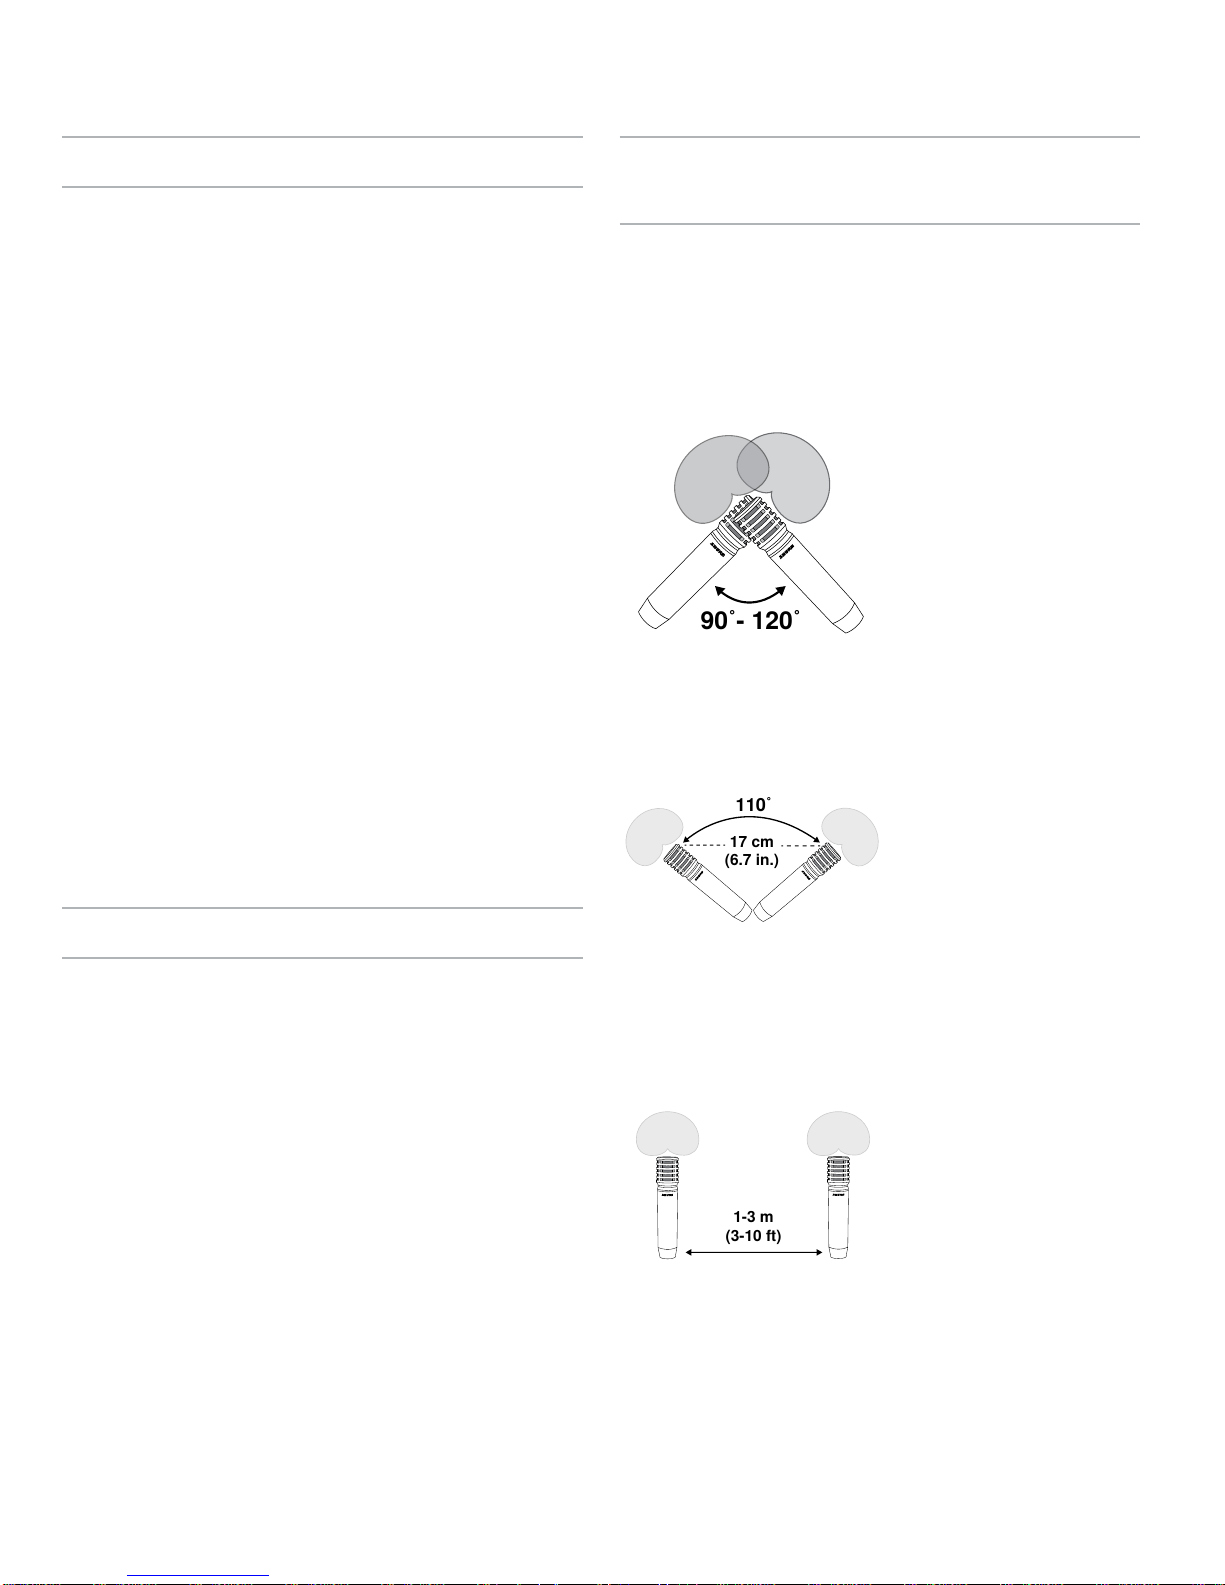
Microphone Techniques for Stereo
Recording
Stereo recording using two microphones adds realism by
capturing sound similar to the way that humans hear. Panning
(directing the signals left and right) adds width and directionality
when listening on stereo systems or headphones.
Tip: Panning the signals farther apart increases stereo separation
and width. Be careful of panning too far, as it may result in a
hollow sound in the middle of the stereo field.
① X-Y Coincident Pair
The X-Y technique
provides excellent phase
coherency because sound
arrives simultaneously at
both microphones.
Placement: Set up the
microphones with the
capsules close together,
but not touching.
Experiment with angles
between 90 and 120
degrees to capture the full
width of the source.
90ɴ120ɴ
② ORTF
Developed as a French
broadcasting standard,
ORTF technique
replicates the spacing
and angle of human
ears. It provides a
natural, wide sound.
Placement: Angle the
microphones at 110°,
with the capsules 17 cm
apart.
110ɴ
17 cm
(6.7 in.)
③ A/B Spaced Pair
Spaced pair recording
can deliver a dramatic
stereo effect because
sound arrives at each
microphone at a slightly
different time, providing
the listener with timing
cues that localize
sounds.
1-3 m
(3-10 ft)
Note:
For drum overheads, the snare drum should be equidistant
from each microphone to achieve a tight, focused sound. Use
a measuring tape or piece of string to verify this distance.
Page 3

4
Applications
The following table provides basic recording techniques for several sources. Experiment with various configurations and microphone
placement to achieve the preferred sound.
Source Suggested Microphones Tips
Drums PGA181: Stereo overheads
PGA52: Kick drum
PGA57: Snare Drum
• See stereo microphone techniques for overhead placement options
• If the kick drum resonant head has a hole in it, place the microphone inside
for improved isolation from other instruments
• Aim the PGA57 towards the center of the snare drum head to capture more
stick attack, or closer the edge to capture more overtones.
Vocals PGA181 • Place the microphone 1-6 inches (2-15 cm) from the source
• Use a pop filter (Shure PS-6) to prevent plosives
Acoustic Guitar PGA181 • Use two PGA181 microphones to record in stereo using one of the stereo
recording methods, or a single PGA181 for a mono signal
• Place microphone(s) 6-12 inches (15-30 cm) from the guitar
• Place near the 12th fret for a balanced sound, or closer to the sound hole
for more bass
Full Band PGA181: Stereo pair, aimed
at entire group
PGA52: Kick drum or bass
amplifier
PGA57: Vocals or guitar
amplifier
• Use close-placement microphones on sources that are most likely to need
extra volume in the mix, such as vocals or acoustic instruments.
• If more close-placement microphones are necessary, use one PGA181 to
capture the entire group, and use the second PGA181 on an instrument.
Guitar/Bass
Amplifiers
PGA52: Bass amplifier
PGA57: Guitar amplifier
PGA181: Guitar or bass
amplifiers
• Aim the microphone at the center of the speaker cone for a bright, punchy
sound, or towards the edge of the speaker for a mellow sound.
• The PGA181 delivers a clear, detailed sound
• The PGA57 and PGA52 deliver a warmer sound that helps to smooth out
harsh sounding amplifiers
Advanced tip: For a more spacious sound, use a PGA57 or PGA52 close to
the amp, with a PGA181 placed 10-20 feet away. Pan them slightly in opposite
channels to create a full, roomy sound.
Strings PGA181: Stereo pair
(ensemble), any individual
instrument
• To record a string ensemble, use one of the stereo microphone techniques
to capture the width of the source
• For an individual instrument, try using one PGA181 approximately 1 foot
from the source, with the other PGA181 in the room (6-12 feet from the
source) to capture ambience.
Brass and
Woodwinds
PGA181: Stereo pair
(ensemble), any individual
instrument
PGA52: Tuba
PGA57: Saxophone, trumpet,
trombone
• To capture brass and woodwind ensembles, use one of the stereo
microphone techniques to capture the width of the source
• For an individual instrument, such as a saxophone, aim the PGA57 toward
the bell of the instrument and use a PGA181 in the room (6-12 feet from
the source) to capture ambience
• For a simplified approach, simply use one PGA181 placed 1-2 feet from the
instrument
Piano PGA181 (Stereo pair) • Use a stereo recording technique, with the microphones placed inside the
piano lid
• For upright pianos, keep the top open and/or remove the front panel when
possible
Page 4
5
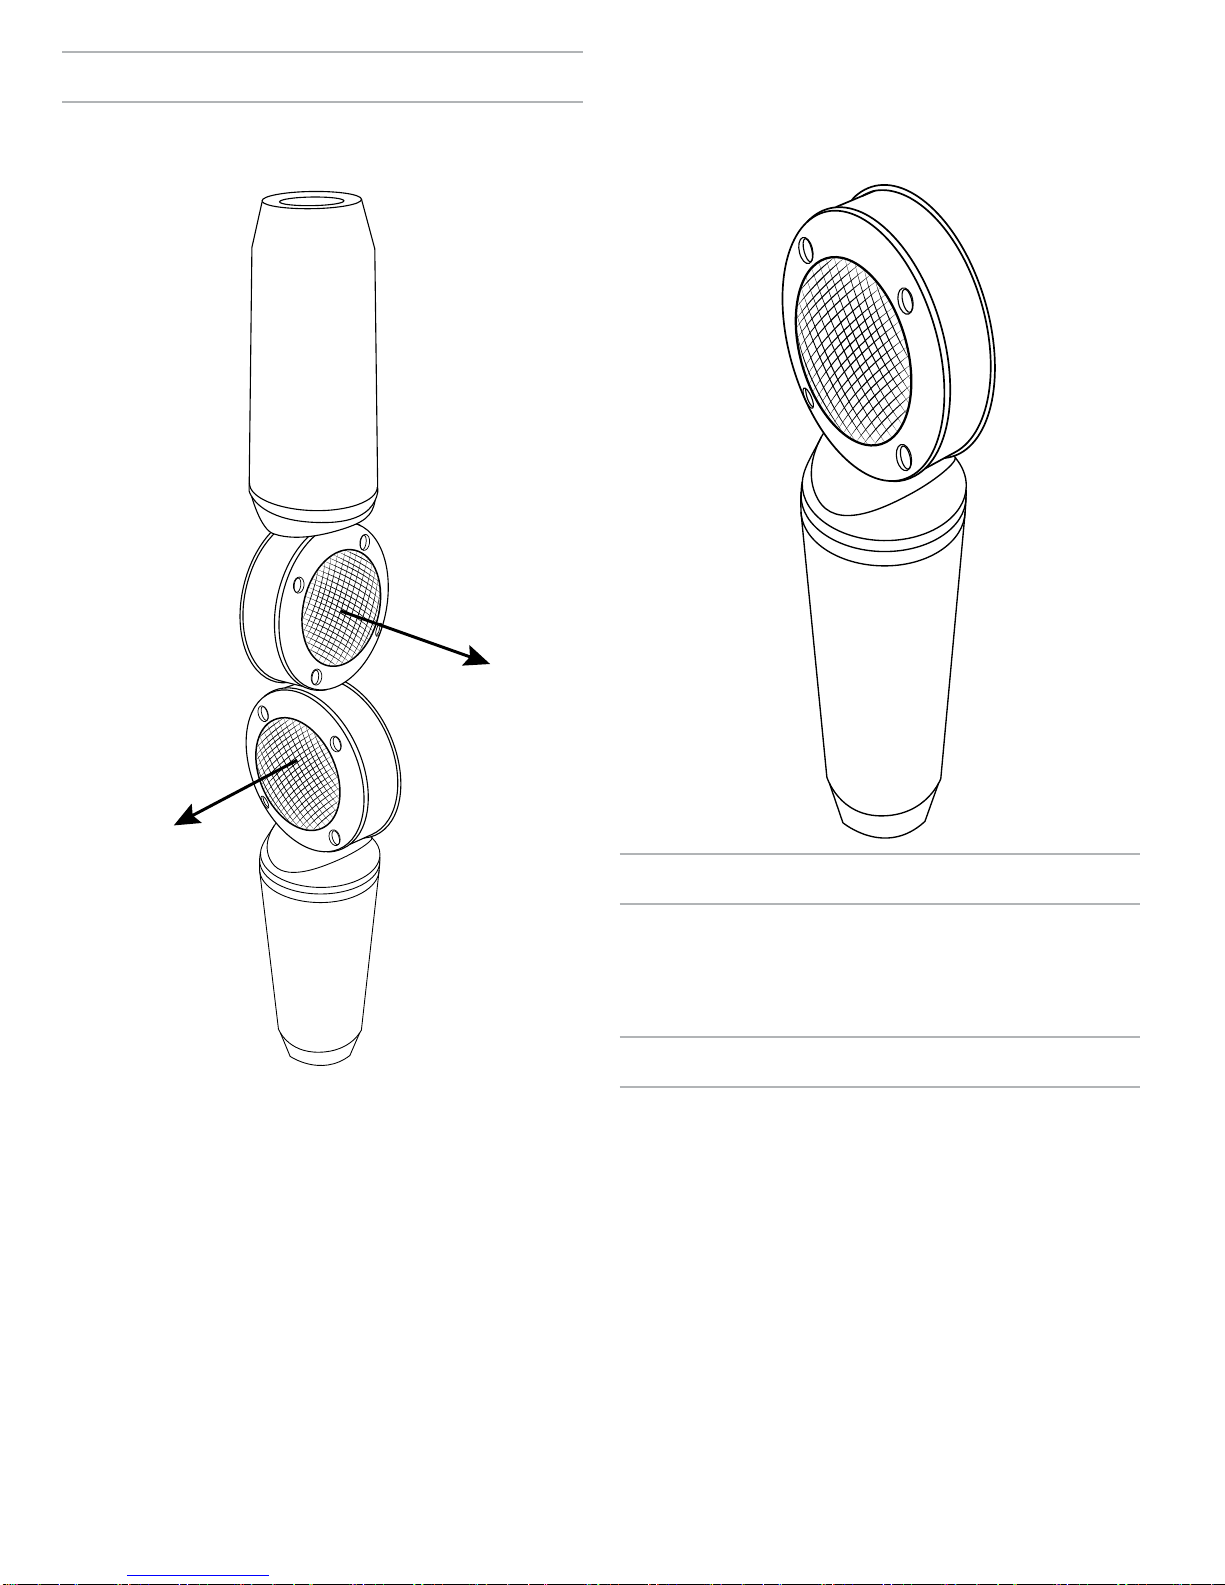
PGA181 X-Y Stereo Position
The PGA181 is a side-address microphone, and must be set up
vertically for the capsules to be coincident.
The capsules are angled 90° apart, just like the alignment with
a front-address microphone
Positioning the Microphone
The front of the microphone is marked by several indicators:
four screws around the grille, the cardioid logo, and the PGA181
model number. Position this side toward the sound source.
Proximity Effect
Directional microphones progressively boost bass frequencies as
the microphone is placed in closer proximity to the source. This
phenomenon, known as proximity effect, can be used to create a
warmer, more powerful sound.
Phantom Power
All condenser microphones require phantom power to operate.
This microphone performs best with a 48 V DC supply (IEC-
61938), but it can operate with lower voltages.
Phantom power is provided by the mixer or audio interface
that the microphone is connected to, and requires the use of
a balanced microphone cable: XLR-to-XLR or XLR-to-TRS. In
most cases, there is a switch or button to activate the phantom
power. See the user guide for the mixer or interface for additional
information.
NOTE: Applies to PGA181 condenser microphones only.
Supplying phantom power to the other included microphones will
not cause damage.
Page 5
6
Optional Accessories and
Replacement Parts
7.6 m (25 ft.) Cable (XLR-XLR) C25J
5/8" to 3/8" Thread Adapter 31A1856
Vinyl zippered storage bag 95B2324
Drum Microphone Mount AP56DM
Grille RPMP52G
PGA57 Replacement Grille RPMP57G
4.6 m (15 ft.) Cable (XLR-XLR) 95D2153
Wireless Microphone Clip WA371
Popper Stopper® Pop Filter with Metal
Gooseneck and Microphone Stand Clamp
PS-6
Foam Windscreen for all larger Shure "balltype" Microphones available in black, blue,
gray, green, red and yellow
A58WS
Microphone Clip for SM58, SM57, SM87A,
Beta 87A, Beta 87C, PGA57, PGA58, PGA48,
PGA81
A25D
Specifications
PGA52
Type
Dynamic (moving coil)
Frequency Response
50 to 12,000 Hz
Polar Pattern
Cardioid
Output Impedance
150 Ω
Sensitivity
at 1 kHz, open circuit voltage
-55 dBV/Pa¹ (1.75 mV)
Polarity
Positive pressure on diaphragm produces positive voltage on pin 2 with
respect to pin 3
Weight
454 g (16.01oz.)
Connector
Three-pin professional audio (XLR), male
Environmental Conditions
Operating Temperature -20° to 165°F (-29° to 74°C)
Relative Humidity 0 to 95%
1 Pa=94 dB SPL
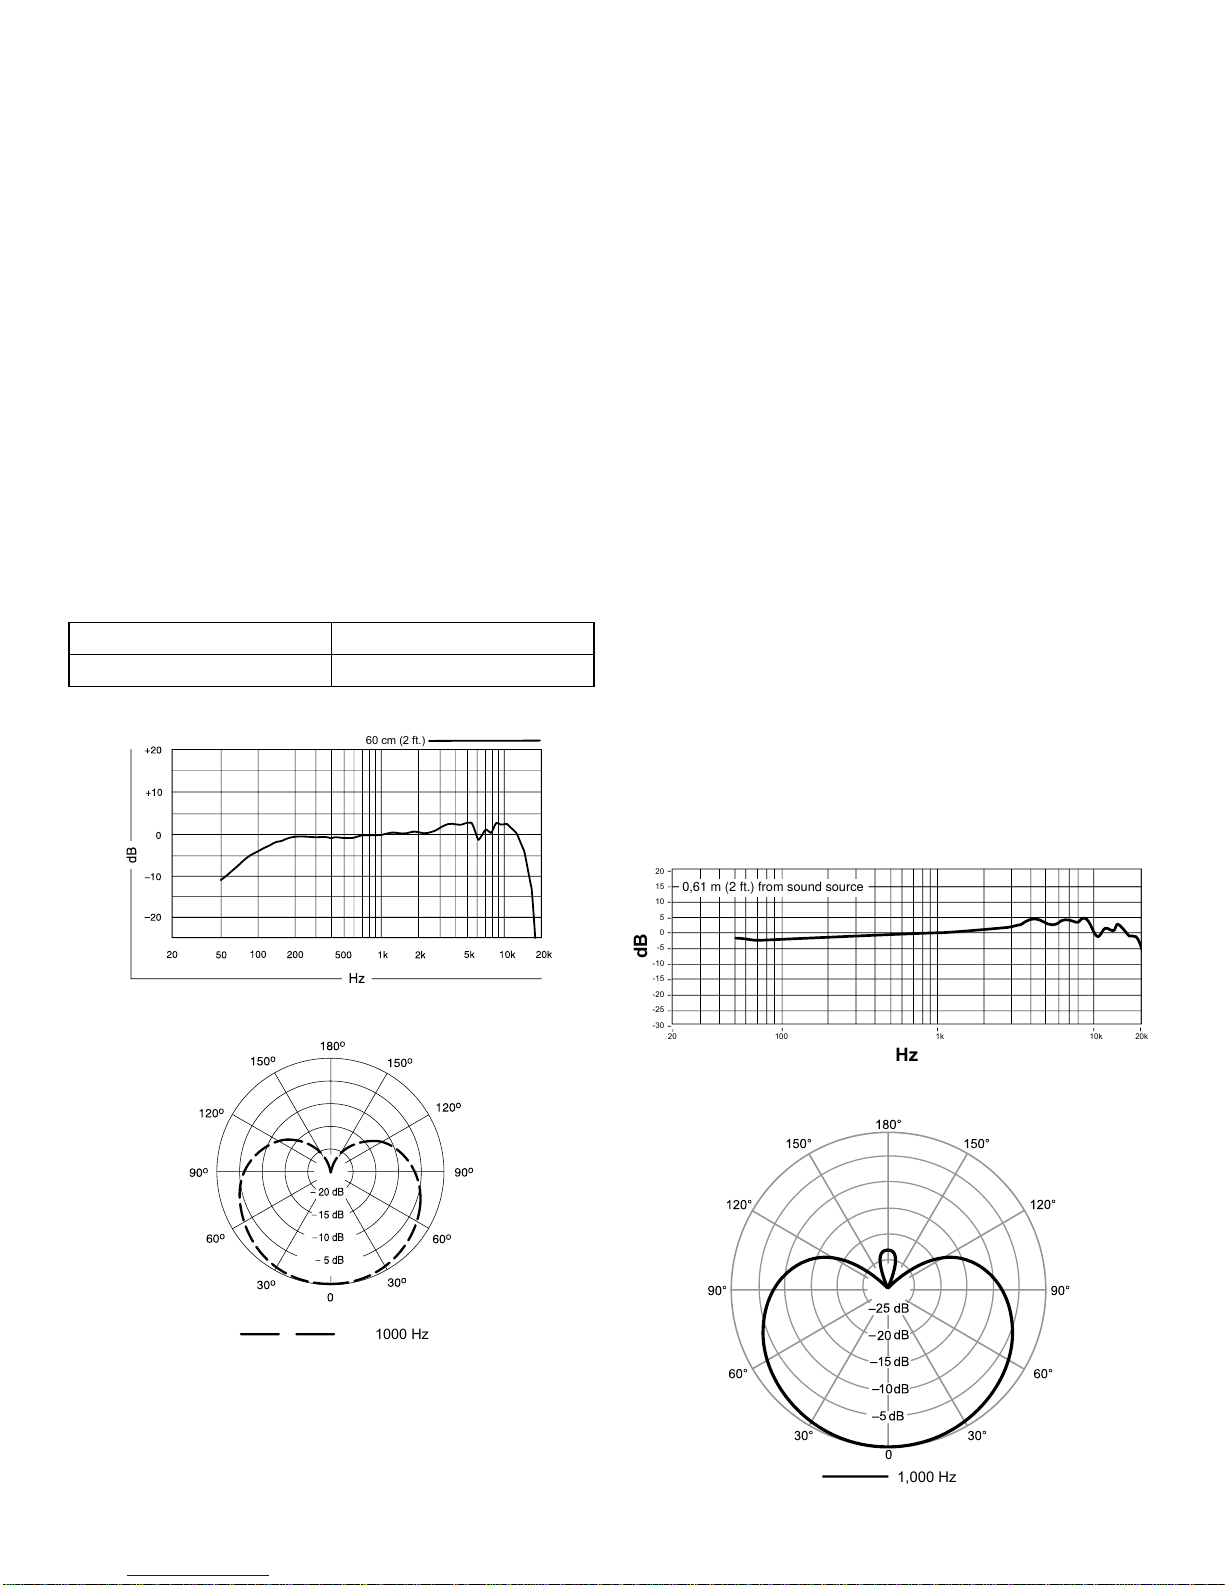
60 cm (2 ft.)
10 cm (4 in.)
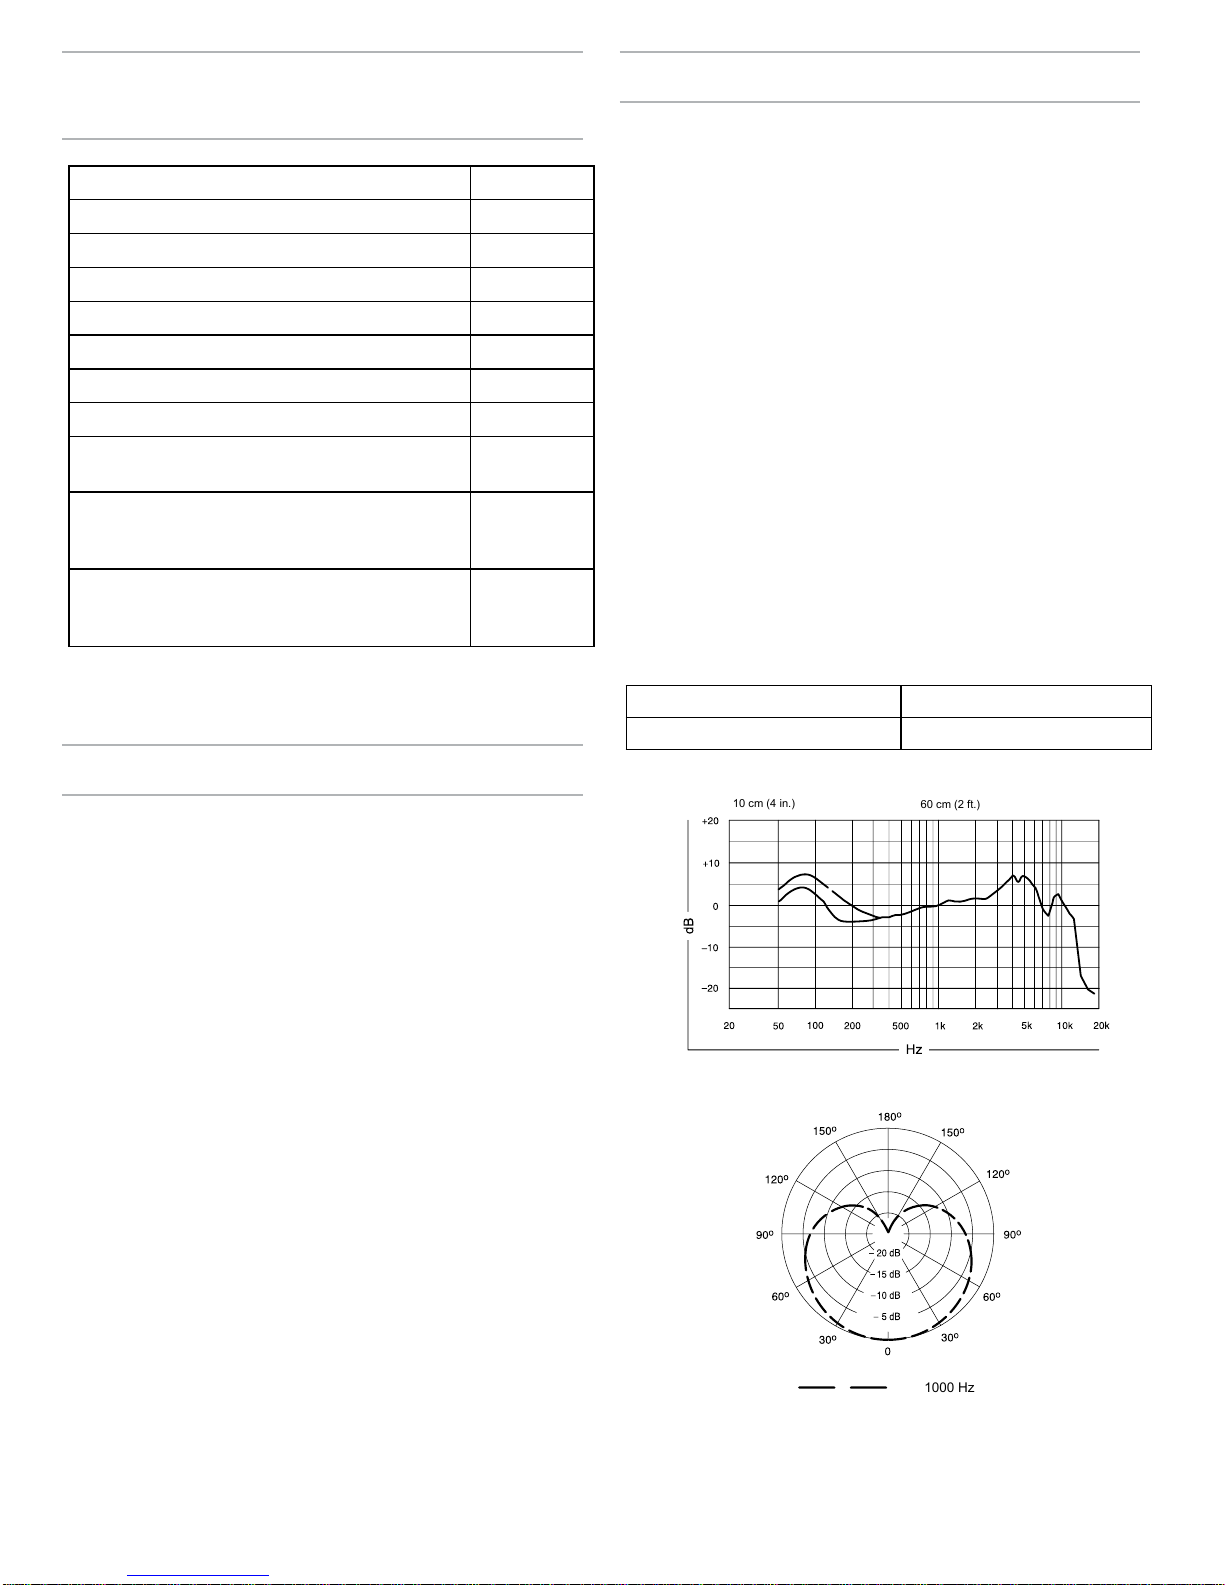
Typical Frequency Response
1000 Hz
Typical Polar Pattern
Certifications
This product meets the Essential Requirements of all relevant
European directives and is eligible for CE marking.
The CE Declaration of Conformity can be obtained from: www.
shure.com/europe/compliance
Authorized European representative:
Shure Europe GmbH
Headquarters Europe, Middle East & Africa
Department: EMEA Approval
Jakob-Dieffenbacher-Str. 12
75031 Eppingen, Germany
Phone: 49-7262-92 49 0
Fax: 49-7262-92 49 11 4
Email: [email protected]
Page 6
7
PGA57
Type
Dynamic (moving coil)
Frequency Response
50 to 15,000 Hz
Polar Pattern
Cardioid
Output Impedance
150 Ω
Sensitivity
at 1 kHz, open circuit voltage
-56.5 dBV/Pa¹ (1.5 mV)
Polarity
Positive pressure on diaphragm produces positive voltage on pin 2 with
respect to pin 3
Weight
280 g (9.88oz.)
Connector
Three-pin professional audio (XLR), male
Environmental Conditions
Operating Temperature -20° to 165°F (-29° to 74°C)
Relative Humidity 0 to 95%
1 Pa=94 dB SPL
60 cm (2 ft.)
Typical Frequency Response
1000 Hz
Typical Polar Pattern
PGA181
Type
Electret Condenser
Polar Pattern
Cardioid
Frequency Response
50 to 20,000 Hz
Output Impedance
at 1 kHz, open circuit voltage
120 Ω, actual
Sensitivity
at 1 kHz, open circuit voltage
-38 dBV/Pa [1] (12.7 mV)
Maximum SPL
1 kHz at 1% THD, 1 kΩ load
138 dB SPL
Polarity
Positive pressure on diaphragm produces positive voltage on pin 2 with
respect to pin 3
Connector
Three-pin professional audio (XLR), male
Weight
383 g (0.8 lbs)
Housing
Cast Zinc
Power Requirements
48 V DC phantom power (4 mA)
[1] 1 Pa=94 dB SPL
20
15
10
5
0
-30
-25
-20
-15
-10
-5
dB
Hz
20 100 1k 10k 20k
0,61 m (2 ft.) from sound source
Frequency Response
1,000 Hz
Polar Pattern
Page 7

 Loading...