

Shure PE52 User Guide
T
M
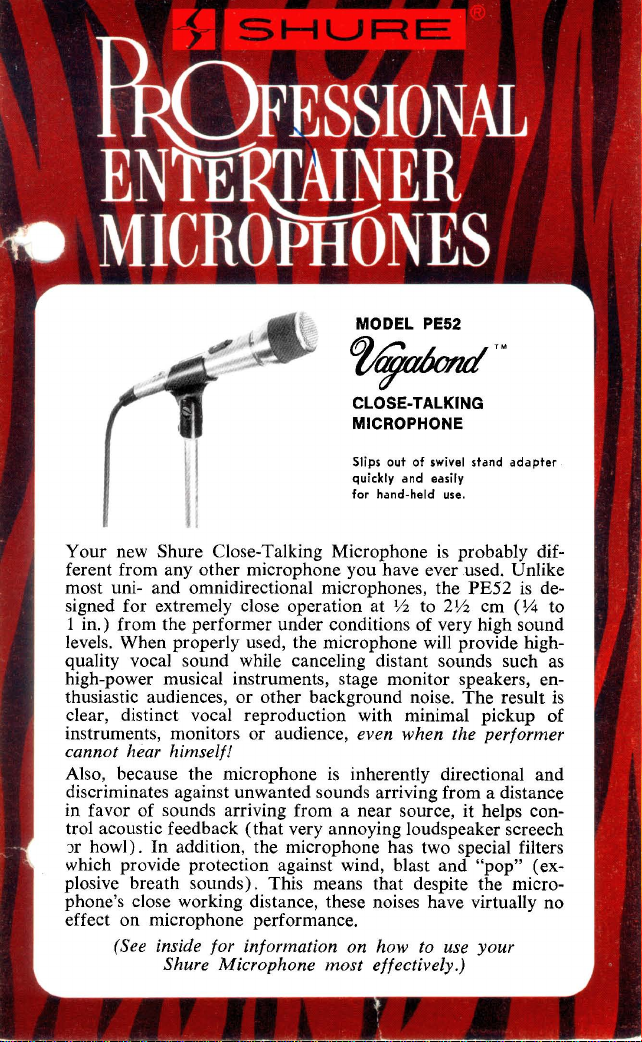
CLOSE-TALKING
MICROPHONE
Slips out of swivel stand adapter
quickly and easily
for hand-held use.
Your new Shure Close-Talking Microphone is probably different from any other microphone you have ever used. Unlike
most uni- and omnidirectional microphones, the
signed for extremely close operation at
1
in.) from the performer under conditions of very high sound
%
levels. When properly used, the microphone will provide
to
2%
PE52
cm
is de-
(%
high-
to
quality vocal sound while canceling distant sounds such as
high-power musical instruments, stage monitor speakers, enthusiastic audiences, or other background noise. The result is
clear, distinct vocal reproduction with minimal pickup of
instruments, monitors or audience,
even when the performer
cannot hear himself!
Also, because the microphone is inherently directional and
discriminates against unwanted sounds arriving from a distance
in favor of sounds arriving from a near source, it helps control acoustic feedback (that very annoying loudspeaker screech
3r howl). In addition, the microphone has two special filters
which provide protection against wind, blast and
"pop" (explosive breath sounds). This means that despite the microphone's close working distance, these noises have virtually no
effect on microphone performance.
(See inside for information on how to use your
Shure Microphone most effectively.)
HOW TO CONTROL FEEDBACK
A
performer's number one enemy in using a microphone is
-'feedback." This is a harsh hum, howl or squeal which occurs
when the microphone picks up sound from the loudspeakers,
re-amplifies and rebroadcasts it over and over again.
The key factors in feedback prevention are loudspeaker position in relation to the microphone, and working distance from
the microphone. Feedback occurs if the microphone picks up
sound from the loudspeakers. Keep the loudspeakers as far
to the sides
as
possible-so they do not point toward the microphone. Always keep the microphone pointed toward and
close to the performer and away from the loudspeakers. When
stage monitor loudspeakers are used, make sure they are positioned in front of the performers and face the rear of the
microphone.
In a room with hard walls, floor, and ceiling, loudspeaker
sound may bounce back into the microphone and create feedback. Solve this
~roblem by turning down the amplifier volume
control.
(Important Note: If you cannot solve the feedback problem
with your close-talking microphone, a Shure Feedback
Controller is suggested.)
BASIC POINTS FOR PROFESSIONAL
MICROPHONE TECHNIQUE
Proper microphone technique will add to the overall effectiveness with which you project yourself to your audience.
Keep the following points in mind when using this microphone:
1.
Maintain the proper distance of
l/z
to
2%
cm
('/4
to 1 in.)
from the microphone. This close working distance allows
the microphone to cancel distant sounds and provide superior output under noisy conditions. This microphone has
a strong proximity effect, that is, maximum bass output
is obtained when it is used close-talking (see Figure
1).
For reduced bass response, hold the microphone a little
farther away. For optimum noise rejection, do not work the
microphone at distances greater than 5 cm (2 in.).
2. Don't needlessly change your distance from the microphone as this will affect both the level and bass output.
3.
Remember that this is a close-talking, voice-range microphone. It should not be used for musical instrument
miking
or general microphone use.
4.
Consider the microphone as an instrument and practice
your technique to enhance your performance.
YOUR SHURE MICROPHONE IS BUILT TO LAST!
Your Shure Microphone is ruggedly built and should give you
years of uninterrupted service: however, remember that it is
a sensitive electronic instrument. Avoid dropping the unit, or
subjecting it to unnecessarily rough treatment. Normal usage,
of course, will not impair performance of the unit. Use the
protective carrying case to prevent damage not only when
traveling, but also when storing the microphone.
WINDSCREEN
The external foam windscreen of your microphone should
be cleaned occasionally. Slide it up and over the grille, rinse
it in clean water, squeeze the water out, and allow it to dry
completely before replacing. Be sure to replace with tapered
end at top.
MICROPHONE CHECK-LIST
I.
Check microphone impedance-is it correct for the amplifier input being used?
2.
Check microphone cable connectors to microphone, mixer,
and amplifier-are they tightly plugged in?
3.
Check microphone, amplifier and/or mixer.
a. Are they turned on?
Are volume controls turned up?
b.
IF THE MICROPHONE DOES NOT WORK
Check the above list. If the microphone still does not appear
to be operating, check it on a spare cable. If microphone still
does not appear to be operating, have the microphone and
cable checked by your Shure Professional Entertainer Products
Dealer, or write Service Department, Shure Brothers, Inc.
 Loading...