

Shure AXT903, AXT904 User Manual
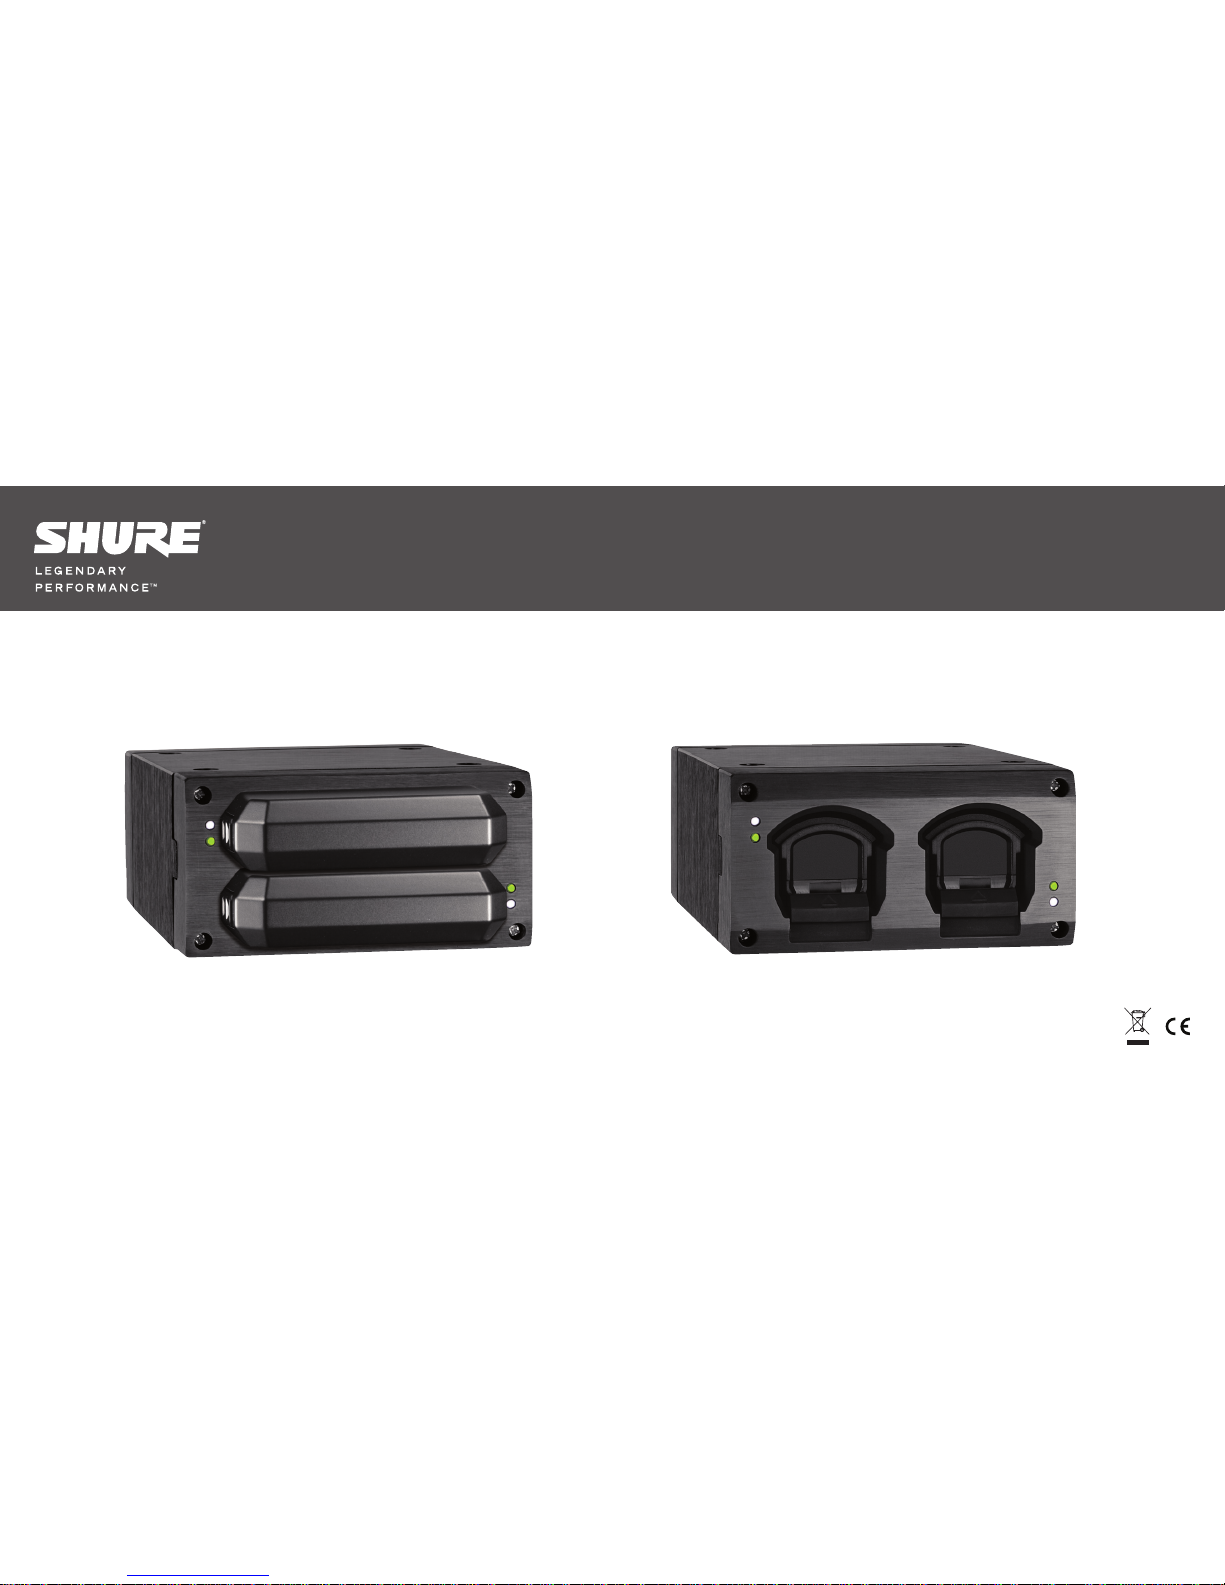
AXT903 and AXT904 Portable Chargers
AXT903 AXT904
© 2011 Shure Incorporated
27A16423 (Rev. 2)
Printed in China
*27A16423*

WARNING: This product contains a chemical known to the State of California to cause cancer and birth
defects or other reproductive harm.


5
AXT Portable Chargers
WARNING: Danger of explosion if battery incorrectly replaced. Operate only with Shure compatible batteries.
Note: Use this battery charger only with the Shure Model PS50 series power supply.
WARNING
• Battery packs may explode or release toxic materials. Risk of fire or burns. Do not open, crush, modify, disassemble, heat above 140°F (60°C), or incinerate
• Follow instructions from manufacturer
• Never put batteries in mouth. If swallowed, contact your physician or local poison control center
• Do not short circuit; may cause burns or catch fire
• Do not charge or use battery packs with other than specified Shure products
• Dispose of battery packs properly. Check with local vendor for proper disposal of used battery packs
Note:
• This equipment is intended to be used in professional audio applications.
• EMC conformance is based on the use of supplied and recommended cable types. The use of other cable types may degrade EMC performance.
• Use this battery charger only with the Shure charging modules and battery packs for which it is designed. Use with other than the specified modules and battery packs
may increase the risk of fire or explosion.
• Changes or modifications not expressly approved by Shure Incorporated could void your authority to operate this equipment.
• The rating label is located at the bottom of the enclosure.
6
Features
• Charges two transmitter batteries
• Rapid charging brings batteries to 50% capacity within 1 hour
• Completely charges batteries within 3 hours
• Modules can be re-used in AXT900 rackmount charging station
• Power supply included
AXT903 and AXT904 Portable Battery Chargers
Optional Accessories
①
②
③
④
⑤
⑥
⑦
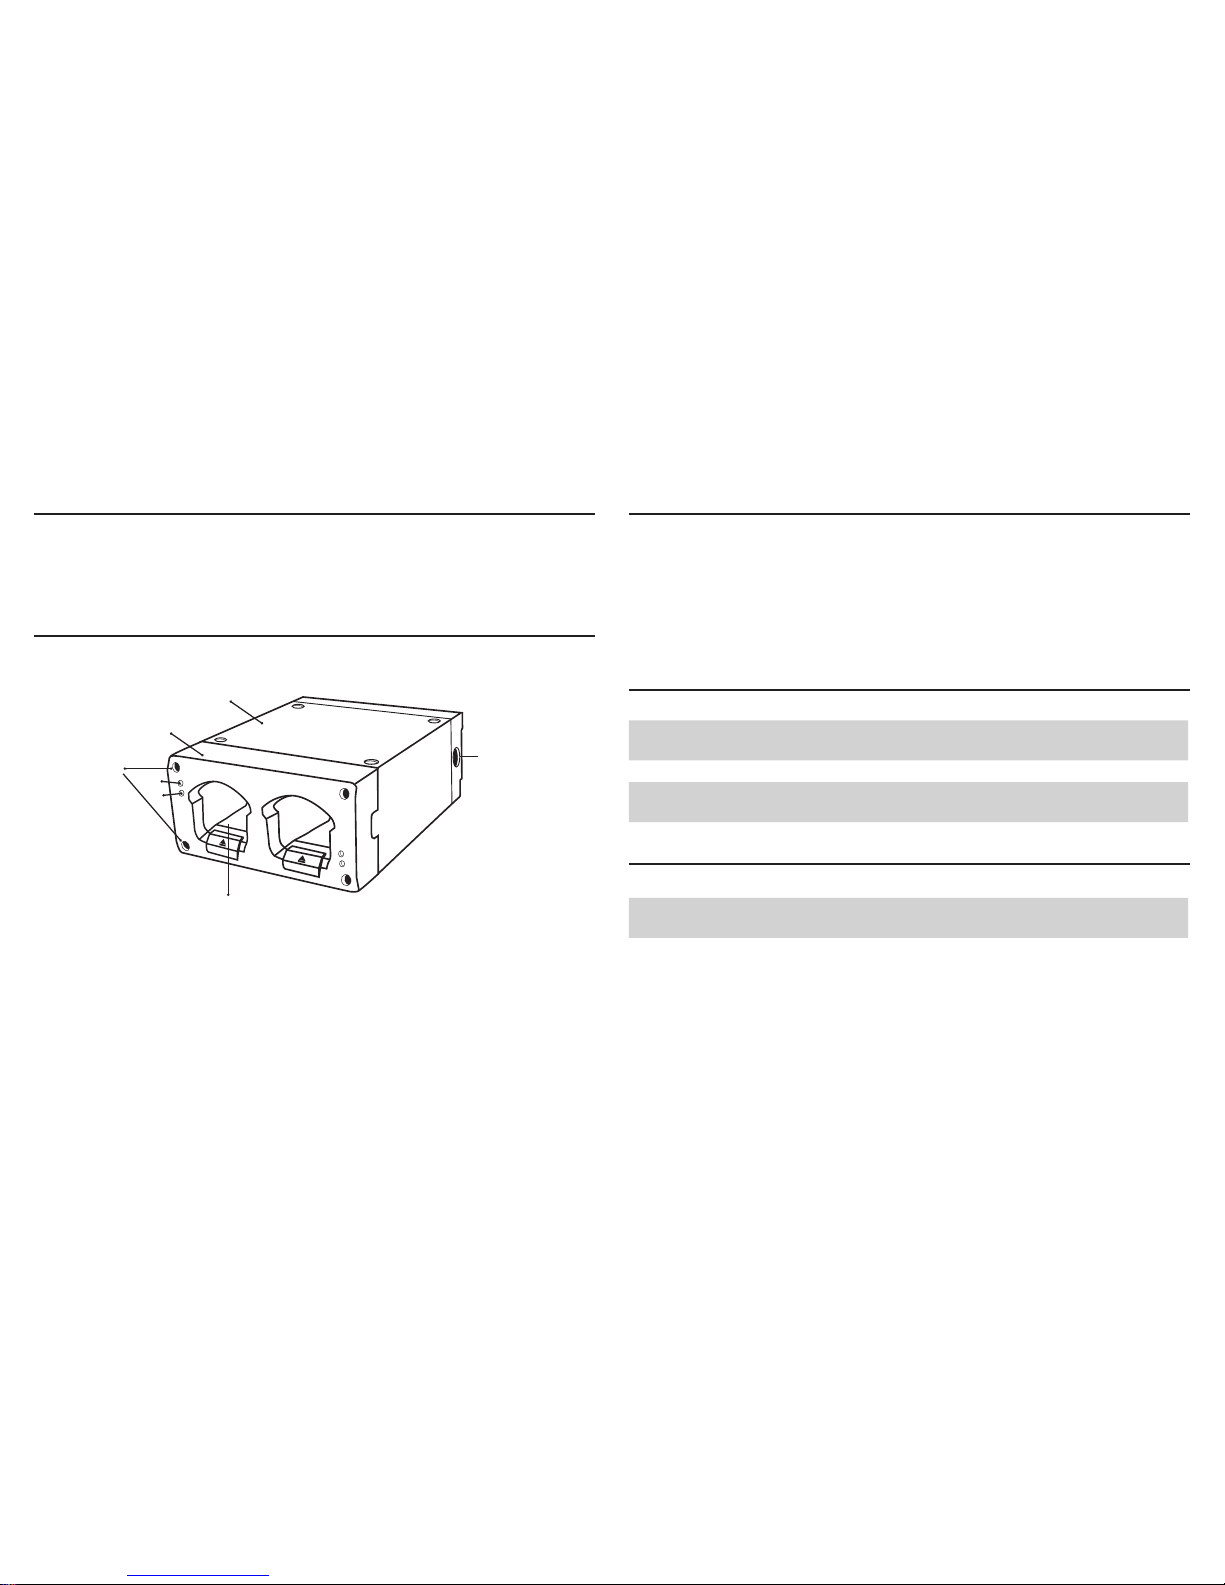
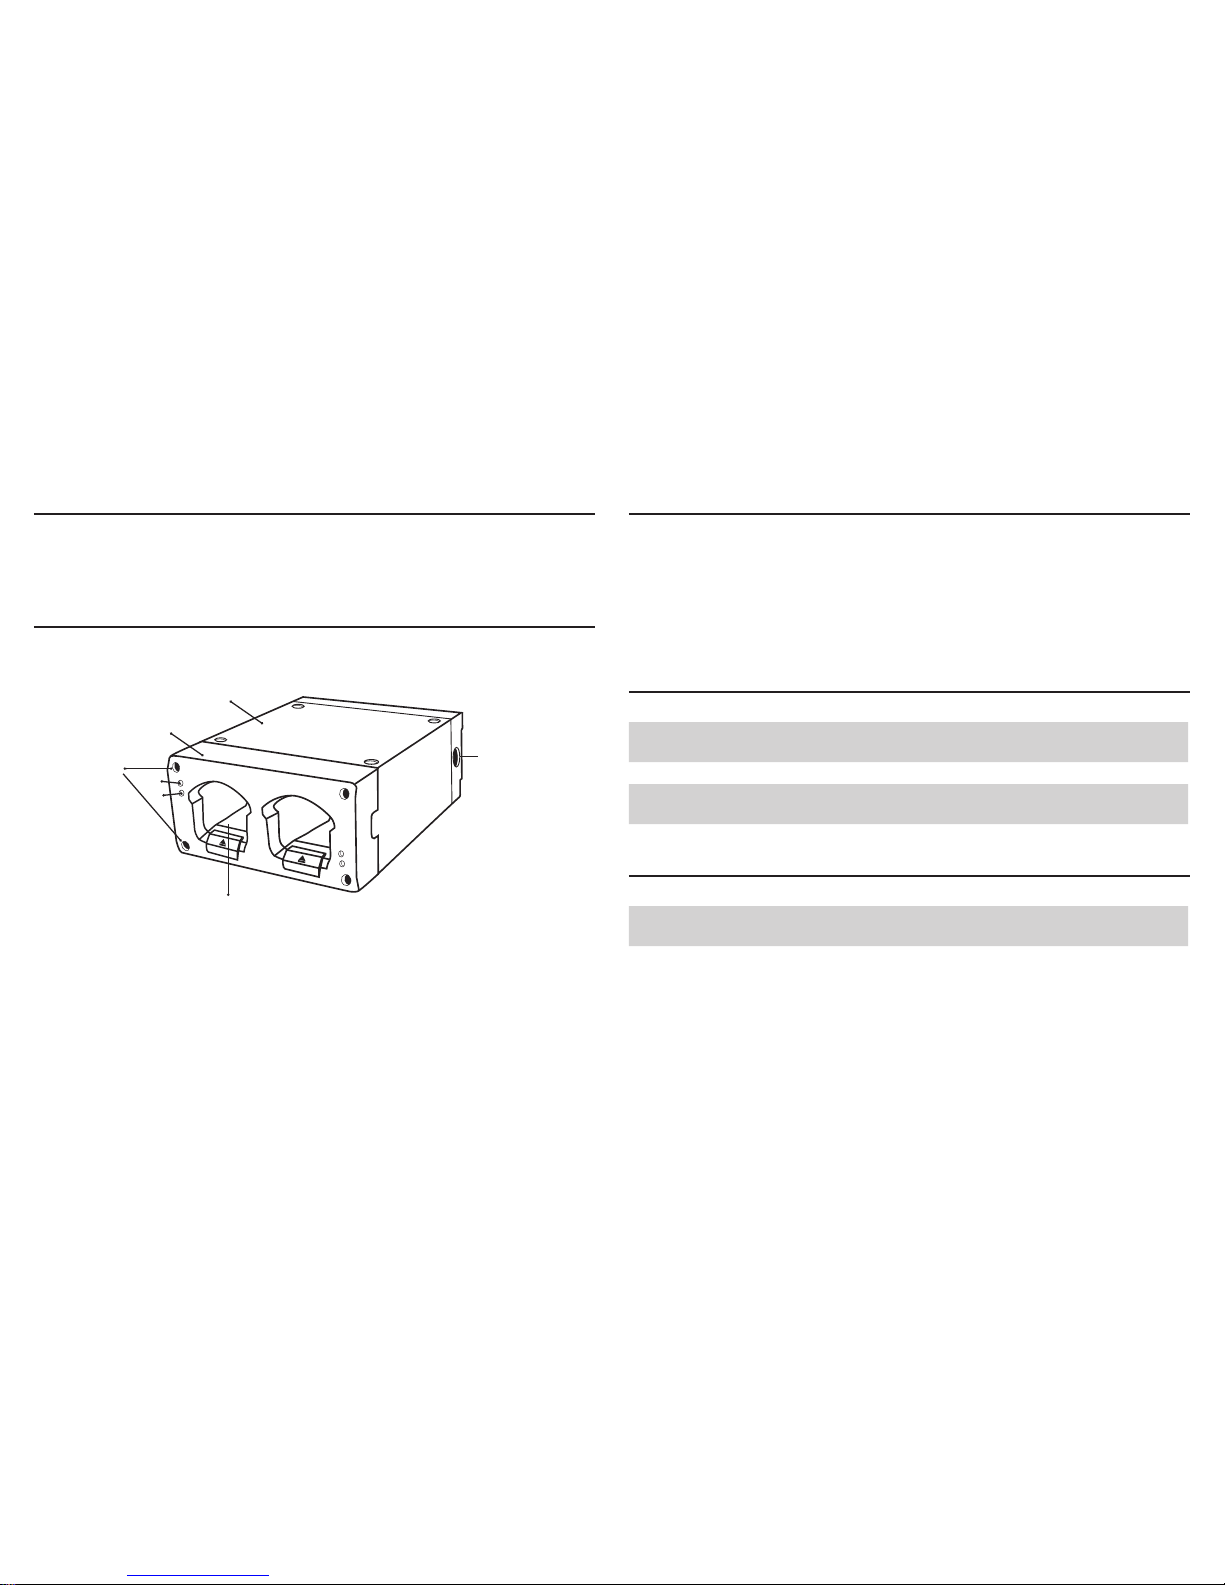
The AXT903 and AXT904 charging stations charge 2 transmitter batteries in a
convenient and compact desktop unit.
① Charger Housing
② 2-Bay Charging Module
③ Installation Screws (4 pieces)
④ Power LED
⑤ Charge Status LED
⑥ Charging Bay
⑦ DC Power Supply Input
Included Components
2-bay charging module AXT901 for bodypack battery or AXT902 for handheld
battery
Power Supply PS50
Mounting Screws for
Charger Modules (8)
30B13476
Charger Overview
2-bay charging module for
bodypack battery
AXT901
AXT902 2-bay charging module
for handheld battery
AXT902
7
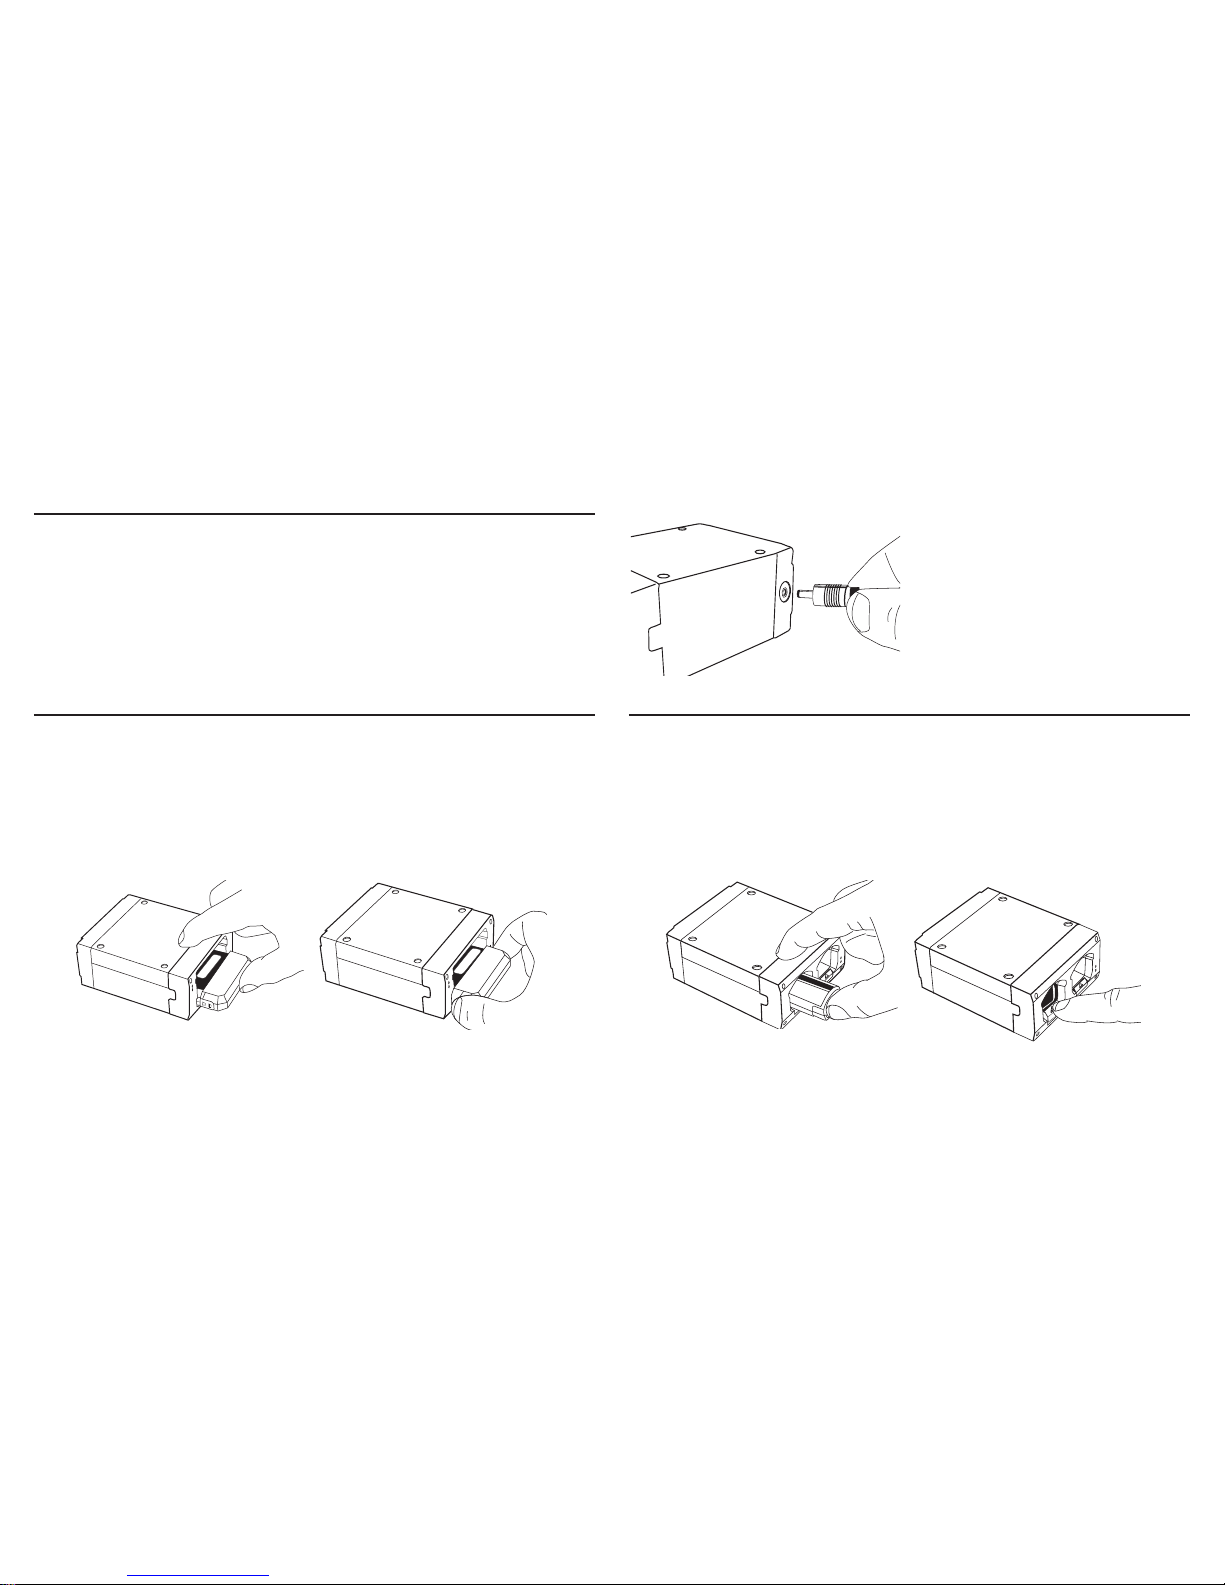
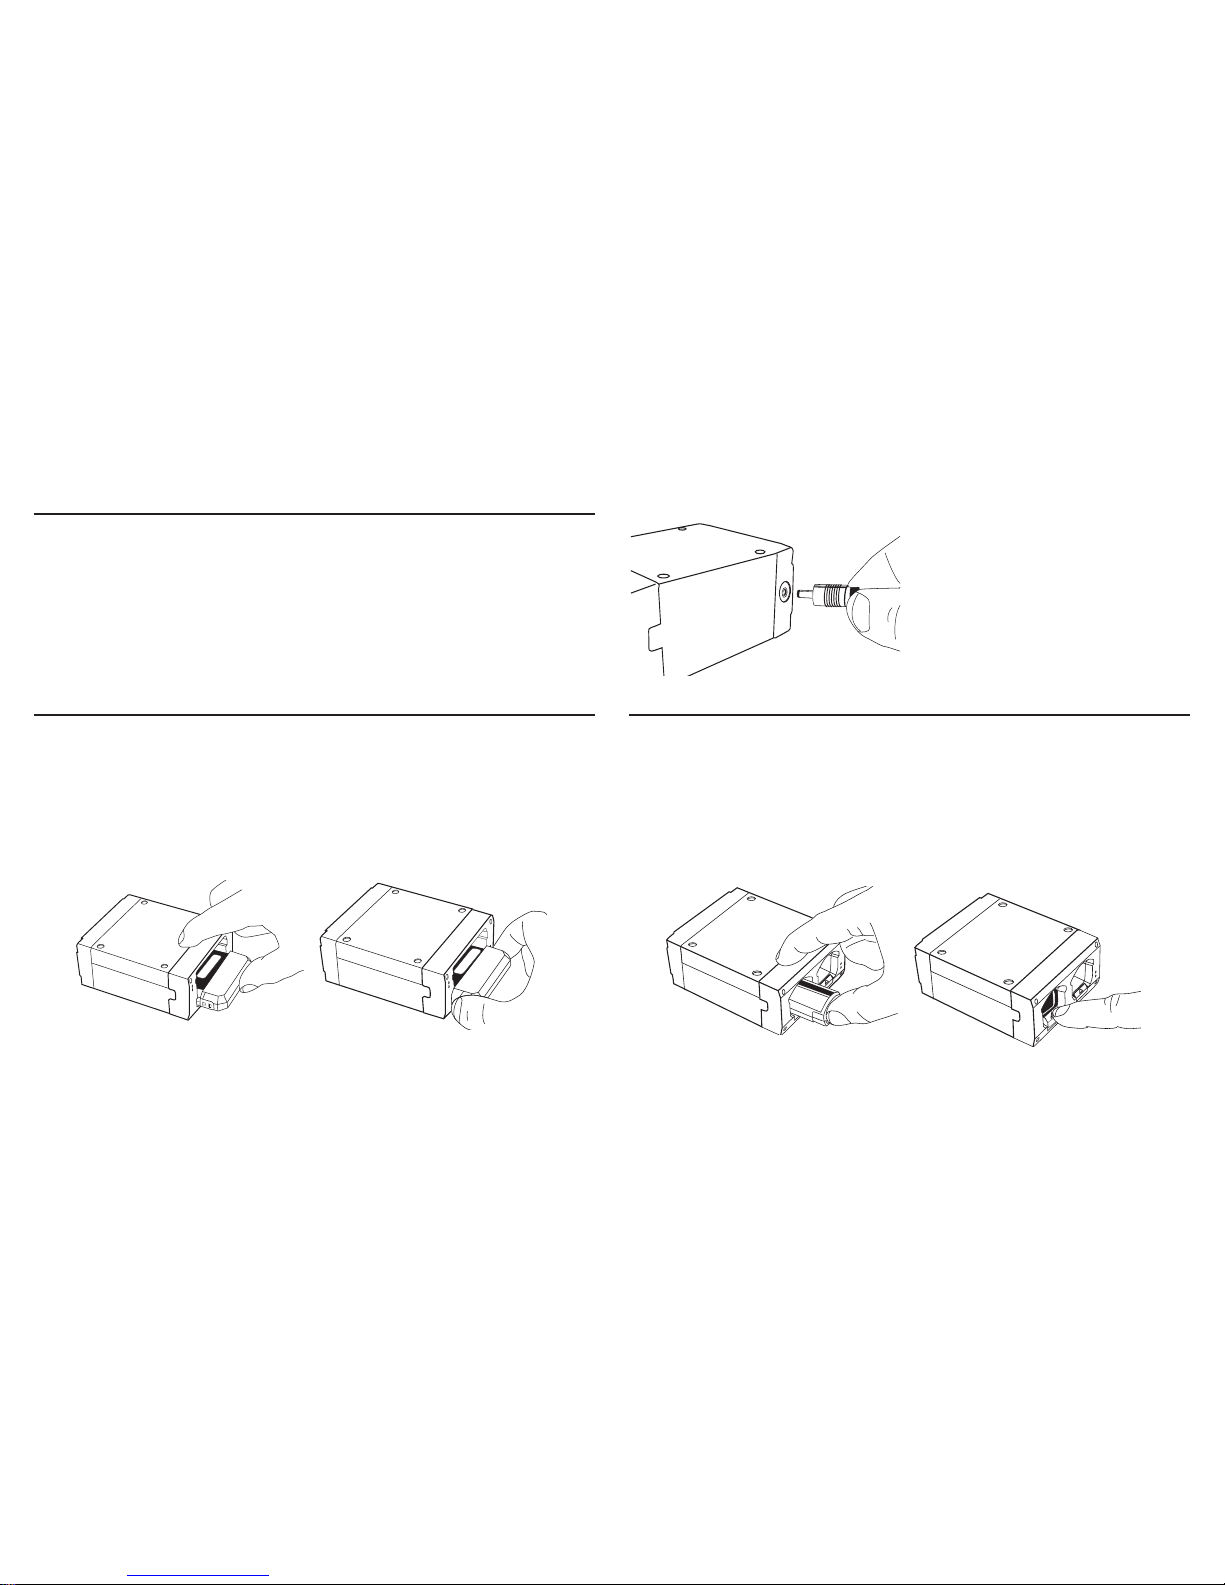
Connecting DC Power
1. Connect the cable from the Shure PS50 power supply to the DC power supply
input.
2. The white LED will illuminate when the PS50 is connected to an AC power
source.
Inserting and Removing Bodypack Batteries
To Insert:
1. Align the battery with the key-way of the charger bay.
2. Press the battery into the charging bay until it locks into place.
To Remove:
Press the release tabs on the sides of the battery and pull back.
Inserting and Removing Handheld Batteries
To Insert:
1. Slide the battery into the charging bay.
2. Press the battery until it locks into place.
To Remove:
1. Press the release button on the front of the charger module.
2. The release mechanism will eject the battery from the charger module.

8
Charging Batteries
Slide the battery into the charging bay until it locks into place. Charging begins as
soon as the batteries are inserted.
Recovering a Battery from Deep Discharge
A deeply discharged battery is one that has been discharged to less than 3.0 volts.
When the charger detects a deeply discharged battery, it automatically enters
recovery mode, which charges the battery using a reduced current. A red LED indicates recovery mode. If recovery is successful, the charger exits recovery mode
and charges the battery to capacity. If the battery cannot be recovered in less than
30 minutes, the red LED turns off and charging stops.
Charge Status LED
Each charger bay has an LED to indicate the status of the battery.
Red battery charging
Green charging complete
Off battery inserted incorrectly or battery depleted
below 3.0 volts.
Amber charging stopped at reduced capacity (not less
than 75% capacity) because the battery is too
warm. To reach 100% capacity, a battery must
be cooled to below 45°C.
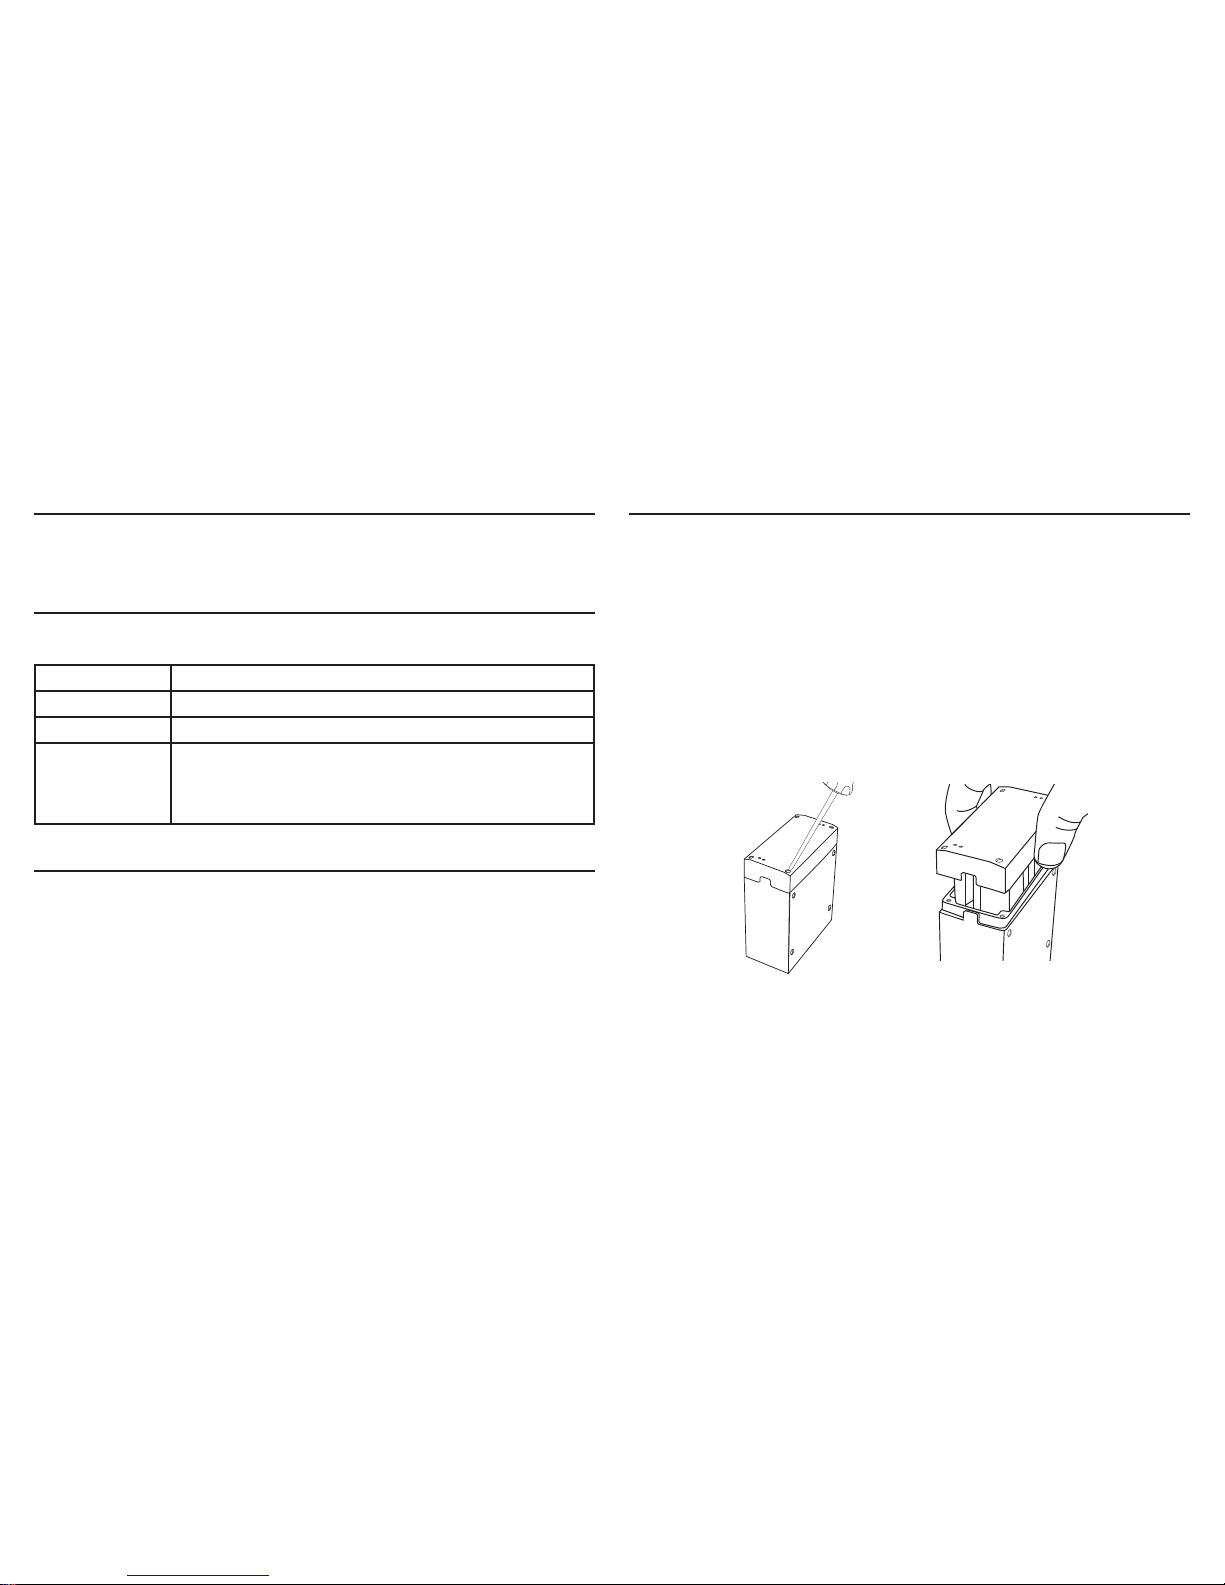
Changing the Charger Module
The modular design of the charger housing accepts either the AXT902 handheld
charging module or the AXT901 bodypack charging module. Use the following instructions to change the charging module.
Caution! Remove DC power and remove batteries when installing the charging
module.
1. Remove the 4 mounting screws that secure the charging module.
2. Pull the charger module to remove it from the housing.
3. Insert the replacement charger module into the housing (note the orientation of
the guide rails).
4. Insert the mounting screws (4 pieces) and tighten them to secure the charging
module.
9
Power LED off. DC power fault - check connection to power supply.
Ensure PS50 power supply is connected to an AC
power source.
Charge status LED does
not illuminate.
Battery is not fully inserted.
Battery does not charge Battery discharged below 3.0 volts. Try another
battery.
Troubleshooting
Specifications- AXT903/904 Portable Battery Chargers
Battery Type Up to 2 rechargeable Li-Ion batteries (AXT910/AXT920/920SL)
Charge Time 50%=1 hour; 100%=3 hours
Operating Temperature
Range
-18°C (0°F) to +40°C (104°F)
Battery Charging
Temperature Range
0°C (32°F) to 60°C (140°F)
Storage Temperature
Range
-29°C (-20°F) to 74°C (165°F), without batteries
Dimensions 45 mm x 86 mm x 114 mm (1.8 in. x 3.4 in. x 4.5 in.), H x W x D
Weight 350 g (12.3 oz.), without batteries or PS50 External Power Supply
Housing Cast and extruded aluminum
Power Requirements 5.5 V DC, 2.72 A

10
Certifications
Conforms to electrical safety requirements based on IEC 60065.
c UL us listed by Underwriters Laboratories, Inc.
Authorized under the verification provision of FCC Part 15B.
This Class B digital apparatus complies with Canadian ICES-003. Cet appareil nu-
mérique de la classe B est conforme à la norme NMB-003 du Canada.
This device complies with Industry Canada licence-exempt RSS standard(s).
Operation of this device is subject to the following two conditions: (1) this device
may not cause interference, and (2) this device must accept any interference, including interference that may cause undesired operation of the device.
Le présent appareil est conforme aux CNR d’Industrie Canada applicables aux appareils radio exempts de licence. L’exploitation est autorisée aux deux conditions
suivantes : (1) l’appareil ne doit pas produire de brouillage, et (2) l’utilisateur de
l’appareil doit accepter tout brouillage radioélectrique subi, même si le brouillage est
susceptible d’en compromettre le fonctionnement.
The CE Declaration of Conformity can be obtained from Shure Incorporated or any
of its European representatives. For contact information please visit www.shure.
com
The CE Declaration of Conformity can be obtained from: www.shure.com/europe/
compliance
Authorized European representative:
Shure Europe GmbH
Headquarters Europe, Middle East & Africa
Department: EMEA Approval
Jakob-Dieffenbacher-Str. 12
75031 Eppingen, Germany
Phone: 49-7262-92 49 0
Fax: 49-7262-92 49 11 4
Email: info@shure.de
Meets essential requirements of the following European Directives:
• Low Voltage Directive 2006/95/EC
• WEEE Directive 2002/96/EC, as amended by 2008/34/EC
• RoHS Directive 2002/95/EC, as amended by 2008/35/EC
Note: Please follow your regional recycling scheme for electronic waste
• Battery Directive 2006/66/EC
Please follow your regional recycling scheme for battery disposal.
• Conforms to European Regulation (EC) No. 1275/2008, as amended.
Information to the user
This equipment has been tested and found to comply with the limits for a Class B
digital device, pursuant to Part 15 of the FCC Rules. These limits are designed to
provide reasonable protection against harmful interference in a residential installation. This equipment generates uses and can radiate radio frequency energy and,
if not installed and used in accordance with the instructions, may cause harmful
interference to radio communications. However, there is no guarantee that interference will not occur in a particular installation. If this equipment does cause harmful
interference to radio or television reception, which can be determined by turning the
equipment off and on, the user is encouraged to try to correct the interference by
one or more of the following measures:
• Reorient or relocate the receiving antenna.
• Increase the separation between the equipment and the receiver.
• Connect the equipment to an outlet on a circuit different from that to which the
receiver is connected.
• Consult the dealer or an experienced radio/TV technician for help.

11

12
AXT Portable Chargers
AVERTISSEMENT : Danger d’explosion si l’accu est mal placé. N’utiliser qu’avec des accus compatibles Shure.
Remarque : Utiliser ce chargeur d’accus exclusivement avec le bloc d’alimentation Shure modèle PS50.
AVERTISSEMENT
• Les accus risquent d’exploser ou d’émettre des matières toxiques. Risque d’incendie ou de brûlures. Ne pas ouvrir, écraser, altérer, démonter, chauffer au-dessus de 60
°C (140 °F) ou incinérer
• Suivre les instructions du fabricant
• Ne jamais mettre les accus dans la bouche. En cas d’ingestion, contacter un médecin ou le centre anti-poison local
• Ne pas court-circuiter ; cela risque de causer des brûlures ou un incendie
• Ne pas charger ou utiliser les accus avec des produits autres que les produits Shure spécifiés
• Mettre les accus au rebut de manière appropriée. Vérifier auprès du fournisseur local la manière appropriée de mettre au rebut les accus usagés
Remarque :
• Cet équipement est prévu pour être utilisé dans des applications audio professionnelles.
• La conformité CEM est fondée sur l’utilisation des types de câble fournis et recommandés. L’utilisation d’autres types de câble peut dégrader la performance CEM.
• Utiliser ce chargeur d’accus exclusivement avec les modules chargeurs et les accus Shure pour lesquels il est conçu. L’utilisation avec des modules et des accus autres
que ceux spécifiés peut augmenter le risque d’incendie ou d’explosion.
• Tout changement ou modification n’ayant pas fait l’objet d’une autorisation expresse de Shure Incorporated peut entraîner la nullité du droit d’utilisation de cet
équipement.
• L’étiquette de capacité se trouve au bas du boîtier.
13
Caractéristiques
• Permet de charger deux accus d’émetteur
• Charge rapide amenant les accus à 50 % de leur capacité en 1 heure
• Charge complètement les accus en 3 heures
• Les modules peuvent être réutilisés dans l’ensemble chargeur rackable AXT900
• Bloc d’alimentation fourni
Chargeurs d’accus portables AXT903 et AXT904
Accessoires en option
Module chargeur à 2 baies pour accus d’émetteur ceinture
AXT901
AXT902 Module chargeur à 2 baies
pour accus d’émetteur à main
AXT902
①
②
③
④
⑤
⑥
⑦
Les ensembles chargeurs AXT903 et AXT904 permettent de charger 2 accus
d’émetteur dans une unité pratique et compacte.
① Boîtier de chargeur
② Module chargeur à 2 baies
③ Vis d’installation (4)
④ LED témoin d’alimentation
⑤ LED d’état de charge
⑥ Baie de charge
⑦ Entrée d’alimentation c.c.
Composants fournis
Module chargeur à 2 baies AXT901 pour accus d’émetteur ceinture ou
AXT902 pour accus d’émetteur à main
Alimentation PS50
Vis de montage pour modules
chargeurs (8)
30B13476
Présentation des chargeurs
14
Branchement de l’alimentation c.c.
1. Brancher le câble du bloc d’alimentation Shure PS50 à l’entrée d’alimentation
c.c.
2. La LED blanche s’allume lorsque le PS50 est branché à une source
d’alimentation c.a.
Introduction et retrait des accus d’émetteur ceinture
Pour introduire l’accu :
1. Aligner l’accu avec la rainure de la baie du chargeur.
2. Insérer l’accu dans la baie de charge jusqu’à ce qu’il se verrouille en place.
Pour retirer l’accu :
Appuyer sur les languettes d’ouverture situées sur les côtés de l’accu et tirer en
arrière.
Introduction et retrait des accus d’émetteur à main
Pour introduire l’accu :
1. Glisser l’accu dans la baie de charge.
2. Appuyer sur l’accu jusqu’à ce qu’il se verrouille en place.
Pour retirer l’accu :
1. Appuyer sur le bouton de déverrouillage situé sur le devant du module chargeur.
2. Le mécanisme de déverrouillage éjectera l’accu du module chargeur.
15
Charge des accus
Glisser l’accu dans la baie de charge jusqu’à ce qu’il se verrouille en place. La
charge commence dès que les accus sont introduits.
Remise en service d’un accu fortement déchargé
Un accu est fortement déchargé s’il est déchargé au-dessous de 3,0 volts. Lorsque
le chargeur détecte un accu fortement déchargé, il se met automatiquement en
mode remise en service, chargeant l’accu avec une intensité réduite. Une LED
rouge indique le mode remise en service. Si la remise en service est effectuée avec
succès, le chargeur quitte le mode remise en service et charge l’accu à sa pleine
capacité. Si l’accu ne peut pas être remis en service dans les 30 minutes, la LED
rouge s’éteint et la charge s’arrête.
Changement du module chargeur
La conception modulaire du boîtier du chargeur permet d’installer soit le module
chargeur d’accus d’émetteur à main AXT902 soit le module chargeur d’accus
d’émetteur ceinture AXT901. Procéder comme suit pour changer le module
chargeur.
Attention ! Débrancher l’alimentation c.c. et enlever les accus lors de l’installation
du module chargeur.
1. Enlever les 4 vis de montage qui fixent le module chargeur.
2. Tirer le module chargeur pour l’extraire du boîtier.
3. Insérer le nouveau module chargeur dans le boîtier (noter l’orientation des rails
de guidage).
4. Mettre en place les 4 vis de montage et les serrer pour fixer le module chargeur.
LED d’état de charge
Chaque baie du chargeur comprend une LED pour indiquer l’état de l’accu.
Rouge Charge en cours
Vert Charge terminée
Éteinte Accu mal inséré ou accu déchargé au-dessous de 3,0 volts.
Jaune Charge interrompue à une capacité réduite (au moins 75 %
de la capacité de l’accu) parce que l’accu est trop chaud.
Pour atteindre les 100 % de sa capacité, un accu doit être
refroidi en dessous de 45 °C.
16
Dépannage
LED d’alimentation
éteinte.
Défaut d’alimentation c.c. - vérifier la connexion au bloc
d’alimentation. S’assurer que le bloc d’alimentation
PS50 est branché à une source d’alimentation secteur.
La LED d’état de
charge ne s’allume
pas.
L’accu n’est pas inséré à fond.
L’accu ne se charge
pas
Accu déchargé au-dessous de 3,0 volts. Essayer un
autre accu.
Caractéristiques- Chargeurs d’accus portables AXT903/904
Type d’accu Jusqu’à 2 accus Li-ion rechargeables (AXT910/AXT920/920SL)
Durée de charge 50%=1 heure; 100%=3 heures
Plage de températures de
fonctionnement
-18°C (0°F) à +40°C (104°F)
Plage de températures de charge
d’accus
0°C (32°F) à 60°C (140°F)
Plage de températures de
stockage
-29°C (-20°F) à 74°C (165°F), sans piles
Dimensions 45 mms x 86 mms x 114 mms (1,8 po x 3,4 po x 4,5 po), H x L x P
Poids 350 g (12,3 oz), sans piles ou PS50 Alimentation externe
Boîtier Aluminium moulé et extrudé
Alimentation 5,5 V c.c., 2,72 A
 Loading...