

Page 1

Model 1200 Powermixer
Price $7.50
SERVICE MANUAL
ISSUE NO. 1
Manufactured by
SHURE BROTHERS INC.
222 Hartrey Avenue
Evanston, Illinois 60202-3696
Copyright 1988, Shure Brothers Inc.
AL954 (HE) 27A8187
Printed in U.S.A.
Page 2

SPECIFICATIONS
Type
Mono Powermixer
Frequency Response
Flat +1, -3 dB, 40 Hz to 20 kHz (any input to any output)
Inputs
Six input channels: six unbalanced high- and/or balanced low-impedance inputs; channels 1 and 2 highimpedance inputs switchable to Aux level; available
expansion modules* each contain 2 high- and 2 lowimpedance microphone inputs; two modules (4 channels) can be added to each 1200
Power Output (1 kHz, 120 Vac, 1% THD)
200 watts minimum with 4 ohm speaker
120 watts minimum with 8 ohm speaker
Distortion
THD typically less than 0.15% at 1 kHz, 0.35% at 70 Hz
and 20 kHz (180 watts to 4 ohms, measured from low-
impedance input, Input Attenuation, individual channel
and Master Volume controls at typical user settings)
IM distortion typically less than 0.4% (116 watts to 4
ohms, Input Attenuation, individual channel and Master
Volume controls at typical user settings)
Low- and High-Frequency Equalization (Individual channel
and Monitor)
±10 dB at 100 Hz and 10 kHz
Input OVERLOAD Indicators
Illuminate 3 dB before clipping of input preamplifier or
equalizer stage
Power Amp Limiter
Threshold: 1.5 dB below speaker output clipping level
Input signal range: 15 dB beyond limiting threshold
Output PEAK/LIMIT Indicator
With Limiter Out: Lights 2 dB before clipping at speaker
outputs
With Limiter In: Lights 0.5 dB before onset of Limiter
action
Output NORMAL Indicator
Lights when speaker output level is greater than 1.4
Vrms (0.5 W into 4 ohms)
Input Sensitivity (full power output)
BAL LO Z: -66 dBV (0.5 mV)
HI Z: -44 dBV (6.3 mV)
AUX: -26 dBV (50 mV)
PA INPUT: 0 dBV (1.0 V)
Input Clipping Level
INPUT
CLIPPING LEVEL
ATTENUATION
BAL LO Z -33 to -3 dBV 0 to -30
(22 to 707 mV)
HI Z
-11 to +18 dBV 0 to -30
(281 mV to 8.41 V)
AUX +6 to +36 dBV 0 to -30
PA INPUT -1 dBV
2 to 63 V
--
(891 mV)
Voltage Gain (at 1 kHz)
INPUT OUTPUT
SPEAKERPGM MIXMONITORPHONES
LO Z
HI Z 73 dB
95 dB 65 dB
43 dB 49 dB
AUX 55 dB 25 dB
PA
29 dB - - 16 dB -
71 dB
31 dB
82 dB51 dB
60 dB29 dB
42 dB11 dB
TAPE
Output Clipping Level
OUTPUT
SPEAKER
MONITOR
PROGRAM MIX
PHONES
TAPE
MINIMUM CLIPPING LEVEL
+29 dBV (28 V)
+18 dBV (7.9 V)
+18 dBV (7.9 V)
+16 dBV (6.3 V)
+18 dBV (7.9 V)
Impedance
INPUTS
LO Z MIC
HI Z MIC
AUX
PA
ACTUAL
1 kΩ
130 kΩ
50 kΩ
50 kΩ
FOR USE WITH
75 to 600 Ω
100 kΩ or less
10 kΩ or less
10 kΩ or less
OUTPUTS
MONITOR
PROGRAM MIX
TAPE
PHONES
SPEAKER
2.4 kΩ 2 kΩ or more
2.4 kΩ 2 kΩ or more
2.4 kΩ
430 Ω 4 Ω or more
-
2 kΩ or more
4 Ω or more
Hum and Noise
Less than -126 dBV equivalent input hum and noise
(20 Hz to 20 kHz, LO Z input to SPEAKER output)
Noise
Less than -127 dBV equivalent input noise (300 Hz to
20 kHz, LO Z input to SPEAKER output)
Signal-to-Noise Ratio
Greater than 80 dB (below full output) at typical control
settings
Phantom Power
24 Vdc ± 10% open circuit, 1.8 k series resistance
Power Requirements
120 Vac ± 10%, 50/60 Hz, 420 watts typical with no ac
receptacle load
AC Convenience Receptacle
120 Vac, 100 watts maximum
Certifications
Listed by Underwriters Laboratories Inc. and by
Canadian Standards Association as certified
Environmental Conditions
Operating Temperature: -7 to 43°C (20 to 110°F)
Storage Temperature: -40 to 74°C (-40 to 165°F)
Relative Humidity (Operating and Storage): 0 to 95%
Overall Dimensions
191 mm H x 483 mm W x 343 mm D (7-½ x 19 x 13-½ in.)
Weight
12.3 kg (27 lb)
18.2 kg (40 lb) in A1200C Carrying Case
RECOMMENDED LOUDSPEAKERS
AUDIOMASTER Model 3200, 100 W, 8 Ω, vented two-way
speakers
OPTIONAL ACCESSORIES
Carrying Case. . . . . . . . . . . . . . . . . . . . . . . . . . . . . . . . A1200C
Input Expansion Module*
(2 channels, 2 each HI Z and LO Z inputs). . A1200MX
Speaker Cable, 15 m (50 ft) with phone plugs
Line Matching Transformer (LO Z to HI Z)
. . . . . .
. . . . . . . . .
A50SC
A95UF
240-V Conversion Kit* . . . . . . . . . . . . . . . . . . . . . . . . RKC209
Phono Preamp . . . . . . . . . . . . . . . . . . . . . . . . . . . . . . . . . M64A
*For installation by qualified service personnel only.
Page 3

MODEL 1200 SERVICE MANUAL
TABLE OF CONTENTS
Description
For Years of Dependable Service
Troubleshooting ..................................
Service Instructions
External Parts
Diagnosis .....................................
External Fuse Replacement
Service Access
General Service Procedure
AC Voltage Measurements
DC Voltage Measurements
Resistance Measurements
Chassis-Mounted Boards and Components
A1 Reverb Pan
SHR-11 (and SHR12) Power Amplifier
SHR-12 Temperature Sensor Board
SHR-14 Main Board
Rear-Panel Boards and Components
SHR-10 Input-Output Board
SHR-03 Aux/Mic Board
SHR-02 Hi-Z Input Board
SHR-01 Lo-Z Input Board.......................
SHR-13 Speaker Output Board
B1 Fan
S3 Phantom Power Switch
Front-Panel Boards and Components
SHR-04 Channel Board (6)......................
Front Mounting Panel
SHR-05 Master Control Board
SHR-09 Limiter Board
SHR-06 Headphones Output Board and
SHR-08 Indicators Board
S2 On/Off Switch
A1200MX Input Expansion Module
Checking Active Components
Ferrite Beads
Service Illustrations
Optional Accessories
.....................................
....................
...............................
..................................
.......................
.................................
...............................
Board Assembly
SHR-11 Potentiometer Adjust
VR1101 Output Voltage Offset
VR1102 Driver Balance
VR1103 Idle Current
VR1201 Temperature Sensor Threshold
VR1401 Power Amplifier Limiter Threshold
......................................
SHR-07 Headphones Control Board
..................................
.......................
........................
........................
........................
.............................
..................
................
.....................
.......................
...............
...........................
...............
.....................
........................
.......................
..................
......................
...............
..........................
...................
.........................
.............
.......................
.............................
.................
.....................
.............................
............................
..........
..........
........
1
2
2
3
3
3
3
3
4
5
5
5
5
5
5
5
6
6
6
6
6
6
7
7
7
7
7
7
7
7
8
8
8
8
8
8
8
8
8
9
9
9
9
9
Page 4

Page 5
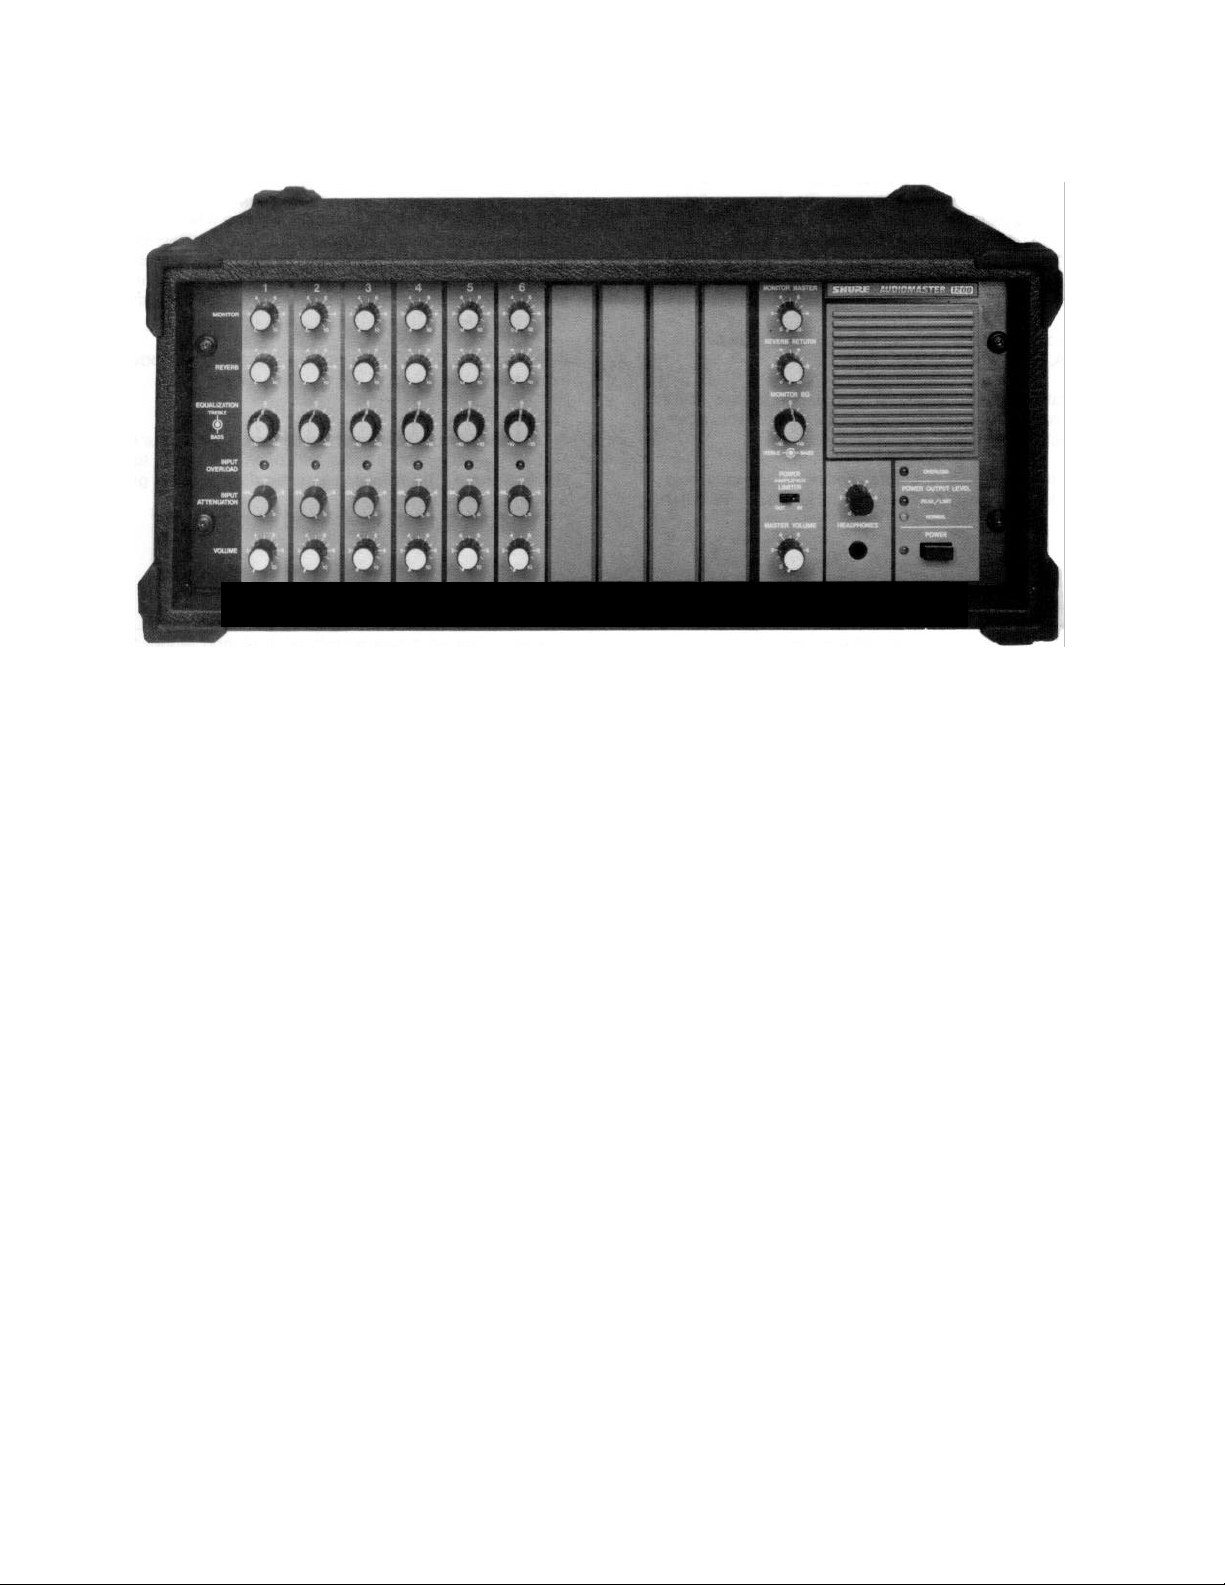
DESCRIPTION
The Shure Model 1200 AUDIOMASTER® Powermixer is a
compact, flexible microphone mixer with six inputs for high- or
low-impedance sources and a 200-watt power amplifier. The
1200 is human-engineered for ease of setup and operation.
Connection of microphones, speakers and other equipment
(tape recorder, equalizer, effects device, remote amp, etc.) is
fast and convenient.
The 1200 is rack-mountable or portable. Its 6 inputs are
expandable to 8 or 10 inputs through the use of A1200MX
Expansion Kits. Inputs accept both high- and low-impedance
microphones (dynamic, ribbon or condenser), as well as ampli-
fied instruments or other high-level sources. Individual channel
input attenuators with overload indicators permit precise gain
control to prevent input overload. The 1200 has built-in rever-
beration with individual channel and overall level adjustments.
Other effects devices or an equalizer can be connected through
a post-master control program loop. An integral power amp
limiter prevents overload distortion over a wide signal input
range. Pre-volume monitor send controls and pre-master volume tape output provide maximum versatility in stage or recording applications. The control panel has color-coded knobs for
ease of adjustments, while LED indicators give instant notice of
operating status.
In addition to the A1200MX Expansion Module, the following
accessories are available for the 1200: A1200C Carrying Case,
A95UF Line Matching Transformer, RKC209 240 V Conversion
Kit, and M64A Phono Preamplifier.
The 1200 is Listed by Underwriters Laboratories, Inc., and
listed by Canadian Standards Association as certified.
1
Page 6

FOR YEARS OF DEPENDABLE OPERATION...
The AUDIOMASTER® System is exceptionally well designed,
with all components of the highest quality, operating well within
their respective ratings to assure long life. The following list of
Do’s and Don’ts describes minimal operating precautions and
maintenance to provide years of dependable service.
DO
use a 16 AWG or larger, heavy-duty, 3-conductor extension
cord when additional line cord length is needed.
DON’T replace the rear-panel fuse with a different size or type.
Use only 5 A, 250 V, Type 3AG.
DON’T operate the Powermixer with its air vents blocked; don’t
place it on a radiator or heat-producing equipment. Avoid operation in direct, hot sunlight.
DO unplug the Powermixer before cleaning. Use only mild
detergent and a damp (never wet) cloth to clean the outer
SYMPTOM
Powermixer is “dead” (no output, POWER LED off)
OVERLOAD LED illuminates, either
A.
Flickering with program material, indicating abnormal
speaker load
B.
Continuously to indicate power amplifier shutdown
No signal at speaker (all other functions appear normal), either
A. NORMAL LED illuminated, or
B. NORMAL LED not illuminated
Fuse blown
One of two inputs on same channel not working properly (both
1/4-inch and 3-pin jacks in use)
surfaces; Don’t use strong solvents or cleaning fluids.
DON't use unbalanced low-impedance microphones with the
PHANTOM 24V switch on; turn off the switch if not required for
powering condenser microphones. If phantom power is in use,
connect unbalanced low-impedance microphones through a
line matching transformer (Shure A95UF) to a HI Z input. Phantom power will not affect balanced low-impedance dynamic
microphones.
DON’T risk fire or shock hazard by operating the Model 1200
in the rain.
TROUBLESHOOTlNG
Should any difficulty be encountered in operation of your AUDIOMASTER System, the trouble can often be traced to some
simple source. The following is offered as a basic guide to
solving this kind of problem.
PROBABLE CAUSE AND CORRECTION
1.
Check that ac power source is “live” and Model 1200 is
plugged in.
2. Check that POWER switch is on.
3.
Check that rear panel fuse (5 A, 250 V) is good.
4.
If the 1200 has turned off due to excessive internal temperatures, allow at least an hour for cooling, and reactivate unit.
If difficulty persists, refer to General Service Procedure in
this manual.
1.
Check total speaker load (must be no lower than 4 ohms)
and for possible shorted speaker cable.
1.
Check air vents for blockage.
2.
Check that internal fan is operating (fan located on rear
panel).
3.
Turn MASTER volume control down for several minutes to
allow proper cooling. If difficulty persists, refer to General
Service Procedure.
1.
Check for defective or improperly connected speaker cables.
1. Check settings of channel VOLUME and MASTER VOLUME
controls.
2. Check connections to EXTERNAL DEVICE LOOP
1. Replace with identical fuse (5 A, 250 V, 3AG).
2.
If second fuse blows, refer to General Service Procedure.
1.
Make sure similar microphones are used on both inputs,
and microphone impedances match the inputs used.
2.
Make sure a low-impedance microphone is not used with
aux level equipment on other input.
3.
Make sure MIC/AUX switch is in MIC position (Ch. 1 and 2
only).
4.
Make sure microphone switches are on; check microphone
cables.
2
Page 7
SYMPTOM
INPUT OVERLOAD LED flashing
NOTE: Occasional flashing is acceptable
Loud clicks when certain microphones or cables are used
No MONITOR output (program output normal)
Sound quality poor (weak or thin)
SERVICE INSTRUCTIONS
PROBABLE CAUSE AND CORRECTION
1.
Adjust INPUT ATTENUATION counterclockwise to reduce
channel input level.
2.
Reduce input signal level at source.
1. Make sure PHANTOM 24V switch is not on (when not needed).
2. Make sure unbalanced low-impedance microphone or cable
is not used when PHANTOM switch is on.
3.
Check for defective microphone cables.
1.
Make sure channel MONITOR and MONITOR MASTER
controls are turned up.
2.
Make sure controls on external equipment connected to
Monitor output jack are turned up.
3.
Check for defective cable from MONITOR output jack.
1.
Check for excessive treble boost or bass cut on equalization
controls.
2.
Check PROGRAM and MONITOR output jacks for signal
quality (if acceptable, problem is in power amplifier section).
3.
Check for defective cables.
4.
Check impedance match (high- or low-impedance mics)
at input.
EXTERNAL PARTS
The knobs and feet can be replaced without disassembling
the 1200. All knobs are of the pull-off type, and are color-coded
by function. The Equalization knobs are dual concentric types;
all other knobs are single.
DIAGNOSIS
A simple method of localizing problems without opening the
1200 is as follows. Turn off the Power switch. Do not connect a
speaker or headphone load. Set all controls of the channel
under test only to full clockwise (other channel volume and
monitor controls full counterclockwise), except: Reverb Return
full counterclockwise, and Eq controls centered. Turn the unit
on and apply a 0.5 mV, 1 kHz test signal across pins 2 and 3 of
one of the Bal Lo Z input connectors. Normal voltmeter readings
taken at each output connector are given in Table 1. Similarly, a
5 mV signal inserted in a HI Z input, 50 mV in an AUX input, or
891 mV in the Power Amp and Monitor Inputs will yield similar
output voltages. This method is useful for saving time in localizing problem areas. Internal servicing should be performed only
by qualified service personnel.
TABLE 1. NOMINAL TEST VOLTAGES
OUTPUTS
INPUT
LO z 0.5 mV 28 V
HI Z
AUX
PA
Input
50 mV
891 mV 25 V
Spkr Prgm Mix
890 mV
5 mV 22 V 708 mV
28 V 890 mV 1.78 V 6.31 V
Mon Phones
1.78 V
1.41 V
--- ---
Tape
6.31 V
5.01 V 141 mV
5.62 V
178 mV
178 mV
---
WARNING
Voltages in this equipment are hazardous to life. Refer
servicing to qualified service personnel.
EXTERNAL FUSE REPLACEMENT
To replace line fuse F1 (with no apparent problems in the
Powermixer), disconnect the line cord from the ac source and
remove the rear panel fuseholder cap by pushing it in and
turning it counterclockwise (either a screwdriver or fingertip
may be used.) Replace the defective fuse only with a 5A 250V
Normal Blow type.
CAUTION
If trouble symptoms (overheating, erratic operation, etc.)
were apparent before the fuse blew, or if the replacement
fuse blows, a qualified service person should trouble-
shoot the Powermixer carefully to find the source of the
problem. Do not continue to replace fuses; have the
trouble corrected.
SERVICE ACCESS
Disconnect the 1200 from its power source. To open the unit
for servicing, remove ten screws and lockwashers from the top
and five from each side of the cover. The cover can then be
lifted off exposing the internal parts (see Figure 1).
3
Page 8
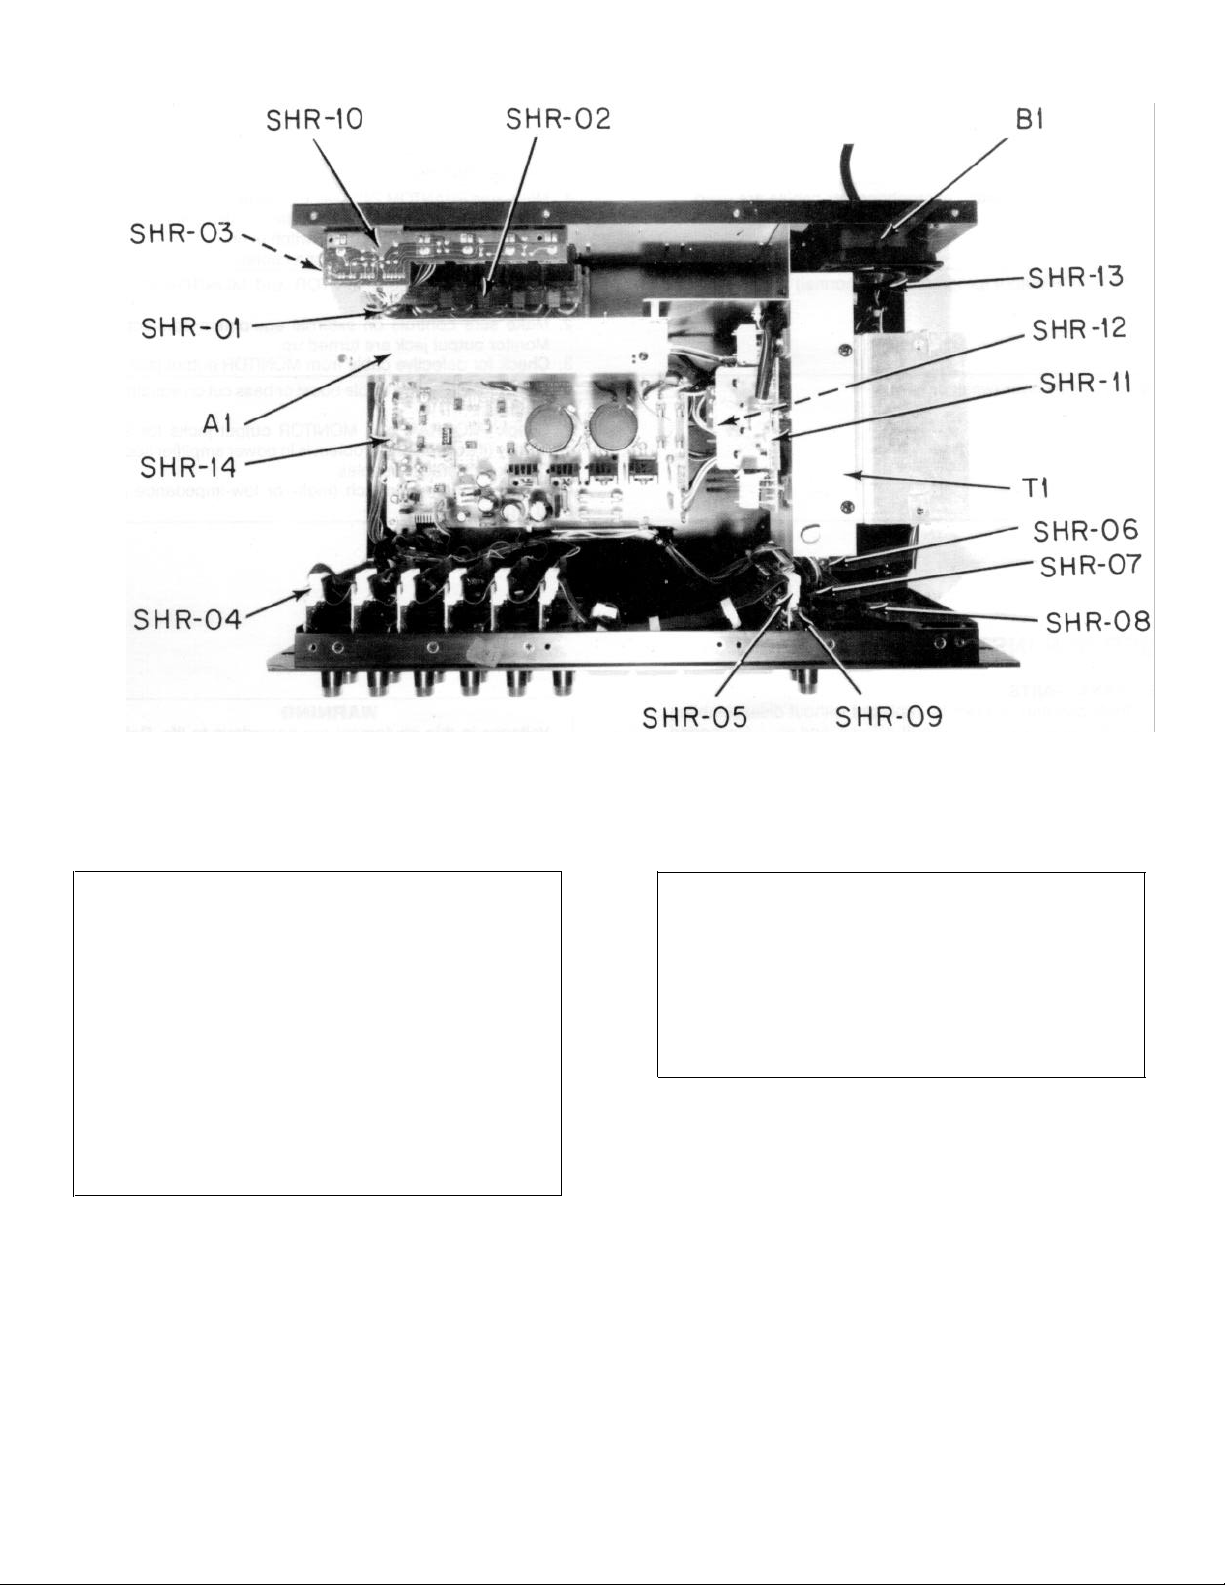
PRINTED CIRCUIT BOARD AND PARTS LOCATION
FIGURE 1
After replacing high-voltage parts such as the fan, power
WARNING
cord, rear panel convenience receptacle, or printed wiring assemblies SHR-11, SHR-12, or SHR-14 (or their
components), make certain that a dielectric voltage
breakdown test is performed before connecting the unit
to a power supply. With the unit disconnected from the ac
source, turn the unit on and measure the resistance
between the ground contact of the power plug and each
of the other two prongs. This resistance should measure
infinite. Then measure the resistance between the plug
ground and exposed metal parts of the chassis, screws,
connectors, fan grille, etc. This resistance should be zero
ohms. If any measurements are recorded outside the
specified limits, a shock hazard exists. The unit must be
repaired and rechecked before it is returned to operation.
IMPORTANT: When removing any printed wiring board, be sure
the wires and connectors detached from the board are identified
for proper reconnection. This may be done by affixing a piece
of masking tape marked with the reference designation
(connectors) or terminal letter or color (wires).
NOTE: Any cable ties that were loosened or removed must be
tightened or replaced after servicing.
Similar wire colors and connectors with the same number
CAUTION
of pins are used in different circuits; make sure proper
reconnections are made. Push-on connectors must be
removed by pulling straight out. The side of a small screwdriver blade inserted between the free and fixed connector
can sometimes be helpful in separating the connector.
Do not apply side force when removing or reconnecting
terminals, or damage may result. Reference to the service
illustrations will be helpful in case of difficulty.
GENERAL SERVICE PROCEDURE
To isolate a problem area, a general procedure is as follows. If
the Powermixer is completely dead, check the ac power source,
line cord, and fuses (external and internal). If the unit turns on
but operation is abnormal, check the chassis power supply
output (-56 Vdc between test point SHR-11-AB and ground,
and +56 Vdc between test point SHR-11-AA and ground; -15
Vdc across C1421, +15 Vdc across C1420, and +24 Vdc
between P1404-A and ground). If the measured dc voltages are
correct, perform additional AC and DC Voltage Measurements
as described below to isolate the problem.
4
Page 9

AC VOLTAGE MEASUREMENTS
Numbers within rectangular symbols on the circuit diagrams
denote ac voltages at that point under the following test
conditions:
1.
Voltages measured with respect to chassis unless otherwise indicated.
2. Line voltage: 120 V, 60 Hz.
3.
Test signal of 0.5 mV across pins 2 and 3 of connector
J101.
4. AC voltage measurements may vary ±20% from values
shown.
5.
Measurements made with ac voltmeter of 1 megohm or
greater input impedance.
6.
No load on Speaker Outputs.
7.
All controls (of channel under test only) full clockwise
except Equalization controls centered.
8. Reverb Return full counterclockwise.
9. Limiter switch and Phantom switch in Off position.
10.
Monitor Master control clockwise.
DC VOLTAGE MEASUREMENTS
Numbers within elliptical symbols on the circuit diagrams
denote dc voltages at that point under the following test
conditions:
1.
Voltages measured with respect to chassis unless other-
wise indicated.
2. Line voltage: 120 V, 60 Hz.
3.
No input signal applied.
4.
Dc voltage measurements may vary ±20% from values
shown.
5.
Measurements made with dc voltmeter of 11 megohms or
greater input impedance.
6.
Phantom switch in On position.
RESISTANCE MEASUREMENTS
With the ac line cord disconnected from the ac source and
the Power On/Off switch off, the following ohmmeter measure-
ments may be made.
1.
Reverb pan output coil: approximately 360 ohms; input
coils approximately 40 ohms.
2.
Transformers may be checked for continuity of each winding.
3. To test transistors, ICs and diodes, refer to the section on
CHECKING ACTIVE COMPONENTS.
To replace the reverb pan, connect the white lead connector
to the reverb Input and the orange lead connector to the reverb
Output. Use the previously removed screws to secure the reverb
pan to the reverb shield, and to secure the shield to the chassis
bottom and the parallel vertical interior shield. Be sure to replace
any cable ties that were removed or loosened.
SHR-11 AND SHR-12 POWER AMP BOARD ASSEMBLY
The Power Amplifier Board Assembly consists of SHR-11
and SHR-12 mounted on the large aluminum heat sink. To
separate the heat sink and its associated boards from the 1200,
remove the screws holding the sink to the power transformer
shield bracket, and those holding the sink to the metal shield
that divides the fan from the input and output connectors and
boards. Disconnect the connectors from P1101, P1102 and
P1201, and unsolder the red, green, and white leads from AA,
AB and AC, respectively, on SHR-11. (The opposite ends of
leads AA and AB are connected to SHR-14, Main Board; the
opposite end of lead AC is connected to SHR-13, Speaker
Output Board.) The Power Amp Board is now free of the 1200.
To replace parts on SHR-11, it is then necessary to remove
SHR-11 from the large heat sink. Do this by removing the four
Phillips screws holding the power transistors at the corners of
the board, and the two Phillips screws holding the board on the
brass standoffs.
NOTES:
1.
Removal of SHR-11 from the heat sink may damage the
insulators below the power transistors. Therefore, when
servicing SHR-11, be prepared to replace all four 802639FK
insulators. If either predriver transistor Q1103 or Q1104
(mounted on the vertical heat sink fastened to SHR-11)
is replaced, be prepared to replace insulator 802681FK
beneath it.
2.
If transistor Q1105, mounted on the solder side of board
SHR-11, is replaced or if the board has been removed from
the heat sink, make certain that Q1105 physically contacts
the large heat sink after reassembly of the board to the heat
sink is completed. Apply a small amount of Wakefield Type
120 Thermal Joint Compound to the top surface of the
transistor in order to ensure proper heat transfer.
CHASSIS-MOUNTED BOARDS AND COMPONENTS
The following printed wiring boards and components are
chassis-mounted.
SHR-11
SHR-12
SHR-14
A1
T1
POWER BOARD
SENSOR BOARD
MAIN BOARD
REVERB PAN
POWER TRANSFORMER
REVERB PAN
To remove the reverb pan assembly, turn the 1200 on its side
(power transformer down) and remove the three screws holding
the reverb shield to the chassis bottom. Turn the 1200 upright
and remove the screw holding the reverb shield to the standoff
attached to the parallel vertical interior shield. Disconnect the
phono connectors at the bottom of the reverb pan assembly.
Remove the four screws holding the reverb pan to the vertical
metal interior shield, and lift the reverb shield and pan assembly
out of the chassis holding the pan to the shield. (If necessary to
free the reverb shield, remove the cable tie(s) holding the
orange and white leads to the metal shield.)
To replace SHR-11 in the 1200, solder the red, green and
white leads to AA, AB and AC. Connect the cable assembly with
three leads from P1405, SHR-14, to P1101 ; and connect the
cable with a single lead from P1407, SHR-14, to P1102.
SHR-11 POTENTIOMETER ADJUSTMENT
If any components are replaced on SHR-11, trimpots VR1101,
VR1102 and VR1103 may require readjustment. Measure the
SHR-11 voltages described in the following paragraphs. If
measured voltages are not correct, make adjustments as follows.
With power off, no input signal applied, and no load on the
1200’s speaker output, turn VR1103 completely clockwise. Turn
power on and allow unit to warm up or thermally stabilize for ten
minutes prior to making the adjustments. See Figure 2 for
trimpot locations.
5
Page 10

VR1101 OUTPUT VOLTAGE OFFSET ADJUSTMENT
1.
Connect a dc voltmeter between SHR-11 terminal AC and
ground (see Figure 2).
2.
Adjust VR1101 so that V1 equals 0 V ±15 mV
VR1102 DRIVER BALANCE ADJUSTMENT
1.
Connect a dc voltmeter between CP1101 and ground (see
Figure 2).
2. Adjust VR1102 so that V2 equals 1.2 V.
VR1103 IDLE CURRENT ADJUSTMENT
1.
After the unit has been turned on for at least five minutes,
connect a dc voltmeter between R1126 and R1127 as shown
(see Figure 2) and check the idle current. If the value of V3
does not equal 6.6 mV ±3.3 mV, use a razor blade to carefully
remove from the top and side of VR1103 the old cement that
prevented its adjustment from changing.
2. Adjust VR1103 so that V3 equals 6.6 mV ±3.3 mV.
3. Apply a drop of cement (white glue, hot melt glue, caulk, etc.)
to VR1103 to eliminate movement due to vibration.
VR1201 TEMPERATURE SENSOR THRESHOLD ADJUSTMENT
If U1201 or other SHR-12 parts are replaced, VR1201 will
probably require recalibration as follows.
1.
Turn off the unit long enough for the heat sink to reach
ambient temperature. Remove all input signal sources and
speaker loads.
2.
Measure the heat sink temperature or ambient temperature
around the heat sink. Consult the graph in Figure 3 to
determine the proper voltage at test point CP1402.
3.
Attach a dc voltmeter between CP1402 (+) and ground (-).
4.
Apply power to the unit and quickly adjust potentiometer
VR1201 on SHR-12 until the proper voltage is reached.
SHR-11 POTENTIOMETER ADJUSTMENTS
FIGURE 2
SHR-12 TEMPERATURE SENSOR BOARD
To remove SHR-12 from the large heat sink, remove the
Power Amplifier Board Assembly from the 1200 as described
above. Then remove the two Phillips screws that hold SHR-12 to
the small vertical heat sink. When replacing SHR-12, U1201
(mounted on the solder side of the board) must physically
contact the vertical heat sink in order to ensure correct operation of the power amplifier over-temperature protection circuitry.
In addition, apply a small amount of Wakefield Type 120 Thermal
Joint Compound to the top surface of the IC to allow good heat
transfer.
TEMPERATURE SHUTDOWN SENSOR CALIBRATION
FIGURE 3
SHR-14 MAIN BOARD
The 1200 contains four internal fuses mounted on the Main
Board (SHR-14). If replacement becomes necessary, replace
only with identical Normal Blow fuses: two 0.75 A 250 V, and two
8 A 250 V. Do not continue to replace fuses if a fuse continues to
blow; have the trouble corrected.
To remove SHR-14 from the chassis, remove the three Phillips
screws on each of the long sides of the board and the single
screw next to the two 8 A fuses on the short side of the board.
This will allow the board to be lifted free of the chassis. If it is
necessary to completely separate SHR-14 from the 1200,
remove all seven connectors (be sure to label the four 4-pin
connectors and their receptacles to ensure proper reattachment).
Unsolder the six transformer and two fan leads from pins AA
through AH, and the two ground leads connected to Al and AJ.
Be sure to label leads also so they can be resoldered to the
proper pins. Unsolder from connection pins AA and AB of
SHR-11 the red and green wires attached to the solder side of
SHR-14. (Remove cable ties as necessary.) The SHR-14 board
can now be completely detached from the 1200.
6
Page 11

If any of the heat-sink-mounted parts (voltage regulators
U1408, U1409 and U1410, or silicon rectifiers D1423 and D1424)
is replaced, be sure to apply a small amount of Wakefield Type
120 Thermal Joint Compound between the component and the
heat sink to allow maximum heat transfer.
A number of components on SHR-14 are mounted on spacing
insulators to keep them a measured distance from the board,
e.g., R1460, D1422. If any of these parts is replaced, be sure to
remount them the required distance above the board on spacing
insulators as originally supplied.
VR1401 POWER AMPLIFIER LIMITER THRESHOLD ADJUSTMENT
This adjustment is made under the following conditions.
1.
Terminate the Speaker Output in a 4-ohm resistive load.
2.
Set the Master control and trimpot VR1401 on SHR-14 fully
clockwise.
3.
Set the Limiter switch to Out.
4.
Connect the unit to a 120 Vac, 60 Hz power source and
switch the unit on.
5.
Drive one low-impedance input channel at 1 kHz with its
channel control fully clockwise. (Turn all the other input
channel Volume Controls fully counterclockwise.) Increase
the input signal until the signal at the Speaker Output just
visibly clips.
6.
Reduce the input signal level such that the output voltage
drops 1.5 dB.
7.
Switch the Limiter In. Slowly turn trimpot VR1401 counterclockwise until the output voltage drops an additional 0.2 dB.
REAR-PANEL BOARDS AND COMPONENTS
The following printed circuit boards and components are
mounted on the rear panel.
SHR-10
INPUT-OUTPUT BOARD
SHR-03 AUX/MIC BOARD
SHR-02
SHR-01
SHR-13
B1
S3
W1
J1
XF1
HI-Z INPUT BOARD
LO-Z INPUT BOARD
SPEAKER OUTPUT BOARD
FAN
+24 VDC PHANTOM POWER SWITCH
POWER CORD
AC CONVENIENCE RECEPTACLE
EXTERNAL FUSEHOLDER
SHR-02 HI-Z INPUT BOARD
To remove SHR-02, remove the six 1/2-inch nuts on the input
jacks. Disconnect the four 3-pin connectors from the SHR-01
LO-Z INPUT BOARD and the two 3-pin connectors from the
SHR-03 AUX/MIC BOARD. Pull the board straight back to
disengage the jacks from the rear panel: SHR-02 can then be
completely separated from the 1200.
SHR-01 LO-Z INPUT BOARD
Remove the twelve screws (two per input) connecting the
XLR-type connectors to the rear panel. To remove SHR-01 without
first removing SHR-02 HI-Z INPUT BOARD, remove the four
Phillips screws that hold the rear panel to the chassis bottom.
Rest the unit on its side while performing this operation. Then
swivel the rear panel away from the chassis (it is still held by the
power cord). This allows SHR-01 to be pulled straight back and
away from the rear panel without being stopped by the interior
vertical metal shield. Disconnect the four 3-pin connectors (two
from SHR-03 and two from SHR-04 CHANNEL BOARDS) and
the four 4-pin connectors (from SHR-02 and SHR-04). (Be sure
to label all removed lead-connector assemblies.) Unsolder from
point AA the yellow lead from SHR-10 REAR PANEL INPUTOUTPUT BOARD: SHR-01 is now completely free of the 1200.
SHR-13 SPEAKER OUTPUT BOARD
To remove SHR-13 SPEAKER OUTPUT BOARD:
1.
Disconnect the 3-pin connector from P1301.
2. With a 1/2-inch nutdriver or wrench, remove the nuts holding
the speaker output jacks to the rear panel.
3.
Unsolder the leads from AA and AB.
4.
The SHR-13 board is now free of the 1200.
B1 FAN
To remove the fan:
1.
Remove the four screws, nuts, and starwashers at the four
corners of the fan grille. This frees the fan from the rear
panel.
2. Unsolder the black fan leads from pins AE and AG on SHR-14.
3.
If necessary to remove the fan from the 1200, slide the fan
leads out of the insulating tubing and separate the fan from
the unit.
For access to or replacement of any of these parts, turn
the 1200 on its side (power transformer down) and remove the
four Phillips screws that hold the rear panel to the chassis
bottom. The rear panel then can be separated sufficiently from
the chassis bottom to permit access to these boards and
components.
SHR-10 INPUT-OUTPUT BOARD
To remove SHR-10, use a 1/2-in. nutdriver to remove the nuts
on the five phone jacks. Carefully pull the board straight back
until the connectors are free of the rear panel. To separate the
board completely from the rear panel, remove the 6-pin and
4-pin connectors from P1001 and P1002. Unsolder the green
and red leads from the Phantom Power switch, and unsolder
from SHR-10 the yellow lead that connects AC on SHR-10 to
AA on SHR-01. SHR-10 can now be completely separated from
the 1200.
SHR-03 AUX/MIC BOARD
To remove SHR-03, disconnect the four connectors from AA,
AB, BA, and BB to P201 and P202 of SHR-02 and from AC, AD,
BC, and BD to P102 and P104 of SHR-01. Remove the four
Phillips screws that hold the switches to the rear panel; SHR-03
can be completely separated from the 1200.
CAUTION
When replacing the fan, be sure to slide the leads through
the insulating tubing before soldering them to the pins on
SHR-14.
S3 PHANTOM POWER SWITCH
Remove the two screws that fasten the Phantom Power Switch
to the rear panel. This will free the switch from the panel. to
separate the switch completely from the 1200, unsolder the red
and green leads from the switch terminals.
FRONT-PANEL BOARDS AND COMPONENTS
The following printed wiring boards and components are
mounted on the front panel.
SHR-04 CHANNEL BOARD (6)
SHR-05
MASTER CONTROL BOARD
SHR-07 HEADPHONES CONTROL BOARD
SHR-06
SHR-09
SHR-08
S2
HEADPHONES OUTPUT BOARD
LIMITER BOARD
INDICATORS BOARD
POWER ON/OFF SWITCH
7
Page 12

SHR-04 CHANNEL BOARD
The SHR-04 Channel Boards are assembled and installed in
pairs. Therefore, SHR-04s for Channel 1 and Channel 2 constitute
one pair, those for Channel 3 and Channel 4 constitute another
pair, etc. To remove any pair of Channel Boards:
SHR-09 LIMITER BOARD
To free SHR-09 LIMITER BOARD from the Mounting Panel,
remove from the front of the panel the two Phillips screws that
attach the Limiter Switch to the panel. This frees the board from
the panel.
1.
Remove the control knobs by pulling them off the shafts.
2.
Remove the two flat-head Phillips screws that hold the Channel
Board Assembly in place. One screw is attached to the top of
the front panel ledge, the other to the chassis bottom.
3.
Disconnect the Channel Bus Connector from the top of each
of the two Channel Boards.
4.
Disconnect the 3-pin connector (coming from SHR-01 Input
Board) from the bottom of each of the two SHR-04 Channel
Boards.
5.
Pull the Channel Board Assembly horizontally backward to
free the control shafts from the front panel; the Assembly is
now free of the 1200.
FRONT MOUNTING PANEL
The Front Mounting Panel must be freed from the Front Panel
in order to work on or remove SHR-05 MASTER CONTROL
BOARD, SHR-06 HEADPHONES INPUT BOARD, SHR-07
HEADPHONES CONTROL BOARD, SHR-09 LIMITER BOARD,
SHR-08 INDICATORS BOARD and the Power On/Off Switch
from the 1200. To remove the Mounting Panel:
1.
Remove the two flat-head Phillips screws from the front
panel ledge above the Mounting Panel.
2.
Rest the 1200 on its side with the fan and mounting panel
upwards.
3.
Remove the top three Phillips screws holding the front panel
to the chassis bottom. Leave the bottom screw (below Channel
1) in place. (This will permit swiveling the front panel far
enough away from the chassis to allow the Mounting Panel
to be freed from the 1200 after other required disconnections
have been made.)
4.
Remove the knobs from the control shafts of the Master and
Headphones Controls.
5.
Disconnect the 3-pin connector from P701 on the HEAD-
PHONES CONTROL BOARD.
6.
Disconnect the 3-pin connector from P601 on the HEADPHONES OUTPUT BOARD.
7.
Disconnect the CHANNEL BUS connector from P501 at the
top of the MASTER CONTROL BOARD and disconnect 8-,
4-, and 5-pin connectors from P502, P503, and P504 at the
bottom of the MASTER CONTROL BOARD.
IMPORTANT:
Mark all connectors before removing them so
that they can be reconnected correctly.
8.
Loosen the cable tie that holds the cable harness to the hole
in the outside bottom of SHR-05.
9.
Swivel the front panel away from the chassis bottom enough
to permit pulling the control shafts out of the front panel and
partially freeing the Mounting Panel from the 1200. (The
panel is still connected to the 1200 by the transformer leads
connected to the On/Off switch.) From this position it is
possible to remove or work on boards SHR-05, -06, -07,
-08, and -09.
SHR-05 MASTER CONTROL BOARD
To remove SHR-05 MASTER CONTROL BOARD from the
Mounting Panel:
1.
Remove the control knobs.
2.
Use a nutdriver or wrench to remove the nuts holding the
control shafts to the Mounting Panel.
3. To free the board, pull the shafts back out of the panel.
SHR-06 HEADPHONES OUTPUT BOARD AND SHR-07 HEAD-
PHONES CONTROL BOARD
SHR-06 and SHR-07 are connected together by a solderedin-place 4-conductor ribbon cable. If it is not necessary to
replace the cable, either remove both boards (if desired to free
one of them completely from the 1200), or only remove one (if
freeing the assembly from the 1200 is not essential).
To remove SHR-07 HEADPHONES CONTROL BOARD, remove
the 7/16-inch nut that holds the control shaft to the Mounting
Panel. This permits the board to be freed from the panel (although
it is still connected via the ribbon cable to SHR-06 HEADPHONES
OUTPUT BOARD).
To remove SHR-06 HEADPHONES OUTPUT BOARD, remove
the 1/2-inch nut that holds the phone jack to the Mounting
Panel. This permits the board to be freed from the Panel.
SHR-08 INDICATORS BOARD
Remove the two Phillips screws holding SHR-08 to the back
of the Mounting Panel. Pull the board back from the panel to
remove the LEDs from their holes and to free the board.
S2 ON/OFF SWITCH
To remove the On/Off Switch from the Mounting Panel:
1.
Pull the switch button off the switch control shaft.
2.
Remove the two Phillips screws that hold the switch to the
panel.
3.
Unsolder the red and black transformer leads from the switch.
A1200MX INPUT EXPANSION MODULE
The A1200MX is an optional input expansion module kit that
provides two additional input channels to the 1200. A maximum
of two A1200MXs can be added to the 1200 for a total of 10
inputs. The A1200MX consists of an input connector module
(SHR-15 and SHR-16), an input transformer module (SHR-17),
a channel control module (two SHR-04s), control knobs, and
hardware.
The A1200MX circuitry is identical to the input circuitry of the
other six input channels. Servicing can be accomplished in the
same manner. Printed wiring board drawings are provided with
the service drawings.
CHECKING ACTIVE COMPONENTS
Integrated circuits can be checked without removing them
from their circuit board. Measure the input, output and power
supply voltages as shown on the applicable circuit diagram.
Defective transistors and diodes can be located by use of a
standard ohmmeter such as a Simpson 260. Polarity of the
ohmmeter must be verified before these checks are made; all
resistance measurements are made with the power off in the
circuit under test.
With a known diode orientation, measure the diode resistance
in the forward and reverse directions. The lowest meter reading
will establish the probe at the cathode end (schematic symbol
arrow points to cathode) as the “minus” probe while the other
probe will be “plus.” (Some ohmmeters are not polarized in this
manner with relation to “volts plus probe” and “volts minus
probe.“) With the ohmmeter “plus” probe on the anode end of a
diode, and the “minus” probe on the cathode end, the ohmmeter
should be read approximately 2000 ohms or less. With the
meter probes reversed, a reading of about 10,000 ohms or
more should be obtained. If either of these conditions is not
met, one lead should be unsoldered from the circuit and the test
repeated. If the results are identical, the diode should be replaced.
8
Page 13

To check LEDs, connect the cathode (notch or flat on flange,
tab on lead or short lead) of the LED to the negative terminal of a
standard 9 V transistor battery. Connect the positive battery
terminal through a 4.7 k resistor to the LED anode. Replace any
LED that does not light.
CAUTION
Do not check LEDs with an ohmmeter. The LEDs may be
damaged or erroneous readings may be obtained.
To check transistors, the ohmmeter should be set to the 100or 1,000-ohm scale. Transistors must be removed from the
circuit before testing. If all conditions in the following table are
met, the transistor may be considered free of any major defect;
if any of the following conditions are not met, the transistor
should be replaced. See Figure 3 for active component lead
codes.
OHMMETER CONNECTlON
“Plus” Lead
Collector
Emitter
Collector
Emitter Base
Base
Base
“Minus” Lead Transistor
Emitter
Collector
Base High Low
Collector
Emitter Low High
OHMMETER READING
NPN PNP
High High
High High
High Low
Low
Transistor
High
FERRITE BEADS
All low-impedance microphone connectors contain ferrite
beads (L101-L112, SHR-01). Be sure to replace any ferrite
beads removed during servicing.
SERVICE ILLUSTRATIONS
Immediately following the parts list on the pages that follow
are printed wiring board foil and legend drawings, and circuit
diagrams. Once a board has been located through the parts
location photo (Figure 1), the components on that board can be
located from the board drawing. The function of the part is
shown on the relevant circuit diagram.
OPTIONAL ACCESSORIES
The following optional accessories are designed for use with
the Shure 1200 AUDIOMASTER Powermixer.
Carrying Case . . . . . . . . . . . . . . . . . . . . . . . . . . . . . . . A1200C
Input Expansion Module (2 channels,
2 each HI Z and LO Z inputs . . . . . . . . . . . . . . . . A1200MX*
Speaker Cable, 15 m (50 ft), with phone plugs . . . . . . A50SC
240 V Conversion Kit . . . . . . . . . . . . . . . . . . . . . . . . . RKC209*
Line Matching Transformer (LO Z to HI Z) . . . . . . . . . . . A95UF
Phono Preamplifier . . . . . . . . . . . . . . . . . . . . . . . . . . . . . M64A
*For installation by qualified service personnel only.
9
Page 14

REPLACEMENT PARTS LIST
The following list provides information on replacement parts for the Shure Model 1200 AUDIOMASTER Powermixer. Shure part numbers
are given for all parts and, where available, manufacturer’s name and part number for acceptable equivalents in parentheses following the
part description (note that for optimum performance, only direct replacement parts should be used).
NOTE: Carbon film resistors shown in this parts list are rated at 0.2 watts. Standard 1/8-watt resistors should only be used as
replacements if circuit power requirements are not exceeded. Standard 1/4-watt resistors can only be used if they are physically mounted
in a vertical position.
NOTE: In early production, PC Board Assembly SHR-14 contains the following legend error: Capacitor C1423 is marked “+” on the
wrong lead. Note the position of C1423 and replace (if necessary) according to the part, not the legend.
REFERENCE DESIGNATION
A1
B1
C401, C702, C1405, C1408
C402, C410-C411, C413, C508, C509
C404
C407, C503
C408-C409, C501-C502, C1410
C412, C1411, C1415
C506, C510-C511, C1414
C701
C1006
C1101
C1103
C1104, C1113
C1105, C1107
C1106
C1108
C1109, C1112
C1110-C1111
C1201
C1301
C1401
C1403
C1406, C1412-C1414
C1407
C1417-C1418
C1419
C1420-C1421
C1422-C1423
C1424-C1425
C1426-C1428
D401-D404, D701-D702, D1401-D1418
D405
D801-D802
D803
D804
D1101
D1102-D1105
D1106-D1107, D1419-D1421
D1422
D1423
D1424
F1
F1401-F1402
F1403-F1404
J1
J101-J106
J201-J206, J1001-J1005
J601, J1301-J1302
L101-L112
L1101
MP1
MP2
MP3
MP4
MP5
SHURE
PART NO.
803039FK
802641FK
707471FK
707416FK
707425FK
707707FK
707725FK
707439FK
707424FK
800660FK
707351FK
707344FK
707328FK
707358FK
802602FK
707316FK
707350FK
708009FK
707629FK
707315FK
802600FK
707714FK
707571FK
707416FK
707705FK
707438FK
707329FK
707322FK
707354FK
802599FK
802605FK
800625FK
802594FK
800633FK
802596FK
802597FK
706541FK
802593FK
706306FK
706319FK
706323FK
706322FK
713642FK
802634FK
784129FK
802633FK
802629FK
713373FK
784104FK
784108FK
802625FK
788427FK
802579FK
802580FK
802581FK
802582FK
DESCRIPTION
Reverb Pan
Fan
Capacitor, Electrolytic, 0.22 µF, 50 V (Nichicon UKB1HR22KAA)
Capacitor, Electrolytic, 22 µF, 16 V (Nichicon UKB1C100KAA)
Capacitor, Electrolytic, 10 µF, 25 V (Nichicon UKB1E100KAA)
Capacitor, Mylar, 0.0015 µF (Panasonic ECQ-B1H152JZ)
Capacitor, Mylar, .047 µF (Panasonic ECQ-V1H473JZ)
Capacitor, Electrolytic, 1 µF, 50 V (Nichicon ULB1H010MAA)
Capacitor, Electrolytic, 4.7 µF, 25 V (Nichicon ULB1H4R7MAA)
Capacitor, Electrolytic, 10 µF, 50 V (Nichicon ULB1H100MAA)
Capacitor, Electrolytic, 100 µF, 50 V (Nichicon ULB1H101MPA)
Capacitor, Electrolytic, 1 µF, 50 V (Nichicon ULB1H010MAA)
Capacitor, Electrolytic, 47 µF, 25 V (Nichicon ULB1E470MAA)
Capacitor, Electrolytic, 10 µF, 63 V (Nichicon ULB1J100MAA)
Capacitor, Ceramic, 10 pF, 500 V
Capacitor, Electrolytic, 22 µF, 16 V (Nichicon UKB1C100KAA)
Capacitor, Electrolytic, 47 µF, 50 V (Nichicon ULB1H470MAA)
Capacitor, Ceramic, 100 pF, 100 V
Capacitor, Mylar, .1 µF (Panasonic ECQ-V1104JZ)
Capacitor, Electrolytic, 10 µF, 16 V (Nichicon UKB1C100KAA)
Capacitor, Mylar, .047 µF, 100 V (Sprague 225P47391WD3)
Capacitor, Mylar, 0.0056 µF (Panasonic ECQ-B1H562JZ)
Capacitor, Bipolar Electrolytic, 10 µF, 16 V (Panasonic ECE-A1CN100S)
Capacitor, Electrolytic, 10 µF, 16 V (Nichicon UKB1C100KAA)
Capacitor, Mylar, .001 µF (Panasonic ECQ-B1H102JZ)
Capacitor, Electrolytic, 0.47 µF, 50 V (Nichicon UKB1HR47KAA)
Capacitor, Electrolytic, 100 µF, 25 V (Nichicon ULB1E101MAA)
Capacitor, Electrolytic, 1000 µF, 16 V (Nichicon ULB1C102MRA)
Capacitor, Electrolytic, 470 µF, 50 V (Nichicon ULB1H471MRA)
Capacitor, Electrolytic, 10,000 µF, 63 V
Capacitor, Ceramic, .01 µF, 500 V
Diode (RCA SK3100)
LED, Red (RCA SK2022/3022)
LED, Red (RCA SK2022/3022)
LED, Yellow (RCA SK2021/3021)
LED, Green (RCA SK2024/3024)
Diode, Zener (RCA SK24A)
Diode (RCA SK3100)
Diode (RCA SK3311)
Silicon Rectifier (RCA SK3647)
Silicon Rectifier
Silicon Rectifier
Fuse, 5 A, 250 V (Littelfuse 312005)
Fuse, 0.75 A, 250 V (Littelfuse 312.750)
Fuse, 8 A, 250 V (Littelfuse 312008)
Outlet, Unswitched AC
Connector, XLR-type Receptacle, 3-pin (Cannon XLB-3-31PC)
Phone Jack, 2-Circuit
Headphone Jack, 3-Circuit
Ferrite Bead
Coil, 4.6 µH
Rubber Foot
Knob, Green, Bass
Knob, Green, Treble
Knob, Black
Knob, Gold
10
Page 15

REFERENCE DESIGNATON
MP6
MP7
MP8
MP9
MP10
P1003-P1004
P1401
Q501, Q1110, Q1403
Q1101, Q1114
Q1102
Q1103-Q1104
Q1105,Q1109
Q1106
Q1107-Q1108
Q1111
Q1112-Q1113
Q1401-Q1402, Q1404
Q1405
Q1406
R101-R106
R201-R206, R405, R520, R522,
R1404, R1415, R1445, R1452
R301, R304, R514
R302, R305
R303, R306, R407, R414, R416, R503,
R513, R1401, R1412, R1423,
R1426-R1427, R1430
R401, R518
R402
R403
R404, R409-R410, R502, R504,
R512, R519, R602
R406, R408, R505-R506
R411, R1410, R1422, R1424, R1448-R1449
R412, R1006, R1409, R1420-R1421,
R1433, R1435-R1438, R1443, R1446,
R1451, R1458
R413, R1419, R1453
R415, R523, R601, R704, R1414,
R1417-R1418, R1425, R1429, R1442,
R1444, R1447
R501, R511
R507
R508, R515, R1428
R509, R516-R517
R510
R521, R1001-R1005, R1413,
R1431-R1432, R1459
R603-R605
R701, R703
R702
R1101
R1102, R1104
R1103, R1112, R1201
R1105
R1106-R1108
R1109
R1110
R1111
R1113
R1114
R1115
R1116
R1117
R1118-R1119
R1120, R1122
R1121, R1123
R1124-R1125
SHURE
PART NO.
802583FK
802584FK
802585FK
802587FK
802642FK
802628FK
711080FK
706102FK
706146FK
800412FK
802590FK
801798FK
706156FK
802591FK
706155FK
802592FK
706537FK
706139FK
706147FK
802610FK
801057FK Resistor, 4.7 K
801059FK Resistor, 6.8 K
801068FK Resistor, 39 K
801065FK
802607FK
801075FK
801076FK
801061FK
801058FK
801081FK
801073FK
801072FK Resistor, 82 K
801069FK
801062FK
801055FK
801077FK
801041FK
803041FK
801053FK
802614FK
802815FK
803042FK
708857FK
708842FK
708845FK
708835FK
708850FK
708906FK
708934FK
802617FK
803043FK
708838FK
708836FK
802616FK
802610FK
708849FK
708854FK
708840FK
802613FK
Knob, Red
Knob, Blue
Knob, White
Fan Grille, Front Panel
Fan Grille, Rear Panel
Connector, Receptacle, 2-pin
Connector, Receptacle, 8-pin
Transistor, PNP (RCA SK3932)
Transistor, Dual, NPN (RCA SK9427)
Transistor, Dual, FET
Transistor, Power, PNP (RCA SK9042) (requires 802681FK insulator)
Transistor, NPN
Transistor, NPN (RCA SK9118)
Transistor, Power, NPN (requires 802639FK insulator)
Transistor, PNP (RCA SK9363)
Transistor, Power, PNP (requires 802639FK insulator)
Transistor, FET
Transistor, NPN (RCA SK9137)
Transistor, PNP (RCA SK9138)
Resistor, 1.8 K
Resistor, 22 K
Resistor, 2 K, 2%
Resistor, 150 K
Resistor, 180 K
Resistor, 10 K
Resistor, 5.6 K
Resistor, 470 K
Resistor, 100 K
Resistor, 47 K
Resistor, 12 K
Resistor, 3.3 K
Resistor, 220 K
Resistor, 220
Resistor, 43 K (Early Production); 30 K (Later Production)
Resistor, 2.2 K
Resistor, Metal Oxide Film, 220, 1 W
Resistor, 13 K, 1%
Resistor, 680, 2%
Resistor, 47 K
Resistor, 2.7 K
Resistor, 4.7 K
Resistor, 680
Resistor, 12 K
Resistor, 1.8 K, 2%
Resistor, 47 K, 2%
Resistor, Metal Oxide Film, 5.6 K, 2 W
Resistor, Metal Oxide Film, 68, 1/2 W
Resistor, 1.2 K
Resistor, 820
Resistor, Metal Oxide Film, 3.9 K, 2 W
Resistor, Metal Oxide Film, 1.8 K, 1/2 W
Resistor, 10 K
Resistor, 27 K
Resistor, 1.8 K
Resistor, Metal Oxide Film, 100, 1 W
11
DESCRIPTION
Page 16

SHURE
REFERENCE DESIGNATION
R1126-R1127
R1128
R1301
R1402
R1403, R1454
R1406-R1407
R1408
R1411
R1416
R1434
R1439
R1440, R1455
R1441
R1450
R1456
R1457
R1460
R1461-R1462
S1
S2
S3
S301-S302
S901
SHR-01
SHR-02
SHR-03
SHR-04
SHR-05
SHR-06
SHR-07
SHR-08
SHR-09
SHR-10
SHR-11
SHR-12
SHR-13
SHR-14
T1
T101-T106
U401-U402, U501-U504, U701,
PART NO.
802612FK
708853FK
710041FK
801064FK
801080FK
800190FK
801033FK
801085FK
801089FK
801063FK
802609FK
801070FK
801051FK
801045FK
800749FK
802611FK
709314FK
802615FK
802630FK
802631FK
802632FK
801599FK
784110FK
235901FK
235902FK
235903FK
235904FK
235905FK
235906FK
235907FK
235908FK
235909FK
235910FK
235911FK
235912FK
235913FK
235914FK
803474FK
802626FK
706077FK
U1401-U1407
U1201
U1408
U1409
U1410
V1401
VR401
VR402, VR502
VR403, VR405, VR701
VR404
VR501, VR504
VR503
VR1101-VR1102
VR1103
VR1201
VR1401
W1
W2
W3
W4
XF1
+ May not exhibit the low-noise characteristics of the original part.
802588FK
802589FK
706097FK
706098FK
802598FK
802620FK
802622FK
802619FK
802621FK
802623FK
802624FK
802618FK
802681FK
800030FK
710138FK
802638FK
908575FK
908580FK
800618FK
802636FK
DESCRIPTION
Resistor, Ceramic, Dual, .22, 5 W
Resistor, 22 K
Resistor, Ceramic, 10, 5 W
Resistor, 18 K
Resistor, 390 K
Resistor, 22, 1/2 W
Resistor, 47
Resistor, 1 M
Resistor, 2.2 M
Resistor, 15 K
Resistor, 51 K, 2%
Resistor, 56 K
Resistor, 1.5 K
Resistor, 470
Resistor, Metal Film, 100 K, 1%
Resistor, Metal Film, 36 K, 1%
Resistor, Metal Oxide Film, 39, 1/2 W
Resistor, Metal Oxide Film, 47, 2 W
Switch, Voltage Selector, DPDT
Switch, On/Off, SPST
Switch, Phantom Power, SPST
Switch, Slide, DPDT
Switch, Slide, DPDT
Printed Wiring Assembly, Lo-Z Input
Printed Wiring Assembly, Hi-Z Input
Printed Wiring Assembly, Aux/Mic
Printed Wiring Assembly, Channel
Printed Wiring Assembly, Master Control
Printed Wiring Assembly, Headphones Out
Printed Wiring Assembly, Headphones Control
Printed Wiring Assembly, Indicator
Printed Wiring Assembly, Limiter
Printed Wiring Assembly, Input/Output
Printed Wiring Assembly, Power
Printed Wiring Assembly, Sensor
Printed Wiring Assembly, Speaker Output
Printed Wiring Assembly, Main
Transformer, Power
Transformer, Mic Input
IC, Quad Op Amp (RCA SK3465+)
IC, Thermal Sensor
IC, Voltage Regulator (Motorola MC7824)
IC, Voltage Regulator, Positive (Motorola MC7815)
IC, Voltage Regulator, Negative (Motorola MC7915)
Opto-Isolator
Potentiometer, Log, 100 K
Potentiometer, Dual, Linear, 50 K
Potentiometer, Log, 10 K
Potentiometer, Linear, 20 K
Potentiometer, Log, 100 K
Potentiometer, Linear, 10 K
Potentiometer, Linear, 100
Potentiometer, Linear, 1 K
Potentiometer, Linear, 47 K
Potentiometer, Linear, 5 K
Power Cable and Plug, 3 m (10 ft), 3-Conductor
Channel Bus Cable, Ribbon, 8-Conductor, with Connectors
Cable, Ribbon, 5-Conductor
Cable, Ribbon, 4-Conductor
Rear Panel Fuseholder
12
Page 17

BLOCK DIAGRAM
Page 18

LEAD CODES
Page 19

15
Page 20

16
Page 21

17
Page 22

18
Page 23

19
Page 24

20
Page 25

21
CIRCUIT DIAGRAM-1
(SHR-01, SHR-02, SHR-03, SHR-04)
Page 26

22
CIRCUIT DIAGRAM-2
(SHR-05, SHR-07, SHR-08, SHR-10)
Page 27

23
CIRCUIT DIAGRAM-3
(SHR-09, SHR-12, SHR-14)
Page 28

24
CIRCUIT DIAGRAM-4
(SHR-06, SHR-11, SHR-13, SHR-14)
Page 29

Page 30

 Loading...