

Shure ANI22-BLOCK, ANI22-XLR User Manual

9/12/17, 9(22 AMShure Publications | User Guides | ANI22
Page 1 of 35http://pubs.shure.com/guide/ANI22/en-US
ANI22
Audio Network Interface
General Description
The Shure ANI22 Audio Network Interface provides 2 channels of Dante-to-analog and 2
channels of analog-to-Dante conversion. A single interface provides a simple way to
connect analog equipment to the audio network, such as wireless microphones, audio
processors, video codecs, and loudspeaker systems. Available in XLR and block connector
versions, each box uses a single network cable to carry audio and power through Power
over Ethernet (PoE). A browser-based web application controls audio and network settings
from any computer connected to the same network.
Safety Information
IMPORTANT SAFETY INSTRUCTIONS
1. READ these instructions.
2. KEEP these instructions.
3. HEED all warnings.
4. FOLLOW all instructions.
5. DO NOT use this apparatus near water.
6. CLEAN ONLY with dry cloth.
7. DO NOT block any ventilation openings. Allow sufficient distances for adequate
ventilation and install in accordance with the manufacturer’s instructions.
8. DO NOT install near any heat sources such as open flames, radiators, heat registers,
stoves, or other apparatus (including amplifiers) that produce heat. Do not place any
open flame sources on the product.
9. DO NOT defeat the safety purpose of the polarized or grounding type plug. A
polarized plug has two blades with one wider than the other. A grounding type plug
has two blades and a third grounding prong. The wider blade or the third prong are
provided for your safety. If the provided plug does not fit into your outlet, consult an
electrician for replacement of the obsolete outlet.
10. PROTECT the power cord from being walked on or pinched, particularly at plugs,
convenience receptacles, and the point where they exit from the apparatus.
11. ONLY USE attachments/accessories specified by the manufacturer.
12. USE only with a cart, stand, tripod, bracket, or table specified by the manufacturer, or
sold with the apparatus. When a cart is used, use caution when moving the
cart/apparatus combination to avoid injury from tip-over.
Publications User Guides ANI22 (English)
› ›
English
Table of Contents
General Description
Safety Information
Getting Started
Hardware and Installation
Signal Flow and Connections
Device Identification
Using A Password
Audio Settings
Networking and Dante
Event Log
ANI22 Command Strings
Important Product
Information
Specifications
Accessories
9/12/17, 9(22 AMShure Publications | User Guides | ANI22
Page 2 of 35http://pubs.shure.com/guide/ANI22/en-US
13. UNPLUG this apparatus during lightning storms or when unused for long periods of
time.
14. REFER all servicing to qualified service personnel. Servicing is required when the
apparatus has been damaged in any way, such as power supply cord or plug is
damaged, liquid has been spilled or objects have fallen into the apparatus, the
apparatus has been exposed to rain or moisture, does not operate normally, or has
been dropped.
15. DO NOT expose the apparatus to dripping and splashing. DO NOT put objects filled
with liquids, such as vases, on the apparatus.
16. The MAINS plug or an appliance coupler shall remain readily operable.
17. The airborne noise of the Apparatus does not exceed 70dB (A).
18. Apparatus with CLASS I construction shall be connected to a MAINS socket outlet
with a protective earthing connection.
19. To reduce the risk of fire or electric shock, do not expose this apparatus to rain or
moisture.
20. Do not attempt to modify this product. Doing so could result in personal injury and/or
product failure.
21. Operate this product within its specified operating temperature range.
This symbol indicates that dangerous voltage constituting a risk of electric
shock is present within this unit.
This symbol indicates that there are important operating and maintenance
instructions in the literature accompanying this unit.
Getting Started
This device features a browser-based web application, which controls audio and network
properties. Upon completing this basic setup process, you will be able to:
Access the web application to customize audio settings and network properties
Use Dante™ Controller software to connect with other Dante devices and pass audio
9/12/17, 9(22 AMShure Publications | User Guides | ANI22
Page 3 of 35http://pubs.shure.com/guide/ANI22/en-US
Access additional configuration information
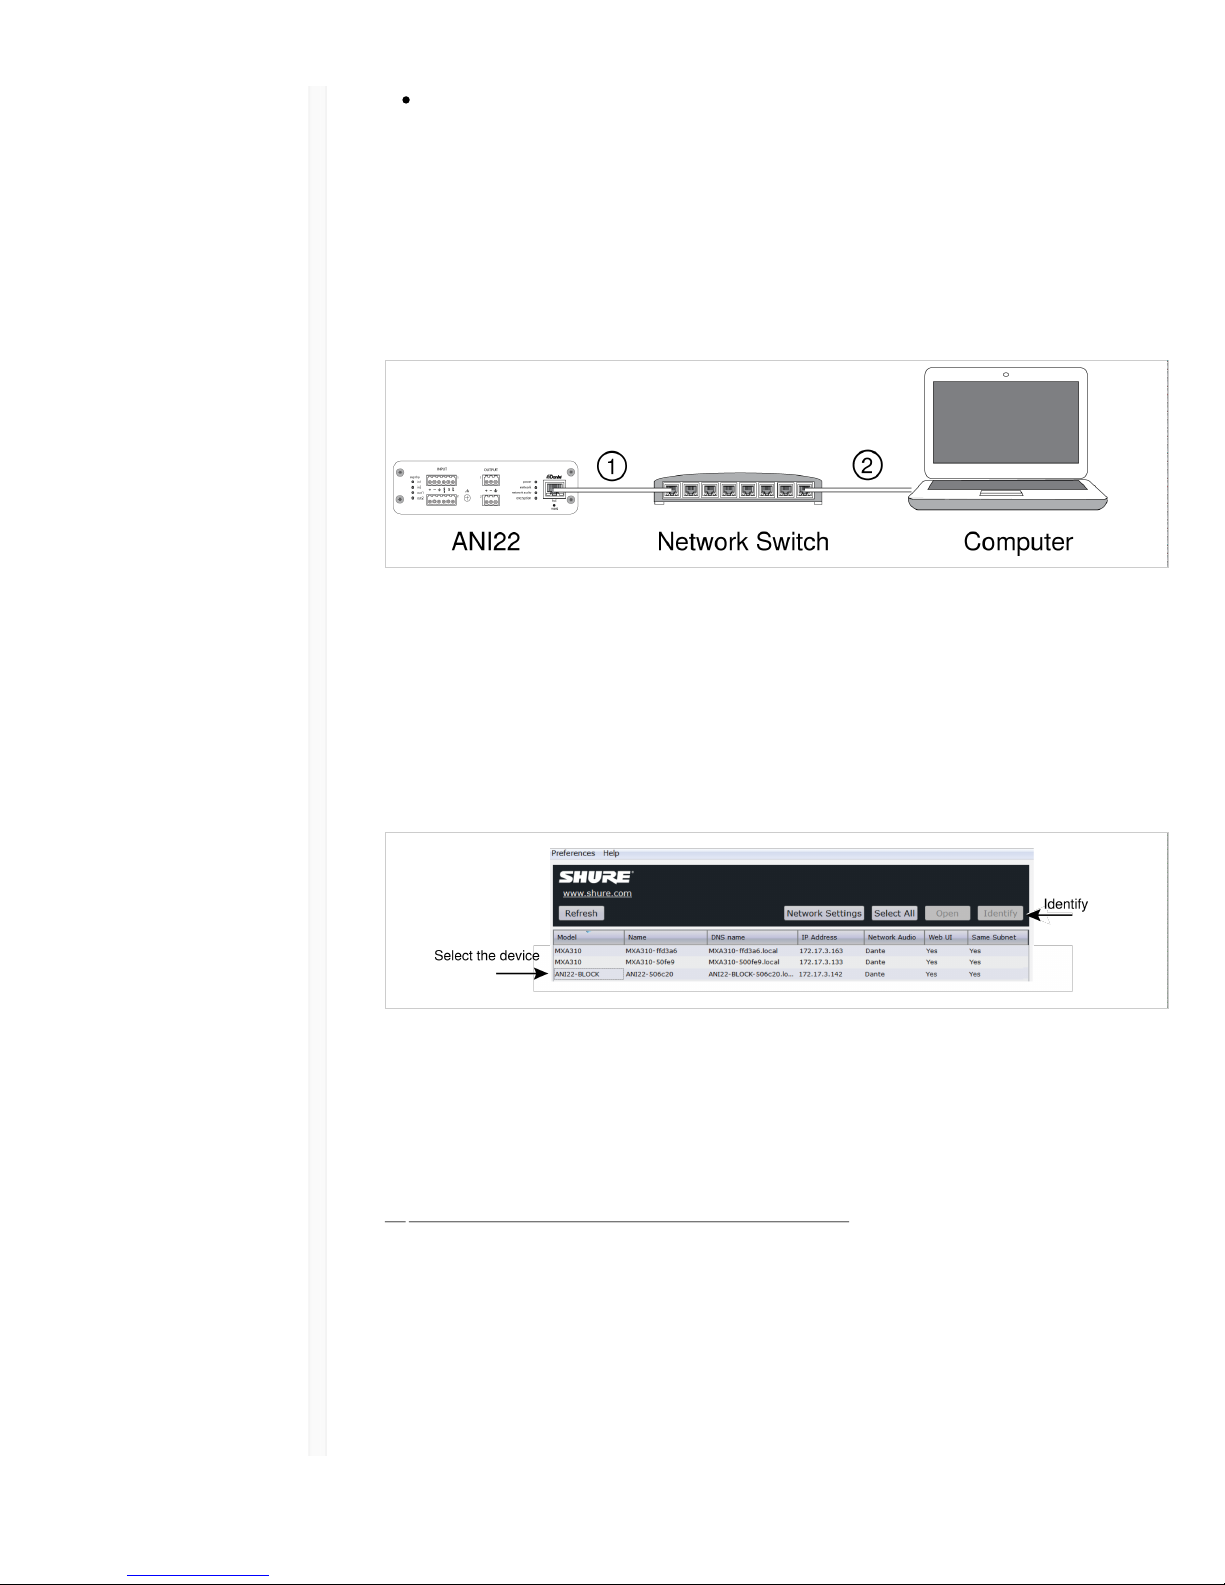
Step 1: Connect to a Network
1. Use an Ethernet cable (CAT5e or higher) to connect the ANI22 to a network switch.
Note: The network switch must provide Power over Ethernet (PoE). Make sure to
connect to a PoE port, since many switches do not supply power on all ports.
2. Connect a computer to the network switch with an Ethernet cable
Step 2: Access the Web Application
1. Download and install the Shure Device Discovery application (http://www.shure.com)
2. Open the Shure Device Discovery application
3. Double-click the device to open the web application.
Tip: If setting up multiple Shure devices, use the Identify button in the application to
flash the lights on the device.
Step 3: Connect Devices in Dante Controller Software
1. Download and install Dante Controller Software from http://www.audinate.com
2. Use Dante Controller to create connections with other Dante devices
Note: Refer to the Dante Controller user guide for more information on channel routing (available at
http://www.audinate.com/resources/technical-documentation)
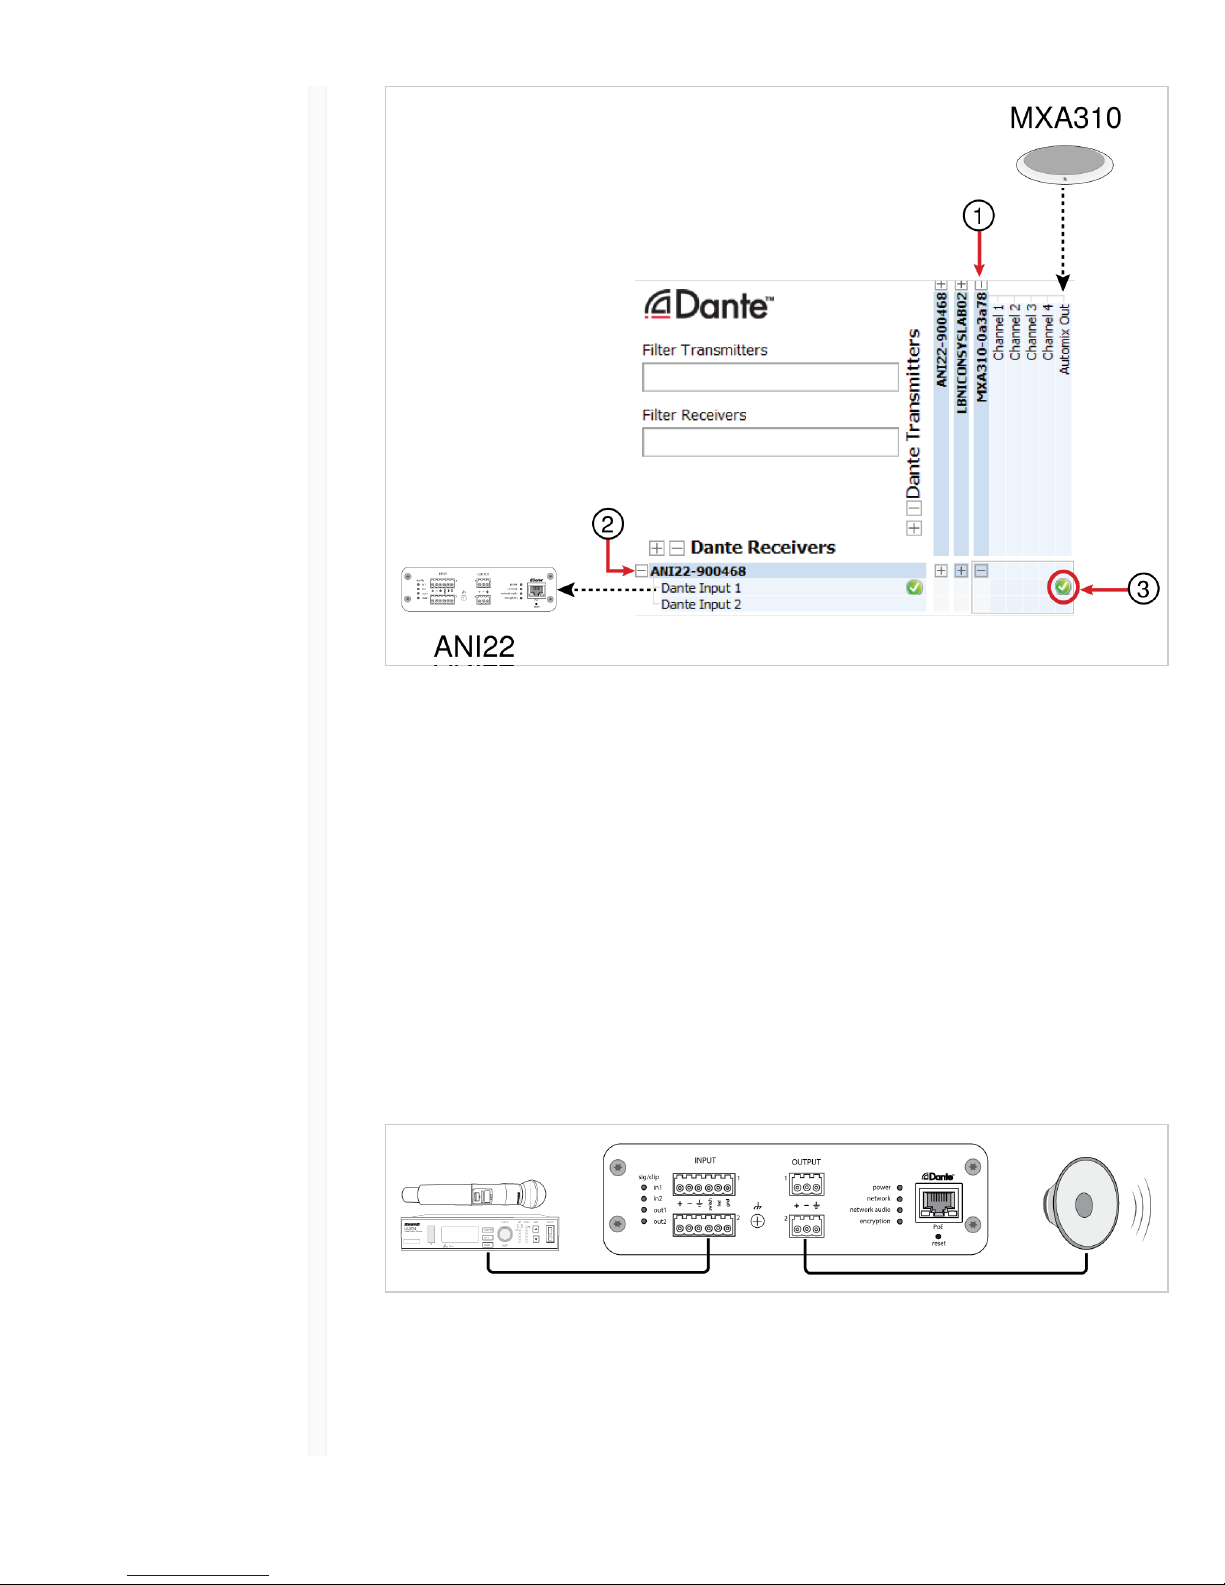
Example: Connecting the ANI22 and Shure MXA310
9/12/17, 9(22 AMShure Publications | User Guides | ANI22
Page 4 of 35http://pubs.shure.com/guide/ANI22/en-US
1. Find the MXA310 in the list of Dante transmitters, and select the plus sign (+) to show
all channels.
2. Find the ANI22 in the list of Dante receivers, and select the plus sign (+) to show all
channels.
3. Check the box where the MXA310 AUTOMIX OUT and the ANI22 DANTE INPUT 1
intersect
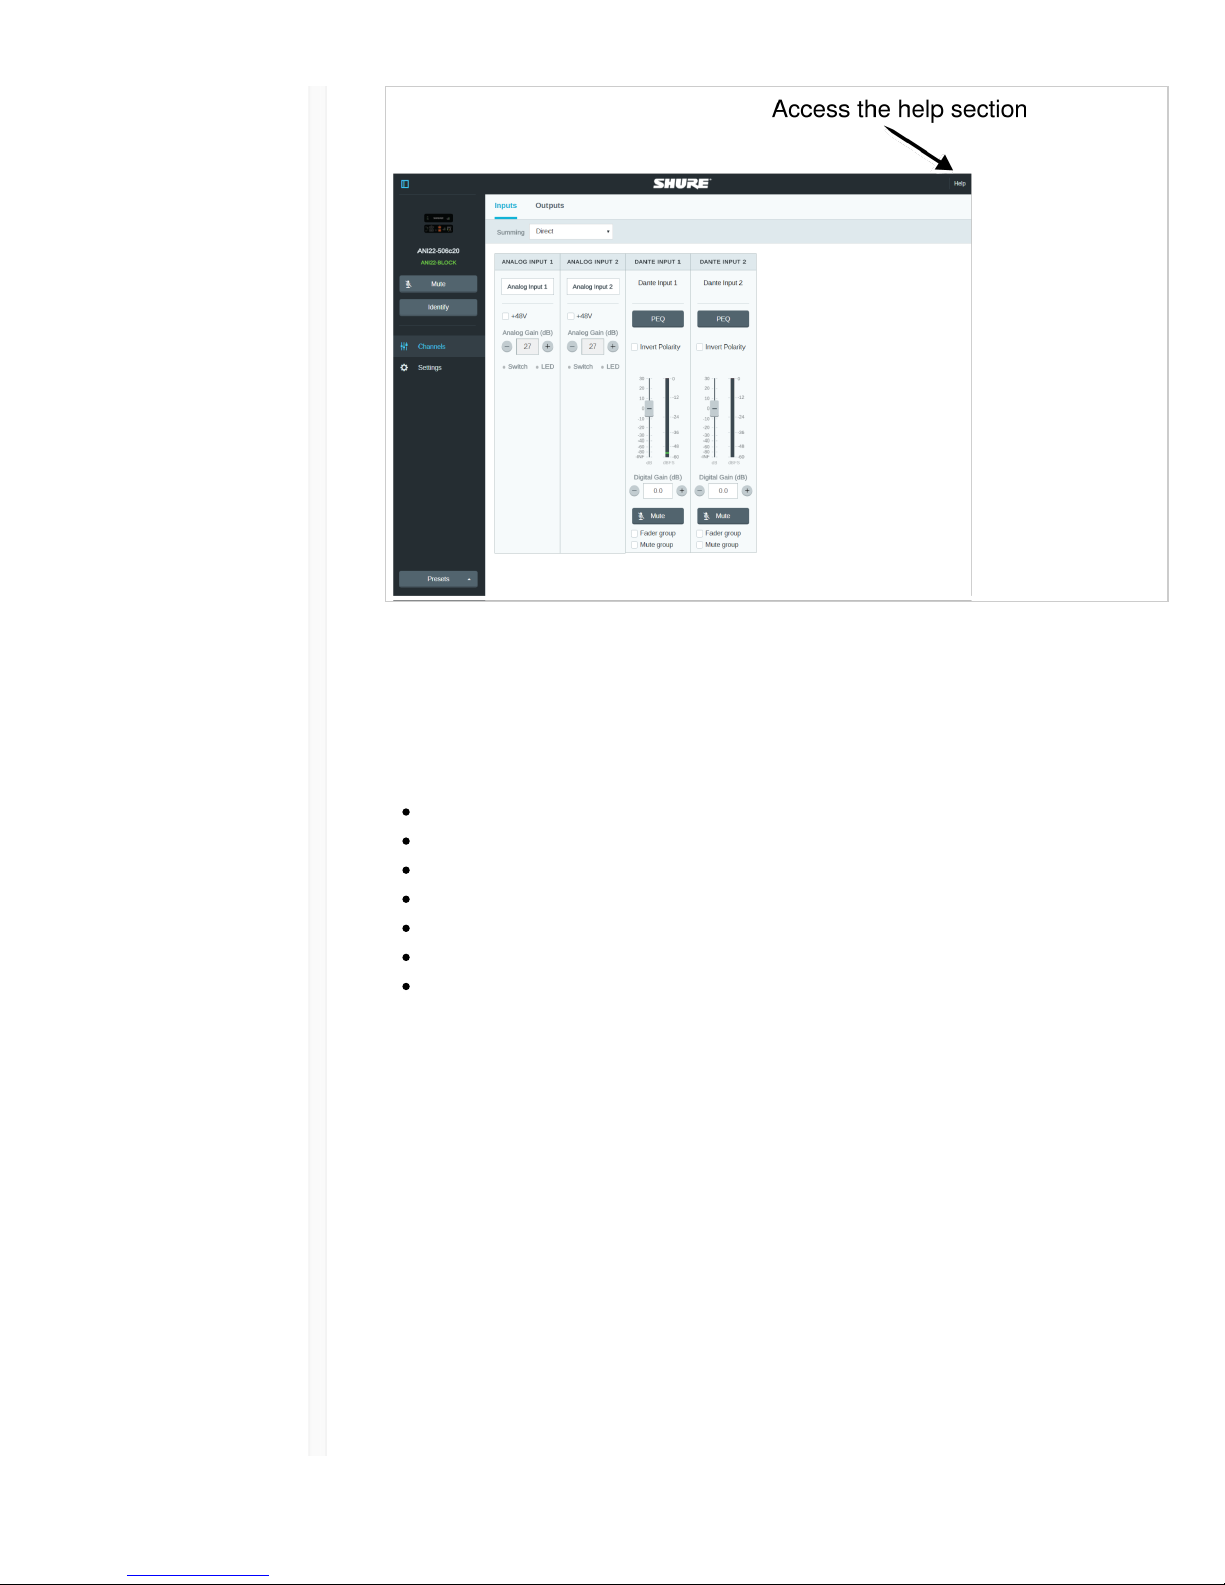
Step 4: Configure Audio
1. Connect analog equipment (such as loudspeakers or wireless microphone systems) to
the analog inputs and outputs. Refer to the hardware section in this guide for
information on connections and LED metering.
2. In the ANI22 web application, adjust input and output levels and perform a sound
check. Refer to the help topics in the web application for additional information.
9/12/17, 9(22 AMShure Publications | User Guides | ANI22
Page 5 of 35http://pubs.shure.com/guide/ANI22/en-US
Get More Information
Now that the basic setup is complete, you should have access to the web application and
be able to pass audio between devices. More comprehensive information is available
online and in the help section, including:
Maximizing audio quality with the built-in parametric equalizer
External control system command strings
System scenario diagrams
Software configuration
Networking information
Troubleshooting
Replacement parts and accessories
The complete user guide is available at http://pubs.shure.com/guide/ANI22
Hardware and Installation
Hardware
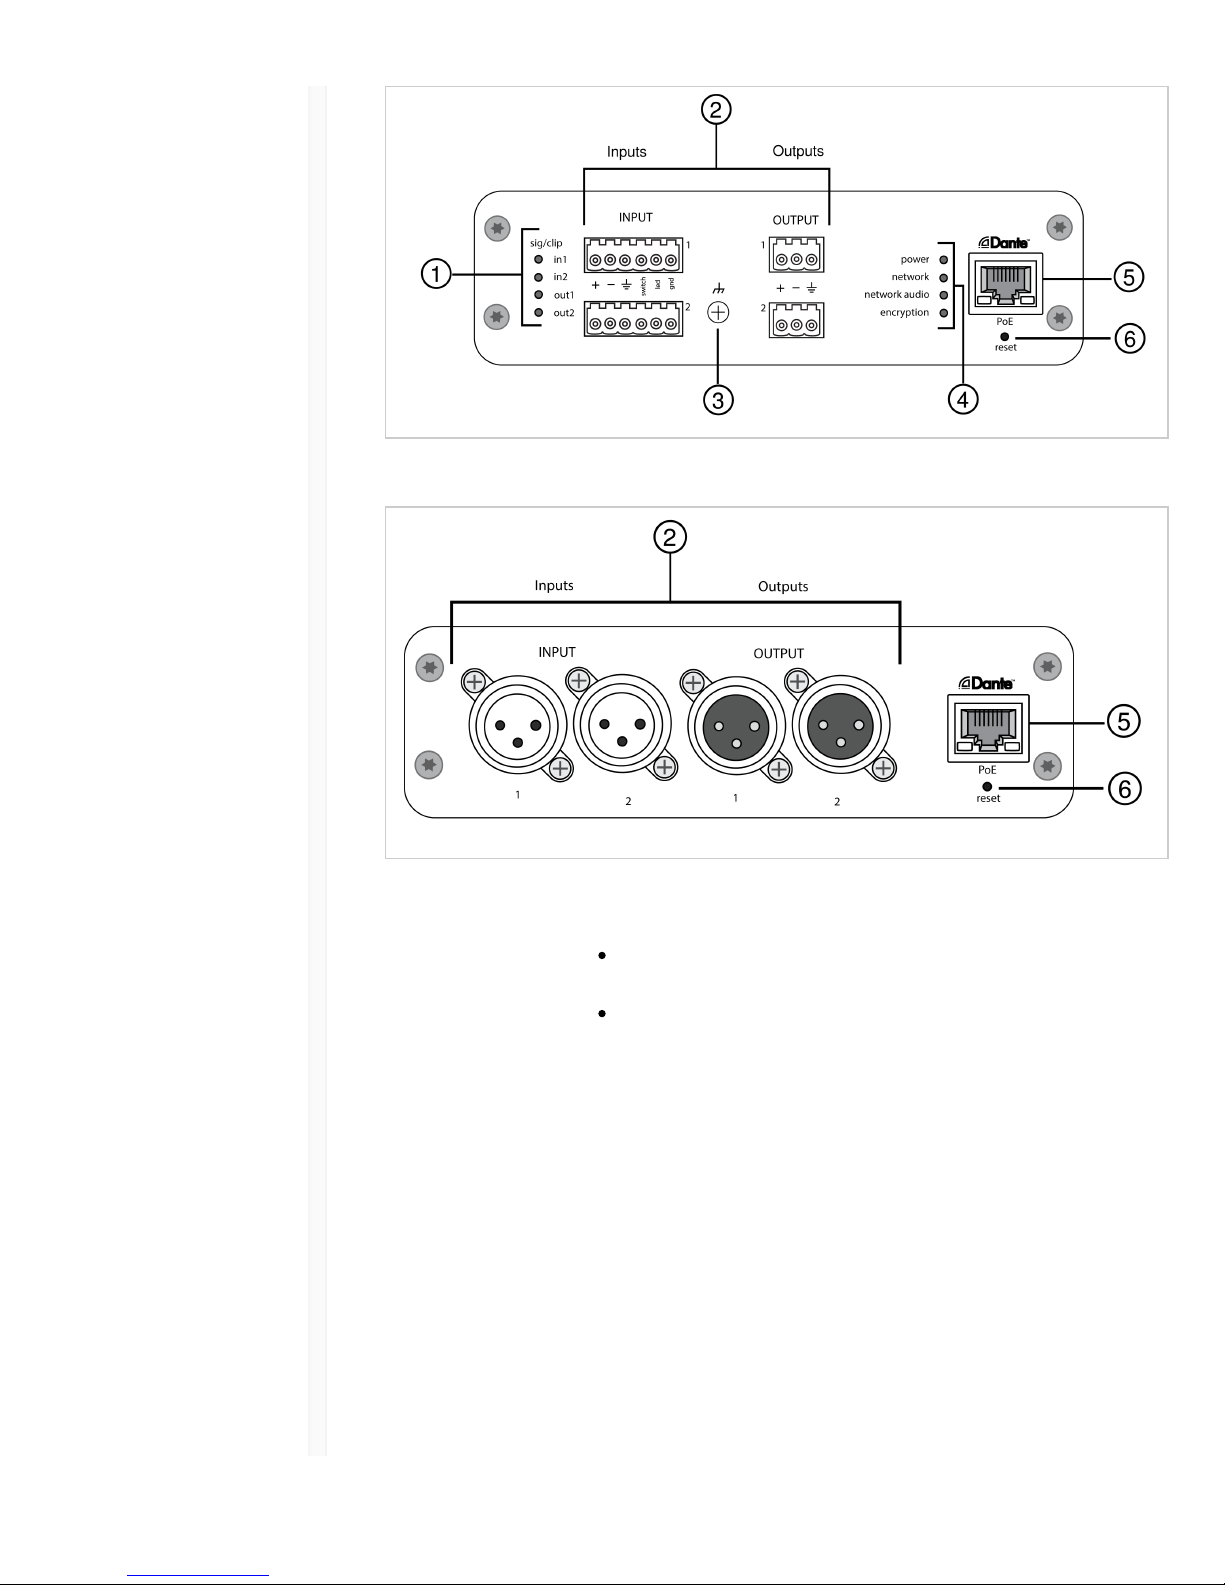
Block Connector Model:
9/12/17, 9(22 AMShure Publications | User Guides | ANI22
Page 6 of 35http://pubs.shure.com/guide/ANI22/en-US
XLR Model:
ɠ Signal/Clip
Indicators
Each indicator corresponds to a single channel. Analog and digital
gain adjustments are made through the web application.
If an input channel LED turns red, attenuate the level from the
source device to prevent clipping at the input stage.
If an output channel LED turns red, lower the corresponding
Digital Gain (dB) fader for the Dante channel under the Input
Channels tab. Do not lower the output level (line/aux/mic), as
any clipping indicated on the LED occurs before the final
output level stage.
LED State Audio Signal
Level
Off less than -60
dBFS
Green -60 dBFS to
-18 dBFS
Yellow -18 dBFS to -6
dBFS

9/12/17, 9(22 AMShure Publications | User Guides | ANI22
Page 7 of 35http://pubs.shure.com/guide/ANI22/en-US
Red -6 dBFS or
more
ɡ Audio and Logic
Connections
Note: Logic connections are only featured on the block connector version.
Block Connector Pin Assignments:
Input
Audio +
Audio -
Audio ground
switch Logic Mute (sent
from microphone)
led Logic LED (received
by microphone)
gnd Logic ground
Output
Audio +
Audio -
Audio ground
XLR Pin Assignments:
1 Ground
2 Positive

9/12/17, 9(22 AMShure Publications | User Guides | ANI22
Page 8 of 35http://pubs.shure.com/guide/ANI22/en-US
3 Negative
ɢ Chassis Ground
Screw
Provides an optional connection for microphone shield wire to
chassis ground.
ɣ LED Indicators Power: Power over Ethernet (PoE) present
Note: Use a PoE injector if your network switch does not supply PoE.
Network: Network connection active
Network Audio: Dante audio present on the network
Note: Error details are available in the event log in the web application.
LED Status Activity
Off No active signal
Green Device is operating
successfully
Red Error has occurred. See
event log for details.
Encryption:
LED Status Activity
Off Audio not encrypted
Green Successful encrypted audio
connection with another device
Red Encryption error. Possible
causes:
Encryption is enabled on
one device and not on
another
Passphrase mismatch
ɤ Dante Network
Port
Connects to a network switch to send Dante audio, while receiving
Power over Ethernet (PoE) and data from the control software. See
the Dante and networking section for additional information.
ɥ Reset Button Resets the device settings back to the factory default.
Power Over Ethernet (PoE)
This device requires PoE to operate. It is compatible with both Class 0 and Class 3 PoE
sources.
Power over Ethernet is delivered in one of the following ways:
A network switch that provides PoE
A PoE injector device

9/12/17, 9(22 AMShure Publications | User Guides | ANI22
Page 9 of 35http://pubs.shure.com/guide/ANI22/en-US
Reset
The reset button is located inside a small hole in the rear panel. Use a paperclip or other
small tool to press the button.
There are two hardware reset functions:
Network reset (press
button for 4-8
seconds)
Resets all Shure control and audio network IP settings to factory
defaults
Full factory reset
(press button for
longer than 8
seconds)
Restores all network and web application settings to the factory
defaults.
Software Reset Options
To simply revert settings without a complete hardware reset, use one of the following
options:
Reboot Device:In the web application (settings > factory reset), there is a Reboot Device
button, which simply power-cycles the device as if it were unplugged from the network. All
settings are retained when the device is rebooted.
Default Settings: To revert audio settings back to the factory configuration (excluding
Device Name, IP Settings, and Passwords), select Load Preset and choose the default
settings preset.
Installation and Rack Mounting
Two mounting solutions are available for installing the Audio Network Interface:
CRT1 19" Rack Tray (optional accessory): Supports up to 3 devices; mountable in a rack or
under a table
Single-unit Mounting Tray (included accessory): Supports a single device for mounting
under a table
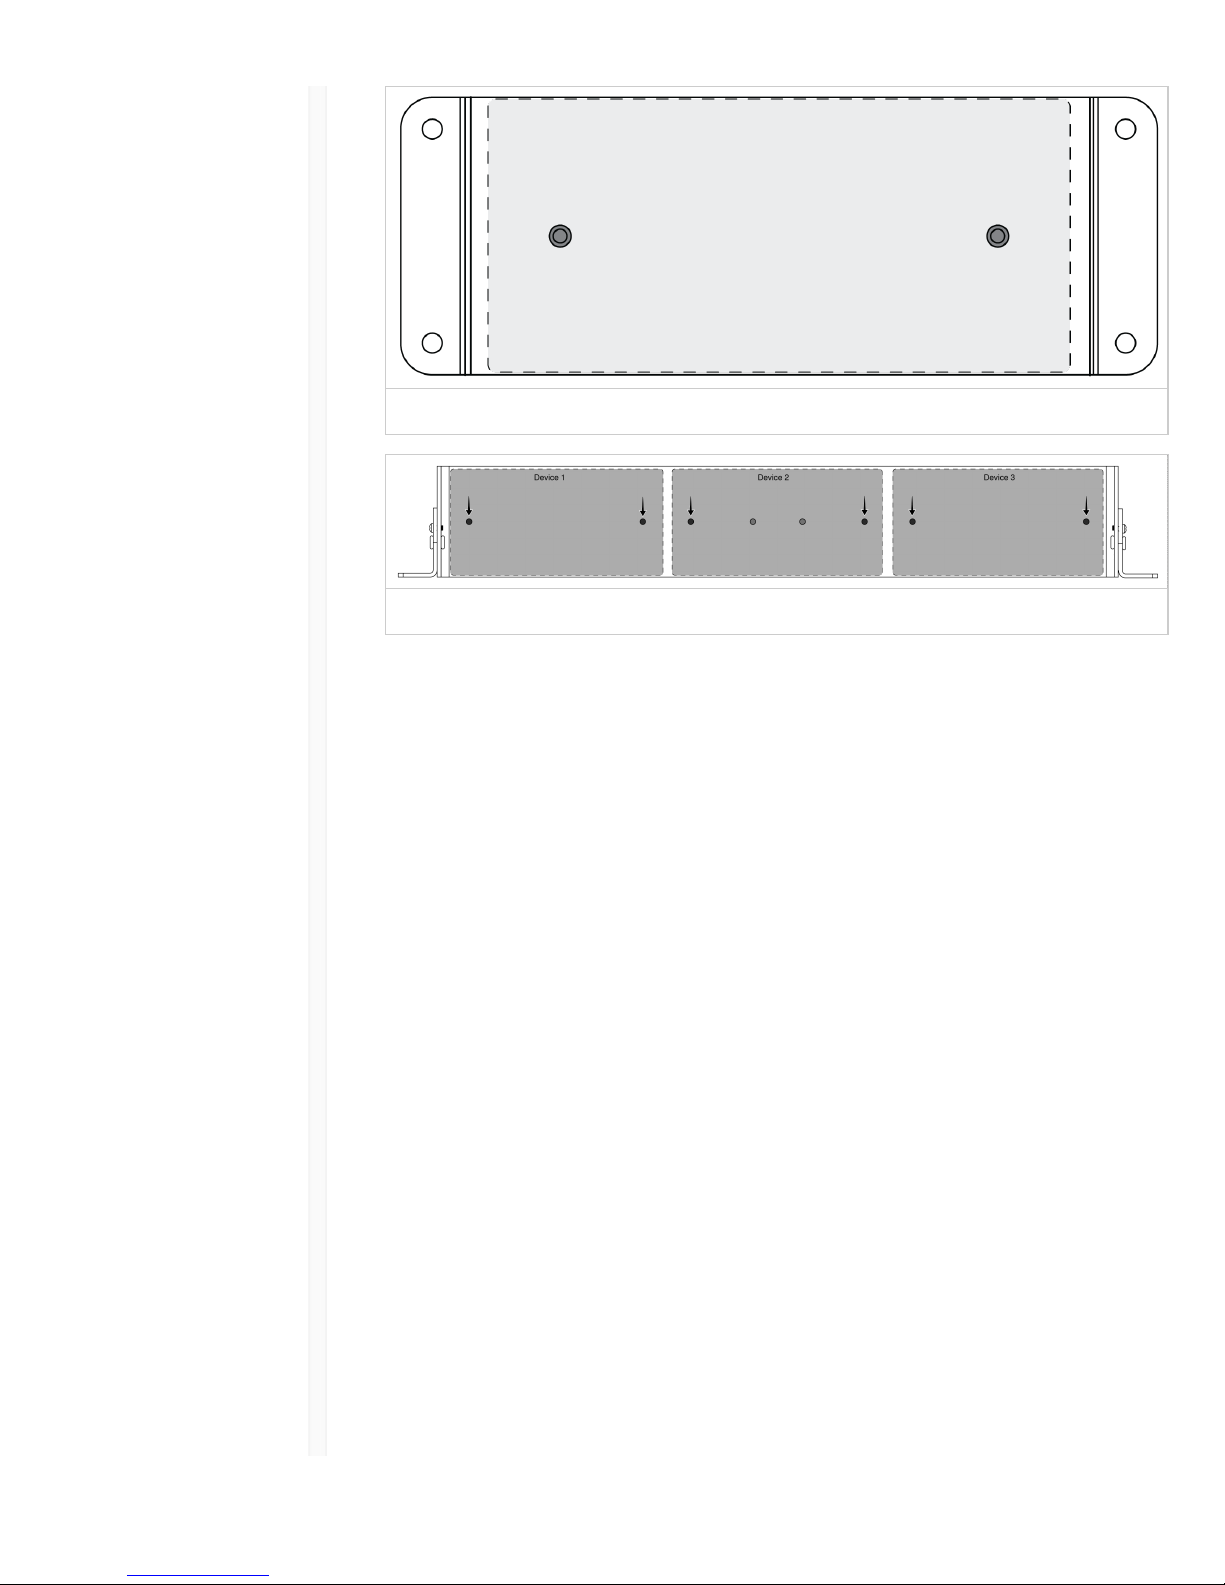
Securing the Devices
Use the included screws from the mounting hardware kit to secure the Audio Network
Interfaces. Audio Network Interfaces can be mounted to face either direction. Insert the
screws from the bottom in the appropriate holes, according to the following diagrams:
9/12/17, 9(22 AMShure Publications | User Guides | ANI22
Page 10 of 35http://pubs.shure.com/guide/ANI22/en-US
Align the holes as shown for securing a single device in the single-unit mounting tray
Align the holes as shown for securing up to three devices in the 19" rack tray.
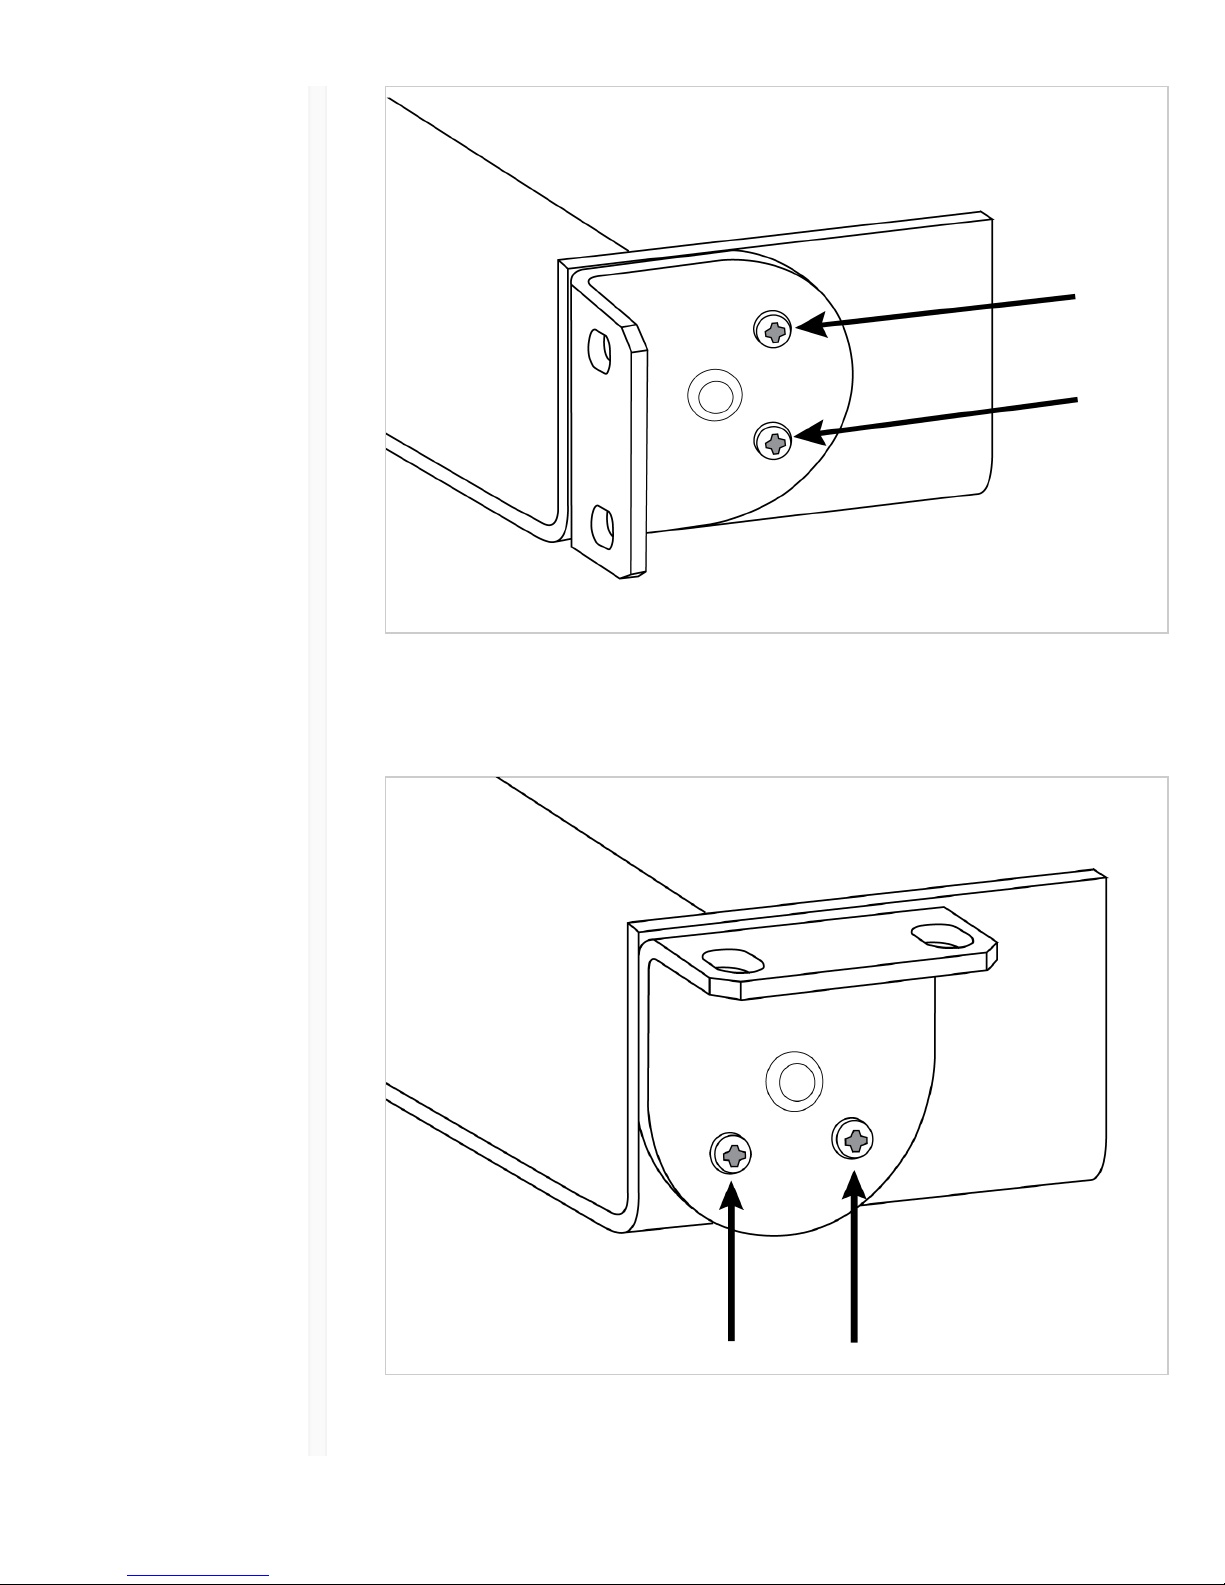
Rack Ear Configuration
A combination of up to 3 Audio Network Interfaces can be mounted in a single 19-inch
rack space. The adjustable rack ears support mounting in a standard equipment rack or
underneath a table.
Standard 19" Rack Mount
1. Align the ears with the mounting holes pointed forward.
2. Install the two screws that hold the ear to the tray as shown.
9/12/17, 9(22 AMShure Publications | User Guides | ANI22
Page 11 of 35http://pubs.shure.com/guide/ANI22/en-US
Under-table Mounting
1. Align the ears with the mounting holes pointed upward.
2. Install the two screws that hold the ear to the tray as shown.
Installing Underneath a Table
 Loading...