

Shure Advance MXA310 User Manual
MXA310
Table Array Microphone
Complete user guide for the MXA310. Includes installation instructions, specifications, best practices, command strings, and more.
Version: 5 (2020-B)

Table of Contents
MXA310Table Array Microphone 4
Overview 4
General Description 4
Features 4
System Overview 5
System Planning and Gear Requirements 5
Setting up the Audio Network 6
System Use Cases 8
Telephone Conference with Shure MXW Audio Network
Interface 9
Telephone Conference with Dante-enabled Audio Proces-
sor 11
Telephone Conference with Breakout Boxes and Audio
Processor 12
Web Conferencing Software with Dante Virtual Soundcard 1
5
Video Conference 17
Hardware and Installation 18
Hardware 18
LED Light Ring 19
Installing the Cable-Exit Plug 20
Permanent Table Installation 20
Power Over Ethernet (PoE) 23
Microphone Placement 23
Seating Scenarios 23
Software Installation, Management, and Security 26
Controlling Devices with Shure Designer Software 27
Accessing the Web Application 27
Web Application Browser Compatibility 27
Accessing the Web Application without the Discovery App 2
8
Shure Incorporated
Firmware Updates 28
Microphone Configuration 28
Control Software Overview 29
Microphone Configuration 29
Adding or Removing a Channel 30
Custom Presets 30
Templates 31
Adjusting Levels 31
Mute and Fader Groups 32
Identifying Channels 32
Device Identification 32
LED Light Ring 32
Parametric Equalizer (PEQ) 33
Reset 35
Low-cut Filter 36
Mute Buttons 36
AES67 37
Encryption 38
Mute Synchronization 38
Setting Up Mute Sync on the MXA310 and P300 39
Automix Channel 39
Automix Settings 40
Automix Modes 40
Using a Third-Party Control System 41
Networking and Dante 41
Digital Audio Networking 41
Switch and Cable Recommendations for Dante Network-
ing 41
Compatibility with Dante Domain Manager 41
QoS (Quality of Service) Settings 42
Dante Transmit Flows 42
2/55

Shure Incorporated
Networking Best Practices 42
Network Audio and Shure Control Data 43
Device IP Settings 43
Configuring IP Settings 43
Manually Assigning Static IP Address 43
Setting Latency 44
Operating the Control Software over Wi-Fi 44
Packet Bridge 44
IP Ports and Protocols 45
Troubleshooting 46
Important Product Information 47
Information to the user 47
What's in the Box 48
Optional Accessories 48
Specifications 48
Frequency Response 50
3/55
MXA310 Table Array Microphone
Overview
Shure Incorporated
General Description
The Microflex Advance table array is a premium networked tabletop microphone for AV conferencing environments, including
boardrooms, huddle rooms, and multi-purpose spaces. Revolutionary technology from the Shure DSP suite includes Steerable
Coverage , with selectable polar patterns on 4 independent channels to capture participant audio. The innovative new toroid
polar pattern delivers 360° coverage, while rejecting sound from directly above the microphone. Control the microphone with
Shure Designer software, or a browser-based web application. The microphone integrates seamlessly with Dante digital net-
worked audio and third-party preset controllers, including Crestron and AMX, to deliver a high-quality AV conferencing experi-
ence that appeals equally to integrators, consultants, and meeting participants.
®
™
™
™
Features
Configurable Coverage
•
Steerable Coverage delivers precise pick-up for up to 4 independent lobes
•
Shure DSP Suite provides fast-acting automatic mixing and channel equalization
•
Innovative toroid polar pattern delivers 360° coverage, while rejecting sound from directly above the microphone to reduce
noise caused by HVAC systems or video projectors.
Software Control
•
Shure Designer software provides comprehensive microphone and pattern control
•
With Designer, you can also design coverage with online and offline devices, and route audio between Shure devices
•
If Designer isn't available, use the browser-based web application to control the microphone
Network Connectivity
•
Four discrete audio channels and an additional automix channel are delivered over a single network cable
•
•
™
Dante digital audio coexists safely on the same network as IT and control data, or can be configured to use a dedicated
network
Control strings available for third-party preset controllers including Crestron and AMX
Professional Design
•
Sleek, low-profile industrial design blends with contemporary board rooms and meeting spaces
•
Configurable multi-colored LED light ring matches the environment, displays mute settings, and confirms coverage set-
tings
•
Available in white, black, and aluminum finishes
4/55
System Overview
Shure Incorporated
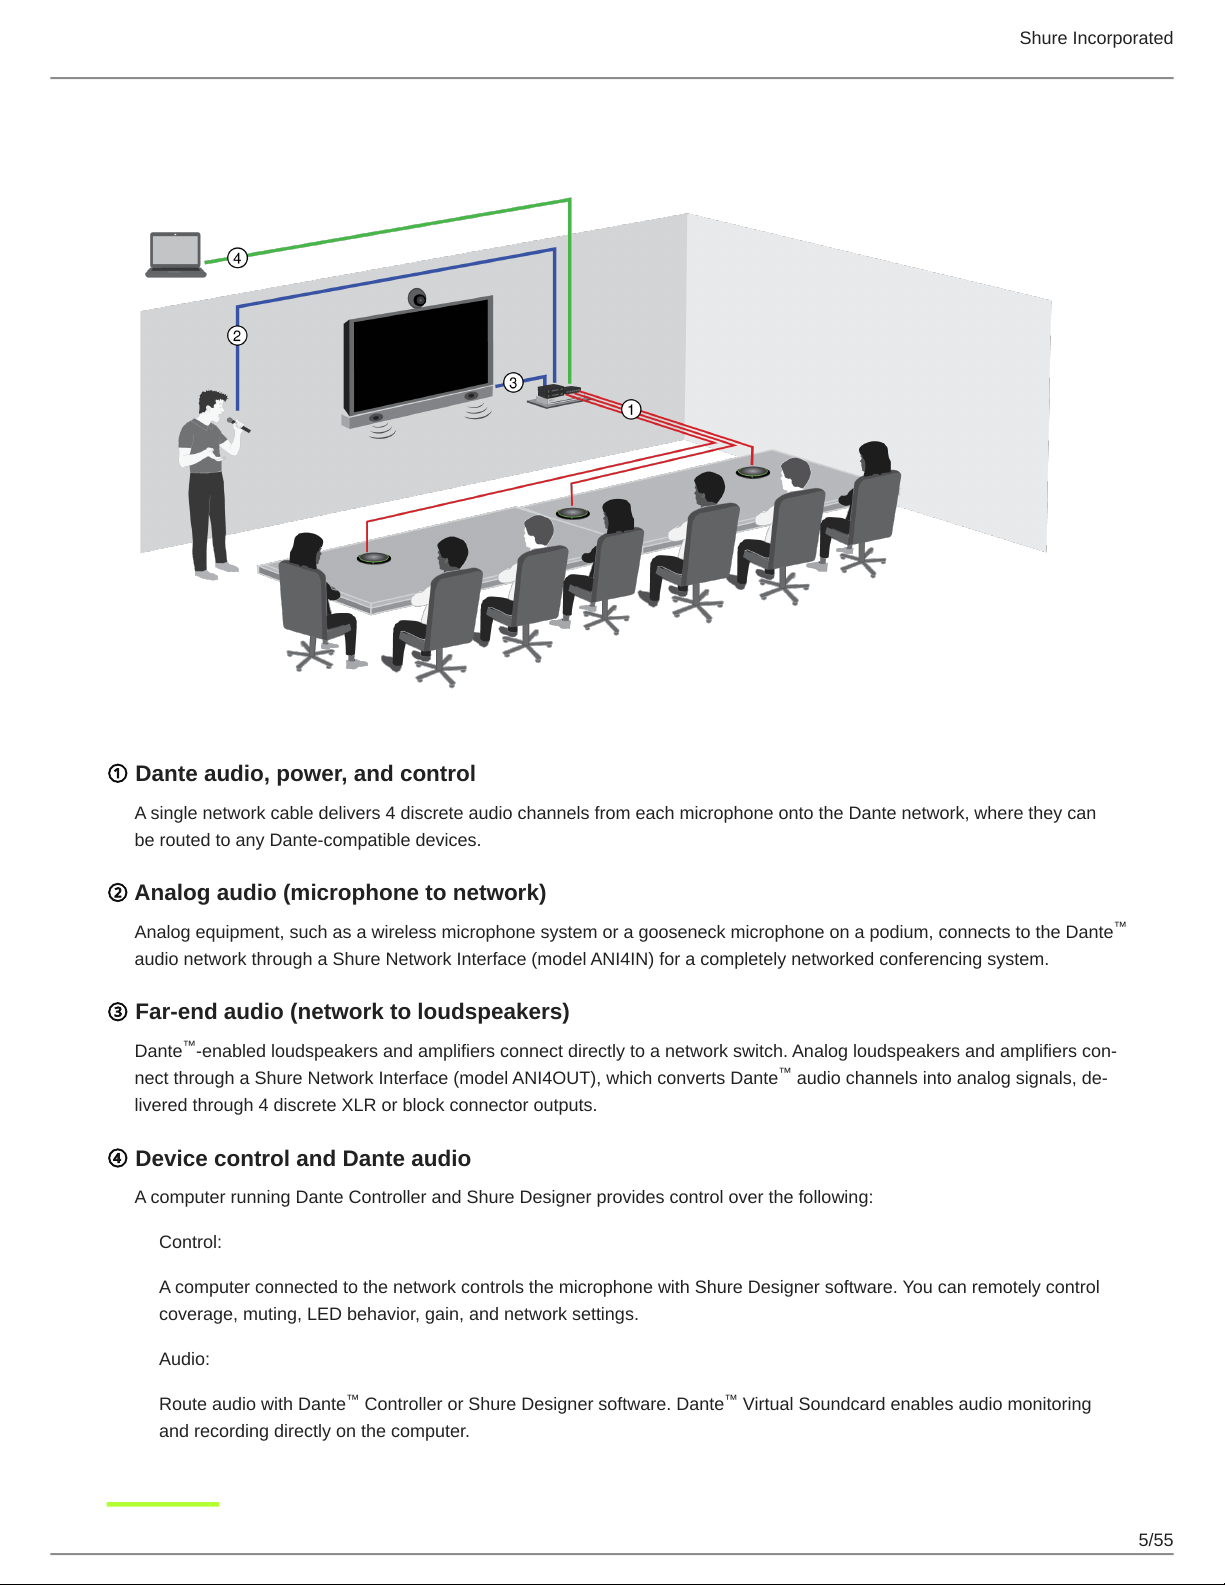
① Dante audio, power, and control
A single network cable delivers 4 discrete audio channels from each microphone onto the Dante network, where they can
be routed to any Dante-compatible devices.
② Analog audio (microphone to network)
Analog equipment, such as a wireless microphone system or a gooseneck microphone on a podium, connects to the Dante
audio network through a Shure Network Interface (model ANI4IN) for a completely networked conferencing system.
③ Far-end audio (network to loudspeakers)
™
Dante -enabled loudspeakers and amplifiers connect directly to a network switch. Analog loudspeakers and amplifiers con-
nect through a Shure Network Interface (model ANI4OUT), which converts Dante audio channels into analog signals, de-
livered through 4 discrete XLR or block connector outputs.
™
④ Device control and Dante audio
A computer running Dante Controller and Shure Designer provides control over the following:
Control:
A computer connected to the network controls the microphone with Shure Designer software. You can remotely control
coverage, muting, LED behavior, gain, and network settings.
™
Audio:
Route audio with Dante Controller or Shure Designer software. Dante Virtual Soundcard enables audio monitoring
and recording directly on the computer.
™ ™
5/55
Shure Incorporated
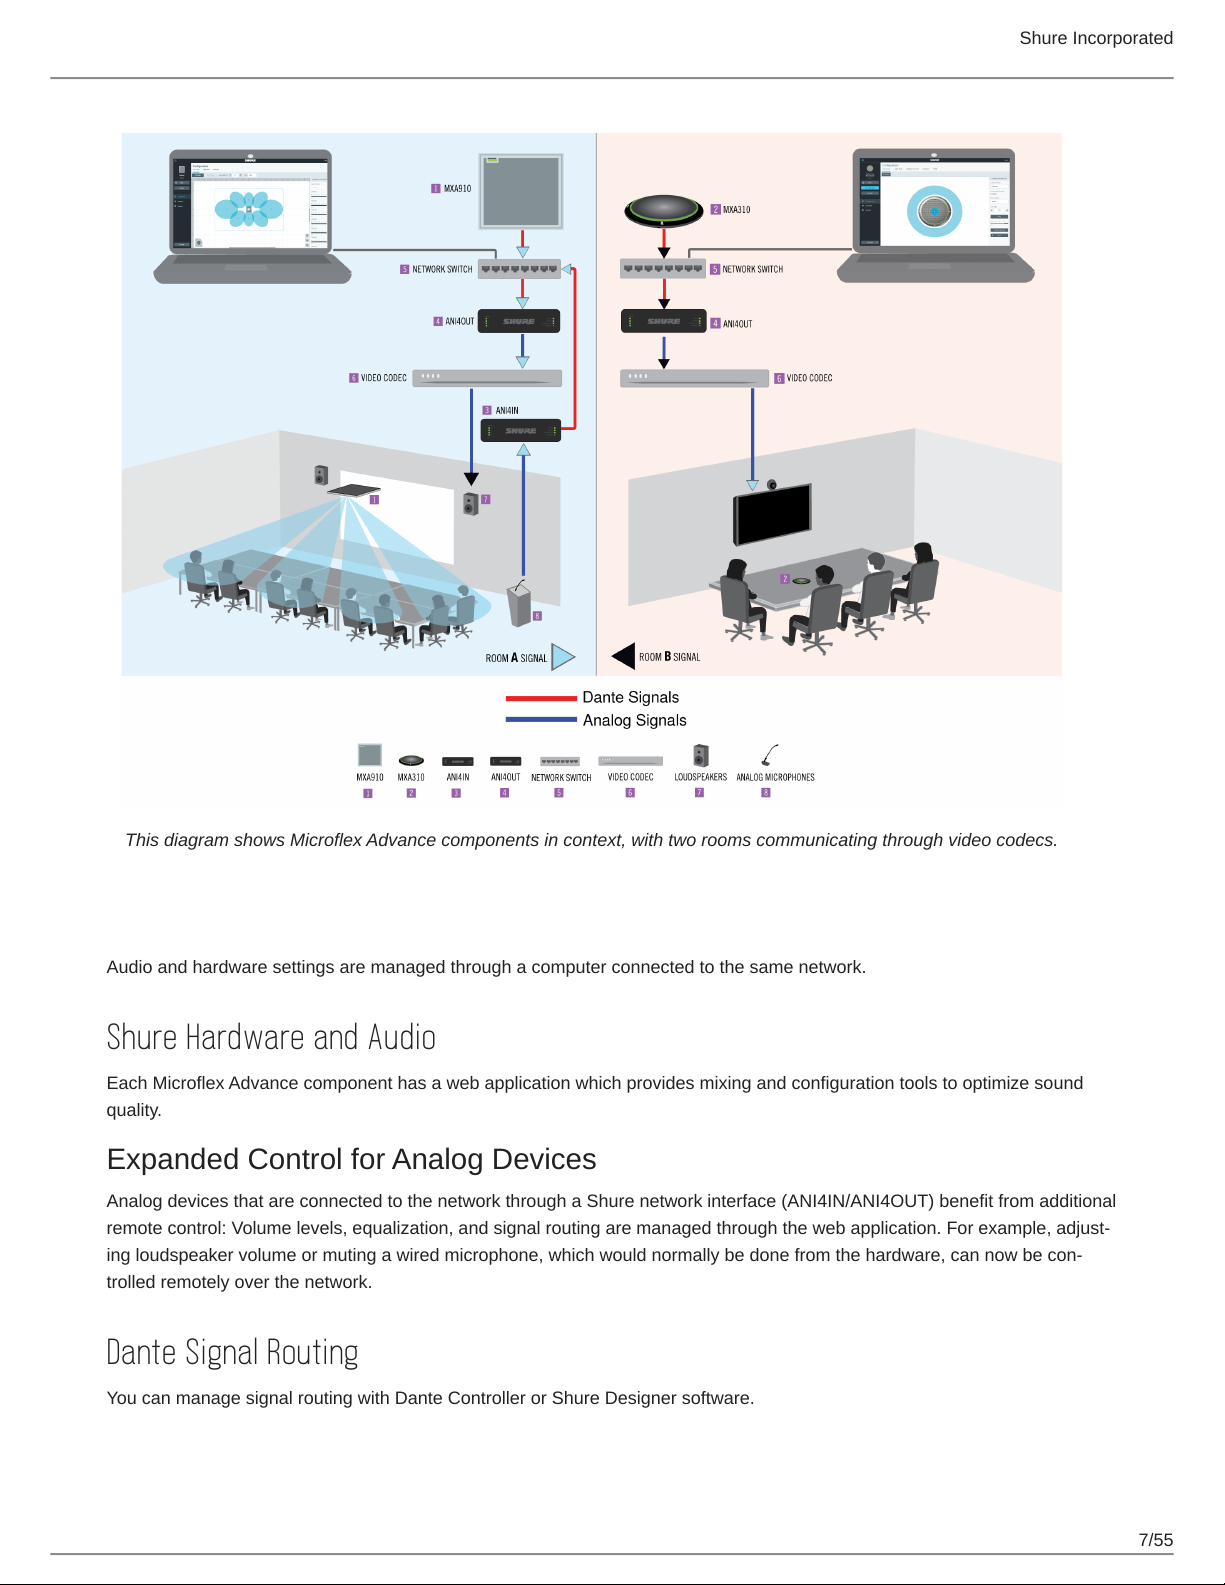
System Planning and Gear Requirements
Setting up the Audio Network
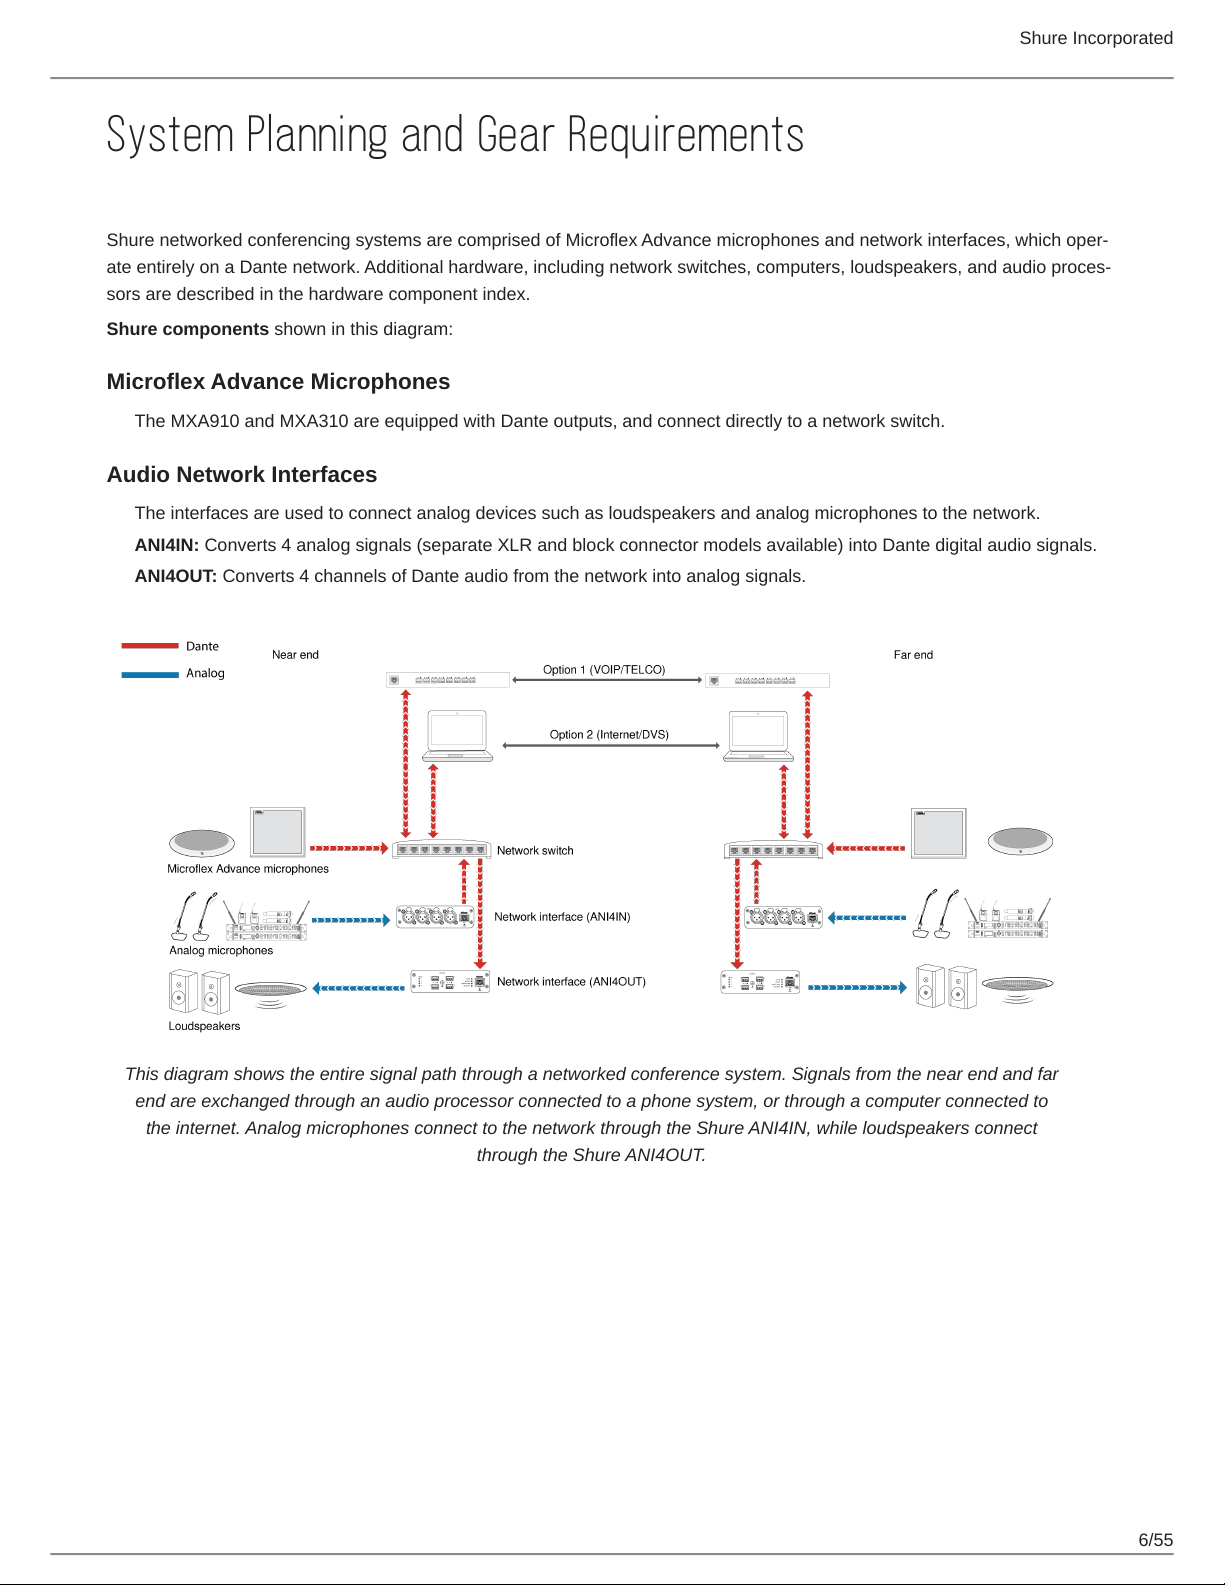
Shure networked conferencing systems are comprised of Microflex Advance microphones and network interfaces, which oper-
ate entirely on a Dante network. Additional hardware, including network switches, computers, loudspeakers, and audio proces-
sors are described in the hardware component index.
Shure components shown in this diagram:
Microflex Advance Microphones
The MXA910 and MXA310 are equipped with Dante outputs, and connect directly to a network switch.
Audio Network Interfaces
The interfaces are used to connect analog devices such as loudspeakers and analog microphones to the network.
ANI4IN: Converts 4 analog signals (separate XLR and block connector models available) into Dante digital audio signals.
ANI4OUT: Converts 4 channels of Dante audio from the network into analog signals.
This diagram shows the entire signal path through a networked conference system. Signals from the near end and far
end are exchanged through an audio processor connected to a phone system, or through a computer connected to
the internet. Analog microphones connect to the network through the Shure ANI4IN, while loudspeakers connect
through the Shure ANI4OUT.
6/55
Shure Incorporated
This diagram shows Microflex Advance components in context, with two rooms communicating through video codecs.
Controlling Hardware and Audio Over the Network
Audio and hardware settings are managed through a computer connected to the same network.
Shure Hardware and Audio
Each Microflex Advance component has a web application which provides mixing and configuration tools to optimize sound
quality.
Expanded Control for Analog Devices
Analog devices that are connected to the network through a Shure network interface (ANI4IN/ANI4OUT) benefit from additional
remote control: Volume levels, equalization, and signal routing are managed through the web application. For example, adjust-
ing loudspeaker volume or muting a wired microphone, which would normally be done from the hardware, can now be con-
trolled remotely over the network.
Dante Signal Routing
You can manage signal routing with Dante Controller or Shure Designer software.
7/55
Shure Incorporated
System Use Cases
These use cases will help you understand how Shure devices fit in conference rooms, huddle rooms, and multipurpose
spaces.
Each diagram includes:
•
Signal flow and connections
•
Required devices
Power Over Ethernet and Hardware Requirements
All Shure devices included in these use cases require Power over Ethernet (PoE, class 0). Refer to the Dante and Network-
ing section for additional information on cable and network switch requirements.
8/55

Telephone Conference with Shure MXW Audio Network Interface
Shure Incorporated
① Array microphone to Shure MXWANI
Connect the microphone output to port 1 on the MXWANI with a network cable. Port 1 provides the necessary Power over
Ethernet (PoE).
② Computer to Shure MWXANI
Connect a computer to the ANI on port 2 or 3 with a network cable to provide control of the array microphone and other net-
worked components.
9/55
Shure Incorporated
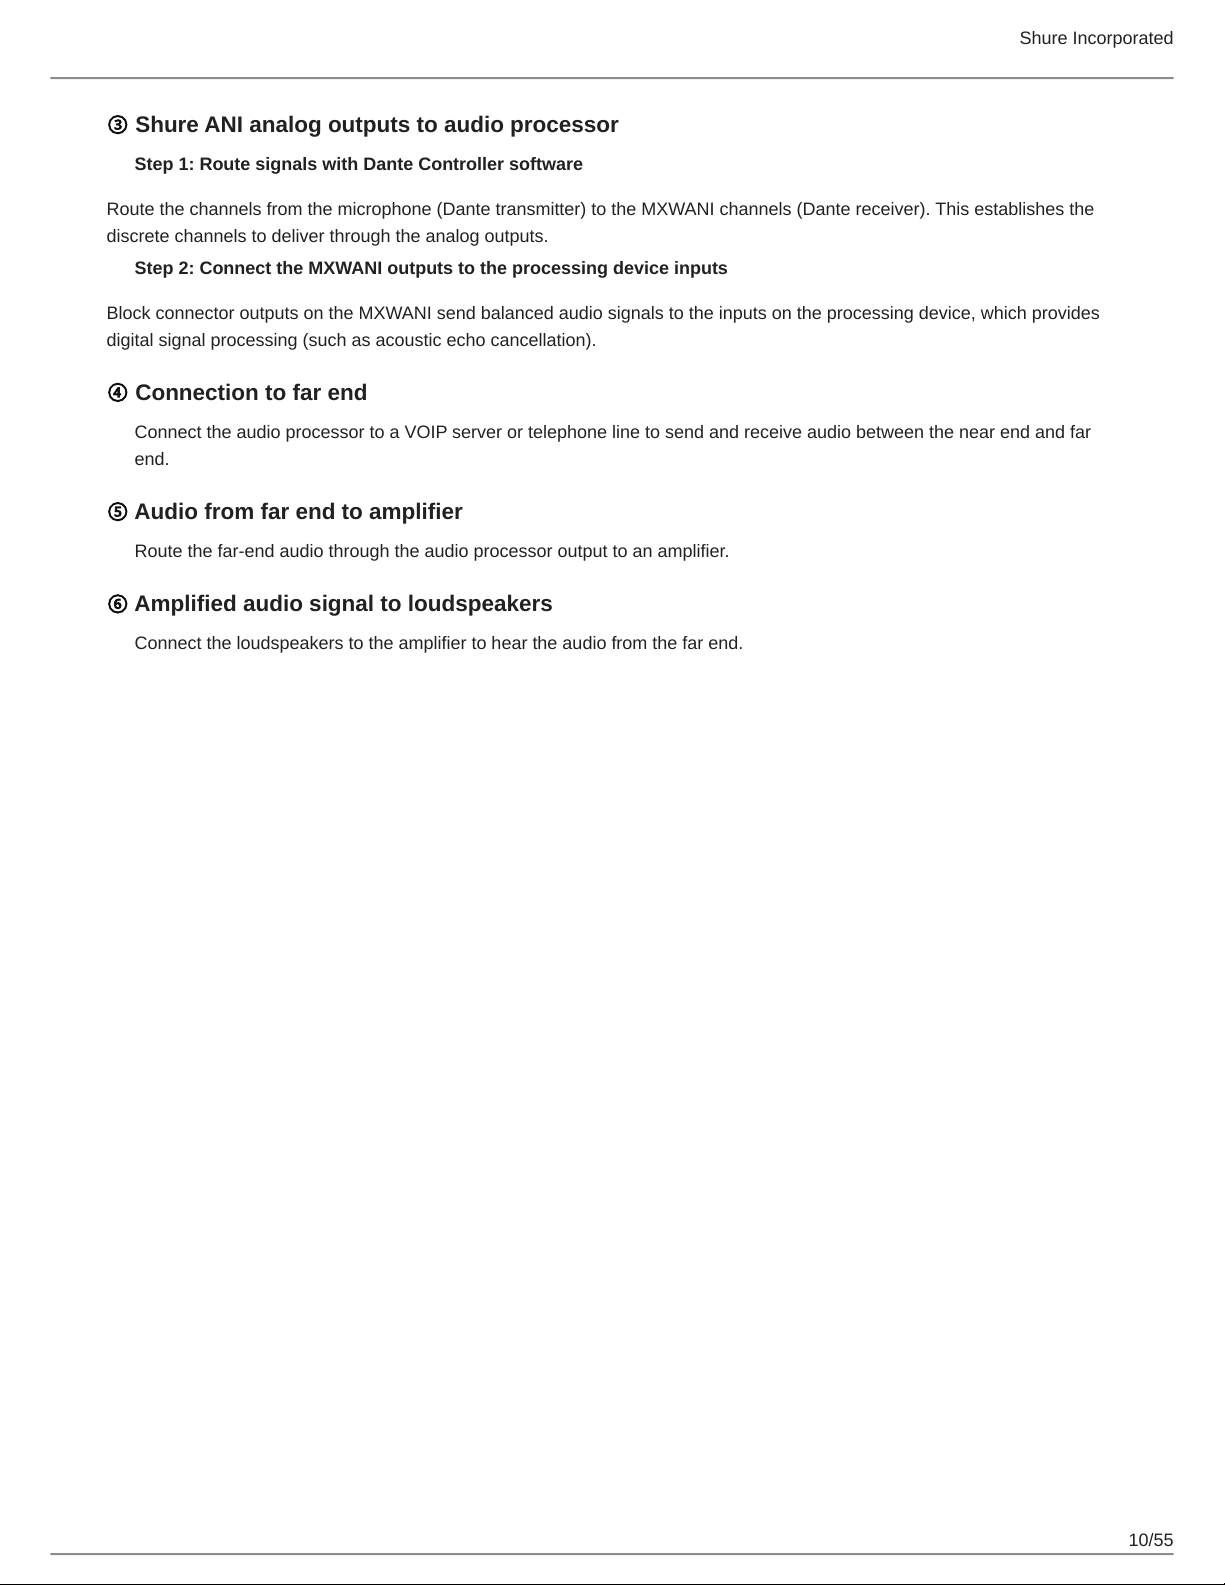
③ Shure ANI analog outputs to audio processor
Step 1: Route signals with Dante Controller software
Route the channels from the microphone (Dante transmitter) to the MXWANI channels (Dante receiver). This establishes the
discrete channels to deliver through the analog outputs.
Step 2: Connect the MXWANI outputs to the processing device inputs
Block connector outputs on the MXWANI send balanced audio signals to the inputs on the processing device, which provides
digital signal processing (such as acoustic echo cancellation).
④ Connection to far end
Connect the audio processor to a VOIP server or telephone line to send and receive audio between the near end and far
end.
⑤ Audio from far end to amplifier
Route the far-end audio through the audio processor output to an amplifier.
⑥ Amplified audio signal to loudspeakers
Connect the loudspeakers to the amplifier to hear the audio from the far end.
10/55

Telephone Conference with Dante-enabled Audio Processor
Shure Incorporated
① Array microphone to network switch
Connect the microphone output with a network cable to any port on the switch that supplies Power over Ethernet (PoE).
② Computer to network switch
Connect a computer to the network switch to provide control of the microphone and other networked components.
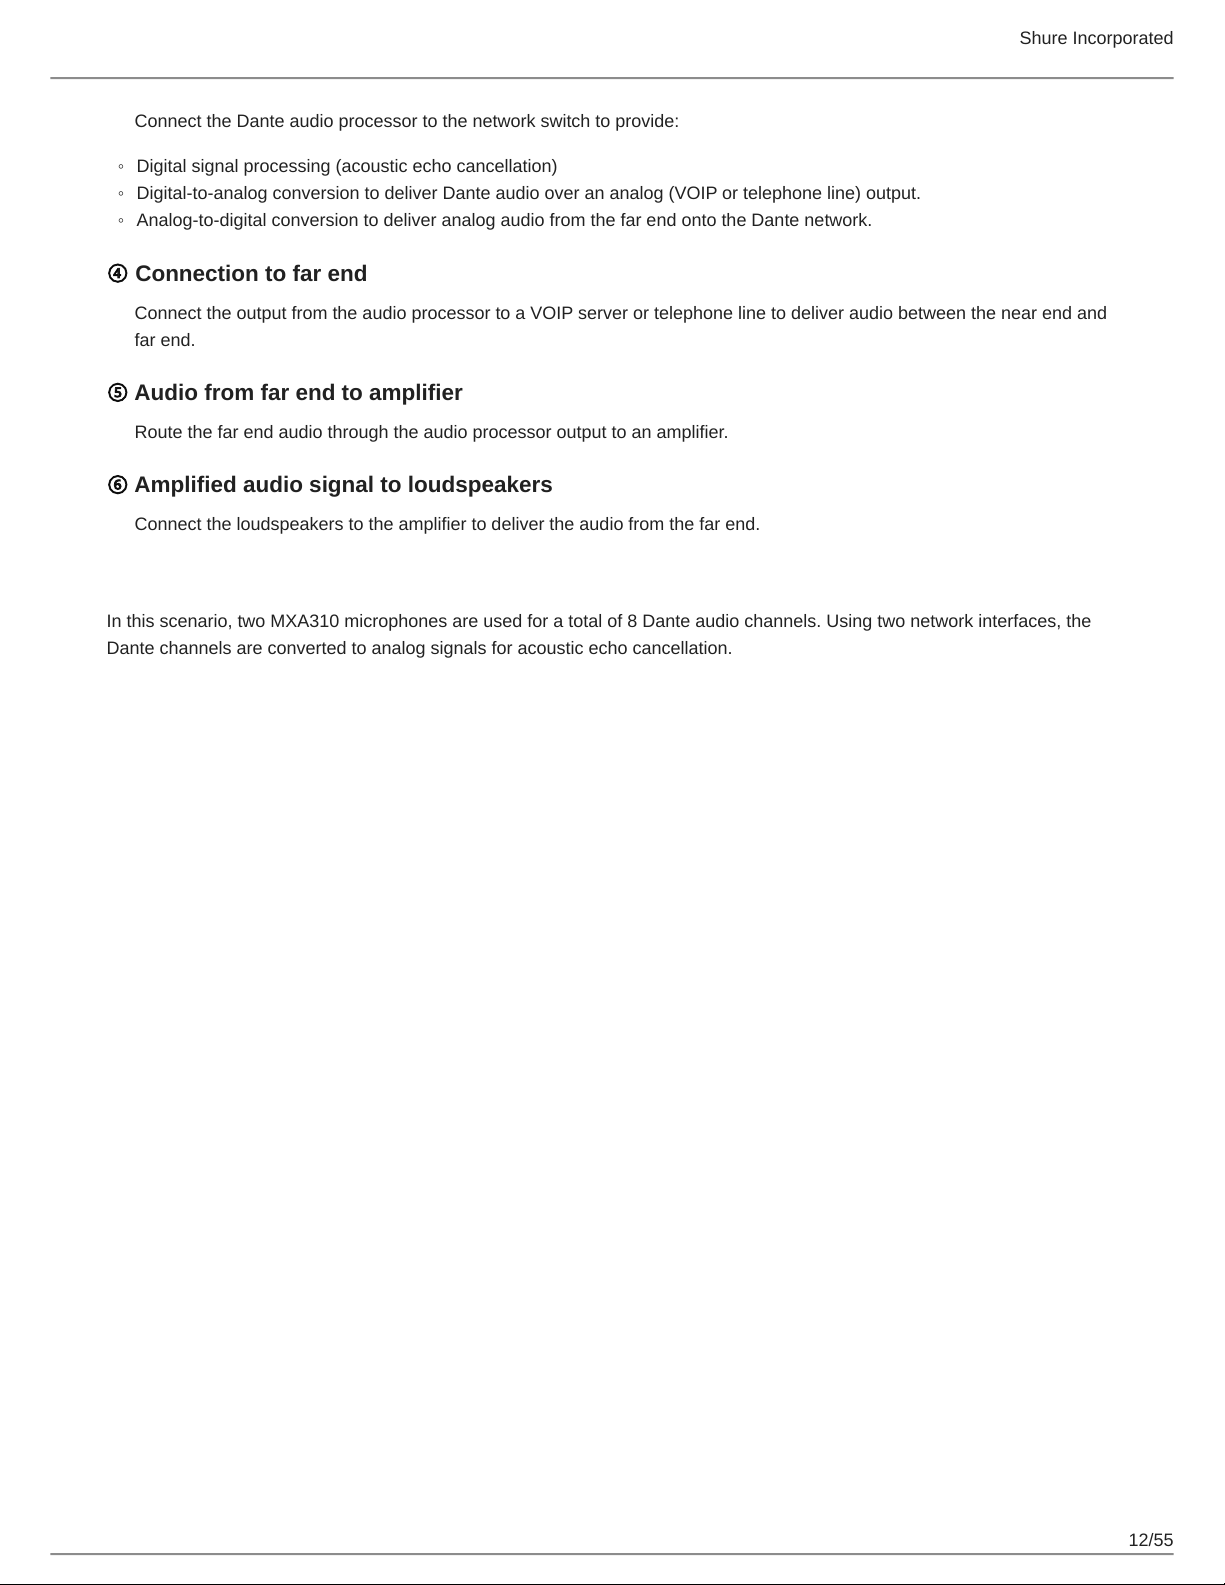
③ Network switch to Dante audio processor
11/55
Shure Incorporated
Connect the Dante audio processor to the network switch to provide:
◦
Digital signal processing (acoustic echo cancellation)
◦
Digital-to-analog conversion to deliver Dante audio over an analog (VOIP or telephone line) output.
◦
Analog-to-digital conversion to deliver analog audio from the far end onto the Dante network.
④ Connection to far end
Connect the output from the audio processor to a VOIP server or telephone line to deliver audio between the near end and
far end.
⑤ Audio from far end to amplifier
Route the far end audio through the audio processor output to an amplifier.
⑥ Amplified audio signal to loudspeakers
Connect the loudspeakers to the amplifier to deliver the audio from the far end.
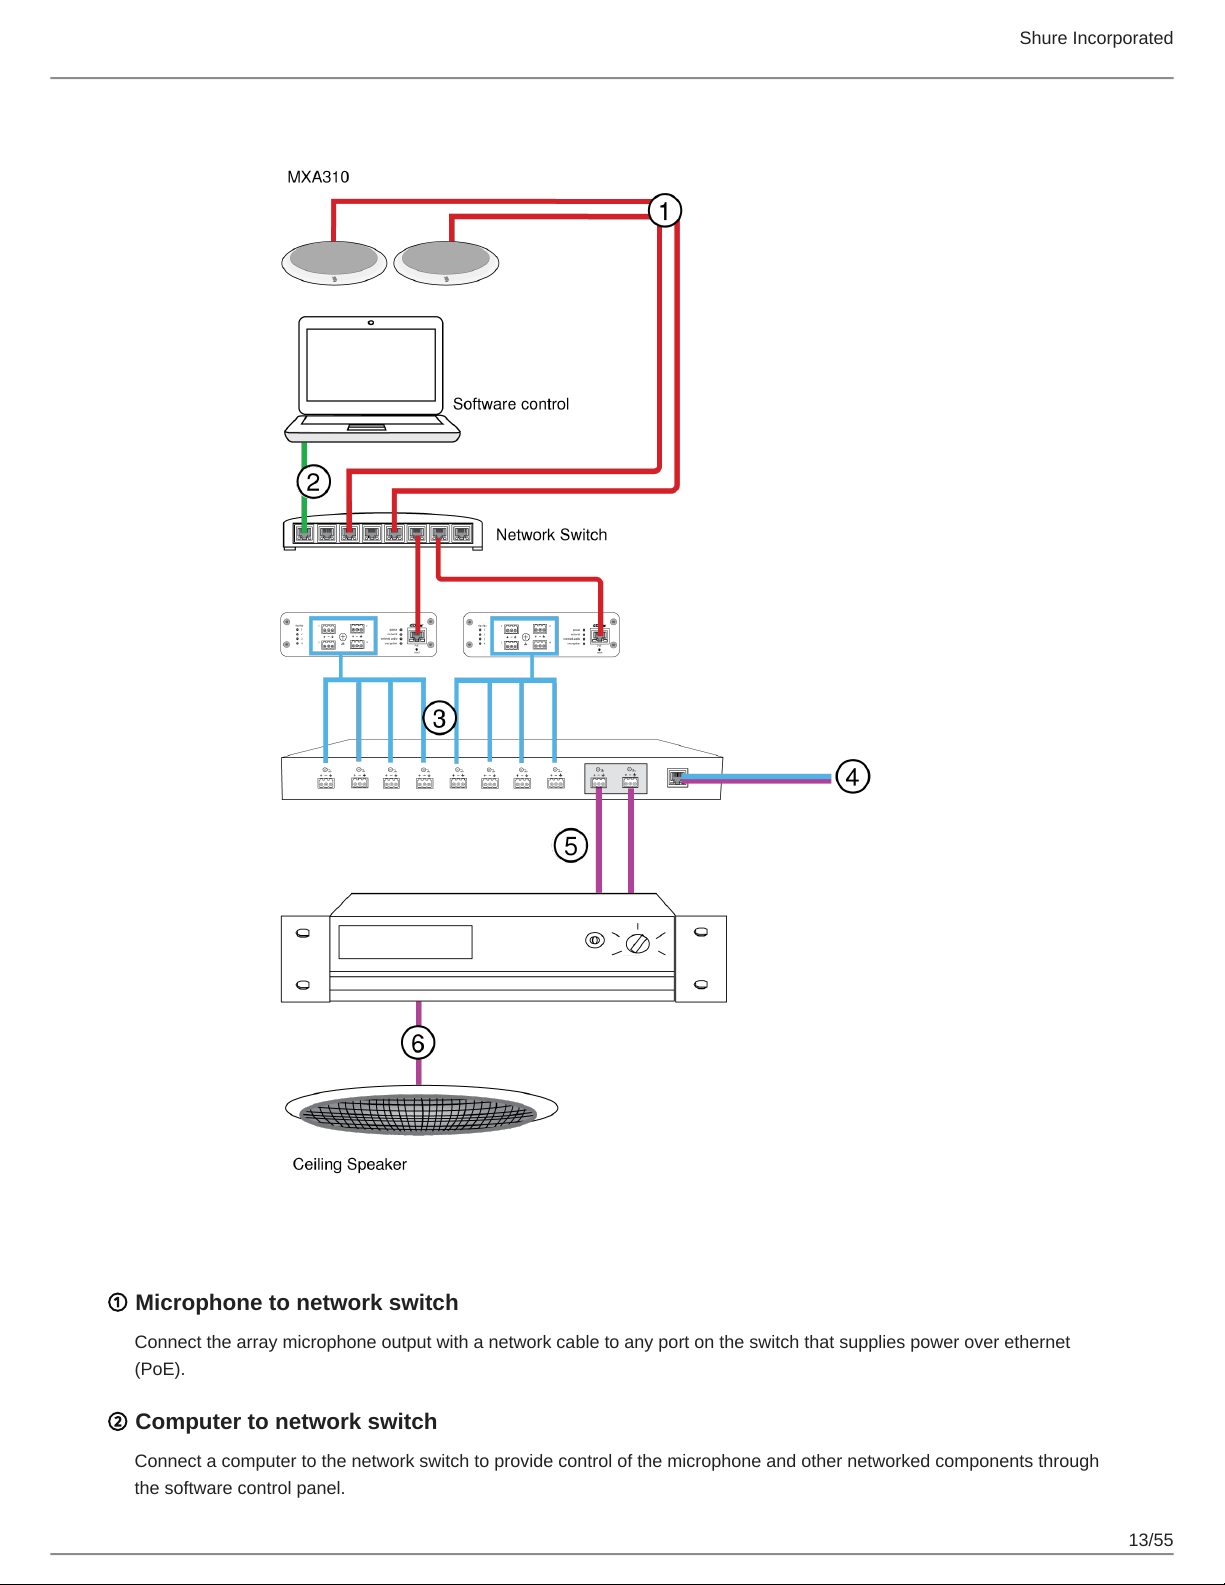
Telephone Conference with Breakout Boxes and Audio Processor
In this scenario, two MXA310 microphones are used for a total of 8 Dante audio channels. Using two network interfaces, the
Dante channels are converted to analog signals for acoustic echo cancellation.
12/55
Shure Incorporated
① Microphone to network switch
Connect the array microphone output with a network cable to any port on the switch that supplies power over ethernet
(PoE).
② Computer to network switch
Connect a computer to the network switch to provide control of the microphone and other networked components through
the software control panel.
13/55
Shure Incorporated
③ ANI4OUT (digital-to-analog conversion)
From the network switch: Use network cables to connect each ANI4OUT to the network switch. A single ANI4OUT re-
ceives 4 channels of Dante audio, and converts them to 4 analog signals, delivered through XLR outputs or block connec-
tors. Using two of them, all 8 channels from the microphones can be connected to analog inputs on an audio processing
device.
To a processing device: Route the ANI4OUT outputs to the processing device inputs to provide digital signal processing
(acoustic echo cancellation).
④ Connection to far end
Connect the output from the audio processor to a VOIP server or telephone line to deliver audio between the near end and
far end.
⑤ Audio from far end to amplifier
Route the far end audio through the audio processor output to an amplifier.
⑥ Amplified audio signal to loudspeakers
Connect the loudspeakers to the amplifier to deliver the audio from the far end
14/55
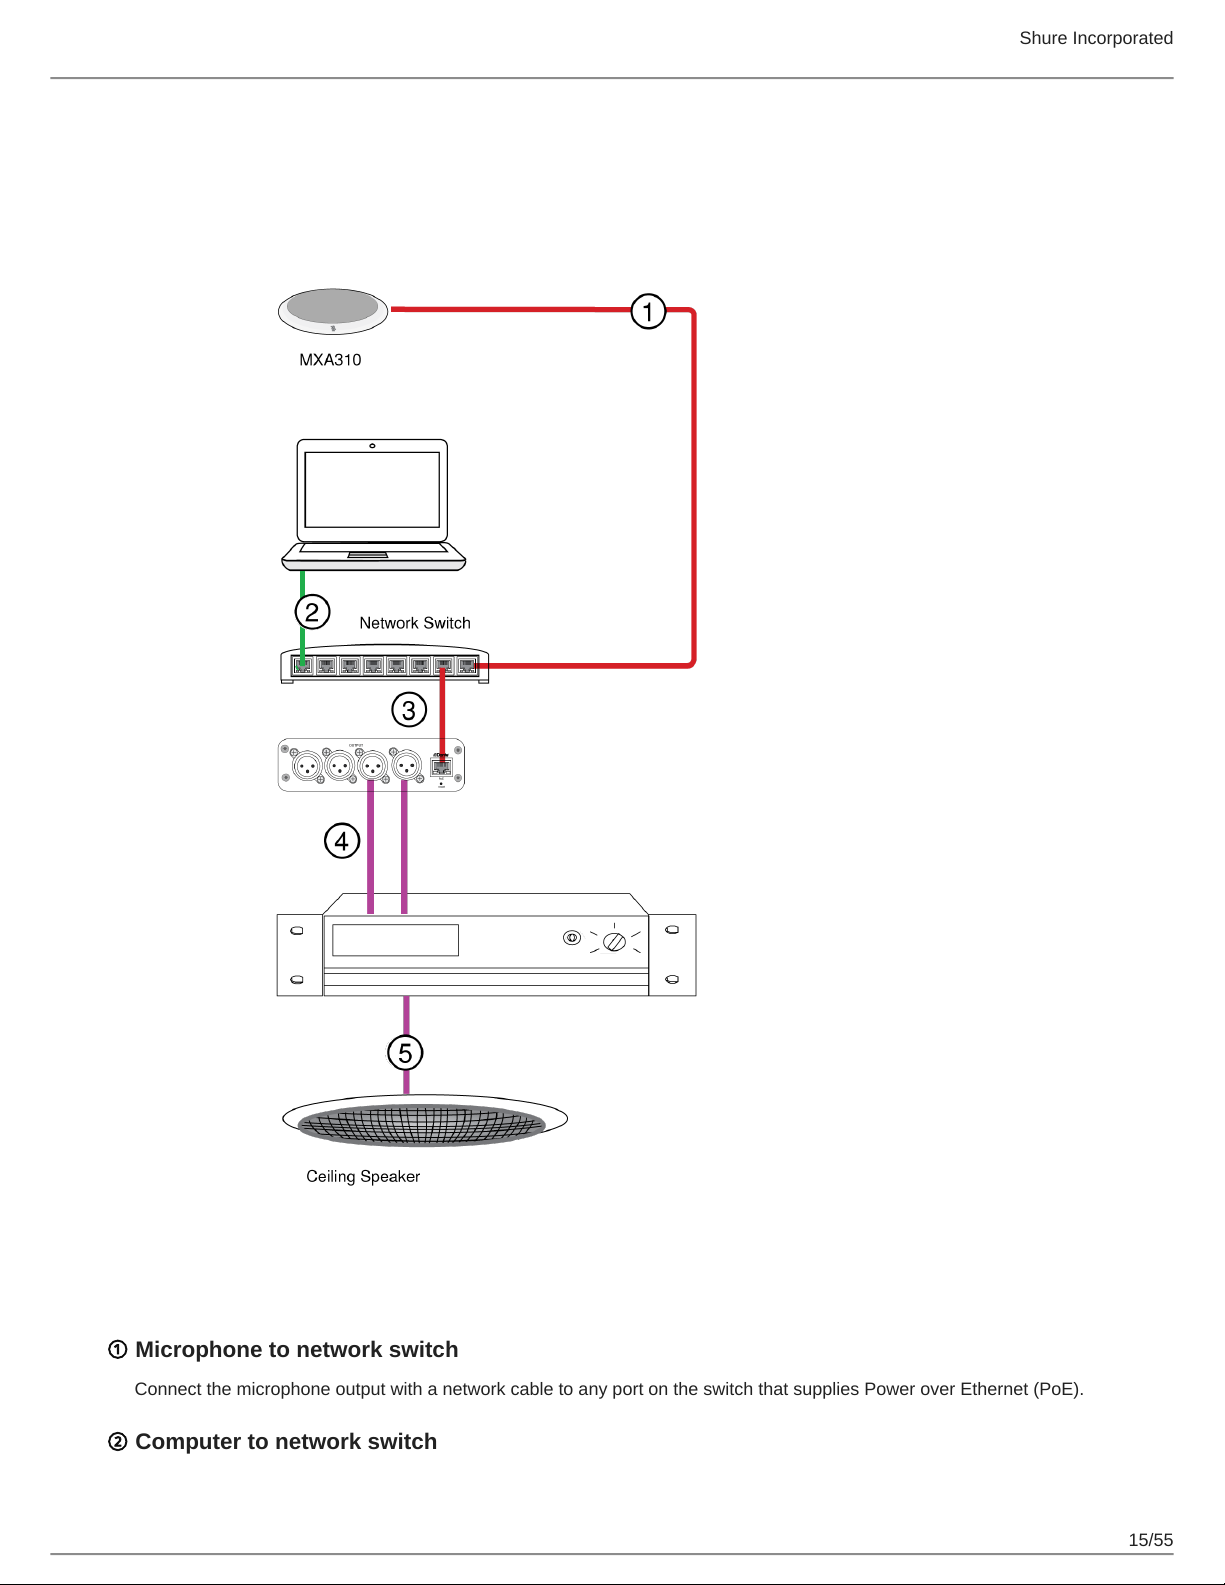
Web Conferencing Software with Dante Virtual Soundcard
Shure Incorporated
① Microphone to network switch
Connect the microphone output with a network cable to any port on the switch that supplies Power over Ethernet (PoE).
② Computer to network switch
15/55
Shure Incorporated
Connect a computer to the network switch to provide control of the microphone and other networked components through
the software control panel. The computer also runs Dante Virtual Soundcard, Dante Controller, and the web conferencing
software.
◦
Dante Virtual Soundcard / Controller: Turn on the Dante Virtual Soundcard and use Dante Controller to route the micro-
phone signal to the computer.
◦
Web Conferencing Software:Assign the audio input and output device settings to the appropriate Dante transmitter and
receiver channels.
③ Network switch to ANI4OUT
Use network cables to connect each ANI4OUT to the network switch. Each interface receives 4 channels of Dante audio,
and converts them to 4 analog signals, delivered through XLR outputs or block connectors.
④ Audio from far end to amplifier
Route the far-end audio to an amplifier.
⑤ Amplified audio signal to loudspeakers
Connect the loudspeakers to the amplifier to deliver the audio from the far end.
16/55
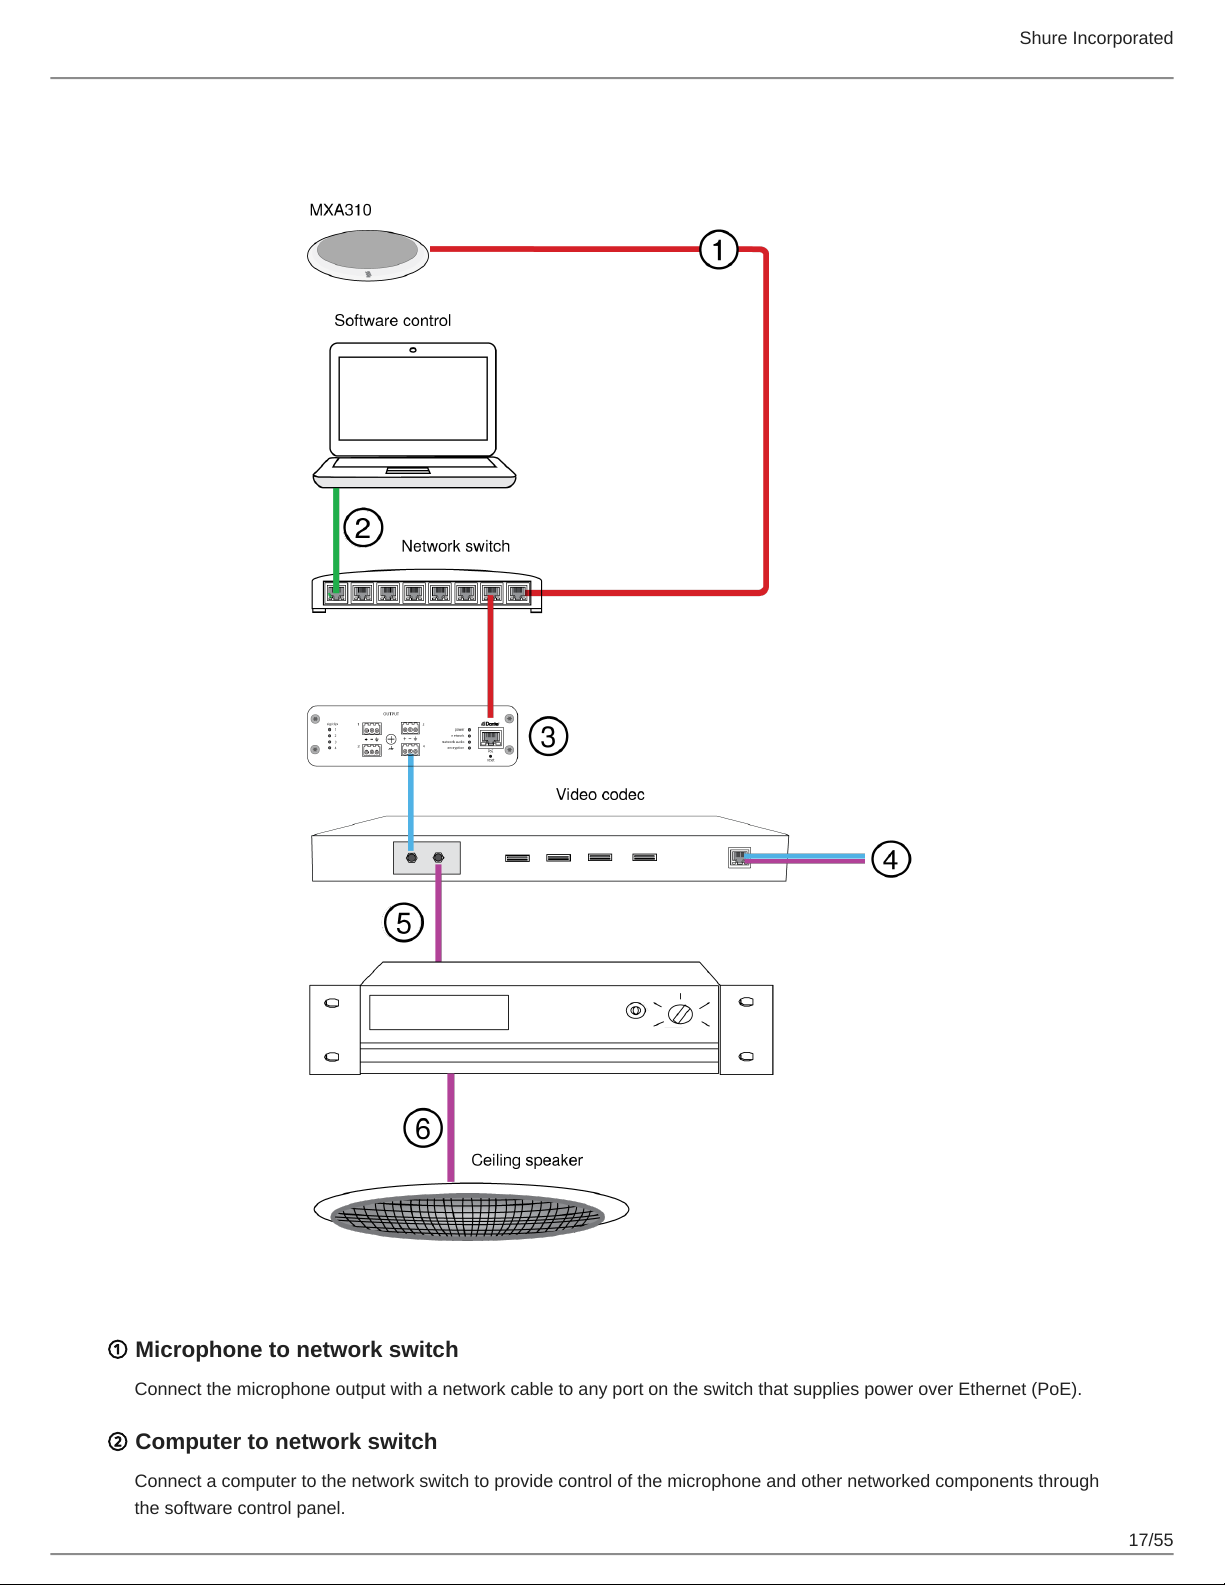
Video Conference
Shure Incorporated
① Microphone to network switch
Connect the microphone output with a network cable to any port on the switch that supplies power over Ethernet (PoE).
② Computer to network switch
Connect a computer to the network switch to provide control of the microphone and other networked components through
the software control panel.
17/55
 Loading...