


GGeenneerraall DDeessccrriippttiioonn ooff FFuunnccttiioonn
It is able to use the camera for a digital photo of maximum 8 mega pixels picture, and is
able to shoot AVI short film. The camera is able to auto adjust exposure and color
balance. The product can be used as a PC camera when connecting with computer.
The contents covered in the manual were referred to the latest information when the
manual was compiled. The screen display and illustration, etc. adopted in the manual are
for elaboration of the digital camera in a way of much more detail and straight. They may
differ slightly from your practical digital camera because of the different batch of technical
development and production.
PPrreeccaauuttiioonnss
Please read carefully the Precautions section before using the digital camera so as to
ensure the accurate and safe application, bringing you the best capability of digital
camera and lengthening the service life of the digital camera.
Never settle the camera under direct sunlight, nor to direct the lens toward the sun.
Otherwise, the image sensor may be damaged.
It is required to take care of the camera and prevent water or sand from dropping
into it when using the camera at a sandy beach or near water. The water, sand drop,
dust or salty component may damage the camera.
Please put the camera far from the dust and chemical subject, and it is required to
put it in a cool, dry and well ventilated location. Never deposit it in a location of high
temperature, humidity or dust to prevent failure.
It is required to operate camera regularly during long time storage. Please check
1

whether the camera operates normally or not before using the camera again.
If dirt or stain is accumulated on the camera or lens, it is required to use a piece of
soft, clean and dry cloth to wipe it out lightly. If the camera or lens is stained with
sand grain, it is available to blow it away lightly. Never use cloth to wipe. Otherwise,
it may scrape the camera or lens surface.
If it is required to clean the lens surface, blow away firstly the sand dust
accumulated on the surface, and then use dish cloth or paper towel suitable for the
optical equipment to wipe the lens lightly. If there is such requirement, please use
the lens cleaning compound. Never use organic solvent to clean the camera.
Never touch the lens surface with finger.
If it is the first time to use a memory card in the digital camera, please carry on
information backup for the card first. Then format the memory card once at the
digital camera.
The external SD card and MMC card are made with precise electronic components.
The following conditions may cause the information lost or damage:
1. Use the memory card incorrectly.
2. Memory card is subjected to bend, fall or impact.
3. Heat, humidity and direct sunlight.
4. Static or electromagnetic field around the memory card.
5. Take out the memory card or interfere the digital camera power supply when
the digital camera or computer is accessing the memory card (i.e. read, write
and format, etc.)
6. Touch the metal contact surface of the card with finger or metal subject.
2

7. The memory card outruns its service life (please purchase regularly a new
Sound Card, Display
The sound card and the display card shall support DirectX8 or
memory card.)
SSyysstteemm rreeqquuiirreemmeennttss
System Requirements
Operating System Microsoft Windows 98 SE, Me, 2000, XP, Vista
Central Processing
unit
Memory Above 128 MB
Above Intel Pentium 166MHz or CPU of equal performance
Card
CD Driver 4 times of speed or above
Hard Disk Surplus space above 500 MB
Other One standard USB 1.1 interface or USB 2.0
higher version.
3
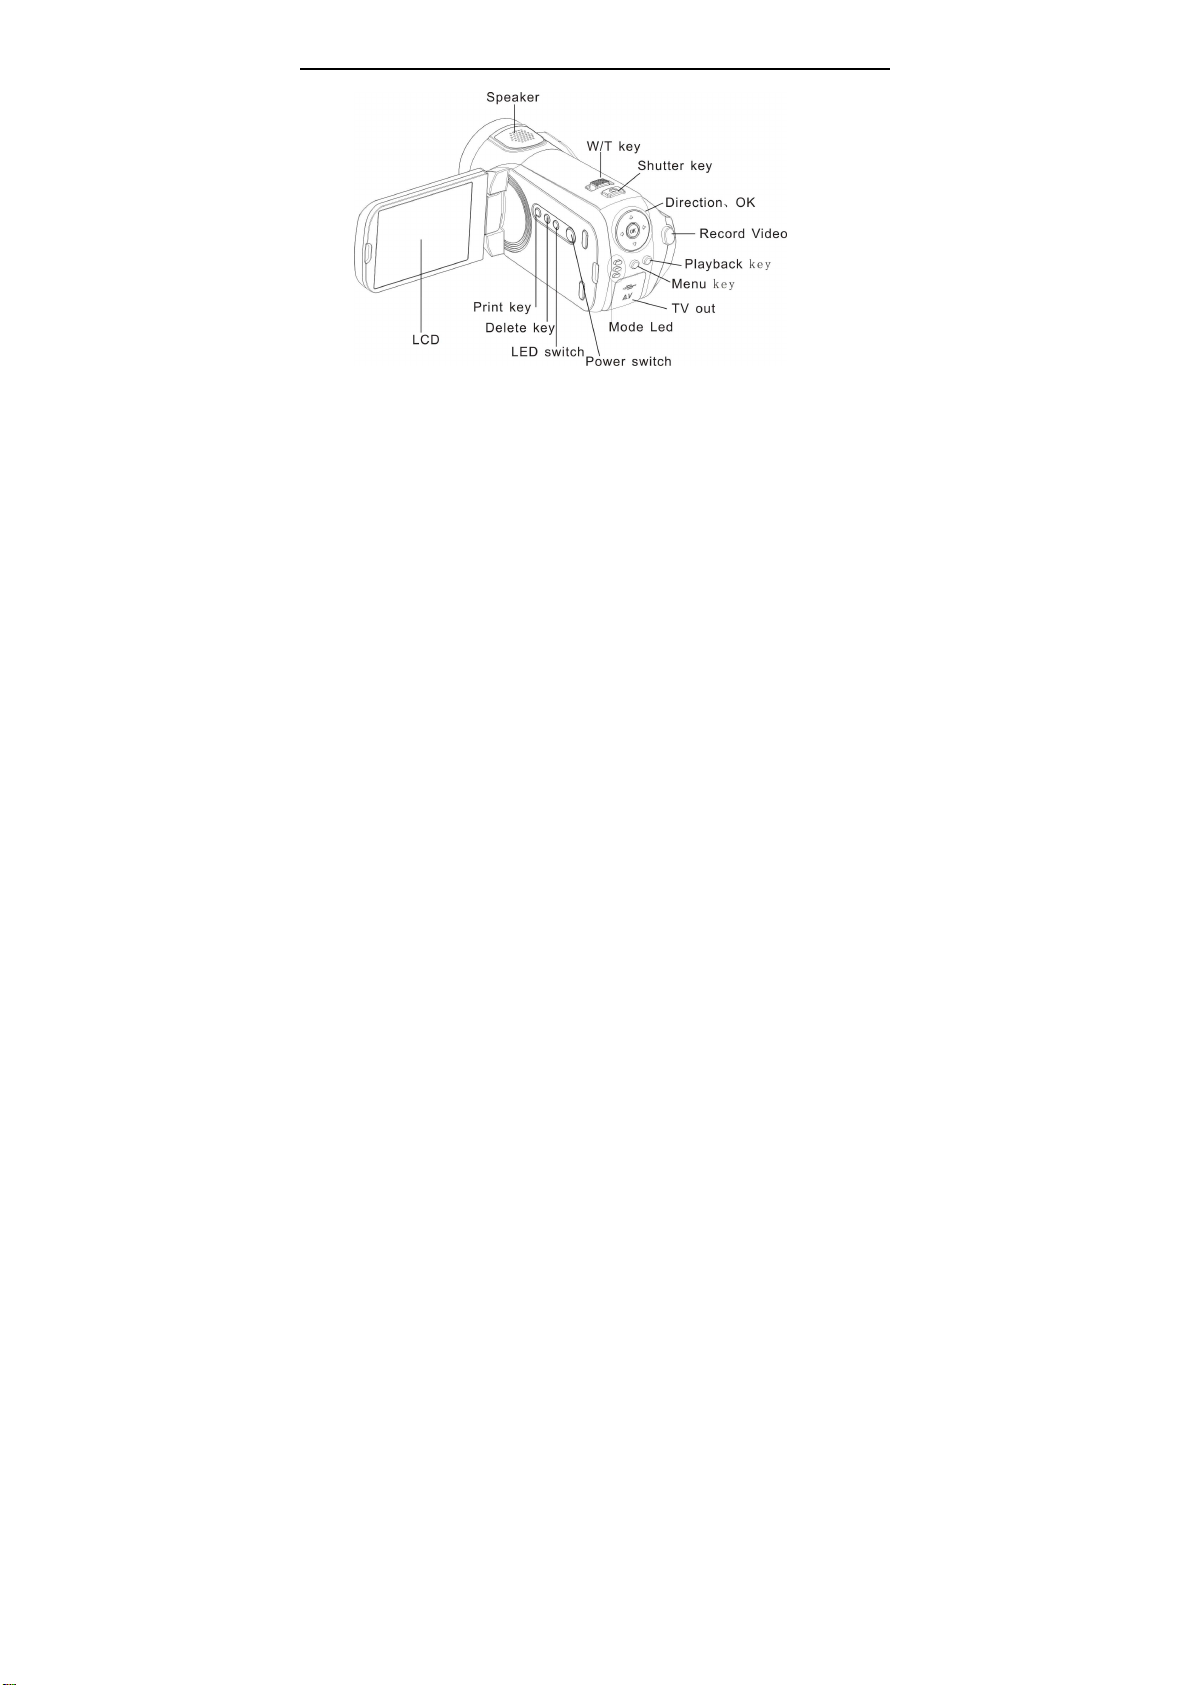
DDeessccrriippttiioonn ooff oouuttlliinnee aanndd bbuuttttoonn
4

SSttaarrtt ttoo uussee ______________
1. Install Battery
1. Open the battery lid
2. Put 4 pieces of AAA (7#) batteries in according to the polarity instruction.
3. Insert the front end of the battery lid into the battery stack, press the back end of the
battery lid and then push the battery lid inwards to allow the battery lid to closely attach
the body.
5

2. Use SD Card
1. Push the SD card into the slot until it is completely inserted according to instructions.
2. Lightly press the card end inwards and the SD card will eject.
3. Power on and off
1. Power on: press the power key for a while, light the screen and the unit will be power
on.
2. Power off: press the power key once while camera is idle state, it will be power off.
Auto power off: While the camera is idle for 1 minute, it will be power off automatically.
The automatically power off time can be set to 1/3/5 minute in setup mode.
3. Low power: While the battery power is very low and LCD display icon “ ”, The
camera will power off automatically
4. Date and Time Settings:
You can enter Setup menu mode to set the system date and time:
6

At setting window, adjust the date or time by direction key: Up or Down for adjust,
Right key for move the cursor, OK key for confirm, Left for exit setup mode.
5 Video mode:
Preview mode
1 :Mode symbol, Indicate is video mode.
2 Auto: Indicate the White balance is auto mode.
Can set it is Auto/Daylight/Cloudy/
Fluorescent/Tungsten.
3 Metering mode: Center/Multi/Spot
4 01:01:01: time counter, It is indicate can
recoding 1 minute 8 seconds movie.
5 It is indicator AVI size: 640x480
6 Battery icon: That is indicate the battery power.
7 LED light icon; that is indicate LED is on state.
8 4.00: indicate is 4X digital zoom;
7

Shooting:
1 Switch on the camera by press Power key to enter preview mode;
2 Press Shutter key to start recoding movie;
3 If you want to stop recoding, press Shutter key again; and if the memory card full, It
will stop recoding automatically.
4 You can do zoom in or zoom out operation during recording by Zoom key.
The max. window is 4X for digital zoom.
8

Video menu
At video preview mode, press OK key enter main menu:
9

10

6 Camera mode:
Preview mode
1 :Mode symbol,
Indicate is video mode.
2 :Self timer mode symbol.
3 Auto: Indicate the
White balance is auto mode.
4 : Metering mode.
5 : Exposure mode.
6 : Image resolution mode.
7 : Image quality mode.
8 : Image counter(default is reduce).
9 :SD icon, it will be display while there is SD/MMC card was plug in.
10 :Battery icon. 11 :LED light icon
11

Shooting:
1 Switch on the camera by press Power key to enter video preview mode;
2 Press Mode key once to switch to Camera preview mode;
3 Press Shutter key once to snap one photo;
Camera mode menu:
At camera preview mode, press OK key enter main menu:
12

13

14

Self timer:
Set the Driver mode is Self timer 2s or 10s at menu, then press Shutter key will
time with beep, after 2 seconds or 10 seconds, the camera will snap one photo
automatically
Continuously take three photos:
Set the Driver mode is Burst at menu, then press Shutter key will snap three
photos continuously
15

7 Playback mode:
Enter Playback mode
Press mode key continuously can enter Playback mode or press it twice to enter
Playback mode after press Power key switch on the camera.
AVI file JPG file
You can view other photos or AVI files by direction key of left or right;
You can zoom in or zoom out the photo to view by press zoom key
16

Thumbnail mode
Press Zoom out key can enter thumbnail mode at playback mode:
Note:
: This icon indicate that is one AVI media file.
: This icon indicate that is one JPG file with voice memo.
You can press direction key to choose the desired image file, and press Zoom in key
17

to exit this thumbnail mode return full screen mode.
Play AVI file
Press Shutter key to start play the selected AVI files at playback mode, and you
can press Shutter key again to stop playing.
Stop mode Playing mode
18

Play JPG(with voice memo) file
1 Select the photo was added voice memo at playback mode;
2 Press Shutter key to start play the selected jpg(with voice memo) file:
Press OK key to stop playing, UP key to pause/resume playing,
1 Playback mode icon 5 Timer of playing
2 Counter of image 6 Control panel for playing
3 Voice Memo indicator
4 Indicator of JPG file
19

Playback menu:
At Playback mode, press OK key enter main menu:
20

Add effect for image Add distort effect for image
21

Resize function:
The image size selected must be smaller than the size of current photo.
22

Add Voice Memo for image:
The time of Voice Memo can be recorded about 30s only
23
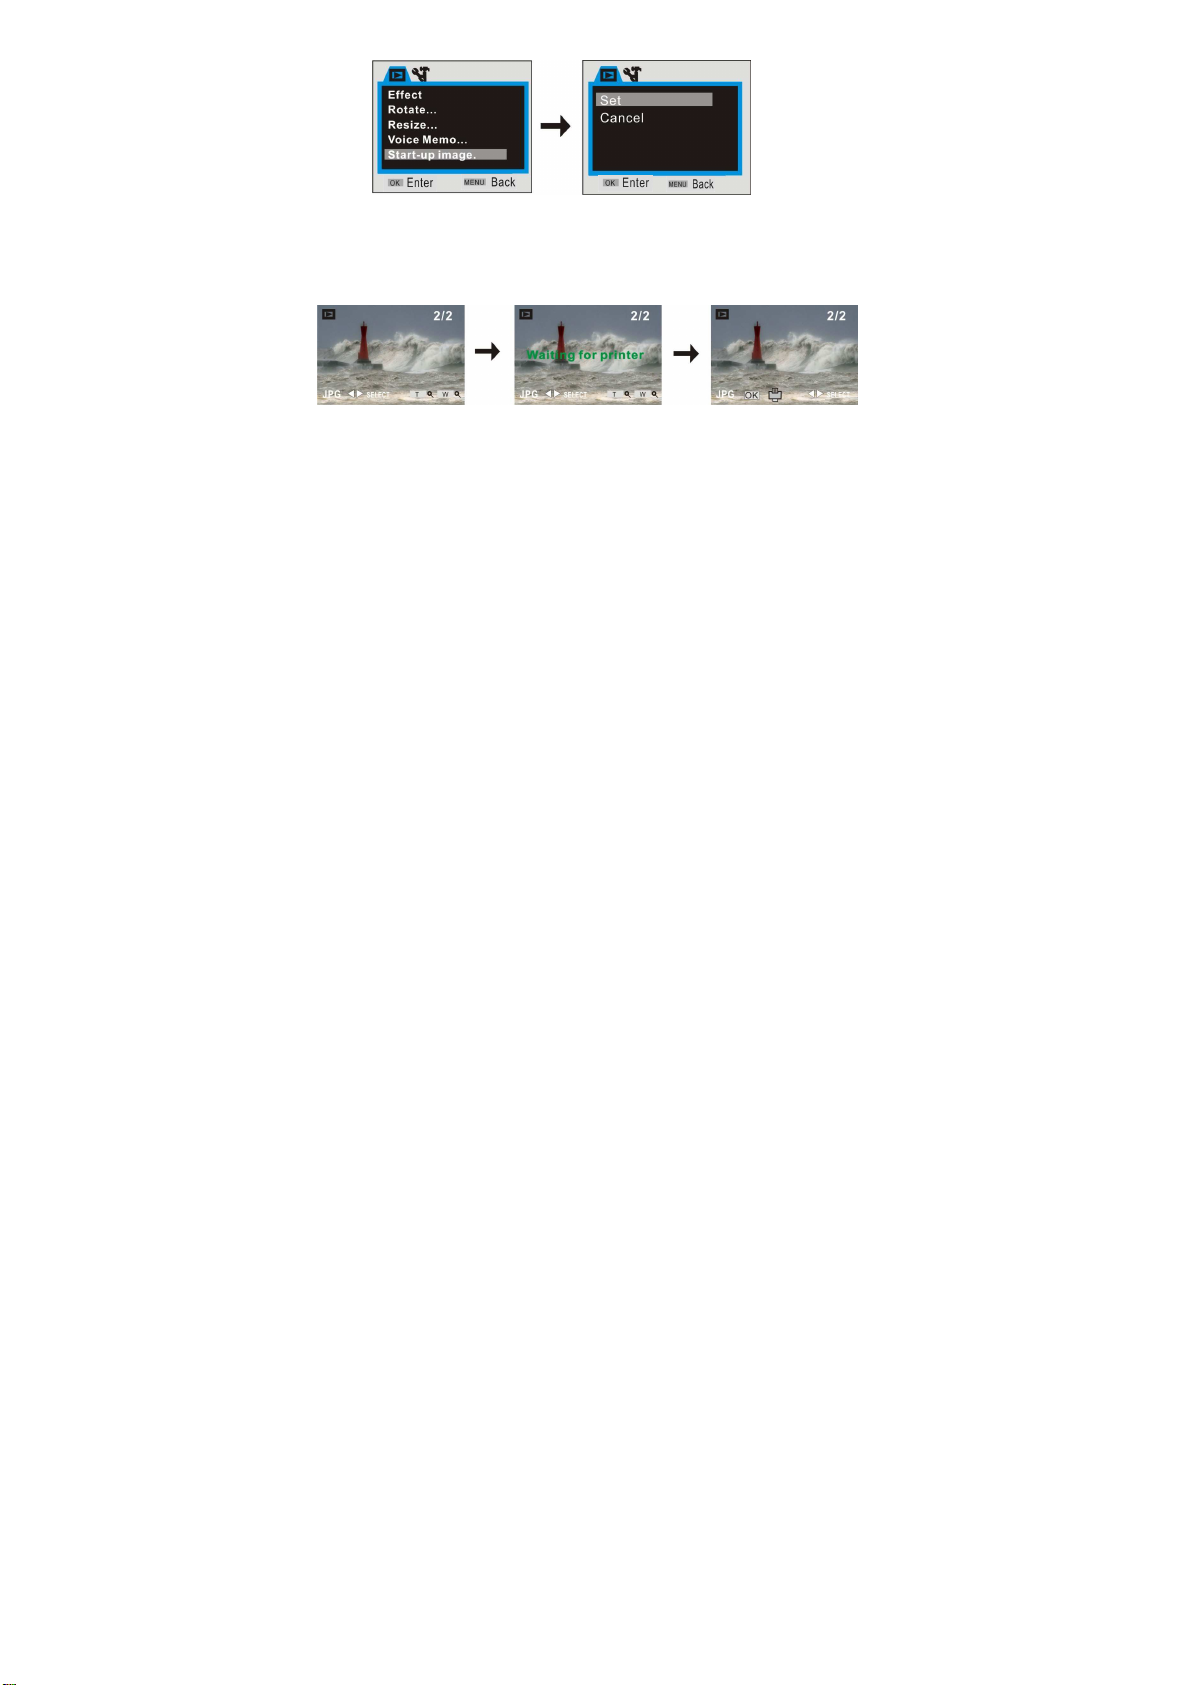
Print the photo:
1 Playback one photo;
2 press the [Print] button;
3 Connect the camera to printer
Fig.1 fig.2 fig.3
If at like above fig.2 mode, you press the MENU key will exit printing mode.
24

8 Setup mode:
Press OK key at preview or playback mode and then press direction of Right key
once will enter Setup mode. You can choose the menu item by Up or Down key, enter
or exit submenu by Left or Right key, and confirm setting by OK key.
25

26

27

Note:
1 The files stored in card will be lost due to format operation, please backup
the data before formatting the memory card.
2 The “My image” menu can be activated while you had set “Start-up Image”
function.
28

AApppplliiccaattiioonn ttoo PPCC ______________
1 Connect to PC
Please install the drive program first before connecting the camera to the computer.
The camera there are two USB mode, they are MSDC and PCCAM, default is
MSDC mode, Turn on the camera power. If the PC camera function of the camera is to
be used, set the camera is PCCAM mode at setup menu. If the removable disc function
of the camera is to be used, please set the camera is MSDC mode at setup mode.
Connect the 4PIN end of the USB line to the available USB interface on the
computer. Connect the other end (5PIN) to the USB interface of the camera.
Download files from the camera to the computer: When the removable disc function
of the camera is used, a removable disc icon will appear in the window of “My
Computer”. The photos/video files you have shot are saved in the file folder \ DCIM\
100MEDIA in the removable disc. Select the shot/recorded files in the file folder
"100MEDIA". Copy (or drag by using the mouse) the files to the file folder in the hard
disc in which you are going to save your files.
Note: Use MSDC function no need install driver on windows ME or higher windows
version
29

2
Install Software
Insert the accompanied CD into CD-ROM, and the installation guide program will run automatically, the
installation guide window appearing. There are four keys on the guide window:
Install Driver
Install MediaImpression
Browse CD
Exit
30

Install Driver
Click the Install Driver button to finish installation step by step according to the clew.
After finishing installation, please restart the computer.
Note: Before installing the driver, do not connect the camera with the computer in order to avoid
the install error.
MediaImpression Installation and Use:
Install Mediainpression:
Click “Install MediaImpression” button and complete the installation as per the tips.
31

32

After installation, please restart the computer.
Run MediaImpression :
Double click the icon on the desktop or follow “Start → Programs” to open:
MediaImpression
After starting MediaImpression, click the “Import” to import the media.
33
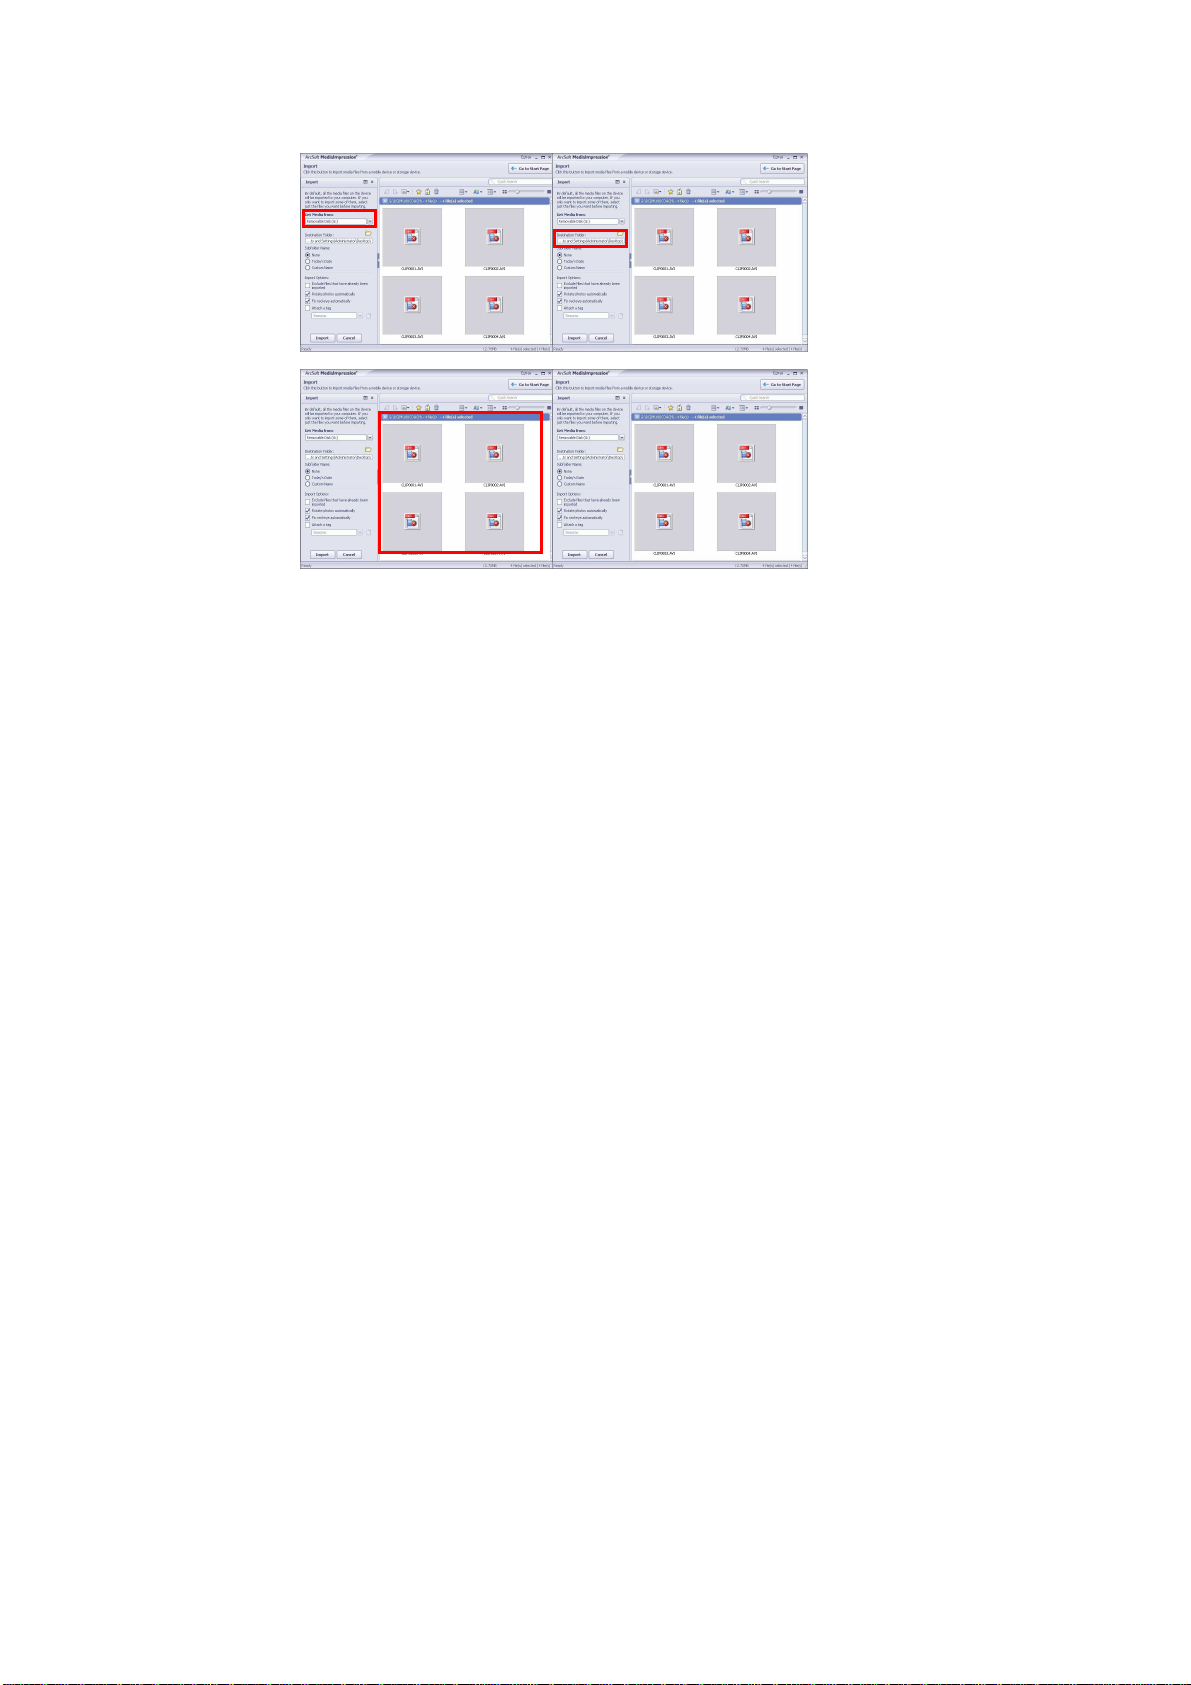
Choose the video camera storage and choose the output location.
Choose require file and click the import, selected file will be stored in the output location.
34
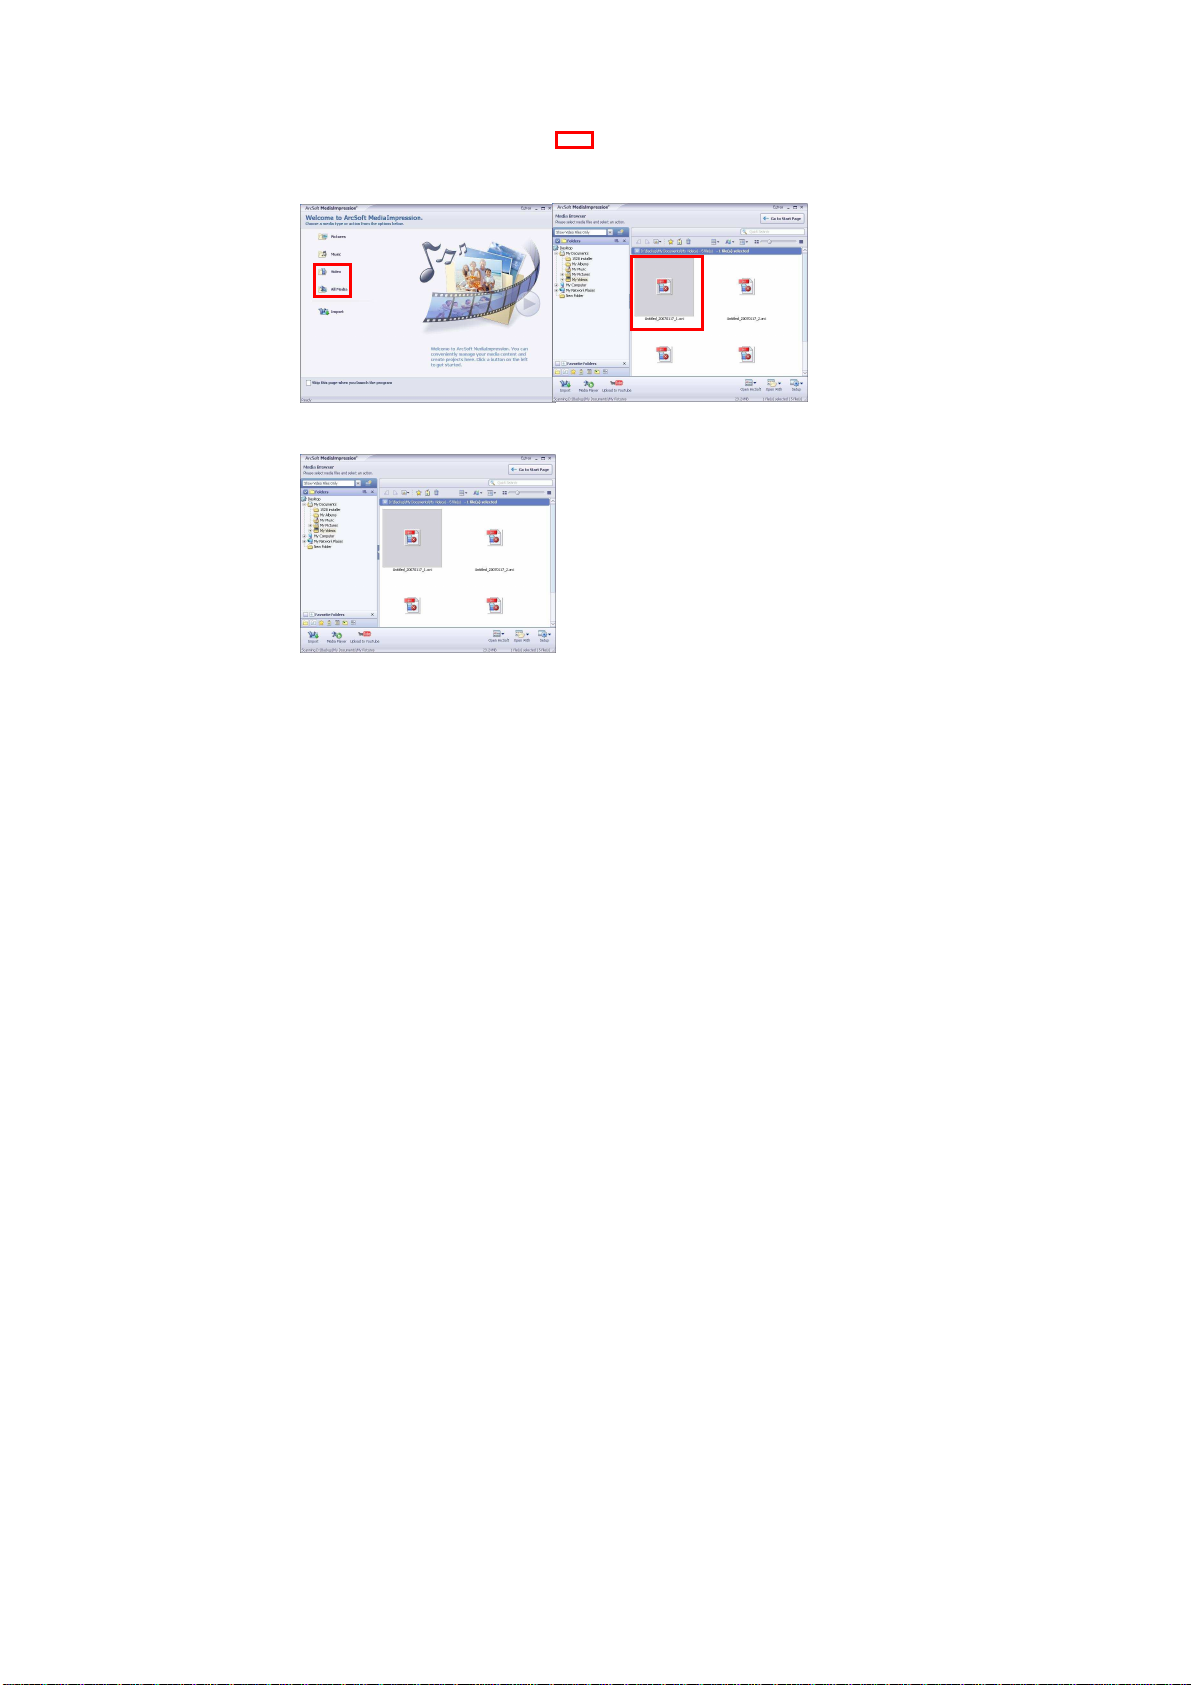
Click “Go to start page” to return the main screen, click the “Video” or “All media” to use the
“YouTube” function.
Choose file and click the “upload to YouTube.
35

Enter you username and password to login the YouTube, execute upload.
36

TTeecchhnniiccaall PPaarraammeetteerrss
Image sensor 2.0 Mega Pixels(CMOS)
Function mode Video, Still photo, playback, Mass storage and PC camera
Lens F3.1 f=6.5mm
Focal distance 120cm~infinity (standard mode)
Digital zoom 4×
Shutter Electronic shutter
LCD display 2.0〞TFT LCD
Picture
resolution
Video record
resolution
3264x2448(8M), 2592x1944(5.0M), 1280x1024(1.3M),
640x480(VGA)
HD:1280X720(15fps),VGA: 640x480(30/15fps), QVGA:
320×240(30/15fps)
White balance Auto/manual: Daylight, cloudy, Tungsten and Fluoresce
Exposure Automatic/manual (-2.0EV~+2.0EV, 0.3EV/step)
Self-shoot timer 10 seconds delay
File format
Memory
medium
No internal flash memory SD/MMC card (max: 8GB)
Video AVI
Photo JPEG
USB interface High Speed USB 2.0 interface
Power supply Battery: 4×AAA alkaline 1.5V
37

Warning: Changes or modifications to this unit not expressly approved by the party responsible for
compliance could void the user’s authority to operate the equipment.
NOTE: This equipment has been tested and found to comply with the limits for a Class B digital device,
pursuant to Part 15 of the FCC Rules. These limits are designed to provide reasonable protection
against harmful interference in a residential installation. This equipment generates, uses and can
radiate radio frequency energy and, if not installed and used in accordance with the instructions,
may cause harmful interference to radio communications.
However, there is no guarantee that interference will not occur in a particular installation. If
this equipment does cause harmful interference to radio or television reception, which can be
determined by turning the equipment off and on, the user is encouraged to try to correct the
interference by one or more of the following measures:
Reorient or relocate the receiving antenna.
Increase the separation between the equipment and receiver.
38

Connect the equipment into an outlet on a circuit different from that to which
the
receiver is connected.
Consult the dealer or an experienced radio/TV technician for help....
Shielded
Shielded USB
USB cables must be used with this unit to ensure compliance with th
ShieldedShielded
cables must be used with this unit to ensure compliance with the Class B FCC limits.
USB USB
cables must be used with this unit to ensure compliance with th cables must be used with this unit to ensure compliance with th
e Class B FCC limits.
e Class B FCC limits.e Class B FCC limits.
39
 Loading...