

Page 1

RDM Touch V1
Highlite International B.V. – Vestastraat 2 – 6468 EX – Kerkrade – the Netherlands
Ordercode: 50409
MANUAL
ENGLISH
Page 2

Ordercode: 50409
RDM Touch
Table of contents
Warning ............................................................................................................................................................................... 2
Unpacking Instructions ................................................................................................................................................. 2
Safety Instructions ......................................................................................................................................................... 2
Operating Determinations .......................................................................................................................................... 3
Connection with the mains......................................................................................................................................... 3
Return Procedure .......................................................................................................................................................... 4
Claims .............................................................................................................................................................................. 4
Description of the device ................................................................................................................................................. 5
Frontside.......................................................................................................................................................................... 5
Backside ......................................................................................................................................................................... 6
Installation ........................................................................................................................................................................... 6
Set Up and Operation ....................................................................................................................................................... 6
Power ON/OFF ............................................................................................................................................................... 6
Keyboard ........................................................................................................................................................................ 7
Main Menu Options ...................................................................................................................................................... 7
Control Modes .................................................................................................................................................................... 8
1. Receive DMX ........................................................................................................................................................... 8
2. Send DMX ................................................................................................................................................................. 9
2.1. Sending Art-Net/sACN to the DMX Output .................................................................................................. 9
3. Cable Tester ...........................................................................................................................................................10
4. Channel Tracer .....................................................................................................................................................10
5. Timings .....................................................................................................................................................................11
Refresh Rates ............................................................................................................................................................11
6. Flicker Finder ..........................................................................................................................................................12
6.1. Results ................................................................................................................................................................12
7. Sequence ...............................................................................................................................................................13
8. PWM Tester .............................................................................................................................................................14
9. MIDI Test ..................................................................................................................................................................14
10. RDM Controller ......................................................................................................................................................15
11. Options ...................................................................................................................................................................17
Sending and Receiving DMX with Art-Net and sACN .........................................................................................17
Receiving DMX .........................................................................................................................................................17
Sending DMX ............................................................................................................................................................17
Maintenance ....................................................................................................................................................................18
Touch Screen Calibration ..........................................................................................................................................18
Troubleshooting ...............................................................................................................................................................18
No Response to DMX..................................................................................................................................................18
Product Specifications ....................................................................................................................................................20
Dimensions ........................................................................................................................................................................21
1
Page 3
Ordercode: 50409
RDM Touch
Your shipment includes:
Showtec RDM Touch
Carrying case
3 to 5-pin adapters
User manual
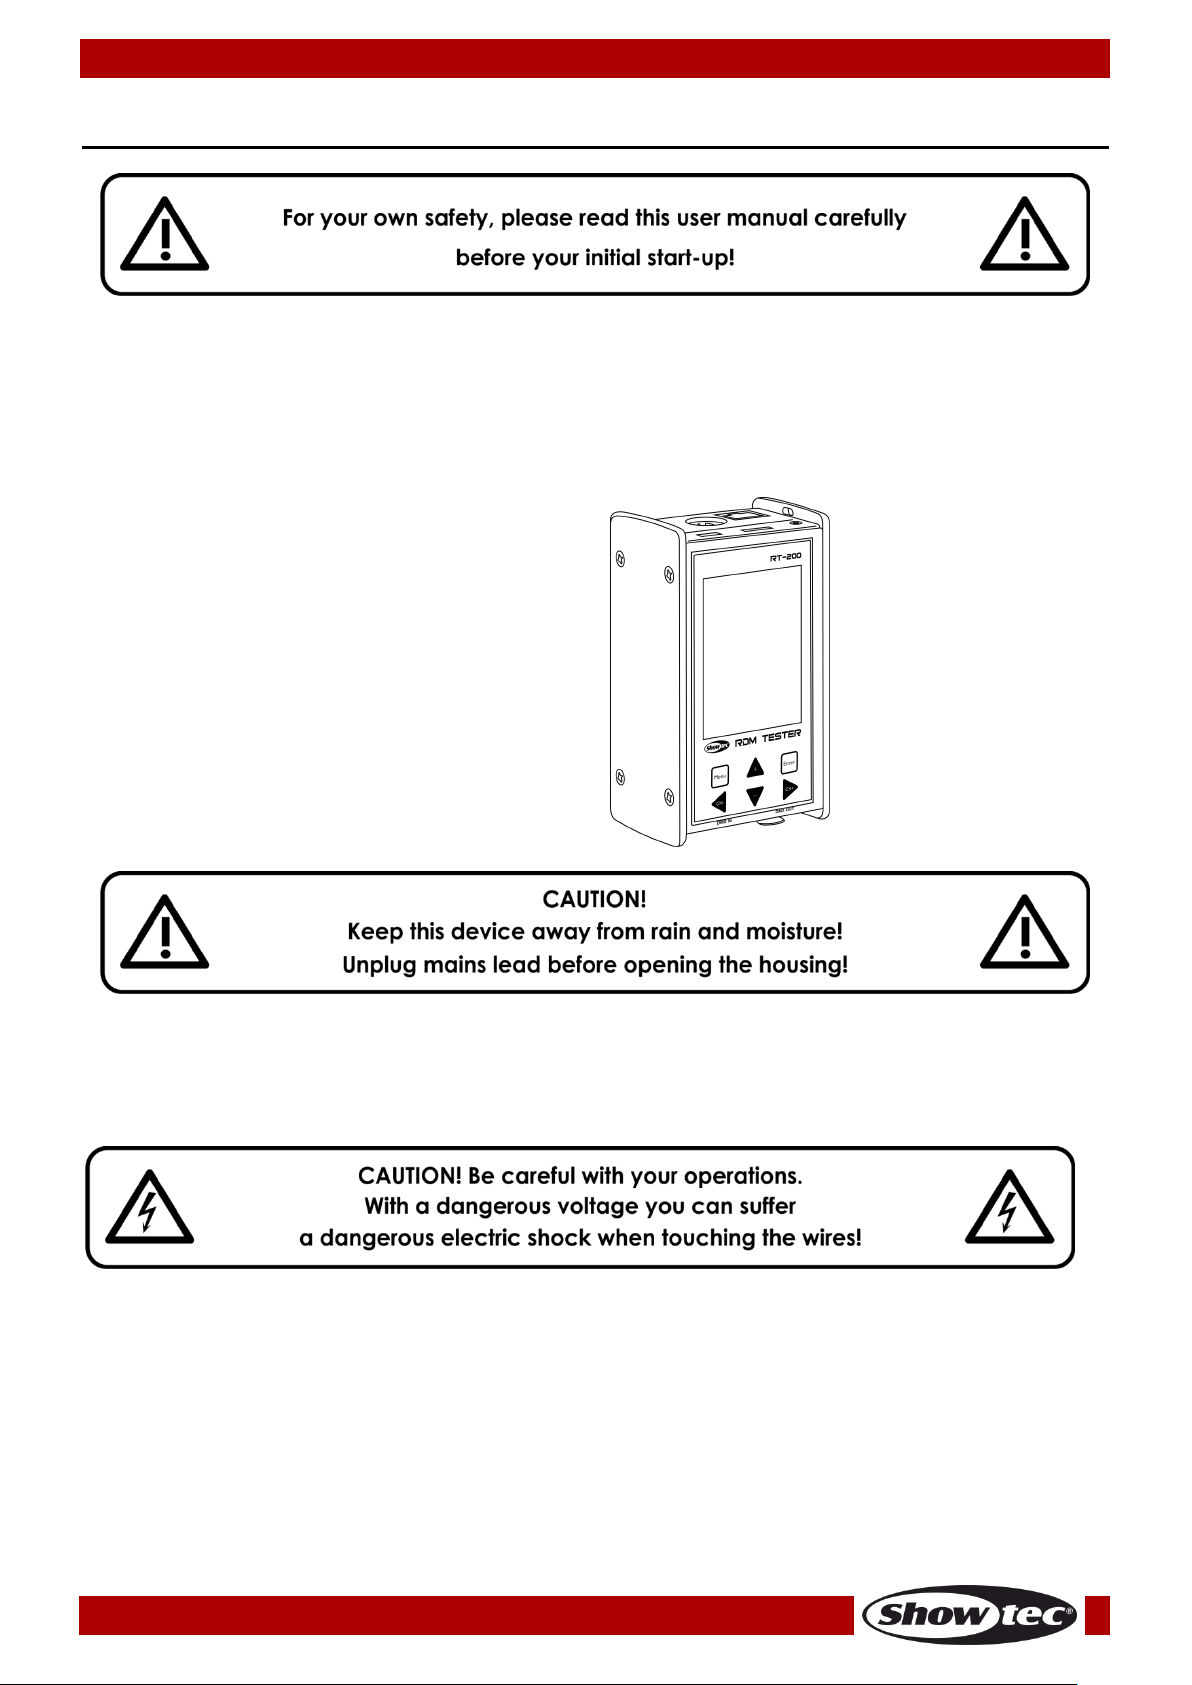
Warning
Unpacking Instructions
Immediately upon receiving this product, carefully unpack the carton and check the contents to ensure
that all parts are present, and have been received in good condition. Notify the dealer immediately and
retain packing material for inspection if any parts appear damaged from shipping or the carton itself
shows signs of mishandling. Save the carton and all packing materials. In the event that a fixture must be
returned to the factory, it is important that the fixture be returned in the original factory box and packing.
Safety Instructions
Every person involved with the installation, operation and maintenance of this device has to:
be qualified
follow the instructions of this manual
Before the initial start-up, please make sure that there is no damage caused by transportation.
Should there be any, consult your dealer and do not use the device.
To maintain perfect condition and to ensure a safe operation, it is absolutely necessary for the user to
follow the safety instructions and warning notes contained in this manual.
Please consider that damages caused by manual modifications to the device are not subject to
warranty.
This device contains no user-serviceable parts. Refer servicing to qualified technicians only.
2
Page 4
Ordercode: 50409
RDM Touch
International
EU Cable
UK Cable
US Cable
Pin
L
BROWN
RED
YELLOW/COPPER
PHASE
N
BLUE
BLACK
SILVER
NEUTRAL
YELLOW/GREEN
GREEN
GREEN
PROTECTIVE GROUND
IMPORTANT:
The manufacturer will not accept liability for any resulting damages caused by the non-observance of
this manual or any unauthorized modification to the device.
Never remove warning or informative labels from the unit.
Do not open the device and do not modify the device.
Do not disconnect and reconnect the device in short intervals, as this would reduce the device’s life.
Only use the device indoors, avoid contact with water or other liquids.
Avoid flames and do not put close to flammable liquids or gases.
Make sure that the device is not exposed to extreme heat, moisture or dust.
If the device is dropped or struck, have a qualified engineer inspect for safety before operating.
If the device has been exposed to drastic temperature fluctuation (e.g. after transportation), do not
switch it on immediately. The arising condensation water might damage your device. Leave the
device switched off until it has reached room temperature.
If your Showtec device fails to work properly, discontinue use immediately. Pack the unit securely
(preferably in the original packing material), and return it to your Showtec dealer for service.
The user is responsible for correct positioning and operating of the RDM Touch. The manufacturer will
not accept liability for damages caused by the misuse or incorrect installation of this device.
Repairs, servicing and electric connection must be carried out by a qualified technician.
WARRANTY: Till one year after date of purchase.
Operating Determinations
This device is not designed for permanent operation. Consistent operation breaks will ensure that the
device will serve you for a long time without defects.
The maximum ambient temperature t
The relative humidity must not exceed 50 % with an ambient temperature of 45°C.
If this device is operated in any other way than the one described in this manual, the product may
suffer damages and the warranty becomes void.
= 45°C must never be exceeded.
a
You endanger your own safety and the safety of others!
Connection with the mains
Connect the device to the mains with the power-plug.
Always check if the right color cable is connected to the right place.
Make sure that the device is always properly connected to the earth!
Improper installation can cause serious injuries and/or damage of property!
3
Page 5

Ordercode: 50409
RDM Touch
Return Procedure
Returned merchandise must be sent prepaid and in the original packing, call tags will not be issued.
Package must be clearly labeled with a Return Authorization Number (RMA number). Products returned
without an RMA number will be refused. Highlite will not accept the returned goods or any responsibility.
Call Highlite 0031-455667723 or mail aftersales@highlite.nl and request an RMA prior to shipping the fixture.
Be prepared to provide the model number, serial number and a brief description of the cause for the
return. Be sure to properly pack fixture, any shipping damage resulting from inadequate packaging is the
customer’s responsibility. Highlite reserves the right to use its own discretion to repair or replace
product(s). As a suggestion, proper UPS packing or double-boxing is always a safe method to use.
Note: If you are given an RMA number, please include the following information on a piece of paper
inside the box:
01) Your name
02) Your address
03) Your phone number
04) A brief description of the symptoms
Claims
The client has the obligation to check the delivered goods immediately upon delivery for any shortcomings and/or visible defects, or perform this check after our announcement that the goods are at their
disposal. Damage incurred in shipping is the responsibility of the shipper; therefore the damage must be
reported to the carrier upon receipt of merchandise.
It is the customer's responsibility to report and submit claims with the shipper in the event that a fixture is
damaged due to shipping. Transportation damage has to be reported to us within one day after receipt
of the delivery.
Any return shipment has to be made post-paid at all times. Return shipments must be accompanied with
a letter defining the reason for return shipment. Non-prepaid return shipments will be refused, unless
agreed otherwise in writing.
Complaints against us must be prepared in writing or sent by fax within 10 working days after receipt of
the invoice. After this period complaints will not be handled anymore.
Complaints will only then be considered if the client has so far complied with all parts of the agreement,
regardless of the agreement from which the obligation is resulting.
4
Page 6
Ordercode: 50409
RDM Touch
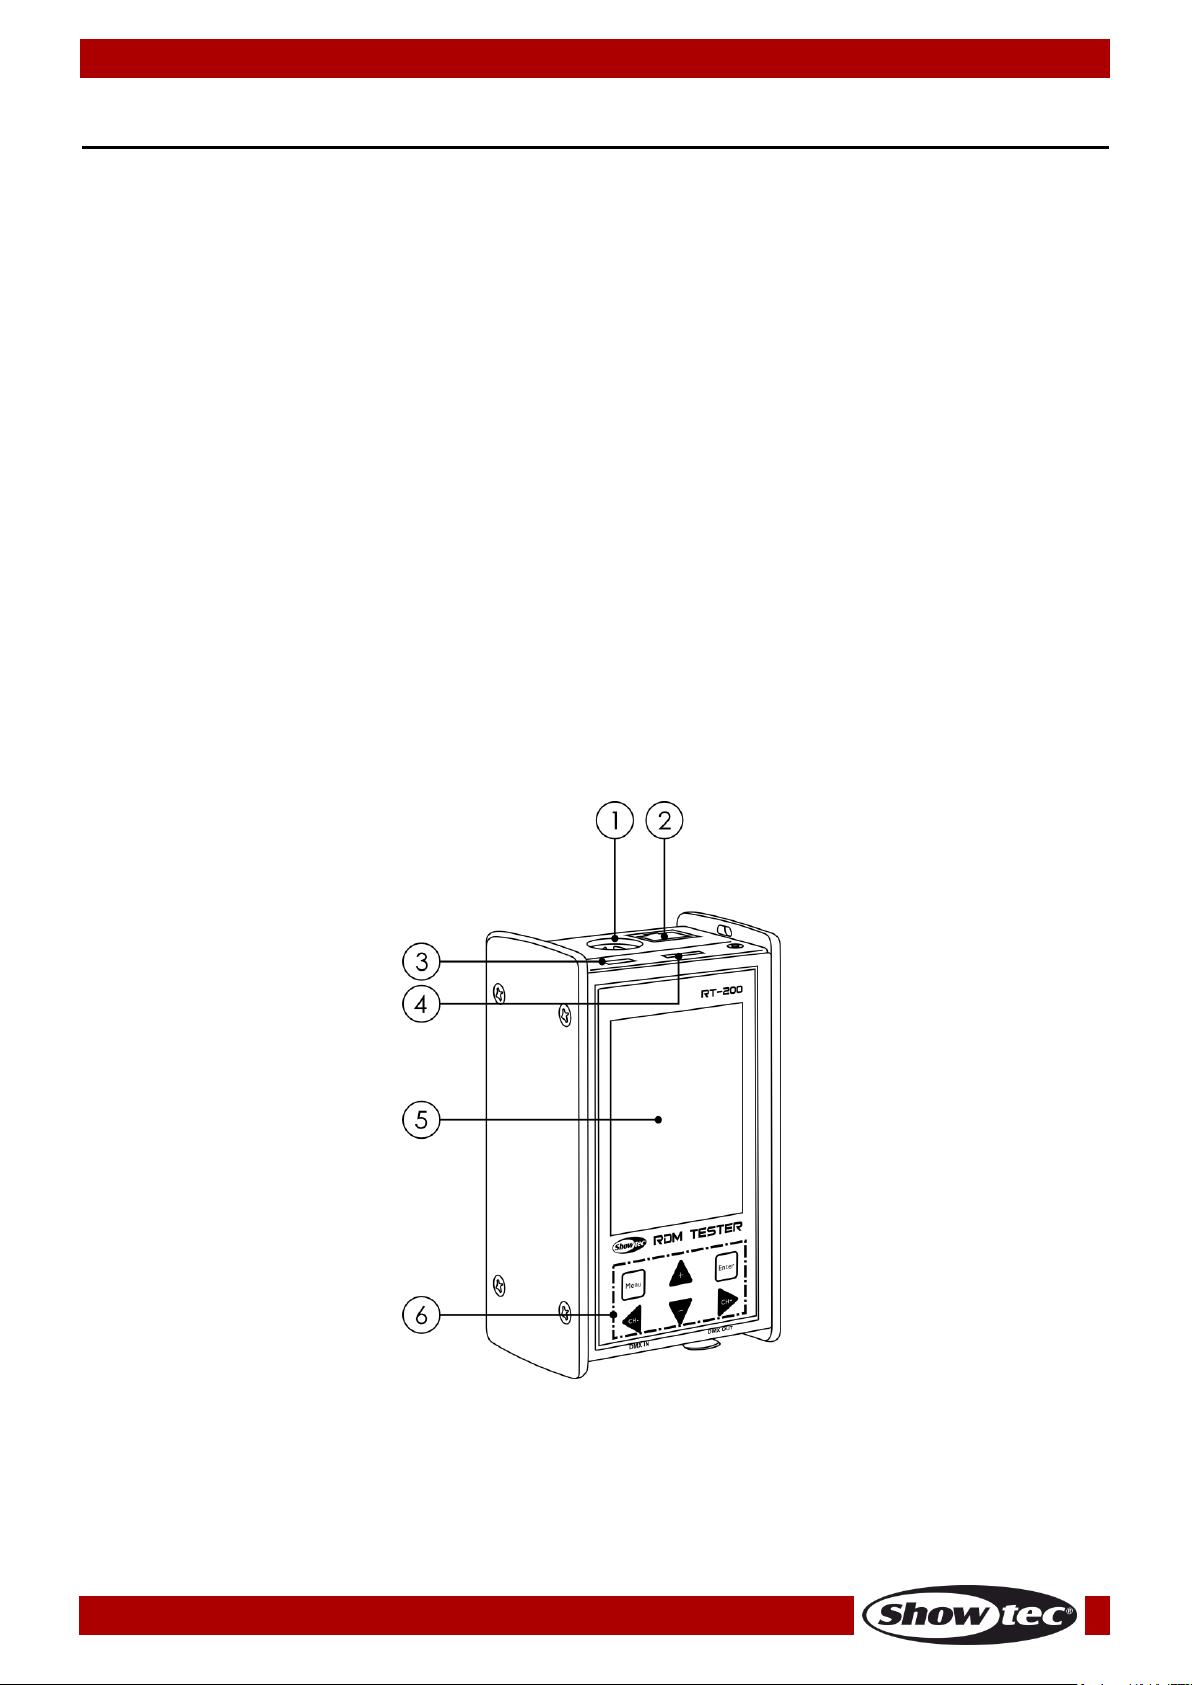
Frontside
Fig. 01
01) MIDI connector
02) RJ45 connector IN/OUT
03) Micro USB connector (PC connection/power supply)
04) Micro SD card slot
05) LCD touch screen display
06) Control buttons (MENU/ENTER/+/-/CH-/CH+)
Description of the device
Features
The Showtec RDM Touch is the most ultimate tool for every lighting technician. With its versatile functions
and user-friendly 6-button + full-color TFT touch screen display, the RDM Touch is fully equipped to
measure, test, and troubleshoot any application with DMX-controlled lighting. This unit can be used for
testing 3 and 5-pin cables, test MIDI signals, monitor and analyze signals, program sequences, send and
receive DMX, and is also equipped with an RDM controller function. The RDM Touch is delivered including
carrying case and 3 to 5-pin XLR adapters.
Features
Power supply: 9V battery (battery not included)
USB power consumption: 300mA max.
Display: Full-color LCD
Display resolution: 240 x 320 pixel
Memory: microSD card
DMX port IN: 5-pin DMX signal connector
DMX port OUT: 5-pin DM signal connector
DMX ports’ electrical standard: ANSI E1.11 / ANSI E1.20
RJ45 port supports TCP/IP, Art-Net; DHCP & Static IP assignment
USB port: Micro USB B type
Cable tester: 3/5-pin, open circuit, short circuit, wrong wiring
Operating temperature: 0°C to +45°C
Dimensions: 67 x 44 x 113 mm (LxWxH)
Weight: 0,4 kg
5
Page 7
Ordercode: 50409
RDM Touch
Fig. 02
NOTE:
It is also possible to power the RDM Touch via USB. In such case, plug one end of the USB cable
into the Micro USB connector (03) and the other end into your PC. The RDM Touch will switch on.
In order to switch the RDM Touch off, simply unplug the cable.
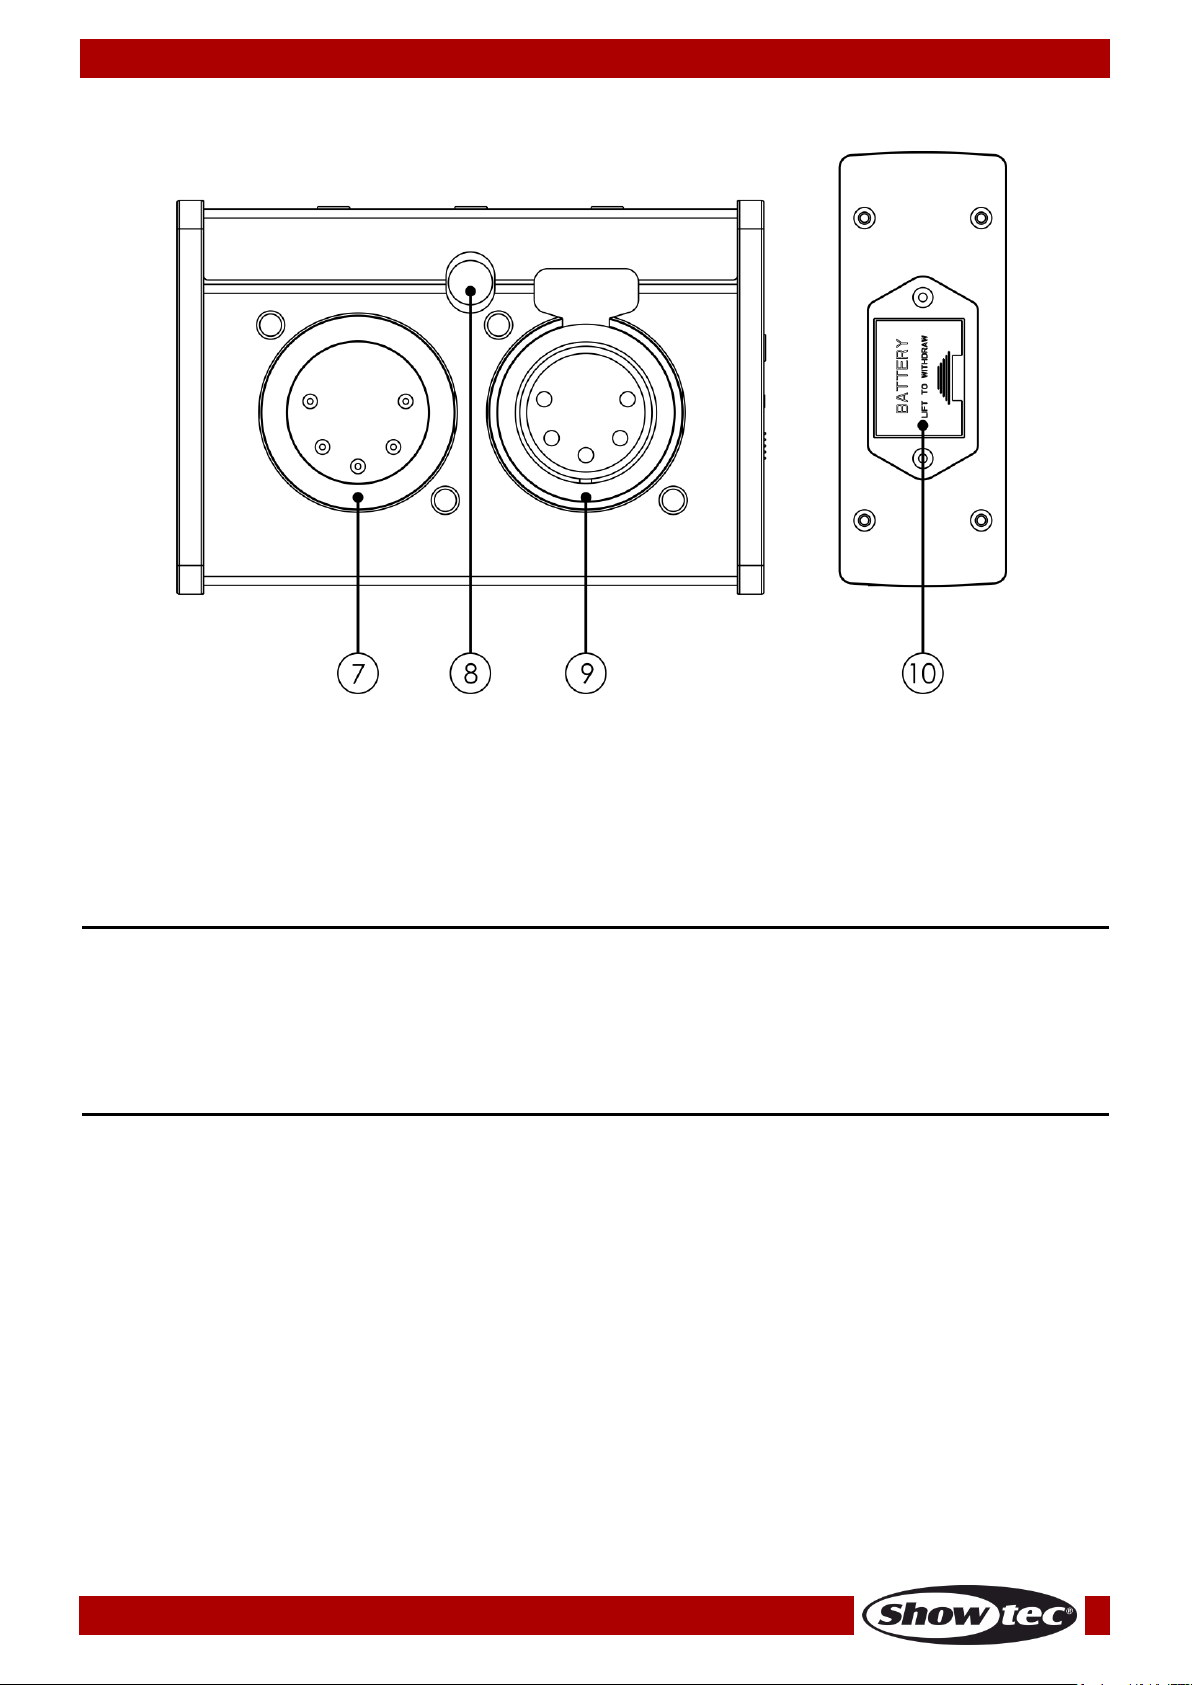
Backside
07) 5-pin DMX signal connector IN
08) Light sensor for PWM testing
09) 5-pin DMX signal connector OUT
10) 9V battery housing
Installation
Remove all packing materials from the RDM Touch. Check if all foam and plastic padding is removed.
Connect all cables.
Do not supply power before the whole system is set up and connected properly.
Always disconnect from electric mains power supply before cleaning or servicing.
Damages caused by non-observance are not subject to warranty.
Set Up and Operation
Follow the directions below, as they pertain to your preferred operation mode.
Before plugging the unit in, always make sure that the power supply matches the product specification
voltage. Do not attempt to operate a 120V specification product on 230V power, or vice versa.
Connect the device to the main power supply.
Power ON/OFF
01) If you power the RDM Touch with a 9V battery, press and hold down the MENU button for 3 seconds.
The RDM Touch will switch on.
02) Repeat step 1 to switch the RMD Touch off.
6
Page 8
Ordercode: 50409
RDM Touch
Fig. 03
NOTE:
NOTE: All the menu options can be accessed either by pressing the control buttons (06) or by
touching the desired option with the stylus pen.
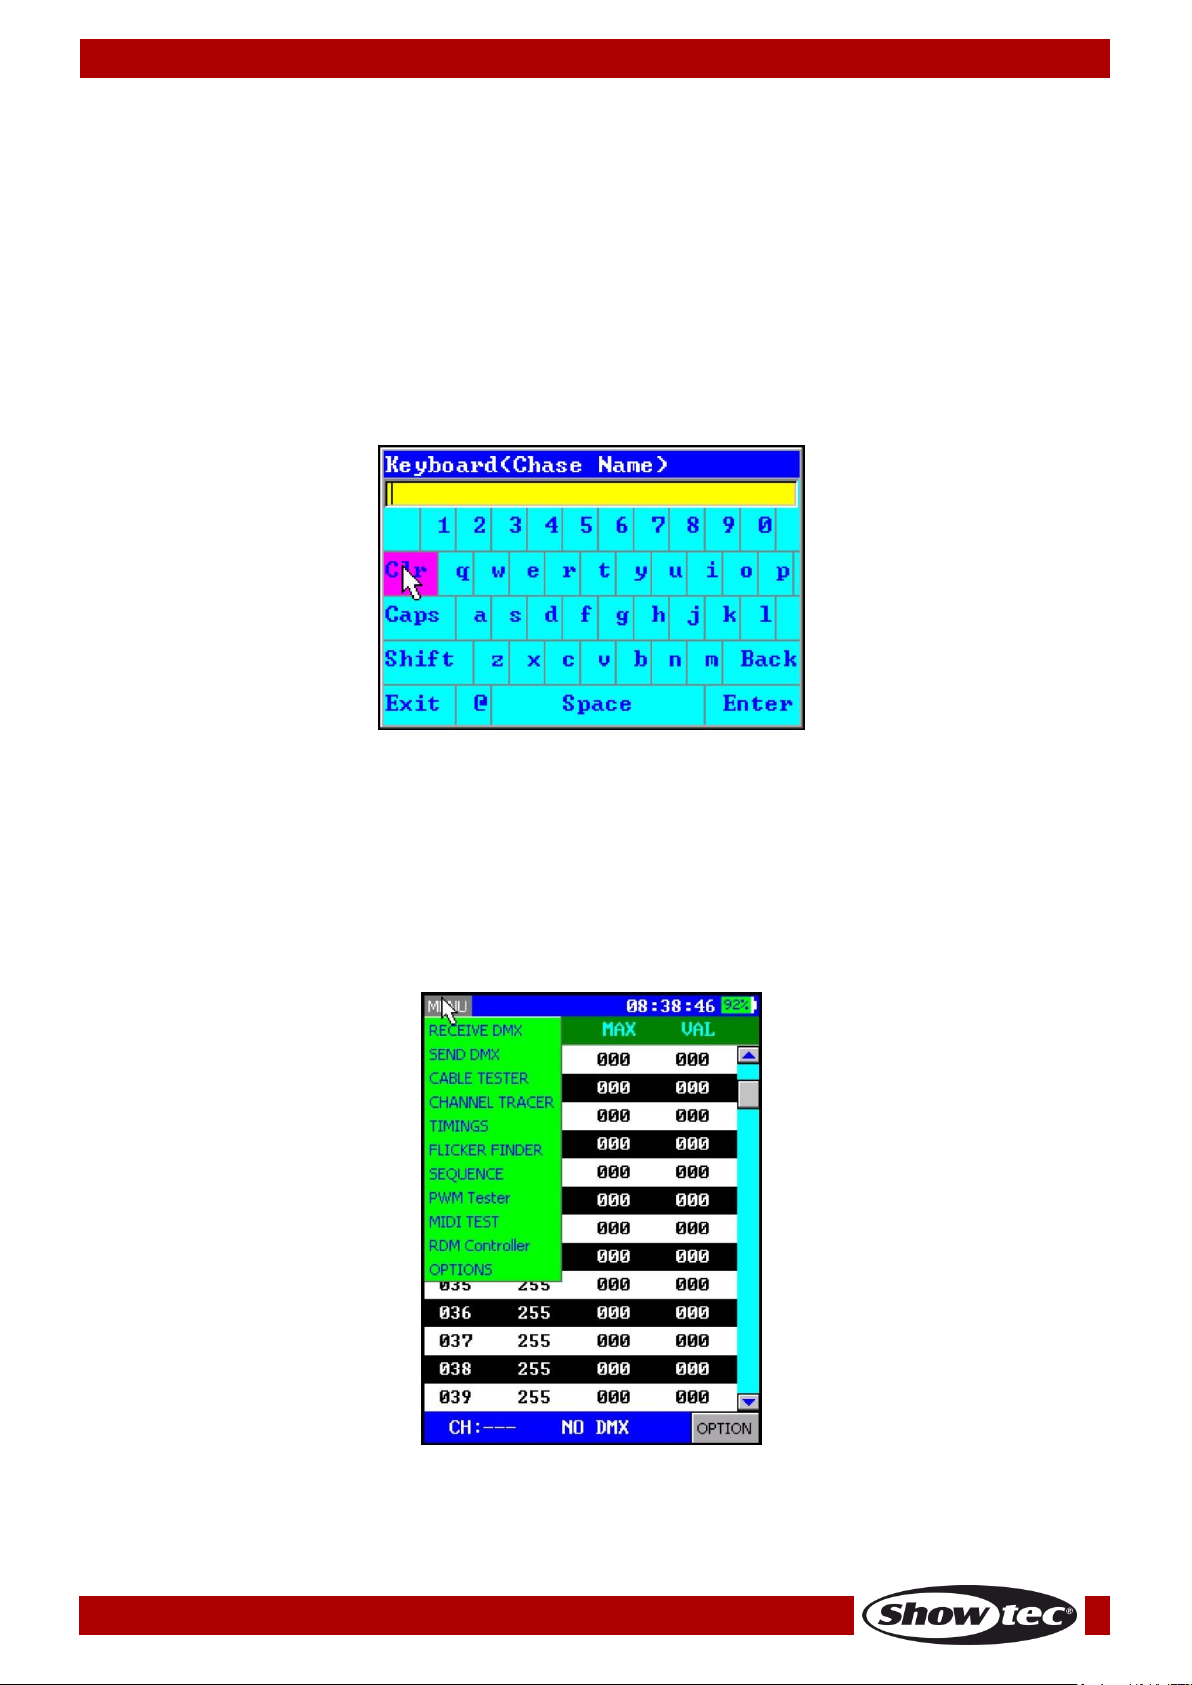
Keyboard
In certain areas, you will be required to use the digital QWERTY keyboard, by means of which it is possible
to input text.
01) Touch the display with the stylus pen or press the control buttons (+, -, CH- and CH+) (06) to choose
the desired character.
02) If you DO NOT use the stylus pen, you need to press the ENTER button every time, to confirm your
choice.
03) If you wish to edit/delete characters, press the + button until you select the text field. Press the CH-
and CH+ buttons to move the cursor. Press the ENTER button to delete the character in front of the
cursor.
04) If you need to use special characters, select @.
05) Once you have finished, select <ENTER> on the screen by touching it with the stylus pen or press the
ENTER button to confirm. In order to cancel your text input, select <EXIT>.
Main Menu Options
01) In order to enter main menu, press the MENU button or, using the stylus pen, select <MENU> on the
screen. The display will show:
02) In order to select the desired menu, press the control buttons (06) or touch the desired menu’s name
with the stylus pen.
7
Page 9

Ordercode: 50409
RDM Touch
Control Modes
1. Receive DMX
In this menu the device will receive DMX signals and show the current value (as well as the maximum and
minimum value) for each channel.
01) Choose the desired channel by touching it with the stylus pen.
02) Using the stylus pen, touch <OPTION>. The display will show:
03) Now it is possible to use the following options:
Store Scene: store the current DMX data on the micro SD card, as a scene.
Replace Scene: overwrite an existing scene.
Show Level As: change the data display style (percent, decimal, hexadecimal).
Addresses: change the DMX range to ALL (001-512) or OPEN (current input).
Clear: reset all the current values.
Source: choose the incoming DMX source (DMX IN or NETWORK).
8
Page 10

Ordercode: 50409
RDM Touch
2. Send DMX
In this menu you can send DMX as well as display values for every channel in every row. It is also possible
to save/load scenes from the micro SD card.
01) Select one of the 512 channels with the stylus pen.
02) Drag the stylus pen from the left to the right in order to set the channel’s value.
03) Using the stylus pen, touch <OPTION>.
04) Now it is possible to use the following options:
Clear: reset all the current values.
Store Scene: store a new scene (excluding Master).
Replace Scene: overwrite an existing scene (excluding Master).
Load Scene: load previously saved scenes from the micro SD card.
Refresh Rate: set the DMX refresh rate. The adjustment range is between 5-40Hz.
2.1. Sending Art-Net/sACN to the DMX Output
01) In main menu, go to <OPTIONS>.
02) Set <Network Port> to ON or AUTO.
03) Set <Network Protocol> to Art-Net or sACN and set the appropriate network universe.
04) In main menu, go to <RECEIVE DMX>, then go to <OPTION> and set the signal source as network.
05) Now, any Art-Net/sACN data will be transferred from the DMX output (09).
9
Page 11

Ordercode: 50409
RDM Touch
3. Cable Tester
In this menu you can test your cables. Connect a cable to the DMX input and output connectors (07/09).
In order to test 3-pin cables, use the included 3 to 5-pin adapter.
01) If you select <CABLE TESTER> in main menu, the RDM Touch will automatically start testing all the pins
(1-5).
02) Solid lines, extending from each input to output (pins 1-5), indicate proper connection. Broken lines
indicate faulty connection.
4. Channel Tracer
In this menu you can real-time test DMX values, displayed in the form of a curve.
01) The display shows 6 channels of data at a time.
02) If you want to set the channel value, use the stylus pen to select the channel in question. Press the
CH- or CH+ buttons or use the stylus pen to touch the (>) and (<) symbols on the screen, next to the
selected channel.
03) In order to disable a channel, either double-click on it with the stylus pen or, once the channel has
been selected, press the ENTER button.
10
Page 12

Ordercode: 50409
RDM Touch
Break Length
MAB Length
USITT DMX-512/1986
≥ 88 us
≥ 4 us
USITT DMX-512/1990
≥ 88 us
≥ 8 us
ANSI E1.11-2004
≥ 92 us
≥ 12 us
<1 frame per second
Not compliant with standard
1-10 frames/sec
Compliant, very slow and may cause problems with some equipment
10-25 frames/sec
Slow
25-44 frames/sec
Typical for most equipment
44 frames/sec
Maximum speed when sending all 512 channels
>44 frames/sec
Only possible when sending fewer than 512 channels. Compliant, but may
cause problems with some equipment.
5. Timings
In this menu you can analyze the DMX timings.
01) Connect a DMX signal source to the DMX input (07). The display will show:
02) The displayed pieces of information are:
DMX signal: shows whether the connected DMX signal is of high or low quality.
Refresh rate: number of frames per second.
Break length: length of the break in microseconds.
Mark after break (MAB): mark after break in microseconds.
Channels received: number of received channels.
Refresh Rates
Please refer to ANSI E1.11 for more information on DMX-512 timings. The accuracy of the RDM Touch is
within 1,5 microseconds.
11
Page 13

Ordercode: 50409
RDM Touch
6. Flicker Finder
In this menu you can test the stability of DMX signals. It may help detect such problems as: signal
interruptions, channel quantity changes, channel value changes.
01) Configure your console to send a static scene or a Static DMX Look. It should not consist of only
zeros.
02) Replace the flickering fixture with the RDM Touch.
03) In main menu, select <FLICKER FINDER>.
04) If needed, set <COMPARE LIMIT> (001-255). In normal circumstances, it should be set to 001.
05) Select <START> to start the scan.
06) Allow the RDM Touch to scan for a considerable amount of time. The longer the scan, the higher the
transmission stability.
07) In the course of the scan, the Flicker Finder will display the following information:
TIME NO SIGNAL: accumulated time when no signal was received.
CHANNELS WITH ERR: the number of channels where DMX values have been received and differ
by the value bigger than set in <COMPARE LIMIT>.
FRAMING ERRORS: the number of detected framing errors.
CHANGES OF #CHS: how many times the number of channels has changed.
08) Select <STOP> to stop/pause scanning.
09) In order to resume scanning, select <START>.
10) In order to clear previous errors, select <CLEAR ERR>.
6.1. Results
01) There are a few possible results which you may receive:
TIME: the accumulated scan time.
TIME NO SIGNAL: the time when no signal was received.
CHANNELS WITH ERR: the number of channels where DMX values have been received and differ
by the value bigger than set in <COMPARE LIMIT>.
FRAMING ERRORS: the number of detected framing errors.
CHANNELS RECEIVED: the total number of channels received before the scan stopped.
CHANGES OF #CHS: how many times the number of channels has changed.
02) If the TIME NO SIGNAL value is bigger than 0, it may mean that your DMX setup is at fault. These
count after no proper incoming signal has been received for more than 1 second. Normally, it does
not lead to flickering. Another source of flickering may be framing errors.
03) If CHANNELS WITH ERR shows a non-zero value, it is a good indication of flickers caused by the DMX
transmission (if the DMX source is sending a non-changing look.)
12
Page 14

Ordercode: 50409
RDM Touch
04) Look at the details, for more information on each channel where errors were found:
CH: channels where value changes have been detected.
REFERENCE: the channel value during the initial test.
ERROR: error counter.
7. Sequence
In this menu you can create, edit and play chases. Chases consist of a number of scenes, created in
SEND DMX and RECEIVE DMX menus.
01) Press the + and – buttons to scroll through the options (in Edit Chase and Play Chase) or touch the
desired option with the stylus pen.
02) The available functions are:
NEW/SAVE: while creating a new chase, you can rename it. Once you have added the desired
steps, select <SAVE>.
LOAD/ADD: use this function to open a chase or to add a step. It is also possible to insert a step
or delete a currently active step by using the CH- and CH+ buttons.
LOAD/OPEN CHASE: these buttons allow you to select a saved chase and open it in either the
Edit Chase or Play Chase menus.
PLAY/STOP: Play and stop the currently opened chase.
03) In Play Chase menu, select one of the following 3 sliders and set the values using the stylus pen or by
pressing the CH- and CH+ buttons:
MASTER (0-255)
SPEED (from slow to fast)
FADE (0-100%)
13
Page 15

Ordercode: 50409
RDM Touch
8. PWM Tester
In this menu you can check the PWM (Pulse Width Modulation) frequency and duty ratio.
01) Point the light sensor on the bottom of the RDM Touch (08) at a lighting fixture.
02) Press and hold down the ENTER button.
03) When the data is stabilized, release the ENTER button.
04) The test result will be displayed on the screen.
9. MIDI Test
Under normal circumstances, MIDI is mostly one-way. In order to receive and send MIDI, you normally
need two separate connectors. The RDM Touch, however, is equipped with two-way MIDI which enables
it to receive and send MIDI signals.
The MIDI test function supports MIDI three-byte instructions. The first byte is the status byte (note off, note
on, MIDI channel information). The second and third bytes carry the parameters of instructions. See the
MIDI list of your MIDI device for more detailed information.
Use this function to test the MIDI signals sent from controller or MIDI fixtures, and if they can send MIDI
signal to other devices.
14
Page 16

Ordercode: 50409
RDM Touch
01) In main menu, select <MIDI TEST>. If the RDM Touch is receiving MIDI signal, the instructions will be
presented on the display.
02) If you want to send out a MIDI signal, select the <SEND> button on the screen (using the control
buttons or the stylus pen).
03) You can enter instruction data to the right of the <SEND> button.
04) Press the CH- and CH+ buttons to move the selected text from the <SEND> button to the instruction
input boxes.
05) Press the ENTER button to confirm, or select the boxes with the stylus pen to use the digital keyboard.
Enter the instruction parameters for each value. It is possible to insert both decimal and hexadecimal
values.
06) In order to input as decimal, add “d” or “D” as the prefix (for example, to input 100: d100 or D100.)
07) In order to input as hexadecimal, add “h” or “H” as the prefix (for example, to input 64: h64 or H64.)
08) Select the <SEND> button to send the MIDI signals.
09) The pieces of information on the display are:
TIME: the time to receive/send instructions (hexadecimal).
ST, D1, D2: MIDI instruction, original data (hexadecimal).
CH: MIDI channel information (01-16).
EVENT: instruction types (note off, note on...)
SEND BUTTON: use to send MIDI instructions.
INPUT BOXES: use to input MIDI send instruction parameters.
10. RDM Controller
In this menu you can configure and monitor any RDM supporting fixtures.
01) Make sure that your RDM fixtures are connected in-line with the DMX output (09) on the RDM Touch.
02) In main menu, select <RDM CONTROLLER>.
03) The display will show the list of devices:
04) There are 3 buttons on the bottom of the screen:
DISCOVER: incremental discovery, adding new fixtures to a current list. Previously discovered
units remain unaffected. If the DMX cable is disconnected, the previously discovered fixtures will
not be removed.
FULL DIS: full discovery. If you use this option, then any previously discovered list and mute marks
will be deleted. All currently connected RDM fixtures will be discovered.
RETURN: use to return to the higher-level menu item.
15
Page 17

Ordercode: 50409
RDM Touch
05) Once discovery has been completed, the available devices will be listed in the Device List screen.
06) Use the stylus pen (or the – and + and ENTER buttons) to enter the Command List of any selected
fixture (the displayed options will vary per fixture).
07) The currently supported parameters are:
DEVICE INFO
MANUFACTURER LABEL
DEVICE LABEL
FACTORY DEFAULTS
SOFTWARE VERSION LABEL
DMX PERSONALITY
DMX PERSONALITY DESCRIPTION
DMX START ADDRESS
SENSOR
PAN INVERT
TILT INVERT
PAN TILT SWAP
DISPLAY INVERT
IDENTIFY DEVICE
RDM RESET DEVICE
08) Some RDM parameters are read-only and some can be edited.
16
Page 18

Ordercode: 50409
RDM Touch
11. Options
01) In main menu, select <OPTIONS>.
02) Press the – and + buttons (or touch the screen with the stylus pen) to scroll through the following
options:
Device Name: rename the device.
Backlight Brightness: LCD display brightness (10-100%, from dark to brightest).
Turn Off If Idle: turn off if idle (No, 1, 3, 5, 10 minutes).
Date: set the date (the type formatting must remain as currently shown. Invalid formatting will
result in an input error).
Time: set the time (the type formatting must remain as currently shown. Invalid formatting will
result in an input error).
IP Address: set the IP address (the type formatting must remain as currently shown. Invalid
formatting will result in an input error).
NetMask: set the netmask (the type formatting must remain as currently shown. Invalid
formatting will result in an input error).
Network Port: set the network port mode (on/off/auto).
Network Universe: set the network universe.
Network Protocol: select network protocol (Art-Net/sACN/Disable).
Delete Scene File: delete saved scenes from the micro SD card).
Delete Chase File: delete saved chases from the micro SD card).
Default Settings: restore factory settings.
Firmware Version: see the current software version (B1.0 V1.5).
Touch Screen Calibration: see page 18 for more information.
03) Once you have chosen the desired option, touch it with the stylus pen (or press the ENTER button) to
change the settings.
Sending and Receiving DMX with Art-Net and sACN
The RDM Touch can send and receive Art-Net or sACN.
01) In main menu, select <OPTIONS>.
02) Go to <Network Protocol> and choose Art-Net or sACN.
03) Set the universe and the sub-universe.
Receiving DMX
01) If you want to receive data, go to main menu and select <RECEIVE DMX>.
02) Touch the <OPTION> button in the bottom right corner. Choose <SOURCE> and set it to <NETWORK>.
Sending DMX
01) The network function is available via the DMX output (09).
02) In main menu, select <SEND DMX> or <SEQUENCE> menus.
03) The device will now use the network to send DMX data.
17
Page 19

Ordercode: 50409
RDM Touch
Maintenance
The operator has to make sure that safety-related and machine-technical installations are to be
inspected by an expert after every year in the course of an acceptance test.
The operator has to make sure that safety-related and machine-technical installations are to be
inspected by a skilled person once a year.
The electric power supply cables must not show any damages or material fatigue.
The RDM Touch requires almost no maintenance. However, you should keep the unit clean.
Disconnect the mains power supply, and then wipe the cover with a damp cloth. Do not immerse in
liquid. Wipe the display clean with glass cleaner and a soft cloth. Do not use alcohol or solvents.
Keep connections clean. Disconnect electric power, and then wipe the DMX connections with a damp
cloth. Make sure that connections are thoroughly dry before linking equipment or supplying electric
power.
Touch Screen Calibration
01) In main menu, select <OPTIONS>.
02) Scroll down to <TOUCH SCREEN CALIBRATION> and press the ENTER button to enter (or use the stylus
pen).
03) Touch the crosshair on the screen with the stylus pen. The crosshair will keep on changing its location
until the process has completed.
04) Touch the screen with the stylus pen to return to main menu.
Troubleshooting
This troubleshooting guide is meant to help solve simple problems.
If a problem occurs, carry out the steps below in sequence until a solution is found. Once the unit
operates properly, do not carry out the following steps.
No Response to DMX
Suspect the DMX cable or connectors, a controller malfunction, a light effect DMX card malfunction.
01) Check the DMX setting. Make sure that DMX addresses are correct.
02) Check the DMX cable: Unplug the unit; change the DMX cable; then reconnect to electrical power.
Try your DMX control again.
03) Determine whether the RDM Touch or light effect is at fault. Does the RDM Touch operate properly
with other DMX/RDM products? If not, take the RDM Touch in for repair. If it operates properly, take
the DMX cable and the light effect to a qualified technician.
18
Page 20

Ordercode: 50409
RDM Touch
Problem
Probable cause(s)
Solution
One or more
fixtures do not
function at all
No power to the fixture
• Check if power is switched on and
cables are plugged in
Internal fuse blown
• Return the fixture to your dealer
Fixtures reset
correctly, but all
respond
erratically or not
at all to the
controller
The controller is not connected.
• Connect controller.
5-pin XLR Out of the controller
does not match XLR Out of the first
fixture on the link (i.e. signal is
reversed)
• Install a phase reversing cable
between the controller and the
first fixture on the link
Fixtures reset
correctly, but
some respond
erratically or not
at all to the
controller
Poor data quality
• Check data quality. If much lower
than 100 percent, the problem
may be a bad data link
connection, poor quality or
broken cables, missing termination
plug, or a defective fixture
disturbing the link
Bad data link connection
• Inspect connections and cables.
Correct poor connections. Repair
or replace damaged cables
Data link not terminated with 120
Ohm termination plug
• Insert termination plug in output
jack of the last fixture on the link
Incorrect addressing of the fixtures
• Check address setting
One of the fixtures is defective and
disturbs data transmission on the
link
• Bypass one fixture at a time until
normal operation is restored:
unplug both connectors and
connect them directly together.
• Have the defective fixture
serviced by a qualified technician
No light or LEDs
cut out
intermittently
Fixture is too hot
• Allow the fixture to cool down
• Clean the fan
• Make sure air vents are not
blocked
• Turn up the air conditioning
LEDs damaged
• Disconnect the fixture and return it
to your dealer
The power supply settings do not
match local AC voltage and
frequency
• Disconnect fixture. Check settings
and correct if necessary
19
Page 21

Ordercode: 50409
RDM Touch
Model:
Showtec RDM Touch
Power supply:
9V DC
USB power consumption:
300mA max.
Dimensions:
67 x 44 x 113 mm (LxWxH)
Weight:
0,4 kg
Details:
Display:
Full-color LCD
Display resolution:
240 x 320 pixel
Memory:
microSD card
Control protocols:
DMX-512, RDM, MIDI, Art-Net, sACN
DMX electrical standard:
ANSI E1.11 / ANSI E1.20
Connections:
5-pin XLR IN&OUT, RJ45, MIDI, Micro USB B, microSD
Housing:
Metal & flame retardant plastic
Max. ambient temperature ta:
45°C
Max. housing temperature tB:
70°C
Product Specifications
Design and product specifications are subject to change without prior notice.
Website: www.Showtec.info
Email: service@highlite.nl
20
Page 22

Ordercode: 50409
RDM Touch
Dimensions
21
Page 23

Ordercode: 50409
RDM Touch
22
Page 24

©2017 Showtec
 Loading...