

Page 1
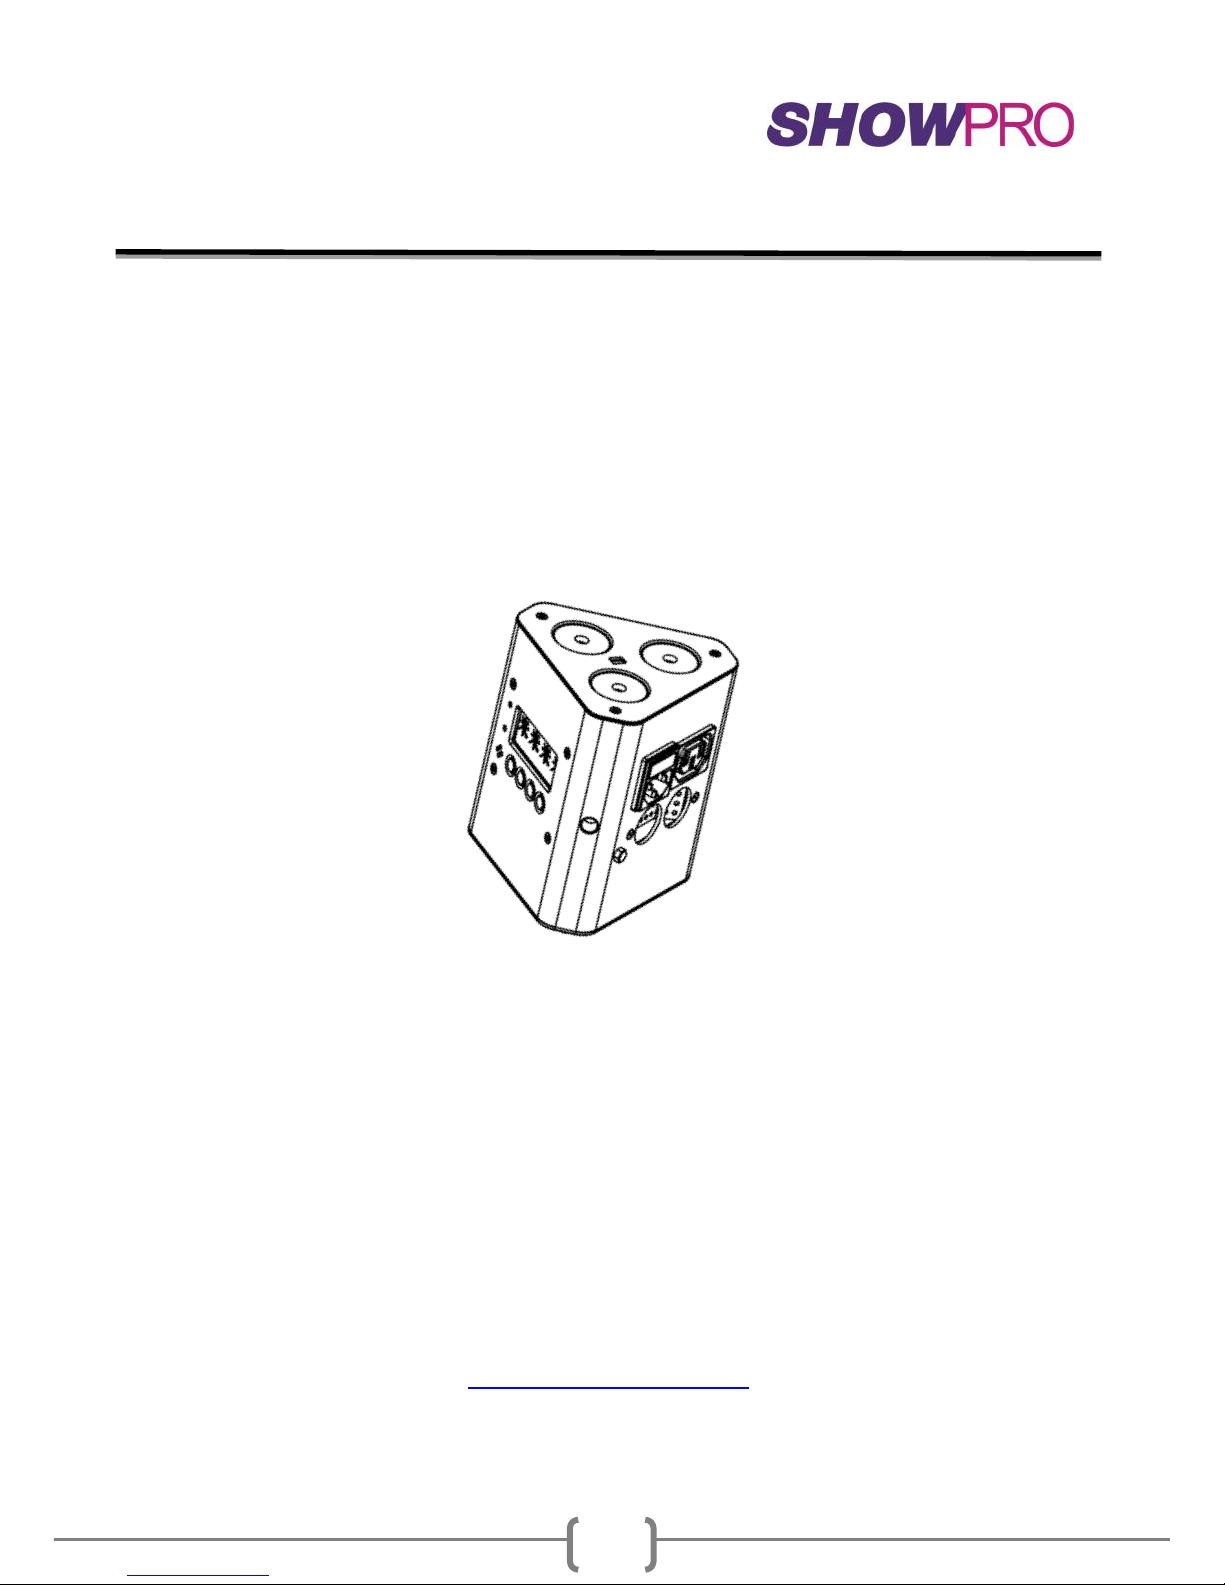
Truss Mate 2
1
User Manual
Truss Mate 2
www.showtech.com.au
Page 2

Truss Mate 2
2
Table of Contents
1. Safety instructions…………………………………………………………3
1.1 Overhead rigging …………………………………………………….4
1.2 Power Connection …………………………………………………..6
1.3 Cleaning and Maintenance ……………………………………..6
2. Menu Navigation ............................................................7
3. DMX Allocation ...............................................................9
4. Technical Specifications ..................................................11
Page 3

Truss Mate 2
3
1. Safety Instructions
FOR SAFE AND EFFICIENT OPERATION
Be careful with heat and extreme temperature.
Avoid exposing it to direct rays of sun near a heating appliance.
Do not put it in a temperature below 41°F/5°C, or exceeding 95°F/35°C.
Keep away from humidity, water and dust.
Do not place the set in a location with a high humidity or lots of dust.
Containers with water should not be placed on the set.
Keep away from sources of hum and noise
Such as transformer motor, tuner, TV set and amplifier.
To avoid placing on un-stable location
Select a level and stable location to avoid vibration.
Do not use chemicals or volatile liquids for cleaning
Use a dry cloth to wipe off the dust, or a wet soft cloth for stubborn dirt.
NO USER SERVICABLE PARTS INSIDE.
If unit is out of service please contact your point of purchase.
Page 4

Truss Mate 2
4
If any troubles arise, remove the power plug and contact your Pro Shop
representative for repair. Do not open the cabinet by yourself, it might result a
danger of electric shock.
Take care with the power cable. Never pull the power cable to remove the plug from
the receptacle, be sure to hold the plug.
When not using the unit for an extended period of time be sure to disconnect the
plug form the receptacle.
1.1 . Overhead Rigging
This item must be built in a way that it can hold 10 times more of its weight for 1
hour without causing any damages. The installation must be secured with a
secondary safety attachment. The Safety attachment has to be constructed in a way
that no part of the installation can fall down. When rigging, de-rigging or servicing
the fixture staying in the area below the installation place, on bridges, under high
working places and other endangered areas us forbidden. Before taking the device in
operation, the installation must be approved by an expert. The operator has to make
sure that safety-relating and machine-technical installations are approved by a skilled
person once a year.
IMPORTANT! OVERHEAD RIGGING REQUIRES EXTENSIVE EXPERIENCE.
Including (but not limited to) calculating working load limits, installation material
being used, and periodic safety inspection of all installation material and the
projector. If you lack these qualifications, do not attempt the installations yourself,
but instead use a professional structural rigger. Improper installation can result in
bodily injury and/or damage to property.
Page 5

Truss Mate 2
5
IMPORTANT:
If multiple PixPad panels are being rigged together as a larger system, special care
must be taken to ensure total loads are adhered to. A maximum of 10 panels should
be hung under each other, longer drops require further bracing or load support,
please refer to a qualified expert. Horizontally mounted panels should also be picked
up from a minimum of every second panel to properly spread the load.
Use only professional trussing system if the item shall be lowered from the ceiling or
high joists. Never let the device swing freely in a room.
CAUTION: Overhead Items may cause serious injuries when crashing down!! If there
is concern about the safety then DO NOT INSTALL the device.
DANGER OF FIRE!
When installing the device, make sure there is no highly-flammable material
(decoration articles, etc) within a distance of min. 0.5m.
Mount the projector with the mounting bracket to your trussing system using an
appropriate clamp.
For overhead use, always install a safety-rope that can hold at least 10 times the
weight of the fixture. You must only use safety –ropes with quick links with screw
cap. Pull the safety-rope through the hole in the mounting bracket and over the
trussing system or a safe fixation spot. Insert the end in the quick link and tighten the
safety screw. The maximum drop distance must never exceed 20cm
A safety rope which already held the strain of a crash or which is defective must not
be used again.
DANGER TO LIFE!
Page 6

Truss Mate 2
6
Before taking into operation for the first time, the installation has to be approved by
an expert.
1.2. Power Connection
!! CAUTION !!
Never leave this device running unattended!! Every person that is involved with this
item has to be qualified!!
Connect item with main plug. The voltage and frequency must exactly be the same as
stated on the device. The power plug must always be inserted without force.
1.3. Cleaning and Maintenance
Please make sure that safety-relating and machine-technical installations are
inspected by a skilled person once a year.
1. Make sure before installing that all screws are tightly connected and not corroded.
2. There must be no deformations on the housings, fixations and installations spots
3. No damages must be showed on the power supply cables, material fatigue and
sediments
If the exterior of the unit is going to be cleaned, please use moist, lint free cloths.
Never use alcohol or solvents.
The Cooling fan must be cleaned monthly and check to ensure it is free of
obstructions.
To clean the interior of the device please use a vacuum cleaner or an air jet, however
we recommend cleaning the lenses weekly to ensure the best output from your unit.
Page 7
Truss Mate 2
7
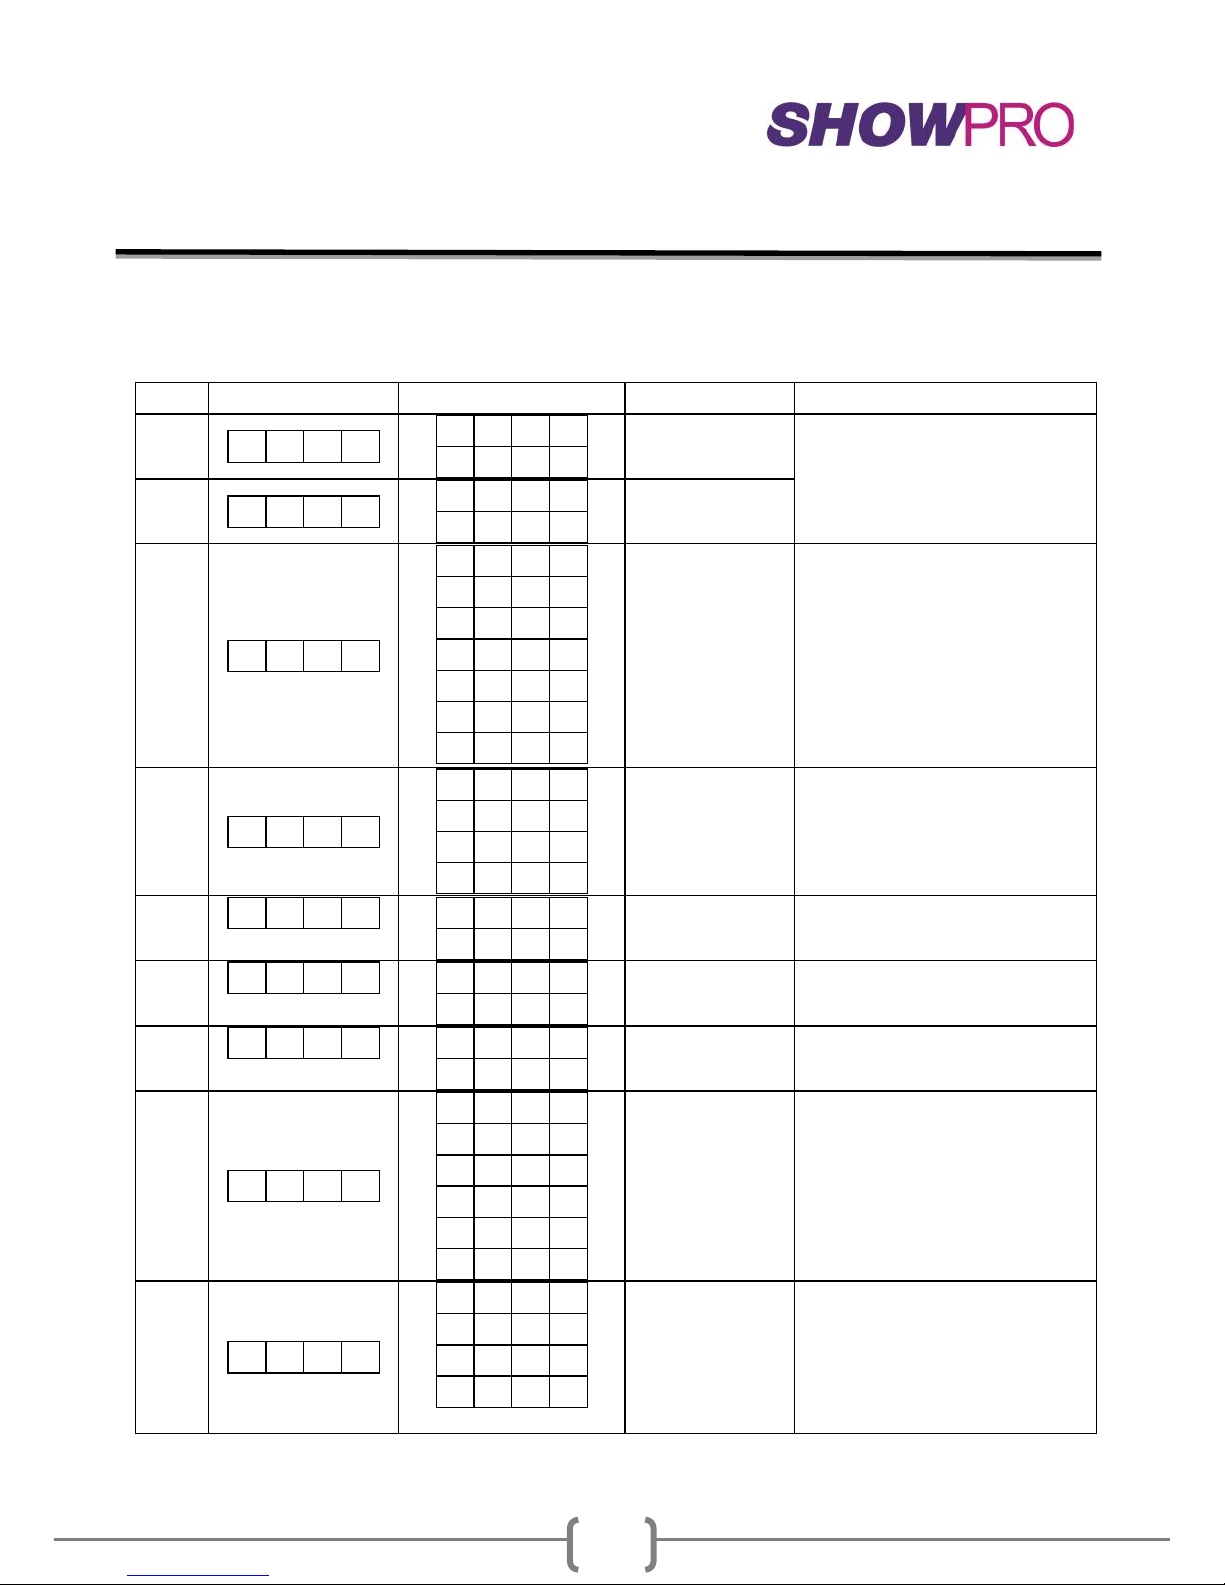
2.0 Menu navigation
NO.
Menu Level 1
Menu Level 2
Menu Level 3
Remark
1
3 - C
H d
1
d 5 1
2
Default: 3-CH,d 1
2
8 - C
H
d
1
d 5 1
2
3
C - -
C 1 C
2
C 3 C
4
C
5
C
6
C
7
1:R
2:G
3:B
4:GB
5:RB
6:RG
7:RGB(Default :RGB)
4
P - -
P
1
P
2
P 3 P
4
P1:3Colors snap (Default P1)
P2:3 Colors Fade
P3:7Colors snap
P4:7Colors Fade
5
S - -
S - - 1 S 1 0
0
Speed : 1-100(slow - fast)
Default:100
6
S n d
S n d
1
S n d
2
Sound
(Default: Snd1)
7
S e n
S u 0 u 1 0
0
(Default 80)
8
U - -
r 0 2 5
5
g 0 2 5
5
b 0 2 5
5
(Default RGB=255)
9
d I M
O F
F
d I M
1
d I M
2
d I M
3
OFF: Dimmer speed off
DIM1: Dimmer speed fast
DIM2: Dimmer speed middle
DIM3: Dimmer speed slow
Default:OFF
Page 8
Truss Mate 2
8
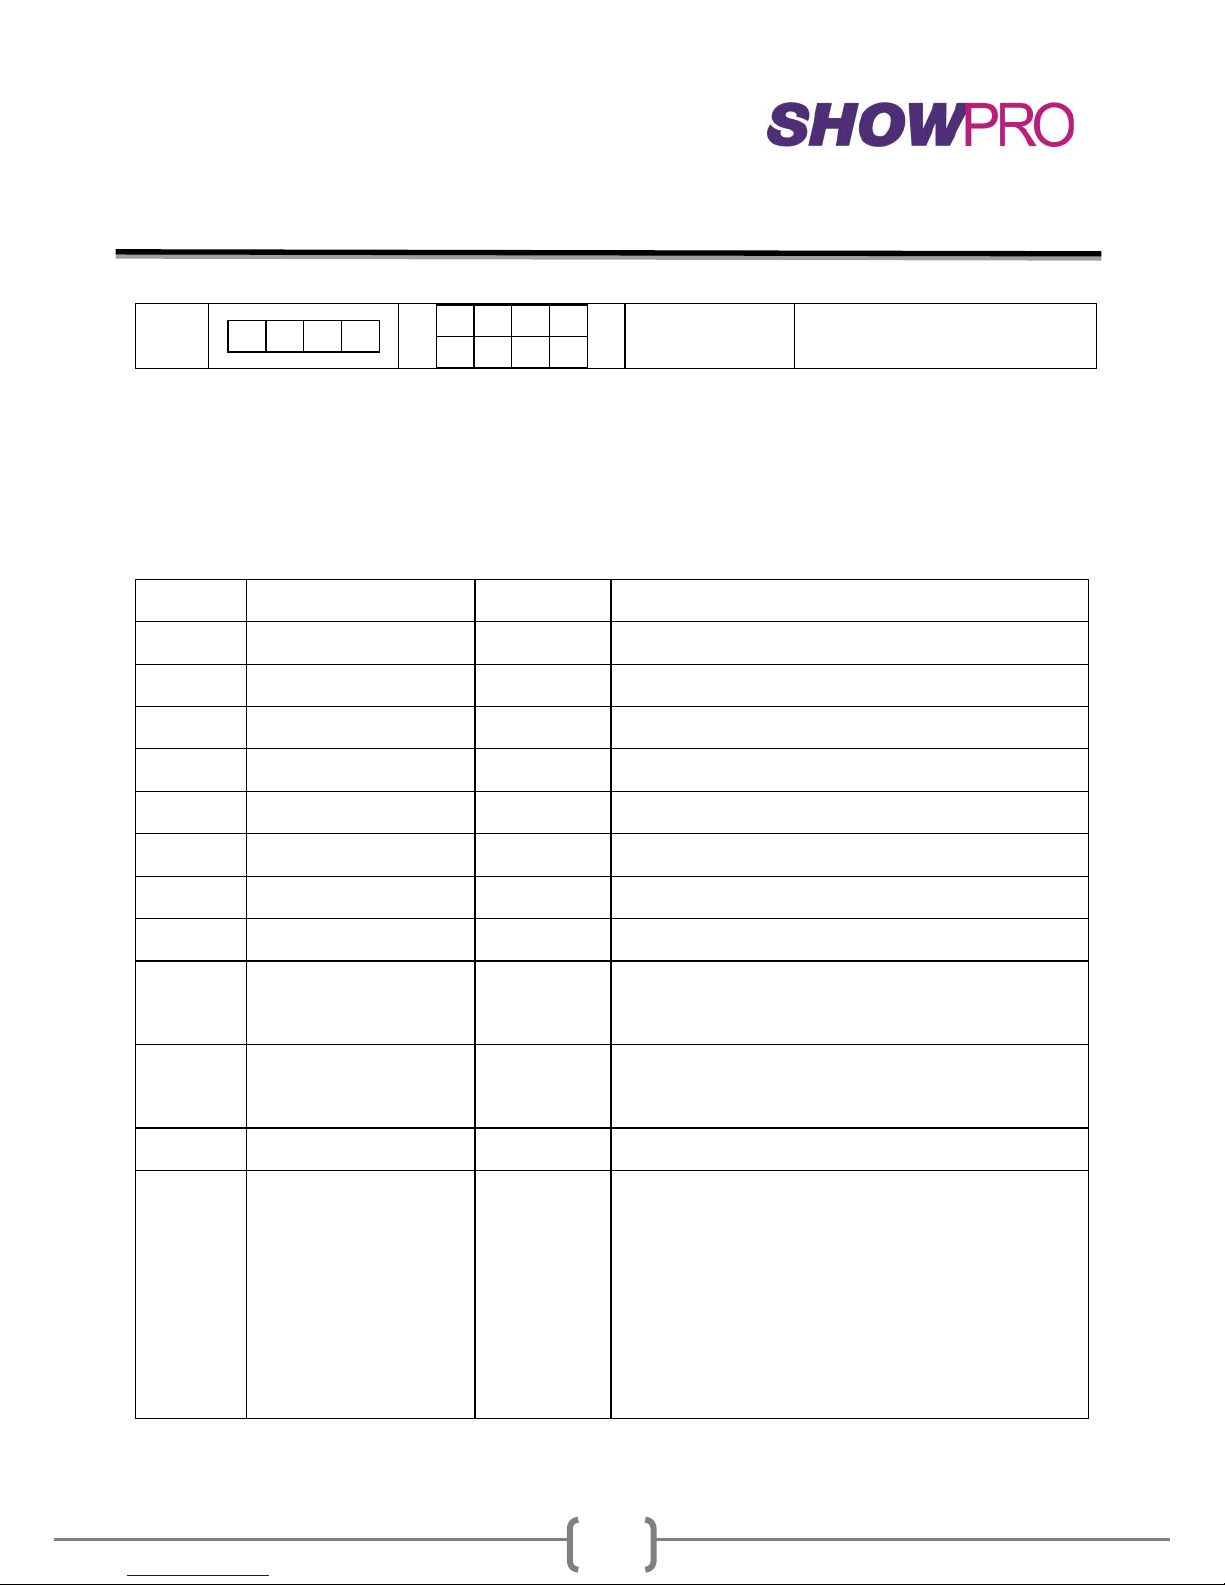
10
S E
T O n O F
F
Default:On
3.0 DMX Allocation
3-CH
Function
Value
Percent/Setting
1
Red
000-255
0~100%
2
Green
000-255
0~100%
3
Blue
000-255
0~100%
8-CH
Function
Value
Percent/Setting
1
Red
000-255
0~100%
2
Green
000-255
0~100%
3
Blue
000-255
0~100%
4
Color
000-015
016-255
No Function
Color Macros
5
Strobe
000-015
016-255
No Function
Strobe Slow to Fast
Programs Speed
000-255
Programs Speed Slow to Fast
6
Programs
000-031
032-063
064-095
096-127
128-159
160-191
No Function
0-100%
100%-0
100% -0-100%
Colors Fade
3Colors snap
Page 9

Truss Mate 2
9
192-223
224-255
7Colors snap
Sound Control
7
Dimmer
000-255
0~100%
8
Dimmer
speed
mode
000-051
052-101
102-152
153-203
204-255
Preset dimmer speed from display
menu
Dimmer speed mode off
Dimmer speed mode1 (fast speed)
Dimmer speed mode2 (middle
speed)
Dimmer speed mode3 (slow speed)
Page 10
Truss Mate 2
10
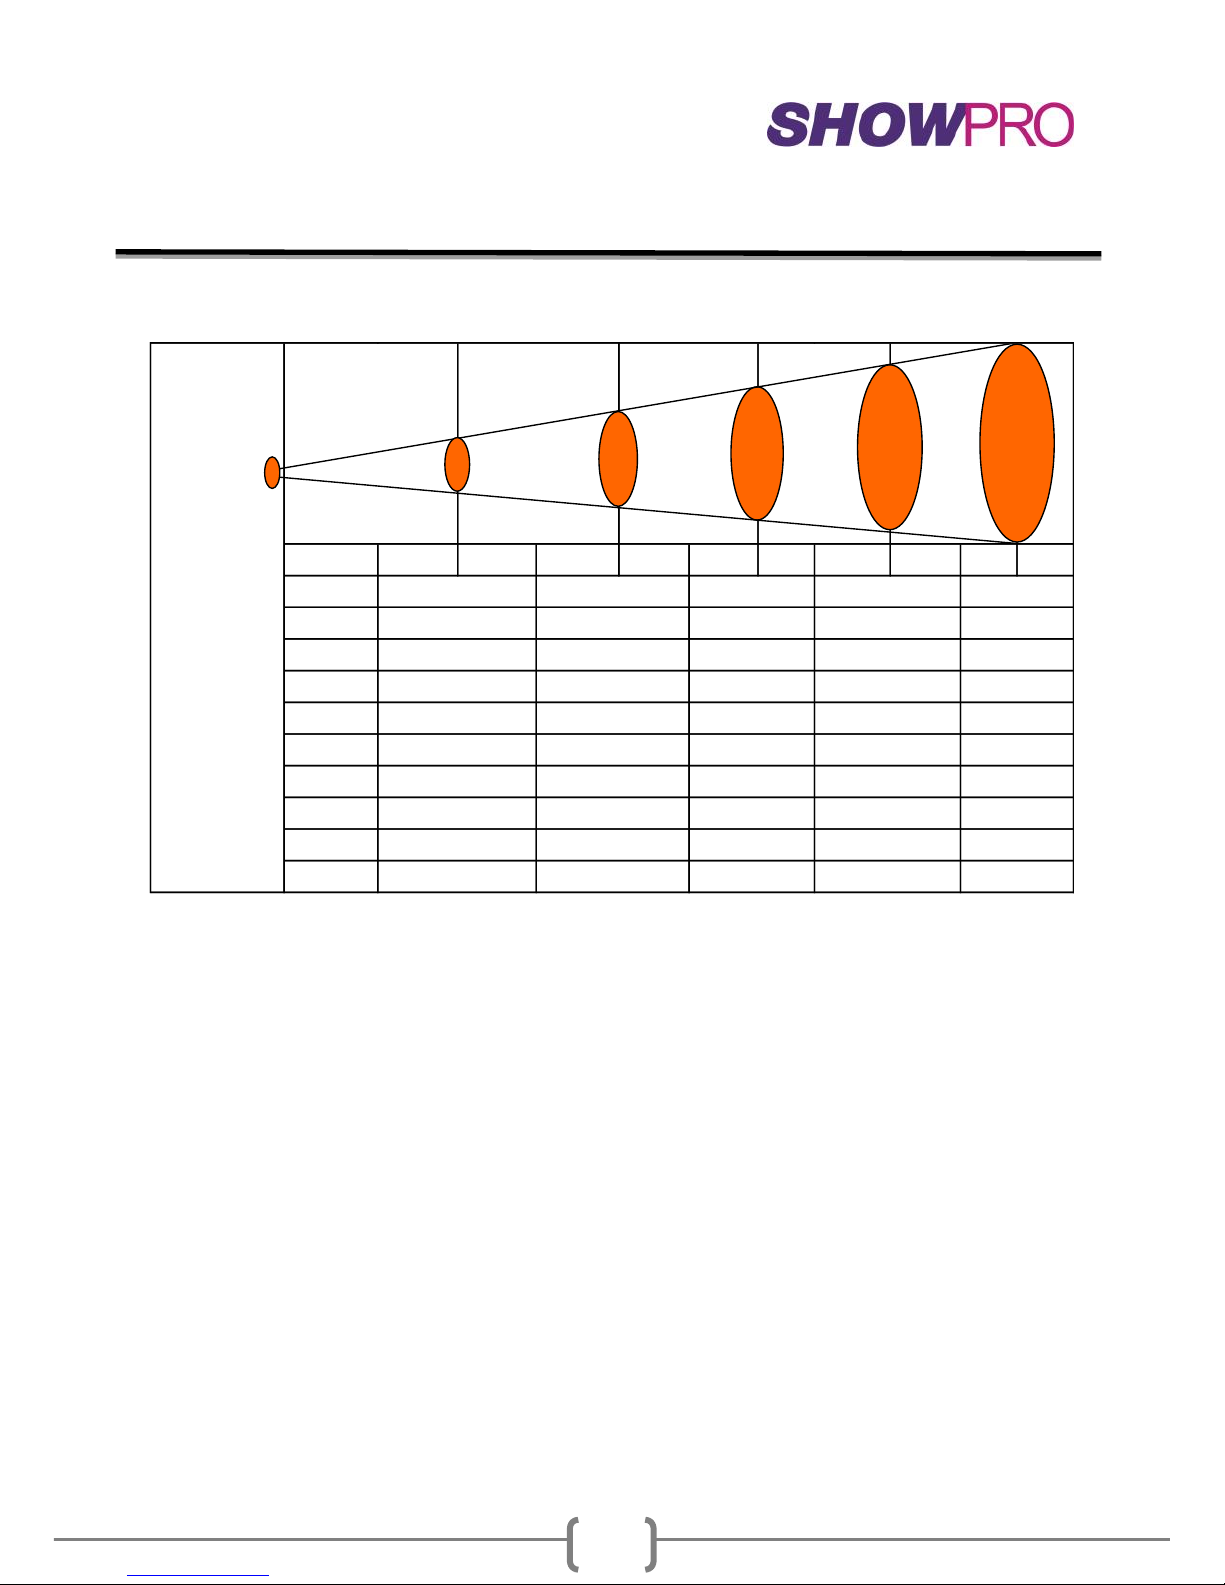
4.0 TECHNICAL SPECIFICATIONS
Color 1m LUX 3m LUX 5m LUX 7m LUX 10m LUX
R
G
B
A
W
P
RGB
RGBA
RGBW
RGBAWP
3024
311
114
250
27.1
10.6
1049
115
45
1767
187
74.3
Please note: Information is subject to change without prior notice ©
Power supply: 100 -240 V AC, 50/60 Hz ~
Fuse:T1A 250V
Power consumption: 13.6 W
Light Source: LED 3 IN 1 (3W 140°)
Beam Angle: 16°
Charging time 4.5h
Discharge: 6h (full Power)
Dimensions (LxWxH): 121.3 x 108.3 x 135.5 mm
Weight: 1.29kg
Maximum ambient temperature Ta: 45° C
Maximum housing temperature TC (steady state): 50°
Please note: Information is subject to change without prior notice ©
 Loading...