

Page 1
®
YA-V1924, YA-BKV1924, YA-GV1924 & YA-BLV1924
YA-V1924 Yamaha 2X4X74-1/2” Wide Frame - White
2 4300199 ST215/75R14C Tire/MSilver Dir Rim
1 62340 Literature Bag - Trailers
1 6555601 Frame Bundle - YAV1924
1 65558 Hdwe Bag - YAV1924 - Bulk
YA-BKV1924
2 4300199 ST215/75R14C Tire/MSilver Dir Rim
1 62340 Literature Bag - Trailers
1 6555603 Frame Bundle - YAV1924
1 65558 Hdwe Bag - YAV1924 - Bulk
Yamaha 2X4X74-1/2” Wide Frame - Black
YA-GV1924 Yamaha 2X4X74-1/2” Wide Frame - Galv
2 4300198 ST215/75R14C Tire/Galv Dir Rim
1 62340 Literature Bag - Trailers
1 6555600 Frame Bundle - YAGV1924
1 65558 Hdwe Bag - YAV1924 - Bulk
YA-BLV1924 Yamaha 2X4X74-1/2” Wide Frame - Blue
2 4300224 ST215/75R14C Tire/White Dir Rim
1 62340 Literature Bag - Trailers
1 6555619 Frame Bundle - YABLV1924
1 65558 Hdwe Bag - YAV1924 - Bulk
Tire Size & Carrying Capacity Chart
Tire Size: ST215/75R-14
Load Range: C
Carrying Capacity: 1870 lbs.
Approximate Tongue Weights for Best Towing:
Slide the water vehicle either forward or backward on
the trailer until the proper tongue weight has been
Axle Adjustment
achieved. Tongue weight should be 5% to 7% of the
Refer to the tire side wall of proper tire pressure.
Midwest Industries, Inc. Ida Grove, IA 51445 (800)859-3028 www.shorelandr.com M305165
total gross weight of the trailer and boat combined.
Page 1
REV A
Page 2
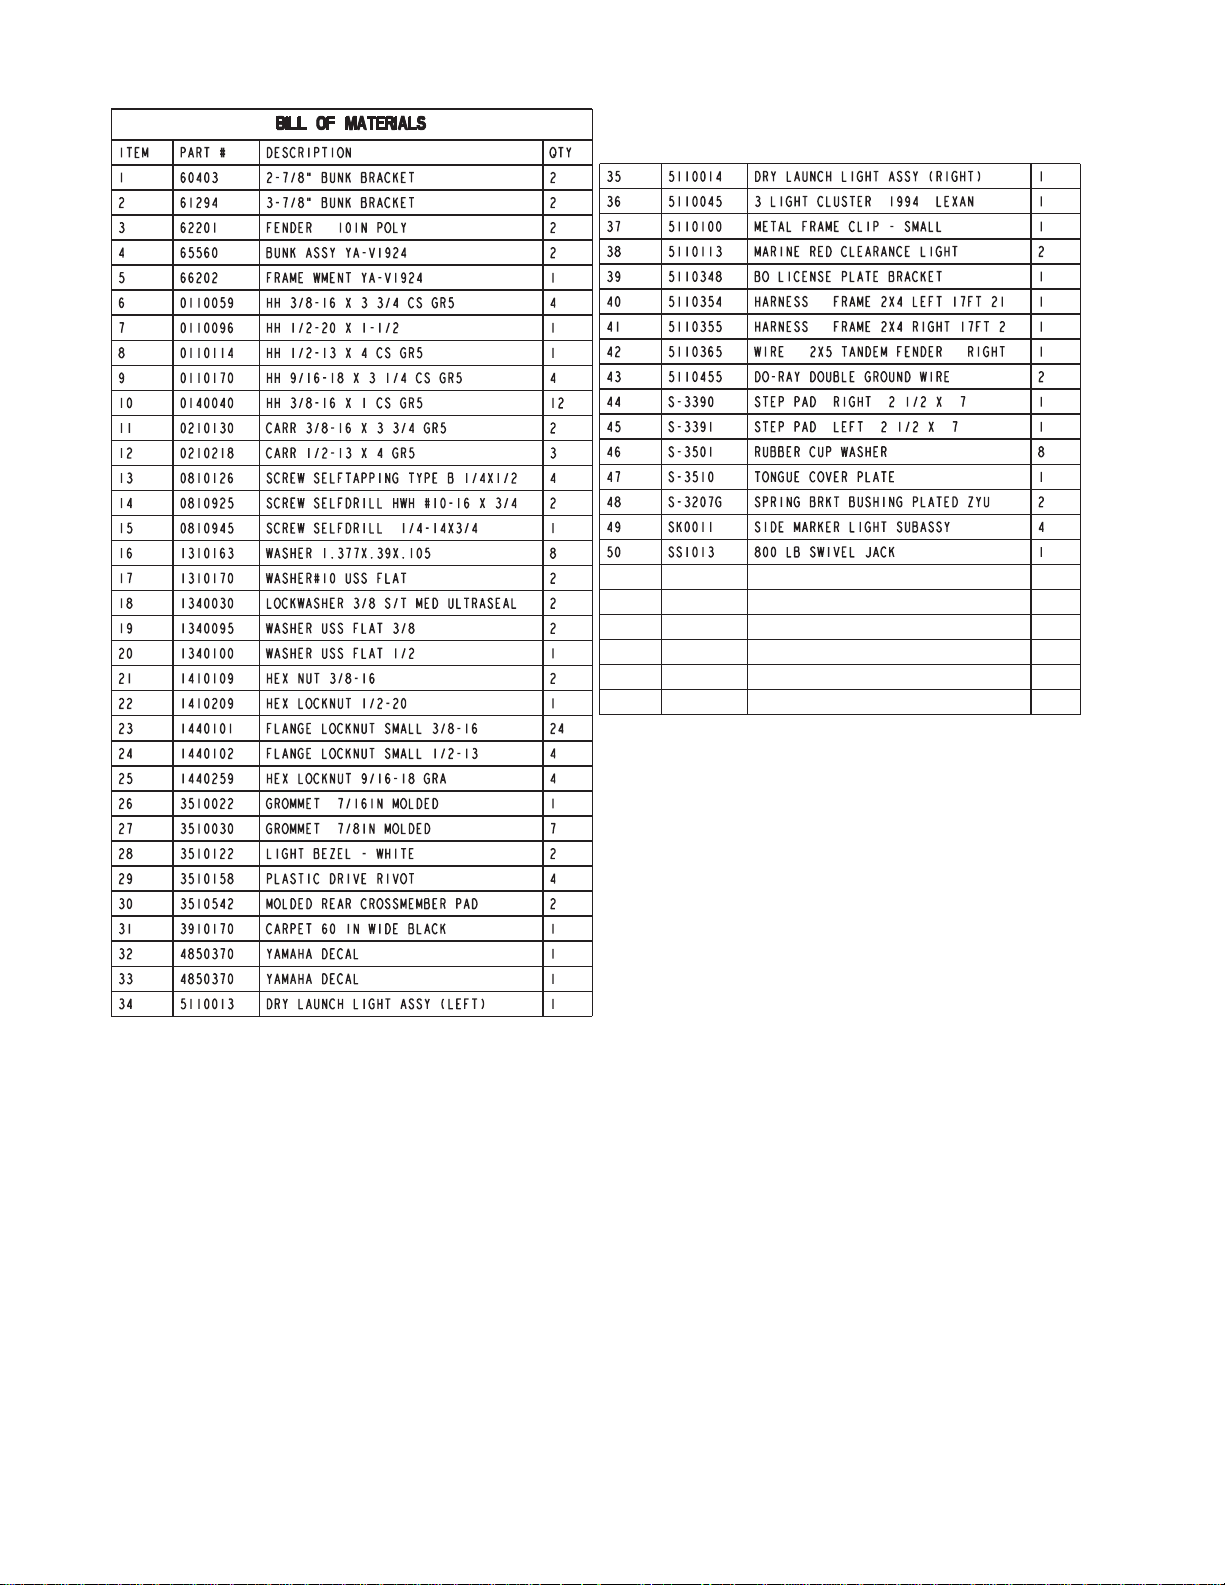
Bundles/Kits:
SS734 1-3/8” X 1-1/16” Hub & Bearing Kit
BK-4 1-3/8” X 1-1/16” Bearing Kit
65560-- Bunk Assembly - YAV1924
65710-- Axle Assembly - YAV1924
66316-- Winch Assembly - YA Hole A-5
66386-- Tongue Assembly - YAV1924
Decals:
4850360 NMMA Certified Trailer Decal .......... 1
4810709 Trailer Caution/Warn Decal.............. 1
4850370 Decal - Yamaha Product ................. 2
4811349 Decal - Profile 2000 ........................ 2
4811358 Decal - Clr w/Blk Ltrs Profile 2000 .. 1
NOTE: ShoreLand’r offers their product line in either
galvanized or a painted finish. When ordering parts it
is important that you specify the finish or color you have
on your product. The five (5) digit number along with a
two (2) digit space _ _, notes the parts which can be
purchased with various finishes. When ordering these
items use the five (5) digit prefix and include the following two (2) digit suffix for proper finish.
Suffix Finish/Color
00 or G Galvanized
01 Arctic White
19 or BL Blue
Midwest Industries, Inc. Ida Grove, IA 51445 (800)859-3028 www.shorelandr.com M305165
REV A
Page 2
Page 3
Midwest Industries, Inc. Ida Grove, IA 51445 (800)859-3028 www.shorelandr.com M305165
REV A
Page 3
Page 4

Midwest Industries, Inc. Ida Grove, IA 51445 (800)859-3028 www.shorelandr.com M305165
REV A
Page 4
Page 5

Midwest Industries, Inc. Ida Grove, IA 51445 (800)859-3028 www.shorelandr.com M305165
REV A
Page 5
Page 6

Midwest Industries, Inc. Ida Grove, IA 51445 (800)859-3028 www.shorelandr.com M305165
REV A
Page 6
Page 7

Midwest Industries, Inc. Ida Grove, IA 51445 (800)859-3028 www.shorelandr.com M305165
REV A
Page 7
Page 8

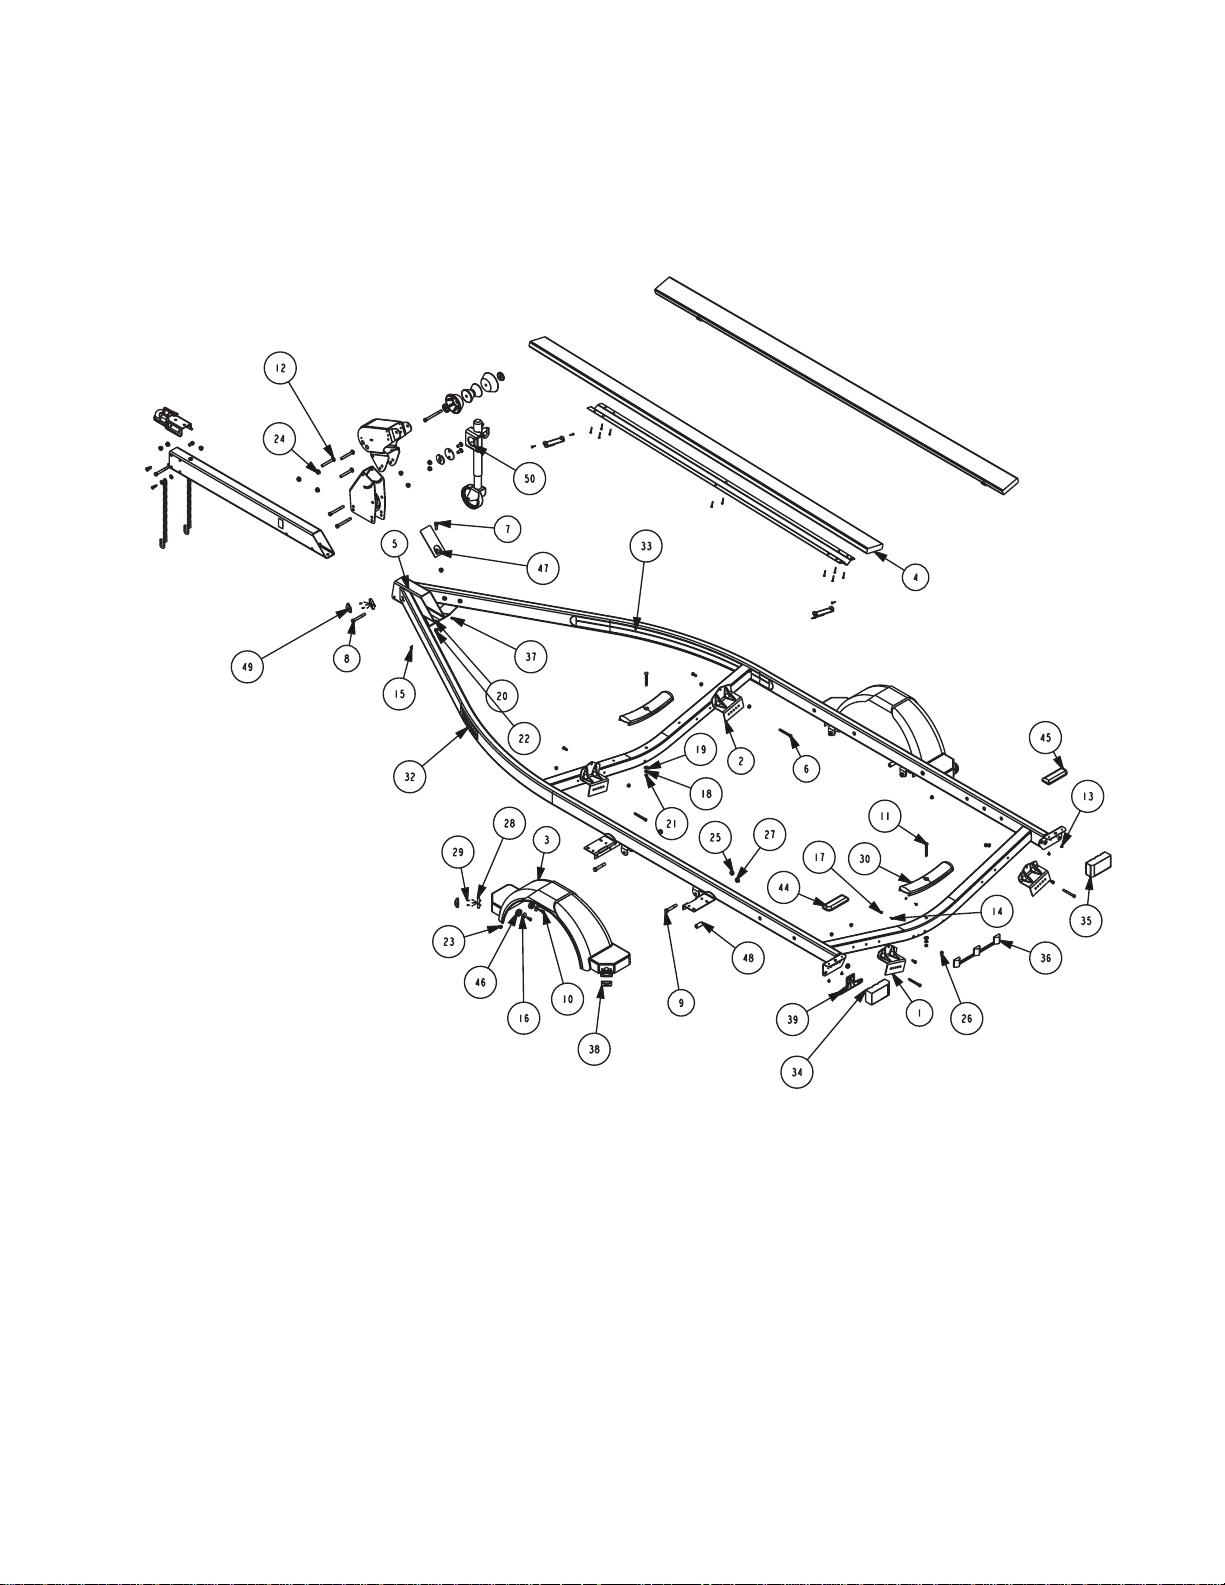
Final Assembly Instructions:
Remove the small parts from the frame by cutting the
bands. Remove the bolt bag and sort all nuts and bolts
by size.
on top of the spring under the u-bolts. Install the spring
plate under the axle. Tighten the 1/2” flange lock nuts
evenly.
Tongue:
Install the tongue into the nose cone of the trailer frame.
Thread the tongue harness through the tongue cover.
Secure the tongue plate cover and the rear of the tongue
with a 1/2” X 1-1/2” hex bolt, 1/2” flat washer and 1/2”
flange lock nut. Secure the front of the tongue channel
to the tongue with a 1/2” X 4” hex bolt and 1/2” flange
lock nut. Tighten both bolts. Tighten bolts but do not
over tighten. Match the tongue harness wires with the
correct frame harness wires and plug in. Ground the
grounding wire (white wire with ring) to the tongue cap
plate using a 1/4” X 3/4” self drill screw. Wiring
is complete.
Safety Chain:
Insert a 3/8” X 1-1/4” hex bolt with a 3/8” flat washer
and safety chain through the lower hole on the front of
the tongue. Secure with a 3/8” flat washer and 3/8”
flange lock nut. Repeat procedure on the opposite side
of the tongue.
Coupler:
Mount the coupler to the tongue with one (1) 1/2” X 4”
hex bolt and two (2) 1/2” X 1” hex bolts. Secure with
1/2” flange lock nuts. Refer to the parts drawing for
placement.
Winch Stand:
Secure the winch stand to the tongue with a 1/2” X 4”
carriage bolt and 1/2” flange lock nut. Install the winch
handle on the winch and secure with the special hardware provided with the winch.
Axle:
Place one of the spring bushings into the rear of the
spring bracket and secure with a 9/16” X 3-1/4” hex
bolt and lock nut. Position the axle under the frame,
then hook the spring loop around the bushing already
installed. Raise the axle assembly up so that the front
of the springs line up with the front spring bracket hole.
Insert the two (2) 9/16” X 3-1/4” hex bolts and lock nuts.
Tighten all nuts and bolts but do not over tighten. Allow
the springs room enough to move.
Move the tire and rim using 80-90 ft. lbs. torque on the
lug nuts using a proper tightening procedure.
Bunk Assembly:
Mount the bunk assemblies to the fixed bunk bracket
on the frame using 3/8” X 1” hex bolts and secure with
3/8” flange lock nuts.
Caution:
1. To prevent damage to the water vehicle hull, place
the water vehicle on the trailer, loosen the 3/8” X 1” hex
bolts so that the bunks conform to the hull of the water
vehicle. Tighten the 3/8” X 1” hex bolts. (Do not overtighten - bunks must pivot.)
2. To prevent damage to the trailer, water vehicle or
towing vehicle, tighten all fasteners before towing.
3. The law requires that the white wire on both the
tongue and the tow vehicle wire harness be grounded
to the trailer and towing vehicle.
Springs:
Mount the springs to the axle with two (2) 1/2” X 6-1/2”
axle u-bolts from the top down. Install the spring clamp
Midwest Industries, Inc. Ida Grove, IA 51445 (800)859-3028 www.shorelandr.com M305165
REV A
Page 8
 Loading...