

Page 1
ACCESS ORY
TA1066
Pontoon/Tritoon Kit
REMOVING THE TONGUE OF THE EXISTING TRAILER
Disconnect the tongue harness from the side frame harnesses and
ground wire.
Disconnect the tongue brake line from the tube coupling that connects to the frame brake line.
TA1066 ASSEMBLY INSTRUCTIONS
The TA1066 kit is used to convert a standard pontoon trailer that
is already assembled in the field to a Tritoon trailer. The item that
makes this kit unique from the TA1067 is the tongue assembly for
this trailer is already installed and will have to be removed and
replaced with the longer Tritoon tongue supplied with the kit. It is
accomplished as follows:
Midwest Industries, Inc. Ida Grove, IA 51445 800.859.3028 www.shorelandr.com 0003600
Page 1 11/17/05
Remove bolt holding tongue cover and rear of tongue. Also remove
cross bolt from tongue channel. Remove the tongue and place on
saw horses.
Remove the bolts holding the actuator housing to the tongue and
slide off the end of the tongue. Disconnect the tongue brake line
from the actuator.
Remove the safety chains.
Page 2
INSTALLING THE NEW TRITOON TONGUE
Insert the new Tritoon tongue into the frame where the tongue was
just removed. Note that this tongue is cut at the opposite angle
and will extend out the rear of the tongue channel when properly
installed. Align the holes in the tongue with the holes in the tongue
channel.
Secure it in place by using the ½” x 4” cross bolt and ½” x 1-½” hex
bolt removed while disassembling the old tongue. Secure with ½”
flange lock nuts. Tighten.
Uncoil the 107” brake line supplied in the kit, and then insert it into
the front of the tongue until it comes out the rear of the tongue.
Locate the longer wire harness supplied in the kit. Insert the end
with the mating plugs to the frame harnesses into the hole in the top
of the tongue, and then route it backwards through and out the rear
of the tongue. Mate the plugs with the side frame harnesses and
plug together. Insert the rubber grommet around the wire harness
where it comes out of the top of the tongue. Attach the white ground
wires to the frame using the screw removed when disassembling
the old tongue.
Locate the actuator removed earlier. Thread the brake line inserted
into the tongue in step 3 into the port in the rear of the actuator.
Tighten.
Position the actuator on the tongue. Secure it in place with the 1/2”
x 4” hex bolts removed from the other tongue. Secure in place with
½” flange lock nuts. Tighten.
Carefully form the rear of the brake line coming out the rear of the
tongue so it can mate to the coupling attached to the side frame
brake line. Thread the brake line into the coupler. Tighten.
Midwest Industries, Inc. Ida Grove, IA 51445 800.859.3028 www.shorelandr.com 0003600
Page 2 11/17/05
Page 3

Note that the brake system will have to be re-bled using the proper
bleeding method as described in the brake manuals to remove any
air the may have entered the system during the removal and assembly process.
Secure the safety chains using the ½” bolt, washers, and flange
lock nut in a similar manner as they were attached to the tongue
removed earlier.
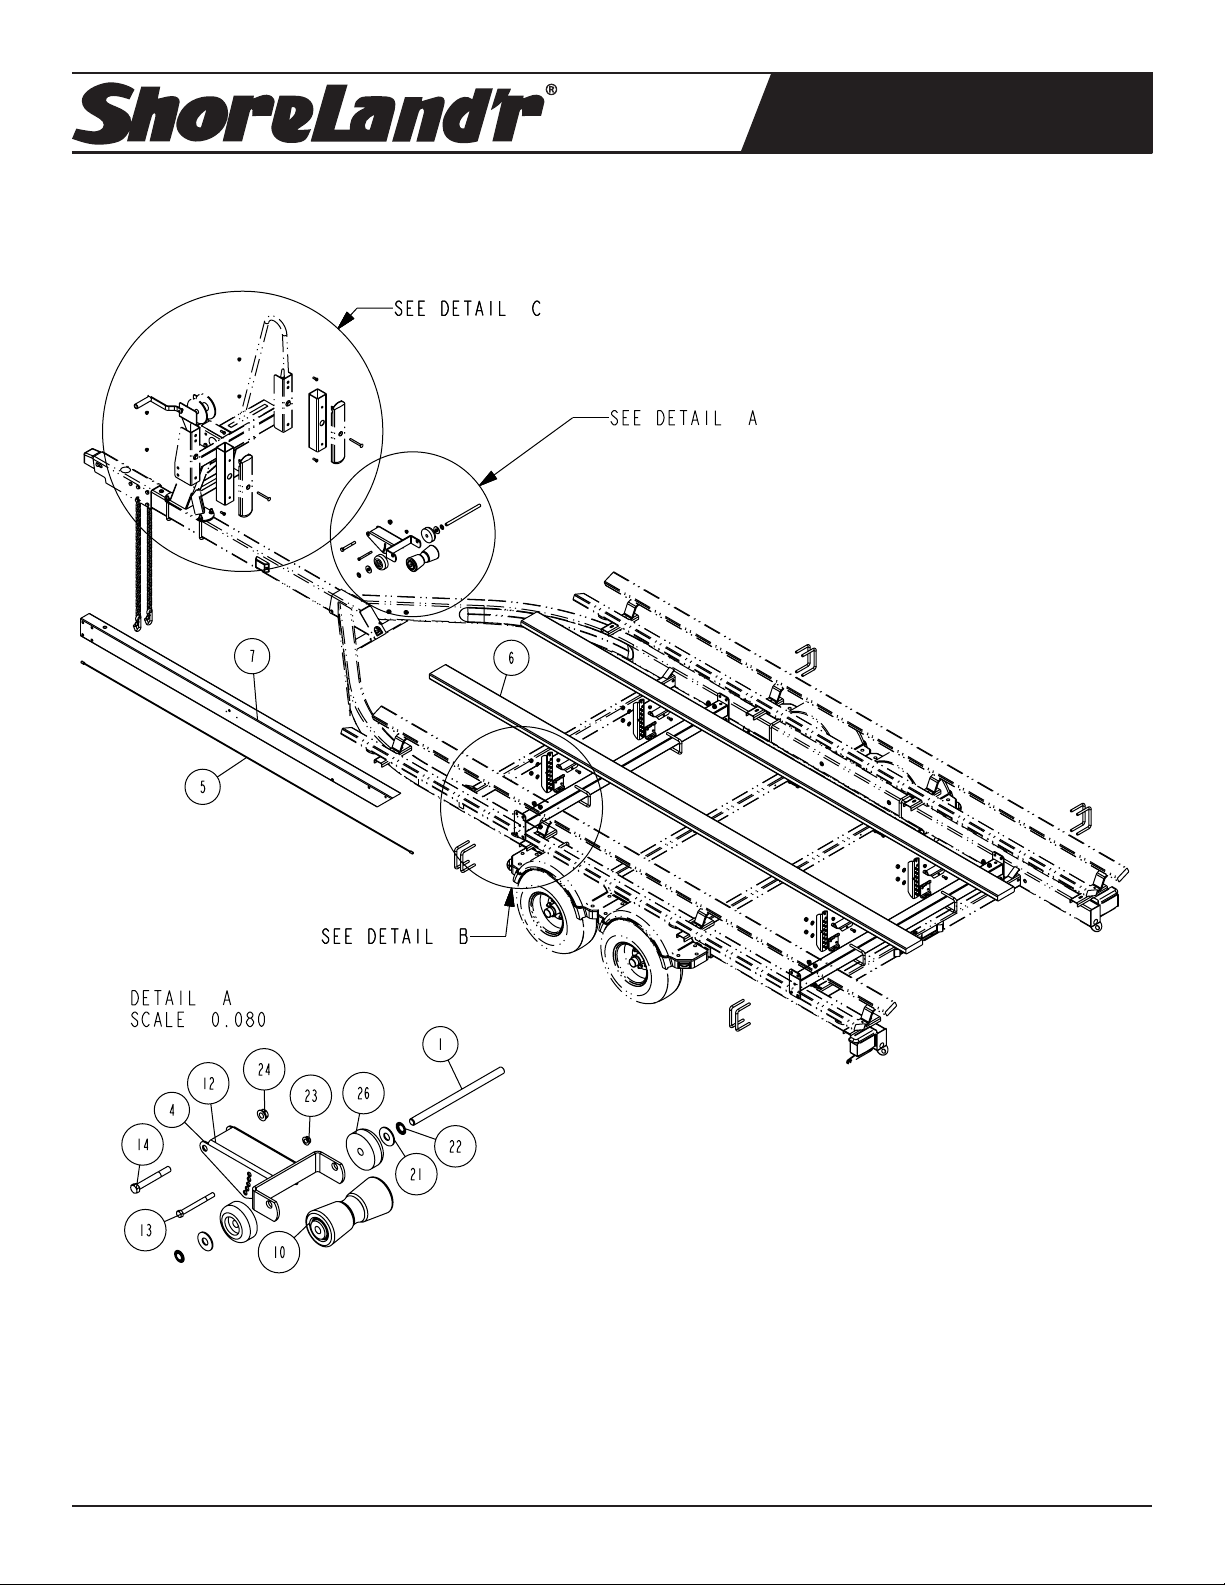
REAR TONGUE ROLLER ASSEMBLY
Locate the tongue roller assembly that will be attached to the rear
of the tongue. Align the holes in the assembly with those drilled in
the rear of the tongue. Attach it to the tongue using a ½” x 4” hex
bolt in the pivoting hole of the bracket. Secure with a ½” flange lock
nut. Tighten but do not over tighten because this roller assembly
must pivot to fit the center pontoon tube once the boat is placed
on it.
Repeat the process in step 5 on the front bracket.
Repeat this process on the bunk on the other side of the trailer.
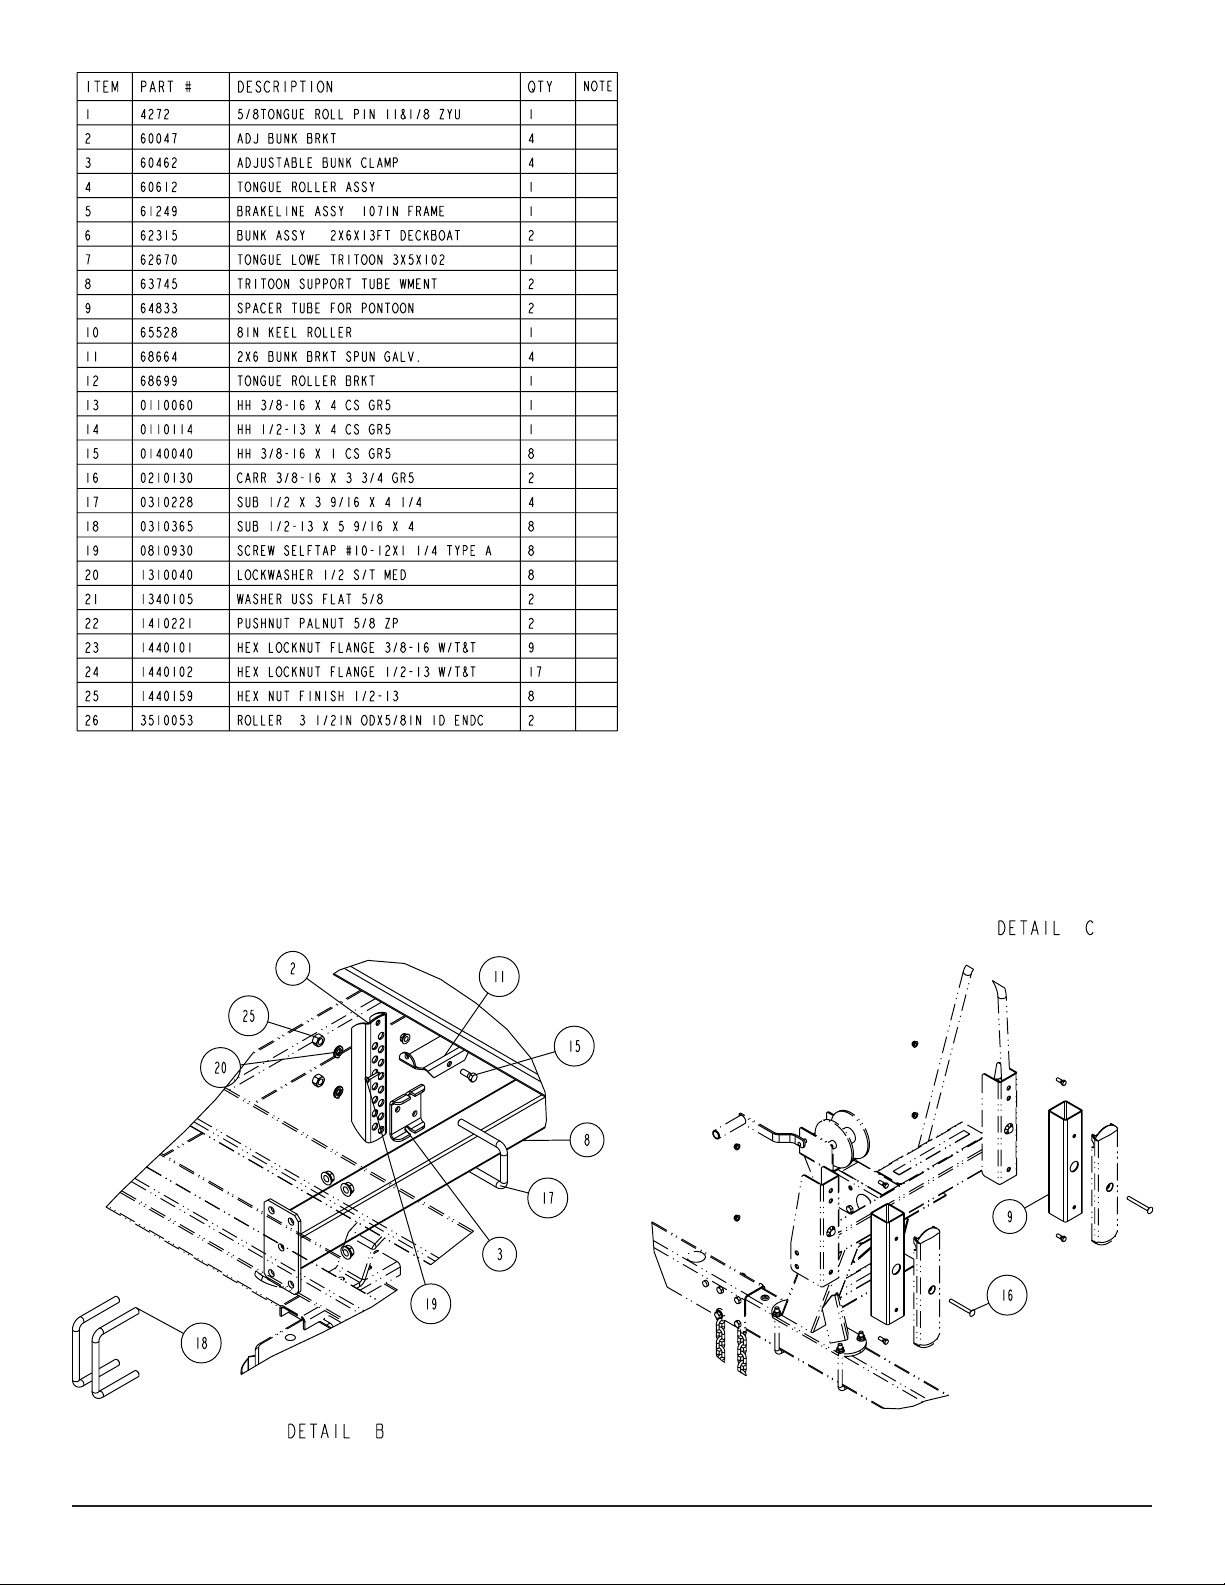
BOW STOP ASSEMBLY
Remove the plastic pads from the winch post. Locate the spacer
tubes provided, and then position one of them so it will be between
the plastic pads just removed and the winch post from which it was
just removed. Attach the tube in place using two 3/8” x 1” hex bolts
on each end of the tube spacer. Secure with 3/8” flange lock nuts.
Attach the plastic pad to the tube spacer using a 3/8” x 3 ¾” hex
bolt and cupwasher, flat washer, lock washer and hex nut.
Tighten the nuts just installed.
Repeat the above process on the remaining plastic pad.
Place a 3/8” x 4” hex bolt in the remaining hole attaching the assembly to the tongue. Position the roller assembly so it is in its lowest position. Leave the bolt loose for now until the final adjustments
are made.
TRITOON SUPPORT TUBE WELDMENTS
Locate the two support tube weldments. Place one at the rear of
the trailer just ahead of the rear cross member. Attach it to the side
frames using ½” x 5 9/16” x 4” U-bolts and ½” flange lock nuts.
Square with the side frames, and then tighten in position.
Place the second support tube weldment 90” forward from the rear
one just installed. (See diagram for approximate placement). Attach it to the side frames using ½” x 5 9/16” x 4” U-bolts and ½”
flange lock nuts. Position the support tube weldment so it is square
in the frame. Tighten.
Place a ½” x 3 9/16” x 4 ¼” square U-bolt around the support tube
weldment just installed so the U-bolt legs are pointing to the front
of the trailer. Locate one of the adjustable bunk brackets. Position
it on the front side of the support tube weldment, align a pair of the
lower adjustment holes with the legs of the U-bolt and then slide
over the U-bolt legs. Next place on a ½” lock washers and hex nuts.
Turn the nuts until they are finger tight only because they will need
to be readjusted when the boat is put on the trailer. Repeat this
process on the remaining brackets.
ADJUSTING INSTRUCTIONS
Place the pontoon on the trailer so the outside tubes are properly
supported. Once the boat is positioned properly front to rear, adjust
the winch post to the pontoon. Attach the winch strap into the bow
eye and tighten. Then tighten the U-bolts securing the winch post
to the tongue.
Slide the tritoon bunks inward until there are in a location where
they will support the tritoon tube. It may be necessary to raise the
bunks up to another hole in the adjustable bunk brackets so they
are high enough to reach and support the tube. Once the proper
hole is determined and they are slid into position, secure them to
the support tube weldments by tightening the U-bolts.
Adjust the roller bracket assembly up by removing the 3/8” x 4” hex
bolt left loose when it was assembled. Rotate the roller assembly
upward in the rear until it contacts the tube. The roller can add extra
support to the tube. If it does not reach the tube, place the 3/8” x
4” hex bolt in the highest position that you can. The main objective
of the roller is to keep the tube from contacting the tongue when
loading and unloading.
Attach the bunk brackets to the top of the adjustable bunk brackets
using 3/8” x 1” hex bolts and lock nuts. Tighten but do not over
tighten because they must be allowed to pivot so the bunks can
conform to the pontoon tube.
Place one of the carpeted bunks on the top of the bunk brackets
on one side of the trailer just installed so that the rear of the bunk is
even with the rear of the other bunks on the trailer (Approximately
22” behind the bunk bracket). Tap the bunk until it is completely
down into the bunk bracket. Secure the bunk in place using two-No.
10 x 1 ¾” Phillips head screws.
Midwest Industries, Inc. Ida Grove, IA 51445 800.859.3028 www.shorelandr.com 0003600
Page 3 11/17/05
Page 4

Midwest Industries, Inc. Ida Grove, IA 51445 800.859.3028 www.shorelandr.com 0003600
Page 4 11/17/05
 Loading...