

Page 1
MC2000-03 / MC2000A-03
Motorcycle Trailer, V-Twin
MC2000-03 Motorcycle Trailer V-Twin
4300254
6845603 Frame Bundle MC V-Twin
3510039 Axle Dexter Torsion MC Trailer
6845703 Hardware Box MC V-Twin
65069 Lit Packet - ShoreLand’r
3310050 Jack 800 lb. Swivel
ST215/75R14C GY OWL Mod Rim Chrome
MC2000A-03 Motorcycle Trailer V-Twin
4300227 ST215/75R14C GY OWL Alum Star Rim
6845603 Frame Bundle MC V-Twin
3510039 Axle Dexter Torsion MC Trailer
6845703 Hardware Box MC V-Twin
65069 Lit Packet - ShoreLand’r Utility
3310050 Jack 800 lb. Swivel
Midwest Industries, Inc. Ida Grove, IA 51445 800.859.3028 www.shorelandr.com M312045
MC2000-03 / MC2000A-03 Specifications:
Capacity: 2000 lbs.
GVWR: 2995 lbs.
GAWR: 2995 lbs.
Ship Wt: 994 lbs.
Frm Size: 2X4 (11 Ga)
Tire Size: ST215/75R14-C
Rim Size: 14 X 6 Alum.
Brake: Disc (Optional)
Coupler: 2” Class III
Safety Chn: Class III 5000 lb.
Suspension: Torsion
Tongue Size: 3X3X10 ga. X 9’-3”
Page 1 of 6
Page 2
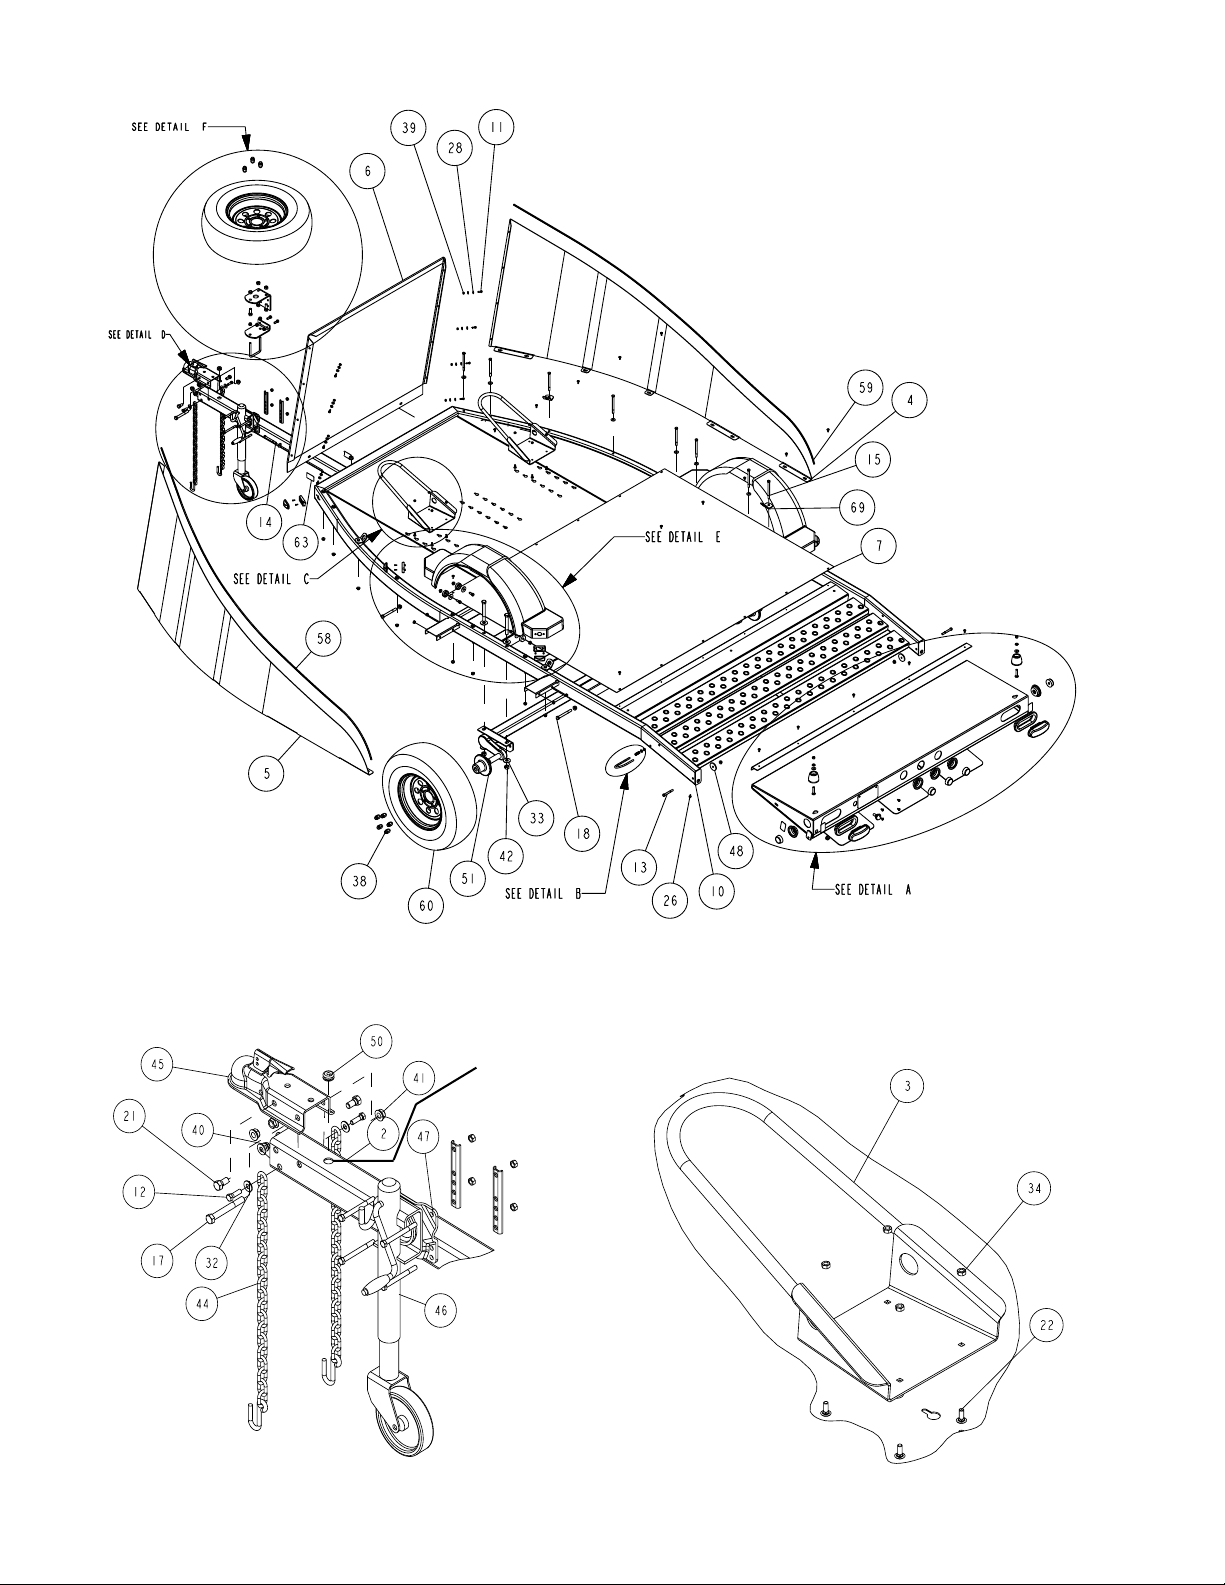
Diagram A
Insert the tongue wire harness down
inside the tongue through this hole.
Detail D
Midwest Industries, Inc. Ida Grove, IA 51445 800.859.3028 www.shorelandr.com M312045
Detail C
Page 2 of 6
Page 3

MC2000-03 MOTOR CYCLE
TRAILER, V-TWIN
Position it under the frame so that the
axle end units that have the spindles
after 50 miles of driving and then
periodically thereafter.
welded to them is pointing towards the
Two people are required to properly
assemble this trailer.
CARE MUST BE TAKEN NOT TO
SCRATCH OR DAMAGE THE SIDE
SHIELD PANELS WHEN REMOVING
THEM FROM THEIR SHIP POSITION AND
INSTALLING THEM ON THE TRAILER.
Carefully remove the banded parts and
hardware bag from the frame bundle.
Sort all the items in the hardware bag
by size.
ASSEMBLY INSTRUCTIONS
Axle Assembly
Place the frame on four sawhorses or
something comparable in height and
strength for the assembly process.
Locate the torsion axle assembly.
rear of the trailer as shown in Diagram
A. Place a 5/8” flat washer on each of
the four 5/8” x 5-1/2” hex bolts and drop
them in the holes in the side frames as
shown in Detail E on page 4. (See Item
# 9). With a jack, hoist, or two people,
raise the axle assembly up under the
bottom side of the trailer frame. Align
the holes in the axle mounting brackets
with the
5/8” x 5-1/2” bolt just installed. Place on
another 5/8” flat washer and secure with
5/8” hex flange lock nuts. Tighten.
Tire and Wheel Assembly
Mount the tire and wheel assemblies
using the 1/2” fine threaded tapered lug
nuts provided. Tighten to 80-90 ft/lb. of
torque using the rotation pattern as
shown in the ShoreLandr’s Owners
Manual. Re-torque the lug nuts
Tongue Assembly
Locate the tongue wire harness in the
hardware bag and unwind. Locate the
four-prong end of the harness. This end
of the harness will plug into the trunk
harness of the tow vehicle. Place the
other ends of the harness into the hole
in the top of the tongue located just
behind where the coupler is to be
mounted. See Detail D. Route the wire
backward in the tongue approximately
42 inches and then bring the harness
back out of the hole provided in the top
of the tongue at this location. Pull the
wire harness out the this hole
approximately 8 inches at this time
which should be plenty harness to make
the connection with the frame harness
later.
Place the coupler on the end of the
Midwest Industries, Inc. Ida Grove, IA 51445 800.859.3028 www.shorelandr.com M312045
Page 3 of 6
Page 4

tongue and align the holes. Place a 1/2” x 4 hex bolt into the
rear hole of the coupler and secure with a 1/2” flange lock
nut. Place a 1/2” x 1” hex bolt into the front hole on one side
of the coupler and tongue and secure with a 1/2” hex flange
lock nut. Repeat this on the other side of the tongue. Tighten
all bolts at this time.
Safety Chains
Place a 3/8” flat washer on a 3/8” x 1-1/4” hex bolt, the insert
the bolt into the last link of one of the safety chains. Attach
the safety chain to the tongue by then inserting the bolt into
the hole provided in the side of the tongue as shown in Detail
D. Place another flat washer on the bolt on the inside of the
tongue and secure with a 3/8” hex flange lock nut. Tighten.
Repeat this process on the other side of the tongue.
Attaching the tongue assembly to the frame.
Place the tongue assembly under the front of the trailer. Align
the tongue with the mounting channels on the frame. Raise
the tongue into position and secure to the frame using
two- 1/2” x 4-1/2” hex bolts and hex flange lock nuts. Tighten.
Once the tongue is installed in its permanent position the
wire harness can now be connected to the frame harness.
Match the tongue harness wire colors with those in the frame
harness and plug the two together. Attach the white ground
wire from the tongue harness to the frame with a 1/4” x 3/4”
self-tapping screw. Note that a pilot hole is provided for this
screw. It is located approximately 3” of the right of the tongue
and on the back side of the front cross member of the frame.
Once it is installed, all excess wire harness can be pushed
into the hole on the top of the tongue. Place one of the
rubber grommets provided into the hole on the top of the
tongue to shield the wire harness from any sharp edges. The
second rubber grommet can now be placed in the hole on
the top side of the tongue located just behind the coupler.
Detail F
Detail E
Midwest Industries, Inc. Ida Grove, IA 51445 800.859.3028 www.shorelandr.com M312045
Page 4 of 4
Page 5

Side Panels and Front Shield
Locate the 16- 3/8” x 5” hex bolts provided in the hardware
bag. Next locate the four tie down brackets also supplied in
the hardware box. Insert four of the bolts through the smaller
hole in the tie down brackets so the bent leg of the bracket
will point upward along side the head of the bolt. Place a 3/8”
flat washer also provided on the balance of the bolts just
mentioned.
matching the next pair of holes upward in the panels and
securing them together with the 1/4” x 3/4” bolts provided
using the process just described for the bottom holes.
Repeat this process until all four of the bolts have been
installed on each side panel.
Once all of the bolts have been installed, all bolts attaching
the side and front panels together and to the trailer can be
tightened.
With the assistance of another person raise one of the side
panels into position on the top side of the trailer side frame.
Starting on the back end of the side panel, align the slotted
holes in the formed over mounting legs of the side panel with
the holes provided in the trailer side frame. While one person
holds the side panel in its proper position, the other person
will place in the attaching bolts. Beginning at the rear of the
side panel, the first bolt to install will have one of the tiedown
brackets on it. Insert this bolt assembly down through the
rear slotted hole in the formed tab of the side panel, then
down through the holes provided in the side frame. Once the
bolt is fully inserted, secure it on the bottom side of the frame
with a 3/8” hex flange lock nut. DO NOT TIGHTEN.
Insert one of the 3/8” x 5” hex bolts with the flat washer in the
next slotted hole forward in the side panel. Place it down
through the frame and secure with a 3/8” hex flange lock nut
as on the first bolt. Continue to move forward placing three
(3) more bolts with flat washers (total of (four) 4) in the other
slotted holes. As you move forward on the side panel it will
have to be pushed inward to the centerline of the trailer to
align the holes in the side panel with the holes in the frame.
Once a total of four bolts with flat washers are installed, the
next bolt has to be one with a tie down bracket on it. This is to
be positioned as the sixth bolt from the rear or else the third
position from the front. Note that this is only a recom-
mended position that will work on most bikes. It may be
placed either forward or backward to best adapt to your
bike and its tie-down location. Continue to place in the
remaining bolts with flat washers until all eight (8) bolts holding the side panel to the frame are installed.
Remove the chrome edge trim from the hardware box and
unwind. This trim is to be placed on the edge of the side
panels not only for appearance but also for protection when
you lean over the panel. Pry one end of the trim open just
enough so that it can be started on the edge of the side panel.
Starting at the front of the side panel where it connects to the
front panel, slip the edge trim onto the side panel. Slowly slip
the edge trim onto the edge pushing it completely down over
the side panel as you move towards the rear. The edge trim
has an adhesive inside so once it is pushed completely over
the side panel it will begin to adhere itself. Cut off any excess
edge trim that you may have once you reached the rear end
of the side panel. Repeat this process on the other side panel.
Tailgate Bumpers
Locate a 3/8” x 2” carriage bolt. Insert it into one of the rubber
bumpers as shown in Detail A on page 6. Next place on a flat
washer, lock washer and hex nut. Thread nut on only enough
to start on the threads so it don’t come off when handling.
Position the assembly as shown in Detail A. Align the square
portion of the carriage bolt head with the slot in the tailgate.
Insert the carriage head bolt into the round portion of the key
hole slot, then slide the square of the bolt head into the long
portion of the key hole slot.Raise the assembly matching the
square of the bolt with the slot while you tighten the hex nut
on the bolt to secure in this position.
Repeat this process on the other bumper assembly.
Wheel Chocks
Repeat the above process on the other side panel.
Locate one of the wheel chocks that is shipped with the trailer.
Place a 1/4” x 3/4” carriage bolt in each of the four holes from
Locate the front panel. Place a flat washer on two (2) 3/8” x
3-3/4” hex bolts. Align the slotted holes in the front panel with
the bottom side as shown in Detail C. Place a 1/4” hex lock
nut on each of the bolts just installed.
the holes in the front cross member of the welded frame and
insert the two (2) 3/8” x 3-3/4” hex bolts. Secure with 3/8”
hex flange lock nuts. DO NOT TIGHTEN.
The wheel chock assembly will fit on either side or else on
the centerline of the trailer. It is also adjustable front to rear in
either location depending on which holes it is mounted in.
Attach the side panels to the front panel with the 1/4” x 3/4”
hex bolts provided. Place a flat washer on one of the 1/4” x
3/4” hex bolts. While one person moves the front panel either
forward or backward to align the bottom hole in the front panel
with the mating hole in the side panel, a second person will
Note that the axle on the trailer is not adjustable for tongue
weight. The tongue weight of the trailer is controlled by the
placement of the motorcycles on the trailer. Select the proper
location that will give you the best fit for your motorcycle and
give you the proper tongue weight for proper towing.
insert the bolt through the matched holes from the rear of the
trailer towards the front. Once the bolt is inserted in the holes
place on a second flat washer. Secure with one of the 1/4”
kep nuts provided. Repeat this process on the bottom hole of
the other side panel and front panel. DO NOT TIGHTEN.
Once identified, place the wheel chock assembly onto the
deck of the trailer aligning the four carriage heads of the bolts
with the key slots in the deck. Drop the heads below the deck
and then slide the assembly forward until the flat portion of
the carriage heads are in the slots. Tighten the nuts to
Continue attaching the front panel to the side panels by
secure in place.
Midwest Industries, Inc. Ida Grove, IA 51445 800.859.3028 www.shorelandr.com M312045
Page 5 of 6
Page 6

Spare Tire Bracket and Tire Wheel Assembly
See Detail F.
Locate the 3/8” x 3 7/16” x 4 1/8” square U-bolt Part No.
0310090 that fits the tongue of your trailer. Place the U-bolt
up and around the tongue from the bottom side. Locate Item
Detail A
Detail B
Ramp Latch
Handle Assembly
# 9 spare tire bracket with two (2) holes. Align the holes in the
bracket with the legs of the U-bolt and place on the
U-bolt. Secure in place using 1/2” hex flange lock nuts.
Position the bracket on the tongue so it is located at the
approximate center of where the spare tire will be located
when installed and tighten in position.
Locate Item No. 10 spare tire bracket with three (3) holes.
Place it in position as shown and secure it to the bracket just
installed using two- 3/8” x 1” hex bolts and hex flange lock
nuts. The bottom set of holes in the bracket will raise the
bracket into its highest position and will adapt to the larger
tires. Tighten.
Locate the three- 1/2” x 1-1/2” hex bolts. Place them into the
upper bracket as shown from the bottom side. Secure into
place using 1/2” fine threaded nuts. Tighten. The bracket is
now ready for mounting the spare tire to it.
Place the spare tire onto the bracket by aligning the holes in
the wheel rim with the three bolts just installed. Once aligned
allow the spare tire to rest onto the bracket. Secure the wheel
Midwest Industries, Inc. Ida Grove, IA 51445 800.859.3028 www.shorelandr.com M312045
to the spare tire bracket using the three- 1/2” lug nuts
provided. Tighten.
Jack With Caster Wheel
See Detail D.
Locate the jack with caster wheel. Note that it will fit various
size tongues. Place two- 3/8” x 4” hex bolts into the holes in
the mounting plate as shown in the diagram. Hold the jack up
to the tongue so that the two bolts just installed are resting
on the topside of the tongue. Check to make sure that there
is a set of holes directly under the tongue. If there is, place a
channel mounting bracket onto the two bolts. Secure using
3/8” lock washers and hex nuts.
Place two more 3/8” x 4” hex bolts in the holes located
directly under the tongue running them through the jack
mounting plate and the channel mounting brackets as well.
Secure using 3/8” lock washers and 3/8” hex nuts. Tighten.
Assembly is complete.
Page 6 of 6
 Loading...