

Shop-Vac 4000 SERIES User Manual
USER MANUAL
Series:
4000
ATTENTION!
DANGER!
Read all safety rules carefully before attempting to operate. Retain for
future reference.
Never operate this unit when flammable materials or
vapors are present because electrical devices produce
arcs or sparks that can cause a fire or explosion. NEVER
OPERATE UNATTENDED!
For your records, please record the following information
and store this user manual in a safe location.
Catalog No.
Model No.
Purchase Date:
(Located on the carton)
(Located on top portion of the vacuum)
87553-62
Household and Workshop
WET/DRY VACUUM

TABLE OF CONTENTS
Important Safety Instructions .............................................................................................
Grounding Instructions ....................................................................................................
Extension Cords .................................................................................................................
Unpacking ......................................................................................................................
Assembly ...........................................................................................................................
Set Up and Operation .........................................................................................................
Filter Installation and Maintenance ..................................................................................
Blower Feature ..................................................................................................................
Empty Liquid Waste From the Tank ....................................................................................
Automatic Suction Shut Off ................................................................................................
Storage. .............................................................................................................................
Service .............................................................................................................................
Troubleshooting ................................................................................................................
Warranty and Contact Information ....................................................................................
3
3-4
4
4-5
5
6
6-8
8
9
9
9
9
10
11
SECTION PAGES
TOOLS NEEDED
PAGE 2
• Safety Glasses
• Flathead Screwdriver

IMPORTANT SAFETY INSTRUCTIONS
When using an electric appliance, basic precautions should always be followed, including the following:
READ ALL INSTRUCTIONS BEFORE USING THIS APPLIANCE.
WARNING – TO REDUCE THE RISK OF FIRE, ELECTRIC SHOCK OR INJURY:
1. Do not leave appliance when plugged in. Unplug from outlet when not in use and before servicing.
Connect to a properly grounded outlet only. See Grounding Instructions.
2. Do not expose to rain – store indoors.
3. Do not allow to be used as a toy. Close attention is necessary when used by or near children.
4. Use only as described in this manual. Use only Manufacturer’s recommended attachments.
5. Do not use with damaged cord or plug. If appliance is not working as it should, has been dropped,
damaged, left outdoors or dropped into water, contact Shop-Vac Corporation for assistance.
6. Do Not: pull or carry by cord, use cord as a handle, close a door on cord or pull cord around sharp edges
or corners. Do not run appliance over cord. Keep cord away from heated surfaces.
7. Do not unplug by pulling on cord. To unplug, grasp the plug; not the cord.
8. Do not handle plug or appliance with wet hands.
9. Do not put any object into openings. Do not use with any openings blocked; keep free of dust, lint, hair
and anything that may reduce air flow.
10. Keep hair, loose clothing, fingers and all parts of body away from openings and moving parts.
11. Do not pick up anything that is burning or smoking, such as cigarettes, matches or hot ashes.
12. Do not use without dust bag and/or filters in place.
13. Turn off all controls before unplugging.
14. Use extra care when cleaning on stairs.
15. Do not use to pick up flammable or combustible liquids such as gasoline or use in areas where they
may be present.
16. Do not use your cleaner as a sprayer of flammable liquids such as oil base paints, lacquers, household
cleaners, etc.
17. Do not vacuum toxic, carcinogenic, combustible or other hazardous materials such as asbestos, arsenic,
barium, beryllium, lead, pesticides or other health endangering materials. Specially designed units are
available for these purposes.
18. Do not pick up soot, cement, plaster or drywall dust without cartridge filter and collection filter bag in
place. These are very fine particles that may pass through the foam and affect the performance of the
motor or be exhausted back into the air. Additional collection filter bags are available.
19. Do not leave the cord lying on the floor once you have finished the cleaning job. It can become a tripping
hazard.
20. Use special care when emptying heavily loaded tanks.
21. To avoid spontaneous combustion, empty tank after each use.
22. The operation of a utility vac can result in foreign objects being blown into eyes, which can result in eye
damage. Always wear safety goggles when operating vacuum.
23. STAY ALERT. Watch what you are doing and use common sense. Do not use vacuum cleaner when you
are tired, distracted or under the influence of drugs, alcohol or medication causing diminished control.
24. WARNING! Do NOT use this vacuum cleaner to vacuum lead paint debris because this may disperse fine
lead particles into the air. This vacuum cleaner is not intended for use under EPA Regulation 40 CFR Part
745 for lead paint material cleanup.
SAVE THESE INSTRUCTIONS
WARNING
– DO NOT LEAVE VACUUM UNATTENDED
WHEN IT IS PLUGGED IN AND/OR OPERATING. UNPLUG UNIT WHEN NOT IN
USE.
GROUNDING INSTRUCTIONS
This appliance must be grounded. If it should malfunction or breakdown, grounding provides a path of
least resistance for electric current to reduce the risk of electric shock. This appliance is equipped with
a cord having an equipment-grounding conductor and grounding plug. The plug must be inserted into an
appropriate outlet that is properly installed and grounded in accordance with all local codes and ordinances.
PAGE 3
GROUNDING INSTRUCTIONS (CONT’D.)
WARNING
– IMPROPER CONNECTION OF THE EQUIPMENT-GROUNDING
CONDUCTOR CAN RESULT IN A RISK OF ELECTRIC SHOCK. CHECK WITH A QUALIFIED
ELECTRICIAN OR SERVICE PERSON IF YOU ARE IN DOUBT AS TO WHETHER THE OUTLET IS
PROPERLY GROUNDED. DO NOT MODIFY THE PLUG PROVIDED WITH THE APPLIANCE – IF
IT WILL NOT FIT THE OUTLET, HAVE A PROPER OUTLET INSTALLED BY A QUALIFIED
ELECTRICIAN.
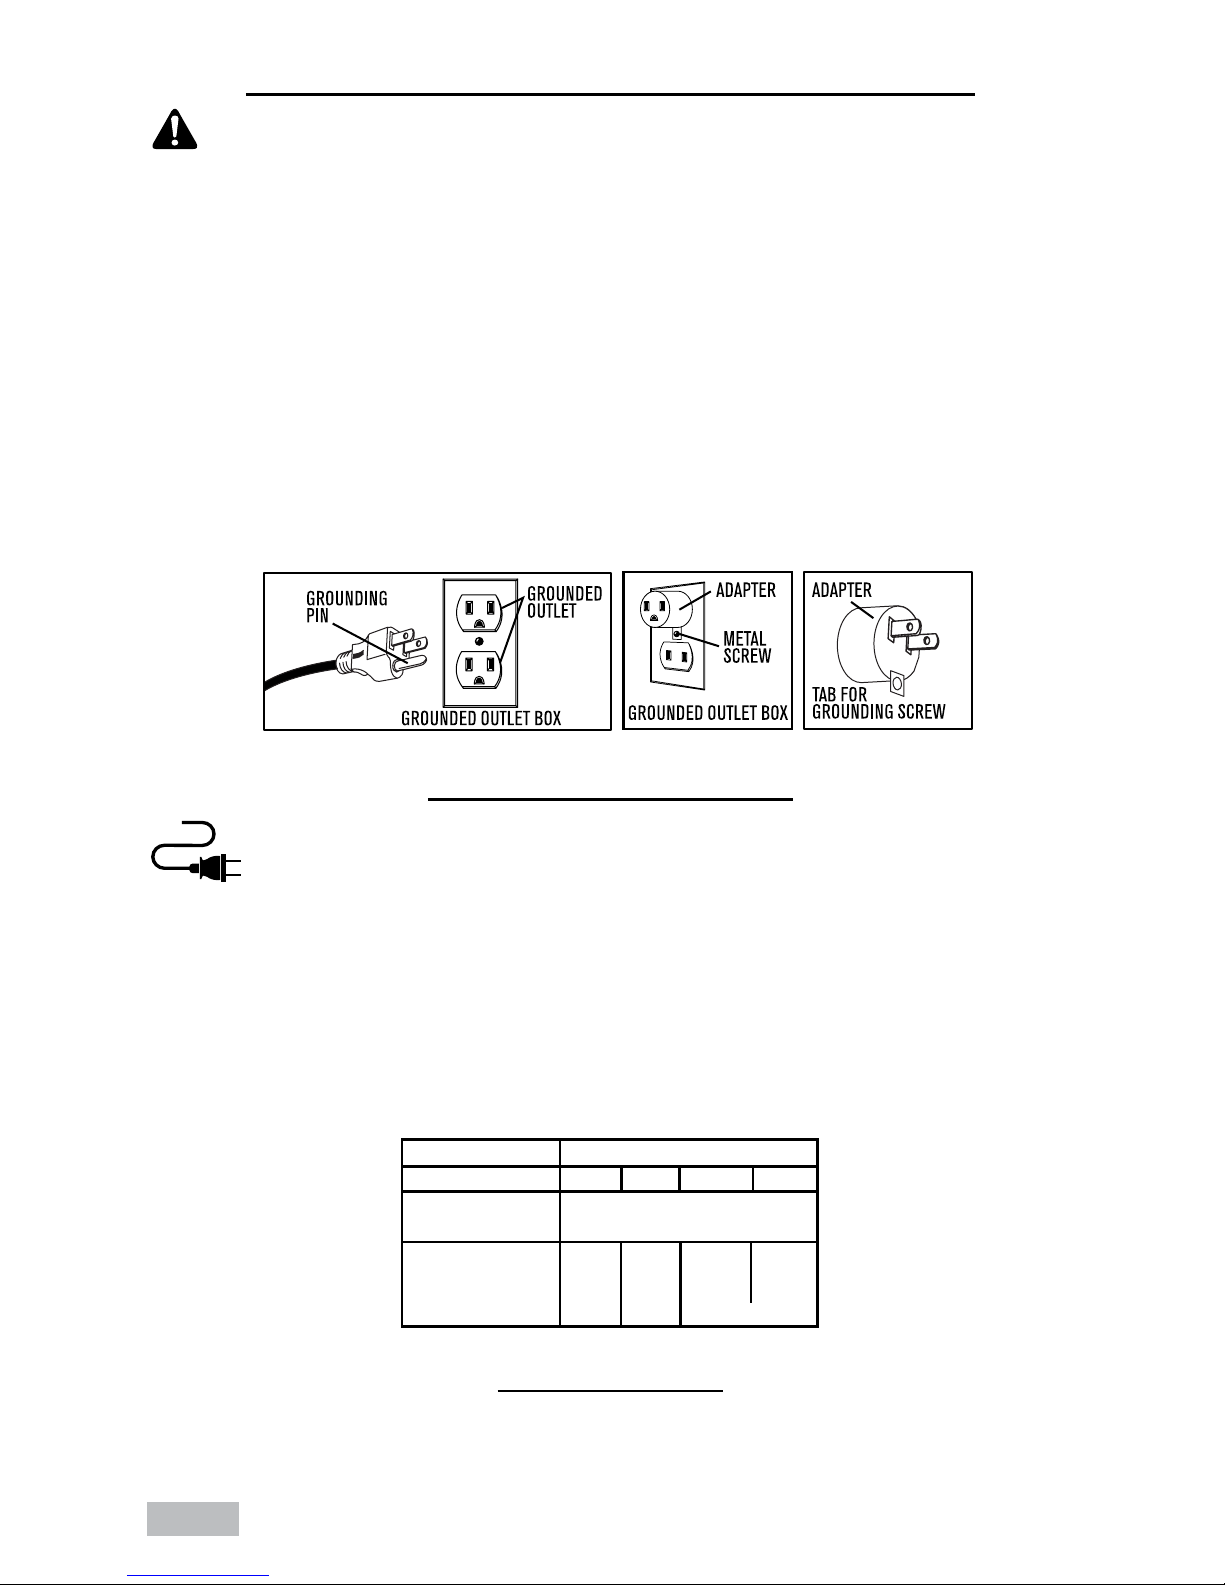
This appliance is for use on a nominal 120-volt circuit, and has a grounded plug that looks like the plug
illustrated in SKETCH A. A temporary adaptor that looks like the adaptor illustrated in SKETCHES B and
C may be used to connect this plug to a 2-pole receptacle as shown in SKETCH B if a properly grounded
outlet is not available. The temporary adaptor should be used only until a properly grounded outlet (SKETCH
A) can be installed by a qualified electrician. The green colored rigid ear, lug or the like extending from the
adaptor must be connected to a permanent ground such as a properly grounded outlet box cover. Whenever
the adaptor is used, it must be held in place by a metal screw.
IN CANADA, THE USE OF A TEMPORARY ADAPTOR IS NOT PERMITTED BY THE CANADIAN ELECTRICAL
CODE. Make sure that the appliance is connected to an outlet having the same configuration as the plug. No
adaptor should be used with this appliance.
EXTENSION CORDS
When using the appliance at a distance where an extension cord becomes necessary, a
3-conductor grounding cord of adequate size must be used for safety, and to prevent loss
of power and overheating. Use Table A to determine A.W.G. wire size required. To determine
ampere rating of your vacuum, refer to nameplate located on motor housing. Before using
appliance, inspect power cord for loose or exposed wires and damaged insulation. Make any needed repairs
or replacements before using your appliance. Use only three-wire outdoor extension cords which have
three prong grounding-type plugs and three-pole receptacles which accept the extension cord’s plug. When
vacuuming liquids, be sure the extension cord connection does not come in contact with the liquid.
NOTE: STATIC SHOCKS ARE COMMON IN DRY AREAS OR WHEN THE RELATIVE HUMIDITY OF THE AIR IS
LOW. THIS IS ONLY TEMPORARY AND DOES NOT AFFECT THE USE OF THE APPLIANCE. TO REDUCE THE
FREQUENCY OF STATIC SHOCKS IN YOUR HOME, THE BEST REMEDY IS TO ADD MOISTURE TO THE AIR WITH
A CONSOLE OR INSTALLED HUMIDIFIER.
UNPACKING
1. Pull lid latches in an outward motion, remove tank cover and any accessories that may have been
shipped in the tank. Refer to Assembly Section before replacing the tank cover.
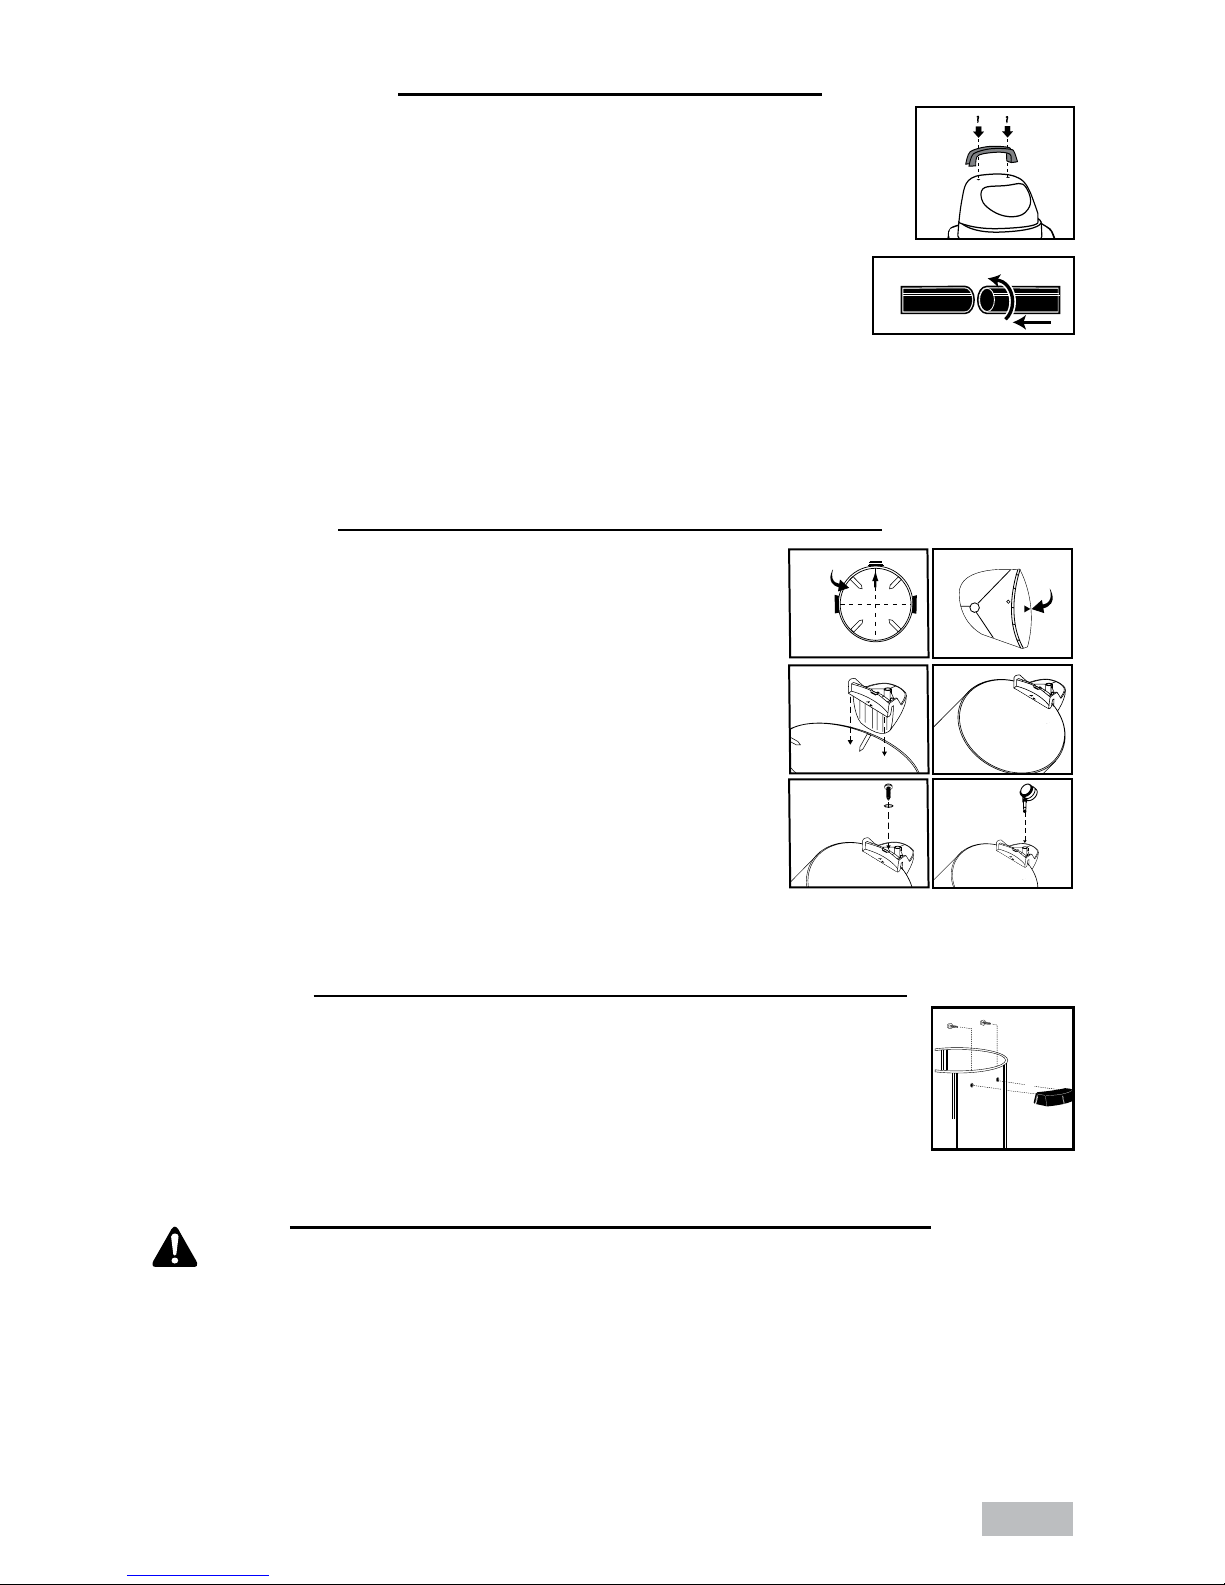
2. To attach top handle, align holes in handle and holes in tank cover and secure with screws provided.
SKETCH A SKETCH B SKETCH C
GROUNDING METHODS
Volts
Total length of cord in feet
120V
Ampere Rating
More Not More
Than Than
0 - 6
6 - 10
10 - 12
12 - 16
25 50 100
150
AWG
18
18
16
14
16
16
16
12
16
14
14
14
12
12
Not recommended
TABLE A
PAGE 4
PAGE 5
UNPACKING (CONT’D.)
3. Attach caster system following the instructions and illustrations in this manual.
4. Attach side tank handles following the instructions and illustrations in this manual.
5. Before replacing tank cover, please refer to Dry Pick Up or Wet Pick Up Operation in
this manual to ensure you have the proper filters installed for your cleaning operation.
6. Replace tank cover, and apply pressure with thumb to each latch until it snaps
tightly in place. Make sure all lid latches are clamped securely.
7. Insert machine hose end into inlet of tank. Twist slightly to tighten the
connection.
8. Attach the extension wands to the accessory end of the hose. Twist slightly to
tighten the connection.
9. Attach one of the cleaning accessories (depending on your cleaning requirements) to the extension
wands. Twist slightly to tighten the connection.
10. Plug the cord into the wall outlet. Your cleaner is ready for use.
I = ON, O =OFF
CASTER SYSTEM ASSEMBLY
1. With cord disconnected from receptacle and tank cover removed,
turn tank upside down so that the bottom is facing up.
2. With a pair of scissors, trim the enclosed template to fit your size
tank. Sizes will be 11”, 14” or 16” diameters.
3. Once template is cut out, place on bottom of tank. Align inlet arrow
on template with center of inlet on tank.
4. If caster feet are attached together, separate by removing webbing.
5. Take caster foot marked with the letter A and align arrow on foot with
arrow on template also marked with the letter A.
6. Place groove of foot over rim of tank and push until the caster foot is
tight against bottom of tank.
7. Secure feet with screw and washer when provided.
8. Insert casters into feet by placing stem of caster into holes provided.
Apply pressure and twisting motion until casters snap into place.
11
9. Repeat steps 4-8 with remaining feet.
10. Return tank to upright position.
SIDE TANK HANDLE ASSEMBLY
Attach side handles to tank with screws provided.
VACUUM SET UP AND OPERATION
DANGER
– This equipment incorporates parts such as switches, motors or the
like that tend to produce arcs or sparks that can cause an explosion. Do not pick up flammable,
combustible, or hot materials. Do not use around explosive liquids or vapors, as electrical devices
produce arcs or sparks which can cause a fire or explosion - do not use at filling stations or
anywhere gasoline is stored or dispensed.
1. Refer to the filter installation and maintenance section to make sure the correct filters are installed for
normal dry or wet pick up operation based on your cleaning needs.
A
Arrow
B
B
A
A
Template
Bottom of Tank
Tank Bottom
A
PAGE 6
VACUUM SET UP AND OPERATION
2. Replace tank cover and apply pressure with thumb to each latch until it snaps tightly
into place. Make sure each latch is clamped securely.
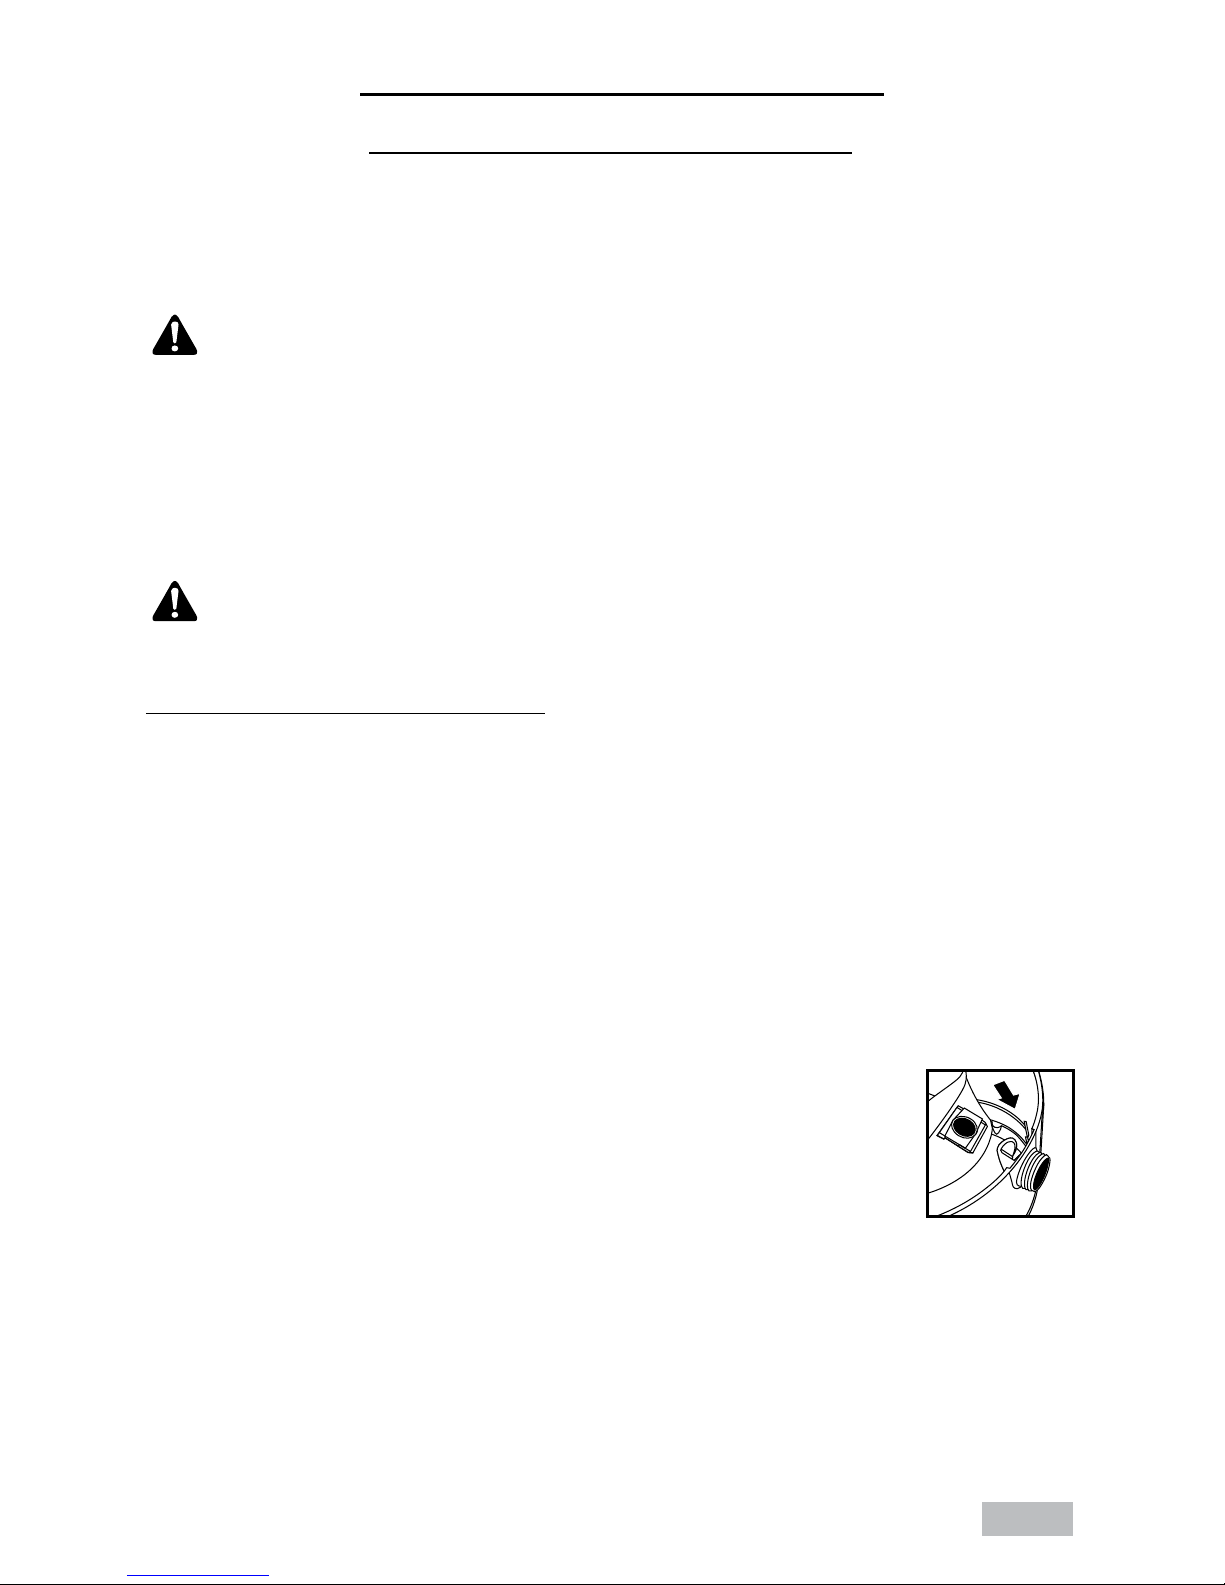
3. Insert machine hose end into inlet located on the front of the tank. Twist slightly to
tighten the connection.
4. Attach the desired cleaning accessory onto the accessory end of the hose.
NOTE: Many more useful tools are available at your local dealer or the Shop-Vac
®
website.
5. Plug the cord into the wall outlet. Your cleaner is ready for use.
I = ON, O = OFF
FILTER INSTALLATION AND MAINTENANCE
FILTRATION SYSTEM
There are a variety of filters available for your vacuum. There are cage filters that install onto the underside
of the tank cover and tank filters that install into the tank. The filters are grouped into three filtration
categories. General filtration is used for large debris; such as, wood chips, nails and gravel. Medium
filtration is used for medium debris; such as, dirt, sand and sawdust. Fine filtration is used for fine debris;
such as drywall dust, cold ash and cement dust. It is important to have the correct filters installed for your
cleaning operation to protect your vacuum motor. THE MOST EFFICIENT FILTRATION FOR YOUR
VACUUM IS A FINE FILTRATION CAGE FILTER WITH A FINE FILTRATION TANK FILTER.
NOTE: When using the vacuum to pick up very fine dust. It will be necessary to empty the tank and clean
the cage filter at more frequent intervals to maintain maximum pick up power or add a disposable filter bag.
DRY PICK UP OPERATION
NOTE: Never use the vacuum for dry pick up without a dry use filter installed. Using the vacuum without a
filter will cause dust to discharge from the blower port and cause damage to the motor.
WARNING – ALWAYS DISCONNECT THE PLUG FROM THE WALL OUTLET
BEFORE REMOVING THE TANK COVER.
Follow the instructions for the filter that came with your vacuum. Some filters mentioned do not come
standard with all vacuums. Additional filters are available at your local dealer or the Shop-Vac
®
website.
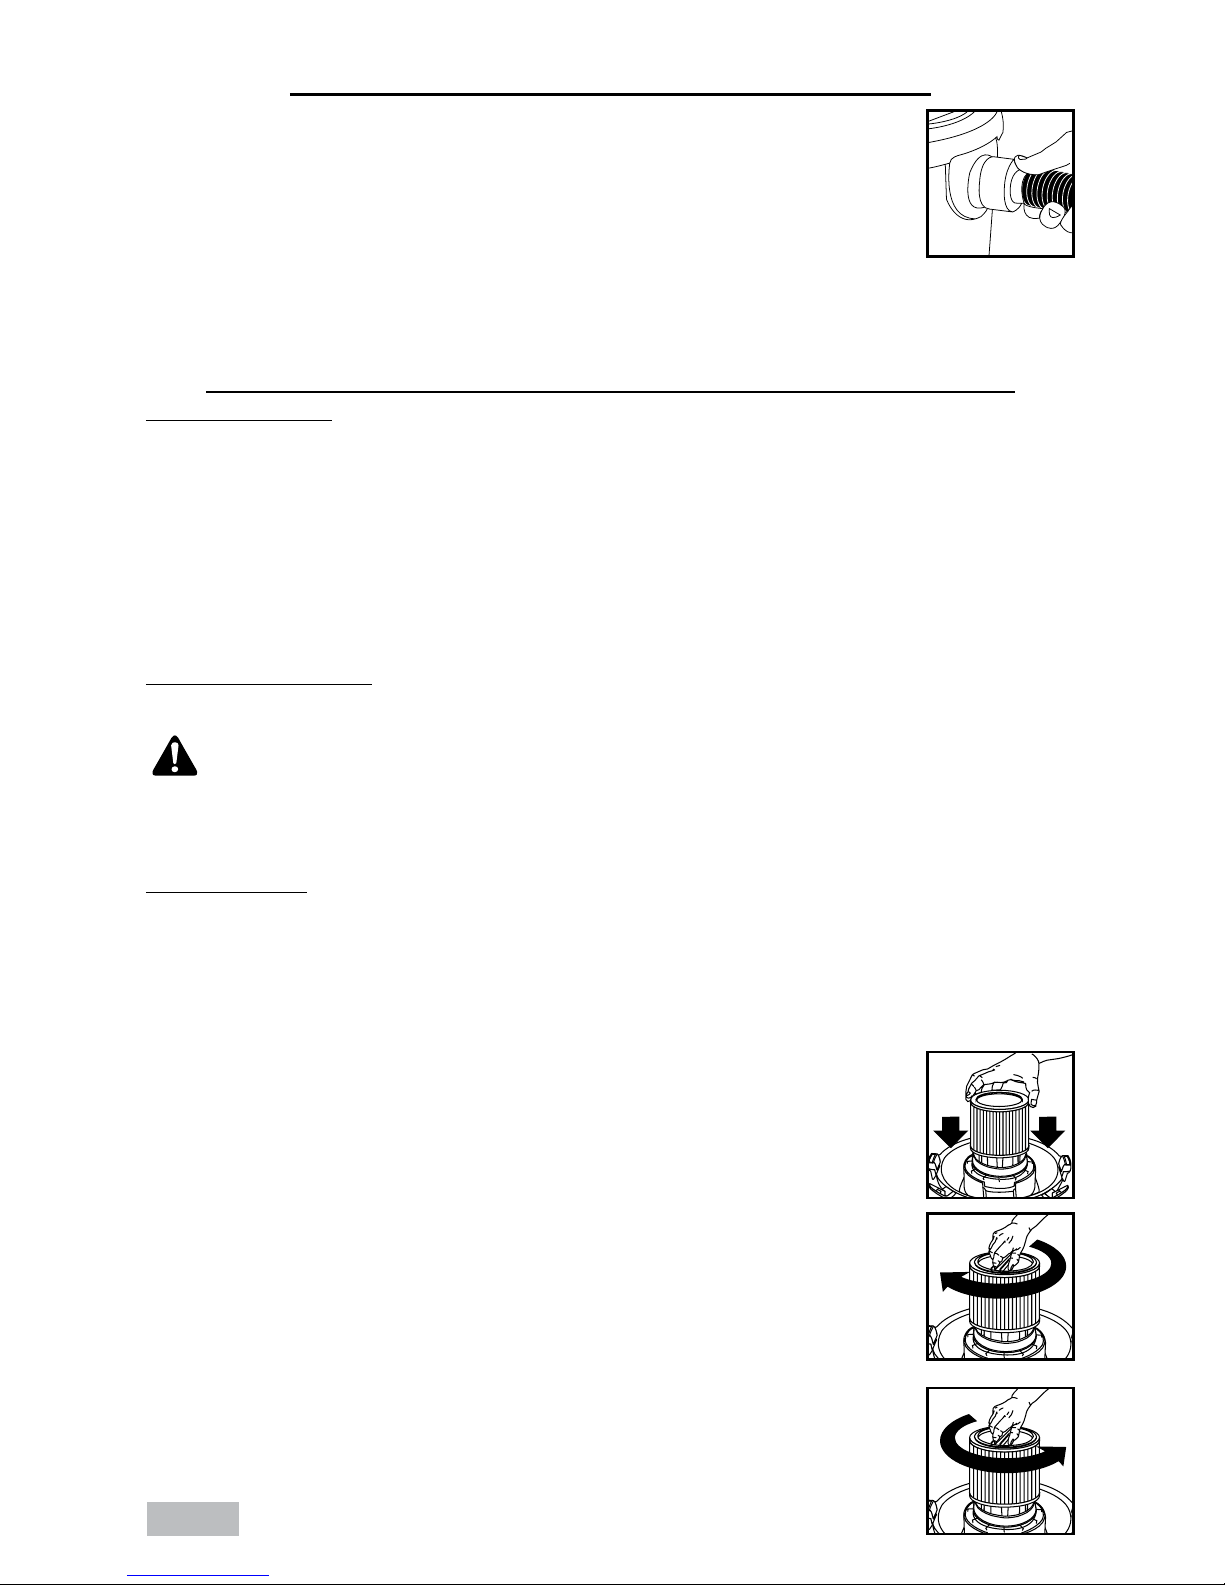
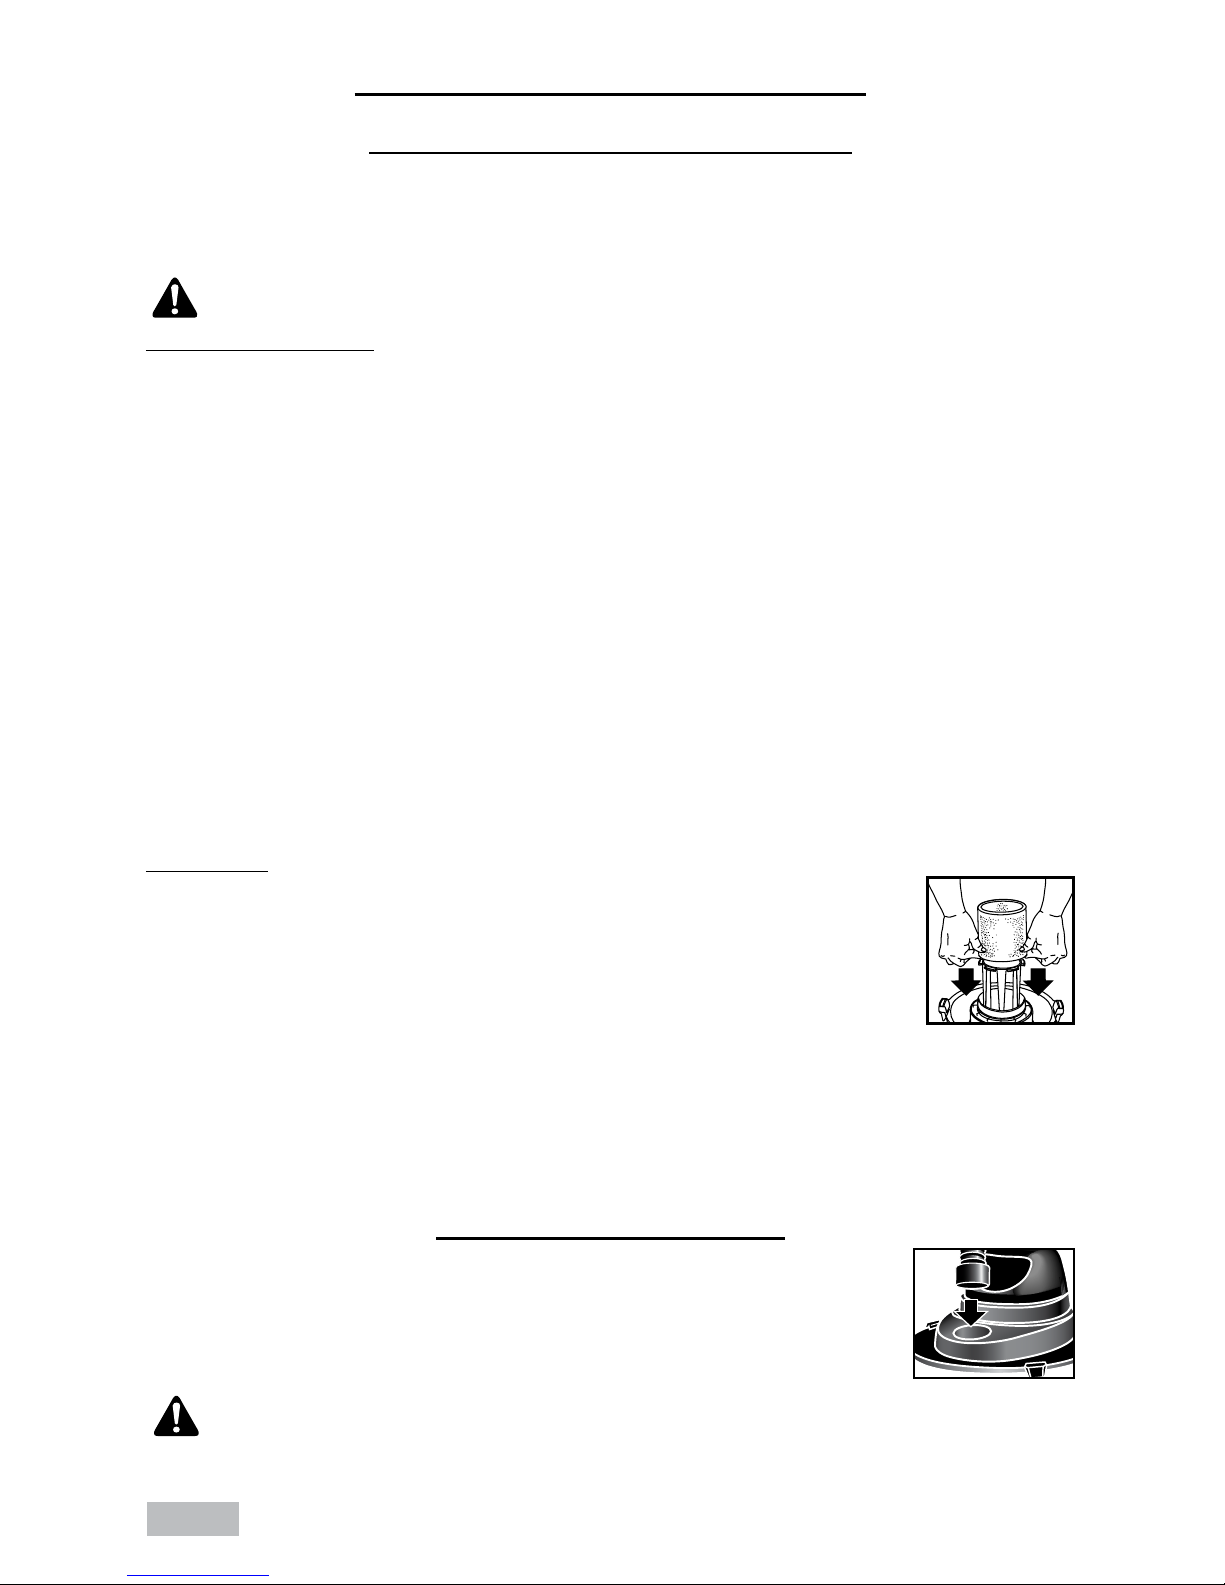
CARTRIDGE FILTER
The cartridge filter can be used for dry pick up and small quantities of wet pick up. Installation is the same
for both. When picking up fine dust or powders a high efficiency filter bag must be used with the cartridge
filter.
1. If a foam sleeve is installed on the lid cage, remove it by sliding it off the lid cage.
NOTE: If the cartridge filter has been used for wet pick up, it must be cleaned and
dried before using it for dry pick up.
2. With the tank cover in an upside down position, slide the cartridge down over the
lid cage, pushing until the filter seals against the cover.
3. Place the filter retainer into the top of the cartridge filter. Hold the tank cover with
one hand, turn the handle on the filter retainer clockwise to lock the filter into
place.
4. To remove the filter for cleaning, hold the tank cover and turn the filter retainer
counter-clockwise to loosen and remove.
PAGE 7
FILTER INSTALLATION AND
MAINTENANCE (CONT’D.)
5. Slide the cartridge filter off the lid cage.
6. Clean the filter by shaking or gently brushing off excess dirt. Extremely dirty filters may be cleaned with
water by rinsing from the inside of the filter. Dry completely (approximately 24 hours).
7. Check the filter for tears or small holes. If none are found, reinstall the filter. To prevent damage to your
vacuum, do not use a filter with a hole or tear.
NOTICE – This filter is made of high quality paper designed to stop small
particles of dust. The filter can be used for wet or dry pick up. A dry filter is necessary to
pick up dry material. If you use your vac to pick up dust when the filter is wet, the filter
will clog quickly and be very difficult to clean. The filter may become saturated when
picking up large quantities of liquid causing misting to appear in the exhaust air. At this
time, you should dry or change the filter to eliminate this occurrence. Please handle the
filter carefully when removing it for cleaning or when installing it. Check the filter for tears
or small holes. Even a small hole can cause dust to be exhausted. Do not use a filter with holes or
tears. Replace it immediately.
WARNING – KEEP FILTERS CLEAN. EFFICIENCY OF THE VACUUM IS LARGELY
DEPENDENT ON THE FILTER. A CLOGGED FILTER CAN CAUSE OVERHEATING AND POSSIBLY
DAMAGE THE CLEANER. CHECK THE FILTER PERIODICALLY AND REPLACE AS REQUIRED.
TEAR RESISTANT WET / DRY COLLECTION BAG
The tear resistant wet / dry collection bag can be used in conjunction with the cartridge filter for picking
up dry debris. The bag is not required for dry pick up; however, it makes it easier to remove the debris and
keeps the tank clean. When picking up fine dust or powders a high efficiency bag must be used. The high
efficiency bags are for dry use only and do not come standard with this model.
The tear resistant wet / dry collection bag can also be used in conjunction with the foam sleeve when
picking up liquids or using the pump feature. The bag traps medium to large debris that may be contained
in the liquid, while allowing the liquid to flow through the bag and deposit into the vacuum’s tank. The bag is
not required for wet pick up, but it is recommended when the liquid contains debris that could damage the
vacuum’s motor. NOTE: If the bag is used for wet pick up, it must be removed from the tank and hung up to
dry.
To install the bag:
1. Make sure the cord is disconnected from the receptacle, the tank cover is removed and the hose is
disconnected from the tank inlet.
2. Grasp the plastic collar firmly and slide the rubber guard onto the inlet fitting as far as
possible.
3. When secured in place, expand the bag and position around the inside of the tank.
To remove the bag:
1. Make sure the cord is disconnected from the receptacle, the tank cover is removed and the hose is
disconnected from the tank inlet.
2. If the bag was used for wet pick up, move the vacuum outside or to a floor that won’t get damaged if the
liquid drips onto it.
3. Grasp the plastic collar firmly and pull the rubber guard off of the inlet fitting. Before removing the bag
from the tank, insert the plastic tab connected to the collar into the bag opening.
4. If the bag was used for dry pick up, simply grasp the plastic handle and remove from the tank.
PAGE 8
FILTER INSTALLATION AND
MAINTENANCE (CONT’D.)
5. If the bag was used for wet pick up, grasp the plastic handle and slowly lift up on the bag. Allow the
liquid to drain from the bag into the tank. If the bag is not full, hang it up and allow it to dry completely.
Once dry, check the bag for tears or holes. If none are found the bag can be reinstalled.
NOTE: Additional filtration options are available at your local dealer or the Shop-Vac
®
website.
WARNING – FOR FINE DUST AND POWDERS.
WET PICK UP OPERATION
1. Your vacuum can be used for wet pick up. Remove ALL dirt and debris found in the tank. Remove all dry
use filters from the vacuum.
2. A clean cartridge filter may be used to pick up small quantities of liquid. To use the cartridge filter; follow
the instructions under dry pick up.
3. For vacuuming large quantities of liquid use a foam sleeve. If a foam sleeve did not come standard with
your unit, one may be purchased at your local dealer, the Shop-Vac
®
website or by contacting Shop-Vac
®
customer service. To use the foam sleeve; follow the instructions in this section.
4. The tear resistant wet/dry collection bag can be used during wet pick up. Refer to the instructions in the
filter installation and maintenance section for details.
5. Misting in the exhaust air or dripping of liquid around the tank cover may occur if the filter becomes
saturated during wet pick up. If this occurs, remove the filter and allow to dry, or replace with another dry
filter.
6. Turn the unit off immediately upon completing a wet pick up job or when tank is full and ready to
be emptied. When the tank is full, suction will drastically reduce. Refer to the automatic suction shut
off section for more information. Raise the hose to drain any excess liquid into the tank. Follow the
instructions in the emptying liquid waste section.
7. Before storing the vacuum cleaner or using for dry pick up, clean and dry the interior of the tank and the
underside of the tank cover. Clean and allow the filters to dry completely.
8. Wet pick up accessories should be washed periodically; especially after picking up wet, sticky kitchen
accidents. This can be accomplished with a warm solution of soap and water.
FOAM SLEEVE
1. With the tank cover in an upside down position, slide the foam sleeve down over
the lid cage, pulling until foam sleeve completely covers the lid cage.
2. To clean the foam sleeve, side it up and off the lid cage. Shake excess debris off of
the foam sleeve with a rapid up and down movement.
3. Hold foam sleeve under running water for a couple minutes, rinsing from the
inside of the filter. A water wash is not always required, depending on the
condition of the filter.
4. Check the filter for tears. If any are found, replace with a new filter.
WARNING FOR FINE DUST & POWDERS
When vacuuming fine dust, or powders of any kind (plaster, drywall dust, cold ashes, concrete dust, etc.)
a high efficiency drywall filter bag must be used. When vacuuming normal household dust and debris,
standard household disposable filter bags may be used.
BLOWER FEATURE
Your vacuum can be used as a powerful blower. To use your unit as a blower insert hose
end into the top exhaust port.
NOTE: Clear hose of any obstructions before attaching to blower port. Twist the hose end
slightly to tighten the connection. Caution should be used when using as a blower due
to the powerful force of air when using certain attachments.
WARNING – ALWAYS WEAR EYE PROTECTION TO PREVENT ROCKS OR
DEBRIS FROM BEING BLOWN OR RICOCHETING INTO THE EYES OR FACE WHICH CAN
RESULT IN SERIOUS INJURY.
 Loading...