

Page 1
MODEL W1876
262149
6" BENCHTOP JOINTER
w/SPIRALTYPE CUTTERHEAD
OWNER'S MANUAL
(FOR MODELS MANUFACTURED Since 07/24)
Phone: (360) 647-0802• Online Technical Support: [email protected]
COPYRIGHT © AUGUST, 2020 BY GRIZZLY INDUSTRIAL, INC., REVISED MAY, 2024 (KS)
WARNING: NO PORTION OF THIS MANUAL MAY BE REPRODUCED IN ANY SHAPE OR FORM WITHOUT
THE WRITTEN APPROVAL OF GRIZZLY INDUSTRIAL, INC.
***Keep for Future Reference***
#21199KS Printed in TaiwanV3.05.24
Page 2
This manual provides critical safety instructions on the proper setup,
operation, maintenance, and service of this machine/tool. Save this
document, refer to it often, and use it to instruct other operators.
Failure to read, understand and follow the instructions in this manual
may result in fire or serious personal injury—including amputation,
electrocution, or death.
The owner of this machine/tool is solely responsible for its safe use.
This responsibility includes but is not limited to proper installation in
a safe environment, personnel training and usage authorization,
proper inspection and maintenance, manual availability and comprehension, application of safety devices, cutting/sanding/grinding tool
integrity, and the usage of personal protective equipment.
The manufacturer will not be held liable for injury or property
damage from negligence, improper training, machine modifications or
misuse.
Some dust created by power sanding, sawing, grinding, drilling, and
other construction activities contains chemicals known to the State of
California to cause cancer, birth defects or other reproductive harm.
Some examples of these chemicals are:
• Lead from lead-based paints.
• Crystalline silica from bricks, cement and other masonry products.
• Arsenic and chromium from chemically-treated lumber.
Your risk from these exposures varies, depending on how often you
do this type of work. To reduce your exposure to these chemicals:
Work in a well ventilated area, and work with approved safety equipment, such as those dust masks that are specially designed to filter
out microscopic particles.
Page 3

Contents
INTRODUCTION .....................................2
Grizzly Technical Support
Machine Specifications
Identification
Controls & Components
SAFETY
ELECTRICAL
SETUP............................................... 12
OPERATIONS
...............................................7
Standard Machinery Safety Instructions
Additional Safety for Jointers
Circuit Requirements
Grounding Requirements
Extension Cords
Unpacking
Items Needed for Setup
Inventory
Machine Placement
Cleaning Machine
Bench Mounting................................. 15
Assembly
Dust Collection
Test Run
General
Stock Inspection
Setting Depth of Cut
Squaring Stock
Surface Planing
Edge Jointing
Bevel Cutting
..................................... 5
....................................... 10
................................ 11
....................................... 12
........................................ 13
............................... 14
......................................... 16
................................. 18
.......................................... 19
....................................... 20
.......................................... 20
................................ 21
.................................. 23
................................. 24
................................... 25
................................... 26
....................... 2
.......................... 3
......................... 6
...... 7
.................. 9
.......................... 10
...................... 11
....................... 12
............................ 14
........................... 22
MAINTENANCE
General
Cleaning & Protecting
Lubrication
SERVICE
General
Rotating/Replacing Inserts
Checking/Adjusting Table Parallelism
Checking/Adjusting Fence Positive Stops
Replacing/Tensioning Belt
Replacing Motor Brushes
Troubleshooting
Electrical Safety Instructions
Wiring Diagram
PARTS
Main
Labels & Cosmetics
WARRANTY
............................................ 29
............................................... 42
.............................................. 42
.................................... 27
.......................................... 27
......................... 27
...................................... 28
.......................................... 29
.................... 29
.................... 36
...................... 37
................................. 38
................. 40
................................. 41
............................ 44
........................................ 45
...... 31
.. 34
SETUPELECTRICAL MAINTENANCE
OPERATIONSSAFETYINTRODUCTION
USE THE QUICK GUIDE PAGE LABELS TO SEARCH OUT INFORMATION FAST!
SERVICE PARTS
Page 4

Model W1876 (For Machines Mfd. Since 07/24)
INTRODUCTION
INTRODUCTION
Grizzly Technical Support
This machine has been specially designed to provide many years of trouble-free service. Close attention
to detail, ruggedly built parts and a rigid quality control program assure safe and reliable operation.
Grizzly Industrial, Inc. is committed to customer satisfaction. Our intent with this manual is to include
the basic information for safety, setup, operation, maintenance, and service of this product.
We stand behind our machines! In the event that questions arise about your machine,
please contact Grizzly Industrial Technical Support at (360) 647-0802 or send e-mail to:
[email protected]. Our knowledgeable staff will help you troubleshoot problems and process warranty claims.
If you need the latest edition, you can download it from http://www.shopfoxtools.com/manuals.
If you have comments about this manual, please contact us at:
Grizzly Industrial, Inc.
Attn: Technical Documentation Manager
P.O. Box 2309
Bellingham, WA 98227
Email: [email protected]
-2-
Page 5

Model W1876 (For Machines Mfd. Since 07/24)
MODEL W1876
6" BENCHTOP JOINTER W/ SPIRALTYPE CUTTERHEAD
Product Dimensions
Weight........................................................................................................... 43 lbs.
Width (side‐to‐side) x Depth (front‐to‐back) x Height.............................. 30 x 17‐1/2 x 13‐1/2 in.
Footprint (Length x Width).......................................................................... 19 x 9‐1/2 in.
Shipping Dimensions
Type.................................................................................................... Cardboard Box
Content........................................................................................................ Machine
Weight........................................................................................................... 44 lbs.
Length x Width x Height........................................................................... 33 x 13 x 12 in.
INTRODUCTION
Electrical
Power Requirement.................................................................... 120V, Single‐Phase, 60 Hz
Full‐Load Current Rating......................................................................................... 10A
Minimum Circuit Size............................................................................................. 15A
Connection Type......................................................................................... Cord & Plug
Power Cord Included.............................................................................................. Yes
Power Cord Length............................................................................................. 72 in.
Power Cord Gauge............................................................................................ 18 AWG
Plug Included....................................................................................................... Yes
Included Plug Type............................................................................................... 5‐15
Switch Type............................................................ Paddle Safety Switch w/Removable Key
Motors
Main
Horsepower........................................................................................... 1‐1/2 HP
Phase.............................................................................................. Single‐Phase
Amps.......................................................................................................... 10A
Speed............................................................................................... 19,000 RPM
Type.................................................................................................... Universal
Power Transfer ............................................................................................ Belt
Bearings............................................................... Shielded & Permanently Lubricated
Main Specifications
Main Specifications
Jointer Size................................................................................................. 6 in.
Bevel Jointing...................................................................................... 0 ‐ 45 deg.
Maximum Width of Cut................................................................................... 6 in.
Maximum Depth of Cut................................................................................ 1/8 in.
Minimum Workpiece Length............................................................................. 8 in.
Minimum Workpiece Thickness....................................................................... 1/2 in.
Number of Cuts Per Minute............................................................................ 66,000
-3-
Page 6

INTRODUCTION
Model W1876 (For Machines Mfd. Since 07/24)
Fence Information
Fence Length........................................................................................ 19‐3/4 in.
Fence Width............................................................................................. 7/8 in.
Fence Height.......................................................................................... 4‐1/4 in.
Cutterhead Information
Cutterhead Type......................................................................................... Spiral
Cutterhead Diameter..................................................................................... 2 in.
Number of Cutter Rows....................................................................................... 6
Number of Indexable Cutters............................................................................... 12
Cutterhead Speed................................................................................. 11,000 RPM
Cutter Insert Information
Cutter Insert Type............................................................................. Indexable HSS
Cutter Insert Length................................................................................. 14.25mm
Cutter Insert Width.................................................................................. 14.25mm
Cutter Insert Thickness................................................................................... 2mm
Table Information
Table Length.............................................................................................. 30 in.
Table Width........................................................................................... 6‐1/4 in.
Table Thickness............................................................................................ 1 in.
Floor to Table Height.............................................................................. 8‐5/16 in.
Table Adjustment Type................................................................. Thread Adjustment
Table Movement Type.................................................................................... Knob
Construction
Body Assembly.............................................................................. Pre‐Formed Steel
Fence Assembly......................................................................... Extruded Aluminum
Guard............................................................................................ Stamped Steel
Table............................................................................................ Cast Aluminum
Paint Type/Finish...................................................................................... Enamel
Other Information
Number of Dust Ports......................................................................................... 1
Dust Port Size......................................................................................... 2‐1/2 in.
Other
Country of Origin ............................................................................................. Taiwan
Warranty ....................................................................................................... 2 Years
Approximate Assembly & Setup Time ................................................................. 20 Minutes
Serial Number Location .......................................................................... Machine ID Label
Sound Rating ............................................................................................... 92 ‐ 94 dB
ISO 9001 Factory .................................................................................................. Yes
Certified by a Nationally Recognized Testing Laboratory (NRTL) ......................................... Yes
Features
Spiral Cutterhead with 12 Indexable HSS Inserts
2‐1/2" Dust Port
Cast Aluminum Infeed and Outfeed Tables
Infeed Table Height Adjustment Lock
Two Safety Push Blocks
Torx T‐25 T‐Handle Driver
Hex Wrenches 2.5, 4mm
-4-
Page 7
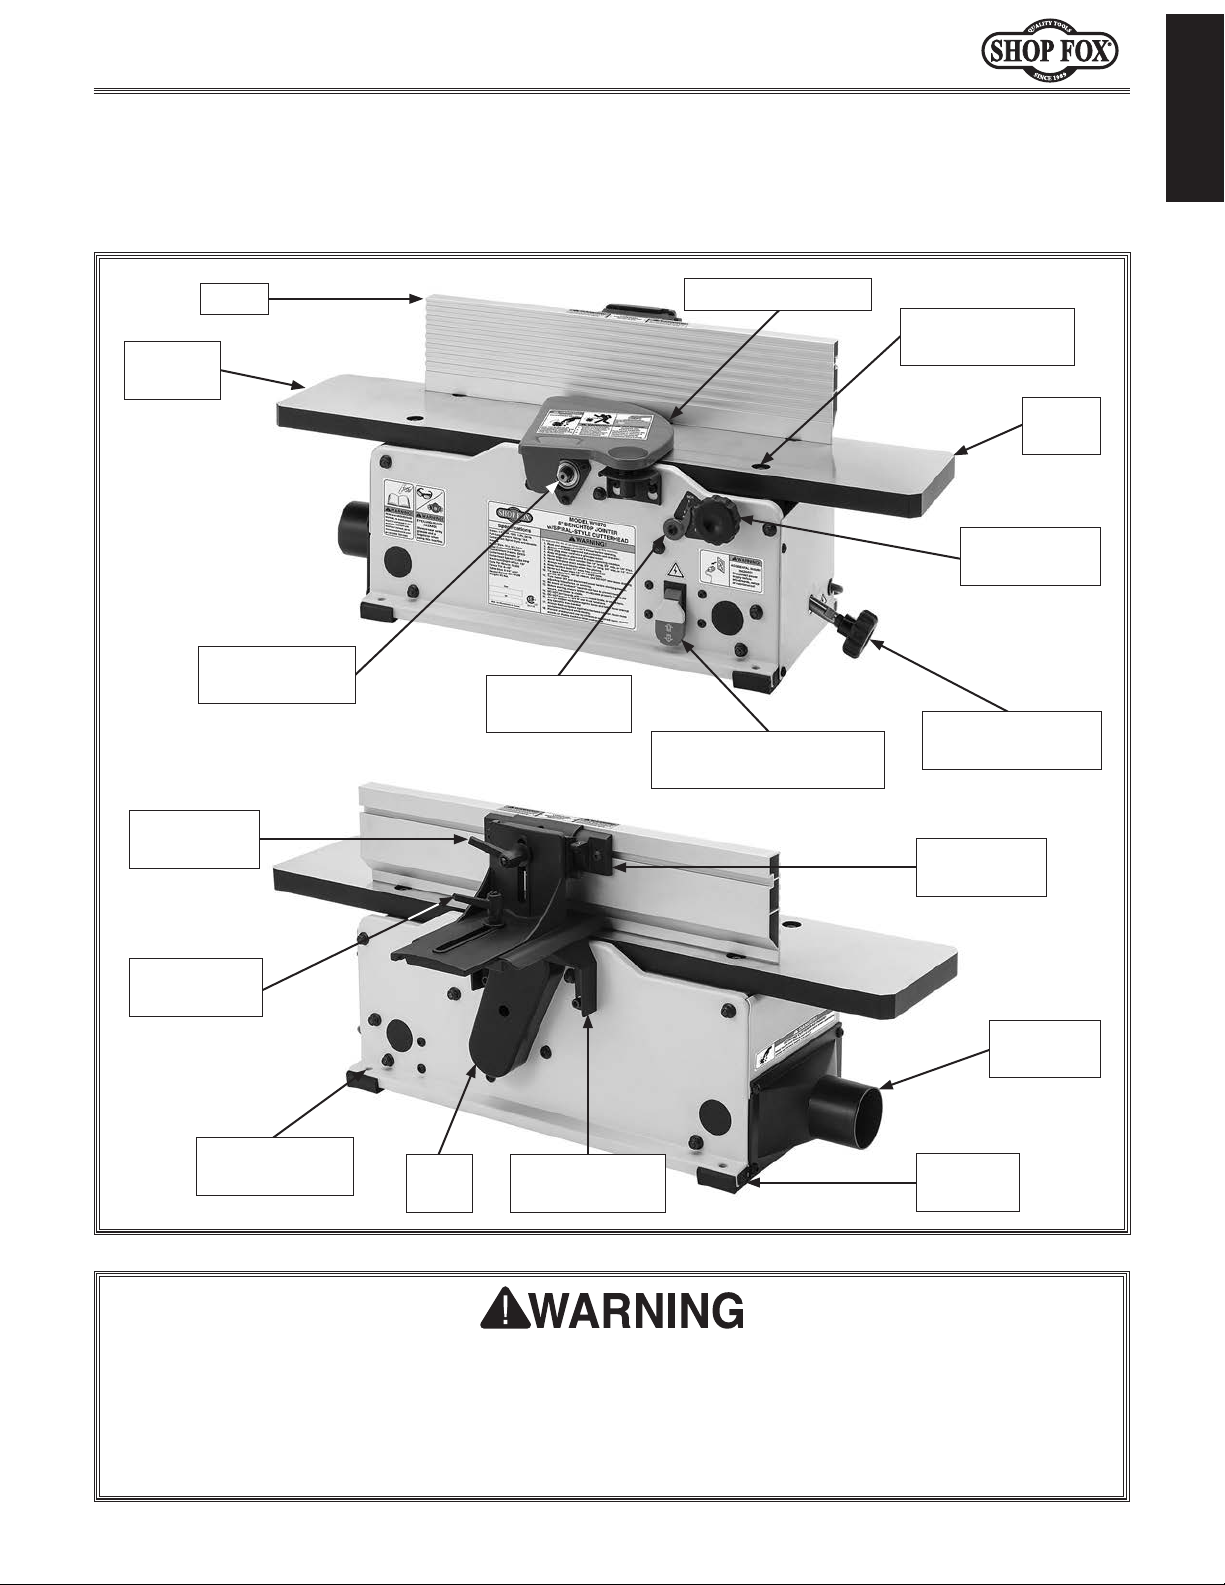
Become familiar with the names and locations of the controls and features shown below to better
Model W1876 (For Machines Mfd. Since 07/24)
Identification
INTRODUCTION
Fence
Outfeed
Table
Cutterhead
Rotation Guide
Fence Tilt
Lock Handle
Depth-of-Cut
Scale
Cutterhead Guard
ON/OFF Paddle Switch
w/Removable Key
Table Leveling
Adjuster (1 of 8)
Infeed
Table
Table Height
Lock Knob
Infeed Table
Adjustment Knob
Fence Slide
Bracket
Fence Slide
Lock Handle
Mounting Hole
(1 of 4)
For Your Own Safety, Read Instruction Manual Before Operating Jointer
Wear eye protection.
a)
b) Always keep cutterhead and drive guards in place and in proper operating condition.
c) Always use hold down/push blocks for jointing material narrower than 3 inches, or planing
material thinner than 3 inches.
d) Never perform jointing or planing on pieces shorter than 8 inches.
Belt
Cover
Fence Support
Bracket
-5-
Foot Pad
(1 of 4)
21⁄2" Dust
Port
Page 8
Controls & Components
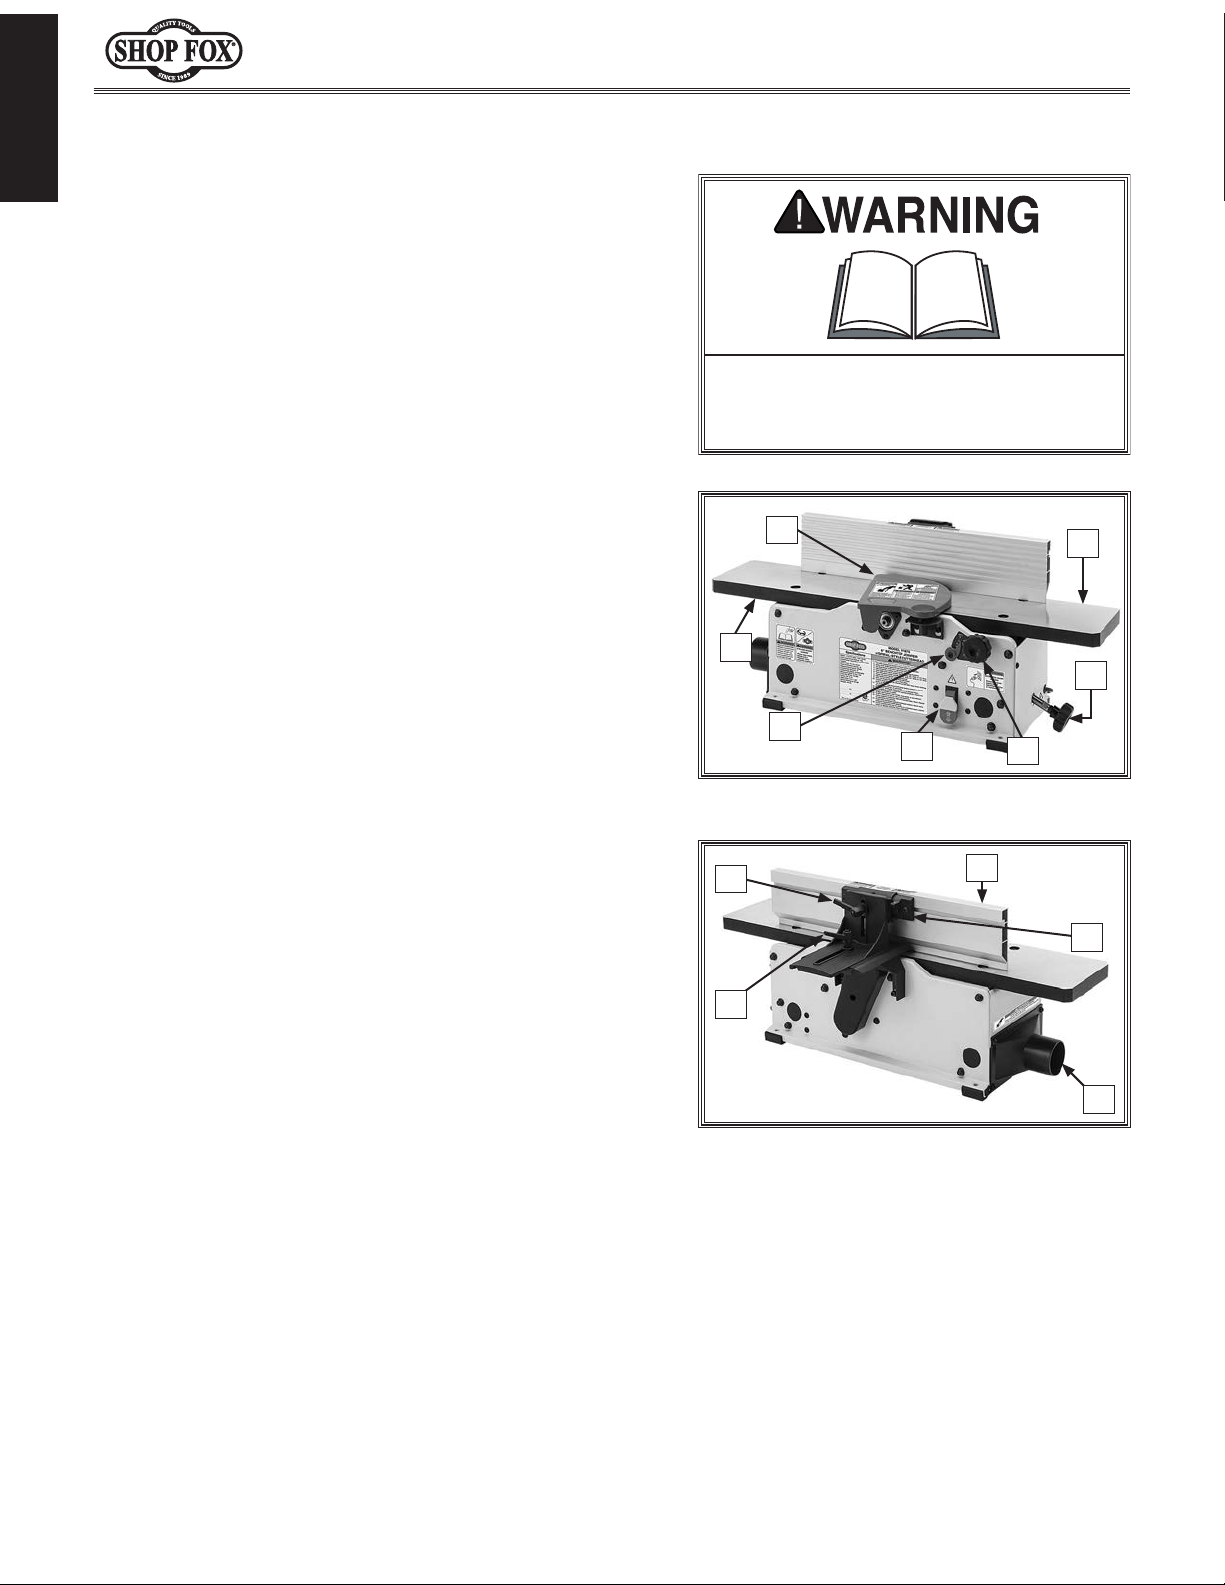
Refer to Figures 1–2 and the following descriptions to
INTRODUCTION
become familiar with the basic controls and components
of this machine. Understanding these items and how they
work will help you understand the rest of the manual and
stay safe when operating this machine.
Outfeed Table: Supports workpiece after it passes
A.
over cutterhead.
B. Cutterhead Guard: Covers cutterhead until
pushed aside by workpiece during operation. When
workpiece leaves cutterhead, guard springs back to
its starting position. DO NOT operate jointer if guard
is not functioning properly.
Infeed Table: Supports workpiece before it reaches
C.
cutterhead. Height of infeed table relative to
cutterhead determines depth of cut.
Model W1876 (For Machines Mfd. Since 07/24)
To reduce your risk of serious injury
or damage to the machine, read this
entire manual BEFORE using machine.
B
C
. Infeed Table Adjustment Knob: Adjusts height of
D
infeed table to control depth of cut.
. Table Height Lock Knob: Tighten to secure infeed
E
table position; loosen for table adjustment.
. ON/OFF Paddle Switch w/Removable Key: Turns
F
motor ON when moved up; turns motor OFF when
pressed down. Removal of yellow key disables
switch, preventing motor operation.
Depth-of-Cut Scale: Shows depth of cut (per pass).
G.
. Fence: Supports workpiece laterally as it moves
H
across cutterhead; determines angle of cut when
edge or bevel joining.
Fence Bracket Assembly: Changes position of fence
I.
relative to tables and secures it in position during
operation.
Dust Port: Connects machine to dust collection
J.
system. Dust port must be installed while operating
jointer to help prevent accidental contact with
cutterhead.
A
G
F
Figure 1. Main components.
L
K
Figure 2. Fence components.
D
E
H
I
J
Fence Slide Lock Handle: Adjusts position of fence
K.
over tables. ALWAYS tighten lock before beginning
operations.
. Fence Tilt Lock Handle: Secures fence tilt angle.
L
Fence tilt can be adjusted between 90º–135º. ALWAYS
tighten lock before beginning operations.
-6-
Page 9

SAFETY
OWNER’S MANUAL.
TRAINED OPERATORS ONLY.
DANGEROUS ENVIRONMENTS.
MENTAL ALERTNESS REQUIRED.
electrical components or improperly grounded
The purpose of safety symbols is to attract your attention to possible hazardous conditions. This
manual uses a series of symbols and signal words intended to convey the level of importance of the
safety messages. The progression of symbols is described below. Remember that safety messages by
themselves do not eliminate danger and are not a substitute for proper accident prevention mea-
Model W1876 (For Machines Mfd. Since 07/24)
SAFETY
For Your Own Safety,
Read Manual Before Operating Machine
sures—this responsibility is ultimately up to the operator!
NOTICE
Standard Machinery Safety Instructions
Standard Machinery Safety Instructions
Indicates an imminently hazardous situation which, if not avoided,
WILL result in death or serious injury.
Indicates a potentially hazardous situation which, if not avoided,
COULD result in death or serious injury.
Indicates a potentially hazardous situation which, if not avoided,
MAY result in minor or moderate injury.
This symbol is used to alert the user to useful information about
proper operation of the equipment or a situation that may cause
damage to the machinery.
SAFETY
Read and understand this
owner’s manual BEFORE using machine.
have a higher risk of being hurt or killed. Only
allow trained/supervised people to use this
machine. When machine is not being used,
disconnect power, remove switch keys, or
lock-out machine to prevent unauthorized
use—especially around children. Make
workshop kid proof!
machinery in areas that are wet, cluttered,
or have poor lighting. Operating machinery
in these areas greatly increases the risk of
accidents and injury.
alertness is required for safe operation of
machinery. Never operate under the influence
of drugs or alcohol, when tired, or when
distracted.
Untrained operators
Do not use
Full mental
ELECTRICAL EQUIPMENT INJURY RISKS. You can
be shocked, burned, or killed by touching live
machinery. To reduce this risk, only allow an
electrician or qualified service personnel to
do electrical installation or repair work, and
always disconnect power before accessing or
exposing electrical equipment.
DISCONNECT POWER FIRST. Always disconnect
machine from power supply BEFORE making
adjustments, changing tooling, or servicing
machine. This eliminates the risk of injury
from unintended startup or contact with live
electrical components.
EYE PROTECTION. Always wear ANSI-approved
safety glasses or a face shield when operating
or observing machinery to reduce the risk of
eye injury or blindness from flying particles.
Everyday eyeglasses are not approved safety
glasses.
-7-
Page 10

WEARING PROPER APPAREL. Do not wear loose
clothing, gloves, neckties, or jewelry that can
HAZARDOUS
HEARING PROTECTION.
REMOVE ADJUSTING TOOLS.
INTENDED USAGE.
Industrial
AWKWARD POSITIONS.
CHILDREN & BYSTANDERS.
GUARDS & COVERS.
FORCING MACHINERY. Do not force machine. It
will do the job safer and better at the rate for
loss of control. Before starting, verify machine
malfunction, leading to serious personal injury
from heated surfaces, high traffic areas, harsh
become entangled in moving parts. Always
tie back or cover long hair. Wear non-slip
footwear to avoid accidental slips, which
could cause loss of workpiece control.
DUST. Dust created while using
SAFETY
machinery may cause cancer, birth defects,
or long-term respiratory damage. Be aware of
dust hazards associated with each workpiece
material, and always wear a NIOSH-approved
respirator to reduce your risk.
Always wear hearing
protection when operating or observing
loud machinery. Extended exposure to this
noise without hearing protection can cause
permanent hearing loss.
Tools left on
machinery can become dangerous projectiles
upon startup. Never leave chuck keys,
wrenches, or any other tools on machine.
Always verify removal before starting!
Only use machine for its
intended purpose—never make modifications
without prior approval from Grizzly
. Modifying machine or using it
differently than intended will void the
warranty and may result in malfunction or
mechanical failure that leads to serious
personal injury or death!
Keep proper footing and
balance at all times when operating machine.
Do not overreach! Avoid awkward hand
positions that make workpiece control difficult
or increase the risk of accidental injury.
Keep children and
bystanders at a safe distance from the work
area. Stop using machine if they become a
distraction.
Model W1876 (For Machines Mfd. Since 07/24)
which it was designed.
NEVER STAND ON MACHINE. Serious injury may
occur if machine is tipped or if the cutting
tool is unintentionally contacted.
STABLE MACHINE. Unexpected movement during
operation greatly increases risk of injury or
is stable and mobile base (if used) is locked.
USE RECOMMENDED ACCESSORIES. Consult
this owner’s manual or the manufacturer for
recommended accessories. Using improper
accessories will increase risk of serious injury.
UNATTENDED OPERATION. To reduce the risk
of accidental injury, turn machine OFF and
ensure all moving parts completely stop
before walking away. Never leave machine
running while unattended.
MAINTAIN WITH CARE. Follow all maintenance
instructions and lubrication schedules to
keep machine in good working condition. A
machine that is improperly maintained could
or death.
CHECK DAMAGED PARTS. Regularly inspect
machine for any condition that may affect
safe operation. Immediately repair or replace
damaged or mis-adjusted parts before
operating machine.
MAINTAIN POWER CORDS. When disconnecting
cord-connected machines from power, grab
and pull the plug—NOT the cord. Pulling the
cord may damage the wires inside, resulting
in a short. Do not handle cord/plug with wet
hands. Avoid cord damage by keeping it away
chemicals, and wet/damp locations.
accidental contact with moving parts or flying
debris—make sure they are properly installed,
undamaged, and working correctly.
Guards and covers reduce
EXPERIENCING DIFFICULTIES. If at any time
you experience difficulties performing the
intended operation, stop using the machine!
-8-
Contact Technical Support at (360) 647-0802.
Page 11

Serious cuts, amputation, entanglement, or death can occur from contact with rotating cutterhead
Model W1876 (For Machines Mfd. Since 07/24)
Additional Safety for Jointers
or other moving components! Flying chips from cutting operations can cause eye injuries or
blindness. Workpieces or inserts/knives thrown by cutterhead (kickback) can strike nearby operator
or bystanders with deadly force. To reduce the risk of serious personal injury from these hazards,
operator and bystanders MUST completely heed the hazards and warnings below.
SAFETY
KICKBACK. Occurs when workpiece is ejected
from machine at high rate of speed.
Kickback injuries occur from getting struck
by workpiece or hands being pulled into
cutterhead. To reduce risk of kickback,
only use proper workpieces, safe feeding
techniques, and proper machine setup.
GUARD REMOVAL. Operating jointer without
guards exposes operator to knives/inserts
and other hazardous moving parts. Except
when rabbeting, never operate jointer or
allow it to be connected to power if any
guards are removed. Turn jointer OFF
and disconnect power before clearing
any shavings or sawdust from around
cutterhead. After rabbeting or maintenance
is complete, immediately replace all
guards and ensure they are properly
installed/adjusted before resuming regular
operations.
DULL/DAMAGED KNIVES/INSERTS. Dull or
damaged knives/inserts increase risk of
kickback and cause poor workpiece finish.
Only use sharp, undamaged knives/inserts.
OUTFEED TABLE ALIGNMENT. Setting outfeed
table too high can cause workpiece to hit
table or get stuck while feeding. Setting
outfeed table too low may cause workpiece
to rock or shift while feeding. Both results
will increase risk of kickback. Always keep
outfeed table even with knives/inserts at
highest point during rotation.
INSPECTING STOCK. Impact injuries or kickback
may result from using improper workpieces.
Thoroughly inspect and prepare workpiece
before cutting. Verify workpiece is free of
nails, staples, loose knots or other foreign
material.
MAXIMUM CUTTING DEPTH. To reduce risk of
kickback, never cut deeper than
1
⁄8".
GRAIN DIRECTION. Jointing against the grain or
end grain can increase the risk of kickback.
It also requires more cutting force, which
produces chatter or excessive chip out.
Always joint or surface plane with the grain.
CUTTING LIMITATIONS. Cutting workpieces
that do not meet minimum dimension
requirements can result in kickback or
accidental contact with cutterhead. Never
perform jointing, planing, or rabbeting cuts
on pieces smaller than specified in data sheet.
PUSH BLOCKS. Push blocks reduce risk of
accidental cutterhead contact with hands.
Always use push blocks when planing
materials less than 3" high or wide. Never
pass your hands directly over cutterhead
without a push block.
WORKPIECE SUPPORT. Poor workpiece support
or loss of workpiece control while feeding
will increase risk of kickback or accidental
contact with cutterhead. Support workpiece
with fence continuously during operation.
Support long stock with auxiliary table if
necessary.
FEED WORKPIECE PROPERLY. Kickback or
accidental cutterhead contact may result if
workpiece is fed into cutterhead the wrong
way. Allow cutterhead to reach full speed
before feeding. Never start jointer with
workpiece touching cutterhead. Always feed
workpiece from infeed side to outfeed side
without stopping until cut is complete. Never
move workpiece backwards while feeding.
SECURE KNIVES/INSERTS. Loose knives or
improperly set inserts can be thrown from
cutterhead with dangerous force. Always
verify knives/inserts are secure and properly
adjusted before operation. Straight knives
should never project more than
from cutterhead body.
1
⁄8" (0.125")
-9-
Page 12
Incorrectly wiring or grounding this
personnel should do any required
where only one machine will be
Model W1876 (For Machines Mfd. Since 07/24)
This machine must be connected to the correct size and
type of power supply circuit, or fire or electrical damage
may occur. Read through this section to determine if an
adequate power supply circuit is available. If a correct
circuit is not available, a qualified electrician MUST install
one before you can connect the machine to power.
A power supply circuit includes all electrical equipment
between the breaker box or fuse panel in the building
and the machine. The power supply circuit used for
this machine must be sized to safely handle the fullload current drawn from the machine for an extended
period of time. (If this machine is connected to a circuit
protected by fuses, use a time delay fuse marked D.)
This machine is prewired to operate on a power supply
circuit that has a verified ground and meets the following
requirements:
The full-load current rating is the amperage a machine
draws at 100% of the rated output power. On machines
with multiple motors, this is the amperage drawn by the
largest motor or sum of all motors and electrical devices
that might operate at one time during normal operations.
ELECTRICAL
Circuit Requirements
The machine must be properly set up
before it is safe to operate. DO NOT
connect this machine to the power
source until instructed to do so later
in this manual.
ELECTRICAL
Full-Load Current Rating
Full-Load Current Rating at 120V .................. 10 Amps
Circuit Requirements for 120V
Circuit Type ............... 110V/120V, 60 Hz, Single-Phase
Circuit Size
Plug/Receptacle
............................................. 15 Amps
.................................... NEMA 5-15
machine can cause electrocution, fire,
or machine damage. To reduce this risk,
only an electrician or qualified service
electrical work on this machine.
NOTICE
The circuit requirements listed in this
manual apply to a dedicated circuit—
running at a time. If this machine will
be connected to a shared circuit where
multiple machines will be running at the
same time, consult with an electrician
to ensure that the circuit is properly
sized for safe operation.
-10-
Page 13
use an adapter if the plug will not
Model W1876 (For Machines Mfd. Since 07/24)
This machine MUST be grounded. In the event of certain
types of
a path of least resistance for electric current
order
Improper connection of the equipment-grounding
will
increase
insulation
grounding
cord or plug is necessary, do not connect the equipmentgrounding
Check with a qualified electrician or service personnel
if
or if
properly grounded.
plug is damaged or worn, disconnect it from power, and
immediately replace it with a new one.
We do not recommend using an extension cord with
Any extension cord used with this machine must contain a
plug and receptacle, and
meet the following requirements:
This machine is equipped with a power cord with an
equipment-grounding
plug
a matching
grounded in accordance with local codes and ordinances.
Grounding Requirements
malfunctions or breakdowns, grounding provides
to travel—in
to reduce the risk of electric shock.
wire
the risk of electric shock. The wire with green
(with/without yellow stripes) is the equipment-
wire. If repair or replacement of the power
wire to a live (current carrying) terminal.
you do not understand these grounding requirements,
you are in doubt about whether the tool is
If you ever notice that a cord or
For 120V Connection
wire and NEM A 5-15 grounding
(see figure). The plug must only be inserted into
receptacle that is properly installed and
120V
5-15 PLUG
Figure 3. NEMA 5-15 plug & receptacle.
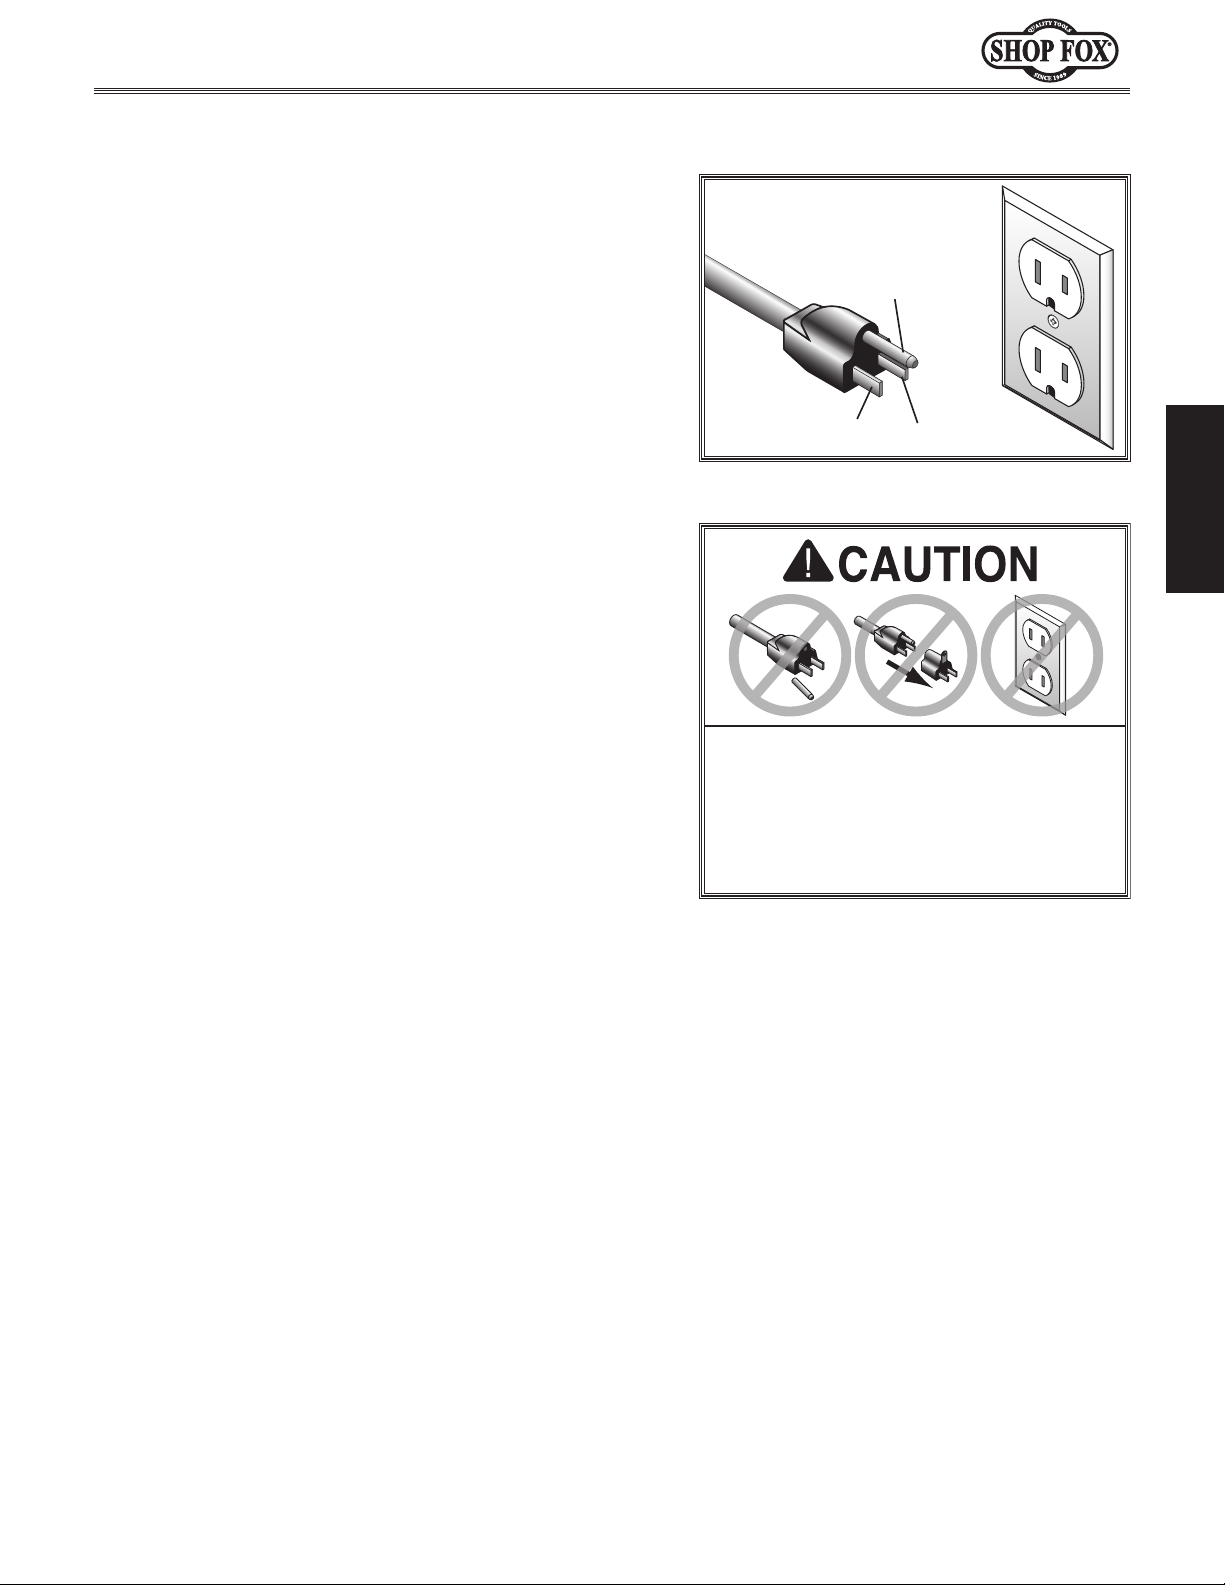
DO NOT modify the provided plug or
fit the receptacle. Instead, have an
electrician install the proper receptacle
on a power supply circuit that meets
the requirements for this machine.
GROUNDED
5-15 RECEPTACLE
Grounding Pin
Neutral Hot
ELECTRICAL
Extension Cords
this machine. Extension cords cause voltage drop, which
may damage electrical components and shorten motor
life. Voltage drop increases with longer extension cords
and smaller gauge sizes (higher gauge numbers indicate
smaller sizes).
ground wire, match the required
Minimum Gauge Size at 120V ...................... 14 AWG
Maximum Length (Shorter is Better).................50 ft.
-11-
Page 14
USE helpers or power
This machine presents
serious injury hazards
to untrained users. Read
to become familiar with
tions before starting the
Unpacking
This machine has been carefully packaged for safe
transportation. If you notice the machine has been
damaged during shipping, please contact your authorized
Shop Fox dealer immediately.
The following items are needed, but not included, to set
up your machine.
Model W1876 (For Machines Mfd. Since 07/24)
SETUP
through this entire manual
the controls and opera-
Items Needed for Setup
Description Qty
• Additional Person for Lifting .............................1
• Safety Glasses (for each person) ........................1
• Degreaser or Solvent for Cleaning .......... As Needed
• Disposable Rags for Cleaning ................ As Needed
• Straightedge 24" ...........................................1
• Level .........................................................1
SETUP
• Hex Wrench 5mm ..........................................1
• Dust Collection System ...................................1
• 21⁄2" Dust Hose .............................................1
• 21⁄2" Hose Clamp ...........................................1
• Flat Head Screwdriver 1⁄4" ...............................1
machine!
Wear safety glasses during
entire setup process!
lifting equipment to lift
this machine. Otherwise,
serious personal injury
may occur.
-12-
Page 15
Keep machine disconnected from
Model W1876 (For Machines Mfd. Since 07/24)
The following is a list of items shipped with your machine.
Before beginning setup, lay these items out and inventory
them.
Note:
check around/inside the machine and packaging materials.
Often, these items get lost in packaging materials while
unpacking or they are pre-installed at the factory.
Inventory
If you cannot find an item on this list, carefully
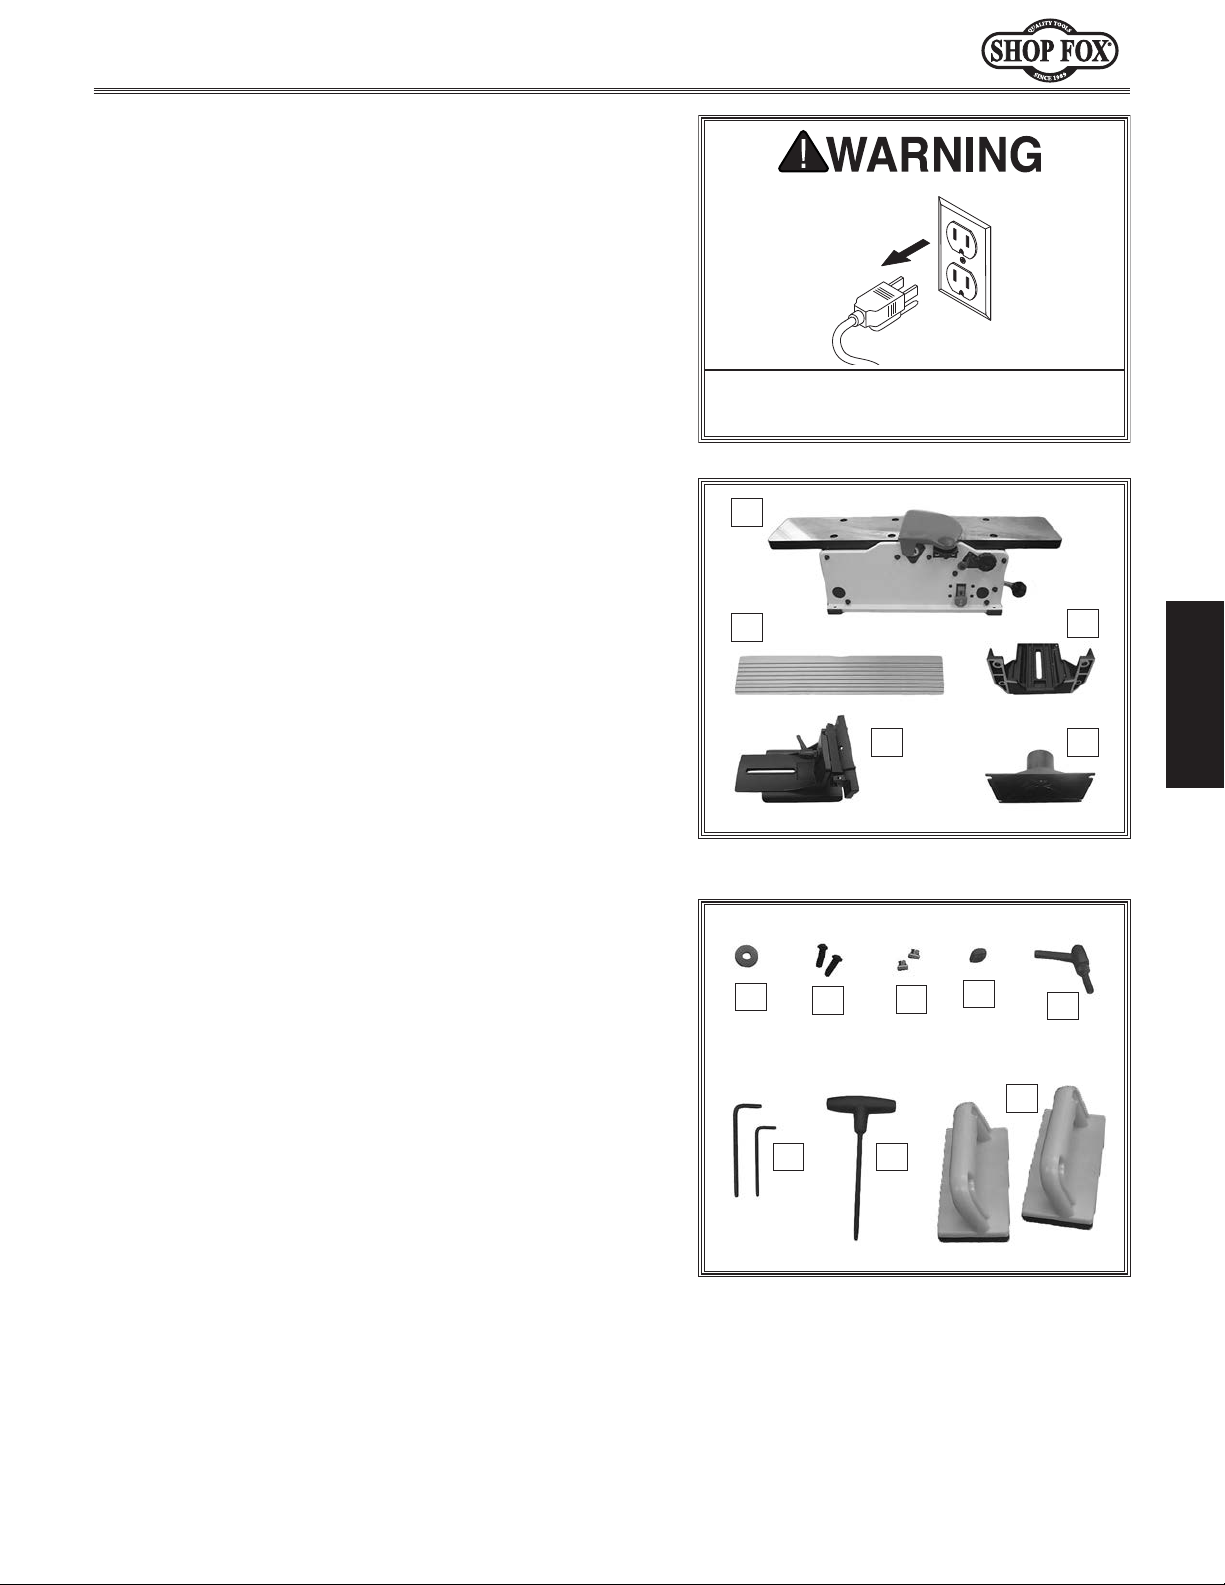
Box Inventory (Figure 4) Qty
A. Jointer w/Cutterhead Guard ............................1
Fence ........................................................1
B.
Fence Support Bracket ...................................1
C.
Fence Slide Bracket .......................................1
D.
Dust Port ....................................................1
E.
power until instructed otherwise.
A
B
C
SETUP
Hardware and Tools (Figure 5
F. Fender Washer 8mm ......................................1
Button Head Cap Screws M6-1 x 16 ....................2
G.
T-Slot Nuts 7mm, M6-1 ...................................2
H.
Square Nut M8-1.25 .......................................1
I.
Fence Slide Lock Handle .................................1
J.
Hex Wrenches 2.5, 4mm ............................1 Ea.
K.
T-Handle Torx Wrench T-25 ..............................1
L.
Push Blocks .................................................2
M.
) Qty
D E
Figure 4. Box inventory.
F
Figure 5. Hardware and tools inventory.
G
K L
H
I
J
M
-13-
Page 16
Workbench Load
Refer to the Machine Specifications for the
weight and footprint specifications of your
machine. Some workbenches may require
additional reinforcement to support the weight
of the machine and workpiece materials.
Consider anticipated workpiece sizes and
additional space needed for auxiliary stands,
work tables, or other machinery when
establishing a location for this machine in the
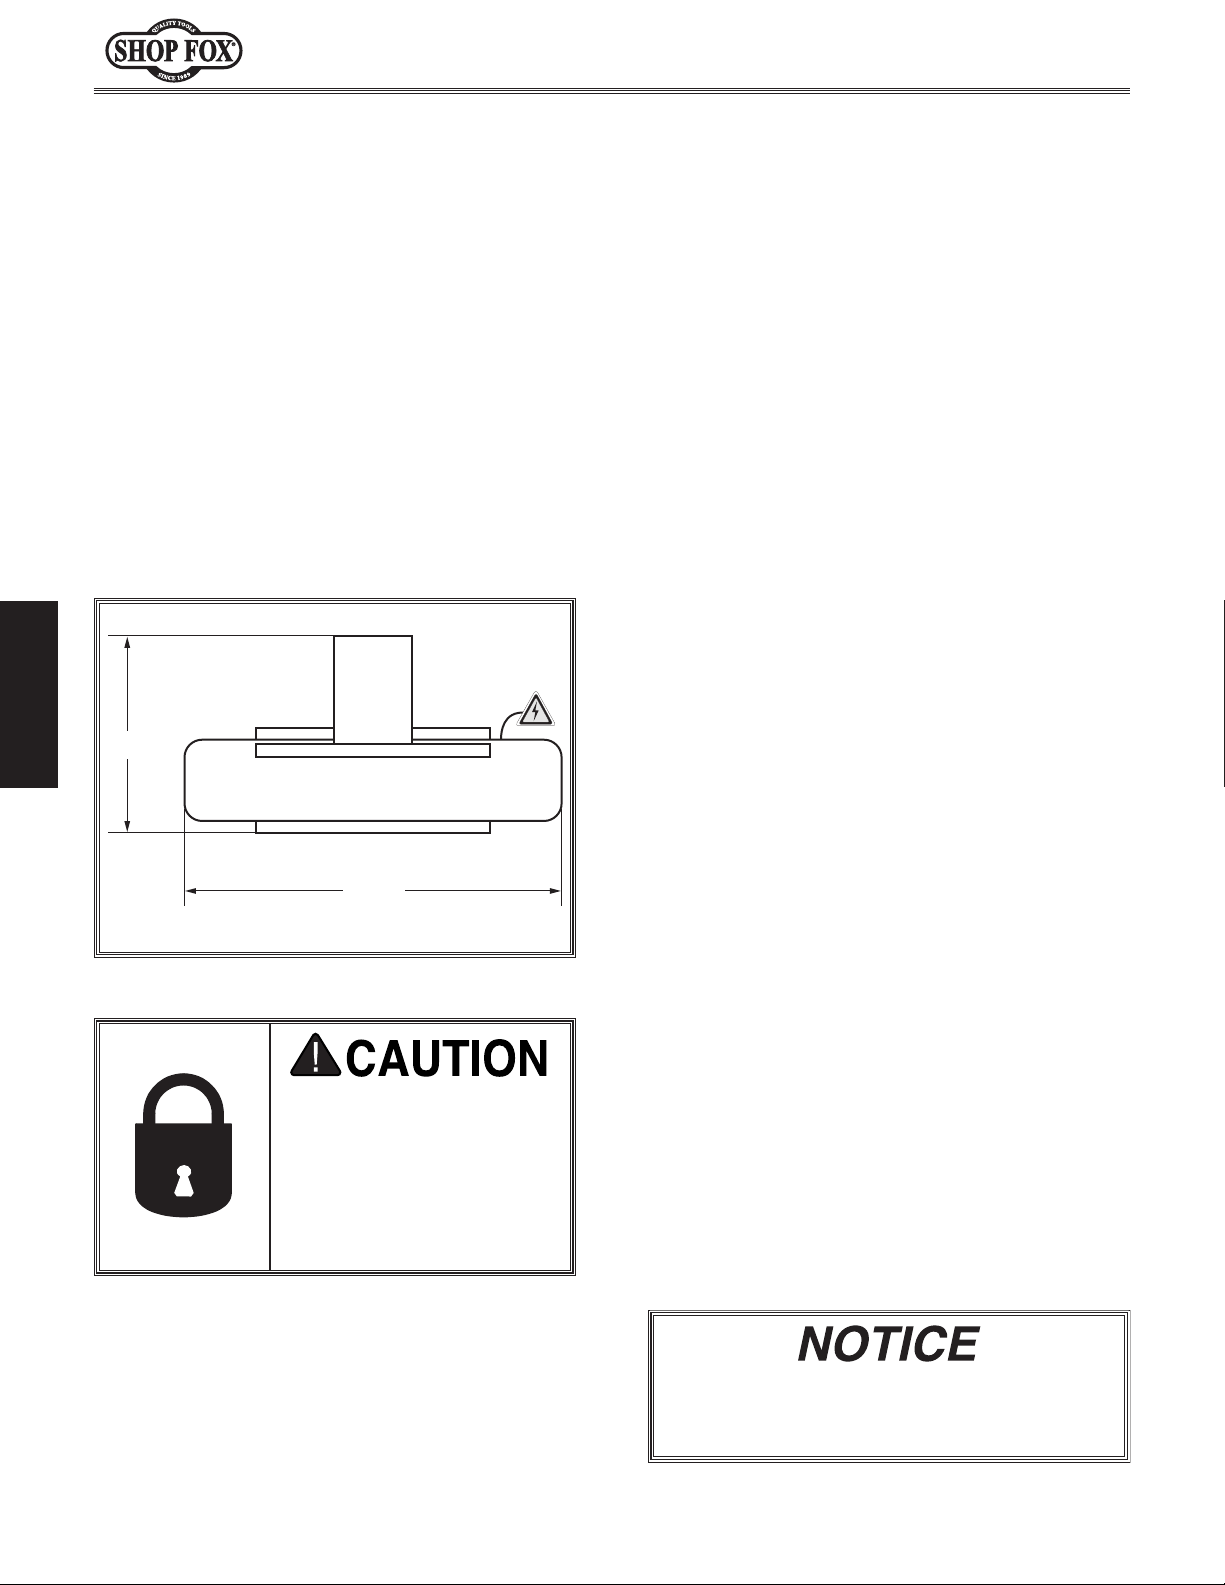
shop. Below is the minimum amount of space
needed for the machine.
The unpainted surfaces of your machine are
coated with a heavy-duty rust preventative that
prevents corrosion during shipment and storage.
This rust preventative works extremely well, but
it will take a little time to clean.
Be patient and do a thorough job cleaning your
machine. The time you spend doing this now will
give you a better appreciation for the proper
care of your machine's unpainted surfaces.
There are many ways to remove this rust
preventative, but the following steps work well
in a wide variety of situations. Always follow the
manufacturer’s instructions with any cleaning
product you use and make sure you work in a
well-ventilated area to minimize exposure to
toxic fumes.
Before cleaning, gather the following:
• Disposable rags
• Cleaner/degreaser (WD•40 works well)
• Safety glasses & disposable gloves
• Plastic paint scraper (optional)
Basic steps for removing rust preventative:
1.
2.
3.
4.
Avoid chlorine-based solvents, such as
acetone or brake parts cleaner, that may
selves with this machine.
Placement Location
SETUP
17½"
Model W1876 (For Machines Mfd. Since 07/24)
Cleaning MachineMachine Placement
Figure 6. Machine dimensions.
INJURY HAZARD! Untrained
users can injure them-
Restrict access to machine
when you are away, especially if it is installed where
children are present.
30"
Put on safety glasses.
Coat the rust preventative with a liberal
amount of cleaner/degreaser, then let it
soak for 5–10 minutes.
Wipe off the surfaces. If your cleaner/
degreaser is effective, the rust
preventative will wipe off easily. If you
have a plastic paint scraper, scrape off as
much as you can first, then wipe off the
rest with the rag.
Repeat Steps 2–3 as necessary until clean,
then coat all unpainted surfaces with a
quality metal protectant to prevent rust.
damage painted surfaces.
-14-
Page 17
The base of this machine has mounting holes that allow it
to be fastened to a workbench or other mounting surface
to prevent it from moving during operation and causing
accidental injury or damage.
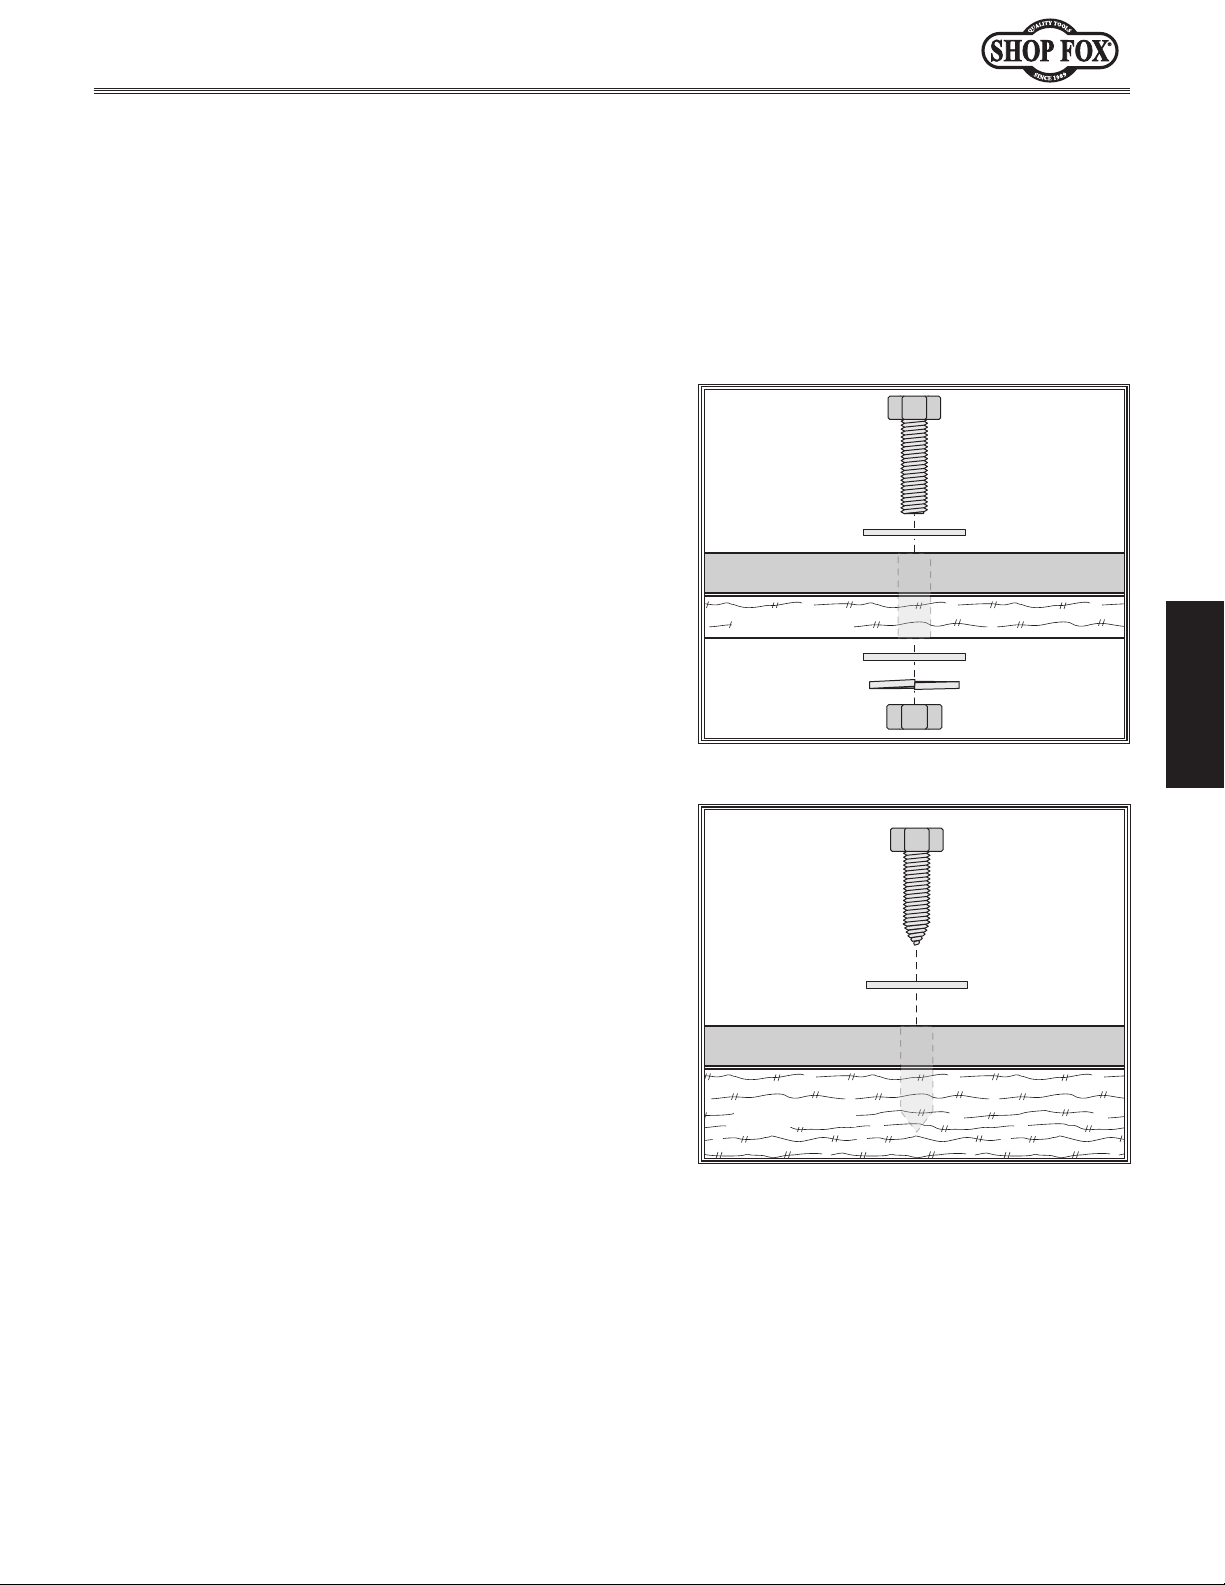
The strongest mounting option is a "Through Mount" (see
example) where holes are drilled all the way through the
workbench—and hex bolts, washers, and hex nuts are
used to secure the machine in place.
Another option is a "Direct Mount" (see example) where
the machine is secured directly to the workbench with lag
screws and washers.
Model W1876 (For Machines Mfd. Since 07/24)
Bench Mounting
Number of Mounting Holes .................................. 4
Diameter of Mounting Hardware Needed
.............1⁄4"
Machine Base
Workbench
Bolt
Flat Washer
Flat Washer
Lock Washer
Hex Nut
SETUP
Figure 7. Typical "Through Mount" setup.
Lag Screw
Flat Washer
Machine Base
Workbench
Figure 8. Typical "Direct Mount" setup.
-15-
Page 18
Assembly
Before beginning the assembly process, refer to Items
Needed for Setup
Ensure all parts have been properly cleaned of any
heavy-duty rust-preventative applied at the factory (if
applicable). Be sure to complete all steps in the assembly
procedure prior to performing the
or connecting
the machine to power.
and gather everything you need.
Test Run
To assemble jointer, do these steps:
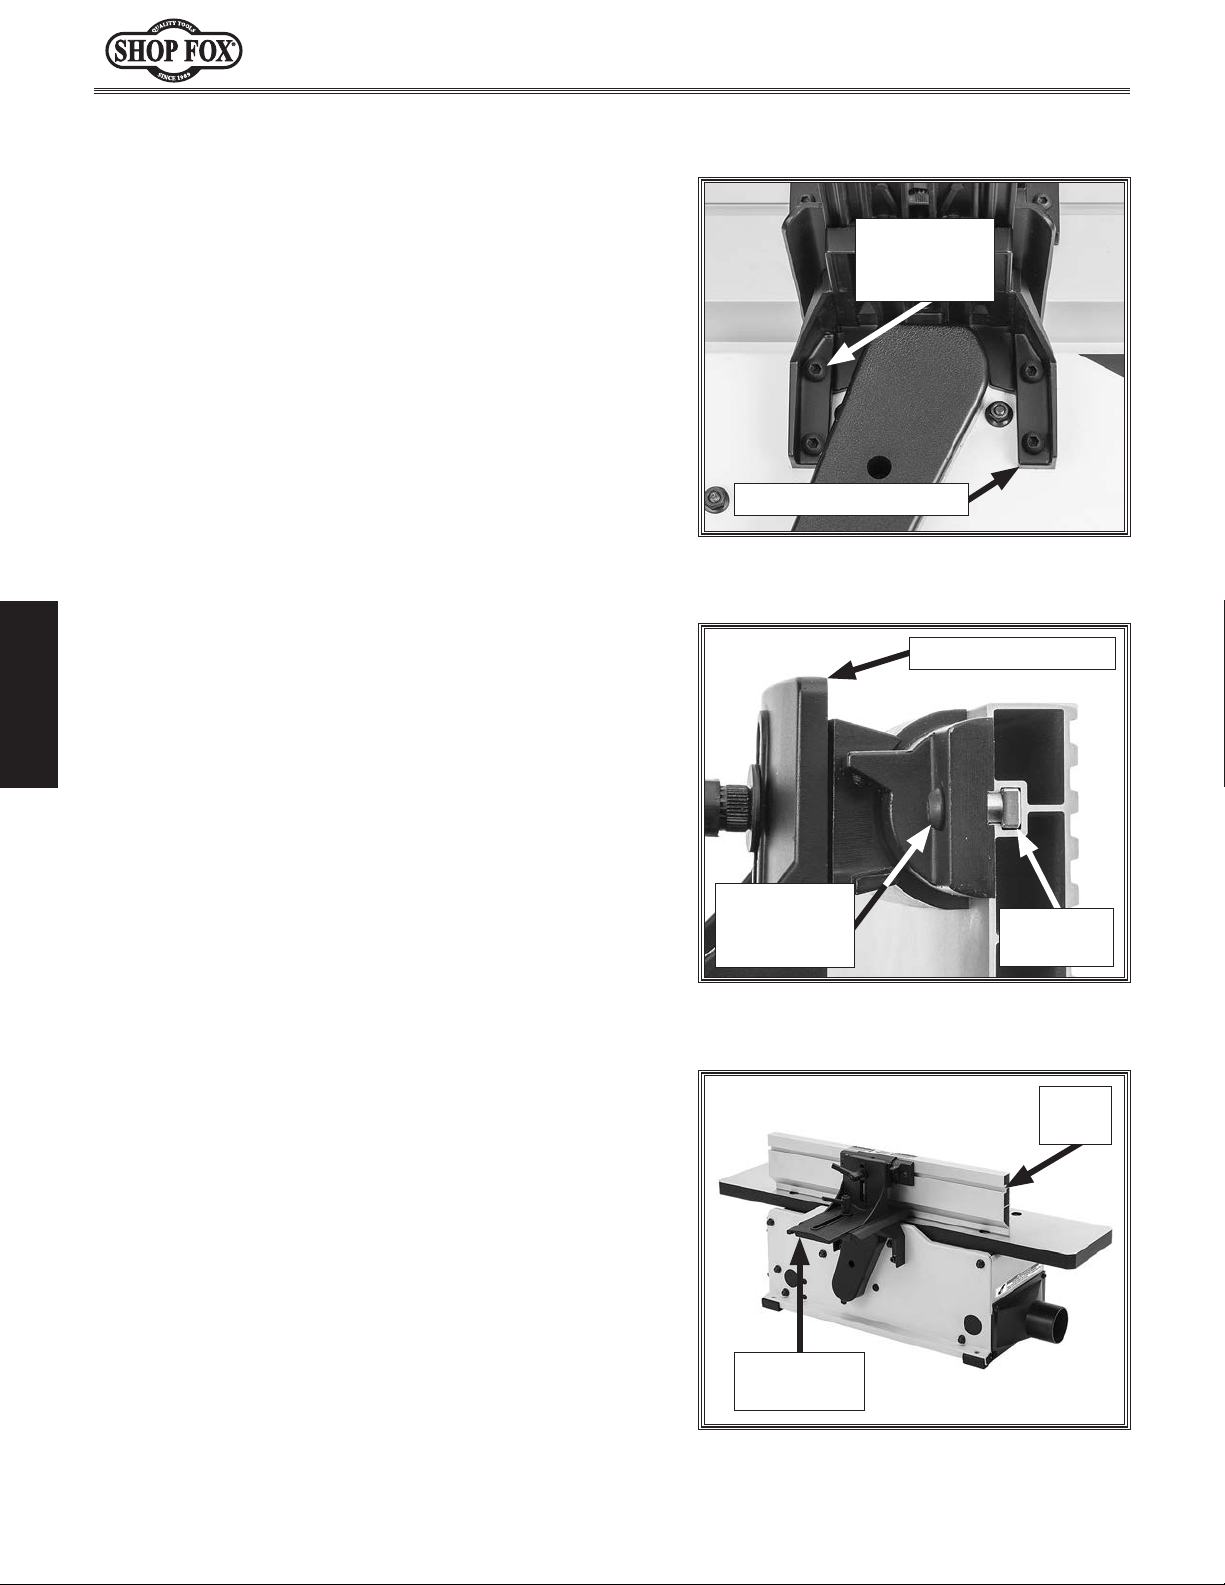
1. Remove (4) button head cap screws from jointer
base and use to install fence support bracket (see
Figure 9).
2. Install (2) M6-1 X 16 button head cap screws and
(2) 7mm T-slot nuts on fence slide bracket (see
Figure 10). DO NOT tighten at this time.
Model W1876 (For Machines Mfd. Since 07/24)
Button Head
Cap Screw
(1 of 4)
Fence Support Bracket
Figure 9. Button head cap screws used to
install fence support bracket.
Fence Slide Bracket
SETUP
3. Install fence on fence slide bracket by inserting (2)
7mm T-slot nuts installed in Step 2 into T-slot on
rear side of fence (see Figure 11).
Button Head
Cap Screw
(1 of 2)
Figure 10. Button head cap screws and
T-slot nuts installation.
T-Slot Nut
(1 of 2)
Fence
T-slot
Fence Slide
Bracket
Figure 11. T-slot on rear side of fence.
-16-
Page 19
Model W1876 (For Machines Mfd. Since 07/24)
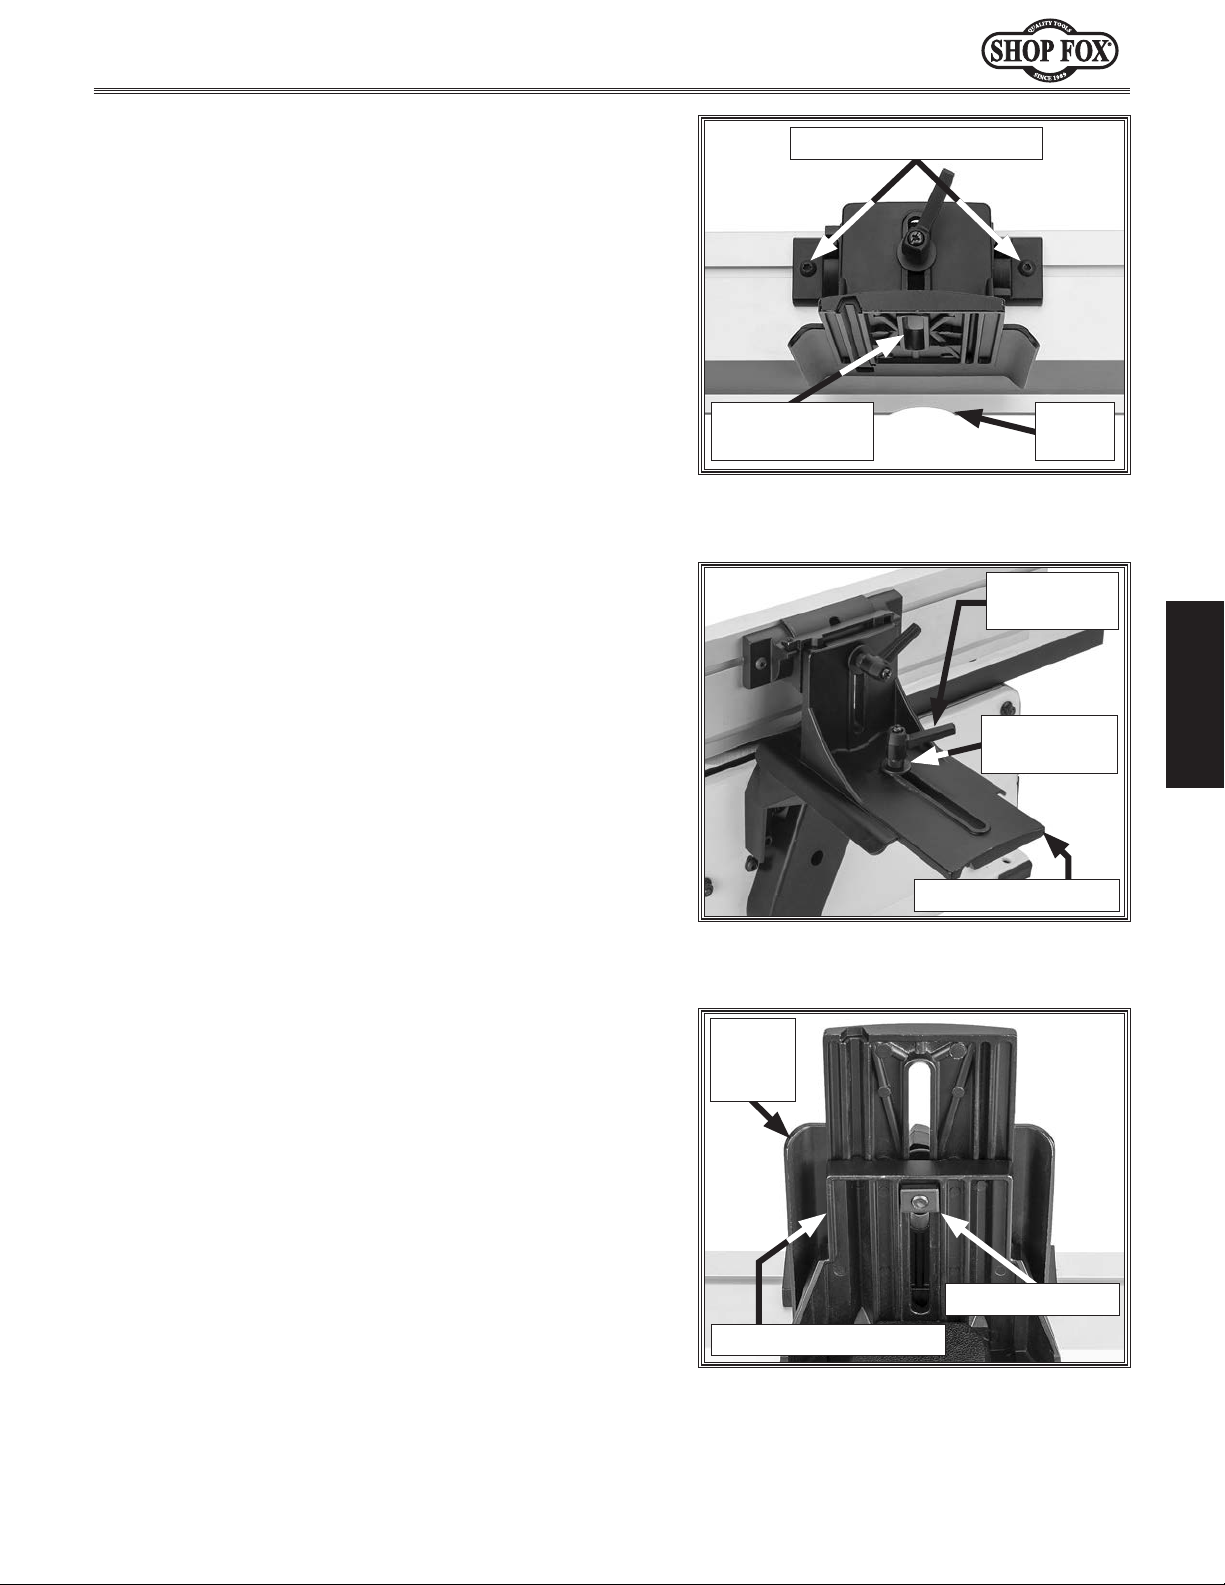
4. Align fence cutout with center of fence slide
bracket, and tighten (2) button head cap screws
installed in Step 2 (see Figure 12).
5. Place fence slide bracket on fence support bracket
and insert fence slide lock handle and 8mm fender
washer through center of brackets (see Figure 13).
Button Head Cap Screws
Fence Support
Bracket Center
Figure 12. Fence cutout aligned with
center of fence slide bracket.
Fence
Cutout
Fence Slide
Lock Handle
SETUP
6. Install 8mm square nut on fence slide lock handle
and tighten handle to lock in place (see Figure 14).
8mm Fender
Washer
Fence Slide Bracket
Figure 13. Fence slide lock handle and flat
washer inserted in center of brackets.
Fence
Slide
Bracket
8mm Square Nut
-17-
Fence Support Bracket
Figure 14. Square nut installed on fence
slide lock handle.
Page 20
Do not confuse this CFM recommendation with the rating
of the dust collector. To determine the CFM at the dust
port, you must consider these variables: (1) CFM rating of
the dust collector, (2) hose type and length between the
dust collector and the machine, (3) number of branches
or wyes, and (4) amount of other open lines throughout
the system. Explaining how to calculate these variables
is beyond the scope of this manual. Consult an expert or
purchase a good dust collection “how-to” book.
This machine creates substantial amounts of dust
Dust Collection
Recommended CFM at Dust Port: ................150 CFM
during operation. Breathing airborne dust on a regular basis can result in permanent respiratory illness.
Reduce your risk by wearing a respirator and capturing the dust with a dust collection system.
Model W1876 (For Machines Mfd. Since 07/24)
SETUP
Tools Needed Qty
Dust Collection System
Dust Hose 2
Hose Clamps 2
Hex Wrench 5mm
To install dust port on jointer, do these steps:
Remove (4) button head cap screws from dust chute
1.
on left side of jointer base.
Place dust port over dust chute and install (4) button
2.
head cap screws removed in Step 1 to secure dust
port in place (see Figure 15).
Note: Dust port must be installed while operating
jointer to help prevent accidental contact with
cutterhead.
To connect a dust collection hose, do these steps:
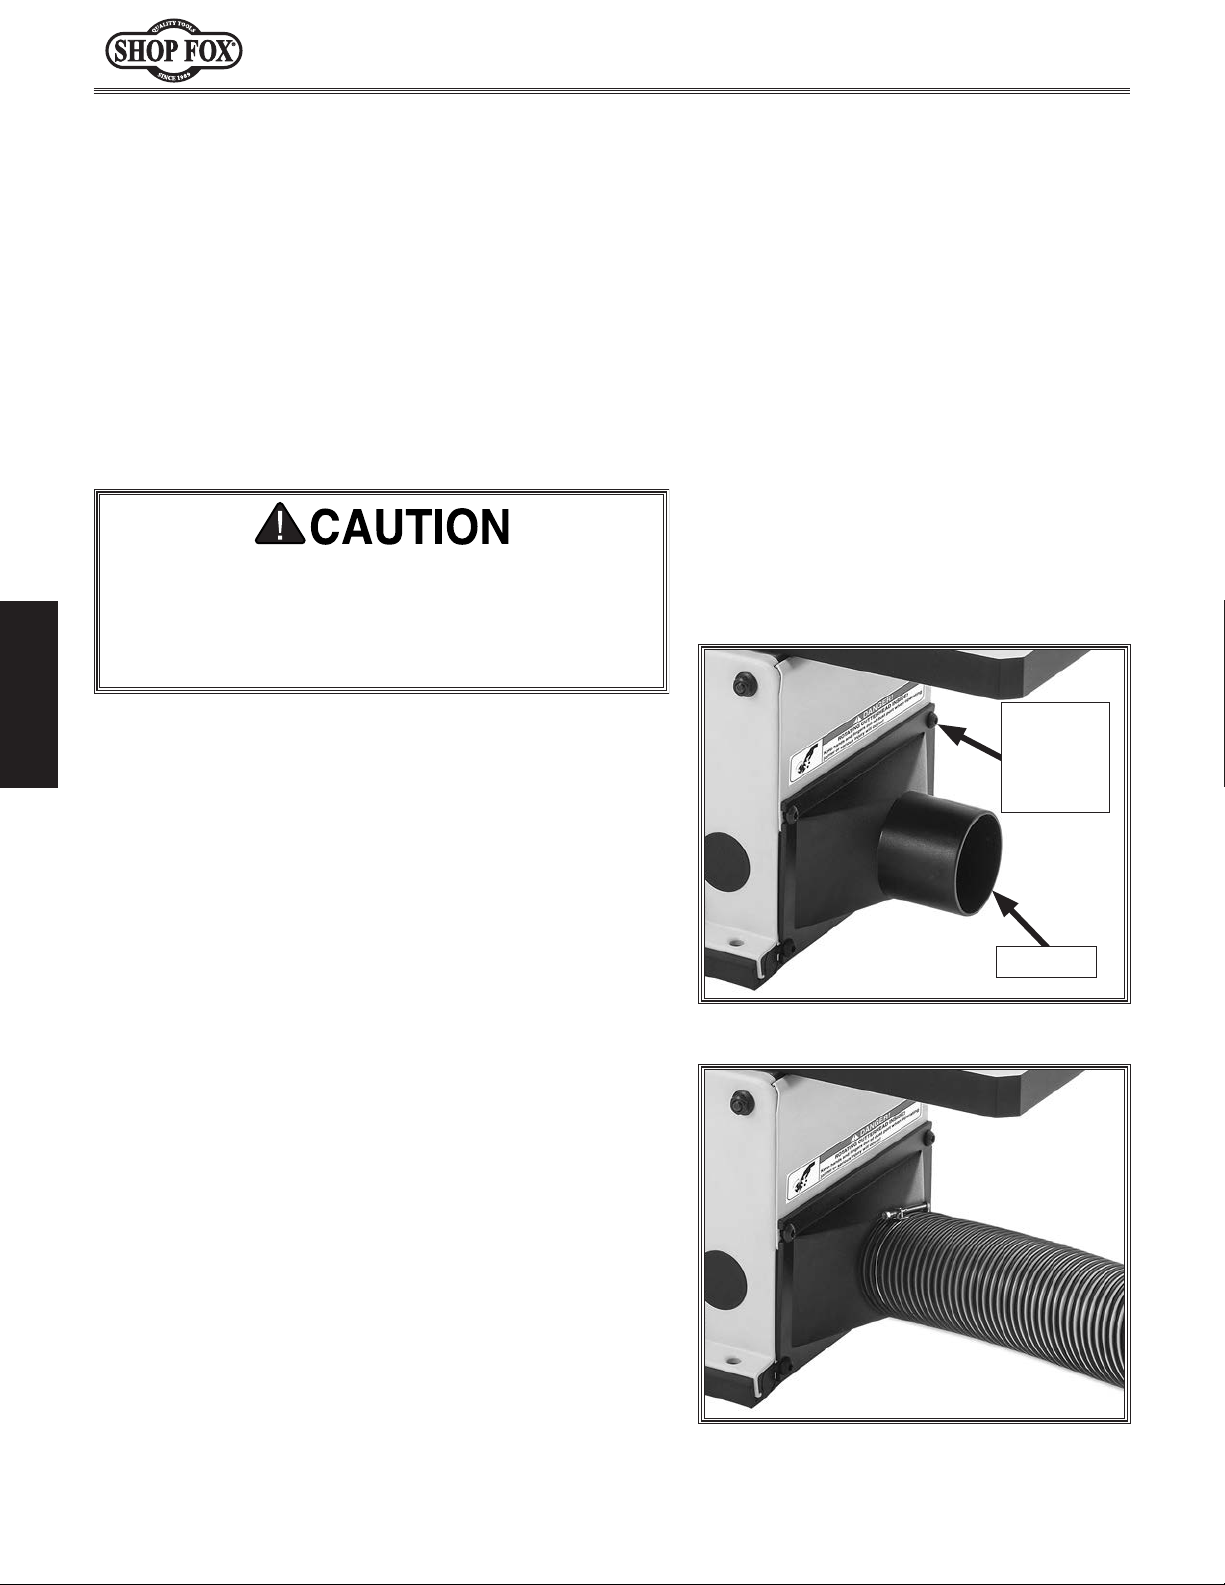
Fit a 21⁄2" dust hose over dust port, as shown in
1.
Figure 16, and secure in place with a hose clamp.
1
⁄2" ..................................................1
1
⁄2" ...............................................2
........................................1
...............................................1
Button
Head Cap
Screw
(1 of 4)
Dust Port
Figure 15. Dust port installed on jointer.
Tug hose to make sure it does not come off.
2.
Note: A tight fit is necessary for proper
performance.
Figure 16. Dust port connected to dust
collection system.
-18-
Page 21
Serious injury or death can result
from using this machine BEFORE
DO NOT start machine until all
or unexpected results that can lead
Once assembly is complete, test run the machine to
ensure it is properly connected to power and safety
components are functioning properly.
If you find an unusual problem during the test run,
immediately stop the machine, disconnect it from power,
and fix the problem BEFORE operating the machine again.
The
section of this
manual can help.
Model W1876 (For Machines Mfd. Since 07/24)
Test Run
Troubleshooting table in the SERVICE
The Test Run consists of verifying the following: 1) The
motor powers up and runs correctly, and 2) the switch
disabling key disables the switch properly.
To test run the machine, do these steps:
Clear all setup tools away from machine.
1.
2. Insert removable key into paddle switch (see Figure
17) and connect machine to power supply.
understanding its controls and related
safety information. DO NOT operate, or
allow others to operate, machine until
the information is understood.
preceding setup instructions have been
performed. Operating an improperly set
up machine may result in malfunction
to serious injury, death, or machine/
property damage.
SETUP
Turn machine ON, verify motor operation, then turn
3.
machine OFF.
The motor should run smoothly and without unusual
noises.
Remove paddle switch key.
4.
Try to start machine with paddle switch. The
5.
machine should not start.
— If machine does not start, the switch disabling
feature is working as designed.
— If machine does start, immediately stop the
machine. The switch disabling feature is not
working correctly. This safety feature must
work properly before proceeding with regular
operations. Call Tech Support for help.
6. After approximately 16 hours of operation, adjust
drive belt tension as instructed in Replacing/
Tensioning Belt on Page 36.
Figure 17. Inserting removable key into
ON/OFF paddle switch.
IMPORTANT: During this first 16 hours, the belt will
stretch and seat into the pulley groove. After this
time, you must re-tension the belt to avoid slippage
and burn out.
-19-
Page 22
This machine will perform many types of operations
that are beyond the scope of this manual. Many of these
operations can be dangerous or deadly if performed
incorrectly.
The instructions in this section are written with the
understanding that the operator has the necessary
knowledge and skills to operate this machine. If at any
time you are experiencing difficulties performing any
operation, stop using the machine!
The overview below provides the novice machine operator
with a basic understanding of how the machine is used
during operation, so the machine controls/components
discussed later in this manual are easier to understand.
Due to its generic nature, this overview is
to be an instructional guide.
OPERATIONS
General
Model W1876 (For Machines Mfd. Since 07/24)
To reduce your risk of serious injury
or damage to the machine, read this
entire manual BEFORE using machine.
NOT intended
To complete a typical operation with the jointer, the
operator does the following:
Examines workpiece to verify it is safe and suitable
1.
for jointing.
Adjusts fence for width of workpiece and locks it in
2.
place.
OPERATIONS
Adjusts fence tilt, if necessary.
3.
Adjusts infeed table height to set depth of cut per
4.
pass.
Ensures cutterhead guard position and operation are
5.
functioning properly.
Puts on safety glasses, respirator, and any other
6.
required protective equipment.
Starts jointer.
7.
Using push blocks as needed, holds workpiece firmly
8.
against infeed table and fence, and feeds workpiece
into cutterhead at a steady and controlled rate until
entire length of workpiece has been cut and it clears
the cutterhead on the outfeed table side.
-20-
To reduce the risk of eye injury and
long-term respiratory damage, always
wear safety glasses and a respirator
while operating this machine.
If you are an inexperienced operator,
we strongly recommend that you read
books or trade articles, or seek training
from an experienced operator of this
type of machinery before performing
unfamiliar operations. Above all, safety
must come first!
Repeats cutting process described
9.
above until desired results are
achieved.
Stops jointer.
10.
Page 23
Model W1876 (For Machines Mfd. Since 07/24)
Stock Inspection
Follow these rules when choosing and jointing stock:
• DO NOT joint or surface plane stock that contains
large or loose knots. Injury to the operator or
damage to the workpiece can occur if a knot
becomes dislodged during the cutting operation.
CORRECT
ROTATION
OUTFEED TABLE
FEED DIRECTION
INFEED TABLE
With Grain
• DO NOT joint or surface plane against the grain
direction. Cutting against the grain increases the
likelihood of kickback, as well as tear-out on the
workpiece.
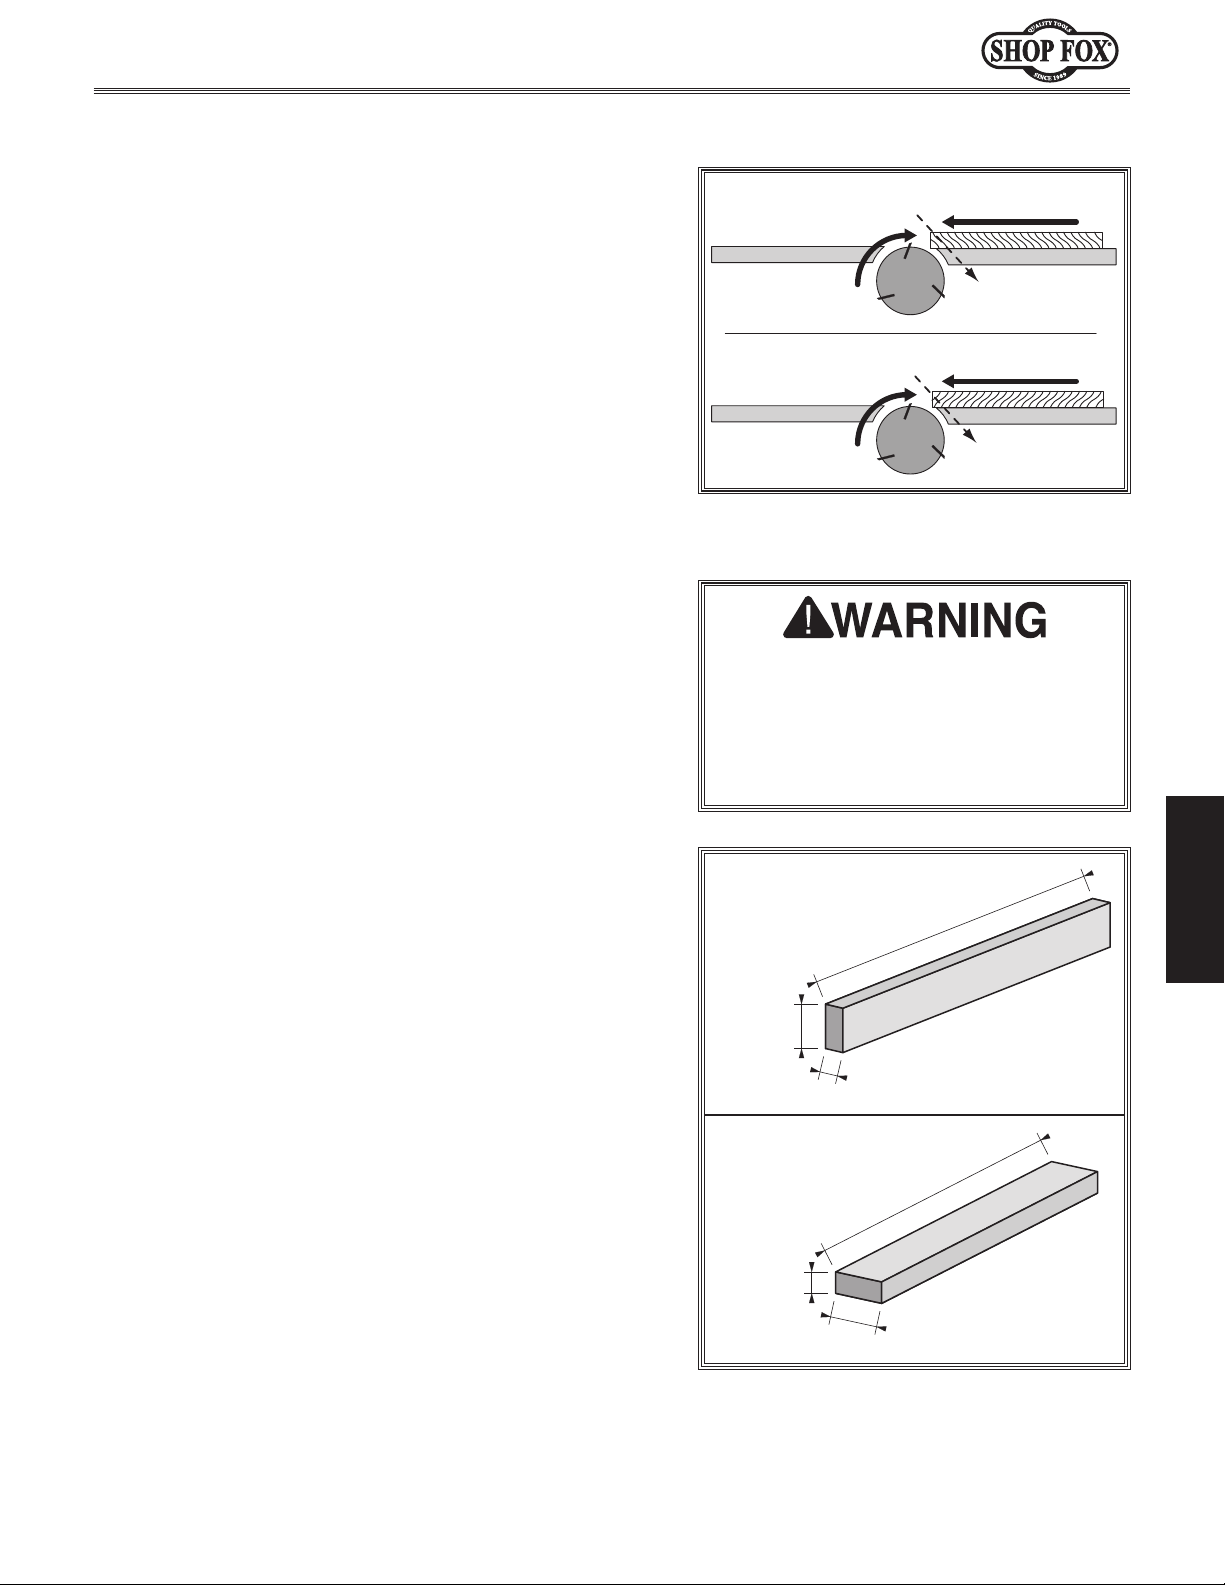
• Jointing and surface planing with the grain
produces a better finish and is safer for the
operator. Cutting with the grain is described as
feeding the stock on the jointer so the grain points
down and toward you as viewed on the edge of the
stock (see Figure 18).
Note: If the grain changes direction along the edge
of the board, decrease the cutting depth and make
additional passes.
• Only cut natural wood. This jointer is only designed
for cutting natural wood stock. Never use it to cut
MDF, particle board, plywood, laminates, drywall,
backer board, metals, glass, stone, tile, products
with lead-based paint, or products that contain
asbestos. Cutting these may lead to injury or
machine damage.
INCORRECT
ROTATION
OUTFEED TABLE
FEED DIRECTION
INFEED TABLE
Against Grain
Figure 18. Proper grain alignment with
cutterhead.
Make sure your workpiece exceeds
the minimum dimension requirement
shown below before processing it
through the jointer, or the workpiece
may break or kick back during the
operation.
Edge Jointing
8" Min.
OPERATIONS
• Scrape all glue off the workpiece before jointing.
Glue deposits on the workpiece, hard or soft, will
gum up the cutterhead and produce poor results.
• Remove foreign objects from the workpiece. Make
sure that any stock you process with the jointer
is clean and free of dirt, nails, staples, tiny rocks
or any other foreign objects that could damage
the cutterhead. These particles could also cause a
spark as they strike the cutterhead and create a fire
hazard.
IMPORTANT: Wood stacked on a concrete or dirt
surface can have small pieces of concrete or stone
pressed into the surface.
• Make sure all stock is sufficiently dried before
jointing. Wood with a moisture content over 20%
will cause unnecessary wear on the cutters and poor
cutting results. Excess moisture can also hasten rust
and corrosion.
-21-
3
/4" Min.
1
/4" Min.
Surface Planing
8" Min.
1
/2" Min.
3
/4" Min.
Figure 19. Minimum stock dimensions for
jointer.
Page 24
Setting Depth of Cut
The depth of cut on a jointer affects the amount of
material removed from the bottom of the workpiece as it
passes over the cutterhead.
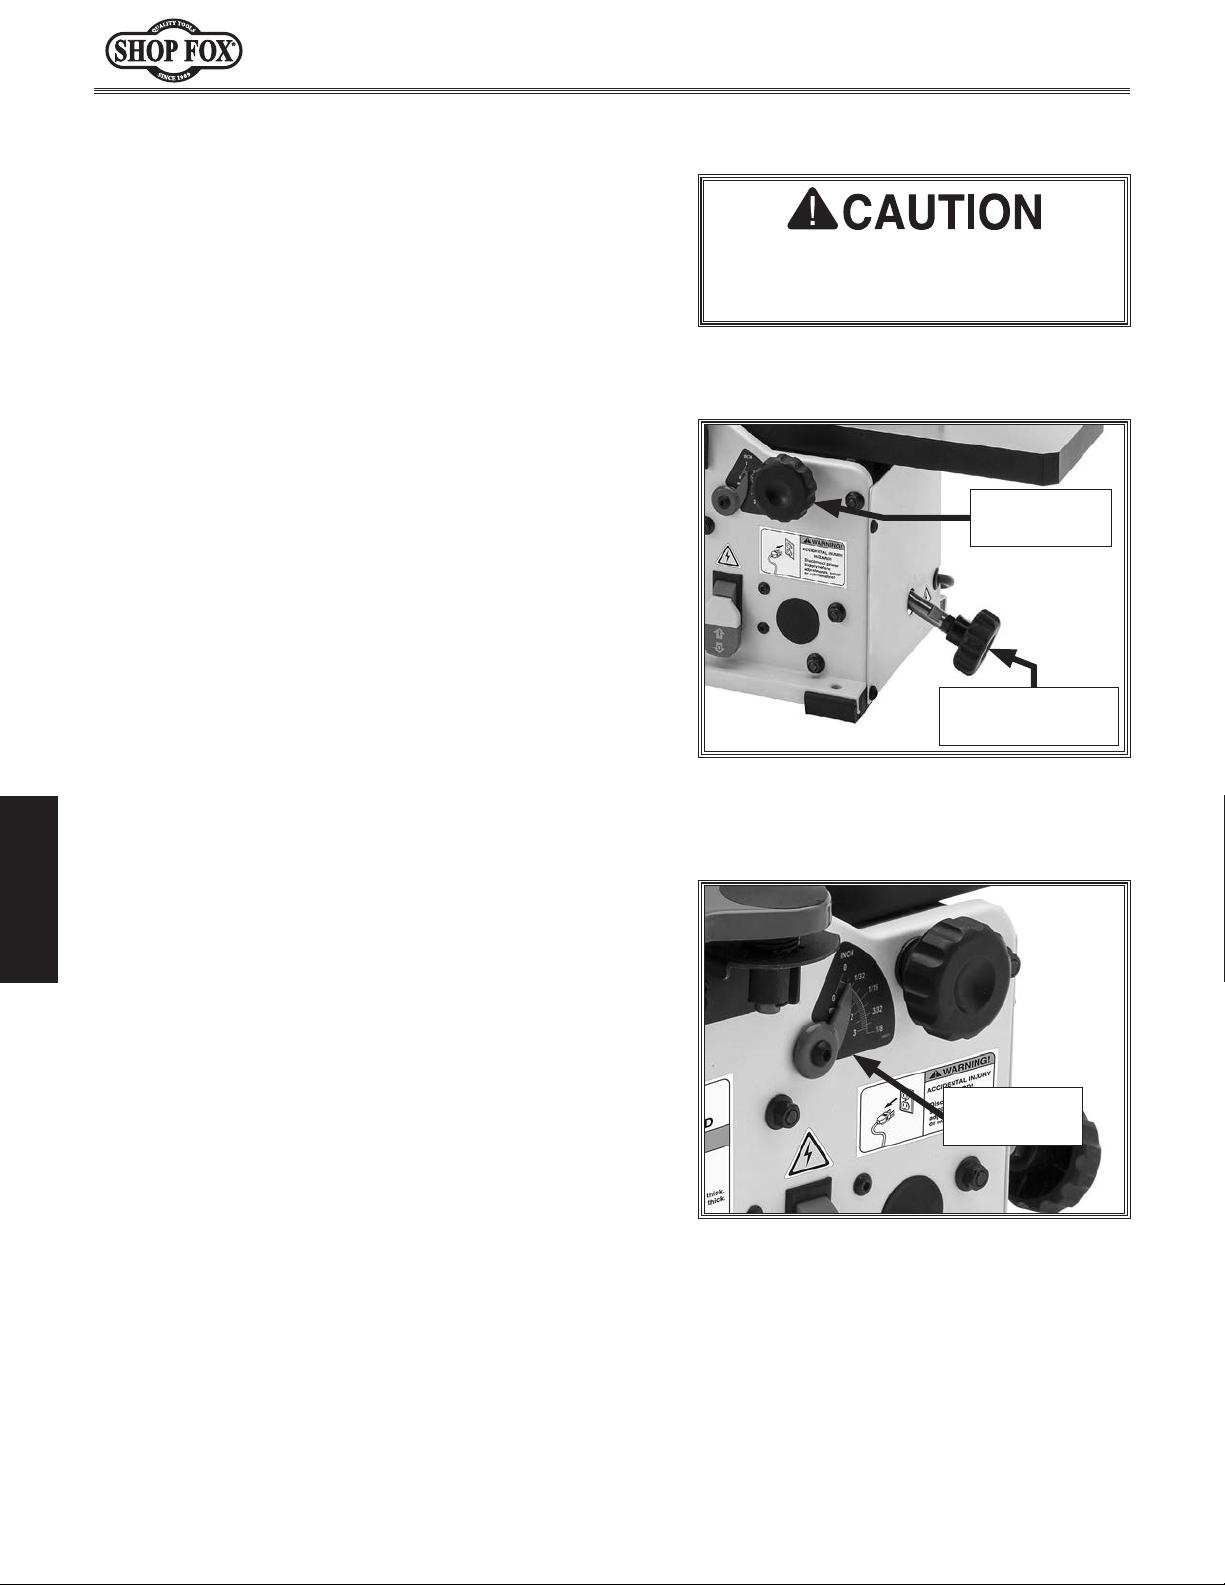
Depth of cut is set by adjusting the height of the infeed
table relative to the outfeed table, and cutterhead
knives/inserts at top dead center (TDC).
Adjusting Infeed Table Height
To adjust infeed table height, loosen table height
lock knob, rotate infeed table adjustment knob
counterclockwise to raise table, or clockwise to lower
table, and then tighten table height lock knob to secure
setting (see Figure 20).
Model W1876 (For Machines Mfd. Since 07/24)
DO NOT exceed 1⁄8" depth of cut per
pass on this machine or kickback and
serious injury may occur!
Table Height
Lock Knob
Depth-of-Cut Scale
Depth of cut can be referenced directly from the scale
located on front of jointer (see Fig ure 21).
OPERATIONS
Infeed Table
Adjustment Knob
Figure 20. Location of depth-of-cut
controls.
Depth-of-Cut
Scale
Figure 21. Location of depth-of-cut scale.
-22-
Page 25
Model W1876 (For Machines Mfd. Since 07/24)
Squaring Stock
Squaring stock means making it flat and parallel along
both length and width, and making the length and width
perpendicular to one another. The purpose of squaring
stock is to prepare it for accurate cuts and construction
later on.
A properly "squared up" workpiece is essential for tasks
such as accurate table saw cuts, glue-ups/laminations,
cutting accurate bevels on a bandsaw, and many other
applications where one surface of a workpiece is used to
reference another.
Items Needed Qty
Jointer ............................................................1
Planer
Table Saw
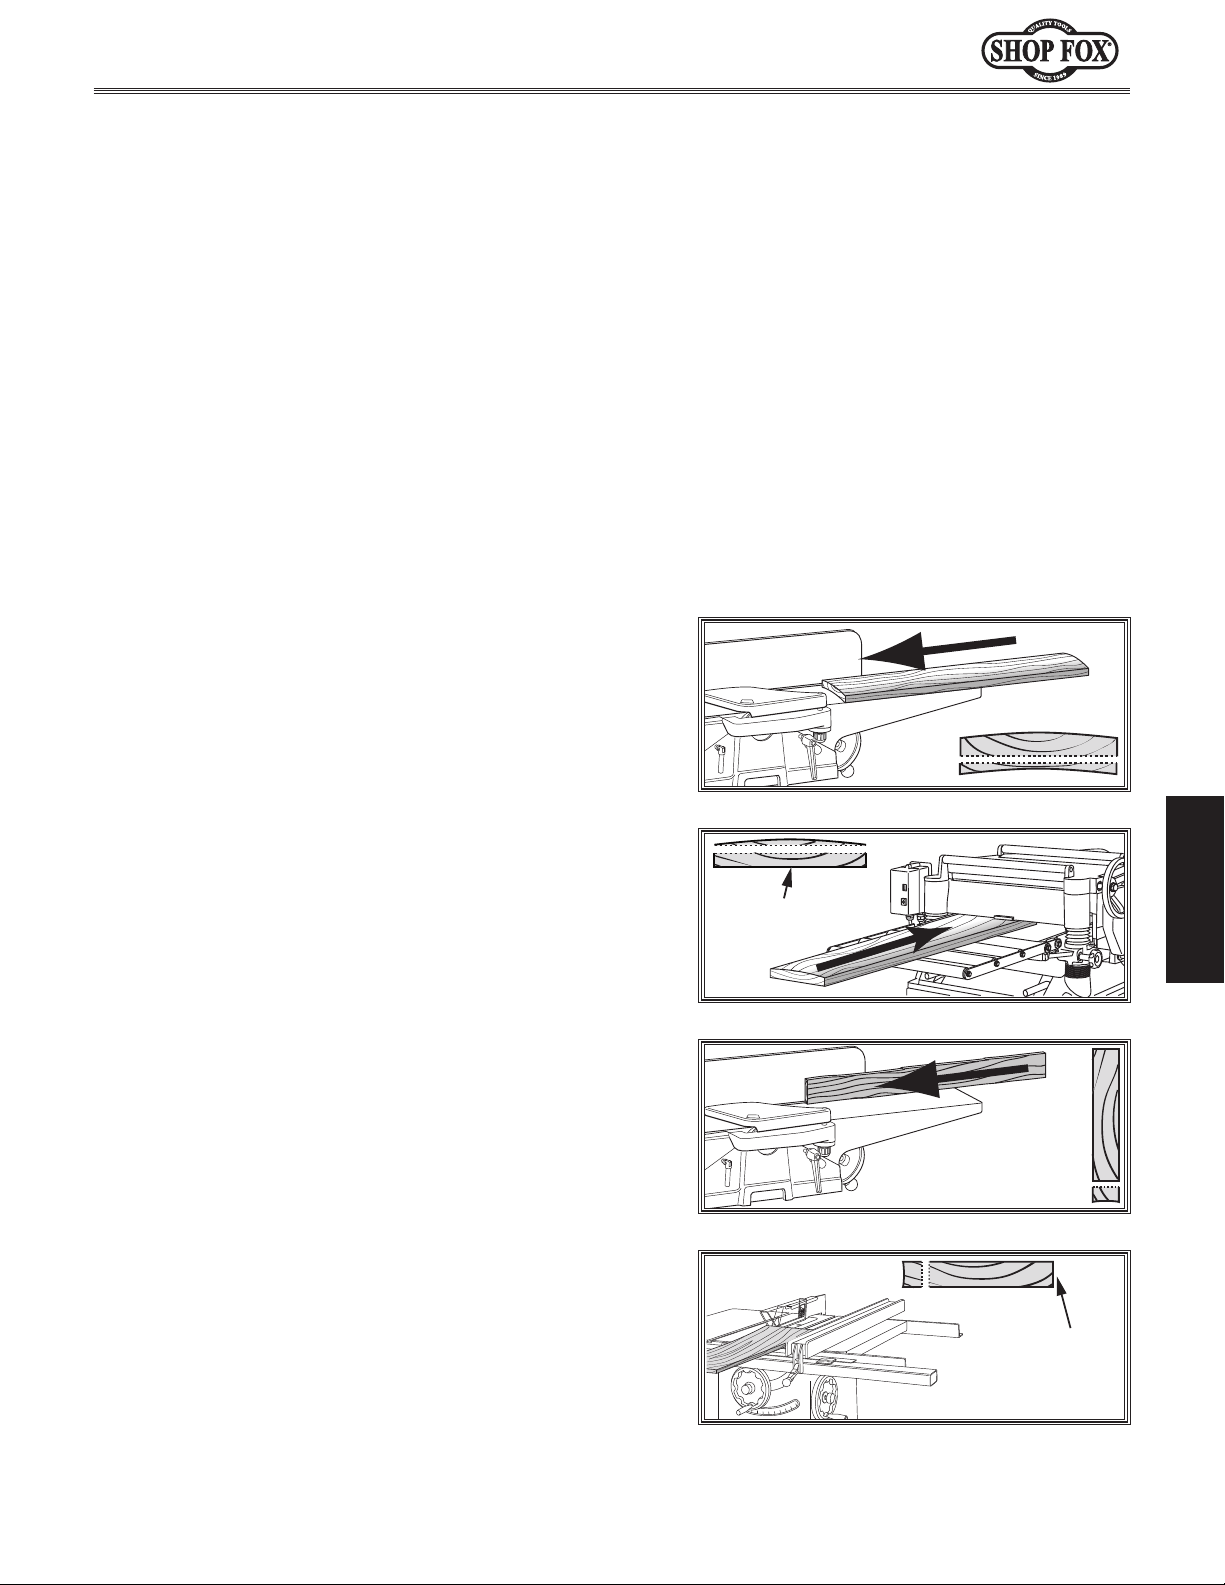
Squaring stock involves four steps performed in the
order below:
.............................................................1
........................................................1
Surface Plane on the Jointer: Concave face of
1.
workpiece is surface planed flat with jointer.
Surface Plane on a Thickness Planer: Opposite face
2.
of workpiece is surface planed flat with a thickness
planer.
3. Edge Joint on the Jointer: Concave edge of
workpiece is jointed flat with jointer.
4. Rip Cut on a Table Saw: Jointed edge of workpiece
is placed against a table saw fence and opposite
edge cut off.
Previously Surface
Planed Face
45
30
15
OPERATIONS
Previously
Jointed
Edge
-23-
Page 26
Surface Planing
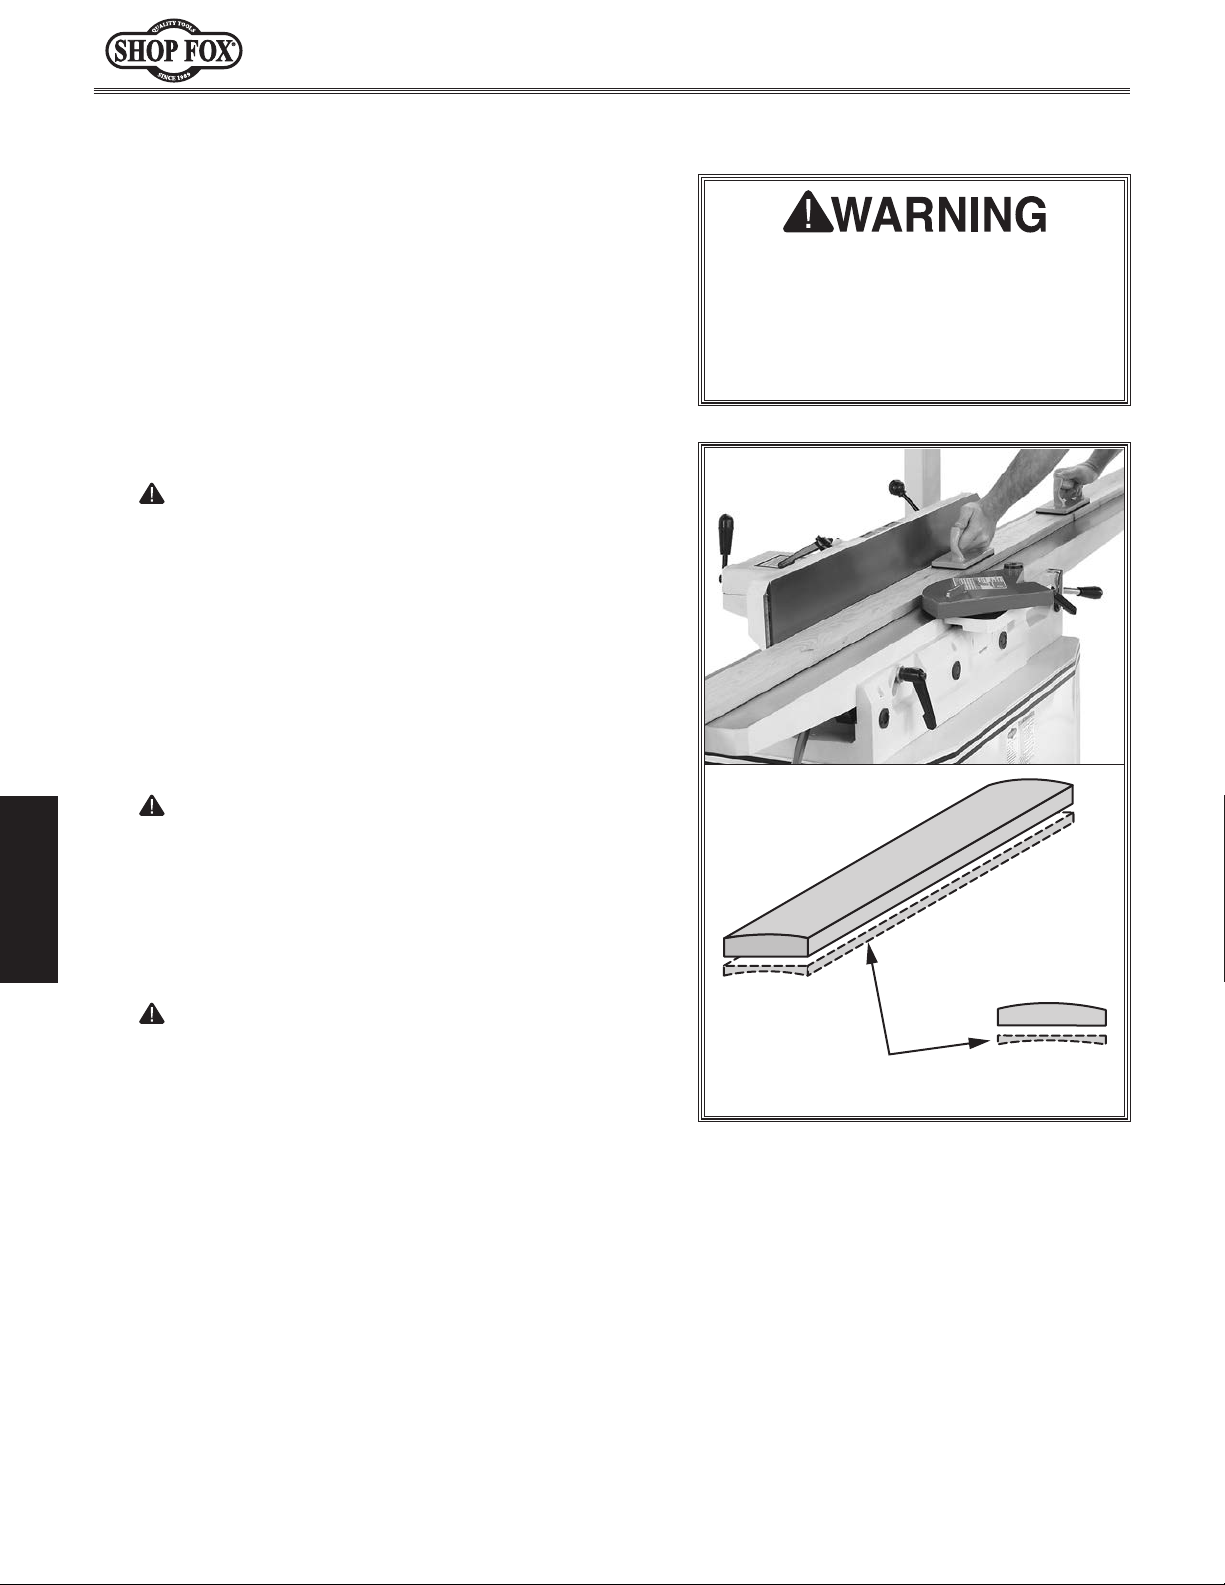
The purpose of surface planing (see Figure 22) on the
jointer is to make one flat face on a piece of stock to
prepare it for thickness planing on a planer.
To surface plane on jointer, do these steps:
Inspect stock to ensure it is safe and suitable for the
1.
operation (refer to Stock Inspection on Page 21).
Set infeed table height to desired cutting depth for
2.
each pass.
Model W1876 (For Machines Mfd. Since 07/24)
Failure to use push blocks when surface planing may result in cutterhead
contact, which will cause serious personal injury. Always use push blocks to
protect your hands when surface planing on the jointer.
CAUTION: To minimize risk of kickback, do not
exceed a cutting depth of
planing.
Set fence to 90°.
3.
Start jointer.
4.
5. Place workpiece firmly against fence and infeed
table with concave side facing down, as shown in
Figure 22.
CAUTION: To ensure workpiece remains stable
during cut, concave sides of workpiece must face
toward table and fence.
Feed workpiece completely across cutterhead while
6.
OPERATIONS
keeping it firmly against fence and tables during the
entire cut.
CAUTION: Keep hands at least 4" away from
cutterhead during the entire cut. Instead of allowing
a hand to pass directly over cutterhead, lift it up
and over cutterhead, and safely reposition it on the
outfeed side to continue supporting workpiece. Use
push blocks whenever practical to further reduce
risk of accidental hand contact with cutterhead.
1
⁄16" per pass when surface
Removed
Surface
Figure 22. Example of a typical surface
planing operation.
Repeat Step 6 until entire surface is flat.
7.
Tip: When squaring up stock, cut opposite side of
workpiece with a planer instead of the jointer to
ensure both sides are parallel.
-24-
Page 27
Model W1876 (For Machines Mfd. Since 07/24)
Edge Jointing
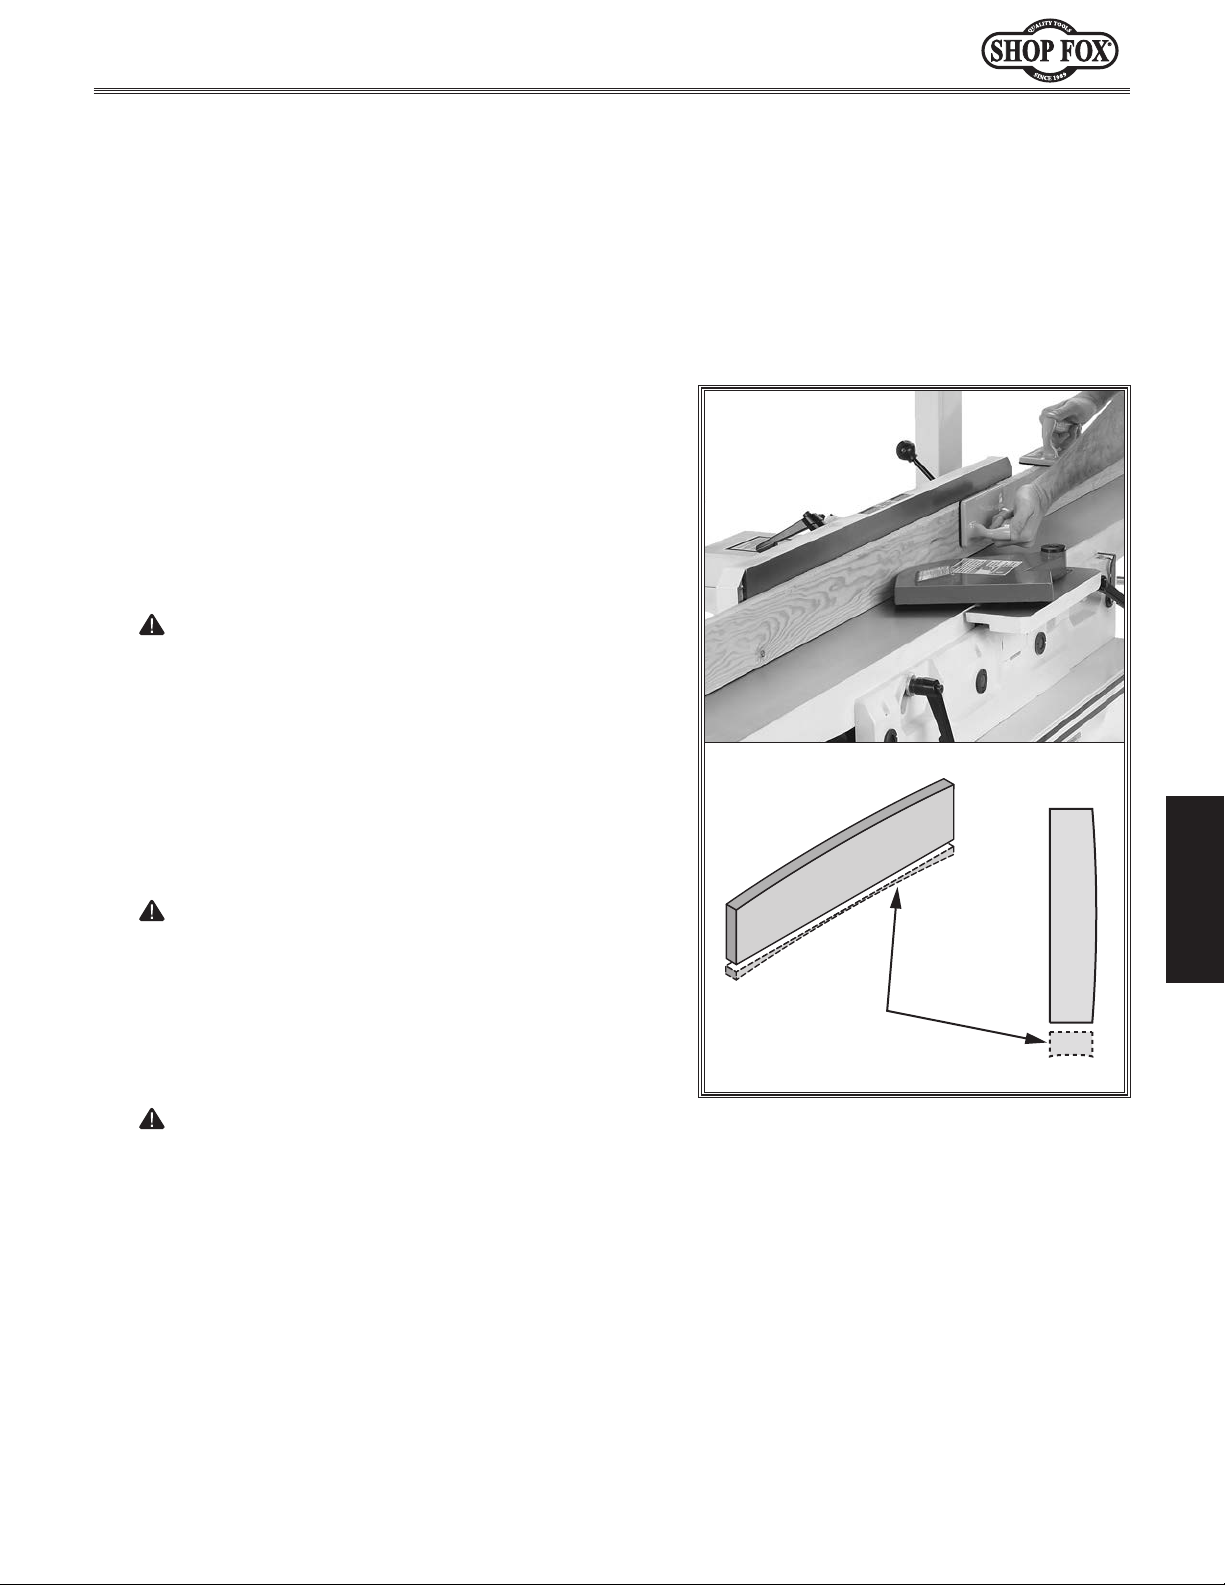
Edge jointing (see Figure 23) produces a flat and true
surface along the side of a workpiece by removing uneven
areas. It is an essential step for squaring up warped or
rough stock and when preparing a workpiece for joinery
or finishing.
To edge joint on jointer, do these steps:
Inspect stock to ensure it is safe and suitable for the
1.
operation (refer to Stock Inspection on Page 21).
Surface plane workpiece (refer to Surface Planing
2.
on Page 24).
Set infeed table height to desired cutting depth for
3.
each pass.
CAUTION: To minimize risk of kickback, do not
exceed a cutting depth of
Set fence to 90°.
4.
Start jointer.
5.
6. Place workpiece firmly against fence and infeed
table with concave side facing down, as shown in
Figure 23.
CAUTION: To ensure workpiece remains stable
during cut, concave sides of workpiece must face
toward table and fence.
Feed workpiece completely across cutterhead while
7.
keeping it firmly against fence and tables during the
entire cut.
CAUTION: Keep hands at least 4" away from
cutterhead during the entire cut. Instead of allowing
a hand to pass directly over cutterhead, lift it up
and over cutterhead, and safely reposition it on the
outfeed side to continue supporting workpiece. Use
push blocks whenever practical to further reduce
risk of accidental hand contact with cutterhead.
1
⁄8" per pass.
OPERATIONS
Removed
Surface
Figure 23. Example of a typical edge
jointing operation.
Repeat Step 6 until the entire edge is flat.
8.
Tip: When squaring up stock, cut opposite edge of
workpiece with a table saw instead of the jointer—
otherwise, both edges of workpiece will not be
parallel with each other.
-25-
Page 28
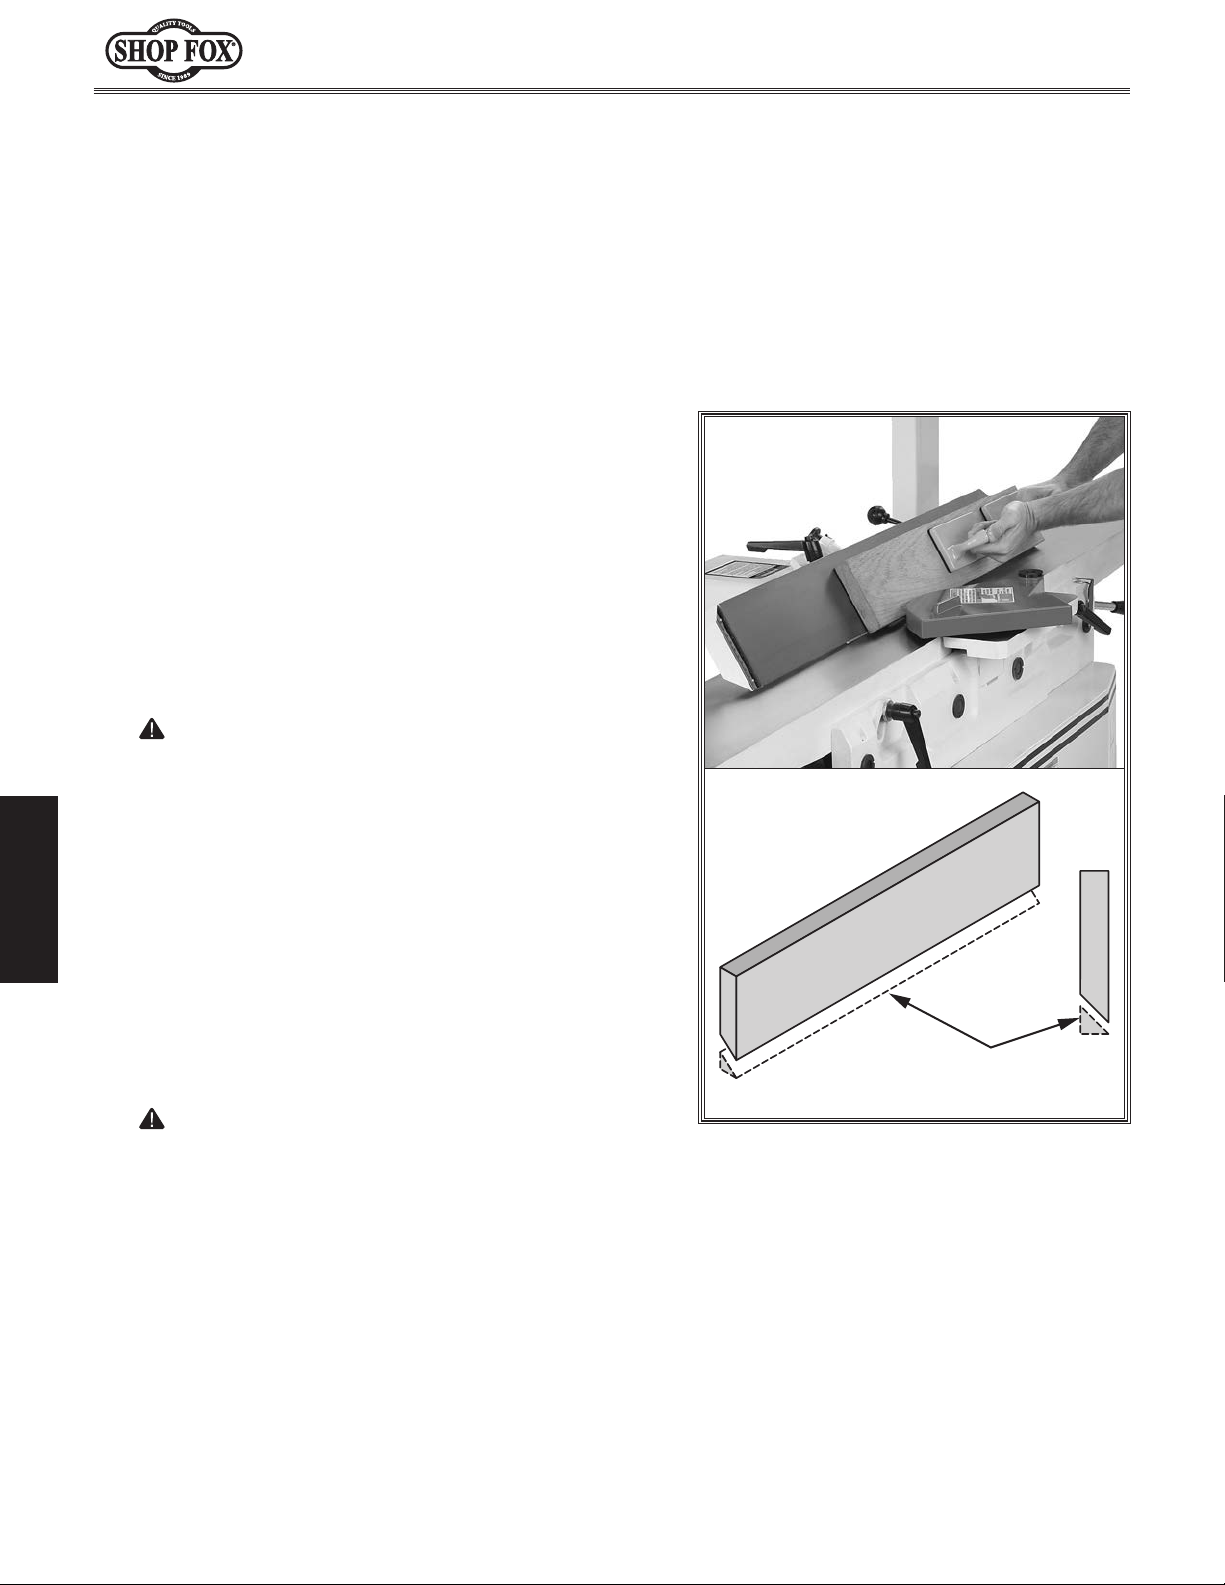
Bevel Cutting
Bevel cuts (see Figure 24) can be made by setting the
fence at the desired angle and feeding the workpiece
firmly along the fence face, with the bottom inside corner
firmly against the table. The cutting process typically
requires multiple passes or cuts to bevel the entire edge
of a workpiece.
To bevel cut on jointer, do these steps:
Inspect stock to ensure it is safe and suitable for the
1.
operation (refer to Stock Inspection on Page 21).
Surface plane workpiece (refer to Surface Planing
2.
on Page 24).
Edge joint workpiece (refer to Edge Jointing on
3.
Page 25).
Model W1876 (For Machines Mfd. Since 07/24)
Set infeed table height to cutting depth desired for
4.
each pass.
CAUTION: Cutting depth for bevel cuts is
typically between
hardness and width of stock.
Set fence tilt to desired angle of cut.
5.
Place workpiece against fence and infeed table.
6.
Start jointer.
7.
1
⁄16" and 1⁄8", depending on
OPERATIONS
8. With a push block in your leading hand, press
workpiece against table and fence with firm
pressure, and feed workpiece over cutterhead with a
push block in your trailing hand.
CAUTION: When your leading hand gets within
4" of the cutterhead, lift it up and over cutterhead,
and place push block on portion of the workpiece
once it is 4" past cutterhead. Now, focus your
pressure on outfeed end of the workpiece while
feeding, and repeat same action with your trailing
hand when it gets within 4" of cutterhead. To help
keep your hands safe, DO NOT let them get closer
than 4" from moving cutterhead at any time during
operation!
Removed
Surface
Figure 24. Example of a typical bevel
cutting operation.
Repeat cutting process, as necessary, until you are
9.
satisfied with the results.
-26-
Page 29
that your machine is
unplugged during all maintenance
Model W1876 (For Machines Mfd. Since 07/24)
MAINTENANCE
General
For optimum performance from this machine, this
maintenance schedule must be strictly followed.
Ongoing
To minimize your risk of injury and maintain proper
machine operation, shut down the machine immediately
if you ever observe any of the items below, and fix the
problem before continuing operations:
• Loose mounting bolts.
• Damaged cutterhead inserts.
• Worn or damaged wires.
• Any other unsafe condition.
Monthly Check
• Fence positive stop accuracy.
• Belt tension, damage, or wear.
• Clean/vacuum dust buildup from inside base and off
motor.
MAKE SURE
procedures! If this warning is ignored,
serious personal injury may occur.
Cleaning & Protecting
Cleaning the jointer is relatively easy. Vacuum excess wood
chips and sawdust, and wipe off the remaining dust with
a dry cloth. If any resin has built up, use a resin dissolving
cleaner to remove it.
Protect the unpainted cast aluminum table by wiping it
clean after every use—this ensures moisture from wood
dust does not remain on bare metal surfaces. Keep
your table rust-free with regular applications of quality
lubricants. Wax and buff table surface to help prevent
improper feeding of workpiece.
MAINTENANCE
-27-
Page 30
Lubrication
Since all bearings are sealed and permanently lubricated,
simply leave them alone until they need to be replaced.
DO NOT lubricate them.
It is essential to clean components before lubricating
them because dust and chips build up on lubricated
components and make them hard to move. Simply adding
more grease to them will not yield smooth-moving
components.
Needed Qty
Items
Pump-Type Oil Can .............................................1
Mineral Spirits
Clean Shop Rags
Fence Slide Bracket
Oil Type .......................................ISO 68 Equivalent
Oil Amount
Lubrication Frequency
....................................... As Needed
..................................... As Needed
............................................ 1–2 Drops
...............Monthly, or As Needed
Model W1876 (For Machines Mfd. Since 07/24)
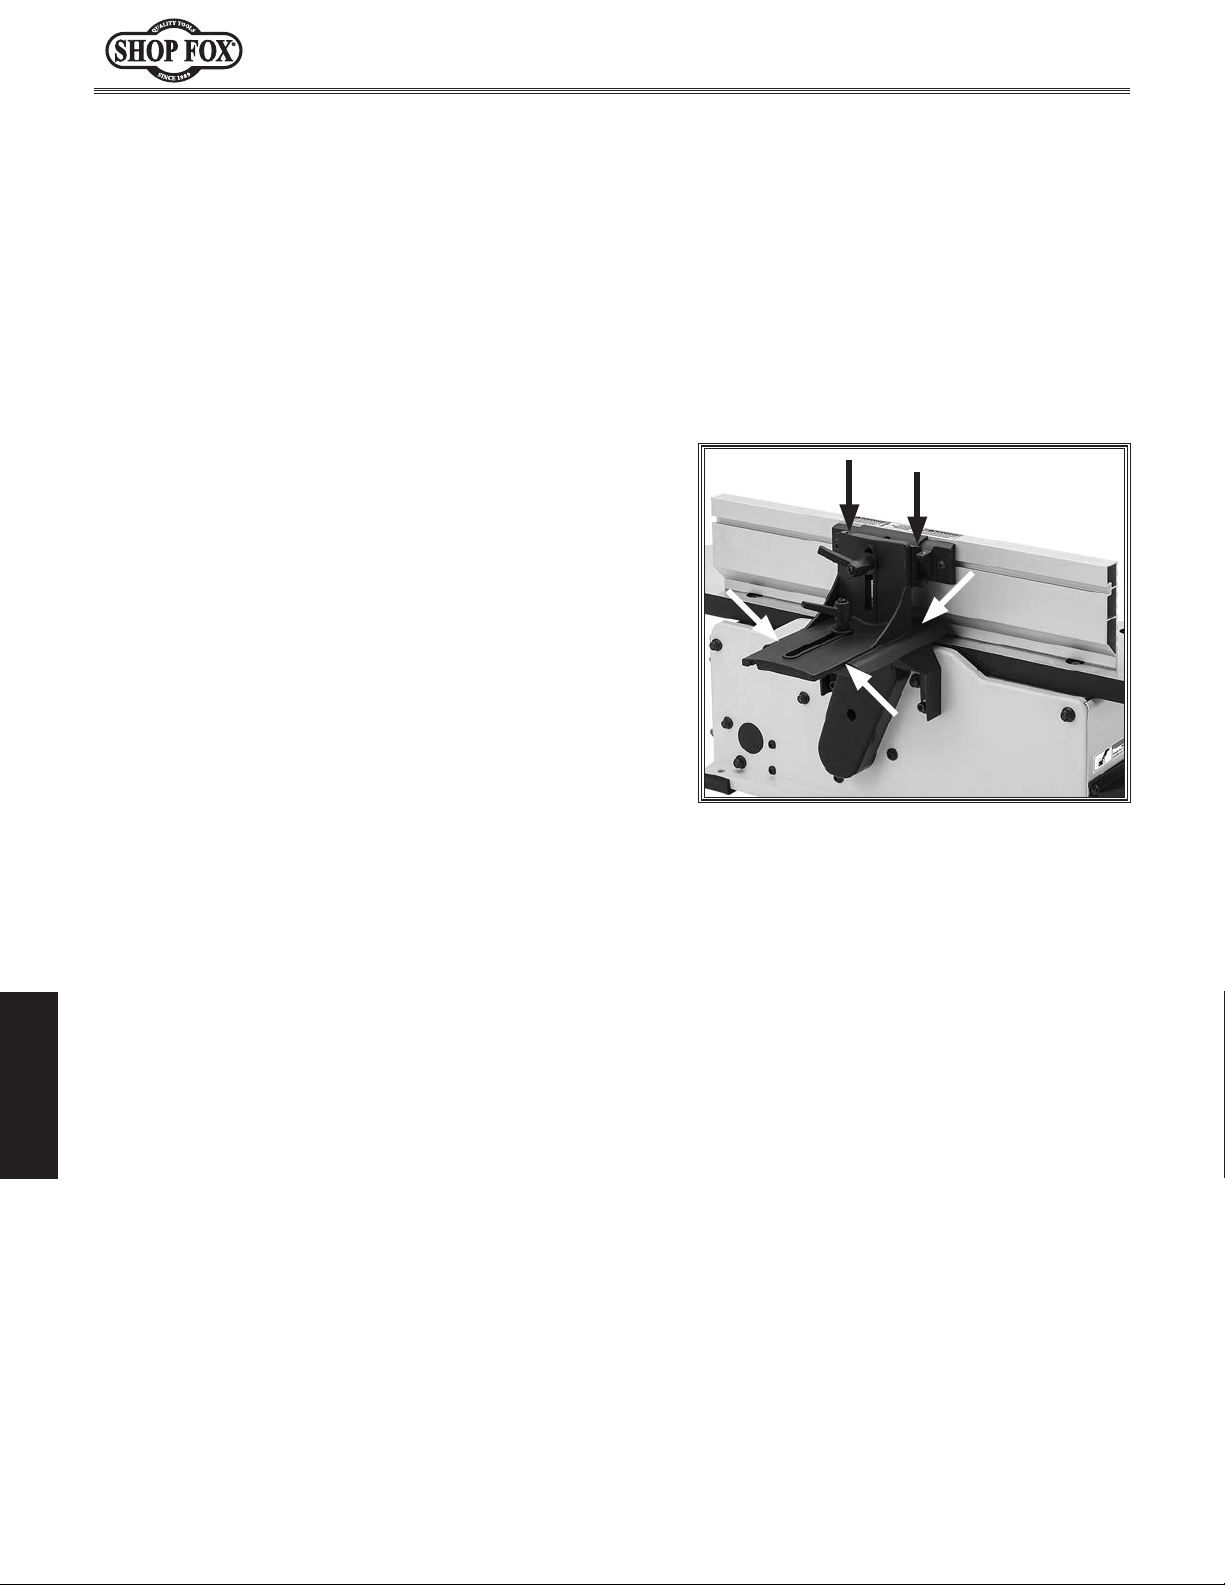
Clean fence slide bracket pivot points and guide ways
(see Figure 25) with mineral spirits and shop rags, allow
to dry, then lubricate with light machine oil.
Move components along their full range of motion several
times, then wipe off any excess oil.
MAINTENANCE
Figure 25. Fence slide bracket lubrication
locations.
-28-
Page 31
that your machine is
Model W1876 (For Machines Mfd. Since 07/24)
This section covers the most common service adjustments
or procedures that may need to be made during the life
of your machine.
If you require additional machine service not included
in this section, please contact Grizzly Industrial
Technical Support at (360) 647-0802 or send e-mail to:
SERVICE
General
Rotating/Replacing
Inserts
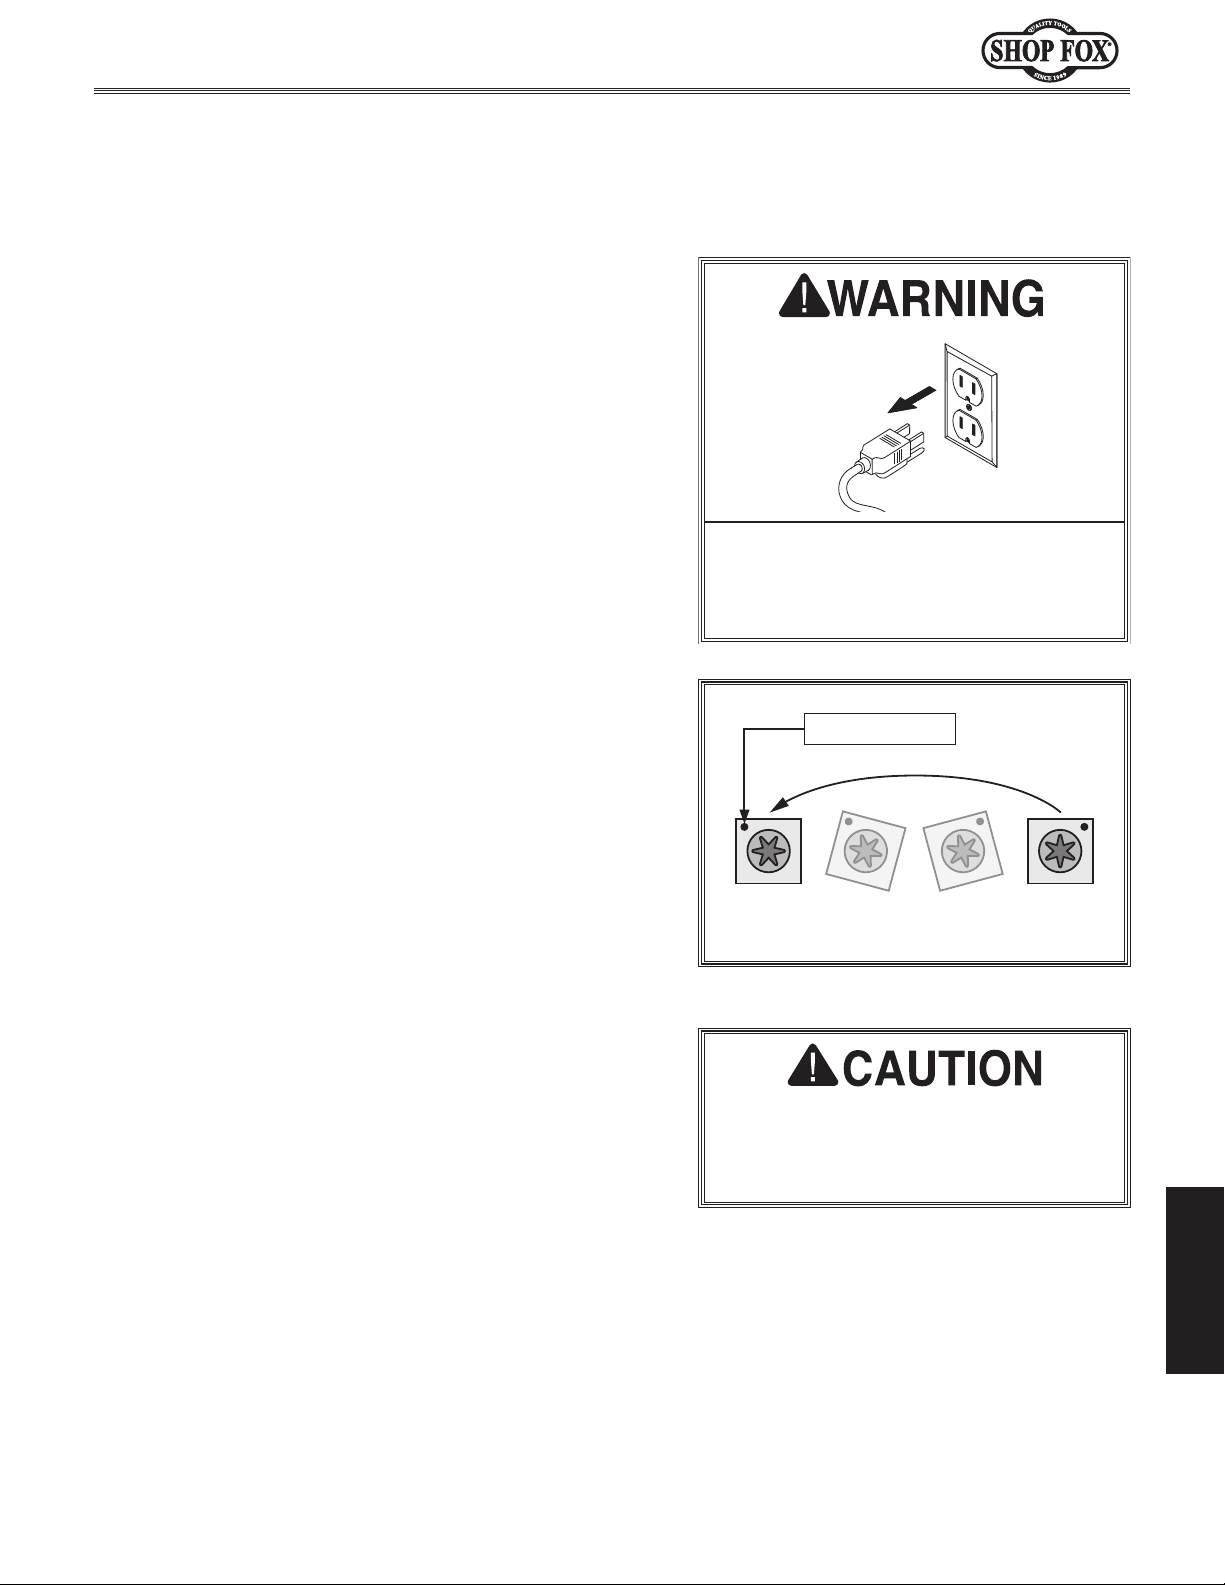
The spiral-style cutterhead is equipped with 2-sided
indexable inserts. Each insert can be removed, rotated,
and re-installed to use either of its two cutting edges. If
one cutting edge becomes dull or damaged, simply rotate
it 90° (see Figure 26) to use an adjacent sharp cutting
edge.
The inserts have a reference dot on one corner. The
position of the reference dot on installed inserts can
be used to track which edges are sharp/unused and
which edges are dull or damaged. Replace inserts once
the reference dot has been rotated back to its original
position.
Items Needed Qty
Work Gloves................................................1 Pair
Indexable Inserts 14 x 14 x 2mm
Torx Head Screws T-25 #10-32 x
T-Handle Torx Driver T-25
Hex Wrench 4mm
Degreaser
Light Machine Oil
Clean Shop Rags
To rotate or replace cutterhead insert, do these steps:
............................................ As Needed
...............................................1
................................... As Needed
..................................... As Needed
.....................................1
................. As Needed
1
⁄2" ............. As Needed
MAKE SURE
unplugged during all service procedures! If this warning is ignored, serious
personal injury may occur.
Reference Dot
Figure 26. Insert rotating sequence.
The indexable inserts are very sharp
and can easily cut your hands. ALWAYS
use caution when handling these parts
to reduce risk of personal injury.
SERVICE
DISCONNECT MACHINE FROM POWER!
1.
Put on work gloves and move fence all the way back.
2.
Loosen (2) button head cap screws securing
3.
cutterhead guard to jointer base, then remove
cutterhead guard.
-29-
Page 32
4. Insert included Torx driver in the cutterhead rotation
guide on front of jointer, and rotate cutterhead
as needed to make inserts accessible for rotation/
removal.
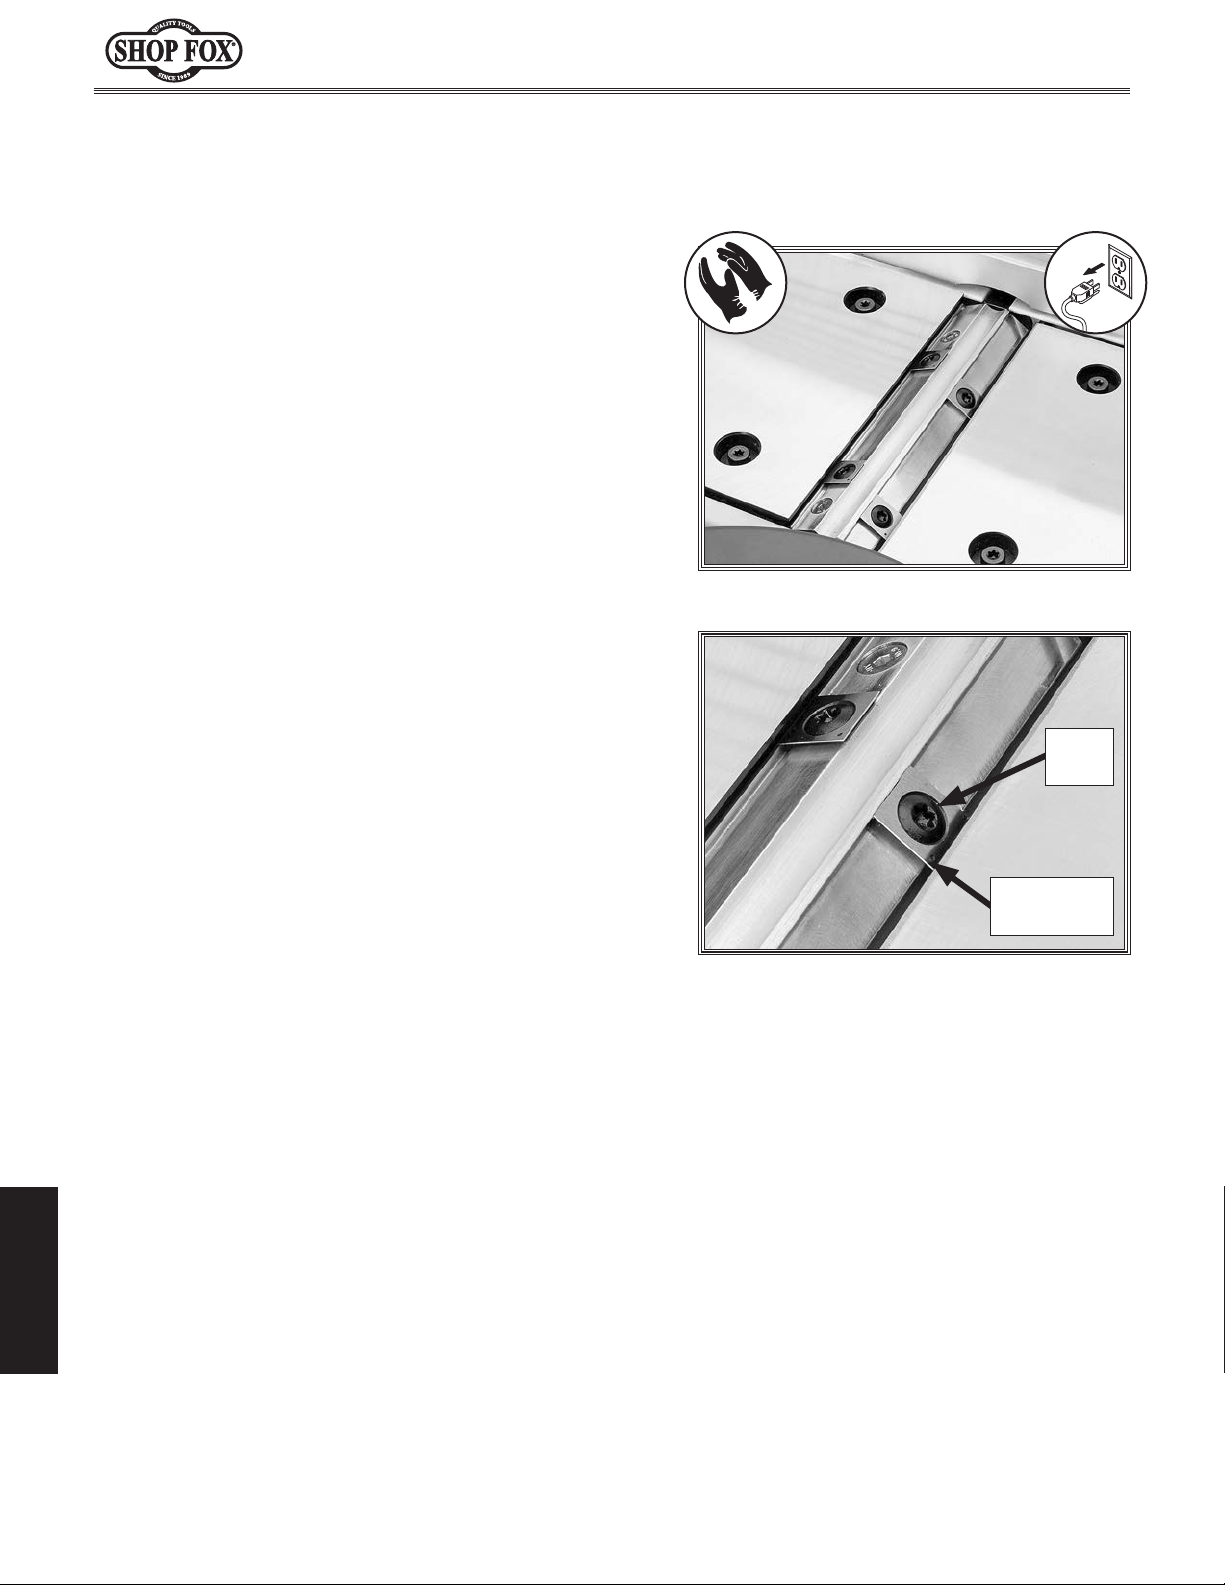
5. Carefully clean away all sawdust or debris from top
of insert, Torx screw, and surrounding area (see
Figure 27).
Remove Torx screw and insert (see Figure 28), then
6.
carefully clean away all dust and debris from insert
and insert surface on cutterhead.
IMPORTANT: This step is critical for achieving a
smooth finish with cutting operations. Dirt or dust
trapped under insert during installation will slightly
raise insert in cutterhead, which will leave marks on
workpiece after jointing.
Tip: Use low-pressure compressed air or a vacuum
nozzle to clean cutterhead surface.
Model W1876 (For Machines Mfd. Since 07/24)
Figure 27. Cutterhead area cleaned.
Install insert with a sharp cutting edge facing
7.
outward. Make sure insert is properly seated on
cutterhead before securing.
— If both insert cutting edges have been used,
replace insert with a new one. Always position
reference dot in same position when installing a
new insert to aid in rotational sequencing.
Lubricate Torx screw threads with a small amount of
8.
light machine oil, wipe excess off, and torque screw
to 48–50 inch/pounds.
IMPORTANT: If too much oil is applied to the
threads, excess will attempt to squeeze out of
threaded hole as you install insert and force it to
raise slightly, making it out of alignment.
9. Install cutterhead guard removed in Step 2.
Torx
Screw
Cutterhead
Insert
Figure 28. Cutterhead insert and Torx
screw.
SERVICE
-30-
Page 33
Model W1876 (For Machines Mfd. Since 07/24)
Checking/Adjusting Table
Parallelism
If the infeed and outfeed tables are not parallel with the
cutterhead and each other, then poor cutting results and
kickback can occur.
Table parallelism is factory-set, and should not normally
need to be adjusted when the machine is new. However,
after prolonged use, or if machine has been jarred during
lifting or transportation, it may become necessary to
adjust the table parallelism.
The correct order for adjusting table parallelism is to first
adjust the outfeed table parallel with the cutterhead
inserts, then adjust the infeed table parallel with the
outfeed table. Each table has four leveling adjusters that
permit the table to be adjusted parallel.
The indexable inserts are very sharp
and can easily cut your hands. ALWAYS
use caution when making adjustments
near these parts to reduce risk of
personal injury.
Top Dead
Center
Needed Qty
Items
Straightedge 24" ................................................1
T-Handle Torx Driver T-25
Hex Wrench 4mm
Flat Head Screwdriver
...............................................1
.....................................1
3
⁄8" ....................................1
Checking/Adjusting Outfeed Table
1. DISCONNECT MACHINE FROM POWER!
Remove cutterhead guard and fence.
2.
Place straightedge on outfeed table so it hangs over
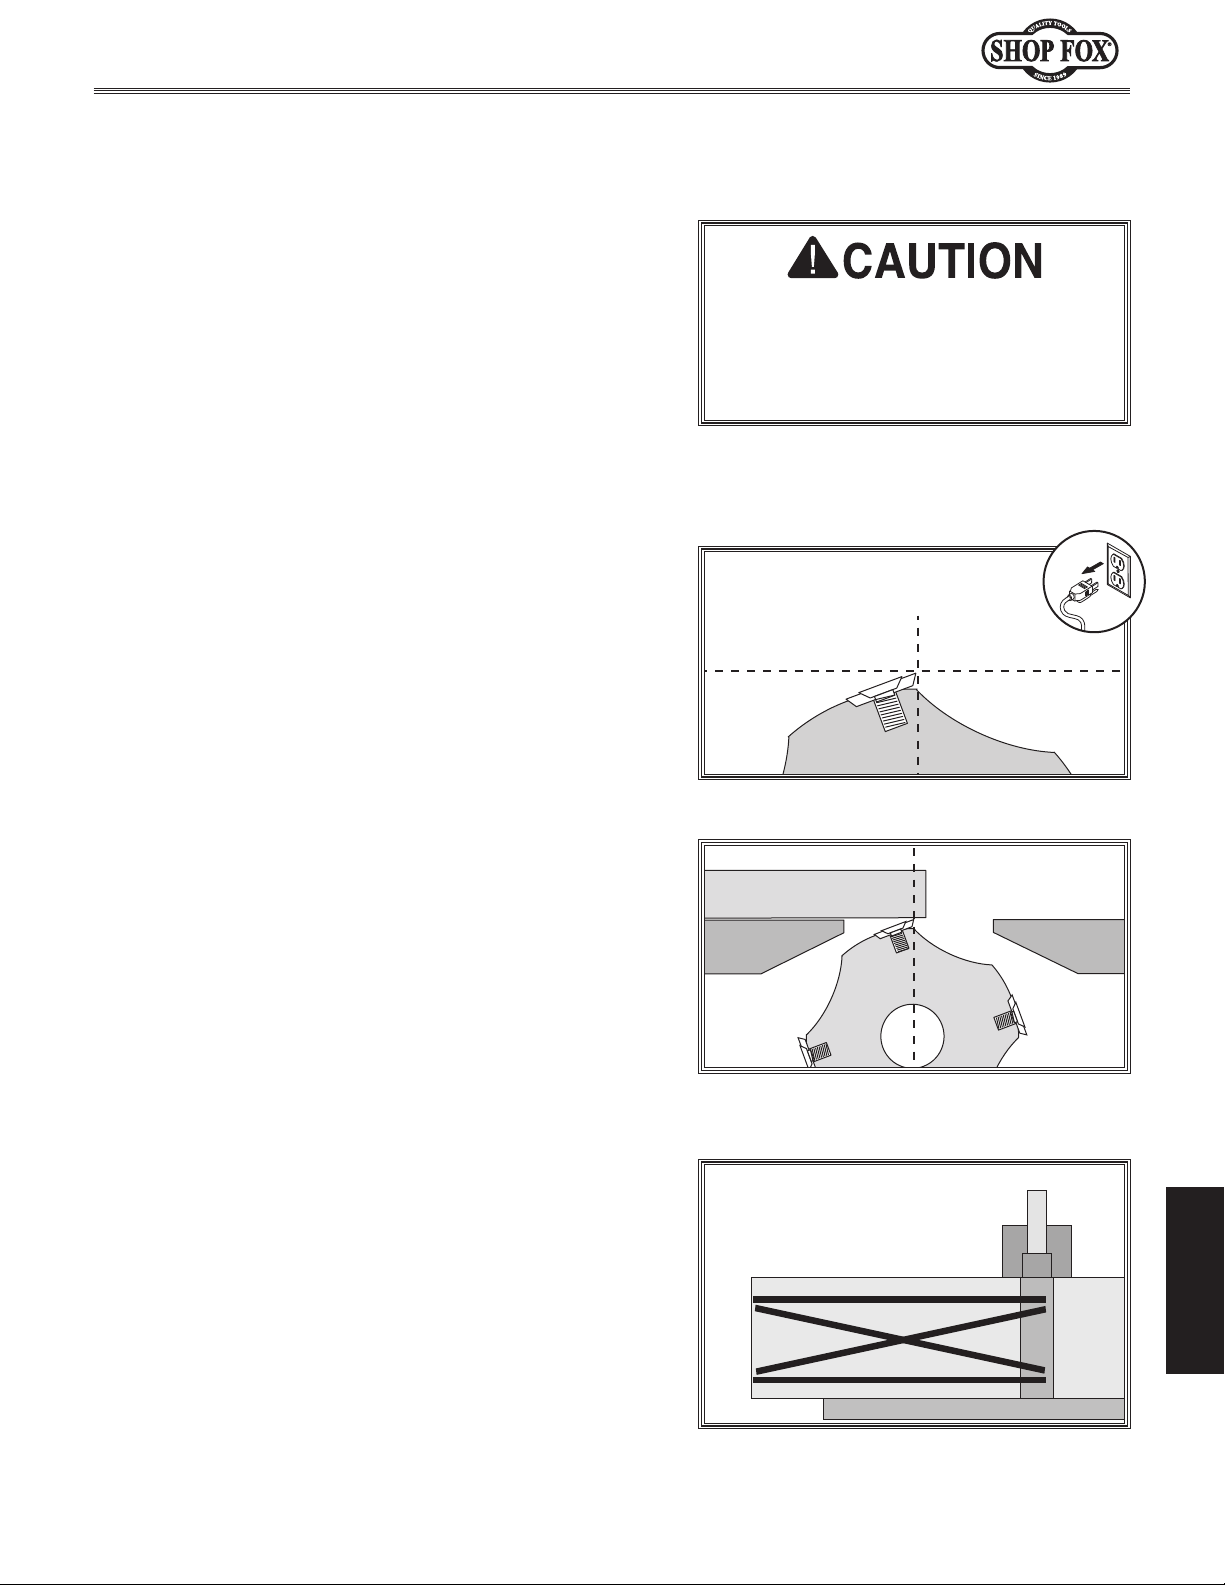
3.
cutterhead, then insert T-handle Torx driver into
cutterhead rotation guide to rotate cutterhead until
insert is at TDC (its highest point during rotation),
(see Figures 29–30).
Place straightedge in positions shown in Figure 31.
4.
If straightedge does touch insert at TDC and sits
—
flat across outfeed table in all positions, then
outfeed table is parallel with cutterhead inserts.
Proceed to Checking/Adjusting Infeed Table
instructions on Page 32.
Figure 29. Cutterhead insert at TDC.
Straightedge
Outfeed
Figure 30. Using straightedge to check
outfeed table height.
Black Lines Represent
Straightedge Positions
from Overhead View
Infeed
SERVICE
If straightedge does not touch insert and sit flat
—
across outfeed table in any one position, then
outfeed table is not parallel with cutterhead
inserts. Proceed to Step 5.
-31-
Figure 31. Straightedge positions for
verifying outfeed table parallelism.
Page 34
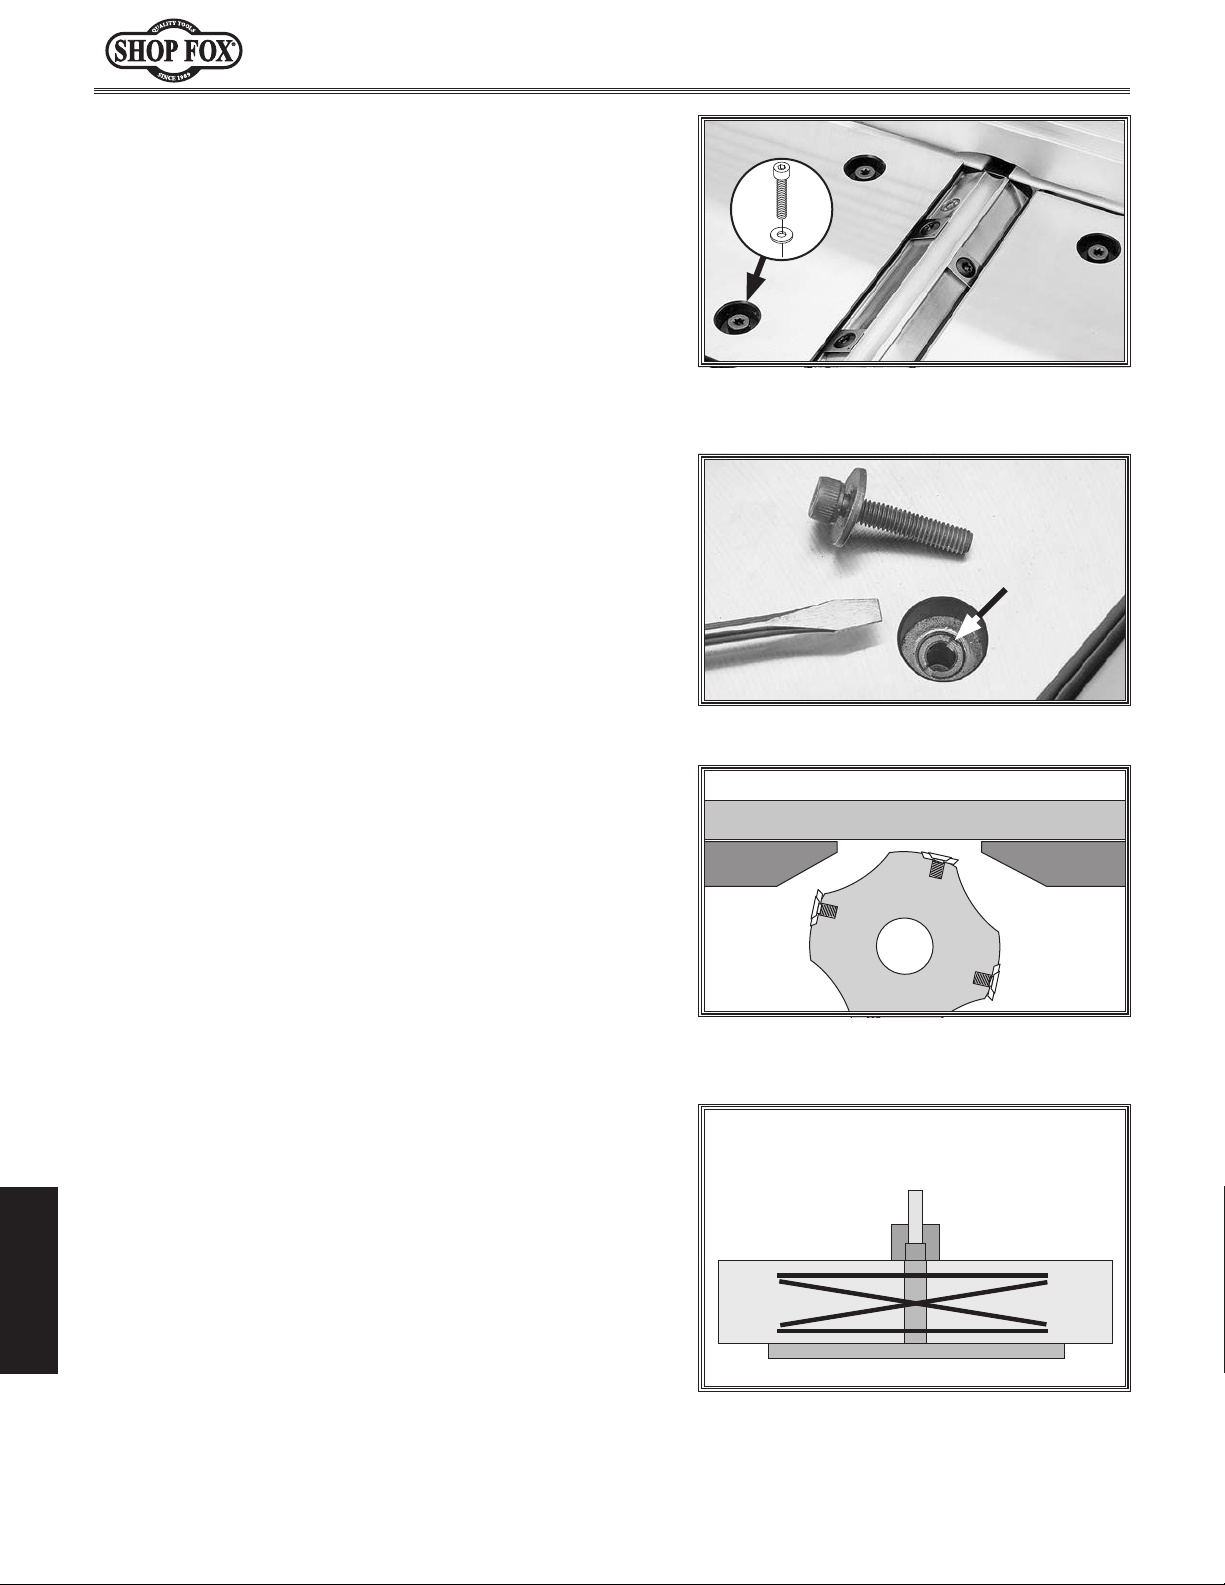
Access outfeed table leveling adjusters by removing
5.
(4) cap screws and flat washers from table openings,
as shown in Figure 32.
6. Use flat head screwdriver to rotate leveling
adjuster(s) (see Figure 33) until straightedge
touches TDC of insert and lays flat across outfeed
table in positions shown in Figure 31 on Page 31.
Note: Rotate leveling adjusters clockwise to lift
table, and counterclockwise to lower table.
Verify outfeed table is parallel to TDC of cutterhead
7.
inserts, then install flat washers and cap screws
removed in Step 5 to secure.
Proceed to Checking/Adjusting Infeed Table.
8.
Checking/Adjusting Infeed Table
1. Follow all steps in Checking/Adjusting Outfeed
Table to verify outfeed table is parallel with TDC of
cutterhead inserts.
Model W1876 (For Machines Mfd. Since 07/24)
x 4
Figure 32. Example of outfeed table
leveling adjuster location.
Figure 33. Leveling adjuster location.
Rotate cutterhead so inserts will not interfere with
2.
straightedge, then place straightedge on infeed and
outfeed tables and adjust infeed table even with
outfeed table, as shown in Figure 34.
Note: Infeed table depth-of-cut scale should be set
at "0".
Place straightedge in the positions shown in Figure
3.
35. In each position, straightedge should sit flat
against both outfeed table and infeed table.
If straightedge does sit flat against both infeed
—
and outfeed tables in all positions, then tables are
parallel. Proceed to Step 7.
If straightedge does not sit flat against both infeed
—
and outfeed tables in any of the positions, then
proceed to Step 4.
SERVICE
Straightedge
Outfeed
Figure 34. Example of infeed table set to
outfeed table height.
Black Lines Represent Straightedge
Positions from Overhead View
Infeed
-32-
Figure 35. Straightedge positions for
checking infeed/outfeed table parallelism.
Page 35
Model W1876 (For Machines Mfd. Since 07/24)
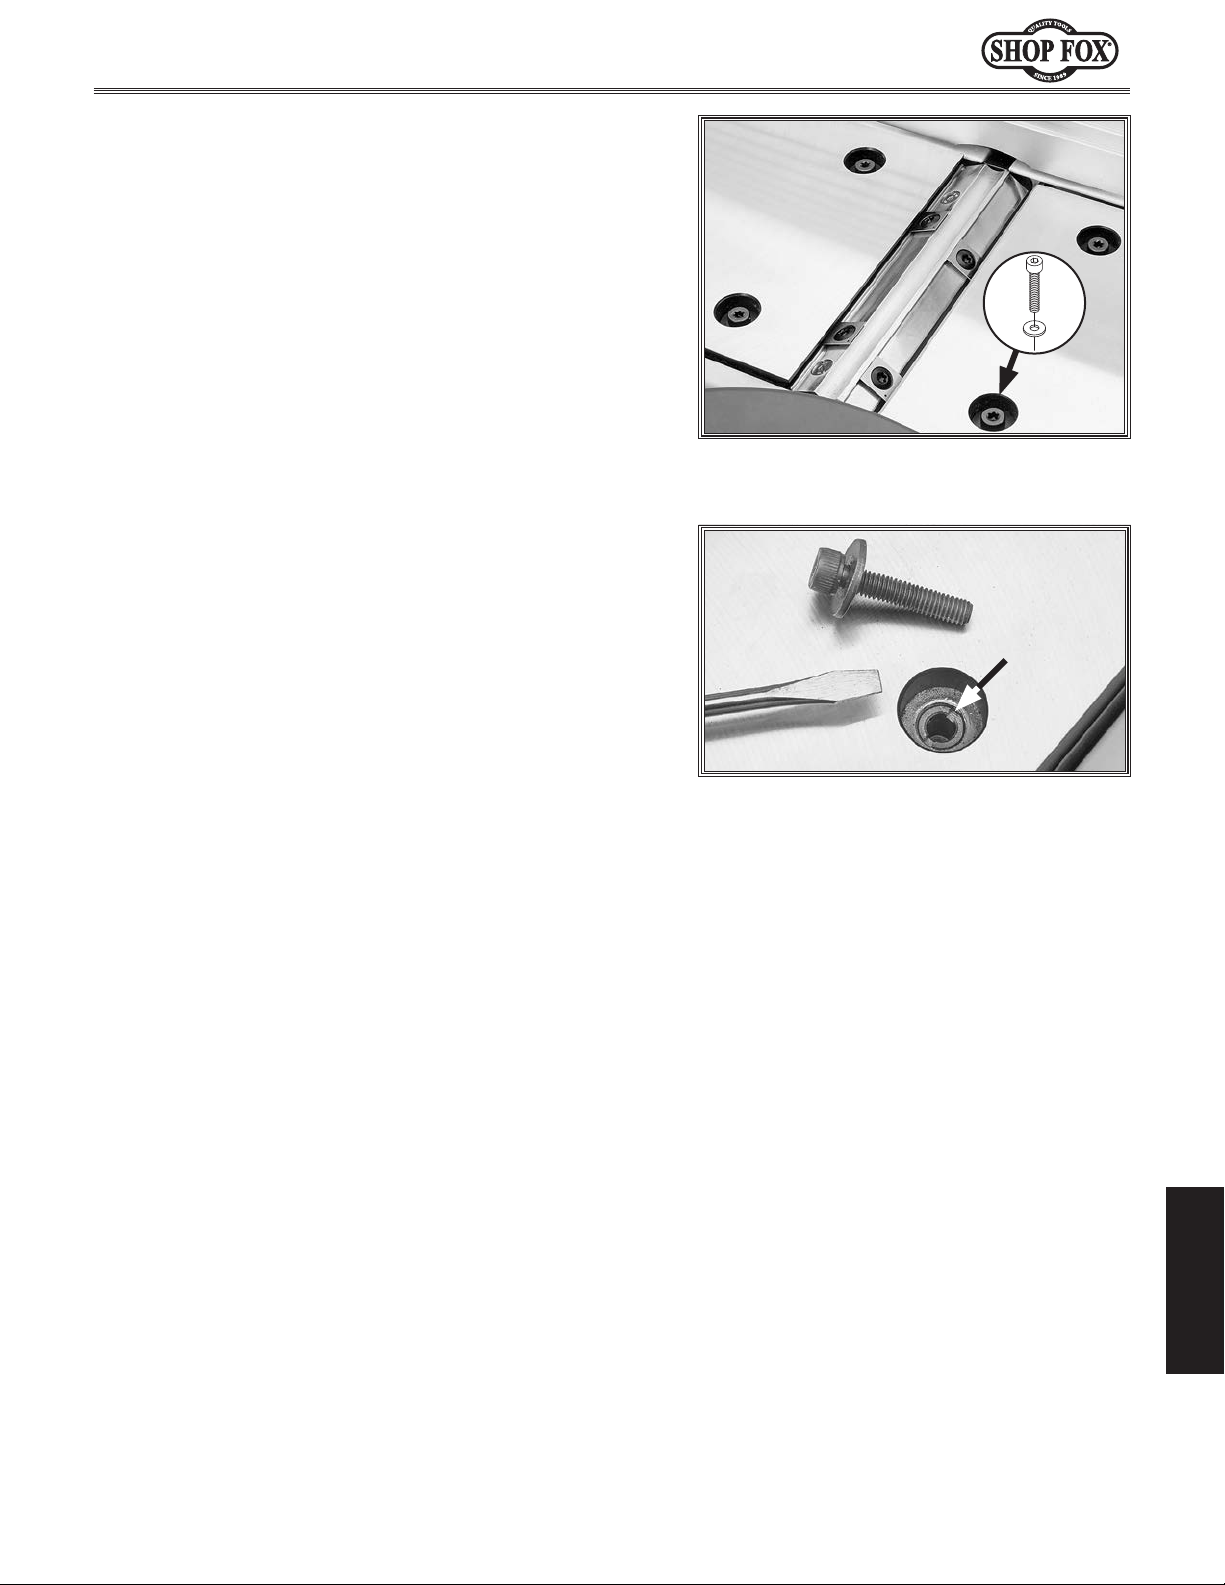
4. Access infeed table leveling adjusters by removing
(4) cap screws and flat washers from table openings,
as shown in Figure 36.
5.
Use flat head screwdriver to rotate leveling
adjuster(s) (see Figure 37) until straightedge lays
flat across both tables, in positions shown in Figure
35 on Page 32.
x 4
Figure 36. Example of infeed table
leveling adjuster location.
Note: Rotate leveling adjusters clockwise to lift
table, and counterclockwise to lower table.
Verify outfeed table is parallel to TDC of cutterhead
6.
inserts, then install flat washers and cap screws
removed in Step 4 to secure.
Install fence and cutterhead guard.
7.
Figure 37. Leveling adjuster location.
SERVICE
-33-
Page 36
Checking/Adjusting Fence
Positive Stops
The fence has adjustable positive stops at the 90º and 45º
outward (135º) positions for quickly and accurately setting
the desired fence angle.
Note: To ensure accurate results when jointing, check
the accuracy of these settings frequently (monthly at a
minimum) and adjust them if necessary.
Needed Qty
Items
Hex Wrench 2.5mm .............................................1
Combination Square
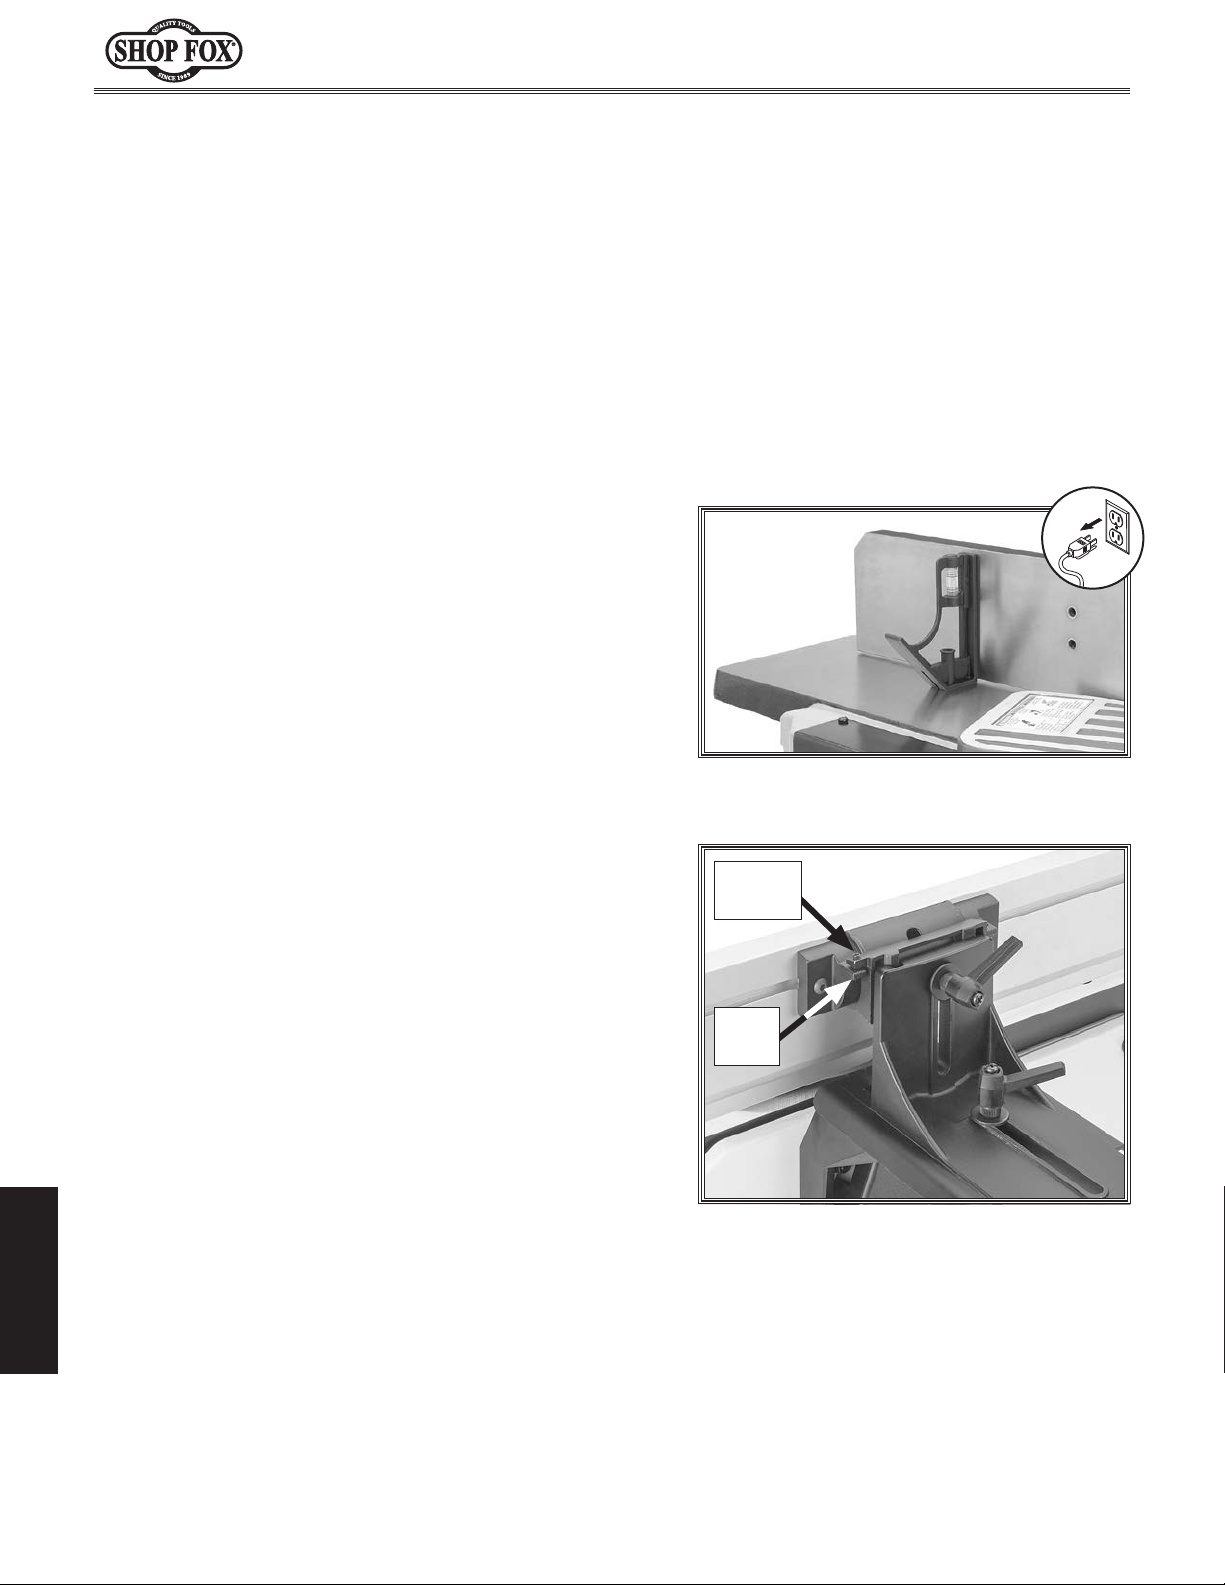
To check/adjust fence positive stops, do these steps:
DISCONNECT MACHINE FROM POWER!
1.
............................................1
Model W1876 (For Machines Mfd. Since 07/24)
Loosen fence slide lock handle and slide fence to
2.
desired position, then tighten handle.
Loosen fence tilt lock handle and adjust fence to 90º
3.
position, then tighten handle.
Note: Both lock handles can be repositioned by
pulling up on the handle and sliding the square nut
underneath to the desired position.
Place combination square on jointer table with 90º
4.
side against fence (see Figure 38).
If fence is flush against combination square, 90º
—
fence positive stop is set correctly. Proceed to
Step 6.
If fence is not flush against combination square,
—
proceed to Step 5.
Adjust fence until it is flush against combination
5.
square, then tighten 90º set screw on fence slide
bracket until it contacts stop block (see Figure 39).
Figure 38. Example of checking 90º fence
angle with combination square.
90º Set
Screw
Stop
Block
Figure 39. Adjusting 90º fence angle.
SERVICE
-34-
Page 37
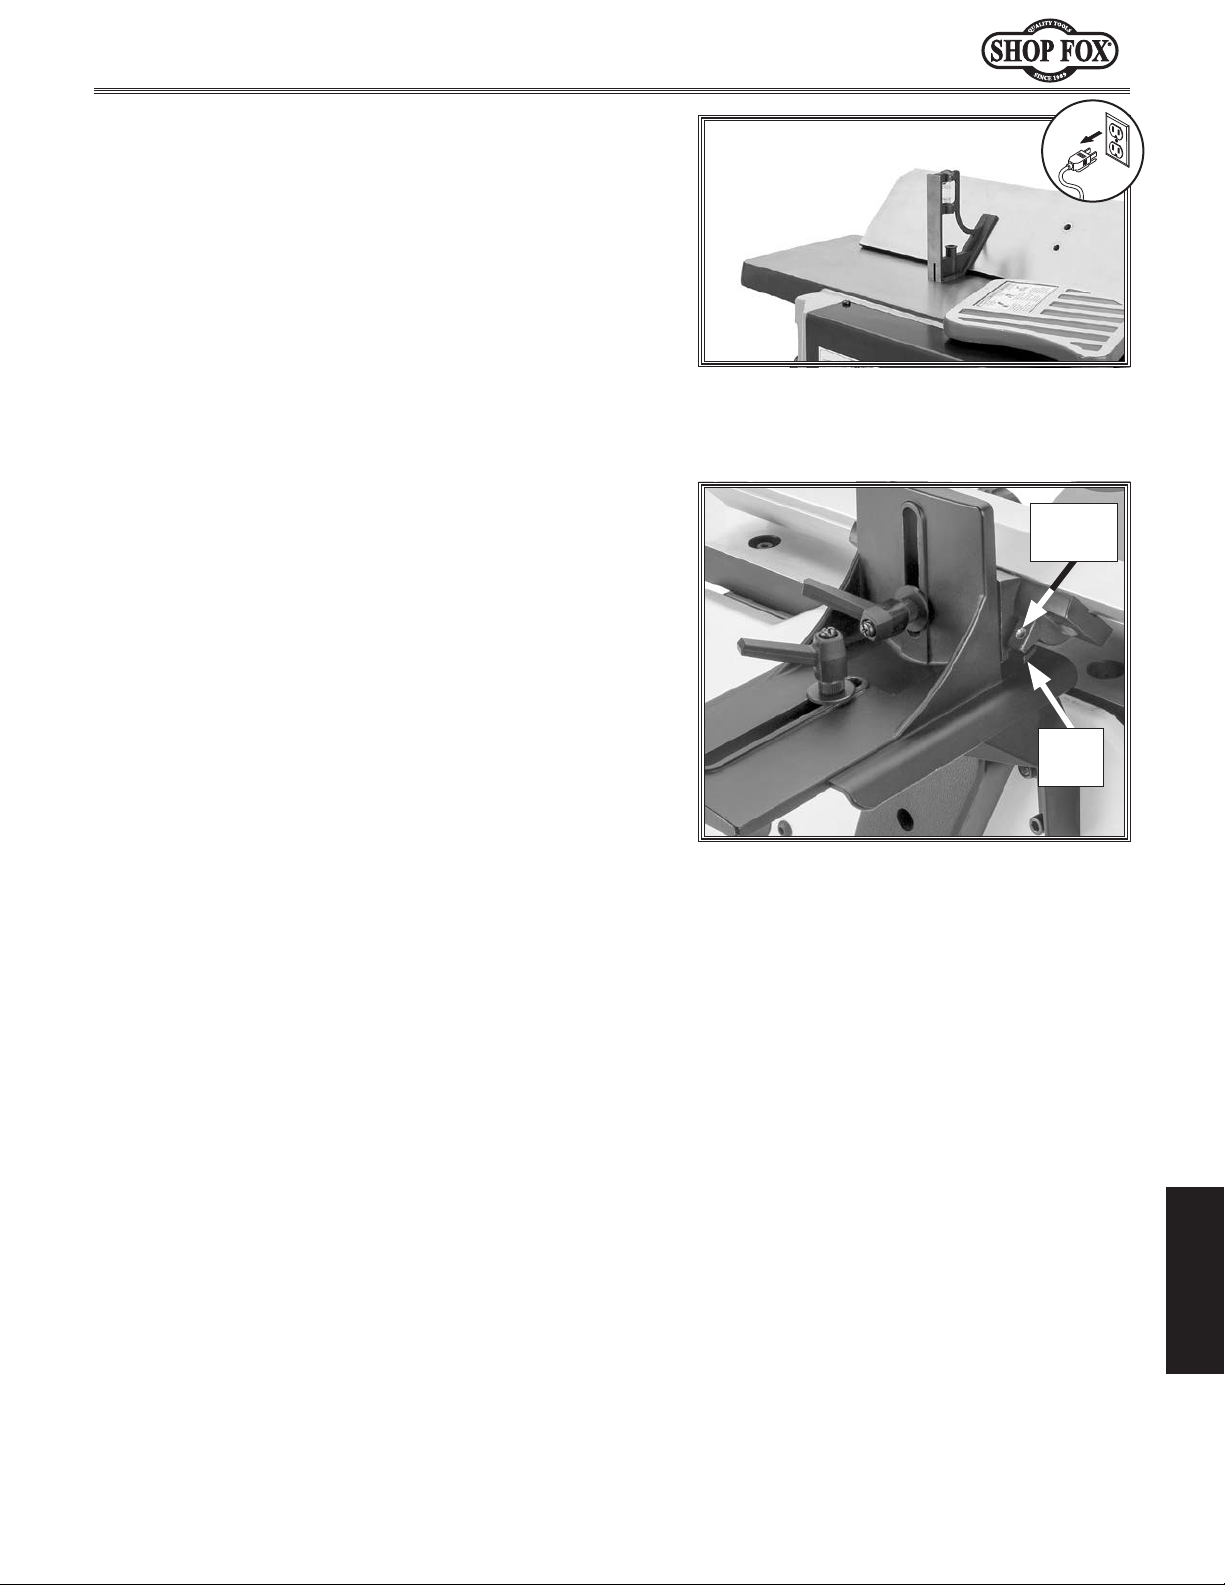
Model W1876 (For Machines Mfd. Since 07/24)
6. Loosen fence tilt lock handle and adjust fence to
45º outward position (see Figure 40), then tighten
handle.
Place combination square on jointer table with 45º
7.
outward side against fence (see Figure 40).
If fence is flush against combination square,
—
45º outward fence positive stop is set correctly.
Proceed to Step 9.
If fence is not flush against combination square,
—
proceed to Step 8.
8. Adjust fence until it is flush against combination
square, then tighten 45º set screw on fence slide
bracket until it contacts stop block (see Figure 41).
Loosen fence tilt lock handle and adjust fence to 90º
9.
position, then tighten handle.
Figure 40. Example of checking 45º
outward fence angle.
45º Set
Screw
Place combination square on jointer table with 90º
10.
side against fence, and verify fence is flush against
combination square.
If fence is flush against combination square, fence
—
positive stops are set correctly.
If fence is not flush against combination square,
—
perform Steps 5–10 to set fence positive stops.
Stop
Block
Figure 41. Adjusting 45º outward fence
angle.
SERVICE
-35-
Page 38
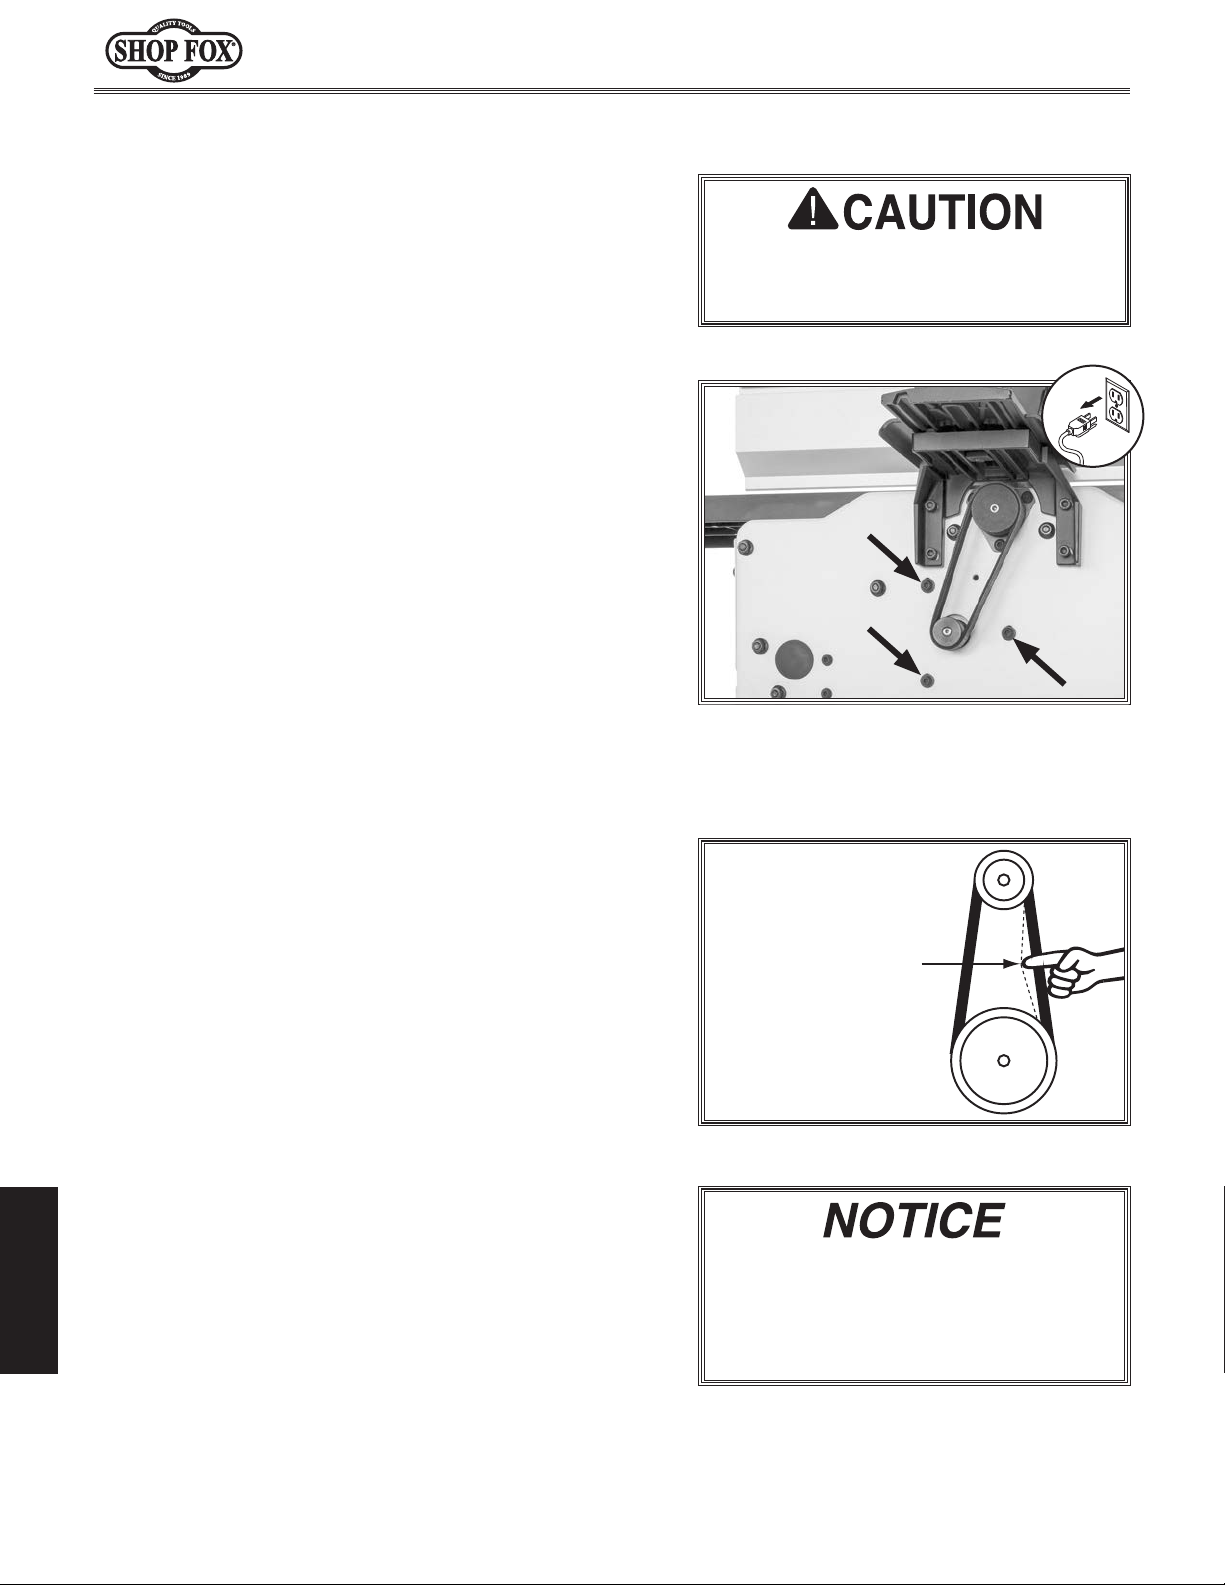
Replacing/Tensioning Belt
To ensure optimum power transmission from the motor to
the cutterhead, the belt must be in good condition (free
from cracks, fraying, and wear) and properly tensioned.
Needed Qty
Items
Replacement Belt (X1876040) ................................1
Hex Wrench 4mm
Replacing Belt
1. DISCONNECT MACHINE FROM POWER!
Loosen (1) button head cap screw securing belt
2.
cover, then remove cover.
Loosen (3) button head cap screws around motor
3.
pulley (see Figure 42). DO NOT remove screws!
Lift motor pulley and remove belt.
4.
...............................................1
Model W1876 (For Machines Mfd. Since 07/24)
Belts and pulleys will be hot after
operation. Allow them to cool before
handling.
Install new belt over motor pulley first, then lift
5.
motor pulley and install remaining portion of belt
over cutterhead pulley.
Proceed to Step 3 in Tensioning Belt below.
6.
Tensioning Belt
1. DISCONNECT MACHINE FROM POWER!
Perform Steps 2–3 as instructed in Replacing Belt.
2.
Press down on motor pulley to keep tension on belt,
3.
and tighten (3) button head cap screws loosened
during Step 3 of Replacing Belt.
Press belt with moderate pressure in center to check
4.
belt tension. Belt is correctly tensioned when there
is approximately
Figure 43).
If there is greater than 1⁄4" deflection when
—
checking belt tension, loosen (3) button head cap
screws around motor pulley, then repeat Steps 3–4
until tension is correct.
SERVICE
Install belt cover using (1) button head cap screw
5.
removed in Step 2 of Replacing Belt.
1
⁄4" deflection when pushed (see
Figure 42. Location of screws around
motor pulley.
Cutterhead Pulley
Approximately
1
/4" Deection
Motor Pulley
Figure 43. Checking belt deflection.
A small amount of black belt dust at
the bottom of the belt cover is normal
during the life of the machine, and
does not indicate a problem with the
machine or belt.
-36-
Page 39
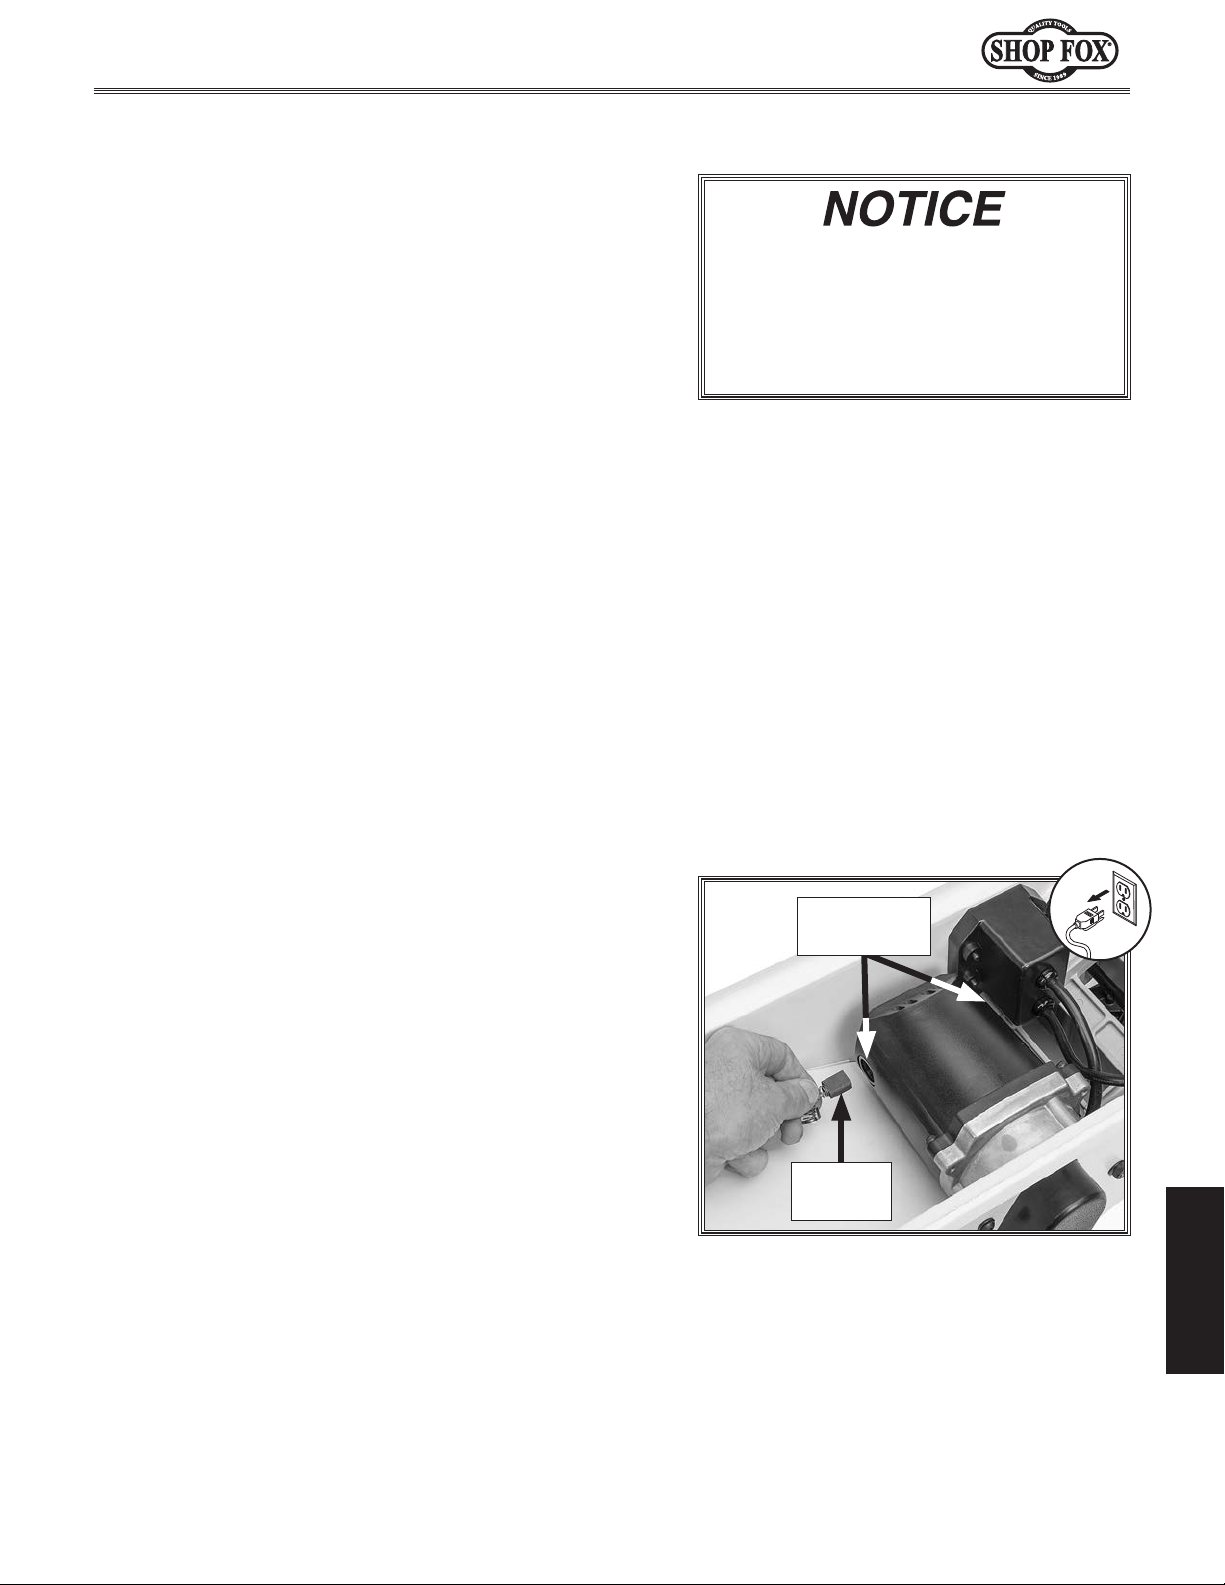
Model W1876 (For Machines Mfd. Since 07/24)
Replacing Motor Brushes
This jointer is equipped with a universal motor that uses
two carbon brushes to transmit electrical current inside
the motor. These brushes are considered to be regular
"wear items" or "consumables" that will need to be
replaced during the life of the motor. The frequency of
required replacement is often related to how much the
motor is used and how hard it is pushed.
Needed Qty
Items
Carbon Motor Brushes (X1876300-1) .........................2
Penny (or Dime)
Shop Vacuum
Clean Shop Rags
To replace motor brushes, do these steps:
DISCONNECT MACHINE FROM POWER!
1.
.................................................1
....................................................1
..................................... As Needed
Replace both carbon brushes (part
number: X1876300-1) at the same time
when the motor no longer reaches full
power, or when the brushes measure
less than
5
⁄8" long).
1
⁄4" long (new brushes are
While facing rear of jointer, tip machine away from
2.
you until it rests on the cutterhead guard mounting
bracket.
Note: Place clean shop rags under jointer to help
prevent damaging machine finish.
Vacuum all dust and debris from motor area.
3.
Unscrew brush covers (see Figure 44).
4.
Note: When removing brush covers, a spring will
pop out of the socket; the carbon brush is firmly
attached to this spring.
Check brushes for wear. If a brush is worn to less
5.
Insert brush assemblies (positioning them so they
6.
Perform Test Run procedure on Page 19.
7.
1
than
slide into the built-in slots) into brush sockets, then
press brush cover against spring and tighten.
—
⁄4" in length, replace both brushes.
If jointer runs properly, motor brush replacement
is complete.
Brush Cover
Location
Brush
Assembly
SERVICE
Figure 44. Removing motor brush.
If motor does not start, brushes are not
—
correctly aligned in sockets, or there is another
problem with the motor or wiring. Refer to
Troubleshooting on Page 38 for assistance.
-37-
Page 40
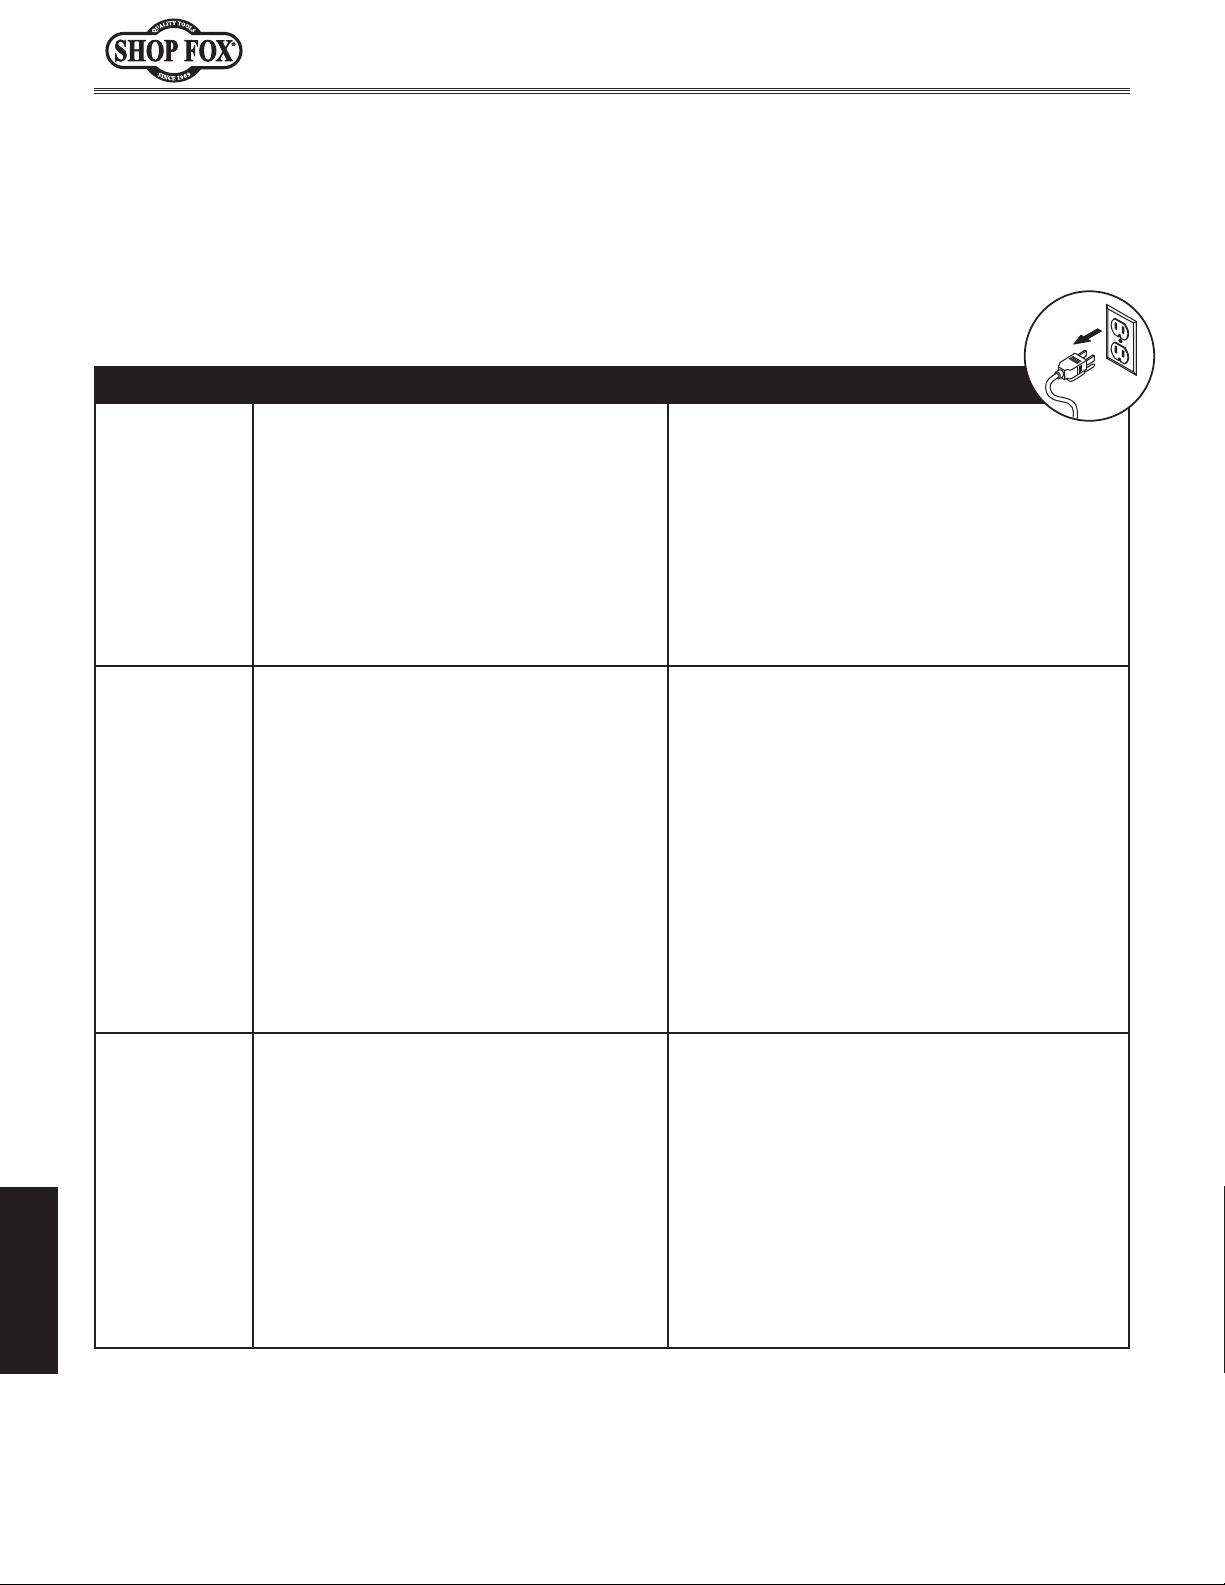
Model W1876 (For Machines Mfd. Since 07/24)
The following troubleshooting tables cover common problems that may occur with this machine. If you
need replacement parts or additional troubleshooting help, contact our Technical Support.
Note:
available, your original purchase receipt. This information is required to properly assist you.
Troubleshooting
Before contacting Tech Support, find the machine serial number and manufacture date, and if
Motor & Electrical
PROBLEM POSSIBLE CAUSE CORRECTIVE ACTION
Machine does not
start, or power
supply breaker
trips immediately
after startup.
Machine stalls or
is underpowered.
Machine has
vibration or
noisy operation.
SERVICE
1. Switch disabling key removed.
2. Incorrect power supply voltage or circuit size.
3. Power supply circuit breaker tripped or fuse
blown.
4. Wiring broken, disconnected, or corroded.
5. Motor brushes worn out.
6. ON/OFF switch at fault.
7. Motor or motor bearings at fault.
1. Workpiece material unsuitable for machine.
2. Feed rate/cutting speed too fast.
3. Workpiece crooked; fence loose or misadjusted.
4. Belt slipping/pulleys misaligned.
5. Motor wired incorrectly.
6. Motor brushes worn out.
7. Pulley slipping on shaft.
8. Machine undersized for task.
9. Extension cord too long.
10. Motor or motor bearings at fault.
1. Motor or component loose.
2. V-belt worn, loose, pulleys misaligned, or belt
slapping cover.
3. Cutterhead insert(s) at fault.
4. Pulley loose.
5. Incorrectly mounted to workbench.
6. Motor mount loose/broken.
7. Cutterhead bearing(s) at fault.
8. Motor bearings at fault.
1. Install switch disabling key.
2. Ensure correct power supply voltage and circuit
size.
3. Ensure circuit is sized correctly and free of shorts.
Reset circuit breaker or replace fuse.
4. Fix broken wires or disconnected/corroded connections.
5. Replace motor brushes (Page 37).
6. Replace switch.
7. Replace motor.
1. Only cut wood/ensure moisture is below 20%.
2. Decrease feed rate/cutting speed.
3. Straighten or replace workpiece/adjust fence.
4. Clean/tension/replace belt (Page 36); ensure
pulleys are aligned.
5. Wire motor correctly.
6. Replace motor brushes (Page 37).
7. Tighten/replace loose pulley/shaft.
8. Use correct inserts; reduce feed rate or depth of
cut.
9. Move machine closer to power supply; use shorter
extension cord.
10. Replace motor.
1. Replace damaged or missing bolts/nuts or tighten if
loose.
2. Inspect/replace belt (Page 36). Realign pulleys if
necessary.
3. Tighten loose cutterhead insert(s); replace if at
fault (Page 29).
4. Secure pulley on shaft.
5. Adjust feet, shim, or tighten mounting hardware.
6. Tighten/replace.
7. Replace bearing(s)/realign cutterhead.
8. Test by rotating shaft; rotational grinding/loose
shaft requires bearing replacement.
-38-
Page 41
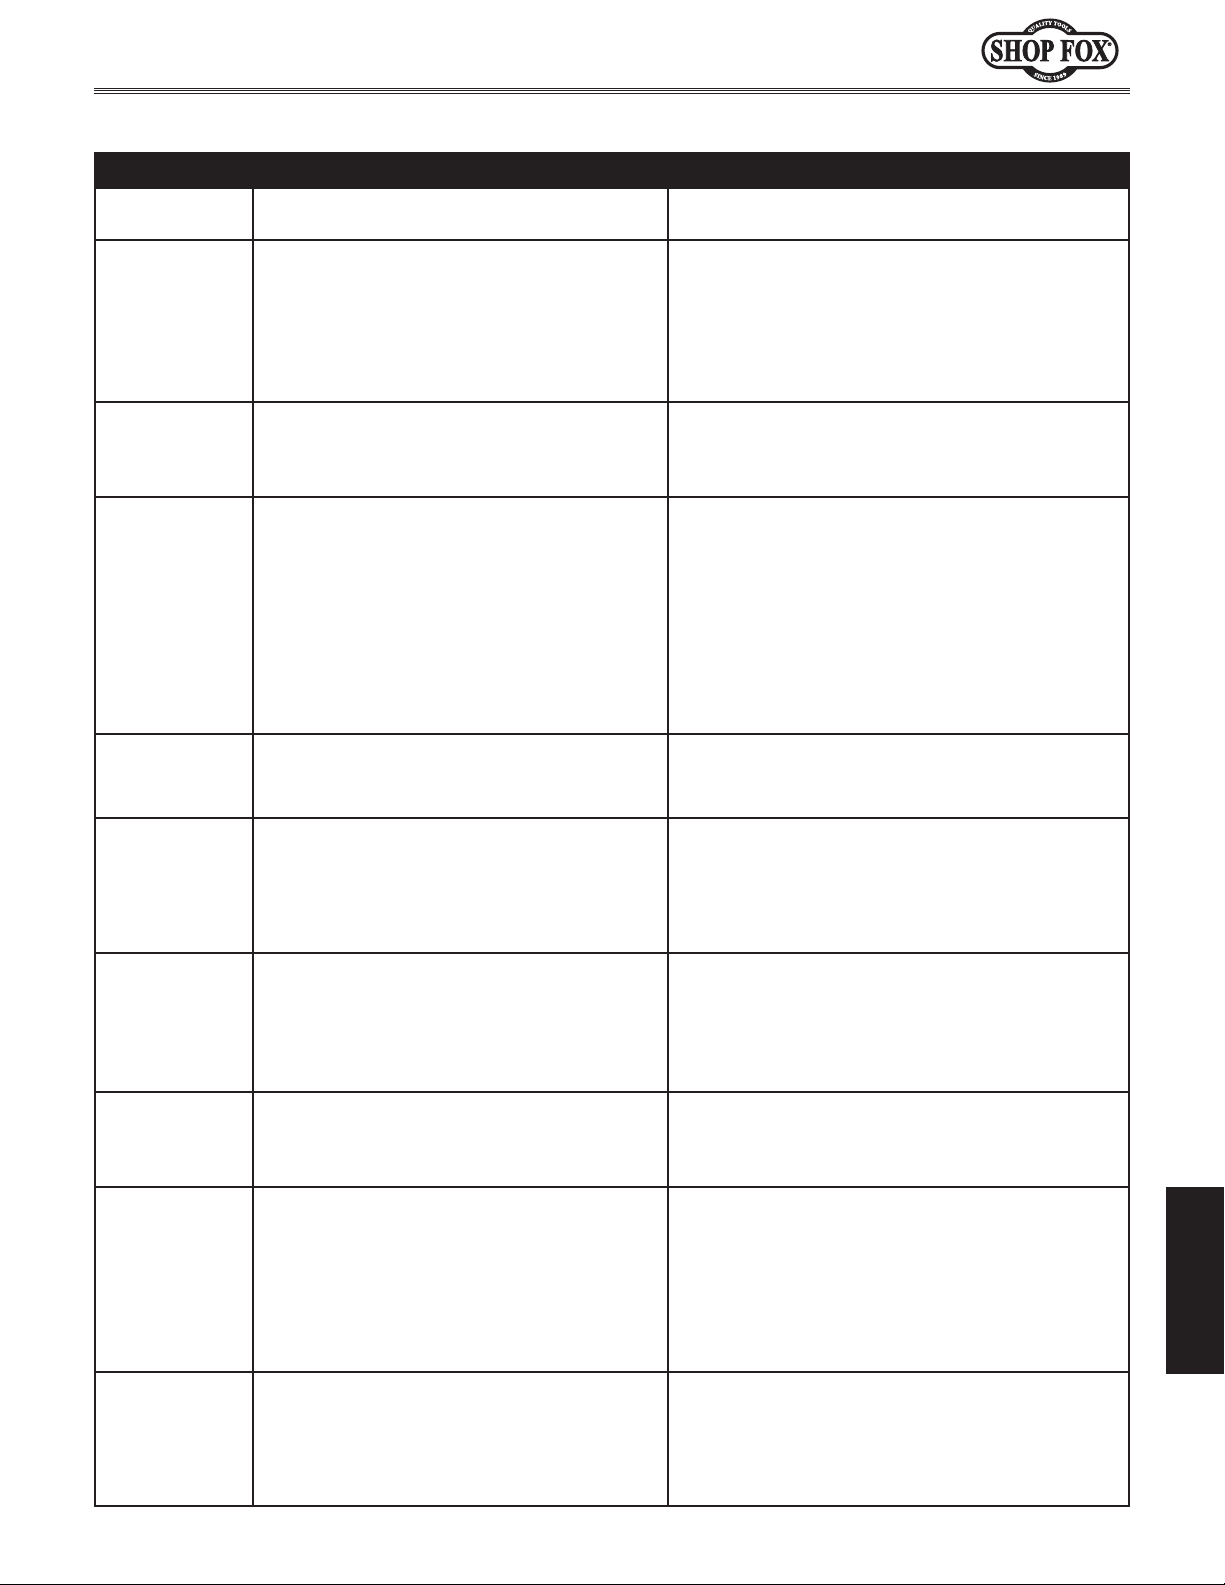
Model W1876 (For Machines Mfd. Since 07/24)
Operation
PROBLEM POSSIBLE CAUSE CORRECTIVE ACTION
Table is hard
to adjust.
Excessive snipe
(gouge in end
of board that
is uneven with
rest of cut); back
of workpiece
is concave.
Workpiece stops
in middle of cut;
front of workpiece
is concave.
Workpiece chipping, tear-out,
indentations,
or overall
rough cuts.
Fuzzy grain left
in workpiece.
Long lines or
ridges that run
along the length
of the board.
Uneven cutter
marks, wavy
surface, or
chatter marks
across face of
workpiece.
Glossy surface;
scorching or
burn marks on
workpiece.
Workpiece is
concave or
convex along
its length after
jointing.
Workpiece edges
not square;
tapered cut
produced.
1. Table lock engaged/partially engaged. 1. Completely loosen table lock.
1. Outfeed table is set too low.
2. Operator pushing down on trailing end (infeed
side) of workpiece as it leaves cutterhead.
1. Outfeed table set too high. 1. Align outfeed table with cutterhead inserts at top
1. Workpiece is rough or has loose knots/surface
flaws; not suitable for jointing.
2. Not feeding workpiece to cut "with" the grain.
3. Dull insert(s).
4. Nicked, or chipped insert(s).
5. Feeding workpiece too fast.
6. Excessive depth of cut.
7. Lack of proper dust collection or clogged dust
port.
1. Wood has high moisture content.
2. Dull insert(s).
1. Nicked, or chipped insert(s).
2. Loose or incorrectly installed insert(s).
3. Dirt or debris under cutterhead insert(s).
1. Feeding workpiece too fast.
2. Insert(s) not adjusted at even heights in
cutterhead.
3. Dirt or debris under cutterhead insert(s).
1. Dull insert(s).
2. Feed rate too slow.
1. Workpiece not held with even pressure against
outfeed table during cut.
2. Workpiece too uneven at start of operation.
3. Tables not parallel with cutterhead body and
each other.
1. Fence not square to table(s); fence tilt
unlocked.
2. Warped infeed or outfeed table.
3. Insert(s) not adjusted at even heights in
cutterhead.
1. Align outfeed table with cutterhead inserts at top
dead center (Page 31).
2. Focus most of the workpiece pressure against
outfeed table while cutting.
dead center (Page 31).
1. Inspect workpiece. Use smooth stock without loose
knots/surface flaws.
2. Flip workpiece 180° before feeding again.
3. Rotate/replace insert(s) (Page 29).
4. Rotate/replace insert(s) (Page 29).
5. Reduce feed rate.
6. Reduce depth of cut.
7. Clear blockages, ensure dust collection is operating
efficiently; upgrade dust collector.
1. Ensure wood moisture content is less than 20%.
Allow to dry if necessary.
2. Rotate/replace insert(s) (Page 29).
1. Rotate/replace insert(s) (Page 29).
2. Remove/replace insert(s) (Page 29), and install
properly.
3. Remove insert(s), clean bottom of insert/cutterhead
mounting pocket, and re-install (Page 29).
1. Reduce feed rate.
2. Remove, clean, and re-install any inserts that are
"raised" in cutterhead (Page 29).
3. Remove insert(s), clean bottom of insert/cutterhead
mounting pocket, and re-install (Page 29).
1. Rotate/replace insert(s) (Page 29).
2. Increase feed rate.
1. Apply even downward pressure against workpiece
throughout entire travel along outfeed side during
cut.
2. Take partial cuts to remove extreme high spots
before doing a full pass.
3. Check/adjust table parallelism (Page 31).
1. Square fence to table(s); lock fence.
2. Regrind/replace table.
3. Remove, clean, and re-install any inserts that are
"raised" in cutterhead (Page 29).
SERVICE
-39-
Page 42
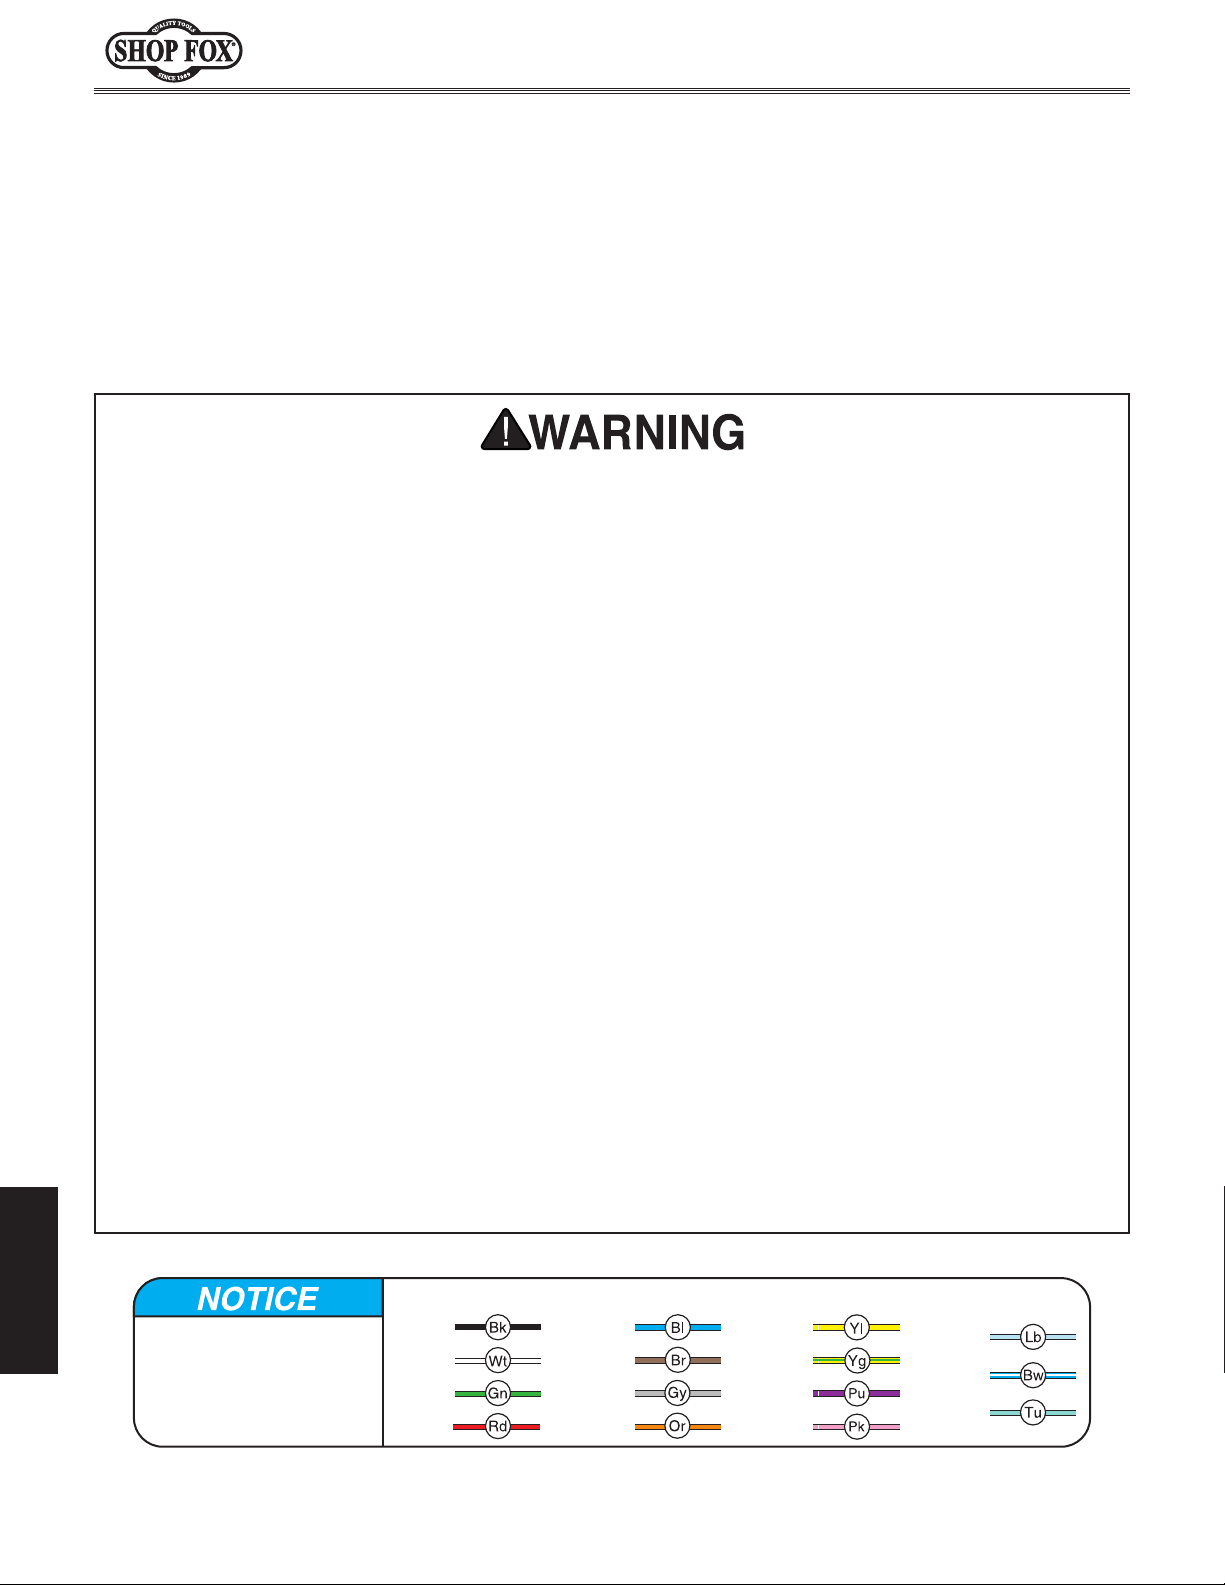
These pages are current at the time of printing. However, in the spirit of improvement, we may make
changes to the electrical systems of future machines. Compare the manufacture date of your machine to
If there are differences between your machine and what is shown in this section, call Technical Support
for assistance BEFORE making any changes to the wiring on your machine. An updated
machine before calling. This information can be found on the main machine label.
Model W1876 (For Machines Mfd. Since 07/24)
Electrical Safety Instructions
the one stated in this manual, and study this section carefully.
at (360) 647-0802
wiring diagram may be available. Note: Please gather the serial number and manufacture date of your
SHOCK HAZARD. Working on wiring that is
connected to a power source is extremely
dangerous. Touching electrified parts will
result in personal injury including but not
limited to severe burns, electrocution,
or death. Disconnect the power from
the machine before servicing electrical
components!
QUALIFIED ELECTRICIAN. Due to the inherent
hazards of electricity, only a qualified
electrician should perform wiring tasks on
this machine. If you are not a qualified
electrician, get help from one before
attempting any kind of wiring job.
WIRE CONNECTIONS. All connections must
be tight to prevent wires from loosening
during machine operation. Double-check all
wires disconnected or connected during any
wiring task to ensure tight connections.
WIRE/COMPONENT DAMAGE. Damaged wires
or components increase the risk of serious
personal injury, fire, or machine damage. If
you notice that any wires or components are
damaged while performing a wiring task,
replace those wires or components before
completing the task.
MODIFICATIONS. Using aftermarket parts or
modifying the wiring beyond what is shown
in the diagram may lead to unpredictable
results, including serious injury or fire.
MOTOR WIRING. The motor wiring shown
in these diagrams is current at the time
of printing, but it may not match your
machine. Always use the wiring diagram
inside the motor junction box.
CAPACITORS/INVERTERS. Some capacitors
and power inverters store an electrical
charge for up to 10 minutes after being
disconnected from the power source.
To reduce the risk of being shocked,
wait at least this long before working on
capacitors.
CIRCUIT REQUIREMENTS. You MUST follow
the requirements at the beginning of this
manual when connecting your machine to a
power source.
EXPERIENCING DIFFICULTIES. If you are
experiencing difficulties understanding
the information included in this section,
contact our Technical Support at
(360) 647-0802.
WIRING DIAGRAM COLOR KEY
SERVICE
Photos and diagrams
included here are best
viewed in color. You can
view these pages in color at
www.shopfoxtools.com
BLACK
WHITE
GREEN
RED
BLUE
BROWN
GRAY
ORANGE
-40-
YELLOW
YELLOW
GREEN
PURPLE
PINK
LIGHT
BLUE
BLUE
WHITE
TURQUOISE
Page 43
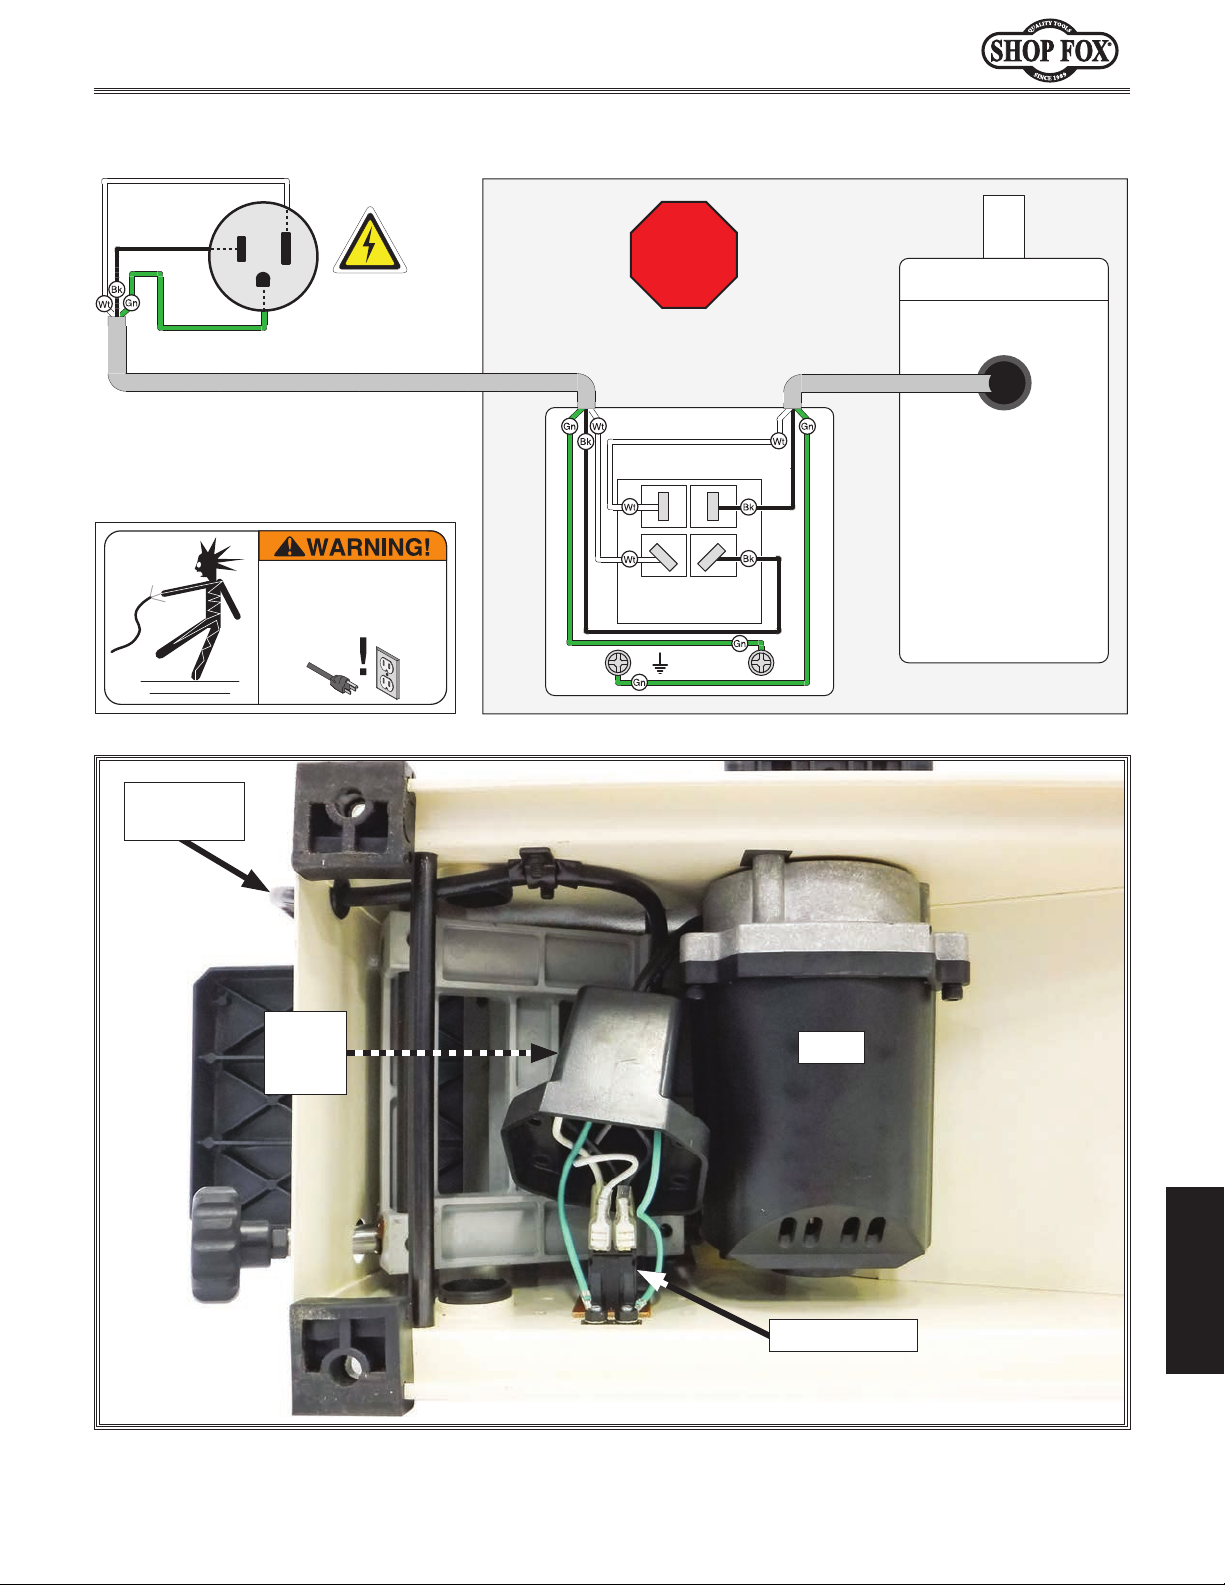
Model W1876 (For Machines Mfd. Since 07/24)
Wiring Diagram
Neutral
Hot
Ground
120 VAC
5-15 Plug
SHOCK HAZARD!
Disconnect power
before working on
wiring
Read
Page 40
STOP
Before
Wiring
PADDLE SWITCH
(viewed from behind)
2 5
4
1
PADDLE SWITCH
KEDU HY18 20A
Ground
MOTOR 120V
To Power
Connection
Paddle
Switch
Box
Motor
SERVICE
Paddle Switch
Figure 45. Wiring overview.
-41-
Page 44
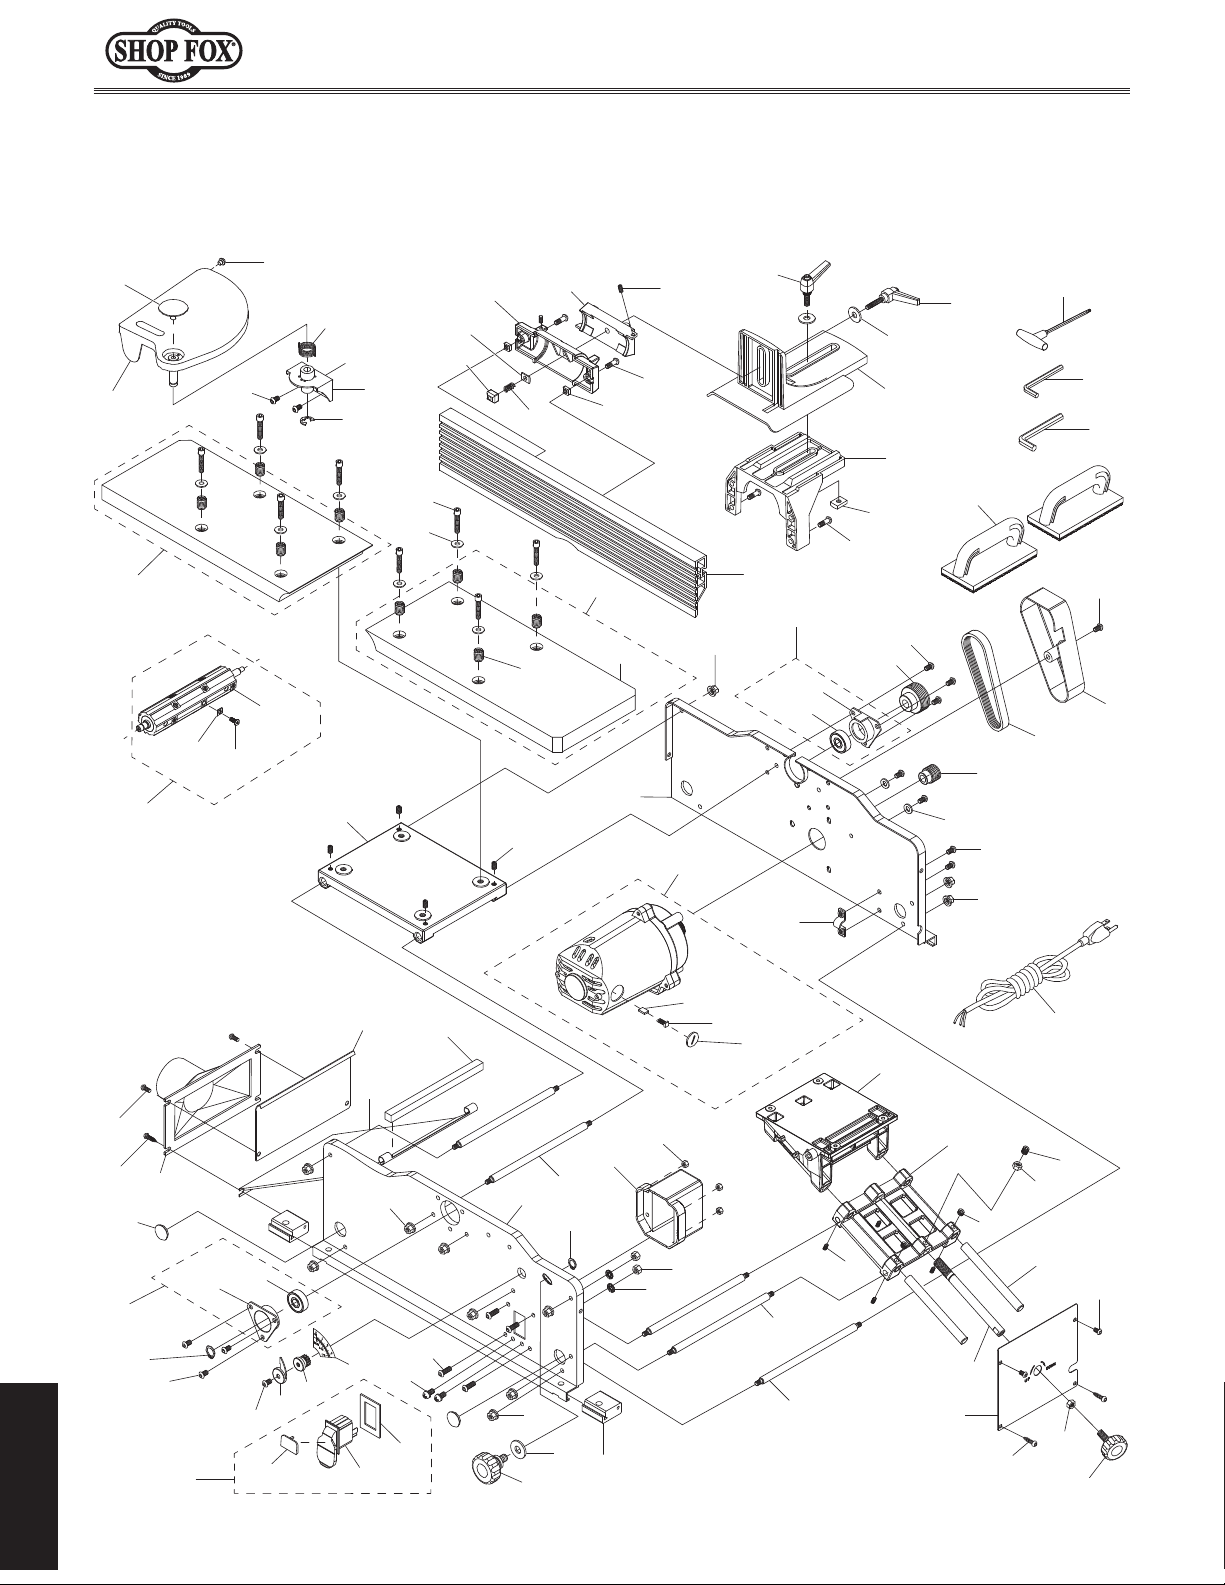
23
23
100
103
133
Model W1876 (For Machines Mfd. Since 07/24)
PARTS
Main
101
43
A
160
160-2
6
160-3
B
160-1
104
3
C
106
105
130-1
130V2
46
47
128
150
4
132
43-2
129
43
43-1
34
131
139
300
48
125
36
36-1
36-2
B
139
136
137
130
39
24
135V2
70
6
38
138
166
71
72
6
41
40
6
48
50
6
7
13
35
14-2
14-1
14
17
6
6
323 323-1
323-3
20
21
10
22
5
48
27
323-2
28
9
29
A
C
12
48
49
26
24
25
75
73
300-1
74
300-2
300-3
49
49
167
51V2
55V2
56
57
54
4
58
62V2
59
6
64
7
PARTS
-42-
Page 45
REF PAR T # DESCRIPTION REF PAR T # DESCRIPTION
57 X1876057 HEX NUT M6-1 323-3 X1876323- 3 P ADDLE SWITCH KEY
Model W1876 (For Machines Mfd. Since 07/24)
Main Parts List
3 X1876003 OUTFEED TABLE SUP POR T 58 X1876058 ADJUSTMENT ROD
4 X1876004 SET SCREW M6-1 X 8 59 X1876059 ADJUSTMENT SHAFT
5 X1876005 DUST CHUTE COVER 62V2 X1876062V2 RIGHT BAS E PANEL V2.07. 24
6 X1876006 BUTT ON H D CAP SCR M6-1 X 12 64 X1876064 HEX NUT M8- 1.25
7 X1876007 TAP SCREW 1/4 X 5/8 70 X1876070 PUSH B LOCK
9 X1876009 FOAM SEAL 71 X1876071 HEX WR ENCH 2.5MM
10 X1876010 DUST CHUTE 72 X1876072 HEX W RENCH 4MM
12 X1876012 FRO NT BASE P ANEL 73 X1876073 EXT TOOTH WASHER 5MM
13 X1876013 DUST P ORT 2- 1/2" 74 X1876074 HEX NUT M5-.8
14 X1876014 FRO NT B EARING RETAINER ASS EMB LY 75 X1876075 LOCK NUT M5-.8
14-1 X1876014-1 FRO NT BEARING RETAINER 100 X1876100 RO UND P LUG 42MM
14-2 X1876014-2 BALL BEARING 6201ZZ 101 X 1876101 CUTT ERHEAD G UARD
17 X1876017 EXT RETAINING RING 12MM 103 X 1876103 RUBBER BUMPER
20 X1876020 SCALE P OINTER 104 X 1876104 TORSION SPRING 1.6 X 23MM
21 X1876021 SCALE G EAR 105 X 1876105 GUARD MOUNTING BRACKET
22 X1876022 SCALE PLATE 106 X 1876106 E-CLIP 10MM
23 X1876023 KNOB BOLT M8-1. 25 X 18, 12-LOBE, D49 125 X 1876125 FENCE
24 X1876024 FENDER WASH ER 8MM 128 X 1876128 TILT BRACKET
25 X1876025 FOOT PAD 129 X 1876129 T-SLOT NUT 7, M6-1
26 X1876026 EXT RETAINING RING 16MM 130 X 1876130 SQUARE NUT M8-1.25
27 X1876027 PH LP HD SCR M5-.8 X 8 130V2 X1876130V2 TAPERED SQUARE NUT M8- 1.25 V2.07.24
28 X1876028 BUTT ON H D CAP SCR M5-.8 X 25 130-1 X1876130- 1 CURVED SQ UARE WA SH ER 8MM
29 X1876029 PADDLE SWITCH BOX 131 X 1876131 SET SCREW M5-.8 X 8
34 X1876034 REAR B ASE PA NEL 132 X 1876132 TILT SUPPORT BRACKET
35 X1876035 RO UND P LUG 35MM 133 X 1876133 ADJ HANDLE M8-1.25 X 30, 50L
36 X1876036 REAR B EARING RET AINER ASSEMBLY 135V2 X1876135V2 ADJ H ANDLE M8- 1.25 X 46, 50L V2.07.24
36-1 X1876036-1 REAR B EARING RET AINER 136 X 1876136 FENCE SLI DE BRACKET
36-2 X1876036-2 BALL BEARING 6201ZZ 137 X 1876137 FENCE SUPPO RT BRACKET
38 X1876038 MOTOR PULLEY 138 X 1876138 FLAT WASHER 6MM
39 X1876039 CUTTERHEAD PULLEY 139 X1876139 BUTTON H D CAP SCR M6- 1 X 16
40 X1876040 PO LY-V B ELT 125J5 150 X 1876150 CO MPRESSION SPRING 1.2 X 10.6 X 15.5
41 X1876041 BELT COVER 160 X 1876160 CUTTERHEAD ASSEMBLY
43 X1876043 TABLE ASSEMBLY 160-1 X1876160- 1 SPIRAL CUTTERHEAD 6"
43-1 X1876043-1 TABLE 160-2 X1876160- 2 CARB IDE INSERT 14.25 X 14.25 X 2MM
43-2 X1876043-2 SET S CREW M12-1.25 X 15 HO LE-PT, SLOT 160-3 X1876160- 3 FLAT H D TO RX SCR M5-.8 X 16
46 X1876046 CAP SCREW M6-1 X 30 166 X1876166 T-HANDLE TORX DRIVER T-25
47 X1876047 FENDER WASH ER 6MM 167 X 1876167 POW ER CO RD 18G 3W 72" 5- 15P
48 X1876048 FLANGE NUT M6-1 300 X1876300 MOTOR 1-1/2HP 120V 1-P H
49 X1876049 STUD-DE M6-1 X 100, 12 300-1 X1876300- 1 CARBON BRUSH
50 X1876050 POWER CORD CLAMP 300-2 X1876300-2 BRUSH HOLDER
51V2 X 1876051V2 INFEED TABLE SUPP ORT V2. 07.24 300-3 X1876300- 3 B R USH COV ER
54 X1876054 SET S CREW M6-1 X 10 323 X1876323 PADDLE SWITCH ASSEMBLY
55V2 X 1876055V2 SUP PO RT BRACKET V2.07.24 323-1 X1876323- 1 P ADDLE SWITCH KEDU HY18 20A
56 X1876056 SET S CREW M6-1 X 16 DO G- PT 323-2 X1876323- 2 P ADDLE SWITCH COVER
-43-
PARTS
Page 46
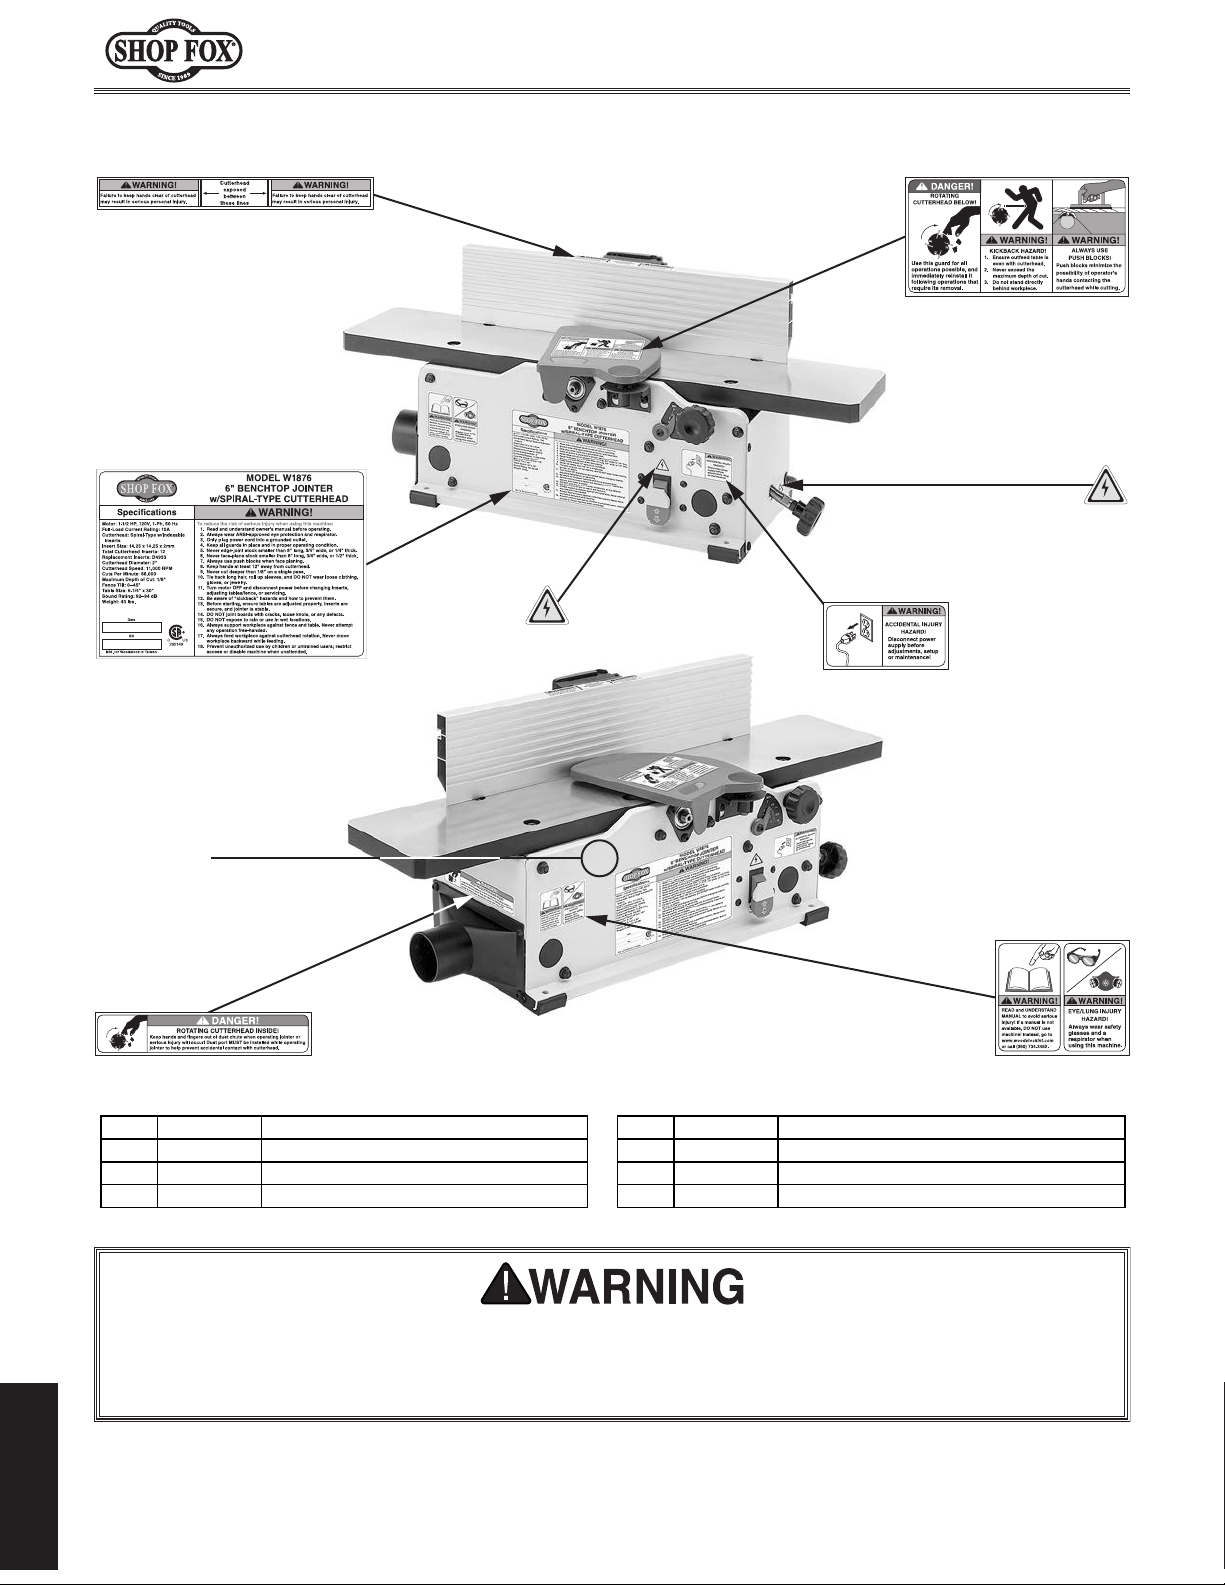
401
REF PA RT # DESCRIPTION REF PA RT # DESCRIPTION
Model W1876 (For Machines Mfd. Since 07/24)
Labels & Cosmetics
402
403
400V2
403
407
406V2
400V2 X1876400V2 MACH INE ID LAB EL V2. 05.24 404 X1876404 DISCONNECT 110V LABEL
401 X1876401 CUTTERHEAD EX POS URE LABEL 405 X1876405 CO MB O WARNI NG LAB EL
402 X1876402 CUTTERHEAD GUARD LABEL 406V2 X1876406V2 CUTTERHEAD WARNING LAB EL V2. 05.24
403 X1876403 ELECTRICITY LABEL 407 X 1876407 TOUCH-UP PAINT, SHOP FOX WHITE
404
405
Safety labels warn about machine hazards and how to prevent serious personal injury. The owner
of this machine MUST maintain the original location and readability of all labels on this machine.
If any label is removed or becomes unreadable, REPLACE that label before allowing machine to be
operated again. Contact us at (360) 647-0802 or www.shopfoxtools.com to order new labels.
PARTS
-44-
Page 47

WARRANTY
Grizzly Industrial, Inc. warrants all Shop Fox machinery to be free of defects from workmanship and
warranty does not apply to defects due directly or indirectly to misuse, abuse, negligence or accidents,
materials for a period of two years from the date of original purchase by the original owner. This
lack of maintenance, or reimbursement of third party expenses incurred.
Grizzly Industrial, Inc. will repair, replace, or arrange for a dealer refund, at its expense and option,
the Shop Fox machine or machine part proven to be defective for its designed and intended use,
provided that the original owner returns the product prepaid to an authorized warranty or repair
facility as designated by our Bellingham, Washington office with proof of their purchase of the product
within two years, and provides Grizzly Industrial, Inc. reasonable opportunity to verify the alleged
defect through inspection. If it is determined there is no defect, or that the defect resulted from
causes not within the scope of Grizzly Industrial Inc.'s warranty, then the original owner must bear the
cost of storing and returning the product.
This is Grizzly Industrial, Inc.’s sole written warranty and any and all warranties that may be implied
by law, including any merchantability or fitness, for any particular purpose, are hereby limited to
the duration of this written warranty. We do not warrant that Shop Fox machinery complies with the
provisions of any law, acts or electrical codes. We do not reimburse for third party repairs. In no event
shall Grizzly Industrial, Inc.’s liability under this limited warranty exceed the purchase price paid for
the product, and any legal actions brought against Grizzly Industrial, Inc. shall be tried in the State
of Washington, County of Whatcom. We shall in no event be liable for death, injuries to persons or
property or for incidental, contingent, special or consequential damages arising from the use of our
products.
Every effort has been made to ensure that all Shop Fox machinery meets high quality and durability
standards. We are commited to continuously improving the quality of our products, and reserve the
right to change specifications at any time.
For further information about the warranty, go to https://www.shopfoxtools.com/warranty, or scan
the QR code below to be automatically directed to our warranty page.
WARRANTY
SHOPFOXTOOLS.COM
Page 48

High Quality Machines and Tools
Grizzly Industrial carries thousands of products designed to meet the needs
of today’s woodworkers and metalworkers. Ask your dealer about these fine products:
®
WHOLESALE ONLY
Phone: (360) 647-0802
Fax: (360) 671-3053
Toll Free Fax: (800) 647-8801
P.O. Box 2069, Bellingham, WA 98227
ShopFoxTools.com
 Loading...