

Shock Doctor Ultra Basketball Flavor Fusion Mouthguard User Manual
Basketball Mouthguard
FITTING INSTRUCTIONS
MUST READ
NO BOIL – LOW HEAT FITTING INSTRUCTIONS
Video Instructions on shockdoctor.com
ALWAYS protect mouthguard from heat environments such as hot dashboards and hot car interiors.
NEVER CHEW or DISTORT mouthguard which can damage it and reduce fit and effectiveness.
STORE at Room Temperature, preferably in a clean mouthguard case.
CLEAN and Rinse after each use.
ITEMS NEEDED
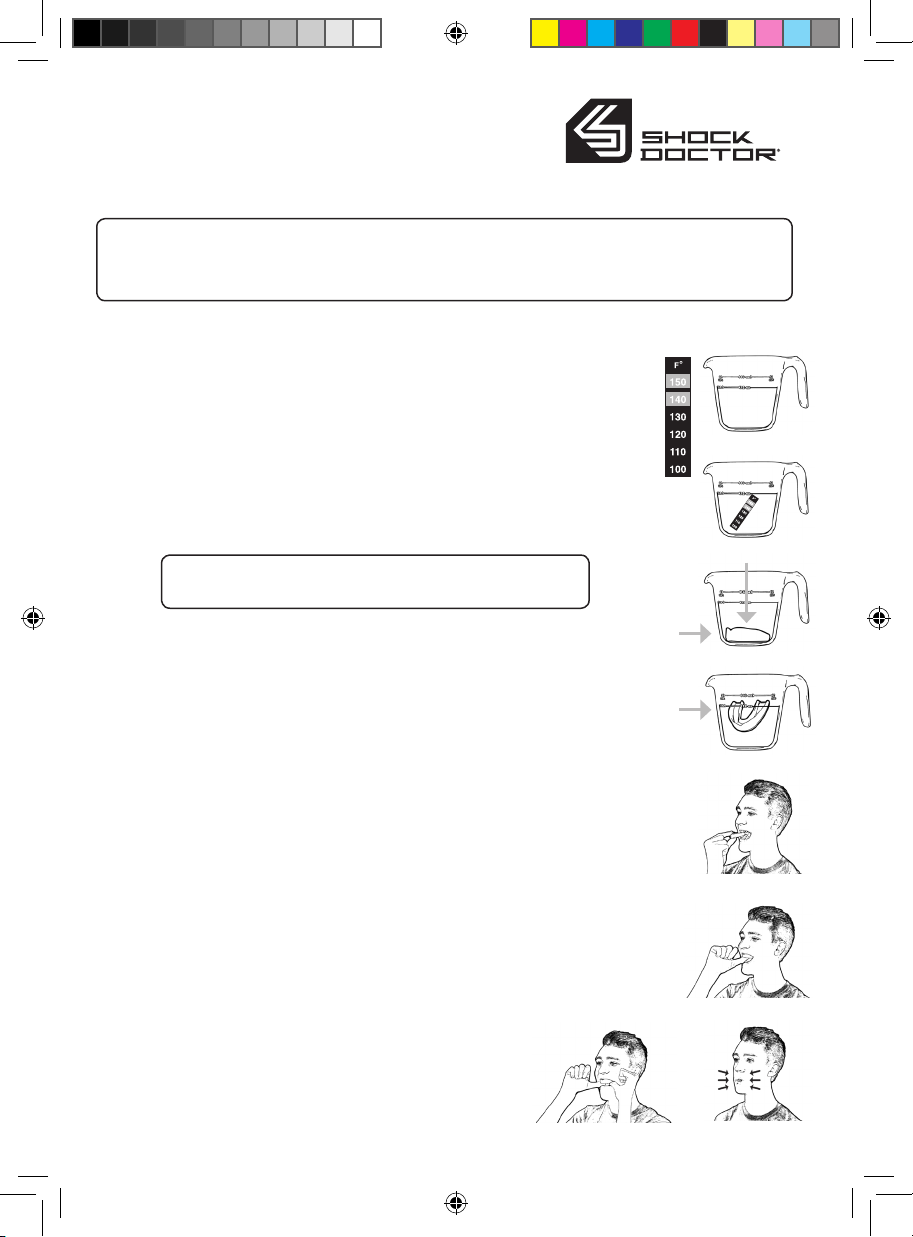
• Temperature strip included with instructions (Fig. 1)
• Large clear safety glass measuring cup or small sauce pan (Fig. 2)
• Mirror • Slotted spoon if desired • Thermometer if desired
NOTE: The mouthguard has a very tight and close fit. The advanced material softens to a firm
putty-like consistency that provides ample time to manipulate and form to the teeth.
Take Your Time and Don’t Rush.
1. Heat water to between 150 F and 160F (Fig. 2)
• Heat 16 oz water on stove, in sauce pan DO NOT BOIL, and pour 12 oz into glass measuring cup
- OR -
• Heat 16 oz water in glass measuring cup in microwave pour out approx. 4 oz. to result in 12 oz.
• Fully Immerse Temp Strip in water. (Fig. 3) (It can be trimmed with a scissor at the 100 degree
mark to fit more easily in container). A thermometer can also be used
If Temp strip shows no temp indication color then water is too hot.
DO NOT IMMERSE MOUTHGUARD IN TOO HOT WATER
• Mix in small amounts of room temp water to cool hot water to lower the temperature
• Non-Flavored Mouthguard: 150 temp indicator is Green/Gold in color, or about 145 degrees
• Flavor Fusion Mouthguards: 140 temp indicator should be Green/Gold in color, or about
135-140 degrees
• Remove Temp Sensor Strip from water
(Fig. 2)
(Fig. 1)
(Fig. 3)
(Fig. 4)
2. Place Mouthguard in warm water
• Insert mouthguard, facing up, into warm water at bottom of container (Fig. 4)
• When mouthguard rises toward the surface of the water or about 35 - 45 seconds, wait 5
more seconds and gently remove. (use a spoon edge to slightly move mouthguard in water
after 30 seconds to avoid it sticking to bottom) Notice that Mouthguard sidewalls and shape
have relaxed (Fig. 5)
• Remove mouthguard from warm water. Handle gently as mouthguard will be very pliable. Make
sure soft walls are straight and the arch channel is clear for fitting onto teeth
• Do Not Rush. You have time to get a great fit
3. Placing and fitting mouthguard correctly
• While facing mirror carefully Center and Align mouthguard on upper arch of teeth (Fig. 6)
• First, press inside rim of mouthguard into back of front teeth and roof of mouth and side of teeth
(Fig. 7)
• Second, push up on bottom of mouthguard along all teeth then slowly bite down with front teeth
into front channel to initiate custom impression. Do Not bite hard or you could bite
through soft material (Fig. 8)
• Third clench teeth slowly together, yet firmly, on the whole
mouthguard and begin to suck out air and press tongue against
inside rim of mouthguard (Fig 9)
(Instructions continue on opposite side)
Instruction sheet_Basketball_rev-4.indd 1 8/29/14 12:03 PM
(Fig. 8)
(Fig. 5)
(Fig. 6)
(Fig. 7)
(Fig. 9)
Basketball Mouthguard
FITTING INSTRUCTIONS
(continued: placing and fitting mouthguard correctly)
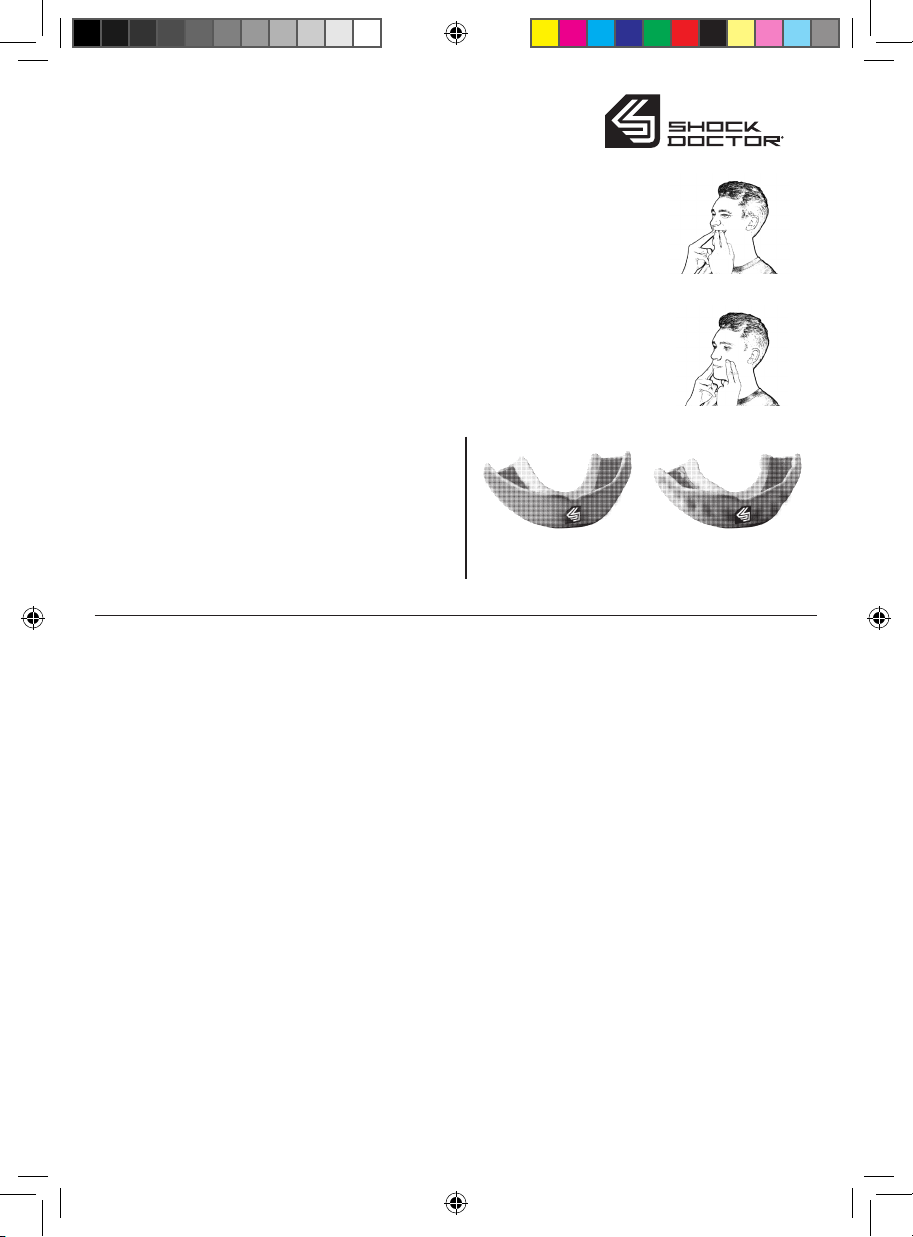
• With fingers firmly press outside of front walls of mouthguard against front row of teeth and
gums then close mouth and suck in air to create a vacuum and continue to compress
mouthguard against all teeth and gums by pressing on outside of lips and cheeks (fig. 10)
• Maintain pressing and compressing mouthguard against teeth and gums with firmer bite until
mouthguard has started to harden. Keep in mouth for at least 4 minutes which allows for
continual custom adjustment while material hardens. (Fig. 11)
• Drinking ice cold water and swirling around mouthguard after two or three minutes can speed
hardening process while continuing to keep a vacuum effect by sucking in air.
• Remove and immerse mouthguard in ice cold water for three to five minutes and check fit.
If not as tight a fit as desired repeat warming instructions, use Temp strip and immerse in 140-
degree water for 30-35 seconds and repeat fit process.
NEVER Chew or Distort Mouthguard which
will damage mouthguard, shorten longevity
and reduce or ruin fit and eectiveness.
STORE at room temperature, preferably in a
clean mouthguard case.
Before Fitting After Fitting
CLEAN and rinse after each use.
Basketball Mouthguard
DENTAL WARRANTY
DISCLAIMER
CERTIFICATE OF LIMITED WARRANTY AND DISCLAIMER
WARRANTY: Shock Doctor, Inc. (“Shock Doctor”) warrants the within mouthguard unit to be free from defects in material and
workmanship which could cause damage or injury to the sound, natural teeth of the purchaser herein when properly used in a
supervised athletic contest or coach-supervised training session. This warranty shall extend for a period of one (1) year from the
date of purchase.
Shock Doctor’s obligations under this warranty shall be limited to the lesser of:
i. The actual dental expense incurred by the user; or ii. $313 per injured or replaced tooth, up to a maximum liability of $10,000 per
incident.
Shock Doctor’s obligations hereunder shall be reduced by the amount of any insurance collected or payable for the damage or injury
claimed. This certificate does not provide payment or indemnity for orthodontic treatments or preparation of a tooth to be used
as an anchor for a bridge Shock Doctor shall have no responsibility or liability hereunder unless: i. The mouthguard was fitted by
claimant in accordance with the printed instructions accompanying this warranty; and ii. A complete written notice of the injury
or damage is received by Shock Doctor within thirty (30) days after the occurrence of the injury or damage; and iii. The notice of
injury is substantiated by a statement of a licensed dentist providing necessary dental treatment within thirty (30) days after the
date of injury or damage and a statement of a participating game official, if a supervised contest, or a supervising coach or school
superintendent, if a practice session, that the mouthguard unit was in proper use at the time of injury; and iv. The within mouthguard
unit is returned to Shock Doctor with the written notice of injury. The mouthguard unit shall become the property of Shock Doctor
upon receipt of return.
This warranty is made in lieu of all other warranties, express or implied, including but not limited to the implied warranty for a
particular purpose and any implied warranty arising out of a course of a dealing, custom, usage or trade. Except as is otherwise
expressly provided herein, Shock Doctor disclaims all liability for loss, injury or damage based upon negligent design or defects in
materials and workmanship for the within mouthguard.
Keep this dental warranty, disclaimer and store receipt in your records. In case of injury, mail mouthguard, store receipt, the notice of
injury and accompanying statements to:
Shock Doctor, Inc.
Shock Doctor, Inc., 110 Cheshire Lane, Suite 120. Minnetonka, MN 55305
Phone: (800) 233-6956 | Fax: (888) 446-5999 | www.shockdoctor.com
©2014 Shock Doctor, Inc. IN83-84
(Fig. 10)
(Fig. 11)
Fitted mouthguard follows
the contours of your teeth
and gums closely.
Instruction sheet_Basketball_rev-4.indd 2 8/29/14 12:03 PM
 Loading...