

Page 1
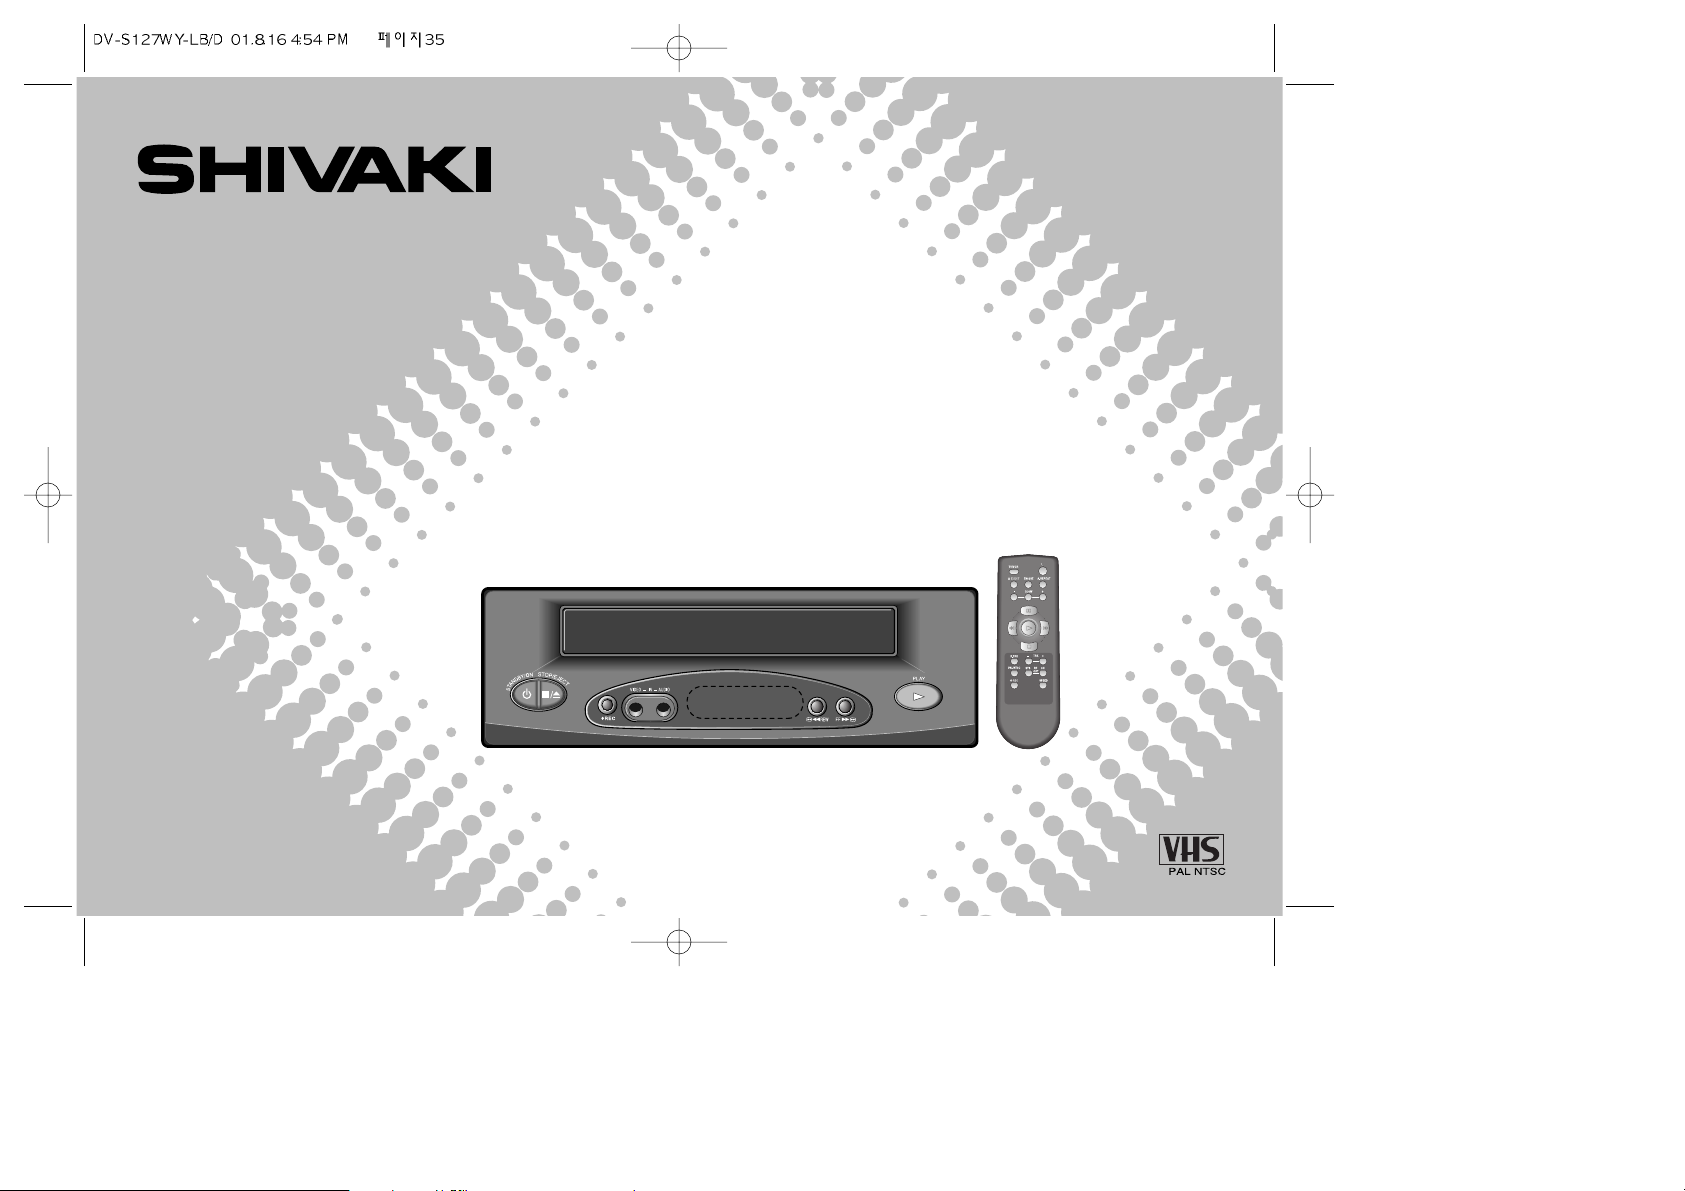
Video
Cassette
Player
SV-M24NR
OWNER’S MANUAL
Page 2
1
DRAWING YOUR ATTENTION
Thank you purchasing this VCP, developed to provide advanced features and functions for high quality performance.
To obtain the best results and to avoid malfunction, PLEASE CAREFULLY READ THE DESCRIPTIONS AND OPERATING
PROCEDURE CONTAINED IN THIS OWNER’S MANUAL PRIOR TO OPERATING THIS VCP.
Caution: To prevent electric shock do not use this polarized plug with an extension cord receptacle or other outlet
unless the blades can be fully inserted to prevent blade exposure.
Warning: This video cassette player should be used with AC 90-250V~, 50/60Hz.
To prevent electric shocks and fire hazards, do NOT use any other power source.
Caution: Any changes or modification in construction of device which are not expressly approved by the party
responsible for compliance could void the user’s authority to operate the equipment.
When you are not using the VCP for along period, it is recommended that you disconnect the power cord from
the AC outlet.
WARNING: TO REDUCE THE RISK OF FIRE OR ELECTRIC SHOCK, DO NOT EXPOSE THIS APPLIANCE TO RAIN OR
MOISTURE. DANGEROUS HIGH VOLTAGES ARE PRESENT INSIDE OF THE ENCLOSURE. DO NOT OPEN
THE CABINET. REFER SERVICING TO QUALIFIED PERSONNEL ONLY.
The lightning flash with arrowhead symbol an equilateral
triangle is intended to alert the user to the presence of
uninsulated “dangerous voltage” within the product’s
enclosure that may be of sufficient magnitude to constitute
a risk of electric shock to persons.
The exclamation point within an equilateral triangle is
intend to alert the user to the presence of important
operating and maintenance (servicing) instructions in the
literature accompanying the appliance.
RISK OF ELECTRIC SHOCKS
DO NOT OPEN
CAUTION: TO REDUCE THE RISK OF ELECTRIC
SHOCK, DO NOT REMOVE THE COVER (OR BACK).
NO USER-SERVICEABLE PARTS INSIDE. REFER
SERVICING TO QUALIFIED SERVICE PERSONNEL.
CAUTION
Page 3
2
IMPORTANT SAFEGUARDS
For your protection, please read these safety instructions completely before operating the appliance, and keep this
manual for future reference.
Carefully observe all warnings, precautions, and instructions on the appliance, or the ones described in the operating
instructions and adhere to them.
USE
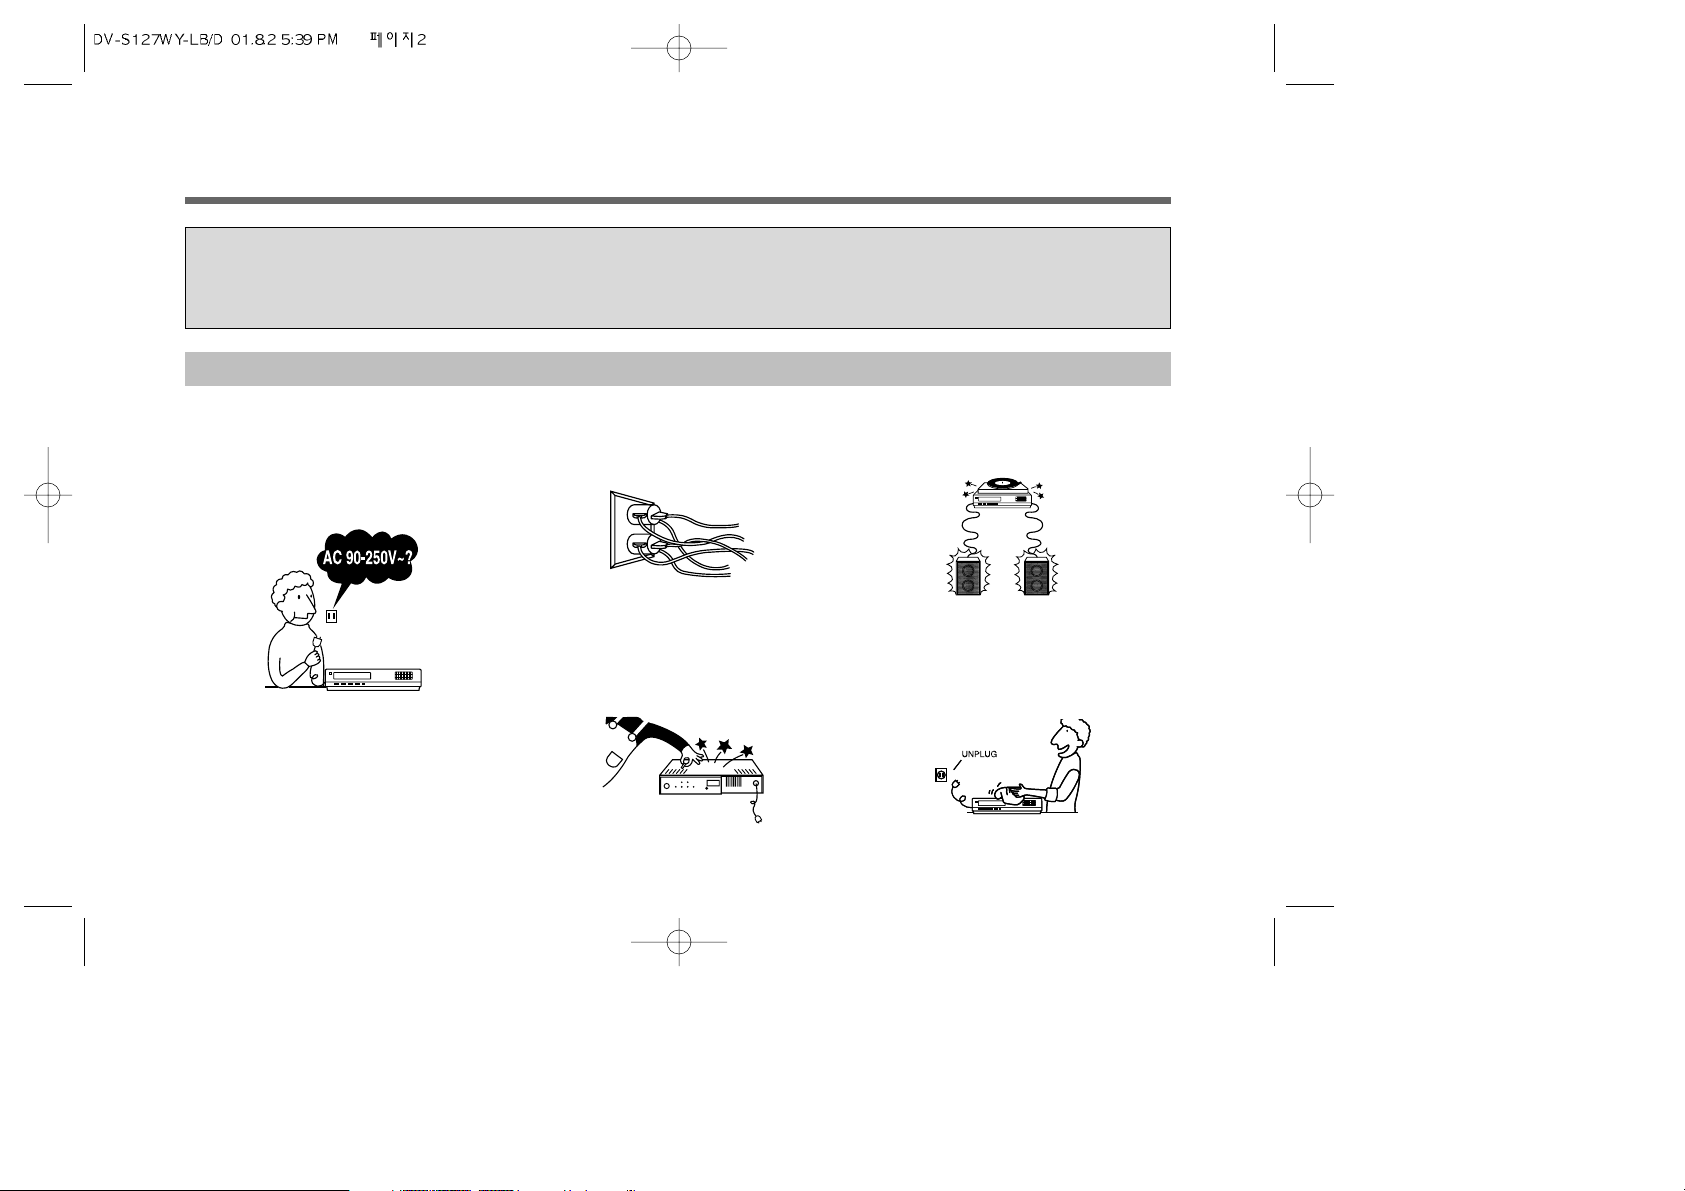
Power Sources–This set should be operated
only from the type of power source indicated on
the marking label. If you are not sure of the type
of electrical power supply at your home, consult
your dealer or local power company. For those
sets designed to operate from AC 90-250V~,
50/60 Hz.
Grounding or Polarization–This set is
equipped with a polarized AC power cord plug (a
plug having one blade wider than the other), or
with a three wire grounding type plug (a plug
having a third pin for grounding).
Follow the instructions below.
Overloading–Do not overload wall outlets,
extension cords or convenience receptacle
beyond their capacity, since this can result in fire
or electric shock.
Object and Liquid Entry–Never push objects of
any kind into the set through openings as they
may touch dangerous voltage points or short out
parts that could result in a fire or electric shock.
Never spill liquid of any kind on the set.
Attachments–Do not use attachments not
recommended by the manufacturer, as they may
cause hazards.
Cleaning–Unplug the set from the wall outlet
before cleaning or polishing it. Do not use liquid
cleaners or aerosol cleaners. Use a cloth lightly
dampened with water for cleaning the exterior of
the set.
UNPLUG
Page 4
3
Water and Moisture–Do not use powerline
operated sets near water-for example, near a
bathtub, washbowl, kitchen sink, laundry tub, in a
wet basement, or near a swimming pool, etc.
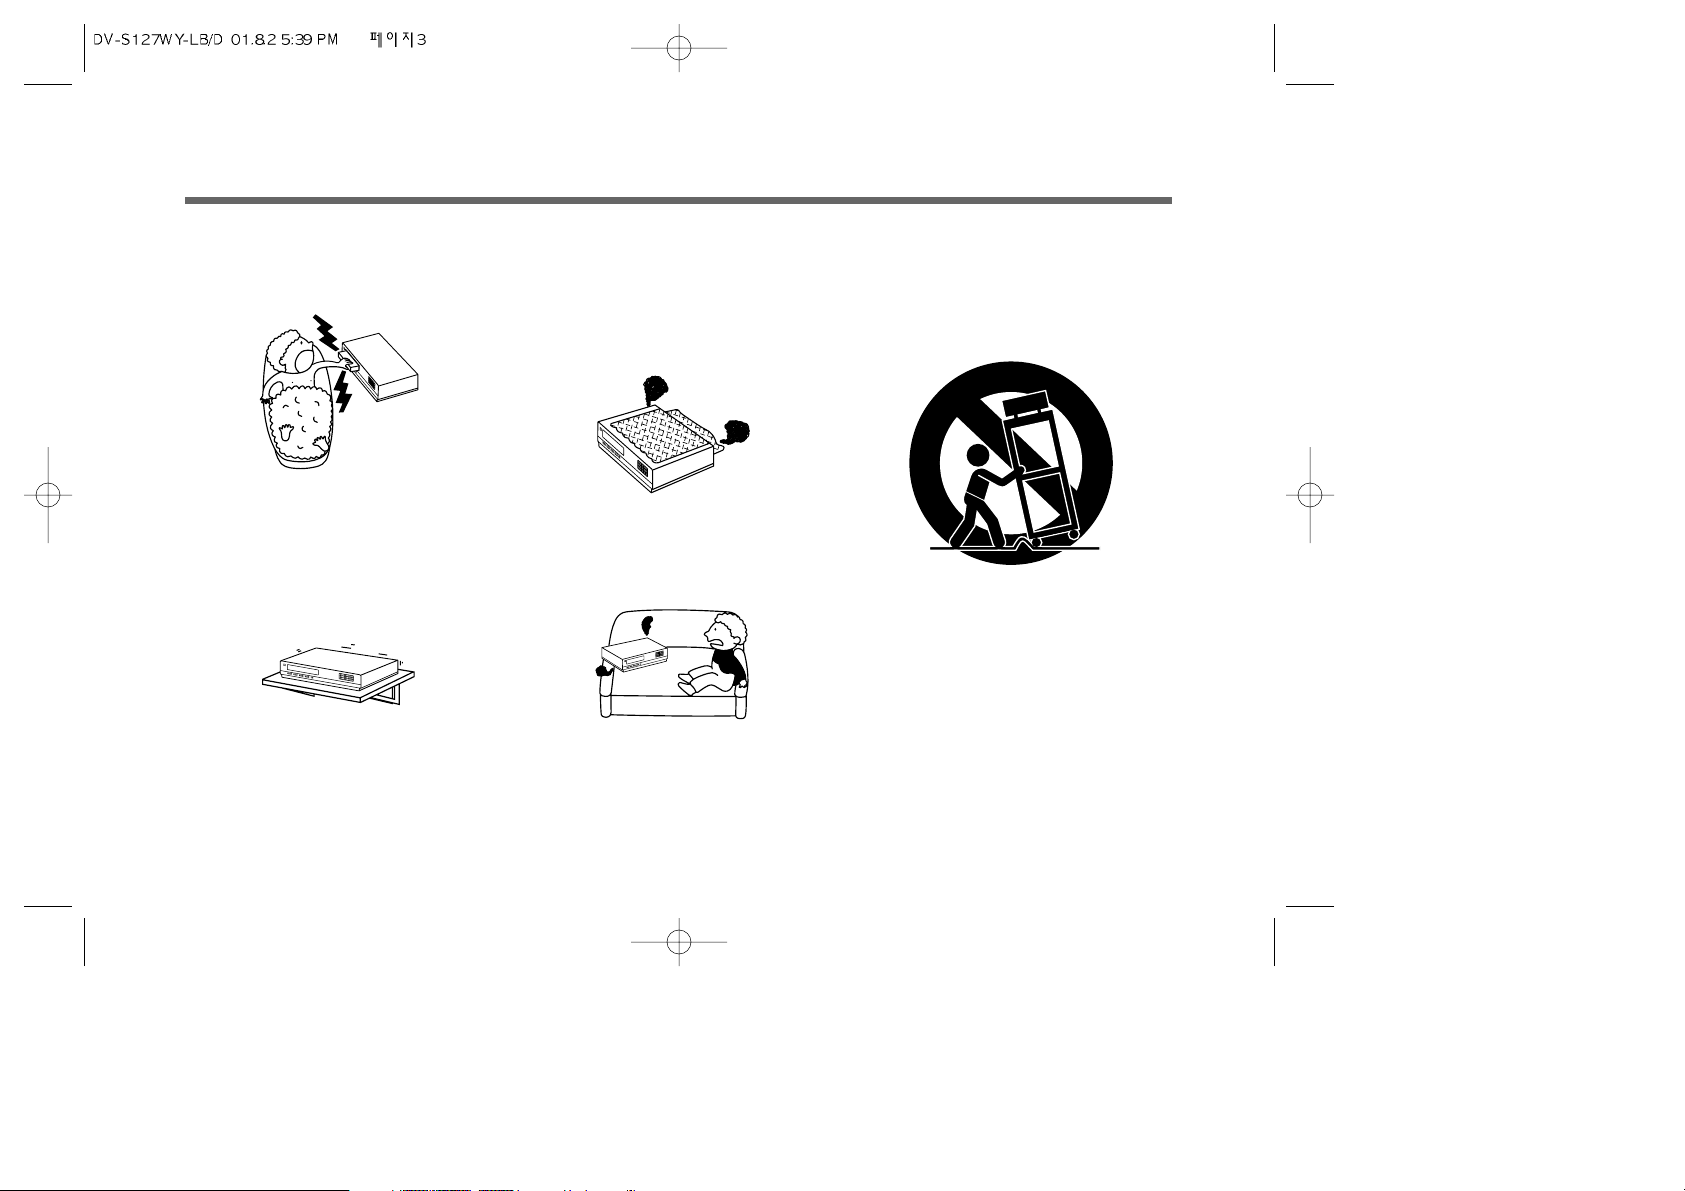
Accessories–Do not place the set on an unstable
cart, stand, tripod, bracket, or table. The set may
fall, causing serious injury to a child or an adult,
and serious damage to the set. Use only a cart
stand, tripod, bracket, or table recommended by the
manufacturer.
Ventilation–The slots and openings in the cabinet
are provided for necessary ventilation. To ensure
reliable operation of the set, and to protect it from
overheating, these slots and openings must never
be blocked or covered.
– Never cover the slots and openings with a cloth
or other materials.
– Never block the slots and openings by placing the
set on a bed, sofa, rug or other similar surface.
Portable Cart Warning–An appliance and cart
combination should be moved with care. Quick
stops, excessive force, and uneven surfaces may
cause the appliance and cart combination to
overturn.
Page 5
4
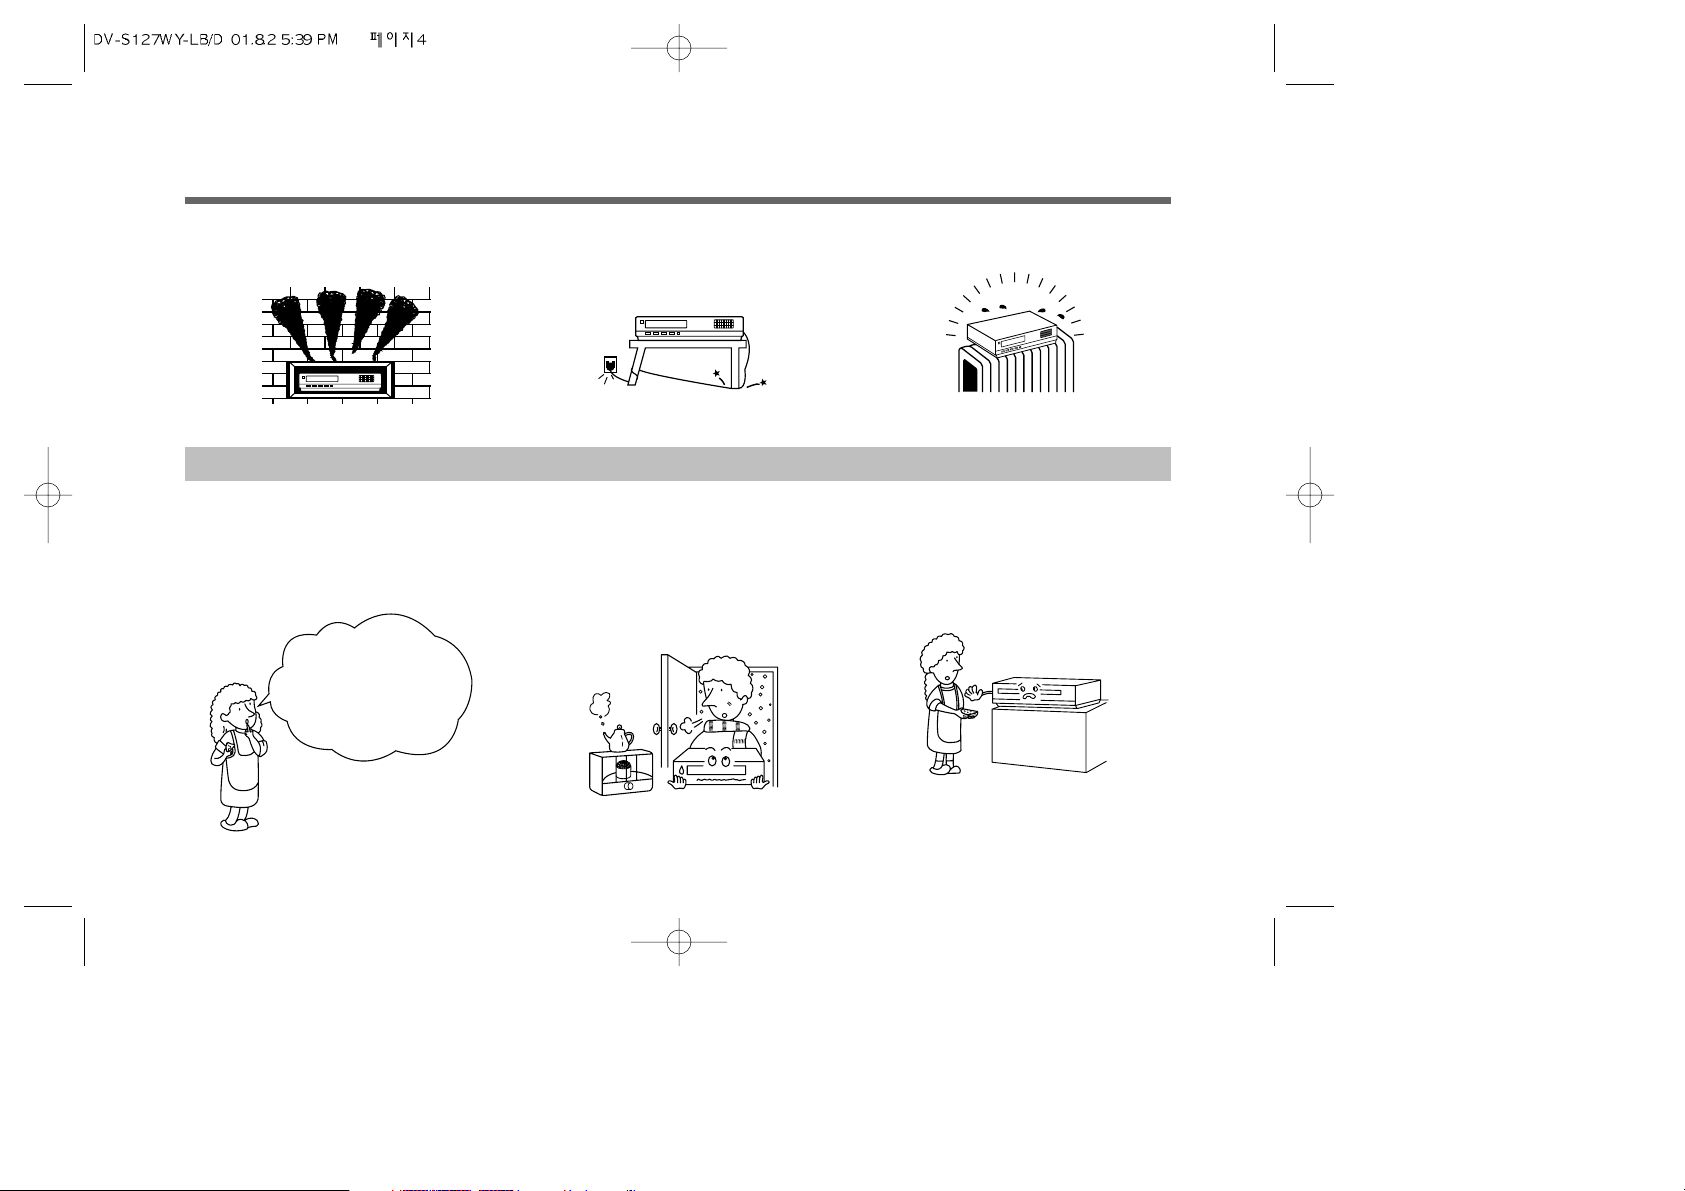
–Never place the set in a confined space such as a
bookcase, or built-in cabinet unless proper
ventilation is provided.
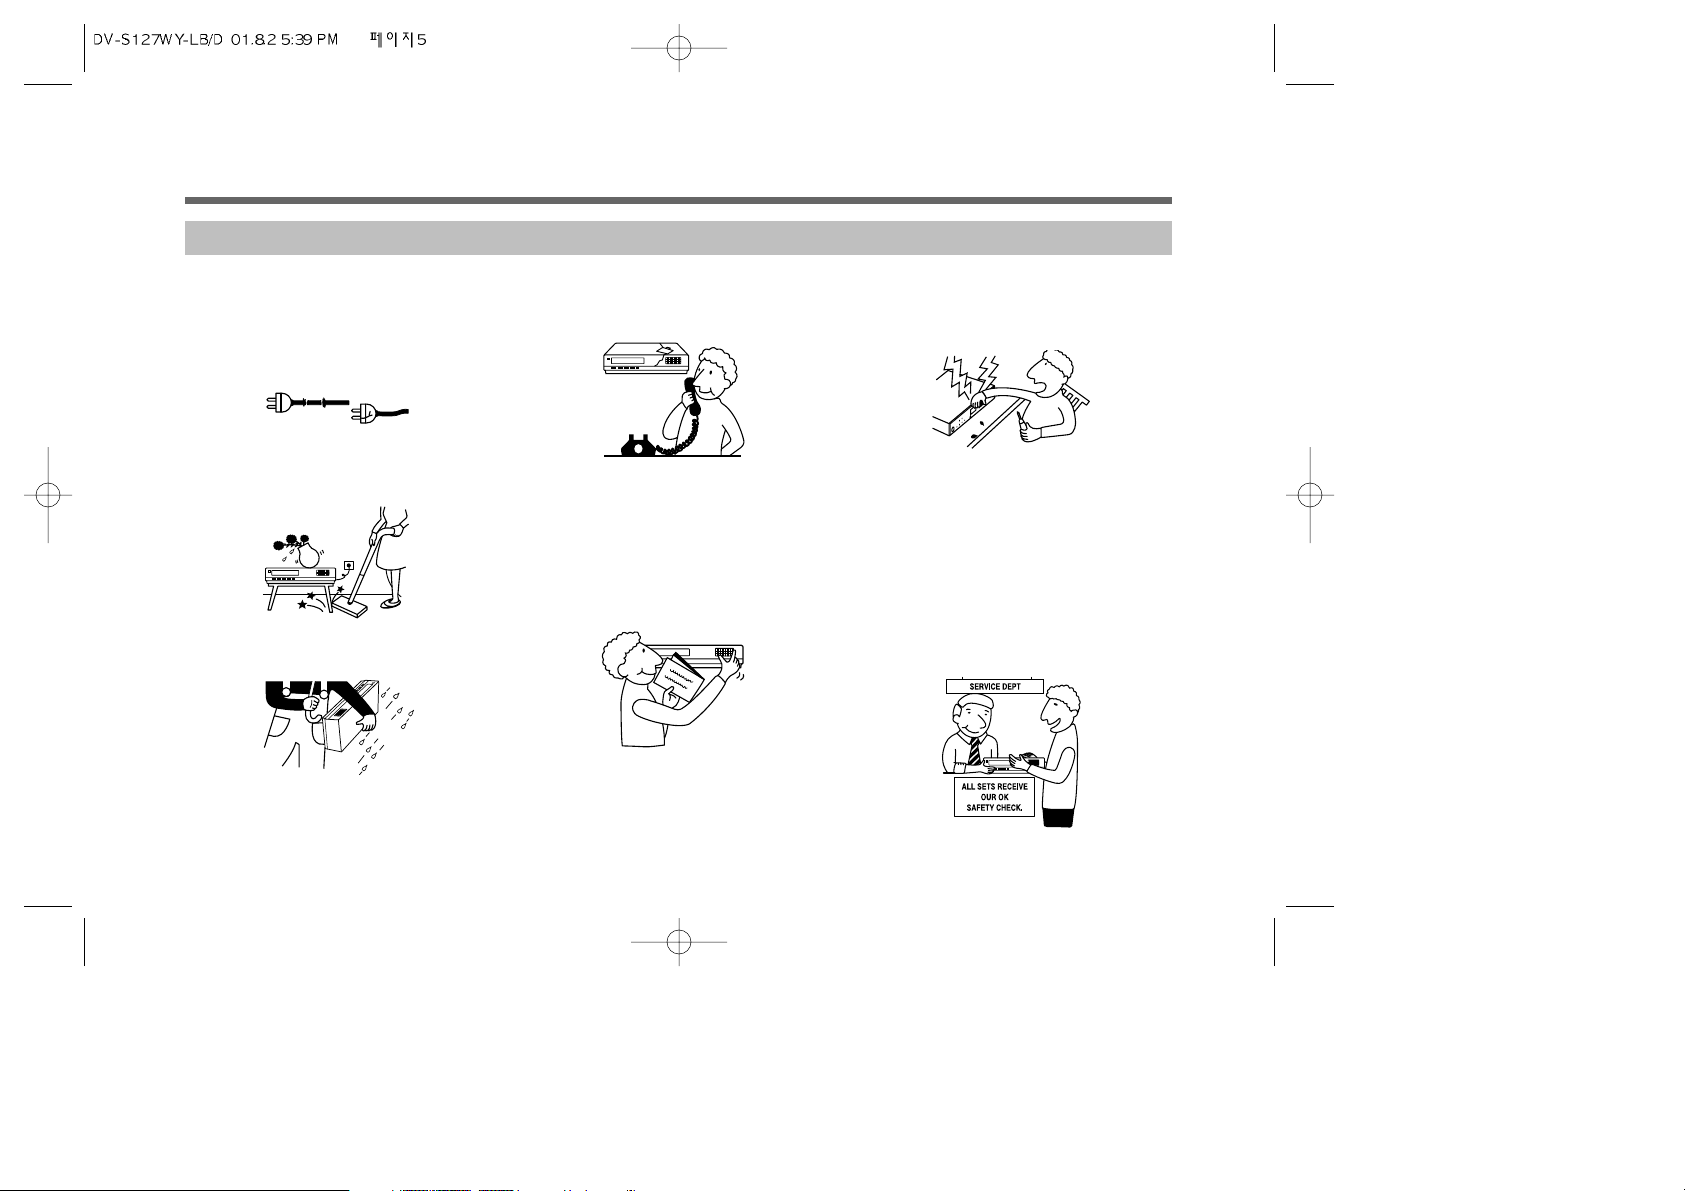
Power-Cord Protection–Route the power cord in
order not to be walked on or pinched by items
placed upon or against them, paying particular
attention to the plugs, receptacles, and the point
where the cord exits from the appliance.
–Do not place the set over a radiator or heat
register, or where it is exposed to direct sunlight.
In the normal temperature, if you pour a cold liquid
into a glass, water vapour in the air will condense
on the surface of the glass. This is moisture
condensation. The moisture condensation may
occur inside of VCPs, if used in this condition, it will
cause damage to the head and the tape.
In case of moving the VCP from a cold place to
heated place,
Or the temperature of surroundings goes up due to
room heating switched on.
Or moving the VCP suddenly from air conditioned
room to a place of high temperature of humidity in
summer.
When the moisture condensation occurs inside of
the VCP, NEVER insert the cassette into the
cassette compartment. Remove the cassette, if
loaded, by pressing the STOP/EJECT key. Only
operate the VCP after the moisture condensation
has completely dried out. Normally, it takes about 2
hours.
MOISTURE CONDENSATION
When does the
moisture condensation
occur inside of the
VCP?
Page 6
5
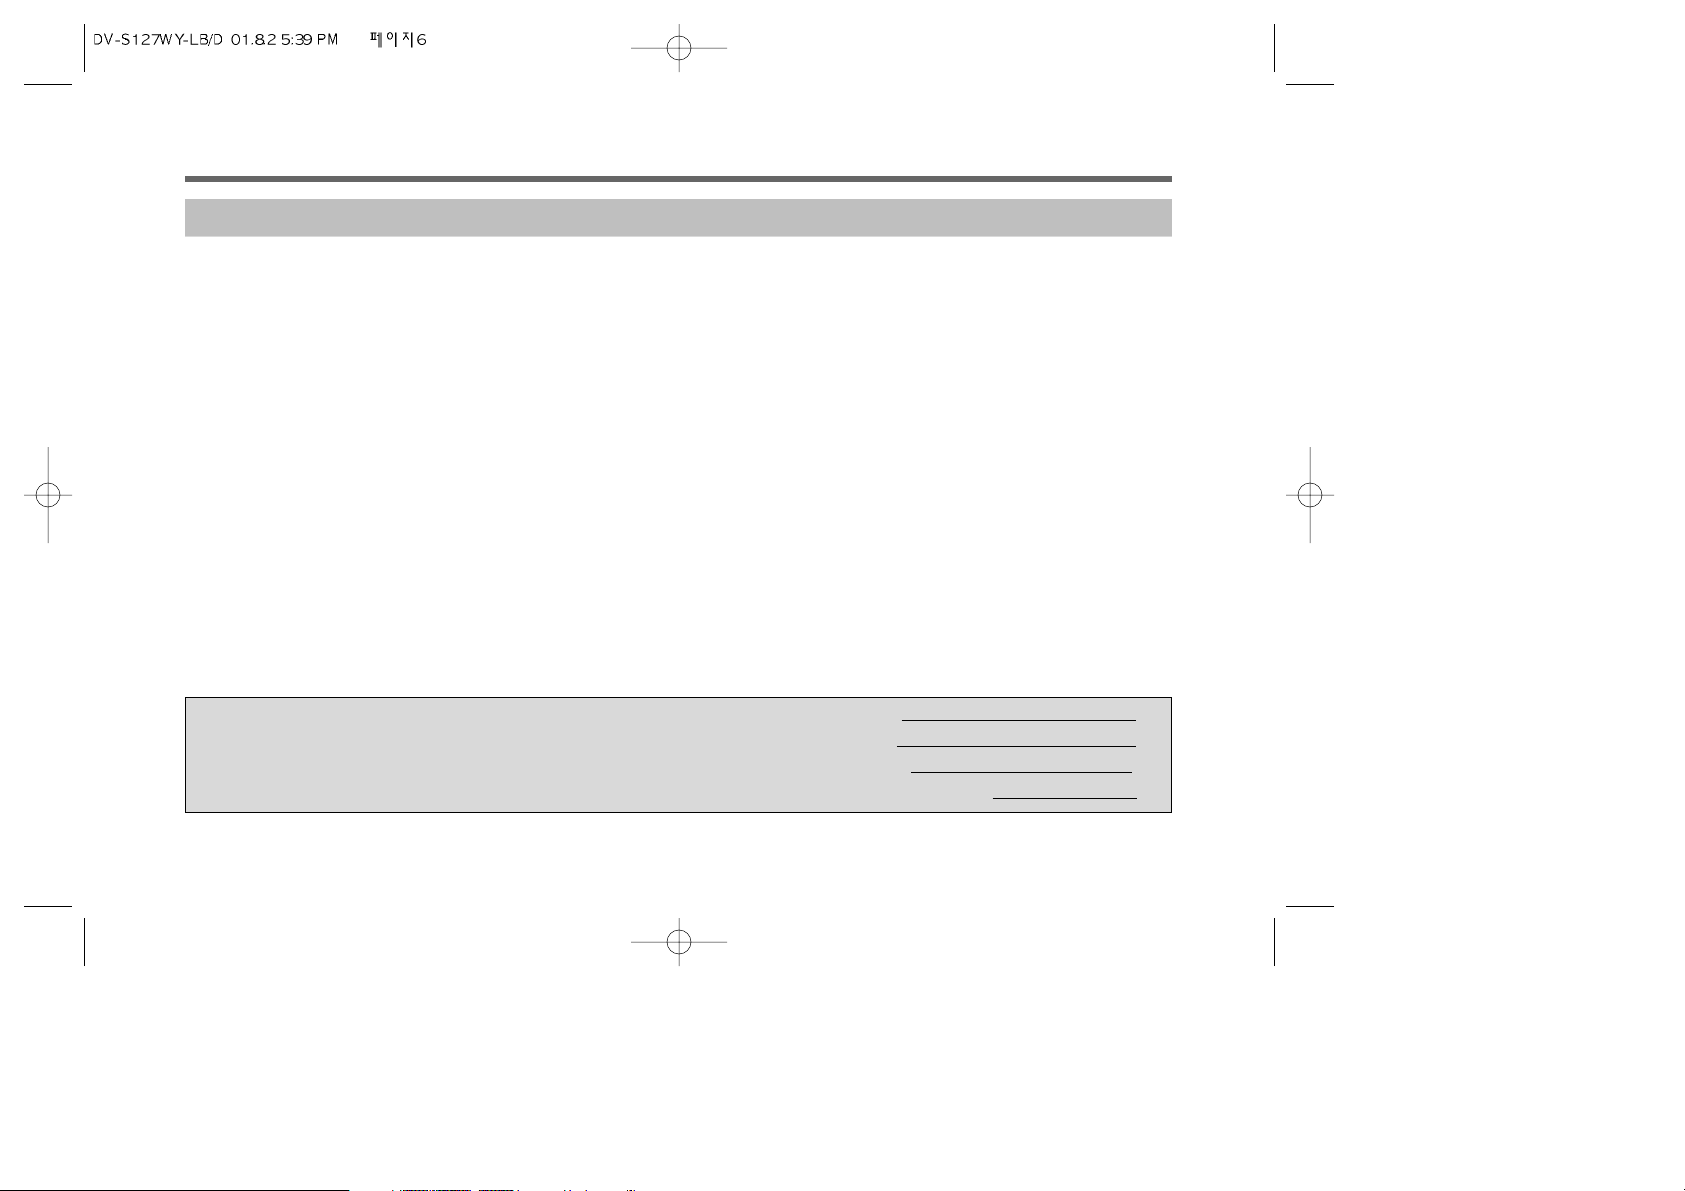
Damage Requiring Service–Unplug the set from
the wall outlet and refer servicing to qualified
service personnel under the following conditions:
–When the power cord or plug is damaged or frayed.
–If liquid has been spilled or objects have fallen into the set.
–If the set has been exposed to rain or water.
–If the set has been subjected to excessive shock by
being dropped, or the cabinet has been damaged.
–If the set does not operate normally when
following the operating instructions, adjust only
those controls that are specified in the operating
instructions. Improper adjustment of other controls
may result in damage and will often require
extensive work by a qualified technician to restore
the set to normal operation.
–When the set exhibits a distinct change in
performance, this indicates a need for service.
Servicing–Do not attempt to service the set
yourself as opening or removing covers may expose
you to dangerous voltage or other hazards.
Refer all servicing to qualified service personnel.
Replacement of parts–When replacement of
parts is required, be sure the service technician has
used replacement parts specified by the
manufacturer that have the same characteristics as
the original parts. Unauthorized substitutions may
result in fire, electric shock, or other hazards.
Safety Check–Upon completion of any service or
repairs to the set, ask the service technician to
perform routine safety checks (as specified by the
manufacturer) to determine that the set is in safe
operating condition.
SERVICE
FRAYED OR CUT
AC LINE
CRACKED PLUG
Page 7
6
IMPORTANT NOTES
• Audio-visual material may include works of copyright which must NOT be recorded without the authority of the owner of
copyright.
• Note that main voltage is supplied to the unit whenever the main plug is connected to the supply socket.
• To avoid the risk of fire or electric shock, do not expose the unit to rain or moisture.
• Do not attempt to open the cabinet. There are no user-serviceable parts inside. Refer all servicing to qualified service
personnel.
• Keep the unit away from radiators or other sources of heat.
• Do not operate or store the unit close to strong magnetic fields.
• Do not spill liquid of any kind onto the unit. If liquid is accidentally spilled onto the unit, immediately remove the main plug
from the supply socket, and consult a qualified service engineer.
• Avoid places subjected to strong vibration.
• Do not place anything heavy on the VCP.
• Use the video cassette player in a horizontal (flat) position only.
• Before operating, remove any paper wrapping which may have been affixed to the player during manufacturing.
DO NOT COVER VENTILATION OPENINGS ON TOP AND SIDES OF THE PLAYER DURING OPERATION.
• When a cassette is inserted into the loading compartment, the power is switched on automatically as long as the power
cord is plugged into an AC outlet. DO NOT force a cassette into the compartment when the power cord is unplugged.
• Keep the player and video cassette away from strong magnetic fields.
• After playing a video cassette, remove it from the player. DO NOT move the player with a cassette in the compartment.
• Store video cassettes in their sleeves or cases and position vertically.
• If a cassette has been subjected to cold temperature, allow it to warm to room temperature before recording or playback.
For your protection, record the model and serial numbers of your video
cassette player here. In the event your player requires servicing or is
stolen, you may need this information. You may also wish to clip or
staple your sales receipt to this page.
Model Number:
Serial Number:
Date Purchased:
Store’s Name and Address:
Page 8
7
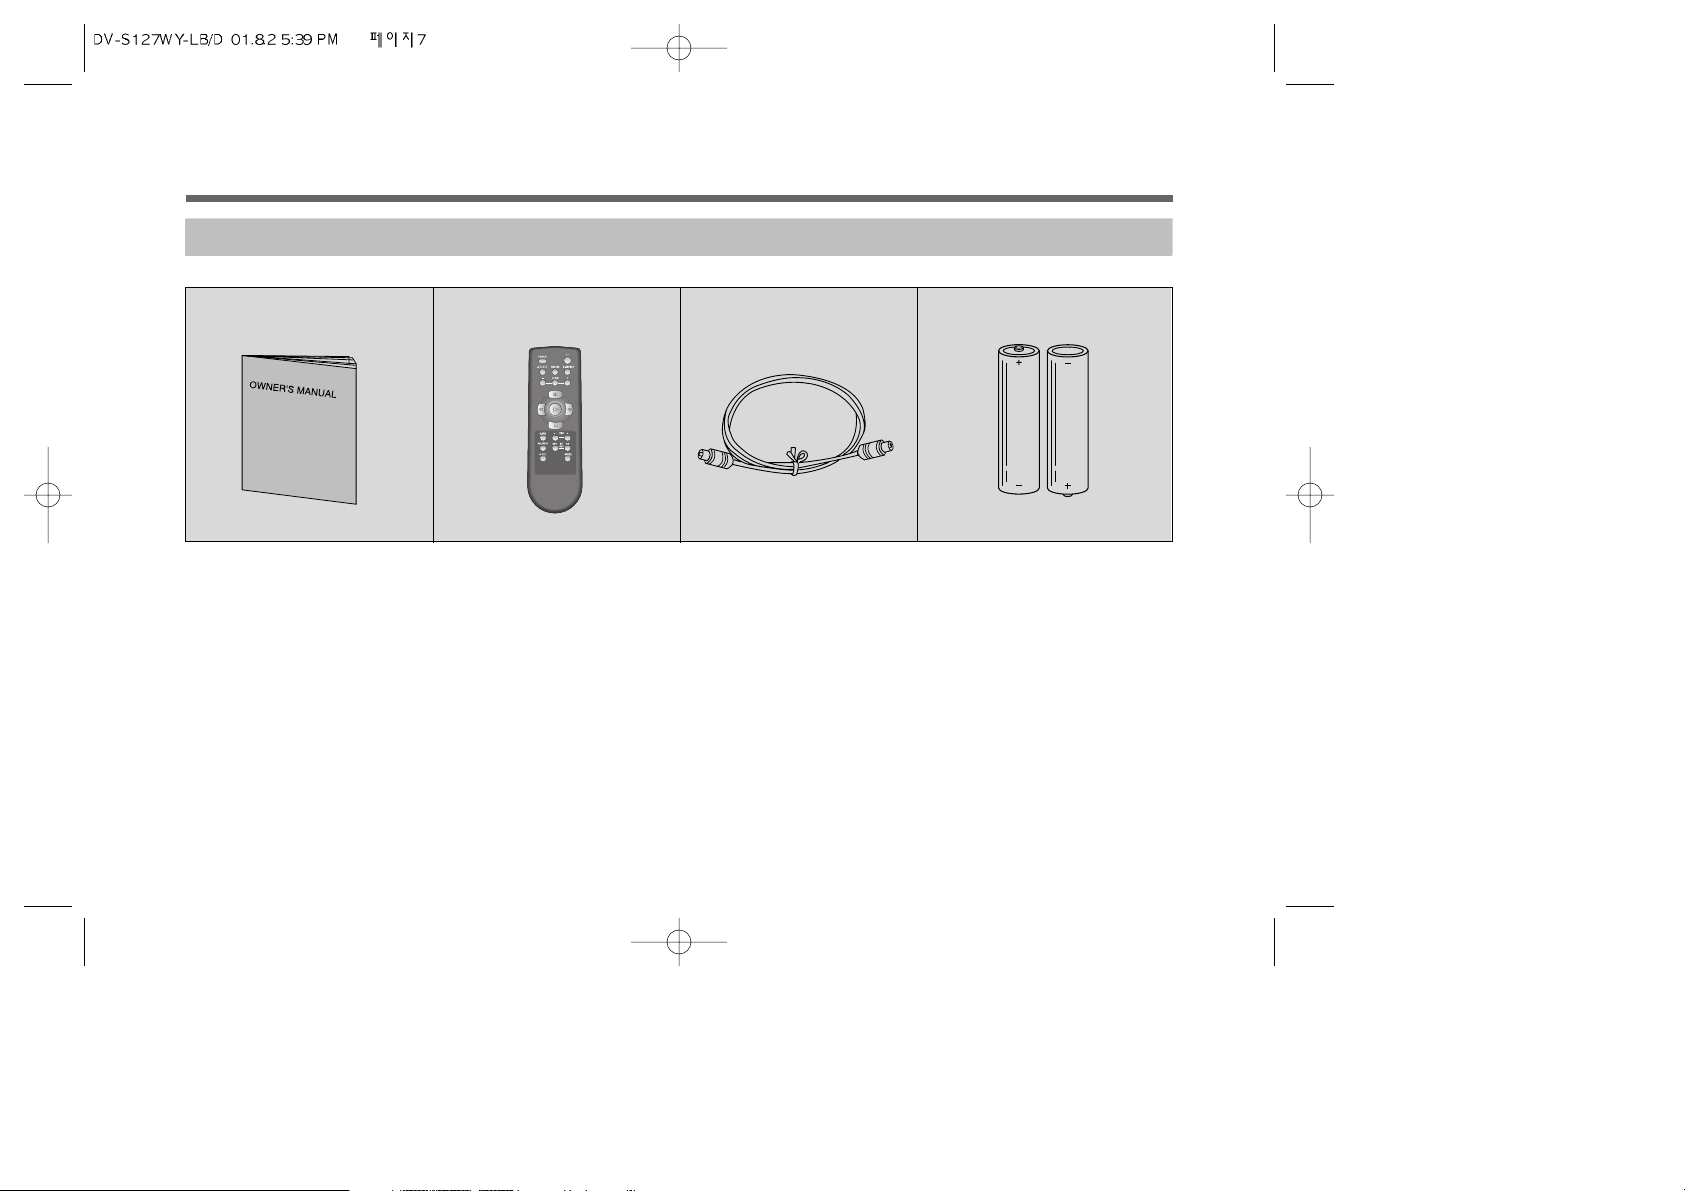
ACCESSORIES
2. REMOTE CONTROL 3. RF CABLE 4. BATTERIES (AAA SIZE)
1. INSTRUCTION MANUAL
Page 9
8
VIDEO HEAD CLEANING
VIDEO HEAD CLOGGING
The video heads are the means by which the VCP reads pictures from the tape during playback.
In the unlikely event that they become dirty enough to be clogged, no picture will be playback. This can easily be determined if,
during playback of a known good tape, there is good sound, but the picture is extremely snowy. If this is the case, have the video
cassette player checked by qualified service personnel.
VIDEO HEAD CLEANING
During normal operation of the VCP, the video and audio heads can get dirty over a period of time, especially when using an old or
poor quality tape. When the heads are dirty the picture can get snowy and the tracking control will not adjust the snow out of the
picture. If this condition occurs, head cleaning cartridges may take care of this problem and restore normal picture. We recommend
that head cleaning cartridges be used sparingly due to the fact that they can be very abrasive to the video heads. If the problem is
not resolved with the head cleaning cartridge then the unit needs to be checked by a qualified service personnel.
NOTE: Video heads may eventually wear out and should be replaced when they fail to reproduce clear pictures. To help
prevent video head clogging, use only good quality VHS tapes. Discard worn out tapes.
Page 10
9
INTRODUCTION
CONGRATULATIONS on your purchase of a new VHS VCP.
This VCP is an existing, new VCP designed to satisfy all your VHS tape play and recording needs.
And, with proper used and care, your new VCP will offer many year of viewing enjoyment.
Just a few of the feature include.
• NTSC PLAYBACK ON PAL TV:
You can playback not only PAL tape but NTSC tape on PAL TV.
• LINE RECORDING (REAR OR FRONT AV JACK )
• NTSC 3.58 RECORDING & PLAYBACK
You can record not only PAL/MESECAM but NTSC (3.58).
• QUICK START
Various operation keys operate quickly when each of them is pressed.
• DIGITAL AUTO TRACKING
This VCP plays clear pictures without special operations.
• AC POWER SUPPLY (AC 90-250V~)
• DC(12V) POWER SUPPLY
• COMPLETE SAFETY DEVICE
When this VCP is not in normal condition, it stops operating automatically for self-protection.
• SELF PICTURE ADJUSTMENT
Since the HEAD DRUM rotates regularly depending on the voltage change or tape condition, the picture is always stable.
• ENCORE FUNCTION
Press the ENCORE key on the remote control to watch the desired picture once more during playback.
• BUILT-IN WIDE RANGE MODULATOR (CH. 22- CH. 40)
• BUILT-IN MULTI RF OUT MODULATOR (PAL-G/K/I)
• AUTO REPEAT SEARCH FUNCTION
If you press the A.REPEAT key during playback,the tape will be replayback after rewinding .
• 2 STEP PICTURE SEARCH
Page 11
10
TABLE OF CONTENTS
NOTE: This Video Cassette Player is compatible with any Video Cassette Player bearing the VHS mark. The VCP is designed to
expand your opportunities for home viewing and not for any usage which might violate the copyright laws.
Save the original shipping carton and packing materials; they will come in handy if you ever have to ship your VCP. For
maximum protection, repack the set as it was originally packed at the factory.
DRAWING YOUR ATTENTION........................................................................................................................................................ 1
IMPORTANT SAFEGUARDS ........................................................................................................................................................... 2
VIDEO HEAD CLEANING ................................................................................................................................................................ 8
INTRODUCTION.............................................................................................................................................................................. 9
TABLE OF CONTENT..................................................................................................................................................................... 10
IDENTIFICATION........................................................................................................................................................................... 11
TO GET STARTED ......................................................................................................................................................................... 18
VIDEO CHANNEL SETTING........................................................................................................................................................... 19
BASIC OPERATION ....................................................................................................................................................................... 20
SPECIAL OPERATION.................................................................................................................................................................... 24
PICTURE ADJUSTMENT............................................................................................................................................................... 27
VIDEO SYSTEM ............................................................................................................................................................................ 28
RECORDING TV PROGRAMS........................................................................................................................................................ 29
BEFORE CALLING SERVICE PERSONNEL ..................................................................................................................................... 33
SPECIFICATION............................................................................................................................................................................. 34
Page 12
11
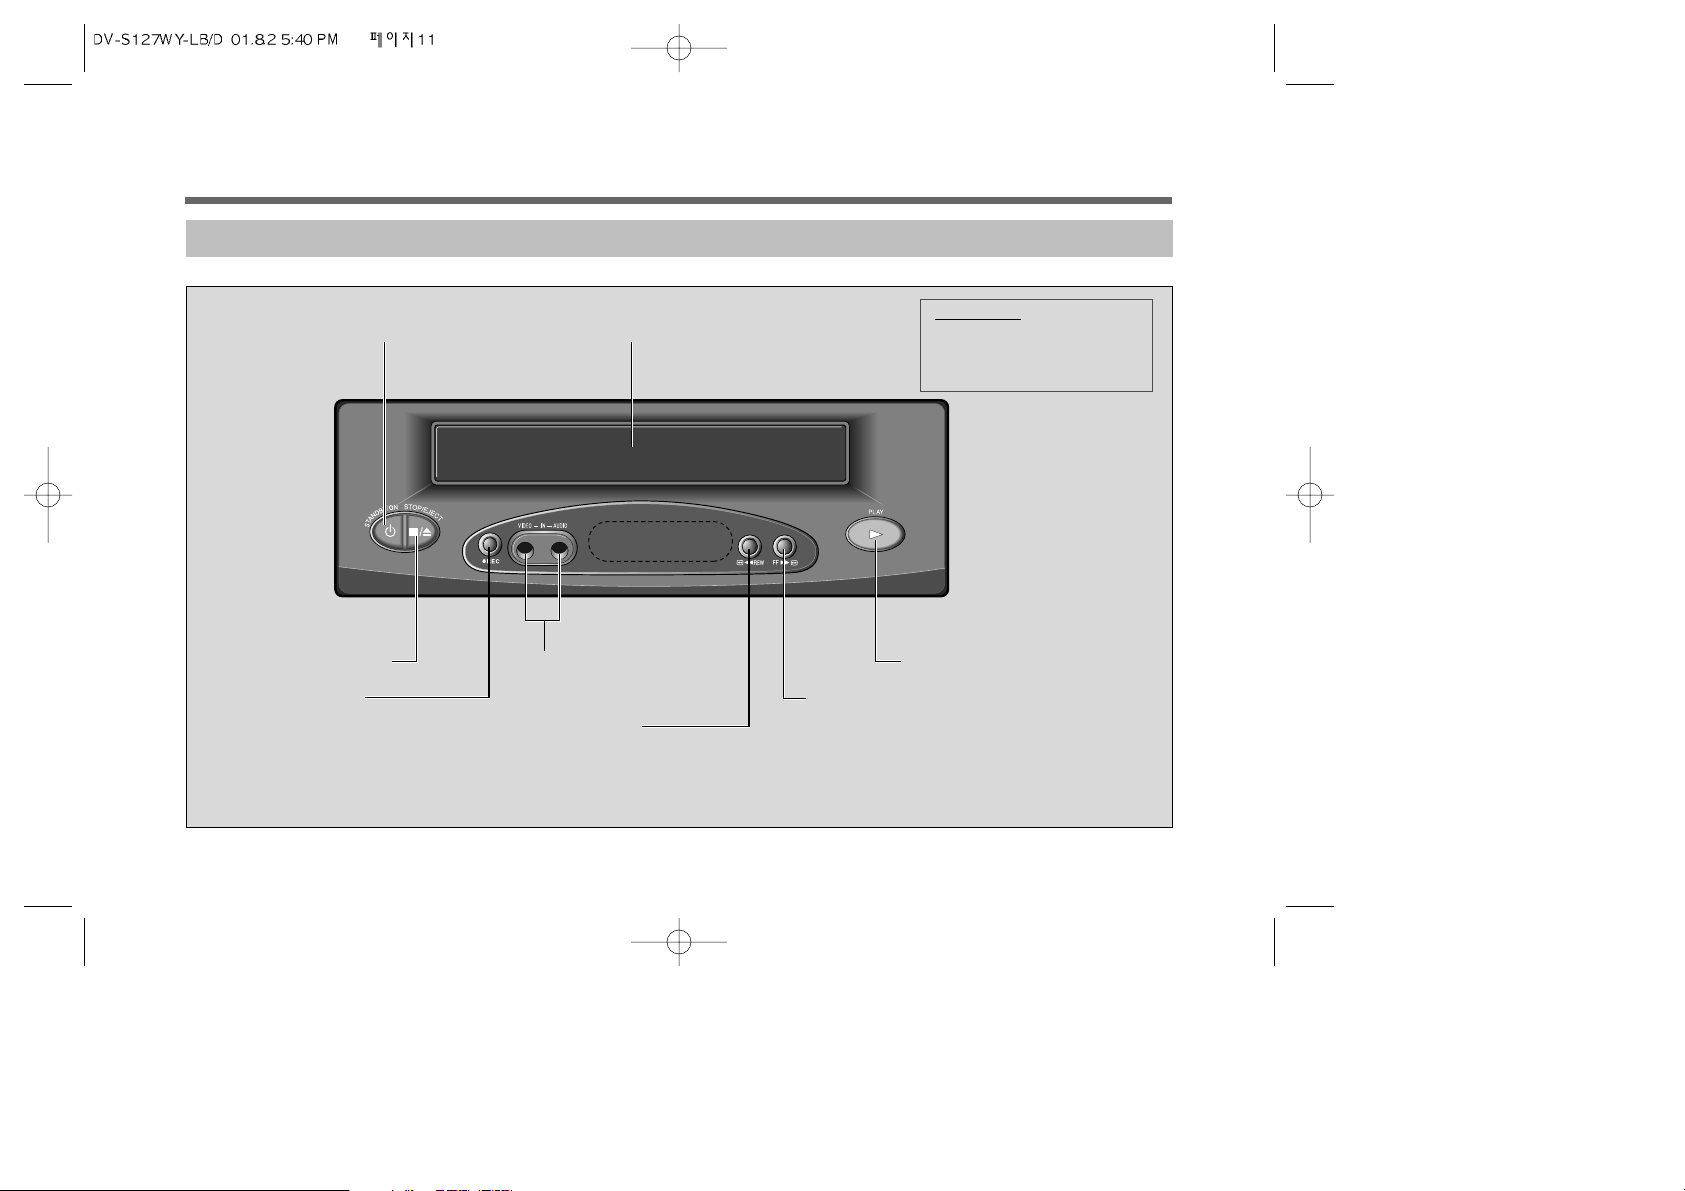
FRONT PANEL
IDENTIFICATION
STANDBY KEY
STOP/EJECT KEY
AUDIO/VIDEO IN JACK
PLAYBACK KEY
RECORD KEY
REWIND/REVIEW KEY
FAST FORWARD/CUE KEY
CASSETTE COMPARTMENT
*If this key is pressed in the PLAYBACK mode, the VCP
enters the Reverse Picture Search mode and if pressed in
the STOP mode, tape is rewound at a high speed.
*If this key is pressed in the PLAYBACK mode,
the VCP enters the Forward Picture Search mode
and if pressed in the STOP mode,
tape advances at a high speed.
CAUTION:
Standby key won’t be
used to turn on (or off) the
main power.
Page 13
12
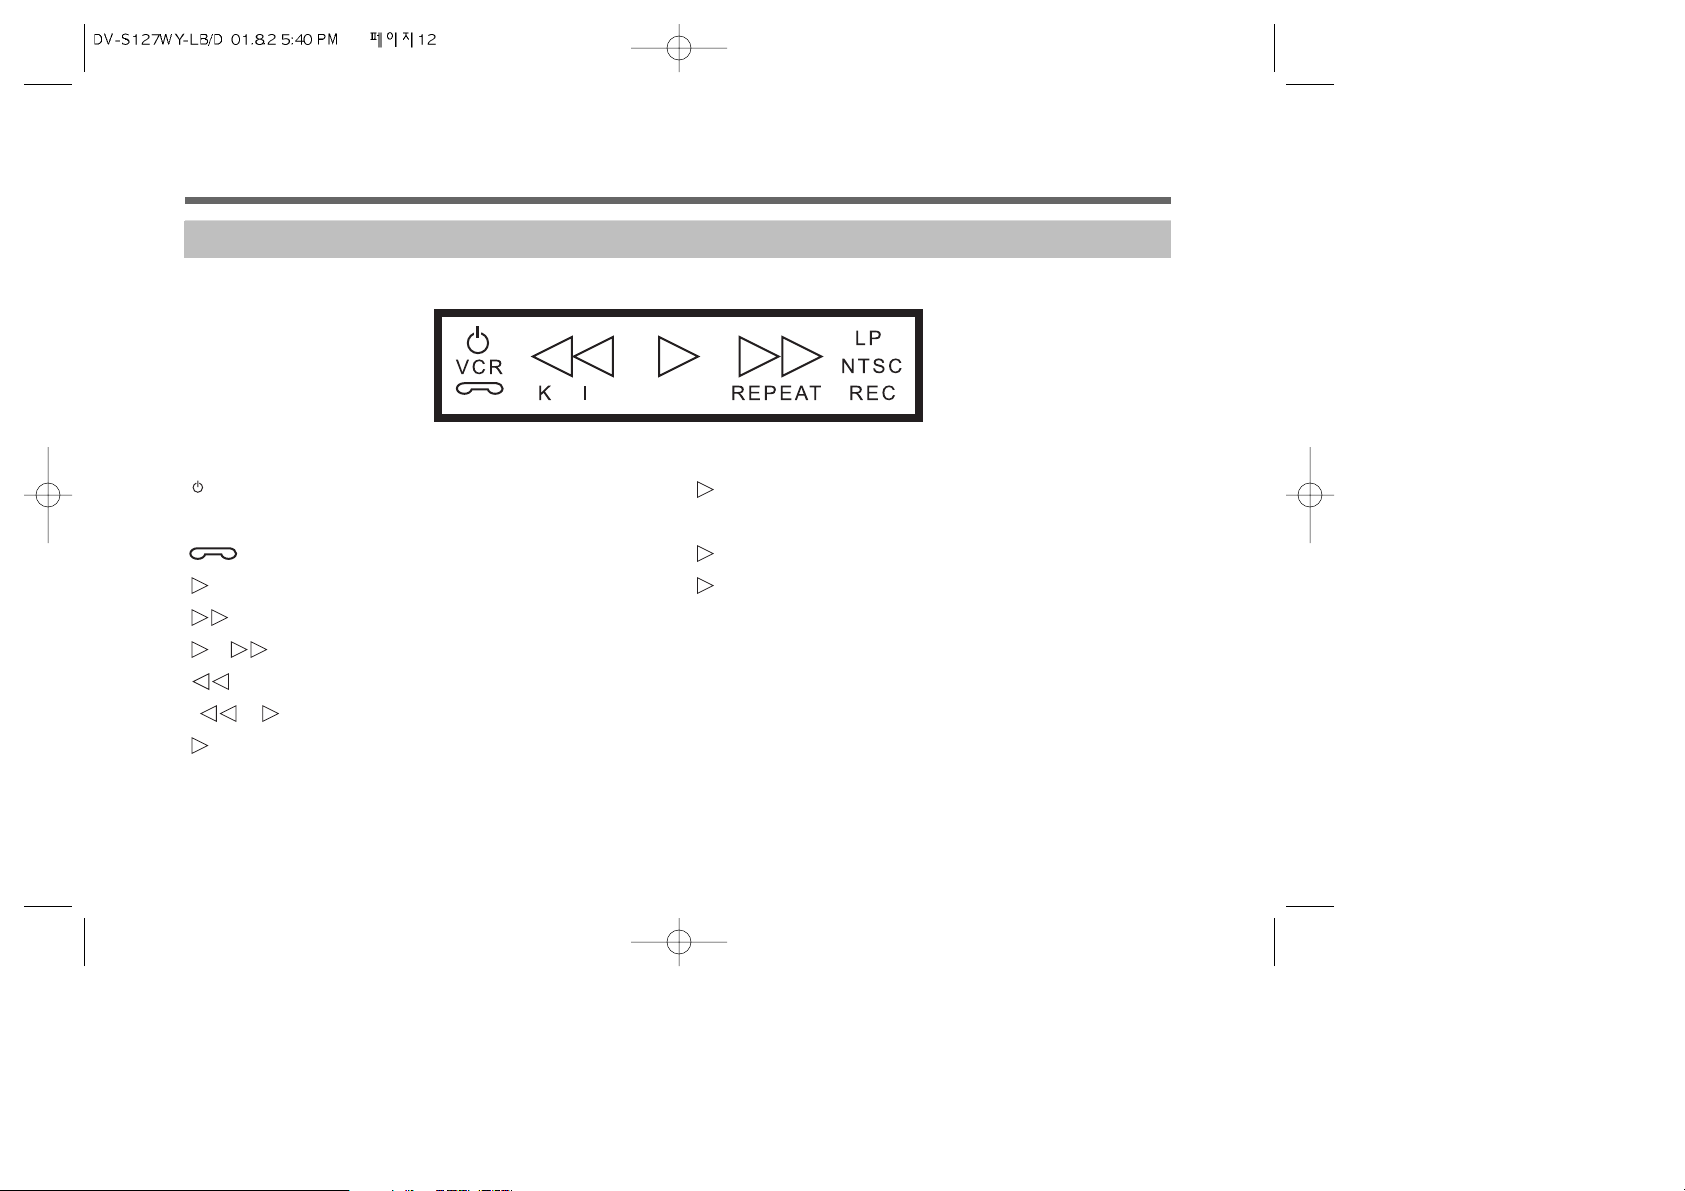
FRONT PANEL DISPLAY
IDENTIFICATION (continued)
Turned on : color is red
Turned off : color is green
Tape Loading
Playback
Fast forward
“ ” Forward Search
Rewind
“ ”, Reverse Search
Still, Frame advance
Slow
REC Record
Record Pause
, REPEAT Auto Repeat
Stop
LP Tape Speed (Long Play)
K/I RF OUT system
NTSC NTSC Video system
* “ “ means blinking.
Page 14
13
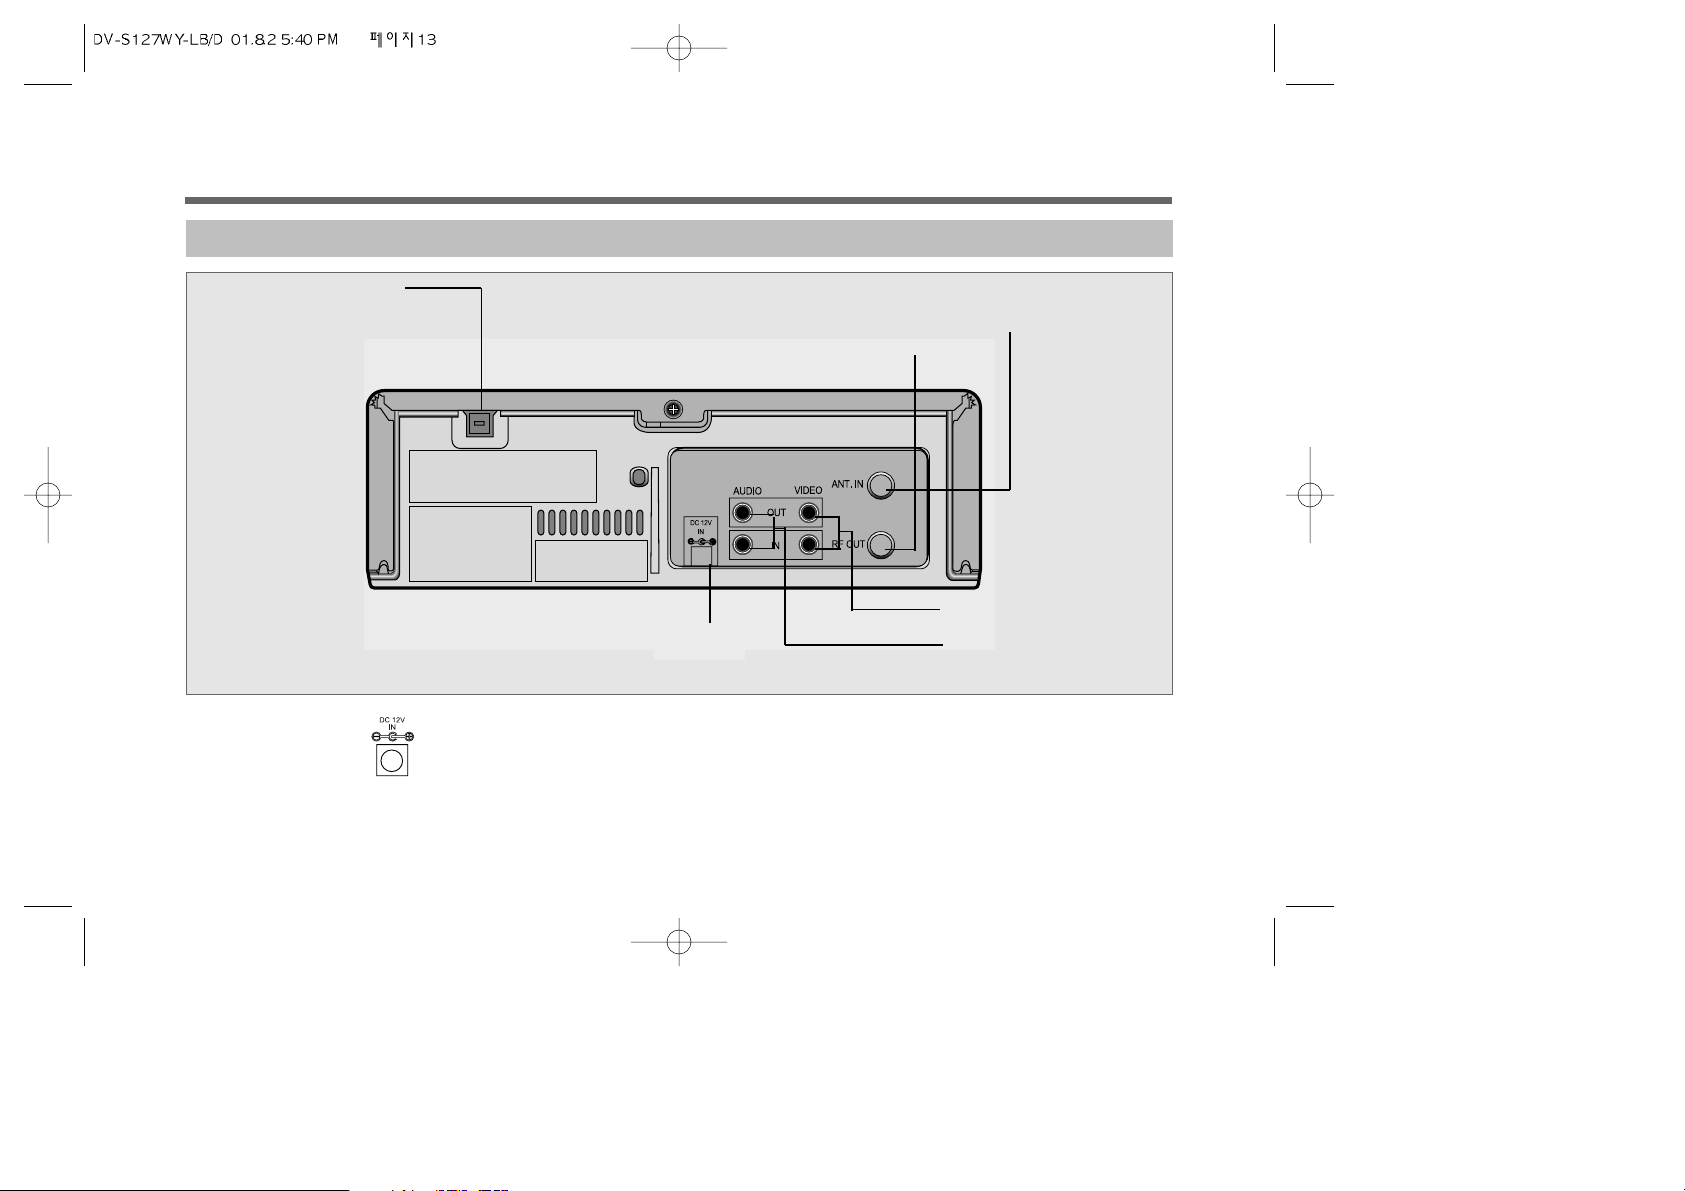
REAR PANEL
IDENTIFICATION (continued)
CAUTION : 1) DC JACK : Be careful not to change the polarity + and - when DC Power operating.
2) Do not connect AC and DC Power together at a time.
AC POWER CORD
DC JACK
ANT IN TERMINAL
(Connect the TV antenna to
this terminal)
VIDEO IN/OUT JACK
AUDIO IN/OUT
JACK
RF OUT TERMINAL
(Connect to the antenna terminal of the TV receiver
through the RF cable (provided))
Page 15
14
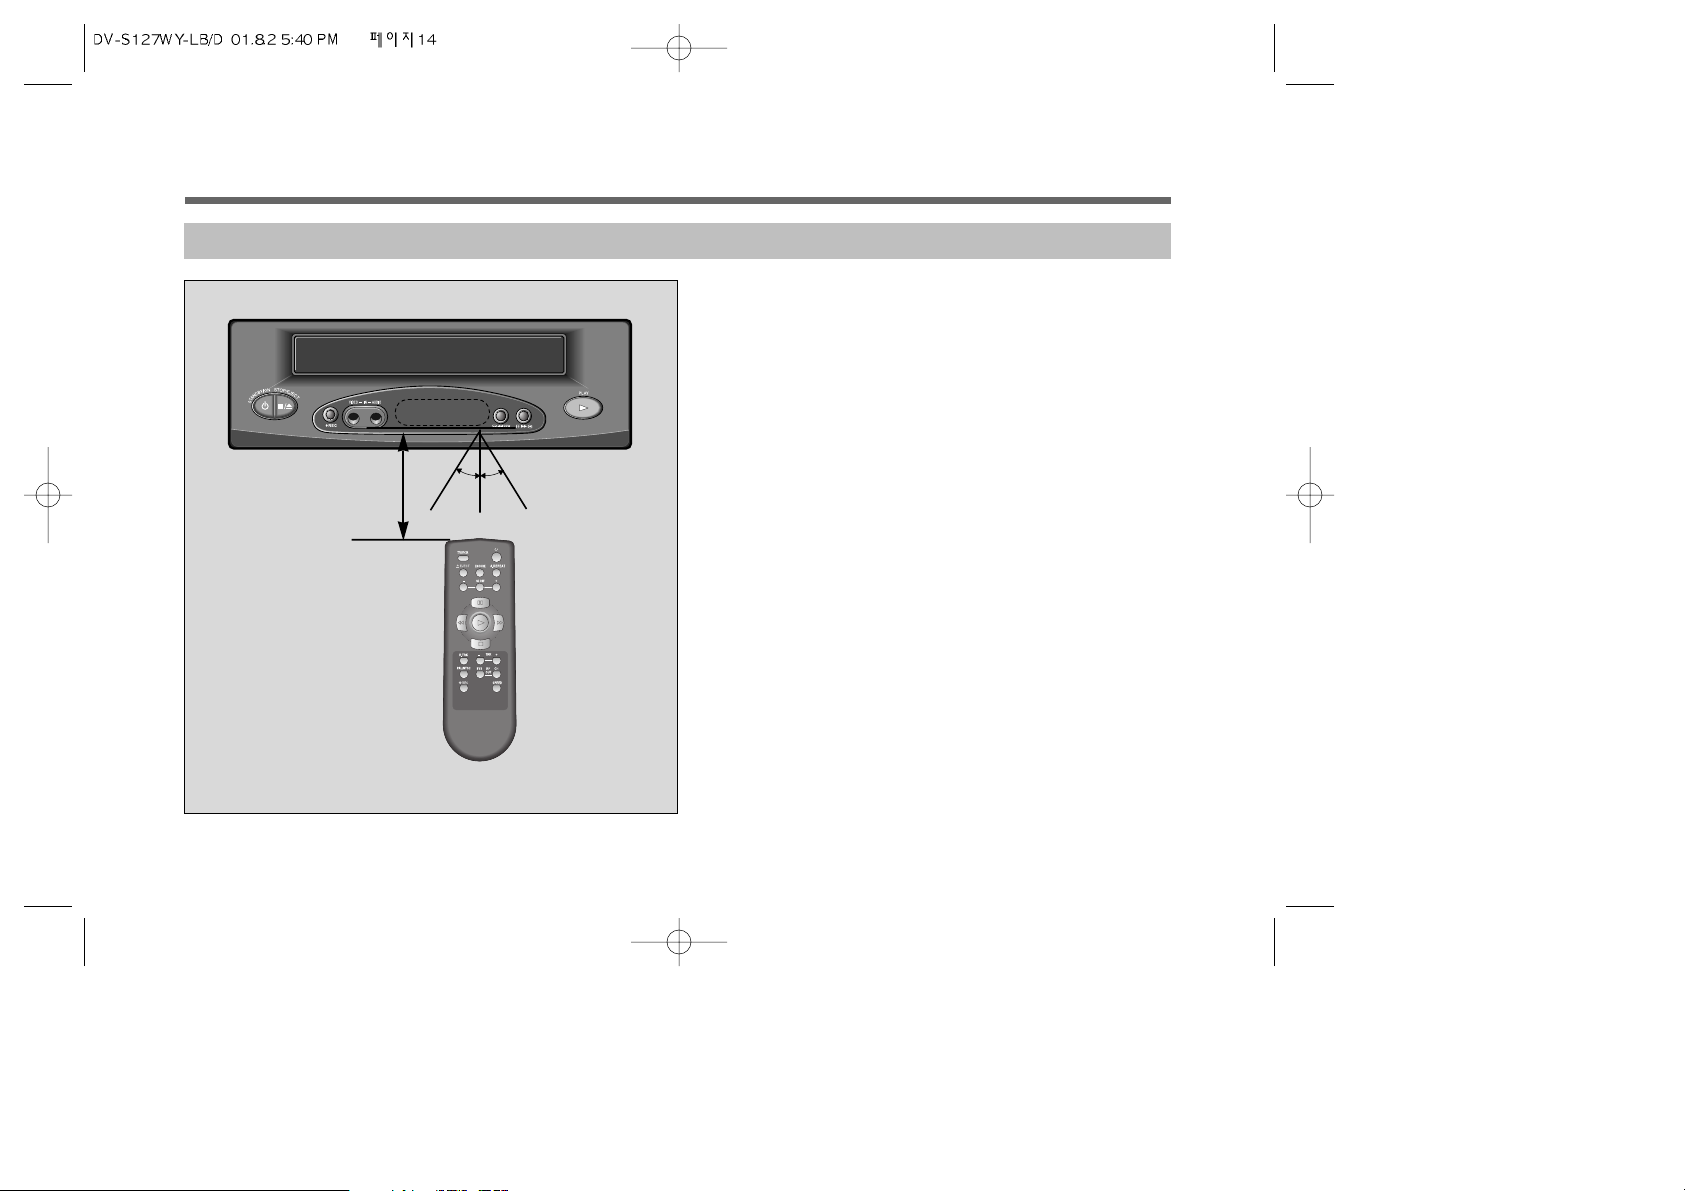
REMOTE CONTROL OPERATION RANGE
7m
1. Any object between the remote control and VCP will
block the path of beam when it is being used.
Dark walls, direct sunshine or very bright
(incandescent) light will reduce the remote control
sensitivity.
2. Hold the remote control within an angle range of
about 30o from either side of the remote sensor center
as shown.
3. When the remote control is vertical to the remote
Sensor, it will work within about 23feet (7m) from the
VCP.
4. Point the front of the remote control directly at the
front of the VCP.
30
o 30o
Page 16
15
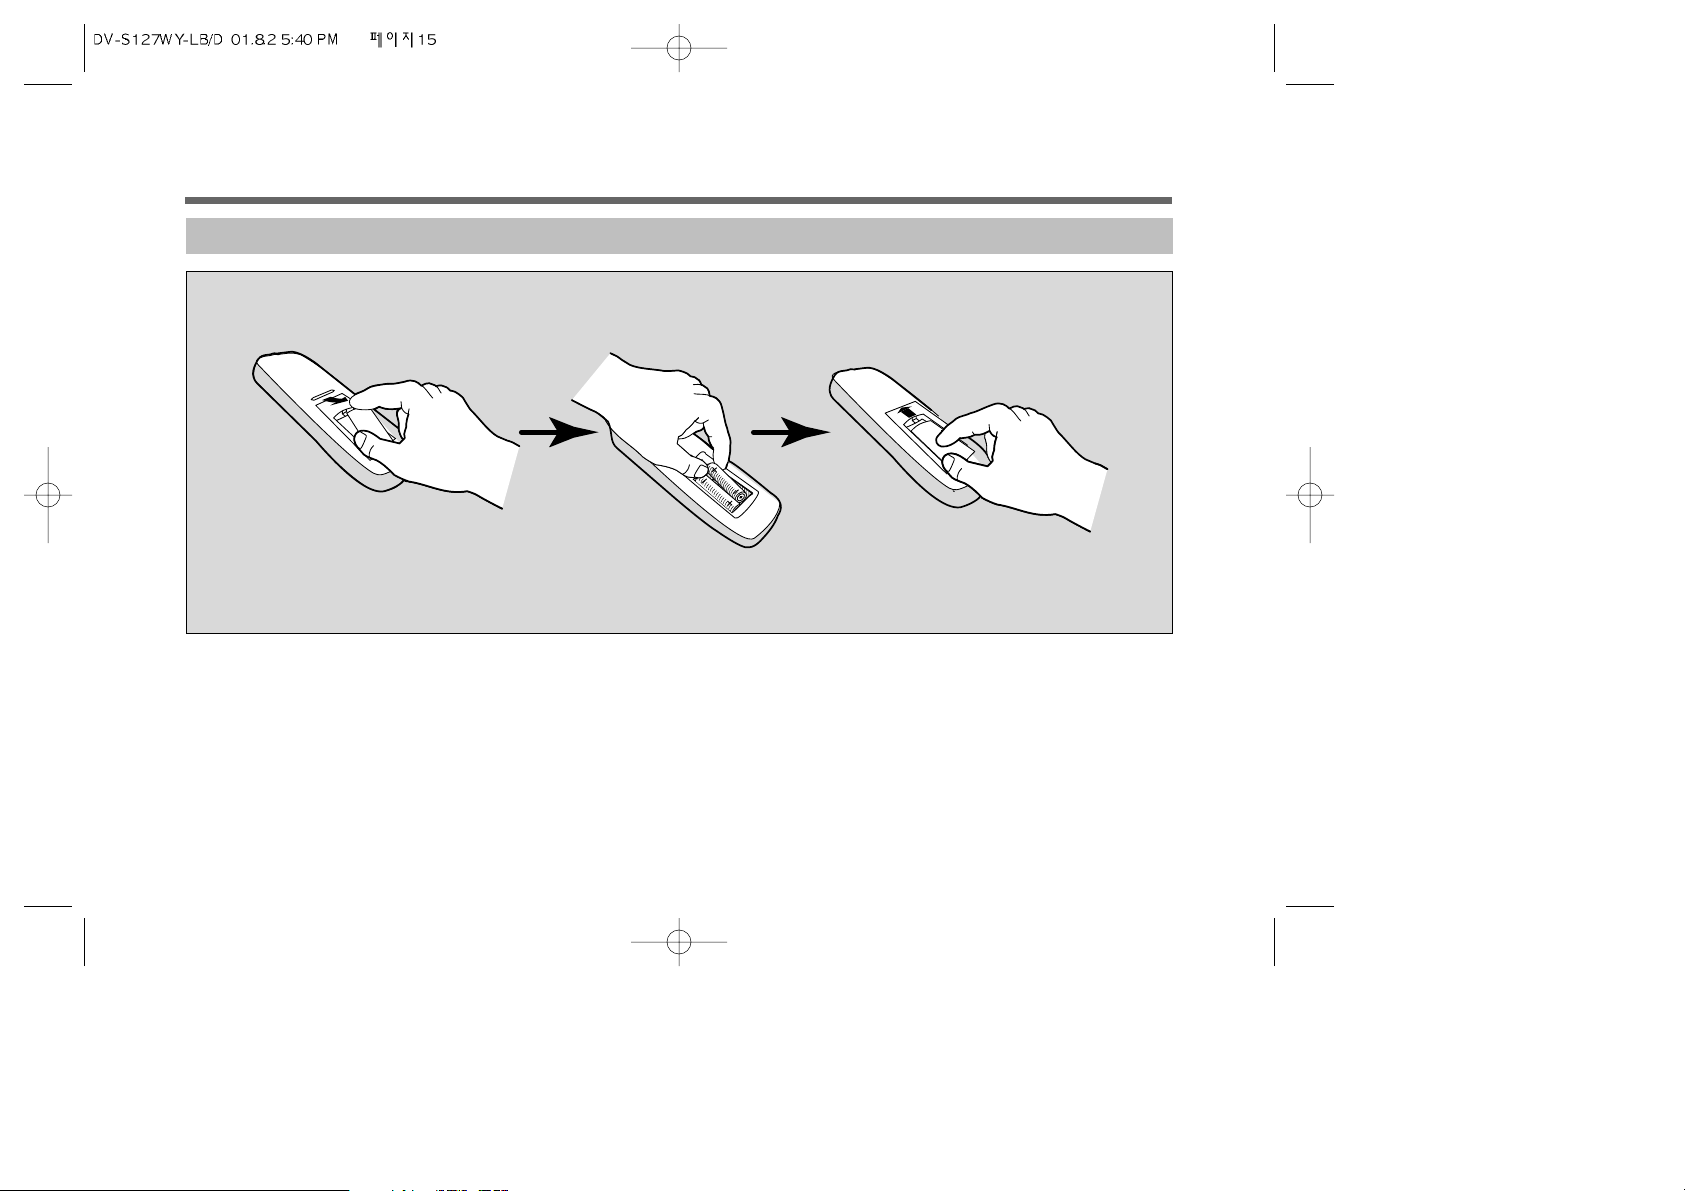
BATTERY INSTALLATION
1. Remove the battery cover on the reverse side of the remote control.
2. Install 2 batteries (“AAA” size) into the remote control. (Carefully install batteries to match the polarity diagrams)
3 Close the battery cover.
• It is advisable to take batteries out of the remote control when it is not in use for a long time.
Page 17
16
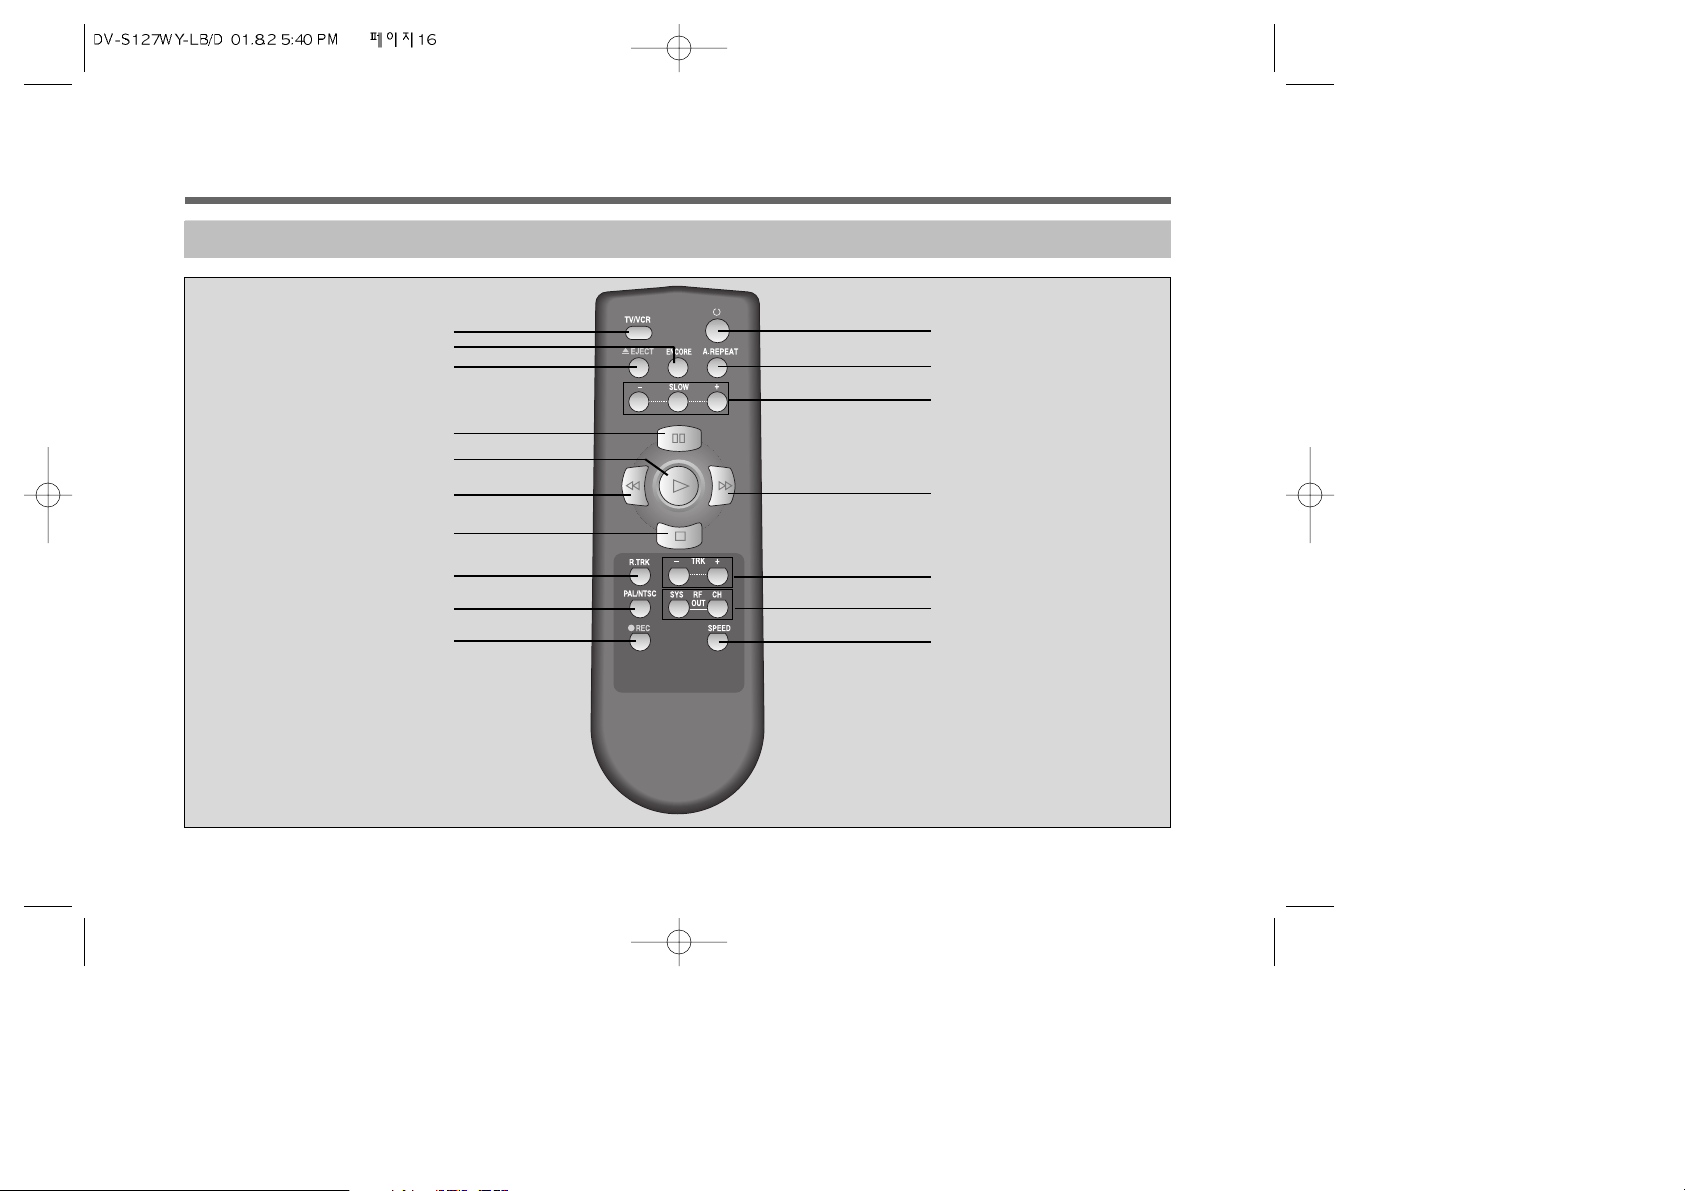
REMOTE CONTROL BASIC FUNCTIONS
TURN ON/OFF
RETRACKING
SPEED
PAUSE/STILL FRAME
REWIND/REVIEW
STOP
EJECT
ENCORE
SLOW +/-
AUTO REPEAT
TRACKING –/+
PLAYBACK
FAST FORWARD/CUE
IDENTIFICATION (continued)
RECORD
TV/VCR(Not used)
RF OUTPUT SELECTION
PAL/NTSC
Page 18
17
WHEN YOU USE THE REMOTE CONTROL
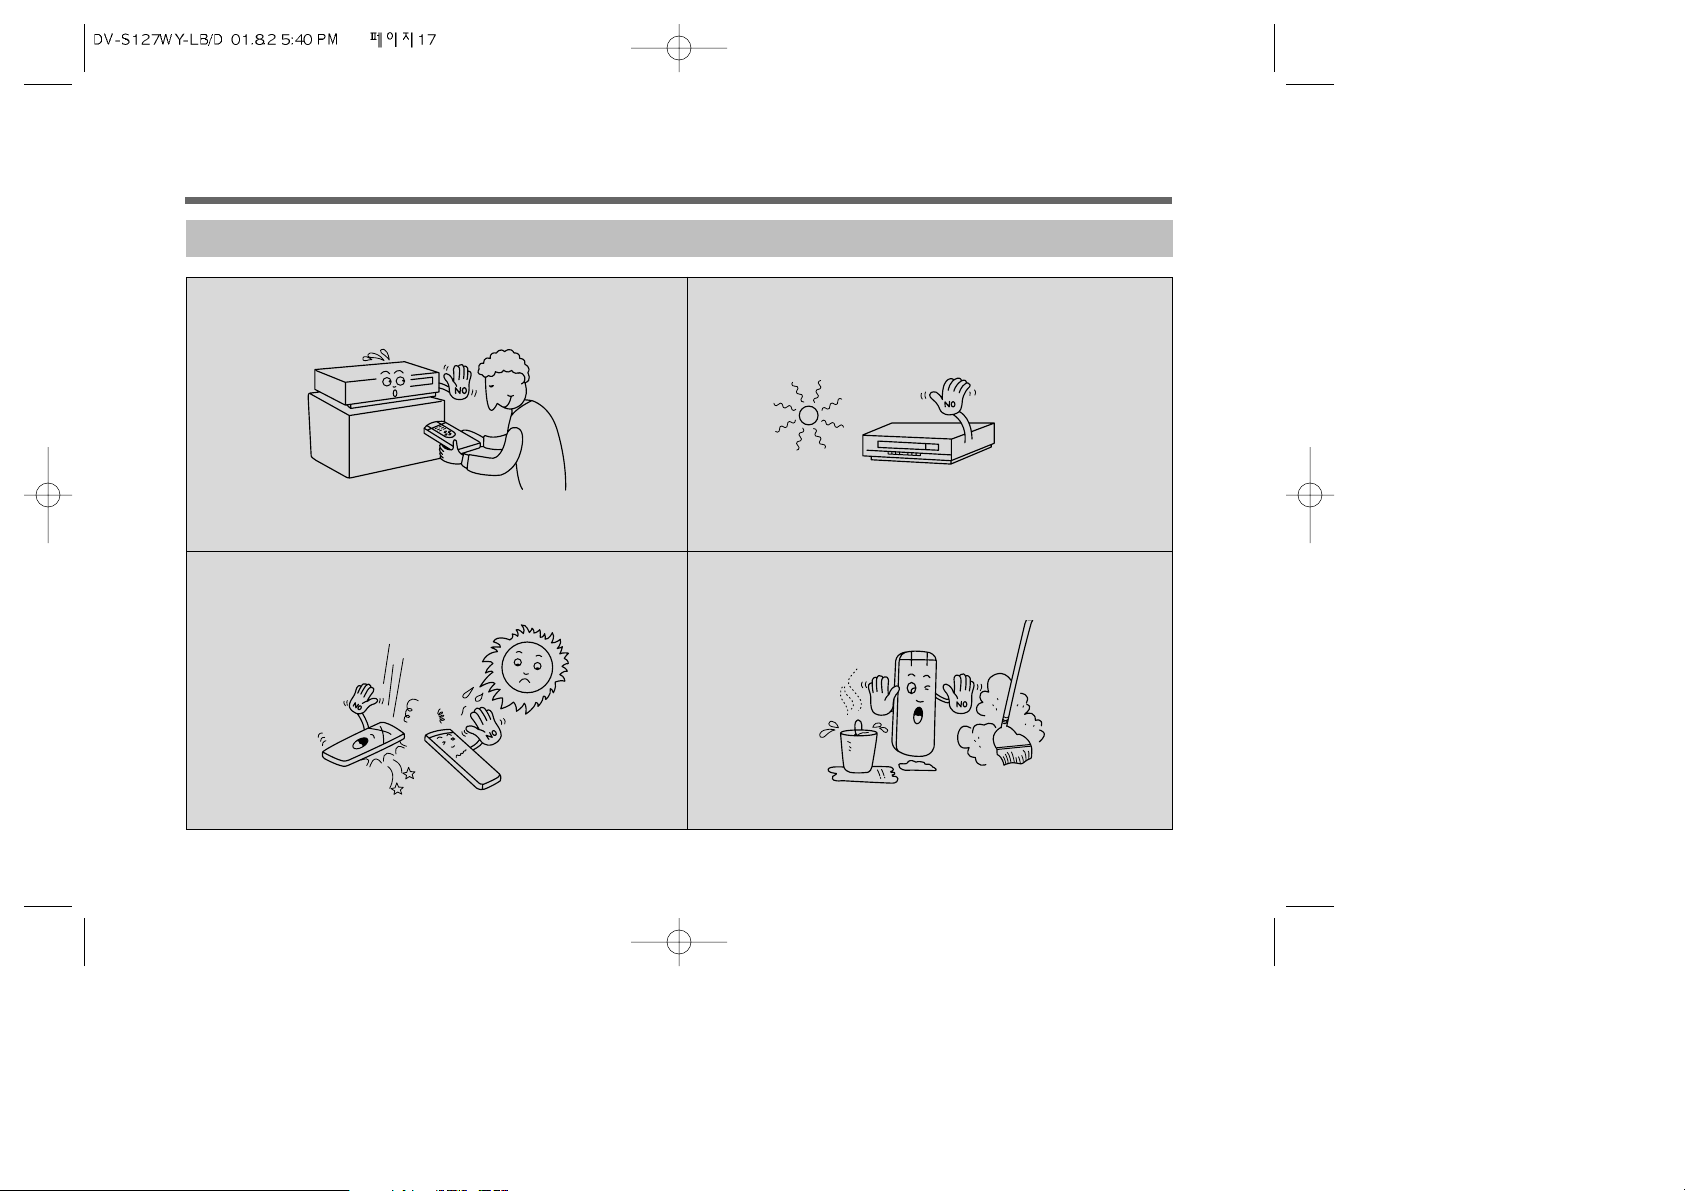
• Do not press two keys at the same time.
• It causes the VCP not to operate.
• Do not expose the remote sensor to the sunshine.
• Avoid direct sunshine and strong shock.
• Keep the remote control away from dust and moisture.
Page 19
18
TO GET STARTED
ANTENNA CONNECTION
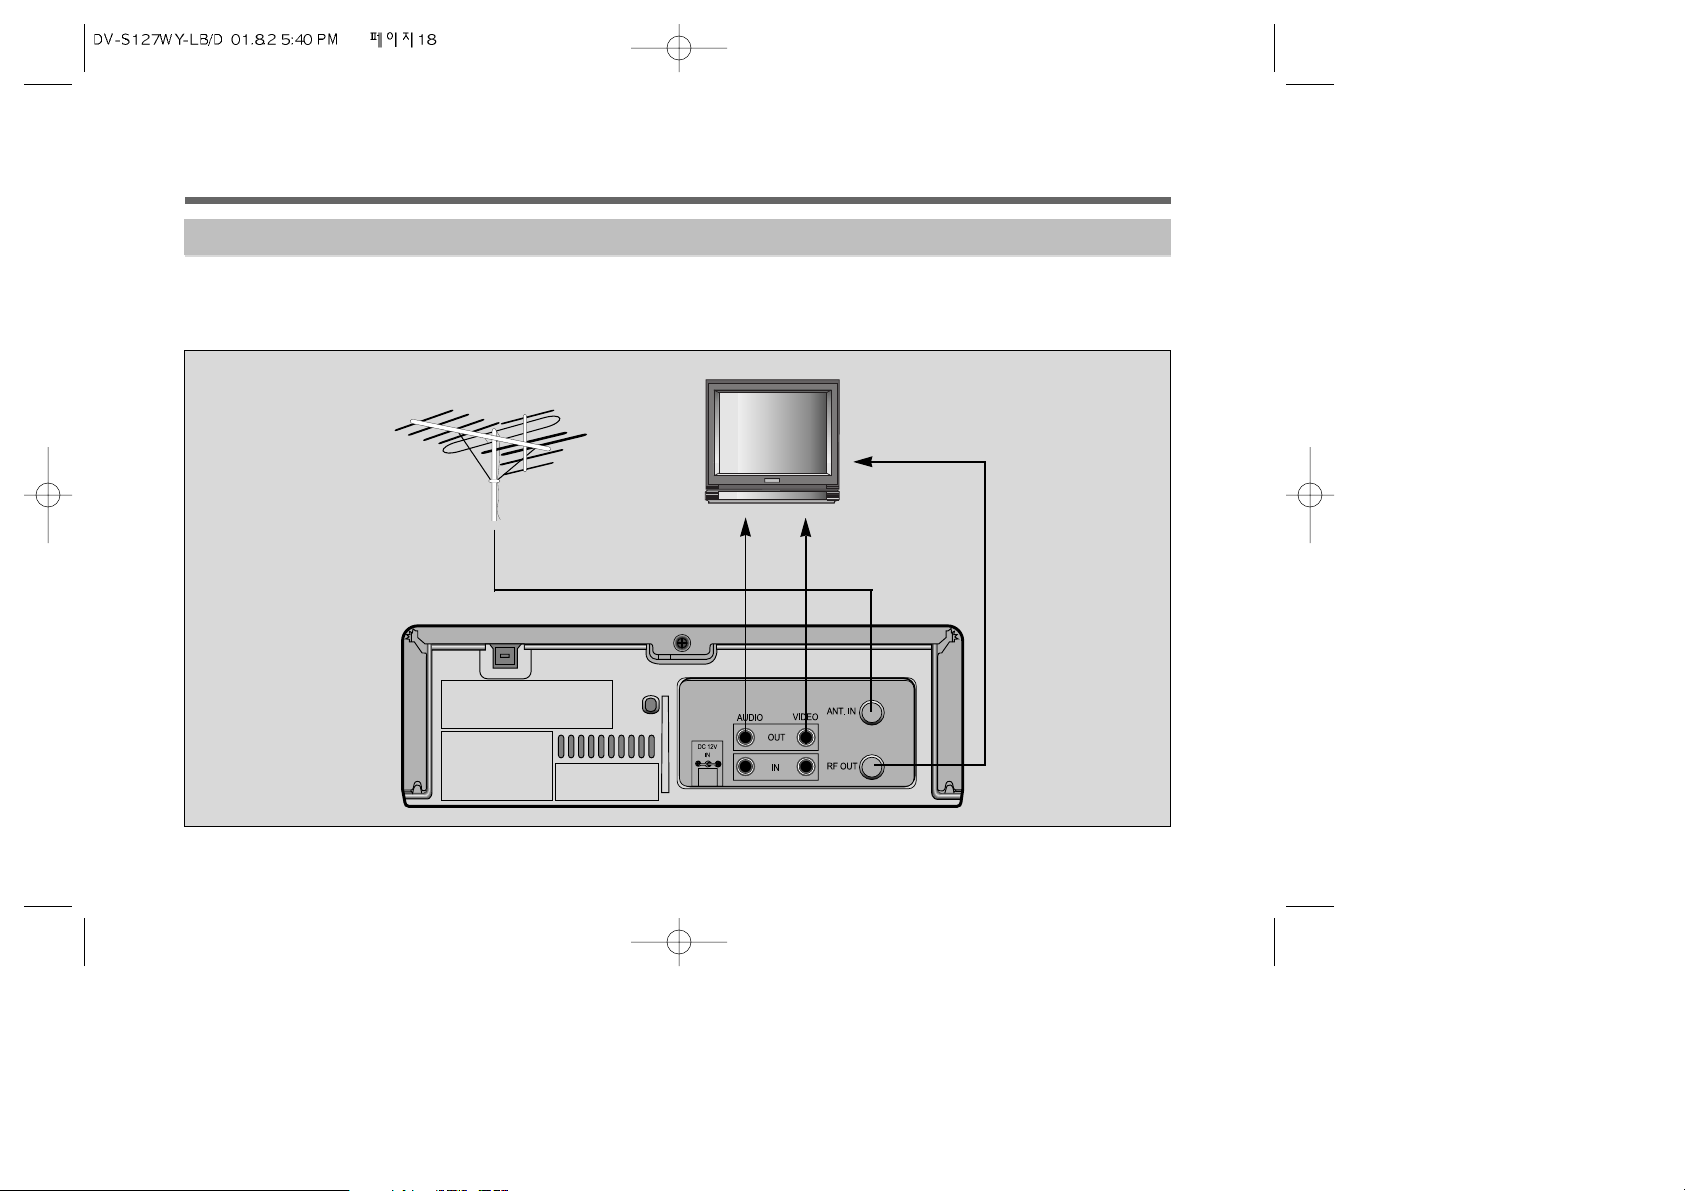
1. Remove the Antenna Cable from the TV set. Connect it to the “ANT.IN” terminal of the VCP.
2. Connect one end of the RF cable to the “RF.OUT” terminal of the VCP.
3. Connect the other end to the “ANT.IN” terminal of the TV.
Antenna
TV set
Page 20
19
VCP RF OUT CHANNEL SETTING
VIDEO CHANNEL SETTING
The built-in RF converter permits playback of video and
audio recordings through a TV receiver. The signals from the
RF converter are viewed through a vacant channel not used
for broadcasting in your viewing area.
The converter channel of all units is set to UHF channel 36
prior to shipment. Setting your TV receiver to UHF channel
36 may provide video playback. But, to obtain the best
possible reproduction on your TV receiver, accurate
adjustment to the RF converter output is required.
ŒTurn on your TV.
´Connect the ANT.IN jack on the rear panel of TV by using the RF
cable.
ˇTurn on the VCP to display the “ ” red color indicator on the
panel.
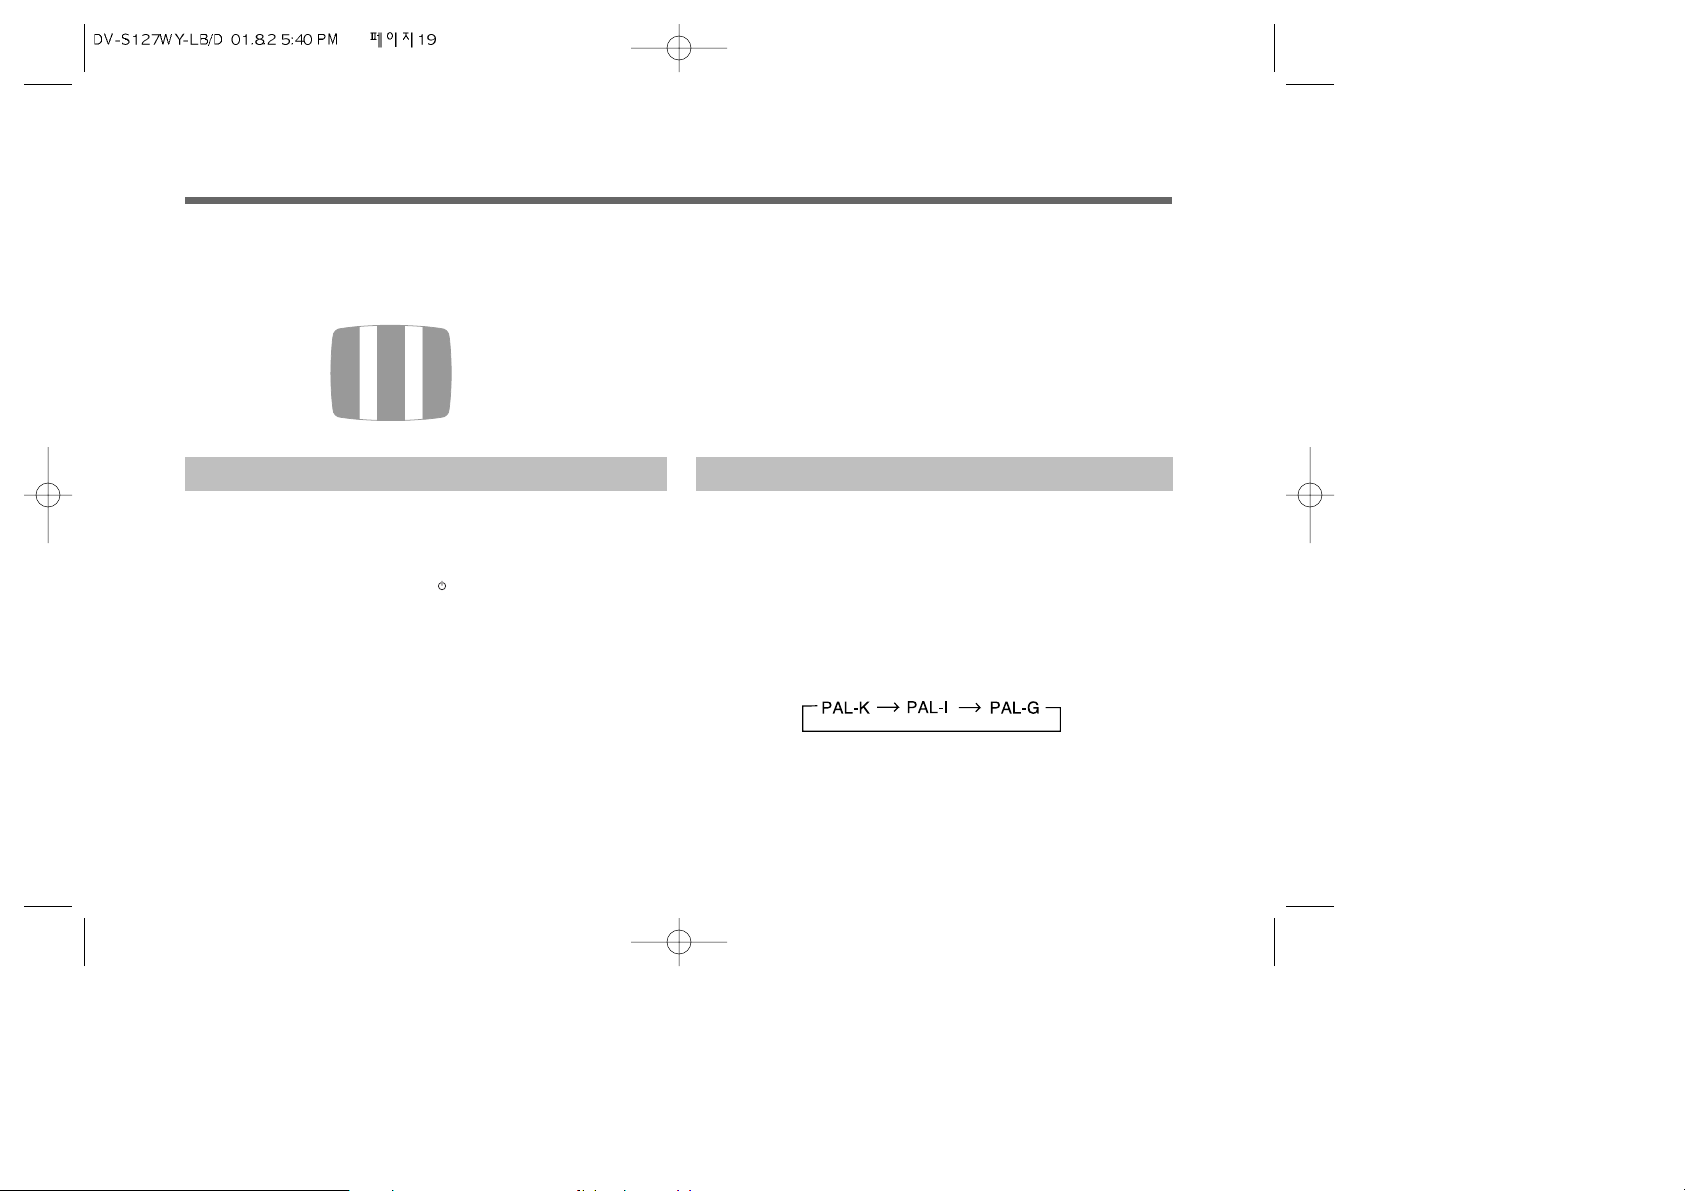
¨Press the “RF OUT CH” key on the remote control.The test
pattern will be transmitted to the UHF 36 CH.
ˆTune into the channel where the interference channel is the
least.
ØTune the UHF channel by pressing the “TRK+/-” key until the test
pattern appear.
∏Press the “RF OUT CH” key to memory the changed UHF channel.
ŒTurn on your TV.
´Connect the ANT.IN jack on the rear panel of TV by using the RF
cable.
ˇPlayback the tape.
¨Tune the UHF channel 36.
If the sound is poor,set the RF OUT system by pressing the “RF
OUT SYS” key on the remote control, the system will be rotated
as follows.
* CAUTION1 : PAL-G is no display.
* CAUTION2 : If you use DC Jack, you can tune the UHF channel
number from 22CH to 30CH.
VCP RF OUT SYSTEM SETTING
Page 21
20
BASIC OPERATION
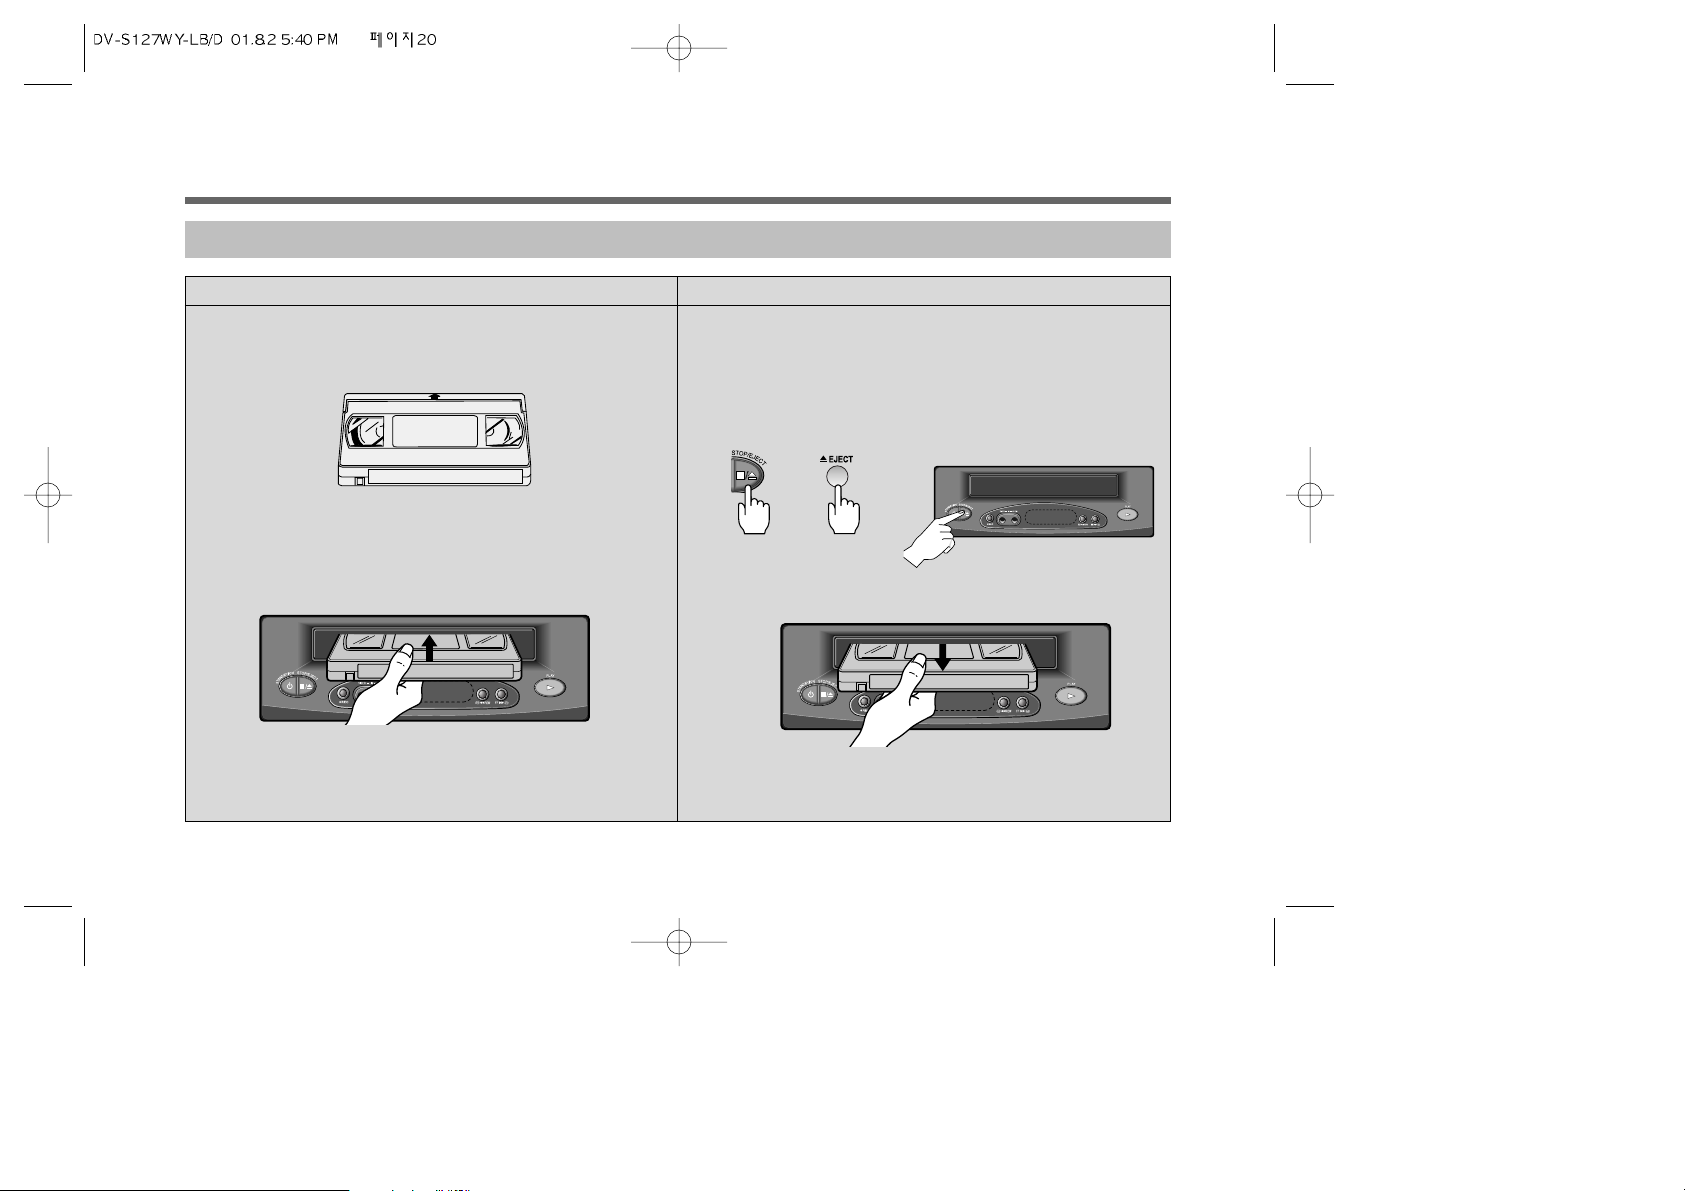
CASSETTE LOADING/UNLOADING
LOADING
UNLOADING
Œ
Push the cassette into the cassette compartment
gently.
(Arrow mark at the top)
´
The cassette indicator LED is lit up.
• An inverted cassette cannot be inserted.
PLAY
REW
POWER
STOP/ EJECT
• Upon inserting the cassette, the power is on even if
the power is off as long as the AC/DC power cord is
plugged in.
´
Pull the cassette out gently.
PLAY
REW
POWER
STOP/ EJECT
• When you press the STOP/EJECT key even if the
power is off, the cassette will be ejected.
<Front Panel>
<Remote Control>
Œ
Press the STOP/EJECT key twice on the VCP (in the
PLAYBACK mode) or press EJECT key once on the remote
control. This first press will stop the tape in any mode
except AUTO REPEAT. The second press will eject the
tape. The cassette indicator LED will be lit out.
Page 22
21
BASIC OPERATION (continued)
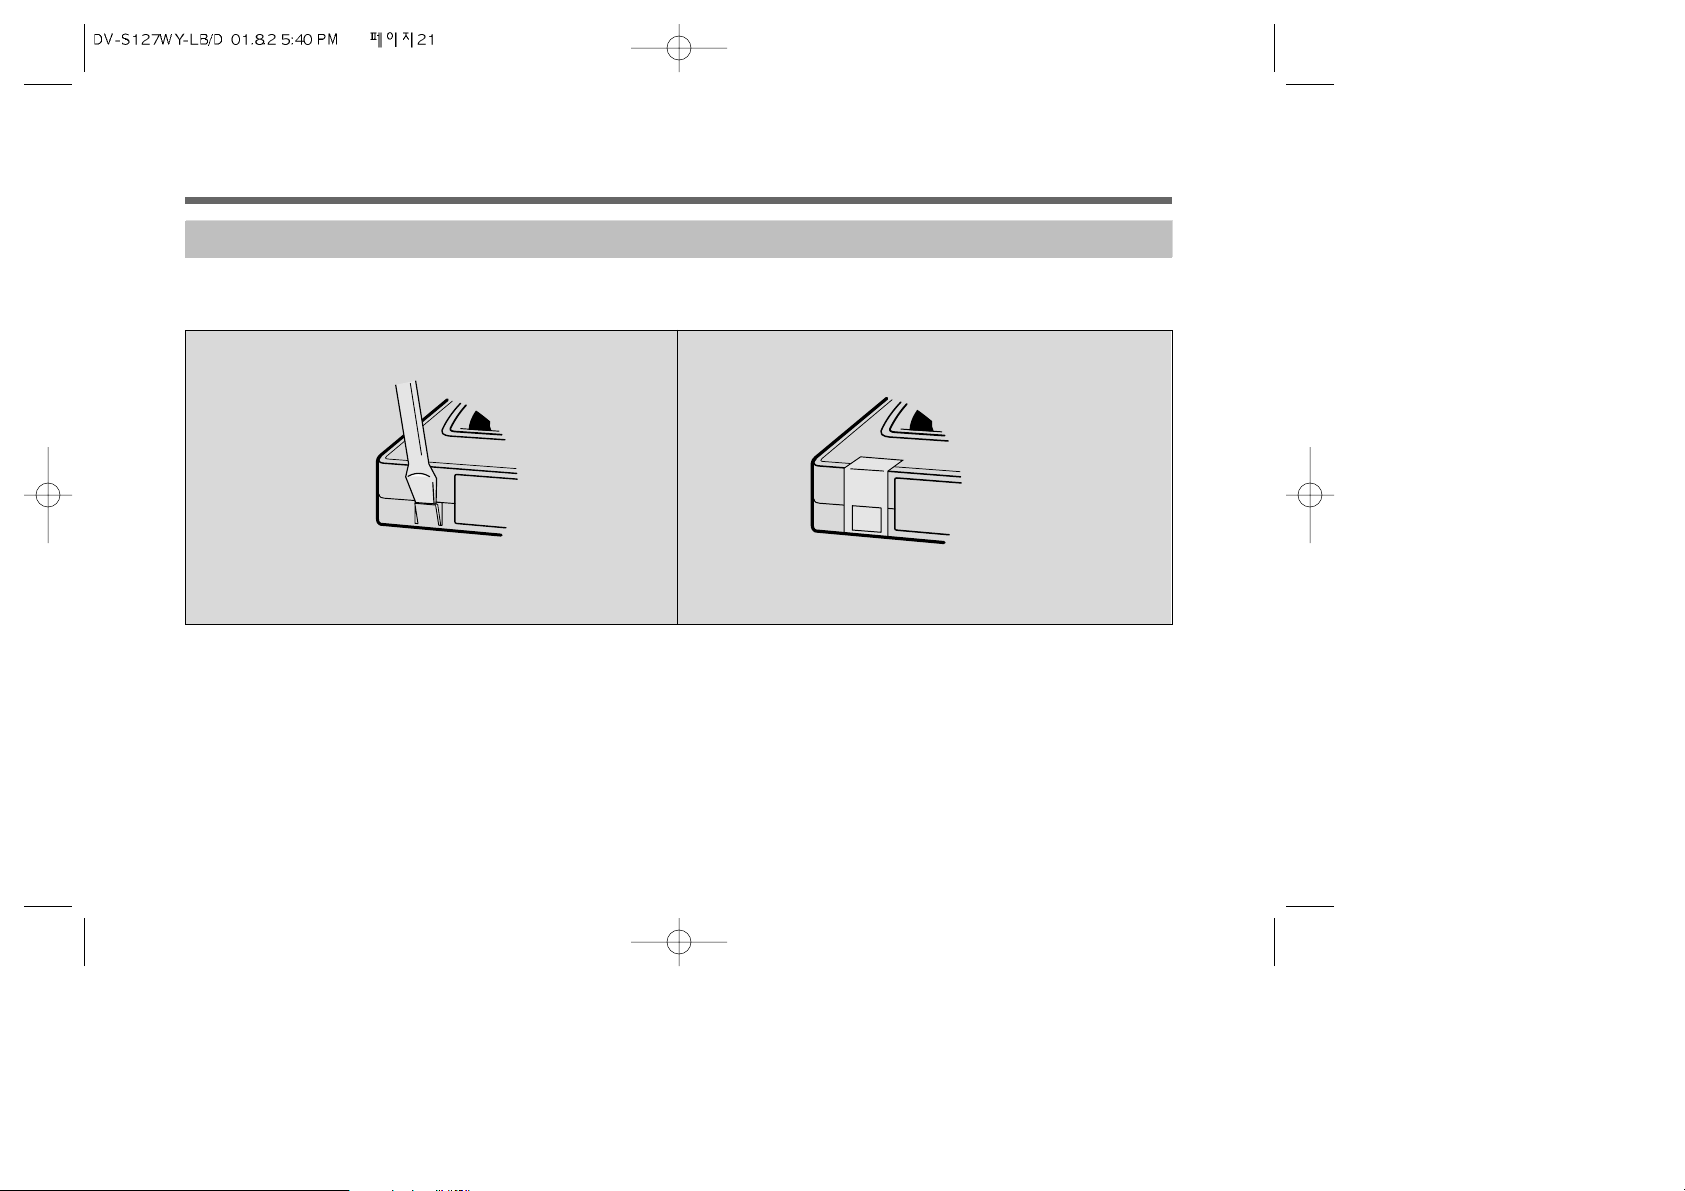
ERASURE PROTECTION
Video cassettes are equipped with a safety tab to prevent accidental erasure.
When the tab is removed, recording can not be performed.
• TO PREVENT ACCIDENTAL ERASURE
• After recording, break off the safety tab with a
screwdriver if you don’t want to record over the tap.
• TO RECORD AGAIN
• Cover the hold with cellophane tape.
Page 23
22
BASIC OPERATION (continued)
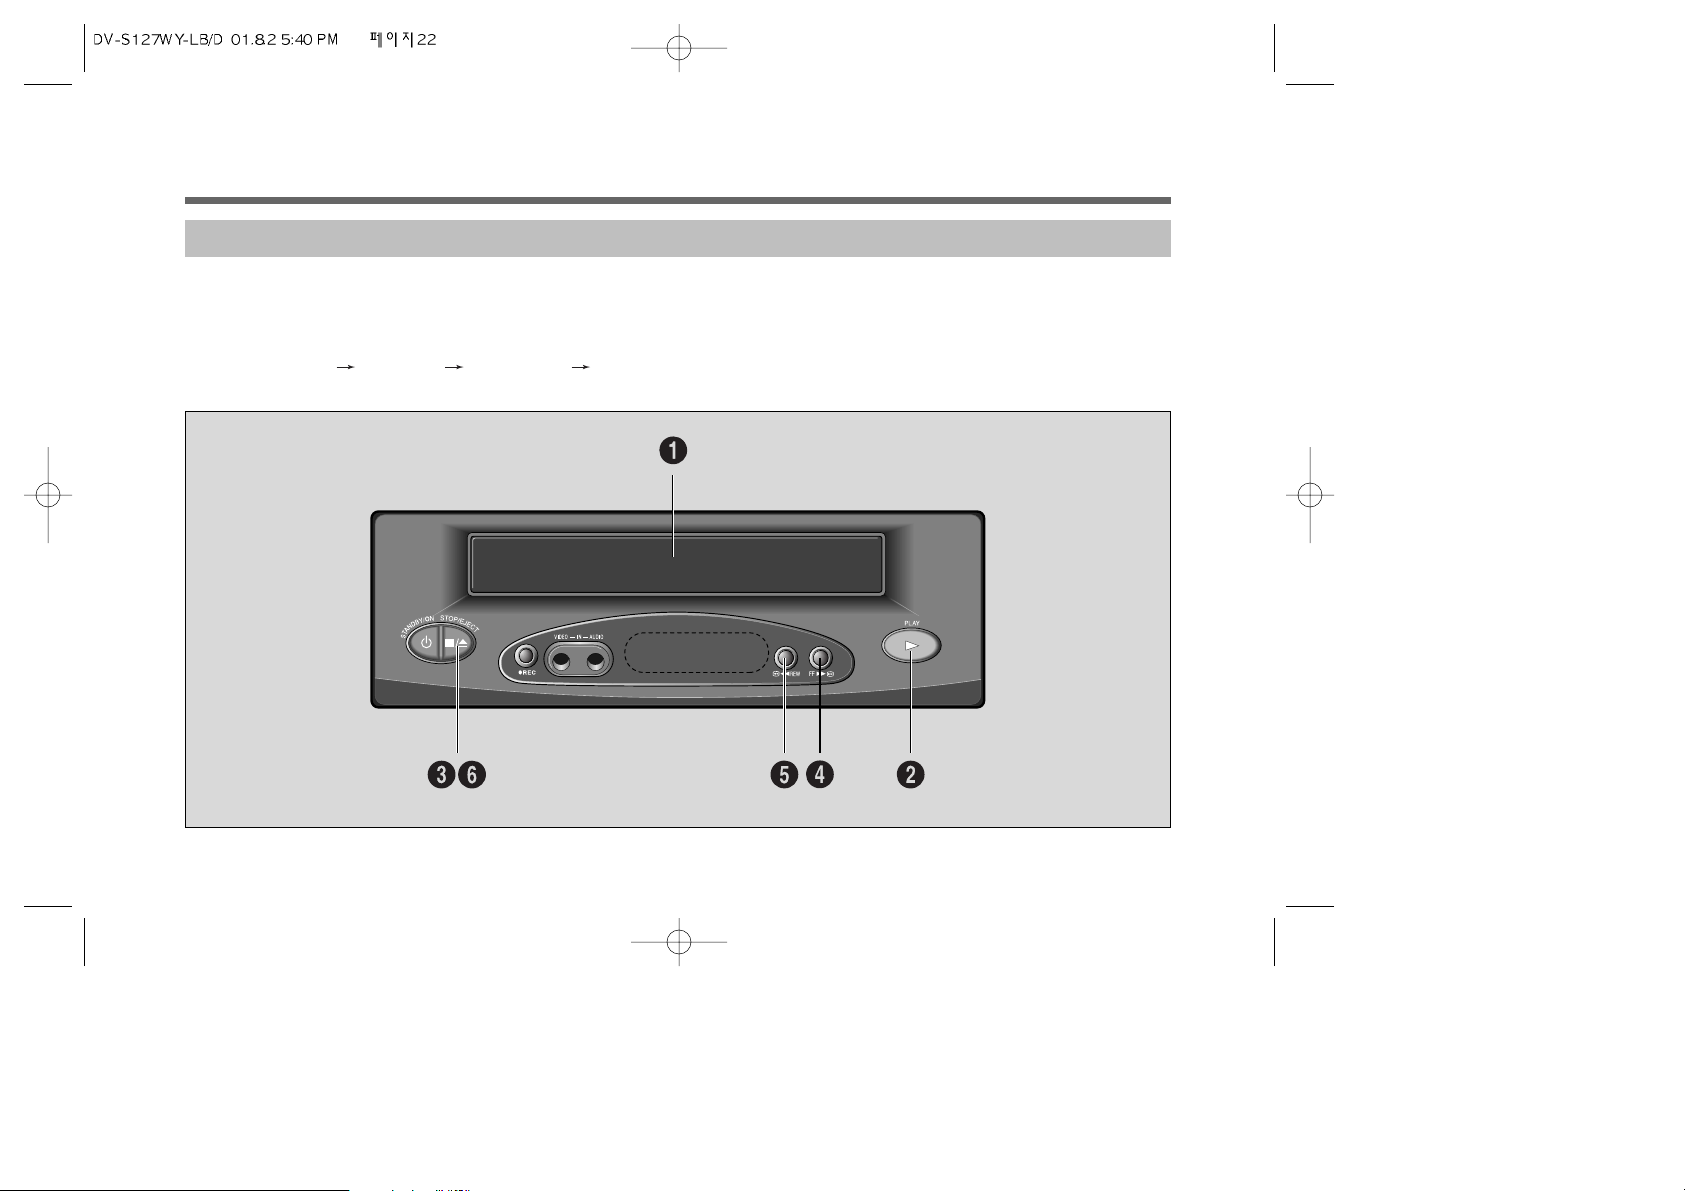
BASIC PLAYBACK
Each key of remote control functions identically with the keys on the front panel.
NOTE : This VCP has Full Auto Function.
If the cassette without the safety tab is inserted, the VCP will operate automatically:
“ TURN ON PLAYBACK REWINDING STOP.”
CAUTION : When loading this VCP with double step, the audio noise may be appeared.
Page 24
23
BASIC OPERATION (continued)
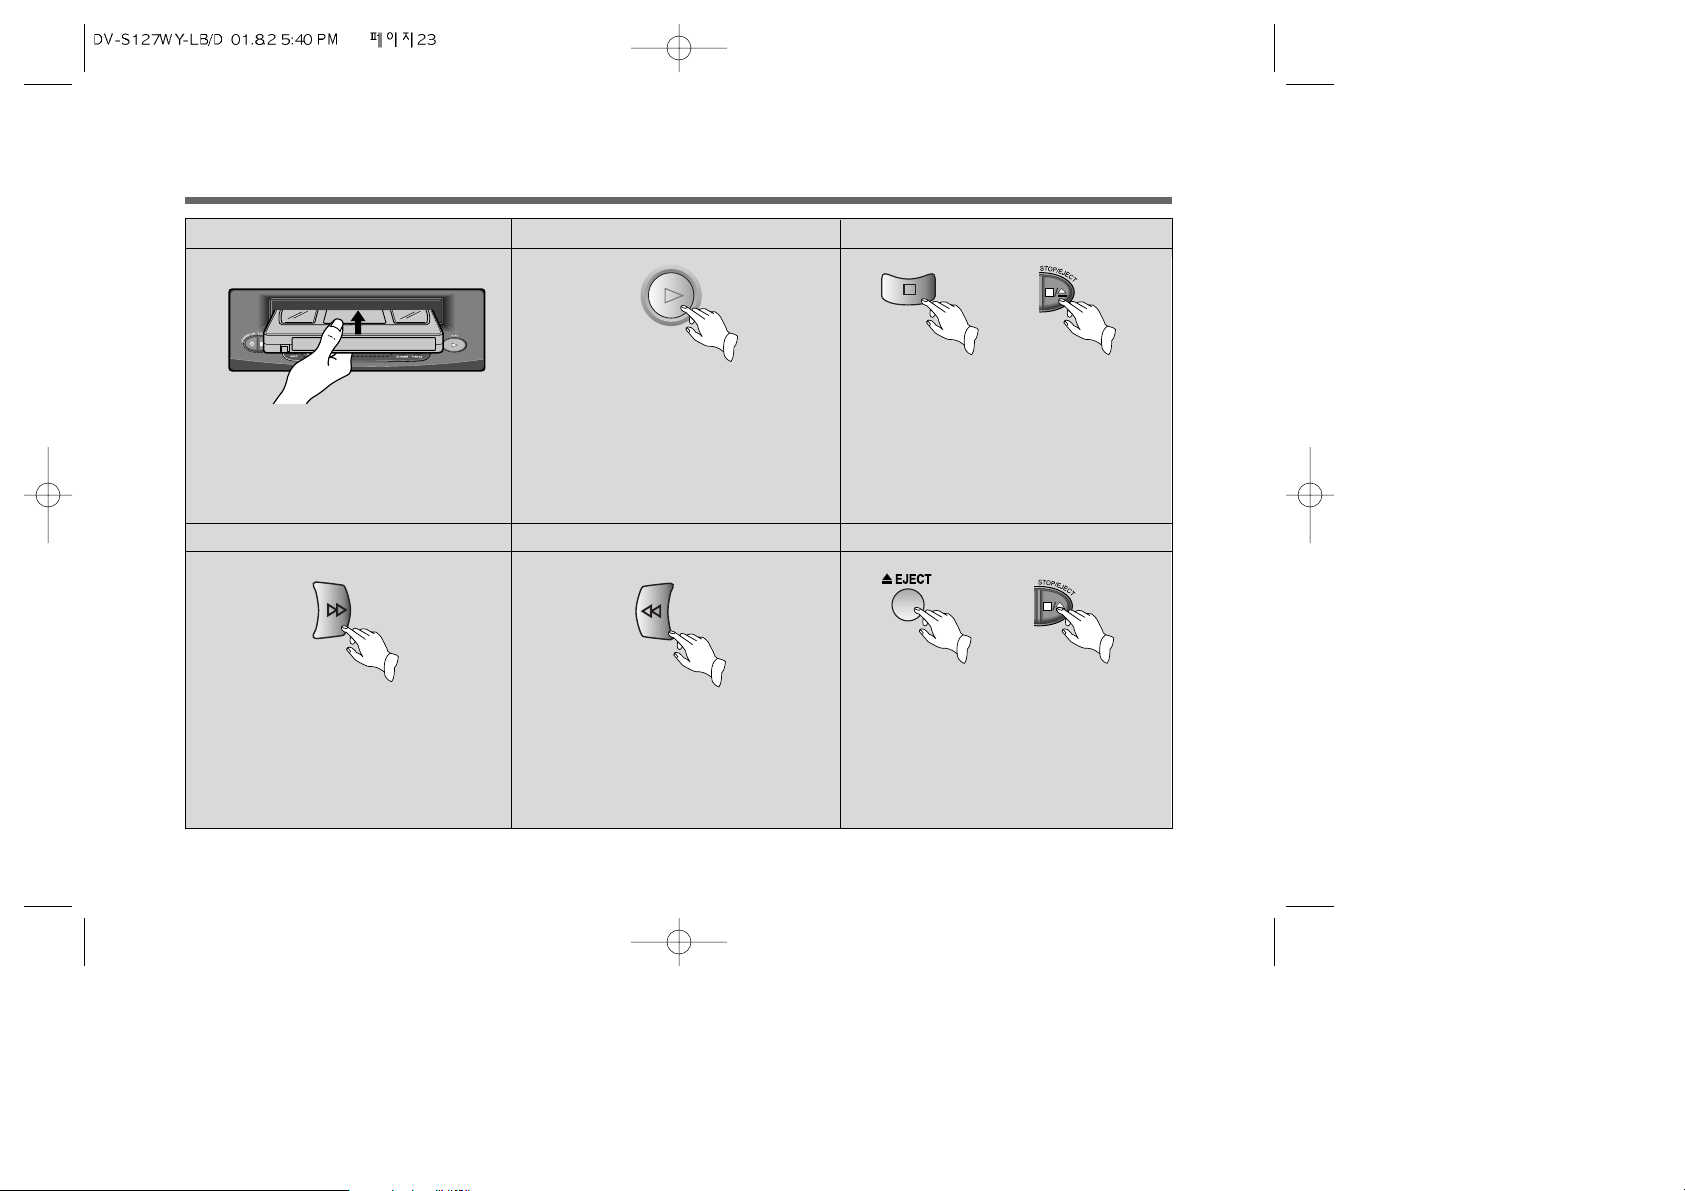
Œ
LOADING
The power is on automatically when
the cassette is inserted even if the
power is off.
PLAY
REW
POWER
STOP/ EJECT
´
PLAYBACK
Press the PLAY key, then pictures will
appear within 1 second and
PLAY indicator will display.
The tape is rewound automatically to
the beginning after playing to the
end.
Press the STOP/EJECT key once.
The tape will stop but remain fully
loaded and ready to play.
ˇ
STOP
Press the FF key in the STOP mode
and then FF indicator will appear.
The tape advances at high speed
without any picture and sound.
¨
FAST FORWARDING
ˆ
REWINDING
Press the REW key in the STOP
mode and then REW indicator will
appear. The tape is rewound at high
speed without any picture and
sound.
Ø
EJECTING
Press the STOP/EJECT key once
more (in the STOP mode) on the
front panel or press the EJECT key
once on the remote control.
<Front Panel>
<Remote Control>
<Remote Control> <Front Panel>
Page 25
24
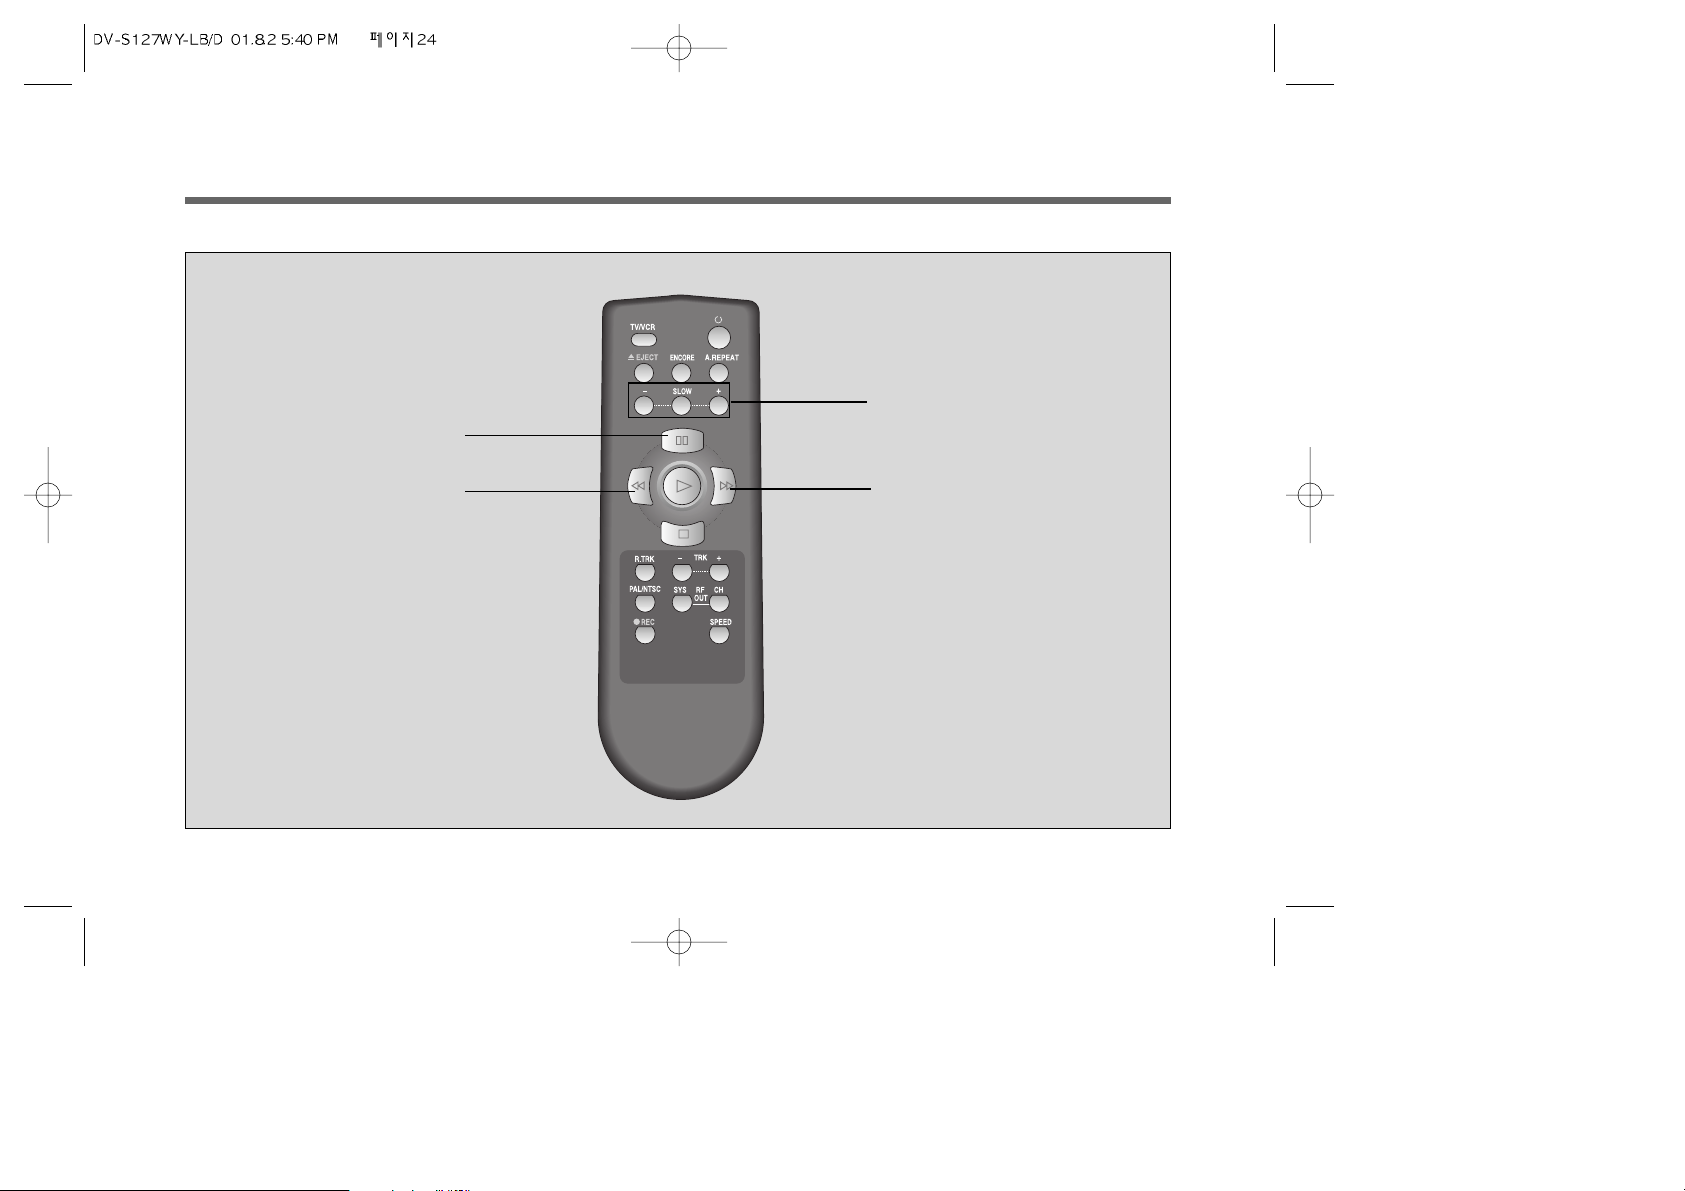
SPECIAL OPERATION
The VCP enters into the PLAYBACK mode during special operations as soon as pressing the PLAY key.
¨
´
ˇ
Œ
Page 26
25
SPECIAL OPERATION (continued)
Œ
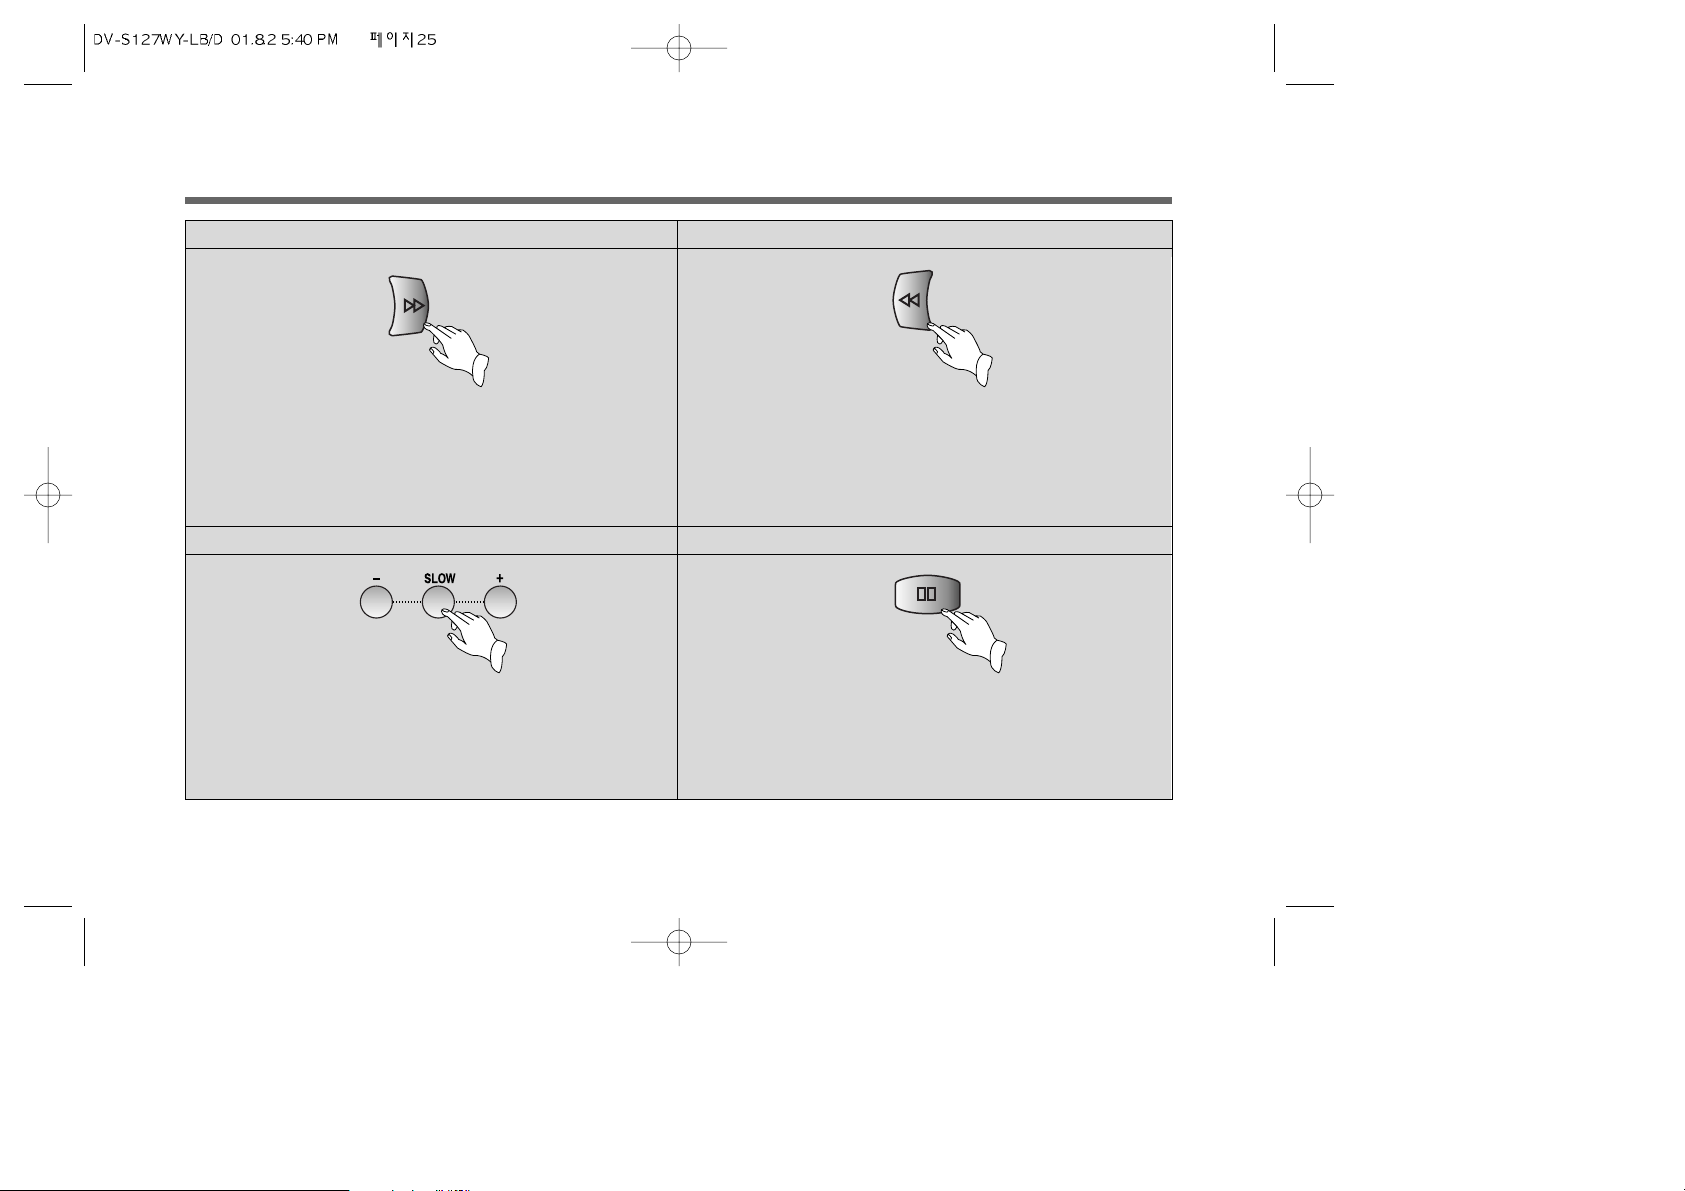
TO VISUALLY SEARCH FORWARD
• Press the FF key once in the PLAYBACK mode. And
then the tape advances rapidly with the pictures .
Pressing this key once more makes the VCP advance
more rapidly.
´
TO VISUALLY SEARCH REVERSE
• Press the REW key once in the PLAYBACK mode. And
then the tape will be rewound rapidly with the
pictures. Pressing this key once more makes the VCP
rewound more rapidly.
ˇ
TO WATCH SLOW PICTURE
• Press the SLOW key during playback. You can watch the
desired frame in detail.
• Press the SLOW -/+ key during slow. It allows you to
control the slow motion speed of picture.
¨
TO WATCH A STILL PICTURE
• Press the P/S key during playback.
If this key is pressed on during still the picture
advances frame by frame.
* CAUTION: In the Search +/-X1 mode, the picture can be flowed in a certain TV. In this time you can steady it by using the TRK+/- keys on the remote control.
Page 27
26
SPECIAL OPERATION (continued)
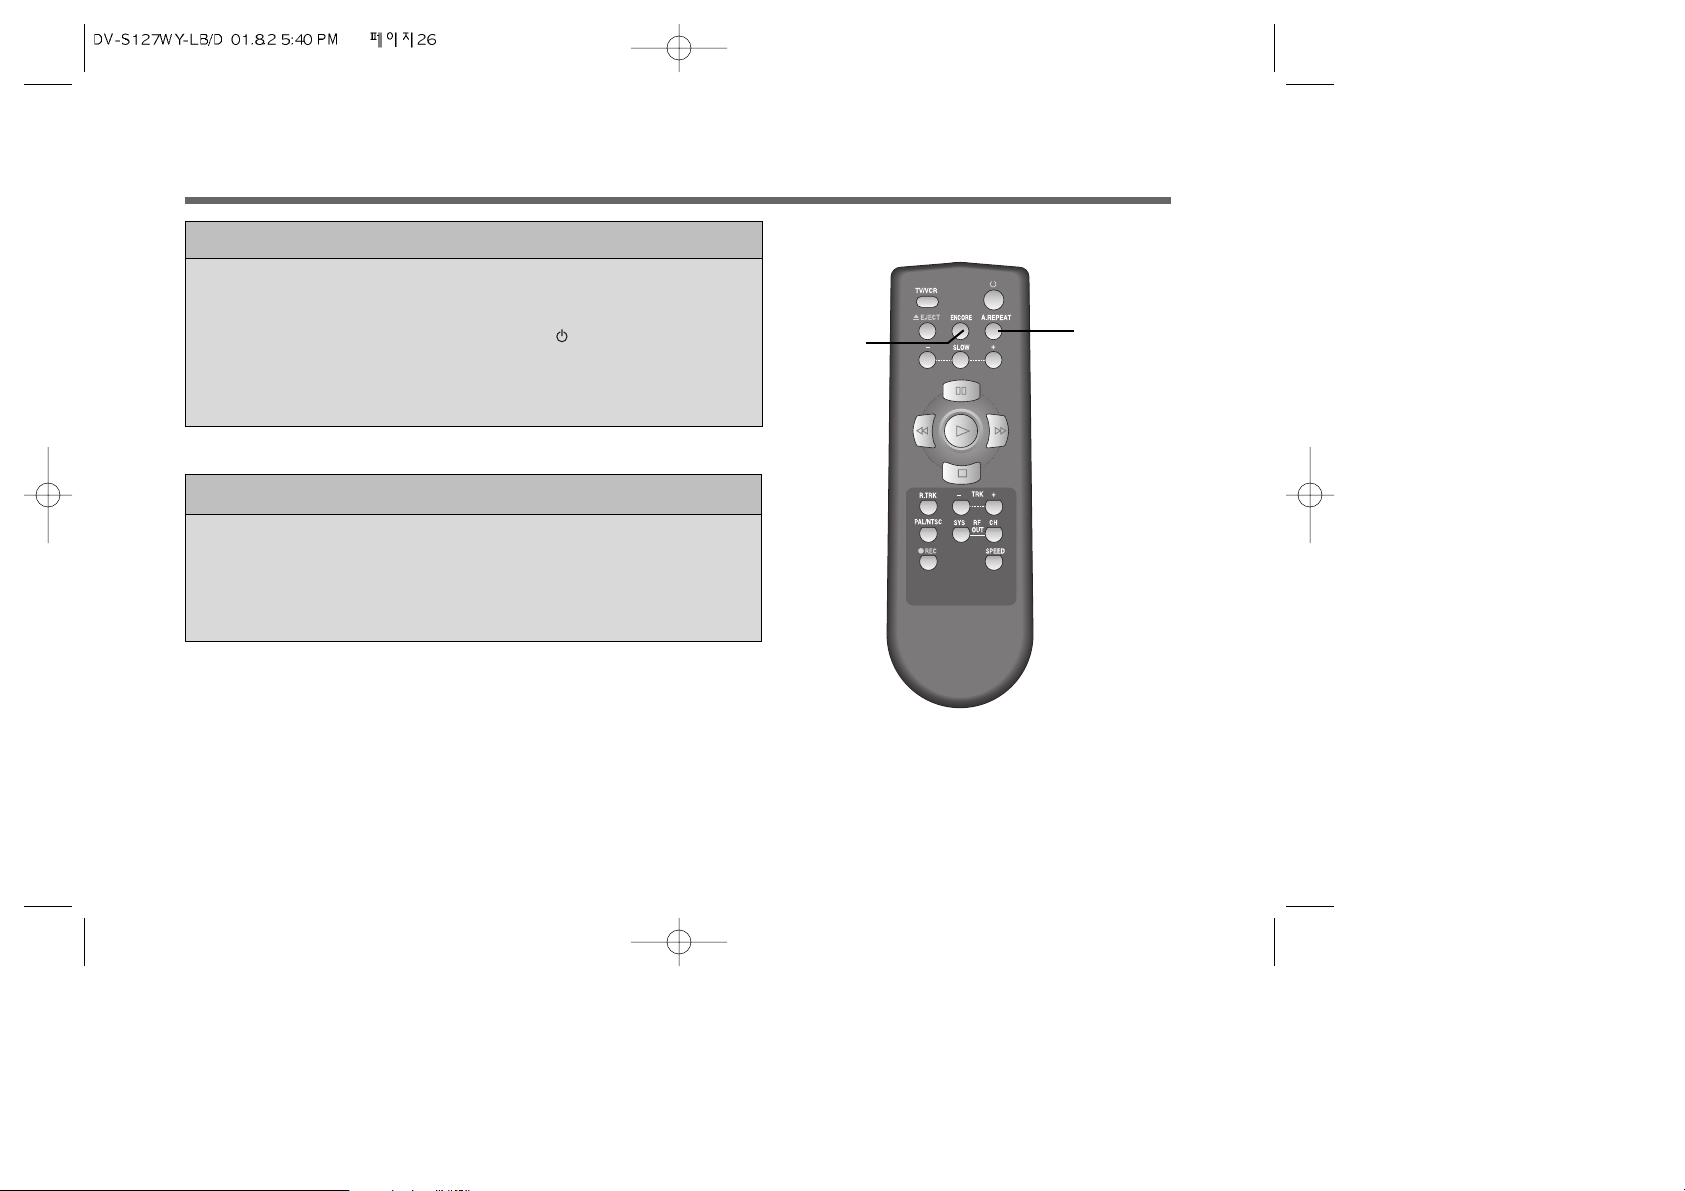
If you press the A.REPEAT key during playback, the tape will be
re-playback after rewinding.
In the A.REPEAT mode, only A.REPEAT and key will be
operated.
If you release the Auto Repeat mode, repress the A.REPEAT key
on the remote control.
Press the ENCORE key on the remote control to watch the
desired picture once more during playback.
The VCP rewinds the tape for about 10 seconds and will play the
picture want to watch again.
AUTO REPEAT
ENCORE
ENCORE FUNCTION
AUTO REPEAT
Page 28
27
PICTURE ADJUSTMENT
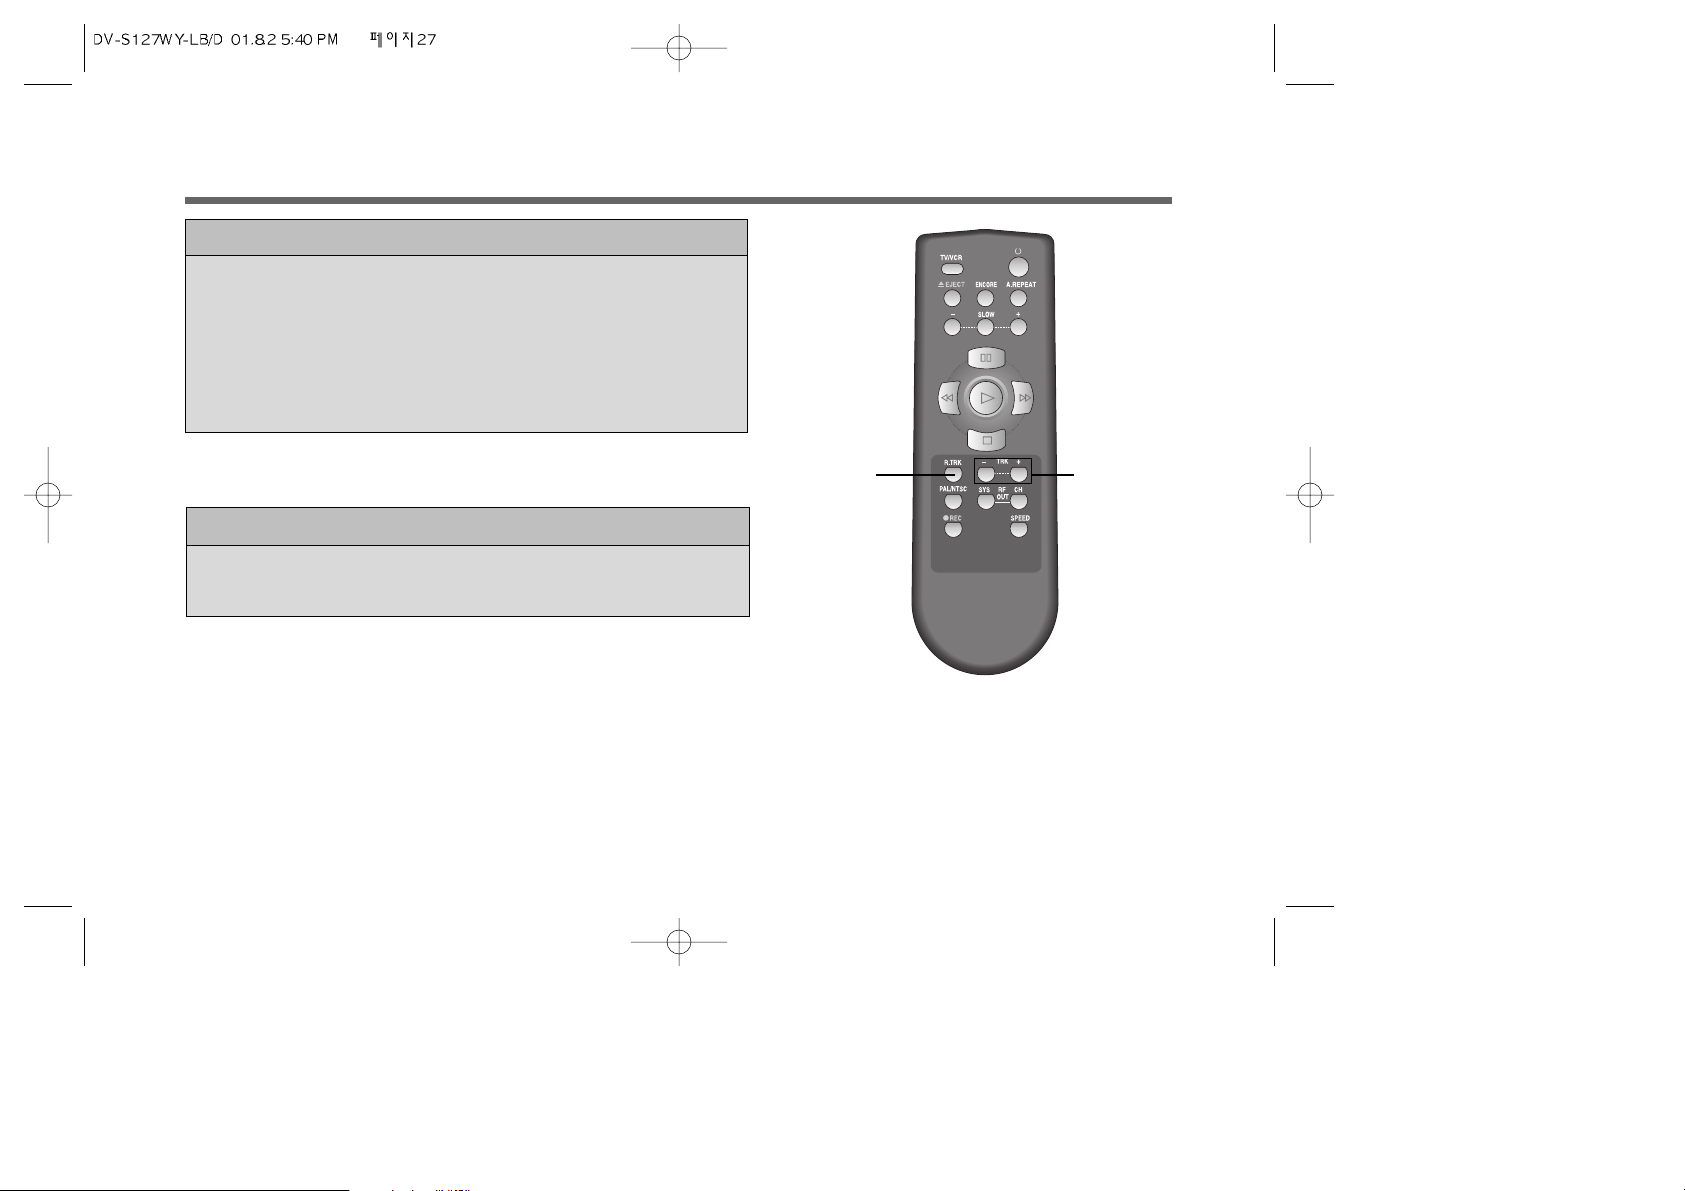
AUTO TRACKING ADJUSTMENT
• Since this VCP has the Auto Tracking Adjustment function, it can
play clear pictures without special operations.
• Auto Tracking Adjustment operates automatically when the
cassette is inserted.
• If noise bars appear in the picture during playback, press the TRK
+/ – keys to reduce the noise bars.
–TRACKING+
RETRACKING
RETRACKING
• Press the R.TRK key when the playback picture is noisy.
This VCP will control the state of playback image automatically.
Page 29
28
• RECORDING
This VCP is possible to record not only PAL signal, but NTSC.
This VCP select the system automatically according to the input signal (PAL or NTSC) in the record mode.
* The LED display indicator will blink according to the Input signal. (PAL/SECAM ”PAL”blinking
NTSC ”NTSC”blinking)
• PLAYBACK
This VCP is possible to playback not only PAL tape, but NTSC tape.
This VCP select the system automatically according to the inserted tape (PAL or NTSC).
When inserting the PAL tape, it will playback the PAL signal.
When inserting the NTSC tape, it will playback the NTSC signal on PAL TV.
(If you have NTSC TV, the picture will be black and white then you can take color picture by pressing PAL/NTSC key on the
remote control.)
If you want to playback the NTSC tape on NTSC TV, connect the NTSC TV to this VCP with the line.
*The LED display indicator will blink according to the tape (PAL/MESECAM TAPE ”PAL”blinking
NTSC TAPE ”NTSC “blinking).
VIDEO SYSTEM
RECORDING / PLAYBACK VIDEO SYSTEM
•NTSC 4.43 will be recorded in black and white.
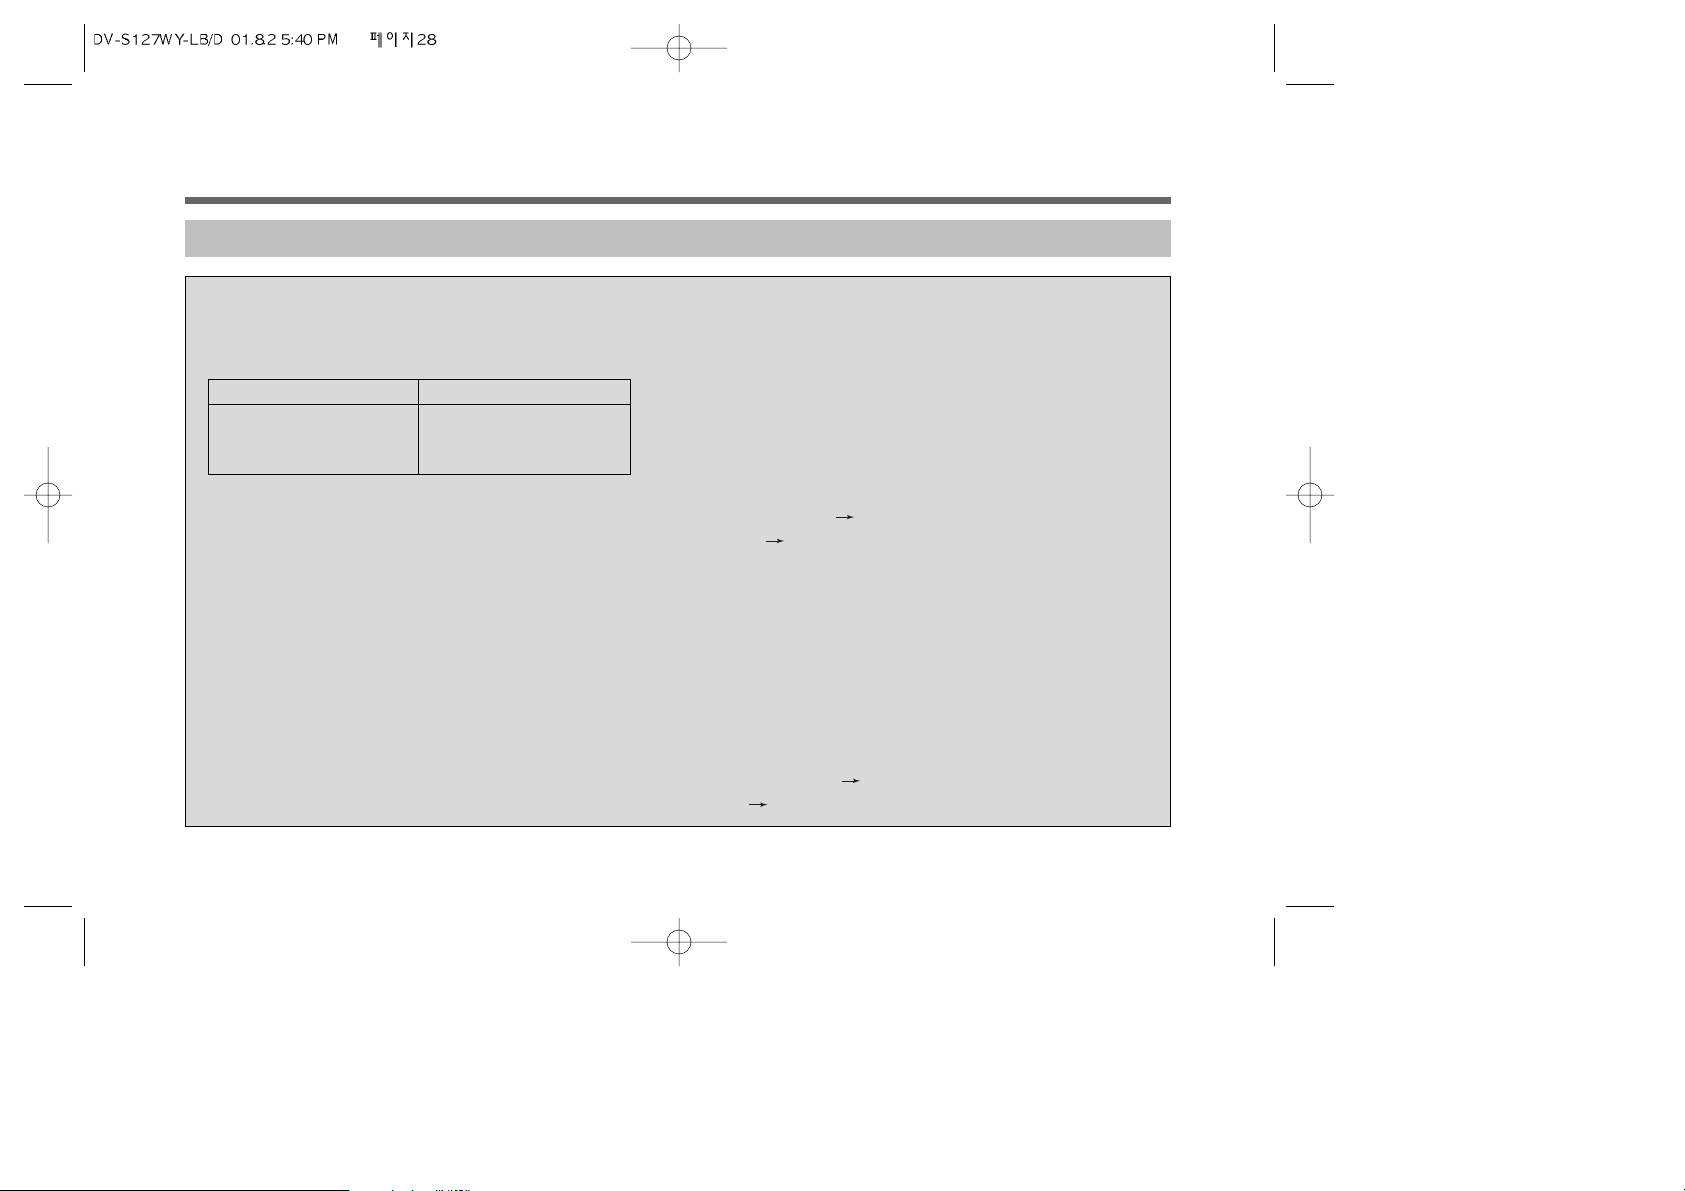
INPUT SIGNAL RECORD SIGNAL
PAL PAL
SECAM MESECAM
NTSC 3.58 NTSC 3.58
Page 30
29
RECORDING TV PROGRAMS
CONNECTION
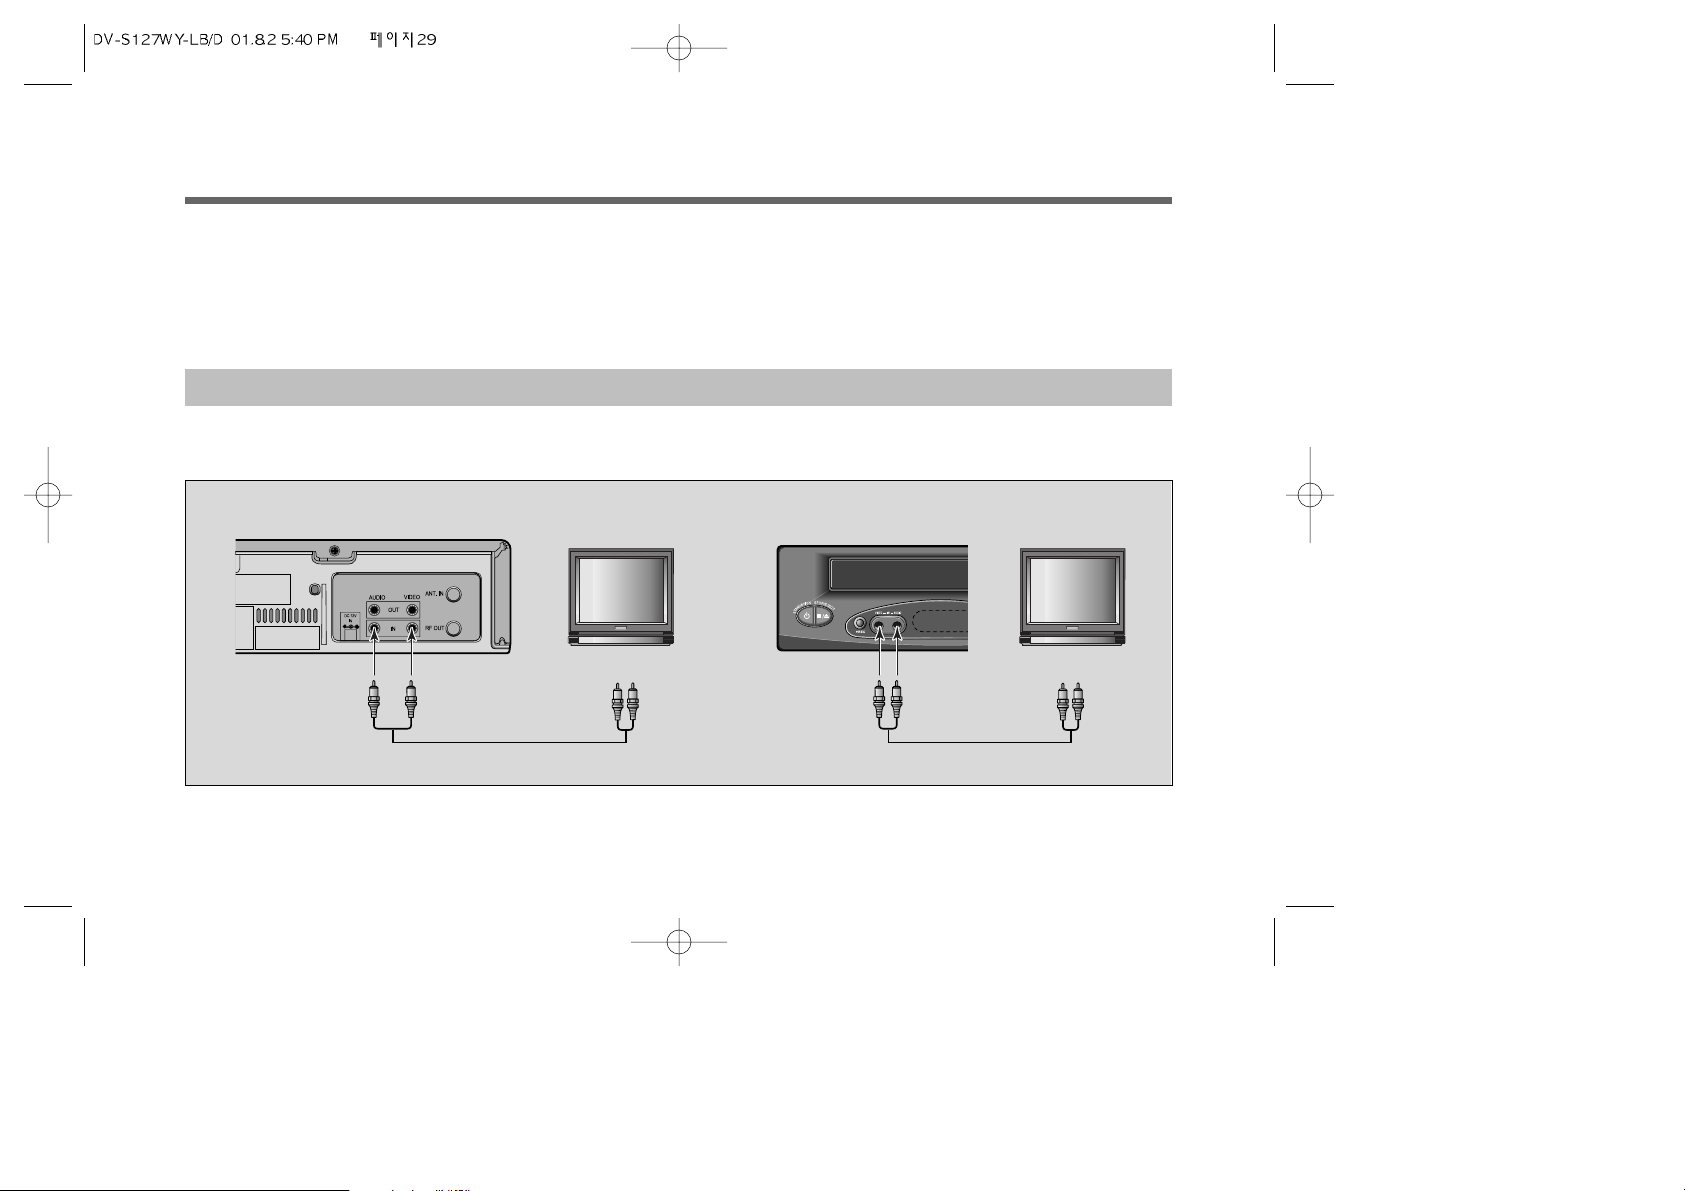
Since this VCP has no its own TUNER, this has no function to receive TV broadcasting signals.
To record TV programs, please use the another TV or VCP having the function to receive TV broadcasting signals with own
TUNER.
1. DIRECT RECORDING(BY TV)
• Connect the Phone A/V jack on the TV set to the Phone A/V jack on the rear or front panel of VCP by using phone cable.
( It will record Front Input Signal only if both (Front and Rear) phone A/V jack connected.)
Page 31
30
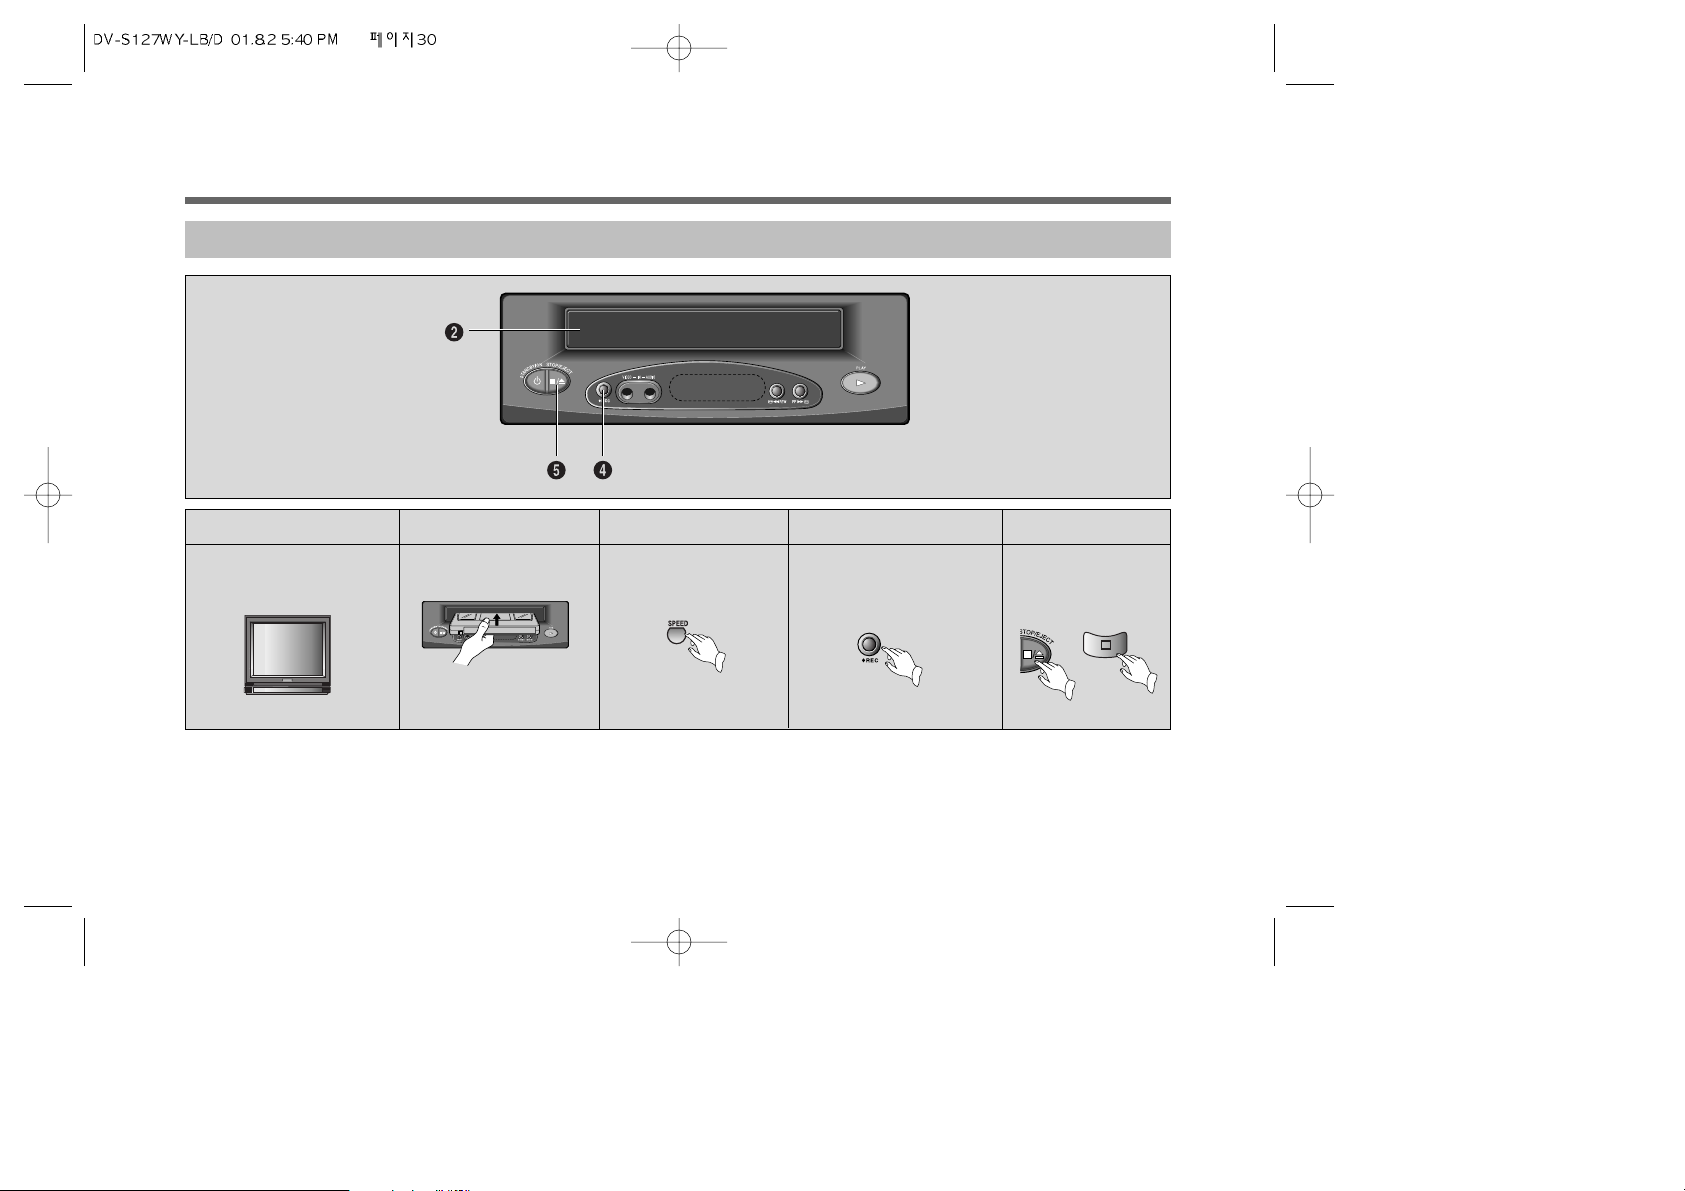
OPERATION
Œ
PREPARATION (TV)
´
LOADING
ˇ
SPEED SELECTION
¨
RECORDING
ˆ
STOP
Turn on the TV and select the
desired CH Number to record.
Insert a blank cassette
tape gently.
Press the REC key.
Recording will start.
The REC Indicator will display.
To finish the recording
press the STOP key.
PLAY
REW
POWER
STOP/ EJECT
* Upon inserting the
cassette, the power will be
on even if the power is off.
• You can record only the same program which you are watching as follows the above steps.
• You can record the TV programs only by the TV having the Phone A/V jacks.
• Please do not turn off the power until recording is finished.
Press the SPEED key to
select the recording speed
(SP or LP).
* In NTSC record mode, the
LP mode is not available.
Page 32
31
CONNECTION
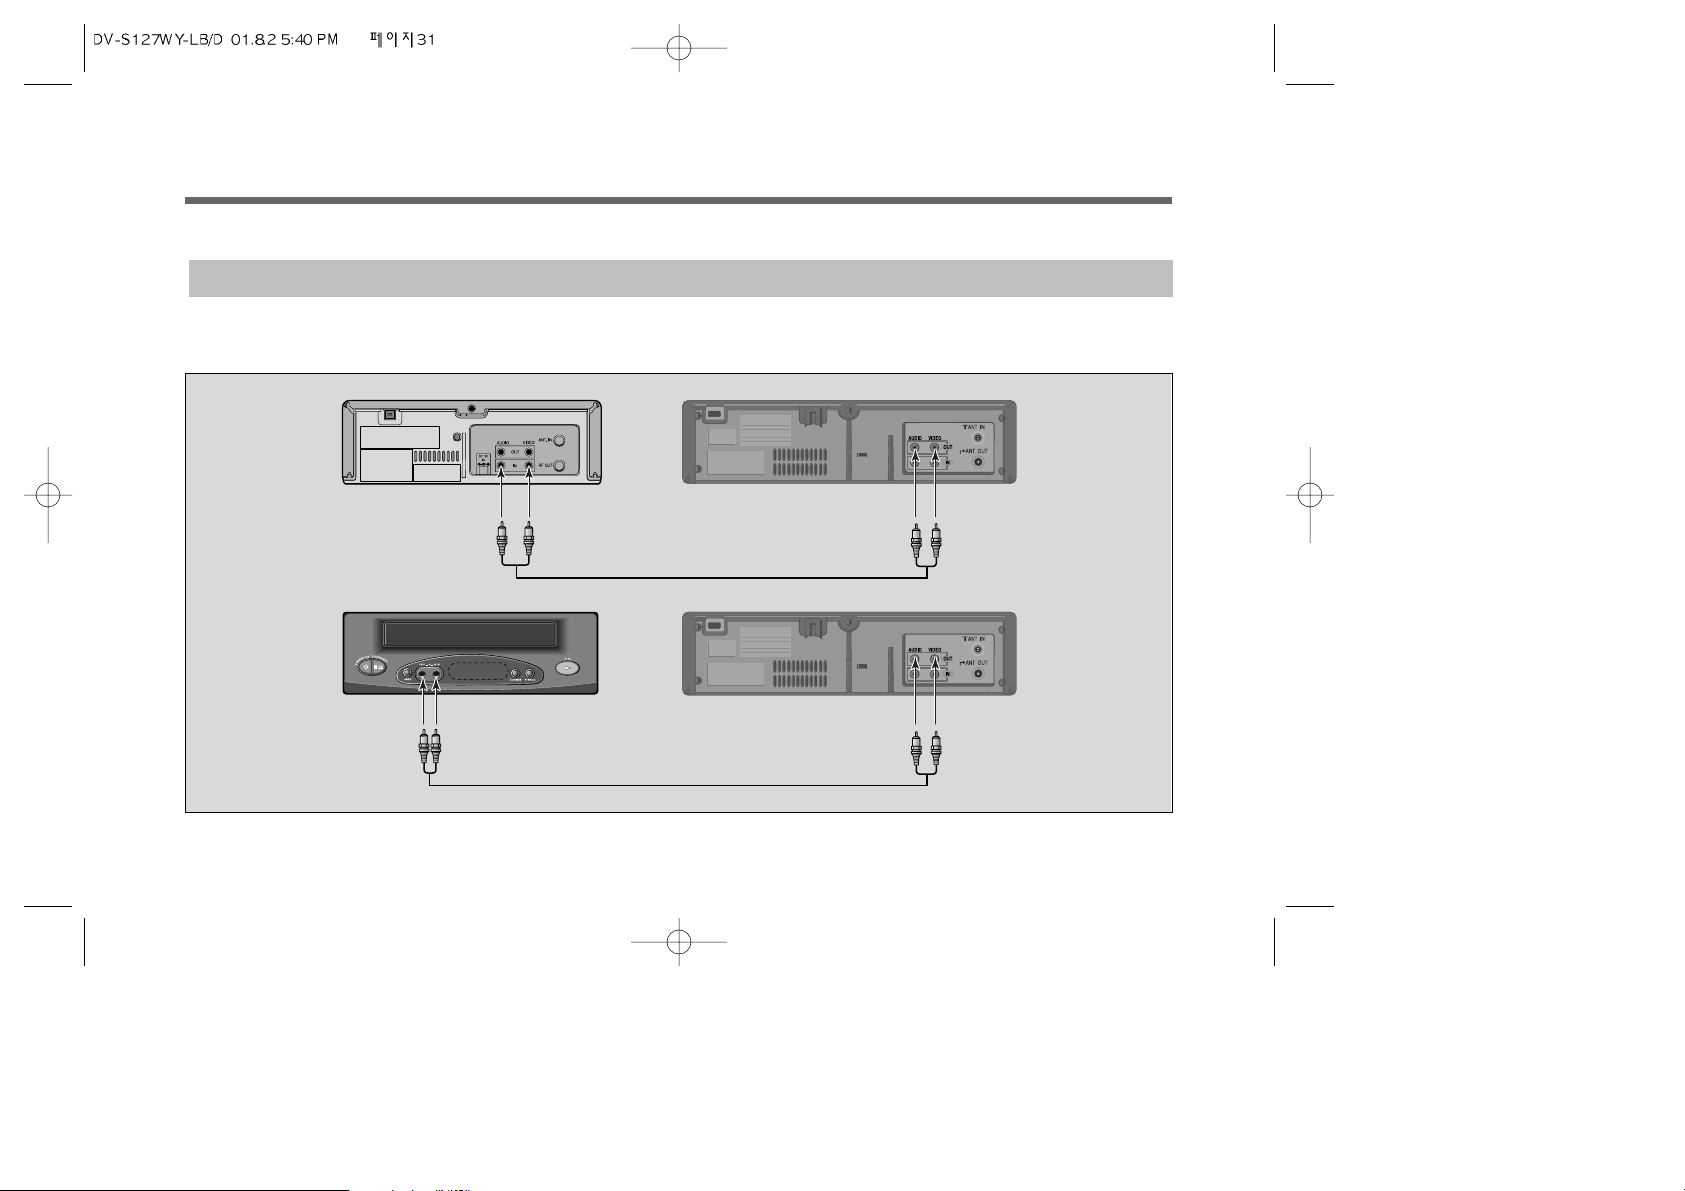
2.INDIRECT RECORDING (BY VCR WITH TUNER)
• Connect the Phone A/V jack on the another VCP set to the Phone A/V jack on the rear or front panel of VCP by using
Phone cable. ( It will record Front Input Signal only if both (Front and Rear) phone A/V jack connected.)
.
.
.
.
Page 33
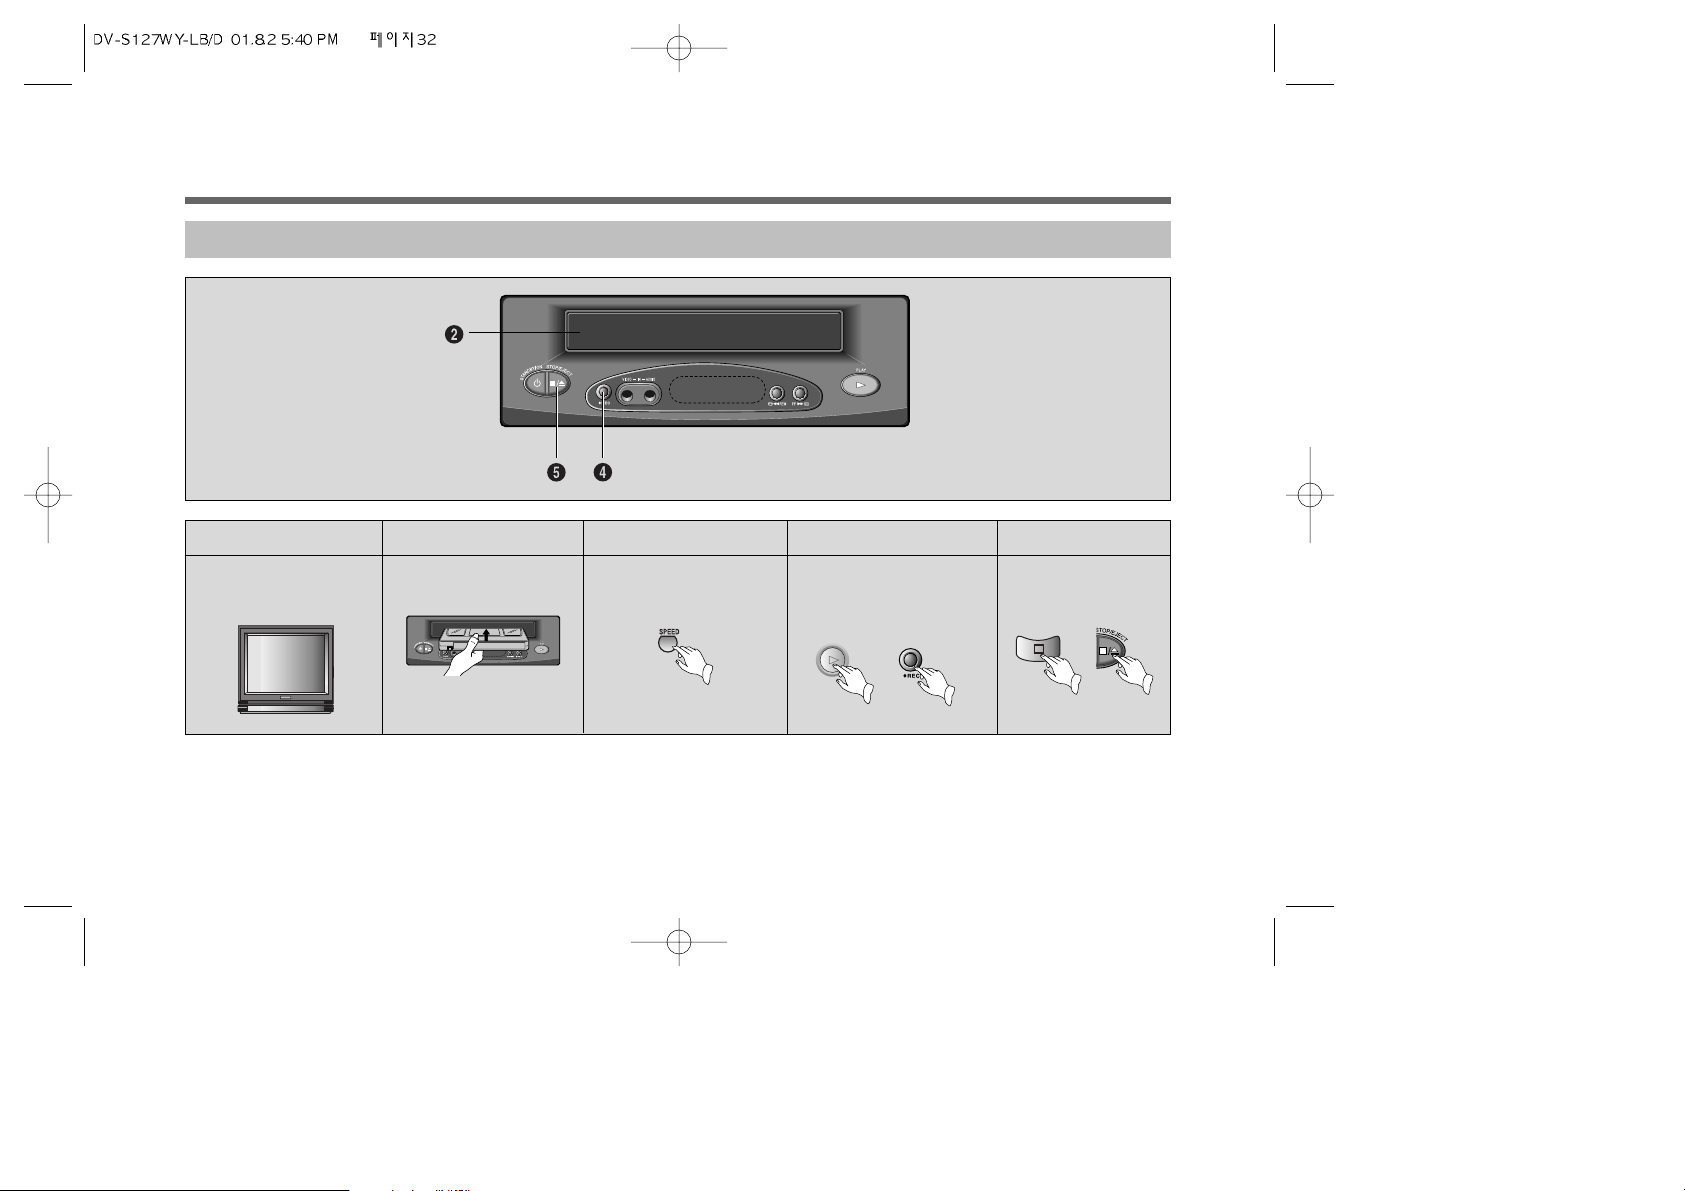
32
Œ
PREPARATION (TV)
´
LOADING
ˇ
SPEED SELECTION
¨
RECORDING
ˆ
STOP
Turn on the power of TV.
Insert the original tape to
playback VCP. Insert the
blank tape to recording VCP.
Press the PLAY key on the
playback VCP. Press the REC
key on the recording VCP.
The REC indicator will display.
To interrupt the recording,
press the STOP key.
PLAY
REW
POWER
STOP/ EJECT
* Upon inserting the cassette,
the power will be on even if
the power is off.
• Please do not turn off the power until recording is finished.
OPERATION
Press the SPEED key to select
the recording speed
(SP or LP).
* Only in NTSC record mode,
select the SP mode.
Page 34
33
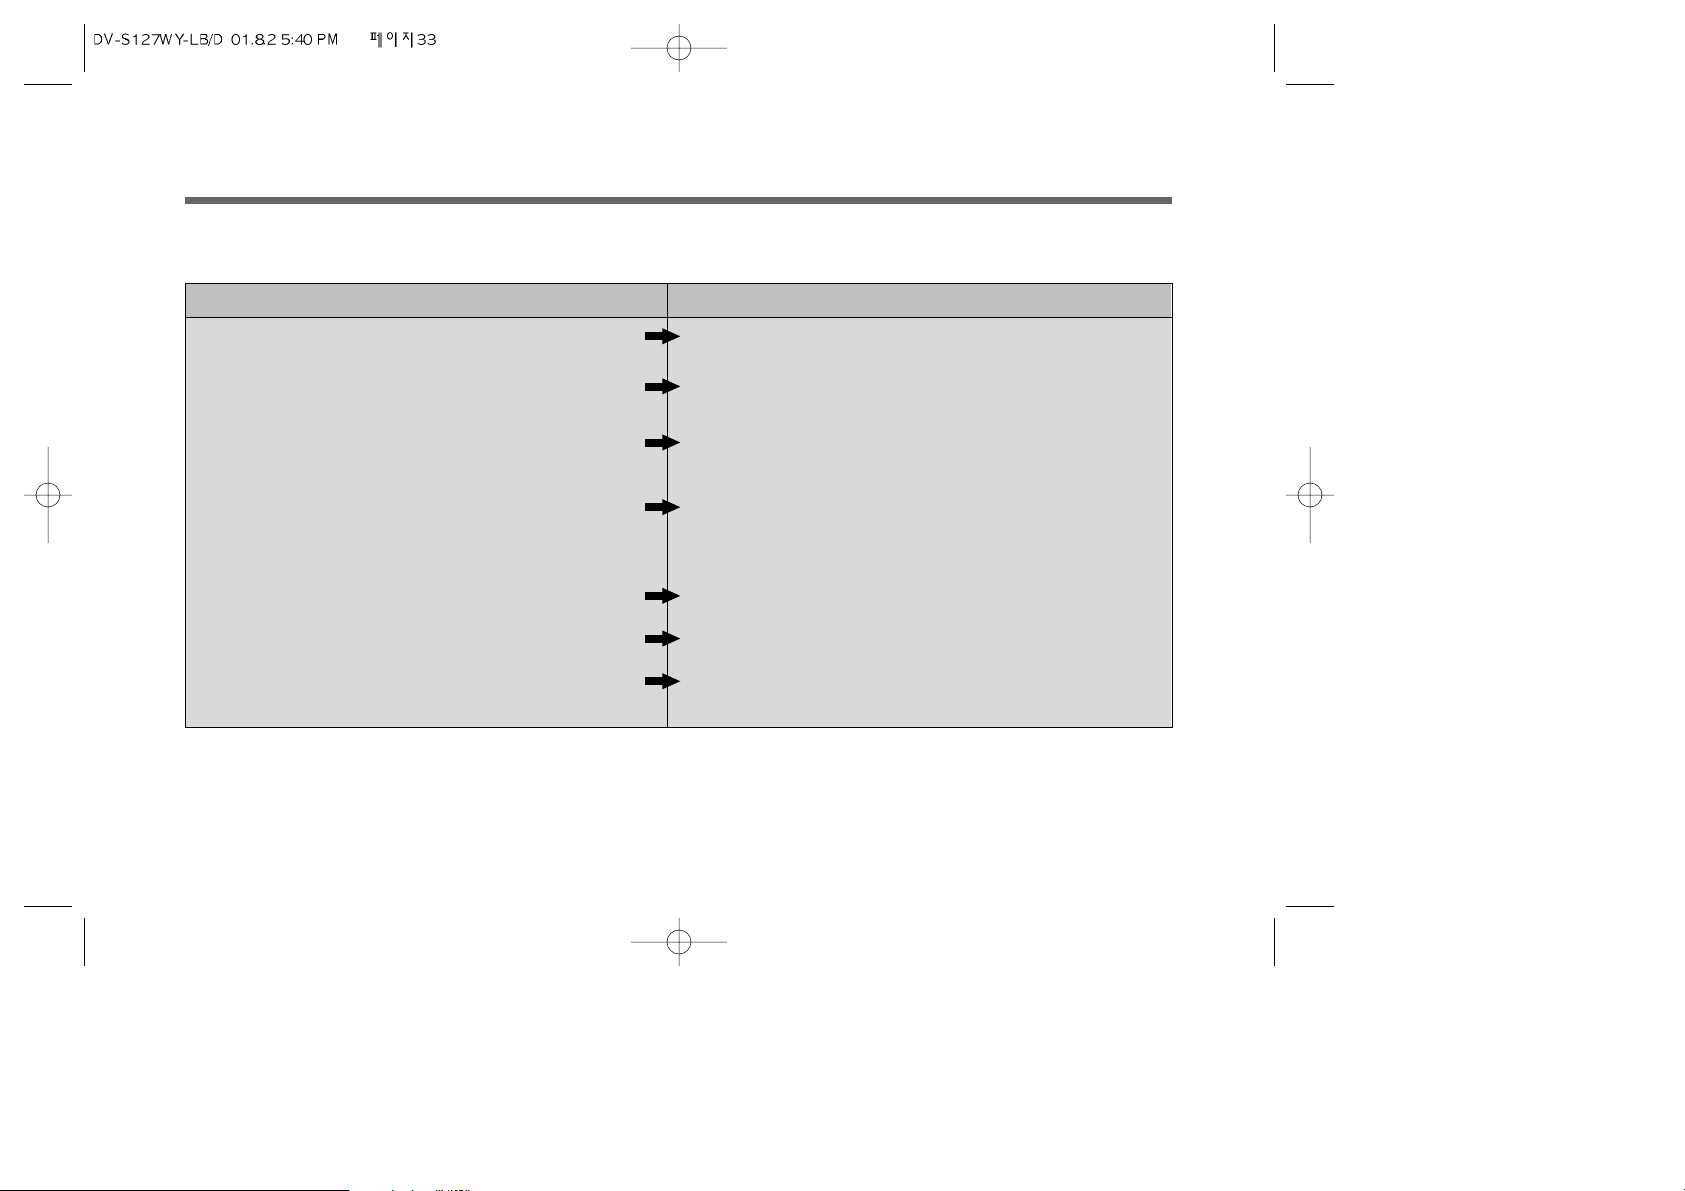
BEFORE CALLING SERVICE PERSONNEL
Before calling service personnel, check the following points for a possible cause of the trouble. A minor adjustment on your
part may eliminate the trouble.
SYMPTOMS POSSIBLE CAUSES
There is no power to the VCP.
Operation key does not function.
Tape does not run in the record mode.
Picture does not appear in the playback mode.
Tape cannot be rewinded or fast forwarded.
Playback picture is partially noisy.
Cassette cannot be inserted into the VCP.
Is the power cord connected?
Is the POWER switch ON?
Has a cassette been inserted?
Has a cassette been inserted?
Is the safety tab on the cassette still intact?
Is the TV receiver channel selector
set to an occupied channel?
Set to the RF converter channel?
Is the tape already rewound or fast forwarded to the end?
Is the TRK + or – properly adjusted?
Is the cassette correctly inserted?
Is there a cassette already in the VCP?
Page 35
34
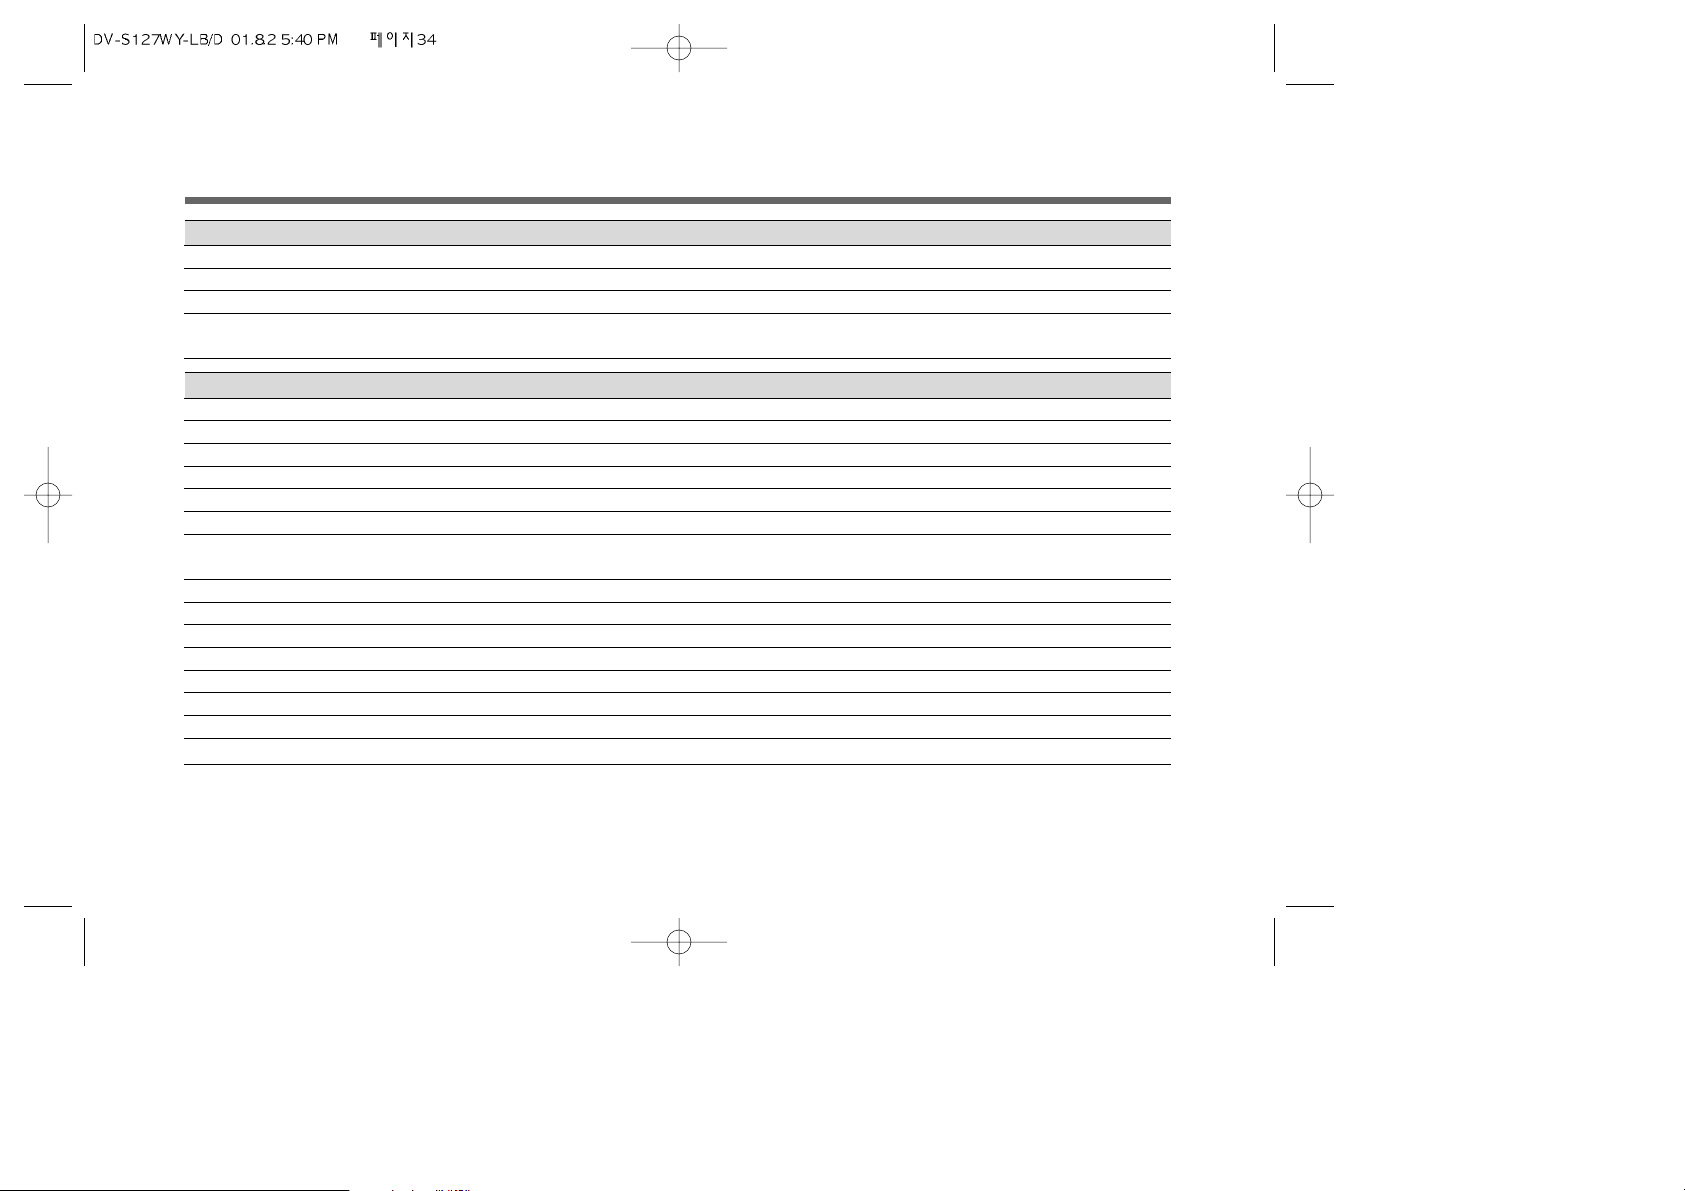
SPECIFICATIONS
General
Power requirement : AC 90-250V~, 50/60Hz, DC12V(2A)
Power consumption : 14 Watt
Weight : 3.5 kg
Temperature : Operating: 5°C to 35°C
Storage: -20°C to 60°C
Tape deck section
Format
Video signal system
Scanning system
Tape width
Tape speed
Playing time
RF output
Video input
Video output
Video S/N
Resolution of picture
Audio input
Audio output level
Audio S/N
Accessories provided
VHS standard
PAL /MESECAM /NTSC(3.58) color signal
Rotary, slant azimuth, two-head helical scan system
12.65 mm
SP: 23.39 mm/sec ,LP: 11.70mm/sec ,NTSC(3.58): 33.35mm/sec
180 minutes with E-180 (SP)
22-40CH (adjustable) 73±3 dBuV
22-30CH (adjustable) 73 ±3 dBuV in case of using DC Jack
1.0Vp-p, 75 ohms unbalanced, sync. negative(Phone Jack)
1.0Vp-p, 75 ohms unbalanced, sync. negative(Phone Jack)
More than 43dB(with Rohde & Schwarz noise meter)-PAL SP standard
More than 240 lines-PAL SP standard
Phone-type connector more than 47K ohms, –8dBm, unbalanced
Phone-type connector more than 1K ohms, –6dBm, unbalanced
More than 38 dB-PAL SP standard
Instruction Manual, Remote control, 2 Batteries, RF cable
:
:
:
:
:
:
:
:
:
:
:
:
:
:
:
:
Design and specifications are subjected to change without notice.
 Loading...