

Page 1
Page 2

SD 8141
Thank you for your choice of the new digital cordless phone Shiro SD8141.
SD8141 is a DECT (Digital European Cordless Telephone) phone with GAP (Generic
Access Profile) profile. To the quality of audio and to the safety offered from the digital
technology, SD8141 offer manifold and useful features including, caller identification,
automatic routing of the phone calls toward a second network operator,
alphanumeric phone book and handsfree speaker phone. If you store a name into the
phone book, the caller name will appear when he calls. All the features are easily
accessible through a practical menu.
Please read carefully this instructions manual before using your new SD-8141phone.
ACCESSORIES
- Base unit and Handset unit
- 2 AAA rechargeable batter y 1.2V
- AC/DC Adaptor
- Tel-line cord
- Users manual
Technical data
- Technlogy: DECT standard (Digital European Cordless Telephone) with GAP
(Generic Access Profile)
- RF channel: 120 TDMA
- Frequency range: 1.88 Ghz ~ 1.9 GHz
- Channel bandwidth: 1.728 Mhz
- Speech encoding: ADPCM / 32 kbit per second
- Duplexing: Time Division Duplex (TDD)
- RF access: Time Division Multiple Access (TDMA)
- Modulation type: GMSK
- Transmission speed: 1.152 Mbps
- Output power: 250mW max
- Battery life: 120 hours standby; 9 hours talking (2 hour hands free speakerphone)
- Coverage range: 50 m indoor; 300 m outdoor
- Handset powered by 2 AAA batter y 1.2V / 550 mAh / Ni-MH
- Base set powered by AC/DC adaptor PRI 230 V AC; SEC 7.5V DC 300 mA;
- Recharging time: 10/12 hours
- Dialling mode: Pulse / Tone (DTMF)
- Handset dimension and weight: [53 x 145 x 29 mm] x 122 g (batteries included )
- Base set dimension and weight: [117 x140x115 mm] x 140 g
- Max handset to one base: 5 (4 + 1 in endowment)
- Max base to the handset: 4
- Usable temperature: from 0° to 40°C
- Storage temperature: from -20° to 60°C
1
Page 3

Index
SD8141 .
Accessories .
Technical data .
A glance guide to the buttons on your .
handset .
Key and symbols description
.
A glance guide to the buttons on the base
.
Installation and set-up .
AC/DC adaptor installation .
Phone line connection .
Battery installation .
Battery charging .
Coverage range .
Precautions .
Handset On/Off .
Before using the unit, check __ .
To make a call_________________________.
.
Pre-dial .
How to answer incoming call .
Automatic answer .
Adjustment of receiver volume .
Microphone mute .
Put on hold the caller .
Last number redial .
One of the 10 last numbers redial .
R key (recall) .
Paging handset .
Out of range indication .
Battery level indication .
Using earphone .
Caller identify ____ .
Navigation method into menu .
Date & Time setting .
Keypad lock .
Warning and confirmation tone On/Off .
Handset ringer volume setting .
Handset ringer tone setting .
Base ringer volume setting .
Base ringer tone setting .
Ringer priority setting .
Timer enabling / disabling .
Replace handset name .
Language display setting .
Phone book .
To modify entry memory .
To delete entry memory .
To delete all entry memory .
To call entry memory .
To store a number from the redial list .
Alarm setting .
PIN code changing .
Dialling mode setting .
Pag.
1
PABX code .
1
Call barring .
1
Disabling call barring .
3
LCR (Least Cost Routing) .
3
How to enable / disable LCR .
4
How to set LCR “Primary” .
5
How to set LCR “Routable” .
6
How to set LCR “Special” .
7
How to set LCR “Others” .
7
Multi handset configuration .
7
Subscription of optional handset .
7
How to de-subscribe a handset .
7
Intercommunication between handsets .
7
Call transfer between handsets .
8
Conference call .
8
Multi base configuration .
8
How subscribe handset to another base .
8
Base search .
8
Baby Sitting (room monitor) .
8
8
Factory default setting
9
9
- Phone book: empty;
9
- Called numbers list: empty;
9
- Caller ID list: empty;
9
- LCR router: disabled with below settings:
9
Primary= empty;
9
Others= empty;
9
Routable*= empty;
9
Special*= empty
10
- Handset name:HANDSET;
10
- Handset ringing volume: 4;
10
- Handset external ringing tone : 1;
10
- Handset internal ringing tone .: 5;
11
- Confirmation beep: enabled;
11
- Timer: enabled;
11
- Date & Time: present on display, enabled
11
automatic setting;
12
- Alarm: disabled;
12
- Base ringing volume:5;
12
- Base ringing tone: 1;
12
- Ringing priority: disabled;
12
- Call barring: disabled;
13
- PIN Code: 0000;
13
- Dialling mode: Tone (DTMF);
13
- PABX pause: disabled;
13
- Baby sitting; disabled;
13
- Display language: English;
13
- Handset subscribed: only handset 1;
14
- Receiver volume: level 3;
14
*After resetting, remember to input the special and
14
routable prefix on LCR router (see paragraph “ LCR”).
14(2)
Pag.
15
15
15
16
16
16
16
17
17
17
17
18
18
18
18
18
19
19
19
2
Page 4
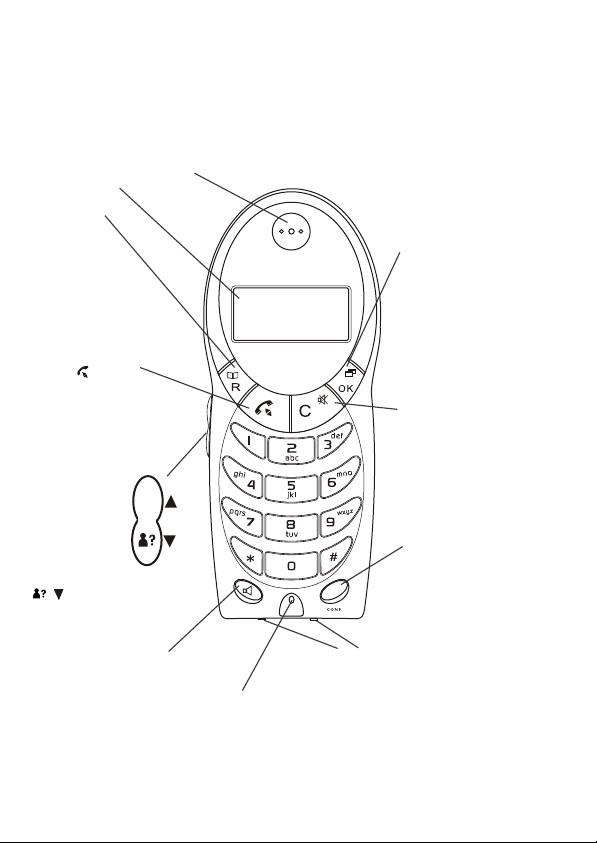
A glance guide to the buttons on your handset.
The handset
Display
See page 4.
MEM button
press to make
calls to numbers
stored in memory
FLASH button
you will need this
if your phone is
connected to a PBX,
or if you use Callwaitting servies
PHONE button
press to begin, answer and
end a telephone call.
REDIAL button
press to display the last 10
numbers you dialled.
UP and DOWN buttons
Press during
programming to
move through
the menu.
Press during
a call to change
the volume
in the earpiece.
/ (Caller Display)
Press to display details of
people who have called you.
SPEAKERPHONE button
press to turn the speakerphone on and off.
Earpiece
Listening
RD
02899832620
Microphone
pick up the voice
SD 8141
OK button
press during programming
to confirm your selections.
Press and hold to switch the
handset off.
MENU button
Press to start and end the
programming menu.
C (CLEAR) button
Press during programming to
move back to the previous
menu option, or to clear digits
one by one from the display
MUTE button
Press during a call to mute
the microphone so the
other person could not hear you.
INT button
Press to make an
INT
intercom call if you
have more than one
handset registered to
ther base unit.
Charge contact
Charging batteries
Before you can use the handset to make
calls you will need to fit and fully charge
the batteries, as described on pages 6 to 8.
Please read the notes on page 5 before you
install the base unit.
3
Page 5
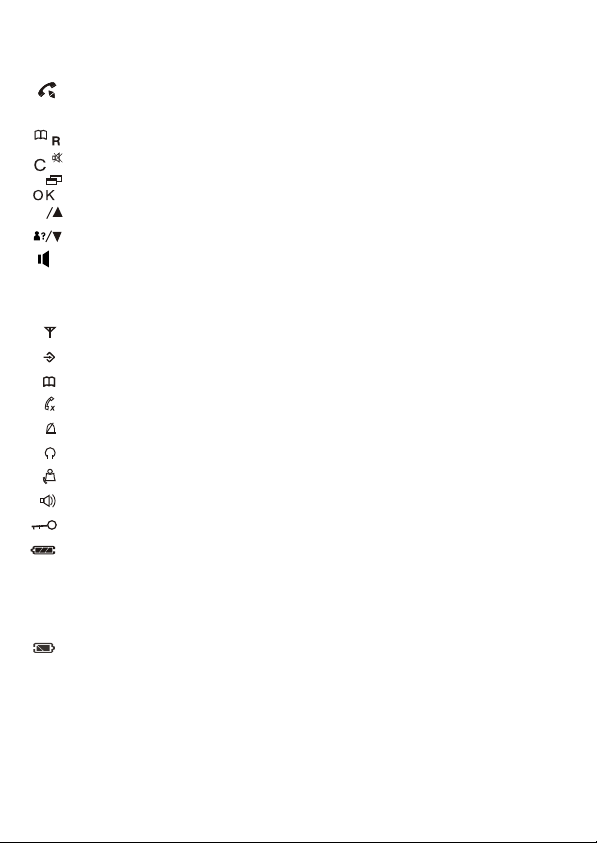
Key and symbols description
Handset:
: Hook switch key;
INT
: Intercom key between handsets;
: phone book access key and flash key ;
\
: mute key, delete key and Menu exit key ;
: Menu access key, confirmation key, handset On-Off;
: Redial list key / up arrow;
RD
: caller identification list access key and down arrow;
: hands free speaker phone key;
Display symbols:
: the handset is in the coverage area of the base;
: Menu access;
: phone book access;
: phone call is in progress (x means microphone mute enable);
: handset ringer disabled;
: baby sitting feature enabled;
:not answered call present in the caller ID list;
:Hands free speaker phone is in use;
: keypad is blocked;
: battery level indication;
Base LED:
NUSE/
: phone conversation is in progress, when is blinking reflect unanswered calls;
NEW CALL
: handset is in the cradle;
P : paging key to call handset;
4
Page 6
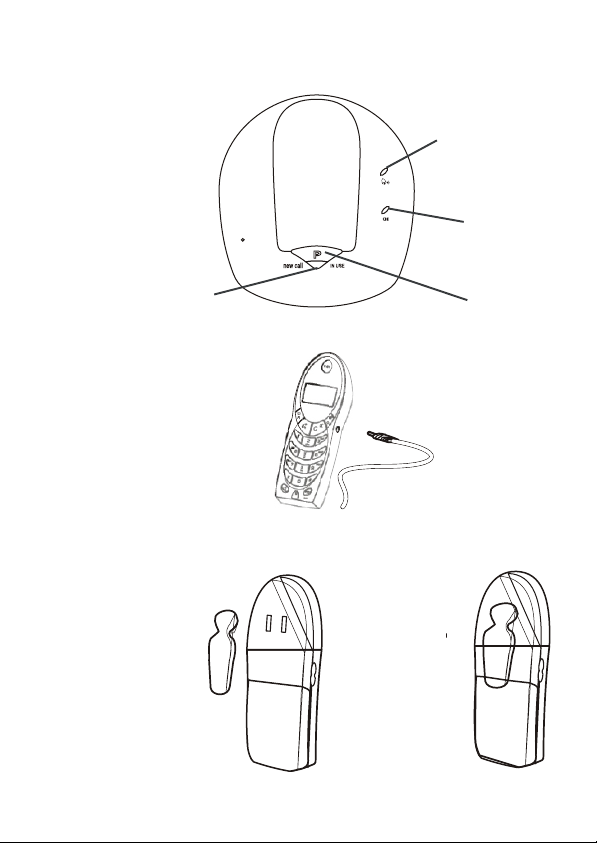
A quick guide to the buttons on the base.
The Base
Incoming Call Light
Charging Light
New Call / In Use
Page Button
The headset jack
The headset jack let you
use the handset**(optional).
Start by plugging
it into the bottom of
the handset as shown.
** You can purchase the handset from our office or purchase a mobile phone handset(motoroXX type).Make sure
the volume is turned up as the mobile phone handset have different power setting.
The belt clip
If you are using your SD 8141,
you may wish to fit the belt clip to
make the handset easier to
carry.
Fit the belt clip
as shown,
making sure it
clicks firmly
into place
5
Page 7
Installing and using your SD 8141digital cordless telephone
Installation and Setting Up
1 Choose a suitable site for the base unit. M
sure it is not near to another telephone
other electrical equipment
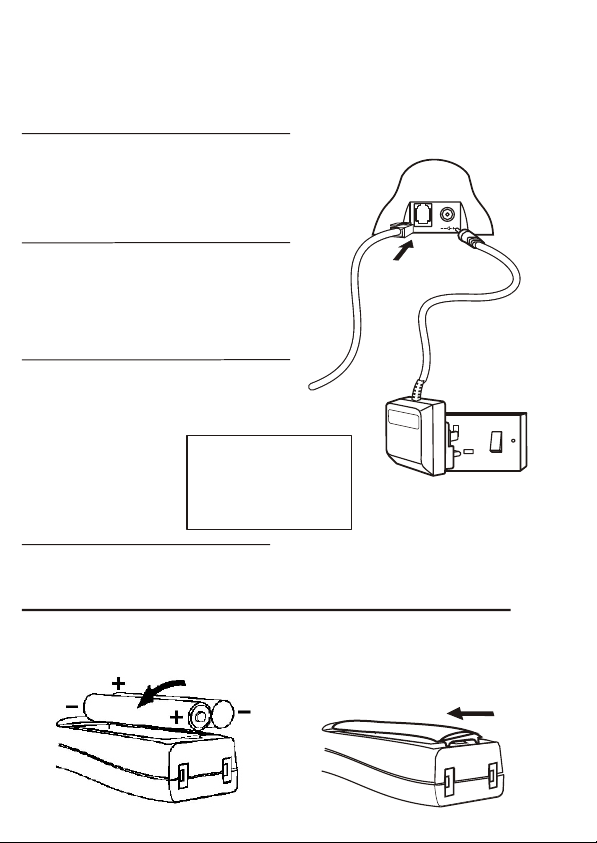
2 Plug the main power lead and the
telephone line cord into the back of
the base unit
3 Plug the power adaptor into a 230 V AC,
50 HZ main socket, with the switch on the
socket set to OFF
The SD 8141 base unit must be
used with the power adaptor
supplied with the unit. Using any
other adaptor will result in
non-compliance with En60950.
This will invalidate any
approval given to this apparatus.
4 Switch on the power at the socket
5 Fitting the batteries in the handset
Insert the rechargeable batteries as shown,
making sure they are firmly in place
ake
or
Fit the battery compartment cover,
sliding it until it clicks firmly into
position
DC 9V
** Please make sure that only RECHARGEABLE batteries are used,
otherwise the warranty will be void.
6
Page 8

AC/DC adaptor installation
Connect the plug of the adaptor to the power jack of the base set located at the
back, and connect it to the 220V socket.
Phone line connection
Connect the plug of the telephone line cord to the jack of base set located at the
back, and connect it the line socket.
Battery installation
1- Remove the battery door;
2- Insert the batteries into the compartment;
3 - Close battery door.
IMPORTANT: The Nichel-Metal Hydrate battery, when exhausted, must be recycled or
disposed properly.
Battery charging
Put the handset onto the cradle. Charge at least 10 hours when the battery is totally
discharged. The light indicator will light up to show that the handset is in charging
mode. When completely charged, this light indicator will remain on.
Coverage range
The coverage area could be affected from manifold situations. The indication of 300m
outdoor and 50m indoor serves as a guide which is obtainable only in a optimal
conditions of propagation of the signal. However for a better coverage it is advisable to
install the base set in a central position of the building within where the cordless phone
be used.
Precautions
1) Read this manual before using this phone.
2) Avoid direct exposure to solar rays and/ or fronts of heat, as well as to avoid the
installation in damps places and/ or dusty.
3) Do not support objects on the cables and/ or on the phone.
4) Do not use adaptor and/ or batteries diverged from those specified on this
instructions manual or however from those in endowment.
5) In case of storms, disconnect the phone from power and phone lines.
6) Clean by using a slightly dampened cloth. Do not use alcohol, solvents, abrasives,
etc.
7) Do not effect reparations alone. Tampering and/ or uses not in conformity with those
described on the instructions manual will render the warranty void.
8) Shiro Corporation declines any responsibility in case of improper uses or
manipulations not conform with the instructions as described in this manual.
7
Page 9
Handset On/Off
Press key to switch handset On or put it in the cradle for charging. It will switch On
automatically.
To switch Off, hold and press key for approximately 2 seconds.
Before using the unit, check:
1) The installation was performed properly;
2) The batteries have been charged properly;
3) The LCD display "OFF " (press key to switch on handset in case it is off);
To make a call
1) Press key for dialing tone (the base LED indicator will light up);
2) Dial the desired number;
3) Press key or put the handset in the cradle to end a call (the base LED indicator
will be off).
NOTE: Pressing key will enable the hands free speaker phone. This key cannot
cease the line.
At the end of each call, the LCD screen will display the talk time duration for about 5
seconds.
Pre-dial
1) Dial the outgoing number (press key if there is an error. The last digit will be
deleted. Alternatively press and hold to delete full number) ;
2) Press key to send a call. The number will be dial out automatically.
How to answer incoming call
1) Press key when handset rings;
2) Press key to answer directly with the hands free speaker phone.
Automatic answer
When the handset is in the cradle, lift to answer a call.
ATTENTION: If you have Caller ID service, the automatic answer will be disabled. You
can decide whether to answer the call.
Adjustment of receiver volume
During a phone conversation, press or key to adjust the receiver volume.
RD
Choose from 5 volume levels. 1 being the lowest and 5 the highest. The volume
indication will disappear from LCD screen after 3 seconds.
8
Page 10

Microphone mute
During a phone conversation, press key, the LCD screen will display . The
microphone will be disabled, but you will still be able to hear the caller. Press again
to restore a phone conversation.
Putting the caller on hold
During a phone conversation, press the INT key. The other party will hear beeping
sound. Press INT key again to restore the phone conversation.
Last number redial
To dial the last dialled number, take phone line by key, then press key. The
RD
last number will be automatically dialed out.
One of the last 10 numbers redial
SD 8141 automatically store the last 10 dialled numbers. To call one of them, press
RD
key, and search through the list by or keys until the LCD screen
RD
display the desired number.
R Key (recall)
Pressing key during a phone conversation allows you to access to the
\\
supplementary service of the network (example, the call waiting if subscribed with the
network operator).
Paging handset
Pressing P key of the base, the handset will ring. This function can be useful, for
example, to locate the handset. Press any key on the handset to end a paging call.
Out of range indication
Please note that the conversation will be cut off if you are far from covered range of the
base set. The symbol will blink on the LCD screen.
Battery level indication
LCD will display 4 battery levels: = full; middle; = low. If the symbol is
displayed , , it indicates that the battery is flat. Put handset in the cradle for
charging.
Using earphone
Sd8141 is equipped with a 2.5mm jack where it can be connected to one standard
earphone typically used for mobile phone.
ATTENTION: select the proper earphone making sure it is the standard type
9
Page 11
Caller Identity (workable only if subscribed with network operator)
SD8141 is able to display the caller number. If the caller number is stored into the
phone book, the name will be displayed. It stores the last 20 calls automatically (the
symbol on LCD screen and the light on the base will blink when the call is not
answered). To see the caller list, press key and then keys to list the
content. Pressing when the number is displayed, will reflect the date and time of
RD
the call. If you press again key, display will show "SAVE? ". If you press key
again, you can store the call number on the phonebook. Input the location name of
this number and press key to confirm the name and press key to confirm the
number.
However, if you wish to delete the caller number, press key when display shows
"SAVE? ". The display will show "DELETE". Confirm by pressing the key.
ATTENTION: Date and time are available only on PSTN lines and not on ISDN lines.
If you like to call the number reflected on the LCD screen, press key and it will be
dialled out automatically.
Navigation method into menu
SD8141 is endowed with an intuitive system of listed menu and sub-menu. The
Key allows input into the main tree of menu. Pressing or keys allow the
RD
menu to be listed. Pressing key allows input to the sub- menu.
Pressing the key allows you to return to the previous menu. Press and hold the
same key allows you to escape from menu and come back in the stand-by mode.
NOTE: For the subsequent steps, the procedure to input the main menu will not be
mentioned anymore .
Date & Time setting
SD8141 is equipped with automatic clock setting system. If you are using it with an
analogue line PSTN (not ISDN) with the caller ID enabled, the clock will be set
automatically when there is an incoming call. Otherwise, the clock have to be set
manually with the following procedure:
- under sub- menu "HANDSET", search for "CLOCK". Enter this menu and select "SET
CLOCK". Set hours then press key . Set minutes then press key. Set month
then press key. Set date.
Press to confirm. To auto setting, go to sub-menu, "CLOCK", search for
“AUTOMATIC”. Select and set "YES " if you like the auto setting or select "NO ". Press
to confirm. This will automatically set the handset’s date and time based on the
FSK CID of the PSTN network.
Under the sub- menu, go to "CLOCK ", press "OK ". If you prefer not to display the clock
onto the LCD Screen, press "OFF ". Press to confirm.
10
Page 12

Keypad lock
To lock the handset keypad:
- enter sub-menu "KEY LOCK" which is in the main menu. Choose "YES " (lock enabled) or
"NO " (lock disabled), press to confirm.
To unlock keypad, press key three times .
Warning and confirmation tone On/Off
There will be a warning beep when the phone is Out of range, Low Battery,
Confirmation at Programming and Key Click. These tones can be disabled by:
- enter sub- menu "HANDSET" which is in the main menu, search for "TONES". Enter this
menu and search for the tone you wont to disable or enable between "KEY ,RANGE,
LOW BATT " and "CONFIRM", press , select "YES " (tone enabled) or "NO " (tone
disabled), press to confirm.
Handset ringer volume setting
You can set up to 4 different volume levels or disable the handset ringer (handset will
not ring). To set, follow this procedure:
- enter sub-menu "HANDSET" which is in the main menu, search for "RINGER". Select the
desired volume level by or keys (included for ringer off -"VOL OFF",”,
RD
symbol will be displayed on LCD screen). Press to confirm.
Alternatively, with an incoming call, adjust the ringer volume directly by pressing
RD
or keys.
Handset ringer tone setting
Set up to 5 different ringer tones. You can also set a different ringer tone for incoming
call and intercom call. To set, follow as below:
- enter sub-menu "HANDSET" which is in the main menu, search for "EXT RING" for the
incoming call, or "INT RING" for the intercom call. Press and set the desired tone by
the or keys. Press to confirm.
RD
Base ringer volume setting
Set up to 5 different volume levels or disable ringer (base will not ring). To set, follow as
below:
- enter sub-menu "BASE" which is in the main menu, search for "RINGER ".
Press and select "VOLUME ". Press and set the desired volume by
RD
or keys (included for ringer off - "VOL OFF"). Press to confirm.
11
Page 13

Base ringer tone setting
Set up to 5 different ringer tones. To set, follow as below:
- enter sub-menu "BASE" which is in the main menu, search for "RINGER ".
Press and select "MELODY". Press and the desired tone by or
RD
keys. Press to confirm.
Ringer priority setting
Choose the ring setting between base or handset (or handsets) and the number of
times the phone will ring the other unit. To set, follow as below:
- enter sub-menu "BASE" that is on the main menu, then select "RINGER". Press
and select "PRIORITY". Press and select "SET UP". Press follow by key.
Select the unit to ring first. Press and or keys, specify after how many
RD
RD
rings the other unit will ring. Press to confirm. The LCD screen will display "PRIORITY",
press and select between "YES" or "NO "to enable or disable the ringer priority.
Timer enabling/disabling
At the end of each call, the conversation time will be reflected on the LCD screen
display. You can disable or enable this function using the following:
- enter sub-menu "HANDSET" which is in the main menu, search for "TIMER".
Press and select between "YES " and "NO" to enable or disable timer. Press to
confirm.
Replace handset name
The default name is "HANDSET ". You can change the name up to a maximum of 8
characters. To set, follow as below:
- enter sub-menu "HANDSET" which is in the main menu, search for "HS NAME".
Press key follow by the key. Delete the old name and input the new name
using the alphanumeric keypad. (Follow the same procedure used to input name into
the phone book). Press to confirm.
Language display setting
SD8141 is equipped with a multi language menu. To set the language between the
available, follow as below:
- enter sub-menu "LANGUAGE" which is in the main menu. Press and select the
desired language by or keys. Press to confirm.
RD
12
Page 14

Phone book
SD8141 can store up to 40 alphanumeric memories with name of 8 characters and
numbers of 18 digits. To store, follow as below:
- enter sub-menu "PHONEBOOK" which is in the main menu and select "NEW". Input
name by the alphanumeric keypad (see table below) and press . Input number
and press key to confirm. Escape sub-menu or store other location.
NOTE: if there is an error during setting, press key to delete.
Key x1 x2 x3 x4 x5
1 Space - 1
2 AB C2
3DE F 3
4GH I 4
5 JKL5
6MN O6
7 PQRS7
8TUV8
9WX Y Z 9
0 0
To modify entry memory
Select "EDIT" under the sub-menu "PHONEBOOK".
Select the name to be modified by pressing or key. Press and, if
necessary, modify the name. Press and, if necessary, modify the number. Delete
RD
characters or numbers by pressing key. Press to confirm.
To delete entry memory
Select "DELETE" under the sub-menu "PHONEBOOK". Select the name to be deleted by
pressing or keys. Press to confirm.
RD
To delete all entry memory
Select "DEL ALL" under the sub-menu "PHONEBOOK". Press to confirm.
NOTE: All data relative to the phone book will be erased.
To call entry memory
\
Press key and look for the name to be called by pressing the or
RD
Keys. To send a call press key.
To store a number from the redial number list
RD
Press key, look through the redial number list by pressing the or keys
RD
until the LCD screen display the desired number. Press key, display will show
"SAVE? ", press and input the associated name and press key to confirm, press
Key again to confirm the number.
To store a number from the caller identity, see section under "Caller Identity".
13
Page 15

Alarm setting
SD8141 is equipped with daily alarm. The alarm can be set daily but the alarm time will
reflect the time that was set previously. The alarm duration is 30 seconds. Press any
handset key to stop alarm. To set, follow as below:
- enter sub-menu "HANDSET" which is in the main menu and search for "ALARM". Enter
this sub-menu and select "ALARM TIME". Press and set hours. Press key. Set
minutes and press key.
Press either or and select "SET ALARM ". Set "YES " or "NO". Press to
RD
confirm.
Repeat the last step to enable alarm every day.
PIN code changing
When you perform advanced setting or subscribe to a new handset, a PIN code is used
for the security of Tower. The default PIN code is "0000 ". To set new PIN code, follow as
below:
- enter sub- menu "BASE " which is in the main menu and search for "ADVANCED ". Press
, LCD screen will display "PIN ". Input old PIN (0000 default) and press . Look for
"PIN CODE " and press . LCD screen will display "NEW PIN", input new PIN (maximum
8 digit) and press key. LCD screen will display “REPEAT", input new PIN again and
press to confirm.
Dialing mode setting
Most of the public telephone centrals use tone (DTMF) dialling which is much more
faster than Pulse dialling. However if your telephone line is connected to an old one,
you will need to set Pulse dialling to dial outgoing numbers. To set, follow as below:
- enter sub-menu "BASE" which is in the main menu and search for "ADVANCED". Press
, LCD screen will display "PIN ”. Input PIN code (0000 default) and press . Look
for "DIAL MODE" and press . Select between "TONE" and "PULSE" and press to
confirm.
Reset to default value
In case if you need to revert to default setting, reset as follows. This will erase all
memories and Tower will come back to default setting.
- enter sub-menu "BASE" which is in the main menu and search for "ADVANCED". Press
, and LCD screen will display "PIN ". Input PIN code (0000 default) and press .
Look for "DEFAULT" and press . LCD screen will display "CONFIRM? ". Press to
confirm and it will return to the default setting.
NOTE: With the reset, the name of the handset does not return to the default name.
NOTE: With the reset, the routable and special prefix are deleted, see "LCR "
paragraph to input the default prefix.
14
Page 16

PABX code
To obtain an external line, the norm is to dial a ‘0’ or ‘9’ for dial tone if the unit is
connected to a PABX. If you were to program a PABX code, there will be a pause of 3/5
seconds between the line access code (0 or 9) and the number to be dialled out.
When numbers are stored in the phone book, insert ‘0’ or ‘9’ as the first digit for getting
an external line. Set as below:
- enter sub-menu "BASE" which is in the main menu and search for "ADVANCED".
Press , LCD screen will display "PIN ". Input PIN code (0000 default) and press .
Look for "PABX PAUSE " and press . LCD screen will display "PABX CODE". Press
and input the desired digit (normally’ 0’ or ‘9’) and press . Look for "PAUSE" and press
. Select between 3 and 5 seconds which is the pause time to be introduce
automatically, press to confirm.
Call barring
SD8141 allows setting of 3 different levels of call barring. You can also specify which
handset to be locked. The barring are "LOCAL" all local numbers will be blocked,
"NATIONAL" all numbers starting with 0 will be blocked, "INTERNATIO" all numbers starting
with 00 will be blocked. To set call barring, follow as below:
- enter sub-menu "BASE" which is in the main menu and search for "ADVANCED".
Press , LCD screen will display "PIN ". Input PIN code (0000 default) and press .
Look for "CALL BAR" and press . LCD screen will display "HANDSET 1". Select the
handset to be blocked and press . Now choose between “LOCAL", "NATIONAL"
and "INTERNATIO". Press to confirm.
Disabling call barring
Enter sub-menu "CALL BAR " as described above and press . LCD screen will display
"HANDSET 1". Choose the handset to be unlock and press . Select "NO BARRING "and
press to confirm.
15
Page 17
LCR (Least Cost Routing)
SD8141 is equipped with LCR multi carrier system. To understand the operational
method of LCR, there is a need to deepen the routing. Programming the sub-menu
"LCR " allows the routing of the numbers you prefer. To set, follow as below:
-Primary: main secondary network operator toward which you want to route all calls;
- routable: stored the area code, or only the first digit of area code. It must be routed
toward the "PRIMARY" main secondary network access code. You can store up to 5
area code (the following area codes are set as default: 0, 00, 3 and 4);
- Special : area code that must not be routed. It is preferable to call with the main
network without routing . Please see page 2 where the area codes set as default are
indicated. You can store up to 10 area code.
- others : in this list, other area codes can be stored to be routed with another network
operator.
Please note that the area code which you wish to store here are not inside the
"routable " list.
NOTE: a PIN code (0000 default) is needed when you do the programming.
Attention
The only way to use the LCR is to made a pre-dial. Dial a number, or recall it from any
memory, and then press key to send a call. All numbers dialled after key is
pressed, will not be routed.
How to enable / disable LCR
After programming as described below, enable (or disable if necessary) with the
following: enter sub-menu "LCR " which is in the main menu and search for "YES "
(or "NO"). Press to confirm.
Setting LCR “Primary”
Enter sub-menu "LCR " which is in the main menu and search for "PRIMARY". Press
and enter the network operator code up to maximum 6 digit (ex. 1088). Press to
confirm.
If you would like to modify the one that is previously stored, repeat the above steps.
Make sure to delete the old one by using key.
Setting LCR “Routable”
Enter sub-menu "LCR " which is in the main menu and search for "ROUTABLE". Press
and look for “NEW”. Press , enter area code of maximum 6 digit and
press to confirm.
To modify an area code: under sub-menu "ROUTABLE", select "MODIFY". Look for the
area code to be modified and press . Using the key, delete the digit and
enter the new one. Press to confirm.
To delete an area code: under sub-menu "ROUTABLE", search for "DELETE". Look for the
area code to be deleted and press to confirm.
To delete all area code stored: under sub-menu "ROUTABLE", search for "DEL ALL" and
press to confirm. All area codes will be deleted.
16
Page 18

Setting LCR “Special”
Enter sub-menu "LCR " which is in the main menu and search for "SPECIAL ". Press
and look for "NEW ". Press , enter area code up to maximum 6 digit and press
to confirm.
To modify an area code: under sub-menu "SPECIAL", select "MODIFY ". Look for the area
code to be modified and press . By using key, delete the digit and enter new
one. Press to confirm.
To delete an area code: under sub-menu "SPECIAL", search for "DELETE". Look for the
area code to be deleted and press to confirm.
To delete all area code stored: under sub-menu "SPECIAL", search for "DEL ALL" and
press to confirm. All area codes will be deleted.
Setting LCR "Others "
Enter sub- menu "LCR " which is in the main menu and search for “OTHERS”. Press
and look for "NEW ". Press , enter area code up to maximum 6 digit and press
To confirm. Press , enter network access code up to maximum 6 digit and press
to confirm.
To modify one entry: under sub-menu "OTHERS ", search for "MODIFY ". Look for the area
code / network operator code to be modified and press . Using key, delete
the digit of the area code to be modified. Enter the new digit and press the key.
Delete the digit of network operator code to be modified. Enter new digit and confirm
by pressing the key.
To delete one entry: under sub-menu "OTHERS", search for "DELETE". Look for the area
code / network operator code and press to confirm.
To delete all entry: under sub-menu "OTHERS", search for "DEL ALL" and press to
confirm. All entry will be deleted.
Multi handset configuration
You can subscribe up to 5 handsets to the same base set.
Subscription of optional handset
- Press and hold the base key for about 5 seconds (two beep tone will be hear). The
subscription will completed after 1 minute.
- With handset: enter sub-menu "REGISTER” which is in the main menu. "BS 1 2 3 4 " will
be displayed on the LCD screen (the numbers 1- 4 will blink, indicating that the handset
is already subscribed at the corresponding base number). Choose the base number
and the handset to be subscribed ( from 1 to 4). Press to confirm .
Key in the PIN code corresponding to the base set (0000 default) and press . The
handset will start searching and the subscription will be completed in a few seconds.
NOTE: repeat the above procedure if it does not work the first time.
17
Page 19

De-subscribe an handset
Enter sub- menu "BASE" which is in the main menu and search for "ADVANCED". Press
,"PIN " will be displayed. Enter PIN code (0000 default) and press . Look for "DEL HS"
and press . The LCD screen will display "HANDSET 1 ". Choose the handset to be
deleted and press . "Confirm? " will be displayed. Press to confirm.
Attention: De-subscription could not be done with the de-subscribed handset that you
are using
Intercommunication between handsets
With 5 handsets, you can do up to 2 intercommunications with 4 handsets and one
handset communicating with external line simultaneously.
To call a handset:
1) Press INT key and the handset number you wish to dial.
2) The called handset will ring, press key to answer.
3) Press the same key in both handsets to end a call.
Call transfer between handsets
1) When you are using an external line, press the INT key (the line will be put on hold).
2) Enter the handset number where you to wish to transfer the call.
3) When the called handset is picked up, an intercom call will be started.
4) Press key to complete the transfer.
If the called handset refuse the call, press INT to obtain an external line again.
Conference call
A conversation with external line can be extended to another handset. To enable the
conference call, follow the same operation described for call transfer and when the
intercommunication is established, press INT and #. The conference call is now
enabled.
Multi base configuration
With the GAP profile, you can subscribe your handset to 4 different DECT bases (also if
different brand and model) provided that these are of the same profile. In this mode, it
is possible to create an area of wide coverage which, in optimal conditions, allow the
use of a handset for a maximum distance of 1200 m.
18
Page 20

Subscribe handset to another base
The procedure is the same as those described in "Subscription of optional handset". If
the base where you want to subscribe the SD8141 handset is of a different model,
please follow the instruction manual on how to put it in subscription mode. When you
are done, follow the same procedure described in "Subscription of optional handset".
Do the vice versa when you want to subscribe an handset of different model to the
SD8141 base. Set the base in “subscription mode” by pressing and holding the base
key for about 5 seconds and follow the handset subscription instruction.
NOTE: you need to know the base PIN code where you want to subscribe one handset.
Base search
Sd8141 is continuously searching the base for stronger signal to be connected. If you
want to do it manually, you will need to choose one particular base and follow the
same operation described for the optional handset subscription without pressing the
base key. Then handset will be connected to the selected base.
Baby sitting (room monitor)
With 2 SD8141 handsets, you can set one of them for room monitoring. It will answer
automatically in the case of an internal call. This function is typically used to monitor
children when they sleep in another room. You can set the handset to be put in the
children room as below:
Enter sub-menu "BABYSIT" which is in the main menu and search for ”YES”. Press key
to confirm (the symbol will be displayed). To disable, repeat the above operation
and select “NO” .
To start monitoring, press INT key and enter the handset number with the baby call
feature enabled. Press key to end monitoring.
19
 Loading...