

Page 1
Page 2

1
Table of Contents
Notice 1
Operation Buttons 2
Package Includes, Power On & Off, Minimum System 3
Requirements, Menu Functions
Music Operation, Voice/Line-In Operation 4
FM Operation 5
System Settings, Setting Equalizer, Setting Repeat Mode 6
Setting Different Folder, Setting A-B Clipping, Picture Operation, 7
Video Operation
Text Operation, Convert video files to SMV, Connecting Player 8
to Computer,
Firmware Upgrade, Troubleshooting Guide 9
Technical Specifications 10
Notice
1. Do not disconnect the player when it is being formatted or
uploading/downloading data.
2. This product needs to be charged for at least 3 hours before usage.
Connect the player to the USB cable to start charging. Once player is full
charged, it will display “Fully Charged”.
Page 3
2
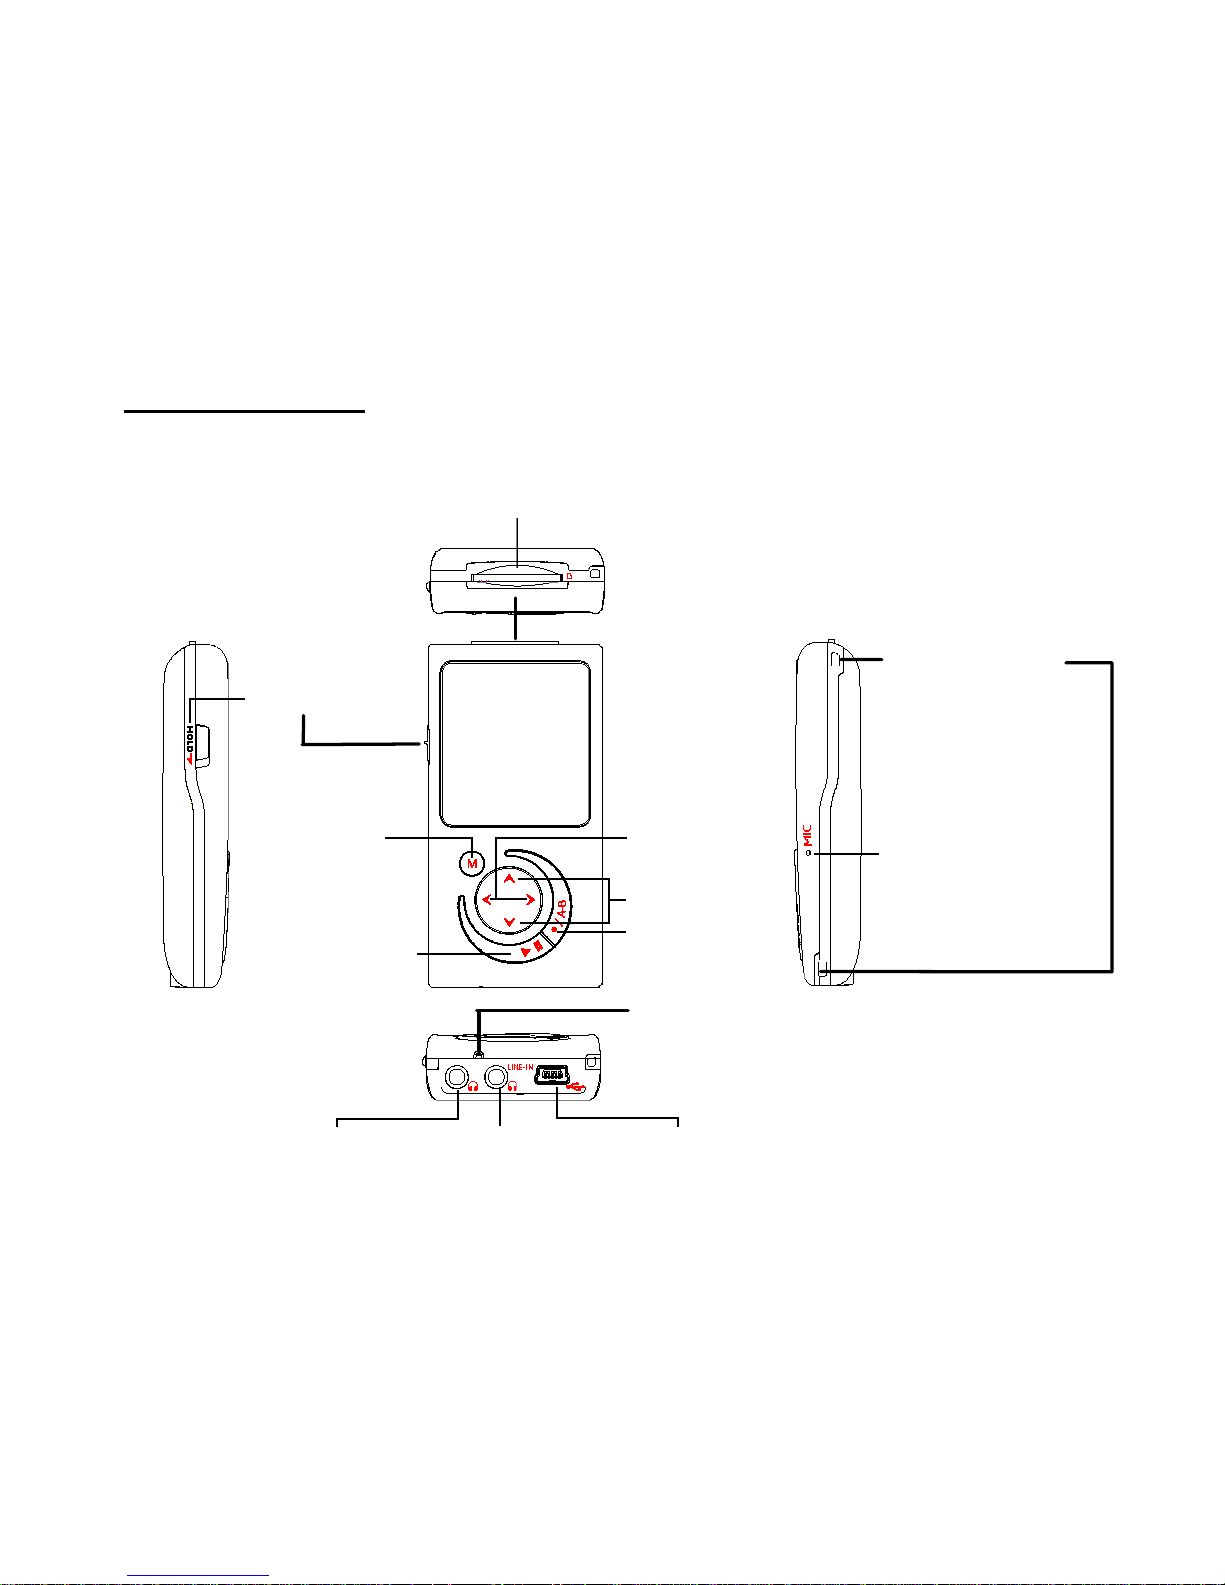
Operation Buttons
MiniSD Card Compartment
Neck Strap
Compartment
Microphone
Left/Right
Vol+/VolOn/Off,
Play/Pause
Menu
Hold
Earphone
Earphone/
Line-IN
USB Port
Reset
Record/A-B
Page 4

3
Package Includes
Installation CD(Optional), USB Cable, Line-In Cable, Earphone, User Guide
Power On & Off
To power on the player, press Play/Pause. To power off the player, press
and hold Play/Pause.
Minimum System Requirements
• Operating System: Windows® 98/98SE/ME/2000/XP or Macintosh™ OS
10.x
• Hardware: 20MB of free disk space, 4x CD-ROM or higher, USB port
Menu Functions
1. Press Menu to go to Main Menu. Pressing Menu again will go to Music
mode.
2. You can select Music, FM Tuner, Record, Images, Video, Text, Folder,
Settings and About.
3. You can navigate Main Menu by pressing Vol+/Vol-. Press Play/Pause to
enter.
4. Choose Music will go to music mode to enjoy your MP3/WMA songs.
5. Choose FM Tuner will go to radio mode.
6. Choose Record will go to voice recording mode.
7. Choose Images will go to picture viewing mode for JPG/BMP format only.
8. Choose Video will go to video mode to view movie of SMV format only.
Page 5

4
9. Choose Text will go to text file reading.
10. Choose Folder will allow you to view different folders.
11. Choose Settings will go to system settings mode.
12. Choose About for player information.
Music Operation
1. By default, player will always resume from Music mode. From Main Menu,
navigate to Music.
2. Press Play/Pause will either play or pause the song.
3. Press Left/Right to choose to the next or previous song.
4. Press VOL+ or VOL- to adjust volume.
5. Press and hold Left/Right to fast forward or rewind.
Synchronous Lyrics
You must ensure the Music file has additional .LRC file on the same folder.
E.g. Song.mp3 and Song.LRC. While playing song, the lyrics will be shown
automatically.
Voice/Line-In Operation
1. From Main Menu, navigate to Record. You will see the Record settings.
2. To change setting, press Play/Pause. To go to next setting, press
Vol+/Vol-.
3. To start, go to Start record and press Play/Pause. To save recording,
press Menu.
Page 6

5
Note: Please connect the Line-In cable from your audio source to the Line-In
port of the player before recording.
Listening/Deleting recorded files
1. From Main Menu > Folder > Internal/External, press Play/Pause to
locate VOICE or LINE-IN folder.
2. Press Play/Pause to enter and you can play/delete the file.
FM Operation
Adjusting and Saving Frequency
1. From Main Menu, navigate to FM Tuner. You can preset 20 fixed channel
and navigate using Left/Right.
2. To auto search and save all available stations, press Play/Pause to select
Auto Scan.
3. To search manually, press Play/Pause to select Manual Scan. Press and
hold Left/Right to scan for available station, press Play/Pause to save.
Recording FM
Press and hold Record/A-B to start recording. Press Menu to save recording
and return to radio mode. You can listen to the file under Music mode.
Delete FM Channel
Press Play/Pause to select Delete Preset.
To exit FM mode, press Menu.
Page 7

6
System Settings
From Main Menu, navigate to Settings mode. Press Vol+/Vol- to navigate
between settings.
Press Play/Pause and you can also do the following:
EQ Set the equalizer for the music
PlayMode Set the repeat mode for the music
Language Set the languages for Menu display
Display skin Set the color for the player display appearance.
Idle Off Set the duration player will turn off automatically during idle
period.
Slideshow Set the scheme for displaying pictures.
Exit Exit to Main Menu
Setting Equalizer
1. From Main Menu, navigate to Settings > EQ.
2. Choose Normal, Rock, Pop, Classical, Jazz, Treble or Bass equalizer.
Setting Repeat Mode
From Main Menu, navigate to Settings > PlayMode. Below are the
descriptions.
Normal: All music files will play sequentially once.
Repeat Track: Repeat current file repeatedly.
Repeat All: All music files will play sequentially and continuously.
Shuffle Once: All music files will play randomly once.
Shuffle Repeat: All music files will play randomly and continuously.
Page 8

7
Selecting Different Folder
1. From Main Menu, navigate to Folder.
2. You will see Internal(Flash) and External(MiniSD).
3. Press Play/Pause to open the folder. Press Menu to go back one level.
Press Vol+/Vol- to navigate between files. Press Play/Pause to
play/delete the file.
Note: You cannot play Picture/Video/Text file if it is not on the correct
folder.
Setting A-B Clipping
1. While playing music, press Record/A-B to select A-B Clipping mode. You
will see A->, press Record/A-B to select the end point. The particular
portion will repeat continuously.
2. Press Record/A-B to exit.
Picture Operation
1. From Main Menu, navigate to Images mode. You can view either BMP or
JPG.
2. Press Play/Pause to view the files.
Note: All image files must be put into PHOTO folder.
Video Operation
1. From Main Menu, navigate to Video mode.
2. Press Play/Pause to view the files.
Note: All video files must be put into MVIDEO folder.
Page 9

8
Text Operation
1. From Main Menu, navigate to Text mode.
2. Press Play/Pause to view the files.
Note: All text files must be put into TEXT folder.
Convert video files to SMV
1. Access the CD to locate the file video2smv.exe.
2. Click on “…” found at Input File to select the source audio/video file to
convert.
3. Click on “…” found at Output File to select the desired output path. You
can find the SMV file under this path after conversion completed.
4. Use 128x128 resolution for best viewing. Press Convert to do the
conversion.
Connecting Player to Computer
1. Connect the USB port of the player to the computer using the USB cable
provided.
2. Please take note if you are using Windows® 98 Second Edition, YOU
MUST INSTALL THE DRIVER PROVIDED IN THE INSTALLATION CD-ROM.
For user using Windows® Millenium/2000/XP, your computer will install
the driver automatically.
3. You will be able to locate the player under My Computer > Removable
Disk.
4. Double-click on it to open up. You can drag and drop your music files
here.
Page 10

9
Firmware Upgrade
1. Click on Start > Programs > Sigmatel MSCNMMC > Firmware Download. You
must ensure the player has been connected to the computer USB port.
2. You may download the firmware file from www.shirocorp.com
.
3. Click Start to start upgrading.
4. Once upgrading has been done successfully, the utility will display the
message.
Troubleshooting Guide
1. Why does my Windows® 98 Second Edition cannot detect the player?
Answer: Please install the driver provided on the Installation CD (Optional)
first. Then connect up the player using USB cable to your computer.
2. I couldn’t scan any station using FM?
Answer: Please ensure the earphone is plugged in properly and try again.
3. My player is fully charged but cannot be powered up.
Answer: Please try to reset the player by pressing Reset.
4. How do I know I have inserted the MiniSD card?
Answer: If you insert it properly, the memory size will increase under About.
5. What is the maximum MiniSD card size supported?
Answer: The maximum supported size is 2GB.
Page 11

10
Technical Specifications
Built-In Memory
Up to 2GB
Battery Li-Polymer battery
LCD Resolution 1.5” TFT, 128x128 pixels
Signal Noise Ratio >90dB
Earphone output 10mW+10mW (320ohm)
Music Format SMV, MP3, WMA, WAV
Record Format WAV
JPEG Format JPG, BMP
TEXT Format TXT
MTV Format
Conversion
AVI format file (*.avi), Windows® Media format file
(*.asf and *.wmv), MPEG1 format file (*.mpg and
*.mpeg)
USB 2.0 Full-Speed (Up to 12Mbps)
Created on 17
t
h
August 2006. MY MP3 Digital Audio Player.
Please visit us at www.shirocorp.com
.
Page 12

11
LIMITATION OF LIABILITY AND DAMAGES.
IN NO EVENT WILL MANUFACTURER AND MANUFACTURER’S
RESELLERS (COLLECTIVELY REFERRED TO AS “THE SELLERS”) BE
LIABLE FOR DAMAGES OR LOSS, INCLUDING BUT NOT LIMITED TO
DIRECT, INDIRECT, SPECIAL WILLFUL, PUNITIVE, INCIDENTAL,
EXEMPLARY, OR CONSEQUENTIAL, DAMAGES, DAMAGES FOR LOSS OF
BUSINESS PROFITS, OR DAMAGES FOR LOSS OF BUSINESS OF ANY
CUSTOMER OR ANY THIRD PARTY ARISING OUT OF THE USE OR THE
INABILITY TO USE THE PRODUCT OR THE SOFTWARES, INCLUDING BUT
NOT LIMITED TO THOSE RESULTING FROM DEFECTS IN THE PRODUCT
OR SOFTWARE OR DOCUMENTATION, OR LOSS OR INACCURACY OF
DATA OF ANY KIND, WHETHER BASED ON CONTRACT, TORT OR ANY
OTHER LEGAL THEORY, EVEN IF THE PARTIES HAVE BEEN ADVISED OF
THE POSSIBILITY OF SUCH DAMAGES. BECAUSE SOME STATES DO NOT
ALLOW THE EXCLUSION OR LIMITATION OF LIABLITY FOR DAMAGES,
THE ABOVE LIMITATION MAY NOT APPLY TO THE PARTIES. IN NO
EVENT WILL THE SELLERS’ TOTAL CUMULATIVE LIABLIITY OF EACH
AND EVERY KIND IN RELATION TO THE PRODUCT OR ITS SOFTWRE
EXCEED THE AMOUNT PAID BY CUSTOMER FOR THE PRODUCT.
 Loading...