

Page 1

CX2 MP3 Digital Audio
Player
User Guide
Version 1.0
Page 2

Table of Contents
Notice 3
Operation Buttons 4
Package Includes 4
LCD Information 5
Power On & Off 6
Playing Music 6
Operating in FM TUNER Mode 7
Operating in FM Radio Mode 7
Operating in Voice Record Mode 9
Operating in Voice Playback Mode 10
Using Delete Music (or Voice) Mode 11
Operating in the Settings Mode 12
Using About Mode 13
Connect with the PC 14
Install the WIN98/SE Driver 14
Troubleshooting Guide 15
Technical Specifications 17
2
Page 3

Notice
1. If the player is not used for a long duration, please remove the battery to avoid battery
leakage.
2. Do not use the player in extreme hot, cold, dusty or wet environment.
3. Do not drop the player from great heights.
4. Under normal volume condition, the player can last up to 10 hours on a single AAA
battery. Please take note this battery lifespan will vary depending on the condition
& manufacturer of the battery. Please replace the battery when the battery icon is
5. To avoid static charge on the player, do not use it on extreme dry environment.
or the unit turns off and cannot be powered up at all.
3
Page 4
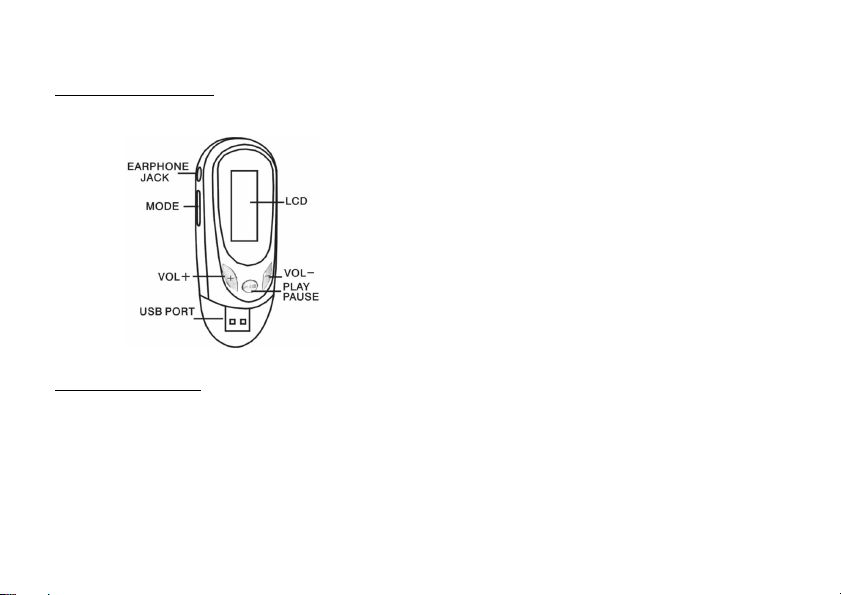
Operation Buttons
Package Includes
• Installation CD
• USB Cable
• Earphone
• User Guide
• AAA Battery
4
Page 5
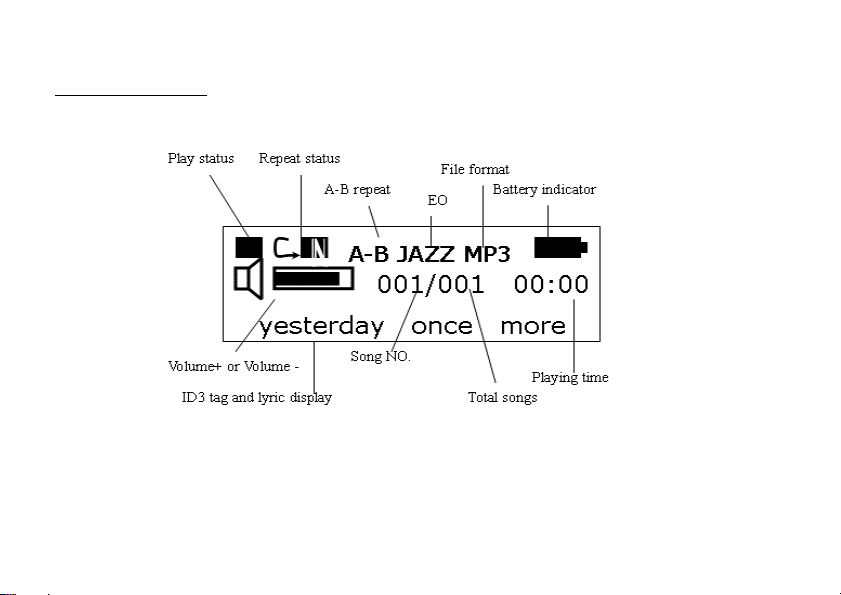
LCD Information
The Play Mode includes Normal, Repeat All, Repeat track, Shuffle Once, Shuffle Repeat, and
Preview.
5
Page 6

Power On & Off
To power on the player, please press and hold the Play/Pause button for about 3 seconds.
To power off the player, please press and hold the Play/Pause button until all the indication on the
LCD disappears.
Playing Music
1. When pressing Play/Pause button, you will see the below picture showing the player in
Music mode.
2. When you press Play/Pause button again, the player will either play or pause the song. It
will show you the current number song played and playing time.
3. Scroll the MODE button forward or backward to select the song, which you want to play.
4. Scroll and hold the MODE button forward or backward to fast forward and fast rewind of
this playing song.
5. While playing music, press PLAY button again to pause the playback.
6. Increase (+) or decrease (-) the volume by pressing the volume control buttons (
,the LCD Screen displays the volume level at the same time.
or +)
6
Page 7

7. While playing, press the MODE button once to select the Point A of the repeat segment, “A-”mark
will show on the screen.
8. Press the MODE button again to select the Point B. ”A-B” mark will show on the screen. The music
will be repeatedly played between Point A and Point B.
9. Press the Mode button for a third time; the segment repeat will be cancelled.
Operating in FM Tuner Mode
1. Press and hold the MODE button for 2 seconds to active the main menu.
2. Scroll the MODE button forward or backward to highlight the FM Tuner menu.
3. Press the MODE button to enter.
4. If you are the first time entering the FM mode, player will automatically scan the
stations in whole the FM band and store the effective stations with sequential channel
No. and its corresponding frequency. When scanning finished, it will return to the RADIO
mode and show CH01 and its corresponding frequency
Operating with FM Radio Mode
In the FM tuner mode, press the MODE button repeatedly until the LCD screen display the Radio
icon.
7
Page 8

1. Scroll the MODE button forward or backward to select the previous channel or the next
channel.
2. Press the
3. Press the
Scan the Channel
button to decrease the volume.
+ button to increase the volume.
1. In the FM tuner mode, press the MODE button repeatedly until the LCD screen display
the Scan icon, press the PLAY button to start scanning.
2. You can select this function to auto scan the stations in whole the FM band and store the
effective stations with sequential channel No. and its frequency. When scanning is
finished, it will return to the Radio Mode.
3.
Note: While scanning, all buttons is not active until the scanning is finished.
Store the Channel
1. In the FM tuner mode, press the MODE button repeatedly until the LCD screen display the
Store mark, press the PLAY button to confirm.
2. After finished storing, it will prompt “Success”. Then it will return to the RADIO mode
automatically.
8
Page 9

Record the FM content
1. In the FM tuner mode, press the MODE button repeatedly until the LCD screen display
the Rec mark, press the PLAY button to start FM content recording.
2. The screen will display the recording file name (e.g. /FM/F002.WAV) and the recording
time and the remaining record time.
3. Pause the recording by press the PLAY button once. And press PLAY button again to
resume recording.
4. Stop the recording by press the MODE button once.
5. You can playback the record file in the Music Mode.
Exit
1. In the FM tuner mode, press the MODE button repeatedly until the LCD screen displays
the Exit icon, then press the PLAY button to confirm exit.
2. Select this submenu to exit to the Music mode
Operating in Voice Record Mode
1. Press and hold the MODE button for 2 seconds to active the main menu.
2. Scroll the MODE button forward or backward to highlight the Record Menu
3. Press MODE button once to start recording.
9
Page 10

4. The screen will display the record file name and the recording time and the remaining
record time.
5. Pause the recording by press the PLAY button once. And press PLAY button again to
resume the recording.
6. Stop the recording by press the MODE button once.
7. Begin playback the record file by press the PLAY button once.
8. After finished recording, active the main menu by pressing the MODE button once to
select other menu or select the Music menu to return to music playback function.
Note: While recording, Only PLAY, Hold and MODE button is active.
Operating in Voice Playback Mode:
1. Press and hold the MODE button for 2 seconds to active the main menu.
2. Scroll the MODE button forward or backward to highlight the “Voice” menu.
3. Press the MODE button to confirm.
4. Scroll MODE button forward or backward to select the record file you want to play.
5. Press PLAY button to start playback.
Note: You can use A-B repeat function same as the operating in the Operating in Music
Mode paragraph.
10
Page 11

Using Delete Music( or Voice) Mode
1. Press and hold the MODE button for 2 seconds to active the main menu.
2. Scroll the MODE button forward or backward to highlight the “Del” menu.
3. Press the MODE button again to enter.
4. Scroll the MODE button forward or backward to highlight the “Delete Music files” or “Delete
voice files” menu.
5. Press the MODE button to active.
6. The LCD screen will display the music (or voice) file name, which will be deleted, a “YES NO”
mark is displaying in the screen at the same time. But if there is no music (or voice) file in the
player, it will have no any action if you press the MODE button. At this time you have to select Exit
menu to exit.
7. Scroll the MODE button forward or backward to select the music (or voice) file that will be deleted.
8. Press the
9. Confirm delete the selected file by selecting the YES prompt and then press PLAY button.
or + button to toggle the YES or NO prompt.
11
Page 12

Operating in the Settings Mode
1. Press and hold the MODE button for 2 seconds to active the main menu.
2. Scroll the MODE button forward or backward to highlight the Settings menu.
3. Press MODE button to active
4. There are 9 sub-menus and corresponding sub-menus in the Settings menu, which are
listed as below:
a. EQ Set7 selection: Natural, Rock, Jazz, Classical, Pop, Soft, DBB.
Scroll the MODE button forward or backward to select the desired option and
press the MODE button to confirm selection.
b. Play Mode 6 selection: Normal, Repeat All, Repeat track, Shuffle Once,
Shuffle Repeat, and Preview.
Scroll the MODE button forward or backward to select the desired option and
press the MODE button to confirm selection.
c. Contrast you can adjust the LCD contrast (darkness) in 10 levels to fit your
satisfied display effect.
Scroll the MODE button forward or backward to increase and press the MODE
button to confirm selection.
d. Backlight Set the backlight continuous lighting time in the range of 0-45
seconds.
Scroll the MODE button forward or backward to decrease or increase, press the
MODE button to confirm selection.
e. Power Set4 selection: DISABLE, 2Min, 10mins, 30mins
12
Page 13

f. Record Set setting the recording parameters.
Scroll the MODE button forward or backward to select the desired option or
press the MODE button to toggle select its sub-option. Use this option to
choose the quality of recording. Higher quality means less recording time. If
select the Exit option, it will return to the Setting Mode menu.
g. LanguageEnglish&GBK, 中文&简体, Spanish, Thailand
Scroll the MODE button forward or backward to select the desired language,
press the MODE to confirm selection.
h. EL ColorYellow, Purple, Red, Cyan, Green, Blue, White, Auto.
Scroll the MODE button forward or backward to select the desired color, press
the MODE button to confirm selection.
i. ExitExit the settings operation menu and return to the Music Mode.
Using About Mode
1. Press and hold the MODE button for 2 seconds to active the main menu.
2. Scroll the MODE button forward or backward to highlight the “About” menu.
3. Press the MODE button to active.
13
Page 14

4. The screen will display as below:
Ver: 2.521
INT: 256MB
FREE: 238MB
The player’s firmware version
The total memory space
The free memory space.
Connect with the PC
1. Use a USB cable to connect the player with the PC.
2. The player will power on automatically. Then a connecting picture will be shown at the
LCD screen of the player.
3. The player function as a removable disk, it can download / upload any files. But when
the player is not connected with the PC, The files which is not the format of MP3/WMA
/WAV will not be shown out in the screen.
4. At this time, you can FORMAT the player like as formatting a hard disk.
Install the Win98/SE Driver
1. Connect the player with the PC USB port directly or by a USB cable.
14
Page 15

2. Win98/SE OS will prompt that it find a new device and will search for its driver, select
the directory to the F:\ Driver For Win98 (F is the letter of CD-ROM drive)
3. Click “Next” and “Next” button to finish the installation.
4. Click “Yes” button to reboot the PC.
Caution:
a) Do not plug the Player while it is downloading file(s). Or it will be harmful to the Player.
b) If the Player doesn’t work properly, try taking out the battery and reinsert the battery
after 3 seconds. If problem persist, try a new battery.
Trouble Shooting:
1. Can not play MP3/WMA files compressed by user own?
Answer: The player just support standard compression mode. So when user compresses MP3/WMA
files. Do select standard compression.
2. How many minutes music can save into the player?
Answer: Different flash has different capability. Usually 1 minute MP3 file is up to 1MB.
3. Can not download files?
Answer: Check whether the USB cable connect with PC and player or not, and
player is power on.
Check if USB driver is installed or not under win98/SE OS.
Check if the player’s memory is full or not.
15
Page 16

Power is too low.
4 I lost the data?
Answer: Data is lost because the voltage is not stabilize when download file. (Strongly advice: user
backup all data, our company will not answer for the data loss)
5 Why do the different music have different volume?
Answer: MP3 music have different volume because parameter different.
6 No display on screen when power on?
Answer: Check Power is too low or not.
Program lost, need to recovery or upgrade the program.
Check if the HOLD switch is Off (*Optional).
16
Page 17

Technical Specifications
d
Built-In Memory 128MB/256MB/512MB/1GB/2GB
Battery 1xAAA Alkaline or Ni-MH
LCD Resolution 128x32 pixels dot-matrix, EL Backlight
Signal Noise Ratio >90dB
Earphone output 5mW+5mW
Music Format MP3, WMA, WAV
Record Format IMPCM, MSPCM, PCM
USB USB2.0, compatible with USB1.1
Created on 22
n
Jan 2007. CX 2 MP3 Digital Audio Player.
Please visit us at www.shirocorp.com
.
17
Page 18

LIMITATION OF LIABILITY AND DAMAGES.
IN NO EVENT WILL MANUFACTURER AND MANUFACTURER’S RESELLERS (COLLECT IVELY REFERRED TO AS “THE SELLERS”)
BE LIABLE FOR DAMAGES OR LOSS, INCLUDING BUT NOT LIMITED TO DIRECT, INDIRECT, SPECIAL WILLFUL, PUNITIVE,
INCIDENTAL, EXEMPLARY, OR CONSEQUENTIAL, DAMAGES, DAMAGES FOR LOSS OF BUSINESS PROF ITS, OR DAMAGES FOR
LOSS OF BUSINESS OF ANY CUSTOMER OR ANY THIRD PARTY ARISING OUT OF THE USE OR THE INABILITY TO USE THE
PRODUCT OR THE SOFTWARES, INCLUDING BUT NOT LIMITED TO THOSE RESU LTING FROM DEFECTS IN THE PRODUCT OR
SOFTWARE OR DOCUMENTATION, OR LOSS OR INACCURACY OF DATA OF ANY KIND, WHETHER BASED ON CONTRACT, TORT
OR ANY OTHER LEGAL THEORY, EVEN IF THE PARTIES HAVE BEEN ADVISED OF THE POSSIBILITY OF SUCH DAMAGES.
BECAUSE SOME STATES DO NOT ALLOW THE EXCLUSION OR LIMITATION OF LIABLITY FOR DAMAGES, THE ABOVE
LIMITATION MAY NOT APPLY TO THE PARTIES. IN NO EVENT WILL THE SELLERS’ TOTAL CUMULATIVE LIABLIITY OF EACH
AND EVERY KIND IN RELATION TO THE PRODUCT OR ITS SOFTWRE EXCEED THE AMOUNT PAID BY CUSTOMER FOR THE
PRODUCT.
18
 Loading...