


13 5x 90 mm 封 面
Baby Monitor Operating Instructions
婴儿监护器简易说明手册
Please read th e user manua l carefully
before you use f or your safe ty and correct
operation, a nd please ke ep it
properly for r eference i n future.
使用前 请仔细 阅读本 说明书
以确保 安全和 正确使 用
并请妥 善保管 以供日 后参考

13 5x 90 mm 内 页
FCC Statement
Thi s equ ipment ha s been test ed an d found to co mply with
the limi ts fo r a Class B dig ital devi ce, p ursuant t o part 15 of
the FCC ru les . Thes e limits ar e des igned to pr ovide
reason abl e protect ion again st ha rmful int erferen ce in a
reside nti al instal lation. T his equip ment gene rat es, uses an d
can radi ate r adio freq uency ene rgy a nd, if not in stalled a nd
used in ac cor dance wit h the instr uct ions, may c ause harm ful
interf ere nce to radi o communi cat ions. How ever, ther e is no
guaran tee t hat inter ference w ill n ot occur in a p articul ar
installatio n. If this equipm ent does cau se harmful interfer ence
to radio or televis ion receptio n, whic h can be determin ed by
turnin g the e quipmen t off an d on, t he user is en courage d to
try to cor rec t the inter ference b y one o r more of the f ollowin g
measur es:
-Reori ent o r relocat e the recei vin g antenna .
-Increa se the sep aration between the equipmen t and rece iver.
-Conne ct th e equipme nt into an ou tle t on a circui t diff ere nt
from tha t to wh ich the rec eiver is co nne cted.
-Consu lt th e dealer or a n experie nce d radio/T V technic ian
for help .
To assu re co ntinued c omplian ce, a ny change s or
modification s not expressly appr oved by the party respon sible
for comp lia nce could v oid the use r’s a uth ority to op erate thi s
equipm ent . (Exampl e- use only s hie lded inte rface cab les
when con nec ting to com puter or pe rip heral dev ices).
Radiation Exposure Sta tement
This dev ice c omplies w ith FCC rad iat ion expos ure limit s
set fort h for a n uncontr olled env iro nment and i t also comp lie s
with Par t 15 of t he FCC RF Rul es.
Operat ion i s subject t o the follo win g two condi tions:
(1) Th is device m ay not caus e har mful inte rferenc e, an d
(2) Th is device m ust accep t any i nterfer ence rece ive d,
includ ing i nterfer ence that m ay ca use undes ired oper ati on.
The c ame ra should b e install ed an d operate d with a
minimu m dis tance of 20 c entimet ers b etween th e radiato r
and your b ody.

13 5x 90 mm 内 页
Caution!
The m anu facture r is not resp ons ible for an y radio or TV
interf ere nce cause d by unauth ori zed modif ication s to th is
equipm ent . Such modi ficatio ns co uld void th e user auth ori ty
to opera te th e equipme nt.
Declaration of Conformity
Hereby, Shinwa In dustrie s(C hina) Ltd . declare s tha t this
device i s in co mplianc e with the es sen tial requ irement s and
other re lev ant provi sions of Di rec tive 1999 /5/EC.
13 5x 90 mm 内 页
WARNING:
The product can not be used as a chil dre n's t oy.
Keep the product out of reach fro m chi ldr en.
The cable may cause potential safety hazard to children.
Use only approved accessori es an d bat ter ies . Do not
connect incompatible prod uct s.
Your d evi ce is n ot water-resistant.keep it dry.
Follow any restrictions. sw itc h the d evi ce off in aircraft,
near medical equipment, fue l, ch emi cal s, or b lasting
areas.
All wireless devices ma y be susceptible to int erference,
which could affe ct pe rfo rma nce.
Power adaptor warning: “Use o nly p rov ide d pow er
adaptor
Caution: Risk of explosion if b att ery i s rep lac ed by an
incorrect type. Dispose of us ed ba tte rie s acc ording to
the instructions
Do not dispose of electrical pr odu cts i n the g ene ral
waste and ensure the used produ ct or b att eri es ar e
disposed safely according t o you r loc al au tho rity and
regulations.
Please do not use the product for i lle gal m oni tor ing or
recording. Our company will n ot un der tak e any r elative
legal liability that caused b y ill ega l use .
13 5x 90 mm 内 页
警 告:
勿将本 产品 作为 儿童玩 具玩 耍。
请保持 一定 距离 或放置 儿童 不易拿 取到 的地 方。
电线可 能会 对儿 童带来 潜在 的安全 隐患 。
本产品 不防 水, 请保持 干燥 。
请遵守 限制 使用 的规定 :在 医院/加油 站/飞机/化 学品 易
燃易爆 品周 围请 保持关 机。
请使用 原装 适配 器和电 池。
废旧电 池的 处理 及产品 报废 处理请 遵守 当地 法律法 规。
请勿将 本品 用于 非法监 控或 录像。 由非 法使 用引发 的法
律问题 ,本 司不 负任何 责任 !
13 5x 90 mm 内 页
Contencs
Camera
Receiver
Power on/off
Register/Logout
Recharge
Installed and remove the bat ter ies
Place/Remove Micro SD card
Operate instruction
摄像端
监控端
如何开 关机
如何注 册/注销
如何充 电
电池如 何安 装拆除
Mic ro S d卡如何 安装 拆除
按键说 明
目 录
01
02
03
03
04
04
04
05
10
11
12
12
12
12
13
13
13 5x 90 mm 内 页
Operating Instructions
Baby Monitor
The care for ch ild ren f rom f ami ly is the most
considerate for every famil y. Shinwa baby monitor is
designed specially for your c hil dre n. It w ill g ive you
unlimited free space and let yo u tak e car e of yo ur
children’s eve ry ac tio n. It s upports the function of video
recording (AVI) , whi ch ca n rec ord children’s every funny
action in their happy growth. I t wil l hel p you r chi ldren
grow-up under your protecti on in a c omf ort abl e
environment without any inf lue nce b y any i nte rference.
2.4GHz wireless digital sig nal t ran smi ssi on, with 2.4”
colorful LCD, portable and sm all , eas y to ca rry ;
Microphone equipped insid e of ca mer a, wh ich h elp you
hear your children’s voi ce, i t can monitor multiple
images simultaneously and p lay m usi c(e.g . lul laby)
by remote control.
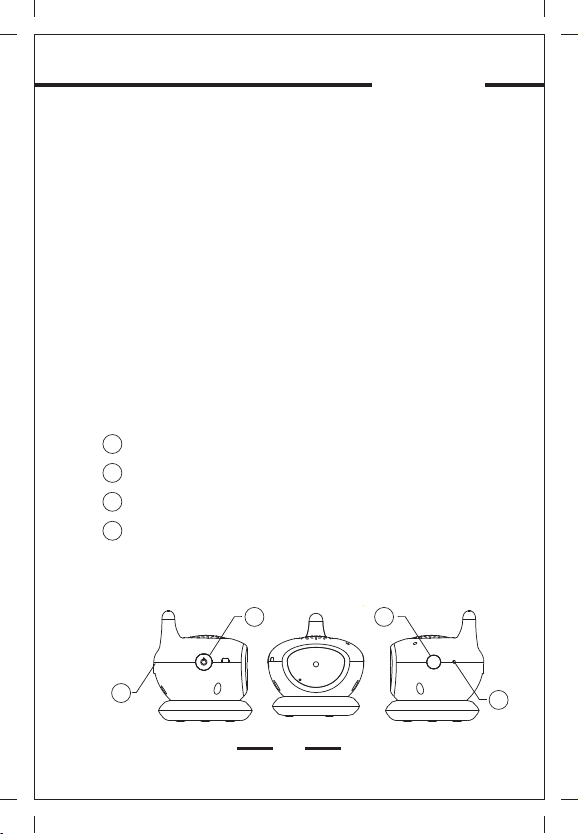
Camera
01
Power Switch
Register
02
USB port
03
04
Reset
0201
03
04
01

13 5x 90 mm 内 页
Operating Instructions
Receiver
01
VOX/Delete
02
Power/ESC
03
Five direction key
(up/down/left/right/O K)
04
Micro SD card slot
(on the underside of the batter y)
USB port
05
Earphone jack
06
07
Reset
01 02
Baby Monitor
07
06
05
04
03
02

13 5x 90 mm 内 页
Operating Instructions
Baby Monitor
Ⅱ. Power on/off
Camera: Press the switch t o pow er ON /OF F. Wh en
the power indicator LED is gree n, the product is ready to
be operated. If the LED doesn’t l igh t ple ase r epl ace the
battery or recharge.
Receiver: Press the Power switch to Power on/off. When
the power indicator LED is blue m ean s the r ece ive r is
now ready to op erate, if not, ple ase replace the batteries
or recharge the receiver. The f irs t tim e to po wer o n, you
should to register the camera to the r ece ive r suc ces sfully.
Video monitoring status:
indication of two-way commu nic ati on:
Intensity of the single
Channel of the camera
A+
Battery capacity of the ca mer a
Battery capacity of the re cei ver
Ⅲ.Register/Logout
Register: Power on the tra nsm itt er an d the r ece iver.
Press “Ok” button of the rec eiv er, c hoo se “s etting” and
then choose “register”. Sel ect t he tr ans mis sion number
and press “OK”, there will be the r egi ste r inf orm ation
from the transmitter cam era . Pre ss “O K” to t urn to the
register position. At the sam e tim e, pr ess t he re gister
key on the transmitter camera a nd hold for seconds. The
register function is activa ted a uto mat ica lly, if the
transmitter camera has been register success, there wil l
be hint on the receiver interfa ce. I f fai led p lea se repeat
this process or check the capac ity o f the b att ery .
Logout: Turn on the transmitt er. P res s “OK ” button of the
03
Ch 1

13 5x 90 mm 内 页
Operating Instructions
receiver, choose “setting ” and c hoo se “l ogo ut” item,
select the number of the camera a nd pr ess “ OK” t o
logout the camera.
Baby Monitor
Ⅳ.Recharge
Recharge through the USB port by two methods as follows:
1. Recharge with a power adapte r plu g.
2. Recharge through a USB cable connected with computer
Method 1 Method 2
Ⅴ.Installed and remove the batte ries
Install: open the receiv er ’s battery com par tme nt on
the rear side. Insert the batte ry, paying attention to
correct polarity. Cl ose t he ba ttery compartment again.
Remove: turn off t he re cei ver. O pen the battery
compartment. Take off the battery. C lose the battery
compartment again.
Ⅵ.Place/Remove Micro SD card
Place: (Receiver side can ext end s tor age w ith
Micro SD card up to 4G.)
Shut down the monitor, open the ba tte ry co ver a nd
remove the battery, th en pu t the M icro SD card face up
into the M icr o SD ca rd sl ot; W hen the card is locked,
you can hear the click.
Remove: Shut down the monitor, o pen t he ba ttery
cover and remove the battery. Then gently press the
Micro SD card, and it will pop up fro m the s lot .
04

13 5x 90 mm 内 页
Operating Instructions
Baby Monitor
Ⅶ.Operate instruction
1.Camera side button instru cti on
Power switch: Power on/o ff, t he in dic ato r LED w ill
light.
Register: Press and hold on can r egi ste r the c ame ra
side with receiver side, when r egi ste rin g the i ndicator
LED will flicker. You can loose the button when it is
registered successfully .
Reset button: Press this b utt on wi ll re set s ystem.
2.Receiver side button inst ruc tio n
Reset button: Reset syst em in a ny ca se wh en pr ess
this button.
The functions of other but ton s are d iff ere nt wh en in
different status. Deta ile d ins tru cti ons a re as follows:
Under the video monitoring st atu s:
(1)Up/Down: Used to change ch ann els b y dif fer ent
sequence. When changed chan nel , it wi ll di spl ay the
number of current channel (CH 1, CH 2, CH 3, CH 4 or 4
images viewing). The receiv er ca n max imu m reg ister 4
cameras at the same time.
Channel changes as below:
4 registered cameras:
3 registered cameras:
2 registered cameras:
1 registered cameras:
Ch1 Ch2 Ch3 Ch 4
Ch1 Ch 2 Ch3
Ch1 Ch2
Ch1 Ch1
05
images
images
images
images

13 5x 90 mm 内 页
Operating Instructions
Baby Monitor
(2)Left/Right: To adjust th e vol ume , and s tat us
displayed with icons.
(3)OK: Only by pressing th is bu tto n can o pen t he me nu,
and the video keep in active stat us wh en th e men u is
opened. The menu will be closed when there is no operation
within 5 seconds or by pressing P owe r/E SC bu tto n.
(4)Power/ESC: Shut down the m enu w hen p res s thi s
button.
(5)Speak/Delete: To open or c los e the
voice transmission from the m oni tor t o the c ame ra.
Under the menu status:
Up/Down: To change channels .
(1)
Left/Right: To move to the l eft a nd ri ght o r cha nge
(2)
the settings.
(3)OK: To select, confir m and e nte r.
(4)Power/ESC: Press th is bu tto n to ca nce l or re turn,
press and hold on for a few seconds t o pow er on o r off .
(5)Speak/Delete: When ope rat ing t he vi deo f iles, it can
be used to delete files; Otherw ise u sed t o ope n or cl ose
the voice transmission.
The menu is active during the per iod o f val idi ty,
and you can operate as follows:
Zoom in/out function: Pr ess t he OK b utt on ca n enter
it. And then use the left/ri ght b utt on to s ele ct on e from 5
different areas of the screen , the n pre ss th e OK bu tton
to execute.
Images move function: Pr ess t he OK b utt on to e nter
it. And then use the left/ri ght /up /do wn bu tto n to move
the image to corresponding di rec tio n. It c an be u sed
06

13 5x 90 mm 内 页
Operating Instructions
Baby Monitor
only when the image is under zoom i n sta tus .
Record function: Press O K but ton t o sta rt or s top
recording, also can press Pow er/ ESC b utt on to s top
recording and exit the menu at th e sam e tim e.
Playback function: Pres s the OK button can ente r the
submenu and display the fi les list, and the list is arrayed
by the found date. Use the Up/Down button to select file,
use the Speak/Delete button t o del ete f ile ; Pre ss the
OK button can play or suspend, pr ess P owe r/E SC
button can return to the video mo nit ori ng in ter face.
Lullaby, press OK button to enter the lullaby interface,
Select the lullaby tracks, th en pr ess O K but ton t o play
the lullaby selected and exit t o the m ain m enu
meanwhile. There is a playing i ndi cat ion o n the l ullaby
menu. Stop playing by pressin g OK button under playing
condition.
System setting functio n: Pr ess O K but ton t o enter,
use Up/Down button to select and then use OK button to
confirm. Press Power/ESC bu tto n can c anc el or r eturn.
System Settings:
Register: Camera register /un reg ist er
Video store location: Micro S D car d or lo cal d isk
PC link: Connect to the PC throug h a USB c abl e, it c an
be used like a USB disk, then your ca n ope rat e the
video files you recorded.
Power saving: Set the auto powe r sav ing t ime .
Language setting: Set the lan gua ge.
Backlight: Set the brightne ss of t he LC D dis pla y.
Voice trigger control : on/of f
07

13 5x 90 mm 内 页
Operating Instructions
Baby Monitor
Movement trigger control: o n/o ff
Camera setting: Set the param ete r for t he ca mer a of
each channel. Such as the brigh tne ss, c ont ras t,
saturation, frame rate and ni ght -vi sio n con trol.
Capacity: View the capacity o f int ern al st ora ge and
external Micro SD card.
Version: View the version of th e sof twa re.
Default: Restore the defaul t set tin gs.
Standby and hibernation mod e:
Enter the hibernation mode: W hen t he hi ber nat ion
time you set in the Power saving mode of system setting,
it will enter the hibernation m ode a uto mat ica lly and
shut down the audio, video and LC D.
Exit the hibernation mode: Wh en pr ess a nyo ne
button of the monitor or the camera side i s warning, it will
exit the hib ernation mo de automaticall y. Then warnin g
can be triggered by voice trigg er fu nct ion o r mov ement
sensitive function.
Voice trigger function
Under working situation of vo ice t rig ger f unc tion, the
receiver will shock when the vo ice r eac h a cer tai n range
that detected by the camera.
Movement trigger function
Under working situation of mo vem ent s ens iti vity
function, the receiver will s hoc k whe n the m ove ment
reach a certain range that dete cte d by th e cam era .
08

13 5x 90 mm 内 页
Operating Instructions
Baby Monitor
Night vision function
In dark surroundings, pictu res c an be v iew ed cl early by
turning on night vision funct ion a uto mat ica lly or manually.
Setting of night vision: unde r set tin g men u, se lect the
camera channel needed, sele ct au to, o n or of f whe n you
see the night vision control ba r.
“auto” means the camera perce ive t he li ght d egr ee
through sensor type and the nig ht vi sio n aut oma tically on or
off when the surrounding is dar k or br igh t.
“on” means on the night vision di rec tly ;
“off” means off the night vi sio n dir ect ly;
09

13 5x 90 mm 内 页
婴儿 监护 器简 易说明 手册
Baby Monitor
每个家 庭都 希望 给予孩 子最 为周 到的 照顾 ,本品 是一 款
专门为 您的 家庭 设计的 既优 秀又可 爱的 幼儿 监护产 品。 她简
化了复 杂的 操作 ,给您 无限 的自由 空间 ,使 您在享 受舒 适生
活的同 时对 孩子 的每一 个行 为都了 如指 掌。 这款产 品支 持录
像功能 ,可 以记 录孩子 们愉 快的成 长过 程。 孩子们 在舒 适的
环境中 不会 受到 任何干 扰, 在您的 保护 下茁 壮成长 。
本品采 用2. 4G Hz无线 数字 信号发射 ;2.4英寸 彩色L CD显 示
屏;体 积小 便于 携带, 摄像 端内设 麦克 风, 随时随 地帮 助您
聆听孩 子的 声音 ;摄像 端和 监控端 可以 独立 使用; 监控 端可
同时监 控4个摄 像端 ;可将 声音 及视频 录制 成AV I格式输 出;
具有双 向通 话功 能,并 可远 程控制 播放 音乐 。
摄像端( CA ME RA)
01
电源键
02
对码键
03
USB接 口
04
复位键
0201
03
04
10

13 5x 90 mm 内 页
婴儿 监护 器简 易说明 手册
监控端( RE CE IVE R)
01
通话键/删 除键
02
POW ER /E SC键
03
五向功 能键(上/下/左/右/ OK键)
04
Mic ro S D卡插 口(位于电 池底 部)
05
USB接 口
06
耳机接 口
07
复位键
01 02
Baby Monitor
07
06
05
04
03
11

13 5x 90 mm 内 页
婴儿 监护 器简 易说明 手册
Baby Monitor
二、如 何开 关机 :
摄像端 :按 电源 键开、 关机 ;开机 成功 红色 指示灯 亮、
若无反 应请 充电 或更换 电池 。
监控端 :长 按电 源键开 、关机;开机后显示视 频主界面,
进入视 频监 控状 态;初 次开 机需要 待摄 像注 册成功 才可
显示监 控画 面。 开机成 功蓝 色指示 灯亮 、若 无反应 请充
电或更 换电 池。
视频监 控状 态:
信号 强度 指示
双向 通话 指示
摄像 端通 道指 示
A+
Ch 1
监控 端电 量指 示
摄像 端电 量指 示
注: 当系 统出 现按键 功能 失效 或死 机时, 可按 复位 键进行 复位 。
三、如 何注 册/注销 :
注册: 在摄 像端 、监控端 开机 状态下,监控端按“OK” 键
打开菜单、进入 “系统设置” 项, 选择“注册”子菜单项,
选择需注册的摄像 端号 ,按“OK”键 弹出注册摄像端信息 ,
再按 “OK”键 确定 进入注册状态 ;此时按住摄 像端的对码
键 , 进 行对 码,注册成 功监 控 端有 提 示成功 , 若失败 可
以 重 复此过 程再试 或确 认电量情 况再试 。
注销: 在监 控端 开机状 态下 ,打开 菜 单、 进 入“系 统 设
置” 项,选择 “注册”子菜单 项,选择需注销的摄像端号,
按“O K”键 弹出注 销摄 像端信息, 再 按“ OK” 键确定执
行注 销。
四、如 何充 电:
摄像端 与监 控端 充电时 从US B接口接 入
方式一 :通 过电 源适配 器充 电
方式二 :通 过US B线连接 电脑 充电
方式 一
方式 二
五、电 池如 何安 装拆除 :
安装: 打开 电池 盖,按 正负 指示放 置电 池, 扣好盖 。
拆除: 关机 ,打 开电池 盖取 出电池 ,扣 好盖 。
12

13 5x 90 mm 内 页
婴儿 监护 器简 易说明 手册
Baby Monitor
六、Mi cr o SD卡 如何安 装拆 除:
安装: 监控 端扩 充存储 可外 接Mic ro S D卡, 目前支 持最
大4G。打 开电 池盖 、取出 电池 、将Mi cr o SD卡 正面插 入
M i c ro S D卡 槽 、 听 到咔 嚓锁住 声音 即可。
拆除: 打开 电池 盖、取 出电 池、轻压Mi cr o SD会 从卡槽
中弹 出、 即可 将Mic ro S D卡从Mi cr o SD卡 槽取出 。
七、按 键说 明
(一) 、摄 像端 按键说 明:
电源键 :开 、关 机,开 机成 功有电 源指 示灯 亮。
对码键 :按 住此 键启动 对码 、对码 过程 中绿 色 指示灯 闪
烁、对 码成 功即 可松开 。
复位键 :系 统复 位。
(二) 、监 控端 按键操 作说 明:
复位键 :系 统复 位,任 何状 态下都 可对 系统 进行复 位处
理。其 余键 的功 能依据 所处 状态 情况 ,功能定义 有区别 ,
具体说 明如 下:
在视频 监控 状态 下
1、上、 下键 :用 于 切 换 通 道 ,向上 或 向 下 顺序切 换 通道。
切换 通 道之 后, 显示当 前通 道号(C h1或Ch 2或Ch 3或C h4
或四 画面显 示) 本品监控端 最大支持同时注册4个摄像端。
上键切 换通 道举 例:
如果有 四个 摄像 端:Ch 1 Ch 2 Ch3 C h4
如果只 注册 三个 摄像端 :Ch 1 Ch2 C h3
如果只 有一 个摄 像端:C h1 四 画面 Ch 1
2、左、 右键 :用 于调节 音量 ,有音 量增 、减 图标显 示。
3、OK键: 按此 键弹 出菜单 ,其 它任何情况下都不 出 菜 单 。
菜单出 现的时候,图 像保持 活动 状态。5秒 没有 操作 菜单
会自动 消隐 或短 按POW ER /ES C键关 闭菜单。菜 单有效期间
本机处 于菜 单状 态。
4、POW ER /E SC键: 短按 此键关 闭菜 单,长按 开、关 机
5、通话 键/删除 键: 用于启 动、 关闭监 控端 往摄 像端通 话
四画面
四画面
13

13 5x 90 mm 内 页
婴儿 监护 器简 易说明 手册
在菜单 状态 下
1、上、 下键 :用 于移动 选择 菜单项 。
2、左、 右键 :用 于向左 、向 右移动 或改 变设 置值。
3、OK键: 用于 选择 确认执 行。
4、POW ER /E SC键: 短按 此键用 于取 消或 返回功 能。
5、通话 键/删除 键, 在操作视 频文件时可做删除功能,其
它用于 启动 关闭 通话。
Baby Monitor
菜单有 效期 间本 机处于 菜单 状态, 界面 的菜 单功能 操作 说明:
:放大 功能 ,按O K键进入 后使 用左、 右键 顺序 选
择监控 画面 区域 (五个 区域 ),OK键 执行 放大 。
:平移 功能,按OK键进 入后上、下、左、右键移动图像。
(监控画 面放 大后,此 菜单才 有效)
:录像 功能 ,按O K键启动 录像 、暂停 录像 ;也 可按
POW ER /E SC
键停止 同时 消隐 菜单。
:回放 功能 ,按O K键进入 播放子界面,显示文件列表。
上、下 键选 择文 件,文 件按 新 到 旧排列 。 按通话键/删除
键可删 除选中 的文 件。OK键为播放或者暂停,POWER/ ES C
键退出 ,回 到视 频监控 界面 。
:睡眠 曲, 按OK键进入,选择 睡眠曲目再按OK键启动睡
眠曲 播放同时退回到主菜单,并且睡眠曲菜单上有播放标识。
当 在播 放状态下按O K键可控 制播 放停止 。
:系统 设置 ,按O K键进入 ,上 、下键 选择 ,OK键确 认
执行;P OW ER /ES C键取 消或退 回。
系统设 置项 有:
注册: 摄像 端注 册/注销
存储位 置设 置: 本机或 者Mi cro S D卡。
连接电 脑: 先用U SB线连 接好 电脑, 再执 行此 功能。 相
当于U盘, 可操 作录 制的视 频文 件
节电模 式:
语言设 置
背光(L CD亮 度调 节)
声控控 制: 开/关
动作识 别控 制: 开/关
14

13 5x 90 mm 内 页
婴儿 监护 器简 易说明 手册
Baby Monitor
摄像头 设置 :设 置各通 道的 摄像头 参数 (亮 度/对比 度/
饱和度/帧 率/红外 夜视 控制)
容量显 示: 包括 本机容 量与 扩展Mi cr o SD卡 容量信 息
版本信 息: 包括 监控端 、摄 像端与 厂家 信息
恢复出 厂设 置
待机/休眠 状态
休眠进 入: 系统 设置中 的节 电时间 到达 休眠 时间后 ,进
入休 眠状 态,会 关闭 音视频 ,关 闭LC D。
休眠退 出: 发射 端报警 或按 监控端 的任 意键 ;报警 是由
于声控 或动 作识 别的功 能引 发。
声控功 能
在监控 端声 控打 开的情 况下 ,当摄 像端 检 测 到 声音达到
一 定 幅 度时,监 控端 会有 震动提 示。
动作识 别功 能
在监控 端动 作识 别打开 的情 况下, 当摄 像端 检测到 有动
作时, 动作 达到一 定程 度,监 控端 会有 震动提 示。
夜视功 能
当环境 光较 暗时 ,可自 动或 人为手 动开 启红 外夜视 ,让
视频清 晰可 见。
夜视功 能设 置: 在设置 菜单 下,进 入到 摄像 头控制 子菜
单项, 选择 需控 制的摄 像头 通道, 可看 到红 外开关 控制
栏,可 设置 成自 动、开 或关 。
“自动 ”就 是摄 像端通 过感 光器件 感知 环境 光亮程 度,
光线较 暗时 自动 开启或 光线 亮时关 闭红 外夜 视;
“开” 就是 直接 控制红 外夜 视开启 ;
“关” 就是 直接 控制红 外夜 视关闭 。
15

13 5x 90 mm 封 底
ab no rm al c on di ti on so lu ti on
1
not avai labl e after
2
Re ce iv in g di st an ce
3
4
can not he ar the v oice
5
6
7
can not po wer on
video in terf ace
power on
sh or te ne d
squeal ing du ring
workin g
from the c amer a
Micro SD c ard
nonrec ogni tion
system h alte d
1, pl ea se r ec ha rg e, s wi tc h on a ft er
ch ar ge d.
2, ch ec k th e re se t bu tt on
1,make s ure th e camera ha s enou gh
power an d corr ectly reg iste red
2,swit ch to th e registe red ca mera
channe l or reg ister the c amer a with t he
existi ng cha nnel
1, supply po wer by a dapter or recharge
2, reselec t posi tion of the r ecei ver an d
camera .
3,keep a way fr om other el ectr ical
equipm ents .
Enlarg e the di stance be twee n the
camera a nd rec eiver
1,turn u p the vo lume of rec eive r
2,exit p layi ng “lullab y”
Use branded SD card that less than 4GMicro
Please p ress t he reset bu tton
异常 情况
1
2
3
4
5
6
7
无法 开机
开机 看不 到视 频界 面
接收 距离 变短
工作 中出 现啸 叫
听不 到摄 像头 端的 声音
Micro SD卡不识别
意外 死机
解决 办法
1、请充电,电量足再开 机
2、检查复位键
1、确 保摄 像头 有电 ,并 正确 注册
2、切 换到 已注 册摄 像头 的通 道, 或者 在
此通 道上 注册 摄像 头
1、使 用适 配器 供电 或充 电
2、重 新选 择监 控端 和摄 像端 位置
3、尽 量远 离其 它电 器
加大 监控 端、 摄像 端之 间的 距离
1、主 机声 音调 大
2、退 出“ 催眠 曲” 播放
建议 使用4 G以内 的正 规品 牌 SD卡Micro
请按 复位 键复 位
 Loading...