

Page 1
FGE Series
Digital Force Gauges
Models FGE-0.5 — FGE-100
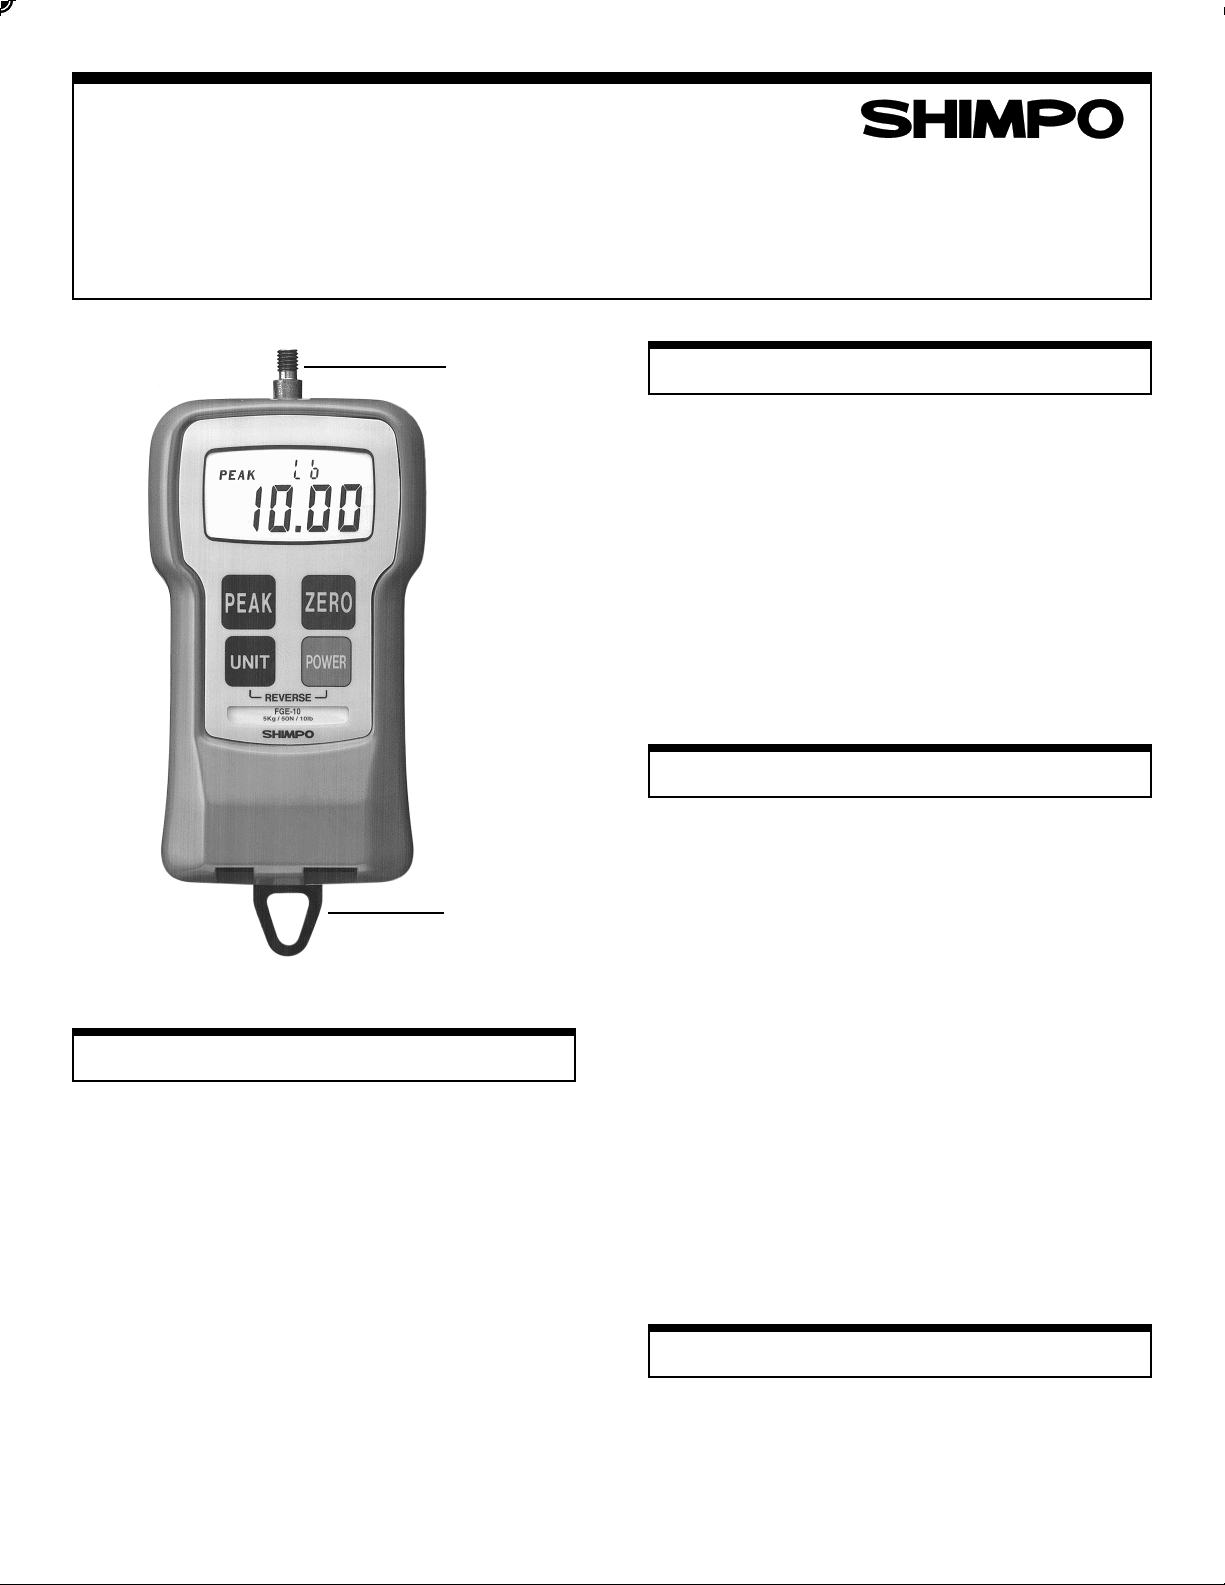
SHAFT
Instruction Manual
Precautions
Do not use the gauge in hostile environments:
A.High humidity areas
B. High temperature environments
(see specifications table)
C. Caustic areas where various chemicals can seep into the
unit.
When not in use, place gauge back in its case to prevent any
damage due to accidental drop etc. With a little care you can
have an instrument that can last and provide service for
many year s.
Operation
HANGER
General Information
You have just received the world's most rugged and economical force gauge. For the price of a mechanical gauge you
have all the advantages of a small digital instrument ergo-
nomically designed to fit perfectly in the palm of your hand.
With the touch of a button you can measure force in any
engineering units desired (lbs, kgs and N).
The unit's microprocessor enables it to measure forces very
accurately in the "average" or "peak" mode. Its LCD display
is smartly designed to inform the operator at all times of ex-
actly what's going on.
If the hanger is used or the gauge is placed on a test stand,
reversing the display so that it can be read right-side-up is
simple: press only two buttons and the digits and units indi-
cators reverse themselves instantly .
When the carrying case is opened make sure you have all the
accessories that came with the instrument; namely adapter/
charger, hook, flat head, and hanger.
1. Charge the batteries for approx. 12 hrs. before using the
gauge. (batteries come dischar ged from the factory) When
batteries are charging the BAT indicator is ON. When the
batteries are fully charged the indicator goes OFF.
2. Hand tighten appropriate attachment to unit's measuring
shaft (do not use a wrench or any other device to tighten
the attachment).
3. Press the POWER switch and release. On the release of
the switch the display will momentarily show all 8's (digit
segment self-check) and then will show some zeros with
the last one or two digits changing to some random num-
bers. Also the unit of measurement (lbs, kgs or N) will
appear above the digits and stay as long as the instrument
is on.
Change Display Units
To change the display units, just press the UNIT button and
the units will change every time this particular button is
pressed.
1
Page 2

Reverse the Display
Low Battery
If unit is used with the hanger or mounted on a test stand and
the display must be reversed, follow this procedure:
1. Press the POWER switch and hold it; display will go
blank.
2. Press and hold UNIT switch.
3. Release POWER switch while you are still holding the
UNIT switch; display is still blank.
4. Press the POWER switch once more and release it while
still holding the UNIT switch. At this point you should
see the display reversed.
5. Release the UNIT switch; the display stays in that mode.
If you want to go back to the normal mode, just repeat steps
1 through 5.
Select Average or Peak
If you want to measure force in real time (average) the display will show only the digits and units of the force being
measured. If you want to measure "peak" force:
1. Press the PEAK button; the word PEAK will appear in
the upper left corner of the display .
2. The display will freeze after capturing the peak force.
3. Press ZERO to cancel previous peak and continue with
your tests.
If you want to go back to average mode press the PEAK
button again and the word PEAK will disappear from the
display.
NOTE: It is very important that you measure forces (tension or compression) that are in line with the measuring shaft
and not at any angle (see fig. 1). Failure to observe this directive will damage the instrument. Also, after the gauge is
positioned and ready to take a measurement (with the proper
attachment in place) tare the unit by pressing the ZERO
switch. In the PEAK mode to clear the display for another
measurement, press the ZERO switch.
When the battery charge starts to get low, a LO BAT sign
appears in the upper left corner of the display . At this point,
if necessary, the adapter/charger can be used to power the
unit indefinitely . With the power off it takes approx. 12 hrs.
to fully char ge. When the battery is fully charged the adapter/
charger cuts off completely to protect the battery .
Auto Power Off
If the power on the gauge is turned on and there is no
activity for 10 minutes, the power is automatically cut-of f
to conserve battery charge. One minute before cut-of f, the
sign PWR appears above the display digits to remind the
operator that there is 1 minute left before power cut-of f . I f
the adapter/charger is powering the gauge, the Auto Power
Cut-Off function becomes inactive.
Tracking Function
A tracking function has been introduced to check and
compensate for temperature drift. When measuring very
minute forces (a few oz.) and at a very slow rate, you may
want to turn off the tracking function. T o turn the tracking
function on or off, follow the steps below:
1. Turn POWER off.
2. Press PEAK and UNIT switches simultaneously and
hold these until step 3 is complete.
3. Press POWER switch and release it to turn the power
on. If tracking function was on, the display will show
TRK OFF momentarily .
4. Release buttons PEAK & UNIT . The tracking function
is now of f. Repeat above steps to turn it on. It is a good
idea to have this function on all the time unless it is
absolutely necessary to cancel it.
Measure Tension
To measure tensile force use the hook attachment. The display will show the force measured and a minus sign (-) will
appear on the left of the display (right next to the digits).
Measure Compression
To measure compression force use the flat head attachment.
No sign will appear on the left of the display during a com-
pression measurement.
2
Fig. 1
Page 3

Specifications
SLEDOM5.0-EGF1-EGF2-EGF5-EGF01-EGF02-EGF05-EGF001-EGF
YTICAPAC
NOITULOSER
YCARUCCA )C°32(F°37tatigid2/1sulpSF%2.0±
YALPSID .noisnetrofngissuniM.nottubafohsupaybelbisreveR.hgihmm21,DCLtigiD-4
EDOMKAEP/EGAREVA )elbatceles(seY
YRETTABWOL
NOITACIDNI
ETADPUYALPSID dnoces3.0
ETARGNILPMAS dnocesrepsemit53
DAOLREVO SFfo%002
REWOP regrahc/retpadahguorhtCAroseirettabdaC-iNelbaegrahceR
TUPTUO oN
FFOREWOPOTUA )esunisiregrahc/retpadafievitcatoN(seY
EGRAHCYRETTAB degrahcyllufnehw.srh02
EMITEGRAHCER .xorppa.srh21
ERUTAREPMET )C°04-0(F°401-23
SNOISNEMID mm)83x57x031(H"5.1xW"9.2xL"1.5
THGIEW )g054(bl1
SEIROSSECCA
)DEDULCNI(
ELBALIAVASEIROSSECCA sdnatstseT
zo8
g002
N2
bl10.0
gK100.0
N10.0
seY
zo61
g005
N5
bl10.0
gK100.0
N10.0
bl2
g0001
N01
bl100.0
g1
N10.0
bl5
gK2
N02
bl100.0
gK100.0
N10.0
bl01
gK5
N05
bl10.0
gK100.0
N10.0
bl02
gK01
N001
bl10.0
gK10.0
N1.0
dornoisnetxednadaehenoc,regnah,daehdehcton,daehtalf,lesihc,kooh,esacgniyrrac,regrahc/retpadaCA
bl05
gK02
N002
bl10.0
gK10.0
N1.0
bl001
gK05
N005
bl1.0
gK10.0
N1.0
Dimensions
3
Page 4

Calibration
Frequent calibration is necessary to insure the accuracy of
your force gauge.
Required for Calibration:
1. A secure calibration stand to mount a force gauge upsidedown.
2. The appropriate calibration weight for your force gauge:
MODEL WEIGHT
FGE-0.5 200g
FGE-1 500g
FGE-2 1Kg
FGE-5 2Kg
MODEL WEIGHT
FGE-10 5Kg
FGE-20 10Kg
FGE-50 20Kg
FGE-100 50Kg
Calibration Procedure:
1. Turn POWER off.
2. Mount the force gauge upside-down on the calibration stand.
3. Attach the hook on the sensing shaft of the force gauge.
4. Press and hold the UNIT, PEAK and ZERO switches.
5. Press and release the POWER switch (while continuing to
press UNIT, PEAK and ZERO) until the smaller characters at
the top area of the display show CAL. Release the UNIT,
PEAK and ZERO switches. The force gauge is now in calibration mode.
6. Press the UNIT switch. The display will show ZER. The
force gauge is now ready for zero point calibration.
7. Press ZERO to zero point calibrate. Wait 5 seconds. The
display will change to show PEK. Do not press any other
switches or move the sensing shaft during calibration.
8. Hang the calibration weight on the hook and stabilize; the
larger characters on the display will change. The force gauge
is now ready for full scale calibration.
9. Press the PEAK switch to begin full scale calibration. Do not
press any other keys or touch the weight during calibration.
After approximately 5 seconds the display will show END.
10. Press the UNIT switch. If calibration was successful, the dis-
play will show OK momentarily, then automatically power
off. If calibration was unsuccessful, the display will show
ERR. Remove the calibration weight and repeat the procedure from step 6.
!!!!!!!!!!!!!!!!!!!!!!!!!!!!!!!!!!!!!!!!!!!!!!!!!!
!!!!!!!!!!!!!!!!!!!!!!!!
SHIMPO ONE-SHIMPO ONE-
SHIMPO ONE-
SHIMPO ONE-SHIMPO ONE-
LIMITED EXPRESLIMITED EXPRES
LIMITED EXPRES
LIMITED EXPRESLIMITED EXPRES
original purchaser of new products only, that this product shall be free
from defects in workmanship and materials under normal use and proper
maintenance for one year from the date of original purchase. This
warranty shall not be effective if the product has been subject to overload,
misuse, negligence, or accident, or if the product has been repaired or
altered outside of Shimpo Instruments’s authorized control in any respect
which in Shimpo Instr uments’s judgment, adversely affects its condition
or operation.
DISCLDISCL
AIMER OF ALL OTHER WAIMER OF ALL OTHER W
DISCL
AIMER OF ALL OTHER W
DISCLDISCL
AIMER OF ALL OTHER WAIMER OF ALL OTHER W
constitutes the SOLE AND EX CLUSIVE WARR ANTY, and Shimpo Instruments
hereby disclaims all other warranties, expressed, statutor y or implied,
applicable to the product, including, but not limited to all implied warranties
of merchantability and fitness.
LIMITLIMIT
AA
TION OF REMEDTION OF REMED
LIMIT
A
TION OF REMED
LIMITLIMIT
AA
TION OF REMEDTION OF REMED
OBLIGATION SHALL BE TO REPAIR OR REPLACE the defective product or
part, at Shimpo Instruments’s option. Shimpo Instruments reserves the
S WS W
ARRARR
ANTYANTY
S W
S WS W
ARR
ARRARR
::
ANTY
: Shimpo Instruments warrants, to the
ANTYANTY
::
ARRARR
ANTIES:ANTIES:
ARR
ANTIES: The foregoing warranty
ARRARR
ANTIES:ANTIES:
YY
::
Y
: Under this warranty, Shimpo Instruments’s SOLE
YY
::
YEAR WYEAR W
YEAR W
YEAR WYEAR W
right to satisfy war ranty obligation in full by reimbursing Buyer for all payments made to Shimpo Instruments, whereupon, title shall pass to Shimpo
Instruments upon acceptance of return goods. To obtain warranty service, Purchaser must obtain Shimpo Instrument’s authorization before returning the product, properly repackaged, freight pre-paid to Shimpo In-
struments.
INDEMNIFICAINDEMNIFICA
INDEMNIFICA
INDEMNIFICAINDEMNIFICA
nify and hold Shimpo Instruments harmless from and against all claims
and damages imposed upon or incurred arising, directly or indirectly, from
Buyer’s failure to perf orm or satisfy any of the terms described herein. In
no event shall Shimpo Instruments be liable for injuries of any nature involving the product, including incidental or consequential damages to per-
son or property, any economic loss or loss of use.
MERGER CLMERGER CL
MERGER CL
MERGER CLMERGER CL
not constitute warranties except to the extent that they also appear in writing. This writing constitutes the entire and final expression of the parties’
agreement.
ARRANTYARRANTY
ARRANTY
ARRANTYARRANTY
TION & LIMITTION & LIMIT
TION & LIMIT
TION & LIMITTION & LIMIT
AA
USE:USE:
A
USE: Any statements made by the Seller’s representative do
AA
USE:USE:
AA
TION OF DAMAGES:TION OF DAMAGES:
A
TION OF DAMAGES: Buyer agrees to indem-
AA
TION OF DAMAGES:TION OF DAMAGES:
!!!!!!!!!!!!!!!!!!!!!!!!
!!!!!!!!!!!!!!!!!!!!!!!!!!!!!!!!!!!!!!!!!!!!!!!!!!
SHIMPO INSTRUMENTS 1701 Glenlake Avenue, Itasca, IL 60143 USA "
#
(630) 924-7138 FAX (630) 924-0342
4
 Loading...