Shimpo DT-2100 Instruction Manual
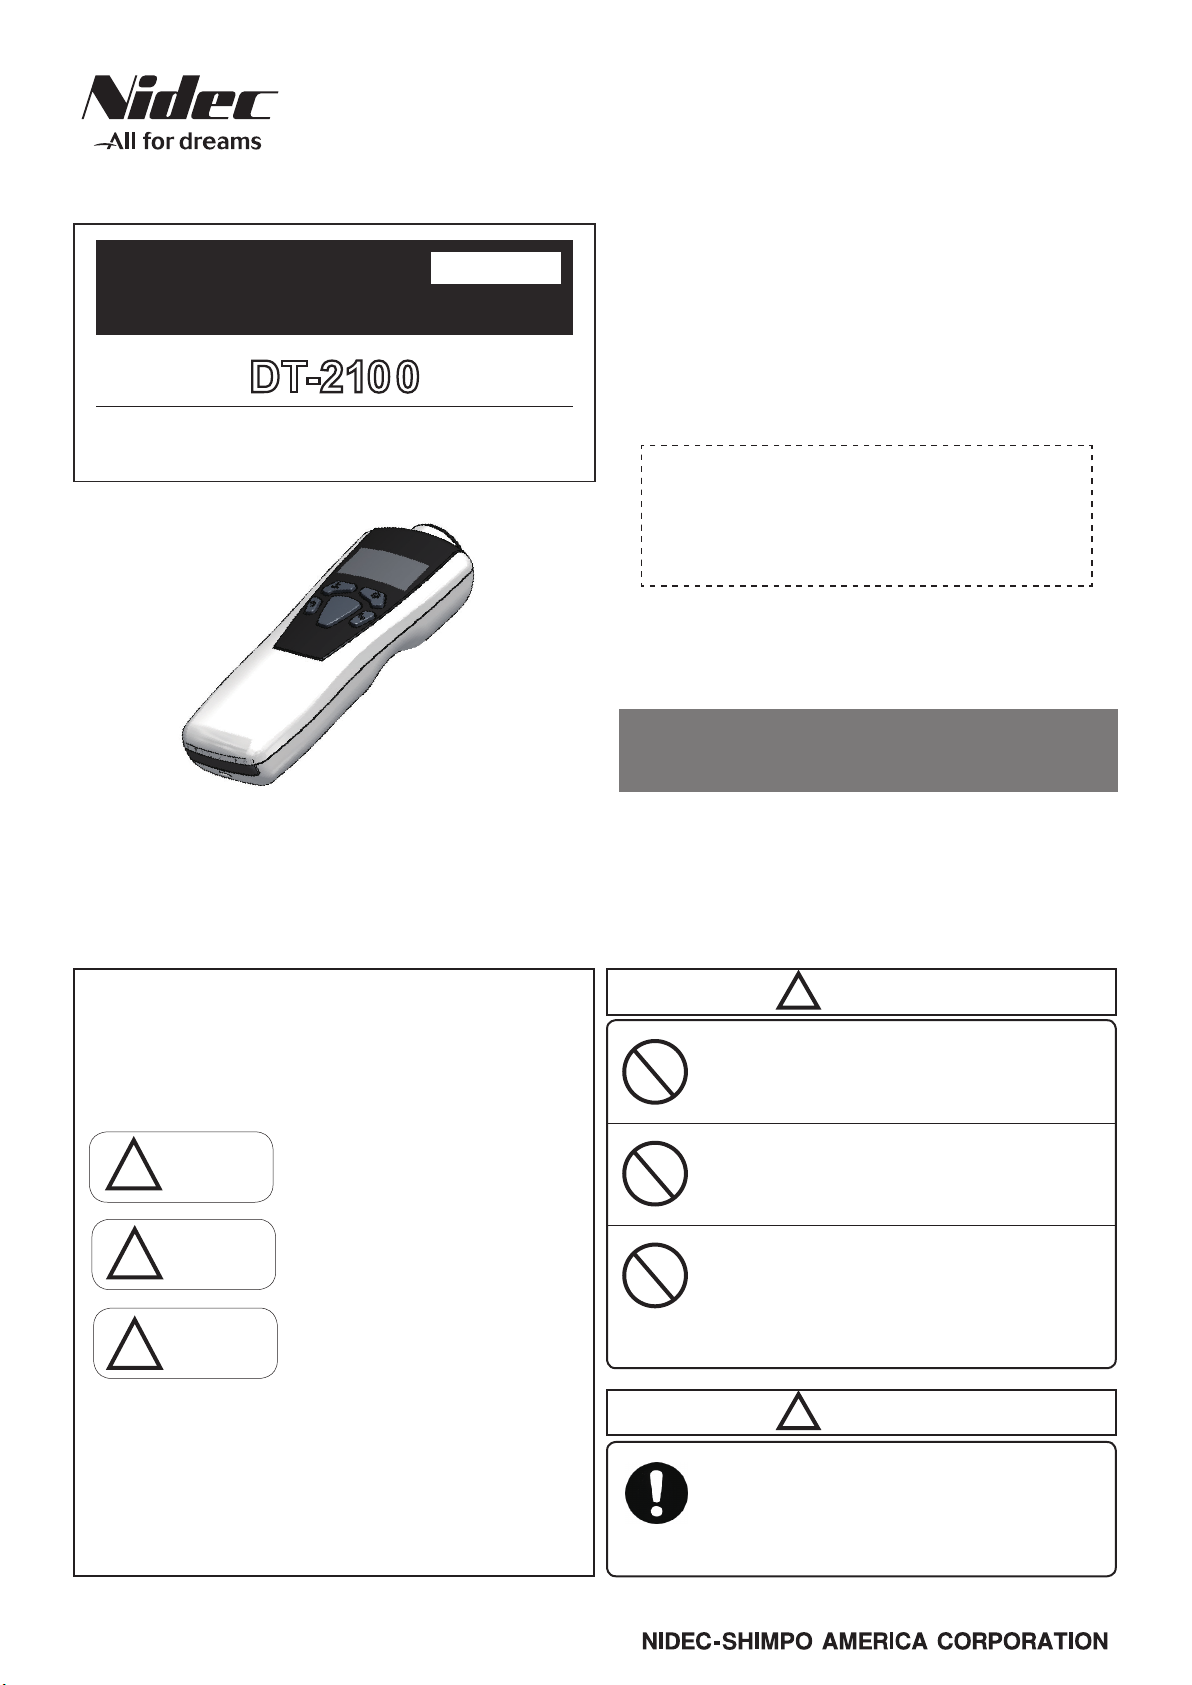
●Enables measurement of a rotating body at a distance using integral
laser beam
Handheld Digital Tachometer
with Dual Non-Contact, Contact Operation
DT-2100
Non-contact type
●Maximum of 1000 data point storage
●The organic light emitting display (OLED) allows enhanced viewing,
even in dark locations
●Selectable meter or graphic display modes
●High accuracy measurement capability of +/-0.006%
●PC communication through USB with available software
99265C
Instruction Manual
Thank you for purchasing Nidec-Shimpo's Handheld High-Performance Digital
Tachometer DT-2100. For instructions on how to use this product properly and
optimally for a long period of time, please be sure to read this manual thoroughly
before use.
Safety Requirements
Be sure to observe
Before operation, maintenance and inspection, please carefully read this instruction manual
and follow it for proper use. Start using only after you have read about the equipment’s func
tions, safety information and precautions.
This instruction manual provides three grades of safety warnings: "Danger", "Warning" and
"Caution". Each of them is an important description related to safety. Be sure to follow them.
Non-contact type digital tachometers are used to perform
measurement by applying the supplied reflection tape
to the rotating body of the object to be measured, and
projecting the laser beam (red) to the tape. In addition, they
can be used for contact type measurement by attaching the
supplied contact adapter.
■Inspection result certicate
We skip issuance of the inspection result certicate for this product. However, at the
time of factory shipment total shipment inspection has been completed, and we have
strictly conrmed that there is no error in measurement accuracy and operation.Your
understanding is appreciated.
Before operation, maintenance and inspection, please
carefully read this instruction manual and follow it for
proper use.
After carefully reading this manual, be sure to store it in a safe
and convenient place for easy reference.
-
・
・
・
!
Do not look into the laser beam
Do not point the laser beam at people
Do not allow usage by children
Warning
This indicates the possibility of re, severe injury,
Danger
!
Warning
!
Caution
!
●Limited Warranty
We are not responsible for damages resulting from negligence through failure to follow the
・
instructions set out in this manual.
We are not responsible for damages resulting from earthquake and/or re unrelated to us,
・
actions by third parties, or any other accidents, intentional or through customer negligence,
as well as from accidents caused by misuse or improper use under abnormal conditions.
For information regarding assurance provisions, please read the attached warranty certi
・
cate.
and even death if a user disregards the instruction
and operates the unit improperly.
This indicates the possibility of severe injuries if a
user operates the unit improperly.
This indicates the possibility of minor injury or
damage if a user operates the unit improperly.
www.nidec-shimpo.co.jp
Do not contact the laser beam irradiation port with a rotating body
If the unit comes into contact with a rotating body,
damage may result to the laser.
Do not measure using wet or oily
hands, or with loosely tted clothing.
If hands slip during measurement, ngers or part of the
hand may get caught in the rotating equipment.
!
Caution
Be careful around installed reective
tape.
-
The reection tape may come loose during high-speed
rotation.

INDEX
1. Part Names and Functions 2
2. Measurement Method 4
3. Measurement Display Description 6
4. Graph Display 8
5. Memory Function 9
5-1. Memory mode details 9
5-2.
Memory registration in the memory group
6. Various Settings 11
6-1. Contents selection 11
6-2. Memory data display 11
6-3. User settings 15
6-4. System settings 22
7. Battery Replacement 34
8. Dimensional Drawing 34
9. Specications 35
10
1
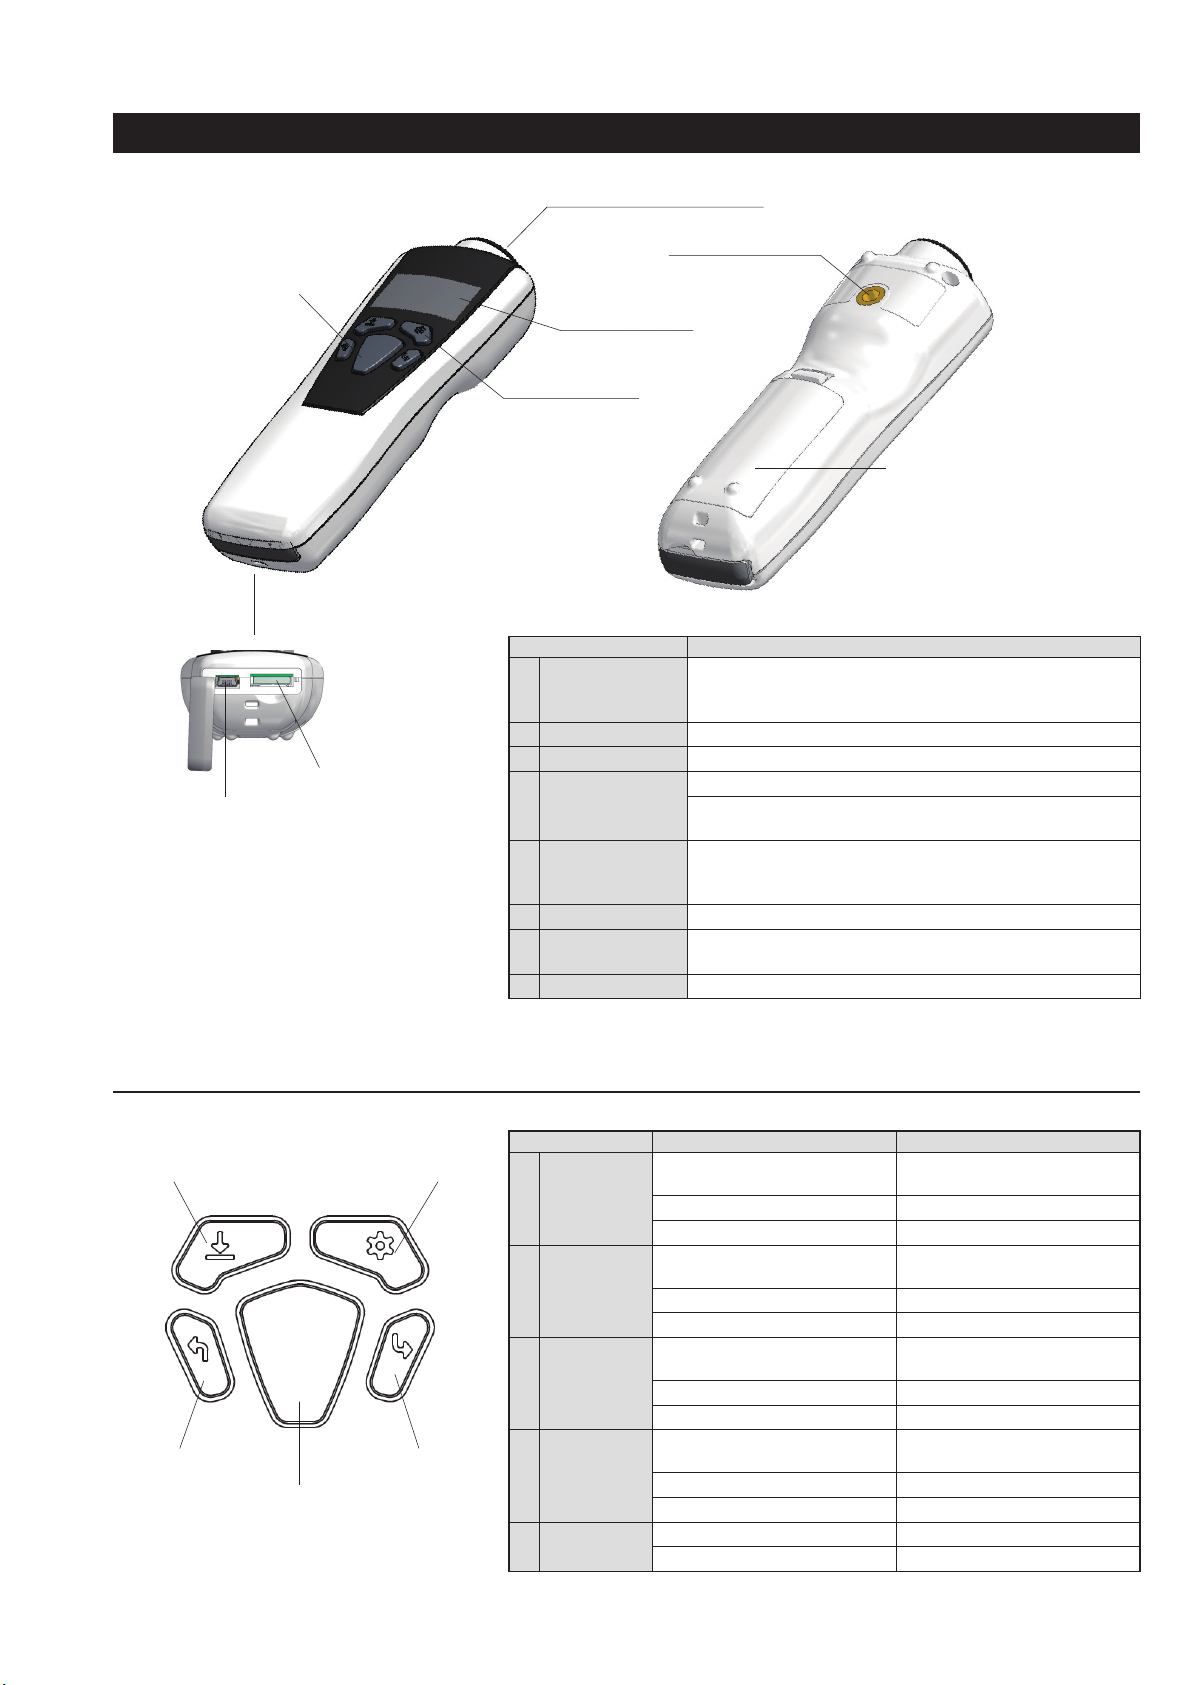
1. Part Names and Functions
(4) Power/Measurement key
(6) Connector
(5) USB connector
(1) Laser beam irradiation port
(7) Mounting Adapter
(2) Display screen
(3) Operation keys
Parts name Functions
(1) Laser beam
irradiation port
Apply the reection tape to the rotating body of the object to be
measured. Project the laser beam (red) to the tape and measure
the rotation speed.
(2) Display screen
Operation keys 1 to 4
(3)
(4) Power/
Measurement key
Displays the measurement value.
Used to change setting or store memory data.
Press this key to turn the power ON.
The power will be turned OFF when no operation has been
performed for a certain period of time. (Auto off function)
(5) USB connector
Power can be supplied through the USB connector.
Also, connecting the unit to a PC enables communications using
using the available software. (Sold separately)
(6) Connector
(7) Mounting Adapter
For internal production usage only
Allows unit to be mounted with its x/x ? threaded connection on
tripod
Battery Compartment
(8)
Uses two AA dry cell batteries
(8) Battery Compartment
■Operation keys and power/measurement key details
Parts name Mode Function
Operation key 1
(1) Operation key 1
(4) Operation key 4
(5) Power/Measurement key
(2) Operation key 2
(3) Operation key 3
(1)
Operation key 2
(2)
Operation key 3
(3)
Operation key 4
(4)
Power/
(5)
Measurement key
2
・
Measurement mode (measurement
standby, during measurement)
・
Set mode Used to select the item.
・
Memory data display mode Used to select the item.
・
Measurement mode (measurement
standby, during measurement)
・
Set mode Used to select the item.
・
Memory data display mode Used to select the item.
・
Measurement mode (measurement
standby, during measurement)
・
Set mode Used as the enter key.
・
Memory data display mode Used as the enter key.
・
Measurement mode (measurement
standby, during measurement)
・
Set mode Used as the cancel key.
・
Memory data display mode Used as the cancel key.
・
When the power is OFF Used to turn the power ON.
・ zz
Measurement mode Used to perform measurement.
Used to store the memory data.
Used to display memory data,
and congure various settings.
Used to switch the measurement
display.
Used to return the measurement
display to the normal display.
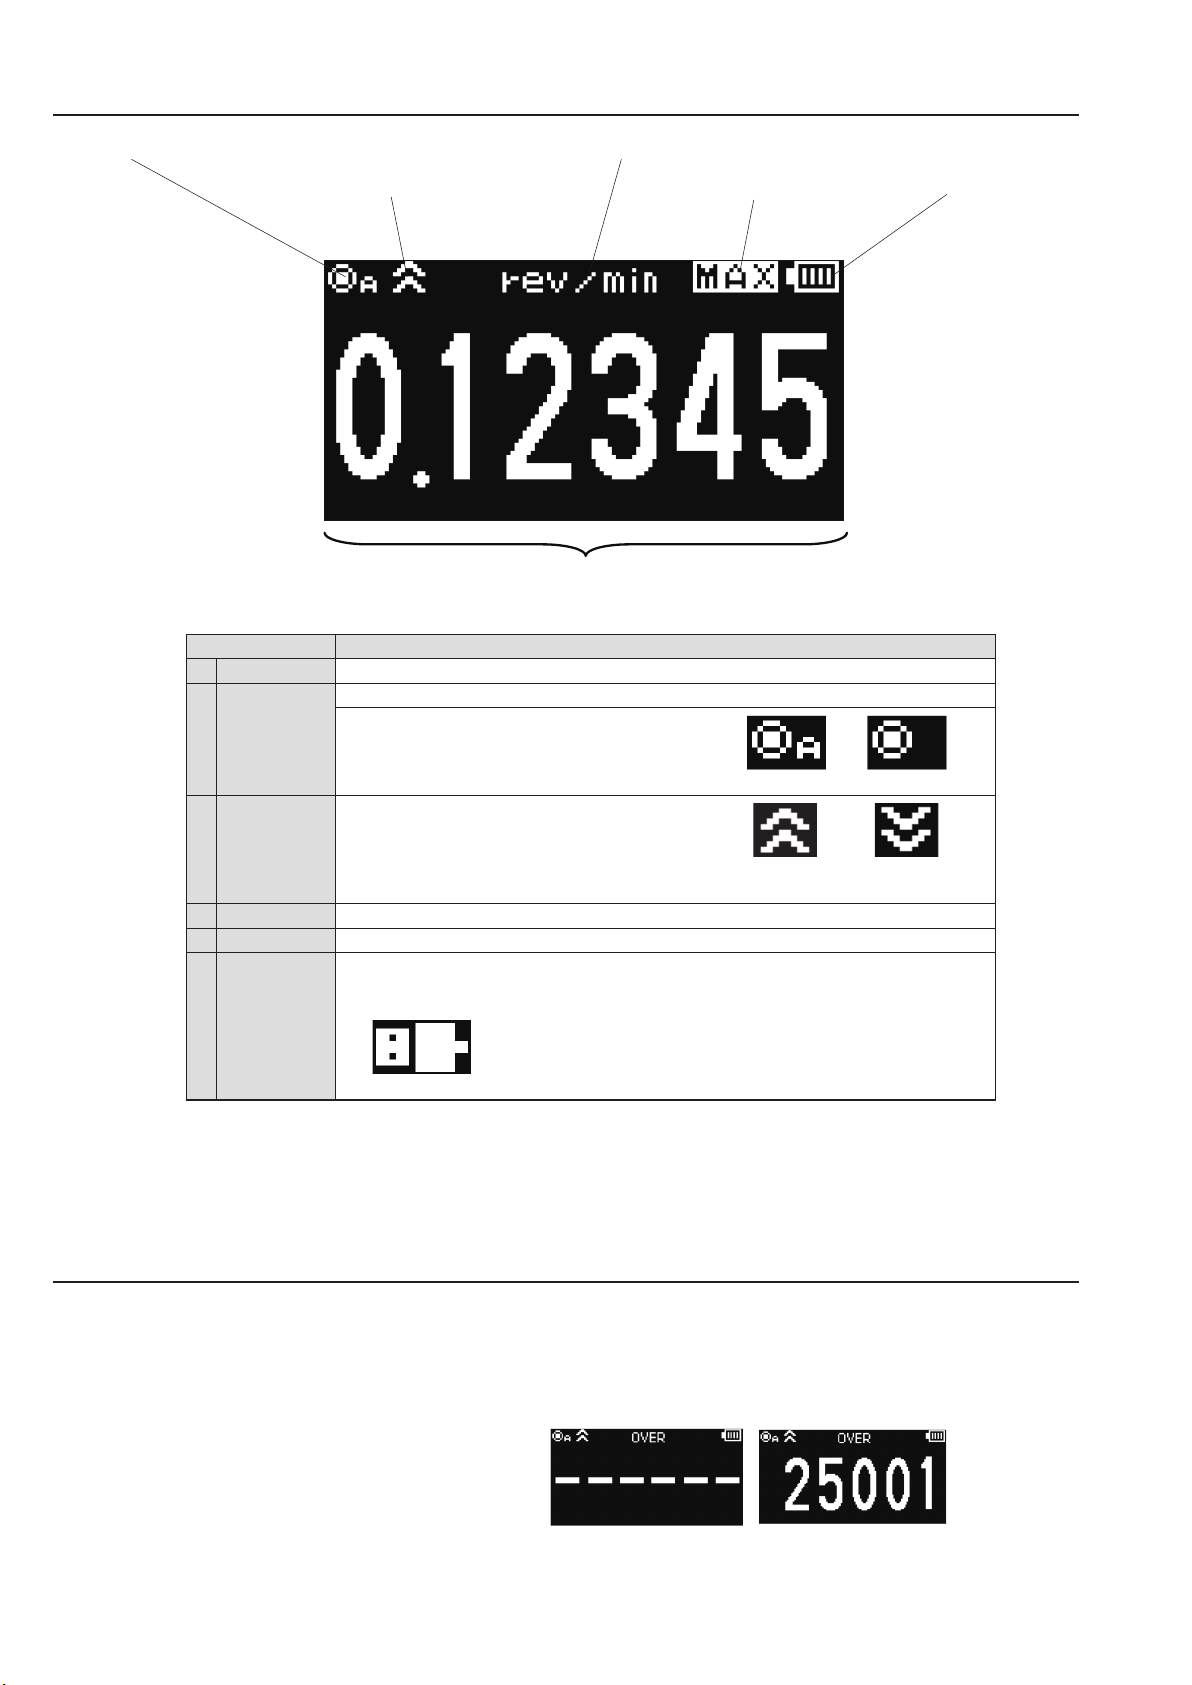
■Display screen details
(2) Rotation detection display
(3) Upper/lower limit judgment display
Key name
(1) Main display
Rotation
(2)
detection display
(4) Unit display
(5) Description display (6) Battery display
(1) Main display
Displays the measurement value.
Blinks during measurement.
"A" is displayed when the contact adapter has been
attached.
With contact Without contact
(3)
Upper/lower limit
judgment display
(4) Unit display
Description display
(5)
(6) Battery display
*For screen protection, the display becomes dark when no operation has been performed for 10 seconds.
Also, the display is turned OFF when no operation has been performed for 1 minute.
Displays judgment results of the display value
according to the comparator setting.
Displays the current set unit.
Displays description for the measurement value currently indicated.
Displays the remaining battery level.
Blinks when the remaining battery level becomes close to 0.
Also, the following mark is displayed when the power is supplied through the USB cable.
When the USB cable is connected
■OVER display
When the measured value exceeds the display range, "
Also, when it exceeds the measurement range, "OVER" is indicated in the unit display, and it blinks.
- - - - - -
" is displayed.
When the upper When the lower
limit is reached limit is reached
●Display range OVER ●
* When "OVER" is indicated, the measurement accuracy is
not guaranteed.
Measurement range OVER
3
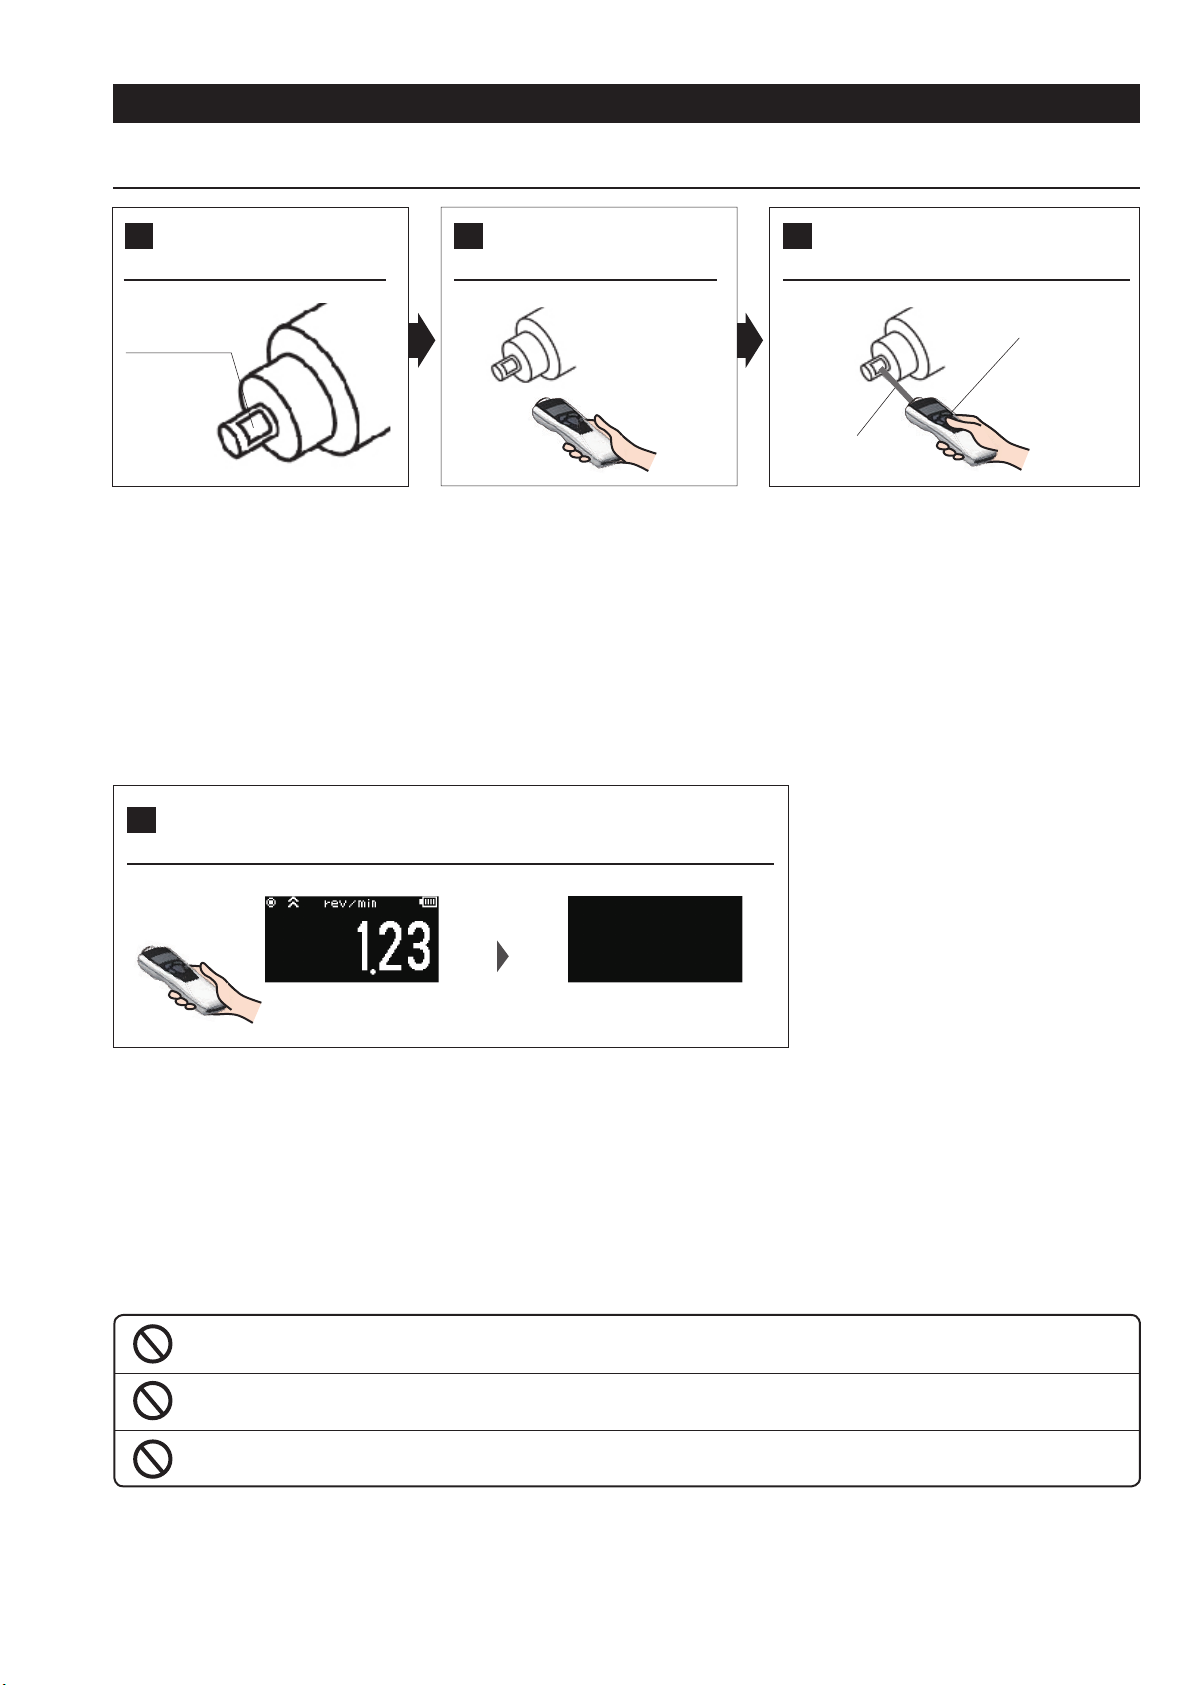
2. Measurement Method
■Non-contact measurement
Apply the re ection tape to
1
the object to be measured
Re ection tape
Apply the supplied reflection tape to
the rotating body of the object to be
measured.
●Do not apply to a rotating body smaller than
the re ection tape.
●If the rotating body is glossy, apply black tape,
or paint it black and apply the reflection
tape.
●Before applying the re ection tape, wipe off
water/oil on the attachment surface of the
rotating body, and apply the tape without
any irregularities.
Point the laser beam irradiation
2
port to the object to be measured
Point the laser beam irradiation port
to the reflection tape applied to the
rotating body.
●Keep a distance of 50 to 4000 mm (2 in.
to 13 ft.) between the reflection tape and
irradiation port.
Press the power/measurement key
3
to start measurement
Power/Measurement key
Laser beam
Press the power/measurement key, and start
measurement.
●When the rotating body is static, the value "0" is
displayed.
●When the rotating body rotates, the actual measurement
data is displayed every display update cycle.
Power OFF when no operation has been performed for a certain
4
period of time (Auto off function)
Left unoperated
Final measurement
value held
After measurement ends, the power is turned OFF when no operation has been performed for a certain period of time.
●The period of time until the power goes OFF can be set in "Auto off" in the system settings.
●When performing communication using the optional USB cable, the auto off function is disabled.
* When the speed and distance units are selected in the unit setting, be sure to select "3. SET_SYSTEM" in contents selection, and set the distance
value per pulse in the "9. DIST/PULS" setting.
Power OFF
■Precautions on measurement and handling
Never look into the laser beam.
Failure to follow this could result in injury to the eyes.
Do not point the laser beam at people.
Do not allow usage by children.
4
■Contact measurement
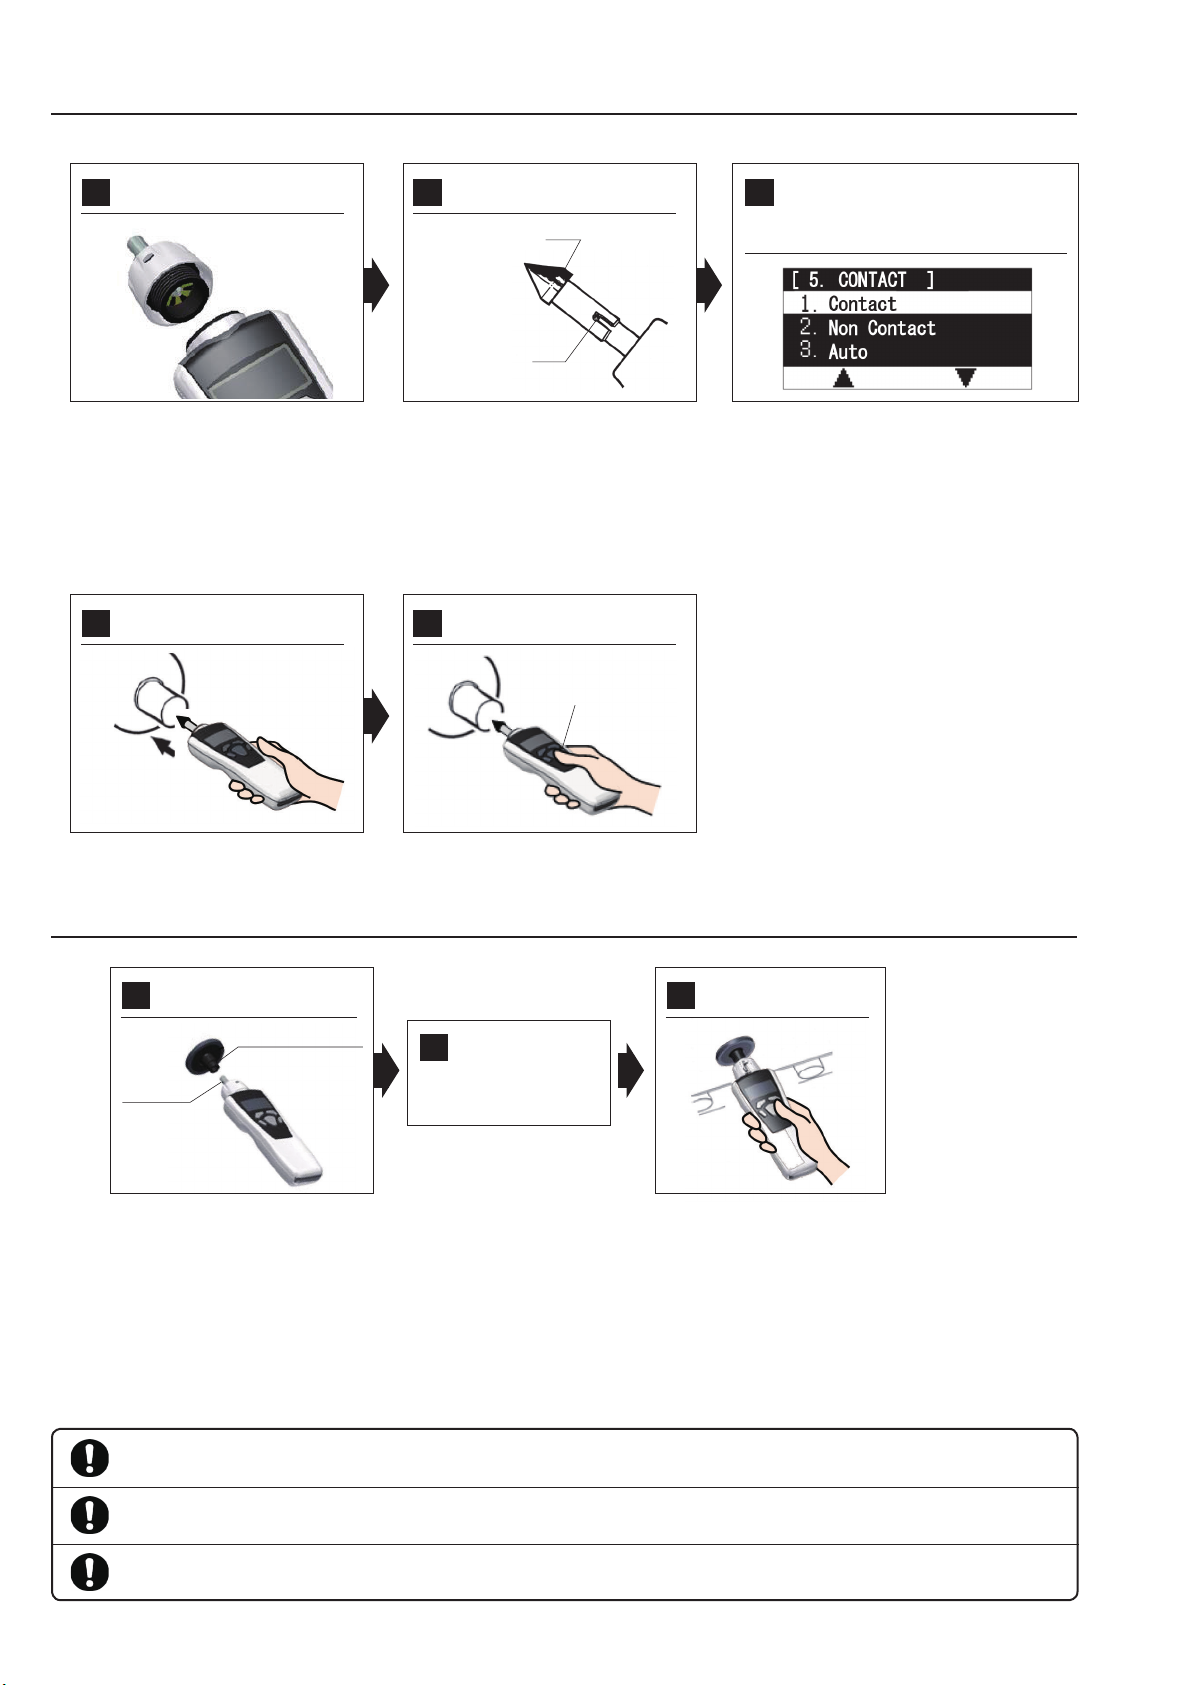
Attaching the optional contact adapter enables measurement in the contact mode.
Attach the contact
1
adapter
Put the contact on the
4
object to be measured
Select the appropriate
2
contact tting and attach.
Contact (conical)
Measurement
shaft pin
For rotation speed measurement, attach
the conical or funnel contact.
● When the object to be measured has a
concave shaft, attach the conical contact.
●When the object to be measured has a
conical shaft, attach the funnel contact.
* When attaching the contact, securely fit
the measurement shaft pin into the contact
groove.
Press the power/measurement
5
key, and start measurement
Power/Measurement key
In the "5. CONTACT" setting of "3. SET_
3
SYSTEM" in contents selection, change
to "1. Contact" or "4. Contact (Low)"*.
* Select "4. Contact (Low)" when using the optional
contact adapter for low speed.
Carefully put the contact on the center of the
rotating body of the object to be measured.
Press the power/measurement key, and
start measurement.
■When using the speed measurement wheel
Attach the speed measurement
1 3
wheel to the measurement shaft
Speed measurement wheel
Put the speed
2
measurement
wheel on the object
Measurement
shaft pin
Note) When attaching the wheel, securely t the
measurement shaft pin into the wheel groove.
*The auto off function works similarly as in the case of non-contact measurement.
* When performing the non-contact measurement again after contact measurement ends, be sure to select "3. SET_SYSTEM" in
contents selection, and set to "1. Contact" in the "5. CONTACT" setting.
* When using the speed measurement wheel, in the "8. DIAMETER" setting of "3. SET_SYSTEM" in contents selection, set the
diameter value of the peripheral speed foil. When using the supplied speed measurement wheel (circumference of 6 inches),
use it with the default value (diameter value of 48.5104 mm).
to be measured
Carefully put the speed
measurement wheel on the object
to be measured (belt part, etc.).
Press the power/measurement
key, and start measurement
Refer to the above (rotation speed
measurement)
■Precautions on measurement and handling
Before measurement, securely t the contact adapter to the contact. Also, during measurement, carefully put the contact on the rotating body of the
object to be measured.
When attaching the speed measurement wheel for measurement, align it along the object to be measured, and do not push the wheel with excessive
force. Also, for safety measurement, use with a speed of 300m/min (500cm/s, 18000m/h, ~18km/h, 197inch/s) or less.
When measuring a high-speed rotating body using the conical or funnel contact over a long period of time, note that the convex and concave portions
of the contact may produce high heat.
5
Rotation speed
3. Measurement Display Description
Press the operation key 3 in the measurement mode. The measurement value description to be displayed is switched.
The types of the measurement value to be displayed are as follows:
Display Description
Normal Description Displays the measurement value corresponding to the selected unit.
Display update Updates every display update cycle.
Maximum value
(Inactive during distance
and manual measurement)
Minimum value
(Inactive during distance
and manual measurement)
Average value
(Inactive during distance
and manual measurement)
Acceleration rate
(Inactive during distance
and manual measurement)
Prescale Description
Prescale maximum value
(Inactive during distance
and manual measurement)
Prescale minimum value
(Inactive during distance
and manual measurement)
Prescale average value
(Inactive during distance
and manual measurement)
Prescale acceleration rate
(Inactive during distance
and manual measurement)
Description Displays the maximum value from measurement start to end. This value is reset when
the next measurement starts.
Display update Updates every display update cycle.
Description Displays the minimum value from measurement start to end.
next measurement starts, or the auto zero function is performed.
Display update Updates every display update cycle.
Description Displays the average value within the "GRAPH_TIME" specied in the system
settings.
Display update Updates every "GRAPH_TIME".
Description Displays the acceleration rate within the "GRAPH_TIME" specied in the system
settings.
Display update Updates every "GRAPH_TIME".
Displays the measurement value when "PRESCALE" is enabled. This feature is selected in
the system settings. When "PRESCALE" is not specied, this is not displayed.
Display update Updates every display update cycle.
Description Displays the maximum value among the measurement values when "PRESCALE" is
enabled. This value is reset when the next measurement starts.
Display update Updates every display update cycle.
Description Displays the minimum value among the measurement values when "PRESCALE" is
enabled. This value is reset when the next measurement starts.
Display update Updates every display update cycle.
Description Displays the average value within the "GRAPH_TIME" specied in the system
settings, among the measurement values when "PRESCALE" is enabled.
Display update Updates every "GRAPH_TIME".
Description Displays the acceleration rate within the "GRAPH_TIME" specied in the system
settings, among the measurement values when "PRESCALE" is enabled.
Display update Updates every "GRAPH_TIME".
This value is reset when the
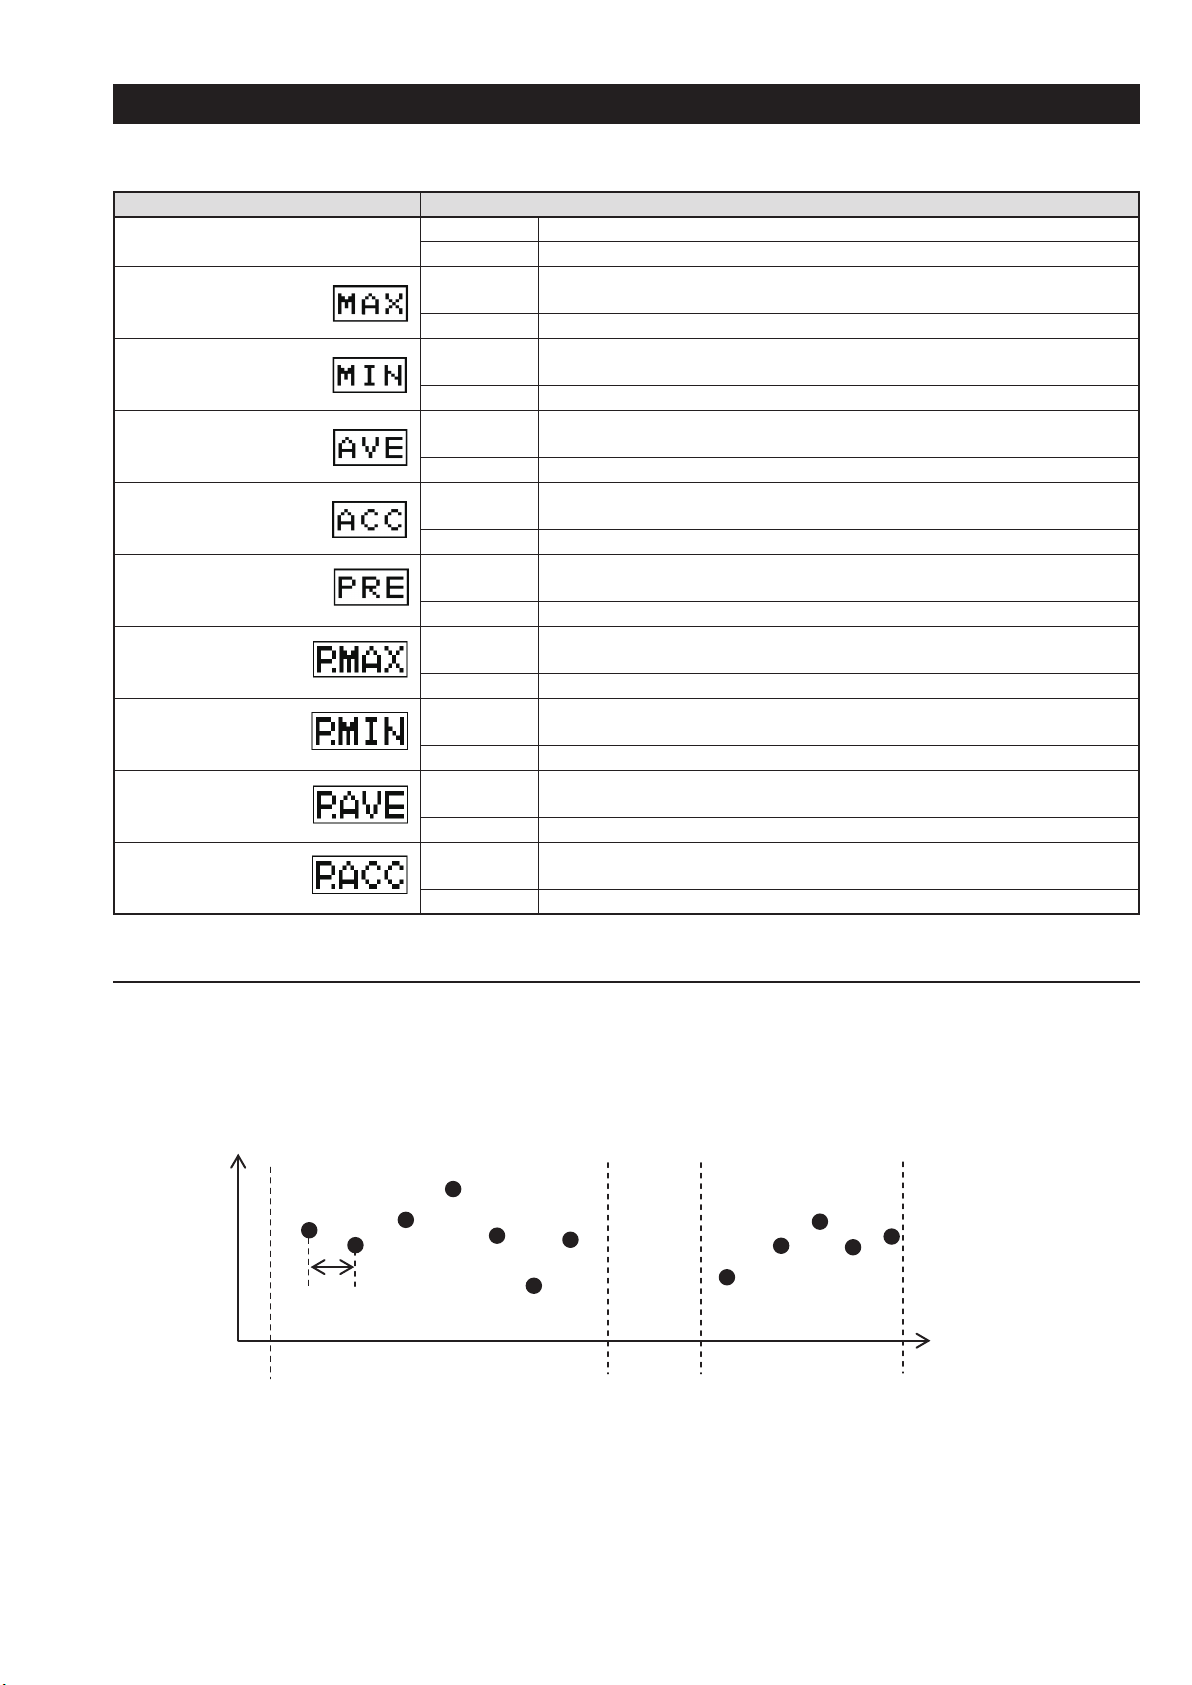
■About calculation of the maximum value (MAX) and minimum value (MIN)
・
As shown in the gure below, the instrument sets the measurement value when measurement starts with initial values of MAX0 and MIN0.
It then compares them to new measurement values every sampling cycle.
New updated maximum and minimum values are created and displayed if they exceed (for MAX0) or are below (for MIN0).
(Updates in the order of MAX
・
The maximum and minimum values are reset when measurement starts.
Measurement
start
→ MAX1 → MAX2)
0
MAX0
MIN0
MAX
1
MIN
Sampling cycle*1
1
MAX
2
MAX2
MAX
MAX0
1
MIN0
MIN2
Time
Measurement
end
Measurement
start
Measurement
end
6
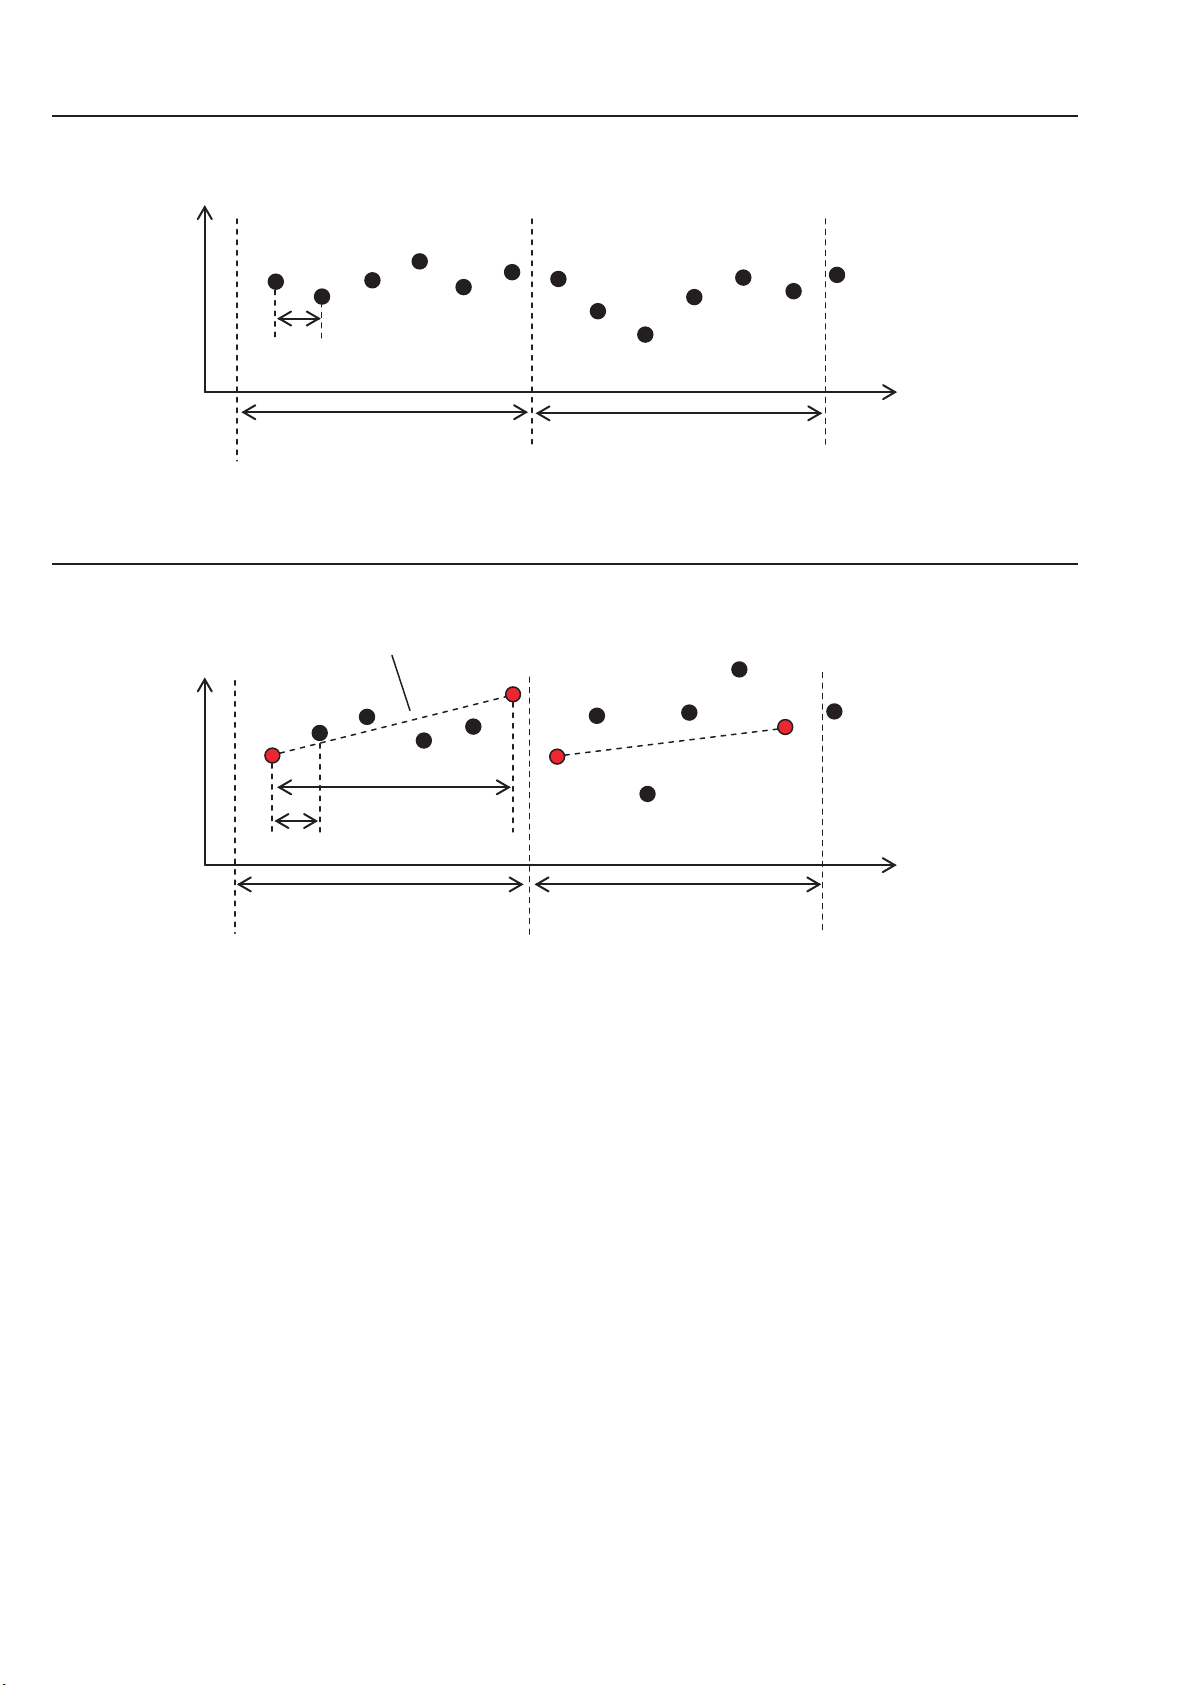
■About calculation of the average value (AVE)
Rotation speed
The average value is displayed by averaging the measurement values in the corresponding cycle every average value update cycle.
4
1
3
2
6
5
7
8
11
10
9
Sampling cycle*1
Average value update cycle*2
Average calculation of the
measurement display values 1 to 6
Average calculation of the
measurement display values 7 to 12
■About calculation of the acceleration rate (ACC)
The acceleration rate is calculated based on v0 and v1 in the corresponding cycle every acceleration rate update cycle.
Rotation speed
Gradient = Acceleration rate
v
0
Acceleration rate
calculation time
Sampling cycle*1
Acceleration rate update cycle*2
v
1
MIN
MAX
12
Time
Time
Acceleration rate =(v1 - v0)/Acceleration rate calculation time
*1 The sampling cycle is "DISP_CYCLE" in the system settings.
*2 The average value update cycle and acceleration rate update cycle are "3-2 Graph time" in the system settings.
*The acceleration rate is displayed up to 5 digits, and when the speed is decreased, it is displayed as a negative value.
*Minus value of the acceleration value cannot be displayed in the graph.
7
4. Graph Display
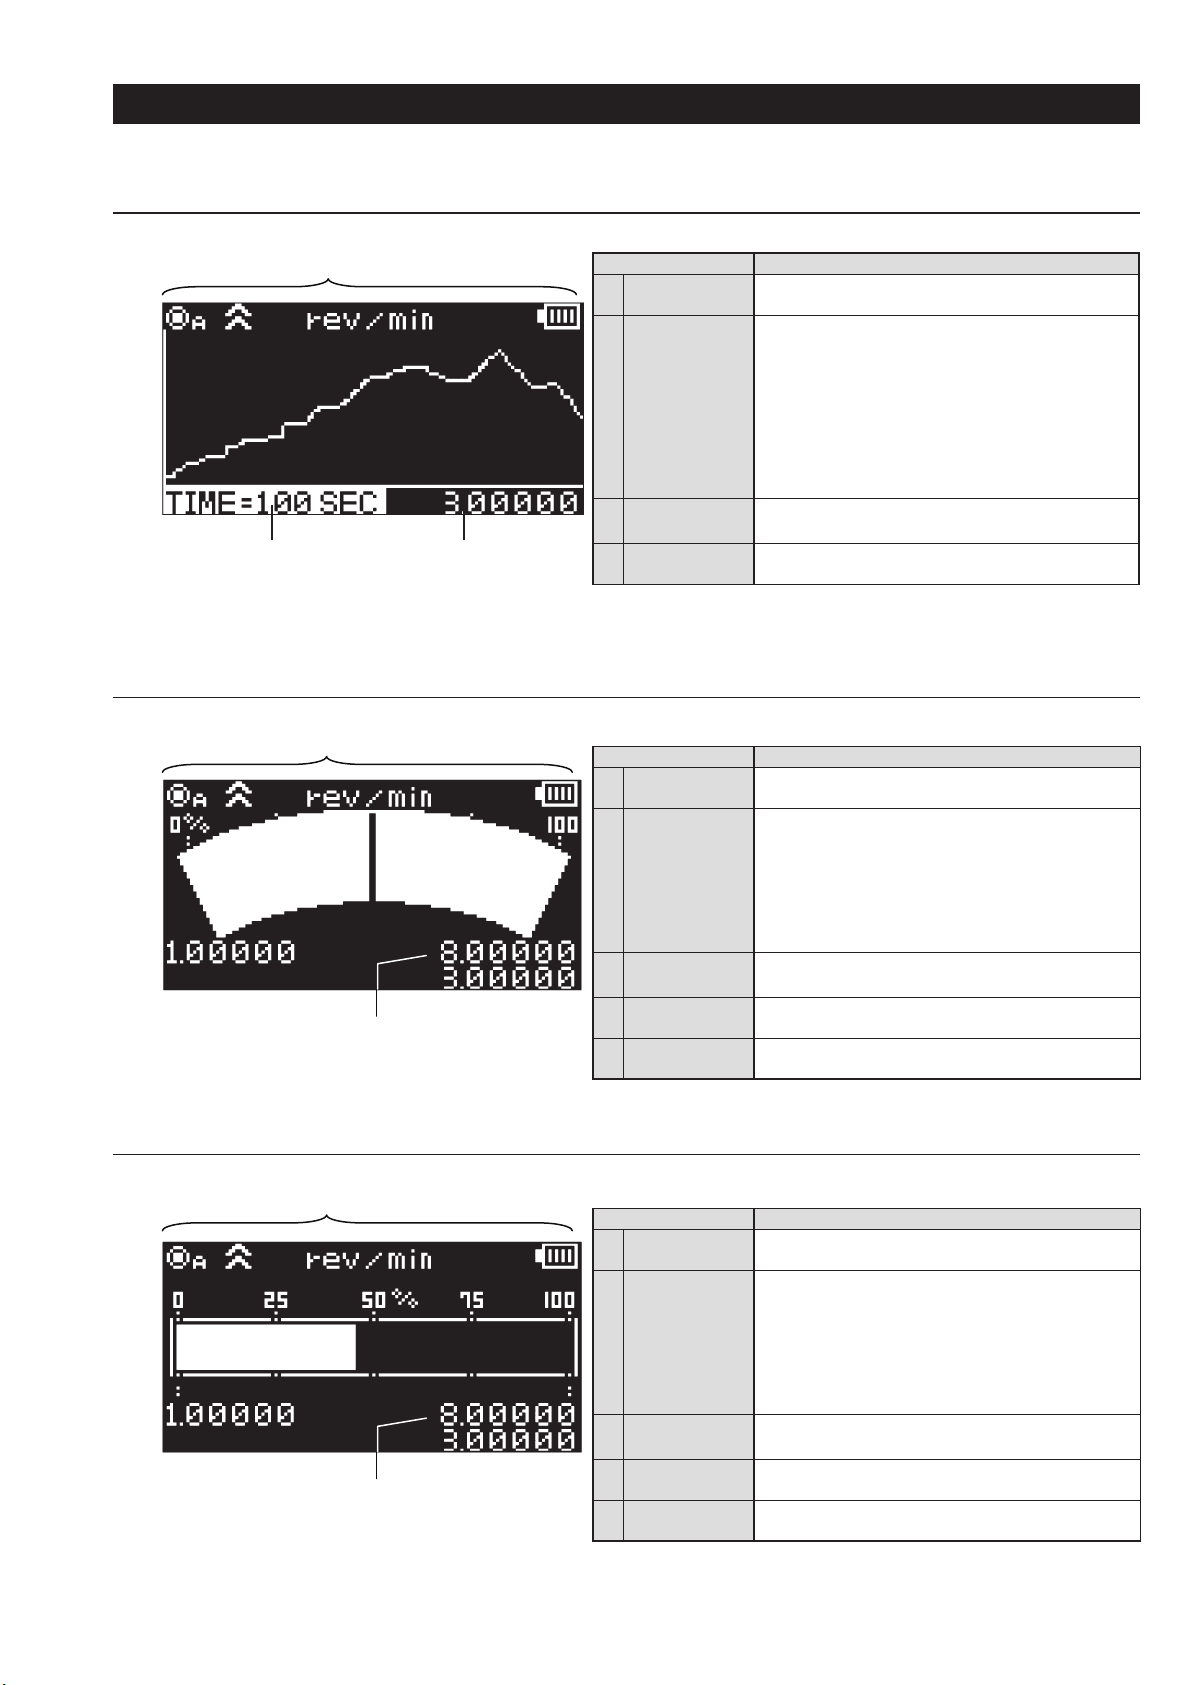
Using the "4. GRAPH_DISP" setting of "2. SET_USER" in contents selection enables the graph to be indicated on the display.
(1) Graph_1 (Line graph)
(1) Various status display
(2) Line graph display
4) Graph time display (3) Measurement value display
(2) Graph_2 (Gauge Mode)
(1) Various status display
(2) Needle graph display
(5) Graph minimum
value display
(4) Graph maximum
value display
(3) Measurement
value display
Parts name Operation
Various status
(1)
display
(2) Line graph display
(3) Measurement
value display
Graph time
(4)
display
Update cycle: Every display update cycle
*
Parts name Operation
Various status
(1)
display
(2) Gauge Display
(3) Measurement
value display
Graph maximum
(4)
value display
Graph minimum
(5)
value display
Update cycle: Every display update cycle
*
Same as in the normal display
Displays the line graph for the measurement value.
Depending on selection one of the below will equal the
graph values:
Maximum value on the vertical axis:
Graph maximum value setting
Minimum value on the vertical axis:
Graph minimum value setting
Horizontal axis: Graph time setting value
Graph ow: Graph ow setting value
Displays the current measurement value
Can switch among MAX, MIN, AVE, and ACC
Displays the graph time setting value
Same as in the normal display
Displays the needle graph for the measurement value.
Depending on selection one of the below will equal the
gauge values:
Graph maximum value:
Graph maximum value setting
Graph minimum value:
Graph minimum value setting
Displays the current measurement value
Can switch among MAX, MIN, AVE, and ACC
Displays the graph maximum value setting
Displays the graph minimum value setting
(3) Graph_3 (Bar graph)
(1) Various status display
(2) Bar graph display
(5) Graph minimum
value display
(4) Graph maximum
value display
(3) Measurement
value display
Parts name Operation
Various status
(1)
display
(2) Bar graph display
(3) Measurement
value display
Graph maximum
(4)
value display
Graph minimum
(5)
value display
Update cycle: Every display update cycle
*
Same as in the normal display
Displays the bar graph for the measurement value.
Depending on selection one of the below will equal the
gauge values:
Graph maximum value:
Graph maximum value setting
Graph minimum value:
Graph minimum value setting
Displays the current measurement value
Can switch among MAX, MIN, AVE, and ACC
Displays the graph maximum value setting
Displays the graph minimum value setting
8
5. Memory Function
The measurement value can be registered and stored in the memory during measurement.
The stored data can be displayed in contents selection "1. DATA".
Registration contents and methods depend on the memory mode.
Set the memory mode in the "2. MEMORY_MODE" of "2. SET_USER" in contents selection.
5-1 Memory mode details
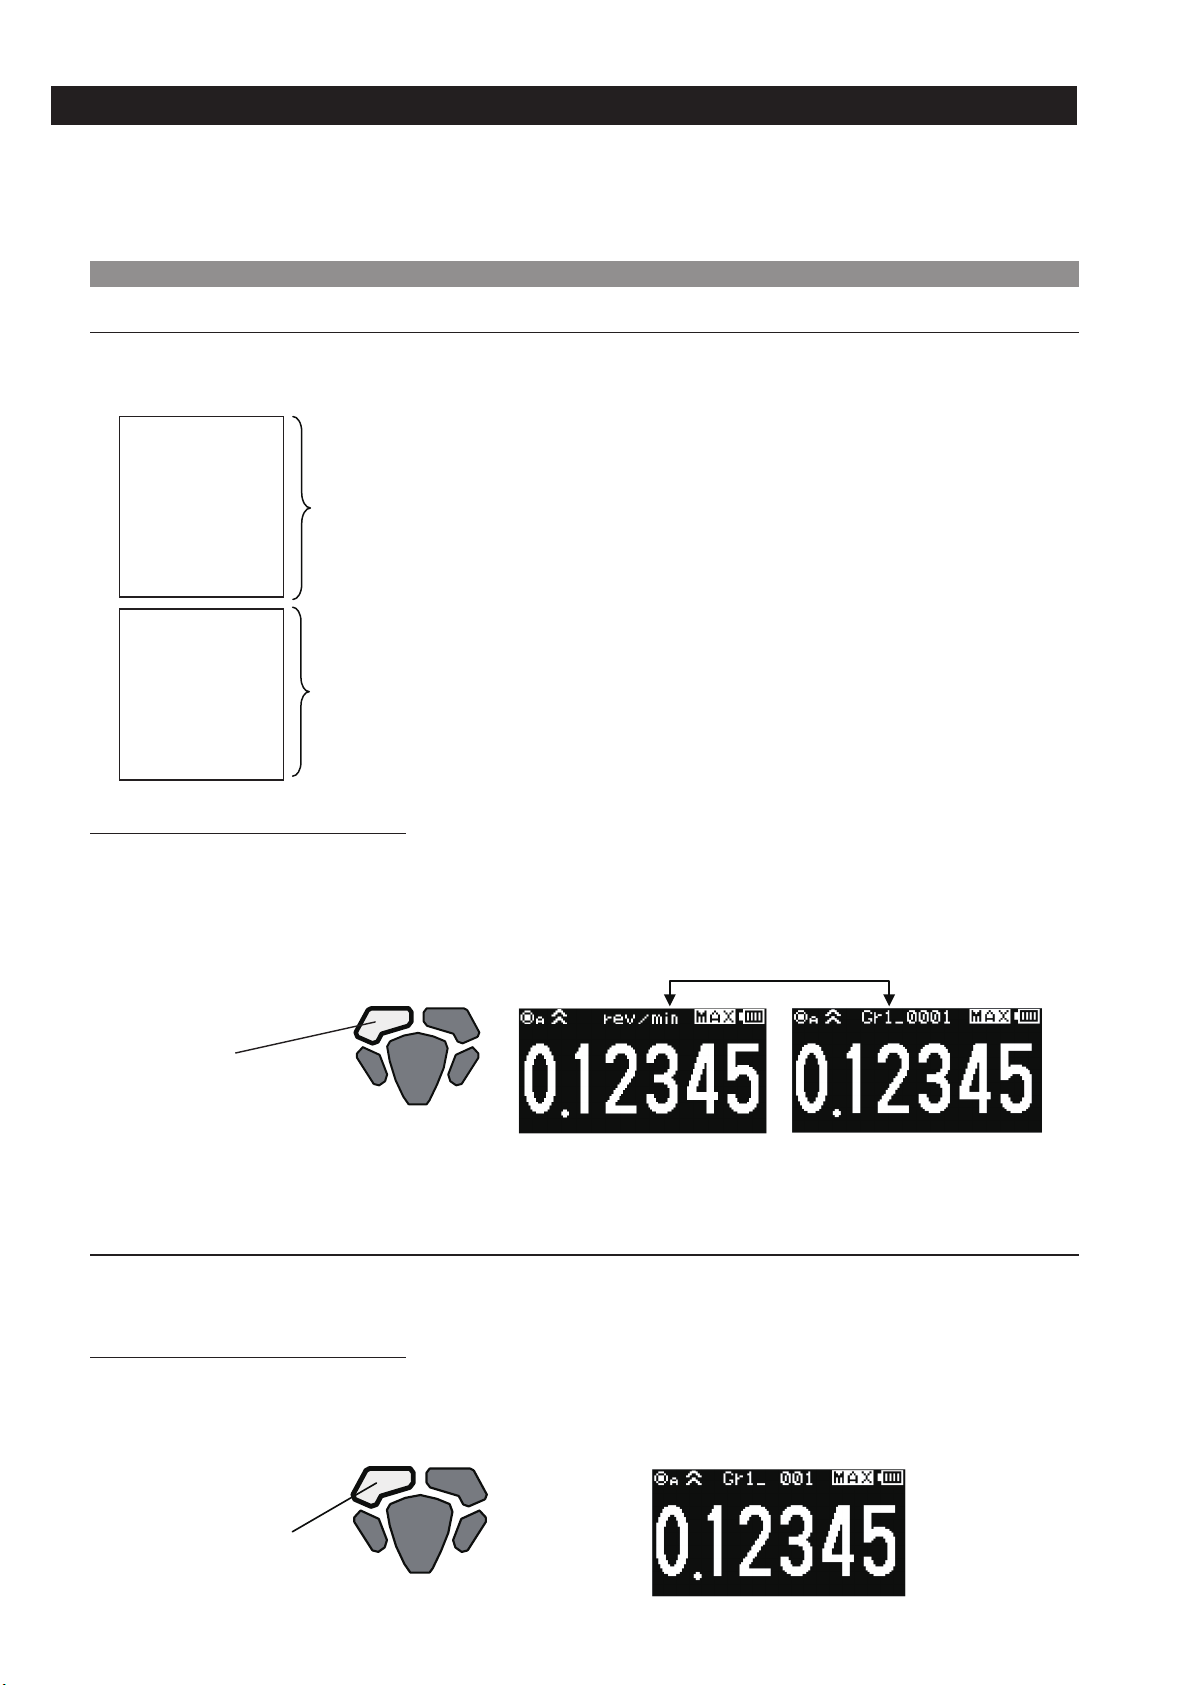
(1) Continuous memory mode
In the continuous memory mode, the measurement value continues to be registered in the memory every display update cycle.
・
The number of memory sets that can be registered in the continuous memory is up to 1000.
・
For the continuous memory, the value description to be registered in the memory depends on the measurement display description.
・
Normal display
・
MAX display
・
MIN display
・
AVE display
・
ACC display
・
PRE display
・
P.MAX display
・
P.MIN display
・
P.AVE display
・
P.ACC display
・
Registers the measurement value every display update cycle
Registers the measurement value every display update cycle after prescale calculation
●Memory registration operation
Press the Operation key 1 once during measurement to start memory registration. Press it again to end memory registration.
・
When turning measurement OFF, or switching to the contents selection mode during memory registration, memory registration ends at
・
that moment.
The unit and "Gr ○ _ □□□□" are alternately displayed in the unit display part during memory registration.
・
(○ shows the number of memory groups, and □ shows the number of memory points currently registered: 0001 to 1000)
Displayed alternately every second during memory registration
Operation key 1:
Memory registration start/end
*The continuous memory mode can be used only when one of the units from "rev/min" to "miles/h" is selected in the unit setting.
(2) Each memory mode
In the each memory mode, only one set of the measurement value currently displayed is registered in the memory.
・
The number of data points that can be registered in the each memory is up to 100.
・
●Memory registration operation
Press the operation key 1 once during measurement to register the display value at that moment in the memory.
・
"Gr ○ _ □□□□" is displayed for 1 second in the unit display part during memory registration.
・
(○ shows the number of memory groups, and □ shows the number of memory sets currently registered: 001 to 100)
Displayed for 1 second during memory registration
Operation key 1:
Performs memory registration
9
(3) Statistics memory mode
In the statistics memory mode, only the statistics data for the measurement value every display update cycle from memory registration start
・
to end is registered in the memory.
The number of data points that can be registered in the statistics memory is up to 100.
・
●Memory registration operation
Press the operation key 1 once during measurement to start memory registration, and press it again to end memory registration.
・
When turning measurement OFF, or switching to the contents selection mode during memory registration, memory registration ends at that
・
moment.
The unit and "Gr ○ _ □□□□" are alternately displayed in the unit display part during memory registration.
・
(○ shows the number of memory groups, and □ shows the number of memory sets currently registered: 001 to 100)
Displayed alternately every second during memory registration
Operation key 1:
Memory registration start/end
* In the statistics memory mode, the statistics data in a single registration is calculated from the measurement value for up to 100 times of
display update. When the display update frequency exceeds 100 in a single registration, memory registration automatically ends.
*The statistics memory mode can be used only when one of the units from "rev/min" to "miles/h" is selected in the unit setting.
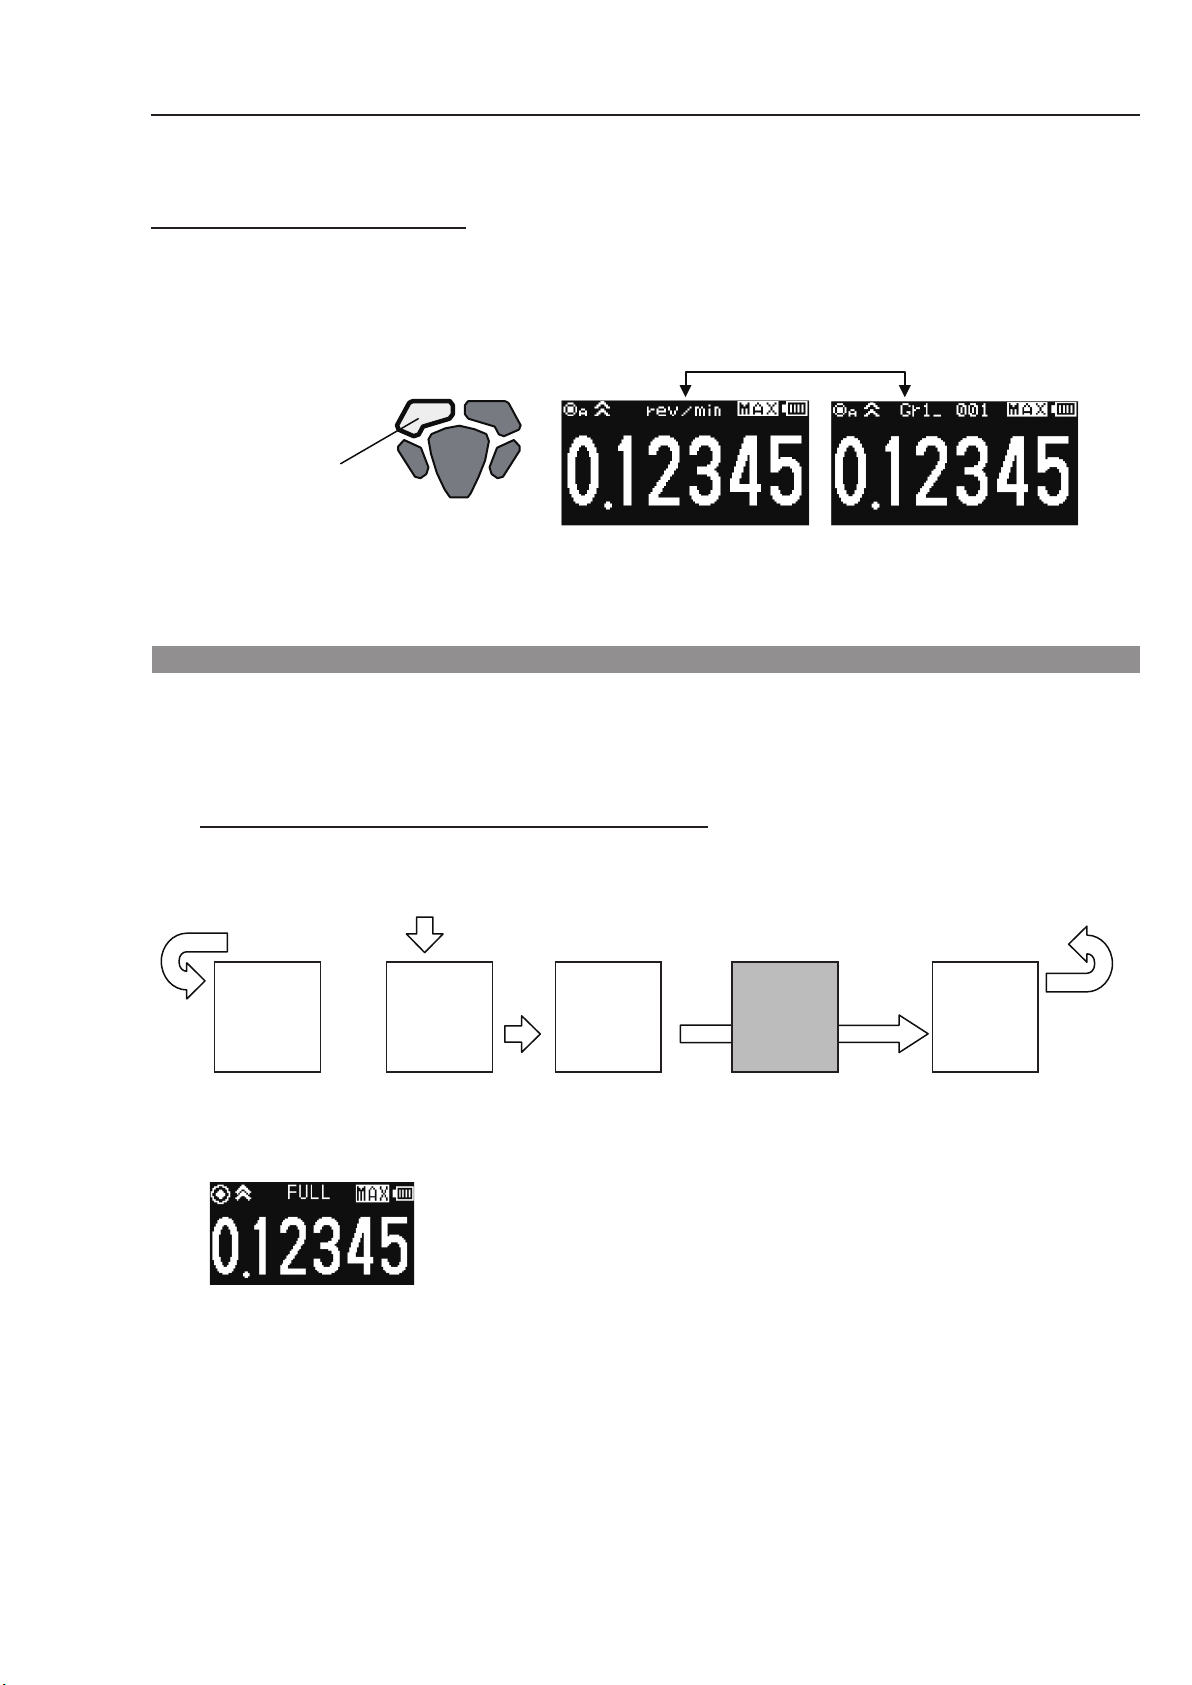
5-2. Memory registration in the memory group
Start memory registration from the start memory group (that has been set in "3. START_MEM" of "2. SET_USER" in contents selection).
・
When the number of memory groups reaches the number of memory sets in each group (that has been set in "4. MEM_GROUP" of "3. SET_
・
SYSTEM" in contents selection), the memory group switches to the next one.
When the number of memory sets exceeds the total number of memory sets for all memory groups, "FULL" is displayed in the unit display
・
part. In this case, additional memory cannot be registered.
Example: When the start memory group is set to memory group 2
(1) Start memory registration from
the start memory group
Group 1 Group 2 Group 3 Group 5Group 4
(2) Go to the next memory group
when the number of memory
sets exceeds the specied
number
(5) Displays "FULL" when the number of memory sets exceeds the specified number for all
memory groups, and ends memory registration ("FULL" is displayed until the operation key 1 is
pressed)
After that, even if you press the operation key 1 and try to start memory registration, "FULL" is
displayed for 1 second, and registration is disabled.
(3) Go to the next memory
group when the number
of memory sets is 0
(4) Return to memory group 1
when the number of memory
sets exceeds the specied
number in group 5
10
 Loading...