


Shimano TL-BT03 Technical Service Instruction
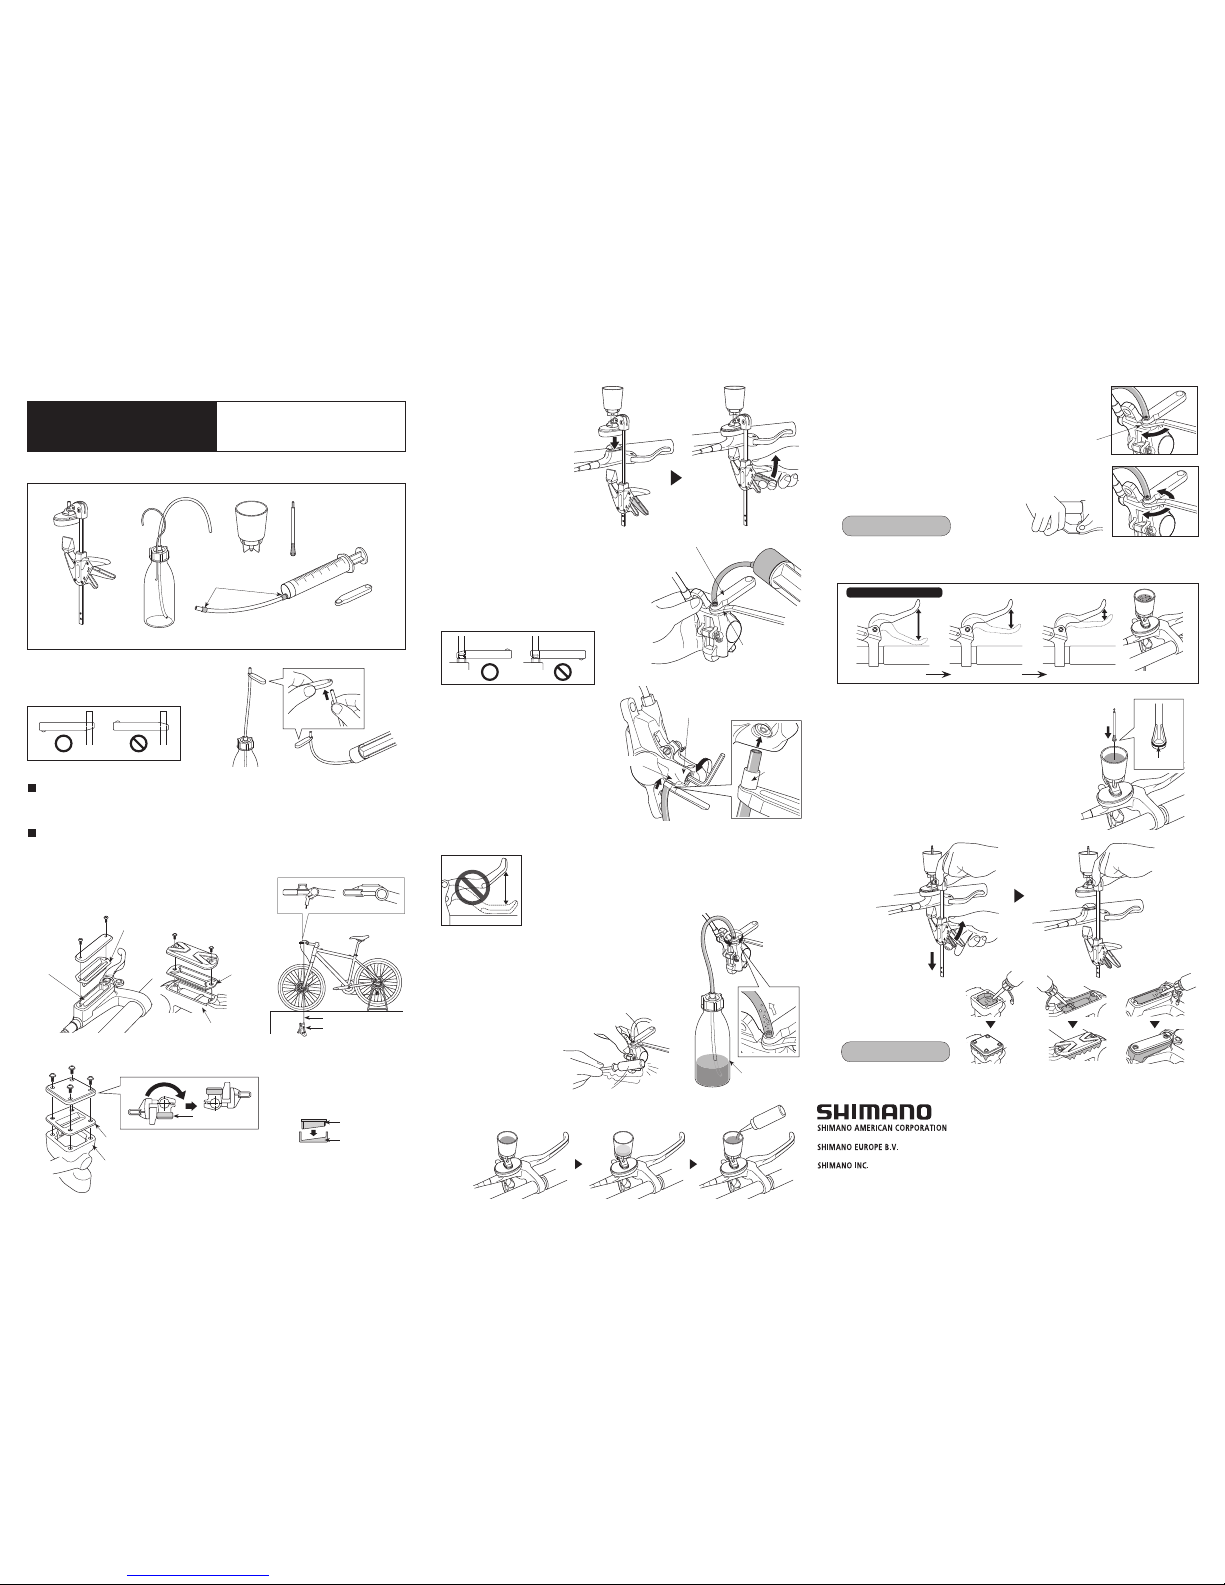
Tube holder installation direction
< Contents of kit >
SI-1304A-003-00
Type where reservoir tank cover is opened
Type where bleed screw is opened (using an oil funnel)
Bleeding tool Tube with bottle
Syringe
Arm bush
Oil funnel
Tube holder
Oil stopper
Tube holder installation direction
The level of liquid inside the funnel will drop at this time, so keep filling the funnel
with oil to maintain the level of liquid so that air is not drawn in (air does not get
inside).
< In case of a bleed nipple type caliper >
Set a 7 mm socket wrench in place, fill the syringe with oil,
and then connect a tube to the bleed nipple. Secure the bleed
nipple and the tube with a tube holder, and then loosen the
bleed nipple by 1/8 of a turn to open it. Push the plunger of
the syringe to add oil. The oil will start coming out from the
oil funnel. Continue adding oil until there are no more
air bubbles mixed in with the oil that is coming out.
Remove the bleeding tool as shown in the illustration, fill
the reservoir tank with oil and then replace the reservoir
tank cover. Fill the reservoir tank to overflowing with oil
while replacing the cover to ensure that no air bubbles
remain inside the reservoir tank. In addition, be careful not
to get any oil on parts such as the rotor and brake pads.
Oil stopper
O-ring
If the brake lever is then operated, air bubbles in the system will rise up through the port into
the oil funnel. Once the bubbles stop appearing, depress the brake lever as far as it will go.
The normal condition is for the lever to be stiff at this point.
Technical Service Instructions SI-1304A-003
Air bleeding kit
TL-BT03
3.
9.
6.
11.
With the spacer for bleeding (yellow) still attached to the calipers, place the bicycle into a bicycle
stand or similar as shown in the illustration.
Be sure to read the Service instructions for “Adding mineral oil and bleeding air” together with
these service instructions.
Install the tube holder as shown in the illustration.
Make sure that the direction of installation is correct.
1.
Cover the reservoir tank with the
bleeding tool which has the oil funnel
attached, and then secure with the
clamp as shown in the illustration.
Note :
Be careful not to overtighten the oil
funnel when attaching it.
2.
Hose
Diaphragm
Reservoir tank
Calipers
Set so that the brake lever is parallel to
the ground, and then remove the
reservoir tank cover.
< BL type >
Reservoir tank
Diaphragm
Diaphragm
Diaphragm
Base of reservoir
tank
Reservoir tank
Turn the lever unit so that the top of the reservoir tank is parallel to the
ground, and then remove the reservoir tank cover.
Note : When reassembling, set the
diaphragm so that it is aligned at
the same angle as the base of the
reservoir tank.
< ST type >
Reservoir tank
Once there are no more air bubbles mixed in with the oil, temporarily close the bleed nipple
and remove the syringe.
Do not continually squeeze and release the lever at this point.
If this is not observed, air bubbles may remain mixed in with the oil
inside the caliper, and it will take longer to bleed the air. (If the lever is
continually squeezed and released, drain out all of the oil and then add
oil again.)
4.
Set a 7 mm socket wrench in place, and then attach the tube with
the bottle to the bleed nipple as shown in the illustration.
Secure the bleed nipple and the tube with a tube holder, and then
loosen the bleed nipple. After a little while, the oil and air will flow
naturally from the bleed nipple into the tube. In this way it will be
possible to easily extract the greater part of the air remaining
inside the brake system. It may help to shake the hose gently or to
tap the reservoir tank or caliper
gently with a screwdriver or
move the position of the caliper
at this time.
5.
With the brake lever depressed, open and close the bleed nipple in rapid
succession (for approximately 0.5 seconds each time) to release any air
bubbles which may be in the calipers. Repeat this procedure about 2 to 3
times. Then tighten the bleed nipple again.
Tightening torque:
4 - 6 N·m {35 - 52 in. lbs.}
8.
Plug the oil funnel with the oil stopper so that the side with
the O-ring attached is facing downward.
Wipe away any oil which has flowed out.
10.
12.
Bleed nipple
Tube holder
Bottle
Air
Tightening torque:
0.3 - 0.5 N·m {2.7 - 4.3 in. lbs.}
Once air bubbles stop coming out from the bleed nipple, temporarily
tighten the bleed nipple.
Bleed nipple
7.
< In case of a bleed boss type caliper >
Fill the syringe with sufficient oil.
After attaching the arm bush to the end of the
tube, connect the tube to the bleed boss.
Fasten the tube with the tube holder so that it
will not be disconnected.
Loosen the bleed screw by 1/8 of a turn to
open it.
Push the plunger of the syringe to add oil. The
oil then starts coming out from the oil funnel.
Continue adding oil until there are no more air
bubbles mixed in with the oil that is coming out.
Bleed screw
Bleed boss
Arm bush
Lever operation
Loose Slightly stiff Stiff
One Holland, Irvine, California 92618, U.S.A. Phone: +1-949-951-5003
Industrieweg 24, 8071 CT Nunspeet, The Netherlands Phone: +31-341-272222
3-77 Oimatsu-cho, Sakai-ku, Sakai-shi, Osaka 590-8577, Japan
* Service Instructions in further languages are available at: http://si.shimano.com
Please note: Specifications are subject to change for improvement without notice. (English)
© Jul. 2014 by Shimano Inc. HTR
SI-1304A-003
ご注意
(Japanese)
ブリーディングキットの洗浄またはメンテナンスにはイソプロ
ピルアルコール、石鹸水を使用するか空拭きを行なってくださ
い。市販のブレーキクレンザー等は使用しないでください。
樹脂部品等を損傷する恐れがあります。
ブリーディングキットを分解清掃した場合、洗浄に使用した
液体成分が残る場合がありますので再組み立ての際は十分に
乾燥させてから行ってください。
注射器からチューブを取り外すことは避けてください。万一
チューブが外れてしまった場合は、アームブッシュとチュー
ブを注射器から取り外し、各部を洗浄し油分を除去してくだ
さい。チューブの先が広がっている場合は、その部分を切り
取ってください。チューブが注射器にしっかり固定されてい
る事を確認のうえ再使用してください。
固定が不十分のまま使用されると、その部分からの油漏れの
恐れがあります。
SI-1304A-003
Nota
(Spanish)
Limpie y m antenga el juego de purga usand o alcohol
isopropí lico o agua jabon osa, o límpielo co n un paño seco. N o
use prod uctos como limp iadores comercia les de frenos.
Usando e sos producto s podría dañar lo s plásticos y otr as
partes.
Al desa rmar y limpiar el ju ego de purga, p uede quedar unp oco
de líquido usado en las p artes del jueg o, por lo cual se
recomien da asegurarse q ue todas las par tes queden
completa mente secas an tes de volver a ar marlas.
Evite retir ar el tubo de la je ringa. Si el tubo se sale
accident almente, extrai ga el casquillo de l brazo y el tubo d e la
jeringa y limpie bien cada pieza para eliminar todo el aceite. Si
el extre mo de la cámara e stá ensancha do, corte esa p arte.
Comprue be que el tubo es té bien conec tado a la jeringa antes
de volver a usarlo.
Si el tubo no calza con seg uridad, durante e l uso podría per der
aceite po r la conexión del tubo.
SI-1304A-003
Opmerking
(Dutch)
De ontluc htingsset reinig en en in goede staat houden m et
behulp van isopropyl alcoh ol of zeepwater of deze
schoonve gen met een dro ge doek. Gebru ik geen produc ten
zoals in de handel verkrijg bare remreiniger s.
Gebruik v an deze producte n kan plastic en overige onderde len
aantasten.
Bij het de monteren en rein igen van de ontluc htingsset bes taat
de kans d at er wat van de vl oeistof die voor het reinigen is
gebruik t op de onderde len van de set ac hterblijft, du s zorg er
voor dat a lle onderdelen v olledig droog zijn alvorens deze te
hermonteren.
De slang n iet van het spuit je verwijderen . Als de slang pe r
ongeluk i s losgeraakt, haal dan de het a rmbusje en de sla ng
van het s puitje. Reinig deze g rondig om alle oli e te
verwijd eren. Als het ui teinde van de sla ng verwijd is, knip dan
het ver wijde deel af. Con troleer of de slan g stevig aan het
spuitje va stzit voordat u het opnieuw geb ruikt.
Als de sl ang bij gebruik ni et goed vastzi t, bestaat de kans dat
er olie ui t de slangaanslui ting lekt.
SI-1304A-003
Hinweis
(German)
Reinigen Sie das Entlüftun gskit mit Isop ropylalkohol oder
Seifenwas ser oder reibe n Sie es mit eine m trockenen Tuch ab.
Verwend en Sie keine im Hand el erhältlichen R einigungsmitte l
für Brem sen.
Durch sol che Produkte könn en die Kunststo ffteile besc hädigt
werden.
Beim Zerle gen und Reinige n des Entlüftung skits kann etw as
Reinigung sflüssigkeit in d en Teilen zurückblei ben;
kontrolliere n Sie vor dem Zus ammenbau, ob all e Teile
vollstän dig trocken sind.
Nehmen S ie das Rohr nicht von der Spritze ab. Sollte das Roh r
sich ver sehentlich lösen , die Hebelbuch se und das Rohr von der
Spritze a bziehen und alle Teile gründlich reinige n, sodass alles
Öl vollst ändig entfernt wird. Falls das Roh rende aufgeweit et
ist, de n aufgeweiteten Teil abschn eiden. Vor erneut er
Verwendu ng sicherstell en, dass das Roh r fest mit der S pritze
verbunden ist.
Falls das Ro hr nicht richtig f estsitzt, ka nn bei der Verwe ndung
am Rohrans chluss Öl aus treten.
SI-1304A-003
Nota
(Italian)
Pulire il ki t di spurgo con al cool isopropilico o acqua saponat a,
oppure u sare un panno as ciutto. Non us are prodotti qu ali i
deterge nti per freni dis ponibili in commer cio.
L'uso di tali pr odotti potreb be danneggiare l e parti in plas tica
e le altre parti.
Quando s i smonta e si puli sce il kit di spu rgo, un po' di liqui do
usato pe r la pulizia potreb be rimanere sulle parti del kit, per
cui assic urarsi che tutt e le parti siano completamente a sciutte
prima di ri montarle.
Evitare di rimuovere il tubo dalla siringa. Se i l tubo dovesse
staccar si accidentalm ente, rimuovere la boccola del bracc etto e
il tubo dal la siringa e pulire tutti gli elemen ti a fondo per
eliminare e ventuali tracce di o lio. Se la parte t erminale del
tubo appa re allargata, ta gliare la parte. P rima di riutilizzarl o,
verificar e che il tubo sia s aldamente collega to alla siringa.
Se il tubo non viene fissa to in modo sicuro, l'olio potrebbe
fuorius cire dalla giuntura di collegamento.
SI-1304A-003
Nota
(Portuguese)
Limpe e m antenha o kit de s angria utilizando álcool
isopropí lico ou água com s abão, ou limpe com um pano seco.
Não use produtos como os limpadores de f reio disponíveis
comercialmente.
Utilizar ta is produtos pod e danificar plás tico ou outras par tes.
Ao desmo ntar e limpar o ki t de sangria um p ouco do liquido
utilizado p ara a limpeza pod e permanecer na s partes do kit ,
portan to, certifique -se que todas a s partes este jam totalmente
secas a ntes de remontá -las.
Evite remo ver o tubo da seri nga. Se o tubo s air acidentalmen te,
retire o c asquilho de braço e o tubo da serin ga e limpe todas a s
peças c uidadosamente p ara remover qualqu er óleo. Se a po nta
do tubo fo r alargada, cor te a parte alarga da. Verifique se o
tubo es tá firmemente en caixado na serin ga antes de usá -lo
novamente .
Se o tubo não encaixar firm emente durante o uso, o óleo
poderá va zar da conexão do tubo.
SI-1304A-003
Note
(English)
Clean and maintain the blee ding kit by using isopropyl alcoh ol
or soapy water, or wipe it wit h a dry cloth. D o not use produ cts
such as c ommercially-availa ble brake cleanser s.
Using suc h products ma y damage plastic and other part s.
When dis assembling and cleaning the blee ding kit, some of the
liquid us ed for cleaning ma y remain on the ki t parts, so m ake
sure that all the parts ar e completely dr y before reasse mbling
them.
Avoid remov ing the tube from the syringe. If the tube
accident ally comes off, re move the arm bus h and tube from th e
syringe and clean each par t thoroughly to remove any oil.
If the en d of the tube is wi dened, cut of f the widened pa rt.
Check tha t the tube is firm ly connected to the syringe bef ore
using it again.
If the tub e does not fit s ecurely during u se, oil may leak fr om
the tube c onnection.
SI-1304A-003
Remarque
(French)
Nettoye r et entretenir l e kit de purge de l'air en utilisant d e
l'alcool d'i sopropyle ou de l 'eau savonneuse o u l'essuyer avec
un chiff on sec. Ne pas utiliser de produ its tels que ne ttoyeurs
pour frei n disponibles da ns le commerce.
L'utilisation de tels produits p eut endommage r les pièces en
plastiqu e et autres.
Lors du d émontage et du nettoyage du ki t de purge, du liq uide
utilisé p our le nettoyage peut demeurer sur les pièces d u kit. Il
faut donc veiller à ce que l es pièces soien t complètement
sèches a vant de les remon ter.
Évitez de r etirer le tube de la seringue. Si l e tube se détac he
accidente llement, retirez le coussinet de bras et le tube de la
seringue et nettoyez minu tieusement chaq ue pièce afin de
retirer to ute huile. Si le bo ut du tube s'est élargit, couper l a
partie é largie. Vérifiez que le tube est ferm ement raccordé à la
seringue avant de l'utiliser à nouveau.
Si le tube ne s'ajuste pas bi en pendant l'utili sation, de l'huil e
peut fui r de la connexion du tube.