

Page 1
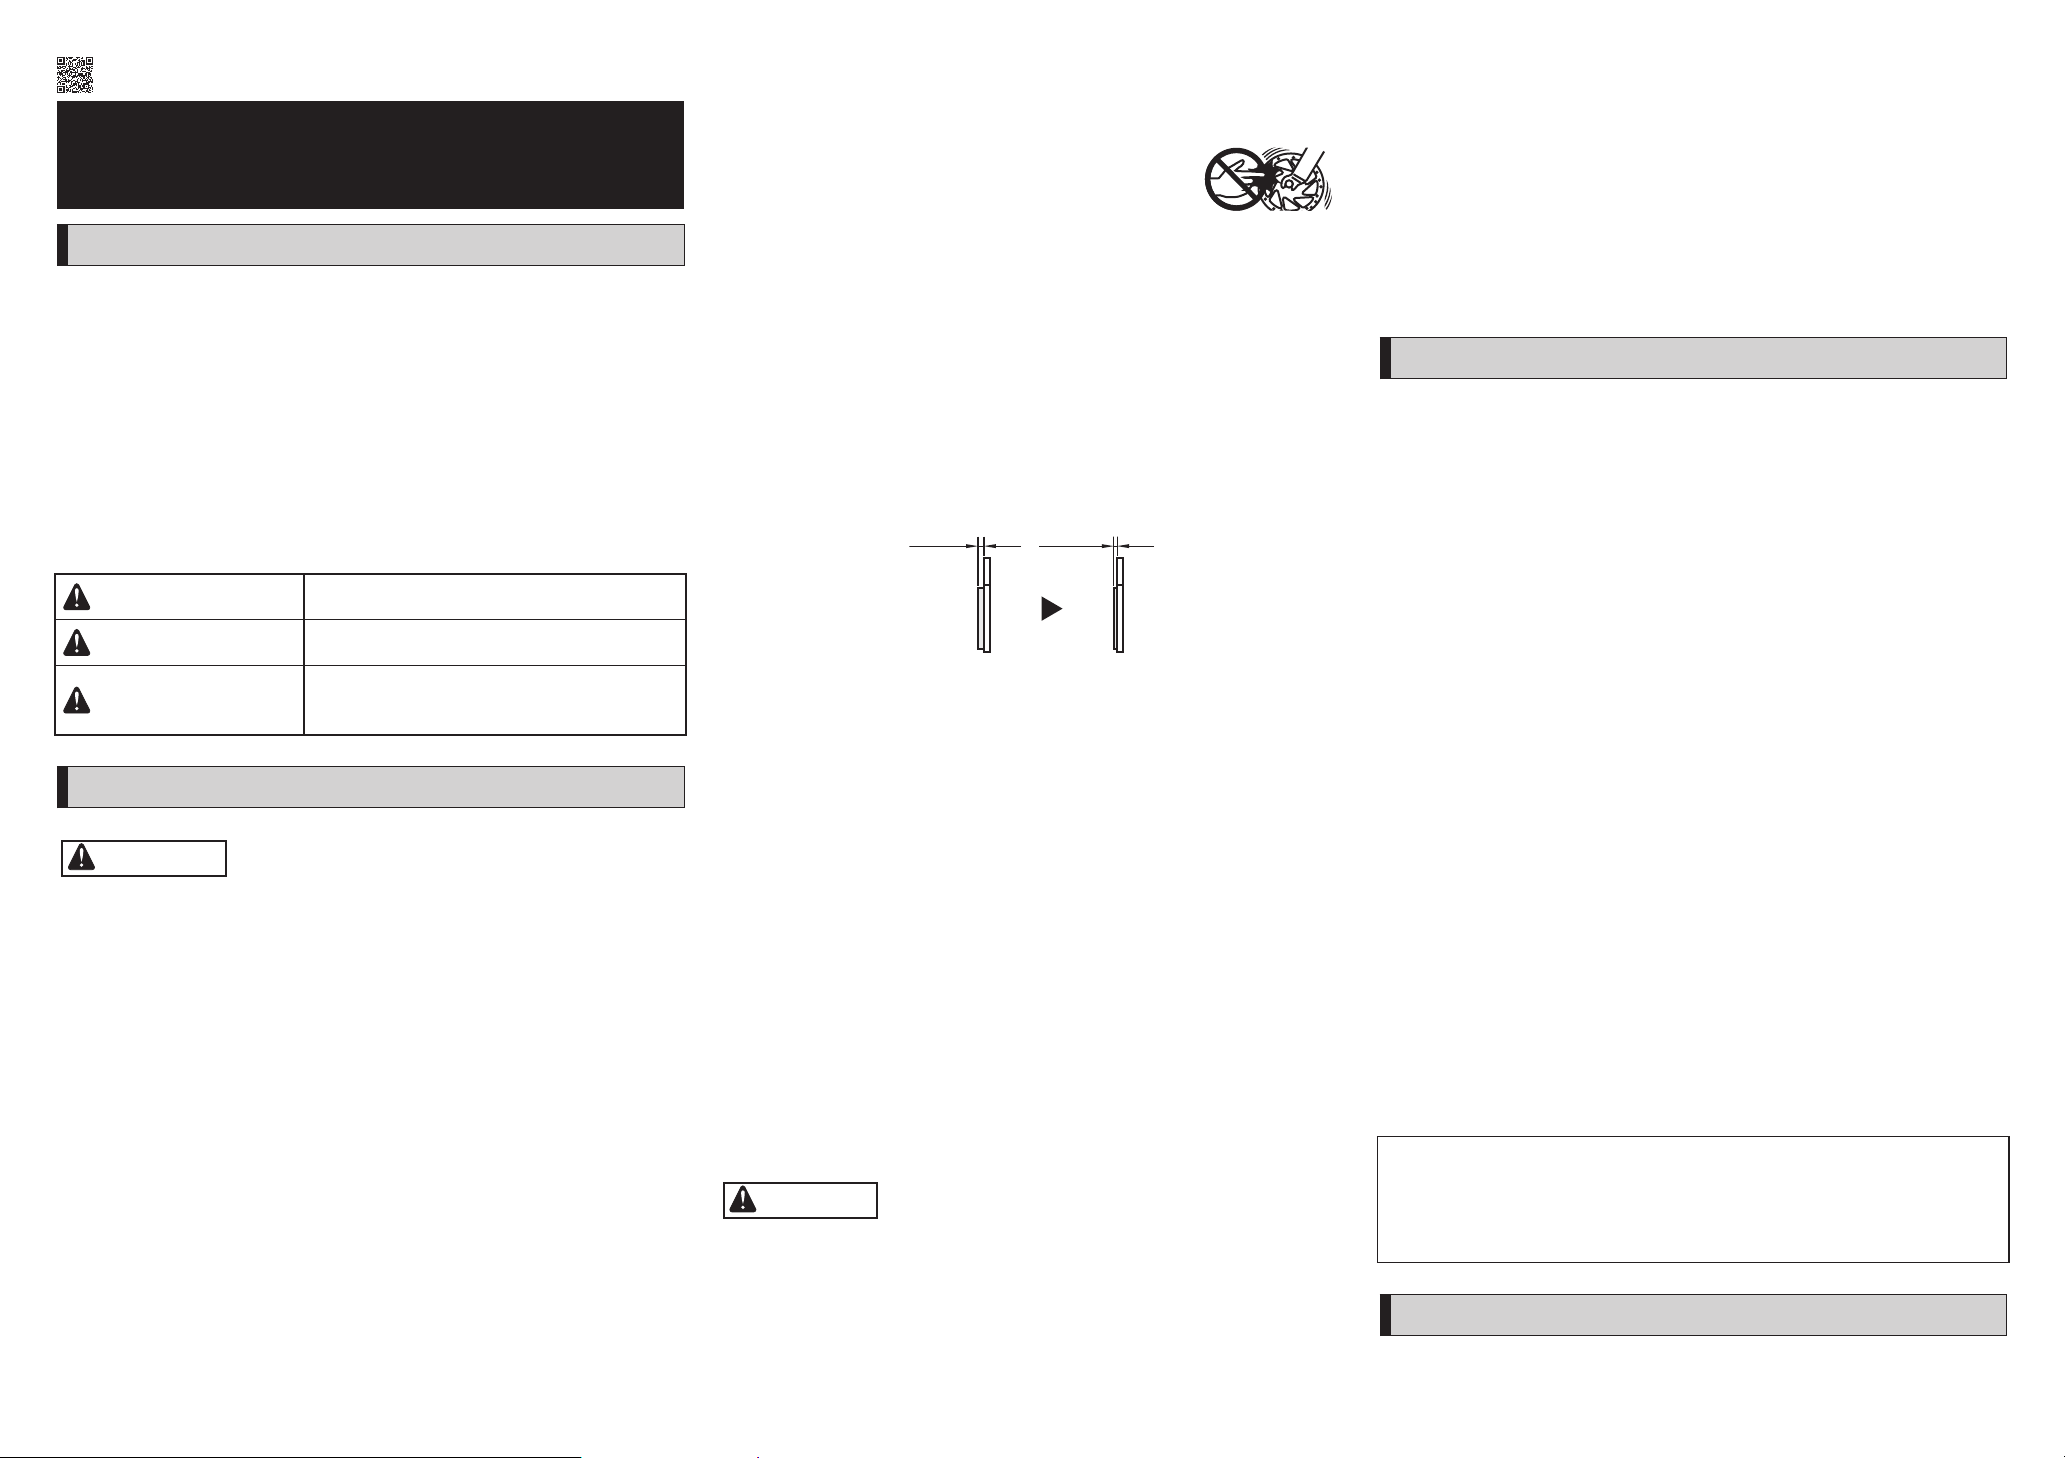
2 mm 0.5 mm
UM-07R0B-000
User's Manual
Dual Control Lever (DI2) for
Hydraulic Disc Brake
IMPORTANT NOTICE
•Contact the place of purchase or a distributor for information on installation,
adjustment, and replacement of the products which are not found in the user's
manual. A dealer's manual for professional and experienced bicycle mechanics is
available on our website (https://si.shimano.com).
For safety, be sure to read this “user's manual” thoroughly
before use, follow it for correct use, and store it so that it
can be referenced at any time.
The following instructions must be observed at all times in order to prevent
personal injury and physical damage to equipment and surroundings. The
instructions are classified according to the degree of danger or damage which may
occur if the product is used incorrectly.
DANGER
WARNING
CAUTION
Important safety information
WARNING
•Because each bicycle may handle slightly differently depending on the model, be
sure to learn the proper braking technique (including brake lever pressure and
bicycle control characteristics) and operation of your bicycle. Improper use of your
bicycle's brake system may result in a loss of control or a fall, which could lead to
severe injury.
•Do not disassemble or modify the product. This may cause the product to not
operate correctly, and you may suddenly fall and be seriously injured.
•Do not touch the front derailleur when operating the shifting switch.
Doing so may result in injury due to trapped fingers.
•This hydraulic brake system has different braking characteristics from those of the
rim brake type, demonstrating relatively high braking force at the beginning of
braking (higher than the rim brake type); familiarize yourself sufficiently with the
braking characteristics before using it. If you ride the bicycle without becoming
sufficiently familiar with the braking characteristics, braking may cause you to fall
off the bicycle, potentially causing serious injury or a fatal accident.
•Do not use a 203 mm or 180 mm disc brake rotor. This will excessively increase the
braking force, which could cause you to lose control of the bicycle, fall, and be
seriously injured.
•Riders must become accustomed to the higher performance of this brake before
riding the bicycle. The 160 mm disc brake rotors provide a higher braking force
Failure to follow the instructions will result in
death or serious injury.
Failure to follow the instructions could result in
death or serious injury.
Failure to follow the instructions could cause
personal injury or physical damage to equipment
and surroundings.
than the 140 mm disc brake rotors. If you ride the bicycle without becoming
sufficiently familiar with the braking characteristics, braking may cause you to fall
off the bicycle, potentially causing serious injury or a fatal accident.
•Please use extra caution to keep your fingers away from the
rotating disc brake rotor. The disc brake rotor is sharp
enough to inflict severe injury to your fingers if caught
within the openings of moving rotor.
•Do not touch the calipers or disc brake rotor while riding or immediately after
dismounting from the bicycle. The calipers and disc brake rotor will become hot
when the brakes are operated, so you may get burned if you touch them.
•Be careful not to allow any oil or grease to get onto the disc brake rotor and
brake pads. Riding the bicycle with oil or grease on the disc brake rotor and brake
pads may prevent the brakes from operating and result in serious injury due to a
fall or collision.
•Check the thickness of the brake pads and do not use them if they have a
thickness of 0.5 mm or less. Doing so may prevent the brakes from operating and
result in serious injury.
•Do not use the disc brake rotor if it is cracked or deformed. The disc brake rotor
may break, and result in serious injury due to a fall. Replace the disc brake rotor
with a new one.
•Do not use the disc brake rotor if its thickness is 1.5 mm or less. Also do not use it
if the aluminum surface becomes visible. The disc brake rotor may break, and
result in serious injury due to a fall. Replace the disc brake rotor with a new one.
•Do not continuously apply the brakes. Doing so may cause a sudden increase in
the brake lever stroke, preventing the brakes from operating and resulting in
serious injury.
•Do not use the brakes with fluid leaking. Doing so may prevent the brakes from
operating and result in serious injury.
•Do not apply the front brake too strongly. If you do so, the front wheel may lock
and the bicycle may fall forward, and serious injury may result.
•Because the required braking distance will be longer during wet weather, reduce
your speed and apply the brakes early and gently. You may fall or collide and be
seriously injured.
•A wet road surface may cause tires to lose traction; therefore, to avoid this,
reduce your speed and apply the brakes early and gently. If the tires lose traction,
you may fall and be seriously injured.
CAUTION
Cautions on SHIMANO genuine mineral oil
•Use appropriate eye protection when handling, and avoid contact with eyes. In
the event of eye contact, flush with fresh water and seek medical assistance
immediately. Contact with eyes may result in irritation.
•Use gloves when handling. In the event of skin contact, wash well with soap and
water. Contact with skin may cause a rash and discomfort.
•Cover nose and mouth with a respirator type mask and use in a well ventilated
area. Inhalation of mineral oil mist or vapors may cause nausea.
•If mineral oil mist or vapor is inhaled, go to an area with fresh air. Cover up with
a blanket. Stay warm and stable and seek professional medical advice
immediately.
Bed-in period
•Disc brakes have a bed-in period, and the braking force will gradually increase as
the bed-in period progresses. Make sure that you are aware of any such increases
in braking force when using the brakes during the bed-in period. The same thing
will happen when the brake pads or disc brake rotor are replaced.
Notice
•To prevent noise and ensure the best performance, perform the bed-in procedure
after replacing the brake pads or disc brake rotor.
•Be sure to rotate the crank when carrying out any operations which are related
to gear shifting.
•The components are designed to be fully waterproofed to withstand wet weather
riding conditions; however, do not deliberately place them into water.
•Do not clean the bicycle with a high-pressure washer. If water gets into any of the
components, operating problems or corrosion may result.
•Handle the components carefully, and avoid subjecting them to strong shock.
•Be careful not to get water into the E-TUBE ports.
•Do not use the thinners or harsh solvents to clean the products. Such solvents may
damage the surface.
•When the bicycle wheel has been removed, it is recommended that pad spacers
are installed. Do not depress the brake lever while the wheel is removed. If the
brake lever is depressed without the pad spacers installed, the pistons will
protrude further than normal. If that happens, consult a place of purchase.
•Use soapy water and a dry cloth when cleaning and carrying out maintenance of
the brake system. Do not use commercially available brake cleaners or silencing
agents. Such substances can cause damage to parts such as seals.
•Contact the place of purchase for updates of the component software. The most
up-to-date information is available on the SHIMANO website.
•Also read the manuals for other connected components together with the
manual for the brakes.
•Products are not guaranteed against natural wear and deterioration from normal
use and aging.
•For maximum performance we highly recommend SHIMANO lubricants and
maintenance products.
This device complies with part 15 of the FCC Rules. Operation is subject to the
following two conditions:
(1) This device may not cause harmful interference, and (2) this device must accept
any interference received, including interference that may cause undesired
operation.
Regular inspections before riding the bicycle
Before riding the bicycle, check the following items. If any problems are found,
consult your place of purchase or a distributor.
Page 2
•Are there any signs of brake oil leakage?
One Holland, Irvine, California 92618, U.S.A. Phone: +1-949-951-5003
High Tech Campus 92, 5656 AG Eindhoven, The Netherlands Phone: +31-402-612222
Roebuck Way, Knowlhill, Milton Keynes, Buckinghamshire, MK5 8HL, United Kingdom
3-77 Oimatsu-cho, Sakai-ku, Sakai City, Osaka 590-8577, Japan
•Do the front and rear brakes work correctly?
•Do the pads have a thickness of 0.5 mm or more?
•Is the disc brake rotor cracked or deformed?
•Does gear shifting occur when the shifting switches are operated?
•Are the levers securely installed to the handlebar?
•Do any abnormal noises occur during operation?
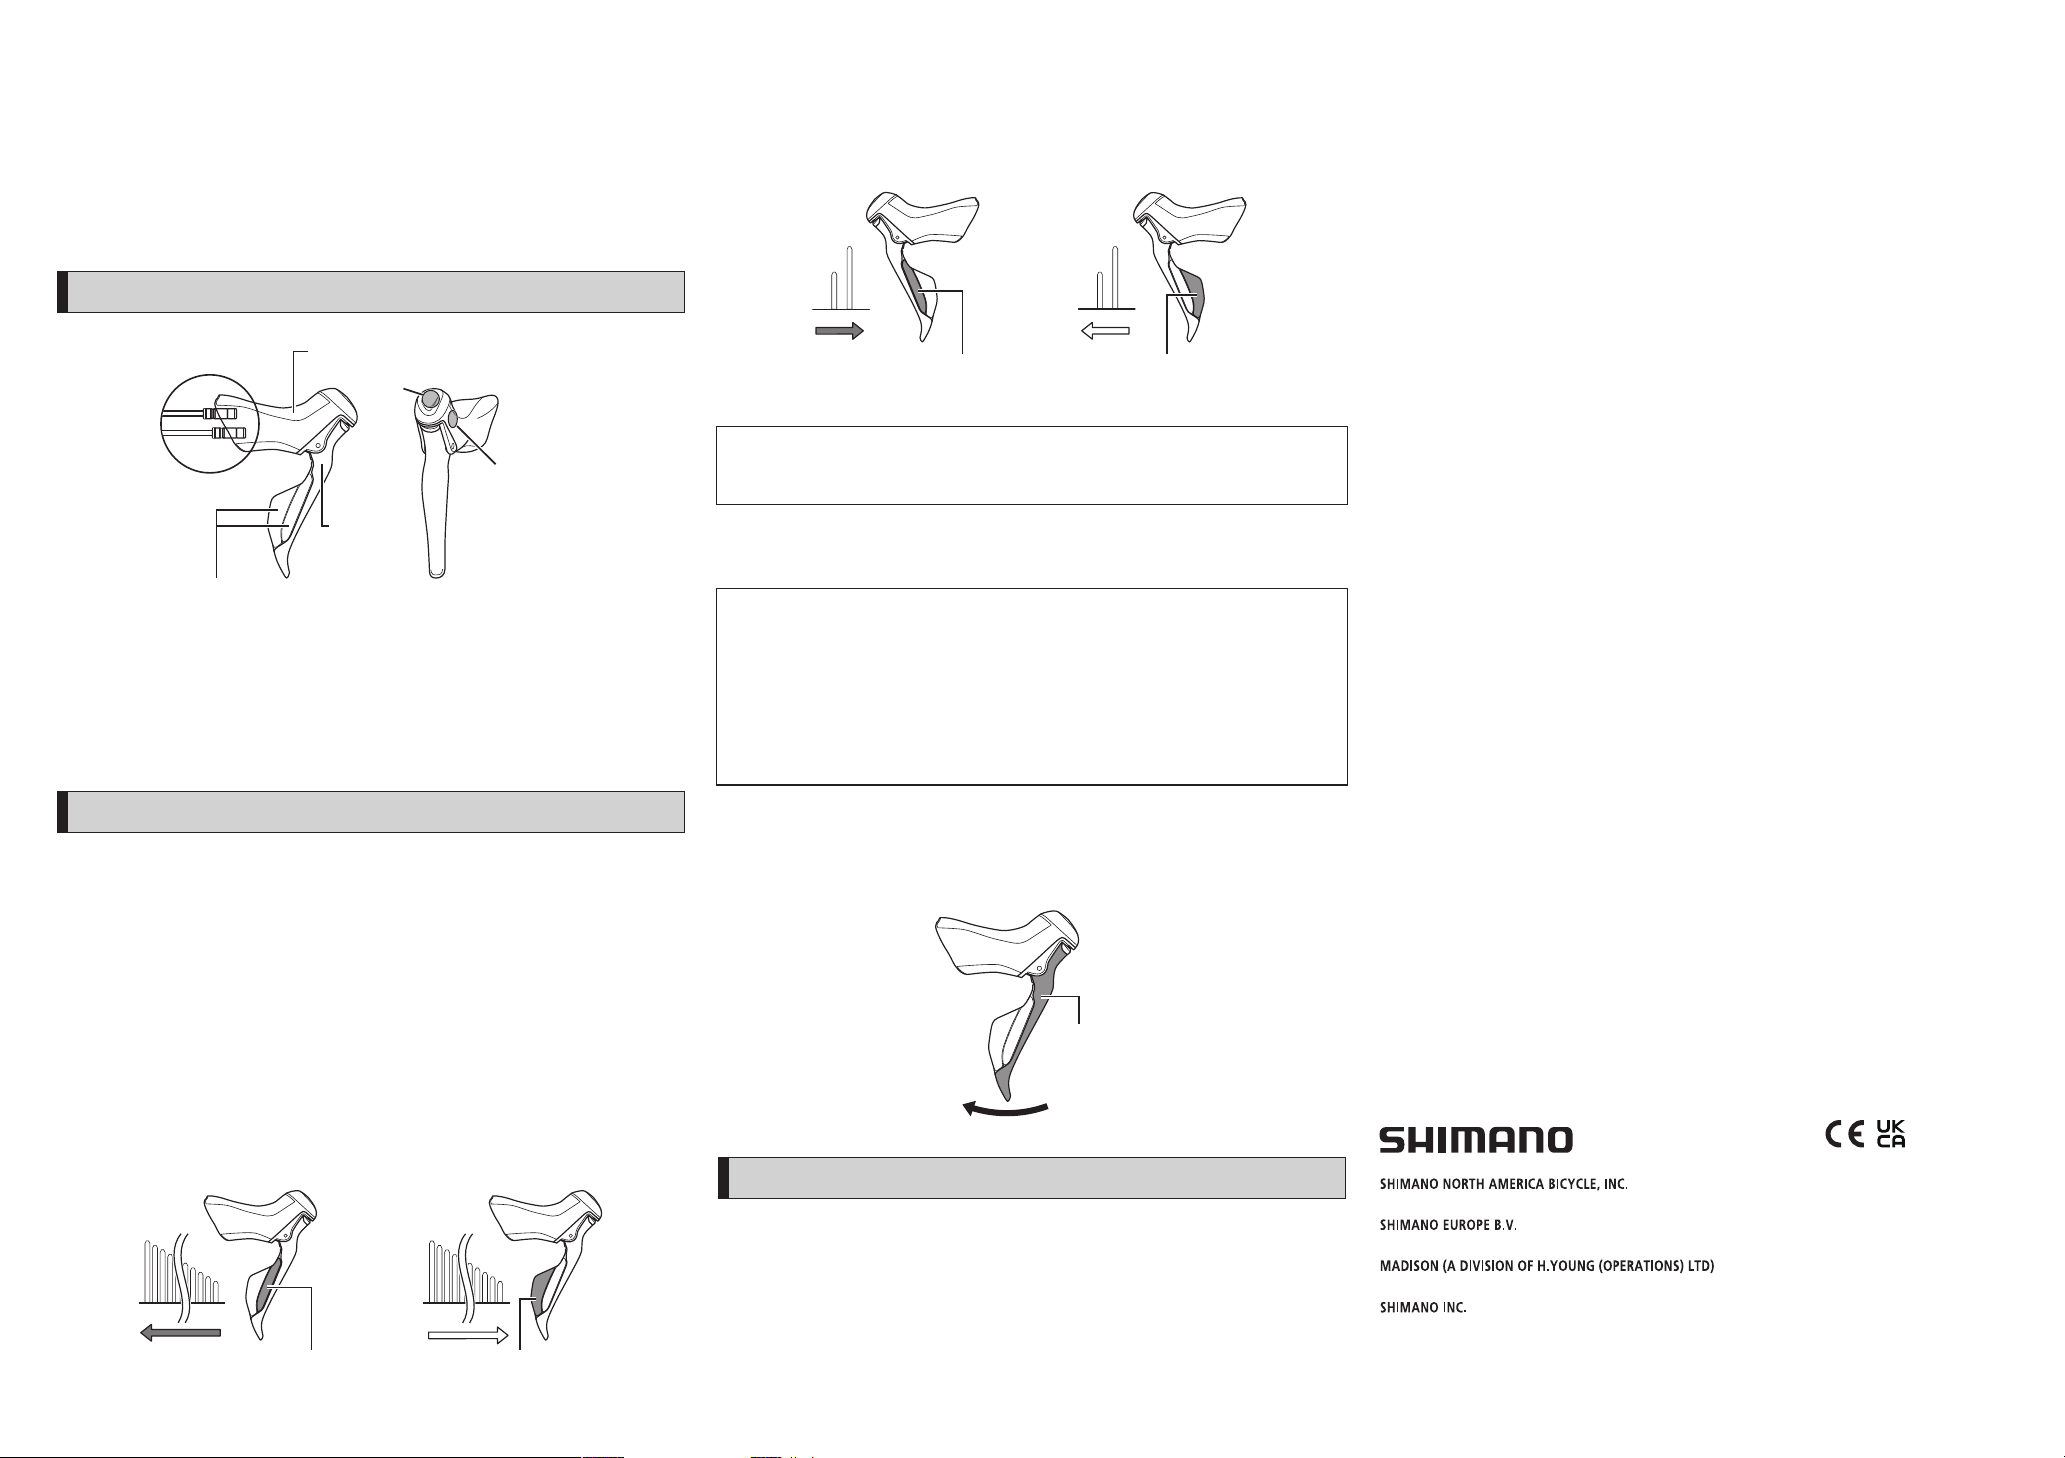
Names of parts
Front shifting switch operation (default setting)
< Shifting switch (X) >
Shifts to a larger chainring.
< Shifting switch (Y) >
Shifts to a smaller chainring.
you bed in the front brake.
3. Repeat steps 1 and 2 for at least 20 times for both the front and rear brakes.
While repeating the process, the brake force will increase.
E-TUBE port*2
Shifting switch
Bracket cover
Location of hood button*1
A
B
Brake lever
*1 Depending on specifications, some models may lack some functions.
A hood button will be at either A (end of the bracket) or B (inward direction of
handlebar) locations for models installed with a hood button. Pull back the
bracket cover and check the location of the hood button.
*2 The number of connecting ports in the E-TUBE port differs depending on the
model.
How to operate
Gear shifting operations
Be sure to rotate the crank when carrying out any operations which are related to
gear shifting.
X
Shifting switch (X)
Y
Shifting switch (Y)
If the chain falls off the crank to the inside, press and hold the shifting switch (X)
for 1 second or more. This will cause the front derailleur to move to the outermost
position and remain there for 10 seconds in order to remount the chain.
Actual behavior may differ depending on the connected components and software
version.
The settings for each switch can be changed as follows.
For details about changing settings, contact the place of purchase.
•Reverse the shifting up and shifting down functions for shifting switches (X) and
(Y)
•Reverse the rear and front shifting switches
•Multi shift mode setting
•Configure the hood button as a shifting switch
Operating the brakes
This product has reach adjustment and free stroke adjustment functions. For details
about making these adjustments, contact the place of purchase.
Hood button (default setting)
The hood button sends signals via the wireless unit to compatible products. The
operation and functions differ depending on the compatible product. Refer to the
manual for the compatible product.
Rear shifting switch operation (default setting)
< Shifting switch (X) >
Shifts to a larger sprocket.
X
Shifting switch (X)
< Shifting switch (Y) >
Shifts to a smaller sprocket.
Y
Shifting switch (Y)
Brake lever
How to perform bed-in
To optimize the performance of the brake pads and disc brake rotor, perform the
bed-in procedure as explained in the steps below:
1. Ride your bicycle in a flat and safe area without obstacles and accelerate to a
moderate speed.
2. Operate the brake lever until you slow down to walking speed.
Do this only with one brake lever at a time. Be careful when performing this
procedure. Always operate your brake lever with moderation, especially when
Please note: specifications are subject to change for improvement without notice. (English)
© Jan. 2021 by SHIMANO INC. ITP
 Loading...