

Page 1

(English)
User's Manual
UM-0RM0B-002
Dual Control Lever (Di2)
Hydraulic Disc Brake
https://si.shimano.com
Page 2

Contents
IMPORTANT NOTICE........................................................................................ 3
Important safety information........................................................................ 4
Notice............................................................................................................... 8
FCC ................................................................................................................. 10
Regular inspections before riding the bicycle ............................................ 11
Names of parts.............................................................................................. 12
How to operate............................................................................................. 13
Gear shifting operation .....................................................................................13
Hood button (default setting) ..........................................................................14
Rear shift switch operation (default setting) ...................................................15
Front shift switch operation (default setting)..................................................16
Operating the brakes.........................................................................................17
Selecting / confirming the shift mode ..............................................................18
Switching to the adjustment mode ..................................................................19
Checking the coin battery level with a shift switch operation .......................20
Coin battery replacement............................................................................. 21
Before replacing the coin batteries ..................................................................21
Replacing the coin batteries..............................................................................22
Method for pairing with the rear derailleur............................................... 24
How to perform bed-in ................................................................................ 25
Specifications ................................................................................................ 26
2
Page 3
IMPORTANT NOTICE
IMPORTANT NOTICE
Contact the place of purchase or a distributor for information on installation, adjustment, and replacement of
the products which are not found in the user's manual. A dealer's manual for professional and experienced
bicycle mechanics is available on our website ( https://si.shimano.com ).
Please observe the appropriate rules and regulations of the country, state or region in which you conduct your
business as a dealer.
For safety, be sure to read this user's manual thoroughly before use, follow it for correct use, and store it so
that it can be referenced at any time.
DANGER
WARNING
CAUTION
Failure to follow the instructions will result in death or serious injury.
Failure to follow the instructions could result in death or serious injury.
Failure to follow the instructions could cause personal injury or physical damage to
equipment and surroundings.
3
Page 4

Important safety information
Important safety information
Remove and immediately recycle or dispose of used batteries according to local regulations and keep away
from children. Do NOT dispose of batteries in household trash or incinerate.
Even used batteries may cause severe injury or death.
Call a local poison control center for treatment information.
The compatible battery type:CR1632
The nominal battery voltage:3 V
Non-rechargeable batteries are not to be recharged.
Do not force discharge, recharge, disassemble, heat above 85°C or incinerate. Doing so may result in injury
due to venting, leakage or explosion resulting in chemical burns.
Ensure the batteries are installed correctly according to polarity (+ and -).
Do not mix old and new batteries, different brands or types of batteries, such as alkaline, carbon-zinc, or
rechargeable batteries.
Remove and immediately recycle or dispose of batteries from equipment not used for an extended period of
time according to local regulations.
Always completely secure the battery compartment. If the battery compartment does not close securely, stop
using the product, remove the batteries, and keep them away from children.
Because each bicycle may handle slightly differently depending on the model, be sure to learn the proper
braking technique (including brake lever pressure and bicycle control characteristics) and operation of
your bicycle. Improper use of your bicycle's brake system may result in a loss of control, which could lead
to serious injury due to a fall or collision.
Do not disassemble or modify the product. This may cause the product to not operate correctly, and you
may suddenly fall and be seriously injured.
Do not throw or subject this product to strong shocks. If this is not observed, bursting, overheating or
problems with operation may occur.
Do not let grease adhere to the metal terminals. A conduction failure may result.
Use only the coin batteries specified. When replacing the coin battery, replace both batteries at the same
time with new ones. Using different kinds of coin batteries or new and old coin batteries together may
cause the coin batteries to burst, leak fluid, overheat or catch fire, resulting in a fire, injuries or
contamination in the surrounding area.
4
Page 5

Important safety information
Coin batteries are hazardous and must be kept away from children. Never put batteries in mouth or in any
part of the body. Severe or fatal injuries can occur within 2 hours if swallowed or placed inside the body. If
this occurs or is suspected, seek medical attention immediately.
Do not use this equipment in locations where children are likely to be present. If the included coin
batteries are swallowed by mistake, seek medical attention immediately.
Dispose of the coin batteries according to proper country and/or state disposal regulations. Disposal of this
product into fire or a hot oven, or mechanically crushing or cutting it, can result in an explosion of the coin
batteries.
Do not use the coin batteries outside their operating temperature ranges. If a battery is used or stored in
temperatures which are outside these ranges, fire, injury or problems with operation may occur.
Do not use the coin batteries if leakages, discoloration, deformation or any other abnormalities occur. If
this is not observed, bursting, overheating or problems with operation may occur.
If any leaked fluid from the coin batteries gets on your skin or clothes, wash it off immediately with clean
water. The leaked fluid may damage your skin.
Do not leave this product in an extremely high temperature surrounding environment such as in a closed
vehicle on a hot day, or near a heater. Doing so may result in an explosion of the coin batteries or the
leakage of flammable liquid or gas from them.
Do not subject this product to extremely low air pressure. Doing so may result in an explosion of the coin
batteries or the leakage of flammable liquid or gas from them. Transporting this product by air is not a
problem.
When operating the shift switch, be careful not to allow your fingers to be caught in the derailleur. The
powerful motor which drives the electronic gear shifting derailleur will operate without stopping until the
shifting position is reached.
This hydraulic brake system has different braking characteristics from those of the rim brake type,
demonstrating relatively high braking force at the beginning of braking (higher than the rim brake type);
familiarize yourself sufficiently with the braking characteristics before using it. If you ride the bicycle
without becoming sufficiently familiar with the braking characteristics, braking may cause you to fall off
the bicycle, potentially causing serious injury or a fatal accident.
The braking force for a hydraulic brake system will increase along with the size of the disc brake rotor (140
mm, 160 mm, 180 mm, 203 mm).
Do not use a 203 mm disc brake rotor. This will excessively increase the braking force, which could cause
you to lose control of the bicycle, fall, and be seriously injured.
Only use a 180 mm disc brake rotor if you are unable to obtain sufficient braking force with a 160 mm
disc brake rotor upon a trial ride, such as when riding an electronic assist road bicycle or if the rider is
heavy. Otherwise, you may lose control of the bicycle, fall, and be seriously injured.
If you feel that the braking force is too high or too low, stop use and consult a place of purchase or a
distributor. Accidents or falls may occur due to losing control of the bicycle, possibly resulting in serious
injury.
5
Page 6
2 mm 0.5 mm
Important safety information
Keep your fingers away from rotating disc brake rotors. The disc brake rotor is sharp enough to inflict
severe injury to your fingers if caught within the openings of moving rotor.
Do not touch the calipers or disc brake rotor while riding or immediately after dismounting from the
bicycle. The calipers and disc brake rotor will become hot when the brakes are operated, so you may get
burned if you touch them.
Do not allow any oil or grease to get onto the disc brake rotor and brake pads. Riding the bicycle with oil
or grease on the brake shoes may prevent the brakes from operating and result in serious injury due to a
fall or collision.
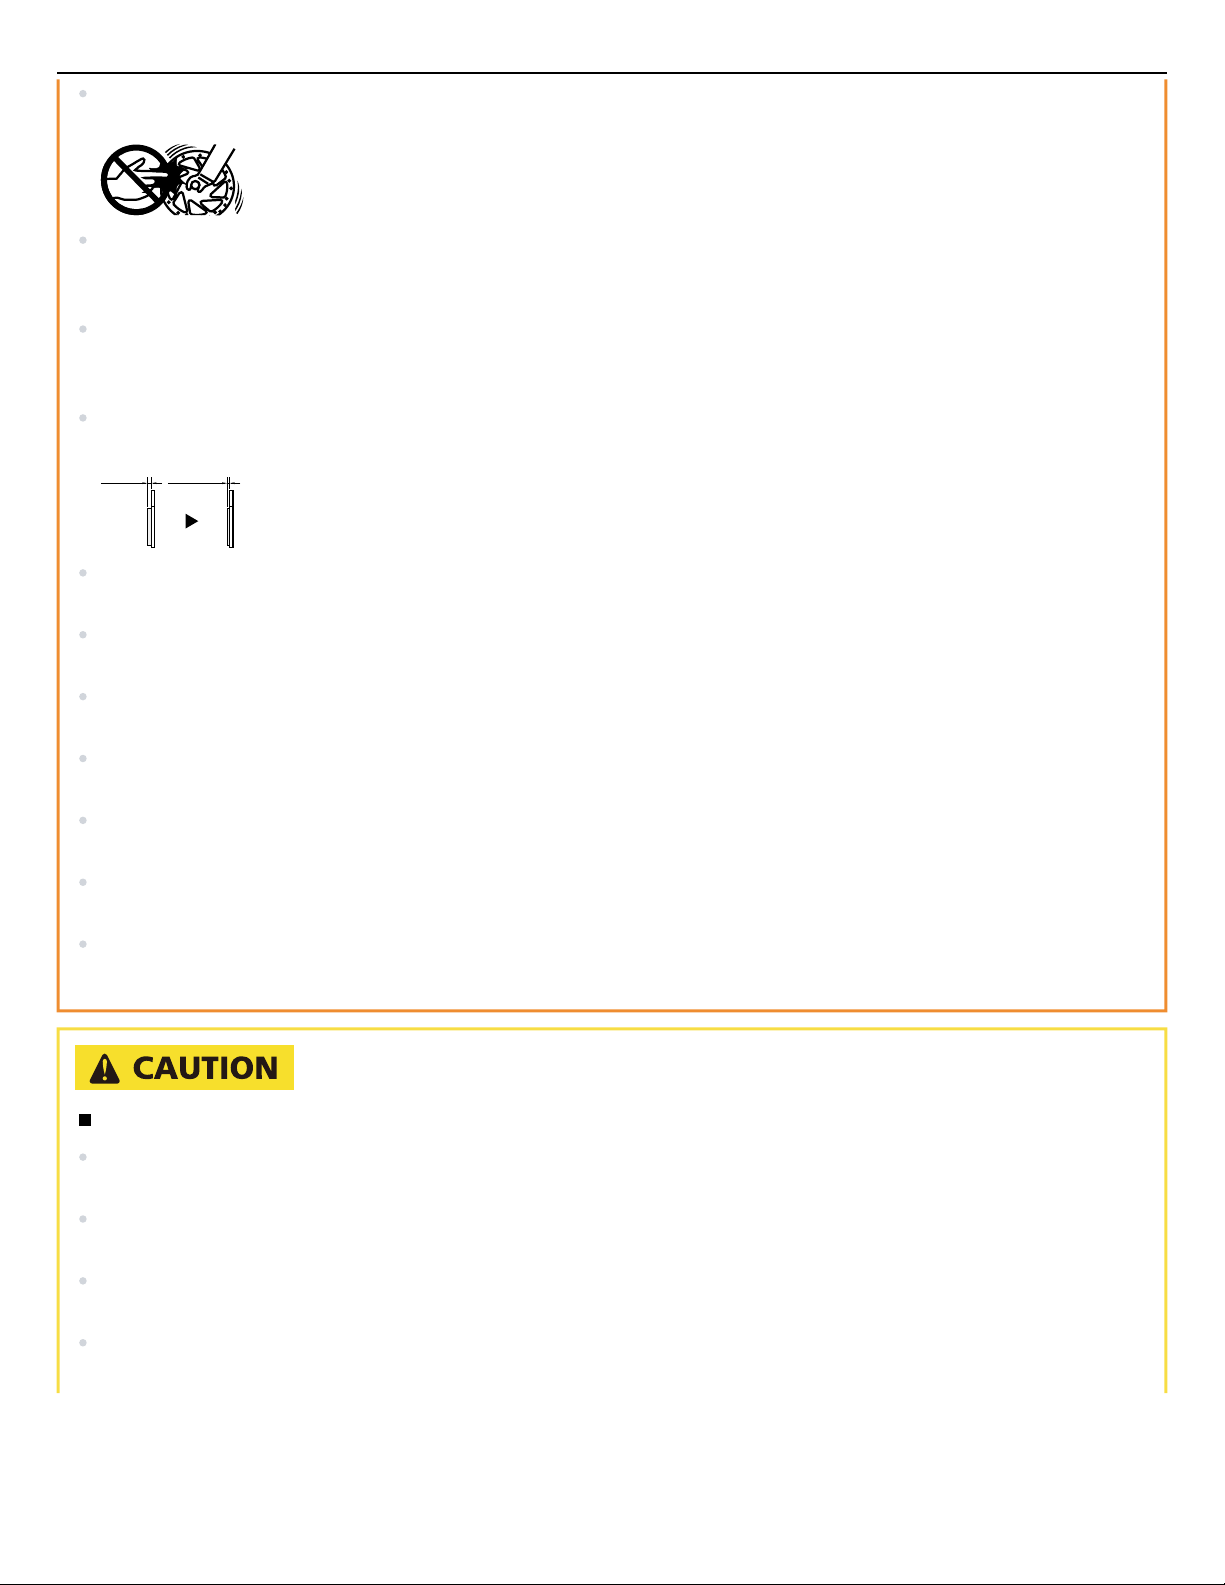
Check the thickness of the brake pads and do not use them if they have a thickness of 0.5 mm or less.
Doing so may prevent the brakes from operating and result in serious injury.
Do not use the disc brake rotor if it is cracked or deformed. The disc brake rotor may break, and result in
serious injury due to a fall.
Do not use the disc brake rotor if its thickness is 1.5 mm or less. Also do not use it if the aluminum surface
becomes visible. The disc brake rotor may break, and result in serious injury due to a fall.
Do not continuously apply the brakes. Doing so may cause a sudden increase in the brake lever stroke,
preventing the brakes from operating and resulting in serious injury.
Do not use the brakes with fluid leaking. Doing so may prevent the brakes from operating and result in
serious injury.
Do not apply the front brake too strongly. If you do so, the front wheel may lock and the bicycle may fall
forward, and serious injury may result.
Because the required braking distance will be longer during wet weather, reduce your speed and apply the
brakes early and gently. You may fall or collide and be seriously injured.
A wet road surface may cause tires to lose traction; therefore, to avoid this, reduce your speed and apply
the brakes early and gently. If the tires lose traction, you may fall and be seriously injured.
Cautions on SHIMANO genuine mineral oil
In the event of eye contact, flush with fresh water and seek medical assistance immediately. Contact with
eyes may result in irritation.
In the event of skin contact, wash well with soapy water. Contact with skin may cause a rash and
discomfort.
Cover nose and mouth with a respirator type mask and use in a well ventilated area. Inhalation of mineral
oil mist or vapors may cause nausea.
If mineral oil mist or vapor is inhaled, go immediately to an area with fresh air. Cover up with a blanket.
Stay warm and stable and seek professional medical advice.
6
Page 7

Important safety information
Bed-in period
Disc brakes have a bed-in period, and the braking force will gradually increase as the bed-in period
progresses. Accidents or falls may occur due to losing control of the bicycle, possibly resulting in serious
injury. The same thing will happen when the brake pads or disc brake rotor are replaced.
7
Page 8

Notice
Notice
To prevent noise and ensure the best performance, perform the bed-in procedure after replacing the brake
pads or disc brake rotor.
Be sure to rotate the crank while performing the switch operations related to gear shifting.
You can use E-TUBE PROJECT to update the software for the hood button. Please contact your place of
purchase for details.
The components are designed to be fully waterproofed to withstand wet weather riding conditions; however,
do not deliberately place them into water.
Do not clean the bicycle in a high-pressure wash. If water gets into any of the components, operating
problems or rusting may result.
Handle the components carefully, and avoid subjecting them to strong shock.
Be careful not to get water into the E-TUBE ports and the satellite shifter connection port.
Do not use the thinners or harsh solvents to clean the products. Such solvents may damage the surface.
In the case of carbon levers, wash them with a soft cloth using a neutral detergent. Otherwise, the material
may be damaged and lose strength.
Avoid leaving the carbon levers in places where high temperatures are present. Also keep them well away
from fire.
When the bicycle wheel has been removed, it is recommended that pad spacers are installed. Do not depress
the brake lever while the wheel is removed. If the brake lever is depressed without the pad spacers installed,
the pistons will protrude further than normal. If that happens, consult a place of purchase.
Use soapy water and a dry cloth when cleaning and carrying out maintenance of the brake system. Do not use
commercially available brake cleaners or silencing agents. Such substances can cause damage to parts such as
seals.
Contact the place of purchase for updates of the component software. The most up-to-date information is
available on the SHIMANO website.
Also read the manuals for other connected components together with the manual for the brakes.
Be sure to attach dummy plugs to any unused E-TUBE ports and the satellite shifter connection port. If water
gets into any of the components, operating problems or rusting may result.
The electric wire has small waterproof connectors, so do not repeatedly connect and disconnect it too often.
Doing so may impair the waterproofing.
2.4 GHz digital wireless
This product adopts digital communication technologies in the 2.4 GHz frequency, which are used for wireless
LAN, etc. It may receive interference in the following locations or environments that prevents wireless
communication from being performed correctly:
Near a device such as a television, computer, radio, motor, or microwave oven, or inside an automobile or
railway car
Near a railway crossing or railway track, television transmitting station, or radar base, etc.
When using the device in combination with another cordless device or some lights
8
Page 9

Notice
Coin batteries
Insert the coin batteries with the correct +/- orientation.
Remove the coin batteries if you do not use them for a long period.
When the coin batteries are depleted, remove them immediately.
Store this product or the bicycle with this product installed in a cool indoor location away from direct sunlight
and rain (approx. 10 - 20°C). If the storage temperature is too low or too high, the performance of the coin
batteries is reduced, and their usable time will be shorter. When using after a long period of non-use, be sure
to replace the coin batteries with new ones.
Products are not guaranteed against natural wear and deterioration from normal use and aging.
For maximum performance we highly recommend SHIMANO lubricants and maintenance products.
9
Page 10

FCC
FCC
This device complies with part 15 of the FCC Rules. Operation is subject to the following two conditions:
(1) This device may not cause harmful interference, and (2) this device must accept any interference received, including
interference that may cause undesired operation.
10
Page 11

Regular inspections before riding the bicycle
Regular inspections before riding
the bicycle
Before riding the bicycle, check the following items. If any problems are found, consult your place of purchase or
a distributor.
Are there any signs of brake oil leakage?
Do the front and rear brakes work correctly?
Do the pads have a thickness of 0.5 mm or more?
Is the disc brake rotor cracked or deformed?
Does gear shifting occur when the shift switches are operated?
Are the levers securely installed to the handlebar?
Are there signs of cracks or peeling on the levers?
Do any abnormal noises occur during operation?
Is there sufficient charge remaining in the coin batteries?
11
Page 12
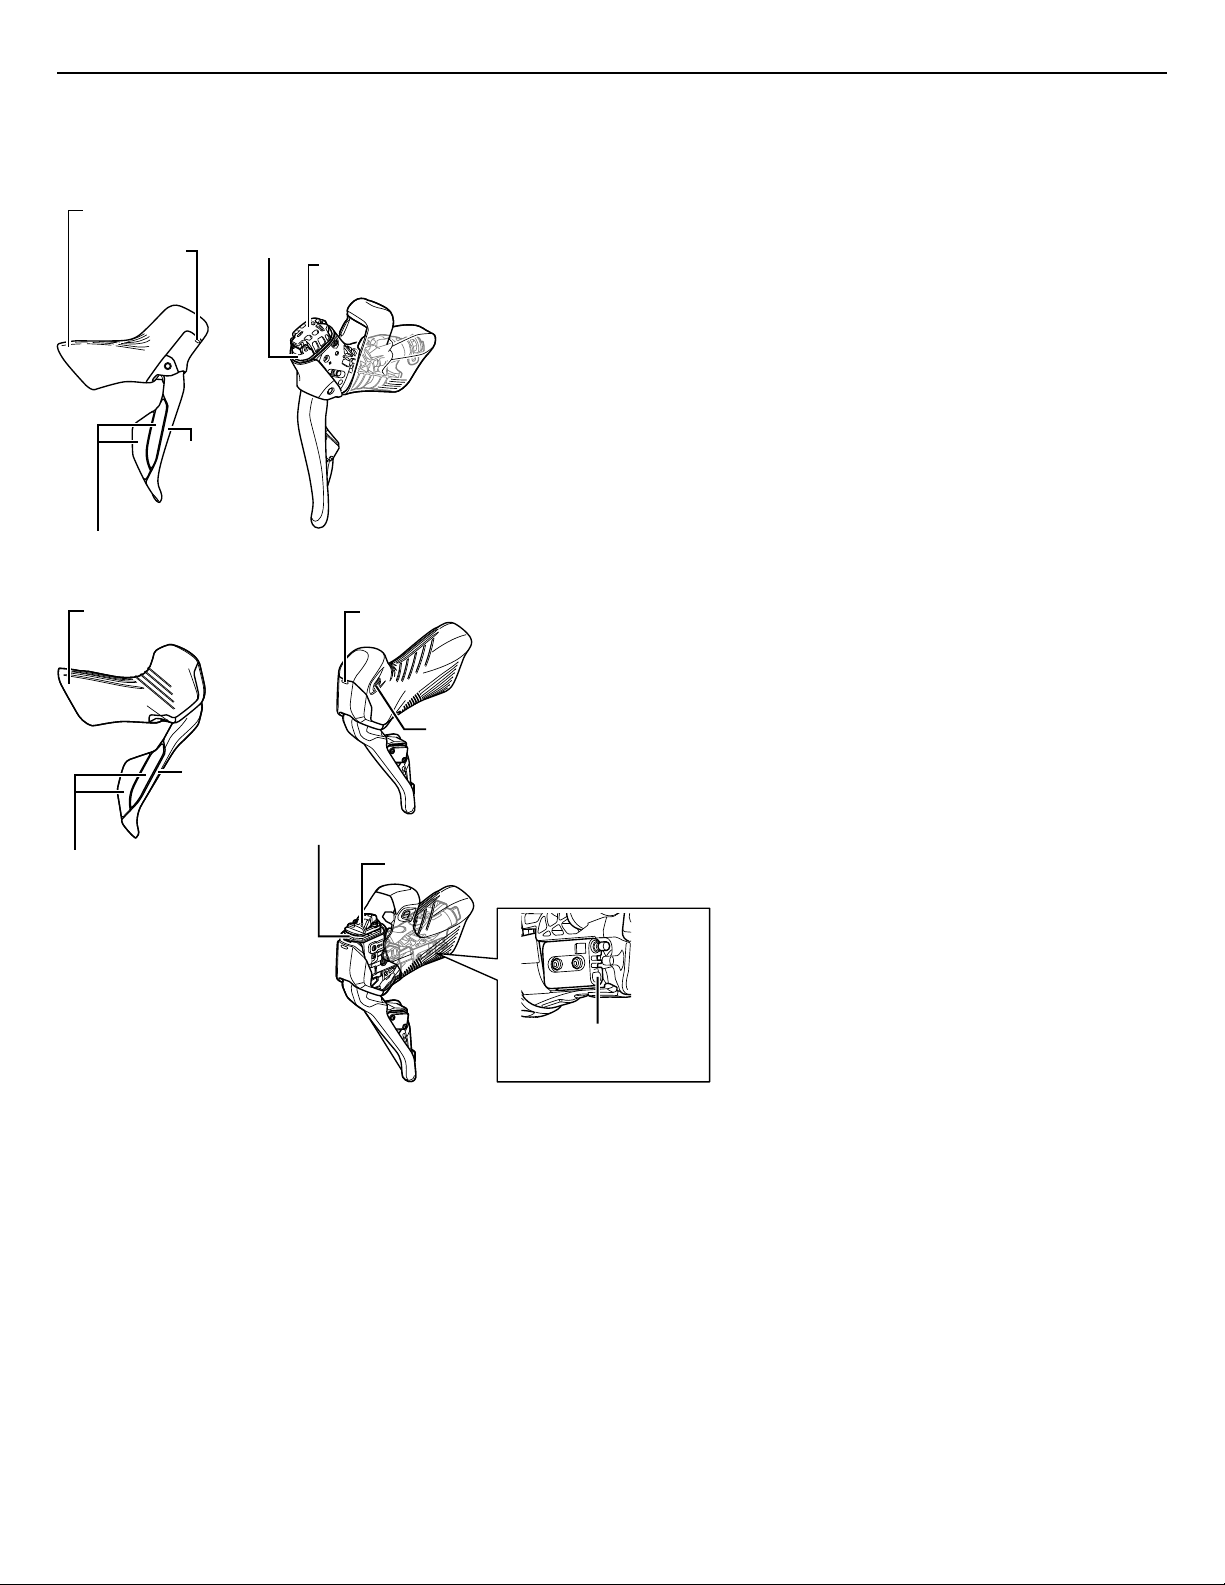
Bracket cover
Battery holder
Shift switch
Brake lever
Battery case
LED
Bracket cover
Shift switch
Brake lever
LED
Hood button
Battery holder
Battery case
Satellite shifter connection
port
Names of parts
Names of parts
ST-R7170
ST-RX825
* The E-TUBE port is not used. Be sure to attach a dummy plug to it.
12
Page 13

How to operate
Gear shifting operation
How to operate
Gear shifting operation
Be sure to rotate the crank while performing all switch operations related to gear shifting.
13
Page 14

How to operate
Hood button (default setting)
Hood button (default setting)
The hood button sends signals via the rear derailleur to compatible products.
The operation and functions differ depending on the compatible product. Refer to the manual for the
compatible product.
14
Page 15
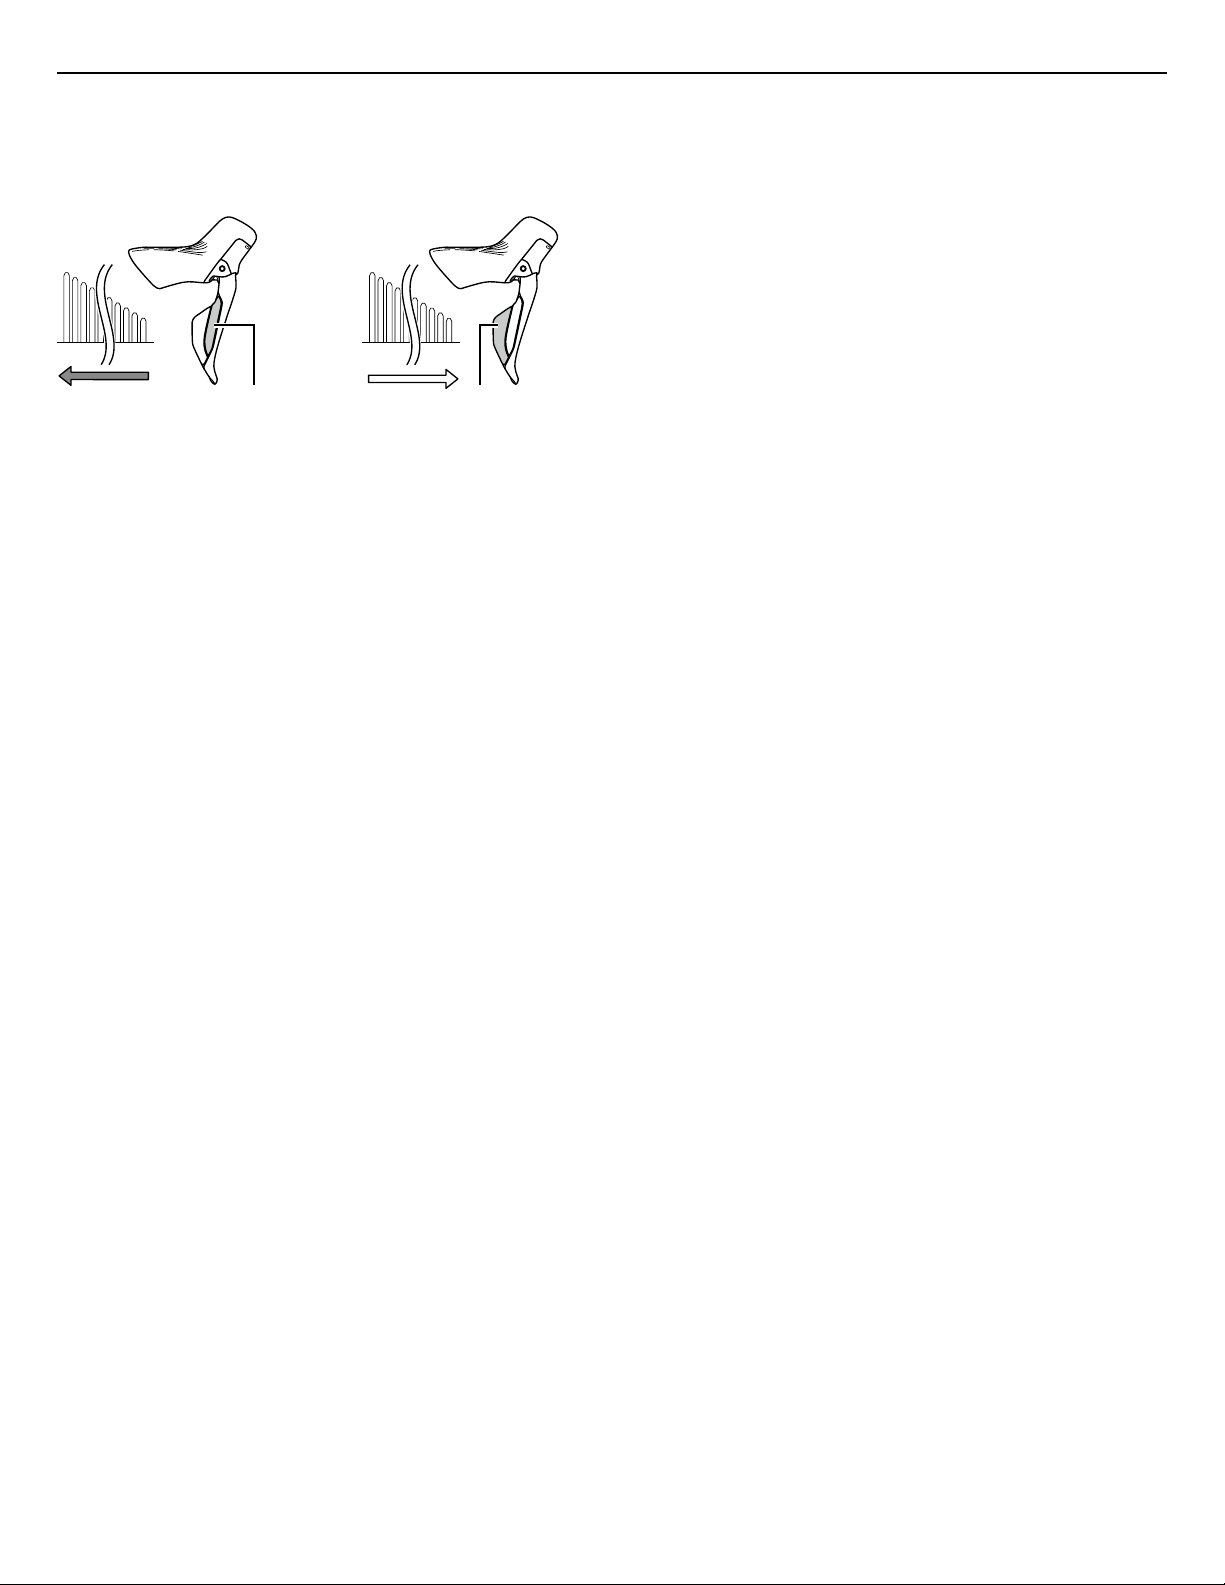
Shift switch [X] Shift switch [Y]
X
Y
<Shift switch [X]>
Shifts to a larger sprocket.
<Shift switch [Y]>
Shifts to a smaller sprocket.
How to operate
Rear shift switch operation (default setting)
Rear shift switch operation (default setting)
15
Page 16
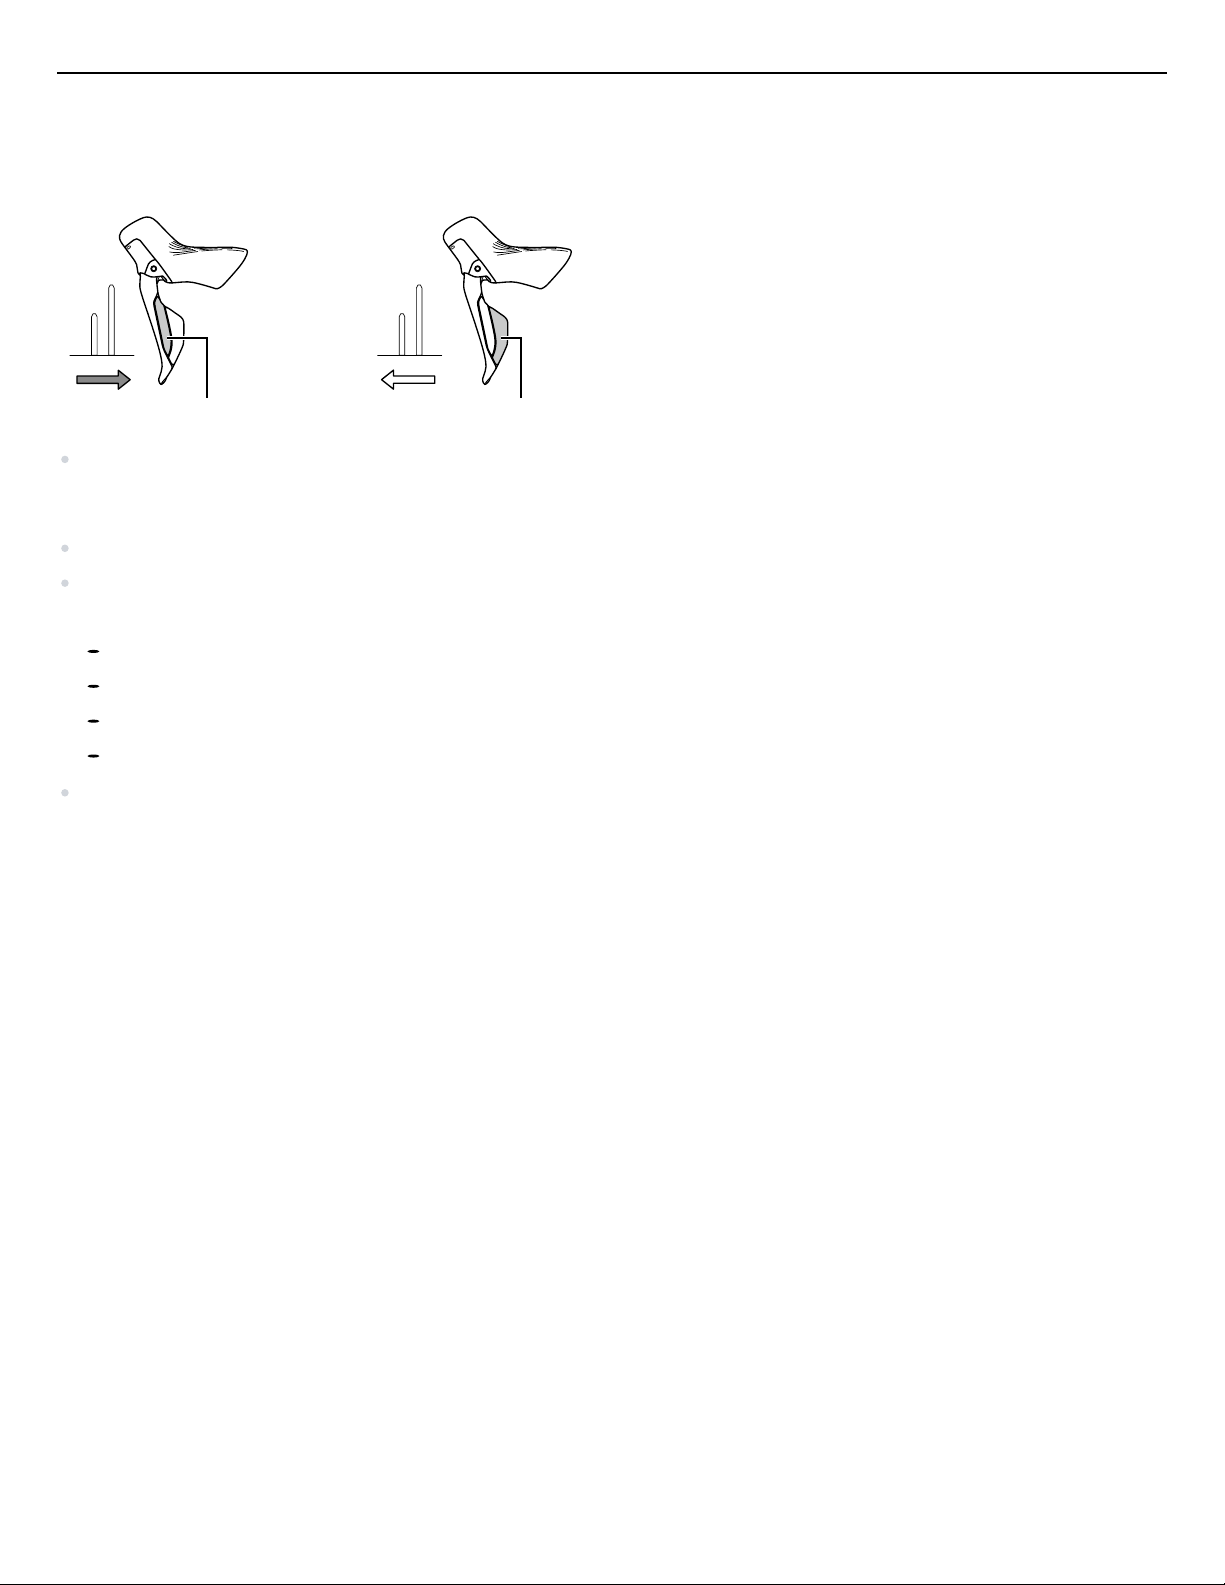
<Shift switch [X]>
Shifts to a larger chainring.
<Shift switch [Y]>
Shifts to a smaller chainring.
X Y
Shift switch [X] Shift switch [Y]
How to operate
Front shift switch operation (default setting)
Front shift switch operation (default setting)
If the chain falls off the crank to the inside, press and hold the shift switch [X] for 1 second or more. This will
cause the front derailleur to move to the outermost position and remain there for 10 seconds in order to
remount the chain.
Actual behavior may differ depending on the connected components and software version.
The settings for each switch can be changed as follows. For details about changing settings, contact the place
of purchase.
Reverse the shifting up and shifting down functions for shift switches [X] and [Y]
Reverse the rear and front shift switches
Multi shift mode setting
Configure the hood button as a shift switch
If no switch operations are performed for 30 minutes, gear shifting will not be performed with the first switch
operation after that. Gear shifting will be performed from the second switch operation.
16
Page 17
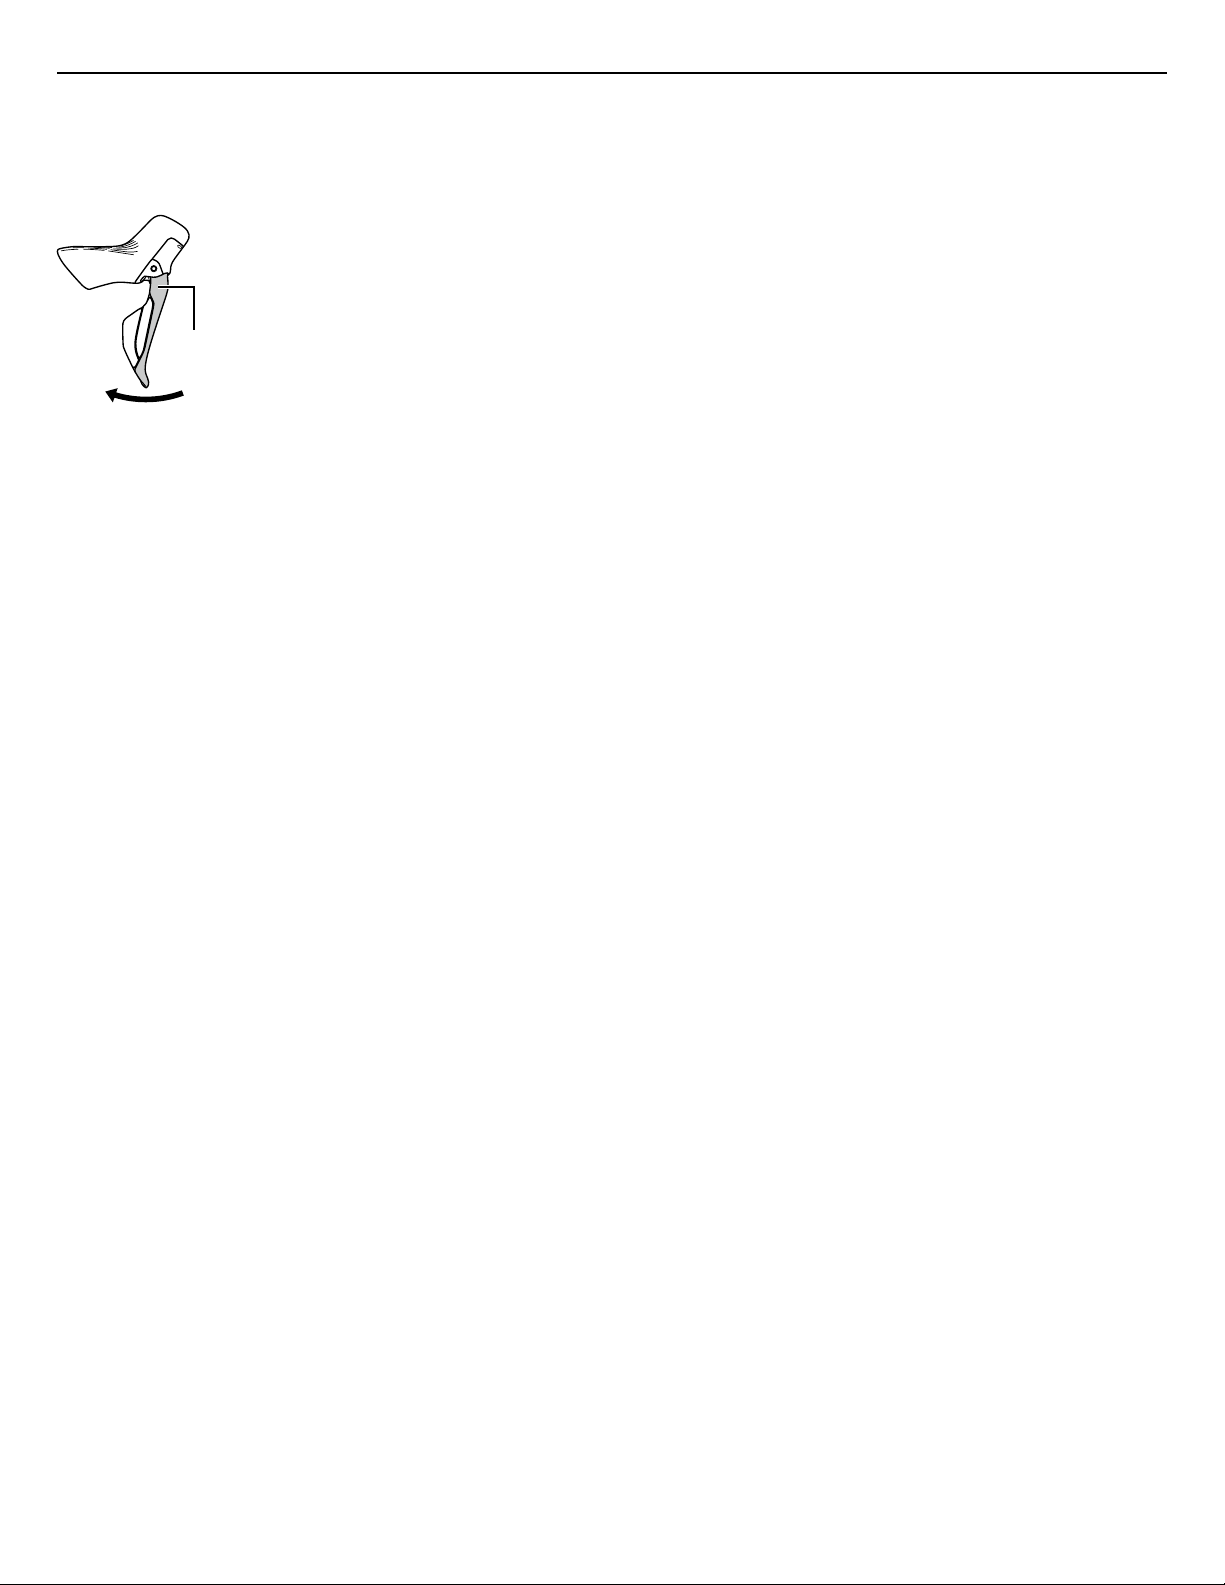
Brake lever
How to operate
Operating the brakes
Operating the brakes
This product has reach adjustment and free stroke adjustment functions. For details about making these
adjustments, contact the place of purchase.
17
Page 18
How to operate
Selecting / confirming the shift mode
Selecting / confirming the shift mode
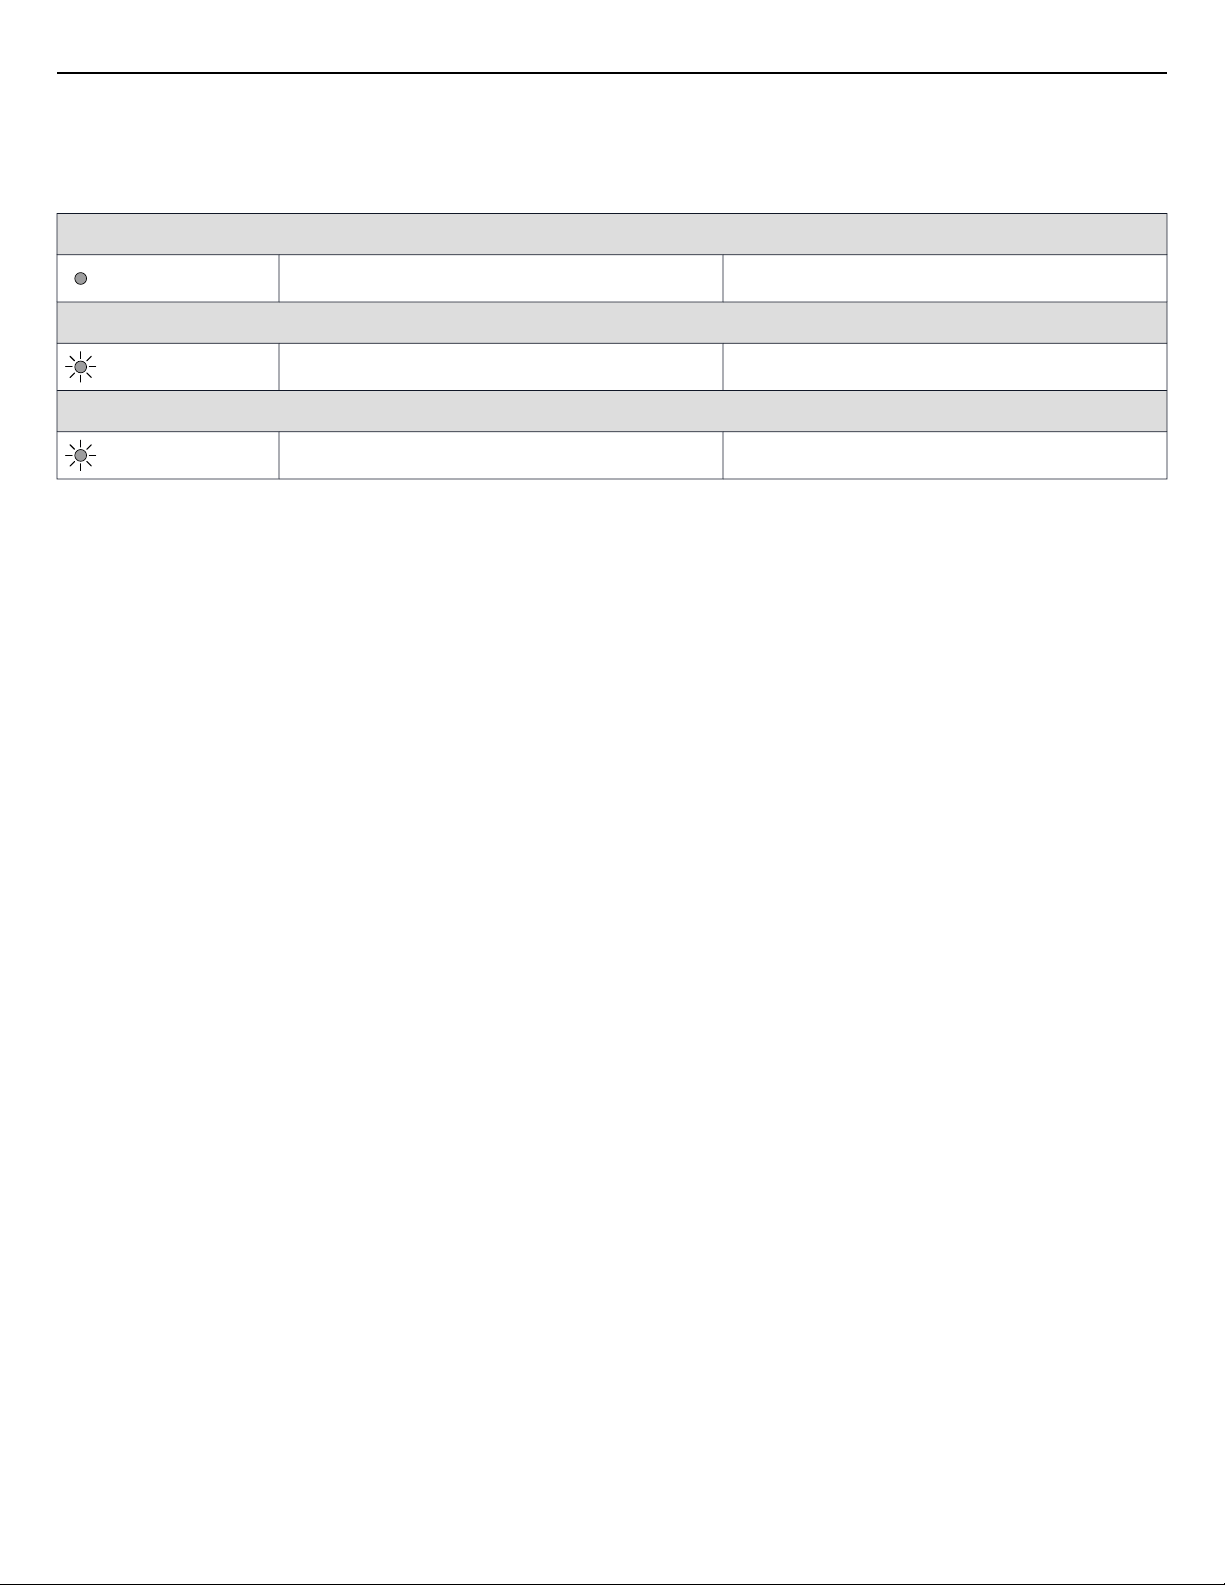
Double click the shift switch assigned to the mode switch function to switch the shift mode selection. The LED on
the rear derailleur changes as indicated in the figure each time the shift mode switches.
Manual shift
Manual shift (M) Blue
Synchronized shift 1
Shift mode 1 (S1) Flashing blue (twice)
Synchronized shift 2
Shift mode 2 (S2) Flashing blue (3 times)
18
Page 19

How to operate
Switching to the adjustment mode
Switching to the adjustment mode
Press and hold the shift switch assigned to the mode switch function for 2 to 5 seconds to switch the mode.
For the setting procedure, contact your place of purchase or a distributor.
19
Page 20
How to operate
Checking the coin battery level with a shift switch operation
Checking the coin battery level with a shift switch
operation
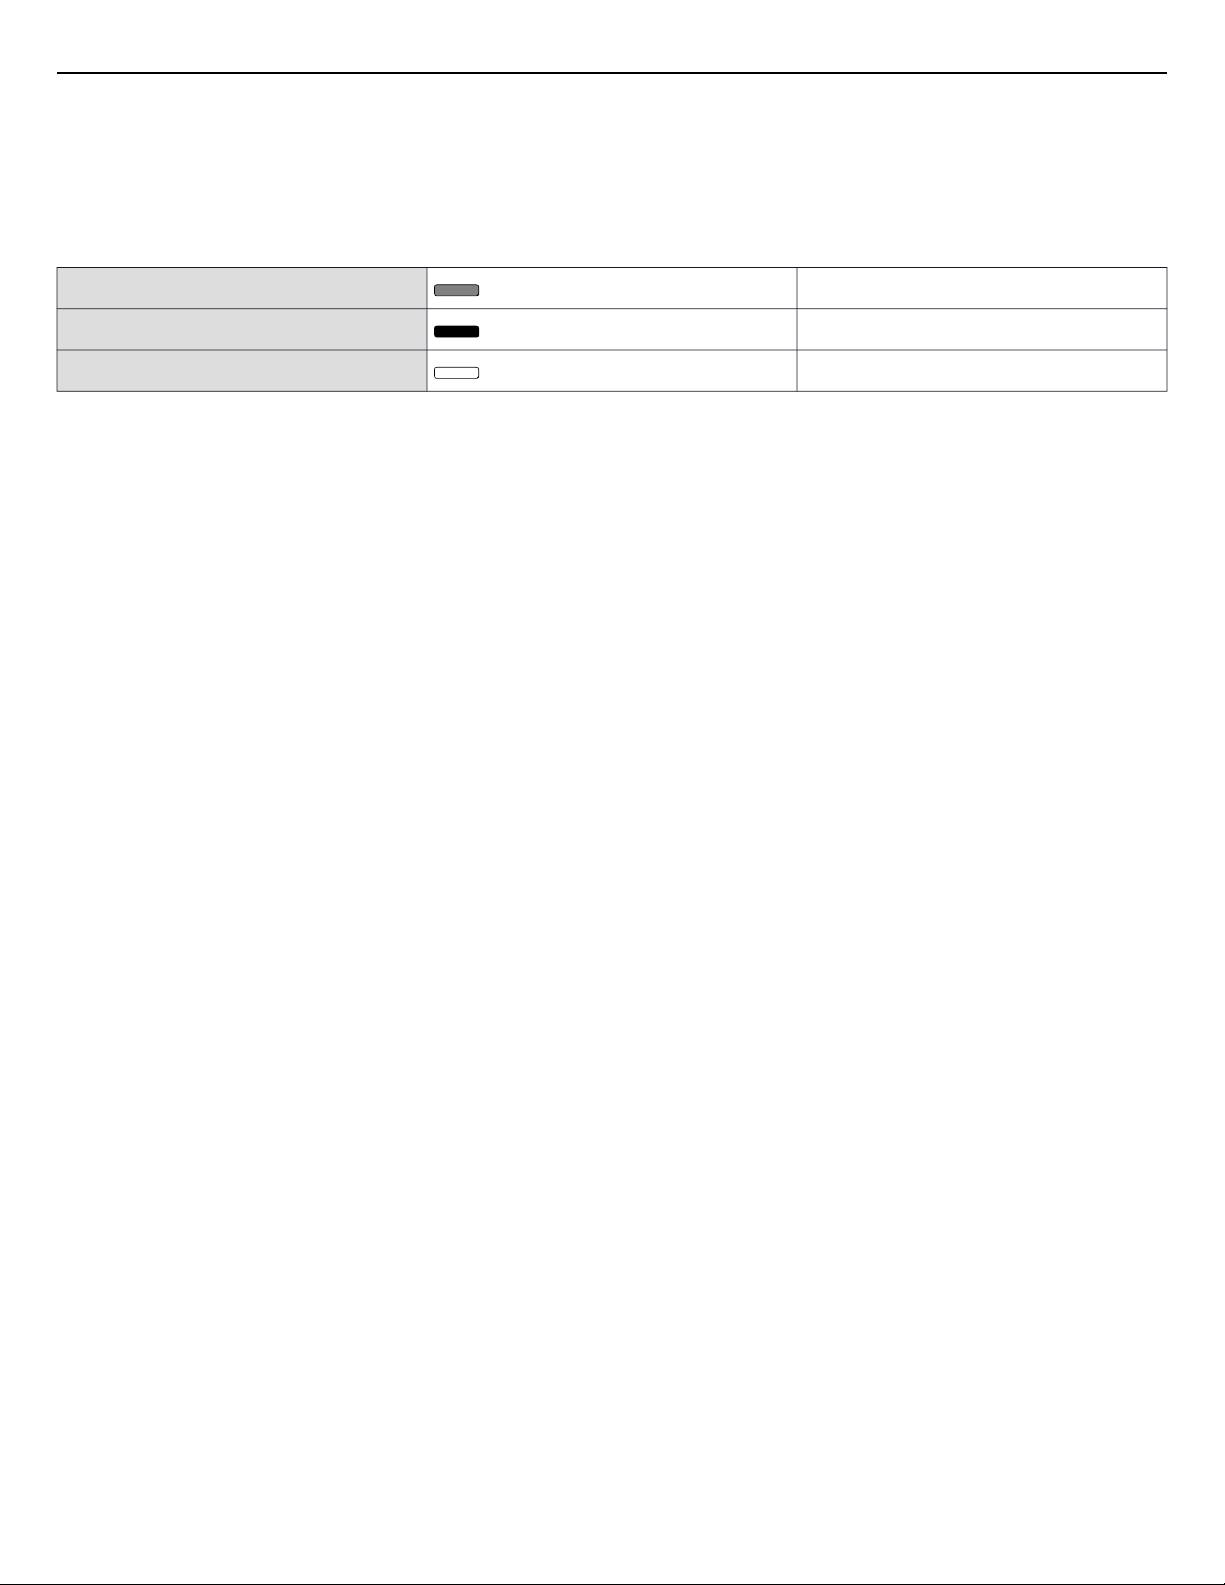
If you hold down two shift switches simultaneously for 0.5 seconds or longer, the LED changes to any of the
status shown in the figure depending on the coin battery level.
11% - 100% Yellow-green
1% - 10% Red
0% Off
20
Page 21

Coin battery replacement
Before replacing the coin batteries
Coin battery replacement
Before replacing the coin batteries
The coin batteries supplied with the dual control levers may be low, as they are intended only for test
purposes. When the coin battery level becomes low, replace the coin batteries with new ones.
When replacing the coin batteries or opening/closing the battery holder, move to an area well away from
sources of water (such as rivers, lakes, the ocean, or ditches).
Do not perform this task in locations with a lot of water or mud, such as outdoors during rain or car washing
facilities. If this is not observed, problems with operation may occur.
Do not perform this task in areas with a lot of sand or dust in the air. If this is not observed, problems with
operation may occur.
Before replacing the coin batteries, wipe the battery holder and battery case to remove water, dirt, etc. If this
is not observed, problems with operation may occur.
Use your hands or an insulated tool with a blunt tip to replace the coin batteries.
Take care of the terminals when removing the coin batteries in order to prevent damage to the coin batteries.
When performing this task with your hands, clean your hands and remove all water and dirt before
performing this task.
Static electricity can damage electronic components. Discharge static electricity from your body before
performing this task.
Use two CR1632 coin batteries for each of the left and right dual control levers.
It is recommended that you use new coin batteries.
21
Page 22
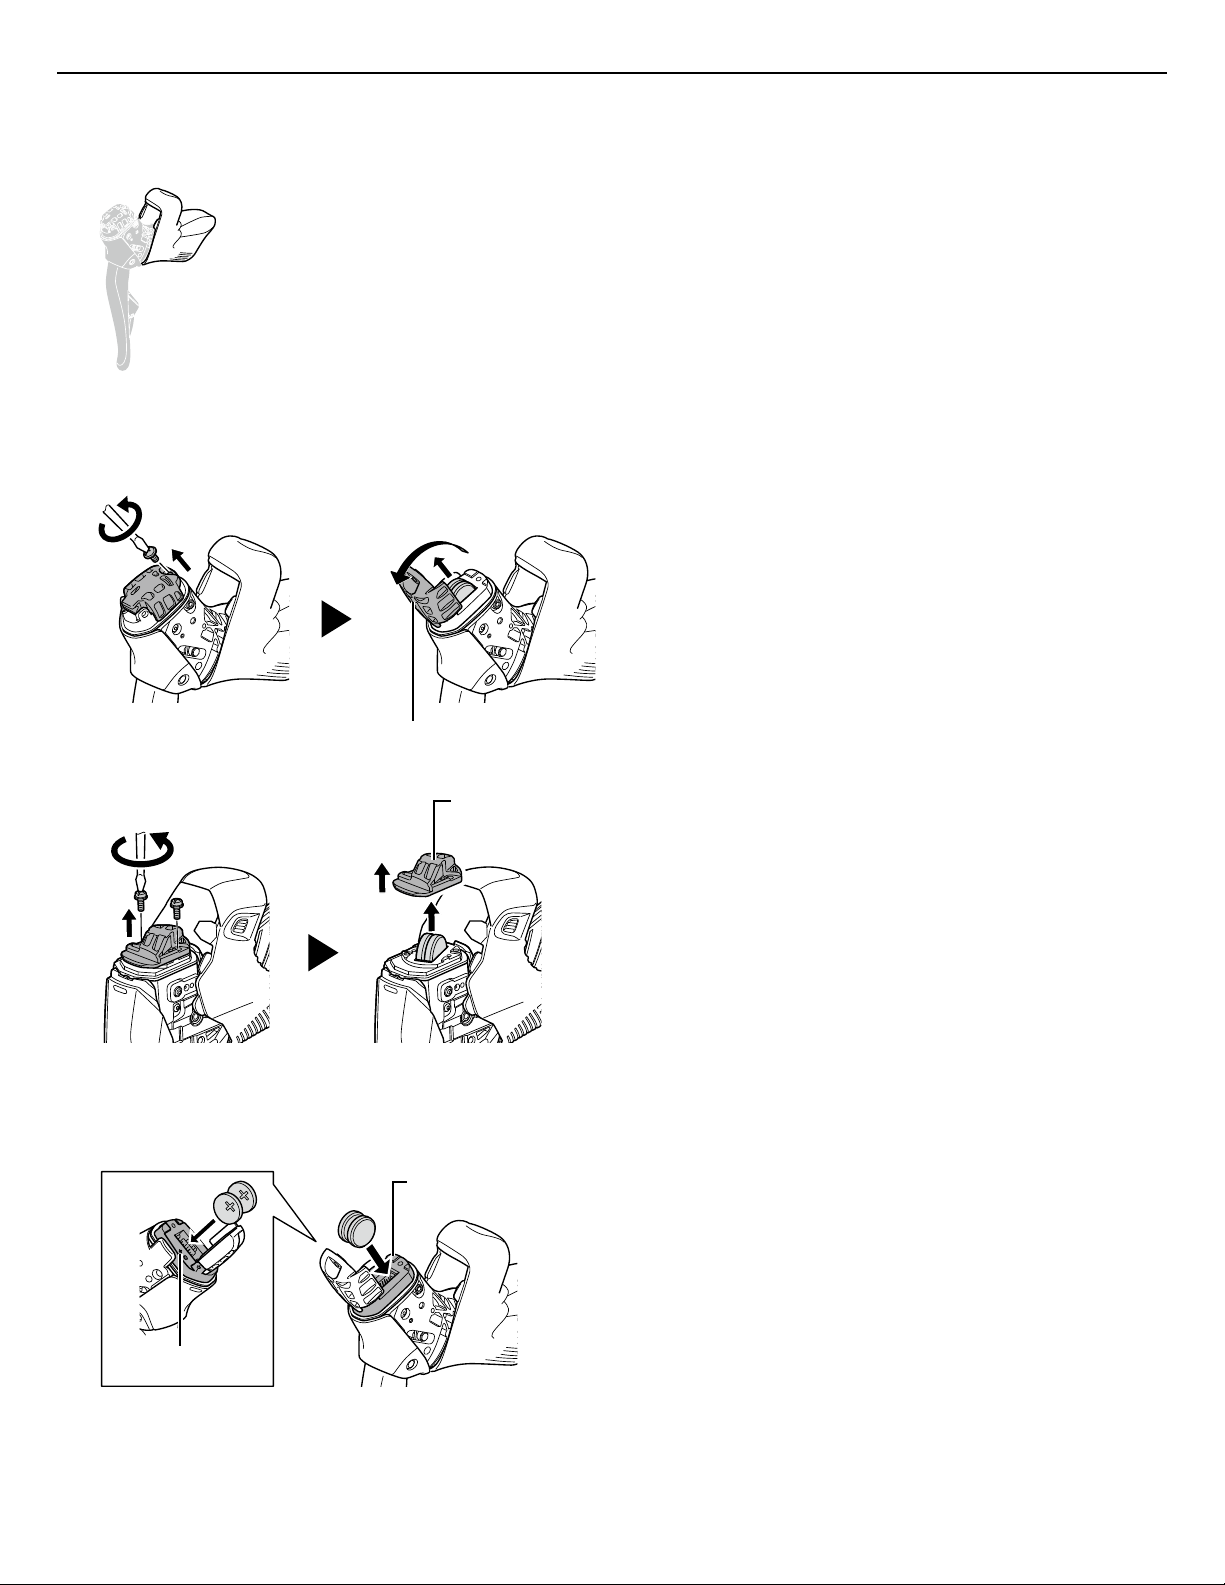
Battery holder
Battery holder
Battery case
+ mark
Coin battery replacement
Replacing the coin batteries
Replacing the coin batteries
Turn over the bracket cover from the front side.1.
Open the battery holder using a screwdriver, and remove the two old coin batteries.
2.
If it is difficult to remove a coin battery, affix tape, etc. to the surface of the coin battery and pull it out.
ST-R7170
ST-RX825
Set the new coin batteries to the battery case.
3.
As shown in the figure, set the two coin batteries with the positive (+) side on the side of the + mark.
ST-R7170
ST-RX825
22
Page 23
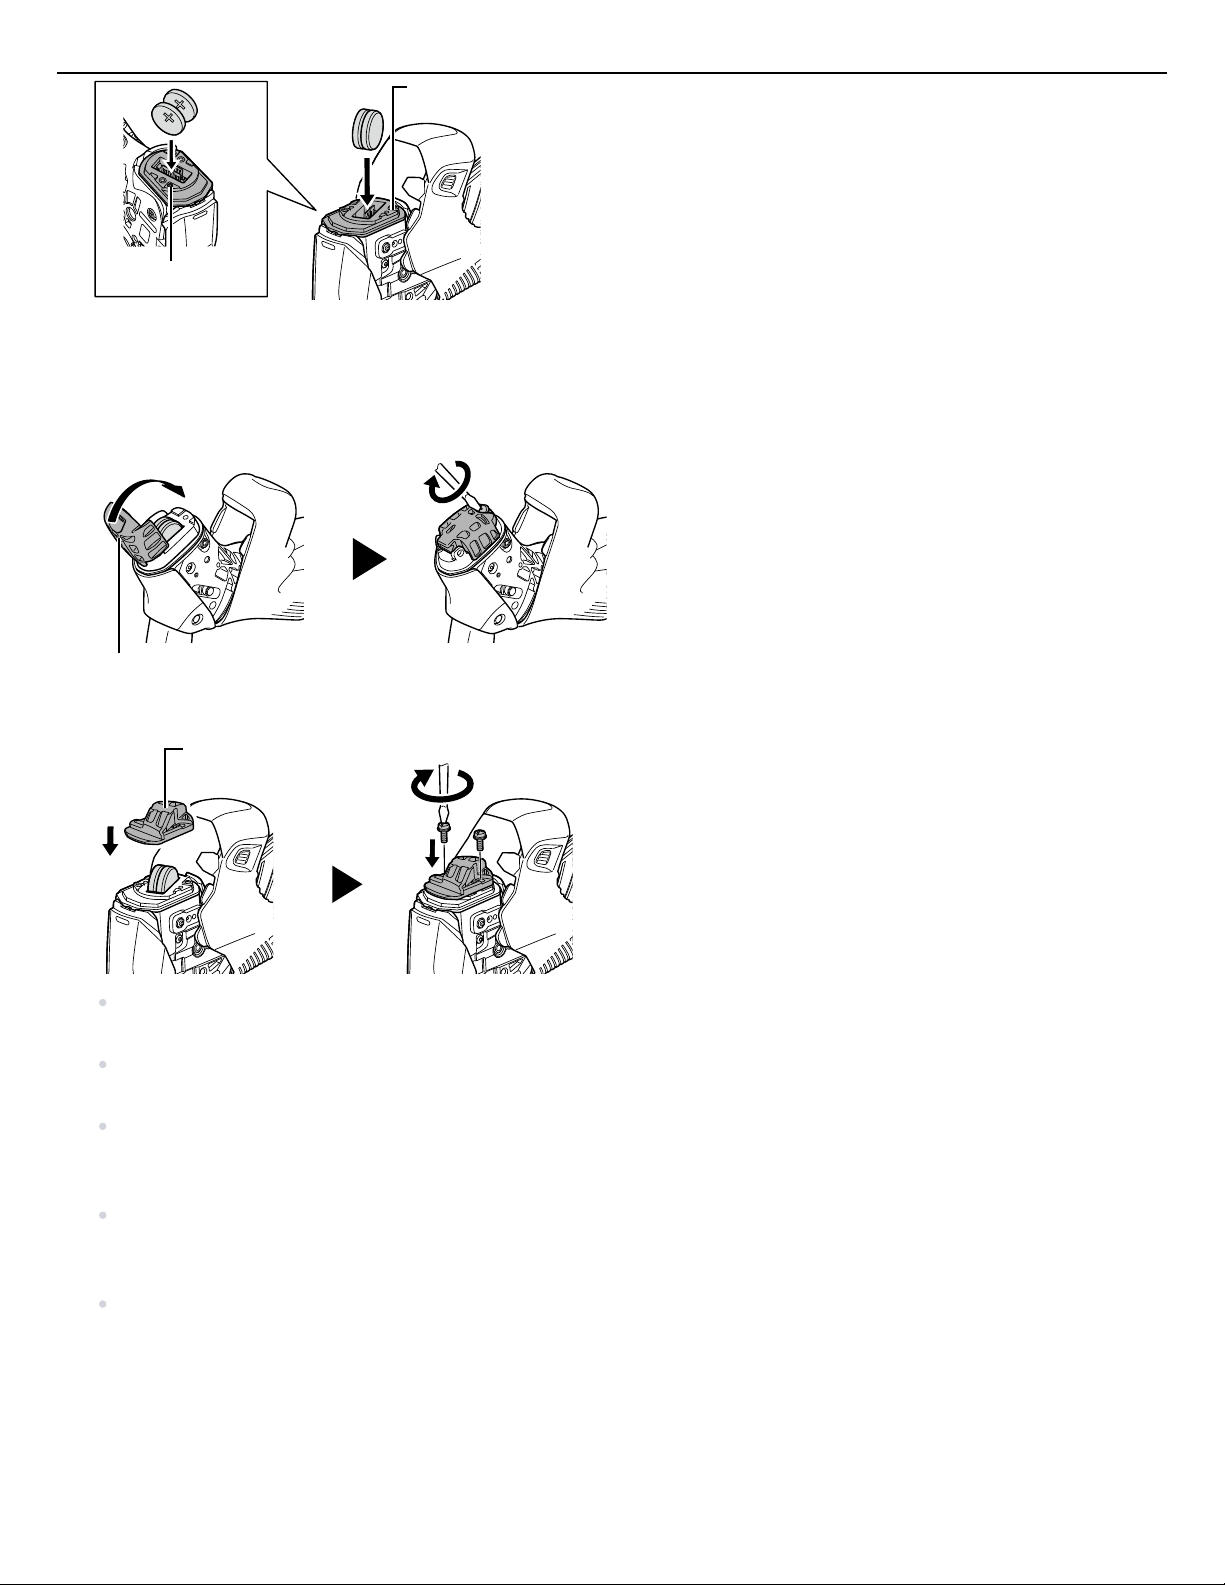
Battery case
+ mark
Battery holder
Battery holder
Coin battery replacement
Replacing the coin batteries
Close the battery holder, and firmly secure it with a screwdriver.
4.
For ST-RX825, firmly secure both screws.
Be careful not to overtighten the screw, as it may cause damage.
ST-R7170
ST-RX825
Before closing the battery holder, check that the waterproof sealing gasket and contacting surfaces are
free of foreign substances (such as dirt, dust, sand, hair, thread, or liquids).
If there are foreign substances present, wipe them away with a clean, dry cloth that does not shed lint or
fibers.
Open the battery holder only when replacing the coin batteries, and do not leave it open. Doing so may
cause problems with operation due to foreign objects getting inside or deterioration to the electronic
component, etc.
Make sure the coin batteries are installed correctly. Installing a coin battery with the positive (+) and
negative (-) polarities reversed will not only stop the component from operating, it may also cause the
component to malfunction.
After replacement, check that it works normally.
23
Page 24
Method for pairing with the rear derailleur
Method for pairing with the rear
derailleur
Refer to the user's manual for E-TUBE PROJECT or contact the place of purchase for information about pairing.
https://si.shimano.com/um/7J4MA/PAIRING_PROCESS
24
Page 25

How to perform bed-in
How to perform bed-in
To optimize the performance of the brake pads and disc brake rotor, perform the bed-in procedure as explained
in the steps below:
Ride your bicycle in a flat and safe area without obstacles and accelerate to a moderate speed.1.
Operate the brake lever until you slow down to walking speed.
2.
Do this only with one brake lever at a time. Be careful when performing this procedure. Always operate your
brake lever with moderation, especially when you bed in the front brake.
Repeat steps 1 and 2 for at least 20 times for both the front and rear brakes.
3.
While repeating the process, the brake force will increase.
25
Page 26
Specifications
Specifications
Frequency band 2.4 GHz
Maximum radio-frequency power <10 dBm
Firmware version 4.0.0 or later
This symbol on your product, literature, or packaging reminds you that this product must be taken to separate
collection at the end of its working life. Do not dispose of this product as unsorted municipal waste but
instead take it for recycling. By ensuring the product is disposed correctly, you will help to prevent potential
negative consequences for the environment and human health. For info on your nearest recycling point, check
with your local waste authority.
26
Page 27

One Holl and, Irvine, California 92 618, U.S.A. Ph one: +1-949-9 51-5003
High Tec h Campus 92, 5656 AG Eindho ven, The Neth erlands Phone : +31-402-6122 22
Roebuck Way, Knowlhil l, Milton Keyn es, Buckingha mshire, MK5 8 HL, United Kin gdom
3-77 Oim atsu-cho, Sak ai-ku, Sakai City, Osaka 59 0-8577, Japan
Please note: specifications are subject to change for improvement without notice. (English)
© Aug. 2024 by SHIMANO INC. ITP
 Loading...