

Shimano Steps BT-E6000, Steps BT-E6010, Steps BT-E8014, Steps BT-E8010, Steps BT-E8020 User Manual
...
UM-78N0A-000-00
User's manual
Original instructions
E6100 Series
Shimano Total Electric Power System


1
CONTENTS
IMPORTANT NOTICE
......................................................................................3
Important safety information
.........................................................................3
To ensure safety
...........................................................................................3
Features of SHIMANO STEPS
..........................................................................7
Assist mode .................................................................................................................................7
Start your STEPS
........................................................................................... 8
Names of parts
...........................................................................................11
Specifications
.............................................................................................12
Preparation
...............................................................................................13
Charging the battery ................................................................................................................13
Charger LED lamp .....................................................................................................................17
Battery LED lamp ......................................................................................................................17
Handling the battery ................................................................................................................18
Installing and removing the battery ........................................................................................19
Installing and removing the cycle computer ...........................................................................24
Operation
.................................................................................................25
Turning the power ON / OFF ....................................................................................................25
Basic operation .........................................................................................................................27
Turning the light ON / OFF .......................................................................................................29
Basic status display ....................................................................................................................30
Changing the assist mode ........................................................................................................32
Walk assist mode ......................................................................................................................33
Switching the travel data display (SC-E6100) ..........................................................................34
Switch the gear shifting mode .................................................................................................35
Setting menu (SC-E6100)
.............................................................................36
Launching ..................................................................................................................................36
Clear ...........................................................................................................................................37
Clock ..........................................................................................................................................38
Start mode .................................................................................................................................39
Backlight ....................................................................................................................................40
English

2
Brightness ..................................................................................................................................41
Beep ...........................................................................................................................................42
Unit ............................................................................................................................................43
Language ...................................................................................................................................44
Font color ..................................................................................................................................45
Adjust ........................................................................................................................................45
Shift timing ...............................................................................................................................46
Shifting advice ..........................................................................................................................47
RD protection reset ...................................................................................................................48
Exit .............................................................................................................................................48
Settings (EW-EN100)
...................................................................................49
RD protection reset ...................................................................................................................49
Adjust ........................................................................................................................................49
Drive unit setting data backup function
......................................................... 49
Connection and communication with devices
..................................................50
About wireless functions ..........................................................................................................50
Errors and remedies
....................................................................................51
Battery LED lamp error indications ..........................................................................................51
Error messages on the cycle computer ....................................................................................52
Error indications (EW-EN100) ...................................................................................................54
Troubleshooting ........................................................................................................................55

3
User's manuals in other languages are
available at :
http://si.shimano.com
IMPORTANT NOTICE
•
Contact the place of purchase or a bicycle dealer for
information on installation and adjustment of the
products which are not found in the user's manual. A
dealer's manual for professional and experienced bicycle
mechanics is available on our website (http://si.shimano.
com).
•
Do not disassemble or alter this product.
•
Use the product according to local laws and regulations.
•
The Bluetooth® word mark and logos are registered
trademarks owned by Bluetooth SIG, Inc. and any use of
such marks by SHIMANO INC. is under license. Other
trademarks and trade names are those of their respective
owners.
For safety, be sure to read this user's
manual thoroughly before use, and
follow them for correct use.
Important safety information
For replacement information, contact the place of purchase
or a bicycle dealer.
Be sure to observe the following in order to avoid burns or
other injury from fluid leakages, overheating, fire or
explosions.
To ensure safety
DANGER
Handling the battery
•
Do not deform, modify, disassemble or apply solder
directly to the battery. Doing so may cause leakage,
overheating, bursting, or ignition of the battery.
•
Do not leave the battery near sources of heat such as
heaters. Do not heat the battery or throw it into a fire.
Doing so may cause bursting or ignition of the battery.
•
Do not subject the battery to strong shocks or throw it. If
this is not observed, overheating, bursting, or fire may
occur.
•
Do not place the battery into fresh water or sea water,
and do not allow the battery terminals to get wet. Doing
so may cause overheating, bursting, or ignition of the
battery.
•
Use the SHIMANO specified charger and observe the
specified charging conditions when charging the
specified battery. Not doing so may cause overheating,
bursting, or ignition of the battery.

4
WARNING
To ensure safe riding
•
Do not give too much of your attention to the cycle
computer display while riding, otherwise accidents may
result.
•
Check that the wheels are securely installed to the bicycle
before commencing riding. If the wheels are not securely
installed, the bicycle may fall over and serious injury may
result.
•
If riding a power-assisted bicycle, make sure that you are
fully familiar with the starting-off characteristics of the
bicycle before riding it on roads with several vehicle lanes
and pedestrian footpaths. If the bicycle starts off
suddenly, accidents may result.
•
Check that the bicycle lights illuminate before riding at
night.
Using the product safely
•
Be sure to remove the battery and charging cable before
wiring or attaching parts to the bicycle. Otherwise, an
electric shock may result.
•
When charging the battery while it is installed on the
bicycle, do not move the bicycle. The power plug for the
battery charger may come loose and not be fully inserted
into the electrical outlet, resulting in risk of fire.
•
When installing this product, be sure to follow the
instructions given in the user's manual. Furthermore, it is
recommended that you use only genuine Shimano parts
at these times. If bolts and nuts are left loosened or the
product is damaged, the bicycle may suddenly fall over
and serious injury may result.
•
Do not disassemble the product. Disassembling it may
cause injury to persons.
•
After reading the user's manual carefully, keep it in a
safe place for later reference.
Handling the battery
•
If any liquid leaking from the battery gets into your eyes,
immediately wash the affected area thoroughly with
clean water such as tap water without rubbing your eyes,
and seek medical advice immediately. If this is not done,
the battery liquid may damage your eyes.
•
Do not recharge the battery in places with high humidity
or outdoors. Doing so may result in electric shock.
•
Do not insert or remove the plug while it is wet. If this is
not observed, electric shocks may result. If there is water
leaking out of the plug, dry it thoroughly before
inserting it.
•
If the charging of the battery continues exceeds 2 hours
after the prescribed charging time, immediately unplug
the battery from the outlet to stop charging, and contact
the place of purchase. Failure to do so may cause
overheating, bursting, or ignition of the battery.
•
Do not use the battery if it has any noticeable scratches
or other external damage. Doing so may cause bursting,
overheating or problems with operation.
•
The operating temperature ranges for the battery are
given below. Do not use the battery in temperatures
outside these ranges. If the battery is used or stored in
temperatures outside these ranges, fire, injury or
problems with operation may occur.
1. During discharge: –10 °C - 50 °C
2. During charging: 0 °C - 40 °C
Cleaning
•
The frequency of maintenance will vary depending on
the riding conditions. Periodically clean the chain using
an appropriate chain cleaner. Do not use alkaline or
acidic cleaning agents for removing rust under any
circumstances. If such cleaning agents are used, they may
damage the chain and serious injury may result.
5
CAUTION
To ensure safe riding
•
Observe the instructions in the user's manual for the
bicycle, in order to ride safely.
Using the product safely
•
Periodically check the battery charger and adapter,
particularly the cord, plug, and case, for any damage. If
the charger or adapter is broken, do not use it until it has
been repaired.
•
This appliance is not intended for use by persons
(including children) with reduced physical, sensory or
mental capabilities, or lack of experience and knowledge,
unless they have been given supervision or instruction
concerning use of the appliance by a person responsible
for their safety.
•
Do not allow children to play near the product.
Handling the battery
•
Do not leave the battery in a place exposed to direct
sunlight, inside a vehicle on a hot day, or other hot
places. This may result in battery leakage.
•
If any leaked fluid gets on your skin or clothes, wash it
off immediately with clean water. The leaked fluid may
damage your skin.
•
Store the battery in a safe place out of the reach of
infants and pets.
Cleaning
•
If any malfunctions or other problems occur, contact the
place of purchase.
•
Never attempt to modify the system yourself, as it may
cause problems with system operation.
Note
Using the product safely
•
Be sure to install caps to any connectors which are not
being used.
•
For installation and adjustment of the product, consult a
dealer.
•
The Product is designed to be fully waterproof to
withstand wet weather riding conditions. However, do
not deliberately place them into water.
•
Do not clean the bicycle in a high-pressure wash. If water
gets into any of the components, operating problems or
rusting may result.
•
Do not turn the bicycle upside down. The cycle computer
or the shifting switch may get damaged.
•
Handle the product carefully, and avoid subjecting it to
any strong shocks.
•
Although the bicycle still functions as a normal bicycle
even when the battery is removed, the light does not
turn on if it is connected to the electric power system. Be
aware that using the bicycle under these conditions will
be considered non-observance of the road traffic laws in
Germany.
•
When charging the battery while it is mounted on the
bicycle, be careful of the following:
-
When charging, make sure there is no water on the
charging port or the charger plug.
-
Ensure that the battery is locked into the battery
mount before charging.
-
Do not remove the battery from the battery mount
while charging.
-
Do not ride with the charger mounted.
-
Close the charging port cap when not charging.
-
Stabilize the bicycle to ensure that it does not
collapse during charging.
Handling the battery
•
When you carry a power-assisted bicycle in a car, remove
the battery from the bicycle and place the bicycle on a
stable surface in the car.
•
Before connecting the battery, make sure that there is no
buildup of water or dirt in the connector where the
battery will be connected.
•
The use of a genuine Shimano battery is recommended. If
using a battery from another manufacturer, make sure to
carefully read the instruction manual for the battery
before use.
Disposal information for countries outside
the European Union
This symbol is only valid within the
European Union. Follow local regulations
when disposing of used batteries. If you
are not sure, consult the place of purchase
or a bicycle dealer.

6
Connection and communication with PCs
A PC linkage device can be used to connect a PC to the
bicycle (system or components), and E-TUBE PROJECT can be
used to carry out tasks such as customizing single
components or the whole system and updating firmware.
•
PC linkage device: SM-PCE1
•
E-TUBE PROJECT: PC application
•
Firmware: software inside each component
Connection and communication with
smartphones and tablets
It is possible to customize single components or the system,
and update firmware, using E-TUBE PROJECT for
smartphones/tablets after connecting the bicycle (system or
components) to a smartphone or tablet via Bluetooth
®
LE.
•
E-TUBE PROJECT: app for smartphones/tablets
•
Firmware: software inside each component
Cleaning
•
The number found on the battery mount key is necessary
when purchasing spare keys. Keep it in a safe place.
There is a space to enter the key number on the back
cover of this user's manual. Enter the key number for
safekeeping and later reference.
•
Contact the place of purchase for updates of the product
software. The most up-to-date information is available
on the Shimano website. For details, refer to the
"Connection and communication with the PC" section.
•
Do not use thinner or other solvents to clean any of the
products. As such substances may damage the surfaces.
•
You should periodically wash the chainrings in a neutral
detergent. In addition, cleaning the chain with neutral
detergent and lubricating it can be an effective way of
extending the useful life of the chainrings and the chain.
•
Use a damp cloth, with the water well wrung out, when
cleaning the battery and plastic cover.
•
For any questions regarding handling and maintenance,
contact the place of purchase.
•
Products are not guaranteed against natural wear and
deterioration from normal use and aging.
•
For maximum performance we highly recommend
Shimano lubricants and maintenance products.
Assist
•
If the settings are not correct, for instance if the chain
tension is too tight, the proper assist force may not be
obtained. If this happens, contact the place of purchase.
<DU-E6110>
•
This component is compatible with coaster brakes. If the
crank is not installed in the correct position or the chain
tension has not been correctly adjusted, contact the place of
purchase, as there may not be proper assistance power.
Label
•
Some of the important information contained in this user's
manual is also indicated on the battery charger label.
FCC compliance information
This device complies with Part 15 of the FCC Rules.
Operation is subject to the following two conditions:
(1) This device may not cause harmful interference, and
(2) This device must accept any interference received,
including interference that may cause undesired
operation.
NOTE: This equipment has been tested and found to
comply with the limits for a Class B digital device,
pursuant to Part 15 of the FCC Rules. These limits are
designed to provide reasonable protection against
harmful interference in a residential installation. This
equipment generates, uses and can radiate radio
frequency energy and, if not installed and used in
accordance with the instructions, may cause harmful
interference to radio communications. However, there
is no guarantee that interference will not occur in a
particular installation. If this equipment does cause
harmful interference to radio or television reception,
which can be determined by turning the equipment off
and on, the user is encouraged to try to correct the
interference by one or more of the following measures:
-
Reorient or relocate the receiving antenna.
-
Increase the separation between the equipment and
receiver.
-
Connect the equipment into an outlet on a circuit
different from that to which the receiver is
connected.
-
Consult the dealer or an experienced radio/TV
technician for help.
7
Features of SHIMANO STEPS
•
Lightweight, compact design
•
Silent, smooth ride
•
High shifting performance system (In the case of electronic gear shifting)
This system uses accurate sensors to enable shifting gears by providing the most appropriate level of power assistance
carefully adjusted by computer controls.
•
Full Automatic Shifting (In the case of electronic 8/5-speed gear shifting)
The sensors detect riding conditions, whether you are riding up a hill against the wind, or on flat ground with no wind;
the automatic gear shifting system uses computer controls to make your ride more pleasant.
•
Start mode (In the case of electronic gear shifting)
This function allows automatic shifting down to a preset gear when you stop the bicycle such as at traffic lights so that
you can start traveling at a light gear.
*
If, while the bicycle is stopped, you shift to a gear lower than the set gear, the system will not automatically shift up.
•
Coaster brake compatible (DU-E6110)
Smoothly provides sufficient control power.
•
Light off road
Sporty, provides powerful assistance. Can only be used when set by the manufacturer of the completed bicycle.
•
Walk assistance function (Walk assist mode)
*
The Walk assist mode function may not available in certain regions.
*
Some of the functions listed above can only be used once the firmware has been updated. If this is the case, consult the
place of purchase, and carry out the firmware updates.
Assist mode
You can select a SHIMANO STEPS assist mode for each particular application.
[HIGH] [NORM] (Normal) [ECO]
Steep uphill slopes. Gentle slope or level ground. Long distance riding on level ground.
When the battery level is running low, the level of assistance is lowered to increase the traveling range.
[OFF]
•
When you don't need power assistance
•
When you are concerned about remaining battery power
[WALK]
•
When you walk while pushing the E-BIKE loaded with heavy baggage
•
When walking the E-BIKE out of an underground bicycle parking garage
*
This mode may not be available in certain regions
8
Start your STEPS
1.
Charge the battery.
It is possible to charge the battety even while it is mounted on the bicycle.
For detals, see “Charging the battery while installed on the bicycle.”
<Down-tube mount type battery>
3
2
1
Light On
Example : BT-E8010
<Rear carrier mount type battery>
1
3
2
Light On
BT-E6000 / BT-E6001
<Integrated battery>
Light On
BT-E8020
Lights up
Charging
(Within 1 hour after the completion of charging)
Flashing
Charging error
9
2.
Turn on the power.
To turn off the power, repeat this procedure.
<Down-tube mount type battery>
BT-E8010 / BT-E8014 BT-E6010
Long press
Or
<Rear carrier mount type battery>
Long press
BT-E6000 / BT-E6001
<Integrated battery>
Long press
NOTE
When turning the power ON/OFF, do not place your foot on the pedal.
10
3.
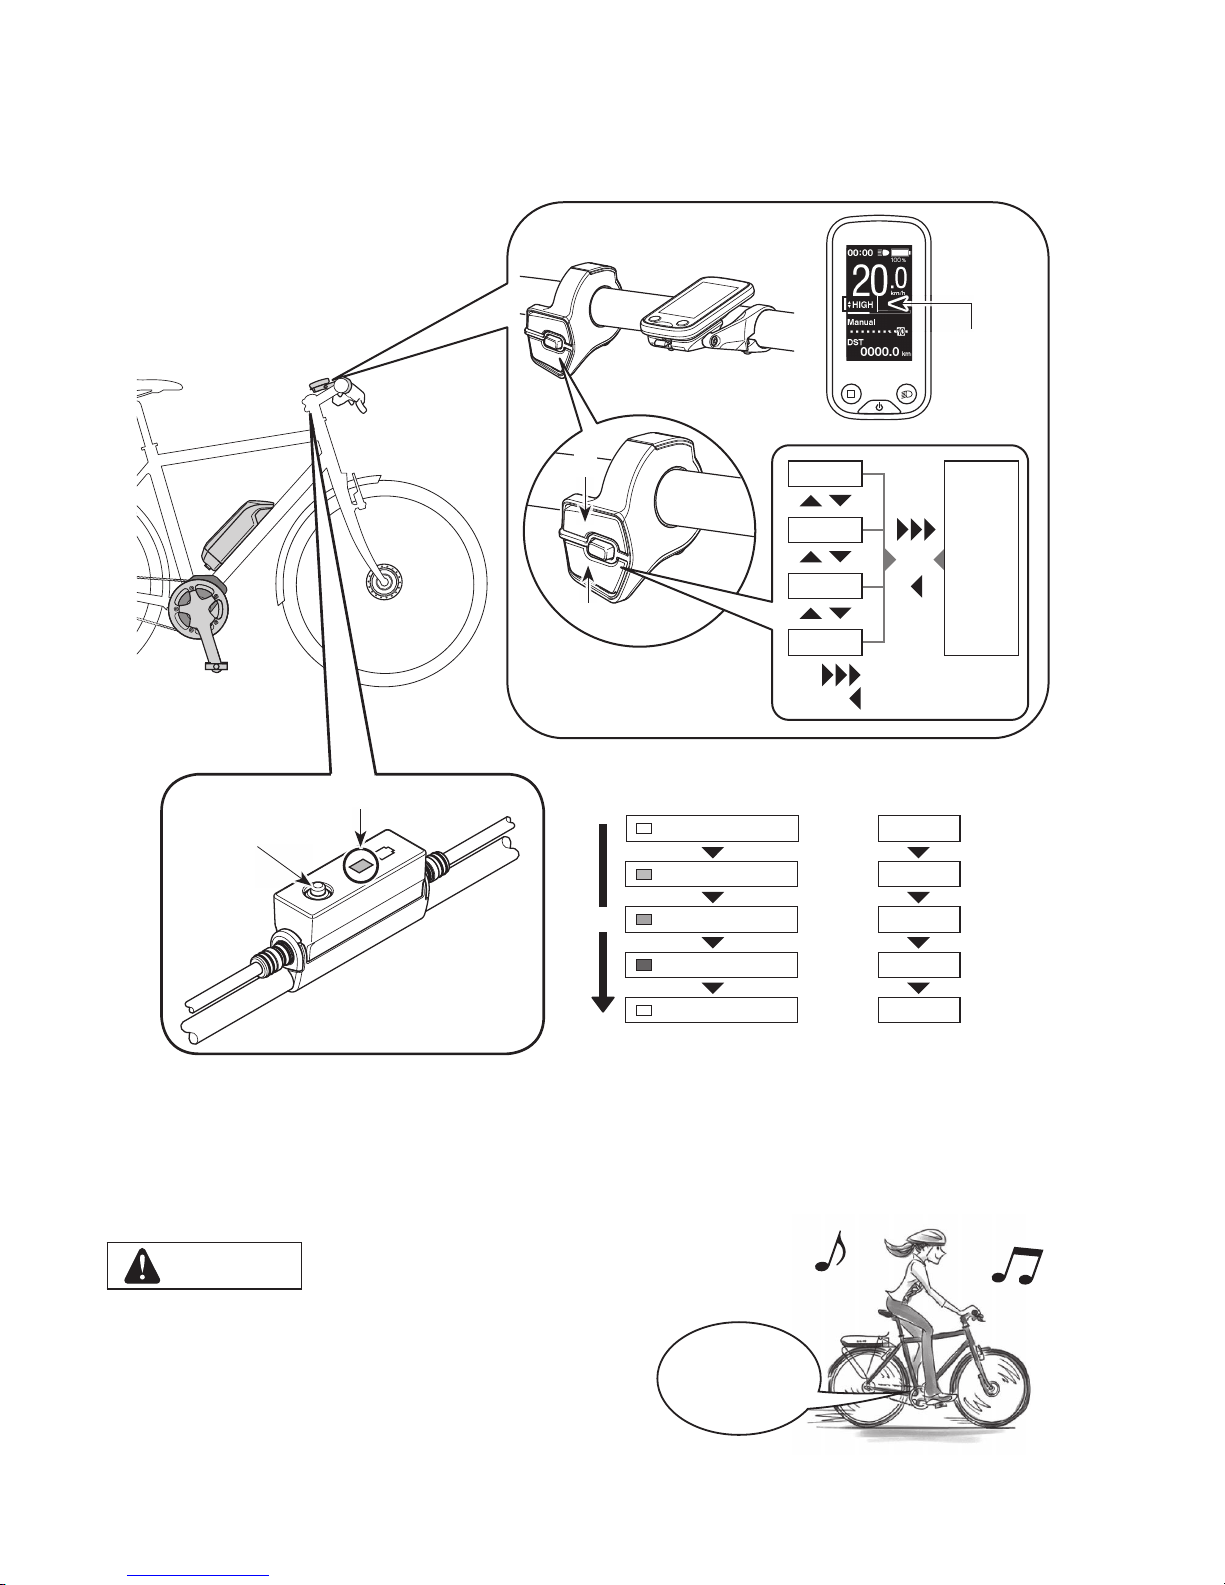
Select your preferred assist mode.
The bicycle is equipped with either SC-E6100 or EW-EN100.
*
When the power is turned on, assist mode is set to [OFF].
*
To change to the [WALK] assist mode, it is
necessary to use the above assist switch.
Assist mode
display
LED lamp (inner side)
Z
< SC-E6100 >
< EW-EN100 >
X
Y
OFF
Lit in light blue
Lit in green
Lit in yellow
OFF
[OFF]
[ECO]
[NORM]
[HIGH]
[OFF]
LED lamp (inner side) indications Assist mode
Z
[HIGH]
[NORM]
[ECO]
[OFF]
[WALK]
XY
Long press Y
Short press X
4.
Ride the bicycle.
Assist will start when you start pedaling.
CAUTION
SHIMANO STEPS supports various brake systems.
Before riding, please check the brake system of your bicycle and
how to operate it beforehand.
5.
Turn off the power.
Assist
Start
11
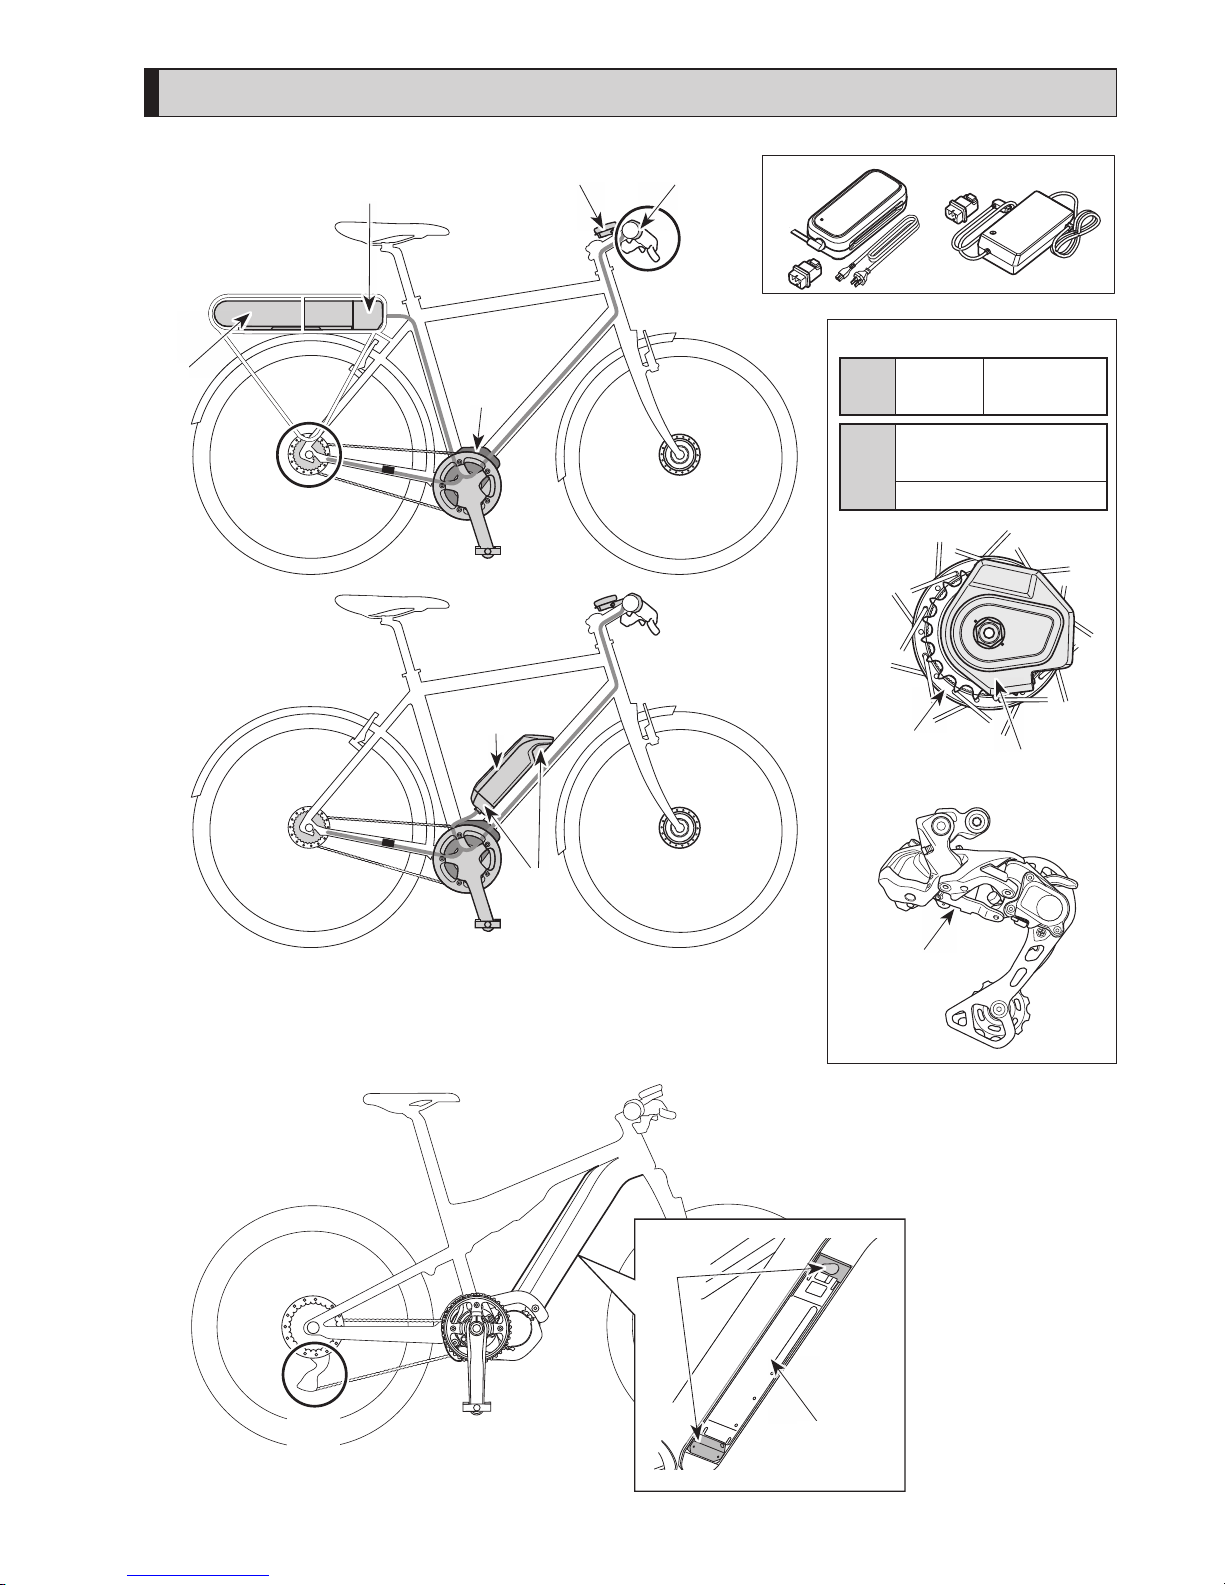
Names of parts
B
(F)
(A)
(G)
(E)
(B)
(C) (D)
(L)
*
1
*
2
< For electronic gear shifting >
(A)
Shifting
switch
•
SW-E6010
(B)
Motor unit + Internal
geared hub
Rear Derailleur (DI2)
Motor unit
Internal geared
hub
Rear Derailleur
(DI2)
(H)
(I)
(B)
(J)
(K)

12
(C)
Cycle computer / Junction [A]
•
SC-E6100
•
EW-EN100
(H)
Battery (down-tube mount type)
•
BT-E6010
•
BT-E8010
*3
•
BT-E8014
(D)
Assist switch
•
SW-E6010
(I)
Battery mount
(down-tube mount type)
•
BM-E6010
•
BM-E8010
(E)
Drive unit
•
DU-E6100
•
DU-E6110
(J)
Battery (Integrated type)
•
BT-E8020
(F)
Battery (rear carrier mount type)
•
BT-E6000
•
BT-E6001
*3
(K)
Battery mount (Integrated type) •BM-E8020
(G)
Battery mount (rear carrier mount
type)
•
BM-E6000
(L)
Battery charger
*
1: EC-E6002 + SM-BCC1
*
2: EC-E6000
*3 If the firmware version of the drive unit is 3.2.6 or lower, the battery may not operate properly. Update the firmware
version via E-TUBE PROJECT.
Specifications
Operating temperature
range: During discharge
-10 – 50˚C Battery type Lithium ion battery
Operating temperature
range: During charging
0 – 40˚C Nominal capacity
Refer to the user's manual
for the battery. For the
latest information on
manuals, see the website
(http://si.shimano.com).
Storage temperature -20 – 70˚C Rated voltage 36 V DC
Storage temperatur
e
(Battery)
-20 – 60˚C Drive unit type Midship
Charging voltage 100 – 240 V AC Motor type Brush-less DC
Charging time
Refer to the user's manual
for the battery. For the
latest information on
manuals, see the website
(http://si.shimano.com).
Rated drive unit power 250 W
*
The maximum speed for which power assistance is provided is set by the manufacturer and is conditional on where the
bicycle is to be used.
13
Preparation
You cannot use the battery immediately after shipment.
The battery can be used after charging it with the designated charger.
Be sure to charge it before use. The battery can be used when the LED on it lights up.
The use of a genuine SHIMANO battery is recommended. If using a battery from another manufacturer, make sure to
carefully read the instruction manual for the battery before use.
Charging the battery
Charging time varies depending on the remaining capacity of the battery and the charger used. For the designated charging
time, refer to the charger user manual.
DANGER
•
Use the battery and charger combination specified by the company for charging and follow the charging conditions specified by the
company. Not doing so may cause overheating, bursting, or ignition of the battery.
CAUTION
•
When charging the battery while it is mounted on the bicycle, be careful not to trip over the charger cord or get anything caught
on it. This may lead to injury or cause the bicycle to fall over, damaging the components.
NOTE
• When removing the battery charger power plug from the outlet or the charging
plug from the battery, do not pull it out by the cord, or it causes breakage.
• If the bicycle is stored for an extended period of time immediately after purchase,
you will need to charge the battery before using the bicycle. Once the battery is
charged, it starts to deteriorate.
• Connect to E-TUBE PROJECT and click [Connection check] to confirm whether the
battery in use is a genuine SHIMANO battery or another brand.
• Charge the batteries on a flat surface indoors.
14
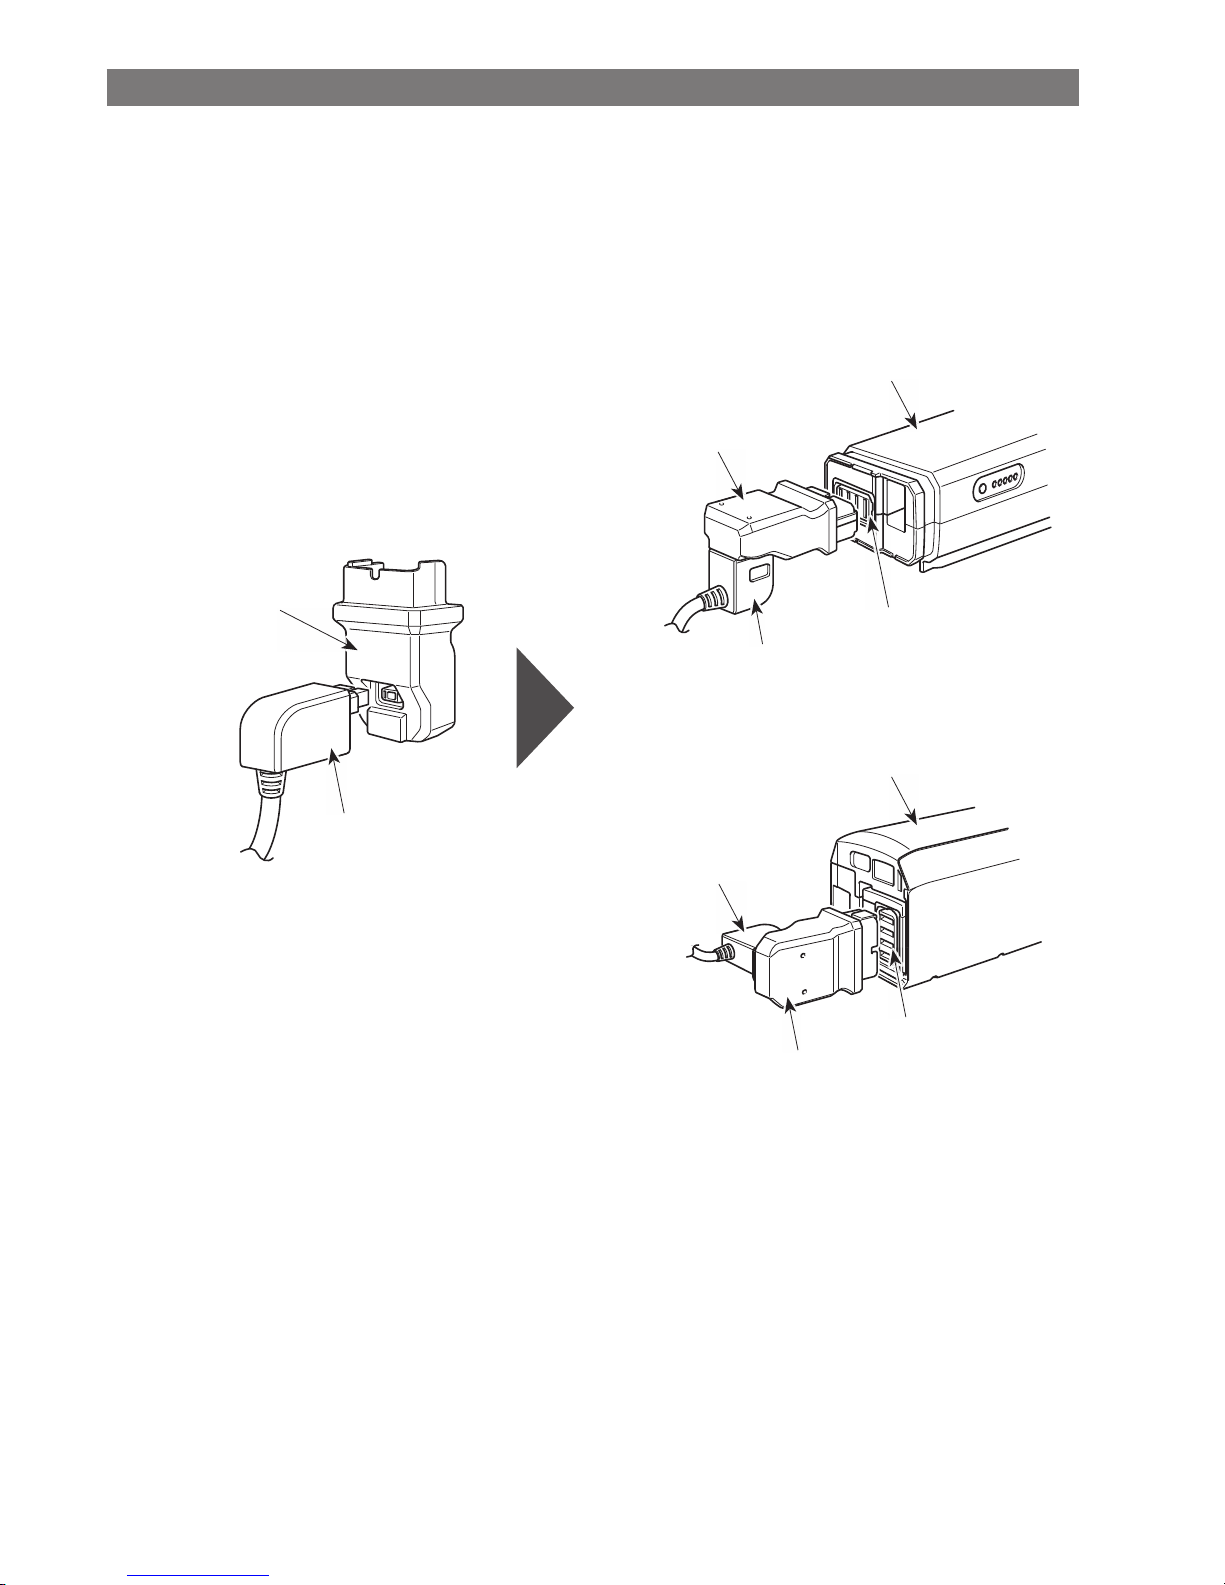
Charging the battery that removed from the bicycle
BT-E6000/BT-E6001/BT-E6010
Adapter (SM-BTE60) is necessary to charge BT-E6000/BT-E6001/BT-E6010 when removed from the bicycle.
1.
Attach the adapter to the charging plug.
2.
Connect the charger’s power plug to the outlet.
3.
Connect the adapter to the battery’s charging port.
Battery
Battery
Charging port
Charging port
Adapter SM-BTE60
<sold separetely>
Charging
plug
Adapter SM-BTE60
<sold separetely>
Charging
plug
Charging
plug
Adapter SM-BTE60
<sold separetely>
< BT-E6000/BT-E6001 >
< BT-E6010 >
15
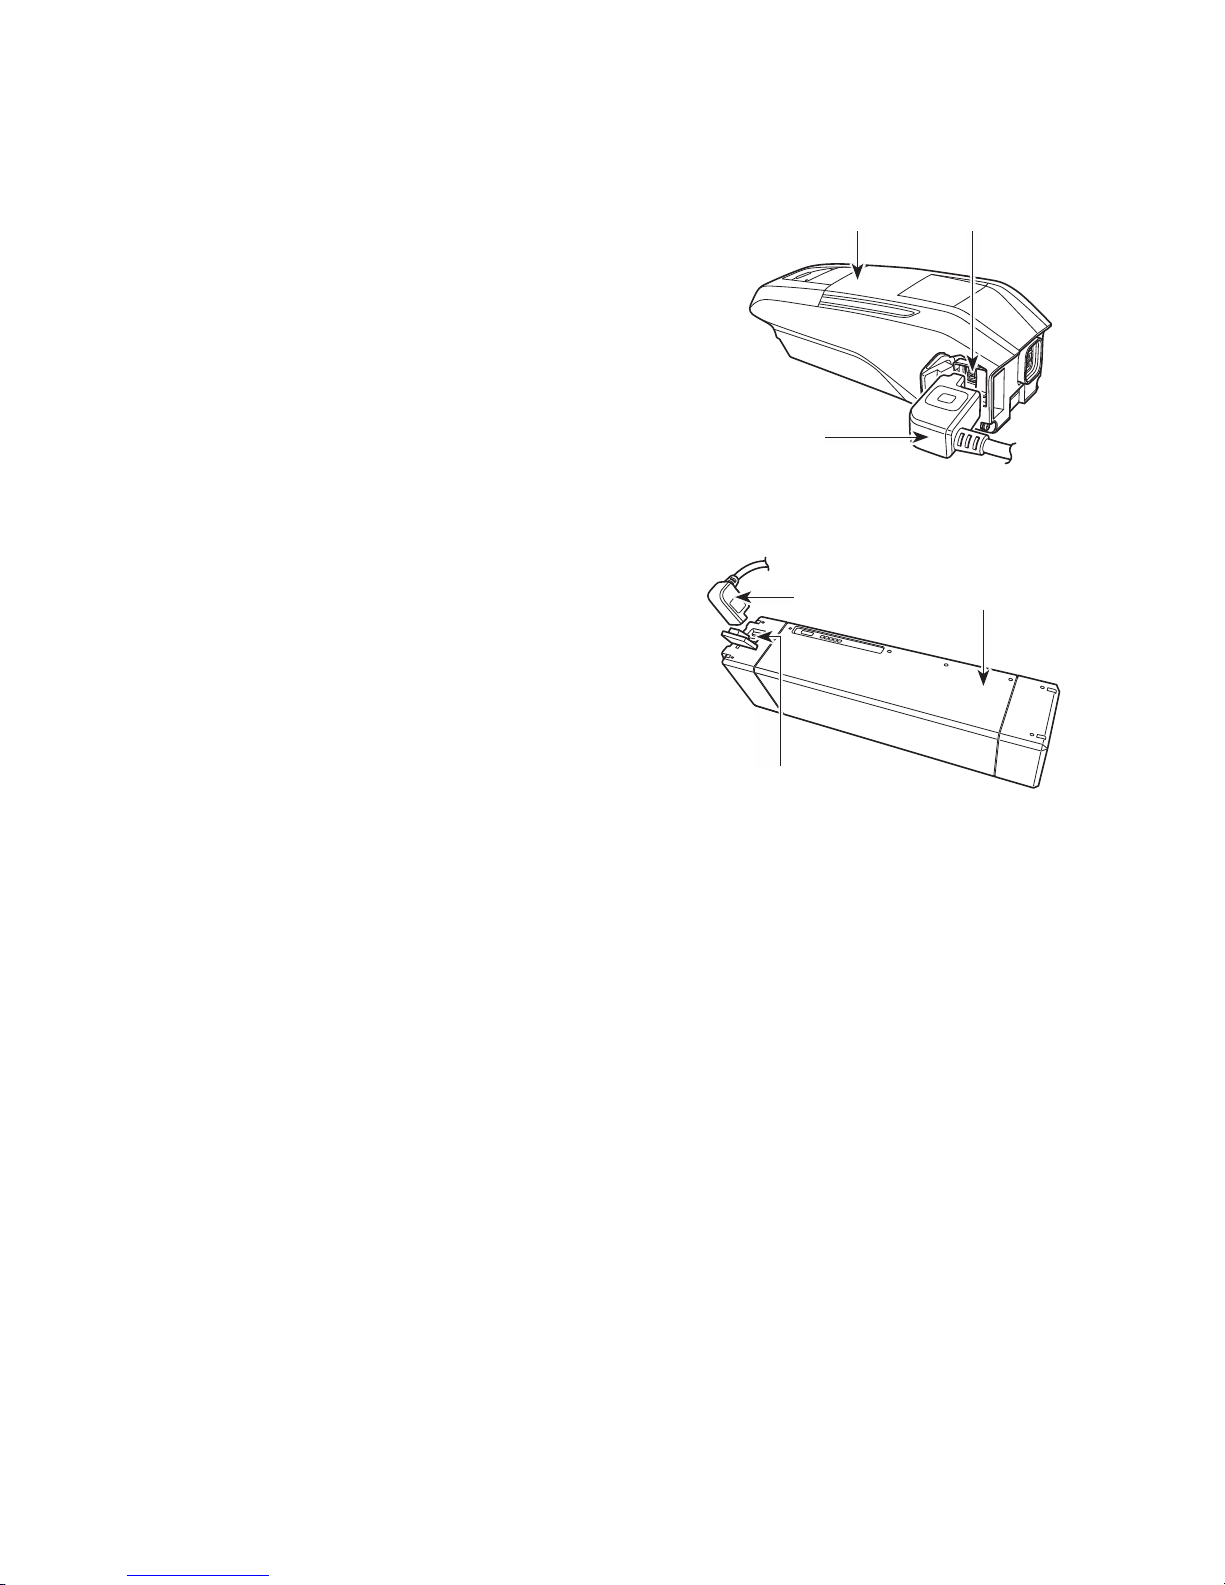
BT-E8010/BT-E8014/BT-E8020
1.
Connect the battery charger’s power plug to the outlet.
2.
Connect the charging plug into the battery's charging
port.
< BT-E8010/BT-E8014 >
Charging plug
Battery Charging port
< BT-E8020 >
Charging plug
Battery
Charging port
16
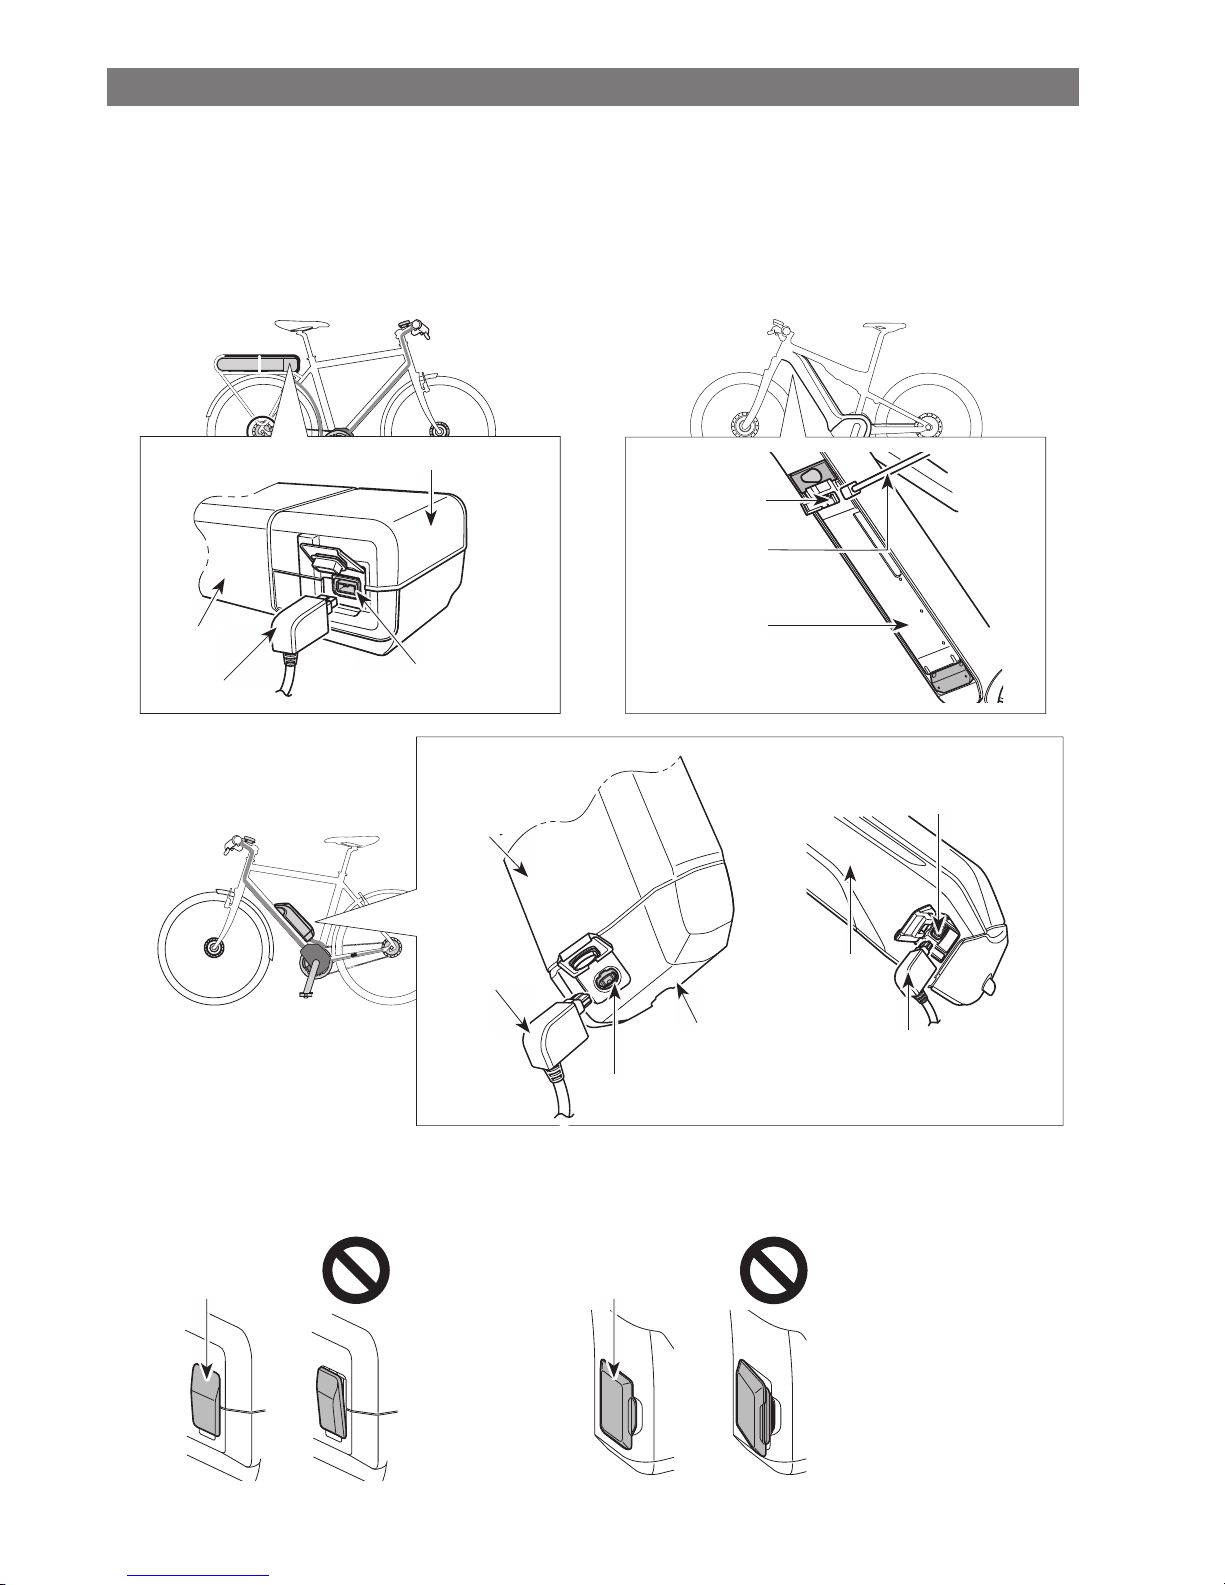
Charging the battery while installed on the bicycle
•
Place the battery charger on a stable surface such as the floor before charging.
•
Stabilize the bicycle to ensure that it does not collapse during charging.
1.
Connect the battery charger power plug to the outlet.
2.
Connect the charging plug to the charging port on the battery mount or the battery.
<BT-E6000/BT-E6001>
Battery mount
Charging port
Charging plug
Battery
<BT-E8020>
Battery
Charging plug
Charging port
<BT-E6010/BT-E8010/BT-E8014>
Battery
Charging
plug
Battery
mount
Charging port
<BT-E6010> <BT-E8010/BT-E8014>
Battery
Charging port
Charging plug
3.
After charging, close the charging port cap securely.
<BM-E6000>
Charging port cap
<BM-E6010>
Charging port cap
17
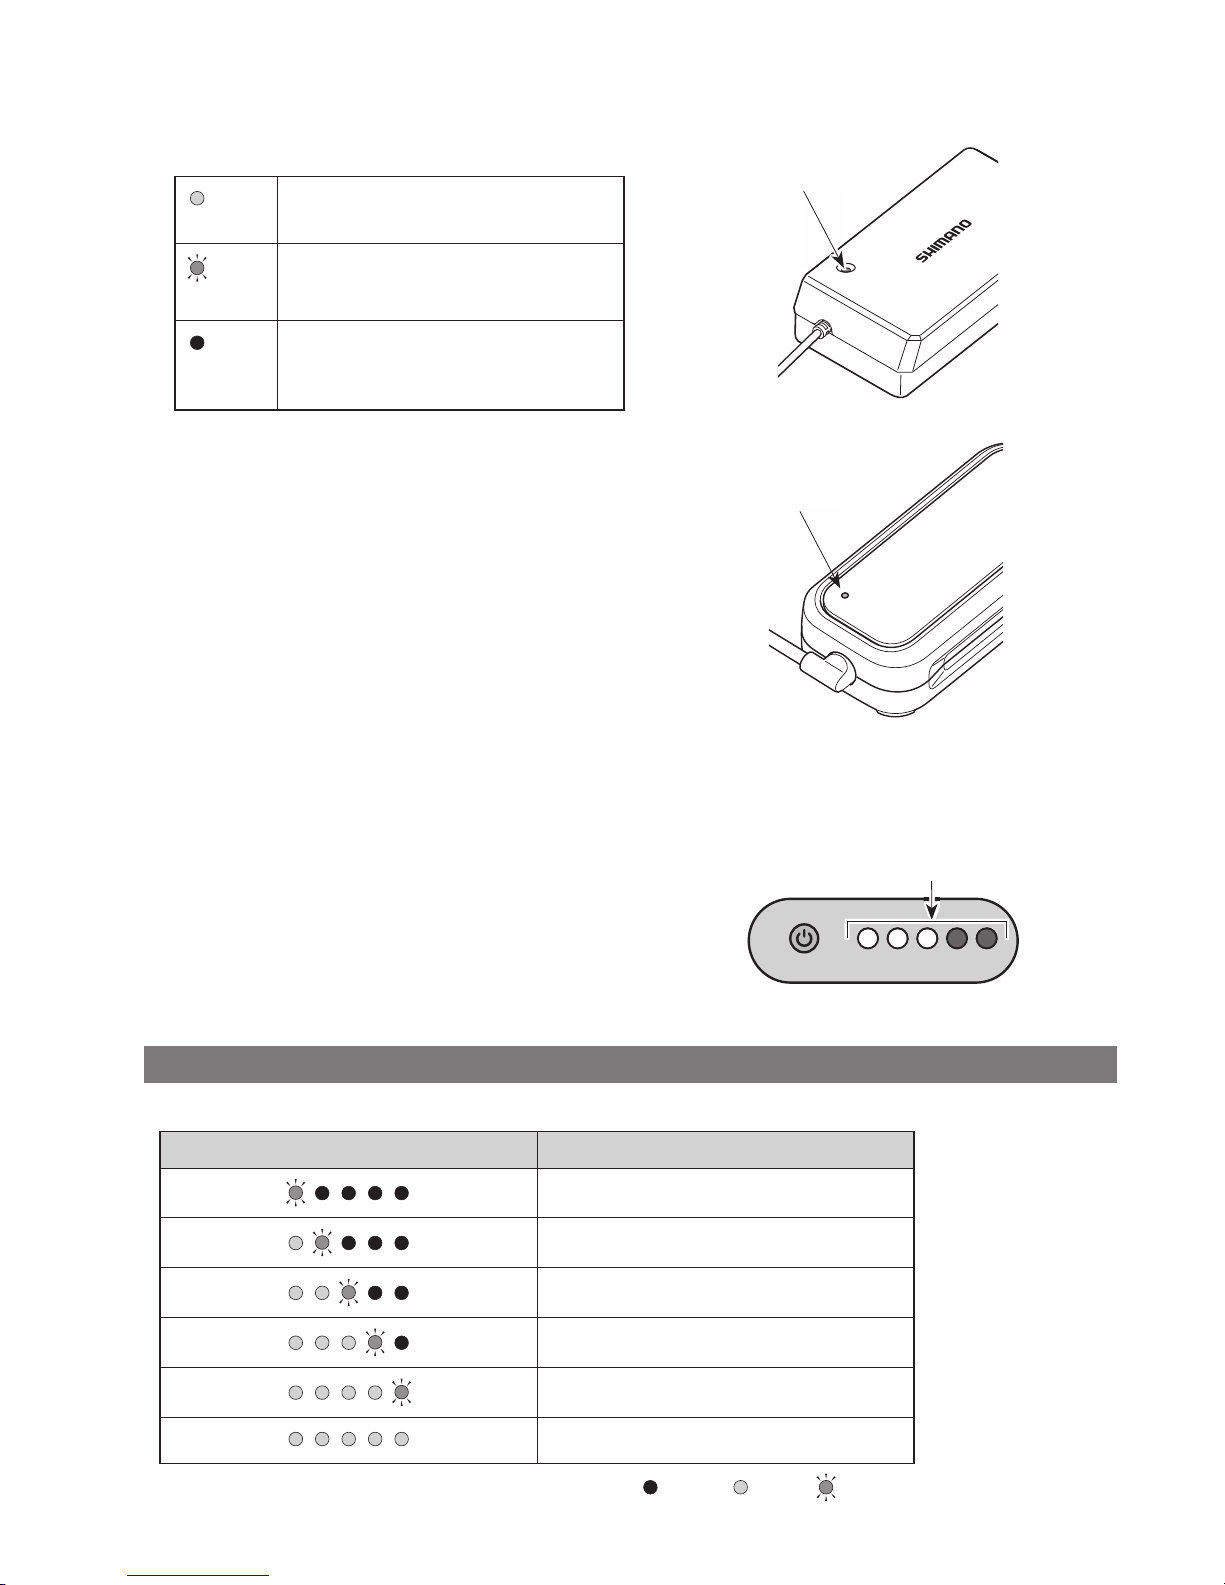
Charger LED lamp
After charging has started, the LED lamp on the charger
will light up.
Lit up
Charging
Blinking
Charging error
Turned
off
Battery disconnected
<EC-E6000>
Charger LED lamp
Charger LED lamp
<EC-E6002>
Battery LED lamp
Use this to check the current charging status.
The shape of the battery LED lamp varies depending on the
model number.
Battery LED lamps
Charging-in-progress indication
While battery is charging, the LED lamps on the battery light up.
LED lamp indication*1 Battery level
0% - 20%
21% - 40%
41% - 60%
61% - 80%
81% - 99%
100%
*1
: Not lit : Lit up : Blinking
 Loading...