

Page 1
UM-6P20A-003
Shifting Lever
(Internal Geared Hub
User's manual
Notice
•Products are not guaranteed against natural wear and deterioration from normal
use and aging.
•For maximum performance we highly recommend Shimano lubricants and
maintenance products.
Set to [2] Set to [2] Set to [2]
3-Speed)
IMPORTANT NOTICE
•Contact the place of purchase or a distributor for information on installation,
adjustment, and replacement of the products which are not found in the user's
manual. A dealer's manual for professional and experienced bicycle mechanics is
available on our website (https://si.shimano.com).
For safety, be sure to read this “user's manual” thoroughly
before use, follow it for correct use, and store it so that it
can be referenced at any time.
The following instructions must be observed at all times in order to prevent
personal injury and physical damage to equipment and surroundings. The
instructions are classified according to the degree of danger or damage which may
occur if the product is used incorrectly.
DANGER
WARNING
CAUTION
Failure to follow the instructions will result in
death or serious injury.
Failure to follow the instructions could result in
death or serious injury.
Failure to follow the instructions could cause
personal injury or physical damage to equipment
and surroundings.
Regular Inspections Before Riding the Bicycle
Before riding the bicycle, check the following items. If any problems are found,
consult your place of purchase or a distributor.
•Is gear shifting carried out smoothly?
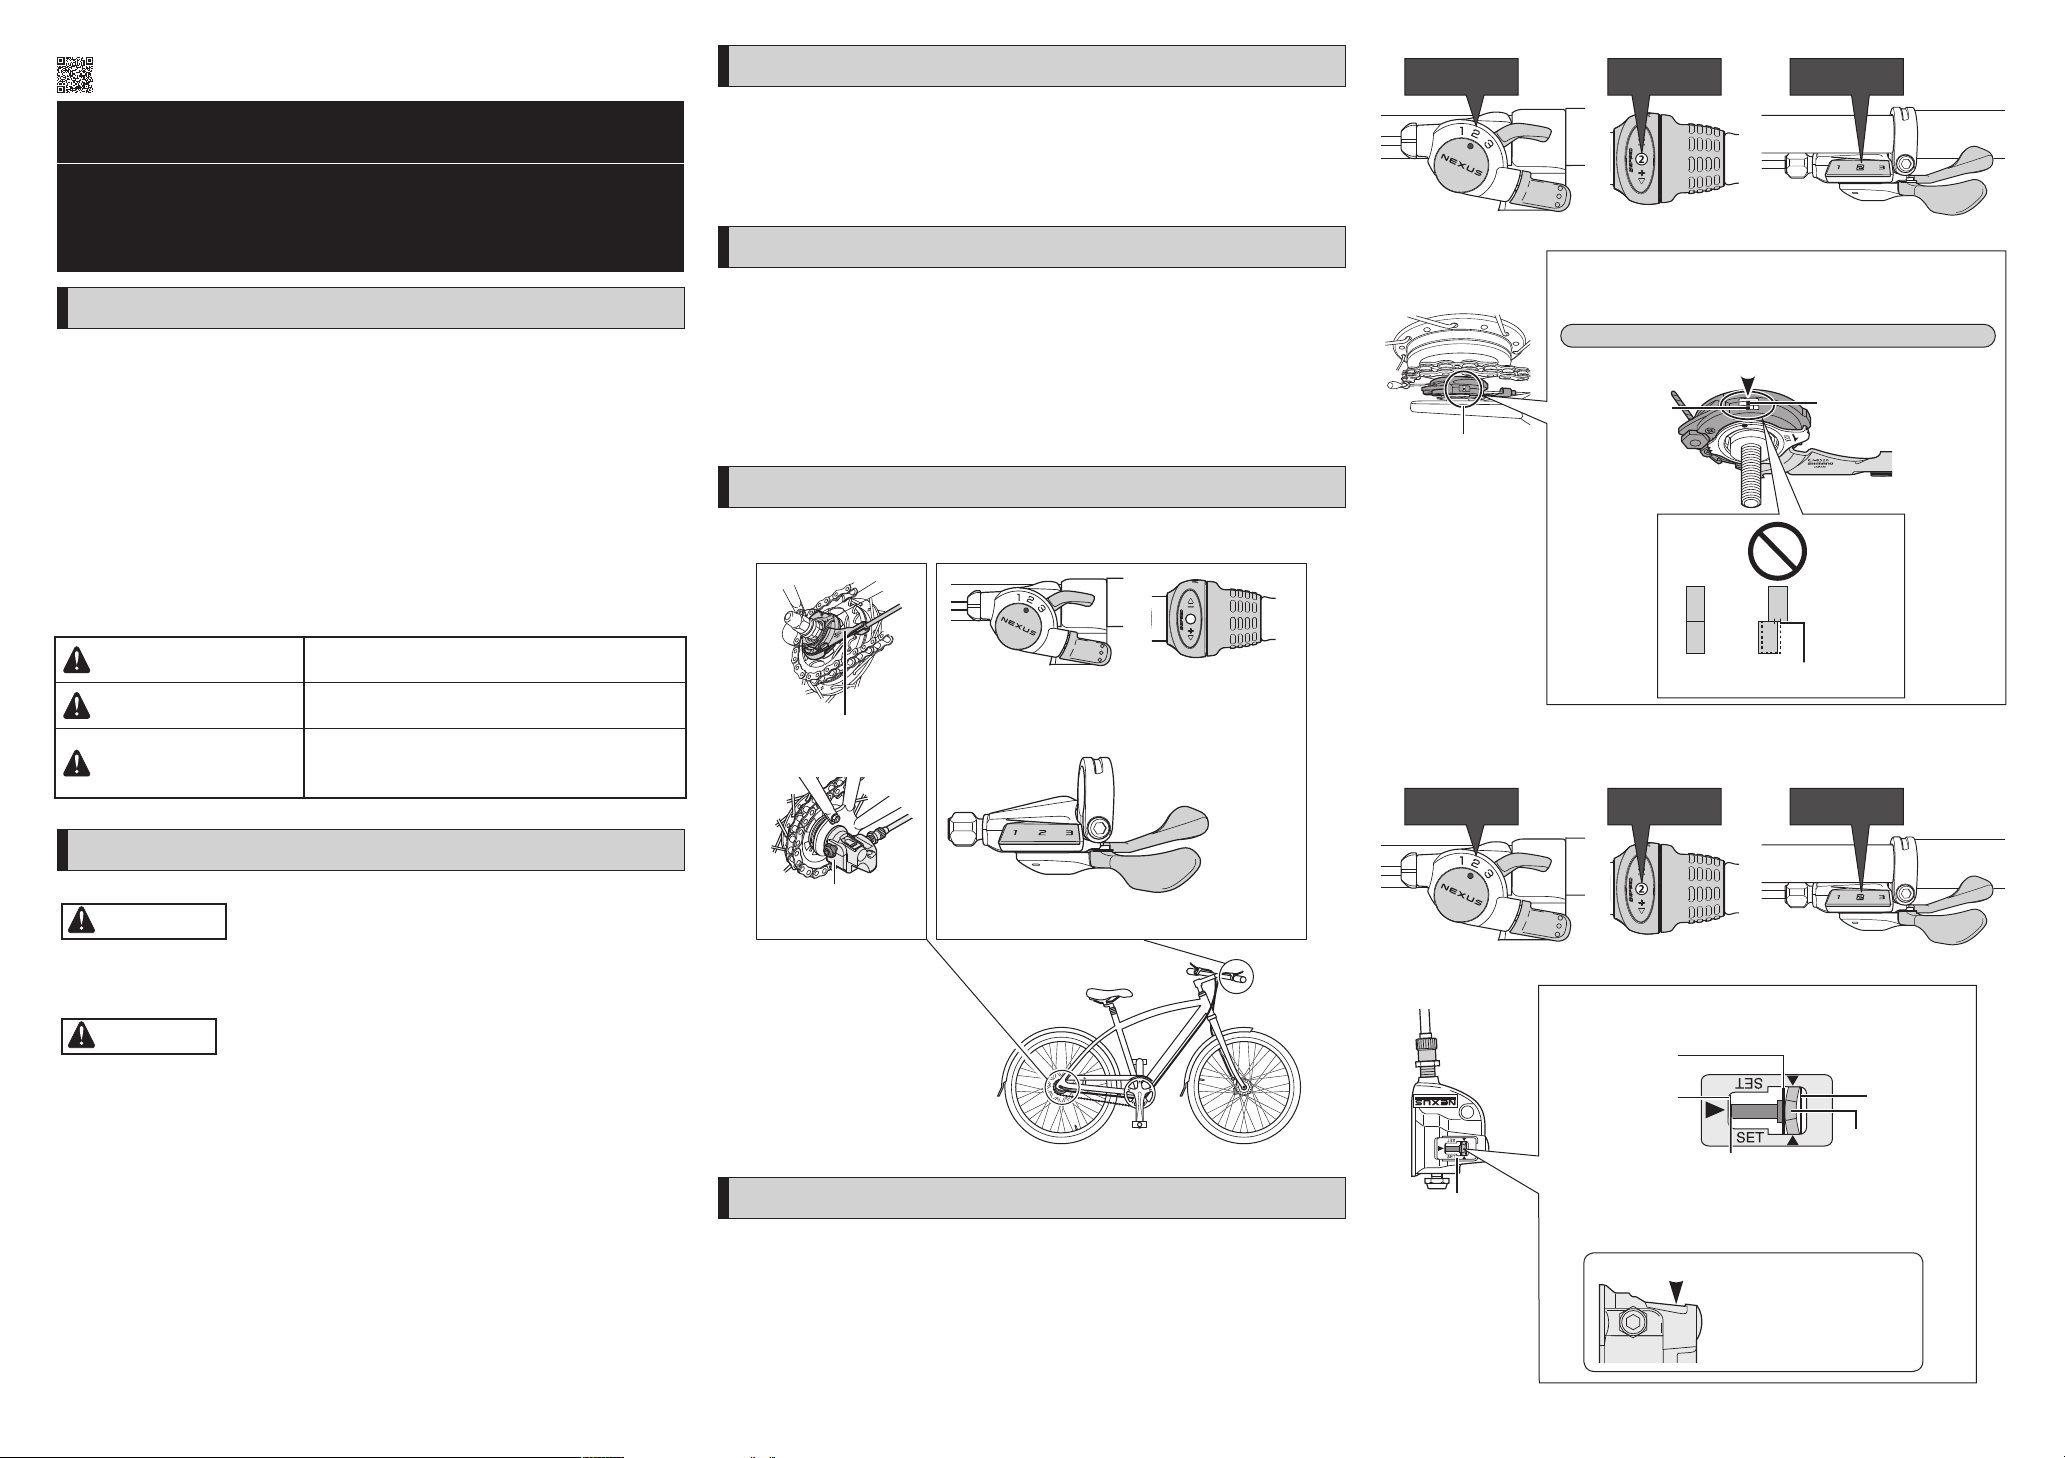
•Are the setting lines of the cassette joint in the correct position?
•Is the bell crank push rod in the correct position?
•Do any abnormal noises occur during operation?
Names of parts
The components differ according to the specifications of the internal geared hub.
Shifting lever
(REVOSHIFT)
Cassette joint
Shifting lever
(piano touch lever)
The yellow setting lines on the cassette joint are located in two places;
above and below. Use the one that is easier to see.
When the bicycle is upright
Should be aligned
Bracket
Yellow setting line
The overlapping area falls short of two
thirds of each setting line
For the bell crank
Set the shifting lever to [2].
Set to [2] Set to [2] Set to [2]
Pulley
Important Safety Information
WARNING
•Do not disassemble or modify the product. This may cause the product to not
operate correctly, and you may suddenly fall and be seriously injured.
CAUTION
•Be sure to push in the shifting lever until you feel a click with a clicking sound to
shift one gear at a time. During shifting, reduce the force being applied to the
pedals. If you try to force operation of the shifting lever or perform multishifting
while the pedals are being turned strongly, your feet may come off the pedals
and the bicycle may topple over, which could result in serious injury. Operating
the shifting lever to multi-shift to a light gear may also cause the outer casing to
spring out of the shifting lever. This does not affect the capabilities of the shifting
lever because the outer casing returns to the original position after shifting.
•Never place your foot on the bell crank. Otherwise, gear shifting may not
function properly.
Bell crank
Shifting lever (RAPIDFIRE PLUS)
Inspection method for cable adjustment
For the cassette joint
Set the shifting lever to [2]. Check that the yellow setting lines on the cassette joint
bracket and pulley overlap. If the overlapping area falls short of two thirds of each
setting line, consult your place of purchase or a distributor. Riding the bicycle with
the setting lines misaligned may cause the gears to not engage properly during
pedaling, causing abnormal noise or free spinning of the pedals.
Push rod
Make sure that the line on push rod is aligned with the end of the hub
axle.
Yellow line
End of hub axle
Line on push rod
If the line on push rod cannot be seen, confirm that the yellow part of
the link is between the two yellow lines on the window.
Note:
When checking, look at the two
yellow lines on the window directly
from above.
Yellow line
Yellow part of link
Page 2
HOW TO OPERATE
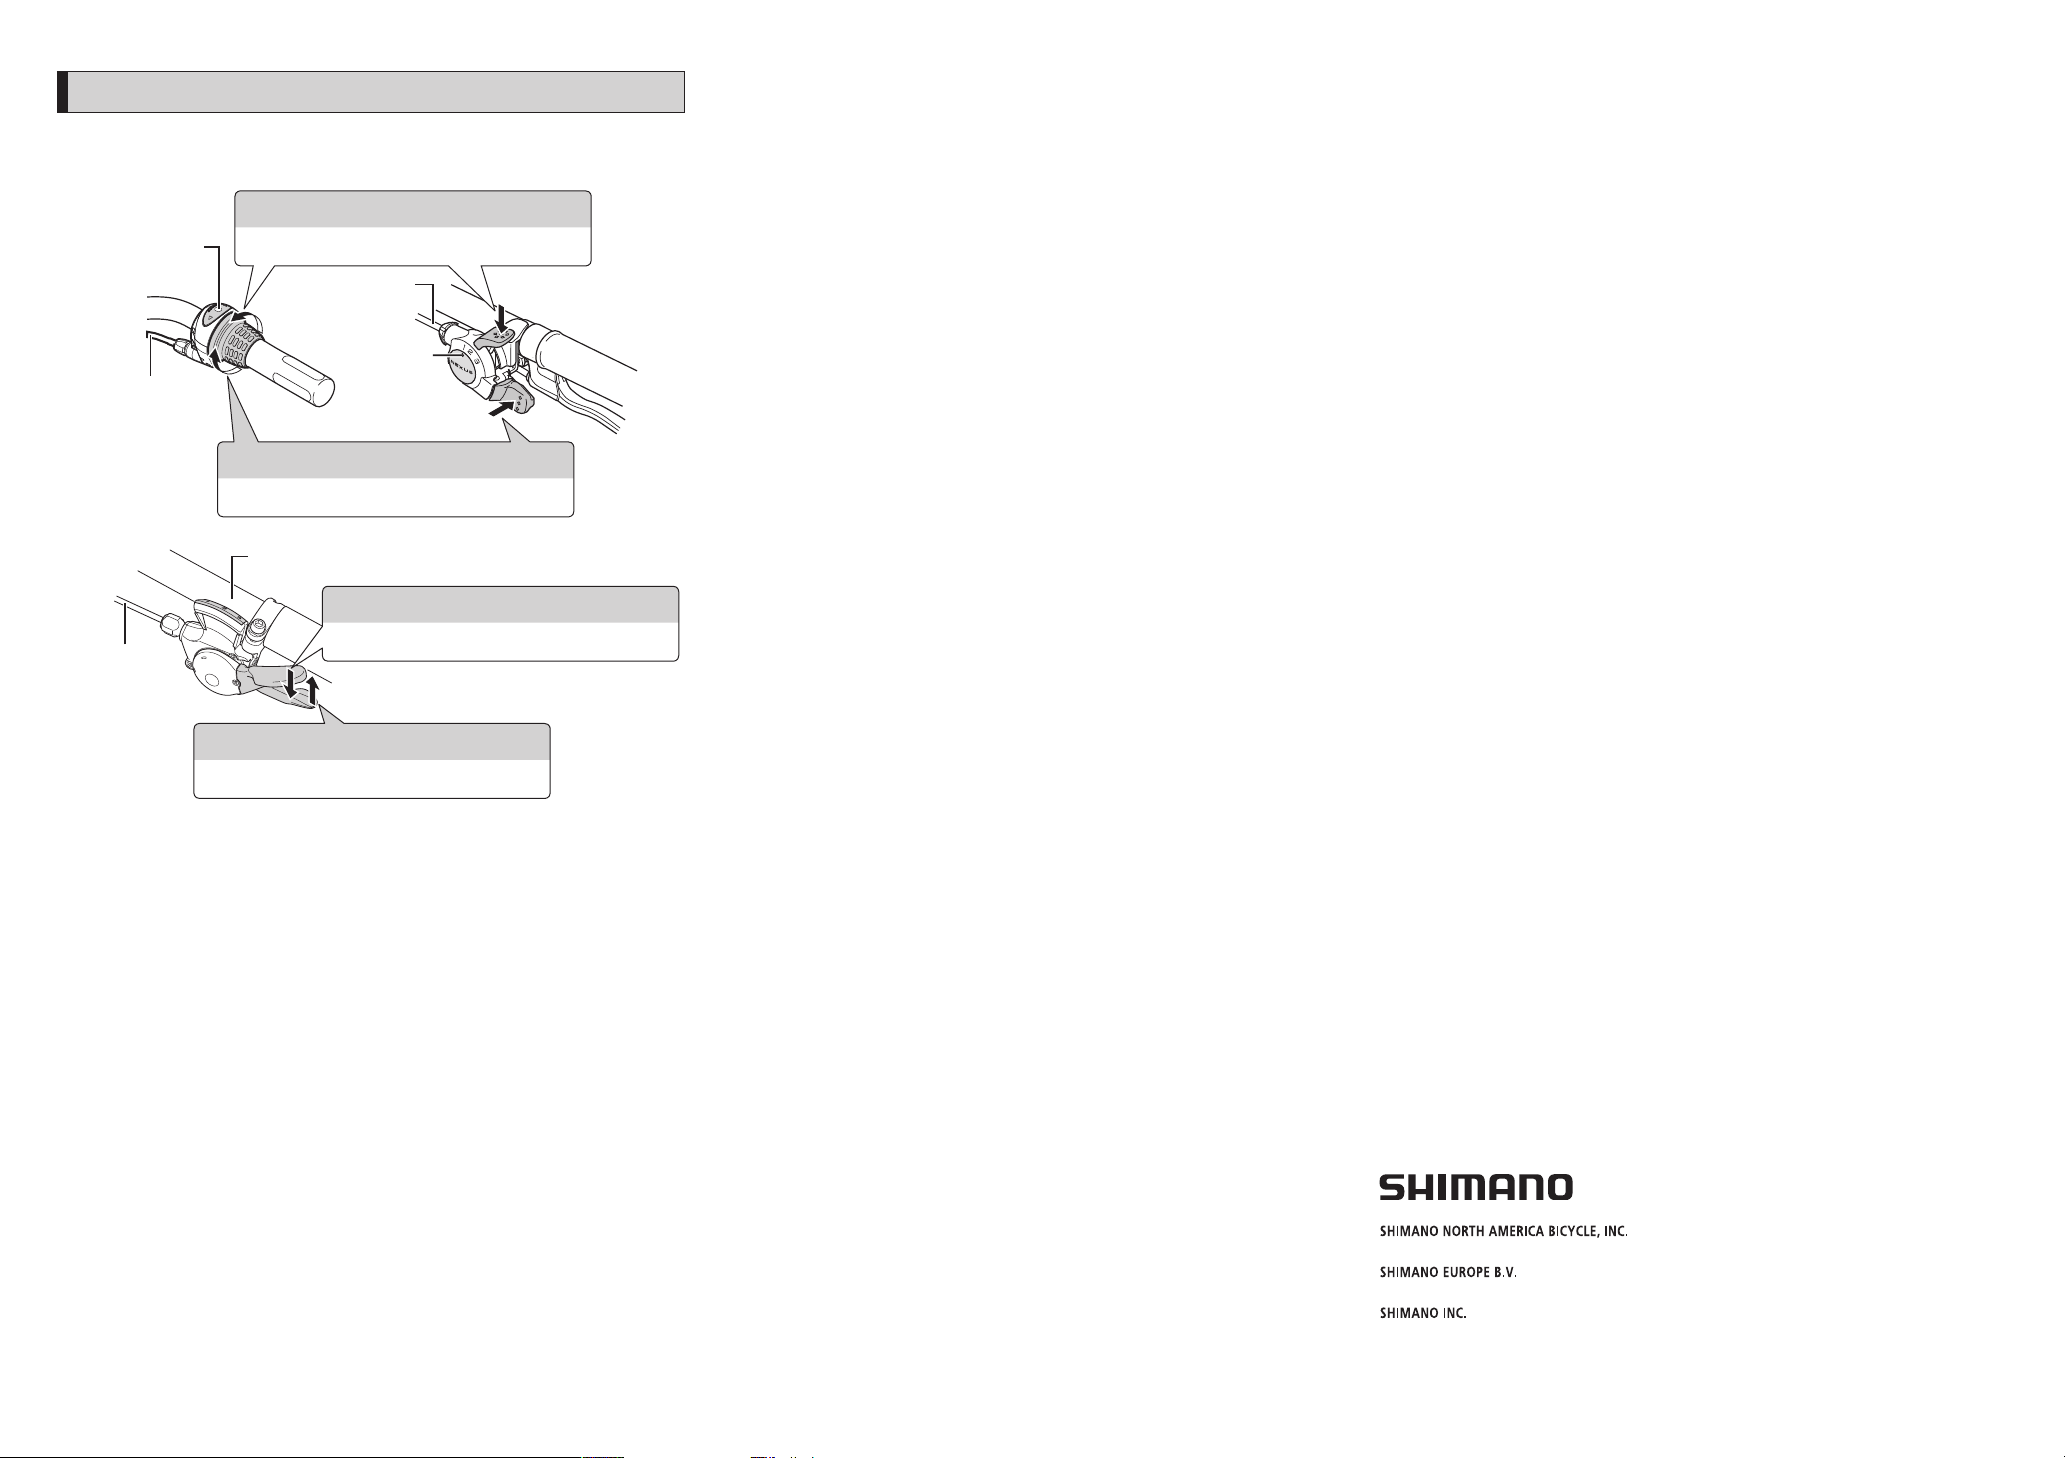
Indicator
One Holland, Irvine, California 92618, U.S.A. Phone: +1-949-951-5003
High Tech Campus 92, 5656 AG Eindhoven, The Netherlands Phone: +31-402-612222
3-77 Oimatsu-cho, Sakai-ku, Sakai City, Osaka 590-8577, Japan
Turn or push the nearby shifting lever until you feel a click with a clicking sound to
shift one gear at a time.
Gear shifting to a heavier gear (pedaling becomes heavier.)
Outer casing
Outer casing
Indicator
The indicator number moves to the larger side.
Outer casing
Indicator
Gear shifting to a lighter gear (pedaling becomes lighter.)
The indicator number moves to the smaller side.
Gear shifting to a heavier gear (pedaling becomes heavier.)
The indicator number moves to the larger side.
Gear shifting to a lighter gear (pedaling becomes lighter.)
The indicator number moves to the smaller side.
Please note: specifications are subject to change for improvement without notice. (English)
© Sep. 2024 by SHIMANO INC. ITP
 Loading...