

Page 1
General Safety Information
SI-0070A-002
WARNING
Understand how the locking mechanism works before you ride.
Before riding, place one foot on the ground and practice engaging
and disengaging from the pedal a number of times until you get used
to it.
Practice riding on smooth ground first.
Before riding, adjust the retention force of the pedal to your liking.
(Refer to the adjustment instructions for the pedal set.)
Make sure that mud, dirt, and foreign objects don't build up in the
pedal-cleat interface area.
If you do not maintain both your shoes and cleats in good condition,
release and engagement to the pedals could become unpredictable
or difficult, which could result in severe injury.
These shoes are highly rigid and extremely lightweight and have been
designed to be used only as racing shoes. The surfaces of the soles
of these shoes are much slipperier than for conventional SPD shoes,
and so you should find a safe place where you can get used to
wearing the shoes before using them fully.
Use extreme caution when pedaling without fitting the cleats into the
pedals and when walking on wet and/ or smooth surfaces in order to
avoid a serious injury.
Select the right-sized shoes for your feet, and be sure to fasten the
loop & hook fasteners and/ or shoe laces when using.
Refer to the instructions supplied with your SPD pedals.
Obtain and read the service instructions carefully prior to
installing the parts. Loose, worn, or damaged parts may cause
serious injury to the rider.
We strongly recommend only using genuine Shimano replacement
parts.
Heat molding of the shoes must only be carried out by a properlyauthorized Shimano footwear dealer. If the heat molding is carried out
incorrectly, burns or fire may result.
Check that there is no adhesive peeling off from around the soles
before using them.
If you have any questions regarding methods of installation,
adjustment, maintenance or operation, please contact a professional
bicycle dealer.
Read these Technical Service Instructions carefully, and keep them in
a safe place for later reference.
BE SURE TO READ AND FOLLOW THE ABOVE WARNINGS
CAREFULLY.
IF THE WARNINGS ARE NOT FOLLOWED, YOUR SHOES MAY
NOT COME OUT OF THE PEDALS WHEN YOU INTEND OR
THEY MAY COME OUT UNEXPECTEDLY OR ACCIDENTALLY,
AND SEVERE INJURY MAY RESULT.
– To avoid serious injuries:
NOTE:
These SPD shoes cannot be used with SPD/ SPD-R/SPD-SL pedals for
road riding.
Do not use washing machines or dryers to clean the shoes.
Allow your shoes to air-dry in a shaded area. Do not expose your shoes to
strong direct sunlight.
Do not apply heat with a dryer or similar appliance.
Do not leave the SPD shoes exposed to temperatures of 50°C or higher,
otherwise the shoes may become warped by heat.
Parts are not guaranteed against natural wear or deterioration resulting
from normal use.
SPD Custom-Fit Shoes
Type 1
These heat-molded custom-fit shoes can be used as they are without heat
molding, but any heat molding of the upper and inner sole must only be carried
out by a properly-authorized Shimano footwear dealer.
Technical Service Instructions
Attaching the cleats
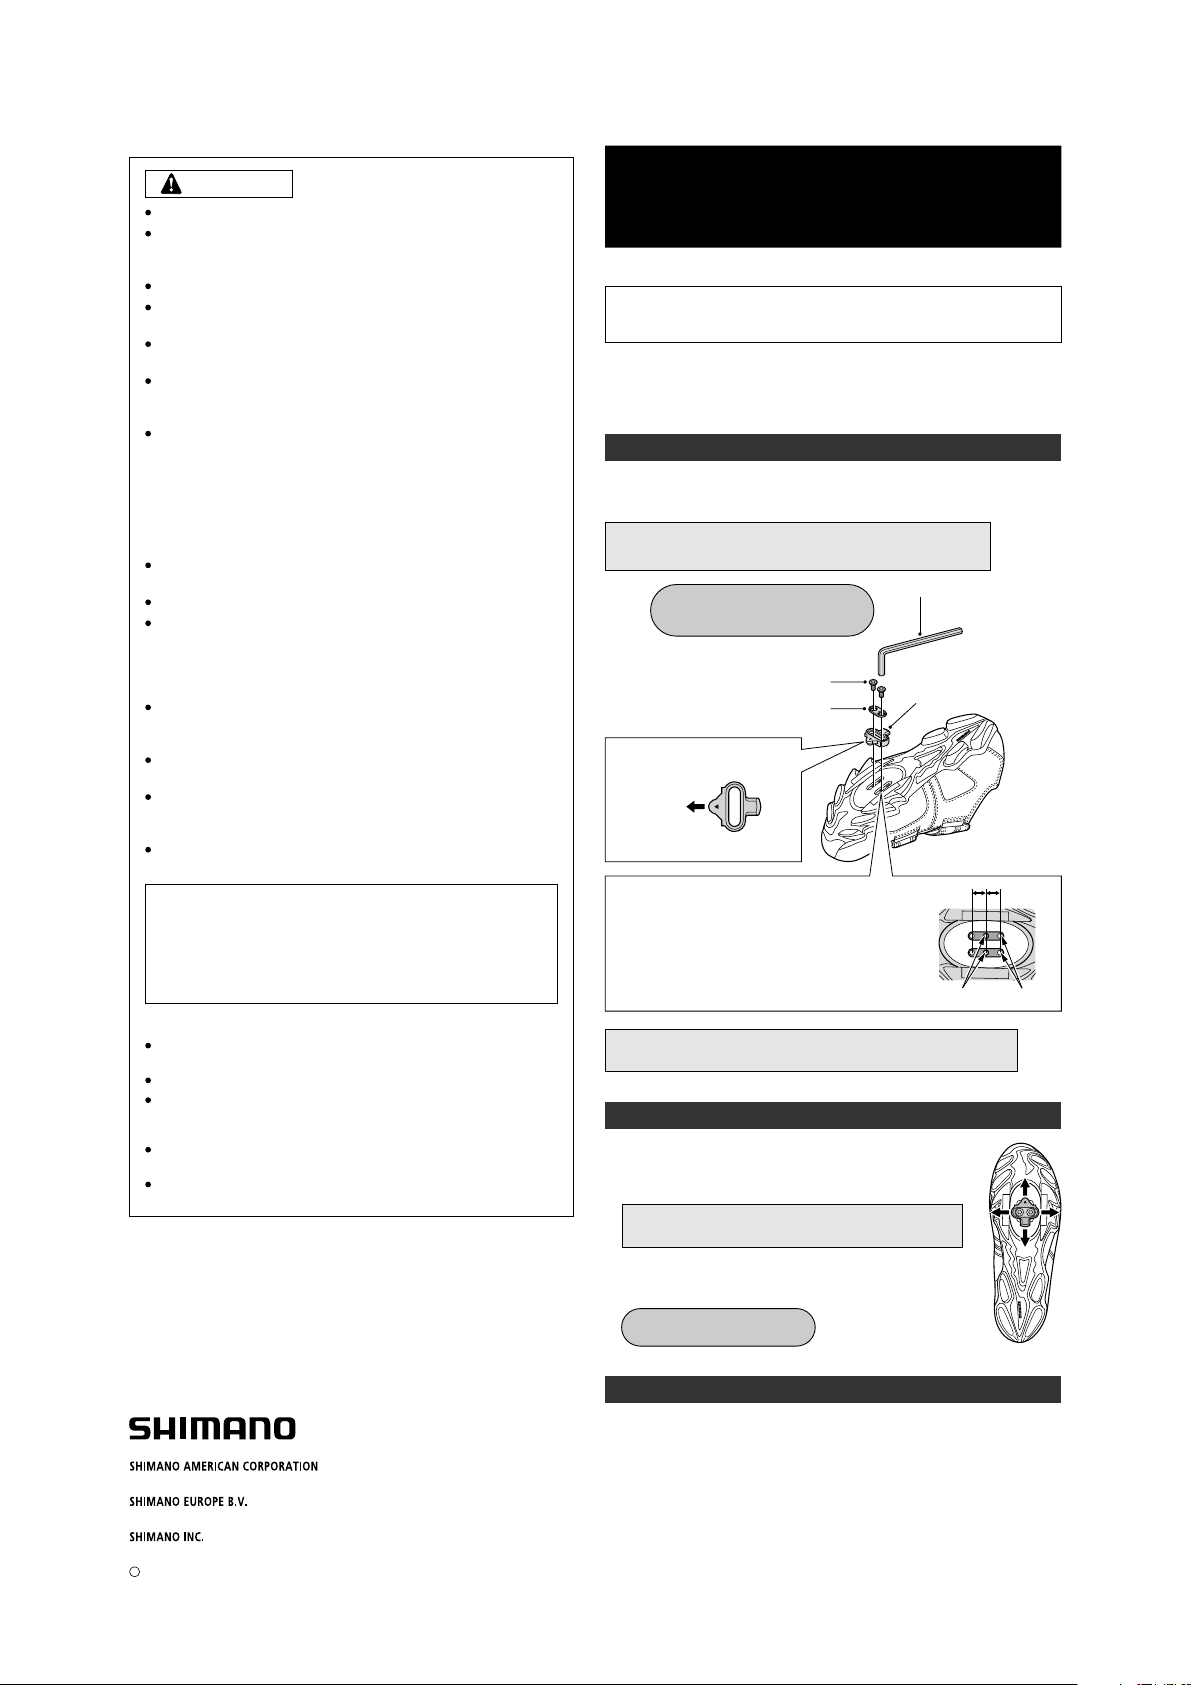
From the bottom of the shoe, position a cleat and then a cleat adapter over the cleat
holes. The cleats are compatible with both left and right pedals.
Provisionally tighten the cleat mounting bolts.
Note:
Be sure to use the special cleat mounting bolts to attach the cleats.
Provisional tightening torque
for cleat mounting bolts:
2.5 N·m {22 in. lbs.}
Cleat mounting bolts
Cleat adapter
Position the triangular portion of
the cleat toward the front of the
shoe.
Front
Cleat:
SM-SH51/ SM-SH55/ SM-SH56
The position of the cleat can be adjusted forward and
backward by a total distance of 20 mm. If set in the
front holes, it can be adjusted 10 mm forward,
set in the rear holes, it can be adjusted 10 mm
backward.
If you do not feel confident about mounting the cleat, ask your Shiman
footwear dealer for assistance.
SM-SH51
Adjusting the cleat position
The cleat has an adjustment range of 20 mm front to back and
1.
5 mm right to left. After provisionally tightening the cleat, practice
engaging and releasing, one shoe at a time. Readjust to
determine the best cleat position.
If you cannot find the optimum position for yourself, please
contact the place of purchase.
4 mm Allen key
Cleat
10 mm 10 mm
and if
Front holes Rear holes
Please note: Specifications are subject to change for improvement without notice. (English)
One Holland, Irvine, California 92618, U.S.A. Phone: +1-949-951-5003
Industrieweg 24, 8071 CT Nunspeet, The Netherlands Phone: +31-341-272222
3-77 Oimatsu-cho, Sakai-ku, Sakai, Osaka 590-8577, Japan
C
Mar. 2009 by Shimano Inc. PIT. SZK. Printed in Korea
After you have determined the best cleat position, firmly tighten
2.
the cleat mounting bolts with a 4 mm Allen key.
Tightening torque:
5 – 6 N·m {43 – 52 in. lbs.}
Cleat replacement
Cleats wear out over time and should be replaced periodically. Cleats should be
replaced when it becomes difficult to release, or it starts to release with much less
effort than the when it was in new condition.
 Loading...