

Page 1
UM-7FX0A-002-00
User's manual
Speedometer / Analog
Compass
User's manuals in other languages are available at :
http://si.shimano.com
IMPORTANT NOTICE
•Contact the place of purchase or a bicycle dealer for information on
installation and adjustment of the products which are not found in the
user's manual. A dealer's manual for professional and experienced bicycle
mechanics is available on our website (http://si.shimano.com).
•Do not disassemble or alter this product.
For safety, be sure to read this user's manual thoroughly
before use, and follow them for correct use.
Important Safety Information
Guidelines that require replacement, contact the place of purchase or a
bicycle dealer.
WARNING TO PARENT / GUARDIAN
•USE OF THIS PRODUCT IN ACCORDANCE WITH THESE USER'S MANUALS IS
ESSENTIAL FOR YOUR CHILD'S SAFETY. MAKE SURE YOU AND YOUR CHILD
UNDERSTAND THESE USER'S MANUALS. FAILURE TO FOLLOW THESE USER'S
MANUALS MAY RESULT IN SERIOUS PERSONAL INJURY.
WARNING
•The analog compass may not always point to the right direction if it is
installed to the bicycle in a place where it is affected by metal such as
brake cables. When checking the direction, stop the bicycle and remove
the compass from the bicycle. If you try to check the compass while the
bicycle is moving, the bicycle may become unstable because of being
ridden with one hand, and this may cause a fall.
•Be careful not to pay excessive attention to the computer data while riding
and do not change the display while riding, otherwise you might have an
accident.
•Keep used batteries out of the reach of children, and dispose of them in
accordance with local waste regulations. If batteries are swallowed by
mistake, seek medical advice immediately.
•After reading the user's manual carefully, keep it in a safe place for later
reference.
Note
•If there is no signal from the speed sensor for 120 seconds, the power save
function will operate and the LCD will turn off.
•Never disassemble the cycle computer, as it cannot be reassembled.
•The cycle computer is fully waterproofed to withstand wet weather
conditions; however, do not deliberately place it into water.
•Avoid leaving the cycle computer exposed to extreme hot weather
conditions as much as possible, because if the cycle computer is left
exposed to high temperatures or direct sunlight for long periods of time,
the LCD may become darkened. If this happens, place the cycle computer
in the shade to let it cool down. It will then return to normal.
•The ambient operating temperature range for the cycle computer is -10°C
to 50°C. If the temperature is outside this range, the movement of the data
display may become sluggish or data may not be displayed.
•Handle the cycle computer carefully, and avoid subjecting it to any shocks.
•Do not use thinner or other solvents to clean parts such as the cycle
computer and speed sensor, as such chemicals may dissolve the part
casings.
•To clean these parts, wipe them with cloth soaked in a weak mixture of
neutral detergent and water.
•The battery which is included when the product is purchased is for the
display computer, so the battery life may be shorter than expected.
•Insert the battery so that the (+) side is visible. If the battery is inserted the
other way around, the initial setting data will be cleared.
•The analog compass may not always point to the right direction if it is in a
place that is affected by magnetism, even if it has been removed from the
bicycle. The direction indicted by the compass should be used only as a
reference.
•If the analog compass becomes damaged or starts leaking, stop using it
immediately.
•Use the analog compass in a place which is free from steel and sources of
magnetic fi elds.
•This analog compass is classed as a toy for simplifi ed indication of
directions. It should not be used for serious applications such as mountain
climbing.
•Do not leave the analog compass in places which may reach temperatures
of -20°C or lower or 50°C or higher.
The analog compass may not indicate the correct direction in the
following cases:
•If it is placed near the outer casing or inner cable of the bicycle (because
of magnetism).
•If it is near high-voltage power lines, railroad tracks (including
underground tracks), manhole covers or steel building frames. However,
these are not the only objects that may affect the analog compass.
The characteristics of the analog compass mean that it may react to
weak magnetic forces and metallic objects, so be careful to use it in a
suitable environment.
•If the clock does not keep time, adjust the clock periodically.
•Products are not guaranteed against natural wear and deterioration from
normal use and aging.
•For maximum performance we highly recommend Shimano lubricants and
maintenance products.
Regular inspections before riding the bicycle
Before riding the bicycle, check the following items. If any problems are
found with the following items, contact the place of purchase or a bicycle
dealer.
•Is the battery drained?
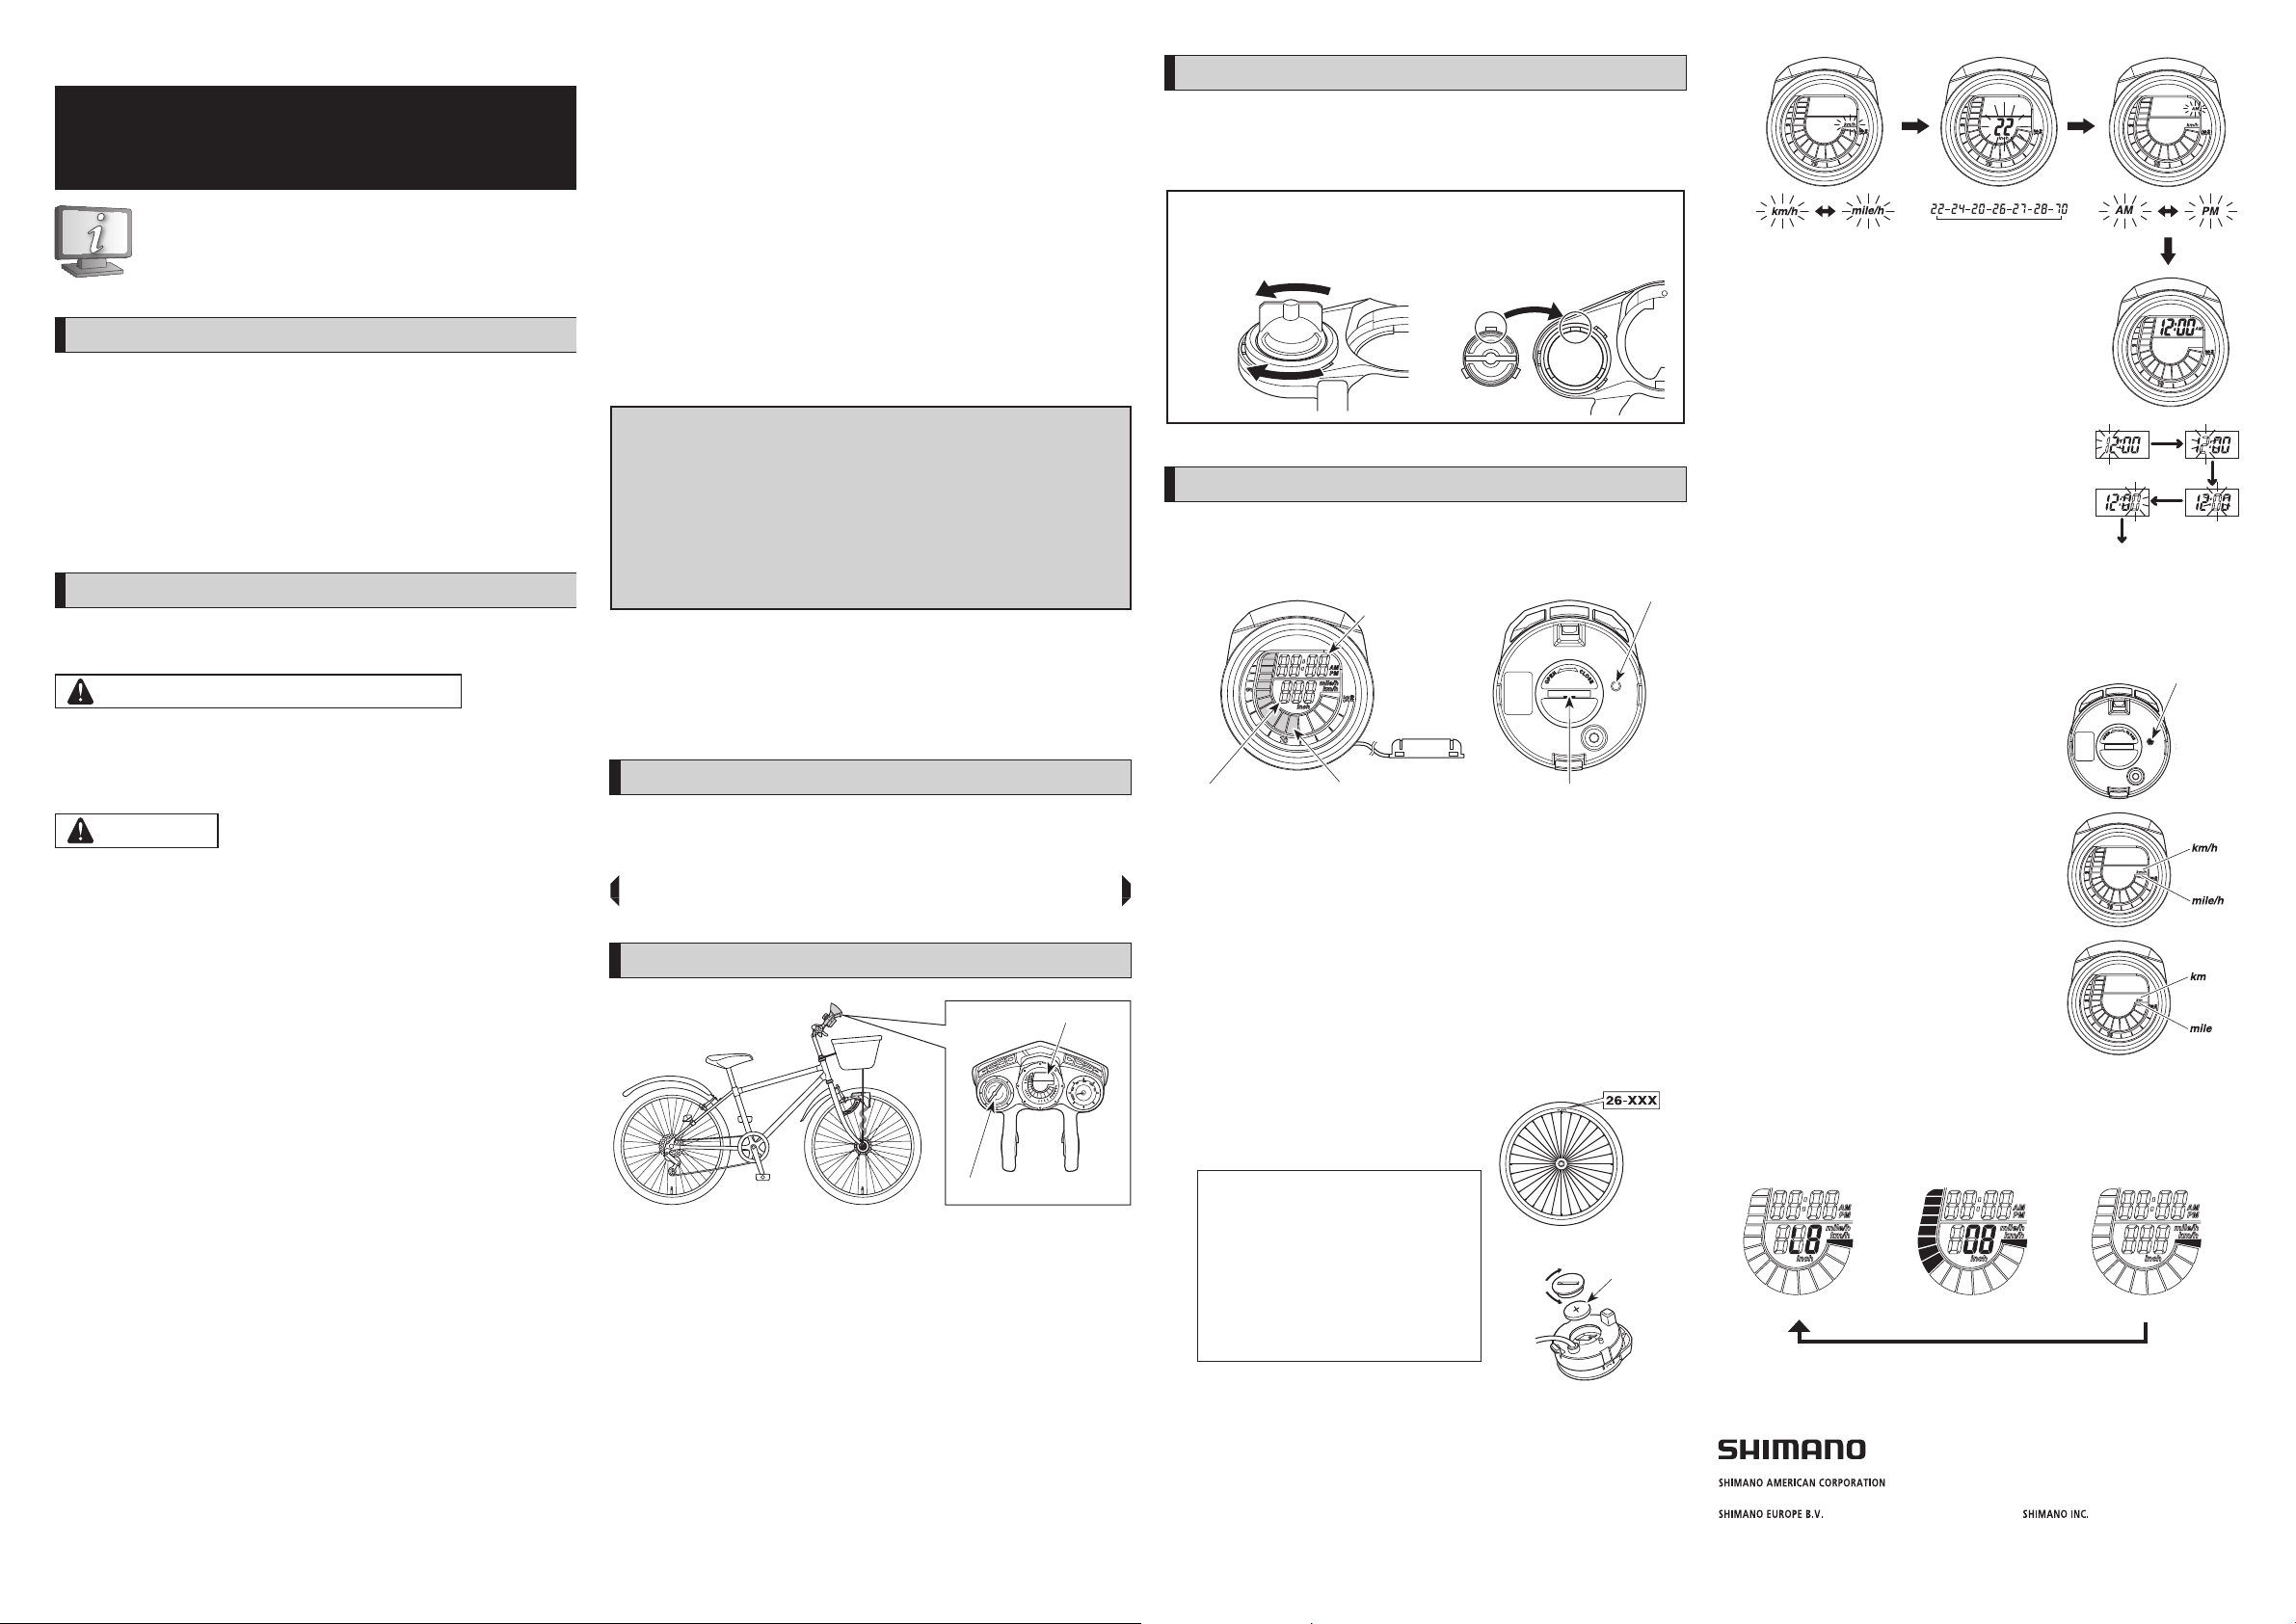
Names of parts
Speedometer
Analog compass
The speedometer and analog compass are optional.
Installation
Installing the analog compass
Install the analog compass by aligning the protrusion of the analog compass
with the [–] mark on the bracket and pushing in the analog compass from
the back side.
When checking the direction, turn the compass counterclockwise to
unlock it, and then remove it from the bracket.
After checking, align the projections on the compass with the hollows in
the bracket, and turn the compass clockwise to lock it onto the bracket.
Unlock
Lock
Settings
Part names
Front
Clock
(always displayed)
Speed
sensor
Current speed or
odometer
Current speed bar format
(1 segment: 1 km/h / 1 mile/h)
Mode selection
You can switch between speed and cumulative distance displays by pressing
the button on the underside of the cycle computer.
Data input
Use the buttons at the back to change the display. If you do not press
anything for 5 seconds while the display is fl ashing, the current settings will
be confi rmed and the display will change to the next item.
(1) Check the tire size.
(2) Insert the battery (CR2032).
(3) "km/h" fl ashes.
(4) For mile display, press the button once to
change the display.
Note:
The speedometer is available with
either km display or mile display. If
using the km speedometer, settings
should be made in terms of kilometers,
and if using the mile speedometer,
settings should be made in terms of
miles. If the wrong units are used, the
numerical values displayed will not be
correct.
Rear
Button
Battery cover
(Tighten securely so
that it is in the
position shown in
the illustration.)
(1)
(2)
Close
CR-2032
Open
(3)
(4)
(5) The numbers fl ash. (22 inches will fl ash
initially.)
To display the size of the tire being used,
press the button several times to change
the display.
(6) "AM" fl ashes.
For PM display, press the button once to
change the display.
(7) The numbers fl ash.
To display the 1st clock digit (hour), press
the button several times to change the
display.
(8) Repeat step (7) for 2nd and 3rd clock digits.
(9) The numbers fl ash.
To display the last clock digit (minutes),
press the button several times to change
the display.
(10) If you press and hold the button for 5
seconds or if you do not press anything for
one minute, the clock setting will be
confi rmed, and this will complete the
setting.
Resetting settings
To reset the settings, press the button once to
start the cycle computer. Then remove the
battery, wait 30 seconds, and then follow the
data input procedure.
(5) (6)
(7)
(9)
(8)
Setting complete
Press
<Changing clock setting>
To change the setting, press the button once to
start the cycle computer. Switch the cycle
computer to Speed mode (km/h or mile/h). Press
and hold the button for at least 5 seconds, and
then follow the data input procedure.
<Changing tire size setting>
To change the setting, press the button once to
start the cycle computer. Switch the cycle
computer to Odometer mode (km or mile). Press
and hold the button for at least 5 seconds, and
then follow the data input procedure.
<Low battery information>
When the battery level is low, the following display will appear, replace the
battery.
(1) Blink "LB" in the display.
(2) Back to normal mode.
(3) Turns off in sleep mode.
(1) (2) (3)
One Holland, Irvine, California 92618, U.S.A. Phone: +1-949-951-5003
Industrieweg 24, 8071 CT Nunspeet, The Netherlands Phone: +31-341-272222
Please note: specifi cations are subject to change for improvement without notice. (English)
© Apr. 2013 by Shimano Inc. HTR
3-77 Oimatsu-cho, Sakai-ku, Sakai-shi, Osaka 590-8577, Japan
 Loading...