

Page 1

OWNER’S MANUAL
BENUTZERHANDBUCH
GEBRUIKERSHANDLEIDING
LE MANUEL DU PROPRIÉTAIRE
IT IS IMPORTANT TO READ THE WARNINGS AND INSTRUCTIONS IN THIS MANUAL BEFORE RIDING YOUR NEW BICYCLE.
LESEN SIE SÄMTLICHE WARNHINWEISE UND ANWEISUNGEN IN DIESER BEDIENUNGSANLEITUNG VOR DER ERSTEN FAHRT MIT
IHREM NEUEN BIKE GRÜNDLICH DURCH.
H
ET IS BELANGRIJK DE WAARSCHUWINGEN EN INSTRUCTIES IN DEZE HANDLEIDING TE LEZEN VÓÓR U MET UW NIEUWE FIETS RIJDT
.
IL EST IMPORTANT DE LIRE LES MISES EN GARDE ET INSTRUCTIONS CONTENUES DANS CE MANUEL AVANT D’UTILISER VOTRE
NOUVEAU VÉLO.
Page 2

Welcome to our bike family
Thank you for purchasing your new bike.
We believe in bikes. We make high quality bikes that are built to last. That is why each bike we make
comes with a limited lifetime warranty.
We wish you many carefree and enjoyable cycling kilometers with your new bike!
However, if you experience any problems with your bike, do not hesitate to contact your local retailer. If
the problem persists, please call our customer service for a solution.
Willkommen in unserer fahrrad-familie
Vielen Dank für den Kauf ihres neuen Fahrrads.
Wir glauben an das Fahrrad. Wir produzieren hochwertige Fahrräder, damit Sie lange mit ihrem Kauf
zufrieden sind.
Aus diesem Grund erhält jedes Fahrrad unsere eingeschränkte lebenslange Garantie.
Wir wünschen ihnen viele problemlose Kilometer und viel Spaß auf ihrem neuen Fahrrad!
Wie auch immer, solten Sie jemals Probleme mit ihrem Fahrrad bekommen, können Sie sich jederzeit an
ihren örtlichen Fachhändler wenden. Wenn das Problem weiterhin besteht, kontaktieren Sie bitte unseren
Kundendienst, um eine Lösung zu finden.
Welkom bij onze fietsfamilie
Dank u voor het kopen van uw nieuwe fiets.
Wij geloven in de kracht van fietsen. We maken hoogwaardige fietsen voor het leven. Daarom wordt elke
fiets geleverd met een beperkte levenslange garantie.
Wij wensen u vele zorgeloze en aangename fietskilometers toe!
Als u echter problemen ondervindt met uw fiets, neem dan contact op met uw plaatselijke fietsendealer.
Als het probleem niet wordt opgelost, vraag dan onze klantenservice om een oplossing.
bienvenue dans notre famille
Merci d’avoir acheté votre nouveau vélo.
Nous croyons aux vertus du vélo. Nous fabriquons des vélos de haute qualité, créés pour durer.
C’est la raison pour laquelle chaque vélo que nous fabriquons est livré avec une garantie à vie limitée.
Nous vous souhaitons de nombreux kilomètres à vélo agréables et sans problème !
Toutefois, si vous avez un souci avec votre vélo, n’hésitez pas à vous adresser à votre distributeur local.
Si le problème persiste, veuillez rechercher une solution auprès de notre service client.
www.trekbikes.com
www.diamantrad.com
Welcome - Willkommen - Welkom - bienvenue
Page 3

UM-70H0A-005-00
User's manual
Original instructions
E6000 Series
Shimano Total Electric Power System
English
Page 4

Page 5

The most important points for you to do
1. Even if you have ridden a bicycle for years, it is important for every person to read the general
“Bike Owner’s manual” and the specific “RIDE+ Owner’s manual” carefully before you ride on the
new RIDE+ bicycle.
• Both manuals contain detailed information and useful suggestions about your new bicycle.
• Make sure that you understand the proper use, maintenance, and disposal of the components of the electrical
system of your new RIDE+ bicycle.
2. Think about safety. Your safety and that of other road users is very important.
• Do not ride the electric bike without the battery pack. The battery pack must be on the bike while riding; else
the bike has no lights when needed.
• Do not misuse the electric bike by riding it without a saddle. Some bikes have a quick release on the seat
post. If the saddle gets stolen, it may lead to hazardous situations when still riding on the electric bike without
a saddle.
• Check your bike for normal operation, loose parts and defects before riding. If you find any problem, visit
your bike dealer for repairs before riding.
• Be aware that other road users do not expect that an electric bike can ride faster than a normal bike.
Riding faster also increases the risk of accidents.
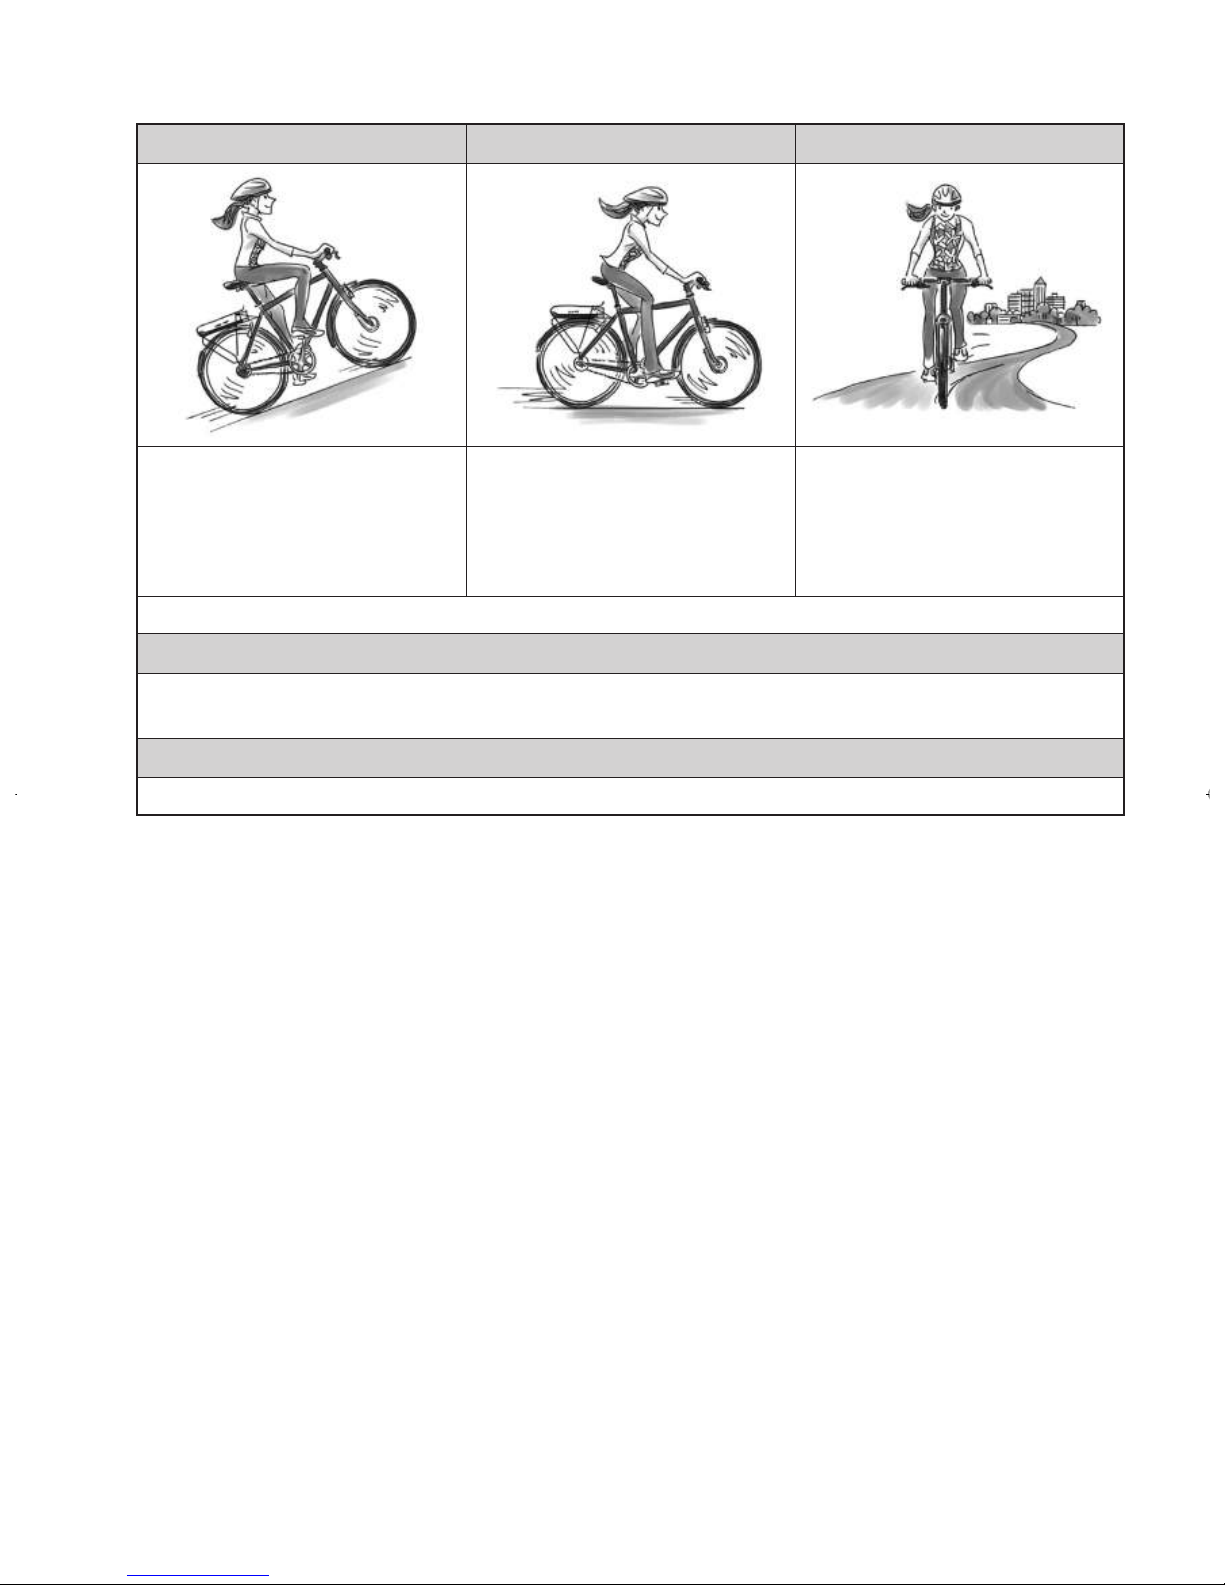
• Do not ride abusively. Only ride in the use conditions specified for your bike.
Condition 1 (paved roads with tires staying on the ground) is valid for RIDE+ City/Trekking bikes, condition 3
(rougher surfaces, tires momentarily NOT on the ground) is valid for RIDE+ Mountain bikes. Please refer
to the general Bicycle Owner’s manual for more detailed information.
• Do not over load the rear rack. The maximum allowable weight for the rear rack on RIDE+ bikes is 20 kg
for bikes with a rear rack battery pack and 25 kg for bikes with a down tube battery.
3. The electric system of your new bicycle needs special attention.
• Do not clean your electric bicycle with a high pressure washer. Any electric system is sensitive for moisture.
High pressure water might ingress in connectors or other parts of the electric system.
• Handle your battery pack with care. Do not drop or impact the battery pack. Mishandling of the battery
pack could lead to severe damage or over-heating. In an extremely rare case, a battery pack that has been
severely impacted or otherwise mishandled could potentially catch fire.
If you suspect damage to your battery pack, visit your dealer immediately for inspection.
4. Maintain the battery pack as instructed in this RIDE+ Owner’s manual.
Failure to follow these instructions may result in damage to your battery pack and may require battery pack
replacement:
• Only charge the battery pack with the included Shimano charger.
• When not using the battery pack for a longer period, charge it to approx. 100 % (4 to 5 LEDs lit on the
charge-control indicator).
• Check the charge status of the battery pack regularly if you do not use your bike for a longer period. When
only one LED of the charge-control indicator lights up or flashes, recharge the battery pack again to
approx. 100 % immediately.
• It is not recommended to have the battery pack connected permanently to the charger.
Important to read before the fIrst rIde
Page 6

• When the battery pack is stored discharged (empty) for longer periods, it can become damaged despite
the low self-discharging and the battery-pack capacity may be strongly reduced.
• Store the battery pack in a dry, well-ventilated location. Protect the battery pack against moisture and water.
• Under unfavorable weather conditions, it is recommended e.g. to remove the battery pack from the bike
and store it in an enclosed location until being used again.
• The battery pack can be stored at temperatures between -20°C and +60°C. For a long battery pack life,
however, storing the battery pack at room temperature of approx. 20°C is of advantage.
• Take care that the maximal storage temperature is not exceeded. As an example, do not leave the battery
pack in a vehicle in summer and store it out of direct sunlight.
• It is recommended to not store the battery pack on the bike.
5. Be careful when transporting a RIDE+ bike.
• An E-bike is heavier than a normal bike. If transporting on a vehicle, be aware of the maximum load capacity
of the vehicle’s roof, towing hook and/or of the applied bike carrier. Refer to the manual of the vehicle and
bike carrier for details.
• Remove the controller, battery pack and, if present, panniers from the bicycle and store them elsewhere in
the vehicle during the drive.
• Always respect local laws about transportation of a(n electric) bicycle.
• Because Li-Ion battery packs of this size and power are considered ‘Dangerous goods, class 9’ when
transporting, regulations may restrict the transport of separate Li-Ion batteries in some places.
The restrictions apply to most airlines and some trucking companies. But, if you intend to ship or travel with
your complete RIDE+ bike (with installed battery pack), the regulations are less strict. Make sure to check
ahead with your airline or carrier, before booking your trip, if it is allowed to travel with your complete
RIDE+ bike.
6. Visit your dealer on a regular basis for maintenance of your new bike.
• To guarantee the safe and proper functioning of the bike, the bike must be maintained on a regular basis,
at least once a year, by an authorized RIDE+ dealer.
• Your dealer has the right knowledge and equipment to maintain your RIDE+ bike.
• If you have questions about your new RIDE+ bicycle, ask your dealer!
Getting the most from your RIDE+ Bicycle
Page 7

1
CONTENTS
IMPORTANT NOTICE
......................................................................................2
Important safety information
.........................................................................2
To ensure safety
...........................................................................................2
Features of SHIMANO STEPS
..........................................................................6
Features .......................................................................................................................................6
Riding the bicycle ........................................................................................................................6
Assist mode .................................................................................................................................7
Names of parts
............................................................................................. 8
Specifications
...............................................................................................9
Method of use
...........................................................................................10
INTRODUCTION .........................................................................................................................10
Charging the battery ................................................................................................................10
About the charger LED lamp ...................................................................................................15
About the battery LED lamp ....................................................................................................15
Handling and charging the battery .........................................................................................16
Installing / removing the battery ............................................................................................17
Switching between cycle computer operations and modes
...............................22
Installing and removing the cycle computer ...........................................................................23
Turning the power ON / OFF ....................................................................................................24
SHIMANO STEPS logo screen ....................................................................................................25
Basic screen display ...................................................................................................................26
About the settings menu .........................................................................................................35
Drive unit setting data backup function
......................................................... 43
Connection and communication with the PC
................................................... 43
Downloading application .........................................................................................................43
Troubleshooting
.........................................................................................44
Battery LED lamp error indications ..........................................................................................44
Error messages on the cycle computer ....................................................................................45
Troubleshooting ........................................................................................................................48
Page 8
2
User's manuals in other languages are
available at :
http://si.shimano.com
IMPORTANT NOTICE
•
Contact the place of purchase or a bicycle dealer for
information on installation and adjustment of the
products which are not found in the user's manual. A
dealer's manual for professional and experienced bicycle
mechanics is available on our website (http://si.shimano.
com).
•
Do not disassemble or alter this product.
•
Use the product according to local laws and regulations.
For safety, be sure to read this user's
manual thoroughly before use, and
follow them for correct use.
Important safety information
For replacement information, contact the place of purchase
or a bicycle dealer.
Be sure to observe the following in order to avoid burns or
other injury from fluid leakages, overheating, fire or
explosions.
To ensure safety
DANGER
Handling the battery
•
Do not deform, modify, disassemble or apply solder
directly to the battery. Doing so may cause leakage,
overheating, bursting, or ignition of the battery.
•
Do not leave the battery near sources of heat such as
heaters. Do not heat the battery or throw it into a fire.
Doing so may cause bursting or ignition of the battery.
•
Do not subject the battery to strong shocks or throw it. If
this is not observed, overheating, bursting, or fire may
occur.
•
Do not place the battery into fresh water or sea water,
and do not allow the battery terminals to get wet. Doing
so may cause overheating, bursting, or ignition of the
battery.
•
Use the Shimano specified charger and observe the
specified charging conditions when charging the
specified battery. Not doing so may cause overheating,
bursting, or ignition of the battery.
Page 9

3
WARNING
To ensure safe riding
•
Do not give too much of your attention to the cycle
computer display while riding, otherwise accidents may
result.
•
Check that the wheels are securely installed to the bicycle
before commencing riding. If the wheels are not securely
installed, the bicycle may fall over and serious injury may
result.
•
If riding a power-assisted bicycle, make sure that you are
fully familiar with the starting-off characteristics of the
bicycle before riding it on roads with several vehicle lanes
and pedestrian footpaths. If the bicycle starts off
suddenly, accidents may result.
•
Check that the bicycle lights illuminate before riding at
night.
Using the product safely
•
Be sure to remove the battery and charging cable before
wiring or attaching parts to the bicycle. Otherwise, an
electric shock may result.
•
When charging the battery while it is installed on the
bicycle, do not move the bicycle. The power plug for the
battery charger may come loose and not be fully inserted
into the electrical outlet, resulting in risk of fire.
•
When installing this product, be sure to follow the
instructions given in the user's manual. Furthermore, it is
recommended that you use only genuine Shimano parts
at these times. If bolts and nuts are left loosened or the
product is damaged, the bicycle may suddenly fall over
and serious injury may result.
•
Do not disassemble the product. Disassembling it may
cause injury to persons.
•
After reading the user's manual carefully, keep it in a
safe place for later reference.
Handling the battery
•
If any liquid leaking from the battery gets into your eyes,
immediately wash the affected area thoroughly with
clean water such as tap water without rubbing your eyes,
and seek medical advice immediately. If this is not done,
the battery liquid may damage your eyes.
•
Do not recharge the battery in places with high humidity
or outdoors. Doing so may result in electric shock.
•
Do not insert or remove the plug while it is wet. If this is
not observed, electric shocks may result. If there is water
leaking out of the plug, dry it thoroughly before
inserting it.
•
If the battery does not become fully charged after 6
hours of charging, immediately unplug the battery from
the outlet to stop charging, and contact the place of
purchase. Failure to do so may cause overheating,
bursting, or ignition of the battery.
•
Do not use the battery if it has any noticeable scratches
or other external damage. Doing so may cause bursting,
overheating or problems with operation.
•
The operating temperature ranges for the battery are
given below. Do not use the battery in temperatures
outside these ranges. If the battery is used or stored in
temperatures outside these ranges, fire, injury or
problems with operation may occur.
1. During discharge: –10 °C - 50 °C
2. During charging: 0 °C - 40 °C
Cleaning
•
The frequency of maintenance will vary depending on
the riding conditions. Periodically clean the chain using
an appropriate chain cleaner. Do not use alkaline or
acidic cleaning agents for removing rust under any
circumstances. If such cleaning agents are used, they may
damage the chain and serious injury may result.
Page 10

4
CAUTION
To ensure safe riding
•
Observe the instructions in the user's manual for the
bicycle, in order to ride safely.
Using the product safely
•
Periodically check the battery charger and adapter,
particularly the cord, plug, and case, for any damage. If
the charger or adapter is broken, do not use it until it has
been repaired.
•
This appliance is not intended for use by persons
(including children) with reduced physical, sensory or
mental capabilities, or lack of experience and knowledge,
unless they have been given supervision or instruction
concerning use of the appliance by a person responsible
for their safety.
•
Do not allow children to play near the product.
Handling the battery
•
Do not leave the battery in a place exposed to direct
sunlight, inside a vehicle on a hot day, or other hot
places. This may result in battery leakage.
•
If any leaked fluid gets on your skin or clothes, wash it
off immediately with clean water. The leaked fluid may
damage your skin.
•
Store the battery in a safe place out of the reach of
infants and pets.
Cleaning
•
If any malfunctions or other problems occur, contact the
place of purchase.
•
Never attempt to modify the system yourself, as it may
cause problems with system operation.
Note
Using the product safely
•
Be sure to install caps to any connectors which are not
being used.
•
For installation and adjustment of the product, consult a
dealer.
•
The Product is designed to be fully waterproof to
withstand wet weather riding conditions. However, do
not deliberately place them into water.
•
Do not clean the bicycle in a high-pressure wash. If water
gets into any of the components, operating problems or
rusting may result.
•
Do not turn the bicycle upside down. The cycle computer
or the shifting switch may get damaged.
•
Handle the product carefully, and avoid subjecting it to
any strong shocks.
•
Although the bicycle still functions as a normal bicycle
even when the battery is removed, the light does not
turn on if it is connected to the electric power system. Be
aware that using the bicycle under these conditions will
be considered non-observance of the road traffic laws in
Germany.
•
When charging the battery while it is mounted on the
bicycle, be careful of the following:
-
When charging, make sure there is no water on the
charging port or the charger plug.
-
Ensure that the battery is locked into the battery
mount before charging.
-
Do not remove the battery from the battery mount
while charging.
-
Do not ride with the charger mounted.
-
Close the charging port cap when not charging.
-
Stabilize the bicycle to ensure that it does not
collapse during charging.
Page 11
5
Handling the battery
•
When you carry a power-assisted bicycle in a car, remove
the battery from the bicycle and place the bicycle on a
stable surface in the car.
•
Before connecting the battery, make sure that there is no
buildup of water or dirt in the connector where the
battery will be connected.
•
The use of a genuine Shimano battery is recommended. If
using a battery from another manufacturer, make sure to
carefully read the instruction manual for the battery
before use.
Disposal information for countries outside
the European Union
This symbol is only valid within the
European Union. Follow local regulations
when disposing of used batteries. If you
are not sure, consult the place of purchase
or a bicycle dealer.
Cleaning
•
The number found on the battery mount key is necessary
when purchasing spare keys. Keep it in a safe place.
There is a space to enter the key number on the back
cover of this user's manual. Enter the key number for
safekeeping and later reference.
•
Contact the place of purchase for updates of the product
software. The most up-to-date information is available
on the Shimano website. For details, refer to the
"Connection and communication with the PC" section.
•
Do not use thinner or other solvents to clean any of the
products. As such substances may damage the surfaces.
•
You should periodically wash the chainrings in a neutral
detergent. In addition, cleaning the chain with neutral
detergent and lubricating it can be an effective way of
extending the useful life of the chainrings and the chain.
•
Use a damp cloth, with the water well wrung out, when
cleaning the battery and plastic cover.
•
For any questions regarding handling and maintenance,
contact the place of purchase.
•
Products are not guaranteed against natural wear and
deterioration from normal use and aging.
•
For maximum performance we highly recommend
Shimano lubricants and maintenance products.
Assist
•
If the settings are not correct, for instance if the chain
tension is too tight, the proper assist force may not be
obtained. If this happens, contact the place of purchase.
<DU-E6010>
•
This component is compatible with coaster brakes. If the
crank is not installed in the correct position or the chain
tension has not been correctly adjusted, contact the place
of purchase, as there may not be proper assistance
power.
Label
•
Some of the important information contained in this
user's manual is also indicated on the battery charger
label.
Page 12

6
Features of SHIMANO STEPS
Features
•
Lightweight, compact design
•
Silent, smooth ride
•
High shifting performance system (In the case of electronic gear shifting)
This system uses accurate sensors to enable shifting gears by providing the most appropriate level of power assistance
carefully adjusted by computer controls.
•
Full Automatic Shifting (In the case of electronic 8-speed gear shifting)
The sensors detect riding conditions, whether you are riding up a hill against the wind, or on flat ground with no wind;
the automatic gear shifting system uses computer controls to make your ride more pleasant.
•
Start mode (In the case of electronic gear shifting)
This function allows automatic shifting down to a preset gear when you stop the bicycle such as at traffic lights so that
you can start traveling at a light gear.
*
If, while the bicycle is stopped, you shift to a gear lower than the set gear, the system will not automatically shift up.
•
Coaster brake compatible (DU-E6010)
Smoothly provides sufficient control power.
•
Light off road
Sporty, provides powerful assistance. Can only be used when set by the manufacturer of the completed bicycle.
•
Walk assistance function (Walk assist mode)
*
Some of the functions listed above can only be used once the firmware has been updated. If this is the case, consult the
place of purchase, and carry out the firmware updates.
Riding the bicycle
1.
Turn on the power.
•
Do not place your foot on the pedals when turning the power on. A system error may result.
•
Power cannot be turned on while charging.
2.
Select your preferred assist mode.
3.
Assistance will start when the pedals start turning.
4.
Change the assist mode in accordance with the riding conditions.
5.
Turn the power off when parking the bicycle.
•
Do not place your foot on the pedals when turning the power off. A system error may result.
Page 13
7
Assist mode
You can select a SHIMANO STEPS assist mode for each particular application.
HIGH NORMAL ECO
Use when powerful assistance is
required, such as when riding up steep
uphill slopes.
Use when an intermediate level of
assistance is needed, such as when you
want to enjoy riding comfortably on a
gentle slope or level ground.
Use when you want to enjoy long
distance riding on level ground. When
pedaling is not very strong, the
amount of assistance is reduced and
energy consumption is lessened.
When the battery level is running low, the level of assistance is lowered to increase the traveling range.
OFF
This mode does not provide power assistance when the power is turned on. Since there is no power consumption
associated with the power assistance, it is useful for reducing battery consumption when the battery is running low.
WALK
This mode is particularly useful when you walk the bicycle with heavy baggage on it or walk it out of a basement.
Page 14
8
Names of parts
B
1 2
3
5
A
B
4
6
9
*
1
*
2
< In the case of electronic gear
shifting >
A
Shifting
switch
SW-E6000
B
Motor
unit
MU-S705
Internal
geared
hub
SG-C6060
SG-S705
SG-S505
Motor unit
Internal geared
hub
5
6
8
7
Page 15

9
1
Cycle computer
•
SC-E6000
•
SC-E6010
6
Battery mount (external type)
•
SM-BME60
•
SM-BME61
•
BM-E6000
•
BM-E6010
•
BM-E8010
2
Assist switch
•
SW-E6000
7
Battery (built-in type)
•
BT-E8020
3
Front gear / Crank arm
•
FC-E6000
•
SM-CRE60
8
Battery mount (built-in type)
•
BM-E8020
4
Drive unit / Speed sensor
•
DU-E6001
•
DU-E6050
•
DU-E6010
9
Battery charger
*
1: SM-BCE60+SM-BCC1
*
2: EC-E6000
5
Battery (external type)
•
BT-E6000
•
BT-E6001
•
BT-E6010
•
BT-E8010
Specifications
Operating temperature
range: During discharge
-10 – 50˚C Battery type Lithium ion battery
Operating temperature
range: During charging
0 – 40˚C Nominal capacity
Refer to the user's manual
for the battery "UM70F0A". For the latest
information on manuals, see
the website
(http://si.shimano.com).
Storage temperature -20 – 70˚C Rated voltage 36 V DC
Storage temperature
(Battery)
-20 – 60˚C Drive unit type Midship
Charging voltage 100 – 240 V AC Motor type Brush-less DC
Charging time
Refer to the user's manual
for the battery "UM-70F0A".
For the latest information on
manuals, see the website
(http://si.shimano.com).
Rated drive unit power 250 W
*
The range of the assist function speed is different depending on the specifications.
DU-E6001, E6010: 25km/h or less
DU-E6050: 20mile/h or less
Page 16
10
Method of use
INTRODUCTION
You cannot use the battery immediately after shipment.
The battery can be used after charging it with the designated charger.
Be sure to charge it before use. The battery can be used when the LED on it lights up.
The use of a genuine Shimano battery is recommended. If using a battery from another manufacturer, make sure to carefully
read the instruction manual for the battery before use.
Charging the battery
DANGER
•
Use the battery and charger combination specified by the company for charging and follow the charging conditions specified by the
company. Not doing so may cause overheating, bursting, or ignition of the battery.
CAUTION
• When removing the battery charger power plug from the outlet or the charging
plug from the battery, do not pull it out by the cord.
• When charging the battery while it is mounted on the bicycle, be careful not to
trip over the charger cord or get anything caught on it. This may lead to injury or
cause the bicycle to fall over, damaging the components.
• If the bicycle is stored for an extended period of time immediately after purchase,
you will need to charge the battery before using the bicycle. Once the battery is
charged, it starts to deteriorate.
• Connect to E-TUBE PROJECT and click [Connection check] to confirm whether the
battery in use is a genuine Shimano battery or another brand.
Page 17
11
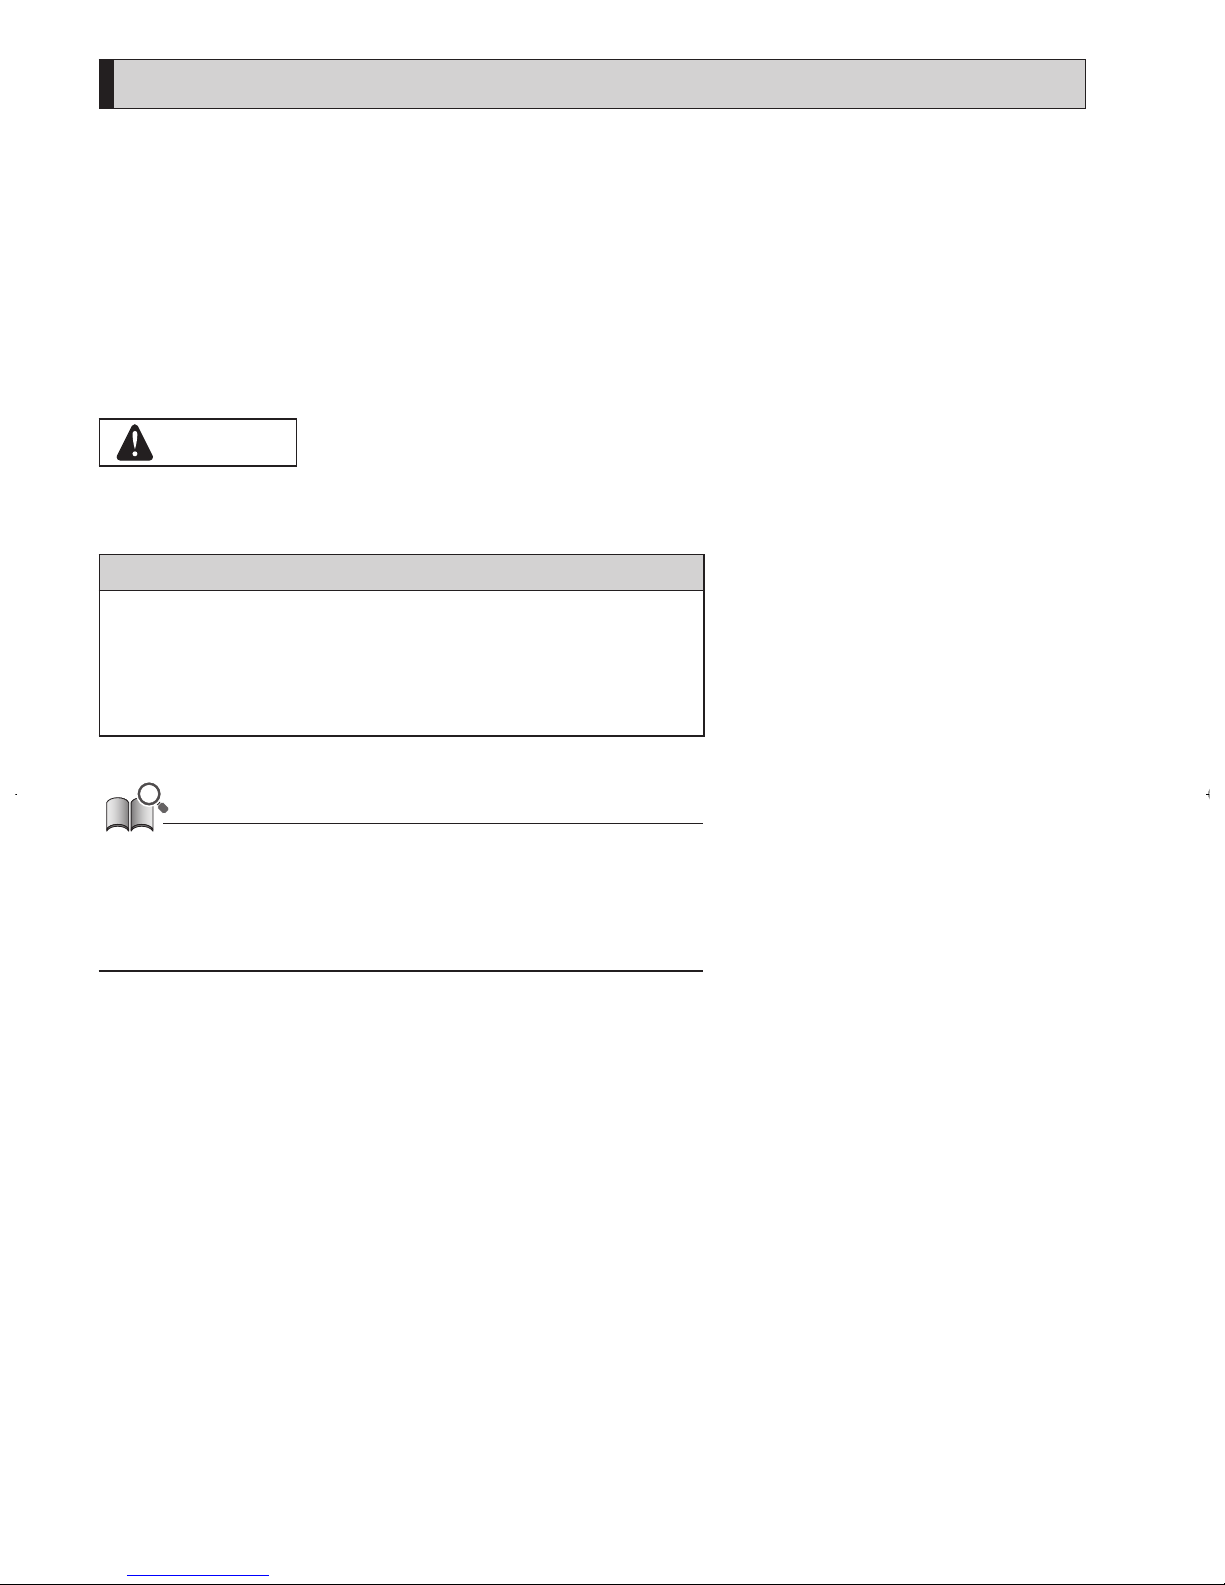
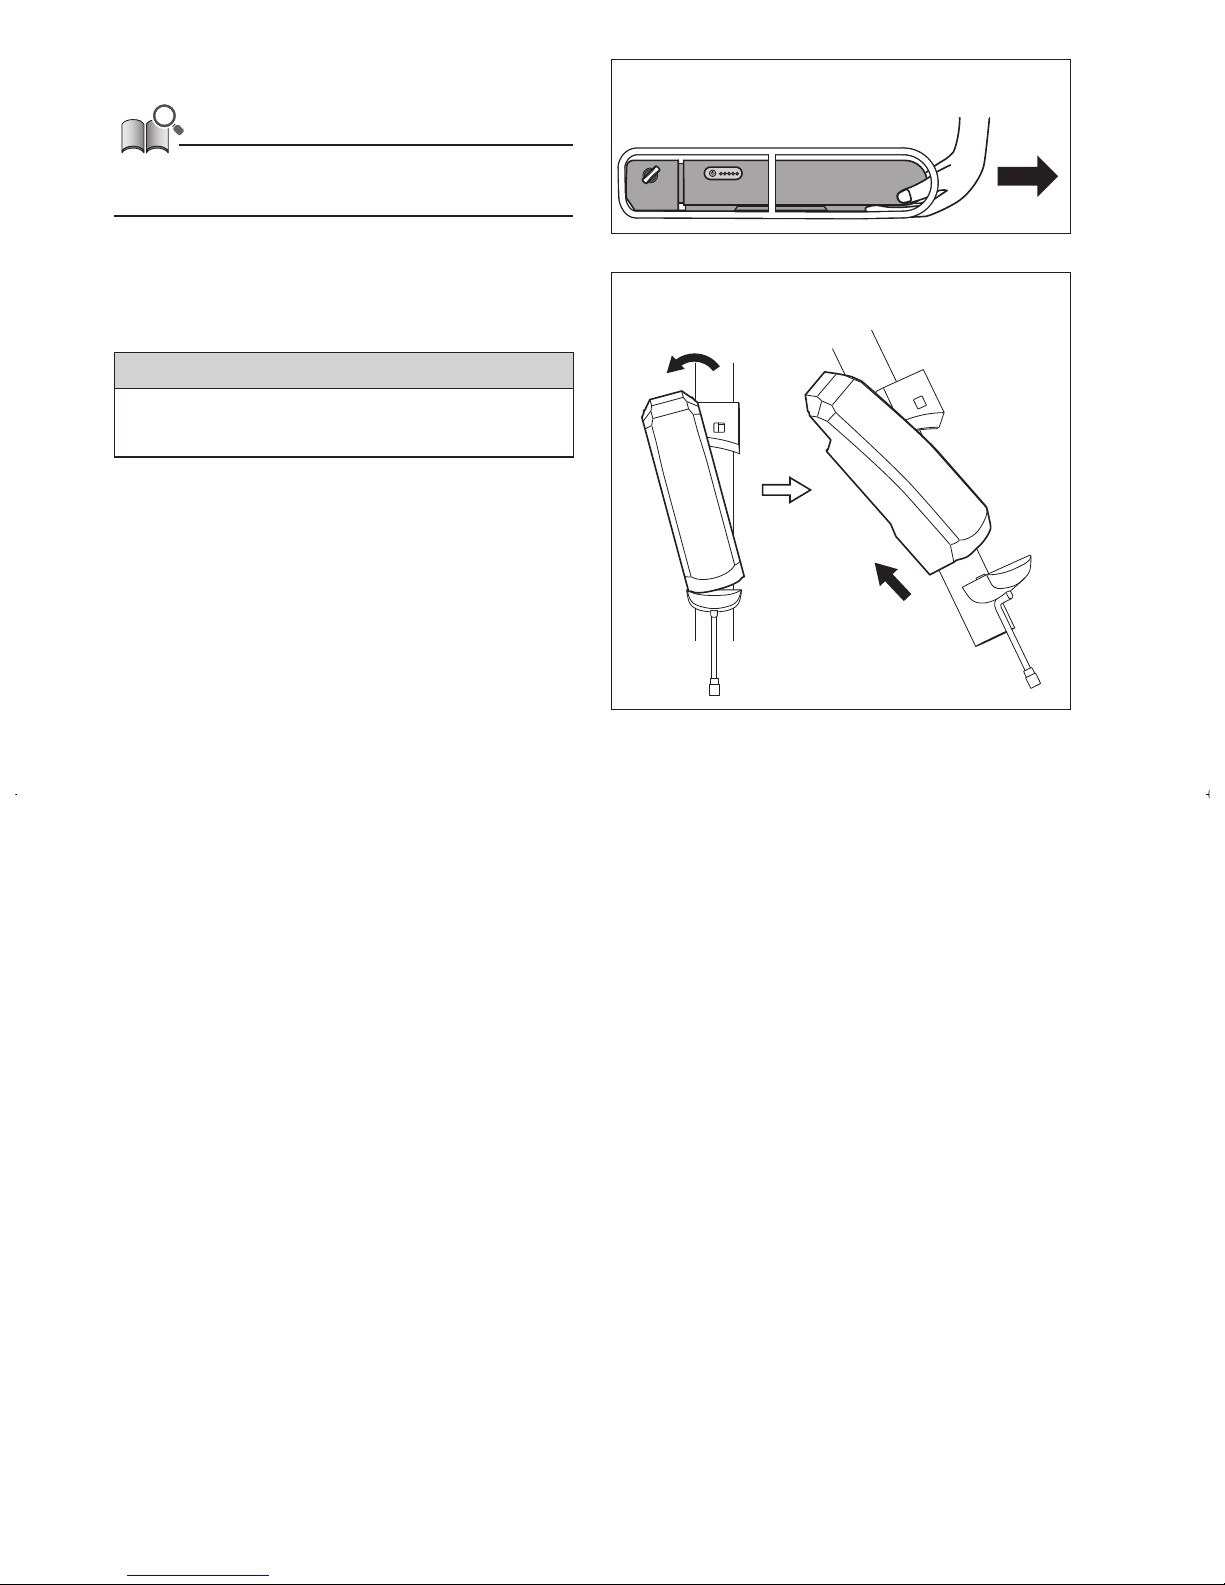
When charging the battery alone
< EC-E6000/BT-E6000/BT-E6001/BT-E6010 >
1.
Attach the adapter to the charging plug.
2.
Plug the charger’s power plug into the outlet.
3.
Plug the adapter into the battery’s charging port.
*
When inserting the adapter into the charging port,
hold the charging plug so it is facing down toward
the adapter. Do not insert the charging plug upward
into the adapter.
*
Charge the batteries on a flat surface indoors.
Adapter
Charging plug
Battery
Charging portAdapter
Charging plug
< BT-E6010 >
Adapter
Battery
Charging port
Charging plug
< BT-E6000/BT-E6001 >
Page 18
12
< EC-E6000/BT-E8010/BT-E8020 >
1.
Connect the battery charger’s power plug to the outlet.
2.
Insert the charging plug into the battery's charging
port.
•
Charge the battery on a flat surface indoors.
< BT-E8010 >
Charging plug
Battery Charging port
< BT-E8020 >
Charging plug
Battery
Charging port
Page 19
13
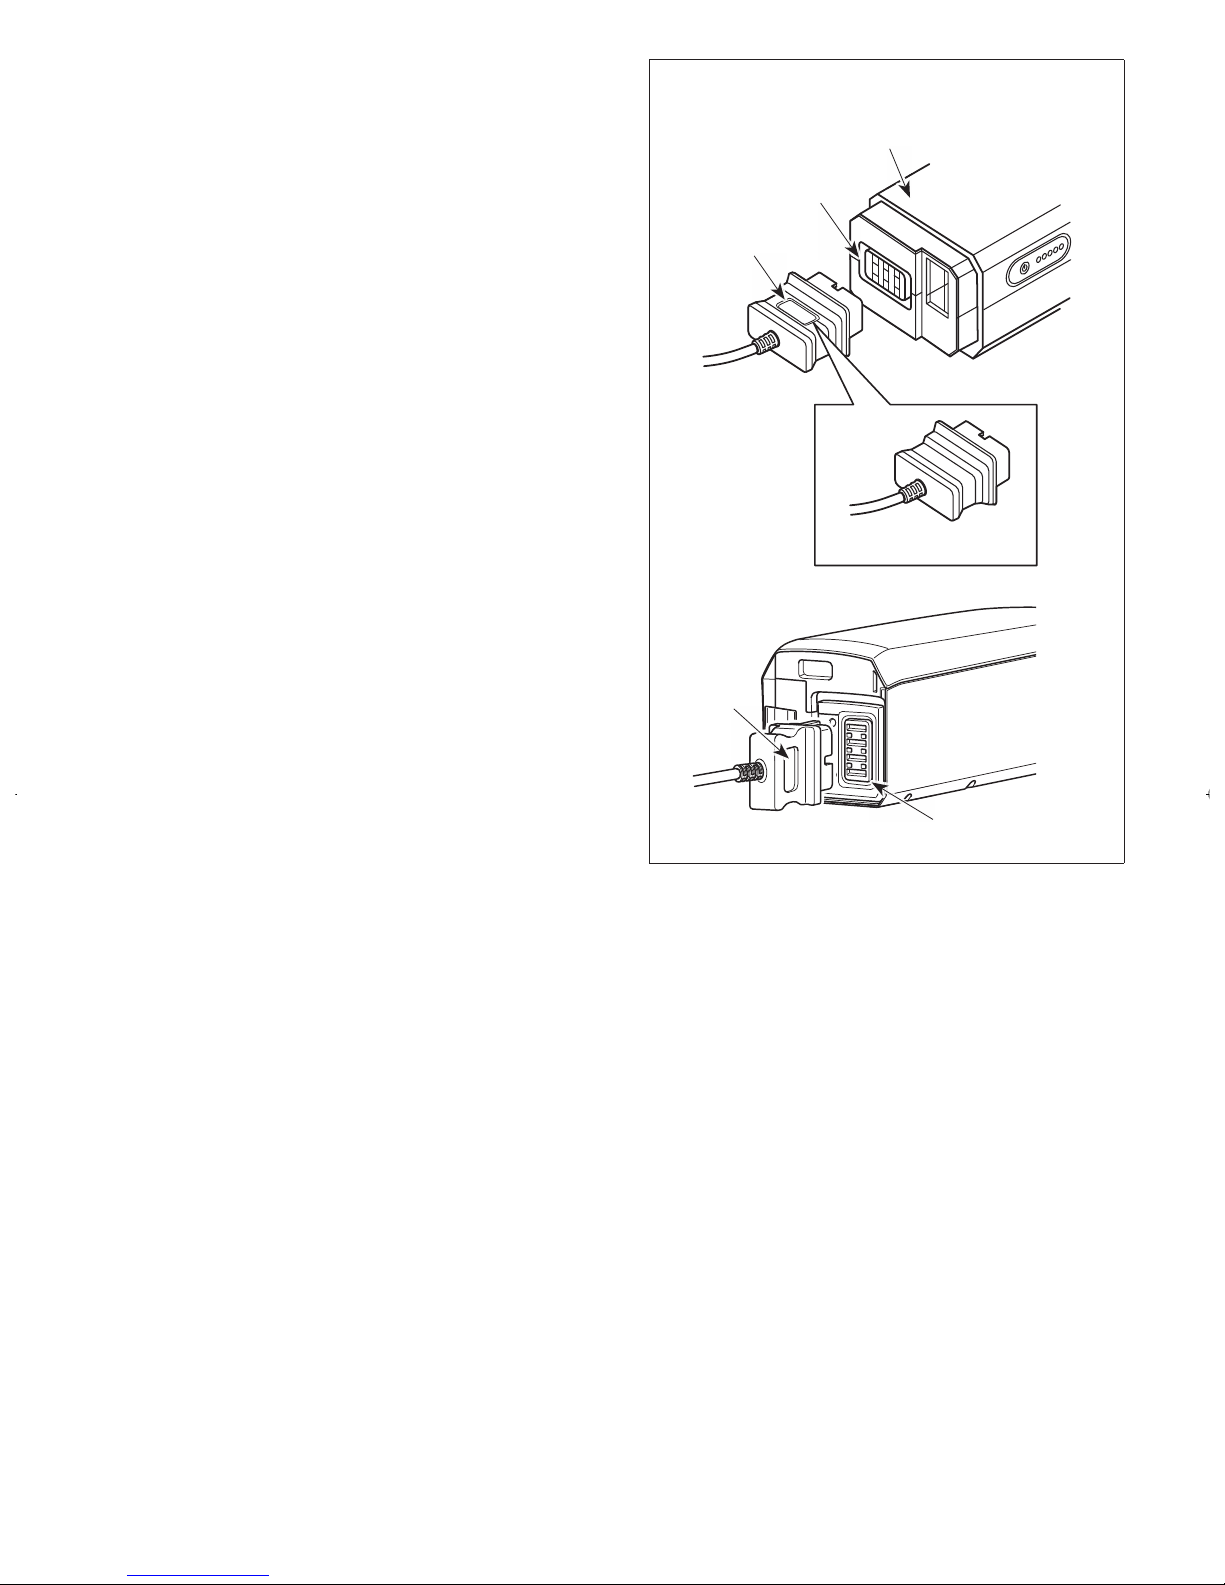
< SM-BCE60/BT-E6000/BT-E6001/BT-E6010 >
1.
Attach the charger plug to the charging port of the
battery.
Insert it with the groove side of the connector facing
up.
*
You cannot insert it with the groove side facing
down.
*
Charge the batteries on a flat surface indoors.
< BT-E6000/BT-E6001 >
Battery
Groove
Charging port
Backside (no groove)
< BT-E6010 >
Groove
Charging port
Page 20
14
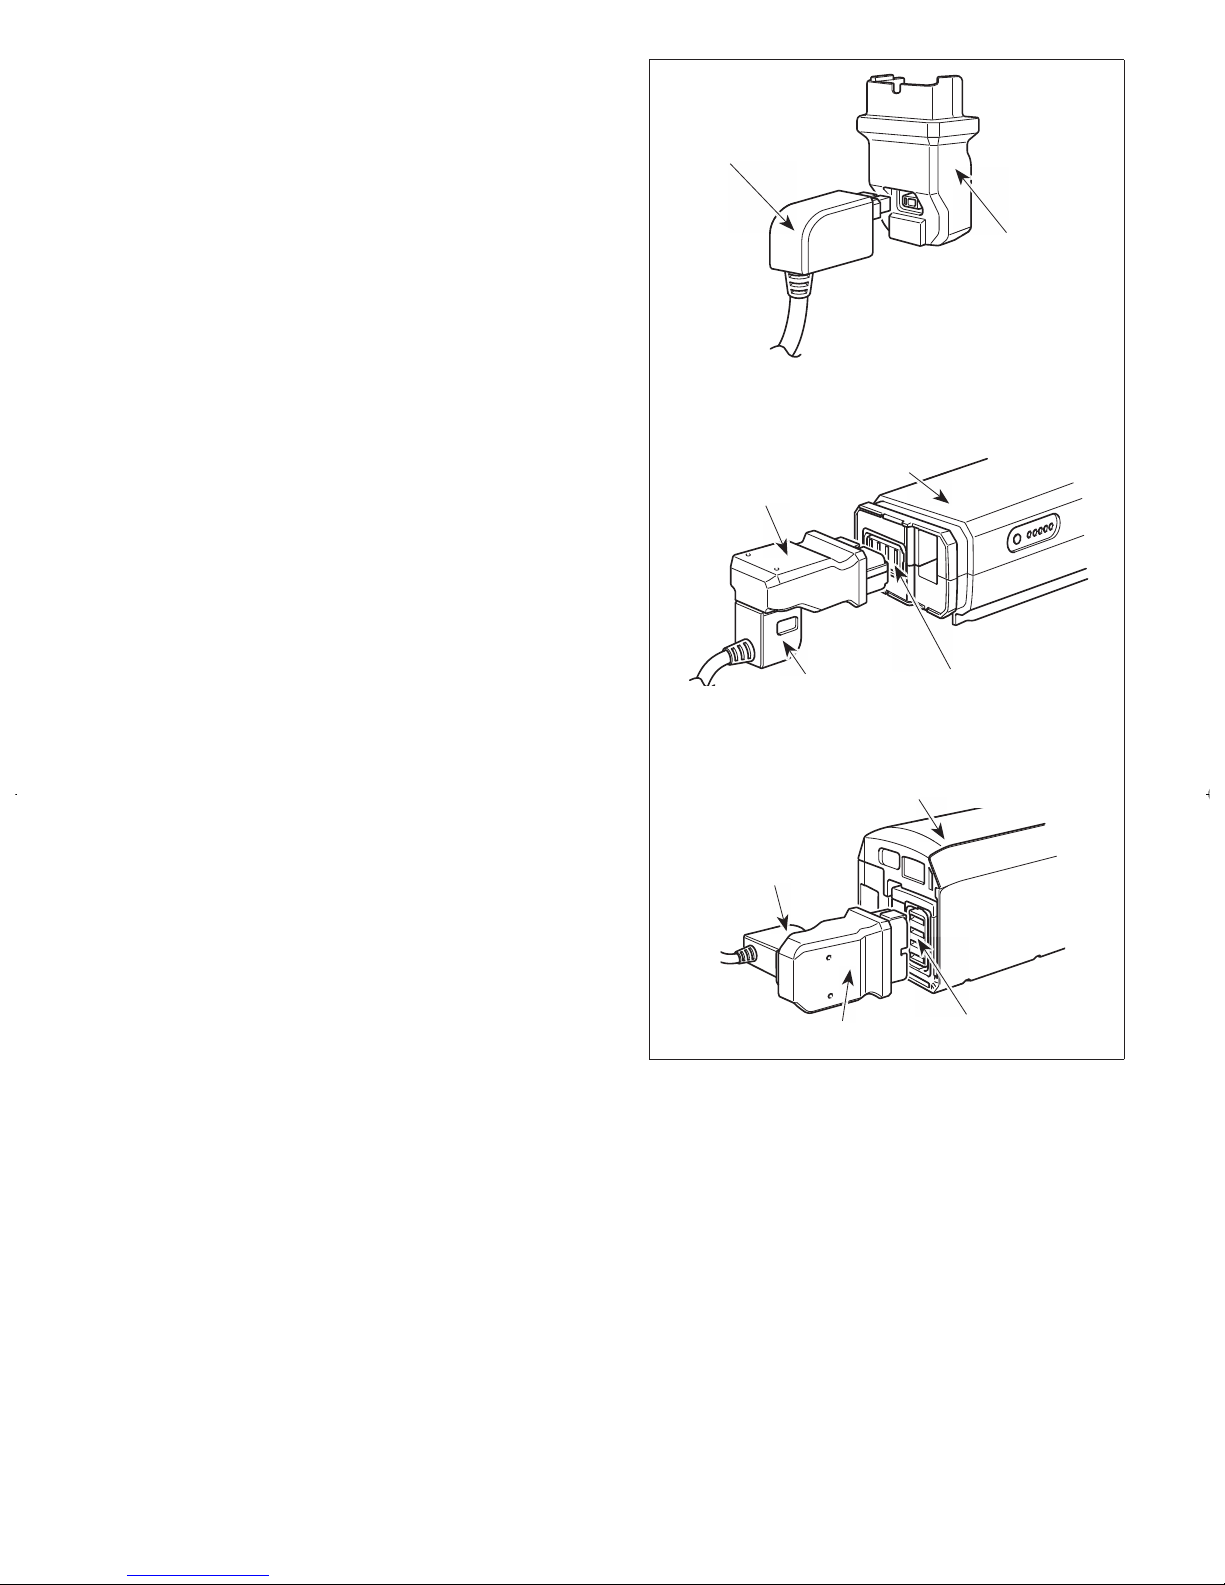
Charging the battery while installed onto the bicycle
< EC-E6000/BT-E6000/BT-E6001/BT-E6010/BT-E8010/BT-E8020 >
1.
Insert the battery charger power plug into the outlet.
2.
Insert the charging plug into the charging port on the battery mount or the battery.
*
Place the battery charger main body on a steady surface such as the floor before charging.
*
Stabilize the bicycle to ensure that it does not collapse during charging.
<BT-E6000/BT-E6001>
Battery mount
Charging port
Charging plug
<BT-E6010/BT-E8010>
Battery mount
Charging plug
Charging port
<BT-E6010>
<BT-E8010>
Battery
Charging port
Charging plug
<BT-E8020>
Battery
Charging plug
Charging port
Page 21
15
About the charger LED lamp
After charging has started, the LED lamp on the charger
lights up.
Lit up
Charging (Within 1 hour after the
completion of charging)
Blinking
Charging error
Turned
off
Battery disconnected
(1 hour or more after the completion of
charging)
Charger LED lamp
About the battery LED lamp
You can check the current charging status on the LED lamp
on the battery.
Battery LED lamp
Charging-in-progress indication
Battery level indicator*1 Battery level
0% - 20%
21% - 40%
41% - 60%
61% - 80%
81% - 99%
100%
*1
: Not lit : Lit up : Blinking
Page 22
16
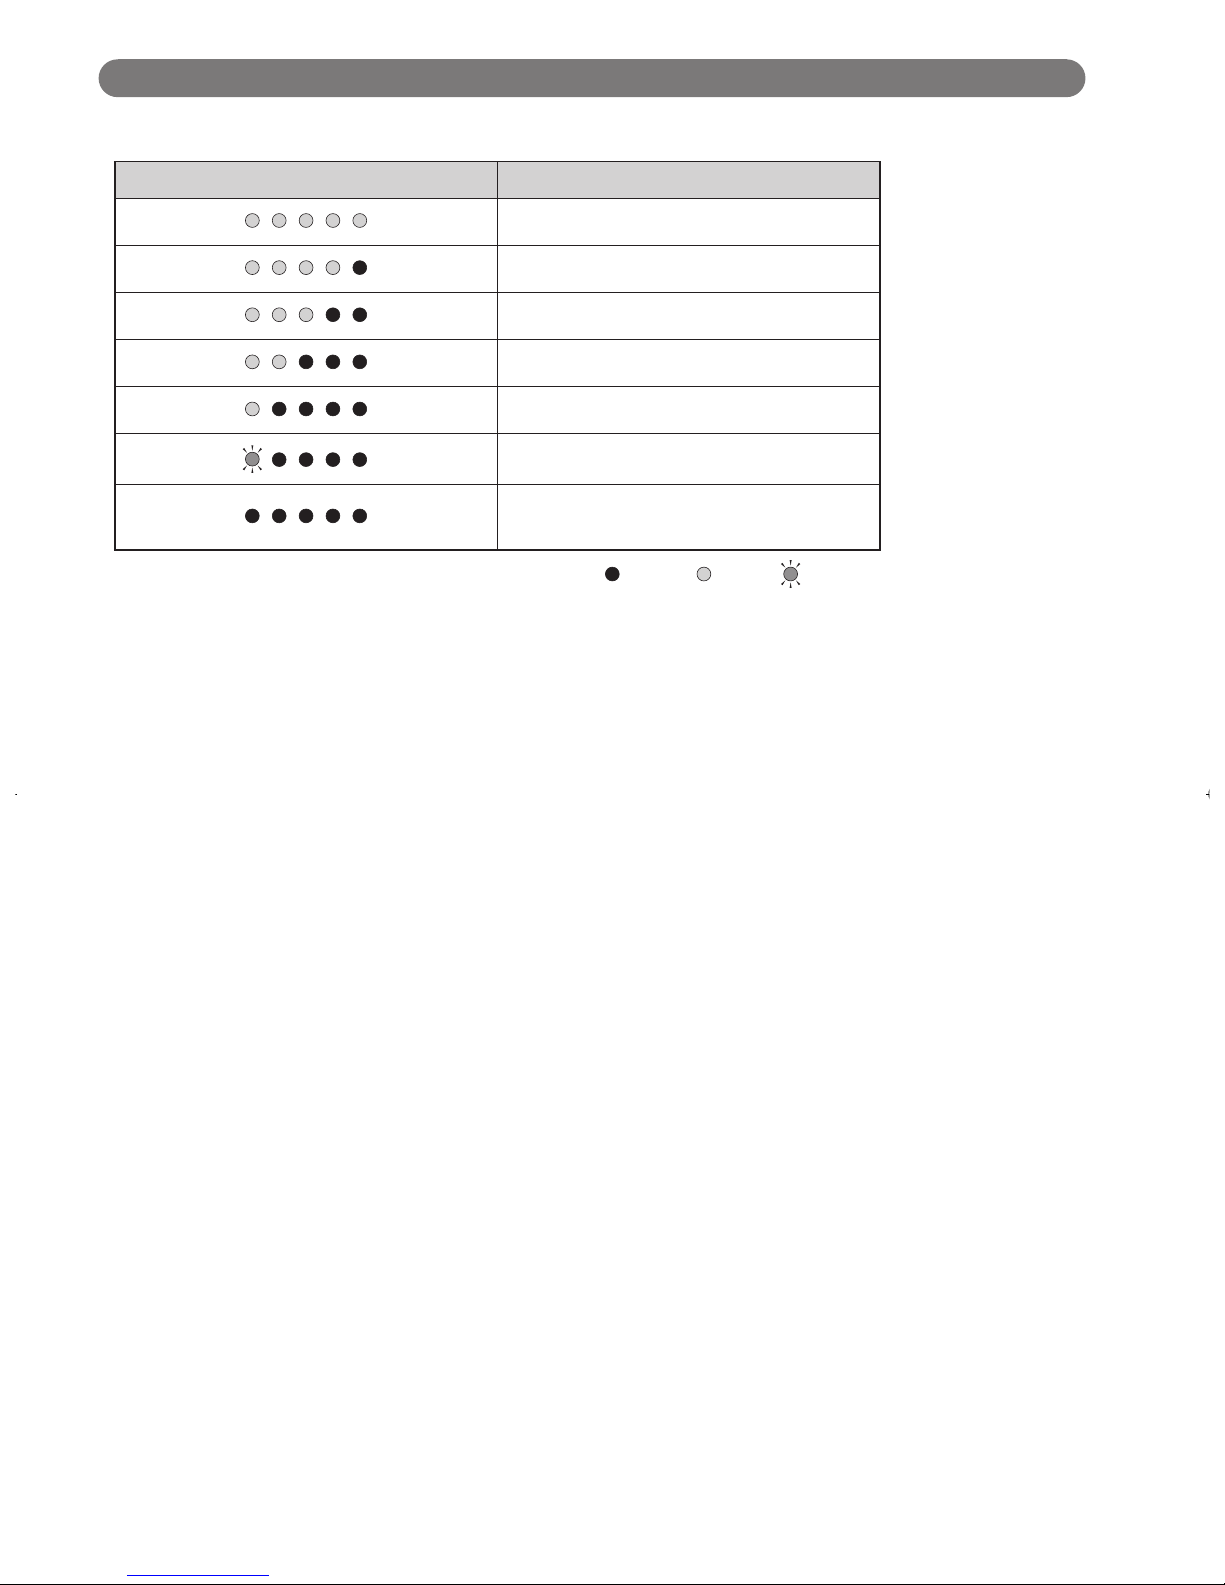
Battery level indication
The current battery level can be checked by pressing the battery's power button.
Battery level indicator*1 Battery level
100% - 81%
80% - 61%
60% - 41%
40% - 21%
20% - 1%
0% (When battery is not installed on bicycle)
0% (When battery is installed on bicycle)
Power off / Shutdown
*1
: Not lit : Lit up : Blinking
Handling and charging the battery
Charging can be carried out at any time regardless of the amount of charge remaining, but you should fully charge the
battery at the following times. Be sure to use the special charger when recharging the battery at these times.
•
The battery is not fully charged at the time of purchase. Before riding, be sure to charge the battery until it is fully
charged.
If the battery has become fully spent, charge it as soon as possible. If you leave the battery without charging it, it will
cause the battery to deteriorate.
•
If the bicycle will not be ridden for a long period of time, store it away with approximately 70% battery capacity
remaining. In addition, take care not to let the battery become completely empty by charging it every 6 months.
Page 23
17
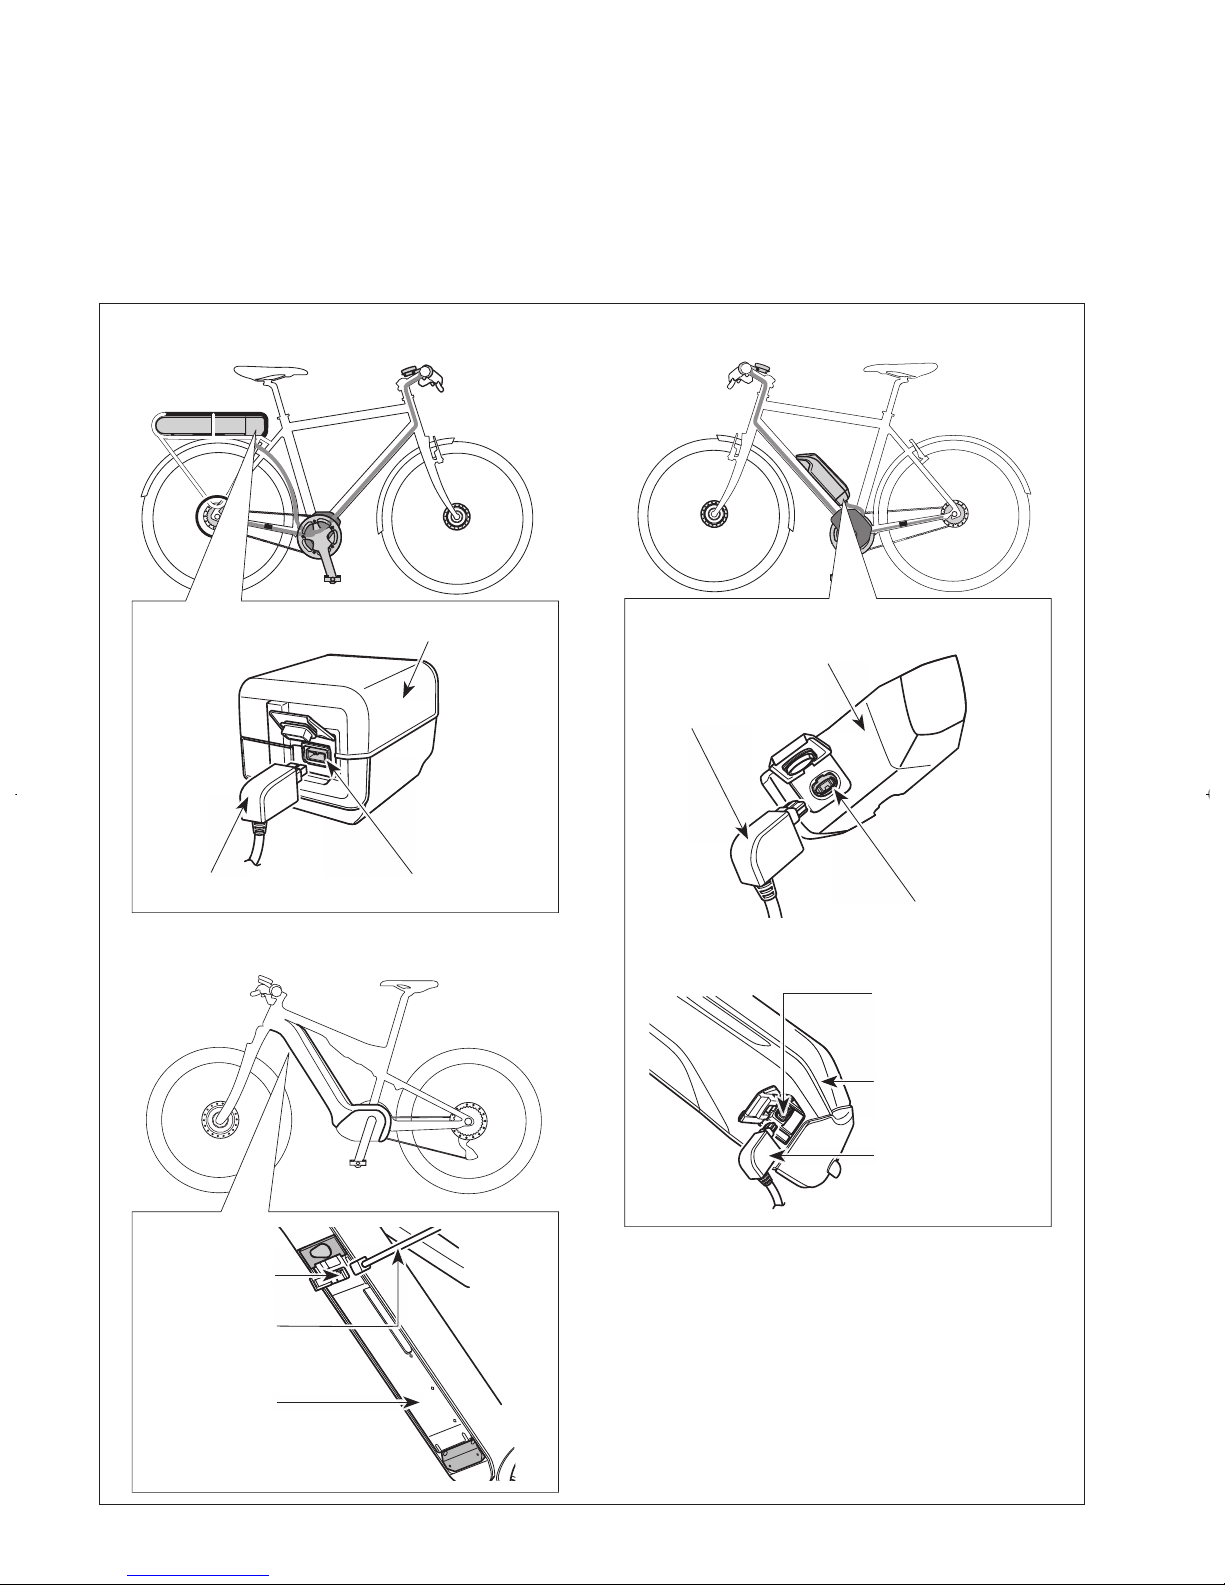
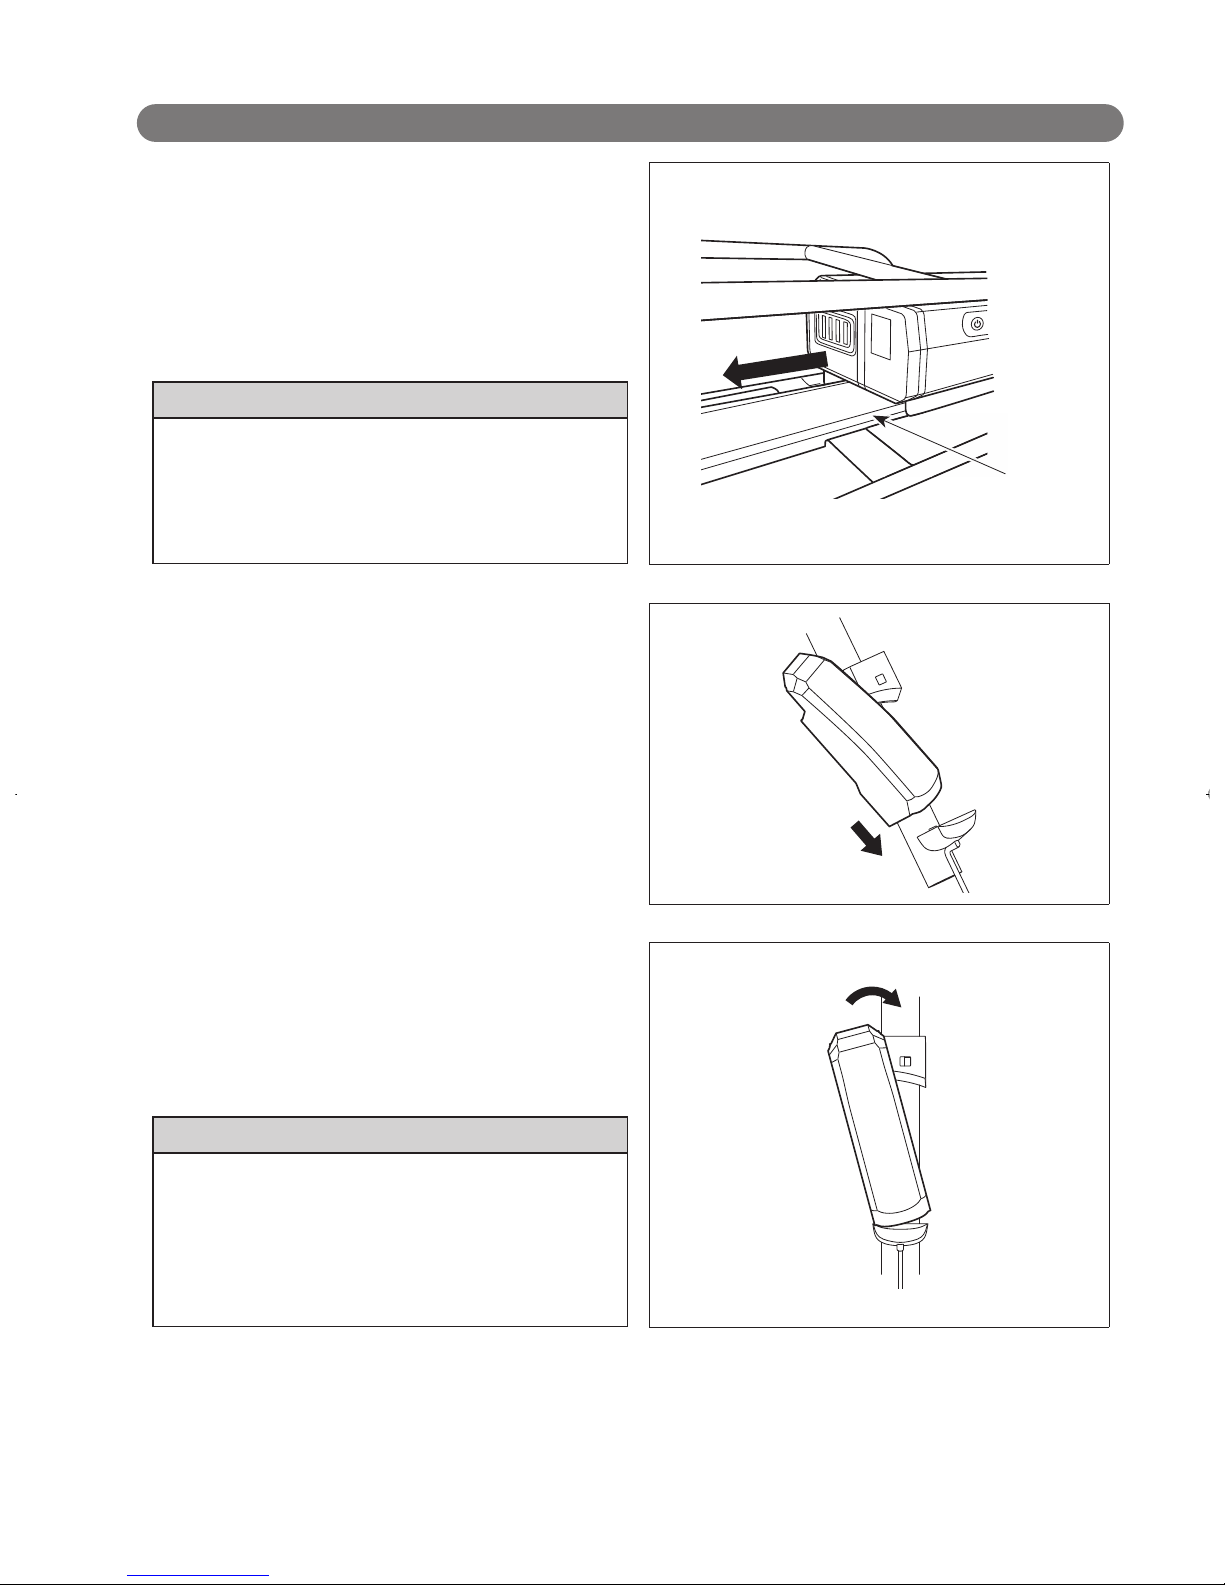
Installing / removing the battery
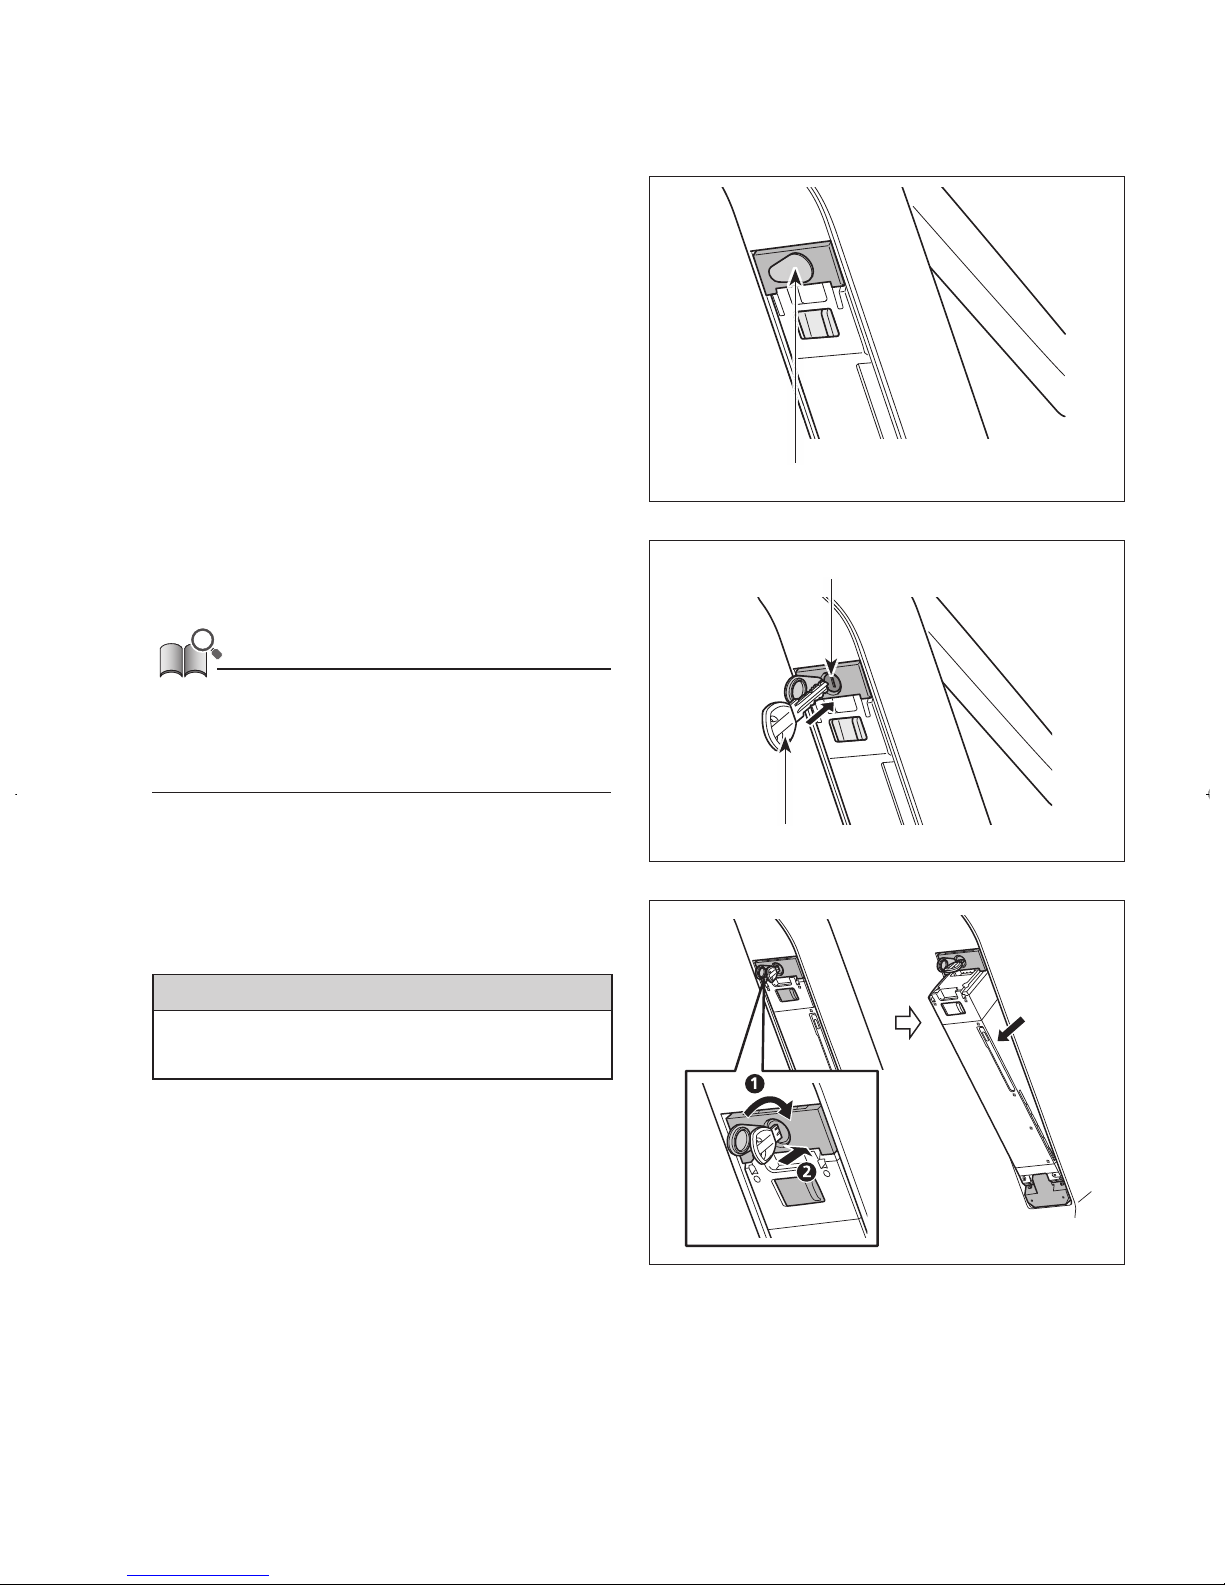
Installation of the battery
< BT-E6000/BT-E6001 >
1.
Set the battery on the holder rail from behind and
slide it forward.
Push it in firmly.
2.
Return the key to the locking position, remove it, and
store it in a safe place.
CAUTION
• Check that the battery is locked before riding the bicycle. The
battery may come loose and fall out if not properly locked in
place before riding.
• To prevent the battery from falling out, do not ride the bicycle
with the key inserted.
Rail
< BT-E6010/BT-E8010 >
1.
Align the indentation in the bottom of the battery
with the protrusion on the holder and insert the
battery.
2.
Slide the battery to the right starting from the point
where it is inserted. Push in the battery until you
hear it click.
3.
Return the key to the locking position, remove it,
and store it in a safe place.
CAUTION
• Check to see that the battery is locked before riding the
bicycle. The battery may fall out while riding if not properly
locked in place.
• Before riding, make sure that the charging port cap is closed.
• To prevent the battery from falling out, do not ride the bicycle
with the key inserted.
Page 24
18
< BT-E8020 >
For the purposes of demonstration, these instructions
take as an example a frame design where the battery is
removed/installed from below.
Insert the battery into the battery mount until there is a
click.
•
When inserted until a click is heard, the battery is
locked automatically.
NOTE
•
Check that the battery is locked before riding the bicycle.
The battery may come loose and fall out if not properly
locked in place before riding.
•
Before riding, make sure that the keyhole cap and charging
port cap are closed.
•
To prevent the battery from falling out, do not ride the
bicycle with the key inserted.
Keyhole cap
Page 25
19
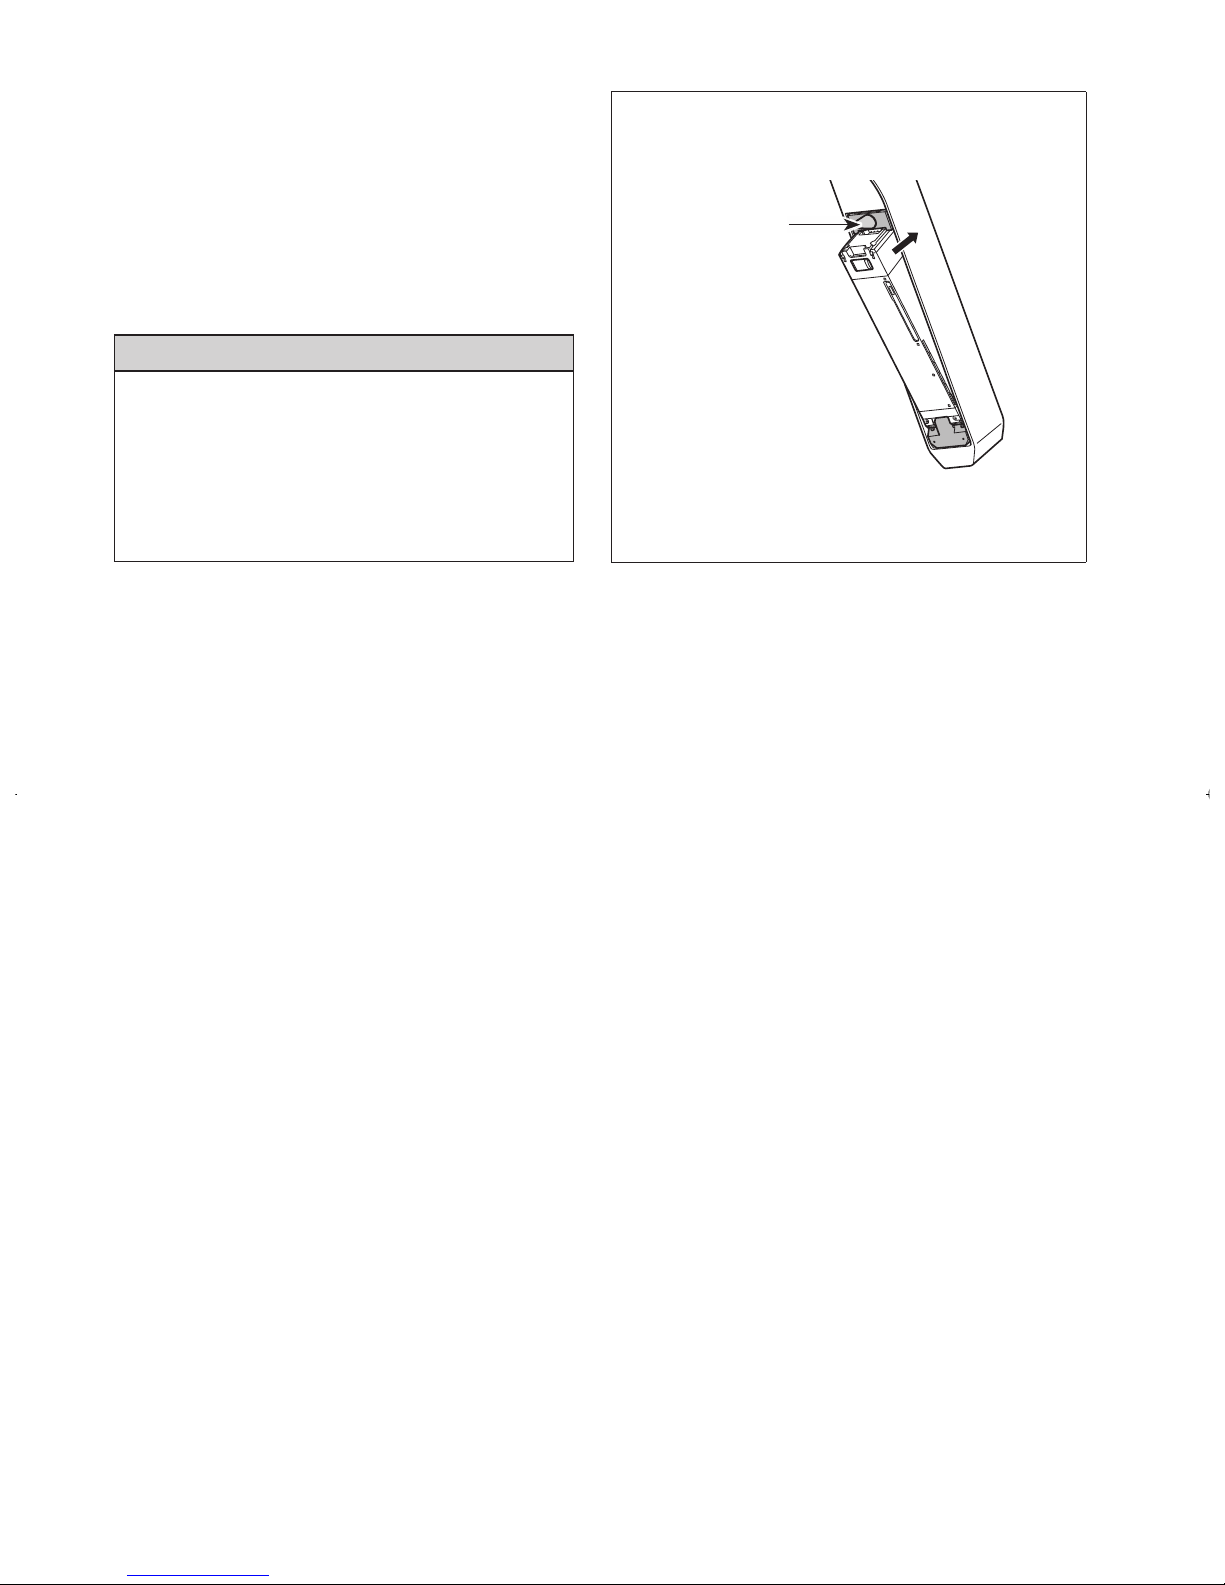
Removing the battery
The following description may not be applicable as different types of keys are available.
< BT-E6000/BT-E6001/BT-E6010/BT-E8010 >
1.
Turn off the power, then insert the key into the key
cylinder in the battery holder.
• The position of the key does not affect the insertion of the
battery. You can insert it regardless of the key position.
• You cannot remove the key when it is not in the inserting
position.
< BT-E6000/BT-E6001 >
Key
Key cylinder
< BT-E6010/BT-E8010 >
Key
Key cylinder
2.
To unlock the battery turn the key to the left until
you feel some resistance.
< BT-E6000/BT-E6001 >
<BT-E6010/BT-E8010>
Page 26
20
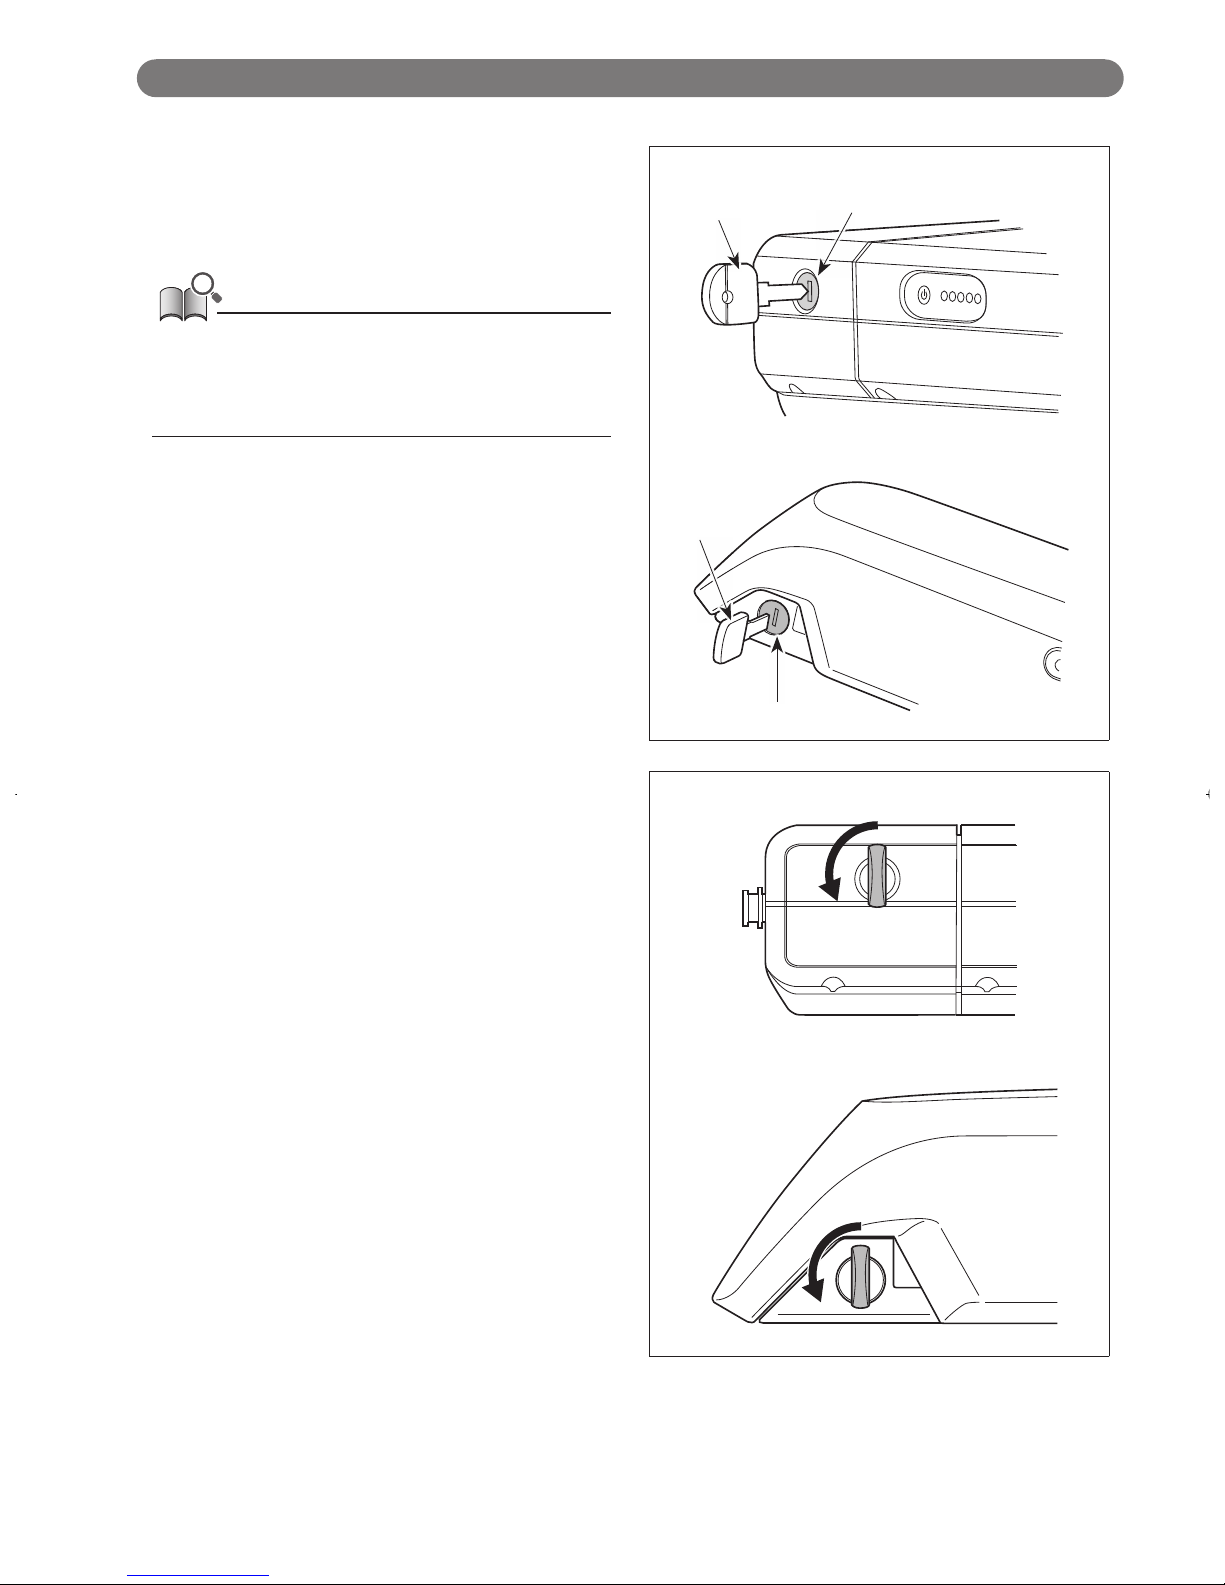
3.
Pull out the battery.
You can remove the battery only when the key is in the
unlocking position.
< BT-E6000/BT-E6001 >
3.
Hold the upper part of the battery and slide it to the left
to remove it.
NOTE
Hold the battery firmly and be careful that it does not drop
when removing or carrying it.
< BT-E6010/BT-E8010 >
Page 27
21
< BT-E8020 >
•
For the purposes of demonstration, these instructions take as an example a frame design where the battery is removed/
installed from below.
•
If using a battery cover manufactured by another company, remove the battery cover before removing the battery.
1.
Remove the keyhole cap.
Key hole cap
2.
Insert the key into the key cylinder in the battery
mount.
• The position of the key does not affect the insertion of the
battery. You can insert it regardless of the key position.
• You cannot remove the key when it is not in the inserting
position.
Key cylinder
Key
3.
The battery detaches automatically when the key is
turned clockwise and pushed in.
NOTE
Support the battery with your hand when detaching to make
sure that it does not fall out.
Page 28
22
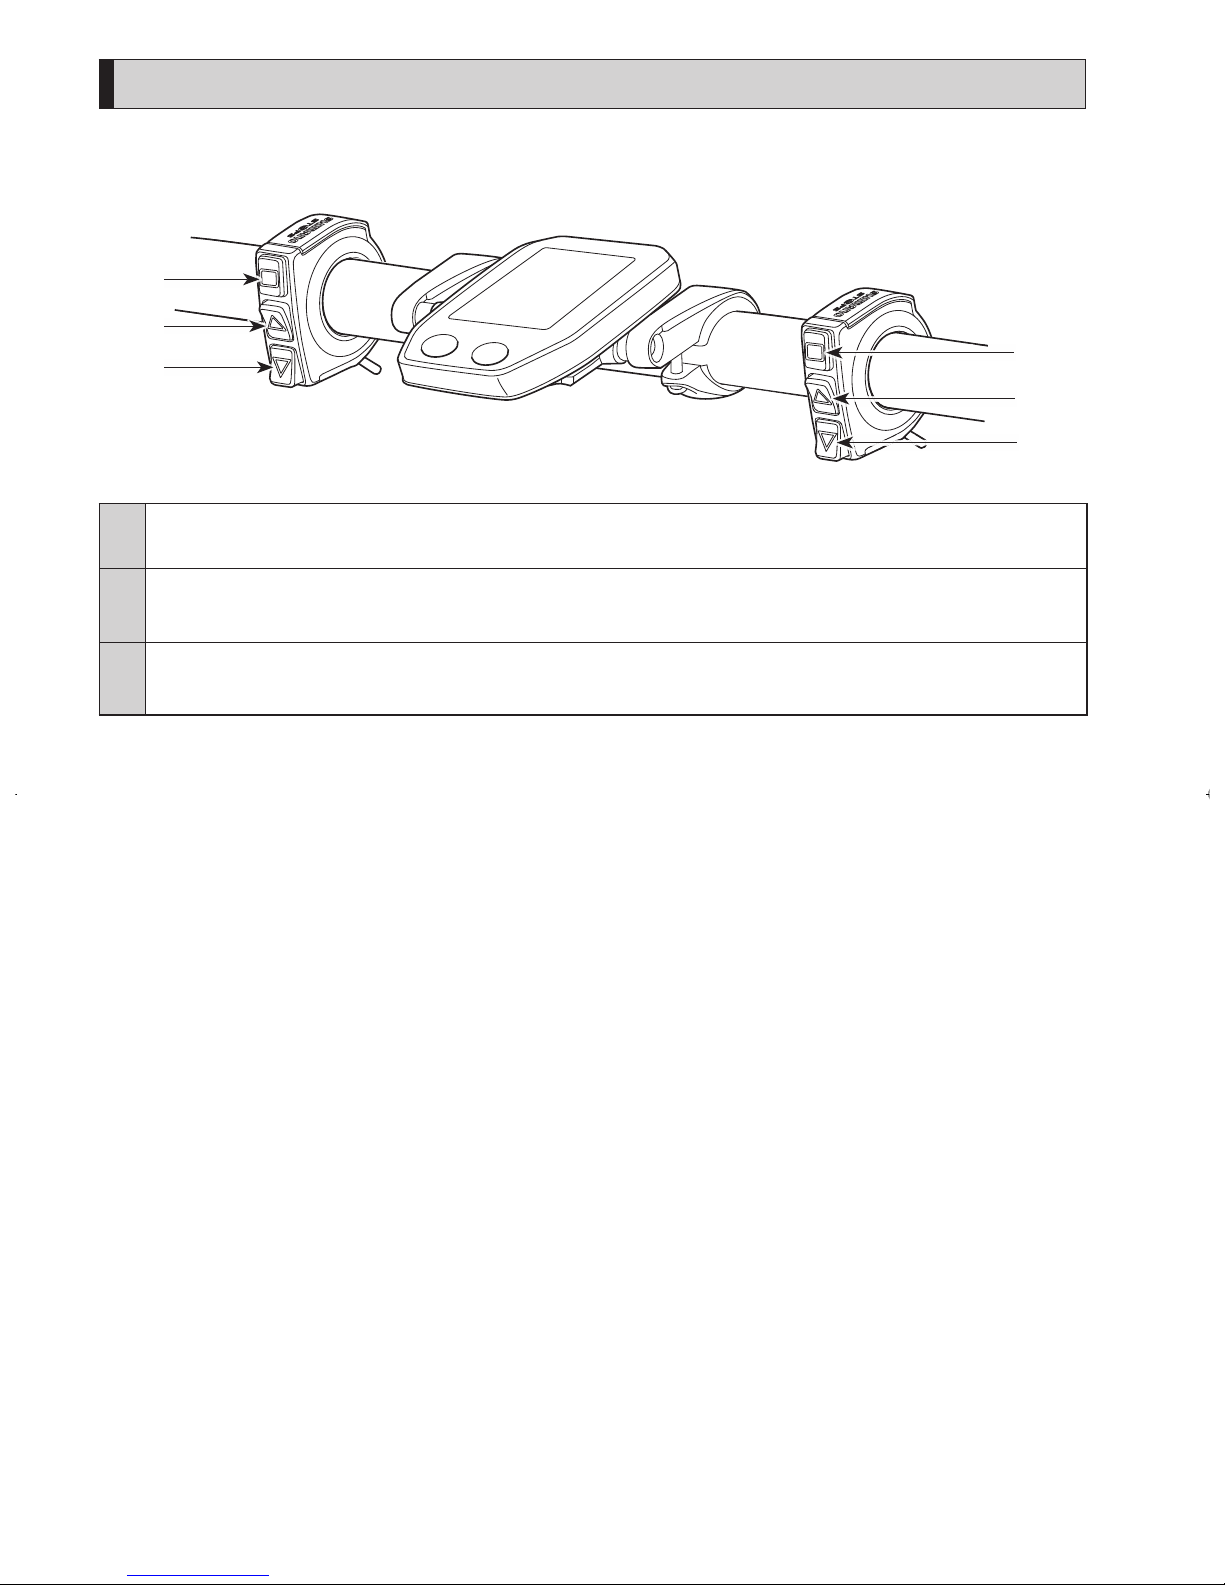
Switching between cycle computer operations and modes
For cycle computer screen operations and switching modes, use the buttons on the assist switch and shifting switch on the
left and right.
X
Y
Z
X
Y
Z
X
•
Changing the cycle computer display
•
Switching between automatic and manual gear shifting
Y
When switching assist modes: the level of assistance becomes stronger
When shifting gears: pedaling becomes heavier
Z
When switching assist modes: the level of assistance becomes weaker
When shifting gears: pedaling becomes lighter
The operation procedure provided here refers to cases where the cycle computer is set to the default values.
Page 29
23
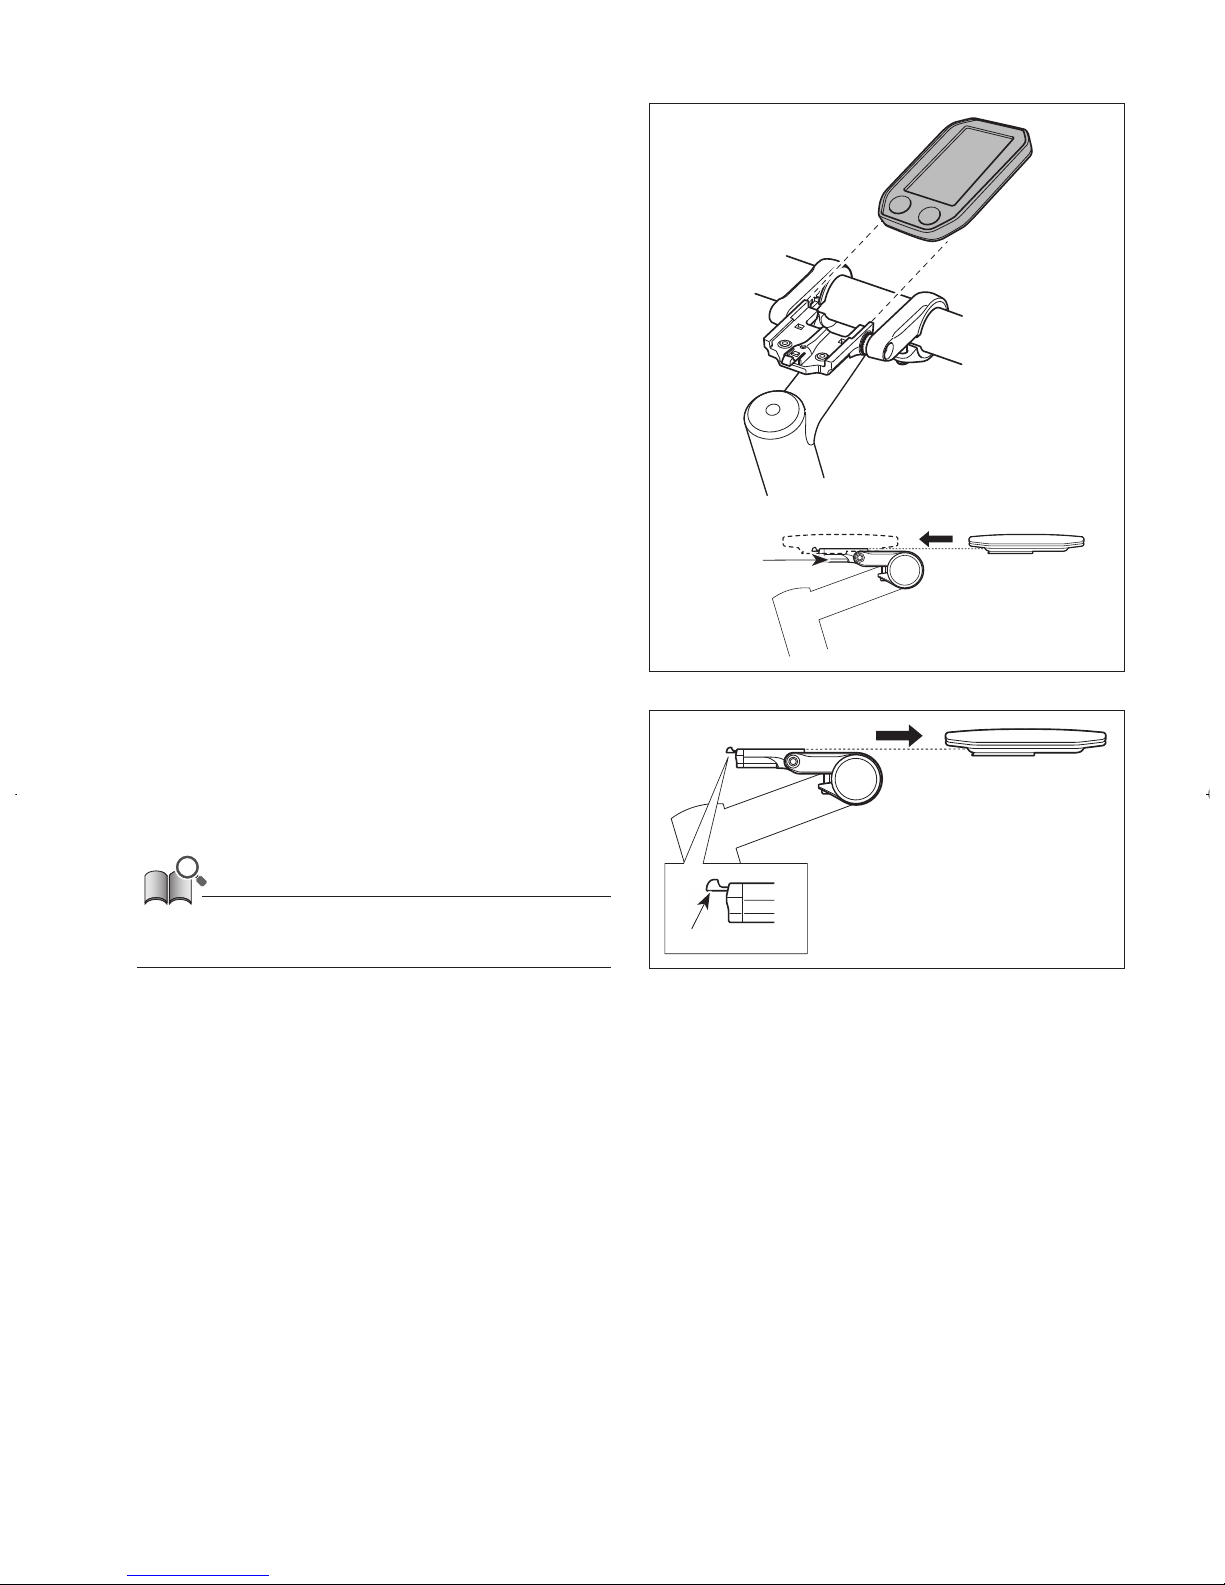
Installing and removing the cycle computer
Slide the cycle computer onto the bracket as shown in the
illustration to install it.
Insert the cycle computer securely until it clicks into place.
Bracket
To remove the cycle computer, push the lever of the bracket
firmly while sliding out the cycle computer.
If the cycle computer is not correctly in place, the assist function
will not operate normally.
Lever
Page 30
24
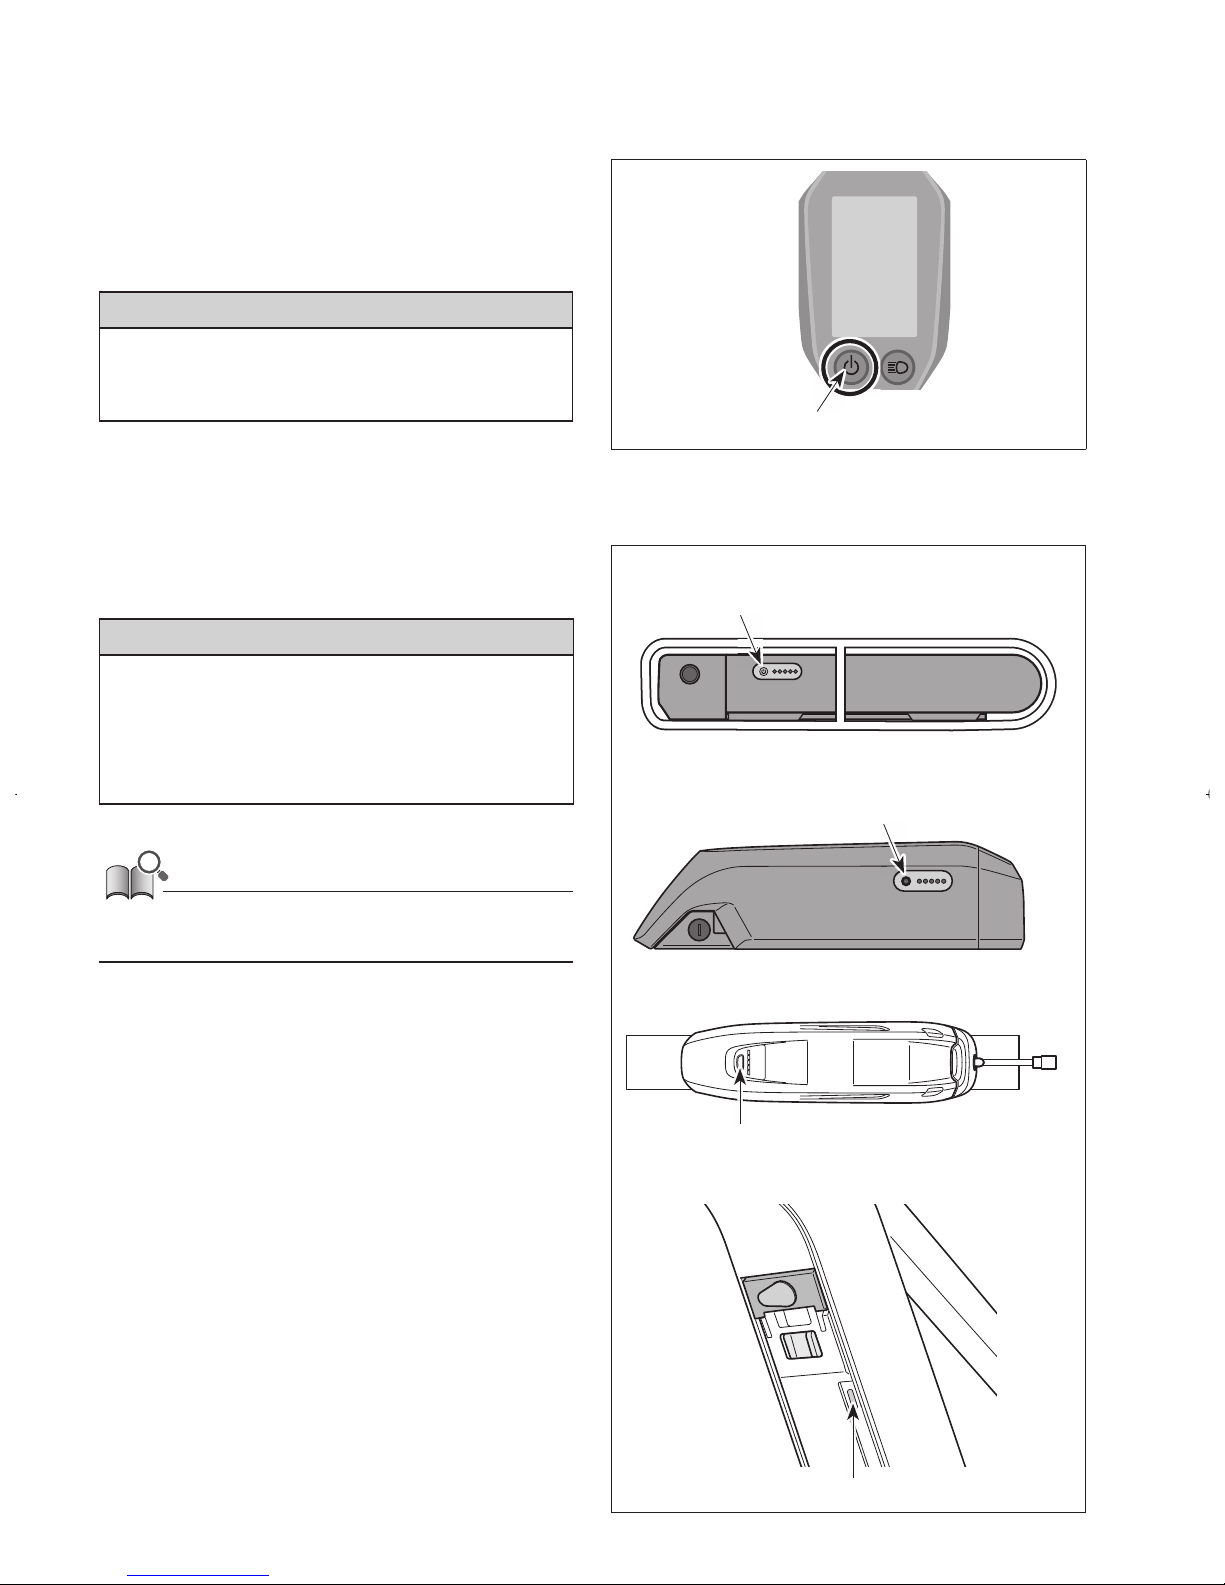
Turning the power ON / OFF
Automatic power off function
If the bicycle has not moved for over 10 minutes, the power will automatically turn off.
< SC-E6010 >
Turning the power ON and OFF via the cycle computer
•
Hold down the power button on the cycle computer for
2 seconds.
NOTE
If internal battery of cycle computer isn't charged sufficiently,
the power will not turn on. The internal battery will be charged
if put on the bike after turning on.
Power button
< BT-E6000/BT-E6001/BT-E6010/BT-E8010/BT-E8020 >
Turning the power ON and OFF via the battery
Press the power button on the battery. The LED lamps will
light up indicating remaining battery capacity.
CAUTION
• When turning on the power, check that the battery is firmly
attached to the holder.
• Power cannot be turned on while charging.
• Do not place your foot on the pedals when turning on. A
system error may result.
BT-E8010/BT-E8020 can be forced to power off by holding down
the power button for 6 seconds.
<BT-E6000/BT-E6001>
Power button
<BT-E6010>
Power button
<BT-E8010>
Power button
<BT-E8020>
Power button
Page 31

25
SHIMANO STEPS logo screen
This screen is displayed during system start up and
shutdown.
This screen is an example of the
SC-E6010 in the Light off road setting.
Page 32

26
Basic screen display
Displays the status of the power assisted bicycle, traveling data.
The number of gears and the shifting mode are only displayed when using electronic gear shifting.
1.
Current speed
Displays the current speed.
2.
Battery level indicator
Displays the current battery level.
3.
Speed unit display
You can switch between km/h and mph.
4.
Changing the assist mode display
Display the current assist mode.
5.
Gear position and traveling data display
Displays the current gear position or traveling data.
Operate the assist switch to change the display for
SC-E6000 from the gear position display to the
traveling data display.
6.
Current time
Shows the current time.
7.
Gear shifting mode
The current gear shifting mode is displayed as
following.
SC-E6000: [A] (Auto)/[M] (Manual)
SC-E6010: [Auto]/[Manual]
< SC-E6000 >
5
2
6
3
1
4
7
8.
Icon to indicate when the light is on
Notifies you when the battery-powered light is on.
9.
Assist gauge
Displays assistance level.
< SC-E6010 >
2
6
1
3
5
8
9
7
4
Page 33

27
Battery level indicator
You can check the battery level on the cycle computer while riding.
< SC-E6000 >
Display Battery level
81 - 100%
61 - 80%
41 - 60%
21 - 40%
1 - 20%
0%
< SC-E6010 >
Display Battery level
100%
0%
Page 34

28
< SC-E6000 > < SC-E6010 >
Changing the assist mode display
Display the current assist mode.
Press Assist-Y or Assist-Z on the assist switch to switch
assist modes.
Display Details
HIGH Assist high
NORM Assist normal
ECO Assist eco
OFF Assist off
WALK Walk assist
HIGH
NORM
ECO
OFF
WALK
Assist Shift
Assist-ZAssist-Y
Long press
for 2 seconds
Page 35

29
< Switch to walk assist mode >
1. Press assist-Z to switch the mode to [OFF].
2. Press assist-Z once again 2 seconds until [WALK] is
displayed.
3. Press and hold assist-Z to start walk assist.
Assist Shift
2 seconds
< SC-E6010 >
< SC-E6000 >
< Walk assist mode operation >
When [WALK] is displayed, press and hold down Assist-Z
on the assist switch to start the walk assist function.
Releasing Assist-Z stops the walk assist function, or
pressing Assist-Y can stop the walk assist function.
Assist Shift
Press
and
hold
down
• If Assist-Z is not operated for over 1 minute, the mode will change to [OFF].
• If the bicycle does not move after the walk assist function turns on, the function automatically stops. To restart the walk assist function,
release the assist switch and press and hold down Assist-Z again.
• The walk assist function can operate at a maximum of 6 km/h.
• The assistance level and speed vary with the gear position.
Page 36

30
Gear position and traveling data display
Displays the current gear ratio or traveling data.
The type of traveling data displayed changes each time you tap Assist-X.
Assist Shift
*1 Gear position (displayed only when using
electronic gear shifting)
*2 Gear position (when setting start mode)
< SC-E6000 > < SC-E6010 >
*
2
*
1
Page 37

31
< SC-E6000 > < SC-E6010 >
Gear position*7
(displayed only when using
electronic gear shifting)
Gear position*6
(when setting start mode)
Traveling distance
Cumulative distance
Traveling range*3 *5
Traveling range
(optional)*4
Traveling time
(optional)*4
Average speed
(optional)*4
Maximum speed
(optional)*4
*3 When [RANGE] is displayed, the battery level and the walk assist indicator do not appear on the screen.
*4 Optional item: You can configure the display settings in E-TUBE PROJECT. For details, refer to the "Connection and
communication with the PC" section.
*5 When the walk assist function is working, [RANGE ---] is displayed in the [RANGE] screen.
*6 The starting gear position is displayed when using start mode.
*7 The gear position is only displayed when using electronic gear shifting.
Page 38

32
Turning the battery-powered light ON or OFF
< SC-E6000 >
When the battery-powered light is connected,
pressing the Assist-X for 2 seconds displays this
information instead of the clock and assist mode. The
light turns on and off each time it is displayed. It is
displayed for about 2 seconds.
When the light is
turned on
When the light is
turned off
Assist Shift
2 Sec.
< SC-E6010 >
When the battery-powered light is connected, push
the light button on the cycle computer to turn the
light on. An icon indicating that the light is on
appears on the screen. Push the button again to turn
the light off. Once the light is turned off, the icon on
the screen disappears.
*
When the battery powered light is not connected and
[Backlight] is set to [MANUAL], pressing the light
button turns the cycle computer’s backlight on and
off.
When the light is
turned on
When the light is
turned off
Light button
The light turns off in conjunction with the battery power.
When the battery power is off, the light is off.
Page 39

33
Switching gear shifting mode
From the basic screen, press Shift-X to switch between
automatic and manual gear shifting modes.
Assist Shift
< SC-E6010 >
< SC-E6000 >
Automatic
Manual
Automatic Manual
Page 40

34
Clearing the traveling distance
You can clear the traveling distance in the main screen. If the battery-powered light is connected and configured, clear
the traveling distance (DST) according to "Clear" in "About the settings menu".
*
When using the SC-E6000 this function can only be used when the light is not connected.
1.
Change the traveling data display to DST and press
the Assist-X for 2 seconds.
< SC-E6010 >
Assist Shift
2 Sec.
< SC-E6000 >
2.
Release the finger when the DST indication starts
blinking.
In this state, pressing the Assist-X again clears the
traveling distance.
• The DST indicator light stops blinking and the screen
takes you back to the basic screen after leaving it alone
for 5 seconds.
• When the traveling distance is cleared, TIME, AVG, and
MAX are also cleared.
< SC-E6010 >< SC-E6000 >
Page 41

35
About the settings menu
Launching
1.
With the bicycle stopped, pressing both the Assist-Y
and Assist-Z at the same time for 2 seconds displays
the setting screen.
Assist Shift
2 Sec.
< SC-E6000 >
< SC-E6010 >
2.
Press the Assist-Y or Assist-Z to move the cursor to the
item you want to configure.
Pressing the Assist-X displays the setting screen for
the item selected.
Configurable items
Details
Clear Clear settings
Clock Clock setting
Start mode
*2
Start mode setting
Backlight Backlight setting
Brightness
*1
Backlight brightness
settings
Beep Beep setting
Unit
Switching between km
and miles
Language Language setting
Font color
*1
Font color settings
Adjust
*2
Adjusting the electronic
gear shifting unit
Auto
*2
Shift timing adjustment
Exit
Return to the main screen
*
1: This menu is only for the SC-E6010.
*
2: This operation is only available when using electronic
gear shifting.
Assist Shift Assist Shift
Clear
Exit
Auto
*2
Adjust
*2
Font color
*1
Language
Clock
Start mode
*2
Backlight
Brightness
*1
Beep
Unit
Page 42

36
Clear
Clear the traveling distance, or reset the display setting to default.
1.
Press the Assist-Y or Assist-Z to move the cursor to the
item you want to configure.
Configurable items Details
Exit
Return to the setting menu
screen
DST
Clearing the traveling
distance
Default
Reset the SC display setting
to default
Default value set in the SC display setting
Configurable items Default value
Backlight ON
Beep ON
Unit km
Language English
< SC-E6010 >
Brightness
3
< SC-E6010 >
Font color
White
2.
Pressing the Assist-X button enables the setting item
indicate by the cursor and takes you back to the
"Setting menu" screen.
When the traveling distance is cleared, TIME, AVG, and
MAX are also cleared.
Assist Shift Assist Shift
< SC-E6000 > < SC-E6010 >
Page 43

37
Clock
Configure the clock setting.
1.
Press the Assist-Y or Assist-Z to set the hour.
Press Assist-Y to increase the numbers.
Press Assist-Z to decrease the numbers.
Assist Shift
< SC-E6000 > < SC-E6010 >
2.
Pressing the Assist-X enables the set value and moves
you to the minutes setting.
Assist Shift
3.
Press the Assist-Y or Assist-Z to set the minutes.
Assist Shift
4.
Pressing the Assist-X enables the set value and takes
you back to the "Setting menu" screen.
You can change the numbers quickly by holding down the
Assist-Y or Assist-Z.
Assist Shift
Page 44

38
Start mode
Set the start gear when using start mode function.
1.
Press the Assist-Y or Assist-Z to move the cursor to the
item you want to configure.
Configurable items Details
OFF No setting
2 2-speed
3 3-speed
4 4-speed
5 5-speed
Assist Shift
< SC-E6000 > < SC-E6010 >
2.
Pressing the Assist-X button enables the set value at
the cursor position and takes you back to the "Setting
menu" screen.
Assist Shift
Backlight
Configure the display backlight setting.
1.
Press the Assist-Y or Assist-Z to move the cursor to the
item you want to configure.
Configurable items Details
ON Always turned on
OFF Always turned off
MANUAL
Turns on and off in
conjunction with the
battery-powered light
Assist Shift
< SC-E6000 > < SC-E6010 >
2.
Pressing the Assist-X button enables the setting item
indicated by the cursor and takes you back to the
"Setting menu" screen.
Assist Shift
Page 45

39
Brightness < SC-E6010 >
The brightness of the backlight can be adjusted as needed.
1.
Press Assist-Y or Assist-Z to adjust the brightness.
•
Brightness can be adjusted to one of 5 levels.
Assist Shift
2.
Pressing the Assist-X button enables the set value at
the cursor position and takes you back to the "Setting
menu" screen.
Assist Shift
Beep
The beep sound can be turned on/off.
1.
Press the Assist-Y or Assist-Z to move the cursor to the
item you want to configure.
Configurable
items
Details
ON Enable beeps
OFF Disable beeps
Assist Shift
< SC-E6000 > < SC-E6010 >
2.
Pressing the Assist-X button enables the setting item
indicated by the cursor and takes you back to the
"Setting menu" screen.
Even when [Beep] is set to [OFF], a beep will sound when
there is a misoperation, system error, etc.
Assist Shift
Page 46

40
Unit
Distance units (km/miles) can be switched.
1.
Press the Assist-Y or Assist-Z to move the cursor to the
item you want to configure.
Configurable
items
Details
km Displayed in km
mile Displayed in miles
Assist Shift
< SC-E6000 >
< SC-E6010 >
2.
Pressing the Assist-X button enables the setting item
indicated by the cursor and takes you back to the
"Setting menu" screen.
Assist Shift
Language
Configure the language setting.
1.
Press the Assist-Y or Assist-Z to move the cursor to the
item you want to configure.
Configurable items
English
Français
Deutsch
Nederlands
Italiano
Español
Assist Shift
< SC-E6000 > < SC-E6010 >
2.
Pressing the Assist-X button enables the setting item
indicated by the cursor and takes you back to the
"Setting menu" screen.
Assist Shift
Page 47

41
Font color < SC-E6010 >
The font color can be changed.
1.
Press the Assist-Y or Assist-Z to move the cursor to the
item you want to configure.
Configurable items
White
Black
Assist Shift
White
Black
2.
Pressing the Assist-X button enables the setting item
indicated by the cursor and takes you back to the
"Setting menu" screen.
Assist Shift
Adjust
You can adjust gear shifting only when using an electronic gear shifting unit.
If you need to adjust the derailleur, contact the place of purchase.
Page 48

42
Auto
Shift timing can be adjusted when in automatic shift mode.
1.
Press Assist-Y or Assist-Z to adjust the
values.
•
Pressing Assist-Y and adjusting the value
upward adjusts shift timing to make
pedaling easier.
•
Pressing Assist-Z and adjusting the value
downward adjusts shift timing to make
pedaling harder.
Assist Shift
< SC-E6010 >
< SC-E6000 >
2.
Pressing Assist-X enables the adjusted
value and takes you back to the “Setting
menu”.
Assist Shift
Exit
Close the setting menu and returns to the basic screen.
1.
Press the Assist-Y or Assist-Z to move the cursor to [Exit].
2.
Pressing the Assist-X exits the setting menu and takes you back to the basic screen.
Page 49

43
Drive unit setting data backup function
The data saved to the drive unit is usually backed up automatically. However, performing the following operations will cause
a message to appear asking whether or not to update the backup data.
•
Reinstalling the cycle computer on a bicycle with different settings.
•
Changing the drive unit settings for an E-TUBE PROJECT.
Connection and communication with the PC
Downloading application
You need E-TUBE PROJECT to configure SHIMANO STEPS and update firmware.
Download an E-TUBE PROJECT from the support website (http://e-tubeproject.shimano.com).
For information on how to install an E-TUBE PROJECT, check the support website. For information on how to operate the PC,
refer to the help manual on the E-TUBE PROJECT.
CAUTION
Connection and communication with a PC is not possible while charging.
• You need SM-PCE1 and SM-JC40 / JC41 to connect SHIMANO STEPS to a PC.
• Firmware is subject to change without notice.
If necessary, contact the place of purchase.
Page 50

44
Troubleshooting
Battery LED lamp error indications
System errors and similar warnings are indicated by the battery LED lamps through various lighting patterns.
Error indication
type
Indication condition
Lighting
pattern *1
Recovery
System error
Communication error
with the bicycle
system
Make sure that the cable is not loose or improperly
connected.
If the situation does not improve, contact the place of
purchase.
Temperature
protection
If the temperature
exceeds the
guaranteed
operating range, the
battery output is
turned off.
Leave the battery in a cool place away from direct
sunlight until the internal temperature of the battery
decreases sufficiently.
If the situation does not improve, contact the place of
purchase.
Security
authentication
error
This is displayed if a
genuine drive unit is
not connected.
This is displayed if
any of the cables are
disconnected.
Connect a genuine battery and drive unit.
Check the condition of the cables.
If the situation does not improve, contact the place of
purchase.
Charging error
This is displayed if an
error occurs during
charging.
Remove the charger from the battery and press the
power button, if an error appears contact an agency.
Battery
malfunction
Electrical failure
inside the battery
Connect the charger to the battery and then remove
the charger. Press the power button with only the
battery connected.
If an error appears with only the battery connected,
contact the place of purchase.
*1 : Not lit : Lit up : Blinking
Page 51

45
Error messages on the cycle computer
Warnings
This disappears if the error is fixed.
< SC-E6000 > < SC-E6010 >
Code
Display
preconditions
Operational restrictions
while warning is
displayed
Remedy
W031
The chain tension may
not have been adjusted
or the crank may have
been installed in the
wrong position.
The assist function is
not available. (However,
electronic gear shifting
will still function.)
Contact the place of purchase or bicycle dealer.
< SC-E6010 >
List of warnings
Code
Display
preconditions
Operational restrictions
while warning is
displayed
Remedy
W010
The temperature of
the drive unit is high.
The level of assistance
may decrease.
Stop using the assist function until the temperature of
the drive unit drops.
If the situation does not improve, contact the place of
purchase.
W011
The traveling speed
cannot be detected.
The maximum speed up to
which power assistance is
provided may decrease.
(Power assistance is provided
up to 25 km/h in top gear.)
Check that the speed sensor is properly installed.
If the situation does not improve, contact the place of
purchase.
W012
The crank may be
installed in the
wrong direction.
-
Install the crank in the correct direction, then turn on
the power again.
Page 52

46
Code
Display
preconditions
Operational restrictions
while warning is
displayed
Remedy
W030
Two or more assist
switches are
connected to the
system.
Gear shifting is not
available for electronic
derailleurs.
Change the assist switch to the gear shifting switch, or
connect only one assist switch and turn on the power
again.
If the situation does not improve, contact the place of
purchase.
-
A communication
error between the
drive unit and the
motor unit was
detected.
Gear shifting is not
available for electronic
derailleurs.
Check that the cable is properly connected between the
drive unit and the motor unit.
If the situation does not improve, contact the place of
purchase.
Error
If an error message is displayed on the
entire screen, follow one of the procedures
below to reset the display.
•
Press the power button of the battery.
•
Remove the battery from the holder.
If resetting the battery power does not solve the
problem or the same problem occurs frequently,
contact the place of purchase.
<SC-E6000> <SC-E6010>
List of errors
Code
Display
preconditions
Operational restriction when
an error is being displayed
Remedy
E010
A system error was
detected.
Power assistance is not
provided during riding.
Press the power button of the battery to turn it on
again.
If the situation does not improve, contact the place
of purchase.
E012
The initialization
of the torque
sensor failed.
Power assistance is not
provided during riding.
With your foot off the pedal, press the battery
power button and turn on the power again.
If the situation does not improve, contact the place
of purchase.
E013
An anomaly was
detected in the drive
unit’s firmware.
Power assistance is not
provided during riding.
Contact the place of purchase or bicycle dealer.
Page 53

47
Code
Display
preconditions
Operational restriction when
an error is being displayed
Remedy
E014
The speed sensor
may have been
installed in the
wrong position.
Power assistance is not
provided during riding.
Contact the place of purchase or bicycle dealer.
E020
A communication
error between the
battery and drive
unit was detected.
Power assistance is not
provided during riding.
Check that the cable between the drive unit and
battery is properly connected.
If the situation does not improve, contact the place
of purchase.
E021
Battery connected
to drive unit
conforms with
system standards
but is not
supported.
Power assistance is not
provided during riding.
Contact your place of purchase or a local bicycle
dealer for assistance.
E022
Battery connected
to drive unit does
not conform with
system standards.
Power assistance is not
provided during riding.
Contact your place of purchase or a local bicycle
dealer for assistance.
E030
A setting error was
detected.
Power assistance is not
provided during riding.
If the situation does not improve even after
pressing the battery power button and turning on
the power again, contact the place of purchase.
E031
The chain tension
may not have been
adjusted or the
crank may have
been installed in
the wrong position.
The assist function is not
available. (However,
electronic gear shifting will
still function.)
Contact the place of purchase or bicycle dealer.
E043
Part of the cycle
computer’s
firmware may be
damaged.
Power assistance is not
provided during riding.
Contact the place of purchase or bicycle dealer.
Page 54

48
Troubleshooting
Assist function
Symptom Cause / Possibility Remedy
Assistance is not being
provided.
Is the battery sufficiently charged?
Check the battery charge. If the battery is
nearly spent, recharge it.
Are you riding on long slopes in summer
weather or riding for a long time carrying a
heavy load?
The battery may be overheating.
Turn off the power, wait for a while and
then check once more.
The drive unit (DU-E6001 / DU-E6050 /
DU-E6010), cycle computer (SC-E6000 /
SC-E6010) or assist switch (SW-E6000) may
be connected incorrectly or there may be a
problem with one or more of them.
Contact the place of purchase.
Is the speed too high?
Check the Cycle Computer display.
Assistance is not provided at speeds of
25 km/h or more.
Assistance is not being
provided.
Are you pedaling?
The bicycle is not a motorbike, so you need
to operate the pedals.
Is the assist mode set to [OFF]?
Set the assist mode to [HIGH]. If you still do
not feel that assistance is being given,
contact the place of purchase.
Is the system power ON?
If you have performed the steps below and
still do not feel the assistance, contact the
place of purchase.
< SC-E6010 >
Press and hold the cycle computer power
button for 2 seconds, or press the battery
power button to turn the power ON.
< SC-E6000 >
Press the battery power button to turn the
power ON.
Assist traveling distance is
too short.
The traveling distance may become shorter
depending on road conditions, the gear
position and whether the light are ON or OFF.
Check the battery charge. If the battery is
nearly spent, recharge it.
The battery characteristics will drop during
winter weather.
This is not a sign of a problem.
The battery is a consumable part. Repeated
recharging and long periods of use will
cause the battery to deteriorate (lose its
performance).
If the distance that can be traveled on a
single charge is very short, replace the
battery with a new one.
Page 55

49
Symptom Cause / Possibility Remedy
Pedaling is stiff.
Are the tires inflated to a sufficient pressure?
Use a pump to add air.
Is the assist mode set to [OFF]?
Set the assist mode to [HIGH]. If you still do
not feel that assistance is being given,
contact the place of purchase.
The battery may be running low.
After charging the battery well, check the
level of assistance again. If you still do not
feel that assistance is being given, contact
the place of purchase.
Did you turn on the power with your foot
placed on the pedal?
Turn on the power again without putting
pressure on the pedal. If you still do not
feel that assistance is being given, contact
the place of purchase.
Battery
Symptom Cause / Possibility Remedy
All the five battery level
indicators stay on.
The battery level indicators do not show
battery levels when the battery is
connected to the bicycle. Battery levels are
shown during charging.
It is not a sign of a malfunction.
The battery quickly loses its
charge.
The battery may be at the end of its service
life.
Replace the battery with a new one.
The battery cannot be
recharged.
Is the power plug of the charger securely
inserted into the electrical outlet?
Disconnect and then reconnect the power
plug of the charger, and then repeat the
recharging operation.
If the battery still cannot be recharged,
contact the place of purchase.
Is the recharging plug of the charger
securely inserted into the battery?
Disconnect and then reconnect the
recharging plug of the charger, and then
repeat the recharging operation.
If the battery still cannot be recharged,
contact the place of purchase.
Is the charging adapter securely connected
to the charging plug, or to the battery
charging port?
Securely connect the charging adapter to
the charging plug or to the battery
charging port, and charge again. If the
battery still does not charge, consult a
dealer.
Is the connecting terminal for the battery
charger, charging adapter, or battery dirty?
Wipe the connection terminals with a dry
cloth to clean them, and then repeat the
recharging operation.
If the battery still cannot be recharged,
contact the place of purchase.
The battery does not start
recharging when the
charger is connected.
The battery may be at the end of its service
life.
Replace the battery with a new one.
Page 56

50
Symptom Cause / Possibility Remedy
The battery and charger are
becoming hot.
The temperature of the battery or charger
may exceed the operating temperature
range.
Stop recharging, wait for a while and then
recharge again. If the battery is too hot to
touch, it may indicate a problem with the
battery. Contact the place of purchase.
The charger is warm.
If the charger is being used continuously to
charge batteries, it may become warm.
Wait a while before using the charger
again.
The LED on the charger
does not illuminate.
Is the recharging plug of the charger
securely inserted into the battery?
Check the connection for any foreign
objects before reinserting the charging
connector. If there is no change, contact
the place of purchase.
Is the battery fully charged?
If the battery is fully charged, the LED on
the battery charger turns off, but this is not
a malfunction. Disconnect and then
reconnect the power plug of the charger,
and then repeat the recharging operation.
If the LED on the charger still does not
illuminate, contact the place of purchase.
The battery cannot be
removed.
Contact the place of purchase.
The battery cannot be
inserted.
Contact the place of purchase.
Fluid is coming out from the
battery.
Contact the place of purchase.
An abnormal odor can be
detected.
Stop using the battery immediately and
contact the place of purchase.
Smoke is coming out from
the battery.
Stop using the battery immediately and
contact the place of purchase.
Lights
Symptom Cause / Possibility Remedy
The front light or the tail
light does not illuminate
even when the switch is
pressed.
The E-TUBE PROJECT settings may be
wrong.
Contact the place of purchase.
Page 57

51
Cycle computer
Symptom Cause / Possibility Remedy
The cycle computer is not
displayed when you push
the battery power button.
The amount of battery charge may be
insufficient.
Recharge the battery, and then turn the
power on once more.
Is the power turned on?
Hold down the power button to turn on
the power.
Is the battery charging?
The power cannot be turned on while the
battery is mounted on the bicycle and
being charged. Stop charging.
Is the cycle computer correctly installed to
the bracket?
Install the cycle computer correctly while
referring to "Installing and removing the
cycle computer".
Is the electric wire connector correctly
installed?
Check to see if the connector of the electric
wire connecting the motor unit to drive
unit is not disconnected. If you are not
sure, contact the place of purchase.
A component that the system cannot
identify may be connected.
Contact the place of purchase.
<SC-E6010>
The system does not start
up when you press and hold
the cycle computer power
button for 2 seconds.
Did you use the cycle computer in, or
expose it to, low temperatures for an
extended period?
The cycle computer may become unable to turn
on if used in, or exposed to, low temperatures
for an extended period. Turn it on by pressing
the power button on the battery. If it still does
not turn on, consult a dealer.
Is the cycle computer correctly installed to
the bracket?
Install the cycle computer correctly while
referring to "Installing and removing the
cycle computer".
The gear position is not
displayed.
The gear position is only displayed when
the electronic gear shifting unit is installed.
Check if the electric wire connector is
disconnected. If you are not sure, contact
the place of purchase.
Can the beep be turned off.
Change the setting.
Refer to "Beep".
Can the backlight be turned
off.
Change the setting.
Refer to "Backlight".
The setting menu cannot be
launched while riding the
bicycle.
The product is designed so that if it detects
that the bicycle is being ridden, the Setting
menu cannot be launched. This is not a sign
of an abnormality.
Stop the bicycle and then make the
settings.
Page 58

52
Other
Symptom Cause / Possibility Remedy
When pressing the switch,
two beeps sound, and the
switch cannot be operated.
Operation of the switch being pressed has
been disabled.
It is not a sign of a malfunction.
Three beeps sound. An error or warning is occurring.
This occurs when a warning or error is
displayed on the cycle computer. Refer to
the section "Error messages on the cycle
computer" and follow the instructions
provided for the appropriate code.
When using a electronic gear
shifting mode, I feel that the
level of assistance weakens
when the gears shift.
This occurs because the level of assistance is
being adjusted to the optimum level by the
computer control.
It is not a sign of a malfunction.
Sound occurs after gear
shifting.
Contact the place of purchase.
A noise can be heard from
the rear wheel during
normal riding.
Gear shifting adjustment may not have
been carried out correctly.
For mechanical gear shifting
Adjust the cable tension. For details, refer
to the Service Instructions for the derailleur.
For powered gear shifting
Contact the place of purchase.
When you stop the bicycle,
the gear does not shift to
the position preset in the
start mode.
You may have been pressing the pedals too
strongly.
If you press the pedals lightly, the gear
shifts more easily.
Page 59

Page 60

*
Key number
The number that is attached to the key is needed in case you need to purchase spare keys.
Make a note of the in the number following box and keep it in a safe place.
Key number
Please note: specifications are subject to change for improvement without notice. (English)
© Sep. 2016 by Shimano Inc. HTR
Page 61

Compliance
Your bicycle has been designed, tested, and produced in accordance with the applicable European
Directives and Harmonised Standards. Therefore, all RIDE+ bicycles are in compliance with CE.
For more detailed compliance information, please refer to the Declaration of Conformity (“DoC”) which
was included along with your bicycle. If you have misplaced your Declaration of Conformity, a new one
can be furnished upon request, by the bicycle shop at which you purchased your RIDE+ bicycle.
Limited warranty
Your bi
cycle is covered by a Lifetime Limited Warranty. Please visit our web site for details.
Contact
Addresses and telephone numbers:
Trek Benelux/Bikeurope B.V
Ceintuurbaan 2-20C
3847 LG Harderwijk
The Netherlands
Telephone: +31 (0)88-4500699
Internet: www.trekbikes.com
Diamant
Trek Fahrrad GmbH
Stettbachstrasse 2
CH-8600 Dübendorf
Switzerland
Telephone: +41 (0)44 824 85 00
Telephone for Germany: 0180-350 70 10
Telephone for Austria: 0820 820 121
Internet: www.diamantrad.com
For Service and Warranty, please contact your local dealer.
Please refer to the Trek website (Menu/Support) for the latest revision of this manual.
New features, as described in the latest manual, may not be applicable on your RIDE+ bike.
P/N 545424 Rev A, September 2016
© 2016 Trek Bicycle Corporation. All rights reserved.
ContaCt
Page 62

Page 63

UM-70H0A-005-01
Gebrauchsanweisung
Originalbetriebsanleitung
Serie E6000
Shimano Total Electric Power System
Deutsch
Page 64

Page 65

Unbedingt vor der ersten Fahrt gründlich durchlesen
Was Sie unbedingt tun sollten
1. Auch als langjähriger Radfahrer sollten Sie die allgemeine Originalbetriebsanleitung sowie die
RIDE+- Betriebsanleitung gründlich durchlesen, bevor Sie das erste Mal mit Ihrem neuen RIDE+
Bike fahren.
• Beide Anleitungen enthalten detaillierte Informationen und nützliche Hinweise zu Ihrem neuen Bike.
• Stellen Sie sicher, dass Sie die korrekte Bedienung, Wartung und Entsorgung sämtlicher elektrischer
Komponenten Ihres neuen RIDE+-Bikes verstanden haben.
2. Beachten Sie vor allem jegliche Sicherheitshinweise. Ihre Sicherheit und die der anderen Verkehrs teilnehmer sind sehr wichtig.
• Benutzen Sie das E-Bike niemals ohne eingebaute Batterie. Die Batterie muss beim Fahren immer eingebaut
sein, andernfalls funktioniert die Beleuchtung nicht, wenn sie gebraucht wird.
• Fahren Sie das E-Bike niemals ohne Sattel. Bei manchen Modellen wird die Sattelstütze mit einem Schnell-
spanner geklemmt. Falls Sattel und Sattelstütze gestohlen werden, kann das anschließende Fahren ohne
Sattel zu gefährlichen Situationen führen.
• Überprüfen Sie Ihr Bike vor jeder Fahrt auf einwandfreie Funktion, lose Bauteile und Defekte. Wenn Sie ein
Problem feststellen, wenden Sie sich zu dessen Behebung an Ihren Fachhändler, bevor Sie das Bike
wieder fahren.
• Machen Sie sich stets bewusst, dass andere Verkehrsteilnehmer womöglich nicht damit rechnen, dass ein
E-Bike schneller fahren kann als ein herkömmliches Fahrrad. Außerdem erhöht eine schnellere
Geschwindigkeit das Unfallrisiko.
• Setzen Sie Ihr Bike nicht missbräuchlich ein. Fahren Sie stattdessen stets entsprechend des Einsatzbereiches,
für den Ihr Bike vorgesehen ist. Nutzungsart 1 (gepflasterte Straßen wobei die Reifen am Boden bleiben) ist
gültig für RIDE+ City / Trekking Bikes, Nutzungsart 3 (unebene Untergründe, Reifen können kurzzeitig den
Bodenkontakt verlieren) gilt für RIDE+ Mountainbikes. Weitere Informationen finden sie in der allgemeinen
“Originalbetriebsanleitung“.
• Überlasten Sie den hinteren Gepäckträger nicht. Die maximal erlaubte Zuladung des hinteren Gepäckträgers
von RIDE+-Bikes beträgt 20 kg (für Modelle mit Batterie-Halterung am Gepäckträger) beziehungsweise
25 kg (für Modelle mit Batterie-Halterung am Unterrohr).
3. Das elektrische Antriebssystem Ihres neuen Bikes erfordert besondere Aufmerksamkeit.
• Reinigen Sie Ihr E-Bike niemals mit einem Hochdruckreiniger. Die elektrischen Komponenten sind feuchtig-
keitsempfindlich. Unter Hochdruck auftreffendes Wasser kann in Steckverbindungen und andere Teile des
Elektro-Systems eindringen.
• Behandeln Sie die Batterie besonders vorsichtig. Lassen Sie sie niemals fallen und setzen Sie sie keinen
Stoßbelastungen aus. Eine Fehlbehandlung der Batterie kann zu schweren Schäden oder Überhitzung
führen. In extrem seltenen Fällen kann es auch vorkommen, dass eine stark beschädigte oder anderweitig
missbrauchte Batterie in Brand gerät.
Wenn Sie den Verdacht haben, die Batterie sei beschädigt, wenden Sie sich für eine gründliche Untersuchung
umgehend an Ihren Fachhändler.
Page 66

4. Pflegen und warten Sie die Batterie entsprechend der später folgenden Anweisungen in dieser
RIDE+-Betriebsanleitung.
Das Nichtbeachten dieser Anweisungen kann zu Schäden an der Batterie führen und einen Austausch der
Batterie erfordern:
• Laden Sie die Batterie ausschließlich mit dem mitgelieferten Shimano-Ladegerät.
• Laden Sie den Akku vor längerer Nichtbenutzung auf bis etwa 100 % (4 bis 5 LEDs der Ladezustandsanzeige
leuchten).
• Überprüfen Sie den Ladezustand des Akkus regelmäßig, wenn Sie Ihr Fahrrad für einen längeren Zeitraum
nicht verwenden. Blinkt oder leuchtet nur noch eine LED der Ladezustandsanzeige, dann laden Sie den Akku
sofort wieder auf bis etwa 100 %.
• Es ist nicht empfehlenswert, den Akku dauerhaft am Ladegerät angeschlossen zu lassen.
• Wird der Akku längere Zeit in leerem Zustand aufbewahrt, kann er trotz der geringen Selbst-entladung
beschädigt und die Speicherkapazität stark verringert werden.
• Lagern Sie den Akku möglichst an einem trockenen, gut belüfteten Platz. Schützen Sie ihn vor Feuchtigkeit
und Wasser.
• Bei ungünstigen Witterungsbedingungen ist es z.B. empfehlenswert, den Akku vom eBike abzunehmen und
bis zum nächsten Einsatz in geschlossenen Räumen aufzubewahren.
• Der Akku kann bei Temperaturen von –20 °C bis +60 °C gelagert werden. Für eine lange Lebensdauer ist
jedoch eine Lagerung bei ca. 20 °C Raumtemperatur vorteilhaft. Achten Sie darauf, dass die maximale
Lagertemperatur nicht überschritten wird. Lassen Sie den Akku z.B. im Sommer nicht im Auto liegen und
lagern Sie ihn außerhalb direkter Sonneneinstrahlung.
• Es wird empfohlen, den Akku für die Lagerung nicht am Fahrrad zu belassen.
5. Behandeln Sie ein RIDE+-Bike beim Transport stets besonders vorsichtig.
• Ein E-Bike ist schwerer als ein „normales“ Fahrrad. Achten Sie beim Transport auf dem Auto auf die maximale
Zuladung von Dach, Anhängerkupplung und/oder Fahrradträger. Beachten Sie die entsprechenden Hinweise
in den Bedienungsanleitungen von Auto und Fahrradträger beziehungsweise die Vorschriften des Transport-
unternehmens.
• Entfernen Sie Controller, Batterie und (falls vorhanden) Packtaschen vom Bike und packen Sie diese separat ein.
• Beachten Sie jegliche lokalen Vorschriften zum Transport von (E-)Bikes.
• Bei Transport eines einzelnen Li-Ion-Akku zählt dieser, aufgrund seiner Größe und Leistung, als „Gefahrgut,
Klasse 9“ und unterliegt besonderen Transportbestimmungen. Diese Bestimmungen gelten für die meisten
Fluggesellschaften und einige Speditionen. Bei einem Transport eines kompletten RIDE+ Fahrrads mit
installiertem Akku, sind die Bestimmungen weniger streng. Vergewissern Sie sich vor Buchung Ihrer Reise
bei Ihrer Fluggesellschaft oder Spedition, ob der Transport erlaubt ist oder welche Bestimmungen für den
Transport gelten.
6. Betrauen Sie Ihren Fachhändler regelmäßig mit der Wartung Ihres neuen Bikes.
• Ihr Fachhändler verfügt über die nötigen Kenntnisse und Ausrüstung, um Ihr RIDE+-Bike korrekt zu warten.
• Wenden Sie sich bei jeglichen Fragen zu Ihrem neuen RIDE+-Bike an Ihren Fachhändler!
Maximaler Fahrspaß mit Ihrem RIDE+-Bike
Page 67

1
INHALT
WICHTIGER HINWEIS
.............................................................................................. 2
Wichtige Sicherheitsinformationen
..........................................................................2
Zur Gewährleistung der Sicherheit
..........................................................................2
Funktionsmerkmale von SHIMANO STEPS
................................................................6
Funktionsmerkmale ....................................................................................................................6
Betrieb des Fahrrads ...................................................................................................................6
Unterstützungsmodus ................................................................................................................7
Bezeichnung der Komponenten
..............................................................................8
Spezifikationen
.....................................................................................................9
Nutzungshinweise
............................................................................................... 10
EINFÜHRUNG .............................................................................................................................10
Laden des Akkus .......................................................................................................................10
LED-Lampe des Ladegeräts ......................................................................................................15
LED-Lampen des Akkus ............................................................................................................15
Handhabung und Ladung des Akkus ......................................................................................16
Einsetzen/Entfernen des Akkus ................................................................................................17
Einstellungen und Betriebsmodi des Fahrradcomputers
........................................... 22
An- und Abbau des Fahrradcomputers ...................................................................................23
Ein- und Ausschalten des Systems ............................................................................................24
SHIMANO STEPS Logobildschirm .............................................................................................25
Standardbildschirm ...................................................................................................................26
Über das Einstellungsmenü ......................................................................................................35
Funktion zur Sicherung der Einstellung der Antriebseinheit
..................................... 43
Verbindung und Kommunikation mit einem PC
.......................................................43
Herunterladen der Anwendung ..............................................................................................43
Fehlersuche
.........................................................................................................44
Fehleranzeige auf Akku-LED ....................................................................................................44
Fehlermeldungen auf dem Fahrradcomputer ........................................................................45
Fehlersuche ...............................................................................................................................48
Page 68

2
Gebrauchsanweisungen in weiteren Sprachen
sind verfügbar unter:
http://si.shimano.com
WICHTIGER HINWEIS
•
Wenden Sie sich an das Geschäft, in dem Sie das Rad gekauft
haben, oder an einen Fahrradhändler für Informationen
hinsichtlich Montage und Einstellung des Produkts, die nicht
in den Gebrauchsanweisungen zu fi nden sind. Eine
Händlerbetriebsanleitung für professionelle und erfahrene
Fahrradmechaniker
ist auf unserer Website verfügbar (http://si.shimano.com).
•
Demontieren oder verändern Sie dieses Produkt nicht.
•
Halten Sie bei der Verwendung des Produkts die vor Ort
geltenden Gesetze und Vorschriften ein.
Stellen Sie aus Sicherheitsgründen sicher,
dass Sie diese Gebrauchsanweisung vor der
Verwendung sorgfältig durchlesen und
genau befolgen.
Wichtige Sicherheitsinformationen
Informationen über Ersatzmöglichkeiten erfragen Sie bitte am
Ort des Kaufs oder bei einem Fahrradhändler.
Zur Vermeidung von Verbrennungen oder anderen
Verletzungen durch Flüssigkeitsaustritt, Überhitzung, Feuer
oder Explosionen beachten Sie die folgenden Punkte.
Zur Gewährleistung der Sicherheit
GEFAHR
Handhabung des Akkus
•
Verformen, modifi zieren oder zerlegen Sie den Akku
niemals und löten sie unter keinen Umständen die
Akkuzellen. Dadurch kann Flüssigkeit auslaufen bzw. der
Akku kann überhitzen, platzen oder sich entzünden.
•
Platzieren Sie den Akku nicht in der Nähe von
Wärmequellen wie Heizungen. Der Akku darf nicht erhitzt
oder in ein Feuer geworfen werden. Dadurch kann der Akku
platzen oder sich entzünden.
•
Lassen Sie den Akku nicht fallen und setzen Sie ihn keinen
starken Stößen aus. Bei Missachtung besteht die Gefahr
eines Brands bzw. der Akku kann platzen oder sich
überhitzen.
•
Tauchen Sie den Akku nicht in Süßwasser oder Meerwasser
ein, die Akkuklemmen dürfen nicht nass werden.
Anderenfalls kann der Akku überhitzen, platzen oder sich
entzünden.
•
Verwenden Sie das von Shimano vorgeschriebene Ladegerät
und beachten Sie die angegebenen Ladebedingungen beim
Laden des angegebenen Akkus. Anderenfalls kann der Akku
überhitzen, platzen oder sich entzünden.
Page 69

3
WARNUNG
Gewährleisten einer sicheren Fahrt
•
Achten Sie während der Fahrt nicht zu stark auf das Display,
da dies zu Unfällen führen kann.
•
Prüfen Sie, dass die Räder sicher am Fahrrad befestigt sind,
bevor Sie losfahren. Wenn die Räder nicht sicher befestigt
sind, kann das Fahrrad umfallen und es kann zu schweren
Verletzungen kommen.
•
Stellen Sie bei der Fahrt mit einem E-Bike sicher, dass Sie mit
den Starteigenschaften des Fahrrads völlig vertraut sind,
bevor Sie auf Straßen mit mehrere Fahrzeugspuren und
Fußwegen fahren. Wenn das Fahrrad plötzlich startet, kann
dies zu Unfällen führen.
•
Vergewissern Sie sich, dass die Fahrradleuchten leuchten,
wenn Sie im Dunkeln fahren.
Sichere Verwendung des Produkts
•
Achten Sie darauf, den Akku auszubauen und das Ladekabel
zu entfernen, bevor Sie Bauteile am Fahrrad anbringen oder
verkabeln. Anderenfalls könnten Sie einen Stromschlag
erleiden.
•
Wenn Sie den am Rad montierten Akku laden, dürfen Sie
das Rad während des Ladevorgang nicht bewegen. Der
Netzstecker des Ladegeräts könnte sich sonst lösen und
dadurch nicht mehr vollständig in der Steckdose sitzen, was
zu einem Brand führen könnte.
•
Stellen Sie bei Montage dieses Produkts sicher, dass Sie die
Anweisungen in der Bedienungsanleitung befolgen. Es wird
außerdem empfohlen, dabei nur Originalteile von Shimano
zu verwenden. Wenn Schrauben und Muttern gelockert
bleiben oder das Produkt beschädigt ist, könnten Sie stürzen
und sich schwere Verletzungen zuziehen.
•
Sie dürfen das Produkt nicht zerlegen. Zerlegen kann zu
Personenschäden führen.
•
Nach sorgfältigem Lesen der Gebrauchsanweisung
bewahren Sie sie an einem sicheren Ort auf, um zu einem
späteren Zeitpunkt darauf zugreifen zu können.
Handhabung des Akkus
•
Falls Flüssigkeit vom Akku in die Augen gelangt, müssen die
betreffenden Stellen sofort gründlich mit sauberem Wasser,
wie Leitungswasser, gewaschen werden. Dabei dürfen die
Augen nicht gerieben werden. Danach muss umgehend ein
Arzt aufgesucht werden. Anderenfalls kann die
Akkuflüssigkeit Ihre Augen schädigen.
•
Laden Sie den Akku nicht an Orten mit hoher
Luftfeuchtigkeit oder im Freien auf. Dies kann zu
Stromschlägen führen.
•
Der Stecker darf nicht in nassem Zustand eingesteckt oder
abgezogen werden. Bei Missachtung könnten Sie einen
elektrischen Schlag erleiden. Wenn Wasser aus dem Stecker
austritt, trocknen Sie ihn gründlich, bevor Sie ihn einstecken.
•
Wenn der Akku nach 6Stunden Ladezeit nicht vollständig
geladen ist, trennen Sie den Akku sofort von der
Stromversorgung, um den Ladevorgang abzubrechen, und
wenden Sie sich an die Verkaufsstelle. Anderenfalls kann der
Akku überhitzen, platzen oder sich entzünden.
•
Verwenden Sie den Akku nicht, falls Kratzspuren oder
andere äußere Beschädigungen sichtbar sind. Anderenfalls
können Platzen, Überhitzung oder Betriebsprobleme die
Folge sein.
•
Die Betriebstemperaturbereiche des Akkus sind nachstehend
angegeben. Der Akku darf nicht außerhalb dieser
Temperaturbereiche verwendet werden. Falls der Akku
außerhalb des Temperaturbereichs verwendet oder
aufbewahrt wird, können Feuer, Verletzungen oder
Betriebsprobleme auftreten.
1. Während der Entladung: -10 °C - 50 °C
2. Während des Ladevorgangs: 0 °C - 40 °C
Reinigung
•
Die Wartungsfrequenz kann je nach Fahrbedingungen
variieren. Schmieren Sie die Kette regelmäßig. Verwenden
Sie unter keinen Umständen basische oder säurehaltige
Reinigungsmittel zur Entfernung von Rost. Wenn derartige
Reinigungsmittel verwendet werden, können sie die Kette
beschädigen, was zu schweren Verletzungen führen kann.
Page 70

4
VORSICHT
Gewährleisten einer sicheren Fahrt
•
Beachten Sie die Anweisungen in der Betriebsanleitung für
das Fahrrad, um eine sichere Fahrt zu gewährleisten.
Sichere Verwendung des Produkts
•
Prüfen Sie das Akkuladegerät, insbesondere sein Kabel,
seinen Stecker und das Gehäuse, in regelmäßigen
Abständen auf Schäden. Falls das Ladegerät oder der
Adapter beschädigt sind, dürfen Sie diese erst wieder nach
einer entsprechenden Reparatur verwenden.
•
Dieses Gerät ist nicht zur Verwendung durch Personen
(einschließlich Kindern) mit eingeschränkten physischen,
sensorischen oder mentalen Fähigkeiten oder mit mangelnder
Erfahrung und Kenntnis vorgesehen, sofern sie nicht
Beaufsichtigung und Unterweisung hinsichtlich der
Verwendung des Geräts von einer Person erhalten, die für
ihre Sicherheit verantwortlich ist.
•
Erlauben Sie Kindern nicht, in der Nähe des Produkts zu
spielen.
Handhabung des Akkus
•
Platzieren Sie den Akku nicht an einem Ort, der direkter
Sonneneinstrahlung ausgesetzt ist, an einem heißen Tag in
einem Fahrzeug oder an anderen heißen Plätzen. Dies kann
zu Akkulecks führen.
•
Falls Flüssigkeit auf die Haut oder die Bekleidung gelangt,
muss diese gründlich mit sauberem Wasser abgewaschen
werden. Ihre Haut kann durch die Flüssigkeit angegriffen
werden.
•
Bewahren Sie den Akku an einem sicheren Ort außerhalb
der Reichweite von Kindern und Tieren auf.
Reinigung
•
Wenn Fehlfunktionen oder andere Probleme auftreten,
wenden Sie sich an die Verkaufsstelle.
•
Versuchen Sie niemals, das System selber zu modifizieren, da
dies Probleme mit dem Systembetrieb verursachen kann.
Anmerkung
Sichere Verwendung des Produkts
•
Achten Sie darauf, nicht genutzte Steckverbindungen mit
einem Blindstopfen zu versehen.
•
Wenden Sie sich wegen Montage und Einstellung des
Produkts an einen Händler.
•
Das Produkt ist auf vollständige Wasserdichtigkeit
ausgelegt, um Fahrbedingungen bei nasser Witterung
standzuhalten. Allerdings sollten Sie es nicht absichtlich in
Wasser tauchen.
•
Reinigen Sie Ihr Rad nicht in einer Waschanlage mit einem
Hochdruckreiniger. Falls Wasser in die Komponenten
eindringt, könnte dies zu Funktionsproblemen oder Rost
führen.
•
Stellen Sie das Rad nicht auf den Kopf. Dadurch könnten
Fahrradcomputer oder Schalthebel beschädigt werden.
•
Behandeln Sie das Produkt sorgfältig und vermeiden Sie
starke Erschütterungen.
•
Auch wenn das Fahrrad immer noch als normales Fahrrad
funktioniert, wenn der Akku entfernt wurde, leuchtet das
Licht nicht auf, wenn es eingeschaltet wird. Wenn das
Fahrrad ohne Akku gefahren und auch keine separate
Lichtanlage verwendet wird, entspricht es nicht mehr der
StVZO und darf somit nicht auf öffentlichen Wegen/Straßen
genutzt werden
•
Wenn Sie einen am Rad montierten Akku laden, müssen Sie
auf Folgendes achten:
-
Stellen Sie beim Laden sicher, dass sich am Ladeanschluss
oder Ladestecker kein Wasser angesammelt hat.
-
Stellen Sie sicher, dass der Akku vor Beginn des
Ladevorgangs in der Akkuhalterung verriegelt ist.
-
Während des Ladevorgangs darf der Akku nicht aus der
Akkuhalterung entfernt werden.
-
Sie dürfen das Rad nicht mit angeschlossenem Ladegerät
fahren.
-
Schließen Sie die Ladeanschlusskappe, wenn Sie nicht
laden.
-
Stabilisieren Sie das Fahrrad um sicherzustellen, dass es
währen des Ladens nicht umkippt.
Page 71

5
Handhabung des Akkus
•
Wenn Sie ein E-Bike in einem Auto transportieren, entfernen
Sie den Akku vom Fahrrad und platzieren Sie das Rad auf
einer stabilen Oberfläche im Auto.
•
Stellen Sie sicher, dass sich im Anschluss, an dem der Akku
angeschlossen wird, kein Wasser angesammelt hat, bevor Sie
den Akku anschließen.
•
Der Gebrauch eines Shimano-Originalakkus wird empfohlen.
Falls Sie einen Akku eines anderen Herstellers nutzen, lesen
Sie die Bedienungsanleitung des Akkus vor dem Gebrauch
aufmerksam durch.
Informationen zur Entsorgung in Ländern
außerhalb der EU
Dieses Symbol gilt nur in der EU. Befolgen
Sie bei der Entsorgung von gebrauchten
Akkus die örtlichen Vorschriften. Wenn Sie
nicht sicher sind, wenden Sie sich an die
Verkaufsstelle oder einen Fahrradhändler.
Reinigung
•
Die auf dem Akkuschlüssel zu findende Nummer ist
notwendig, um zusätzliche Schlüssel zu kaufen. Bewahren
Sie sie an einem sicheren Ort auf. Auf der Rückseite dieser
Anleitung findet sich ein Feld zum Eintragen der
Schlüsselnummer. Tragen Sie die Nummer zur sicheren
Aufbewahrung und zur späteren Verwendung ein.
•
Für Aktualisierungen der Produktsoftware wenden Sie sich
bitte an den Händler. Die aktuellsten Informationen finden
Sie auf der Website von Shimano. Für genauere
Informationen siehe den Abschnitt "Anschließen und
Datenaustausch mit dem PC".
•
Verwenden Sie keinen Verdünner oder andere
Lösungsmittel, um eines der Produkte zu reinigen. Derartige
Mittel könnten die Oberflächen beschädigen.
•
Sie sollten die Ritzel regelmäßig mit einem neutralen
Reinigungsmittel reinigen. Die Reinigung mit einem
neutralen Reinigungsmittel und die anschließende
Schmierung kann die Verwendbarkeit von Ritzeln und Kette
effektiv verlängern.
•
Verwenden Sie ein feuchtes, gut ausgewrungenes Tuch,
wenn Sie den Akku und die Kunststoffabdeckung reinigen.
•
Bei Fragen hinsichtlich der Handhabung und Wartung
wenden Sie sich an die Verkaufsstelle.
•
Gewöhnlicher Verschleiß und der Alterungsprozess eines
Produkts durch normale Verwendung werden nicht durch
die Garantie abgedeckt.
Unterstützung
•
Wenn die Einstellungen nicht richtig sind, wenn die
Kettenspannung z. B. zu hoch ist, kann die ordnungsgemäße
Unterstützungskraft möglicherweise nicht erzielt werden.
Wenden Sie sich in diesem Fall bitte an den Händler.
<DU-E6010>
•
Diese Komponente ist mit Rücktrittsbremsen kompatibel.
Bei nicht korrekt installierter Kurbel oder falsch eingestellter
Kettenspannung wenden Sie sich bitte an den Händler, da
hierdurch unter Umständen keine richtige Unterstützung
beim Treten gewährleistet ist.
Etikett
•
Einige der wichtigen Informationen in dieser
Betriebsanleitung werden auch auf dem Etikett des
Ladegeräts angezeigt.
Page 72

6
Funktionsmerkmale von SHIMANO STEPS
Funktionsmerkmale
•
Gewichtsoptimierte Kompaktkonstruktion
•
Leise, ruhige Fahrt
•
High-Performance Schaltsystem (Bei elektronischer Gangschaltung)
Dieses System ermöglicht Ihnen das Umschalten, indem die optimale Unterstützung bereitgestellt wird, die von einem Computer
auf Grundlage genauer Sensorwerte angepasst wird.
•
Vollautomatische Schaltung (Bei elektronischer 8-Gangschaltung)
Die Sensoren ermitteln die Fahrbedingungen und erkennen so, ob Sie bei Gegenwind einen Hügel hinauffahren oder im Flachen
ohne Wind. Das automatische computergesteuerte Schaltsystem bietet die entsprechende Unterstützung, um ihre Fahrt noch
angenehmer zu machen.
•
Start mode (bei elektronischer Gangschaltung)
Diese Funktion ermöglicht ein automatisches Herunterschalten auf einen voreingestellten Gang, wenn Sie beispielsweise an
einer Ampel anhalten, so dass Sie stets mit einem leichten Gang wieder anfahren können.
*
Wenn Sie angehalten haben und bei stillstehendem Rad einen Gang herunterschalten, schaltet das System nicht automatisch
wieder einen Gang hoch.
•
Kompatibel mit Rücktrittsbremse (DU-E6010)
Bietet sanfte Unterstützung und Kontrolle.
•
Light off road
Sportlich, bietet kräftige Unterstützung. Steht nur zur Verfügung, wenn vom Hersteller des Fahrrads eingestellt.
•
Schiebehilfe(Schiebe-Unterstützungsmodus)
*
Einige der oben genannten Funktionen stehen erst nach Aktualisierung der Firmware zur Verfügung. Setzen Sie sich in diesem
Fall mit dem Händler in Verbindung und lassen Sie von diesem eine Firmware-Aktualisierung durchführen.
Betrieb des Fahrrads
1.
Schalten Sie das System ein.
•
Setzen Sie Ihre Füße beim Einschalten des Systems nicht auf die Pedale. Es kann zu einem Systemfehler kommen.
•
Während des Ladevorgangs kann das System nicht eingeschaltet werden.
2.
Wählen Sie Ihren bevorzugten Unterstützungsmodus aus.
3.
Die Unterstützung setzt ein, wenn die Pedale sich zu drehen beginnen.
4.
Wechseln Sie den Unterstützungsmodus gemäß den Fahrbedingungen.
5.
Schalten Sie das System ab, wenn Sie das Fahrrad abstellen.
•
Setzen Sie Ihre Füße beim Ausschalten des Systems nicht auf die Pedale. Es kann zu einem Systemfehler kommen.
Page 73

7
Unterstützungsmodus
Sie können einen SHIMANO STEPS Unterstützungsmodus für jede spezifische Anwendung auswählen.
HOCH
NORMAL
ECO
Verwenden Sie diesen Modus, wenn
starke Unterstützung erforderlich ist,
beispielsweise bei steilen
Bergauffahrten.
Verwenden Sie diesen Modus, wenn
eine mittelstarke Unterstützung
benötigt wird, wenn Sie beispielsweise
bequem an einer leichten Steigung oder
bei ebenem Untergrund fahren
möchten.
Verwenden Sie diesen Modus, wenn Sie
lange Strecken auf ebenem Untergrund
fahren wollen. Wenn nicht sehr stark in
die Pedale getreten wird, wird das Maß
der Unterstützung vermindert und der
Energieverbrauch wird gesenkt.
Wenn die Akkuladung gering ist, wird das Maß der Unterstützung vermindert, um die Reichweite zu erhöhen.
AUS
Dieser Modus stellt keine Tretunterstützung bereit, wenn das System eingeschaltet ist. Da kein Strom im Zusammenhang mit der
Tretunterstützung verbraucht wird, ist dies nützlich zur Senkung des Akkuverbrauchs, wenn der Ladestand gering ist.
GEHE
Dieser Modus ist besonders hilfreich, wenn Sie das Fahrrad mit schwerem Gepäck beladen haben und schieben oder wenn Sie es
aus einem Keller herausschieben.
Page 74

8
Bezeichnung der Komponenten
B
1 2
3
5
A
B
4
6
9
*
1
*
2
< Bei elektronischer Gangschaltung >
A
Schalthebel
SW-E6000
B
Motoreinheit MU-S705
Nabenschaltung
SG-C6060
SG-S705
SG-S505
Motoreinheit
Nabenschaltung
5
6
8
7
Page 75

9
1
Fahrradcomputer
•
SC-E6000
•
SC-E6010
6
Akkuhalterung (externer Typ)
•
SM-BME60
•
SM-BME61
•
BM-E6000
•
BM-E6010
•
BM-E8010
2
Unterstützungsschalter
•
SW-E6000
7
Akku (eingebaut)
•
BT-E8020
3
Kettenblatt/Kurbelarm
•
FC-E6000
•
SM-CRE60
8
Akkuhalterung (eingebaut)
•
BM-E8020
4
Antriebseinheit /
Geschwindigkeitsaufnehmer
•
DU-E6001
•
DU-E6050
•
DU-E6010
9
Batterieladegerät
*
1: SM-BCE60+SM-BCC1
*
2: EC-E6000
5
Akku (externer Typ)
•
BT-E6000
•
BT-E6001
•
BT-E6010
•
BT-E8010
Spezifikationen
Betriebstemperaturbereich:
Während des Entladens
-10-50°C Akkutyp Lithium-Ionen-Akku
Betriebstemperaturbereich:
Während des Ladens
0-40°C Nennleistung
Zum Akku „UM-70F0A“ siehe
Bedienungsanleitung. Für
neueste Informationen zu
Bedienungsanleitungen siehe
die Website
(http://si.shimano.com).
Lagertemperatur -20-70°C Nennspannung 36 V DC
Lagertemperatur (Akku) -20-60°C Typ der Antriebseinheit Mittelmotor
Ladespannung 100 – 240 V AC Motortyp DC, bürstenlos
Ladedauer
Zum Akku „UM-70F0A“ siehe
Bedienungsanleitung. Für
neueste Informationen zu
Bedienungsanleitungen siehe
die Website
(http://si.shimano.com).
Nennleistung der
Antriebseinheit
> 250 W
*
Abhängig von den Spezifikationen sind unterschiedliche Geschwindigkeitsbereiche für die Unterstützungsfunktion möglich.
DU-E6001, E6010: 25 km/h oder weniger
DU-E6050: 20 Meilen/h oder weniger
Page 76

10
Nutzungshinweise
EINFÜHRUNG
Sie können den Akku nicht direkt nach dem Versand verwenden.
Der Akku kann erst nach dem Aufladen mit dem dafür vorgesehenen Ladegerät verwendet werden.
Den Akku unbedingt vor der Verwendung aufladen. Der Akku ist bereit zur Verwendung, sobald die an ihm befindliche LED
aufleuchtet.
Der Gebrauch eines Shimano-Originalakkus wird empfohlen. Falls Sie einen Akku eines anderen Herstellers nutzen, lesen Sie die
Bedienungsanleitung des Akkus vor dem Gebrauch aufmerksam durch.
Laden des Akkus
GEFAHR
•
Verwenden Sie zum Laden nur die vom Unternehmen angegebene Kombination aus Akku und Ladegerät und beachten Sie dabei auch die
Ladebedingungen. Anderenfalls kann der Akku überhitzen, platzen oder sich entzünden.
VORSICHT
• Wenn Sie den Netzstecker des Ladegeräts aus der Steckdose ziehen oder den Ladestecker
aus dem Akku, dürfen Sie hierbei nicht am Kabel ziehen.
• Wenn Sie einen am Rad montierten Akku laden, müssen Sie darauf achten, nicht über
das Ladekabel zu stolpern. Sie könnten sich verletzten oder das Rad könnte umfallen
und dadurch beschädigt werden.
• Wenn das Fahrrad direkt nach dem Kauf über einen längeren Zeitraum gelagert wird,
müssen Sie den Akku vor Verwendung des Fahrrads aufladen. Wenn der Akku geladen
wurde, beginnt seine Leistung abzunehmen.
• Stellen Sie eine Verbindung zu E-TUBE PROJECT her und klicken Sie auf [Prüfung der
Verbindung zum Bike], um zu bestätigen, ob der Akku in Gebrauch ein ShimanoOriginalakku oder einer eines anderen Herstellers ist.
Page 77

11
Beim alleinigen Laden des Akkus
< EC-E6000/BT-E6000/BT-E6001/BT-E6010 >
1.
Bringen Sie den Adapter am Ladestecker an.
2.
Verbinden Sie den Netzstecker des Ladegeräts mit einer
Steckdose.
3.
Stecken Sie den Adapter in den Ladeanschluss des Akkus.
*
Wenn Sie den Adapter mit dem Ladeanschluss
verbinden, müssen Sie den Ladestecker so halten, dass er
vom Adapter aus gesehen nach unten ausgerichtet ist.
Schließen Sie ihn nicht nach oben ausgerichtet an.
*
Laden Sie den Akku in einem geschlossen Raum und auf
fl achem Untergrund auf.
Adapter
Ladestecker
Akku
LadeanschlussAdapter
Ladestecker
< BT-E6010 >
Adapter
Akku
Ladeanschluss
Ladestecker
< BT-E6000/BT-E6001 >
Page 78

12
< EC-E6000/BT-E8010/BT-E8020 >
1.
Stecken Sie den Netzstecker des Ladegeräts in die
Steckdose.
2.
Stecken Sie den Ladestecker in den Ladeanschluss des
Akkus.
•
Laden Sie den Akku in einem geschlossen Raum und auf
fl achem Untergrund auf.
< BT-E8010 >
Ladestecker
Akku Ladeanschluss
< BT-E8020 >
Ladestecker
Akku
Ladeanschluss
Page 79

13
< SM-BCE60/BT-E6000/BT-E6001/BT-E6010 >
1.
Befestigen Sie den Ladegerätstecker am
Ladegerätanschluss des Akkus.
Stecken Sie ihn so ein, dass die markierte Seite des Steckers
nach oben zeigt.
*
Sie können ihn nicht mit der markierten Seite nach
unten einstecken.
*
Laden Sie den Akku in einem geschlossen Raum und auf
fl achem Untergrund auf.
< BT-E6000/BT-E6001 >
Akku
Rille
Ladeanschluss
Rückseite (keine Markierung)
< BT-E6010 >
Rille
Ladeanschluss
Page 80

14
Laden des am Rad montierten Akkus
< EC-E6000/BT-E6000/BT-E6001/BT-E6010/BT-E8010/BT-E8020 >
1.
Stecken Sie den Netzstecker des Ladegeräts in die Steckdose.
2.
Stecken Sie den Ladestecker in den Ladeanschluss der Akkuhalterung oder des Akkus.
*
Legen Sie das Ladegerät vor dem Ladevorgang auf eine ebene Oberfl äche, z. B. auf den Boden.
*
Stabilisieren Sie das Fahrrad um sicherzustellen, dass es während des Ladens nicht umkippt.
<BT-E6000/BT-E6001>
Akkuhalterung
Ladeanschluss
Ladestecker
<BT-E6010/BT-E8010>
Akkuhalterung
Ladestecker
Ladeanschluss
<BT-E6010>
<BT-E8010>
Akku
Ladeanschluss
Ladestecker
<BT-E8020>
Akku
Ladestecker
Ladeanschluss
Page 81

15
LED-Lampe des Ladegeräts
Nach Beginn des Ladevorgangs leuchtet die LED-Lampe am
Ladegerät auf.
Leuchten
Es wird geladen (Leuchtet bis zu
1Stunde nach Abschluss des
Ladevorgangs)
Blinkt
Ladefehler
Abgeschaltet
Akku getrennt
(1 Stunde oder länger nach Abschluss
des Ladevorgangs)
LED-Lampe
des Ladegeräts
LED-Lampen des Akkus
Sie können den aktuellen Ladestatus an den LED-Lampen
überprüfen, die sich auf dem Akku befi nden.
LED-Lampe des Akkus
Anzeige des laufenden Ladevorgangs
Akkuladestandsanzeige*1 Akkuladestand
0% - 20%
21% - 40%
41% - 60%
61% - 80%
81% - 99%
100%
*1
: Leuchtet nicht : Leuchtet : Blinkt
Page 82

16
Akkuladestandsanzeige
Der aktuelle Ladestand kann geprüft werden, indem man den Ein-/Ausschalter des Akkus drückt.
Akkuladestandsanzeige*1 Akkuladestand
100% - 81%
80% - 61%
60% - 41%
40% - 21%
20% - 1%
0% (Wenn der Akku nicht im Fahrrad
eingebaut ist)
0 % (Wenn der Akku im Fahrrad eingebaut ist)
Ausschalten
*1 : Leuchtet nicht : Leuchtet : Blinkt
Handhabung und Ladung des Akkus
Der Ladevorgang kann jederzeit durchgeführt werden, unabhängig von der verbleibenden Ladung. Sie sollten den Akku jedoch zu
den folgenden Zeitpunkten vollständig laden. Achten Sie darauf, das Spezialladegerät zu verwenden, wenn der Akku zu diesen
Zeitpunkten aufgeladen wird.
•
Beim Verkauf ist der Akku nicht komplett geladen. Laden Sie ihn vor der Verwendung vollständig auf.
Wenn der Akku vollständig entladen ist, sollten Sie ihn frühestmöglich wiederaufladen. Wenn Sie den Akku nicht frühzeitig
wiederaufladen, verschlechtert sich seine Leistung.
•
Wenn das Fahrrad über einen längeren Zeitraum nicht benutzt wird, stellen Sie es mit einem Restladestand des Akkus von ca.
70% ab. Sorgen Sie außerdem dafür, dass der Akku nicht vollständig entleert wird, indem Sie ihn alle 6 Monate aufladen.
Page 83

17
Einsetzen/Entfernen des Akkus
Montage des Akkus
< BT-E6000/BT-E6001 >
1.
Setzen Sie den Akku von hinten auf die Halteschiene
und schieben Sie ihn nach vorn.
Drücken Sie ihn fest hinein.
2.
Drehen Sie den Schlüssel zurück in die
Verriegelungsposition, ziehen Sie ihn ab und bewahren
Sie ihn an einem sicheren Platz auf.
VORSICHT
• Prüfen Sie, dass der Akku verriegelt ist, bevor Sie das Fahrrad
benutzen. Wenn der Akku vor der Fahrt nicht richtig verriegelt
wurde, kann er sich lösen und herausfallen.
• Um ein Herausfallen des Akkus zu vermeiden, fahren Sie das
Fahrrad nicht mit eingestecktem Schlüssel.
Schiene
< BT-E6010/BT-E8010 >
1.
Richten Sie die Vertiefung in der Akku-Unterseite auf
die Nase am Halter aus und setzen Sie den Akku ein.
2.
Schieben Sie den Akku vom Einsetzpunkt aus nach
rechts. Drücken Sie den Akku hinein, bis er hörbar
einrastet.
3.
Drehen Sie den Schlüssel zurück in die
Verriegelungsposition, ziehen Sie ihn ab und bewahren
Sie ihn an einem sicheren Platz auf.
VORSICHT
• Sehen Sie vor dem Fahren mit dem Fahrrad nach, ob der Akku
verriegelt ist. Wenn der Akku vor der Fahrt nicht richtig verriegelt
wurde, kann er herausfallen.
• Stellen Sie vor dem Fahren sicher, dass die Ladeanschlusskappe
geschlossen ist.
• Um ein Herausfallen des Akkus zu vermeiden, fahren Sie das
Fahrrad nicht mit eingestecktem Schlüssel.
Page 84

18
< BT-E8020 >
Zu Demonstrationszwecken nehmen diese Anweisungen ein
beispielhaftes Rahmendesign an, in dem der Akku von unten
herausgenommen/eingebaut wird.
Führen Sie den Akku in die Akkuhalterung ein, bis ein
Klickgeräusch zu hören ist.
•
Falls der Akku bis zum Klickgeräusch eingeführt wird, wird
der Akku automatisch verriegelt.
HINWEIS
•
Prüfen Sie, dass der Akku verriegelt ist, bevor Sie das Fahrrad
benutzen. Wenn der Akku vor der Fahrt nicht richtig verriegelt
wurde, kann er sich lösen und herausfallen.
•
Stellen Sie vor dem Fahren sicher, dass die
Schlüssellochabdeckung und die Ladeanschlusskappe
geschlossen sind.
•
Um ein Herausfallen des Akkus zu vermeiden, fahren Sie das
Fahrrad nicht mit eingestecktem Schlüssel.
Schlüssellochabdeckung
Page 85

19
Entfernen des Akkus
Die folgende Beschreibung ist möglicherweise nicht zutreffend, da verschiedene Schlüsseltypen verfügbar sind.
< BT-E6000/BT-E6001/BT-E6010/BT-E8010 >
1.
Schalten Sie das System aus und führen Sie dann den
Schlüssel in den Schlüsselzylinder im Akkuhalter ein.
• Die Position des Schlüssels wirkt sich nicht auf das Einsetzen des
Akkus aus. Sie können ihn unabhängig von der
Schlüsselposition einsetzen.
• Sie können den Schlüssel nicht abziehen, wenn er sich nicht in
der Einführposition befi ndet.
< BT-E6000/BT-E6001 >
Schlüssel
Schlüsselzylinder
< BT-E6010/BT-E8010 >
Schlüssel
Schlüsselzylinder
2.
Zum Entriegeln des Akkus drehen Sie den Schlüssel nach
links, bis Sie etwas Widerstand feststellen.
< BT-E6000/BT-E6001 >
<BT-E6010/BT-E8010>
Page 86

20
3.
Ziehen Sie den Akku heraus.
Sie können den Akku nur entnehmen, wenn sich der Schlüssel in
der Entriegelungsposition befindet.
< BT-E6000/BT-E6001 >
3.
Halten Sie den Akku oben fest und schieben
Sie ihn nach links, um ihn zu entfernen.
HINWEIS
Halten Sie den Akku fest und achten Sie darauf, dass er nicht
herunterfällt, wenn Sie ihn herausnehmen oder tragen.
< BT-E6010/BT-E8010 >
Page 87

21
< BT-E8020 >
•
Zu Demonstrationszwecken nehmen diese Anweisungen ein beispielhaftes Rahmendesign an, in dem der Akku von unten
herausgenommen/eingebaut wird.
•
Falls eine Akkuabdeckung von einem anderen Hersteller verwendet wird, entfernen Sie die Akkuabdeckung, bevor Sie den
Akku entfernen.
1.
Entfernen Sie die Schlüssellochabdeckung.
Schlüssellochabdeckung
2.
Führen Sie den Schlüssel in den Schlüsselzylinder in der
Akkuhalterung ein.
• Die Position des Schlüssels wirkt sich nicht auf das Einsetzen des
Akkus aus. Sie können ihn unabhängig von der Schlüsselposition
einsetzen.
• Sie können den Schlüssel nicht abziehen, wenn er sich nicht in
der Einführposition befi ndet.
Schlüsselzylinder
Schlüssel
3.
Der Akku löst sich automatisch, wenn der Schlüssel im
Uhrzeigersinn gedreht und hineingedrückt wird.
HINWEIS
Stützen Sie den Akku mit Ihrer Hand ab, wenn Sie ihn lösen, um
sicherzustellen, dass er nicht herausfällt.
Page 88

22
Einstellungen und Betriebsmodi des Fahrradcomputers
Verwenden Sie die Tasten links und rechts am Unterstützungsschalter und Schalthebel für Einstellungen und Umschalten von Modi
des Fahrradcomputers.
X
Y
Z
X
Y
Z
X
•
Wechseln der Displayanzeige
•
Umschalten zwischen automatischer und manueller Gangschaltung
Y
Beim Wechseln der Unterstützungsmodi: Das Maß der Unterstützung wird stärker
Beim Wechseln des Gangs: Das Pedalieren wird schwerer
Z
Beim Wechseln der Unterstützungsmodi: Die Unterstützung wird geringer
Beim Wechseln des Gangs: Das Pedalieren wird leichter
Die hier beschriebene Vorgehensweise gilt für jene Fälle, in denen der Fahrradcomputer auf die Standardwerte eingestellt ist.
Page 89

23
An- und Abbau des Fahrradcomputers
Schieben Sie den Fahrradcomputer für die Montage auf die
Halterung, wie in der Abbildung gezeigt.
Setzen Sie den Fahrradcomputer sicher ein, bis er mit einem
Klicken einrastet.
Halterung
Um den Fahrradcomputer zu entfernen, drücken Sie fest auf
den Hebel der Halterung, während Sie den Fahrradcomputer
herausschieben.
Wenn das Display nicht richtig eingesetzt ist, funktioniert der
Unterstützungsmodus nicht ordnungsgemäß.
Hebel
Page 90

24
Ein- und Ausschalten des Systems
Automatische Ausschaltfunktion
Wenn das Fahrrad über 10Minuten lang nicht bewegt wurde, wird das System automatisch abgeschaltet.
< SC-E6010 >
Ein- und Ausschalten des Systems über den Fahrradcomputer
•
Halten Sie die Einschalttaste des Fahrradcomputers
2Sekunden lang gedrückt.
HINWEIS
Falls der interne Akku des Fahrradcomputers nicht ausreichend
aufgeladen ist, wird das System nicht eingeschaltet. Der interne
Akku wird aufgeladen, wenn er nach dem Einschalten in dem
Fahrrad platziert wird.
Ein-/Austaste
< BT-E6000/BT-E6001/BT-E6010/BT-E8010/BT-E8020 >
Ein- und Ausschalten des Systems über den Akku
Drücken Sie den Ein-/Ausschalter des Akkus. Die LED-Lampe
leuchtet auf und zeigt die verbleibende Akkukapazität an.
VORSICHT
• Wenn Sie das System einschalten, prüfen Sie, dass der Akku sicher
am Halter befestigt ist.
• Während des Ladevorgangs kann das System nicht eingeschaltet
werden.
• Platzieren Sie Ihren Fuß beim Einschalten nicht auf den Pedalen.
Es kann zu einem Systemfehler kommen.
BT-E8010/BT-E8020 kann zum Ausschalten gezwungen werden,
indem der Ein-/Ausschalter 6Sekunden lang heruntergedrückt wird.
<BT-E6000/BT-E6001>
Ein-/Austaste
<BT-E6010>
Ein-/Austaste
<BT-E8010>
Ein-/Austaste
<BT-E8020>
Ein-/Austaste
Page 91

25
SHIMANO STEPS Logobildschirm
Dieser Bildschirm wird beim Systemstart und beim Abschalten
angezeigt.
Hier sehen Sie ein Beispiel für die Display-Anzeige
desSC-E6010 in der Einstellung Light off road.
Page 92

26
Standardbildschirm
Zeigt den Status des E-Bikes und Fahrtdaten an
Die Anzahl der Gänge und der Schaltmodus werden nur bei Verwendung der elektronischen Gangschaltung angezeigt.
1.
Aktuelle Geschwindigkeit
Zeigt die aktuelle Geschwindigkeit an.
2.
Akkuladestandsanzeige
Zeigt den aktuellen Akkuladestand an.
3.
Anzeige der Geschwindigkeitseinheit
Sie können zwischen km/h und mph wählen.
4.
Wechseln der Anzeige des Unterstützungsmodus
Zeigt den aktuellen Unterstützungsmodus an.
5.
Anzeige von Gangstufe und Fahrtdaten
Zeigt die aktuelle Übersetzung oder Fahrtdaten an.
Betätigen Sie den Unterstützungsschalter, um die
Anzeige für SC-E6000 von der Gangstufenanzeige auf
die Fahrtdatenanzeige umzuschalten.
6.
Aktuelle Uhrzeit
Zeigt die aktuelle Uhrzeit an.
7.
Gangumschaltungsmodus
Der aktuelle Gangumschaltungsmodus wird
folgendermaßen angezeigt.
SC-E6000: [A] (automatisch)/[M] (manuell)
SC-E6010: [Auto]/[Manuell]
< SC-E6000 >
5
2
6
3
1
4
7
8.
Symbol für eingeschaltetes Licht
Macht darauf aufmerksam, dass das akkubetriebene
Licht eingeschaltet ist.
9.
Unterstützungsanzeige
Zeigt die Stärke der Unterstützung an.
< SC-E6010 >
2
6
1
3
5
8
9
7
4
Page 93

27
Akkuladestandsanzeige
Sie können den Akkuladestand auf dem Fahrradcomputer beim Fahren kontrollieren.
< SC-E6000 >
Anzeige Akkuladestand
81 - 100%
61 - 80%
41 - 60%
21 - 40%
1 - 20%
0%
< SC-E6010 >
Anzeige Akkuladestand
100%
0%
Page 94

28
< SC-E6000 > < SC-E6010 >
Wechseln der Anzeige des Unterstützungsmodus
Zeigt den aktuellen Unterstützungsmodus an.
Drücken Sie Unterstützung-Y oder Unterstützung-Z am
Unterstützungsschalter, um die Unterstützungsmodi zu
wechseln.
Anzeige Details
HOCH Starke Unterstützung
NORM Normale Unterstützung
ECO Eco-Unterstützung
AUS Unterstützung aus
GEHE Schiebe-Unterstützung
HOCH
NORM
ECO
AUS
GEHE
Unterstützung Schaltung
Unterstützung-ZUnterstützung-Y
2Sekunden
lang drücken
Page 95

29
< Auf Schiebe-Unterstützungsmodus umschalten >
1. Drücken Sie Unterstützung-Z, um den Modus auf [AUS]
umzuschalten.
2. Drücken Sie erneut 2 Sekunden lang Unterstützung-Z,
bis [GEHE] angezeigt wird.
3. Drücken und halten Sie Unterstützung-Z, um die
Schiebeunterstützung zu starten.
Unterstützung Schaltung
2Sekunden
< SC-E6010 >
< SC-E6000 >
<Schiebe-Unterstützungsmodus>
Wenn [GEHE] angezeigt wird, halten Sie Unterstützung-Z
auf dem Unterstützungsschalter gedrückt, um die
Schiebe-Unterstützungsfunktion zu starten. Wenn Sie
Unterstützung-Z loslassen oder Unterstützung-Y drücken,
wird die Schiebe-Unterstützungsfunktion gestoppt
Unterstützung Schaltung
Drücken
und
Halten
• Wenn Unterstützung-Z über 1Minute lang nicht betätigt wird, wechselt der Modus auf [AUS].
• Falls das Fahrrad nach dem Einschalten der Schiebe-Unterstützungsfunktion nicht bewegt wird, stoppt die Funktion automatisch. Zum Neustarten
der Schiebe-Unterstützungsfunktion lassen Sie den Unterstützungsschalter los, drücken Sie dann Unterstützung-Z erneut und halten Sie den
Schalter gedrückt.
• Die Maximalgeschwindigkeit der Schiebe-Unterstützungsfunktion beträgt 6km/h.
• Das Maß der Unterstützung und die Geschwindigkeit hängen von der Gangstufe ab.
Page 96

30
Anzeige von Gangstufe und Fahrtdaten
Zeigt die aktuelle Übersetzung bzw. Fahrtdaten an.
Die Art der angezeigten Fahrtdaten wechselt bei jedem Berühren der Taste Unterstützung-X.
Unterstützung Schaltung
*1 Gangstufe (nur bei elektronischer Gangschaltung
angezeigt)
*2 Gangstufe (bei Einstellung des Startmodus)
< SC-E6000 > < SC-E6010 >
*
2
*
1
Page 97

31
< SC-E6000 > < SC-E6010 >
Gangstufe*7
(nur bei elektronischer
Gangschaltung angezeigt)
Gangstufe*6
(bei Einstellung des Startmodus)
Fahrtstrecke
Gesamtkilometer
Reichweite*3 *5
Reichweite
(optional)*4
Fahrzeit
(optional)*4
Durchschnittsgeschwindigkeit
(optional)*4
Maximale Geschwindigkeit
(optional)*4
*3 Wenn [RADIUS] angezeigt wird, werden der Akkuladestand und die Schiebe-Unterstützungsanzeige nicht auf dem Bildschirm
angezeigt.
*4 Optionales Element: Sie können die Anzeigeeinstellungen in E-TUBE PROJECT konfigurieren. Für genauere Informationen siehe
den Abschnitt „Verbindung und Kommunikation mit einem PC“.
*5 Während die Schiebe-Unterstützungsfunktion arbeitet, wird [RADIUS ---] auf dem [RADIUS]-Bildschirm angezeigt.
*6 Im Startmodus wird die Gangposition beim Start angezeigt.
*7 Die Gangstufe wird nur bei Gebrauch der elektronischen Gangschaltung angezeigt.
Page 98

32
Ein- und Ausschalten der akkubetriebenen Lichtanlage
< SC-E6000 >
Wenn die akkubetriebene Leuchte angeschlossen ist,
werden durch 2 Sekunden langes Drücken von
Unterstützung-X diese Informationen anstelle der Uhr
und des Unterstützungsmodus angezeigt. Das Licht wird
jedes Mal ein- und ausgeschaltet, wenn es angezeigt
wird. Es wird ungefähr 2 Sekunden lang angezeigt.
Wenn das Licht
eingeschaltet ist
Wenn das Licht
ausgeschaltet ist
Unterstützung Schaltung
2Sek.
< SC-E6010 >
Wenn die akkubetriebene Lichtanlage angeschlossen ist,
drücken Sie die Lichttaste am Fahrradcomputer, um das
Licht einzuschalten. Auf dem Display wird ein
entsprechendes
Symbol angezeigt. Durch erneutes
Drücken der Taste wird das Licht wieder ausgeschaltet.
Nach dem Ausschalten des Lichts verschwindet das
Symbol wieder vom Display.
*
Ist das akkubetriebene Licht nicht angeschlossen und die
ist [Hintergrundbeleuchtung] auf [MANUELL] eingestellt,
wird durch Drücken der Lichttaste die Hintergrundbeleuchtung des Fahrradcomputers ein- und ausgeschaltet.
Wenn das Licht
eingeschaltet ist
Wenn das Licht
ausgeschaltet ist
Lichttaste
Wird zusammen mit dem akkubetriebenen Licht ausgeschaltet.
Wenn der Akkustrom ausgeschaltet ist, ist das Licht ausgeschaltet.
Page 99

33
Wechseln des Gangschaltungsmodus
Drücken Sie im Ausgangsbildschirm Schalten-X, um zwischen
automatischem und manuellem Gangschaltungsmodus
umzuschalten.
Unterstützung Schaltung
< SC-E6010 >
< SC-E6000 >
Automatisch
Manuell
Automatisch Manuell
Page 100

34
Löschen der Fahrtstrecke
Die Fahrtstrecke kann im Hauptbildschirm gelöscht werden. Wenn die akkubetriebene Leuchte angeschlossen und konfi guriert
ist, löschen Sie die Fahrtstrecke (TRIP) gemäß den Anweisungen „Löschen“ im Abschnitt „Über das Einstellungsmenü“.
*
Bei SC-E6000 steht diese Funktion nur zur Verfügung, falls das Licht nicht angeschlossen ist.
1.
Wechseln Sie die Fahrtdatenanzeige zu TRIP
und drücken Sie 2 Sekunden lang die Taste
Unterstützung-X.
< SC-E6010 >
Unterstützung Schaltung
2Sek.
< SC-E6000 >
2.
Geben Sie die Taste frei, wenn die TRIP-Anzeige zu
blinken beginnt.
In diesem Zustand wird durch erneutes Drücken von
Unterstützung-X die Fahrtstrecke gelöscht.
• Die TRIP-Anzeigeleuchte hört zu blinken auf und der
Bildschirm wechselt nach 5 Sekunden ohne
Bedienungsvorgänge wieder auf den Standardbildschirm.
• Wenn die Fahrtstrecke gelöscht wird, werden ZEIT, Φkm/h
und MAX auch gelöscht.
< SC-E6010 >< SC-E6000 >
 Loading...