

Page 1
Sherbourn
Technologies, Inc.
T100 AM/FM Tuner
Owner’s Manual
Page 2

All of us at Sherbourn Technologies thank you
for your decision to purchase the T100 Tuner. We
take enormous pride in the design and manufacturing quality of our products and are
confident that your new T100 will provide you
with many years of enjoyable and trouble-free
service. Should you ever have any need to call
upon our services, please feel free to contact us at
the address shown at the end of this manual or you
can contact the dealership from which you
purchased the product.
Full details of the warranty coverage provided
by Sherbourn Technologies can be found at the
end of this booklet.
Sherbourn also makes a complete line of
amplifiers and a 7.1 Preamp/ Processor/Tuner for
all kinds of listening pleasure. Whether your taste
is for two channel stereo, multi-channel home
theater or multi-channel whole house custom
installation, there is a Sherbourn product that will
be a perfect fit for your needs.
Once again we thank you for your decision to
purchase one of our fine products.
Safety Instructions
1. Important Safety Instructions! Please read all
the safety and operating instructions shown in
this manual before operating this equipment.
2. Sherbourn products are designed to comply with
international directives on the Restriction of
Hazardous Substances (RoHS) in
electrical and electronic equipment
and the disposal of Waste Electrical
and Electronic Equipment (WEEE).
The crossed wheelie bin symbol
indicates compliance and that the
products must be appropriately
recycled or processed in accordance with these
directives.
3. Please retain this manual in a familiar place for
future reference about safety and operating
matters.
4. Adhere to all warnings and follow all operating
instructions.
5. Warning: For safety during a lightening
storm, the T100 must be earth grounded during
normal uses, refer to the diagrams in page 3 and
4 for the earth connection."
6. For added protection for this product during a
lightening storm or when it is left unattended and
unused for long periods of time, it is recommended
that you unplug the unit from the wall outlet. This
will prevent damage to the product due to
lightening or power line surges.
7. Locate the product away from heat sources such
as stoves, heat registers, radiators or other
appliances including other amplifiers that produce
heat.
8. Mount the equipment in a wall or cabinet only
as described in this owner’s manual.
9. Do not use the equipment near water; for
example near a bathtub, washbowl, kitchen sink, a
swimming pool, a wet basement, etc.
Notes for Installation
For best reception, do not install a T100 Tuner
inside an equipment rack cabinet or in a basement.
The sensitivity of the AM reception may be badly
impaired if the T100 and its loop antenna are not
exposed to the space where radio waves can travel.
Always place a T100 Tuner away from a noisy
fluorescent light, plasma or LCD TV, digital
amplifiers, digital control panel, computers and
their cables.
Breakout Box
The T100 Tuner comes with a Breakout Box
that allows the tuner to be remotely located. It
provides local connections to your control syste m
and outputs audio signals to the amplifiers. The
T100 should be placed in a house at an elevated
location from the ground and away from any metal
panel, metal wall or metal shielding.
2
Page 3
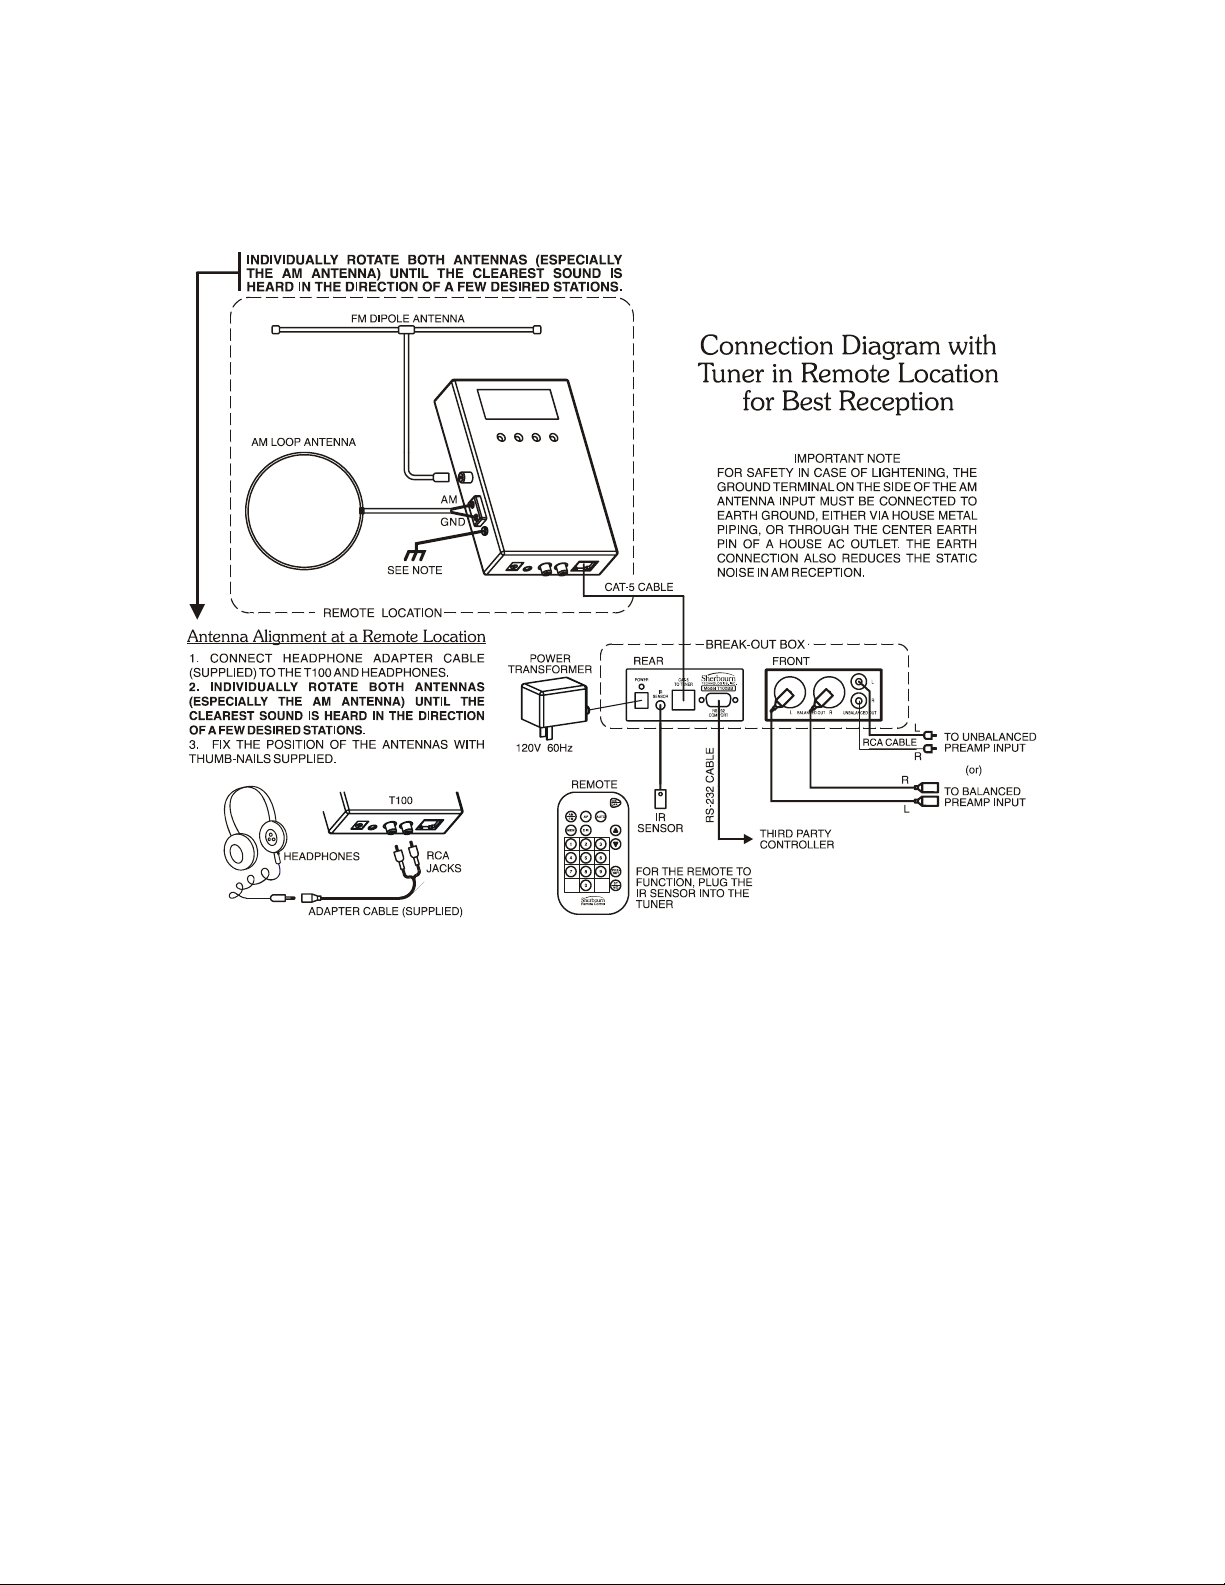
Locate the Breakout Box by the amplifiers.
The CAT-5 cable, between the T100 and Breakout
Box, carries DC power to the tuner, brings the
balanced left and right audio signal from the tuner,
sends and receives RS232 communication to and
from the tuner, and carries the IR control signals to
operate the tuner. Note there is only one CAT-5
cable needed between the tuner and the Breakout
Box.
IR Sensor
The IR Sensor that comes with the T100
must be plugged into the IR Sensor jack on the
T100 rear panel or the Breakout Box in order
for the T100 to respond to the IR Remote
Control. There is no IR receiver inside the LCD
display and it will not respond to IR control if
the external IR Sensor is not connected.
3
Page 4

4
Page 5

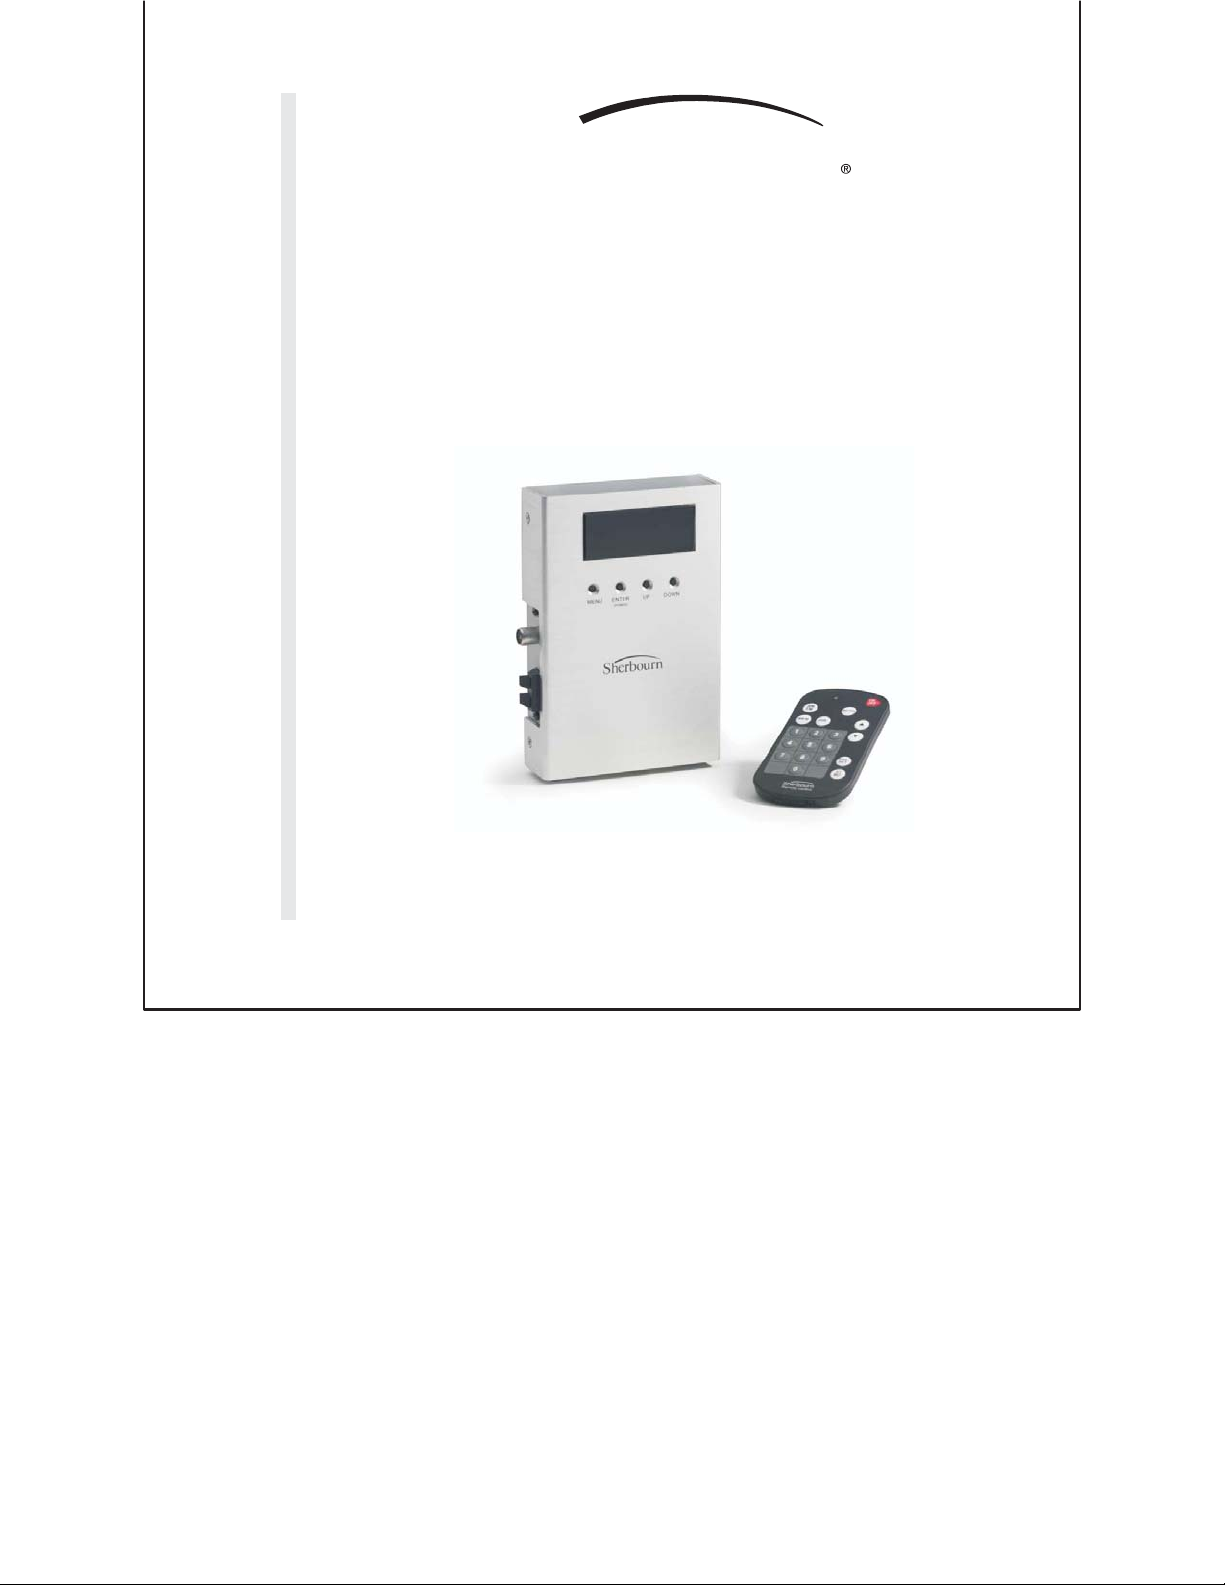
Front Panel Controls
(1) MENU
Depressing this button allows you access to different
functions: AM/FM selection, Auto/Manual tuning
selection, Scan the preset stations, Memorize a
station, and setting the IR Code.
(2) ENTER (Power )
When plugging in the power transformer the first
time, the tuner will automatically turn on. Pressing
this button for 4 seconds will turn the unit power
from On to a standby (sleep) mode, press and hold
it again turns the power back ON.
(3) UP
Allows for tuning up to higher frequency stations.
(4) DOWN
Allows for tuning down to lower frequency stations.
(5) LCD DISPLAY
The display will turn off after approximately 3 to 4
minutes. To turn display ON, simply press the
ENTER button.
Menu Modes
By pressing the MENU button a number of times,
you can toggle through the five functions. Pressing
the button:
once will enter the AM/FM selection mode,
twice will enter the Auto/Manual selection mode,
three times will enter the Preset scanning mode,
four times will enter the Preset memory writing, and
five times will enter the IR code selection.
Tuner Operation
MAKE AM/FM SELECTION
1. Press the MENU button slowly until either the
ENTER and MHz characters flash, or the
ENTER and kHz characters flash.
2. Press the ENTER button until either MHz or
kHz stops flashing.
3. Press either UP or DOWN button to obtain
MHz or kHz. (note – MHz is the FM band and
kHz is the AM band)
4. Either wait until the ENTER stops flashing or
depress the ENTER button.
EZ Steps:
1. Press MENU once
2. Press ENTER
3. Press UP
4. Press ENTER (or wait 3 seconds)
SELECT AUTO OR MANUAL TUNING
1. Press MENU button slowly until AUTO and
ENTER flash.
2. Press ENTER button to stop flashing.
3. Press UP or DOWN button to change to a new
tuning mode.
4. Press ENTER to switch to the new mode.
EZ Steps:
1. Press MENU twice
2. Press ENTER
3. Press UP
4. Press ENTER (or wait 3 seconds)
5
Page 6

LISTEN TO PRESET STATIONS OR SCANS
1. Press MENU slowly until P-SCAN and
ENTER characters flash.
2. Press ENTER.
3. Preset stations or scans will continue to
advance until the ENTER button is pressed.
EZ Steps:
1. Press MENU three times slowly
2. Press ENTER
3. When desired station is playing, press ENTE R
TO PRESET MEMORIES
1. Select a desired station.
2. Press MENU button slowly until MEM and
ENTER characters flash.
3. Press ENTER button.
4. Select desired PRESET number by pressing
UP or DOWN button.
5. Press ENTER button.
EZ Steps:
1. Select desired station
2. Press MENU four times
3. Press UP or Down
4. Press ENTER button
CHANGING IR CODE
1. Press MENU slowly five times until IR1 or
IR2 or IR3 is flashing.
2. Press ENTER to stop flashing.
3. Press UP or DOW N to cycle through the three
codes to display the one desired.
4. Press ENTER (or wait 3 seconds)
Remote Control Functions
The T100 Remote Control is intuitive to use,
but a few important functions are described
below.
MEM Button: If you press and hold this
button for four seconds, the T100 automatically
searches for stations and saves them in 32
(maximum) memory locations. It starts from the
FM band, and then switches to the AM band. The
first station found will be saved to preset number
06, and will continue until the preset number 32 is
filled. Preset numbers 01 to 05 are reserved for
manual programming of your favorite stations.
Manual Preset Programming: Tune to a
desired station, press the MEM button to flash
MEM in the LCD display. Press any two numbers
between 01 and 32 to save the station into the two
numbers pressed.
Accessing a Preset Station: Pressing any
two numbers between 01 and 32 on the remote
control keypad will tune the T100 to the preset
numbers pressed. If there is no station stored at
that location, no change will take place.
Direct Frequency Tuning: Pressing the DIR
button, followed by the frequency of a desired
station, will tune the T100 to that frequency
directly.
6
Page 7

Preset Scan: Pressing the PRESET button
starts a scan among the memorized stations. Press
the UP or DOWN button to change the direction of
the scanning. Press the PRESET button a second
time to stop at the last station scanned.
Changing IR Code: The T100 can respond to
one of the three sets of IR codes. Multiple tuners
can be used in one occasion without interference.
If multiple tuners are needed in your application,
two more remote controls carrying IR2 code and
IR3 code may be ordered from Sherbourn
Technologies. Check the availability of them with
the Ordering Department at (978) 663-7385.
The remote controls are color coded; the
second one comes with a red dot or red bottom and
is for IR2 remote codes, a third one comes with a
white dot or a white bottom and is for IR3 codes.
Refer to the paragraph “Changing IR Code” in the
Tuner Operation section in page 6 to change the IR
code of the T100 to respond to a different remote.
RS-232 Codes
T100 RS-232 codes may be available from
your Sherbourn dealers, or may be downloaded
from the Sherbourn web site at:
www.sherbourn.com
Three Year Limited Warranty
Subject to the terms and conditions stated
below, Sherbourn Technologies, Inc.
(Sherbourn) warrants to the original owner
that this model T100 shall be free from defects
in workmanship or materials for a term of
three (3) years from its date of purchase from
an Authorized Sherbourn Dealer. Transfer of
this product by its original owner (the ‘Owner’)
will automatically terminate this Warranty
regardless of when occurring.
In the event of any defect covered by this
warranty, Sherbourn shall provide all parts,
materials, and labor necessary to restore the
Product to its original specifications, and shall
return the Product to its owner at Sherbourn’s
expense. In the alternative, Sherbourn may at its
sole option either replace the Product without
charge, or if its replacement is not commercially
7
practicable or repair or replacement cannot be
accomplished within a reasonable time, Sherbourn
may refund the purchase price of the Product,
subject where appropriate to reasonable
depreciation for actual use in accordance with
applicable laws, in full satisfaction of its warranty
obligations.
Sherbourn’s sole obligation under this
warranty shall be to repair or replace the
product, or at its option refund the purchase
price, as provided for hereinabove. Sherbourn
does not warrant against, nor shall it be liable
for, any of the following: removal or installation
charges, shipping expenses to Sherbourn or its
authorized service facility, loss of use, property
damage of any kind, or other incidental or
consequential damage or losses of any kind.
Note: Some states do not allow exclusion or
limitation of consequential damages, so the
foregoing exclusions may not apply to you.
This warranty does not cover any of the
following: (a) cabinetry, trim, or other appearance
items (except where they are defective at the time
of original sale and the Product is delivered for
repair within the first thirty days (30) thereafter):
(b) failures arising from accident, catastrophe,
misuse, neglect, or failure to properly connect and
operate the product in accordance with the
accompanying instruction: (c) failures arising from
improper installation of the Product or
incompatibility of other components in the system
of which the Product is a part: (d) failures of any
kind in products (i) which have been purchased
from other than Authorized Sherbourn dealers, or
(ii) which evidence any tampering, alteration, or
attempted servicing by anyone other than
Sherbourn or an Authorized Sherbourn Service
Facility; and Sherbourn shall have no liability or
obligation of any kind with respect to any of the
foregoing losses types of failures.
To obtain service under this Warranty, the Owner
must first obtain from Sherbourn a Return
Authorization Number, and must then, at the owner’s expense (i) arrange for any necessary deinstallation of the Product, and (ii) deliver or ship
the Product, properly packaged and clearly identified with the Return Authorization Number, pre-
Page 8

Specifications
FM
Frequency Range 88MHz to 108MHz
Antenna Input Impedance 75 ohm
Usable Sensitivity @30dB S/N - 5 dBu (typically)
Signal/Noise ratio - Mono 62 dB
- Stereo 55 dB
THD(1kHz) -Mono 0.2 %
- Stereo 0.4 %
Image Rejection 79 dB
Frequency Response 400 to 8kHz
Stereo Separation 33 dB
Capture Ratio 2 dB
AM
Frequency Range 530 to 1700kHz
Usable sensitivity 23 dBu
IF rejection 90 dB
Selectivity 100 dB
Distortion 0.5% (typically)
Signal/Noise ratio 50 dB
Frequency Response 50Hz to 3kHz
Power requirement 12VDC 300 mA
AC voltage for Power supply :
USA/Canada 120V, 60Hz
Europe 230V, 50Hz
Dimensions: 6"(153mm) high x 4"(102mm) wide
x 1-1/4" (32mm) deep.
 Loading...