

Page 1
Owner’s Manual
for Model PT-7010A
Preamplifier/Processor/Tuner
Sherbourn Technologies, Inc., 19-3A Sterling Road, North Billerica, MA 01862 U.S.A., Tel 978-663-7385, Fax 978-663-7389
1
Page 2

Table of Contents
4 Thank Y ou for your PT-7010A Purchase
5 Safety Precautions
6 NEC (National Electrical Code) Standards
6 Note for Cable Television (CATV) Installer
6 Antenna Grounding Outside the House
6 Unpacking the PT-7010A
6 Recording the Serial Number
7 Features of the PT-7010A A/V Controller
8 PT-7010A Front Panel Features
8 Power Button
8 IR Receiver Window
8 Processor Display
8 Z2 (Zone 2)
8 Input Select Buttons
8 MODE UP/DOWN (Mode Buttons)
9 AM/FM Tuner Controls
9 Tone Controls
9 Signal Processing Indicator Lights
9 MUTE Button
9 PANEL DIM Button
9 Additional Front Panel Lights
9 COM/RECV
9 ZONE TWO POWER
9 ZONE TWO ADJUST
9 SIDE AXIS
10 PT-7010A Rear Panel Layout
10 Audio/V ideo Inputs
10 Audio/Video Outputs
10 Component V ideo In
10 Component Video Out
10 Infrared (IR) Inputs
10 Triggers and Relay
11 RS-232Port
11 XLR Audio Outputs
11 Main Audio Outputs
11 8-CH Analog Input
11 FM Antenna
11 AM Antenna
11 Ground Screw
11 Audio Inputs
11 Audio Outputs
11 Stereo Outputs
11 Side-Axis Outputs
12 IEC Line Cord Socket
12 Digital Inputs
12 Digital Output
12 IEEE-1394"Firewire”Port
12 Installation and Connections
12 AC Power Considerations
12 Connection Tips for Superior Sound
13 Connection Tips for Video Quality and Flexibility
13 What is Composite Video?
13 What is S-V ideo?
13 What is Component Video?
13 V ideo Up Conversion
13 V ideo Output to the Main Screen and OSD
13 Zone Specific T urn-On Triggers
14 Trigger connection Option 1 and 2
15 Connection Diagrams
15 Connecting a DVD-V ideo Player (Analog Audio
and Composite Video)
16 Connecting a DVD-V ideo Player (Digital Audio
and Component Video)
17 Connecting to the TV or Projector using
Component Video
18 Connecting a VCR (Analog Audio and Composite
V ideo)
19 Connecting a CD Player (Analog Audio)
20 Connecting a Cassette Tape or DAT Deck
21 Connecting the 8-Channel Analog Inputs
22 Connecting the AM and FM Antennas
23 Connecting an Amplifier (MAIN ZONE)
24 Connecting an Amplifier (ZONE 2)
25 Connecting an Amplifier (ZONE 2)
26 Overview of the PT-7010A Remote
26 Button Layout
26 LCD Display
26 Button and Display Light
26 DEVICE Buttons
26 PAGE Button
27 MAIN Button
27 FAV Button
27 JOYSTICK PAD
27 M1, M2 and M3 Macro Buttons
27 Quick Start Setup Instructions
27 Adding Batteries to the Remote Control
27 Quick Start Instructions for PT-7010A Setup
30 Operation of the PT-7010A using the Remote
30 Turning on the MAIN Zone
30 Turning on ZONE 2
31 Programming and Configuring YOUR
Components
31 P-PRO
31 LEARN
32 EDIT
32 FAV
32 PUNCH
33 ERASE
33 LIGHT
33 MACRO
33 RECAL (Recall)
33 CLONE
34 The On-Screen Display (OSD) Functions
34 Video Connections
34 OSD Activation
34 Quick Access to Information
2
Page 3

34 OSD Menus
34 How to Navigate the OSD Menus
34 TRIM Menu
35 MODES Menu
35 Dynamic Range
35 Pro Logic llx Sub Menu
35 DTSLFE
35 DTSNeo:6
35 Party
35 Jazz Club Ambience
35 TONE Menu
36 INPUTS Menu
36 Input Configuration Menus (The example
shows the DVD menu)
36 Tuner Preset Menu
36 Saving AM/FM Presets
37 SETTINGS Menus
37 MAIN ZONE Menu
37 ZONE 2 Menu
37 SPEAKERS Menu -SIZE
38 SPEAKERS Menu - POSITION
39 SPEAKERS Menu - CALIBRATION
40 Crossover Adjustment
40 Subwoofer Mode
40 VIDEO Menu
41 SOFTWARE Menu
41 CONTROL Menu
42 Special Features of the Sherbourn PT-7010A
42 Bass Management
42 Surround Modes for 2 Channel Source Material
43 Surround Modes for Multi-Channel Sources
44 Tuner Operation
44 Recording Operation
45 Zone 2 Operation
46 Speaker Placement Tips
46 Tips Before You Begin
46 The Front Speakers
46 The Center Speaker
46 Side-Axis Speakers
46 The Surround Speakers
47 Surround Back Speakers
47 Subwoofer Location
48 Remote Control Codes
48 Audio Components
48 Auxiliary Devices
49 Cable Boxes
49 CD Players
50 DVD Players
50 Laserdisc Players
50 Satellite/DSS Receivers
50 T ape Decks
51 T elevisions
52 VCRs
53 Troubleshooting Guide
53 No Sound (from one or more full range speakers)
53 No Subwoofer (or poor output)
53 Poor AM Reception
53 Poor FM Reception
53 Input Selection Problems
53 There is No TV Picture
53 No T one Control Functions
53 No Dolby Digital or DTS Playback
54 No On Screen Display
54 Sound Drops Out With CD or DVD Playback
54 Remote W on ’ t Learn Commands or Codes
54 Remote Not W orking
54 ZONE 2 Not Working
54 ZONE 2 Does Not Play Digital Inputs
54 External Amplifier(s) Shut Down (Often or
Prematurely)
54 PT-7010A “Locks Up” (No Response)
54 Reset Procedure
55 Problems Updating PT-7010A Firmware
55 “Hum” Noises
55 Other Probable Causes of Noise
56 Favorite Settings Log
56 Tone Settings
56 Main Zone Settings
56 Zone 2 Settings
56 Mode Settings
57 Control Settings
57 Video Settings
57 Input Settings and Remote Codes
58 SPEAKER Settings
59 Technical Specifications
60 Software Upgrade
60 Licensing and Trademark Disclosures
60 DTS Disclosure
60 Dolby Disclosure
60 Apple Disclosure
60 Sherbourn Disclosure
61 Two Year Limited Warranty
3
Page 4
A Special ‘Thank You’
All of us at Sherbourn Technologies would like to thank you for your purchase of
our exciting PT-7010A Pre/Pro/Tuner and we wish you many years of trouble free
and enjoyable listening. From our company’s inception it has been our philosophy
to concentrate our efforts on designing and engineering electronic components with
rugged build quality , high performance and innovative features at affordable prices.
With our exceptional pedigree as a keystone, our products have been recognized and
praised around the world by knowledgeable consumers and industry writers.
Because we want you to get the very best performance from your new purchase, and
as a special ‘thank you’ for your business, we are enclosing a copy of the Sound &
V ision DVD that will help you to set up your system to optimize the characteristics
of your listening environment.
4
Page 5

Safety Precautions
Read this Owner’s Guide thoroughly before attempting to
install and configure the Sherbourn PT-7010A Pre/Pro/Tuner .
All the safety and operation instructions should be read
before any operation of the component(s) begin. After
successful installation and configuration of the Sherbourn
PT-7010A Pre/Pro/Tuner, be sure to retain this manual in
a safe place for any future reference needs.
All warnings on the Sherbourn PT -7010A Pre/Pro/Tuner and
in these operating instructions should be followed. Safety is
a key component to a long lasting and trouble free installation.
The vast majority of the subsequent safety precautions involve
simple common sense. If you are not comfortable with the
installation of audio/video entertainment equipment, it will
be to your benefit to seek the services of a qualified
installation professional.
The Sherbourn PT-7010A Pre/Pro/Tuner should NEVER
be used near water such as a bathtub, washbowl, kitchen
sink, laundry tub, in a wet basement, or near a swimming
pool, etc. The Sherbourn PT-7010A Pre/Pro/Tuner should
be situated so that its location or installation position does
not interfere with proper ventilation. The Sherbourn PT -7010A
Pre/Pro/Tuner should not be situated on a bed, sofa, rug, or
similar surface that may block any ventilation openings; or
placed in a built-in installation such as a bookcase, cabinet,
or closed equipment rack that may impede the flow of air
through ventilation openings. If installed in a closed
equipment rack for custom installations, be sure to add forced
air ventilation so that it has adequate air circulation.
The Sherbourn PT-7010A Pre/Pro/Tuner should be situated
away from heat sources such as radiators, or any other devices
which produce heat.
The following situations require your Sherbourn PT-7010A
Pre/Pro/Tuner is serviced only by qualified service personnel:
1. The power-supply cord or the plug has been damaged; or
2. Objects have fallen, or liquid has spilled into the
component; or
3. The PT-7010A has been exposed to rain; or
4. The PT-7010A does not appear to operate normally
or exhibits a marked change in performance; or
5. The PT-7010A has been dropped, or its enclosure or
chassis is damaged.
The user should not attempt to service the PT-7010A Pre/
Pro/Tuner beyond the means described in this Owner’s Guide.
All other servicing should be referred to qualified service
personnel. T o pr event electric shock, do not use this polarized
plug with an extension cord, receptacle or other outlet unless
the blades can be fully inserted to prevent blade exposure.
Pourpreevenir les chocs electriques ne pas utiliser cette fiche
polarises avec un prolongateur, un prise de courant ou une
autre sortie de courant, saufsi les lames peuvent titre inser ees
a fond sans laisser aucune parllle a decouvert.
Grounding or Polarization — Precautions should be taken
so that the grounding or polarization means of the component
is not defeated.
This apparatus does not exceed the Class A/Class B
(whichever is applicable) limits for radio noise emissions from
digital apparatus as set out in the radio interference regulations
of the Canadian Department of Communications.
ATTENTION—Le pr esent appar eil numerique n’emetpas de
bruits radioelectriques depassant las limites applicables aux
appareils numeriques de class A/de class B (selon le cas)
prescrites dans le reglement sur le brouillage
radioelectrique edicts par les ministere des
communications du Canada.
The Sherbourn PT -7010A Pre/Pro/Tuner should be connected
to a power supply only of the type described in this Owner’s
Guide and what is labeled on the PT -7010A component. Power
supply cords should be routed so that they are not in
high foot traffic areas or pinched by items placed upon
or against them, paying particular attention to cords at the
wall plugs, convenience receptacles, and the point where
they connect into the PT -7010A Pre/Pro/T uner. The power
cord of the PT-7010A Pre/Pro/Tuner should be unplugged
from the outlet when unused for a long period of time.
When it’s time for cleaning the Sherbourn PT-7010A Pre/
Pro/Tuner, it should be cleaned only as recommended in
this Owner’s Guide. Never spray liquids directly into the
component’s vent openings. Care should be taken so that small
objects do not fall into the inside of the PT-7010A Pre/Pro/
Tuner.
For questions regar ding service please contact the Sherbourn
T echnical Support Department. T o reach us by phone, please
call 978-663-9385 between the hours of 9 a.m. and 5 P.M.
EST. To reach us by the web at www.sherbourn.com, go
to the Contact Us section and submit your technical
support issue.
WARNING - TO REDUCE THE RISK OF FIRE OR
ELECTRIC SHOCK, DO NOT EXPOSE THIS
APPLIANCE TO RAIN OR MOISTURE.
CAUTION: T O PREVENT ELECTRIC SHOCK, MA TCH
WIDE BLADE OF PLUG TO WIDE SLOT, FULLY
INSER T.
ATTENTION: POUR EVITER LES CHOCS
ELECTRIQUES, INTRODUIRE LA LAME LA PLUS
LARGE DE LA FICHE DANS LA BORNE
CORRESPONDANTE DE LA PRISE ET POUSSER
JUSQU’AU FOND.
5
Page 6
NEC (National Electrical
Code) Standards
A Note for the Cable Television (CA TV) Installer
This reminder is to call the CA TV system installer’s attention
to Article 820-40 of the NEC that provides guidelines for
proper grounding and in particular, specifies that the cable
ground shall be connected to the grounding system of the
building as close to the point of cable entry as practical.
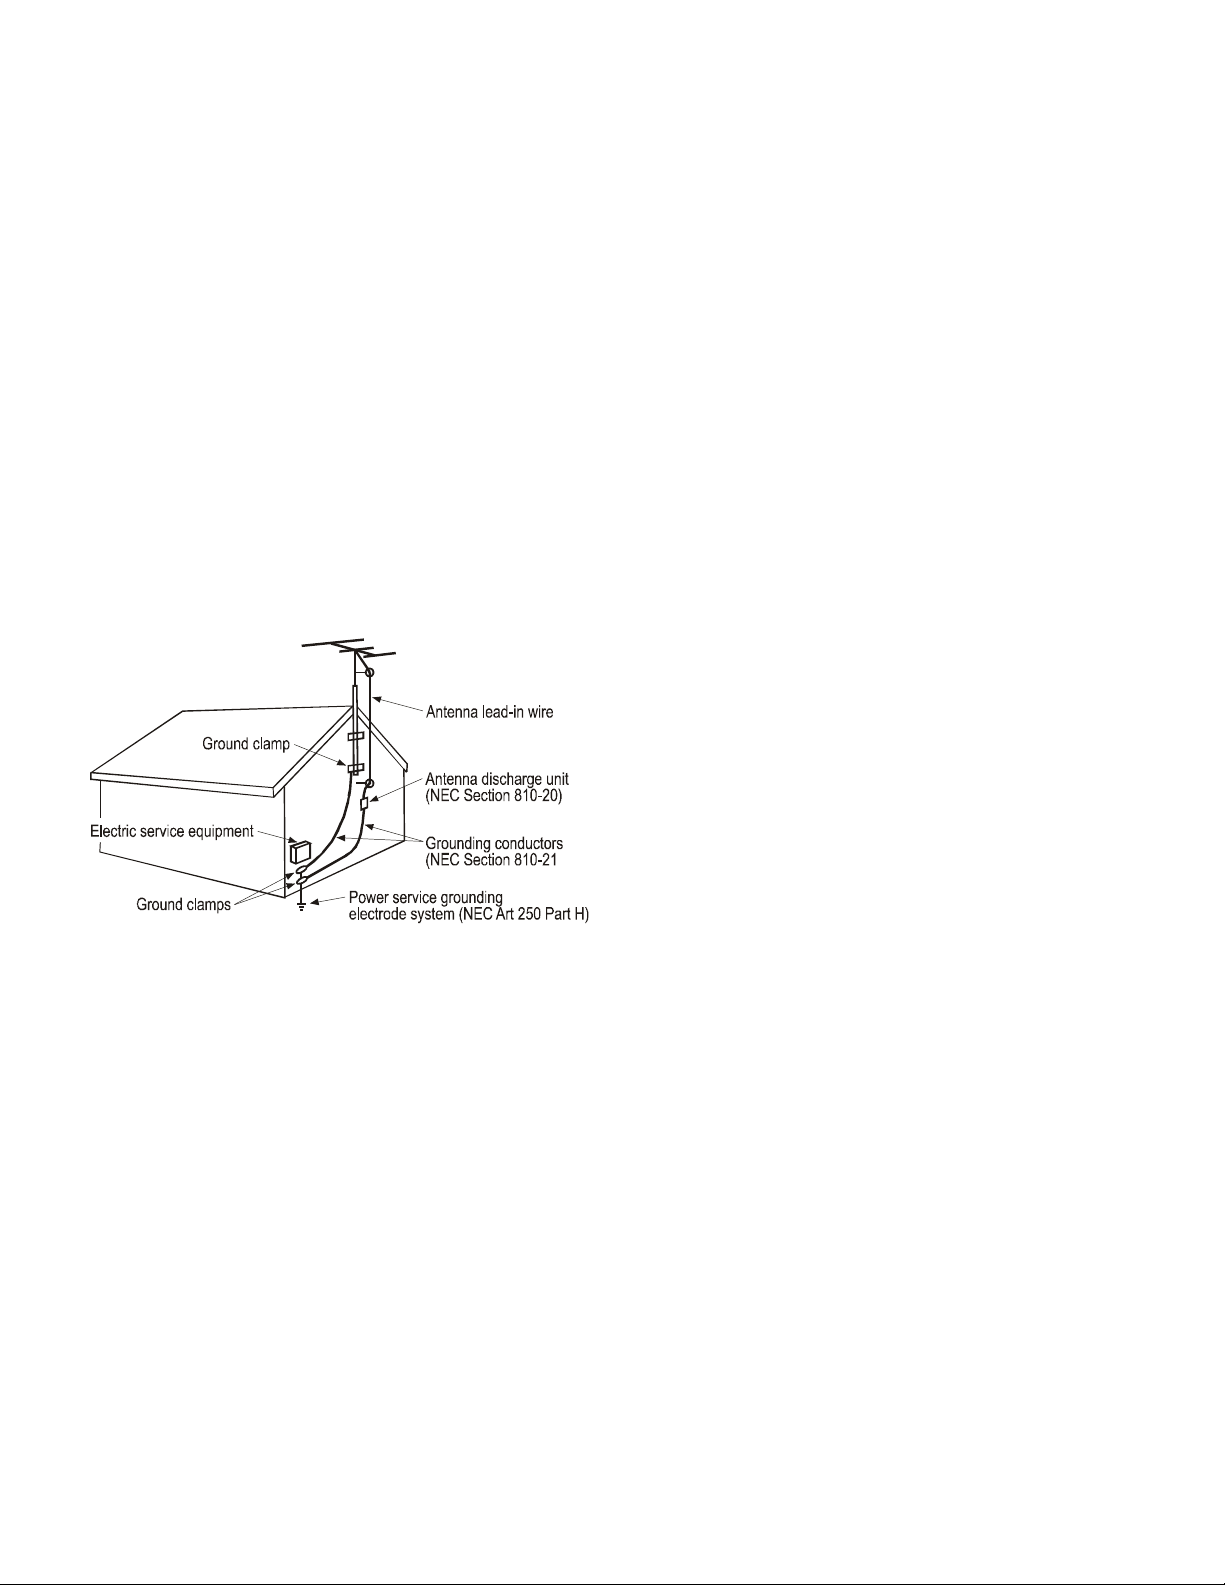
Antenna Grounding Outside the House
If an outside antenna is connected to the receiver, be sure the
antenna system is grounded so as to provide some protection
against voltage surges and built-up static charges. Article 810
of the National Electrical Code, ANSI/NFPA 70, provides
information with regard to proper grounding of the leadin wire to an antenna-discharge unit, connection to
grounding electrodes, and requirements for the grounding
electrode. See diagram below .
Unpacking the PT-7010A
The Sherbourn PT -7010A Pre/Pro/Tuner should reach you in
flawless condition. If you notice any shipping damage or other
issues upon unpacking the unit, please contact your Sherbourn
Retailer immediately .
Gently lift out the unit and remove all the packing material
and accessories. It is important to save all the packing
materials and the box in case your Sherbourn PT-7010A
ever needs to be moved or shipped back to the factory for
service.
Make sure that you keep your sales receipt. It is the only
way for Sherbourn to establish the duration of your Limited
Warranty and it may be useful for insurance purposes.
Please take a moment to fill out and mail the Sherbourn
Customer Response card.
Recording the Serial Number
Please read the serial number located on the rear panel and
record it below. Also record the place where you purchased
this product and the date of purchase.
Cable TV Coaxial Cable, Satellite
Dish Cables, and Television
Antennas should be grounded
BEFORE the point of entry into
the house.
Model Number
Serial Number ___________________________________
Place of Purchase _________________________________
Date of Purchase _________________________________
________PT-7010A___________
6
Page 7

Features of the PT-7010A Pre/Pro/Tuner
• 24-bit, Crystal Semiconductor® Analog to Digital converter and 24-bit, 192kHz Analog Devices® Digital to
Analog converter
• 32-bit, 20 MHz control processor
• 24-bit, 150 MIPS Motorola Symphony™ DSP processor
• Dolby Digital EX®, Dolby Pro Logic II®, Dolby Pro Logic IIx®, DTS ES® and DTS NE0:6® decoding modes
• Support for all digital sampling rates to 96 kHz
• Digital Domain Treble and Bass control
• DSP “simulated” surround mode for enhancement of two channel sources
• Direct two-channel analog bypass mode
• Gold plated input and output connectors, balanced XLR outputs and unbalanced RCA outputs
• Six A/V inputs, each with audio, S-video and composite video with three A/V outputs, each with audio,
S-video and composite video
• Eight channel analog input with separate RCA connectors for DVD-Audio format
• Three component video inputs and two component video outputs
• Automatic video transcoding - up converts Composite and S-Video source to Component Video
• Six coaxial and four digital inputs and coaxial and optical digital outputs - including from analog and
down mixed 5.1 sources
• AM/FM tuner with 40 presets
• Three audio only inputs, including MM Phono
• Two tape outputs
• Record outputs feature down mixed two channel output from a 5.1 digital source
• Four subwoofer outputs
• 7.1 channel outputs plus stereo side outputs for a total of 9.1 channels
• “Party Mode” for two channel playback through all speakers
• Zone two can play sources independent of the Main Zone
• Trigger outputs for both zones
• IR control of both zones, with rear IR ports and discrete codes
• On Screen Display (OSD)
• RS-232 control port with discrete codes
• Flash memory upgradable through RS-232 port
• IEEE 1394 “Fire Wire” port for future expansion
• IEC standard two prong removable power cord
7
Page 8
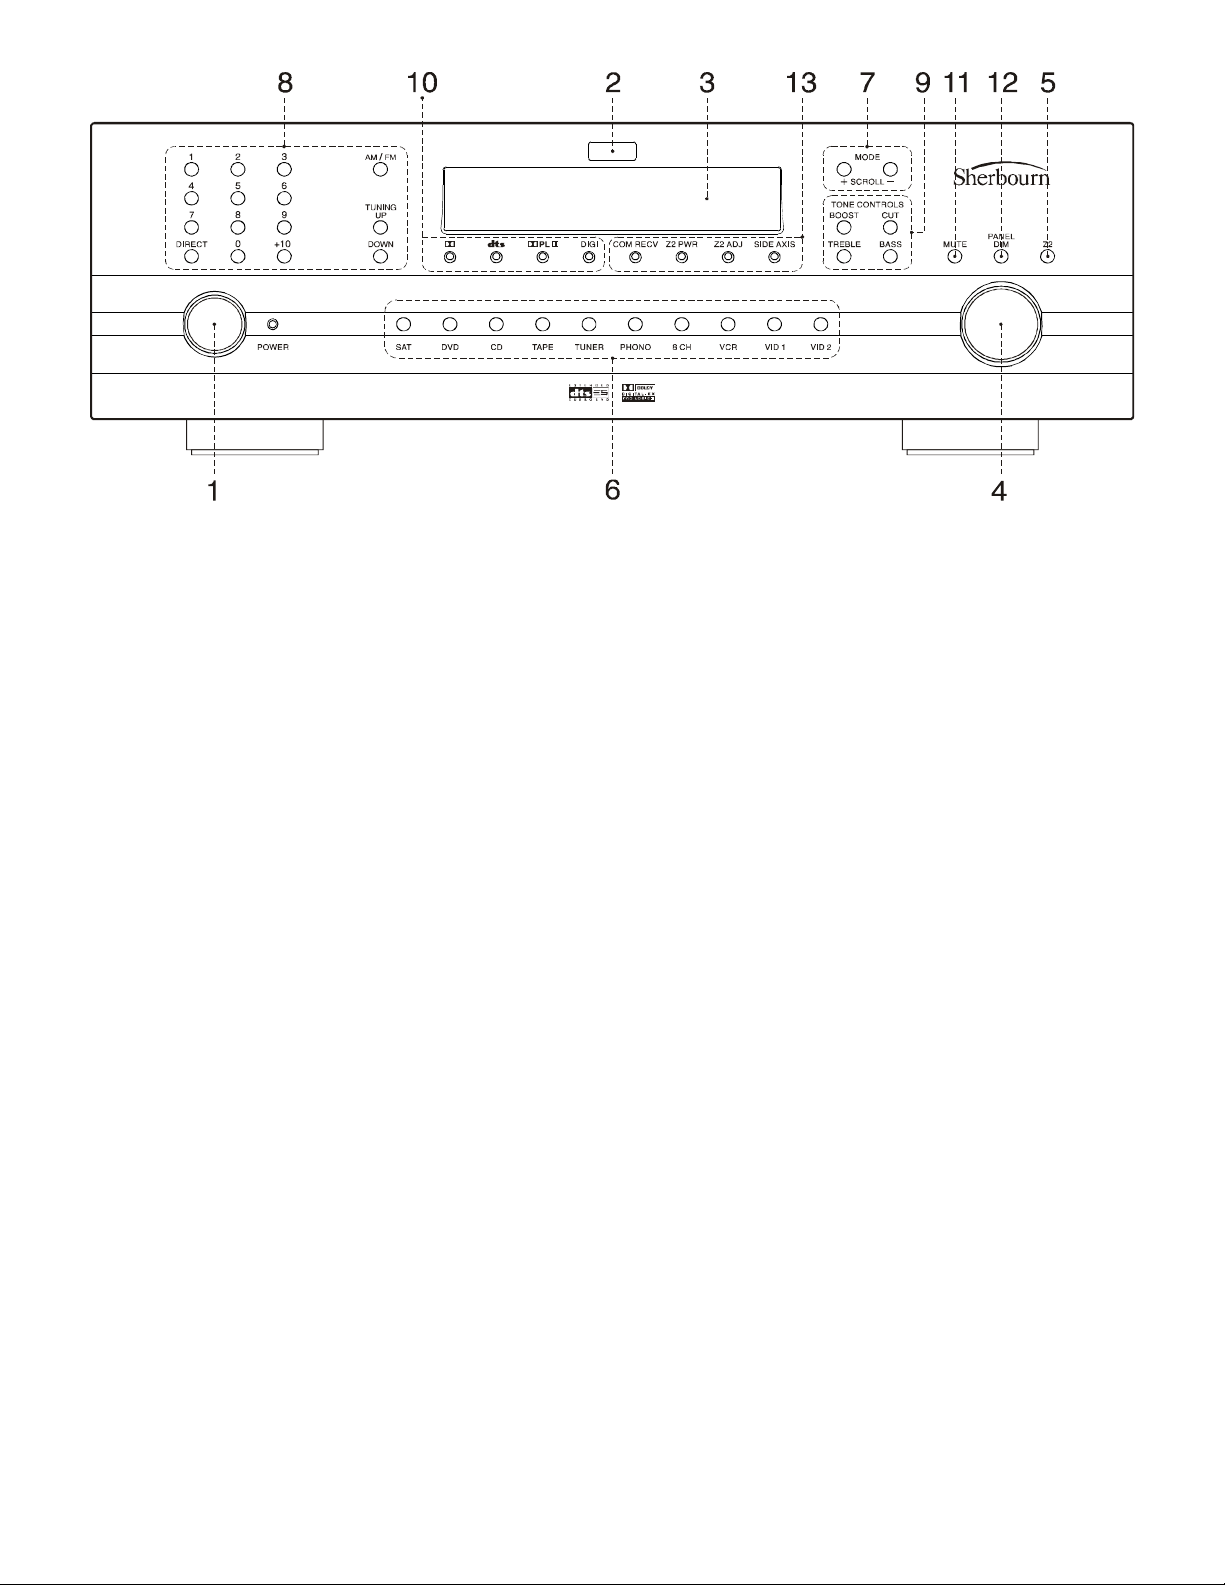
PT-7010A
Front Panel Features
1
Power Button
This turns the PT-7010A on or off. It is a non-latching
momentary button. If you press Z2 first, it can turn on
Zone 2 (even if the Main Zone is off).
IMPORTANT- Please note the PT-7010A requires
initialization after the power cord is plugged into the AC
receptacle. Push and hold the power button for
approximately. 5 seconds. The unit will power up after
this small delay. The second push of the power button
will turn the unit off and after this the unit will turn on
and off in a normal fashion.
2 IR Receiver Window
This window should be clean and free from obstruction
for the remote control to work correctly.
3 Pr ocessor Display
This soothing blue display shows which input is selected,
the tuner frequency, volume level, and other useful
information.
4 Volume Knob
Rotate this manual control clockwise to increase the
volume. The dB level will appear in the front panel display .
When turning on a new source, make sure the level is low ,
such as -80 dB and increase it slowly. The dB display
becomes less negative as the volume increases. The PT7010A volume control is velocity sensitive. If turned
slowly, the volume will change in small increments. If
rotated quickly, level change will be made in larger
increments.
Note: When the PT -7010A is turned on, it has a deliberately
slow and smooth volume ramp from silence, up to the level
that was set when the unit was last turned off. It can also
be programmed to come up to a preset volume you have
selected, rather than the previous volume. The knob does
not turn when volume is operated from the PT-7010A
remote.
5 Z2 (Zone 2)
Any changes you make after pressing this, will affect Zone
2 and not the Main Zone. For example, press Z2, then
POWER to turn on Zone 2, then adjust the Volume and
select an input. Press Z2 again to revert back to Main Zone
operation. It will also revert back after a short period of
no activity.
Note: If Zone 2 has not been enabled this button has no
effect. The unit is shipped with Zone 2 disabled.
6 Input Select Buttons
Use these controls to select the source that you want to
listen to and/or view . Using the On Screen Display (OSD)
IN-PUTS menu, each input can be adjusted in level so
that all the inputs have similar volumes. Each input can
also be set to enter a desired surround mode whenever
that input is selected.
Note: After you have selected an input, you should check
that the PT -7010A is set to the desired surr ound mode (or
the stereo mode).
7 Mode Up/Down (Mode Buttons)
These buttons allow you to step up or down through the
various sound play-back modes.
8
Page 9

8 AM/FM T uner Controls
The AM/FM button toggles between the AM or FM band.
Press and hold it to scan of the station presets. Press it
again or press a preset button to stop the scan.
DIRECT T uner Controls
Press the DIRECT button, then the numbers for frequency
tuning.
UP/DOWN Tuner Controls
Switch to stations above or below the frequency of the
current station. If repeatedly pressed, the tuner will move
up or down one frequency step each time. If held down
for a second or more, the tuner will automatically keep
tuning stations. Press UP or DOWN once again to stop
when it reaches a station you like.
Preset Tuner Memory Buttons
Press just the numbers (do not press DIRECT) for tuning
the memorized presets.
9 Tone Controls
T o change the tone, first press BASS or TREBLE and then
press UP or DOWN to suit your taste. The display will
show the change in dB level for reference. The range for
both BASS and TREBLE is +/-10 dB in steps of 1 dB.
The unit returns to its normal display after a few moments
of inactivity, and any level changes are retained. The BASS
and TREBLE levels can also be adjusted using the OSD
TONE Menu and the remote control.
Note: The T one contr ols do not affect the LFE channel, or
the 8-Channel analog input.
13 Additional Front Panel Lights
COM/RECV
This light pulses to verify front panel volume LEVEL or
INPUT SELECTOR commands are being sensed, or that
the remote control commands are being sensed.
ZONE TWO POWER
This light is on when Zone 2 is turned on.
ZONE TWO ADJUST
This light is on when Zone 2 is being adjusted.
SIDE AXIS
This light is on when the side-axis outputs are enabled.
10 Signal Processing Indicator Lights
DOLBY DIGITAL
This light is on when a Dolby Digital signal is being
decoded.
DTS
This light is on when a DTS signal is being decoded.
DOLBY PRO LOGIC llx
This light is on when the Dolby Pro Logic II or Pro Logic
IIx mode is engaged.
DIGI
This light is on when a digital audio signal is being
decoded.
11 MUTE Button
This turns off the sound. Press it again, or adjust the volume
control to return to the previous volume level.
12 PANEL DIM Button
The front panel lights have four levels: bright, medium,
low and off (low intensity display with all illumination
off).
9
Page 10
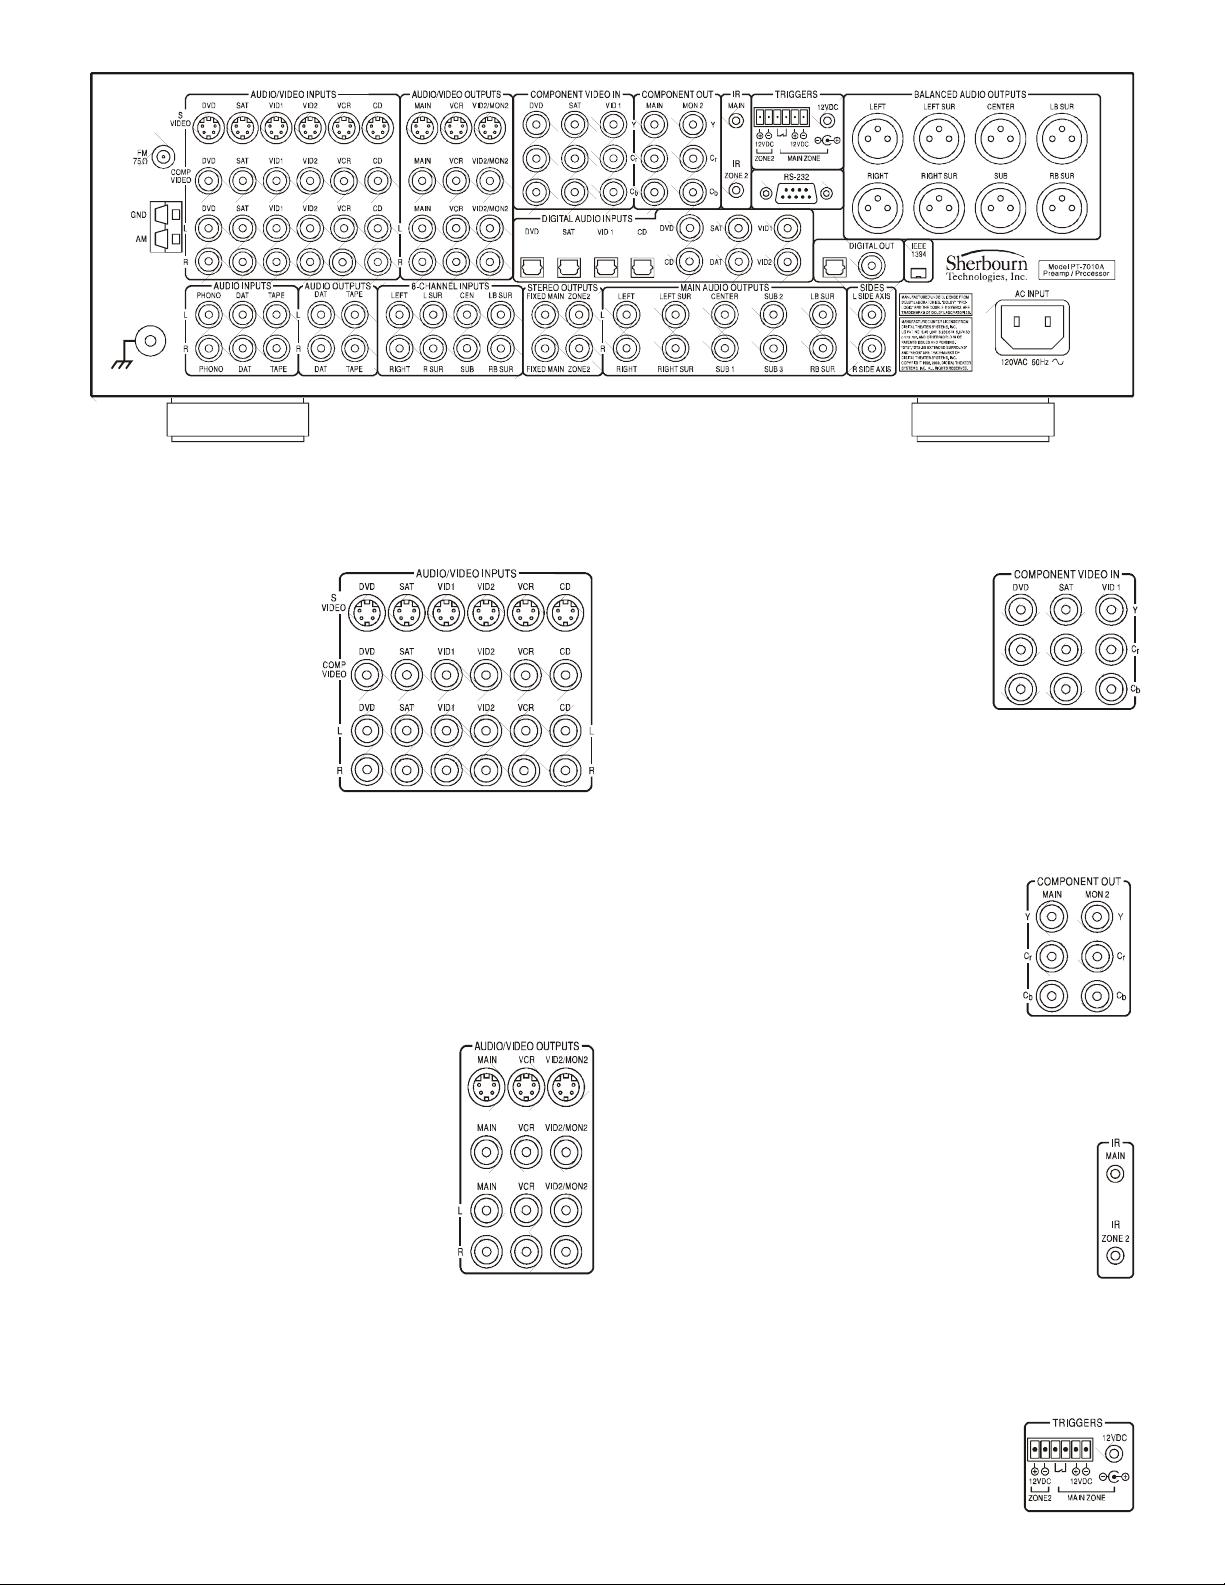
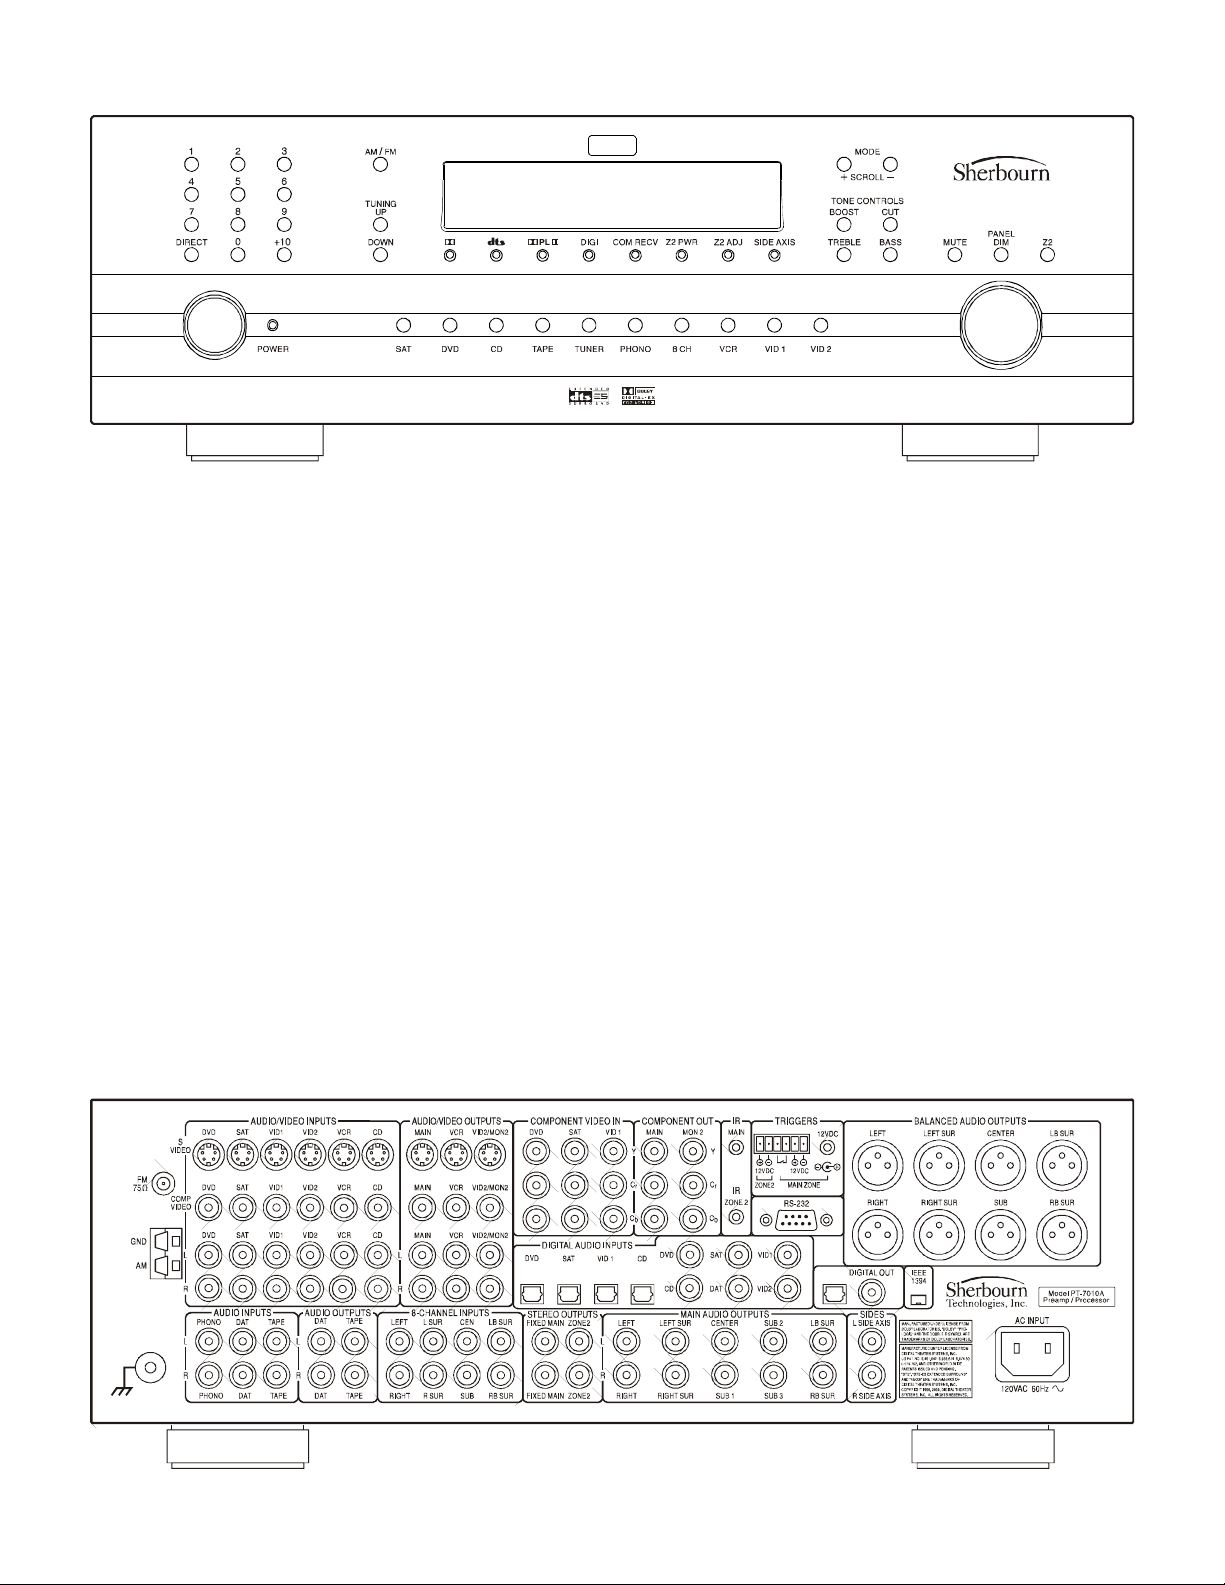
PT-7010A Rear Panel Layout
1 Audio/Video Inputs
These audio, Component
V ideo, Composite-V ideo
and S-Video inputs
connect to the outputs of
your audio video
components. When these
inputs are selected, the
audio will be heard in
your system and the
video will be seen on the TV screen. VID2 can be used
for a second VCR.
2 Audio/Video Outputs
MAIN
Connects to the inputs of a TV monitor, where the video
of any selected input and the On Screen Display (OSD)
can be viewed. The audio connections allow you to listen
to any selected audio source through your
TV’s speakers.
more than 2 channels.
3 Component Video In
These inputs connect to the componentvideo outputs of your DVD, SAT or other
video source (VID1) if they have this
advanced capability. When these inputs
are selected, the PT-7010A will
automatically route any video signals going into these jacks
to the component video outputs. Note that component
video provides the best picture compared to composite or
S-Video. The PT-7010A can also route HDTV signals.
4 Component Video Out
If your TV Monitor has component video
inputs, connect them to these outputs. If you
select DVD, SAT or VID1, then any video
signals going to the component inputs, will
pass through to your TV monitor. The PT7010A can also up convert any Composite Video or SV ideo signals from the other inputs to Component V ideo.
VCR
Connects to the inputs of a VCR to allow
recording.
VID2/MON2
Connects to the input of a second VCR
for recording, or to a second TV. When
configured in the OSD for “VID2,” this output is muted
whenever the VID2 input is selected. This prevents
feedback; also there is no OSD then on this output. When
configured for “MON2,” the output is always active, the
same as the Main output.
Note: Analog audio signals are present at these L and R
outputs even if a digital input has been selected. The
output is a 2 channel down mix if the digital source has
10
5 Infrared (IR) Inputs
These are used in custom installations to control the
Main Zone and Zone 2 from a remote location. The
input accepts 1/ 8" mono mini-jacks from standard
remote control IR equipment, such as those made
by Xantech and other companies. The remote sensors
can be in a different room, or in a preferred location
in your main room.
6 Triggers and Relay
The relay switch is normally open, and it
will close after a short delay , when selecting
a source. This can be used in installations
to trigger video screen deployment, or other
custom purposes. The OSD INPUTS menu
Page 11
allows you to choose which inputs will activate the relay.
The +12 VDC outputs are on when-ever their zone is
enabled. Sherbourn amplifiers have a +12 VDC input
which allows them to be turned on automatically by the
PT-7010A. The 1 /8" mini-jack is wired in parallel with
the terminals. Do not exceed a current draw of 500 mA
total for both outputs.
DSP surround are by-passed in order to maintain the
highest fidelity. This input is not available in Zone 2.
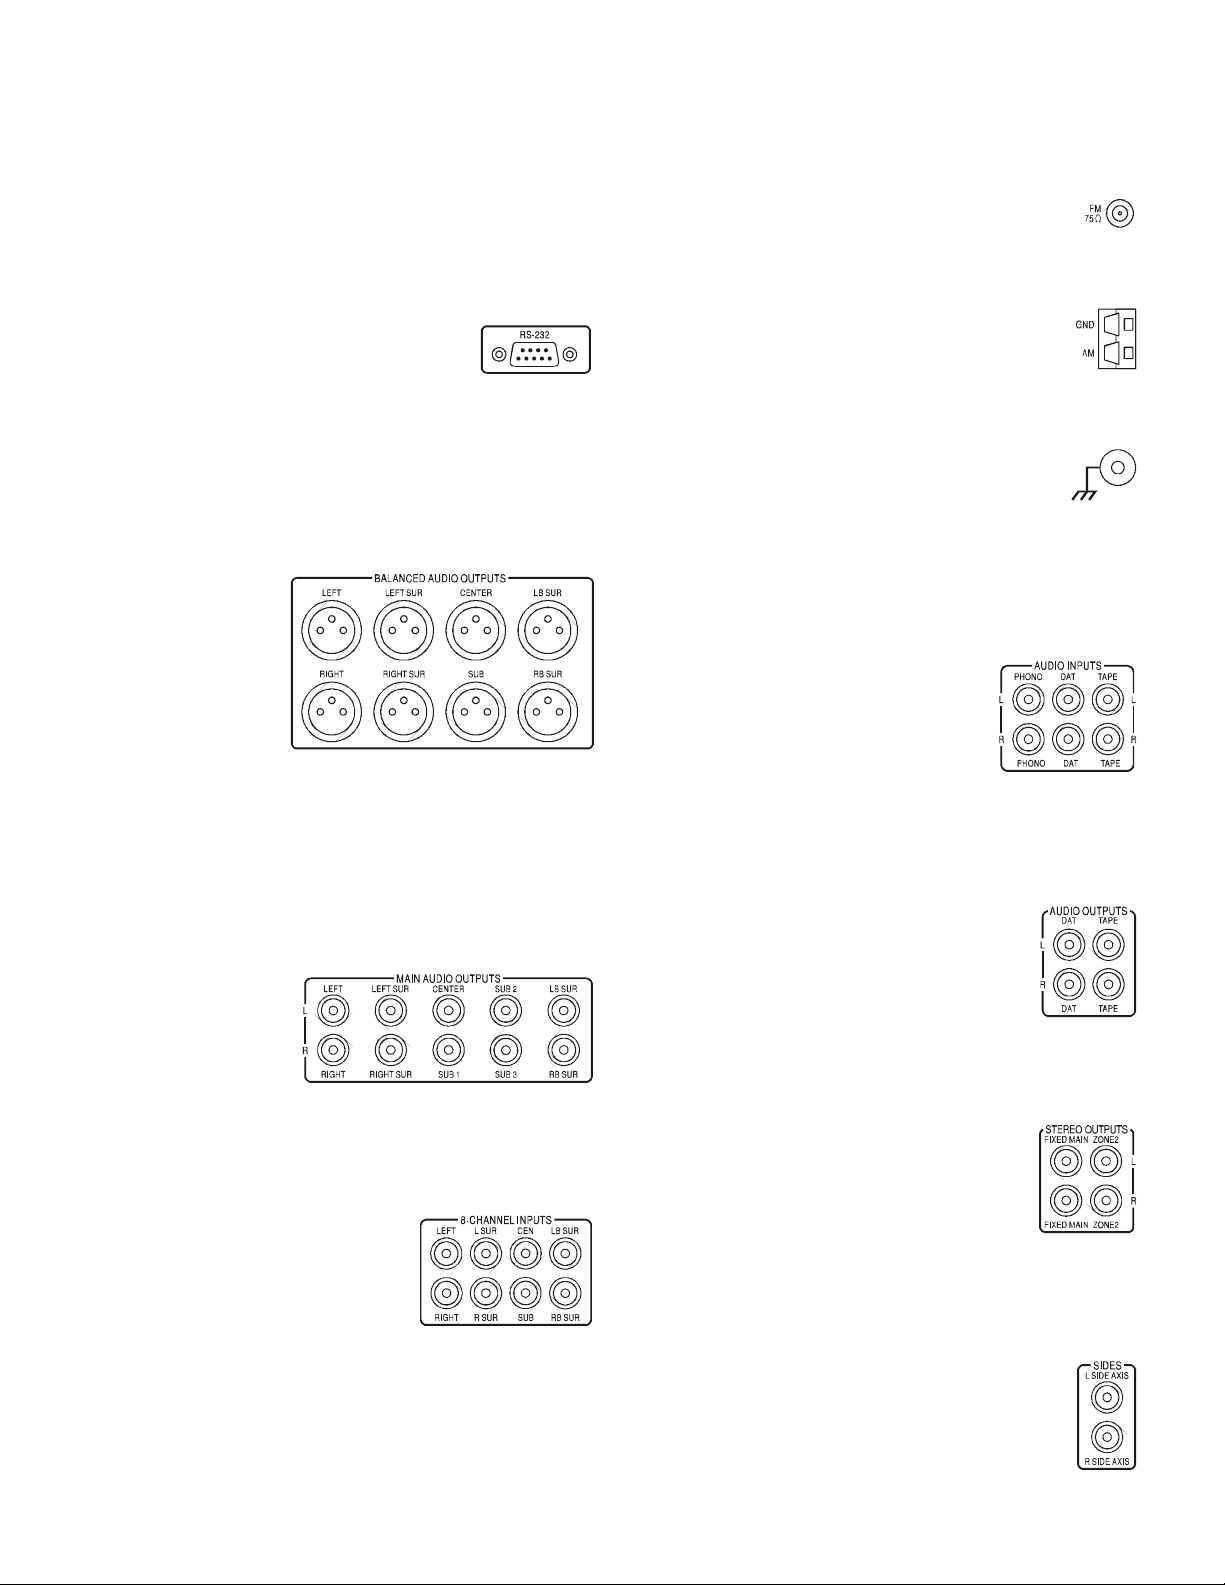
11 FM Antenna
The supplied FM antenna fits this “F-type” screwon connector. Other antennas can be fitted for
improved reception.
7 RS-232 Port
This connects to the serial port of a home or
laptop computer, allowing the PT-7010A
flash memory software to be up-graded. The
latest software can be downloaded from the Sherbourn
website, see page 60. It also allows connection of an optional control device intended to be installed in a remote
location.
8 XLR Audio Outputs
These line-level
balanced XLR
outputs connect to the
XLR inputs of your
amplifiers and
powered subwoofer.
The outputs are: front
left, front right,
center, left surround, left surround back, right surround
back, right surround and one subwoofer (LFE) output. If
your amplifier has a choice of inputs, we recommend using
the XLR balanced type. This gives better noise rejection,
especially for longer cable runs.
9 Main Audio Outputs
These line-level RCA
outputs connect to the
inputs of your
amplifiers and powered
subwoofer(s). There
are outputs for front left, front right, center, left surround,
left surround back, right surround back, right surround and
three identical subwoofer (LFE) outputs.
10 8-CH Analog Input
These analog audio inputs can
connect to the output of an external
surround processor, or a source
component such as DVD-Audio,
SACD, or a DVD player with its own surround decoder.
You can select this as an input from the front panel or
remote control. The eight channels of analog audio will
then pass into the PT-7010A Note: This is designed to be
a very short, ultra pure, analog-only signal path. DSPbased effects such as tone controls, bass management and
12 AM Antenna
These connections are for the included AM loop
antenna.
13 Ground Screw
This is commonly used for the ground connection
wire of a turntable, to prevent any hum in your
speakers. It is tied to the chassis ground, and may
be used as needed.
Note: It is not necessary or desirable to connect this to an
electrical ground.
14 Audio Inputs
These audio inputs connect to the outputs
of your turntable, DAT or TAPE player.
Any standard audio component with a
line-level output can be connected to
DAT or TAPE. Only a turntable with a
moving-magnet, or high-output moving coil cartridge can
be connected to the PHONO input.
15 Audio Outputs
These audio outputs connect to the analog
record inputs of your tape decks, such as DA T ,
cassette or reel to reel. These outputs allow
you to record the selected audio program. Note
that these also allow analog recording from
digital audio sources.
16 Stereo Outputs
FIXED MAIN is a line level output, and the
volume is not adjustable. This can be used as
a record output, or to feed another audio
system. ZONE 2 connects to the inputs of a
stereo amplifier to run Zone 2. The volume
and source are adjustable, either from the front panel, or
from a remote IR sensor.
17 Side-Axis Outputs
These outputs provide two optional front side
channels to complement the left, center, right,
surround and surround back channels. They can
be turned on or off using the Speaker Size OSD
menu (see page 37).
11
Page 12
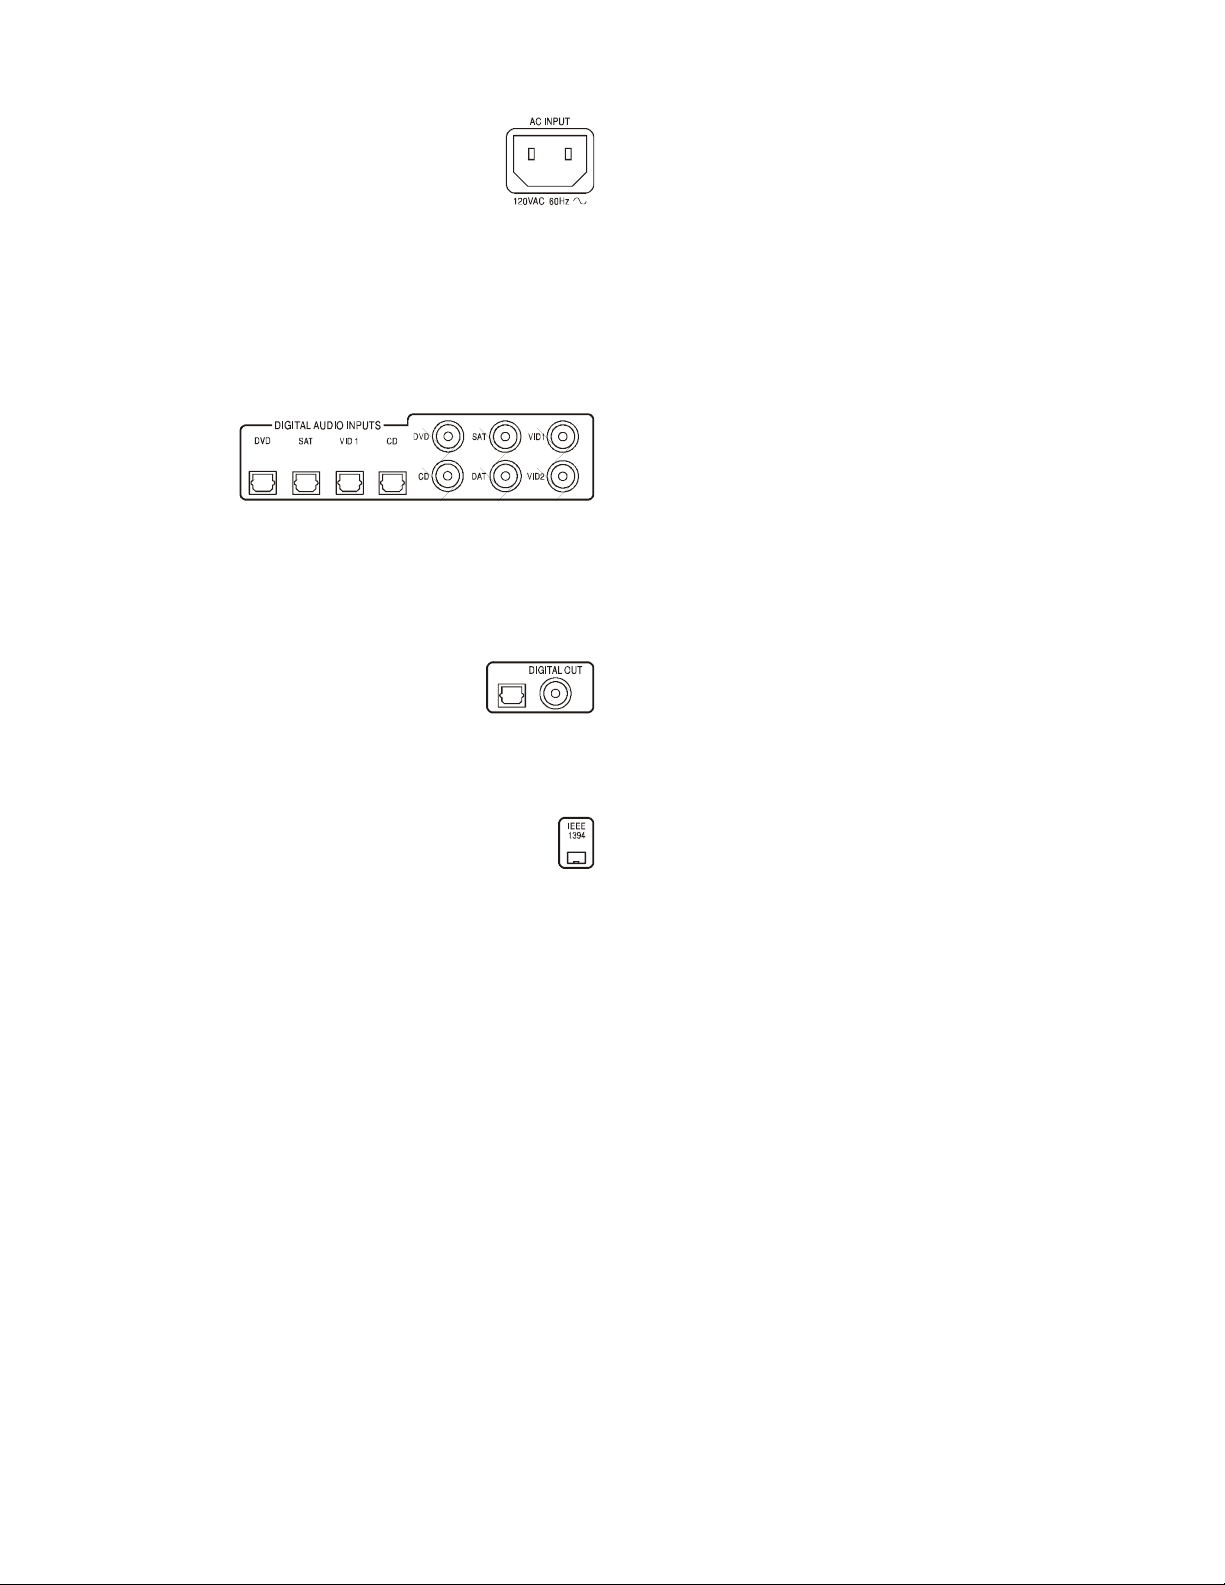
18 IEC Line Cord Socket
The PT-7010A comes with a detachable line
cord which connects here. Plug the line cord
into an AC wall socket or power strip which is
correctly configured with the voltage and
current supply specified for the PT-7010A.
19 Digital Inputs
These inputs connect to the digital outputs of your audio/
video components. The DVD, SAT and VID1 and CD
inputs have two options, optical or coaxial. The DAT and
VID2 inputs are coaxial only . Whenever one of these inputs
is selected from
the front panel
or remote, the
PT-7010A will
automatically
select the digital input if there is a signal present, otherwise
it will select the corresponding analog input.
20 Digital Output
This S/PDIF output is active for all sources
except the 8-channel input. It allows you to
record digital audio, for example to a DAT
or CD-R.
other components will require if they share a common wall
socket. The majority of household electrical sockets in
places other than the kitchen and garage are 15 amperes
maximum. Most DVD players and other source
components are fairly low current items. The Sherbourn
PT-7010A requires a minimum of 2 amperes @ 120 volts.
It should be sufficient to allow the PT-7010A to share a
wall socket with other video source units, but power
amplifiers and a video display (big screen TV or video
projector) should each be provided a SEP ARATE electrical
connection on a SEPARATE circuit. This configuration
yields the most stable power supply in any home theater
application, regardless of your equipment choices.
IMPORTANT- Please note the PT-7010A requires
initialization after the power cord is plugged into the AC
receptacle. Push and hold the power button for
approximately. 5 seconds. The unit will power up after
this small delay . The second push of the power button will
turn the unit off and after this the unit will turn on and off
in a normal fashion
.
Refer to your power amplifier and video display owner’s
manuals to learn the power requirements so you can safely
plan your electrical power requirements for your home
entertainment system.
21 IEEE-1394"Firewire”Port
This connection is for future expansion and
accessories.
Installation and Connections
Observe the following precautions when choosing a
location for your Sherbourn PT-7010A:
1) Protect it from prolonged exposure to direct sunlight
and other direct sources of heat, such as heating vents
and radiators.
2) Do not expose the unit to rain or moisture. If fluid or a
foreign object should enter the unit, immediately turn off
the power and contact your Sherbourn Dealer.
3) Avoid excessive exposure to extreme cold or dust.
4) Do not place heavy objects on top of the unit.
5) If you need to clean the front surface, first turn off the
power and then use a soft dry cloth, rubbing with the grain.
Be careful not to scratch the display window.
AC Power Considerations
Ensure that the unit is plugged into an outlet capable of
supplying the correct voltage and current specified for your
model. Remember to account for the electrical power that
Connection Tips for Superior Sound
Before setting up your new system, please consider the
following:
• Whenever possible, route the power cords away from
the signal cables or speaker wires to prevent any hum or
interference heard in the speakers.
• Use quality coaxial digital cables to connect the PT7010A to any source equipment which has coaxial digital
outputs. Optical cables transmit only light pulses and are
much more immune to noises, but are sensitive to excessive
bends. Whichever you choose, follow the cable
manufacturer’s recommendations.
• Many RCA type patch cords can be a very tight fit and
there is usually a preferred method of getting them off.
Some have to be removed with a twisting action. Be gentle
or you may damage the jacks of your PT-7010A, or other
components.
• Many audiophile signal cables are intended to be hooked
up in one direction. If this is the case the cables will be
marked with arrows the direction of signal flow.
• It is usual for the right channel RCA patch cord plugs to
be red and the left channel connections to be white, grey,
or black (depending on the cable brand). RCA connectors
that are gold will be designated with a colored band to
designate the channel.
• If the amplifier to which you will connect the PT -7010A
features balanced XLR inputs, use the PT-7010A’s XLR
12
Page 13

balanced outputs instead of RCA type patch cords.
Balanced signal transmission between audio components
provides superior rejection of hum and noise, especially
if long cables are required.
Connection Tips for Video Quality
and Flexibility
The Sherbourn PT-7010A has three types of video
connections on board:
What is Composite Video?
Composite video signals are connected between products
with a single 75-ohm coax cable with Yellow RCA
connectors on each end. Composite video inputs or outputs
are present on almost all types of consumer grade video
equipment. Composite video signals can also be modulated
onto an RF carrier, along with an audio signal, and
transmitted over-the-air or on coax cable, by broadcast
stations and cable TV systems. RF video signal cables are
usually 75-ohm coax terminated with screw-on Fconnectors. That’s what your cable TV wiring is if you
have standard (non digital) cable services.
Picture Quality: Good. This is the lowest quality cable for
a video source, but again, it is also the most common.
What is S-Video?
Most midrange and premium video equipment provide the
option of using S-video connections. The S-video (or Y/
C) cable is terminated at each end with a four-pin DIN
connector. Although it may appear to be a single cable,
internally it has two 75-ohm coax or twisted pair cables to
carry the separate Y (luminance) and C (chrominance)
signals. Picture Quality: Better. The S-video cable will
offer marked improvement over a composite cable.
7010A can easily allow the following:
a) Up conversion from Composite Video inputs to SVideo and Component Video outputs.
b) Up conversion from S-Video inputs to Component
Video outputs.
c) Down conversion from S-Video inputs to the MON2
video output jack.
This flexibility in video conversion allows the PT -7010A
to switch ALL of your video sources, regardless of type,
making it an ideal central video signal controller. The PT7010A can also switch HDTV signals.
Example: - Typically you will connect your video display
(Television or Projector) to the Component Video outputs
of the PT-7010A. With the up conversion capability any of
the video sources using Composite V ideo or S-Video inputs
would automatically be converted to Component Video.
Keep in mind that it is ALWAYS preferable to use the best
type of input you have available, so if Component V ideo is
not available on the video source component and you can
choose between Composite Video or S-Video, choose SVideo.
One final note about the video switching on the PT -7010A
is that there are no video input capabilities for the Tuner,
Tape, or Phono sources, so the video output will remain
on the last selected video source until another input with
video source capabilities is selected.
Video Output to the Main Screen and OSD
When an audio/video component is selected, the audio
will play in your system and the video will be switched to
a video input of your TV monitor. You must have the TV
connected in order to see the On Screen Display (OSD).
What is Component Video?
Component cables look just like composite cables. The
difference is that, where a composite cable carries the entire
video signal on a single cable, component cables split the
signal in three. The signal itself is referred to as either
Y ,Cr ,Cb, or Y,Pb,Pr . Manufacturers make connecting these
cables easy by color coordinating them. The tips of the
cables and jacks will be red, green and blue. A good rule
of thumb is that, if the connections are RCA type, it is
usually a component cable. Most high-end DVD players
and HDTV tuners will have component connections.
Picture Quality: Best. This connection gives a superior
image over Composite or S-Video connections.
Video Up Conversion
The Sherbourn PT-7010A has advanced video DSP
circuitry and coding which allows the ultimate flexibility
in video signal processing. With these attributes, the PT-
Zone Specific Turn-On Triggers
The “Main Zone” and “Zone 2” trigger terminals each
supply 12 VDC whenever that zone is turned on. This can
be used to turn on power amplifiers equipped with a 12 V
trigger input. The two middle terminals marked as relay
contacts are connected together only when the Main Zone
is on and an input is selected for which the trigger output
is enabled. The OSD INPUTS Menu can be used to select
which inputs have the trigger output enabled or disabled
Use all standard safety precautions and make sure all the
equipment is disconnected before making any connections.
See the two connection options on the next page.
13
Page 14
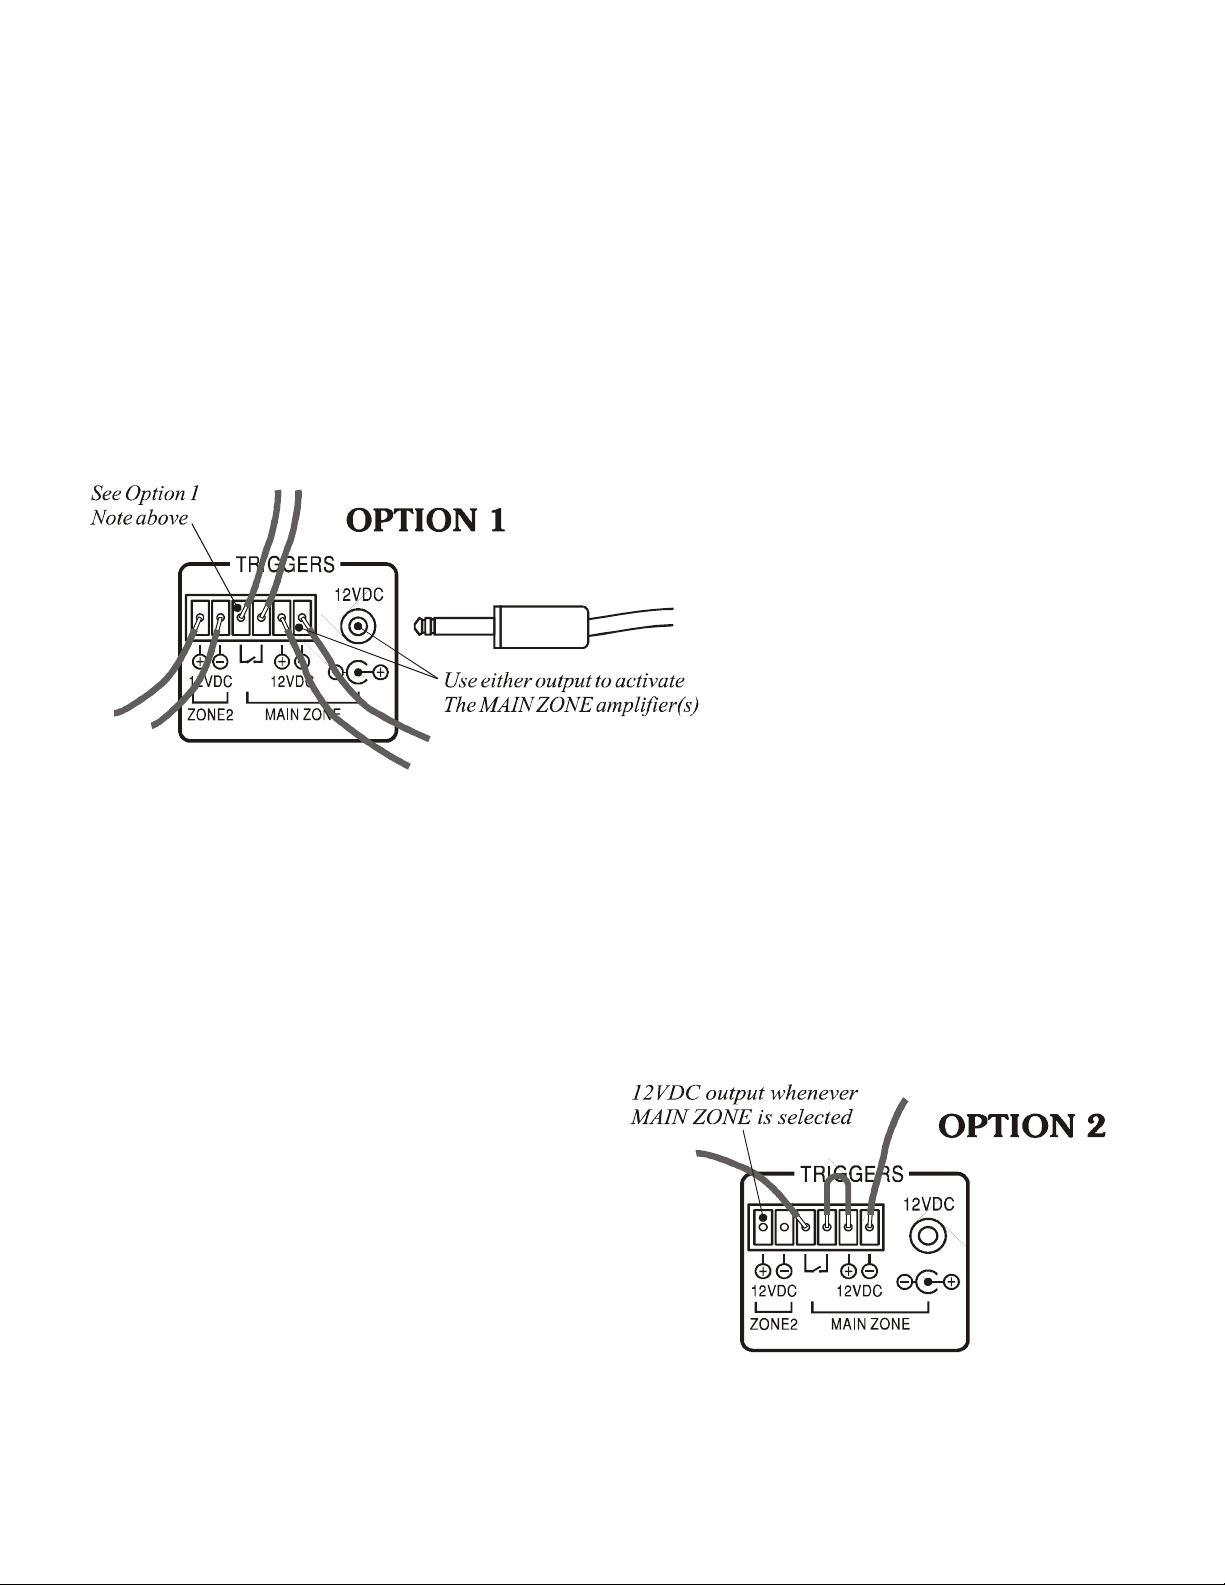
Option 1
This shows independent 12 VDC outputs that will turn on
any compatible external amplifier with a 12 VDC trigger
input. Use the middle relay contacts to enable another
independent device that will turn on (as the contacts close)
whenever a “trigger enabled” input in the MAIN ZONE
has been selected. DO NOT use the center relay contacts
for 120 VAC or 240 VAC switching! They are only for
low voltage AC/DC loads of 2 A maximum. T ypically this
will mean low voltage control of structured lighting
systems, automated window coverings, or other low
voltage devices. Never switch anything that plugs directly
into the wall with these on-board contacts. This action
will damage the unit and VOID THE WARRANTY.
Option 2
This simply shows looping the 12 VDC into the relay
contact to turn on a device using the available 12 VDC
trigger already supplied.
14
Page 15

Connection Diagram 1:
Connecting a DVD-Video Player
(Analog Audio and Composite Video)
This configuration shows a DVD-Video player connection where
the audio output from the DVD player is taken from the analog
outputs (Red and White RCA jacks) and video output is taken
from the Composite Video output (the Yellow RCA jack).
S-VIDEO connection provides a
better quality picture than
Composite Video.
When you select DVD on the PT-7010A, the audio output from
the DVD player will play through the audio system and video will
appear on the TV or projector (remember that you must first select
the correct input on the TV). While this method will certainly get
you up and running, using the S-Video connection would be
preferred if you want to experience a better picture quality.
15
Page 16
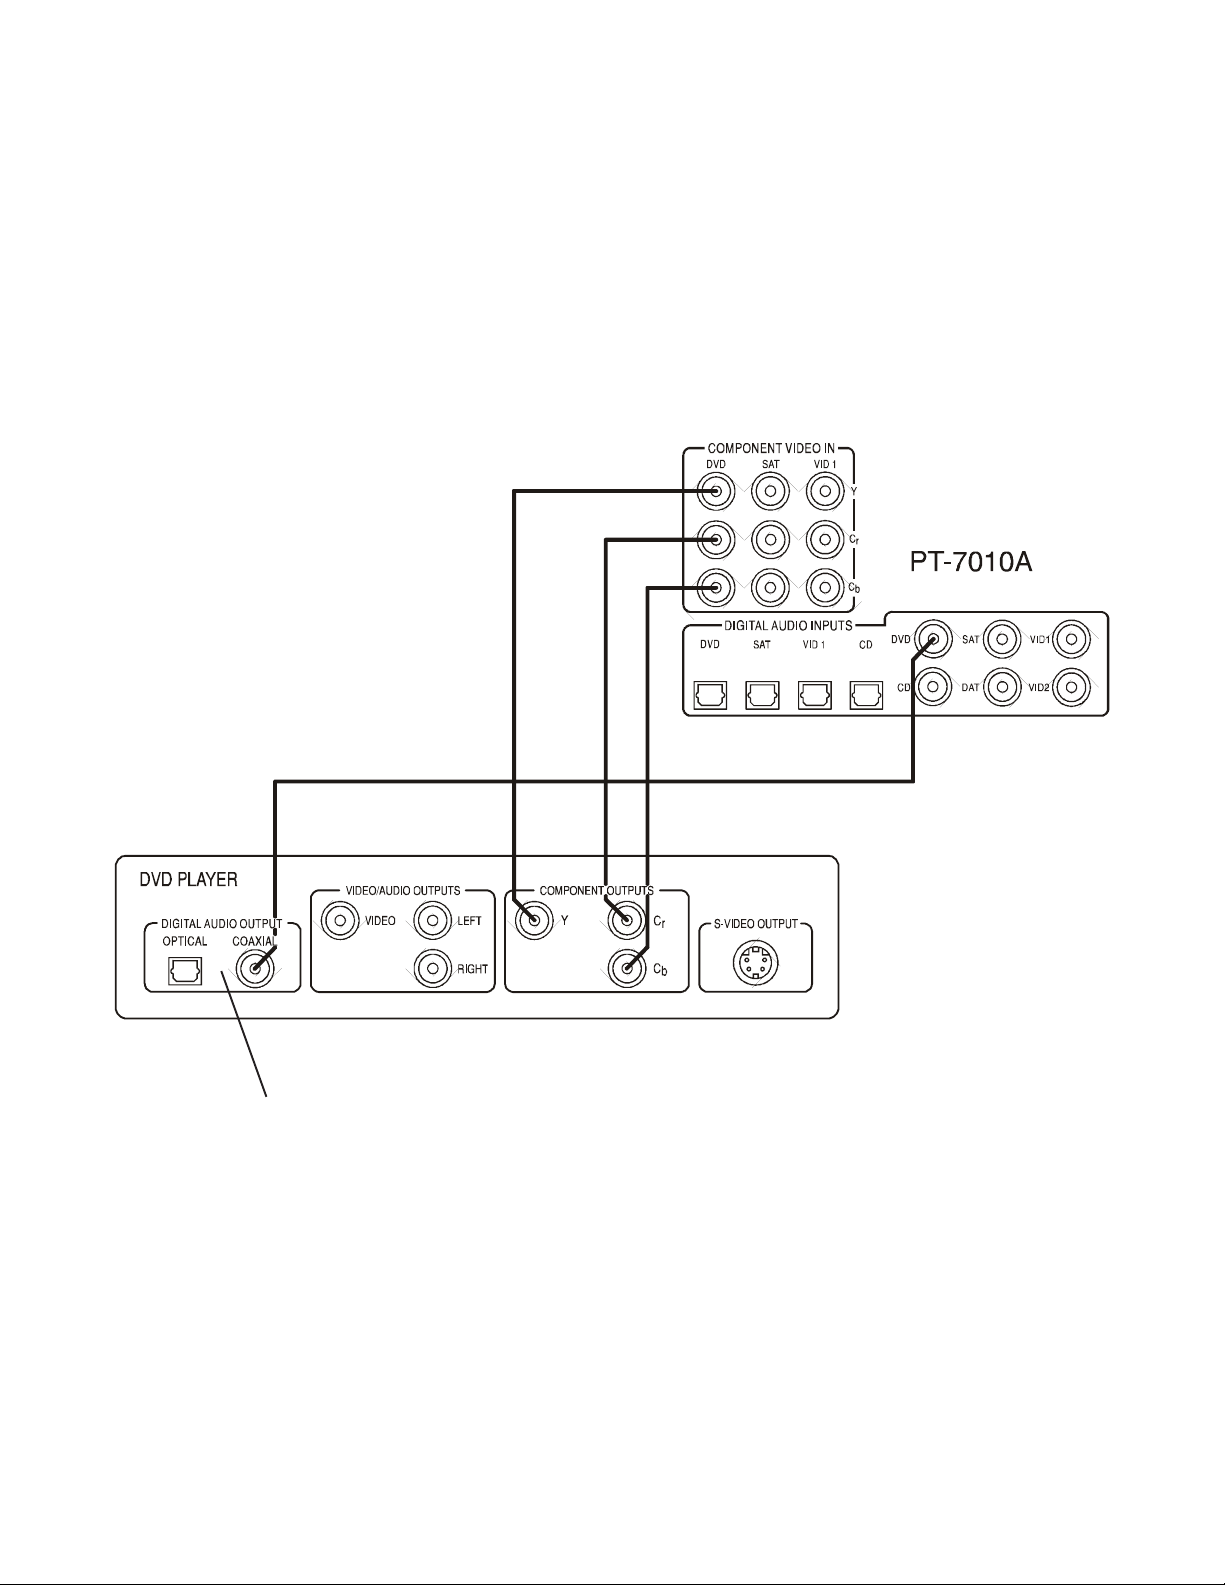
Connection Diagram 2:
Connecting a DVD-Video Player
(Digital Audio and Component Video)
This configuration shows a DVD-V ideo player connection where
the audio output from the DVD player is taken from the digital
output (Coaxial or Optical) and video output is taken from the
Component Video outputs (the Red/Blue/Green trio).
DIGITAL audio connections are necessary to
decode surround sound encoded material such
as Dolby Digital or DTS. Use Coaxial (shown)
or Optical cables
16
When you select DVD on the PT-7010A, the audio output from
the DVD player will play through the audio system and video will
appear on the TV or projector (you must first select the correct
input on the TV). This method will give the best picture quality
and enable the discrete encoded Dolby or DTS audio to be decoded
by the PT-7010A.
Page 17

Connection Diagram 3:
Connecting to the TV or
Projector using Component
Video
This configuration shows the PT -7010A connections to the “main”
video display where video output is taken from the Component
Video outputs (the Red/Blue/Green trio) labeled “MAIN” on the
back panel of the PT-7010A.
COMPONENT VIDEO Input on the TV
or Projector. There may be more than one
input on high end video screens
This configuration will give the best picture quality, especially if
the video source component output begins as a native Component
Video output. Remember that with the video transcoding feature,
the PT-7010A will still allow your Composite or S-Video source
inputs to up convert to the Component Video outputs, but you
should always connect the highest quality video signal available.
17
Page 18
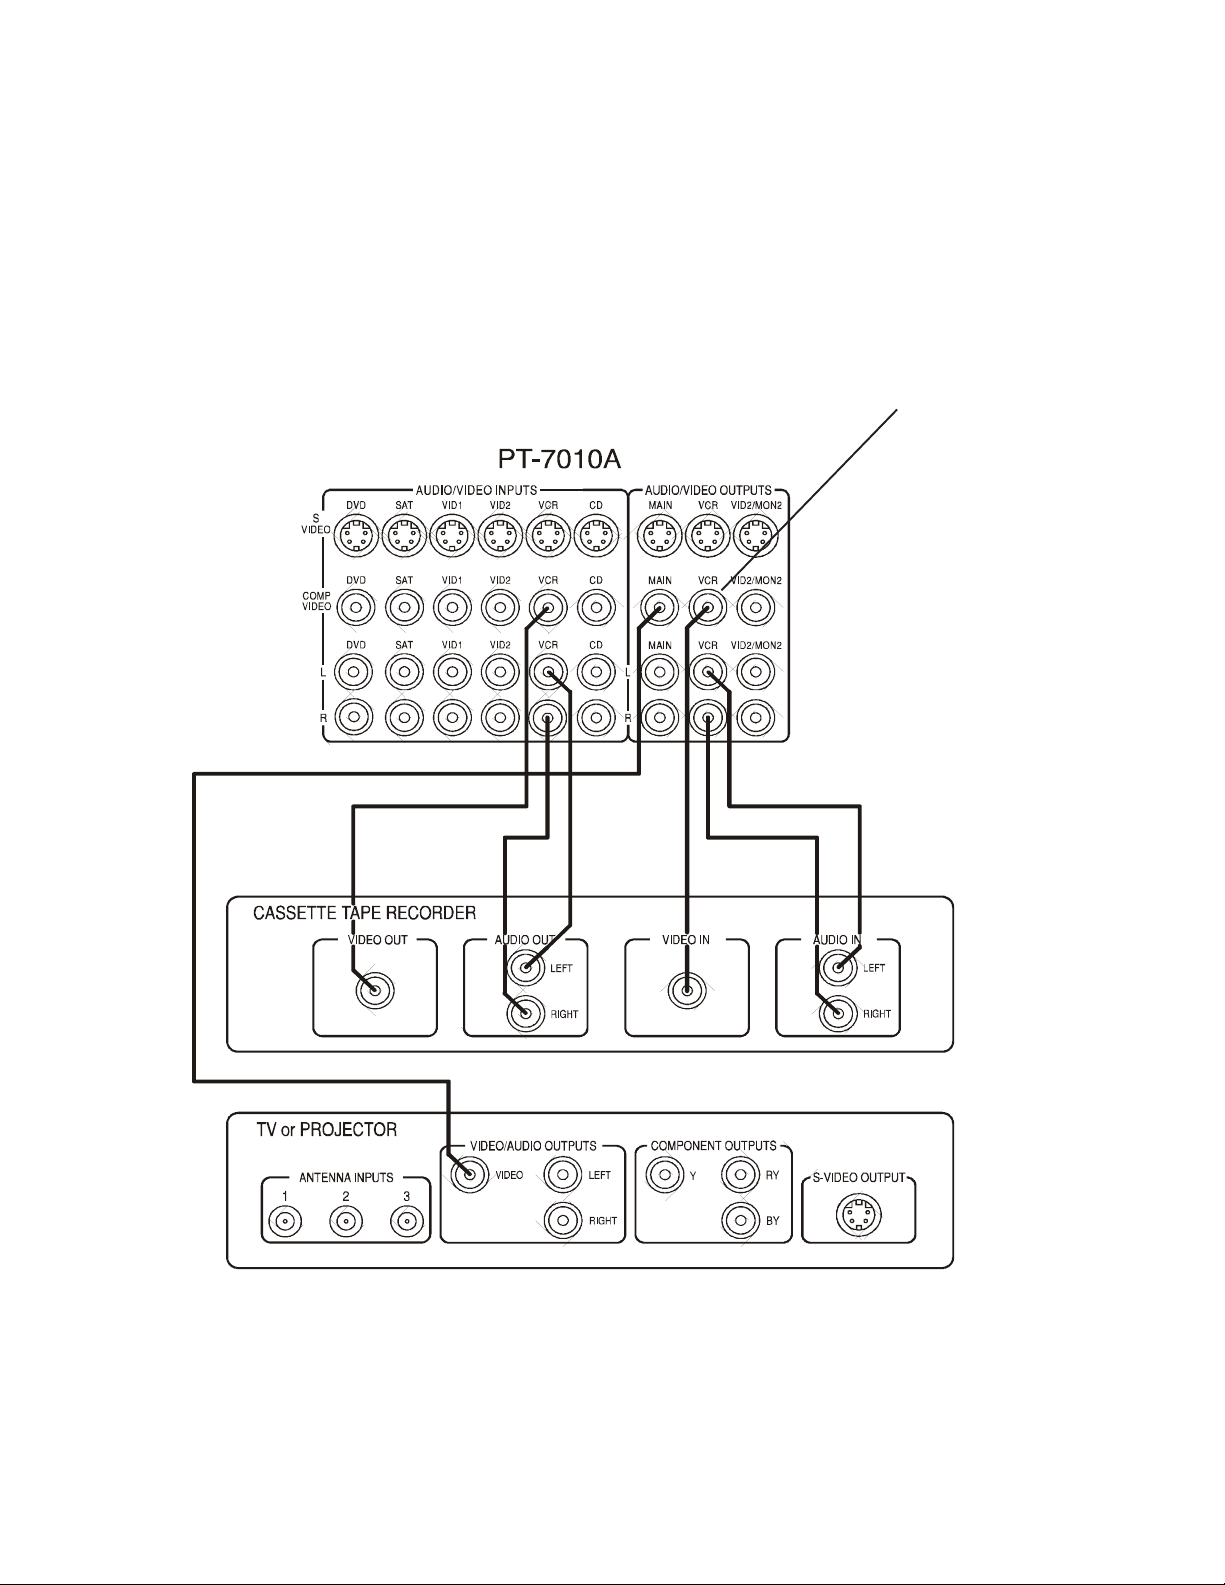
Connection Diagram 4:
Connecting a VCR
(Analog Audio and Composite Video)
This configuration shows a VCR connection where the audio output
from the VCR is taken from the analog outputs (Red and White
RCA jacks) and video output is taken from the Composite Video
output (the Yellow RCA jack). If you plan to use the VCR for
recording, you also must connect the PT-7010A’s VCR outputs
into the VCR inputs.
If you plan to record with
your VCR do not forget to
connect the VCR OUTPUTS
from the PT-7010A into the VCR’s inputs
18
This configuration allows the PT-7010A to route the output of the
VCR into the TV or projector. If your VCR has S-Video outputs,
you may use that connection type in lieu of the Composite Video
RCA jack as shown in the connection diagram.
Page 19
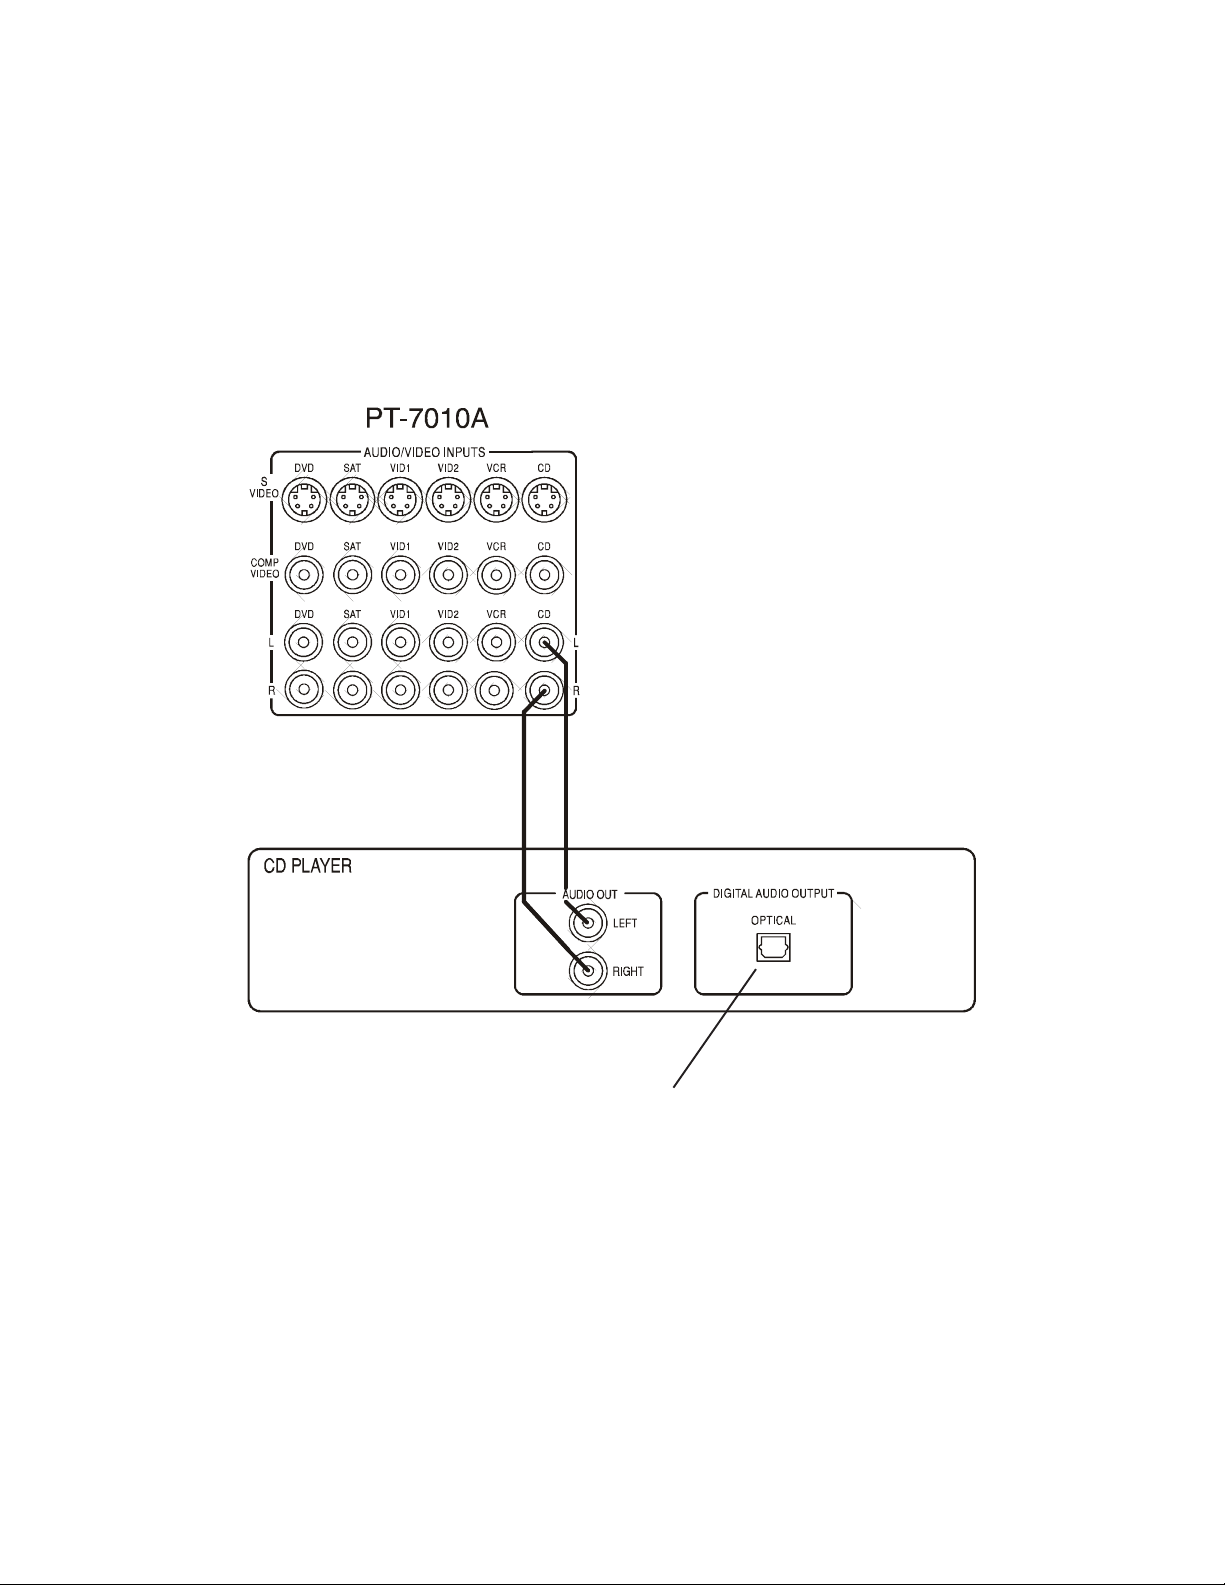
Connection Diagram 5:
Connecting a CD Player
(Analog Audio)
This configuration shows a CD Player connection where the
audio output from the CD Player is taken from the analog
outputs (Red and White RCA jacks).
If the CD Player is equipped with a
DIGITAL audio output, you may
choose to use that connection for
better sound quality
When you select CD on the PT-7010A, the audio output from the
CD player will play through the audio system. While this method
of connection is normal, if the CD player is equipped with an optical
digital output you may choose to use that instead. The advantage
of doing so allows the professional grade digital to analog
converters built into the PT-7010A decode the signal rather than
having that done in the CD player.
19
Page 20

Connection Diagram 6:
Connecting a Cassette Tape or DAT
Deck
This configuration shows a Cassette Tape Deck connection where
the audio output is taken from the left and right audio outputs
(may also be labeled PLAY). If you plan to use the Cassette Tape
Deck for recording, you also must connect the PT-7010A’ s TAPE
audio outputs into the Cassette Tape Deck inputs (may also be
labeled RECORD).
20
The Tape Deck outputs
are sometimes labeled
PLAY
Depending on the type of tape deck you connect, the inputs and
outputs on the PT-7010A can be connected to TAPE or DAT. If
you have both types connected, the PT-7010A will switch
automatically on to whichever source is playing. You can’t have
both playing at the same time. In the diagram shown, recording
from any selected source is possible except recording between
Cassette Tape and DAT. This is called “dubbing” and is beyond
the design intent of the Sherbourn PT-7010A Pre/Pro/Tuner.
The Tape Deck outputs
are sometimes labeled
RECORD
Page 21

Connection Diagram 7:
Connecting the 8-Channel
Analog Inputs
This configuration shows the 8-channel inputs that would
be used for DVD-A, SACD, and other DSP bypass
situations. You may also elect to use this input choice if
your DVD-Video player has its own surround processor
or if you have an external (dedicated) surround processor.
Note that although Composite
V ideo connections are shown, any
one of the 3 types could be used in
this connection diagram. Always
choose Component Video wher e
possible
The 8 channels of audio completely bypass all digital signal
processing functions of the PT -7010A including the tone controls,
surround processing, and bass management features. This provides
the purest signal quality for high resolution DVD-A or SACD
media. This input is only applicable for the MAIN ZONE, not
ZONE 2.
21
Page 22

Connection Diagram 8:
Connecting the AM and FM
Antennas
This configuration shows the AM and FM antenna connections.
The AM antenna should be a “loop” style antenna with two wires
that connect into the AM ANTENNA receptacles. The FM antenna
must terminate into an “F style” connector and has a 75 Ohm
impedance.
22
Position the AM and FM antennas where reception is best. The AM loop antenna that
has been included with the PT-7010A has been matched to the AM tuner for optimum
reception. If you choose to use an outdoor FM antenna, please observe proper safety
precautions regarding home wiring as outlined in the beginning of this manual.
Page 23

Connection Diagram 9:
Connecting an Amplifier
(Main Zone for a 5.1 Configuration)
This configuration shows the MAIN ZONE 5.1 channel
connections to a multi-channel amplifier. You may use
single ended RCA audio cables or the preferred balanced
XLR audio connections. The advantage of the XLR
balanced connections is that they have a much higher
rejection to any radiated noise from AC line cord
interference. Also note the connection of the 12 VDC
trigger to turn the amplifier on.
In this configuration the PT-7010A is connected to 5 channels of amplification via
balanced XLR connections. The sixth output would connect to the input of a powered
subwoofer. If using more than one subwoofer, use the pass through output on one
subwoofer to route the input signal to the additional subwoofer(s). If you choose to
connect the remaining two connections (LEFT and RIGHT SURROUND BACK)
you will need a 7 channel amplifier like the one shown here - the Sherbourn 7/2100A
- and you must enable the channels through the SPEAKER SIZE menu of the PT7010A remote control.
23
Page 24

Connection Diagram 10:
Connecting an Amplifier
(Main Zone for a 7.1 Configuration)
This configuration shows the 7.1 channel connections to
a 7-channel amplifier. Also note the connection of the 12
VDC trigger to turn the amplifier on.
24
Page 25

Connection Diagram 11:
Connecting a Separate Amplifier
for Zone 2
This configuration shows the ZONE 2 connections to a 2channel amplifier. The output is a left and right RCA
connection. Zone 2 does not have the option of balanced XLR
connections. Also note the connection of the 12 VDC trigger
to turn the amplifier on.
25
Page 26

Overview of the PT-7010A
Remote
• Fully backlit
• Pre-programmed for most brands of A/V equipment
• Learns commands from your other remote controls
• Macro feature lets you program a sequence of control
steps
• Operates up to ten components
• Does not lose programming memory when changing
batteries
Button Layout
Think of the Sherbourn PT-7010A remote control as ten
remotes in one. There are ten DEVICE buttons (five on
either side of the display) and each allows the remote to
operate one piece of equipment. From the factory, the
device buttons are labeled: CD, TAPE, AUX, ZONE2,
7010A, DVD, VCR, SAT, TV and CABLE.
Only the 7010A and ZONE2 buttons are pre-programmed,
and these allow the remote to operate your PT-7010A.
The remote can be set to operate your other remote
controlled equipment.
This is done in three ways from the hidden SETUP menu:
1) Entering a code from the tables at the end of this manual
2) Stepping through the codes
3) Learning from your other remotes
See Remote Setup on page 31 for more details.
1 LCD Display
The top line shows the present device, mode or status,
and it shows when a remote command is being transmitted.
The bottom line shows the page number, status and basic
instructions during programming.
The main part of the display shows the labels of the ten
DEVICE buttons. You can change any label and customize
the remote to fit your system. Note: this is not a touch-
sensitive screen, just a way of labeling the device buttons
on each side, and showing instructions and status.
2 Button and Display Light
The button on the right side of the remote briefly turns on
the lights for the buttons and display. Pressing it again
will turn it off. The duration of time the lights stay on is
adjustable or the lights can be disabled.
Adjusting the LCD Contrast: The contrast of the display
can be changed by holding down the MAIN button and
pressing the Joystick Pad UP or DOWN.
3 DEVICE Buttons
Once you press a device button, all the device buttons
change label and function to become buttons to operate
your device. There are two pages per device, and you can
move between them using the PAGE button.
4 PAGE Button
Use this to jump to various display pages. For example, if
you press the 7010A device button, the display changes to
show buttons which control your PT-7010A. If you press
PAGE, the display will move to page 2, showing more
functions for the PT-7010A
26
Page 27

5 MAIN Button
This button will return the remote display back to the Main
menu. Depending on which mode you are in, it may take
two or more presses. This will help you get back to the
Main menu if you ever get lost in the menus.
6 FAV Button
This button allows you to step through five display pages
of your favorite TV and radio stations. These can be set
and relabeled to suit.
7 JOYSTICK PAD
This pad and surrounding buttons are used to operate
standard DVD menus, and VCR and Tape Deck controls.
In 7010A mode, if you press MENU, the On Screen
Display will appear and the joystick can be used to select
and adjust the various items.
8 M1, M2 and M3 Macro Buttons
These MACRO buttons can be programmed to send out
a sequence of commands with a single press.
advantage of the On Screen Display (OSD) feature. Make
sure you have read the safety precautions on the precedin g
pages before attempting to use your PT-7010A or the
remote. You will need a measuring tape during this setup
process.
Step 1 -Add the batteries to the remote control as indicated.
Step 2 - Connect your source equipment and amplifiers to
the PT-7010A. If you haven’t yet done this, please refer to
the connection diagrams in the subsequent sections of this
guide. Safety Precaution - Make sure that all of your
equipment remains unplugged from the AC mains until
you have made all the connections.
Step 3 - Connect the speakers to your amplifier(s) so you
will be able to hear sound.
Step 4 - If you are using a new DVD player or had
previously configured it with 2-channel (RCA type) analog
audio connections, you may need to configure the output to
digital audio. In your DVD player’s AUDIO SETUP MENU,
you must set the digital output to BITSTREAM. If this is not
set correctly, the PT-7010A cannot decode the digital
information for discrete surround sound playback.
Quick Start Setup Instructions
Most features of the Sherbourn PT-7010A can be operated
by the remote control’s 7010A section. For the best Home
Theater performance, you should calibrate your speakers and
customize the PT -7010A settings for your system. Press the
MENU button on the remote control to activate the On
Screen Display (OSD). This has several menus which will
allow you to set up your speakers and calibrate your system
correctly. The remote can also be used to activate and control
all features of the second zone.
Adding Batteries to the Remote Control
The PT-7010A Remote Control uses four AAA batteries.
They can be added by simply removing the back cover of
the unit and placing them according to the diagram. Once
installed, you should expect 6-8 months of normal use before
having to replace them again.
Remember that the remote will not lose programming
memory when the batteries are removed for changing. This
will make subsequent battery replacements a breeze!
Quick Start Instructions for PT-7010A Setup
The following quick start instructions will help you get started
using your Sherbourn PT-7010A with the least amount of
trouble. For the best results, have the PT-7010A up and
running with a video screen connected so you can take
Step 5 - The PT-7010A has a Bass Management System
which allows the damaging bass from each full range channel
to be redirected to a subwoofer. Larger speakers can typically
play the full frequency range, however you may choose to
have smaller speakers (such as satellite types) can have the
bass redirected to the subwoofer(s). Make a note of which
speakers you would like to play the full frequency range
(Large) and those which will have the bass redirected
(Small). Also make a note of the approximate distance of
each speaker from your listening position.
Step 6 - Turn on the PT-7010A
Step 7 - Turn on your amplifiers, TV and other source
equipment.
(Refer to the drawing of the remote on the next page)
Step 8 - Press the remote MAIN button a few times to make
sure you are on the Main Menu in the remote’ s display.
Step 9 - Set the remote to operate the PT-7010A by pressing
the 7010A button.
Step 10 - Turn down the PT-7010A volume and use the
remote or front panel input selector to select a video source.
Step 11 - Play the source, and bring up the volume to a low
27
Page 28

MAIN Menu of the OSD on your TV.
Step 14 - Use the joystick pad left, right, up and down buttons
to navigate through the menus in the next steps.
NOTE: you can quit the OSD at any time by
pressing EXIT on the remote. Any changes
you make will be saved. There is no need to
navigate back through pr evious pages, unless
you want to make more changes.
When the OSD is active, the PT -7010A front
panel display shows an abbreviated message of where you
currently are in the menus.
S tep 15 - In the MAIN Menu, select the SETTINGS Menu,
and then the SPEAKERS Menu.
level. Make sure the video can be seen in the TV monitor.
S tep 12 - S top or pause the source.
The PT-7010A now needs to be setup correctly to suit
your speakers and system. The SETTINGS (OSD) menu
is used to enter and make three main adjustments:
• Speaker Size
• Speaker Calibration
• Speaker Position
This setup needs to be done when you use your system for
the first time, or if you change anything such as the amplifiers
or speakers, or the speaker position. The calibration is also a
good way to check that your system is working correctly.
These adjustments are made using the OSD as follows:
Step 13 - Press MENU on the remote to bring up the
S tep 16 - In the SPEAKERS Menu, select the SIZE Menu.
Use the joystick pad to set the size of each speaker to Small
or Large, or set to OFF for those speakers which are not
present. Return to the SPEAKERS Menu when you are
finished.
Step 17 - In the SPEAKERS Menu, select the
CALIBRATION Menu to adjust the output of each speaker.
A test noise plays in each selected speaker, and you use the
remote to adjust the volume of each speaker until they are
all playing at the same level. Return to the SPEAKERS
Menu when you are finished. This task can be made easier
and more accurately with a low cost sound level meter . Radio
28
Page 29

Shack and other local suppliers will have this type of product
readily available and it is highly recommended.
Step 18 - In the SPEAKERS Menu, select the
SPEAKER POSITION menu.
Enter the distance from your listening position to EACH
speaker . It will be handy to use that measuring tape to get as
close as possible. Don’t sweat a few inches, but being off
by a foot or more will compromise the system’s ability to
create a cohesive sound field.
blockbuster with up to nine speakers and a subwoofer fully
engaged!
For additional information, refer to the pages corresponding
to the topic listed.
REMOTE CONTROL Page 30
ON-SCREEN DISPLA Y Page 34
SPEAKER SIZE Page 37
SPEAKER POSITION Page 38
SPEAKER CALIBRA TION Page 39
BASS MANAGEMENT Page 42
SURROUND MODES Page 42-43
Step 19 - If you play a Dolby Digital or DTS encoded source,
the PT -7010A will automatically select the correct surround
mode. If it is a 2-channel source, you can select a surround
mode using the remote’s MODE buttons or from the front
panel.
Step 20 - The PT-7010A has many more options which are
described in further detail in the OSD menu section on page
34. These options will help you customize the PT-7010A to
suit your tastes. You can do this after you have used the PT7010A for a while and have a better idea of how you would
like to customize your system.
Now you should be ready to enjoy your new Sherbourn PT7010A. It will allow you to listen to many great and wonderful
audio formats from classic vinyl LP’s to the latest big screen
29
Page 30

Operation of the PT-7010A
using the Remote
Turning on the MAIN Zone
1) Press the remote’s MAIN button to make sure the
display is on the main display menu.
2) Press the 7010A device button to set the remote to
operate the PT-7010A. The display changes to show the
PT-7010A input selections.
3) Press PAGE to reach page 2, which shows the PRO
LOGIC-II, PARTY, STEREO, and the trims for center,
surrounds, and sub. On the right is ‘+’ (increase level) and
on the left is ‘-’ (decrease level).
4) The following buttons with fixed labels are also
programmed: Power, Volume Up, Volume Down, and
Mute. The number pad accesses the tuner presets directly,
and CH+/- steps through them. DIS is the +10 function,
and ENT is station enter. The MODE buttons either side
of the Joystick, allow you to select the different surround
modes.
After pressing 7010A, you will enter PAGE 1 and PAGE 2 screens
for commanding the PT -7010A by r emote. These functions allow
source selection and individual level contr ol of specific speakers
as labeled.
Turning on ZONE 2
1) Press the remote’s MAIN button to make sure the
display is on the main display menu.
2) Press the ZONE 2 device button to set the remote to
operate the Zone 2 of the PT-7010A. The display changes
to show the PAGE 1 of the ZONE 2 input selections.
3) The hard buttons operate Zone 2 controls such as
Power, Volume, Mute, Tuner Controls, and Presets.
4) Press PAGE to reach page 2, which shows Zone 2 on/
off, Zone 1 on/off, and balance left/ right.
Note: Zone 2 must first be enabled using the OSD (see
page 37), or these controls will have no effect. Zone 2 is
disabled by default as it is shipped from the factory . When
enabled, Zone 2 can be turned on even if the Main Zone
is off. See page 37 for more Zone 2 details.
After pressing ZONE2, you will enter PAGE 1 and PAGE 2
screens for commanding Zone 2 of the PT-7010A by remote.
These functions allow source selection as well as control of
turning on/off of both zones 1 & 2
30
Page 31

Programming and Configuring
Your Components
You must enter the SETUP mode to program the remote
control for the other components in your system, and to
customize it for your convenience. There is only one way
to enter the SETUP mode: Hold down both the MAIN
and ENT buttons for a few seconds until SETUP appears
in the display.
The SETUP display shows 10 options.
P-PRO
LEARN
FAV
MACRO
PUNCH
RECAL
ERASE
EDIT
LIGHT
CLONE
Each of these setup options is described in the subsequent
pages of this section. Please note that there are multiple
steps involved in each program sequence, so it is best to
read through the section thoroughly BEFORE beginning
to setup the PT-7010A remote.
P-PRO
The remote is pre-programmed to operate many types of
equipment. The P-PRO mode allows you to enter a 3-digit
code to recall the commands for each of your system
components.
1) Find the brand of your TV, DVD, VCR, CD and other
components, then look at the tables starting on page 49 of
this manual. Make a note of the various codes for each
piece. Note that some TV/VCR combined units may use
VCR codes, not TV codes.
2) Sit in a position in front of your equipment, and make
sure that all components are turned off.
3) In the SETUP mode, press P-PRO and the device labels
will appear.
4) Select the device button you wish to program, then
choose the device table you took the code from. For
example, for a TV, press TV twice. If you want AUX to
control a VCR, press AUX, then press VCR.
5) You can now enter a code using the remote’s keypad,
or UP or DOWN. After the third digit is entered, the remote
transmits a power command. If the component turns on,
press SAVE and then EXIT.
6) If you could not find a code which works, hold the UP
button to step through all the codes in the table for that
device. Release UP when your equipment turns on. If you
go past, press DOWN. Press SAVE and then EXIT.
7) The display will change to show the devices again, still
in the P-PRO mode. Repeat steps 4 to 7 until all your
equipment is working.
8) Press MAIN to return to the main menu from any setup
mode.
9) Test the remote to see which buttons will operate your
equipment. For example, if you were trying to control your
TV, check the power, channel up and down, and volume
up and down. If some of these buttons are not working
correctly, choose another code for that manufacturer, or
you can program over those not working by using the
LEARN mode.
LEARN
The PT-7010A remote can learn commands from other
remote controls. This is useful if the pre-programmed
commands do not operate some of your equipment, if
certain buttons do not work, or you want to customize key
functions. NOTE: PAGE, MAIN, FAV, M1, M2 and M3
cannot be reprogrammed.
Find your original remote and make sure it has good
batteries. You must also make certain it operates your
equipment perfectly. Operate a few commands to ensure
that the buttons you want to program are functioning
properly from that original remote.
In the following example, the Sherbourn remote will learn
the PLAY command from a DVD remote.
1) Point the DVD remote into the Red IR top window of
the Sherbourn remote. Place them on a flat surface, about
1 to 2 inches apart, and avoid bright lighting or sunlight.
2) In the SETUP mode, press LEARN.
3) Select the DVD device button and the display will
change to show some common DVD labels, remembering
31
Page 32

that there are two pages from which to choose.
4) Select the PLAY button just above the joystick pad.
The display will show “READY.”
5) Press your DVD remote’s PLAY button. The display
will show “GOOD” if it has been accepted. If it shows
“FAIL,” press PLAY again.
6) Press another button on the Sherbourn remote and
repeat the procedure until all the DVD buttons you need
are learned.
7) Press MAIN once to return to the LEARN mode, twice
for SETUP and three times for the MAIN menu.
8) Try out the Sherbourn remote and see if the learned
buttons will successfully operate your equipment. You may
find that some commands cannot be learned. This may
happen because some commands are too long, too short
or simply not compatible with a learning remote such as
the Sherbourn remote, but this is very rare.
9) The EDIT command can be used to change the labels
if some of the standard labels do not correspond to your
original remote buttons
EDIT
This mode allows you to change the labels in the display
to suit your system. You can change device labels, or the
buttons on page 1 or page 2 of a device, or the F AV labels.
1) In the SETUP menu, press EDIT.
2) To edit a device label, press PAGE and then the device
button. Go to step 5.
3) To edit a button on a device’s page 1 or 2, press the
device button and its page 1 will appear. Press PAGE to
reach page 2 if required. Go to step 5.
4) To edit a FAV button, press FA V and select the button
you want from the five pages. Use PAGE or FA V to change
pages to find the one you want. Go to step 5. (Read about
FAV programming in the subsequent paragraphs)
5) Press the button you want to edit and the first character
will flash.
6) Use the keypad to enter up to 5 characters. This is like
using a telephone keypad to enter letters. For example, if
you press 1 a few times, it will step through A, B, C, 1.
Press 2 for D, E, F and 2. The number 0 has a selection of
special characters from which to choose.
7) Press the JOYSTICK RIGHT to move on to the next
character, or press JOYSTICK DOWN to delete a
character.
8) When finished, press the button next to the label you
just edited. You can edit other buttons, or press MAIN a
few times to return to the main menu.
FAV
This mode allows you to enter your favorite TV and radio
stations. Note that the following procedure assumes you
have already programmed your remote to operate your TV,
radio tuner and other equipment. The keypad must already
be able to select channels on your TV or SAT , and any PT-
32
7010A tuner presets.
Before using FA V mode, use the EDIT mode to change
the labels in the FA V display to show your station call
signs or reminders. You can also delete the labels from
unused buttons, or move all your most favorite FA V labels
to PAGE 1.
1) In the SETUP mode, select FAV.
2) Select the device, such as SAT, TV or 7010A, to learn
station commands from.
3) The FAV display will appear , and you can step through
five pages using PAGE or FAV .
4) Press a favorite channel button and the first character
will blink. Use the keypad to enter the channel number.
For channels below 10, you should enter a 0 (zero) first. If
you want, you can enter a power button before entering
the channel. Also, if your equipment needs it, you may
have to enter the ENT button after the channel is entered.
If you want to add a short delay, press PAUSE (II). You
can add 0.2 seconds each time you press PAUSE.
5) When you have finished with one channel, press its
button, and the label will reappear. Move on to the next
favorite channel and program it in the same way. Repeat
this for all the channels and devices. Press MAIN to return
to the top menu.
6) Now, if you press the molded FA V button, the favorite
channels appear in the display, and the ones you
programmed will take you to your favorite channel or radio
station. If you programmed in a power command, the TV
or tuner will turn on first.
7) The commands are sent in sequence, for example for
channel 13, first the 1 and then the 3 are sent. Wait a few
seconds before switching between favorites, or your TV
may receive for example, the 1 of one button and the 2 of
the next.
PUNCH
This mode allows you to set up the volume, channel up/
down and transport buttons so they will work for your
main devices, no matter which device the remote is set
for. For example, the volume buttons can operate the TV,
even if the remote is set to VCR. The channel buttons can
operate the VCR, even if the remote is set to TV.
1) In SETUP, select PUNCH and the display changes to
show VOL, CH, and PLA Y. The PLAY selection will make
the eight transport buttons around the joystick “punch”
through.
2) Select one of these buttons, for example VOL.
3) Press a device button for the device you want the
Volume commands to appear in (punch TO).
4) Press a device button for the device you want to learn
from (punch FROM). These settings are saved.
5) Repeat steps 2 to 4 until you have punched to all devices
you want.
6) Use MAIN to return to SETUP.
Page 33

NOTE: To erase Punch commands from a device (return
buttons to their previous programming): Repeat steps 1
and 2, then press the device button twice. Repeat for other
devices, then press MAIN to return to SETUP.
ERASE
Use this mode to erase commands stored in the remote.
This does not affect the labels, just the stored IR
commands. The pre-programmed commands for the PT7010A can be lost. Please follow this section
CAREFULLY!
1) In the SETUP mode, select ERASE and the display
will show LEARN, FAV, MACRO and EXIT.
2) If you select LEARN, press ALL to erase all learned
buttons, or KEY to erase one device at a time. If you use
KEY, press MAIN and EXIT when you have erased all
the devices you want.
NEVER select ALL! This will erase the 7010A
operating codes and the remote will have to be sent to
the factory for reprogramming.
3) If you select FAV, press ALL to erase all favorites, or
KEY to erase single favorites. Note that the labels are not
erased.
4) If you select MACRO, press ALL to erase all macros,
or KEY to erase macros, one device at a time.
5) Press EXIT to return to the SETUP menu, and press
MAIN to return to the main device menu.
System at the top. The ten device buttons can also be
programmed as macros, although these will only be
activated if the device button is held down for a few
seconds.
Note that the macro buttons are independent of which
device the remote is set for. So there is only one M1 macro,
only one power macro etc.
1) In the SETUP mode, press MACRO.
2) Press one of the buttons you wish to program as a macro,
such as M3, Power, or a device button.
3) Press up to 20 buttons you would like the macro program
to store. Do this in the exact order you want them to be
transmitted. Use the P AGE, F AV and the direct buttons to
find buttons to use in the macro.
4) To add a delay between steps, you can add 0.2 seconds
each time you press PAUSE (II). This does not take up a
step.
5) Press the CHANNEL UP button to save your macro.
6) Repeat this procedure to program more macros, and
press MAIN to return to the main menu.
7) Try out the macros to see if they work as expected. It
may take some time to transmit all the commands in
sequence, so keep the remote pointing at your equipment
and do not move it during this time.
Note that the remote’s ZONE 2, PAGE 2 has discrete on
and off codes for the Main Zone and Zone 2. You can use
these within Macros instead of the main power button
commands (which toggle on/off).
LIGHT
This mode allows you to either disable the light, or change
the number of seconds it stays on. (The light is inactive
while in the SETUP mode).
1) In the SETUP menu, select LIGHT and the display
will show ON, time in seconds, SAVE and EXIT.
2) If you press ON, it changes to OFF and disables the
light. This is useful if you want to save battery life, or if
you have children who like to use the remote as a flashlight.
3) Use the keypad to enter the amount of time (in seconds)
in which you wish the light to remain on after releasing
the light button. If you enter 00, it only stays on while the
light button is held down.
4) Select SAVE, or press EXIT to make no change. Either
of these will return you to the SETUP menu.
MACRO
The macro mode allows you to set up certain buttons to
transmit up to 20 commands in sequence. For example, a
single button press could turn on all of your home theater
equipment, and set the PT-7010A to DVD, set the TV to
channel 3, and set the DVD to play, make the tea and put
the cat out.
The buttons which can be programmed as macros are: M1,
M2 and M3 at the bottom of the remote, and Power and
RECAL (Recall)
This mode lets you quickly see the three digit codes you
have assigned to each device. This is useful if you want to
check the tables and find other codes which may work
better.
1) In the SETUP mode, select RECAL. The device labels
and their codes will flash alternately, before returning to
the SETUP menu. Make a note of the codes.
2) Press MAIN to return to the main device menu.
CLONE
This feature allows you to easily copy all of the commands
and labels from one Sherbourn remote (of the same type)
to another.
1) Set both remotes on a flat surface, with their IR windows
pointing towards each other, about 1 or 2 inches apart.
2) In the SETUP menu for
and the display will change to show SEND, RCV (receive)
and EXIT.
3) Press SEND on the remote you want to copy from. Press
DEVIC to only clone a single device, then press the device
button. Press ALL to clone all programming.
4) Press RCV on the remote you want to copy to.
5) When you are ready , press START on both remotes. It
may take up to 1 minute to complete the clone sequence
both remotes, press CLONE
33
Page 34

so do not move the remotes during this time. The remote
will flash “GOOD” if it has successfully learned all the
commands. If it flashes “F AIL,” then repeat this procedure.
6) Press MAIN to return to the main menu.
The On-Screen Display
(OSD) Functions
Video Connections
The On Screen Display (OSD) function is present at the
MAIN Composite Video, S-Video, or Component Video
outputs. It is also present at the output labeled VID2/
MON2, but only if it is set to MON2 in the programming
steps using the OSD. Make sure that your TV monitor’s
video input is connected correctly to one of these outputs.
OSD Activation
The OSD is activated using the remote’s MENU button
(with the remote set to operate the 7010A function). The
joystick pad and surrounding buttons allow you to navigate
through the OSD menus to control and customize many
features of the PT-7010A.
OSD Menus
The first menu of the On Screen Display (OSD) has the
following items listed. TRIMS, MODES, T ONE, INPUTS,
SETTINGS, and an EXIT option to quit programming.
Press MENU on the Sherbourn remote to bring up the first
OSD menu screen.
How to Navigate the OSD Menus
Select any one of the options using the joystick pad UP
and DOWN to navigate through the menu choices. Once
you make a choice, a FORWARD arrow after text on the
screen, shows there is more information on another page.
A BACK arrow shows that you can return to the previous
page. When applicable, a DOWN arrow, such as at the
bottom of the Inputs Menu, shows there is a second page
of similar choices. In these circumstances, the UP arrow
shows the way back to the first page.
Press EXIT to quit the OSD at any time. Any changes you
make will be saved.
Note that the PT-7010A front panel display shows
abbreviated text when the OSD is activated.
Quick Access to Information
Pressing INFO at any time will bring up a short description
of the source you are listening to.
For example if you are listening to a DVD, the TV display
might show:
DVD DIGITAL 48K
DTS 5.1 / 5.1
What this means is that DVD is the selected input and the
signal type is DIGITAL. The sample rate of the signal is
48kHz and the decoding mode is registered as DTS mode,
5.1 is the input format, 5.1 is the output (i.e. five speakers
and a subwoofer).
NOTE: Y ou can quit the OSD at any time by pr essing EXIT
on the remote. Any changes you make will be saved. Ther e
is no need to navigate back through pr evious pages, unless
you want to make more changes.
TRIM Menu
This menu allows you to adjust the individual volume level
of your speakers “on-the-fly .” Although careful calibration
is key to a good home theater, the Trims allow fine
adjustment of the current program playing. The T rims add
or subtract from the reference levels set during calibration
using the Speaker Calibration menu. Recalibrating will
reset these on-the-fly trims to zero.
34
Note: The Trim adjustments do not exceed +/-10 dB
Page 35

MODES Menu
Dynamic Range
This is the range in level between the loudest sound and
quietest sound during Dolby Digital and DTS playback only.
The options are QUIET (narrow range), MEDIUM (average
range) and LARGE (wide range).
allow you to create a more realistic surround effect from
2 channel sources:
• Center Width -This spreads the center channel between
the front left and right channels.
• Panorama - This wraps the front left and right channels
around to the surround channels.
• Dimension - This adjusts the balance between the front
and surround speakers.
DTS LFE
Set your subwoofer (LFE) channel for either CINEMA or
MUSIC during DTS playback. In the Cinema setting, there
is no change to the DTS subwoofer level from that
mastered on the DTS disc. For the Music setting, there is a
10 dB reduction, necessary to accurately match the levels on
DTS music discs.
DTS Neo:6
This allows you to select either CINEMA or MUSIC for
DTS Neo:6 playback. These two options are described in
more detail on page 43.
Select Quiet for late night listening if you do not want to
disturb anyone. Select Loud for full dynamic range.
Pro Logic llx Sub Menu
Select this for Dolby Surround playback, or to enhance any
2-channel stereo program. A second menu will show the
available options.
Party
This mode allows you to play a stereo source with multiple
speakers. A second menu allows you to select which speakers
are present.
Jazz Club Ambience
This adjusts the ambience and effects of the Jazz Club mode,
simulating various venue sizes and strength of the rear
reflections.
TONE Menu
The Bass and Treble can be boosted or cut by up to 10
dB.
Pro Logic II and Pro Logic llx Modes:
PLII Movie, PLIIx Movie, PLII Music, PLIIx Music, PLII
Matrix, or PLII Pro Logic. These are described in more
detail on pages 42-43.
PLII and PLIIx Music modes have three options which
35
Page 36

INPUTS Menu
These menus let you select which input you would like to
configure. Pressing the joystick right on each input brings
up a second menu which allows you to configure what
happens when each input is selected.
Input Configuration Menus (The example shows the
DVD menu)
NAME - Use the joystick up/down, and left/right to change
the display name for any input, up to 9 characters. Move
fully to the left after entering the name.
whenever the 8-Channel audio input is selected. Also, this
input only works in the MAIN ZONE, not in ZONE 2.
Tuner Preset Menu
This allows you to set the AM/FM band and frequency of
up to 40 radio stations. They can be recalled quickly and
set as favorite stations on the remote control. See page 44.
GAIN TRIM - Use this to adjust all of your sources to
play at similar levels. To prevent overloading, the levels
can only be adjusted downwards. You should try and trim
all the inputs to be the same average level as your quietest
source.
DEFAULT MODE - Set the input to a favorite surround
mode or stereo.
MAIN ZONE - Enable/disable the selected input in the
Main Zone. You can set up your system so any unused
inputs are not selectable. From the factory, the inputs are
enabled. If you choose to disable an input, then it will not
play in the Main Zone.
TRIGGER RELAY - The Trigger Relay can be set to turn
on whenever the input is selected. This could be used to
turn on an amplifier, video screen, lighting controls, etc.
ZONE 2 - Enable or disable the input for use in Zone 2.
Sometimes this is a useful idea to implement when a simple
selection is desired in the second zone (such as a patio,
play room, garage, or bedroom).
Note: The 8-Channel input menu is different fr om the other
menus as it allows you to select a specific video input
For FM stations, try to select the Stereo-NR (noise
reduction) for the best reception.
Saving AM/FM Presets
Step 1) Once you are on a preset in the OSD, press the
MODE button on the remote control to select the band
from FM NR ON, FM NR OFF, or AM MONO.
36
Page 37

Step 2) Use joystick LEFT and RIGHT to select the
frequency.
Step 3) Pr ess the joystick CENTER to enter that frequency
into preset memory and play that station.
Step 4) Use the joystick DOWN button to move to the
next preset down on the screen. The bottom arr ow on each
screen leads to the next page of presets.
Step 5) Repeat this for all the presets you want to set, then
press EXIT when finished.
Power Up Volume
This allows you to set the PRESET volume level mentioned
above. You might want to set it to a low level to avoid any
surprises upon turn-on, especially if other users like loud
music.
Max Volume
The volume can be set to not exceed a certain level chosen
by you. This is useful if you have sensitive speakers,
sensitive neighbors, or you would rather not have others
play your system too loud. Finally, a smart preamplifier
where YOU can police the volume without even being
there!
ZONE 2 Menu
These settings are like those described for the Main Zone.
In addition, the entire Zone 2 can be enabled or disabled,
and the stereo balance adjusted with this menu.
SETTINGS Menus
MAIN ZONE Menu
Power Up Source
This sets the input source which the 7010A button will
then always select whenever the PT-7010A is turned on.
Power Up Volume Mode
This lets you choose the volume level the PT-7010A
reaches when it is turned on. You can select from a
PRESET level, set below (the power-up volume), or it can
play at the LAST level it was playing before it was turned
off. The PT-7010A will always turn on at the level set
here, but it can be adjusted to any level afterwards.
The Power Up Volume has three options: PRESET, LAST
and FIXED. The FIXED option allows you to set the Zone
2 to a fixed volume, not adjustable with the remote.
PRESET and LAST are as described for the Main Zone.
SPEAKERS Menu - SIZE
This menu allows you to enter the size of your speakers.
The bass management of the PT-7010A will then
automatically assign each speaker a frequency range based
on your preferences. For full range speakers with low
frequency capabilities, you will probably choose LARGE.
In the case that speakers are not capable of full range duty,
choosing the SMALL setting will engage a high pass
crossover point at the point which is chosen for the
subwoofer. When SMALL is chosen, the low frequency
range is sent to the subwoofer.
See pages 40 and 42 for more details on bass management
and information regarding the adjustment of the bass
management crossover point.
37
Page 38

RANGE.
Select SMALL for any speakers such as satellites with 5
or 6 inch woofers. They will then receive the higher
frequency range above the crossover point selected for
the subwoofer. Remember that if you are not completely
sure (or if you choose to play it safe at first) you can select
this setting to get things started and see how much (if
anything) is missing from the audio signal content in the
MAIN speakers.
Select OFF if you have no surround speakers.
CENTER Speaker
In the OFF position, the center channel information is
redirected to the fronts. This is sometimes known as a
“PHANTOM” center channel.
MAIN Speakers
Select LARGE for any speakers which are capable of good
bass performance. Frequency response will be FULL
RANGE.
Select SMALL for any speakers such as satellites with 5
or 6 inch woofers. They will then receive the higher
frequency range above the crossover point selected for
the subwoofer. Remember that if you are not completely
sure (or if you choose to play it safe at first) you can select
this setting to get things started and see how much (if
anything) is missing from the audio signal content in the
MAIN speakers.
SIDE-AXIS Speakers
Select LARGE for any speakers which are capable of good
bass performance. Frequency response will be FULL
RANGE.
Select SMALL for any speakers such as satellites with 5
or 6 inch woofers. They will then receive the higher
frequency range above the crossover point selected for
the subwoofer. Remember that if you are not completely
sure (or if you choose to play it safe at first) you can select
this setting to get things started and see how much (if
anything) is missing from the audio signal content in the
MAIN speakers.
Select OFF if you have no side-axis speakers. The size is
always the same as the main speakers, so do not set the
mains to LARGE, if the side-axis speakers are small and
not capable of good bass performance.
SURROUND Speakers
Select LARGE for any speakers which are capable of good
bass performance. Frequency response will be FULL
In the ON position, the center channel can be configured
in the same manner as the MAIN speakers (Large or Small).
SURROUND BACK Speakers
Select OFF if you have no surround back speakers. The
information will be shared among the other surround
speakers, creating a phantom back channel.
SUBWOOFER
Select ON if you have a subwoofer. It will then receive
any LFE signals (from 5.1, 6.1 sources), and the bass from
any channels set to SMALL. If you have no subwoofer,
you would obviously need to select OFF so that other
speakers in the system can receive the bass that is otherwise
handled by the subwoofer.
Note: the bass management does not work for the 8Channel input, or for Zone 2. Therefore the speaker size
settings will have no effect and these channels will always
be full range.
SPEAKERS Menu - POSITION
This menu allows you to enter the distance from your
listening position to the various speakers. The PT-7010A
will then automatically adjust and correct the speaker delay
times. The sound from each speaker should arrive at the
listener seated in the primary listening position at the
correct time. Please note that the best sound stage and
imaging will result from careful attention to this parameter ,
especially for the FRONT speakers.
The procedure is as follows:
1) Measure (in feet and inches) how far each speaker is
away from the center listening position of your home
theater.
2) In the OSD menu, use the r emote contr ol joystick arrow
buttons to enter the distance in feet for each speaker.
38
Page 39

3) The PT-7010A automatically sets the appropriate delays
for each speaker so the sounds arrive at the primary
listening position at the correct time.
4) Use the table at the right to r ecord your speaker distance
measurements.
Speaker Placement Tip - There is no substitute for well
placed speakers, especially in pairs and especially in the
main front (L, C, R) positions. If you can place the main
speakers equidistant (at similar distances) from the
primary listening position, you will enjoy the most
balanced sound levels from most points in the room. The
farther away or closer the left speaker is from the listener
(when compared to the right speaker), the mor e delay one
will have over the other. Sitting nearest the speaker with a
high degree of delay does not sound natural. Read more
about speaker placement tips in the “Speaker Placement
Tips” section.
SPEAKER POSITION DISTANCE
LEFT MAIN / SIDE
RIGHT MAIN / S IDE
CEN TER S P EAK ER
LEFT S URRO UN D
RIGHT S URRO UN D
LEFT S URRO UN D BAC K
RIGHT S URRO UN D BAC K
its level can be adjusted using the joystick left/right
buttons. Adjust each speaker in turn until they are all equal
in volume.
The best results are obtained if you use a Sound Pressure
Level (SPL) Meter. This is a hand held meter which will
accurately measure and display the sound level. Adjust
all of the speakers until they are playing within 1 dB of
each other. Without a meter, you can still obtain good
results with careful listening.
3) Repeat the procedure several times for each speaker
until you are satisfied they are playing at the same level.
4) Press the joystick UP to return to the top of the menu,
and then press joystick LEFT to exit. The calibration noise
generator will turn off.
SPEAKERS Menu - CALIBRATION
The calibration procedure allows you to adjust the volume
level of each speaker in turn until they are all equal. This
will give you the best Home Theater performance. You
should only do this calibration when you are sitting in
your usual listening/viewing position.
Preliminary: Play a movie and adjust the volume for a
comfortable listening level. The volume of the calibration
test noise is linked to the setting of the main volume
control, so if the test noise is too quiet, turn the main
volume up a little and retry.
1) Use the OSD to navigate to the SPEAKER
CALIBRATION menu.
2) Press the remote’s joystick down to turn on the noise
generator . While the test signal is playing in each speaker,
39
Page 40

SPEAK ER P OS I TI ON LEVEL (in dB)
LEFT MAIN SPKR
C EN T ER S P EAKER
RIGHT MA IN S P KR
allows you to redirect the low frequencies of your main
and surround speakers to a subwoofer . The crossover point
of the left and right main speakers can be selected from
40 Hz to 160 Hz. There is an additional selection for the
center and surround speakers with the same range of
adjustment between 40-160Hz.
RIGHT S I DE AX I S
RIGHT S URROUND
RIGHT S URR BAC K
LEFT S URR BAC K
LEFT S URROUND
LEFT SIDE AXIS
SUBWOOFER
The main volume control adjusts the volume of all of the
speakers up and down at the same time. They keep the
same relative levels as were originally selected.
Dolby Digital, Dolby Pro Logic and DTS soundtracks are
designed to be played back on a properly calibrated Home
Theater. The sounds from each speaker will be at the
correct relative levels, as the movie sound director
designed them. Repeat the calibration if you change any
speakers or your external power amplifiers. You should
also run a new calibration whenever you move your seating
relative to the speakers.
If you set the L-R CROSSOVER to 80 HZ (a good
starting point), left and right channel main speakers set to
SMALL receive frequencies above 80 Hz. The frequencies
below 80 Hz are then redirected to the subwoofer. The
same scenario applies to the C-SURR setting for center
and surround speakers.
Most manufacturers provide a -3 dB specification for their
speakers. This is the frequency where the speaker’s output
has dropped by 3 dB. Set the PT-7010A crossover to this
frequency or above. If you cannot find this, set the
crossover to 80 Hz (the default). Set your subwoofer’s
own crossover control to maximum frequency or bypassed
mode. If it is set lower than the PT -7010A, there would be
a hole in the mid bass, and bass information would be
missing.
Subwoofer Mode
The subwoofer output can be set to NORMAL or
Note: The range of adjustment is +/- 10 dB for each
speaker.
Crossover Adjustment
The bass management system built into the PT-7010A
ENHANCED BASS mode.
The Enhanced Bass mode provides an output to your
subwoofer even when you are listening to a stereo source
with main speakers set to LARGE. In the Normal mode,
there would be no subwoofer output in this case, and the
bass would only come from the main speakers. The
Enhanced Bass mode has no effect if the main speakers
are set to SMALL, as the subwoofer is automatically
engaged. It also has no effect in 5.1 or greater surround
modes.
VIDEO Menu
OSD POPUP (Volume, Source, and Mode)
40
Page 41

When enabled, a “pop-up” message appears on your TV
any time the volume (including mute or on-the fly trims),
source, or surround mode are changed. The OSD circuit
in the PT -7010A is not switched into the video path unless
called up by an OSD action. This allows for the best
possible video reproduction quality. When the OSD display
activates, it is normal to see a slight flicker on the screen.
This menu allows you to choose which, if any features,
are enabled for OSD features after initial setup of the PT7010A.
Note: The speakers keep their relative time delay settings
which the PT -7010A calculates from the Speaker Position
Menu settings. The video delay is just added on top. Leave
the video delay at zero if you do not have an external video
processor or if you detect any noticeable synchronization
problems with dialogue.
SOFTWARE Menu
This menu is used to show the current revision levels of
system software within your PT -7010A. It also allows the
PT-7010A Flash memory software to be upgraded by use
of the RS-232 port.
Note: The OSD “pop-up” does not function on the
component video output. This is intentional, as we feel
that the OSD insertion circuitry will degrade the
performance of the component video circuitry due to the
ultra wide bandwidth requirement for optimal component
video performance.
VIDEO DEF AULT
Select the video output where the “pop-up” text appears,
either S or composite video, but not both. The full OSD is
not affected by this menu item, as it is available on both.
VID2/MON2 OUT
VID2: the VCR2/MON2 outputs can be used for recording
to a second VCR. There is no OSD, and the output is muted
when VID2 is chosen as an input (to prevent feedback).
MON2: the VCR2/MON2 output becomes a second
monitor output (with OSD) for another TV. It will not mute
when VID2 is chosen.
VIDEO DELAY
This adjustment is useful if you have an external video
processor in your system. Video signals may become
delayed with respect to the audio signals. Although it is
called Video Delay, it is actually a delay adjustment of the
audio signals relative to the video signals. Use the remote’s
joystick pad to adjust the delay in one millisecond steps.
An equal amount of delay time is added to all audio
channels.
Please note that to accomplish the software upgrade, you
will need to connect the PT-7010A to a computer with a
serial cable (DB-9 type). The latest version of the PT7010A software is available on the Sherbourn website.
You will need to download this to your computer before
connecting and upgrading the PT-7010A.
For detailed instructions on this procedure and to check
for the latest software version, please visit the Sherbourn
website at www.Sherbourn.com.
CONTROL Menu
In most cases, there is no need to change these settings
(all enabled by default). You should make any changes
with caution. This menu allows you to enable or disable
the RS-232 port and the rear panel IR remote control
connections. The front panel IR receiver can also be
disabled if required, but make sure the rear panel IR
receiver is working correctly and is still active before doing
this.
The front panel IR can be re-enabled by holding down the
remote’s MENU button for several seconds, while pointing
it at the front IR window.
(See diagram on next page)
41
Page 42

Special Features of the
Sherbourn PT-7010A
Bass Management
Unlike higher frequencies, it is difficult to discern exactly
from which direction lower bass is coming. The PT-7010A
has a bass management system which takes advantage of
this effect. It allows you to choose whether your speakers
will play the full frequency range, or if the bass will be
redirected to the subwoofer.
The advantages of redirecting the bass to a subwoofer
include the following:
The overall bass of the system is improved as sub woofers
are specially designed for this frequency range.
• The subwoofer can simultaneously play the bass from
all of the speakers, in addition to its own low frequency
effects channel (LFE).
• There is no loss in per ception of the position of movie or
music sound effects, as the ear cannot easily locate the
position of low frequency sources.
• Smaller speakers can be used for main front, center and
surrounds, as they do not have to reproduce the low
frequency range. This leads to a saving in speaker expense
and room space. A subwoofer is required if the front
speakers are set to SMALL.
• Y our amplifiers do not waste power r epr oducing the low
frequency range when using a power ed subwoofer . Nearly
all home audio subwoofers are self powered.
See page 40 for information regarding the adjustment of
the bass management crossover point.
Note: The SPEAKER SIZE menu is used to set the bass
management correctly for your speaker system. See page
37.
Dolby Digital and DTS modes are designed especially for
complete systems with front, center, and surround speakers
and subwoofers. You need all of the speakers to get the
best performance from your Home Theater. If you do not
have a subwoofer connected, then you should not use the
bass management system (so set all the speakers to Large).
Without a subwoofer, you will be missing the 5.1 LFE
(low frequency effects) information.
Considering the advantages of the bass management
system, you might try setting all of your speakers to Small,
even if they are capable of good low-frequency
performance.
Surround Modes for 2 Channel Source
Material
For 2 channel input sources, you can choose from the
following modes:
• STEREO
• DOLBY PRO LOGIC II or PRO LOGIC llx
• PARTY
• JAZZ CLUB
• DTS Neo:6
• SOURCE DIRECT
DOLBY PRO LOGIC II and DOLBY PRO LOGIC llx
This is the conventional two-channel stereo mode with
sound from your left and right speakers. The PT-7010A
bass management lets you use your subwoofer to handle
the lower frequency range. Dolby Pro Logic II has several
options which can be set using the On Screen Display
(OSD) menus. These include:
MOVIE mode for Dolby Surround soundtracks. These
are decoded by the PT-7010A into separate channels: left
and right channels for off-screen imaging, a center channel
for most on-screen dialog, and stereo surround channels
for ambience and special effects.
MUSIC mode for listening to any stereo material. This
mode also includes three options:
• Center Width, which spreads the center channel across
the front soundstage.
• Panorama, which wraps the left and right channels
around you.
• Dimension, which adjusts the front/rear balance of the
PLII or PLIIx effect.
Try the PLII or PLIIx MUSIC modes for all of your stereo
42
Page 43

programs, and adjust these extra options to suit your taste.
PRO LOGIC llx extends the Dolby Pro Logic II
technology by adding stereo full range surround back
channels. Use this feature instead of Dolby Pro Logic II if
you are using the surround back channels in your system.
This mode also features the Music and Movie modes as
described above.
PLII MATRIX mode can be used for mono sources, or
for FM programs with poor stereo reception.
PLII PRO LOGIC mode emulates the original standard
surround mode. It can be used for source material which
is not of optimum quality, or if you just feel nostalgic for
the way things were.
PARTY
This extra stereo mode copies the front speaker signals to
the other speakers in your system. This mode adds
tremendous presence to your stereo sources and is great
for parties and casual listening alike. The OSD menu can
be used to select which speakers are active in this mode.
JAZZ CLUB
In this DSP mode, the surrounds simulate the ambiance
caused by rear reflections and effects of a small to medium
sized venue. This is useful for adding surround sound
effects to stereo sources. The ambiance effect can be varied
using the OSD MODES menu.
DTS Neo:6
The CINEMA option can produce up to six full range,
separate channels and a subwoofer output from stereo
matrix surround sources. This enhances the playback of
sources such as surround sound video tapes, Laser Discs
and broadcast TV programs.
The MUSIC option can expand normal stereo programs
into six channels. It does so in a natural sounding way,
which enhances the listening experience.
SOURCE DIRECT
This mode bypasses all DSP , Tone, and bass management
circuits. It is stereo analog only, and offers the shortest
signal path through the PT-7010A. Only the front left and
right speakers are engaged. Do not use this mode for
digital-only sources, as it only routes the analog audio. T o
prevent damage to your speakers, this mode only works if
your front speakers are set to Large.
In addition to these modes, and those offered for multichannel sources, the side-axis speakers will widen the front
sound stage and fill in the sound field between the front
speakers and the surrounds. Note that the side-axis
speakers are active in stereo as well as multi-channel
operation.
Surround Modes for Multi-Channel
Sources
For multi-channel sources, the PT-7010A will
automatically select the correct mode from one of the
following:
• DOLBY DIGIT A L
• DOLBY DIGITAL EX
• DTS
• DTS-ES MATRIX
• DTS-ES DISCRETE
If you want to try one of the modes on the previous page,
you should select a 2-channel output from your DVD
player ’s options menu.
NOTE: In your DVD player ’s audio setup menu, set the
digital output to BITSTREAM. If this is not set correctly ,
the PT-7010A cannot decode the digital information.
DOLBY DIGITAL 5.1
Dolby Digital and DTS are “5.1” surround systems with
five main channels: left front, center, right front, left
surround, and right surround. Each channel can play the
full frequency range and is independent of the other
channels. The “.1” denotes the subwoofer channel which
plays the low frequency effects (LFE), also independent
of the other channels.
Dolby Digital EX and DTS ES offer “Extended
Surround.” Both systems offer a surround back
channel which effectively fills in the otherwise empty
sound space behind you.
DTS (5.1)
This mode is available if the PT -7010A automatically
detects that a DTS encoded source is present at one of
its digital inputs. Look for the DTS Logo on DVDs,
Laserdiscs, CDs and other sources. You must select
DTS from the DVD options menu to configure the
DVD player to output a DTS BITSTREAM. The PT 7010A will then automatically recognize it as DTS.
DTSES(6.1)
All DTS-ES sources have the surround back channel
matrixed into the left and right surrounds. Newer DVD
releases also have a discrete surround back channel, in
addition to the same information matrixed.
DISCRETE ES sources: the PT -7010A DTS-ES discrete
decoder will decode the discrete surround back channel.
It also removes the surround back matrix from the left and
right surrounds, and restores them to be fully independent
channels.
43
Page 44

MA TRIX ES sources: If
there is no discrete
surround back channel,
the PT-7010A decodes
the matrixed surround
back channel from the
left and right surrounds,
and restores them to fully
independent channels.
Tuner Operation
The Tuner is selected either by rotating the manual input
selector on the front panel, or by touching the TUNER
button in the remote’ s 7010A mode. The front panel display
shows the frequency of the last station you were listening
to.
The FM Tuner can tune stations from 87.5 MHz to 108.0
MHz in 0.2 MHz steps (.05 MHz steps for some
international models). The AM Tuner range is 530 kHz to
1710 kHz in 10 kHz steps (531 kHz to 1710 kHz in 9 kHz
steps for some international models).
Tuner and the OSD
Page 36 shows how to set up the Tuner using the on screen
display.
Tuning Stations Manually
Use the front panel AM/FM button to select either the AM
or FM band, and then use one of these three ways to tune
stations manually:
1) Touch UP or DOWN momentarily to change the tuner
by one frequency step.
2) Hold UP or DOWN for a second or so, then release to
start the scanning feature. The PT-7010A will scan to the
next station, pause on it for a few seconds to allow you to
hear what is offered there, and then scan to the next, and
so on. Pressing UP or DOWN stops the scanning process.
3) Hold UP or DOWN for an extended period to make
the tuner speed across the band without stopping on a
station. The tuner will begin scanning for stations when
you release the button. Pressing UP or DOWN stops the
scanning.
4) When a station is tuned, it can be set as a preset for
easy recall, see “Setting the Presets” below.
Setting the Presets
Once you have tuned in a station, press and hold a preset
button until the display flashes to show the memory has
been set. Use the +10 button to add presets higher than 9,
and hold the last button pressed for a few seconds.
Recalling a Preset S tation
Once you have selected the Tuner, you can quickly recall
a station by pressing its preset number, either on the front
panel or by using the remote’s numeric keypad, FAV
buttons, or the channel up and down buttons.
Scanning Presets
To scan through the presets, press and hold the FM/AM
Recording Operation
Recording to a Tape Player
Input signals from an audio source playing in the PT -7010A
can be recorded using the left and right audio outputs.
The tape player will receive a straight copy of the analog
source signal going in, unaffected by the volume, tone, or
any surround modes. If you are playing a digital source,
the tape player will receive a down mixed stereo analog
signal for recording.
• Select the source (such as CD) and play it thr ough your
system.
Tuning Stations Directly
Use the AM/FM button to select either the AM or FM
band and then press the DIRECT button. Within a few
seconds, enter the station’s frequency by using the preset
number buttons. For example, to tune to radio station 97.3,
press DIRECT, then 9, then 7 and then 3.
44
Page 45

• Set your tape player to record and adjust the input levels
for the best performance. Once the levels are correct, you
can reset your source to the beginning and make your
recording.
• Do not select another Main Zone input while you are
recording.
Recording to a VCR
Any video source playing in the PT -7010A can be recorded
using the left and right audio and the video outputs. The
VCR will receive a straight copy of the source signal going
in, unaffected by the volume, tone or any surround modes.
• Select the video source and play it through your system.
• Set your VCR to record.
• Do not select another Main Zone source while you are
recording.
• The VID2/MON2 output can also be used for recording,
but first make sure that it is set to VID2 in the VIDEO
menu of the OSD (see page 40). This output will then mute
to prevent feedback whenever the VID2 input source is
selected.
• Do not use the OSD while recording as the incoming
video is shut off while the OSD is displayed
Indicators
The front panel has two LED’s to show the Zone 2 status:
Zone 2 Power. This LED is always on when Zone 2 is on.
If it is off, there will be no output to the Zone 2 amplifier.
Zone 2 Adjust
This turns on whenever the Zone 2 source or volume is
being changed.
Note: if this is on, then any adjustments you make of volume
or input, will affect Zone 2, not the Main Zone.
In addition to these LEDs, the front panel display will show
the input and volume adjustment.
Turning on Zone 2
Use the On Screen Display in the Main Zone to check that
Zone 2 is enabled. (See page 37 for details). This enables
the Zone 2 system, but it still has to be turned
on.
Press the remote’s ZONE 2 button.
The remote’s POWER, VOLUME and
MUTE buttons then work for Zone 2. The
remote display changes as in PAGE 1.
Zone 2 Operation
If you have an amplifier and a pair of speakers in a second
room or area (Zone 2), they can play an analog stereo
source independent of what is playing in the Home Theater
room (Main Zone). You can also play the same source as
selected in the Main Zone. Multi-channels sources will be
down mixed to stereo, if applicable.
Zone 2 plays stereo sources, and is unaffected by the T one
controls, DSP, surround modes or bass management.
Connections
The connections for Zone 2 are shown on pages 24-25.
Note: Zone 2 can play analog sources independent of what
is playing in the Main Zone. It cannot play from a digitalonly source unless that input is selected and playing in the
Main Zone. T o play a source such as a DVD or CD player
in Zone 2 independent of the Main Zone, make sure you
also connect the player’s L-R analog audio output to the
PT-7010A.
PAGE 1
This allows you to select the inputs to play in
Zone 2. Z2MAI (main) allows Zone 2 to play
whatever is playing in the Main Zone.
Press PAGE to show the next page:
PAGE 2
This has discrete codes which are
useful if you want to program the
remote control with Macros.
Z2 OFF , Z2 ON, Zone 2 on or of f.
Z1 Off, Z1 ON, Main Zone on or
off.
Z2BL
Use these two buttons to adjust the left-right balance of
Zone 2. B, C, E, F
These are extra buttons you can Learn over and re-Label
with your favorite Zone 2 commands.
Press MAIN to return to PAGE 1, and press it again to
return to the MAIN menu.
Note: Zone 2 can also be turned on and adjusted without
using the remote. Press the Zone 2 button on the PT -7010A
front panel, followed by Power, to turn it on (or off), or
adjust the input source or volume.
Note: Zone 2 operations will work even if the Main Zone
is off.
45
Page 46

Speaker Placement Tips
deadening material such as drapes on the walls to reduce
any unwanted reflections.
Tips Before You Begin
Read this section thoroughly . There are a number of ways
in which it may seem aesthetically pleasing to place
speakers in a room that will ultimately result in a sound
quality compromise. The placement of speakers is equally
as important as the room itself. While there may be very
little you can do about the room where your home theater
is installed, you can choose placement of speakers within
that room to maximize the sound quality of the system.
Ultimately, this will give a much better result when you
are enjoying your home theater and your new Sherbourn
PT-7010A.
Overall, the best placement for front speakers is where
the sound is directed at ear level. This means that the
speakers themselves can be in positions lower (like small
floor standing speakers) or higher (like in-wall or in-ceiling
speakers) as long as the sound is “pointed” toward the
listeners and preferably around ear level. This is not
necessarily the case with the rear speakers or the side axis
speakers. Read each of the sections carefully for the most
appropriate positioning. A subwoofer is also a little
challenging to install depending on the room. In multiple
subwoofer installations, the positioning of the woofers to
the listener as well as to each other is critical because there
can be problems with cancellation if optimum placement
is not observed.
The Front Speakers
Y ou should closely follow the placement recommendations
of your speaker manufacturer, with the addition of the
following points:
• The left and right front speakers should be positioned so
that your TV is exactly centered between them. This will
help focus your attention towards the screen.
• For the best overall imaging, the left speaker should be
set exactly the same distance and angle away from your
listening position as the right speaker. It is recommended
that you use a tape measure to set them up to be the same
distance away within about half an inch tolerance.
If you have a smaller TV, the speakers should be no more
than two feet away from the sides of the TV. If possible,
have the center, left and right speakers at the same height
(within two feet). This will help give a smooth transition
when sound effects move from speaker to speaker.
Ideally, the speakers should be no closer than two feet
from the rear and side walls, in order to reduce any
reflections that might upset the imaging. If your speakers
are closer than this, you can experiment by adding sound
The Center Speaker
Most movie dialog will come from the center speaker, so
careful positioning is an important part of a good home
theater system. Your eyes and ears should focus your
attention towards the center of the screen.
The center speaker can sit on top, or directly underneath
the TV, as long as it is located on the centerline and not
off to one side. Ideally you would try to maintain a
deviation from the center line of the speakers of less than
12". This means the center speaker will not be lower or
higher than 12" to the center measurement of the LEFT
and RIGHT MAIN speaker center measurements.
Position the front face of the speaker close to the front
edge of the TV cabinet. (The sound waves may otherwise
reflect off the top of the TV cabinet and distort the center
imaging).
In some systems, two center speakers are used; one on
either side of the TV. As they are in mono, the result is a
sound image that is positioned exactly at the screen center .
Side-Axis Speakers
The PT-7010A has two side-axis channels which are
matrixed and derived from the left and right front channels,
so they are available in stereo as well as surround modes.
Use the OSD SPEAKER SIZE menu to turn the SIDEAXIS channels ON or OFF (see page 38).
Wherever you position the side-axis speakers, place these
speakers along the side walls, close to the fronts. You can
also angle them in towards your listening position for better
results. You should not use a surround or effect speaker
(such as a dipole) for side axis speakers. Direct radiating
speakers will give the best result without interfering with
the clarity and presence of the main speakers in the front
left, center, and right sides.
The Surround Speakers
Place each surround speaker to be an equal distance away
from your central listening position and keep them at least
one or two feet above ear level.
Dipole surround speakers are usually positioned to the side
of your listening position. They radiate forwards and
backwards and have a quiet null zone (the “apex” of the
triangular shape) which should point towards the listener .
The overall effect is that you cannot hear the direct sound
from the surround speakers because they don’t directly
radiate into the listening space. Most manufacturers of
46
Page 47

dipole speakers, intended for use as an effects or surround
speaker, have excellent details on optimum positioning
for the best overall results based on the application.
Conventional surround speakers can be placed behind the
listener, on the rear walls or the side walls or in the ceiling.
Adjust the angle so they do not point directly at the listener
but cause reflections from the sidewalls, floor, or the
ceiling. Avoiding direct aim at the listening positions will
give the effect of broadening the rear soundstage so that
you cannot distinguish the sound as coming from a small
box on the wall but from a larger area behind you.
Surround Back Speakers
The PT-7010A has two extra outputs for surround back
speakers. These create a wonderful sense of realism in
surround effects during playback of Dolby Digital EX,
Dolby Pro Logic 11x, and DTS ES.
The PT -7010A can be configured for one or two surround
back speakers. Ideally, all the surround speakers should
be of the same make and model, and fitted at similar heights
to produce a smooth continuous sound field. If you are
connecting one surround back speaker, connect its
amplifier input to the PT-7010A LEFT CHANNEL
SURROUND BACK output. Place the speaker behind
your listening position.
Subwoofer Location
The PT-7010A has identical output connections for up to
three subwoofers, in addition to a fourth, balanced sub
output.
A subwoofer typically sounds best in a corner with at least
5 feet of wall to either side. Due to the short wave-lengths
of high-frequency sounds, they don’t interact strongly with
the size and shape of a room. Lower frequencies long
wavelengths can cause “Standing wave” problems. Placing
the subwoofer in a corner usually creates the best possible
situation for the sound to interact with the room, allowing
even distribution of the bass frequencies. Often the corner
that offers nearby placement to the front speakers may
yield the best results, but you should try several locations
before settling on just one.
through it, or simply plug the analog outputs of a CD player
directly into your subwoofer’ s low-level inputs. T urn down
the subwoofer’s volume level before turning on the CD,
then play the test tones or some music with heavy sustained
bass passages.
3. Walk around the room, standing in all the positions
where you might be able to place the subwoofer. Again,
this is usually near the corners of the room. Try locations
fairly close to the front speakers.
Notice where in the room the bass output from the
subwoofer sounds the loudest. Shut things down and install
the subwoofer there. This is the best position for the
subwoofer. The bass will sound the best when you are
sitting in your normal listening position.
If your subwoofer seems to sound best when it is near the
front speakers (often the case), keep in mind that most
television sets may not react well to the subwoofer if it is
not built specifically for use in a home theater application.
While most front Left/Center/Right speakers do have
shielding when intended for use in a home theater
application, subwoofers are not always magnetically
shielded and may damage the television if placed too close.
If you want to check if this will be a problem, select an
unused video input on the television to bring up a single
color screen. If you see any color distortion anywhere on
the screen, an unshielded speaker is too close to the screen
and should be moved away from the television until the
color distortion disappears.
Note - most powered home subwoofers feature a phase
control with a range between 0-180 degrees. This is pr esent
so that in situations where the optimum location is not
particularly desirable, you can locate the subwoofer
elsewhere nearby and make a slight adjustment to the
phase so that is sound arrives to the listener at the same
time as the other speakers. Ideally, sound arriving at the
same time is what allows the subwoofer to create the
illusion of the main speakers making the bass. This is what
enhances the listening experience.
The best location for a single subwoofer can be found by
playing a couple of different low frequency test tones (or
some music with heavy sustained bass passages) and
proceeding with the following easy
1 -2-3 process:
1. Place the subwoofer right on the seat of your couch or
listening chair.
2. You can then either run the calibration (noise) signal
47
Page 48

Remote Control
Codes
Audio Components
ADC 007
Adcom 082, 092, 225, 161, 269
Aiwa 018, 104, 170, 202, 203, 213,
21 1, 188
Akai 138, 189
AMC 125, 126, 167, 128, 258, 281,
282
Amend 054
AMX 196
Angstrom 142
Arcam 141
Audio Access 147
Audio Alchemy 135
Audio Design 194, 221, 01 1
Audio Ease 021, 196, 207
Audio File 071
Audio Matrix 167
Audio Source 273
Audio T echnica 134
B&K 096, 097
Bose 070, 170, 224
Bryston 023
Carver 006, 028, 061, 071, 201,
214, 226, 180, 185, 022, 029, 077,
284
Casio 076
Chiro 140
Cinema Sound 034, 134
Citation 148, 272
Clarion 026
Curtis Mathes 076
Denon 002, 034, 109, 215, 229,
230, 027, 037, 234, 259
Eiger 149
Elan 057
Enlightened Audio 099, 098
Fisher 047, 214, 180, 182
Fosgate 062, 231
GE 056, 260
Goldstar 008
Hafler 174
Harman/Kardon 231, 233, 254, 153,
154, 1 18, 121, 227, 277
Hitachi 020
Inkel 197
JBL 263
48
JC Penny
Jeff Rowland 206
Jensen 058
JVC 240, 163, 191, 1 14, 266, 279
Kenwood 026, 066, 145, 146,
181, 190, 197, 192, 182, 199, 151,
222, 180, 005, 280
Kinergetics 220, 140
Koss 216
Krell 150, 072
Kyocera 007
Lexicon 120, 235, 236, 237
Linn 124
Luxman 137, 139, 052, 054, 1 15,
004, 009
LXI 076, 056
Magnavox 086, 164, 152, 208
Marantz 006, 028, 031, 040, 063,
185, 186, 251, 265
Mclntosh 238
MCS 076
Meridian 100, 012, 013
Mitsubishi 242, 243, 204
Mondial 157, 158, 042, 043, 081,
112
Myryad 276
NAD 186, 113, 283
Nakamichi 111, 244, 245, 172,
183
NEC 176
Onkyo 017, 046, 064, 107, 108,
187, 079, 080, 090, 179, 209,
270, 275
Panasonic 032, 195, 219, 177
Parasound 129, 130, 132, 261
Phast 196
Philips 249, 250, 251, 063
Pioneer 014, 033, 039, 044, 045,
050, 069, 159, 168, 1 16, 035, 079,
198
Proceed 144, 268
RCA 010, 048, 117, 156, 067
Realistic 019, 056, 073, 075, 095
Revox 162
Rotel 074, 083, 085
Samsung 016
Sansui 040, 048, 1 10, 1 19, 065, 228
Sanyo 047, 059
Scott 019, 091
Sears 076
Sharp 026, 094, 131, 175, 181
Sherwood 024, 048, 055, 102, 103,
105, 106, 051, 030
Sony 018, 093, 223, 247, 248, 160,
166, 015, 101, 184, 218, 271
Soundesign 036
Soundstream 084, 088
SSI 068
Sumo 171
Sunfire 001, 329
T aekwang 138
T eac 005, 019, 049, 111, 212, 217
T echnics 122, 176, 193, 219, 178,
177, 200, 257, 262
Theta 136
T oshiba 060, 087, 198, 278
Wards 180
Yamaha 026, 253, 169, 067, 173,
205, 264, 232, 089, 264, 274, 285
Zenith 143, 210
Auxiliary Devices
Lighting Switches. TiVo. Etc.
3M152
Aiwa 164
Archer 155
Auton 191
DMX 156
Draper Screen 204
Dwin 080
Everquest 206
Extron 151
Faroudja 184
Fuji 209
Jerrold 153
JVC 185
Kenwood 185
Lite-T ouch 208
Lutron 077, 158, 159
Makita 186, 201
Mindpath 205
Mies 160, 187
NSM 161
Piano Disc Plus 085
Philips 090
Polk Audio 162
Replay 075
Russound 081
Scientific Atlanta 156, 163
Sima 082
Solo Electronics 207
Somfy 078, 079
Sony 104, 164, 165, 166
Starcom 153
Page 49

T urboscan 167
Velodyne 203
X-10 093, 183
Xantech 168, 169, 170, 171, 172,
188, 189
Cable Boxes
ABC 103, 003, 004, 039, 042, 046,
053
Amehcast 099
Antronix 014
Archer 005, 007, 014
Bell South 099
Centurion 092
Century 007
Citizen 007
Combano 080, 081
Comsat 074
Comtronics 030
Digicable 101
Eagle 020, 030, 040
Eastern 057, 066
Echostar 106
Electricord 032
Gemini 008, 054
General Electric 072
General Instruments 074, 103,
104
GNC 099
Golden Channel 030
Hamlin 049, 050, 055
Hitachi 055, 103
Jerrold 002, 003, 004, 008, 009,
010, 013, 069, 074
Magnavox 010, 012, 064, 079,
094, 095
Media One 107
Mitsubishi 102
Lutron 077, 158, 159
Mindpath 205
NSM 161
Piano Disc Plus 085
Philips 090
Replay 075
Scientific Atlanta 156, 163
Sima 082
Solo Electronics 207
Somfy 078, 079
Sony 104, 164, 165, 166
Starcom 153
T urboscan 167
CD Players
Adcom 062, 042
Aiwa 059, 065, 088, 089, 105,
122, 170,187
Akai 085, 195, 202
AMC 231, 232
Amend 1 18
Arcam 238
Audio Access 119, 147
Audio Ease 165
Audio T echnica 046
BSR 037, 057
California Audio 103, 008
Capetronic 063
Carrera 057, 080
Carver 185, 041, 044, 050, 086,
107, 130, 134, 135, 138, 139,
203, 204, 167
Casio 1 1 1, 182
Clarinette 182
Creek 159
Crown 035
Denon 002, 123
Emerson 042, 069, 102
Fisher 050, 185, 134, 008
Fraba 111
Genexxa 010, 069, 102
Goldstar 010, 069, 102
Haitai 093
Harman/Kardon 018, 033, 047, 208
Hitachi 042, 175
Inkel 130, 143, 144
JC Penny 014, 061, 092, 141
Jensen 158
JVC 004, 022, 136, 163, 213, 214,
242, 243
Kenwood 185, 007, 023, 055, 071,
072, 142, 137
Koss 061
Krell 241
Kyocera 005
Lotte 102
Luxman 01 1, 028, 070, 076
LXI059
Magnavox 044, 107
Marantz 027, 041, 044, 051, 077,
107, 209
Mclntosh 212 MCS 014, 073, 092
Memorex 010
Mission 044, 107
Mitsubishi 179
Mitsumi 153
Modulaire 182
Mondial 147
Myryad 244
NAD 006, 005, 067, 178
Nakamichi 217, 218, 219, 095
NEC 014, 062
Nikko 046
NSM 044, 107
Onkyo 030, 038, 039, 168, 169
Optimus 010, 050, 057, 058, 081,
082, 083, 085, 093, 195
Panasonic 103, 201, 172, 008, 068
Parasound 233
Philips 041, 044
Pioneer 010, 020, 025, 056, 174,
175, 176
Proceed 239
Proton 044, 107, 228
Quasar 103, 008
Radio Shack 182
RCA 017, 042, 150
Realistic 042, 050, 051, 102, 181,
182, 187
Rotel044, 107, 161, 178, 250
SAE 044, 107
Sansui 044, 069, 107, 128, 171,
190, 125
Sanyo 050
Scott 069, 102
Sharp 026, 031, 051, 066
Sherwood 003, 019, 051, 096, 1 12,
1 15, 119, 166
Signature 033
Sony 048, 081, 097, 126, 133, 177,
225, 226, 164
Soundesign 251
Sumo 155
Sylvania 044, 107
Symphonic 052, 181
T aekwang 195, 085
T andy 010
T eac 015, 034, 036, 051, 052, 101,
131, 140, 079
T echnics 060, 103, 200, 172, 184,
008, 068
T echwood 076
Theta Digital 234, 235
T oshiba 006, 067, 091, 160, 148
Vector Research 080
Victor 004, 022, 1 14, 124
Wards 185, 033
Yamaha 024, 046, 054, 186, 183,
49
Page 50

245
Yorx 182
DVD Players
Apex Digital 087
Denon 007, 080
GE 026, 027
Harman/Kardon 084
JVC 012
LG 091, 057, 074
Magnavox 066
Marantz 083
Mitsubishi 017
NAD 088
Onkyo 076, 035
Panasonic 021, 042
Philips 066
Pioneer 023, 092
Proceed 086
Proscan 026, 027 RCA 026, 027
Samsung 056, 070
Sharp 094
Sony 033
Theta Digital 032
Thomson 026, 027
T oshiba 035, 034
Y amaha 042, 089
Zenith 057, 074, 091
Laserdisc Players
(Use with DVD)
Denon 206, 207
Funai 120
Kenwood 152, 013 Magnavox
032, 121
Marantz 21 1
Mitsubishi 121
NAD 121
Optimus 049, 013
Panasonic 1 13
Philips 032
Pioneer 106, 1 17, 121
Radio Shack 120
RCA 002
Realistic 049
Runco 127
Sanyo 075
Sharp 152, 013
Sony 053, 1 10
T echnics 113
Theta Digital 032
T oshiba 152, 106
50
Y amaha 043, 129
Satellite/DSS
Receivers
Alphastar 123
Amplica 050
Birdview 129, 113, 051, 126
BSR 053
Capetronics 053
Channel Master 013, 014, 015,
018, 036, 055
Chaparral 008, 009, 012, 077
Citoh 054
Curtis Mathes 050
Drake 005, 006, 007, 010, 011, 112,
1 16, 141, 052
DX Antenna 024, 046, 056, 076
EchoStar 038, 040, 057, 058, 093,
094, 095, 096, 097, 098, 099, 100,
122
Electrohome 089
Eurosat 1 14
Fujitsu 017, 021, 022, 027, 133,
134
General Electric 151, 106, 150
General Instruments 003, 004, 016,
029, 031, 059, 101, 148
Hitachi 139, 140
Home Cable 080, 044, 029
Houston Tracker 033, 037, 039,
104, 057, 051
Hughes 068, 154
Hytek 053
Hyundai 149 I
CR 023
Janiel 060, 147
Kathrein 108
Legend 057
Lutron 132
Luxor 144, 062
Macom 010, 059, 063, 064, 065
Memorex 057
Nextwave 028, 124, 125
Norsat 069, 070
Pace 143
Panasonic 142, 060
Pansat 121
Personal Cable 1 17
Philips 071, 152, 153
PL 023, 026
President 019, 102
Primestar 1 10, 030
Prosat 072
ProScan 151, 106, 150
RCA 151, 106, 150
Realistic 043, 074
Samsung 123
Satellite Service 028, 035, 047, 085
Sony 103
Starcast 041
Superguide 020, 124, 125
Teecom 023, 026, 075, 087, 088,
090, 107, 130, 137
T oshiba 002, 127
Town & Country 023, 026
Uniden 016, 025, 042, 043, 044,
045, 048, 049, 078, 079, 080,
086,101, 135, 136
Viewstar 1 15
Winegard 128, 146
Zenith 081, 082, 083, 084, 091, 120
Tape Decks
Aiwa 015, 071, 100, 1 14
Carver 006, 008, 027, 024, 036
Denon 105, 227, 229
Fisher 064
Goldstar 01 1
Harman/Kardon 233
JVC 106, 1 16, 239, 240
Kenwood 005, 013, 023, 026, 064,
145, 146, 181, 190
Linn 124
Luxman 035, 137, 139
Magnavox 027
Marantz 014, 027, 056, 065, 087
Mclntosh 238
Mitsubishi 242, 243
NAD 029, 048
Nakamichi 244, 245, 025
Onkyo 002, 012, 016, 017, 018,
019, 1 15
Optimus 026, 054, 055
Panasonic 007, 010, 032, 088, 195
Philips 027, 087
Pioneer 003, 039, 047, 050, 066,
098, 222
Quasar 007, 088
Sansui 027, 1 13, 119, 224
Sharp 026, 057, 131, 175, 181
Sherwood 038, 004, 028, 030, 033,
034
Sony 020, 022, 052, 084, 089
T eac 009, 059, 212
Page 51

T echnics 007, 010, 076, 088, 109,
122, 193
T oshiba 1 12
Victor 106
Y amaha 021, 026, 031, 067, 040
Televisions
Admiral 072, 081, 161, 160
Akai 197, 146
Amark 112, 143
Ampro 073, 167, 157, 183
Amstrad 052
Anam 043, 054, 056, 080, 112, 131
AOC 197, 004, 112, 058
Audiovox 076
Blaupunkt 088
Cairn 201
Candle 197, 002, 003, 004
Capehart 058
Centronic 043
Citizen 197, 002, 003, 004, 043,
101, 103, 143
Classic 043
Concerto 004
Contec 043, 050, 051
Coronado 143
Craig 043, 054
Crown 043, 143
Curtis Mathes 197, 101, 004, 143
CXC 043
Daewoo 004, 016, 043, 004, 076,
103, 114, 125, 127, 143
Daytron 004, 143
Dwin 1 17
Dynasty 043
Dynatech 062
Eiki 187
Electrohome 024, 076, 143, 196
Emerson 197, 004, 005, 028, 043,
047, 048, 050, 051, 076, 096, 143,
151, 153, 154, 155
Fisher 007, 057
Fujitsu 198
Funai 028, 043
Futuretech 043
GE 197, 008, 009, 034, 056, 073,
074, 130, 144, 155, 160, 161, 165,
004, 091, 157, 183
Goldstar 004, 102, 106, 1 12, 113,
1 16, 119, 127, 143
Hall Mark 004
Hitachi 004, 009, 010, 011, 012,
023, 075, 143, 158, 163, 166, 072
Infinity 164
JBL 164
JC Penny 197, 004, 008, 009, 024,
030, 065, 101, 143, 156, 160
Jensen 013
JVC 034, 038, 070, 083, 154, 199
KEC 043
Kenwood 197, 070
Kloss 002, 059
KMC 143
KTV 197, 043, 143, 154
Lodgenet 072
Logik 072
Luxman 004
LXI 166, 007, 015, 052, 081, 160,
164
Magnavox 197, 003, 004, 022, 059,
060, 061, 063, 064, 127, 160, 164,
094
Marantz 197, 164
Matsui 164
Memorex 007, 072, 004
Metz 088
MGA 197, 004, 024, 028, 042
Minerva 088
Mitsubishi 004, 024, 028, 040, 042,
109, 124, 146, 191
MTC 197, 004, 062, 101
NAD 015, 025
NEC 132, 130, 134, 197, 040, 016,
024, 056, 019
Nikei 043
Onking 043
Onwa 043
Optonica 019, 081
Orion 096
Panasonic 034, 056, 080, 092, 164
Philco 197, 003, 024, 056, 059,
060, 063, 064, 164, 004
Philips 197, 003, 004, 005, 038,
059, 093, 164, 127
Pioneer 197, 018, 023, 025, 116,
135, 190
Portland 004, 143
ProScan 144, 160, 161, 165, 167
Proton 004, 058, 131, 143, 171,
173, 193
Quasar 034, 056, 092
Radio Shack 019, 043, 143, 004,
127
RCA 160, 161, 165, 065, 156, 144,
197, 004, 023, 024, 056, 074, 152
Realistic 007, 019, 043, 047
Roctec 186
Runco 168, 169, 178, 179, 180,
181, 182, 183, 073, 157
Sampo 197, 058, 004, 202
Samsung 004, 050, 089, 101, 105,
127, 143, 160
Sanyo 166, 007, 020, 053, 057,
082, 187
Scott 004, 028, 043, 048, 143
Sears 015, 030, 003, 007, 028,
057, 143, 094, 160, 080, 165, 166
Seleco 189, 200
Sharp 170, 081, 019, 028, 029,
014, 004, 022, 143, 175
Siemens 088
Signature 072
Sony 070, 085, 139, 147, 126, 185,
194
Soundesign 004, 028, 003, 043
Spectricon 1 12
SSS 004, 043
Supre Macy 002
Sylvania 197, 003, 059, 060, 063,
064, 164, 044, 160, 127
T andy 081
T atung 056, 062
T echnics 034, 080
T echwood 004
Teknika 002, 003, 004, 024, 028,
043, 072, 101, 143
T elefunken 037, 046, 086, 087
T elerent 072
Tera 172
TMK 004
T oshiba 007, 015, 030, 040, 062,
101, 138
T otevision 143
Universal 008, 009
Video Concepts 146
Vidikron 174, 184, 188, 192
Vidtech 994
Wards 004, 008, 009, 019, 028,
060, 061, 063, 064, 072, 074, 143,
164, 034
Westinghouse 076
Y amaha 197, 004
Y ork 004
Yupiteru 043
Zenith 072, 073, 095, 103, 157,
183
51
Page 52

Zonda 1 12
VCRs
Aiwa 034, 181
Akai 016, 043, 046, 124, 125, 142,
146
Ampro 072
Anam 031
Audio Dynamics 012, 023, 039,
043
Brooksonic 035, 037, 129
Canon 028, 031
Capehart 108
Craig 003, 040, 135
Curtis Mathes 031, 041
Daewoo 005, 007, 010, 065, 108,
1 10, 111, 112, 116, 1 17, 119
Daytron 108
DBX 012, 023, 039, 043
Dynatech 034, 053
Electrohome 059
Emerson 006, 017, 025, 027,
029, 031, 034, 035, 036, 037, 046,
101, 129, 131, 138, 153, 162, 1 16
Fisher 003, 008, 009, 010
Funai 034
GE 031, 063, 072, 107, 109, 144,
147
Go Video 132, 136, 155, 040, 1 15
Goldstar 012, 013, 020, 101, 106,
1 14, 123
Harman/Kardon 014, 045
Hitachi 004, 018, 026, 034, 043,
063, 137, 150, 160, 013
InstantReplay 031
JCL 031
JC Penney 012, 013, 015, 040,
066, 101
Jensen 043
JVC 012, 031, 043, 048, 050,
055, 060, 130, 150, 152
Kenwood 014, 048, 034, 106
Lloyd 034
LXI 003, 009, 017, 034, 106
Magin 040
Magnavox 031, 034, 041, 067,
068, 156, 164
Marantz 012, 031, 067, 069
Marta 101
Matsui 027, 030
MEI 031
Memorex 003, 010, 014, 031,
52
034, 053, 072, 101, 102, 134, 139
MGA 045, 046, 059
Minolta 013, 020
Mitsubishi 013, 020, 045, 046,
051, 059, 061, 142, 151, 049
MTC 034, 040
Multitech 024, 034
NEC 012, 023, 039, 043, 048
Nordmende 043
Optonica 053, 054
Orion 025
Panasonic 066, 070, 083, 1 13,
140, 145, 157, 163, 074
Pentax 013, 020, 031, 063
Philco 031, 034, 067
Philips 031, 034, 054, 067, 071,
101
Pilot 101
Pioneer 013, 021, 048
Portland 108
Pulsar 072
Quartz 002, 014
Quasar 066, 145, 075
Radio Shack 123
RCA 013, 020, 041, 107, 109, 140,
144, 145, 147, 034, 040, 158
Realistic 003, 008, 010, 014, 031,
034, 040, 053, 054, 101
Rico 058
Runco 148
Salora 014
Samsung 032, 040, 066, 102, 104,
107, 109, 1 12, 113, 115, 120, 122,
125
Sansui 022, 043, 048, 135
Sanyo 003, 007, 010, 014, 134,
102
Scott 017, 037, 1 12, 129, 131
Sears 003, 008, 009, 010, 013,
014, 081, 101, 017, 073, 1 12
Sharp 031, 054, 149, 159, 165
Shintom 024
Signature 034
Sony 003, 031, 052, 056, 057, 058,
076, 077, 078, 149, 154
Soundesign 034
STS 013
Sylvania 031, 034, 059, 067
Symphonic 034
T andy 010, 034
T atung 039, 043
T eac 034, 039, 043
T echnics 031, 070
T eknika 019, 031, 034, 101
Thomas 034
TMK 006
T oshiba 008, 013, 042, 047, 059,
079, 082, 1 12, 131, 081
T otevision 040, 101
Unitech 040
Vector Research 012
Victor 048
Video Concepts 012, 034, 046,141
Videosonic 040
Wards 003, 013, 017, 024, 031,
034, 040, 053, 054, 131
Y amaha 012, 034, 039, 043
Zenith 034, 048, 056, 058, 072,
080, 101
Page 53

Troubleshooting Guide
The Sherbourn PT-7010A is expertly designed and built
to provide years of trouble-free performance. Most
problems that occur can usually be solved by checking
your setup or making sure that the audio and video
components connected to the processor are on and fully
operational.
The following information will help you deal with common
setup problems you may experience during normal use of
your unit. If problems persist, contact your Sherbourn
Dealer for help.
No Sound (from one or more full range speakers)
• Speaker cables may have come undone. Turn off your
system and check the cables, and tighten the binding
posts.
• An audio cable may have an internal break.
• The volume level is low for the channels concerned.
Recheck the calibration procedure (page 39).
• The Mute switch is on.
• The channel has not been turned on in the Speaker Size
Menu (page 37).
• The correct surround mode is not selected. (Some DVD
discs are stereo only).
Note: In Source Direct mode, only the front left and right
speakers are engaged. They must also be set to Large.
No Subwoofer (or poor output)
• The subwoofer’s amplifier is off or its controls are set
low.
• Are all other speakers set to LARGE in the Speaker
Size menus?
• SUB is not switched on in the Speaker Size Menu (page
37).
• Recheck the calibration procedure (page 39).
• Adjust the Crossover and check Bass Management
(page 40 and 42).
• See page 47 to find the best location for your subwoofer.
• If the bass is weak during Dolby Digital or DTS
playback, check the correct audio output is selected in
your DVD menu, otherwise it may just play stereo into
your PT-7010A and you won’t get the true LFE signal
to the subwoofer.
Poor AM Reception
• Often one of the main complaints about poor AM
reception is that the same AM station can be heard at
different frequencies. Check to see BOTH wires of the
AM loop antenna are connected. A loop antenna is
required for AM reception, as it forms part of the frontend tuned circuit.
Poor FM Reception
• The antenna may be incorrectly attached.
• Station not correctly tuned in, weak or off the air.
• Y ou can improve reception by using external antennas.
Some cable TV feeds also offer FM reception.
Input Selection Problems
• If you find that certain inputs cannot be selected, check
the INPUTS menu of the OSD (page 36), and make
sure that the input has not been disabled in that
particular Zone.
There is No TV Picture
• Make sure that the video input of your TV monitor is
connected to the Main monitor output on the PT -7010A
rear panel.
• Check that your Monitor is selecting its correct video
input.
• Check the video connection from your selected source
component into the PT-7010A.
• Make sure that you are using the correct video
connections. If in doubt, try connecting the video output
from your source directly to your TV monitor. This
will help you narrow down the problem.
• Use only one type of Component Video, S-Video, or
Composite Video connection on a given input. If more
than one are present at the same time, the PT-7010A
will choose higher quality format and the S-V ideo and
the Composite Video output will be off in this case.
No T one Control Functions
• Remember that the tone controls are non-functioning
whenever the PT -7010A is using the 8-CH input, Source
Direct mode, or in Zone 2.
No Dolby Digital or DTS Playback
See page 43
• Look for the Dolby Digital or DTS Logo on the source
program’s box or sleeve. Make sure your player’ s digital
output is set to BITSTREAM for Dolby Digital or DTS.
This is often a player’s setup menu item, not the disc’s
menu. Some discs are available with a number of
different options, such as Dolby Digital or Dolby Pro
Logic. Make sure that you have selected the correct
mode from your player’s menu. Only digital inputs will
work for these modes.
• Check that your player’s digital output is connected to
the appropriate corresponding digital input on your PT 7010A.
• There is no AC-3 RF input connection for Laserdisc
players. You will need an external RF demodulator.
• Check the calibration procedure from time to time. This
is an excellent way of checking that all speakers are
working correctly.
53
Page 54

• Noise bursts are heard when DTS encoded CDs or LDs
are played. Compressed DTS data uses the normal
digital audio tracks of CDs and LDs. This analog noise
may be heard in your system before the DTS digital
signal is locked on, or it may appear as a background
hiss. To reduce or prevent this noise, disconnect any
analog connections to your CD, DVD, or Laserdisc
players. Just use the Digital connections and see if this
addresses the problem.
No On Screen Display
See page 34 and 40
• Press the remote’ s MENU button to activate the OSD.
It should be present even when no video source has
been selected. Remember, there is no OSD “Pop Up”
for component video connections.
Sound Drops Out With CD or DVD Playback
• Make sure the disc is not dirty or scratched.
• Some inexpensive players and changers tend to
mistrack more often, causing dropouts with an external
DAC.
Remote Won’t Learn Commands or Codes
See page 31
• Make sure you are pointing the original remote into
the receiving window of the Sherbourn remote. This is
located on the top edge of the remote.
• Try touching and holding the first button to be learned.
• Do not do the learn procedure in bright lighting or
sunlight.
• Make sure the Sherbourn remote is correctly in its
LEARN mode. Make sure the batteries in the remote
are fully charged.
• Try varying the distance between the remotes from 1
to 2 inches, and see if the learn procedure improves.
Remote Not Working
See pages 30-33
• Make sure the batteries are not dead, or installed
incorrectly.
• Make sure the remote is set on the correct device display
for the component you are trying to control.
• Make sure that the buttons have not been erased or
learned over.
• Make sure that the PT-7010A front panel receiver
window is not obstructed.
• Check that the front or rear IR receivers have not been
turned off in the OSD CONTROL menu.
ZONE 2 Not Working
See pages 30 and 37
• Zone 2 is set “disabled” from the factory , so you must
use the OSD Zone 2 menu on page 37 to enable it when
you are ready to use it. This enables Zone 2, but it does
not turn it on.
• Once Zone 2 is enabled, use the remote control’ s Zone
2 device button, followed by the Power button to turn
Zone 2 on. Alternatively, press the front panel Zone 2
button, followed by the main Power button. The front
panel Zone 2 Power light will be on when the zone is
active (i.e. engaged and on). The Zone 2 Adjust light
turns on when the zone is being adjusted. For example,
if you turn Zone 2 on with the remote, and adjust the
volume, Zone 2’s volume changes, and the Zone 2
Adjust light will be on.
Zone 2 Does Not Play Digital Inputs
• Zone 2 can play analog sources independent of what is
playing in the Main Zone. It cannot play from a digitalonly source unless that input is selected and playing in
the Main Zone. T o play a source such as a DVD player
in Zone 2 independent of the Main Zone, make sure
you connect the player’s L/R analog audio output to
the PT-7010A too.
External Amplifier(s) Shut Down (Often or
Prematurely)
Check the following:
• Make sure each speaker’s average impedance is not
less than your amplifiers can safely handle.
• The amplifier(s) have good ventilation, no vents are
covered.
• Try setting all the speakers to SMALL and let your
subwoofers handle the heavy bass.
• Check that the amplifier(s) power output is a good
match for your speakers. If your speakers are inefficient,
consider using larger power amplifiers.
• Make sure all wiring is correct and there are no shorts.
PT-7010A “Locks Up” (No Response)
• Unplug AC power momentarily, and press Power to
turn back on.
• If this does not work, try the reset procedure.
Reset Procedure
The PT-7010A is a microprocessor controlled device of
great complexity . Occasional power fluctuations and spikes
may cause the PT-7010A to “lock up” or act strangely.
The PT-7010A can be reset as follows.
• On pages 56-58, write down your calibration settings,
input settings, T uner presets, and any other settings you
have made.
• Press the power button to turn the unit off, or turn it off
from the wall for a moment.
• Press and continue to hold down the front panel Power
button and the Tone DOWN button at the same time.
The PT-7010A will power on and cycle through the
54
Page 55

display . Keep holding the buttons down until “Resetting
to Factory Defaults” appears in the front panel display .
When the PT-7010A has been reset, it will shut off.
Turn the PT-7010A back on and it will go to the default
screen. It has now been reset. If the PT-7010A has to
be reset regularly you should invest in a good quality
AC line conditioner or contact Sherbourn for technical
support.
Problems Updating PT-7010A Firmware
• Check that the serial cable is connected correctly
between the PT -7010A and your computer’s serial port.
If you have a Palm Pilot™ or similar device with
“HotSync™” or its equivalent, you may need to disable
this software before proceeding. This software ‘seizes’
control of a serial port on your machine and prevents the
Sherbourn software from accessing that port. Use another
port or disable HotSync.
For additional information regarding technical issues
encountered with updating the firmware of the PT -7010A,
visit the Sherbourn website at www.Sherbourn.com.
“Hum” Noises
This problem is more than likely caused by a “ground loop”
in your system, rather than a fault in the PT -7010A. Follow
these steps to isolate the main cause of the hum; there
may even be more than one. Remember to turn off all
components in your system, including the PT-7010A,
before disconnecting or connecting any cables.
Disconnect the following items in order, and check each
time if the hum has gone away:
• Disconnect all cables which come from outside the
room, such as cable TV, satellite TV, or roof top
antennas. Make sure that they are disconnected where
they first enter the room, so they are making no
connection to the PT-7010A or the TV, or any other
component. If the hum is caused by the cable TV line,
then you will need a “ground loop isolator.” This is an
inexpensive device fitted in line with the coaxial cable
feed. Contact your cable company or your Sherbourn
Dealer for assistance.
• Disconnect all connections from the PT -7010A to your
TV.
• Disconnect any component which has a grounded
power cord.
• If the hum persists, disconnect all the source
components one at a time from the back of the PT7010A, until you identify the problem. (Ground loop
isolators are available for audio lines and video. Ask
your Sherbourn Dealer for assistance)
• Try moving the speaker cables away from any power
cords. Try just one speaker, connecting it to different
channels and see if an amplifier channel is bad.
If you are still having a problem, remember that
Sherbourn’s dealers and technical support staf f will assist
you.
Other Probable Causes of Noise
• Speaker noise may also be caused by interference or
noise on your AC line. Make sure there are no large
appliances sharing the line, or halogen lamps or lightdimming Triac devices.
• Try connecting your system to another AC socket on a
separate line.
• If the hum is heard from within the PT-7010A and not
through the speakers, this may also be caused by
interference on the AC or DC lines. The power
transformers may turn this interference into an audible
noise. Internal hum can be made worse by a shelf or
cabinet resonating, so try moving the PT-7010A to
another shelf.
• Try moving your components further away from the
TV , especially if you ever notice the screen has changed
color in the area closest to the component.
• If you have very high efficiency speakers, these may
tend to reveal noises which other speakers do not.
55
Page 56

Favorite Settings Log
You can use this section to log your favorite settings from various OSD menus and other preferences controlled by the
PT-7010A. This will come in handy if the unit is ever powered down for transport or in the event loss of power is
unintentional.
TONE LEVEL (in dB)
BASS
TREBLE
M AI N ZONE SETTI N GS SELECTION
POWER UP SOURCE
PO W ER UP VO L . M O DE
PO W ER UP VO L . LEV EL
MAX. VOLUME LEVEL
ZONE 2 S ETTIN G S SELECTION
ZO N E 2 S YSTE M
BALANCE
POWER UP SOURCE
PO W ER UP VOL . M O DE
Tone Settings
You can reference the TONE SETTINGS on page 35 of
this manual.
Main Zone Settings
You can reference the MAIN ZONE and ZONE 2
SETTINGS on page 37 of this manual.
Zone 2 Settings
You can reference the MAIN ZONE and ZONE 2
SETTINGS on page 37 of this manual.
PO W ER UP VOL . LEV EL
MAX. VOLUME LEVEL
M OD E S ETTIN GS SELECTION
DYNAMIC RANGE
PL-II MO DE
PL-II C ENTER WIDTH II IIx
PL-II PANO RAMA II IIx
PL-II DIMEN SIO N II IIx
DTS LF E
DTS NEO:6
JAZZ CL UB AMBI EN CE
Mode Settings
You can reference the MODE SETTINGS for the signal
processing and decoding functions on page 35 of this
manual. Be sure to note any different settings between
Dolby Pro-Logic II and Dolby Pro-Logic llx modes where
applicable.
56
Page 57

CON TROL S ETTINGS SELECTION
RS- 2 3 2 P O RT
REAR MAIN I/R
REAR ZONE 2 I/R
FRONT PANEL I/R
VID EO S ETTI NGS SELECTION
O S D VO L. PO P-U P
OSD SOURCE POP- UP
OS D MODE PO P- UP
VIDEO DEFAULT
VID 2 / MON 2
VIDEO DELAY
Control Settings
Y ou can reference the CONTROL SETTINGS on page 41
of this manual.
Video Settings
You can reference the VIDEO SETTINGS on page 40 of
this manual.
Input Settings and Remote Codes
You can reference the INPUT SETTINGS on page 36 of this manual. REMOTE CODES are found on pages 48-52.
Check off the appropriate boxes, fill in the appropriate information and indicate levels where necessary.
TUPNI
KCAJ
DVD
DC
HC-8
TAS
1DIV
2DIV
RENUT
EPAT
ONOHP
EMAN
NIAG
MIRT
NIAM
ENOZ
OEDIV
EPYT
REGGIRT
YALER
2ENOZ
&EKAM
LEDOM
ETOMER
SEDOC
LAMRON
EMULOV
57
Page 58

SPEAKER Settings
You can reference the SPEAKER SETTINGS on pages 37-39 of this manual. TRIM settings can be found on page 34.
REKAEPS
NOITISOP
RKPSNIAMTFEL
RKPSRETNEC
PSNIAMTHGIR
RK
DNUORRUSTHGIR
KCABRRUSTHGIR
KCABRRUSTFEL
DNUORRUSTFEL
REFOOWBUS
NOITARBILAC
)Bd(LEVEL
YCNEUQERFREVOSSORCTHGIR-TFELzH
NEUQERFREVOSSORCRRUS/RETNECzH
YC
)Bd(LEVELMIRT)TEEF(ECNATSID
GNITTES
FFO/MS/GL
58
Page 59

Technical Specifications
LINE LEVEL INPUTS
Sensitivity: 125mV for 0.5V output
Frequency Response:
+/- 0.5dB from 20Hz to 20kHz
Signal to Noise Ratio:
(relative to 2V out) Analog 97dB
Digital 105dB
Distortion (THD): <0.03%
Separation (at 1kHz): 70dB
Tone Control: Bass +/- 10dB
Treble +/- 10dB
AUDIO OUTPUT SECTION
Frequency Response: Main Channels
(Large) 20Hz to 20kHz
Subwoofer (LFE): 20Hz to 160Hz
(Note: The subwoofer crossover is set at
160Hz. The subwoofer plays the bass from the
other channels using the LFE Bass
Management function in the signal processing
formats)
Delay Adjustment:Center 0-25ms
Rear 0-25ms
XLR OUTPUTS
Pin #1 = Ground
Pin #2 = Positive
Pin #3 = Negative
INFRARED OUTPUTS (OPTICALLY ISOLATED)
1/8" Jacks at 12V level
POWER REQUIREMENTS
120VAC, 60Hz, 40W
DIMENSIONS
Width 17 inches (432mm)
Depth 15-1/2 inches (394mm)
Height 5-3/4 inches (146mm)
SHIPPING WEIGHT
35 pounds (16kg)
VIDEO SECTION
Video Inputs/Outputs:1V p-p, 75&!
Bandwidth Component Video:100MHz, -1.5dB
S-Video: 6MHz, -2dB
Composite Video: 18MHz, -1.5dB
(Video transcoder / up converter circuitry is
completely automatic)
FM TUNER SECTION
FM Range: 87.5 to 108MHz, 0.2MHz steps
Usable FM Sensitivity (Mono): 1.6uV at 75&!
At 75kHz: 15.2dBf (DEV 30dB)
50dB Quieting Sensitivity (Stereo): 31.6uV at 75&!
41.2dBf
Audio Output Bandwidth (+0.5, -3dB):
30Hz to15kHz
AM TUNER SECTION
AM Range: 530 to 1710kHz, 10kHz steps
Usable AM Sensitivity (S/N 30% modulated)
At 20dB S/N: 16uV / (600uV/m)
At 1mV input: 48dB
TRIGGER OUTPUTS
12V MAIN and ZONE 2
Trigger Current load <500mA total
MAIN Zone Trigger Relay Contact Rating:
24VDC at 2A Maximum
59
Page 60

Software Upgrade
The PT-7010A Flash memory software can be upgraded
by connecting your PC to the PT-7010A RS-232 serial
port. The updated software may be downloaded from our
website at www.Sherbourn.com. This is the preferred
method, as the software can be updated relatively fast and
the latest version is always available.
Licensing and Trademark
Disclosures
DTS Disclosure
This product is manufactured under license from Digital
Theater Systems, Inc. US Patent No 5,451,942, 5,956,674,
5,974,380, 5,978,762 and other worldwide patents issued and
pending. “DTS”, “DTS-ES Extend Surround”, and “Neo:6”
are trademarks of Digital Theater Systems, Inc. Copyright
1996-2004 Digital Theater Systems, Inc. All Rights Reserved.
Dolby Disclosure
This product is manufactured under license from Dolby
Laboratories. “Dolby”, “Pro Logic” and the double-D symbol
are trademarks of Dolby Laboratories.
Apple Disclosure
FireWire is a trademark of Apple Computer, Inc.
Sherbourn Disclosure
Sherbourn reserves the right to make improvements to its
products at any time. Therefore, the specifications of the
product and the specific details of this manual are subject to
change at any time.
60
Page 61

Two Year Limited Warranty
She
ou
tion of any kind with respect to any of the foregoing losses
types of failures.
Subject to the terms and conditions stated below,
Sherbourn T echnologies, Inc. (Sherbourn) warrants to
the original owner that this model PT-7010A shall be
free from defects in workmanship or materials for a
term of two (2) years from its date of purchase from an
Authorized Sherbourn Dealer. Transfer of this product by its original owner (the ‘Owner’) will automatically terminate this Warranty regardless of when occurring.
In the event of any defect covered by this warranty,
Sherbourn shall provide all parts, materials, and labor necessary to restore the Product to its original specifications,
and shall return the Product to its owner at Sherbourn’s
expense. In the alternative, Sherbourn may at its sole option either replace the Product without charge, or if its replacement is not commercially practicable or repair or replacement cannot be accomplished within a reasonable
time, Sherbourn may refund the purchase price of the Product, subject where appropriate to reasonable depreciation
for actual use in accordance with applicable laws, in full
satisfaction of its warranty obligations.
To obtain service under this Warranty, the Owner must
first obtain from Sherbourn a Return Authorization Number, and must then, at the owner’s expense (i) arrange for
any necessary de-installation of the Product, and (ii) deliver or ship the Product, properly packaged and clearly
identified with the Return Authorization Number , prepaid,
and insured, to Sherbourn at the address shown below, or
to an Authorized Sherbourn Service Facility. In addition,
the Owner must provide evidence that the Product is at the
time of delivery within the scope of this Warranty, by including the ORIGINAL dated sales receipt with the Product when submitted for repair. Safeguard your original sales
receipt, as it may be required to validate Warranty coverage.
The owner is solely responsible for payment of all expenses
for removing the Product from its installation, delivering
it to Sherbourn or an Authorized Sherbourn Service Facility, and reinstalling it following repair, as well as for any
repairs made to Products which are subject to the exclusions noted above.
Sherbourn’ s sole obligation under this warranty shall be
to repair or replace the product, or at its option refund
the purchase price, as provided for hereinabove.
Sherbourn does not warrant against, nor shall it be liable for, any of the following: removal or installation
charges, shipping expenses to Sherbourn or its authorized service facility, loss of use, property damage of any
kind, or other incidental or consequential damage or
losses of any kind.
Note: Some states do not allow exclusion or limitation of
consequential damages, so the foregoing exclusions may
not apply to you.
This warranty does not cover any of the following: (a)
cabinetry, trim, or other appearance items (except where
they are defective at the time of original sale and the Product is delivered for repair within the first thirty days (30)
thereafter): (b) failures arising from accident, catastrophe,
misuse, neglect, or failure to properly connect and operate
the product in accordance with the accompanying instruction: (c) failures arising from improper installation of the
Product or incompatibility of other components in the system of which the Product is a part: (d) failures of any kind
in products (i) which have been purchased from other than
Authorized Sherbourn dealers, or (ii) which evidence any
tampering, alteration, or attempted servicing by anyone
other than Sherbourn or an Authorized Sherbourn Service
Facility; and Sherbourn shall have no liability or obliga-
In order to learn the name and address of the nearest Authorized Sherbourn Service Facility, obtain a Return Authorization Number and shipping instructions, or obtain
answers to any other questions you may have concerning
this Warranty, you may telephone Sherbourn between the
hours of 9:00 am and 5:00 PM Eastern Standard Time,
Monday through Friday at (978) 663-7385, or write to our
Service Department at Sherbourn Technologies, Inc., 193A Sterling Road, North Billerica, MA 01862.
This warranty gives you specific legal rights, and you may
also have other rights which vary from state to state.
If this product has been purchased outside of the United
States of America, you should contact your local dealer or
distributor to determine the warranty coverage provided
in your country.
rb
Sherbourn Technologies, Inc.,19-3A Sterling Road,
North Billerica, MA 01862 Tel (978) 663-7385
Fax (978) 663-7389 Web www.sherbourn.com
rn
R
61
Page 62

She
rb
ou
Sherbourn Technologies, Inc., 19-3A Sterling Road, North Billerica, MA 01862
Tel (978) 663-7385 Fax (978) 663-7389 Web www.sherbourn.com
62
rn
R
 Loading...